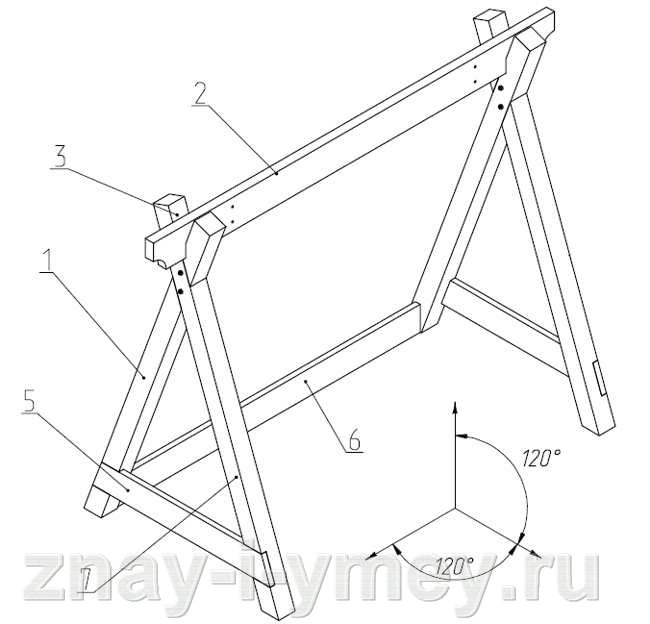
- Visor
- Benefits of a swing and their types
- Baby swing
- Vacuum cleaner assembly procedure
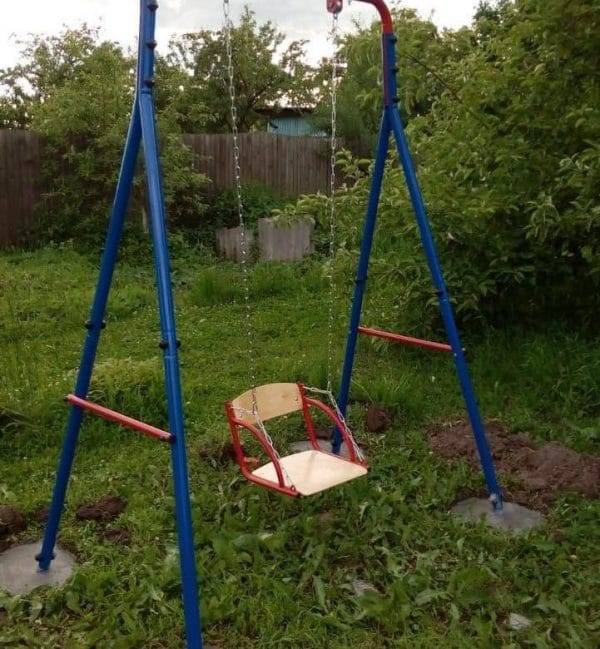
- Children's swing in the country
- Seat preparation
- Step-by-step instructions on how to make a vacuum cleaner with your own hands
- Seat fixing options
- Features of creating a wooden swing for a summer residence: characteristics and types of structures
- The advantages of creating a wooden garden swing with your own hands
- Safety requirements for winder stairs
- How to make a garden swing from a profile pipe with your own hands
- Homemade gas heater
- Preparation of materials and components
- Cutting blanks and assembling the structure
- Do-it-yourself swing for a summer residence
- Do-it-yourself hanging swing for a summer residence
- Metal garden swing
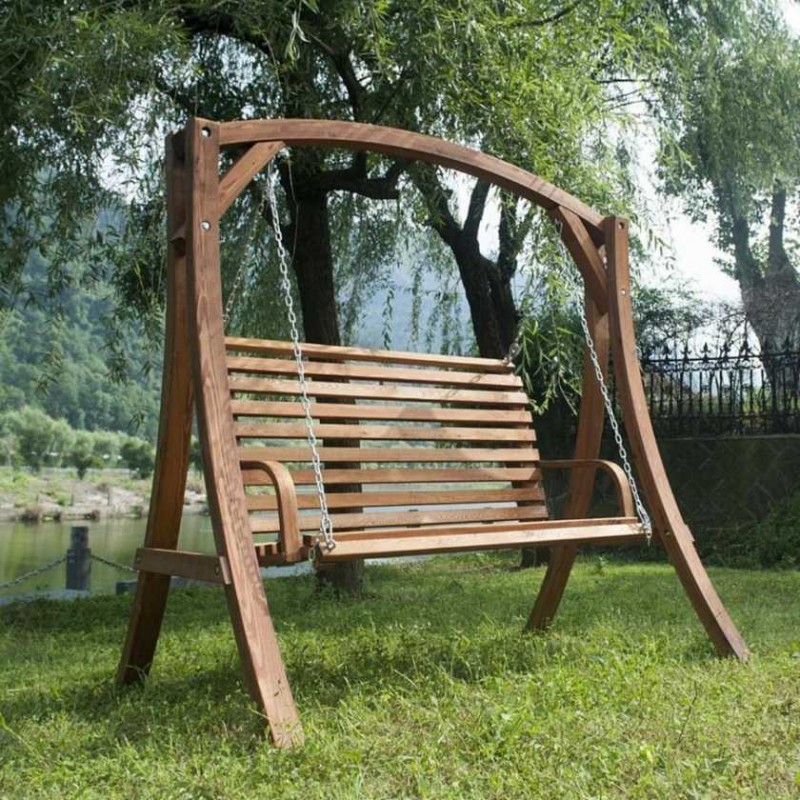
- Wooden garden swing
- Site selection and design features
- How to make a swing in the country from metal
- Creating a swing in the country with your own hands: drawings and technology
- Device for street lighting
- Simple swing without welding, using a threaded connection
Visor
They are made of cellular polycarbonate and a rectangular metal frame, which has jumpers from pipes of a small section. The visor is welded to the frame with a slight slope, which guarantees the rapid rolling of snow and the runoff of precipitation.
Fastening is carried out by means of self-tapping screws, which are equipped with sealing washers. The structure after completion of all work is painted and primed.
The swing is fastened with clamps, which are made of reinforcing bars with pointed ends, buried half a meter into the ground. If the swing is mounted on a concrete platform, the installation is carried out in pre-installed bolts and screwed with nuts.
Benefits of a swing and their types
A truly durable structure can be created from metal. It is noteworthy that metal can be taken with any section. Garden swings can be divided into two categories:
- stationary - inserted into the ground;
- mobile - they can be moved from place to place.
The last option is really very convenient and practical. And so that they do not tip over, special fasteners are used. It will be more reliable to create a metal swing using bearings.

Garden swings have enough advantages to put them on your site:
- metal swings are durable. And if you treat the tree with a special compound, it will also last a very long time;
- you can make your own version of the design, which will give it originality and make the site much more comfortable;
- making a swing yourself will be many times cheaper than buying ready-made ones.
Baby swing
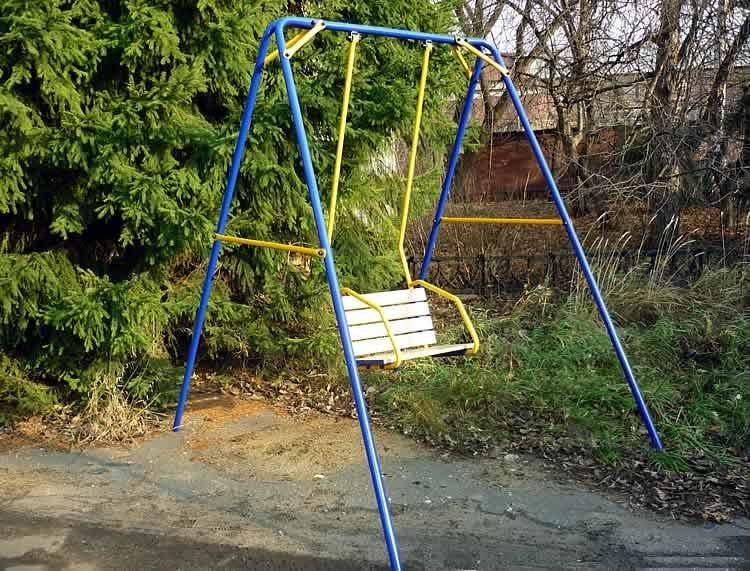
The light weight of the child allows you to make structures of low complexity, which are most often assembled from metal pipes with a diameter of 50 mm or more.
For children under 6 years old, the light swing design with a frame in the form of the letter “L” or “P” is considered the best option. Since children will quickly leave this age and a more massive model will be required, it makes no sense to complicate the design.For children, it is better to make a swing with your own hands from profile pipes, since the streamlined shape minimizes the risk of injury.
The procedure for manufacturing an L-shaped frame:
- Two metal pipes with a cross section of at least 4 cm are bent at an angle of 30 degrees strictly in half, forming two arcs of the letter “L”. The length of the rods is determined by the age and height of the child. It is recommended to use pipes 3 m long.
- A meter-long crossbar is installed between the two. To fix it, you should use a welding machine.
- This version of the swing is suitable for stationary fixation deep into the soil. For these purposes, four points should be measured and marked at the installation site, under the ends of the frame pipes and the earth should be drilled at least 60 cm deep. Then the structure is installed in the holes, and they are densely sprinkled with earth and sand.
If you want to make the swing portable, you should add additional stiffness bars at the bases of the “L” elements. Similarly, swings for older children can be performed, the size of which should be calculated individually.
With an increase in the weight category of skiers, it is recommended to increase the bending angle and install an additional stiffness bar between the angle.
Children's swings can also be made in a U-shape. To do this, it is enough to weld the rods together in an appropriate way, while the length of the rods will correspond to the width and height of the swing.
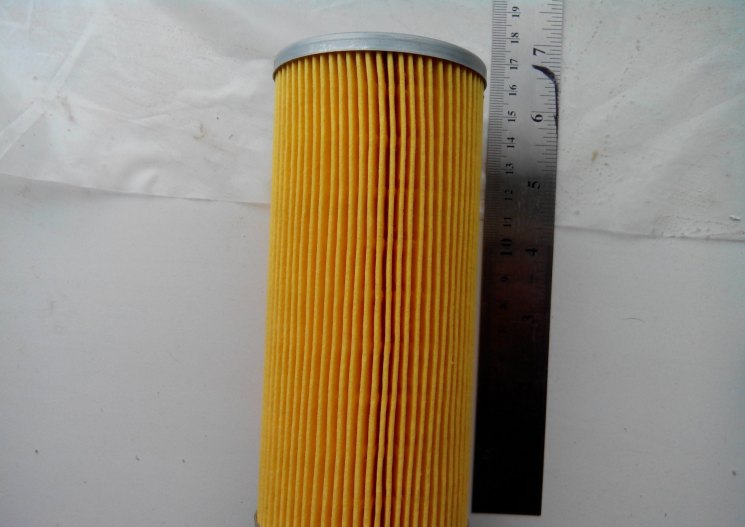
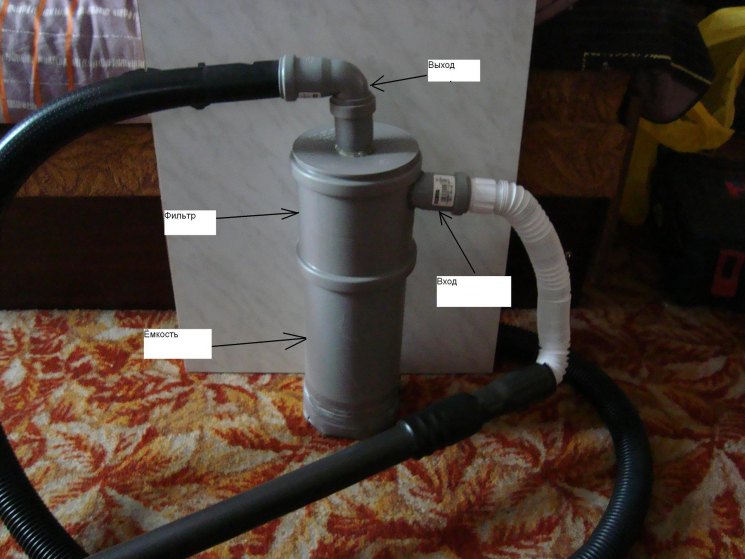
Vacuum cleaner assembly procedure
- attach the filter to the lid with a hairpin;
- connect the hose to the tank;
- installation of a branch pipe for hose suction;
- installing a filter housing to provide protection;
- hardening with the help of a shell;
- the invention of a cart made of plywood;
- final assembly of the resulting unit.
Next, it is worth checking the performance of this vacuum cleaner using electricity. Suction should occur with the same power as the original vacuum cleaner, because this indicates that the engine has retained its working qualities.
It is also possible to make a washing vacuum cleaner with your own hands. It is indispensable for general cleaning. The first step in inventing the washing vacuum cleaner from the old one is to insert a water filter.
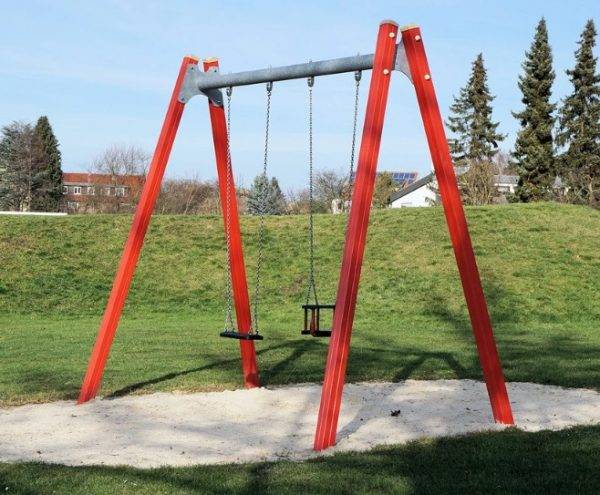
Children's swing in the country
There are two options here:
- several separate seats for each child, installed at a distance;
- common bench for several children.
There can also be several variations of supports here, especially if the swing is made for two or three children. It can be a U-shaped metal structure with additional stiffeners. Or maybe a triangular support with a fixation of the middle section.


![[master class] do-it-yourself garden swing | a photo](https://fix.housecope.com/wp-content/uploads/7/f/2/7f2e1d4de0c29abe8e3a275bb56ee8a8.jpg)
What you need to create:
- fasteners;
- welding machine (bolts can be used instead);
- drill for metal;
- composition for cement mortar;
- metal plates;
- metal profile with a square section. The side should be 6 cm, and the length should be 3 meters;
- cross bar.
In this example, the structure is made immovable, because half a meter will sink into the ground. The swing will be about a couple of meters in height.
The length of the middle jumper depends solely on how many children it is planned for. One such design can withstand up to three children.
Creation instructions:
- In advance, make holes for fasteners with a drill for metal.
- From the inside, they should be reinforced with dense metal plates.
- The crossbar should be fixed to the supports with bolts and washers.
- Strengthen the seat on suspensions.
- Fix the supports with cement.
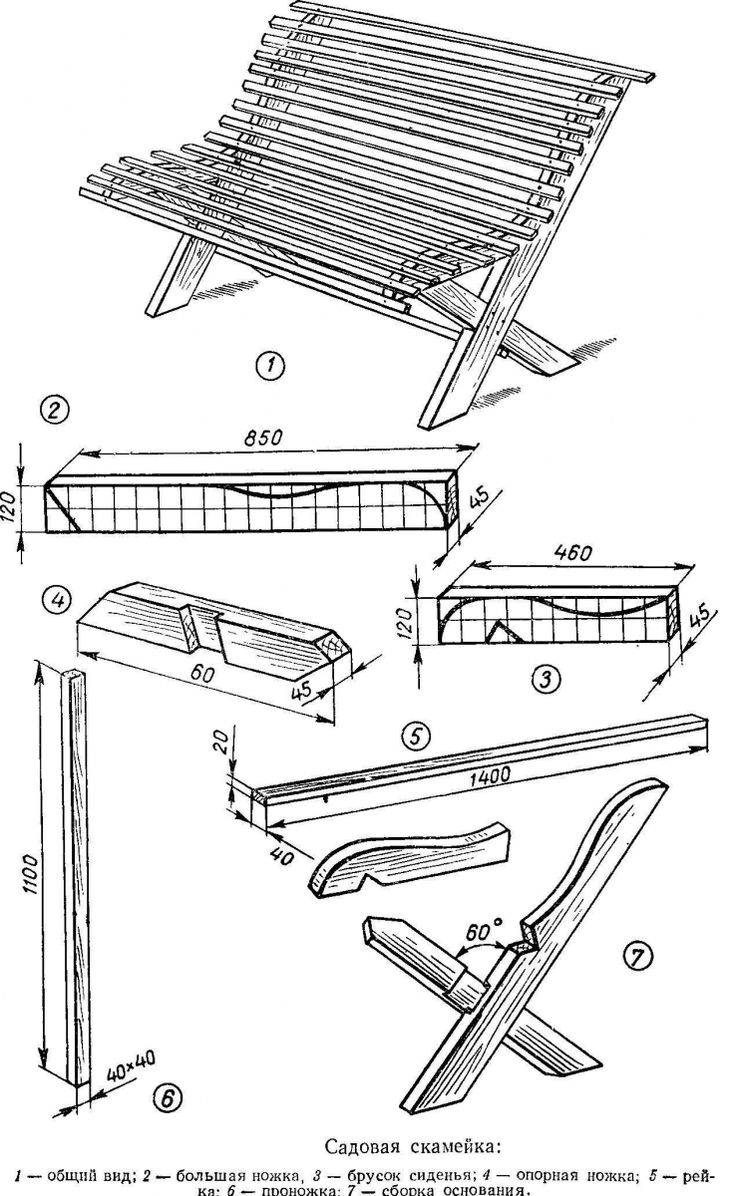
Seat preparation
It is very easy to achieve the same back height and bench width - you should cut boards of the same thickness into segments of about 60 centimeters.

The elements of the seat are interconnected with screws. For greater strength, glue the joints of wooden elements with glue.

On the sides of the bench, armrests are installed at the height at which it will be convenient to place the hand. In addition to additional comfort, the armrest boards prevent falls to the side.

“Ears” are screwed onto the back of the bench, with the help of which suspensions are fixed.

The bench is covered with paint or varnish. You can prepare a soft cushion lining for the entire length and width of the bench.

Step-by-step instructions on how to make a vacuum cleaner with your own hands
- the first step is to install the outlet;
- we make installation of the scheme of electricity;
- attach a toggle switch;
- connect the power cable;
- fix the filter;
- install the suction pipe;
- collect a vacuum cleaner;
- connect the hose.

Next, we test the resulting unit, and pay attention to how the vacuum cleaner sucks and collects garbage. In the same way, we test the power tool, because the vacuum cleaner should automatically start working.
The next vacuum cleaner that you can make will be a do-it-yourself cyclonic vacuum cleaner. It has a complicated design.
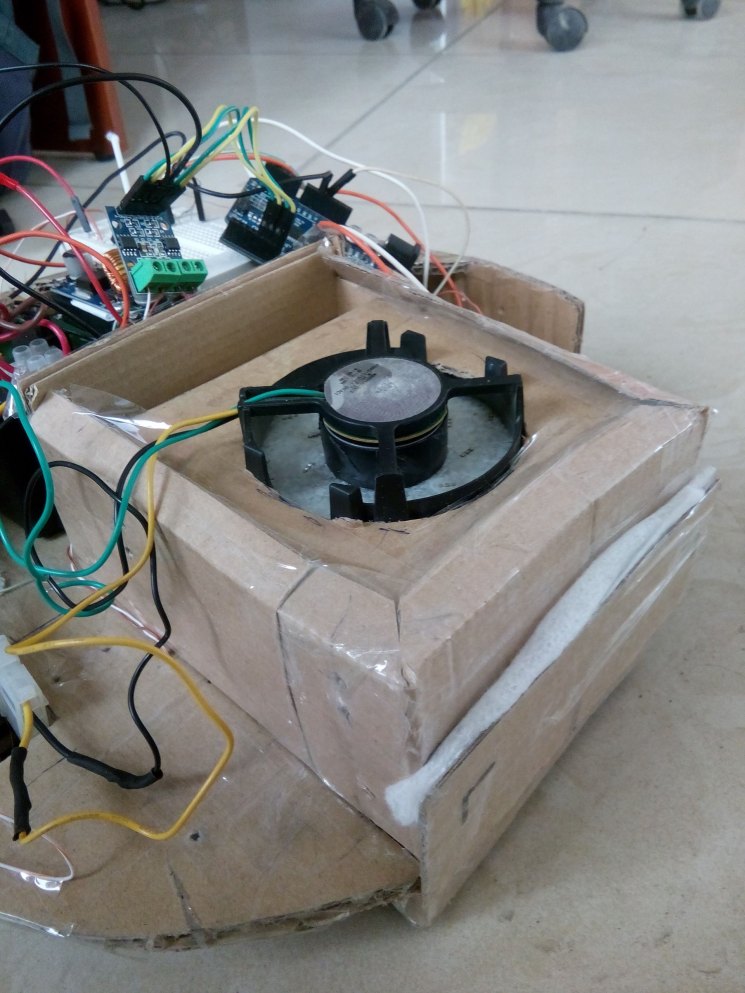
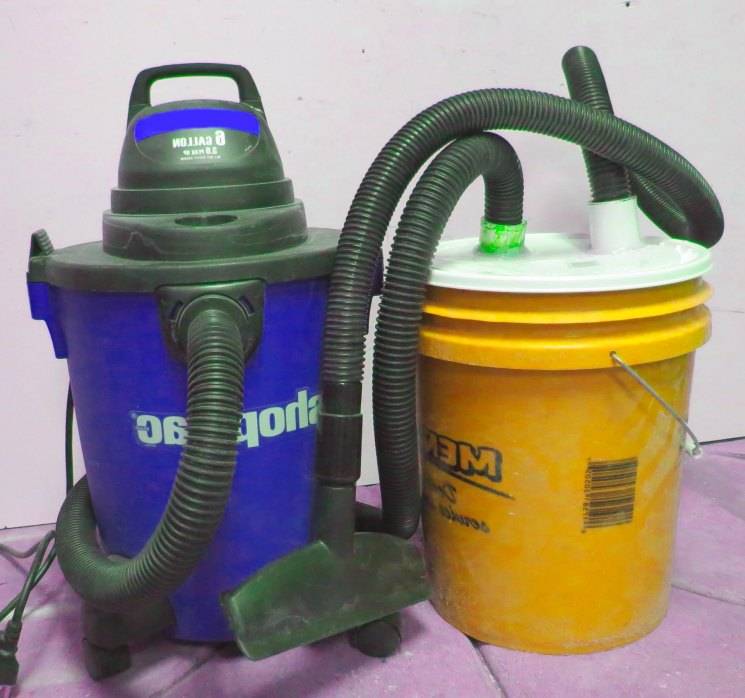

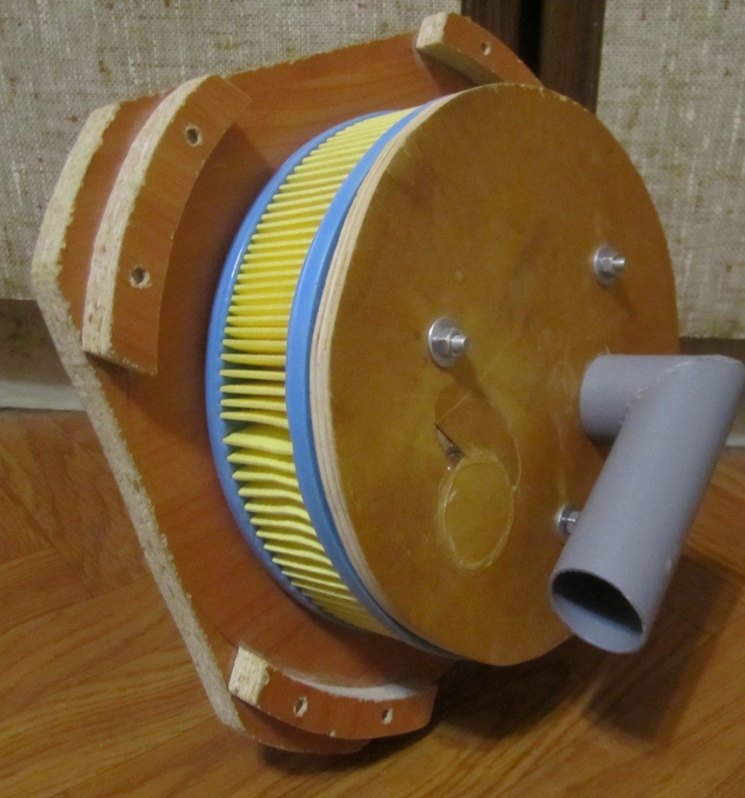
For assembly, you will need a plastic container, a filter and an old vacuum cleaner.
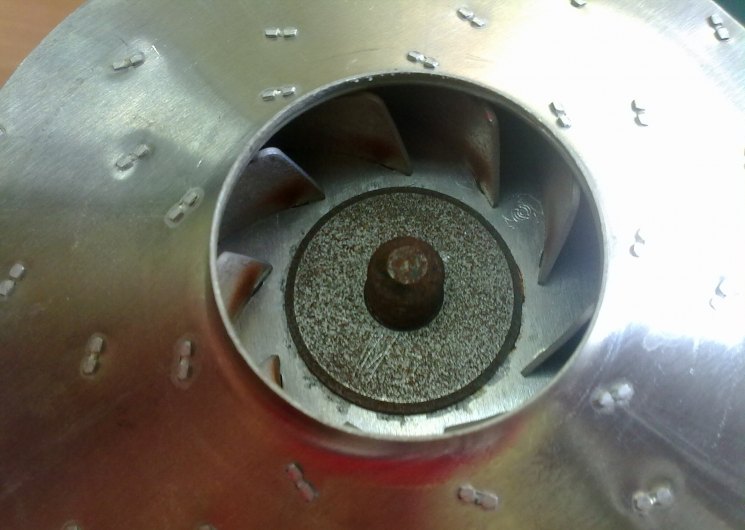
The most important feature of such a vacuum cleaner is inside - a metal casing that serves to protect the filter.
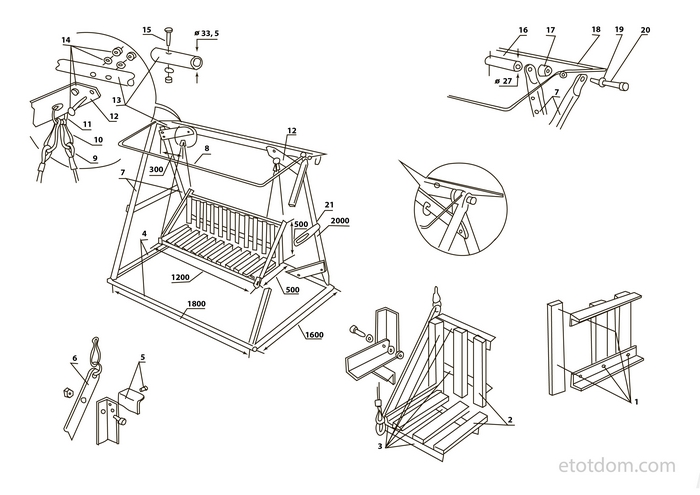
Seat fixing options
Fixing the seat to the frame can be performed by various methods, but in any case it requires a separate development of the attachment mechanism.
Spring fixation. An eyelet with a hole for a spring is welded to the transverse beam, a similar eyelet is installed at the end of the seat mounting pipe. Further, a dense spring is threaded through the holes. Such fixation is suitable mainly for garden swings and additionally acts as a flavor for a comfortable stay.


Anchor fixation. It is mainly used for swings, on which an impressive buildup is planned. The anchor consists of two metal plates, between which a ring is threaded, fixed to the bolt between the plates. In this case, the pipe from the swing seat is welded to the anchor ring.
Chain fixation. The most common fixation for seats on ring chains. To do this, rings are welded to the crossbar of the swing, through which the chain is threaded. The chain can also be fixed on a hook fixed through a ring, or directly on a hook placed on a crossbar.
In building materials stores, you can also find special bolt anchors for attaching chains from the seat to the main frame of the swing.
Garden swings are recommended to be fixed from the four corners of the seat for stability, and the ability to lean on the back.
Features of creating a wooden swing for a summer residence: characteristics and types of structures
To create a garden swing, three main materials are most often used. This list includes wood, plastic and metal.Undoubtedly, each of these materials has its own advantages and disadvantages. But when it comes to do-it-yourself garden swing drawings, you will not find more practical and convenient raw materials than wood.
A wooden swing has only one drawback, which concerns the operation of any products made of wood. Such structures without the application of appropriate protective measures can be severely affected by the influence of negative environmental factors.

Original round garden swing with a soft mattress
These factors include the impact of:
- rain;
- snow;
- direct sunlight;
- fungi and mold;
- insects;
- sudden temperature changes;
- decay processes.
 With your own hands you can make a variety of swings and translate your own ideas into reality
Useful advice! To prevent premature damage to wood, it is enough to install the structure under a canopy or pull an awning over it. Thanks to this, you will ensure the protection of the swing from the harmful effects of rain and sun. Special protective agents and antiseptic compounds solve the problem with parasites, fungi, decay processes and moisture.
The advantages of creating a wooden garden swing with your own hands
Wood has excellent technical and operational characteristics. Thanks to the properties of this material, you can create a truly comfortable and beautiful design.
 Wicker swing in the form of spheres is quite roomy and comfortable
Features of a do-it-yourself garden swing made of wood:
- environmental friendliness. Since wood belongs to materials of natural origin, products made from it are completely safe for human health;
- external aesthetics. The structures are able to fit into any landscape and garden design, since the main part of the environment is made up of natural materials (stone, wood) and vegetation. Compared to metal products, wooden structures are much more aesthetically pleasing and can support the exterior of any country house;

Pillows and blankets will make the swing softer and more comfortable
- safety. Due to its softness, wood is easy to use and operate, it can reduce the number of injuries. This advantage is most beneficial if you intend to design a children's swing;
- simple mounting system. Any person who has the simplest skills in construction and handling wood can be engaged in the construction of a swing;
 A canopy over the swing will protect from the scorching rays of the sun in the summer
versatility. This type of material lends itself quite easily to various types of processing (grinding, cutting, cutting). Thanks to this, any of the do-it-yourself garden swings made of wood, the photo of which you like the most, can be done by you yourself without involving specialists in this process. Wood allows you to make single-type structures or swings with a large capacity, made in the form of sofas
 Adults also do not mind relaxing and relaxing, imposingly swaying on a swing
Note! The cost of purchasing the material is not high. In addition to this, by creating products yourself, you save on the services of craftsmen.
Safety requirements for winder stairs
Do not forget that walking on a wooden staircase should be as safe as possible, since both adults and children can move along it. Therefore, the following recommendations are imperative:
- the number of steps in one flight of stairs must be made at least 3 and it is desirable that their total number be odd - it is psychologically more convenient to start and end the ascent with the same foot;
- the height of the fence should exceed the level of the center of gravity of a person, on average this parameter ranges from 90 to 120 cm;
- fastening of the structure should be carried out directly to the load-bearing elements of the floor.
How to make a garden swing from a profile pipe with your own hands
When the material is prepared, the type of structure is determined, they begin to manufacture it. At hand should always be a drawing of a swing from a profile pipe with dimensions, as it is needed for cutting blanks.
Step by step assembly instructions:
- According to the drawing, blanks are cut from a profile pipe. You will need long elements for racks, one crossbar. The required number of jumpers is cut from a pipe of a smaller cross section.
- When all the blanks are cut off, they begin to assemble the frame. The first knot is made where the top of the supports is connected to the crossbar. If the swing is collapsible, then the pipe is drilled, connected with bolts. For the strength of the corners put spacers. They can be fixed with metal screws.
- If a non-separable structure is assumed, then you will have to weld a swing from a profile pipe with your own hands using a welding machine. Seams for aesthetics are cleaned with a grinder.
- The finished frame from the pipe is installed in a permanent place. If concreting of supports is supposed, then a hole is dug under each rack.A layer of gravel 20 cm thick is poured at the bottom of the pit. The supports are bursting with stones inside the hole, poured with liquid concrete.
- On the crossbar mark the location of the moving nodes. Holes are drilled under the anchor in the pipe. The threaded connection must be secured with an additional lock nut. It will prevent loosening of the fasteners during the operation of the swing.
- To enjoy swinging in the rain or sunshine, you need a roof. The frame is welded in the shape of a rectangle from a thin pipe. To prevent precipitation from accumulating, a flat roof is fixed under a slope. A semicircular shelter looks prettier. Arcs will have to be bent from the pipe. To do this, use not a square, but a flat profile. Such a pipe is easier to bend and easier to attach roofing material to it.
- The seat is single or in the form of a bench is more convenient with a semicircular back. For the side elements of the frame, two arcs are bent. Between themselves they are welded with jumpers. The finished frame should resemble the shape of a bucket. Hinges are welded to the four corners of the structure. A chain will be fixed to the fasteners.
- When the seat frame is ready, chains are attached to the eyes on the crossbar. Having measured the desired length, cut off the extra links.
- The free ends of the chains are connected to the lugs on the seat frame, and they are leveled. If a skew is obtained, the desired section is lengthened or shortened by changing the number of links.
- When the swing for children with their own hands from the profile pipe is welded, they proceed to the design. From the rails make the seat trim. Wooden blanks are fixed with bolts. The frame is degreased, covered with a protective primer, painted. As a roofing, colored polycarbonate is well suited. The sheet is screwed with self-tapping screws with sealing washers.
Ready-made entertainment is immediately worth trying out.
In the video, an example of making a swing:


Homemade gas heater
The main advantage of such a model is that its manufacture requires a minimum of parts that will always be found in the household of any craftsman.
Such an economical source of heating is not too expensive; the cost of its manufacture and maintenance is completely bathed in the process of operation
Preparation of materials and components
To make a gas heater in the garage, you must prepare in advance:
- burner with valve;
- tin sheet;
- metal scissors;
- drill with a thin drill;
- rivets;
- riveter.
For the manufacture of the lattice, a cut of a fine-mesh metal mesh is required. Great, if you have an ordinary wire sieve from a colander on hand, it will act as a protective grill.
The main element of the device is a gas-filled collet cartridge with a capacity of 450 milliliters, used for refilling lighters.
Collet cylinders are convenient in that when using them, you can not immediately consume all the contents. The presence of shut-off valves allows the device to be used repeatedly.
If desired, a heating structure can be made on the basis of not only disposable cartridges used to refill lighters, but also using a small refilled cylinder.
Cutting blanks and assembling the structure
In the manufacture of the structure, the first step is to fix the heater to the burner.
The selected household sieve of the appropriate diameter is applied to the galvanized sheet and circled around the contour with a marker
In the direction of the four sides of the workpiece applied to the galvanized sheet, four rectangular ears are added. One of the ears should be made twice as long as the rest. Workpieces are cut out along the outlined contour, trying to make even, burr-free cuts.
The burner is bolted to the cut tin blank. The ears located on the four sides of the workpiece are bent in the opposite direction and used to fix the strainer.
Attached with the help of the lugs of a tin circle, the strainer has a dome shape, thanks to which it will perfectly dissipate heat to the sides
To attach a second protective mesh, take another piece of sheet metal and cut out of it exactly the same size circle. Elongated ears are attached to the workpiece, which are necessary for attaching the mesh.
Stepping back from the edge of the circle half a centimeter, 10 through holes are drilled along the circumference. From a cut of a fine-mesh metal mesh, a strip is cut, the length of which corresponds to the diameter of the cut tin blank.
The ears located on four sides are bent and used to fix the wide side of the fine mesh strip, the second workpiece is fixed on the opposite side
Curved ears of round tin blanks are fixed to opposite sides of the mesh strip using a riveter and rivets. When assembled, you should get a cylinder with mesh walls and tin ends.
At the final stage, it remains only to turn on the gas water heater and check its performance. The heat produced by this small device will be enough to heat a small room or garage.
Do-it-yourself swing for a summer residence
Simple swing designs can be completely done with your own hands. There are the simplest models, which will not be difficult to design, even if you do not have the skills to work with wood or metal. If you have a special tool, you can take on more serious designs. Let's take a look at some of the options below.
Do-it-yourself hanging swing for a summer residence
The easiest way to make a swing with your own hands is to make a hanging structure, which will be intended primarily for kids. First you need to prepare a place, level the site. Then two pits for the posts are dug, their depth should be about a meter to ensure good stability. Prepared poles are buried and the crossbar is fixed on them. Next, you will need strong ropes or chains that will hold the seat. For the manufacture of the seat using durable natural wood. The board must be carefully cleaned, it can be painted, varnished or covered with a cloth.
If you doubt the reliability of the U-shaped support, you can make an X-shaped one - then you will need four identical pillars, fastened in pairs, as shown in the photo. Sometimes the swing is simply attached to a strong branch of a massive tree.
For the seat, you can use not only a wooden plate, tires from cars are often used for this. From them you can cut fancy original figures. You can also make a seat from fabric and slats for the little ones, use the base of a wicker chair (without legs) or the most common small pallet.
Metal garden swing
With welding equipment, you can make a simple but very reliable metal swing.Most often, support poles are made of a metal pipe with a diameter of about 5 cm. They are welded in pairs, and a crossbar of the same diameter is welded on top.
The support can be installed in the ground, fixed with cement mortar, or additionally welded on the lower base, which will ensure their stability and balance on any flat surface. Such a swing can be freely moved to the desired location.
The seat can be metal, but it is more practical to make it from wooden boards that do not heat up in the sun, an elegant vine seat is an excellent option. Strong chains or metal slats will act as holders. It also does not hurt to equip a canopy that protects from sunlight and rainfall.
Wooden garden swing
A wooden beam is much more pliable in processing, which makes it possible to make a wide variety of designs on your own.
Here it is important to correctly draw up the initial drawing and responsibly approach the choice of material. Quite suitable for the manufacture of pine timber, you will also need power tools, a jigsaw, a planer, a grinder, etc.
Wooden parts are cut according to the drawing and polished
First of all, you will have to sweat over the design of the seat. First, a frame is assembled from three corner elements, to which the transverse rails of the seat and back are then attached (you can equip the structure with armrests)
Wooden parts are cut according to the drawing and polished. First of all, you will have to sweat over the design of the seat. First, a frame is assembled from three corner elements, to which the transverse rails of the seat and back are then attached (you can equip the structure with armrests).


The next step will be the formation of L-shaped racks.To do this, you need to cut special grooves at an angle. The design must be supplemented with a lower bar for reliability.
With the help of clutches, carabiners and chains, the seat must be attached to the base. Ready-made swings can be painted, opened with a stain, varnish, a canopy made of fabric or polycarbonate can be organized.
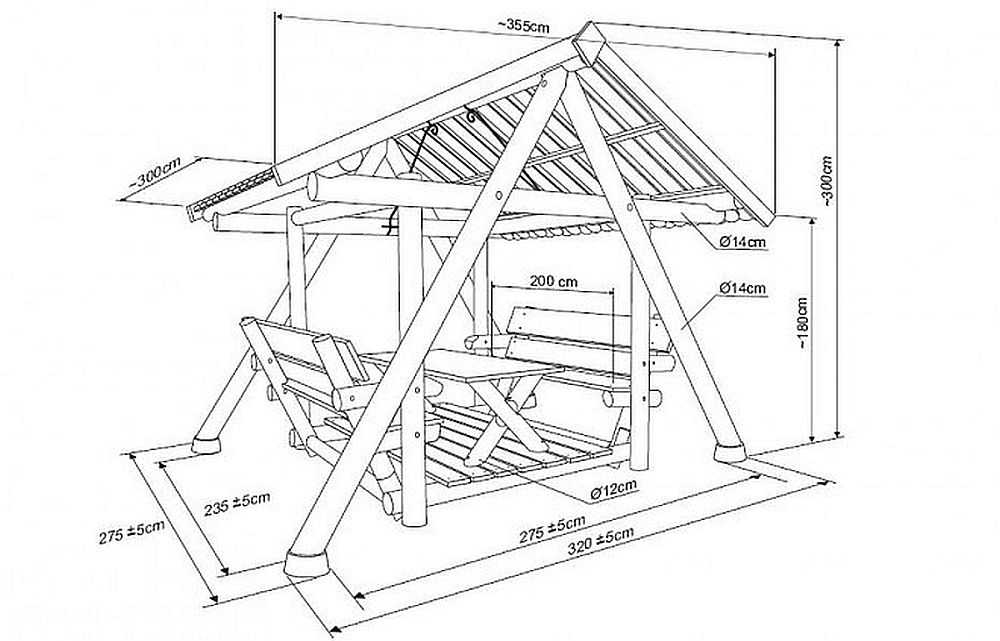
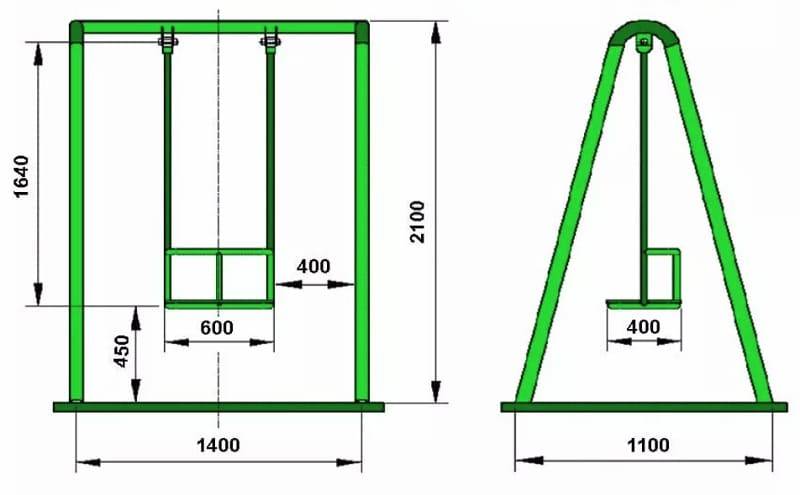
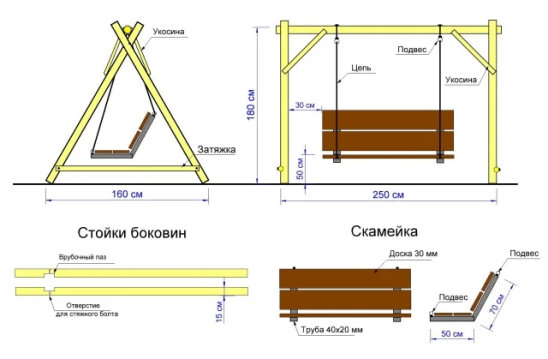
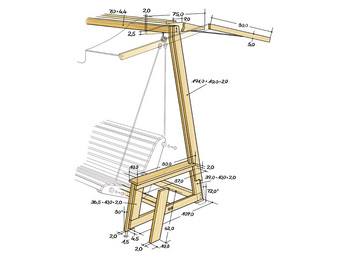
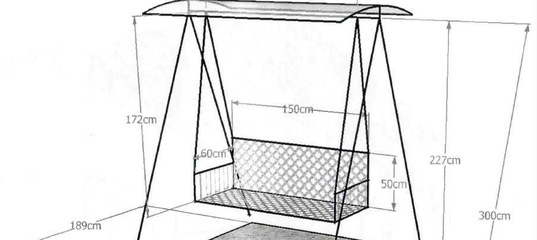
Site selection and design features
It involves the preparation of the site for the structure and the determination of the dimensions of the structure. The place should be flat, without obstacles in front and behind. To make it comfortable for two to sit on the swing, they are supplied with a bench.
Sizes are usually selected individually, but you should be guided by the recommended parameters:
- the distance between the uprights at the base in front - 200 and on the sides - 230, and at the top - 160 cm;
- the total height from the support to the visor is 227, and from the bench - 172 cm;
- bench length - 150, back wall height - 50 cm.
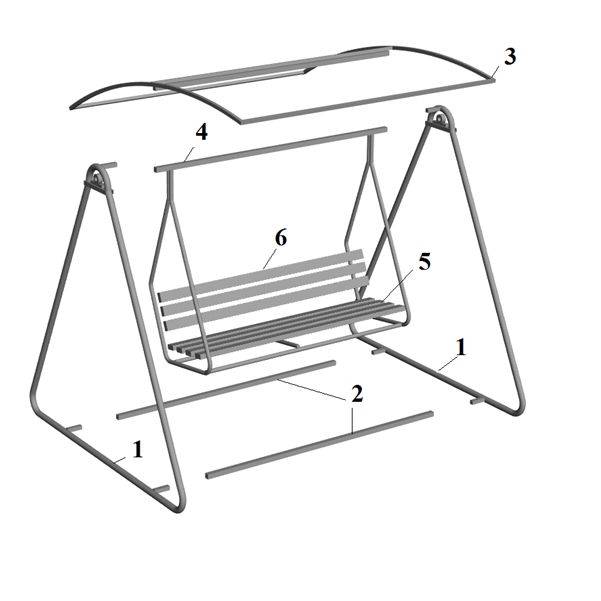
The product is welded from a rectangular support frame located at the base, sidewalls connected at the top (on each side of a pair that forms a triangle) and a horizontal crossbar. A bench is hung on the last.
How to make a swing in the country from metal
Before you get down to business, you should prepare the necessary materials, as well as tools.
Make sure you have:
- file or sandpaper (for working with a metal surface);
- welding machine;
- electrodes;
- containers for mixing the solution;
 Metal swings are distinguished by elegance and seeming lightness of design.
- ingredients for the preparation of the solution (crushed stone, water, cement, sand);
- fasteners (nuts, bolts);
- metal pipes;
- wrenches and shovels;
- grinders and a set of discs for metal.

Modern design metal swing for summer cottage
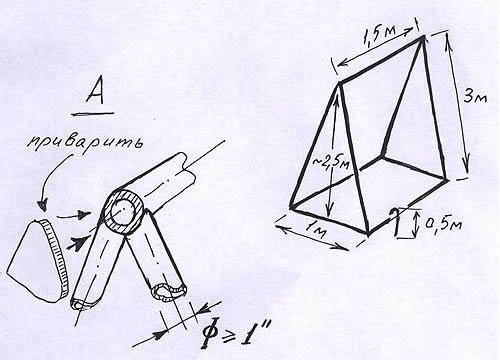
Creating a swing in the country with your own hands: drawings and technology
The first thing to do is prepare the pipes. The cutting of the material is carried out as follows:
- side stand - 2 pieces, length - 2 m;
- base element - 2 pcs. on each side, the length is up to you;
- crossbar - 1 piece, length - 1.5-2 m.

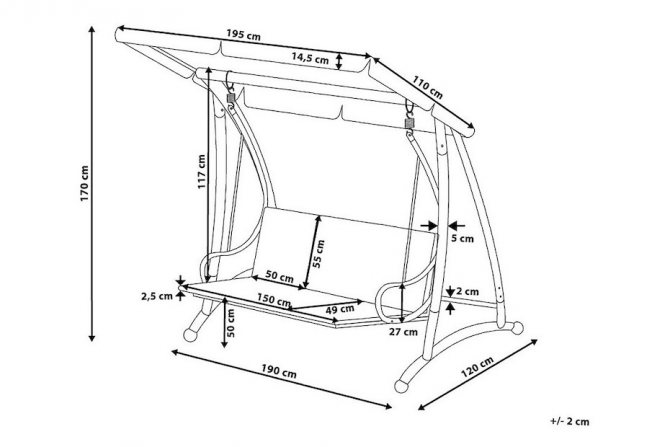
Mounting dimensions of a swing made of metal and wood
Useful advice! After cutting metal pipes, burrs may form on them. Use a file or sandpaper to remove them.
The elements intended for the base must be fixed by welding at an angle of 45°. Next, a crossbar is welded to the uprights at an angle of 90 °.
To install the structure, two trenches should be dug. The width of these recesses must correspond to the tripod resulting from the assembly, and the depth must be at least 0.8 m. The width of the crossbar must fit between the trenches.
 Suspended swing of an unusual shape with a metal frame
The supporting parts of the swing will be installed in the recesses. Previously, a pillow of sand should be formed at the bottom. The layer thickness is 0.1-0.2 m. After that, the embankment is carefully compacted. The base of the structure is installed on top, the recesses are poured with concrete mortar.
To prepare the mixture, mix sand, cement and crushed stone in the following proportions: 2:1:1 (respectively). Add liquid to the resulting mixture and mix the solution. As a result, you should get a homogeneous mass. Make sure it's not too liquid.

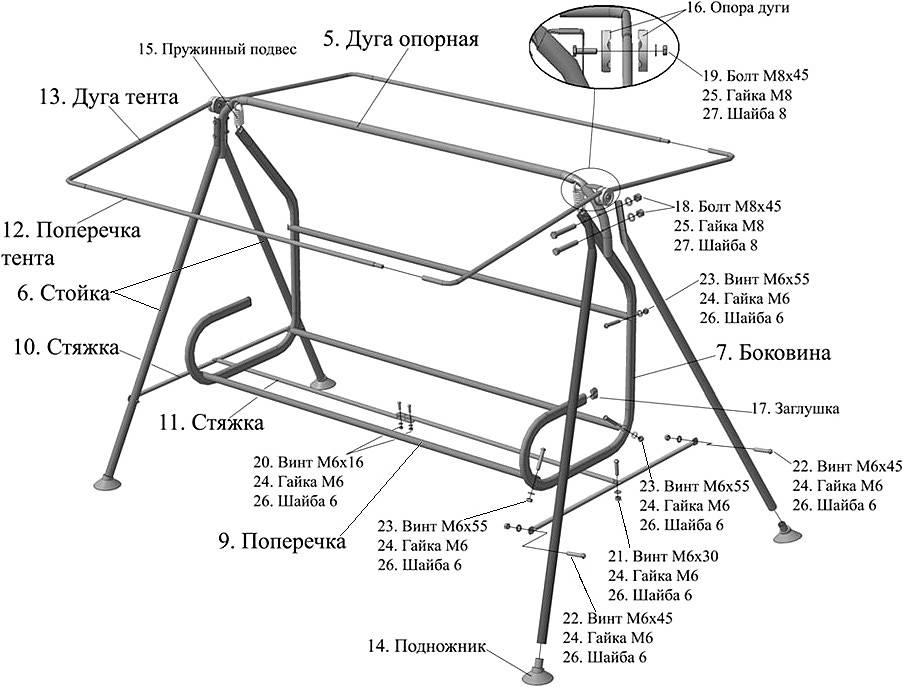
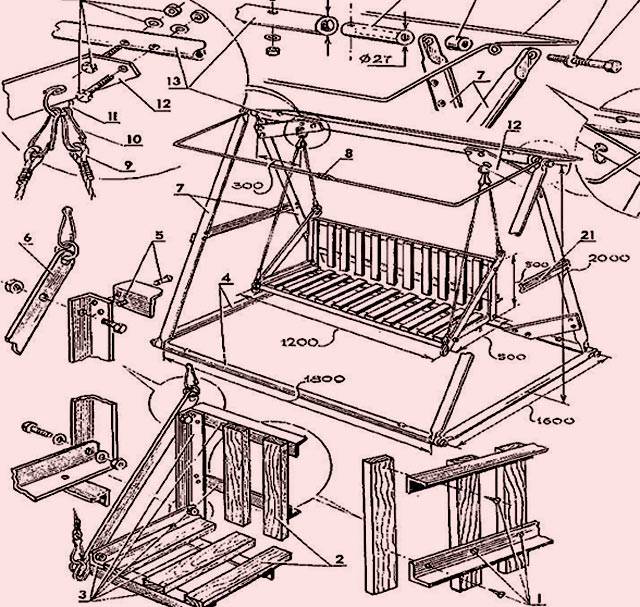
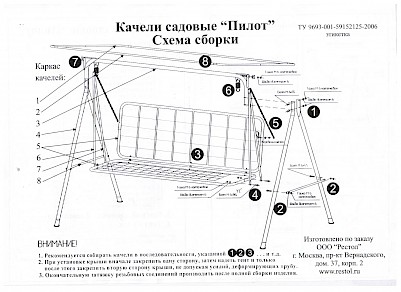
Diagram of a garden swing: 1 - screws for fastening the back and seat slats; 2 - slats; 3 - corners of the rocking seat frame; 4 - bar of the base of the swing farm; 5 - rivets; 6 - connecting strip of seat stiffness and seat suspension; 7 - side bars of the swing farm; 8 - connection of the ends of the supporting frame of the awning; 9 - cord for hanging the rocking chair; 10 - carbine; 11 - ring; 12 - kerchief-strut; 13 - the upper bar of the swing farm; 14 - connecting bolts with washers and nuts; 15 - bolt-lock insert; 16 - insert with a hole and internal thread for the connecting bolt; 17 - wide spacer; 18 - support frame for the awning; 19 - washer; 20 - a bolt connecting the upper bar with the side ones; 21 - crossbar - 2 pcs. (steel strip with bolts)
It takes about a week for the concrete to harden. Up to this point, it is not recommended to attach a seat to the crossbar, which can be held by cables or metal beams. After making sure that the mortar has hardened, attach the hooks by welding and install the seat on the cables. If metal beams are used, weld the seat to them. When the structure is completely ready and installed, it can be covered with paint to give the swing a beautiful appearance and protect the metal from corrosion.
 Metal swing for giving with an awning and soft pillows
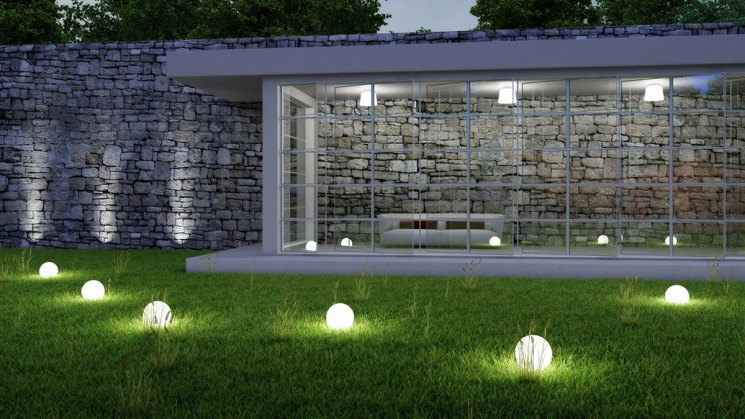
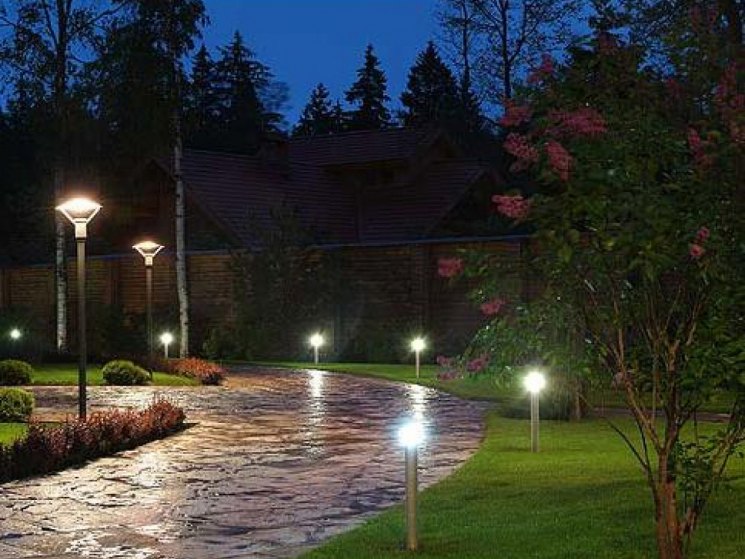
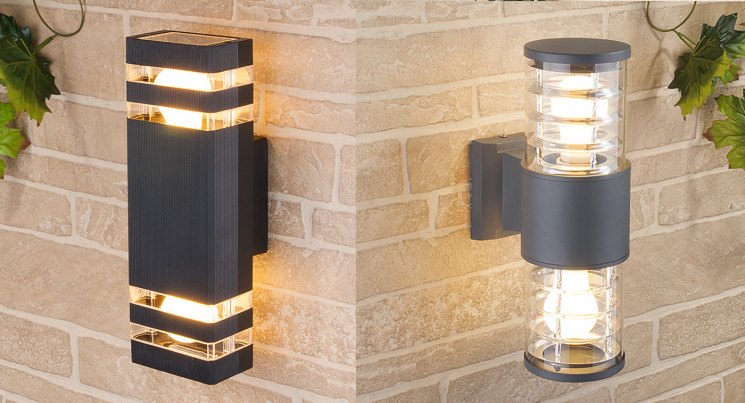
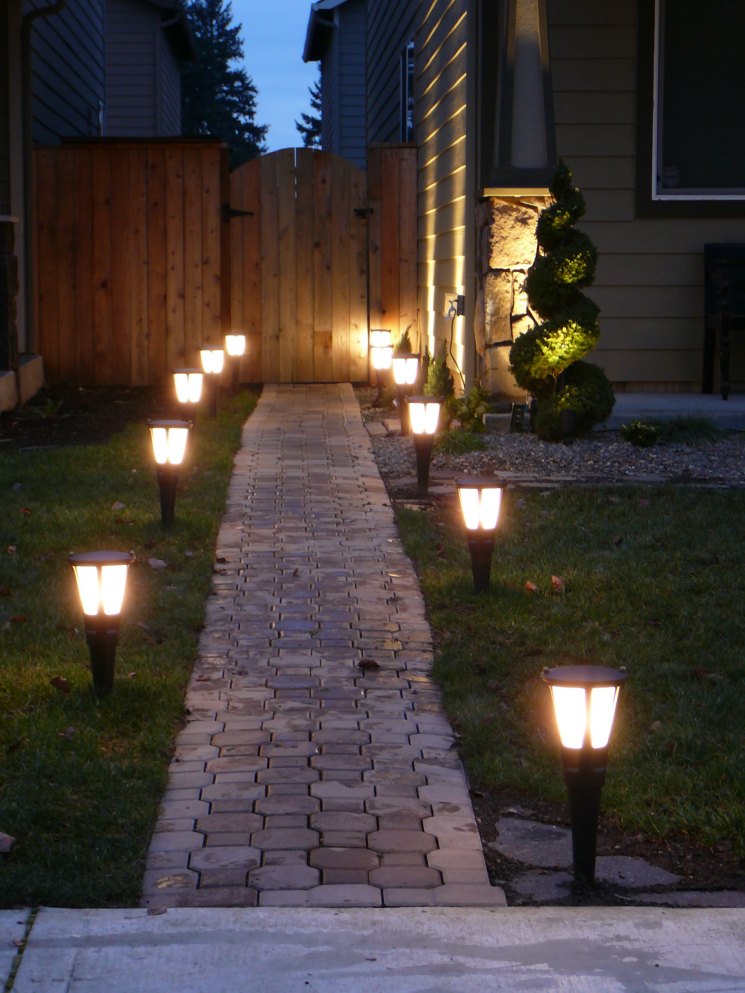
Device for street lighting
We make a street lamp with our own hands from a glass bottle. You will need:
- Glass bottle with a narrow neck. It’s good if you come across a colored bottle of an unusual shape.
- Cartridge with light bulb. Its size should be such that it freely enters the neck of the bottle.
- Silicone sealant.
- Beads, sequins and thin copper wire for decoration.


The work flow is as follows:
We thoroughly clean the surface of the bottle from labels and stickers and rinse from the inside.
After the bottle has completely dried, we proceed to decorating. At the bottom we pour beads and sequins of different colors. We wind the wire around our finger to make a spring, and also lower it into the bottle.


![[master class] do-it-yourself garden swing | a photo](https://fix.housecope.com/wp-content/uploads/3/1/a/31a5d98576b01231b68f858040fbe162.jpeg)

We place a cartridge with a light bulb in the glass and fix it with sealant. Several of these lamps, placed throughout the site, will noticeably transform it.
Simple swing without welding, using a threaded connection
The drawing with dimensions is determined by the number of places, since the same letter is taken as the basis for the children's swing - P. For one kid, a height of about 2 m is needed, which means that the profile pipe for the vertical rack should be a meter longer - it will go underground when concreting. The length of the horizontal bar can vary not only on the number of seats, but also on their size - with a standard width, 1.4-1.5 m will be enough, a more spacious one requires an increase in the distance between the side posts, and therefore a longer upper bar.
To make it yourself, you will need a drawing with dimensions, a correctly defined location, a profile pipe with a diameter of 60 mm or more, M16 bolts, grovers and locknuts for them, seat corners, a galvanized chain and carabiners.
Step-by-step instructions on how to make the simplest children's swing with your own hands from metal are as follows:
- A hole is dug, at least 1 m deep, which should not be wide (experts advise using a garden drill).
- The structure is mounted in a supine form, both vertical pipes are attached to a horizontal rack, using bolts, lock nuts and growers (lock nuts securely fasten the mounting bolts, preventing them from unwinding.
- To secure the seat, eyebolts are securely installed (two for each seat). Galvanized chains are attached to them with carabiners.
- The finished structure is installed in dug pits, in which the bottom is additionally strengthened (you can take brick, wild stone, pour crushed stone).
- After checking the correct installation of the pillars with a plumb line, the soil is rammed manually or using an auxiliary device - for example, sticks with a fixed bar. Only after a qualitatively fulfilled requirement can the pillars in the pit be poured with liquid cement.
However, this may require additional time and effort as the work will be at height and the vibration from the tools may compromise the integrity of the cement pour if it is not yet well cured.
Making a seat is not difficult, especially if it is without a back. It is necessary to drill holes in the corner for carabiners and for bars. If desired, you can use a board or plywood instead of bars.
The posted photos show a simple children's swing with reliable protection against corrosion, weather conditions, damage to the wooden seat by pests and moisture. They clearly demonstrate that even a simple structure can be made attractive and aesthetic, organically fit into the environment.


