- Cable for heating a water pipe: principle of operation
- Resistive Models
- self-adjusting
- Varieties of cables
- Resistive
- Self-adjusting
- Internal
- Heating circuit installation methods
- Outdoor installation instructions
- We embed the circuit in the pipe
- Connecting the heating cable for water supply to the network
- Types of heating cable
- resistive
- Zonal
- self-adjusting
- heating film
- Varieties of pipes to be heated
- 3. Resistive heating cable
- Conclusions and useful video on the topic
Cable for heating a water pipe: principle of operation
A cable is, in fact, a conductor that gives off heat to surrounding objects. It consists of one or two cores, their cross section is different and the working power depends on it.
Resistive Models
Resistive equipment is suitable for heating pipes with a diameter of not more than 40 mm
It is important to evenly distribute the wire throughout the body of the system to avoid heating
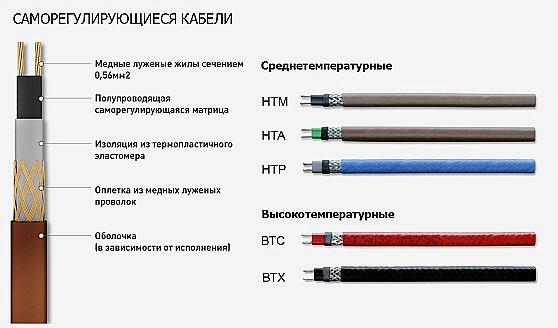
self-adjusting
The self-regulating heating cable has two parallel cores in a polymer braid. There are instructions for heating pipes. The degree of heating of such a model is directly proportional to the ambient temperature. The lower it is, the more heat the cable gives off and vice versa.
This wire has more advantages than other models:
- The cable automatically increases power when the temperature drops and turns off when it rises. This allows you to save energy.
- It is highly resistant to sudden voltage changes.
- Complete absence of danger of overheating.

To choose a self-regulating heating cable for water pipes, you need to consider parameters such as:
- Material.
- The diameter of the system to be heated.
- Type of.
- The thickness of their insulation.
- The amount of heat loss.
Attention! Having made a mistake in such calculations, you can get either an inefficient system or an impractically expensive system to operate.
Varieties of cables
Resistive
The simplest system, which is used to maintain the optimum temperature of the pipeline, is a resistive cable.
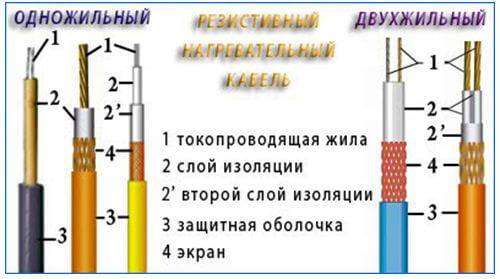
Its design includes the following elements:
Scheme of the device of the resistive heater
Nichrome conductor with fixed resistance. When current passes, it heats up, being the main source of heat.


- Photopolymer insulation that protects the conductor from short circuits and provides heat transfer to the braid.
- Braid made of copper wire, which performs the function of uniform distribution of the emitted conductive residential heat. It can also be a shielding layer.
- External insulation with good thermal conductivity. Prevents corrosion of copper and nichrome parts, reliably protecting them from moisture and atmospheric influences.
The key feature of the resistive cable is that it is turned on and off by a separate thermostat. The functions of this device are automatically adjusted according to the readings of the installed temperature sensors.
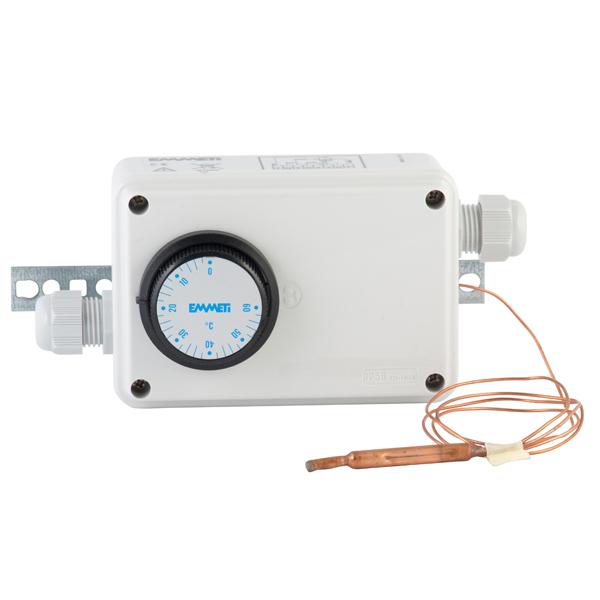
Thermostat with internal sensor
The presence of a thermostat and temperature indicators makes the system quite vulnerable. If at least one of these nodes is disconnected or fails, the cable switches to continuous operation mode, and as a result, it quickly fails as a result of overheating.
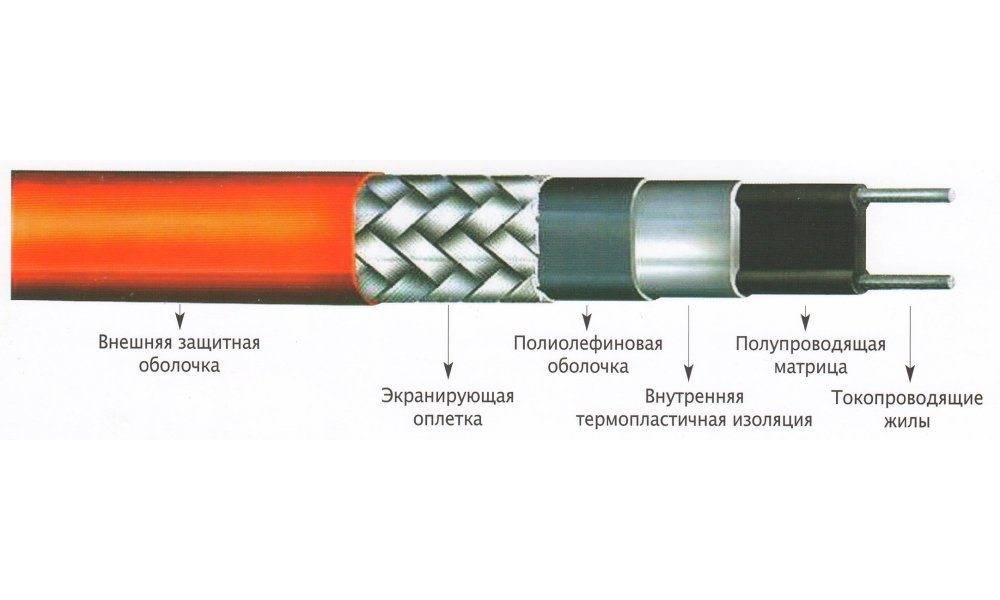
Self-adjusting
Appearance and marking
The disadvantages described above are deprived of self-regulating pipe heating systems:
- As with resistive cables, the heating source is nichrome or similar alloys.
- The cores are placed in insulating channels made of polymers with high thermal conductivity.
- Between the channels there is a temperature-dependent semiconductor matrix: the more it heats up, the less conductive paths are formed in it.
- Thus, the adjustment of the cable operation is carried out automatically: when the pipe cools down, the matrix conducts current intensively, and the conductors heat up more. The higher the temperature rises, the lower the conductor properties of the cable will be, so that the risk of overheating and melting of the conductors is minimized.
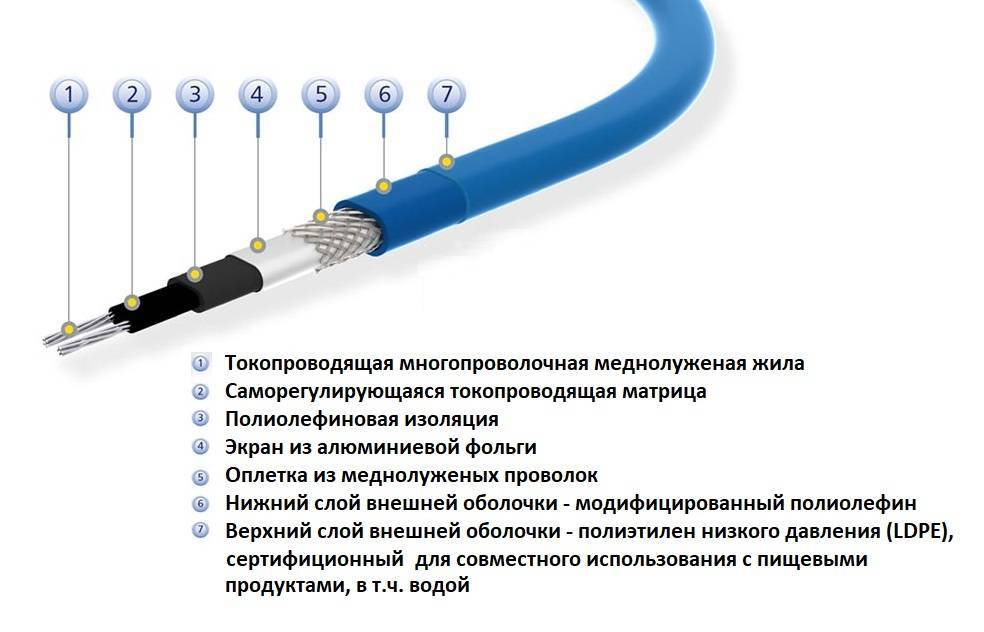
The device and principle of operation of a self-regulating conductor
The key disadvantage of self-regulating heaters is their rather high price (about 200 rubles per linear meter). However, the reliability of the system usually compensates for such costs.
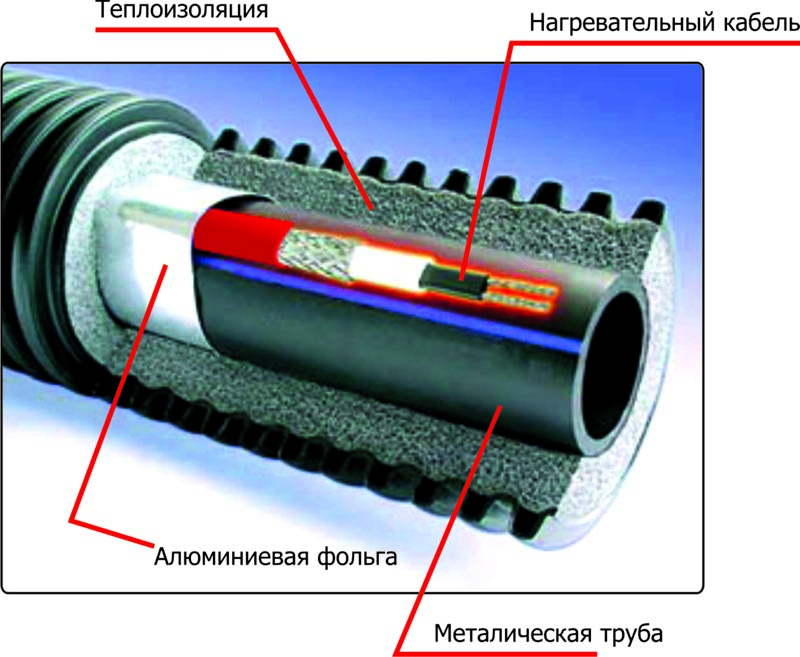
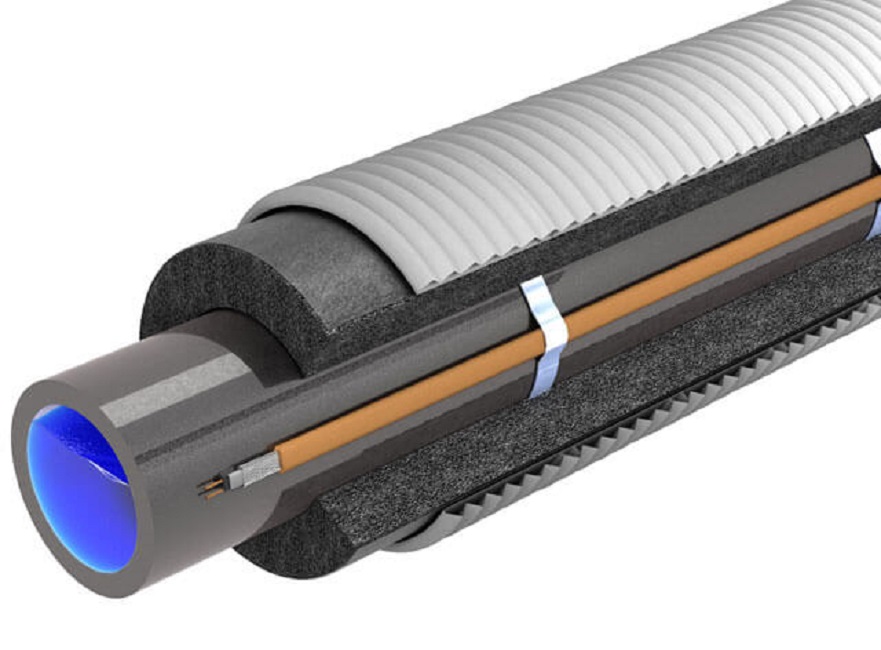
Internal
A separate group of devices are internal cables.
Unlike the more popular outdoor ones, they are mounted directly in the pipe cavity, and are characterized by much greater efficiency by minimizing heat loss.
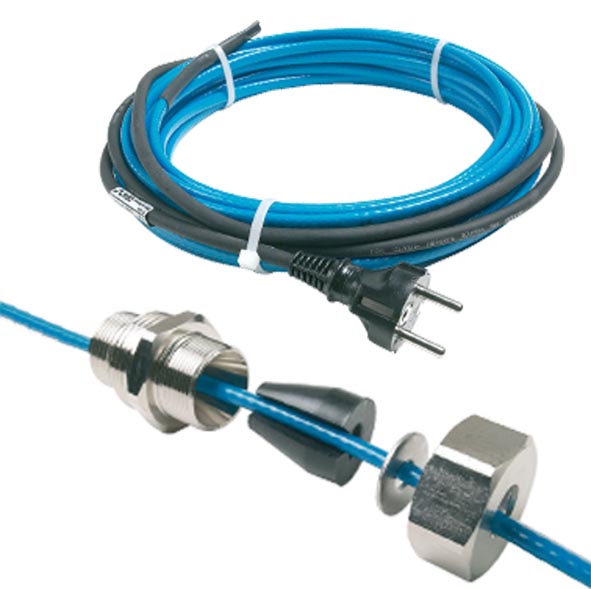
Heating cable for water supply inside the pipe with a plug for connecting to the mains and a set of mounting sleeves
- The main heat source is usually a special self-regulating heating cable for mounting inside the pipe. Such models are equipped with denser insulation with good moisture-proof properties, which allows them to protect metal cores and matrices from short circuits.
- Resistive models can also be used for indoor installation, but this is the exception rather than the rule.
- In addition to the cable itself, the heating system kit usually includes special couplings and glands for installation on the pipeline.
- The device is powered by 220V. Sometimes the instruction recommends connecting conductors through an uninterruptible power supply in order to keep them in working condition during power outages.
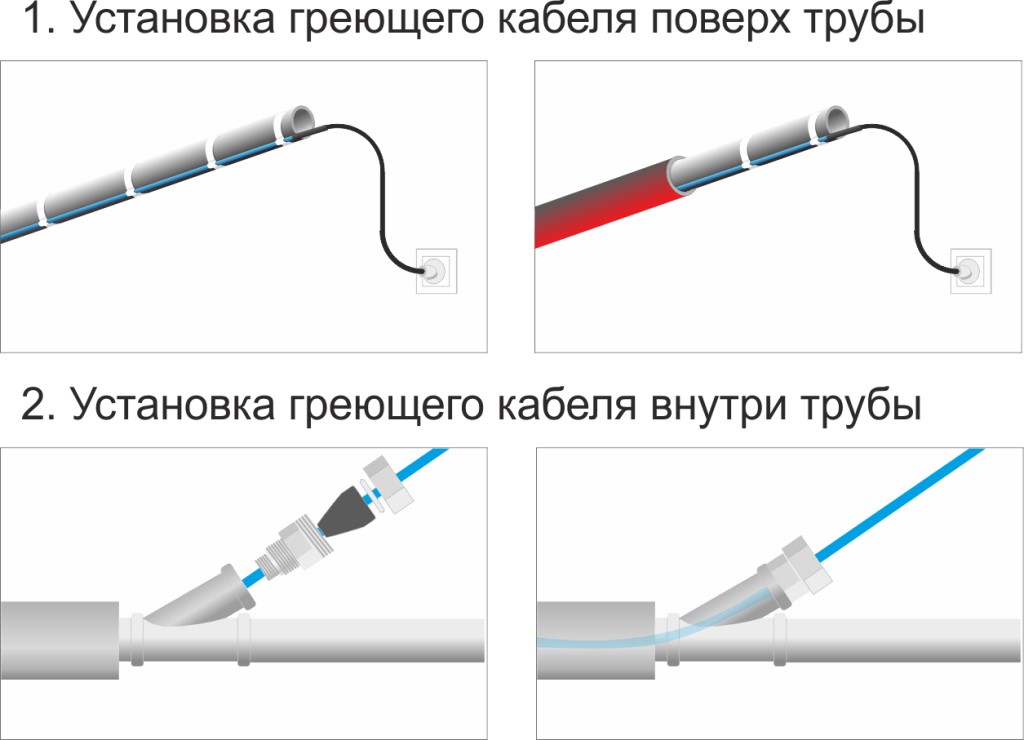
Heating circuit installation methods
Water heating thermal cables are mounted in two ways - outside and inside the pipe, each of them has its pros and cons. The advantages of the first option are as follows:
- the conductor does not block part of the flow section of the line;
- in this way it is easier to arrange heating of extended sections and valves;
- no need to install and maintain special units for cable entry into the pipeline.
External electrical heating requires more power elements. If it is customary to lay a wire from the inside with a heat output of 10-13 W / m, then it will be necessary to heat the pipe from the outside with a cable with a power of 15-40 W / m, which reduces the efficiency of the system.


The second unpleasant moment is the difficulty of repairing products buried in a trench. It is possible that in order to determine the location of the malfunction, you will have to dig out the entire highway.Conversely, when sealing a gust or replacing pipes, the cable heater can be accidentally damaged.
Heating the pipeline from the inside is not only more economical, but also more practical in terms of maintenance. True, for a hermetic launch of the conductor inside, you will have to put an additional pass-through node. Again, with a long street water supply, you need to increase the diameter of the pipe just to successfully push the cable through. And if a valve or a crane is provided on the highway, then internal installation is not possible at all.
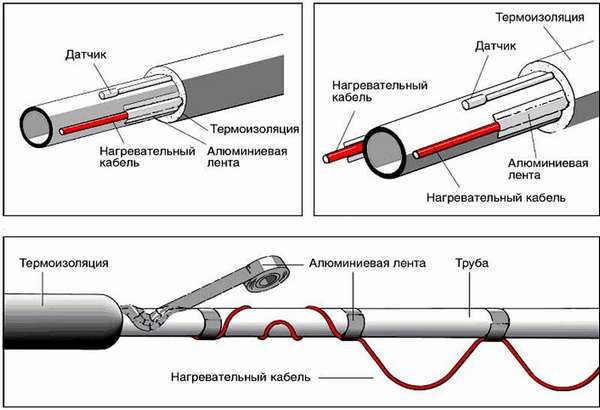
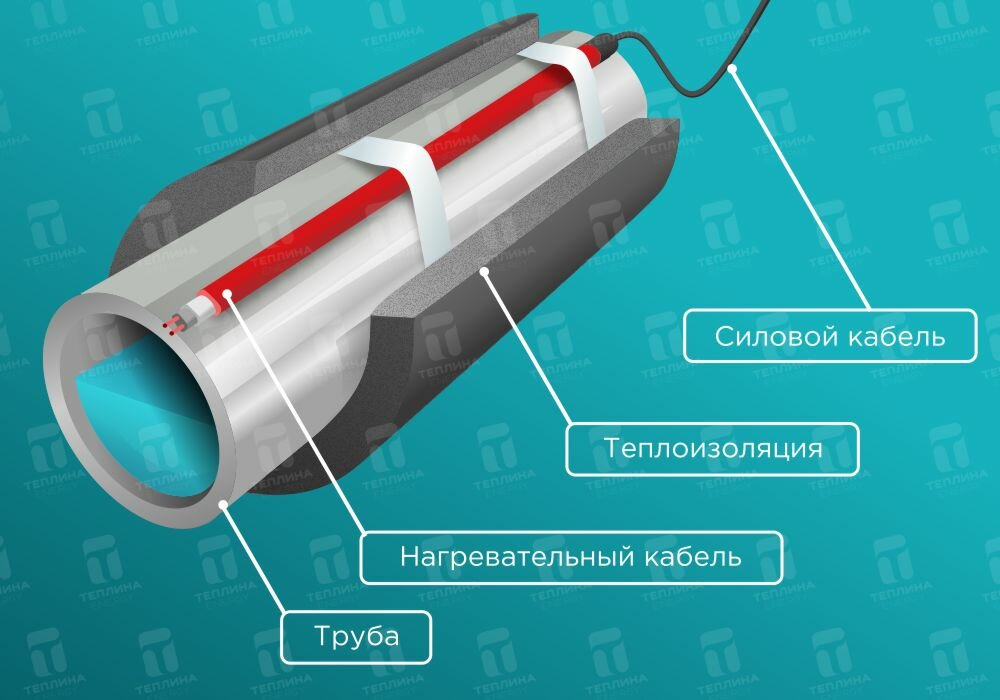
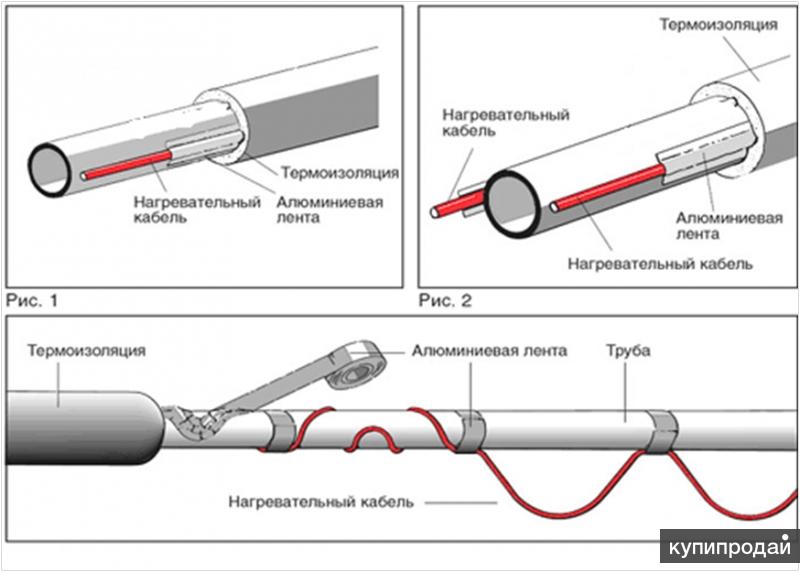
Outdoor installation instructions
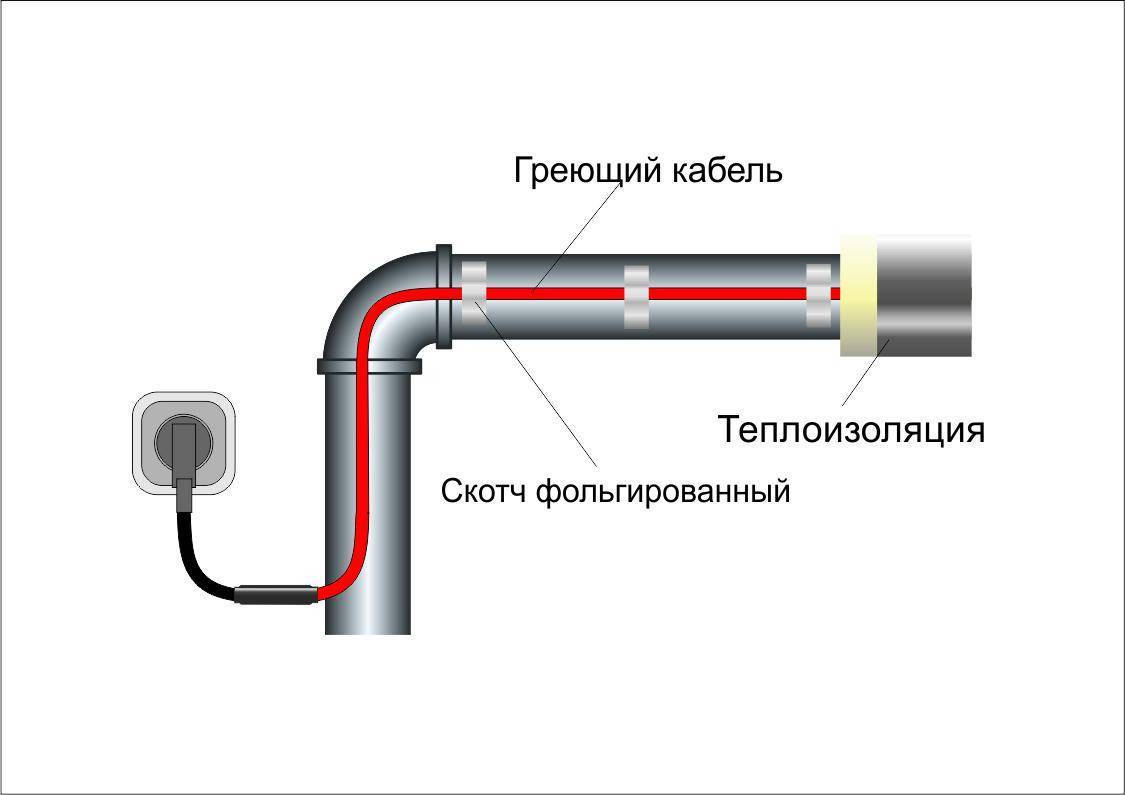
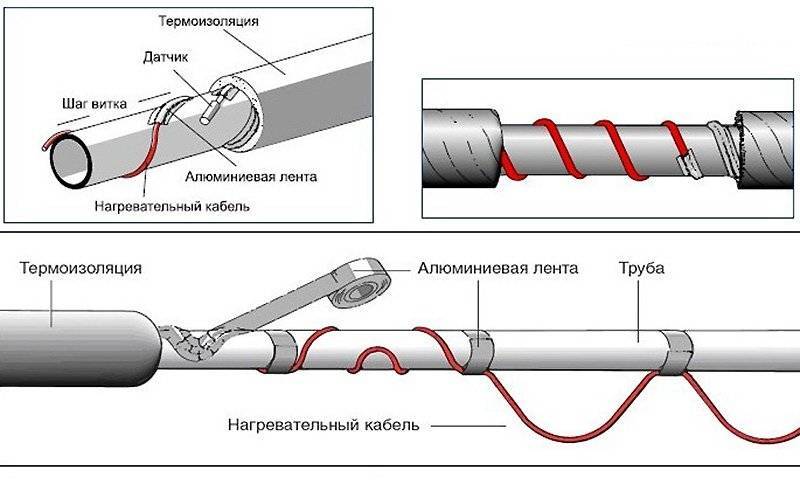
To make an external hot water circuit, in addition to the wires themselves, you will need fastening means - aluminum tape and plastic clamps - puffs. The work is carried out in the following order:
- Along the bottom of the pipe where you plan to attach the heating cable for the plumbing, stick a strip of aluminum tape. It will serve as a good heat distributor.
- Attach a flat self-regulating conductor to the pipeline without twisting and fix it on top with a second strip of foil.
- Fix the heating element by pulling it to the line with clamps every 20 cm, as shown in the photo below.
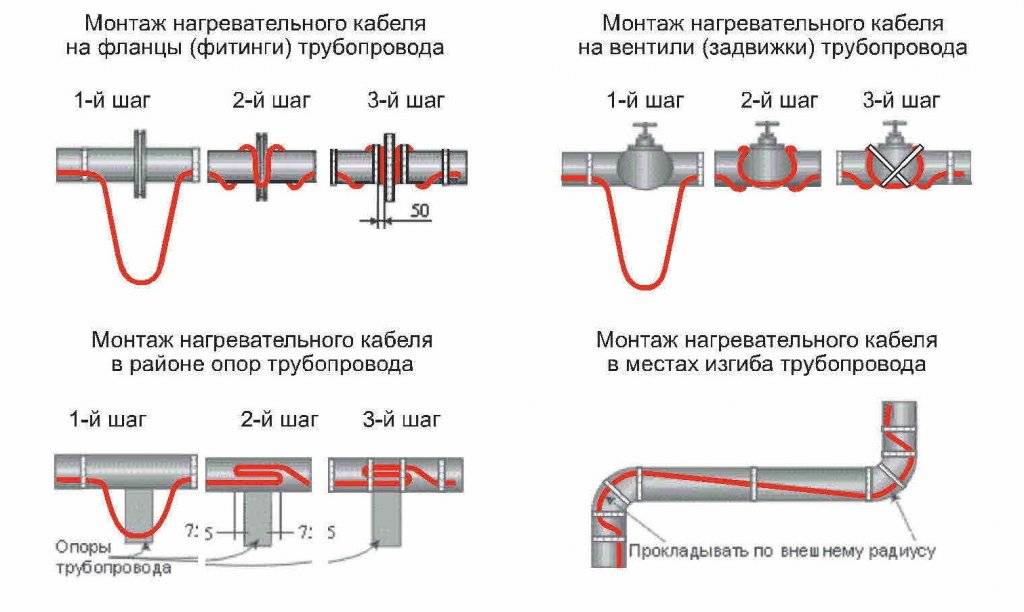
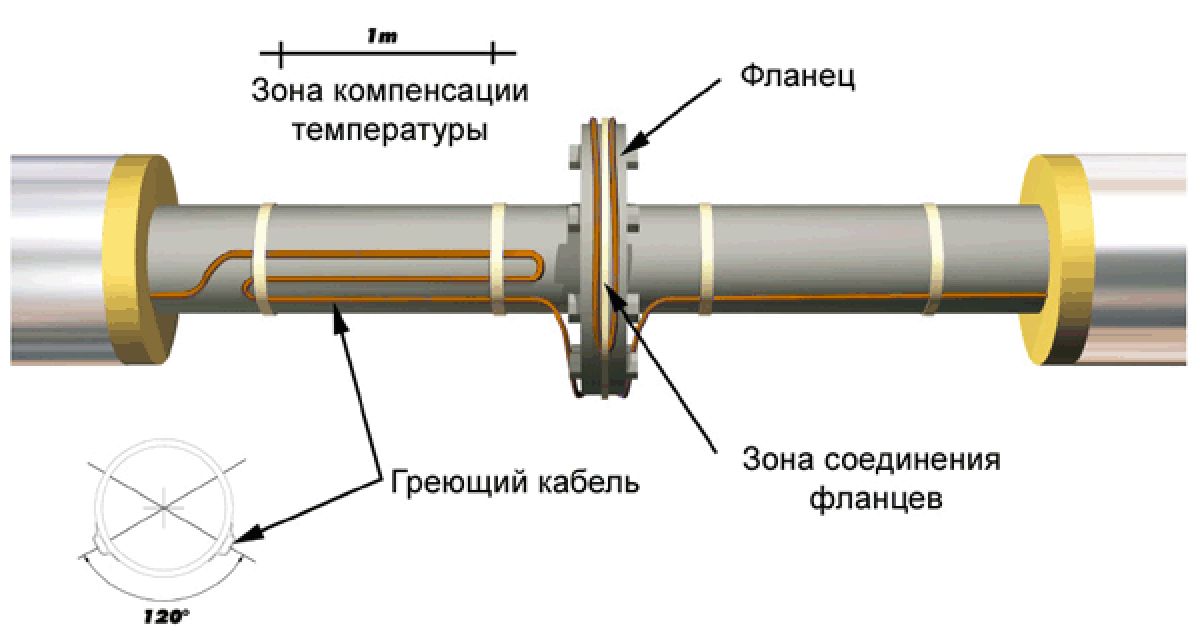
- To protect the valves from the cold, it is necessary to leave an allowance in the form of a hanging loop and continue mounting the straight section. Then loop around the tap or valve, glue it with tape and attach it with clamps.
On water mains running along the street, it is better to lay the cable in the form of a spiral, providing more efficient heating. The same applies to large diameter pipes, when spiral installation becomes more profitable than laying 3-4 straight lines.The fastening technology remains unchanged - gluing the foil and fixing with clamps is carried out on all types of pipes - plastic and metal.
The last stage is the thermal insulation of the pipeline, without which its heating loses all meaning. For insulation, sleeves made of foamed polyethylene or foam shells are used. Before installing the heat-insulating layer, do not forget to check the operability of the cable heating of your communications. The process is shown in more detail in the video:
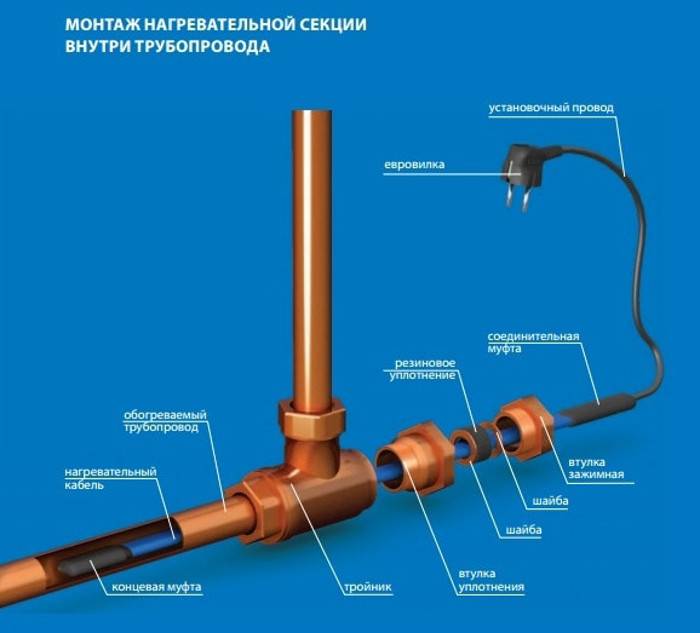
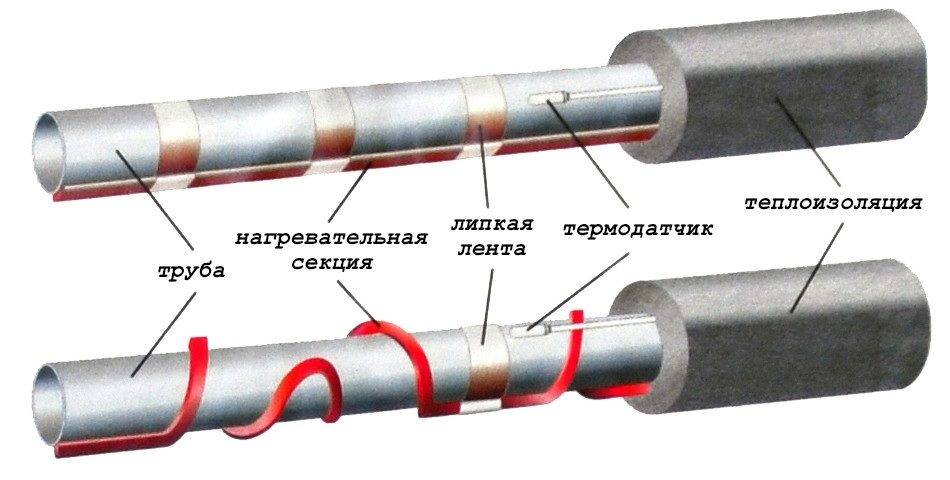
We embed the circuit in the pipe
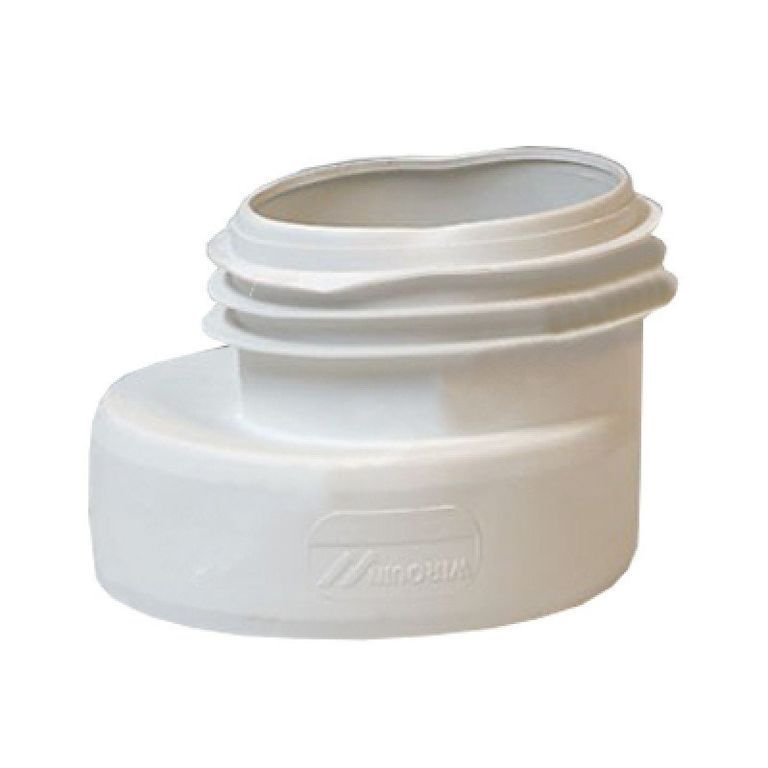
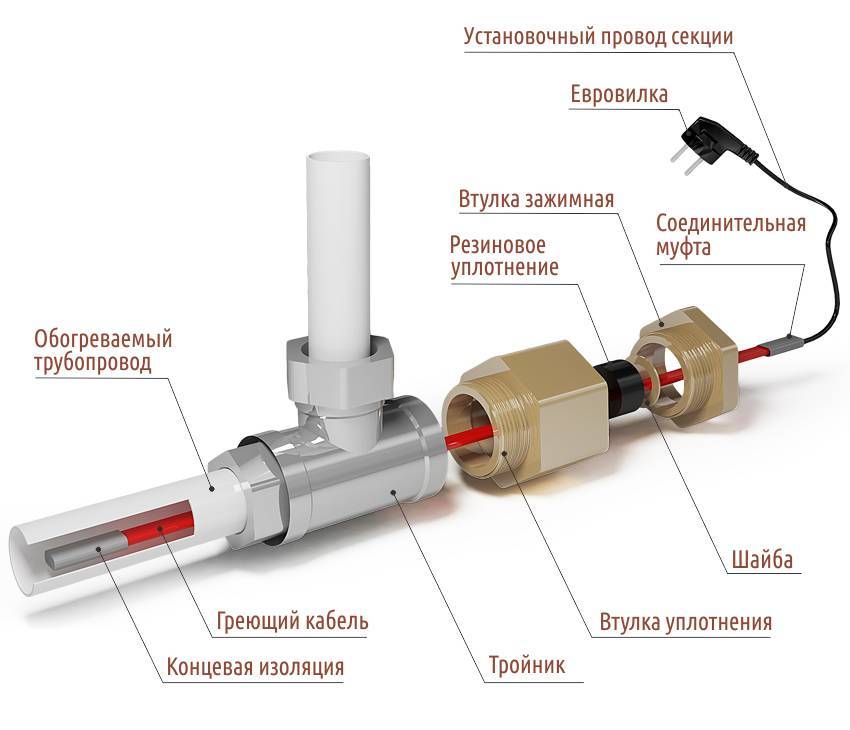
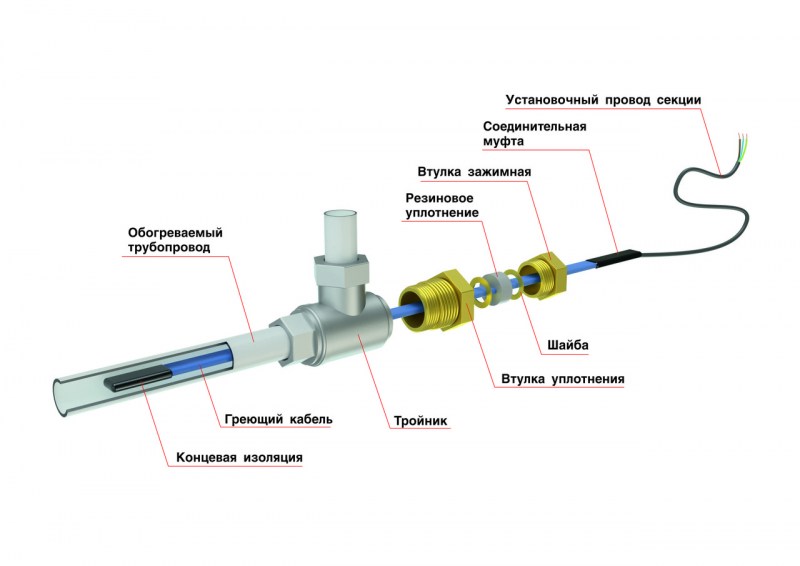
To successfully push the heating cable into the pipeline, you should select a ready-made bushing kit of the desired diameter. It includes the following details:
- housing with external or internal thread;
- rubber seal;
- 2 bronze washers;
- hollow clamping nut.
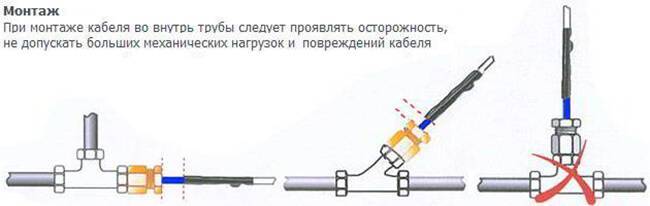
The node is installed in the place where the water supply makes a turn of 90 °, only instead of a knee, a tee is mounted at this point. It is also very desirable that all turns on the supply line be made in a natural way - due to the permissible bending of the pipe (excluding steel and polypropylene). When there are no fittings on the line, pushing the heating conductor is much easier, as well as pulling it out for repairs.
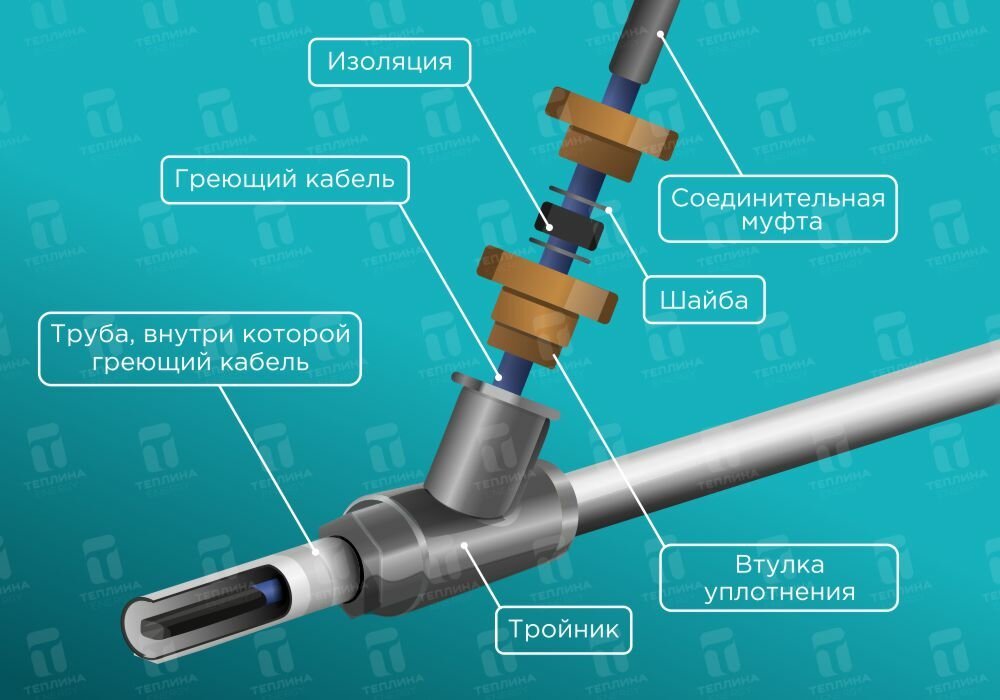
Installation is carried out in the following sequence:
- Place a brass tee at the turn of the water line.
- If possible, straighten the twisted cable and pull the parts over it in this order: nut, first washer, gland, second washer.
- Screw the body of the bushing into the tee, insert the wire there and push it to the required depth.
- Put the washers together with the stuffing box into the socket and tighten the nut.
Parts installation sequence
It is important here to assemble all the parts in the correct order, and before cutting the cable and installing the end sleeve, otherwise it is difficult to tighten the gland. According to reviews on the forums, this method of heating communications is quite often practiced at the inputs to frame houses built on pile foundations.
The subtleties of installation work are demonstrated in the next video:


Connecting the heating cable for water supply to the network
If you have just started learning how to make electric heating of water pipes, then you need to learn how to make insulation at the end of the conductor. You can use heat shrink tubing for this. It will reliably protect your devices from moisture. You also need to watch the tutorial video to connect the heating cable correctly.
For the safety of this heating of the water supply, you will need to install an RCD. This device can protect your system from current leakage. When connecting the temperature sensor to the water supply, you need to take into account that the sensor will work correctly if the wire length does not exceed 50 meters.
Types of heating cable
There are different designs of heating cable:
resistive
The easiest option
designs. Has a strictly defined length, does not allow cutting or
connect several pieces, as the resistance will either decrease too much, which
create an emergency situation for the electrical wire and equipment, or increase and sharply
reduce the efficiency of the cable. There are designs with one and two
conductors. The first option requires laying folded in half, since
the ends must be connected at one point. The second type can be laid as
anything, since a double conductor is a single wire that
simply goes to the end and comes back.
The resistive cable has mass
shortcomings, but its attractiveness to the user lies in the low
cost.
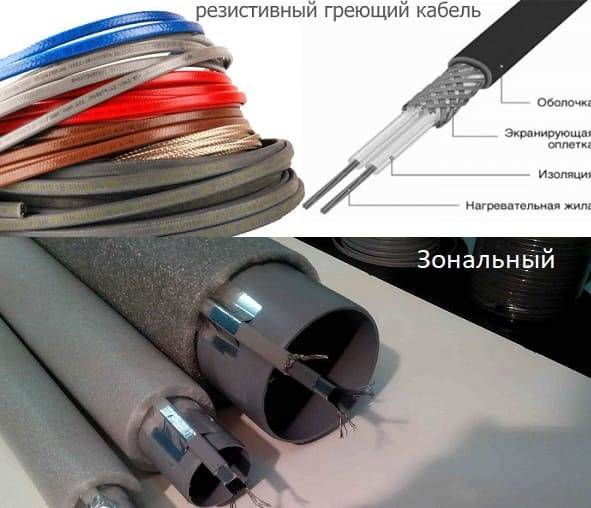 Resistive and zone heating element
Zonal
The zonal design is a double conductor in insulation, around which a heating nichrome filament is evenly wound. It is connected to the conductors at regular intervals, which makes it possible to obtain the corresponding heating zones. Such a system does not depend on the length of the circuit and can heat pipelines of any size. The use of a zone type facilitates the installation of a heating cable on a sewer pipe and provides several advantages:
- starting currents are absent;
- if the nichrome thread is damaged in a separate section, the rest of the cable continues to work;
- heating power does not depend on the length of the circuit;
- characteristics do not change over time.
Disadvantages can be considered
danger of local overheating of the cable section and the possibility of damage during
installation time. The price of such a heater is slightly higher than that of resistive types,
but significantly lower than that of self-regulating structures.
self-adjusting
Self-regulating cable
consists of two conductors, on which a polymeric heating
matrix protected by a double layer of internal insulation, a copper screen and an external
protective insulating layer. Peculiarity
its work consists in the ability to create its own temperature in different areas
cable depending on external conditions. The lower the temperature, the stronger
heat release at this point.The self-heating cable for sewerage represents the most
effective solution to the problem of pipeline freezing, but its cost
significantly higher than for simpler designs.
heating film
In the most difficult cases, use a heating
film. It wraps around the pipe, ensuring uniform heating of the entire
surfaces. This allows you to get the maximum heating efficiency, but significantly
complicates and slows down installation work. At the same time, the film consumes
much less electricity, which can significantly reduce costs.
Considering what to mount
the system has to be paid once, and you pay for the resources used -
permanently heated
sewer pipes using a film can be considered quite successful
option.
Varieties of pipes to be heated
It may be necessary to heat the following sewer pipes:
- external sewerage systems - to divert wastewater to treatment plants or septic tanks;
- pipes connecting the septic tank to drainage fields or a filtration well;
- for removal of washing waters of cleaning filters.
As a rule, insulation is carried out by wrapping with thermal insulation, providing an air gap and in other ways (for more details: “How to make insulation of sewer pipes in the ground - do-it-yourself materials and methods of insulation”). The latest technologies can offer more convenient ways to heat sewer pipes - with a heating cable that can be laid both outside and inside the pipe.In addition, on sale there are elements of engineering communications that already have a ready-made heating system. We are talking about sandwich pipes and self-heating cables.
3. Resistive heating cable
This type of conductor may consist of one or two steel conductors, which are covered with a layer of insulation, shielding protection and an outer protective sheath. Some cables have two layers of insulation. Solid conductors are distinguished by some characteristic features:


- They need power at both ends of the cable;
- They create a very strong electromagnetic field, which is harmful to the human body;
Two-wire heaters include one heating and one conductive wire, which eliminates the need to connect a power source to two ends. This greatly simplifies the installation process.
benefits
- high power;
- Sufficient flexibility;
- Affordable cost;
- Long service life under proper operating conditions and proper installation.
The disadvantages are quite significant:
- Strict length limit. Resistive conductors are produced immediately in a fixed length. It is strictly forbidden to shorten them yourself. Such actions will lead to an increase in resistance due to a decrease in length, which in turn will lead to overheating and failure;
- With excessive accumulation of dirt and debris in the place where the cable is laid or in the presence of places where the cable crosses with itself, overheating and failure are inevitable;
- Since the cable cannot be cut, it becomes impossible to carry out local repairs even if a small area is damaged. The cable will be completely replaced;
- Heat transfer remains constant along the entire length of the heater. Sometimes this leads to overheating of the cable in certain sections or its rapid heating;
- The use of a thermostat is mandatory. This is necessary in order to be able to constantly monitor the temperature and prevent overheating of the conductor. This nuance makes a resistive cable not very suitable for use in places where access is limited.
An improved version of the resistive cable is the zonal resistive cable. Its key difference is that it is divided into small zones. This allows you to independently adjust the length of the cable and carry out local repairs or replacements. Its cost is slightly higher. During installation, temperature sensors should also be used, and during operation, ensure that debris does not accumulate around the cable.
Conclusions and useful video on the topic
Detailed installation of the heating cable system inside the pipeline is discussed in the following video:
Features of various types of cables from manufacturers and recommendations to the future buyer:
Information about the end insulation and detailed instructions for splicing with the supply wire in the following video:
If you choose good materials and follow the installation technology, you can independently install it inside the pipe and connect the heating cable
At the same time, it is important to carefully follow each step, securely connect the cores and ensure tightness.
And the above expert advice and video instructions will help to understand in detail the installation process for home craftsmen who do not have experience in performing such work.If you doubt your own abilities, then it is easier to turn to an experienced master, who is praised and recommended by friends and other grateful customers.


Please write comments in the block below, ask questions, post photos on the topic of the article. Tell us about how you installed the heating cable yourself or your friends equipped their pipeline. It is possible that your information will be useful to site visitors.