- Safety Rules for Using a Food Chopper
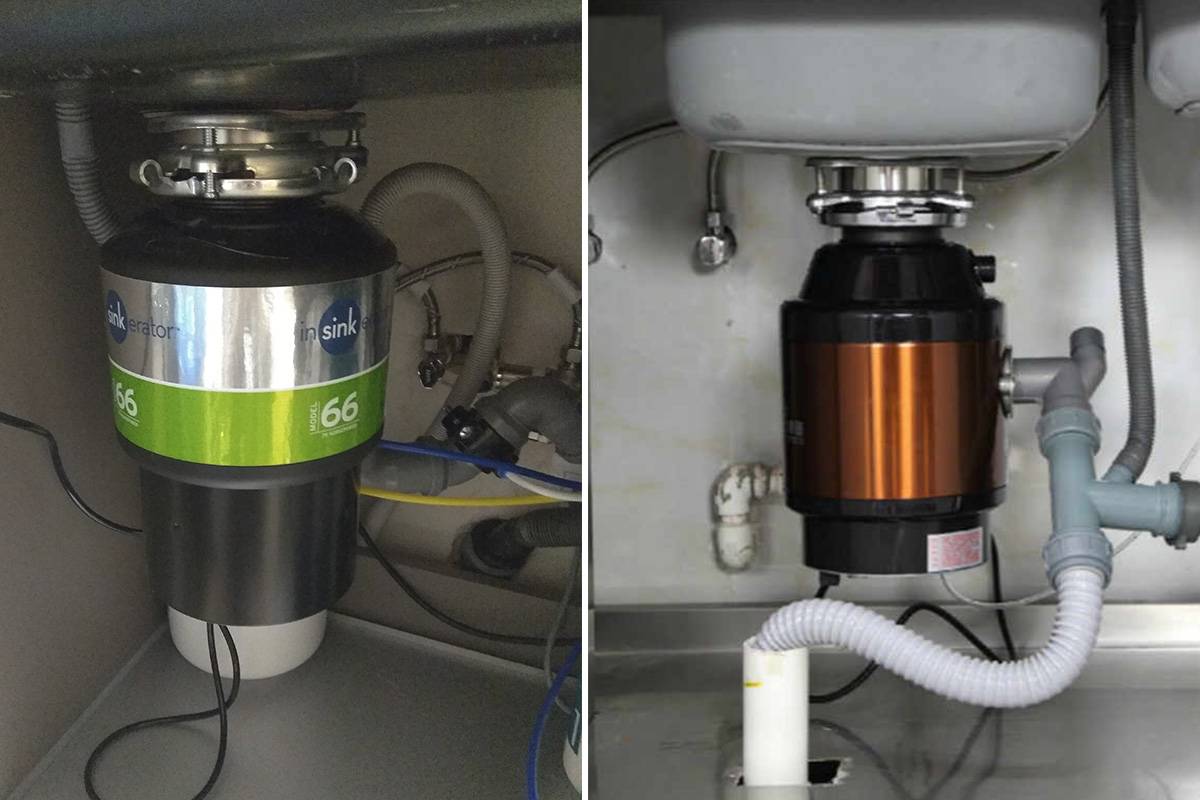
- Features of dismantling and minor repairs
- leak
- Flywheel
- Blockage formation
- Dismantling
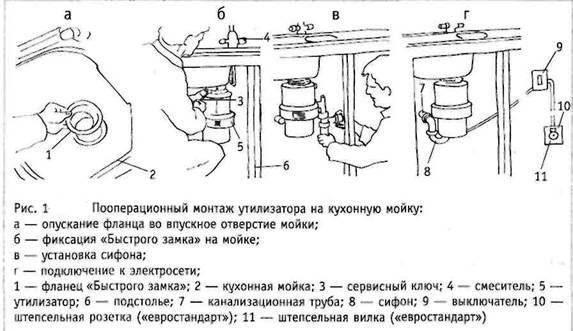
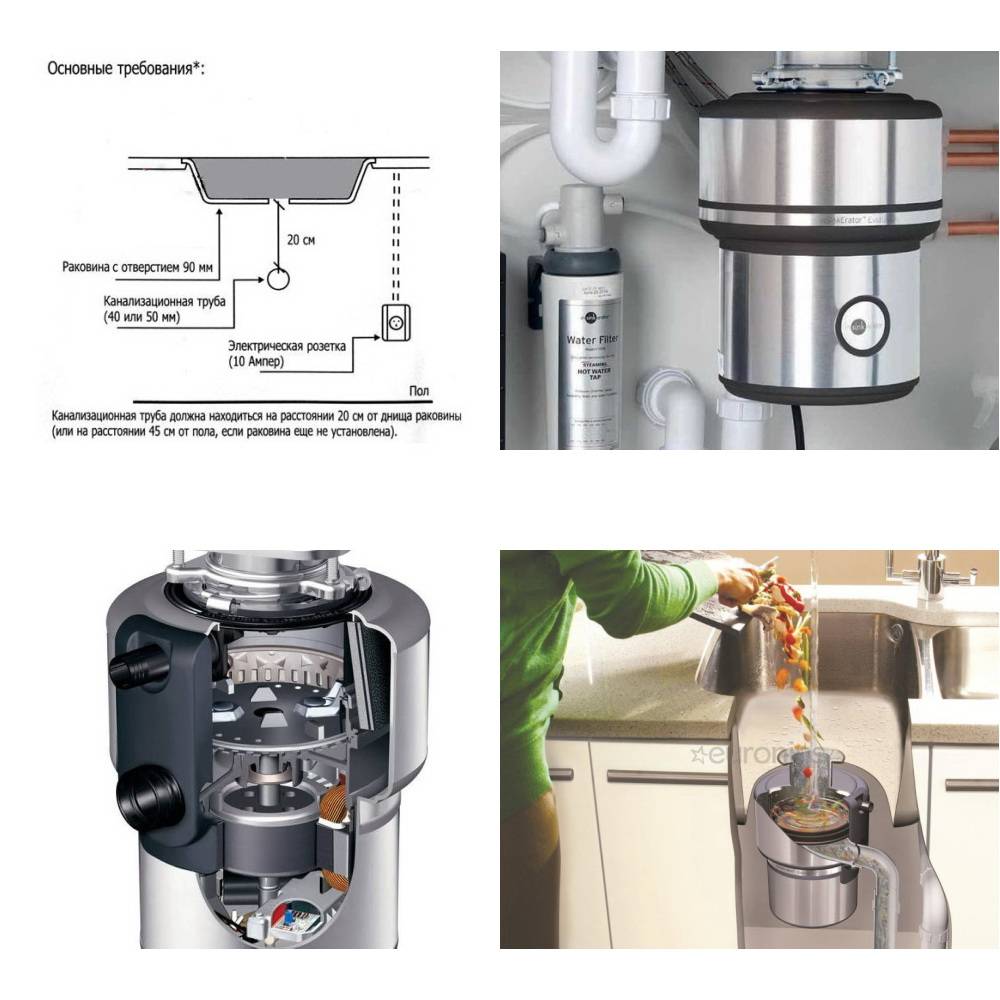
- How to install the grinder yourself
- Preparatory stage
- Installation
- How to install a chopper with your own hands
- Device connection
- 4 Best Sink Food Waste Disposers
- In Sink Erator Evolution 250 - large dispenser with a capacious chamber
- Status Premium 400 - quiet and reliable heat exchanger
- Zorg ZR-75D - inexpensive shredder with good power
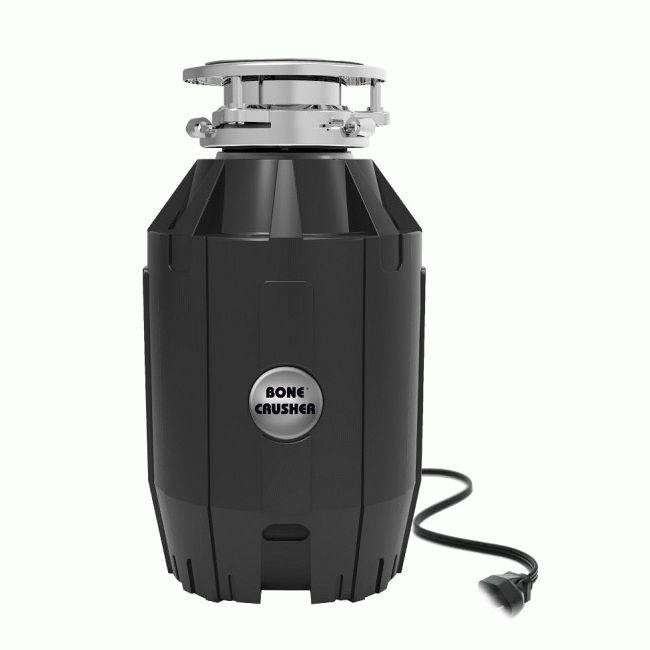
- Bone Crusher 910 Delux - Antimicrobial Speed Disposer
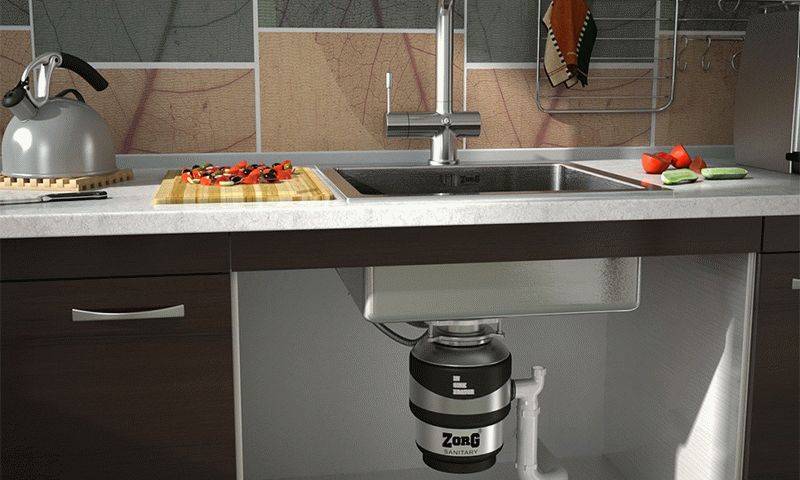
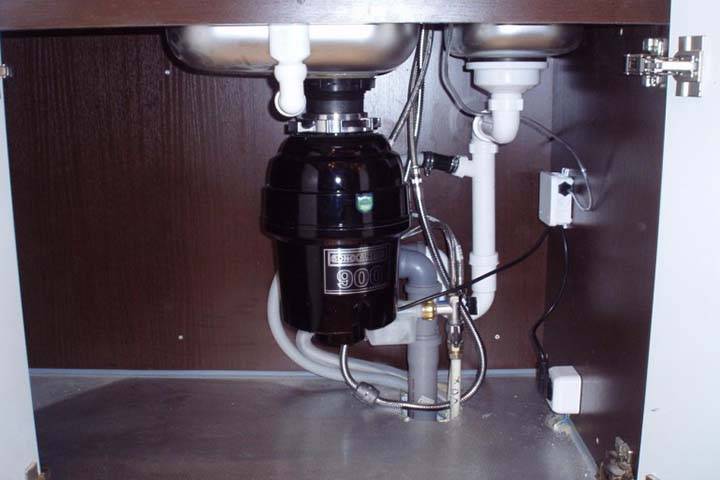
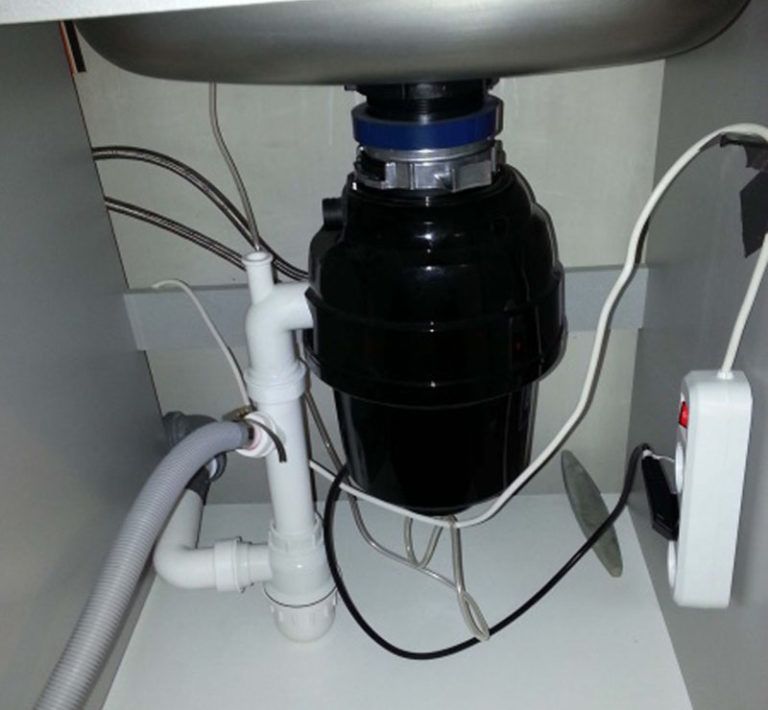
- Self-installation of a food waste disposer
- Important Model Selection Options
- Possible additional features
- How to choose a sink waste disposer?
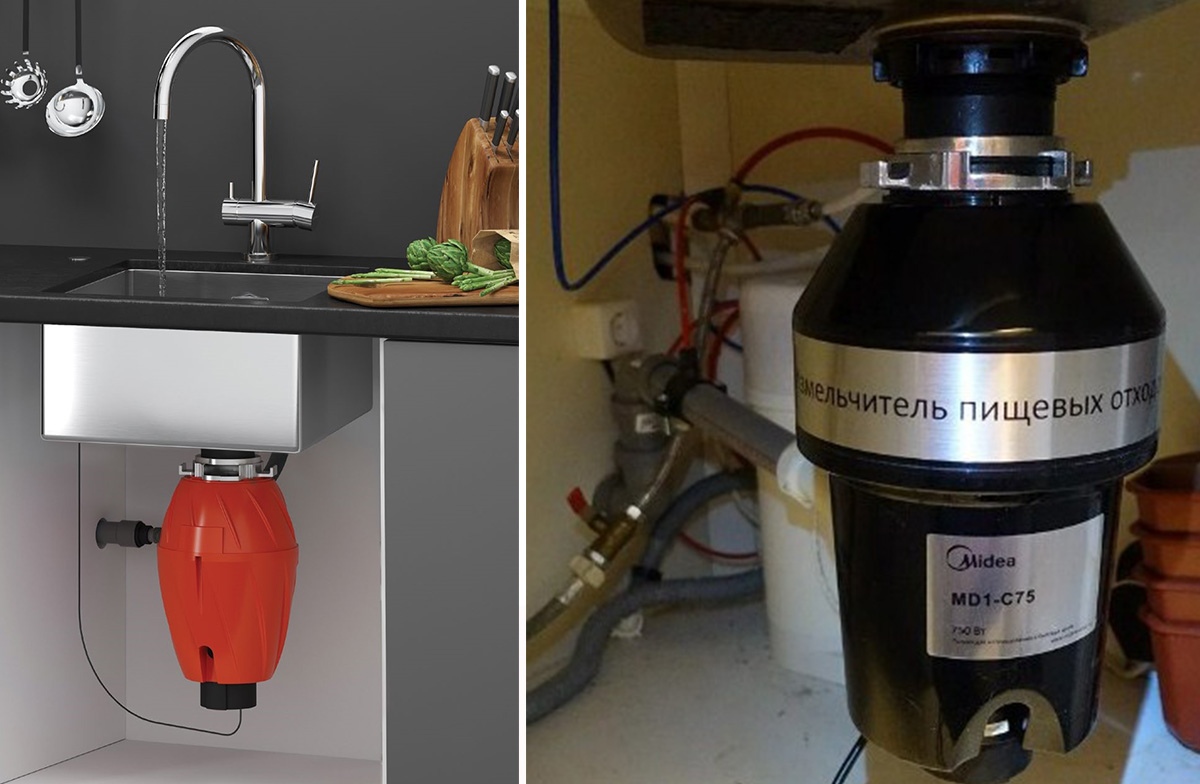
- Sink Waste Disposer
- Tips
Safety Rules for Using a Food Chopper
There is no fundamental algorithm for the correct operation of the device. However, in order to extend its service life and get the maximum effect, it is recommended to follow the following sequence of actions:
- Open the water.
- Turn on the dispenser.
- Rinse the waste down the drain.
- Wait for the cleanups to be recycled. This can usually be determined by the noise emitted by the device.
- After at least 10 sec. turn off the water so that the remaining waste has time to go into the pipe.
The grinder will turn off if something hard, such as cutlery, gets into it. In this case, you should not be afraid, but it is still better to avoid falling metal, glass and plastic objects into the sink. Carefully monitor the packaging of these materials. The device will not be able to grind them and you will have to extract everything manually. In addition, it is undesirable to get into the disposer:
 Make sure that polyethylene does not get into the grinder
- polyethylene;
- rubber;
- thread or rope;
- hair.
These items will either not be able to grind properly and will most likely linger in the drain pipe or will be wound around the motor shaft, making it difficult to work and shortening its “life”. It is also better to avoid large meat bones, large portions of large scales, onion peels, hard paper towels. But chicken bones are even useful for the device - they help clean the crushing disc. Disposer without problems will detail vegetables and fruits, potato peels, herbs, fruit seeds, nuts, watermelon peels and other products or offal, as well as napkins and similar products, cigarette butts.
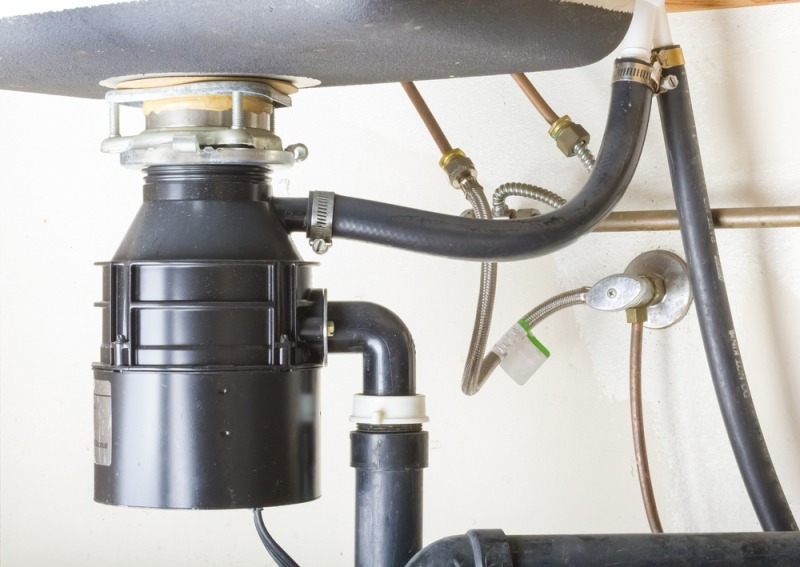
Features of dismantling and minor repairs
The most common problems that owners of the device face:
- the appearance of a leak;
- clogging;
- flywheel failure.
Dismantling and repair work can be carried out without seeking help from a specialist. To do this, you will need a hex key, tweezers and a basin into which water will drain.
@Lowe's
leak
Water that has accumulated under the sink is the first sign of a leak. Trouble can be diagnosed by feeling the main structural elements.If water enters the area of the seal, then it is necessary to tighten the loose bolts. If the leak does not disappear, a complete replacement of the hose or seal will be required.
Flywheel
During a visual inspection, no blockages were found, but the device refuses to work? The reason may be hiding in the flywheel, which has become unusable:
- First of all, the element must be cleaned of contaminants.
- Then, using a hex wrench, loosen the flywheel.
- Re-inspect and thoroughly clean the structure. It is possible that a thread or a piece of polyethylene has been wound around the parts - they should be removed.
- Then you need to remove the fasteners and clean the impellers.
Blockage formation
The most common cause of failure is the accumulation of dirt or the ingress of a foreign object. It can be a large piece of bone, polyethylene, small metal elements.
Troubleshooting: the structure should be carefully inspected and foreign objects removed. Did not work out? Then you need to disconnect the hoses and clean it manually.
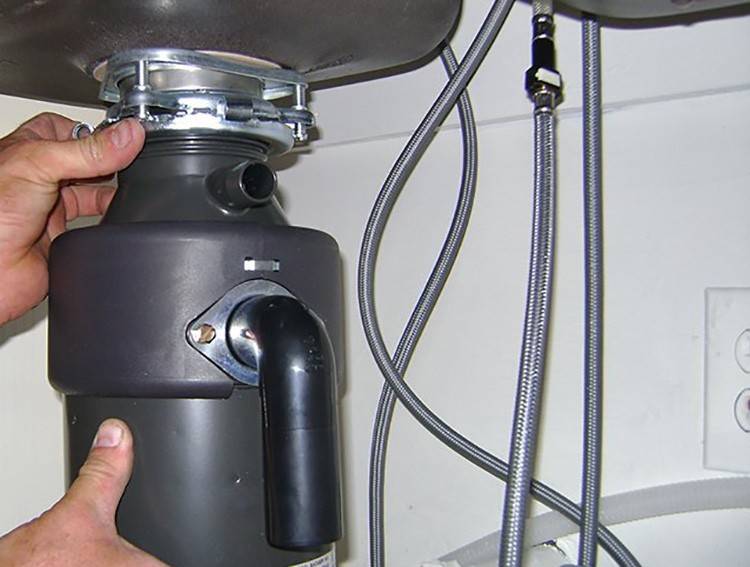
Dismantling
In rare cases, you will need to completely dismantle the device. It could be repair or replacement equipment for new.

@John Moore Services
Stages of work:
- First of all, the device must be disconnected from the power supply.
- Remove everything that is stored under the sink and bring the necessary tools: a hex wrench or pliers.
- With their help, you need to disconnect the drainage pipes, unscrew the fasteners of the device from the bottom of the sink.
- Next, remove the pneumatic switch.
- If it is necessary to make a complete dismantling, then with a screwdriver you need to loosen the bolts of the adjusting ring, remove the retaining ring, and then remove the structure from the drain hole.
As you can see, the installation and maintenance process is not difficult. The work does not take much time, effort and the purchase of special tools. By installing such a useful device as a disposer, you can forever forget about the need to sort waste and store cleaning and other household waste under plumbing.
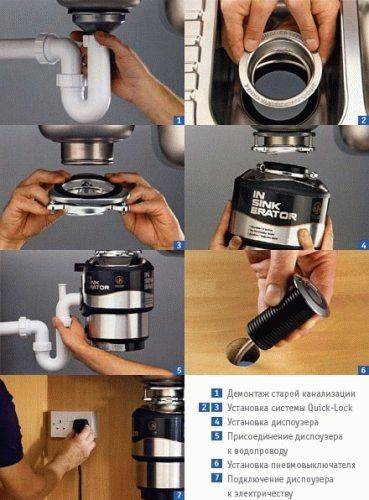
How to install the grinder yourself
To install a chopper with your own hands, you must:
- prepare all components and tools for the job;
- install the device in accordance with the attached diagram.
Preparatory stage
To install a kitchen grinder under the sink, you will need to prepare:
- the equipment itself;
- flanges for connection of the utilizer with a sink and a sewer pipe;
- sealing rings for connections;
- exhaust outlet;
- pneumatic hose and pneumatic button, if the selected chopper model has a built-in switch.
As a rule, all of the listed design elements are included in the chopper kit. Therefore, when buying equipment, it is necessary to check not only its performance, but also the complete set.
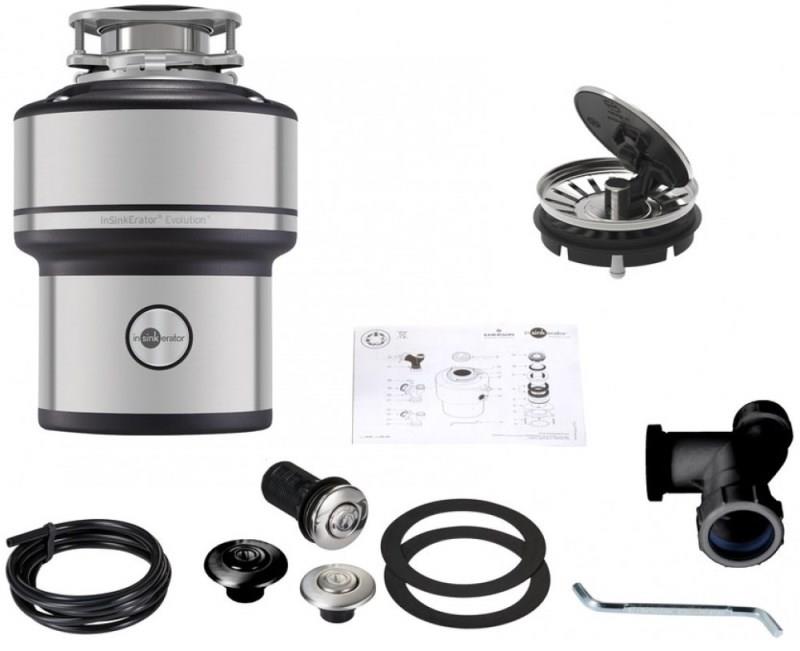
Set of elements for mounting the chopper
Additionally you will need:
socket with grounding for safe use of equipment in conditions of high humidity;
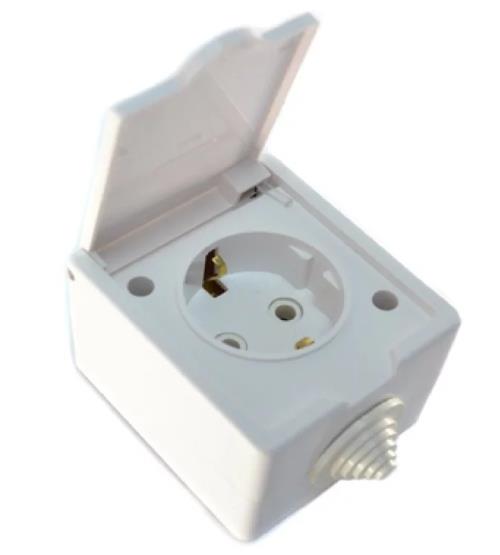
Dedicated socket for safe connection of electrical equipment
- wires for connecting the socket;
- adapters for connecting the utilizer to the sewer system, if the elements included in the equipment kit are not enough.
Of the tools you may need:
- spanners;
- screwdrivers;
- drill, screwdriver for fixing equipment.
Installation
The grinder is installed in the following order:
- electricity is supplied to the place of installation of kitchen equipment and a socket is installed;
- the sewer pipe is disconnected from the kitchen sink. Before performing the next stage of work, it is necessary to clean the pipe and all connecting elements in this unit;
- a sealing gasket is installed at the place of connection of the utilizer to the sink;
- equipment is attached to the sink;

Connection of the utilizer to the kitchen sink
- an outlet pipe is inserted into the outlet of the grinder;
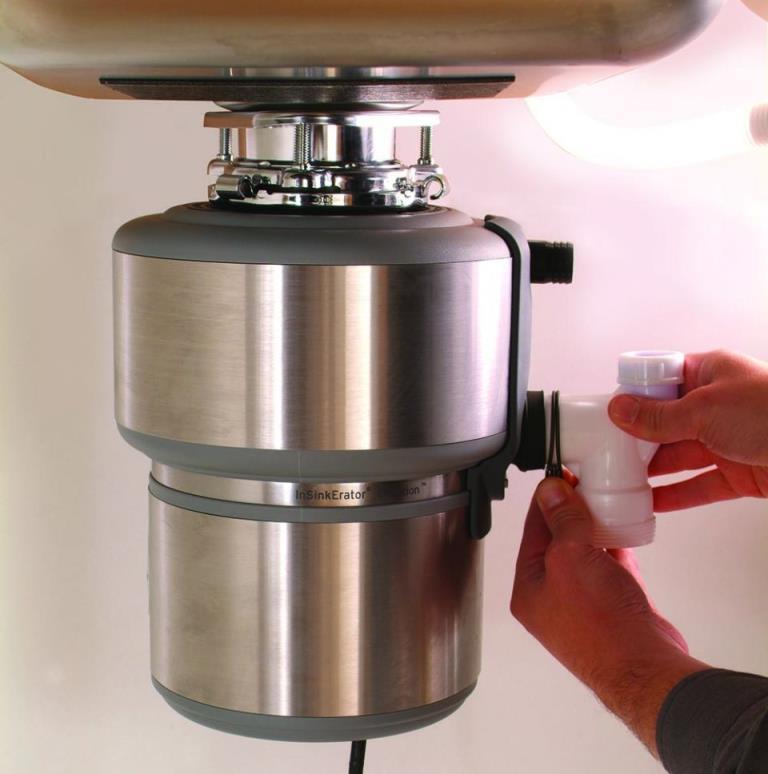
Installing an outlet pipe for connection to the sewer
- the outlet pipe of the equipment is connected to the sewer pipe with the help of various adapters. All pipe joints must be sealed with O-rings;
Connecting equipment to the sewerage system
Additional adapters, if necessary, are recommended to be purchased made of smooth pipes. When using corrugated pipes, food waste residues can settle on the walls, which will lead to the formation of an unpleasant odor.


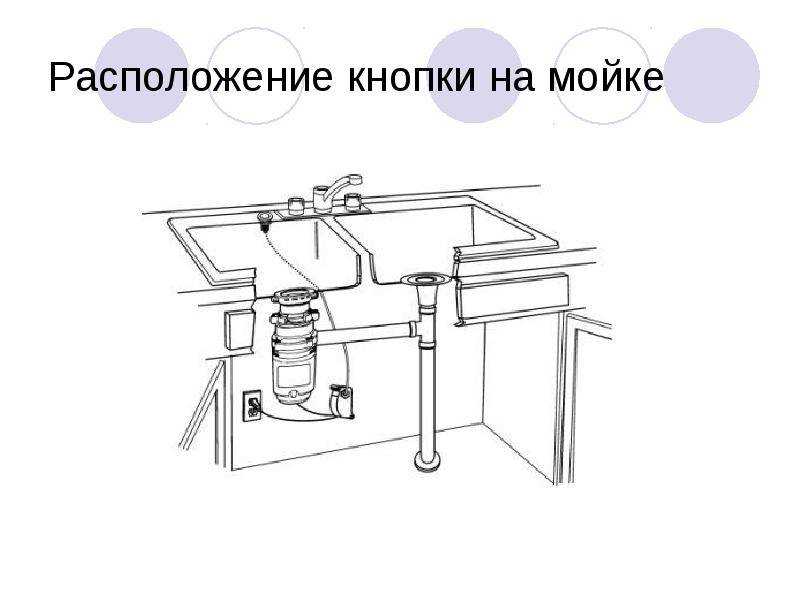
- an electrical switch is installed. For ease of use, it is recommended to bring the device on button to the surface next to the sink.
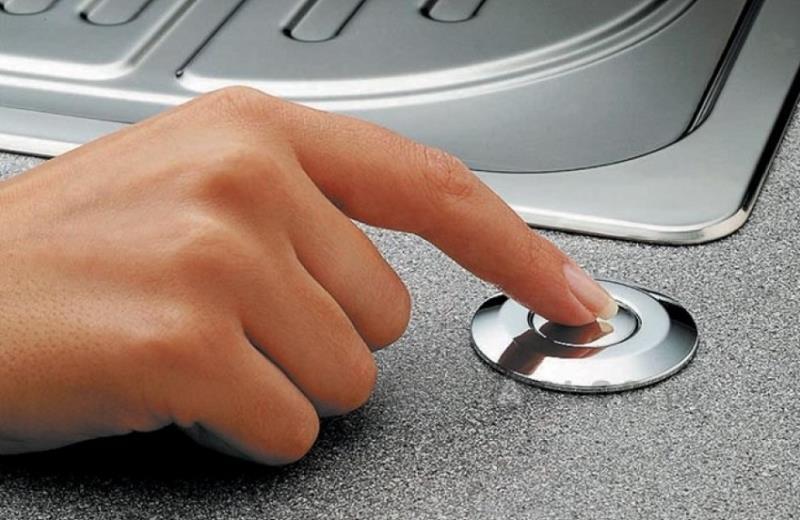
The most optimal location of the button to turn on the chopper
The process of self-installation of the chopper is presented in detail in the video.
For trouble-free operation of the equipment for a long time, it is necessary to regularly 2-3 times a year completely clean the utilizer with lemon juice, soda solution, pieces of ice or other non-abrasive substances.
How to install a chopper with your own hands
Before installing the dispenser, you should carefully study the instructions, as well as check with the complete set of the device. Most likely, you will have to additionally purchase some elements to connect it.
First of all, rigid elbow siphons with smooth walls are needed, since ordinary bottle siphons with corrugated outlets will accumulate remnants of processed food waste. As a result, the disposer will no longer empty effectively, which will lead to the appearance of unpleasant odors and blockage of the sewer.
It may also be necessary to replace the sink, since in order to connect the food waste disposer, its drain hole must correspond to Ø 90 mm. To increase the hole to the required size, you must contact a specialist, or upgrade on your own.
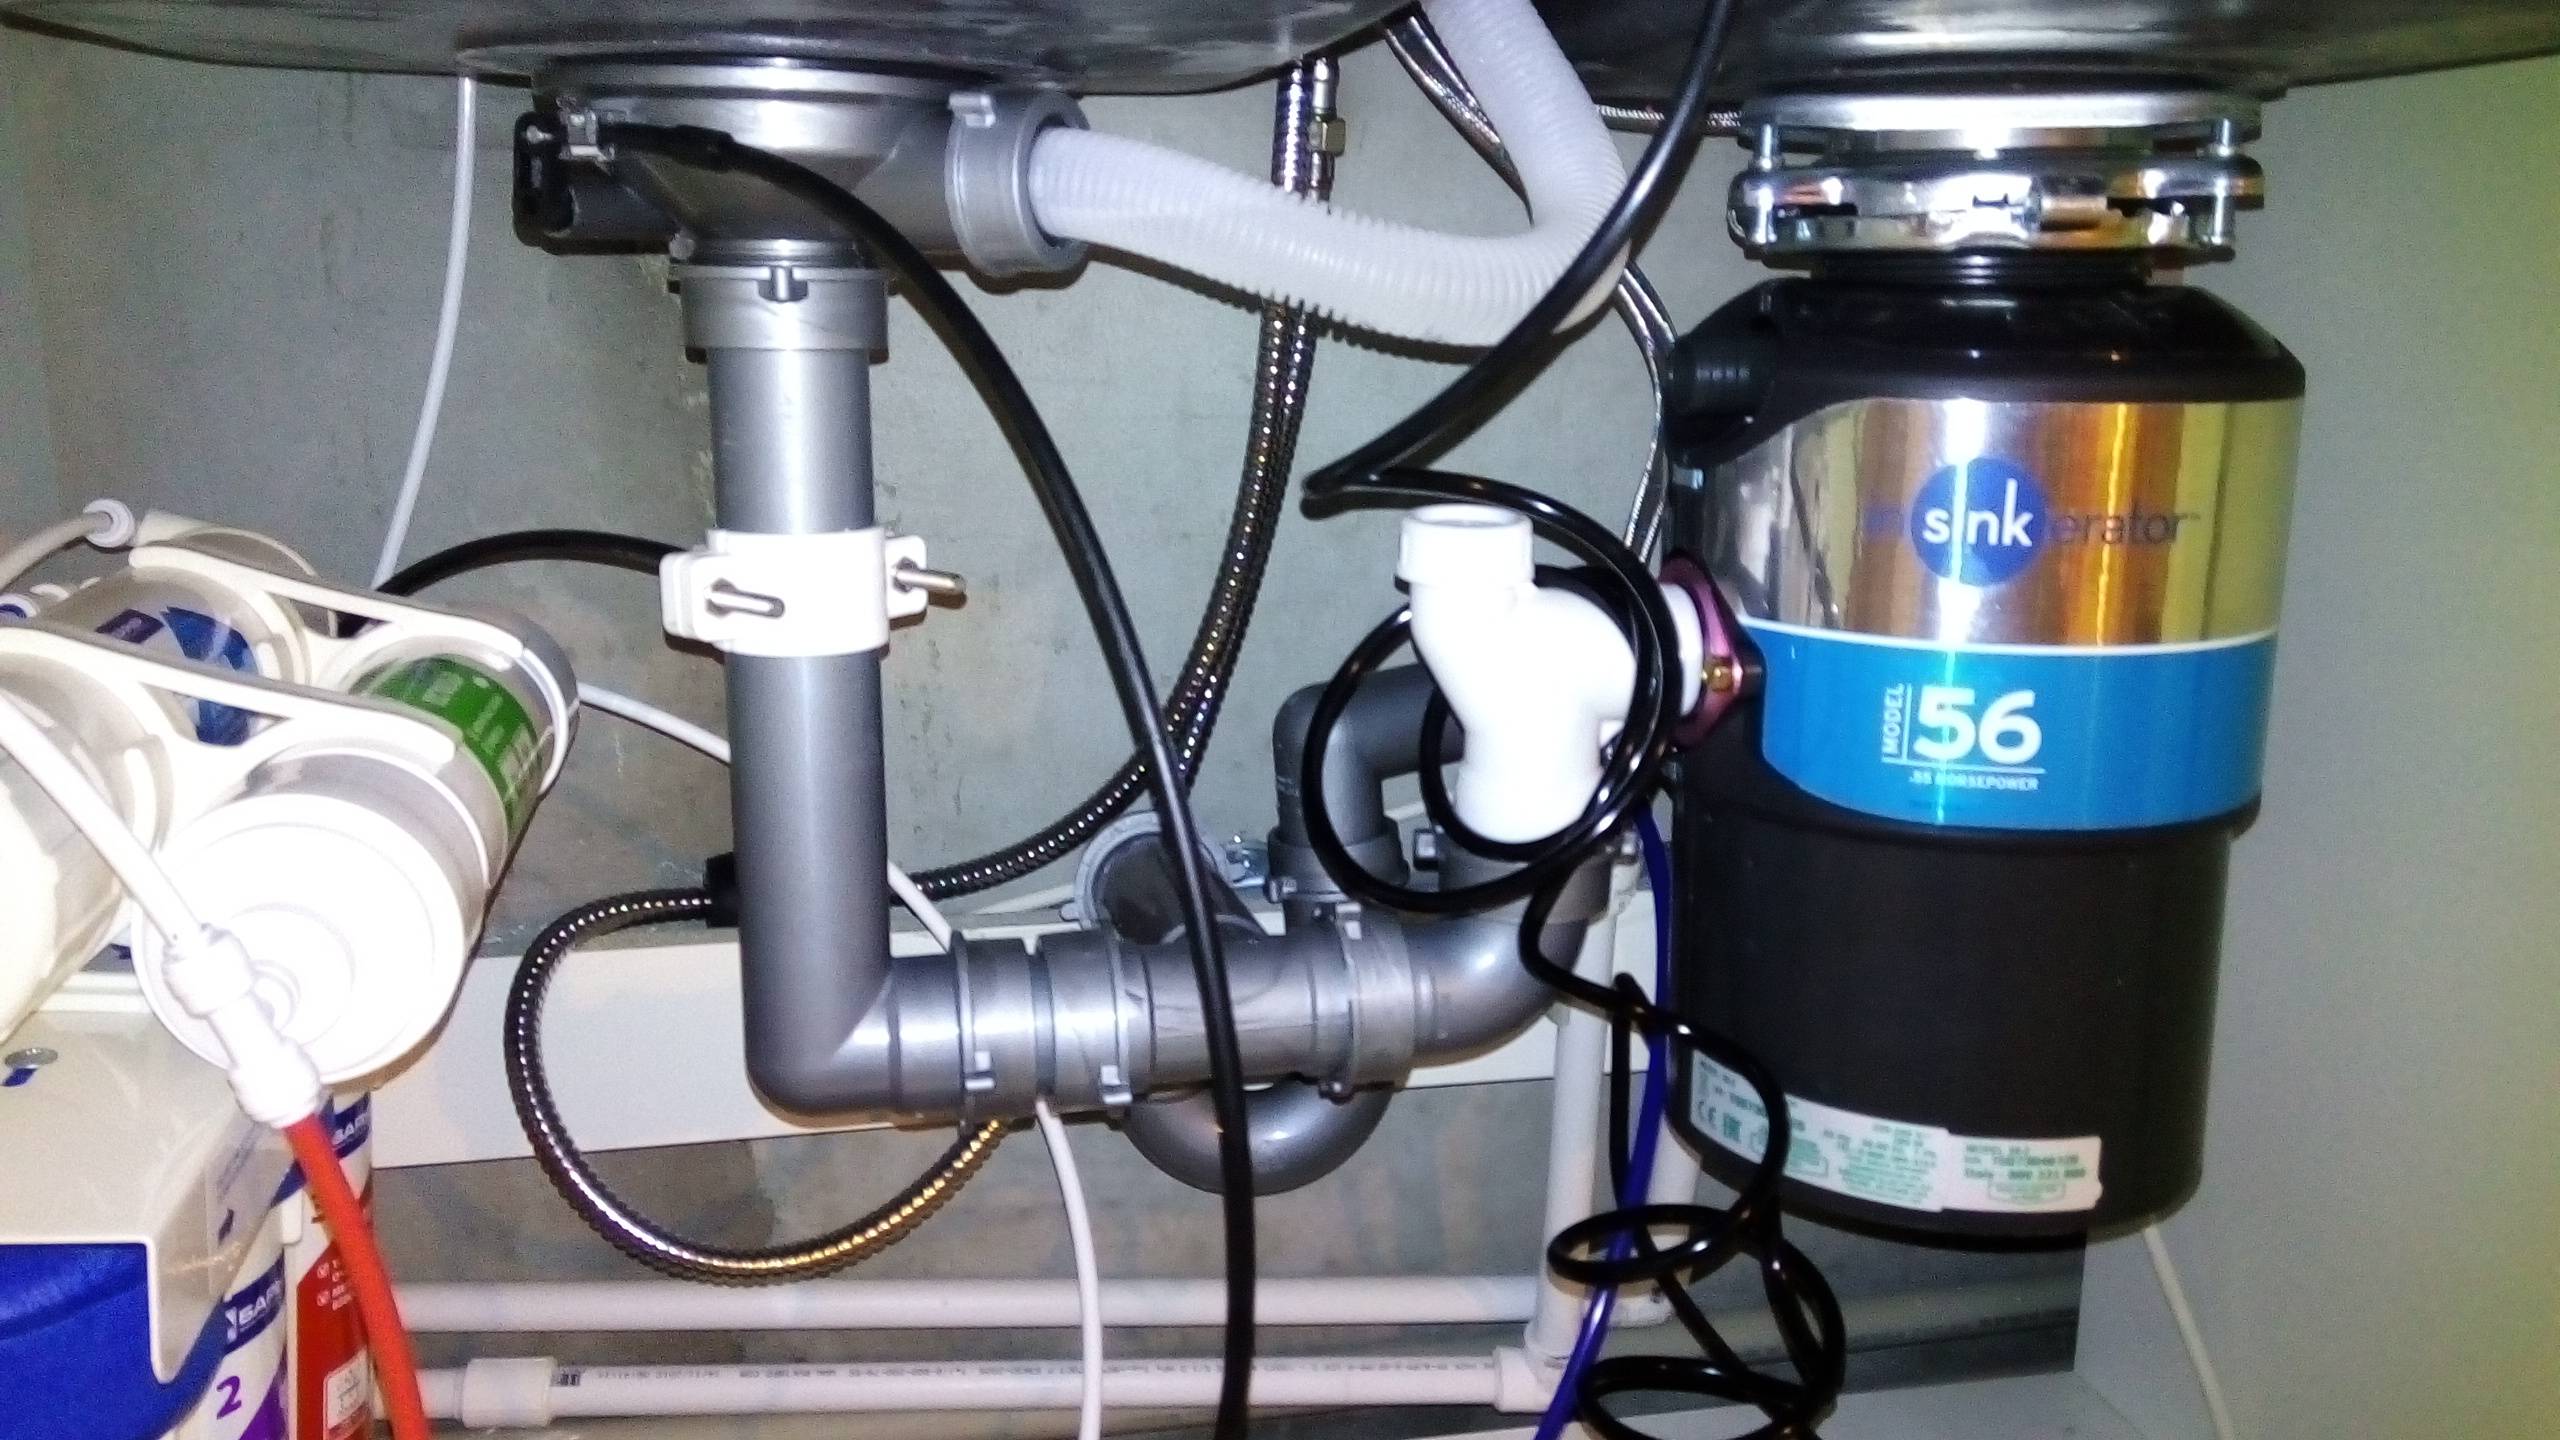
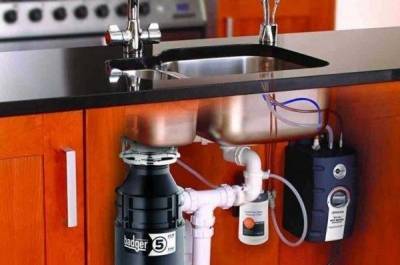
Device connection
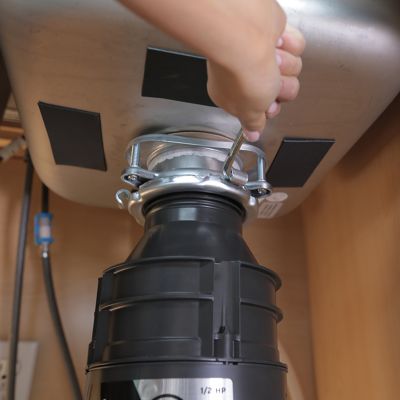
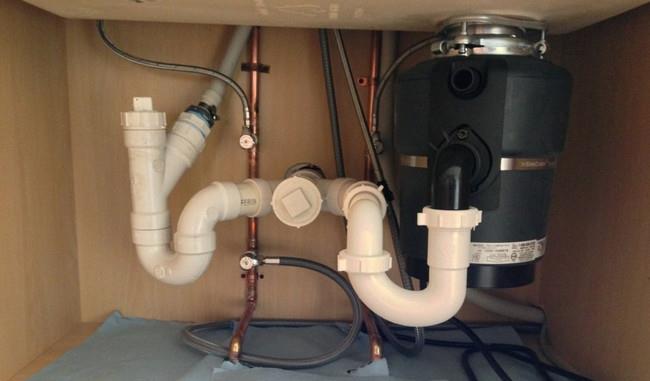
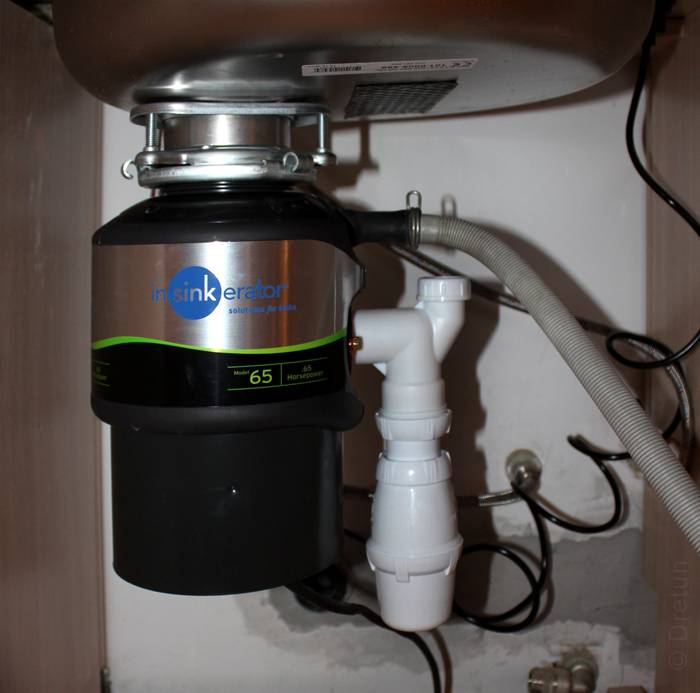
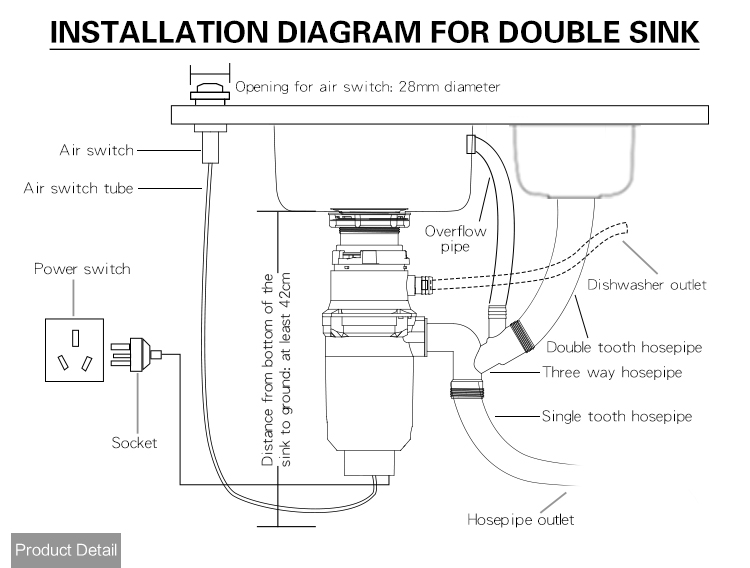
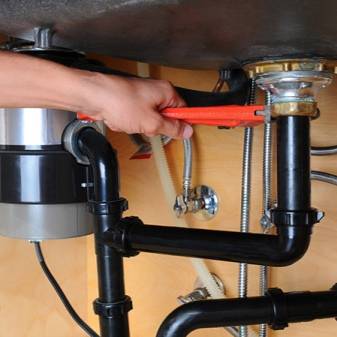
Installing the disposer begins with disconnecting the siphon and drain pipe from the sink. After, it is necessary to carefully clean the drain hole from contamination and food waste residues. Further:
- A new drain pipe (device neck) with a rubber seal is inserted into the opening of the sink from above. A lock nut is screwed onto it under the bottom of the sanitary bowl and attracted. The tightening must be secure to avoid leaks.
- On the branch pipe, in its annular groove, a compensating rubber band with a Quick-Lock lock is mounted, to which the body of the utilizer is connected and snapped into place. The lock-latch can also be part of an adapter block fixed on the neck and pressed against the bottom of the sink by tightening the crimp screws. That is, regardless of the installation scheme of the neck of the device, it is connected to it through a quick-release latch.
- The grinder is connected to the sewer through a U-shaped siphon. It can be included in the kit, as well as fasteners made of plastic and rubber parts, as well as steel clamping rings. However, some dispenser models go on sale without such kits.
- If the kitchen is equipped with a dishwasher, then its drain can also be connected to the chopper through a special hole. It is closed with a plug, which, if necessary, can be easily removed with a screwdriver.
- After assembling the siphon and draining the pipes into the sewer, the equipment and communications should be checked for water leaks. First, you need to simply drain the water in the usual way for some time, and then carry out a volley discharge from the sink filled to overflow. In both cases, the connections are carefully examined, if they are dry, then the device is allowed to be connected to the mains.
- When all electrical installation work is completed (installation of the kitchen grinder socket, installation of a pneumatic switch, etc.), a final check is carried out with the start-up of the device.
4 Best Sink Food Waste Disposers
Decided to get rid of nasty smells from the trash can and put a disposer in the kitchen? Then get acquainted: the best food waste disposers for mounting under the sink. In this review, we will look at the most powerful and efficient models of household utilizers that grind both vegetable peelings and small bones with equal ease.
In Sink Erator Evolution 250 - large dispenser with a capacious chamber
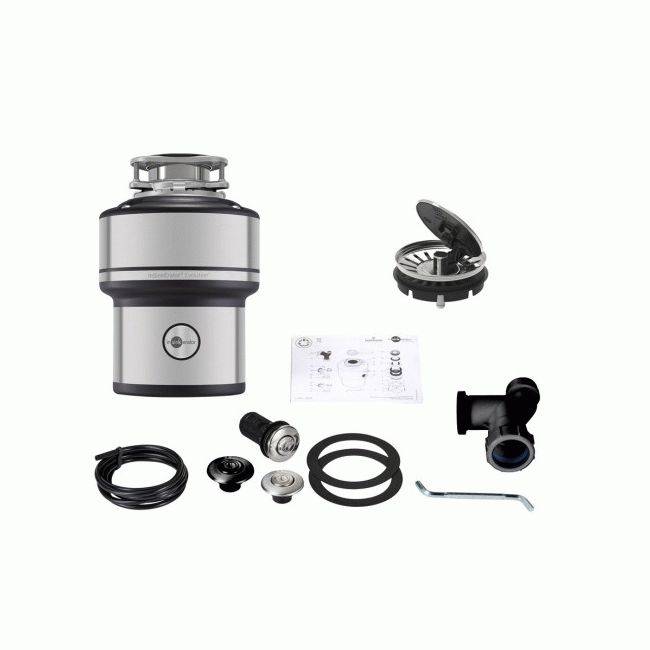
This utilizer easily deals not only with soft cleanings, but also with fish bones, nut shells, fruit seeds.
The grinder has a chamber size increased to 23 cm (volume 1.18 l) and runs at a good speed of 1425 rpm. The model comes with a button and two trims finished in chrome and stainless steel - you can choose the option that best suits the design of the kitchen.
- Efficient three-stage grinding turns any waste into a fine slurry.
- Quiet, but powerful induction motor, plus good sound insulation.
- All major components are made of stainless steel.
- When hard waste enters the neck, the machine automatically increases the torque.
- Reverse function and overload protection in case something gets stuck inside.
- Excellent equipment: there is a protective curtain, and a grate for the drain hole, as well as all the necessary mounting hardware and seals.
- Can be installed on sinks made of stone and composite thanks to vibration damping pads.
- Extension of the warranty period up to 8 years.
- Large weight - almost 12 kg.
- Very expensive (29-30 thousand rubles).
- The pneumatic button here is rather weak and may soon require repair or replacement.
Status Premium 400 - quiet and reliable heat exchanger
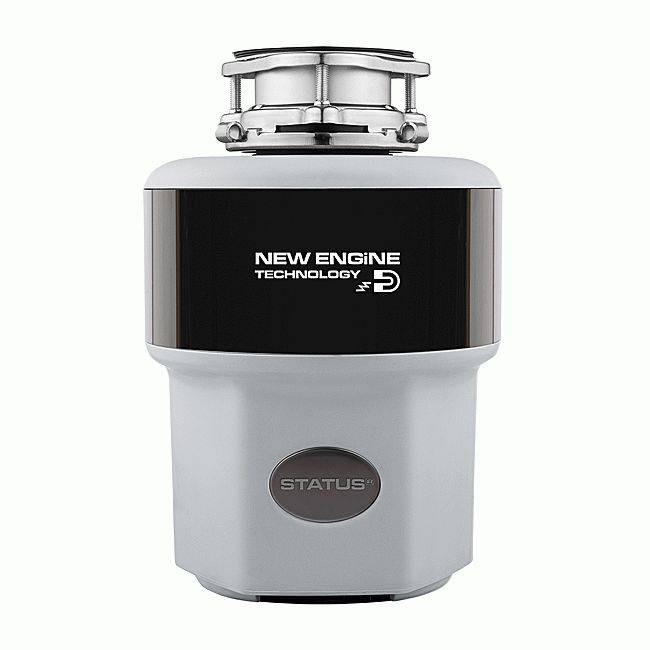
Another rather big disposer with a width of 22.5 cm has a capacious chamber of 1.2 liters. The utilizer develops a good rotation speed of 1480 rpm and easily copes even with small bones.
Despite these characteristics, it runs even quieter than the previous model thanks to the brushless motor. Such a solution simultaneously increases the resource of the motor and provides the chopper with a long service life.
- Stainless steel chamber.
- Three-stage grinding.
- Automatic reduction of speed in the absence of waste and complete shutdown after 8 minutes of "idle" work.
- The working bodies change the direction of rotation at each start - their wear occurs more evenly and without disturbing the balance.
- Full set of engine protections (against overload, jamming and overheating).
- Soundproofing in the grinding chamber, which made it possible to reduce the overall noise of the operating disposer to a comfortable 45 dB.
- 5 years warranty.
A rather large cost - 25 thousand rubles.
Zorg ZR-75D - inexpensive shredder with good power
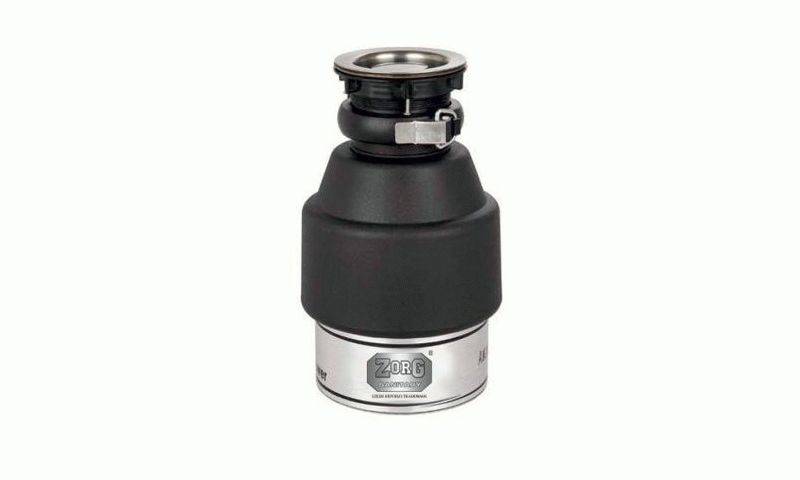
The powerful 750-watt disposer with a high speed of 2600 rpm and noise reduction is able to quickly grind any leftover dinner (unless you send large bones down the drain).
The model from the Czech manufacturer turned out to be compact, but roomy - the useful volume of the crushing chamber is 1.07 liters with a relatively small width of 19 mm.
- Sufficient space for a family of 3-4 people.
- Reliable and durable stainless steel components.
- Built-in motor overload protection.
- Possibility of inclusion from the DU panel.
- Relatively light weight 5.6 kg.
- Three year warranty.
- Low price compared to other models - 11-13 thousand rubles.
- Double drain, and for the second outlet there is not even a plug in the kit, which can seriously complicate installation.
- The declared noise reduction is not a full-fledged sound insulation, and a working dispenser will still be audible (50-60 dB).
- Composite tank.
Bone Crusher 910 Delux - Antimicrobial Speed Disposer
This model has the highest rotation speed - 2700 rpm, instantly cracking down on a large amount of waste.
The main mechanisms here are made of stainless steel, but the crushing chamber is made of more fragile polycarbonate, which may not have the best effect on the service life of the utilizer.
- The patented Bio Shield technology prevents bacteria from multiplying inside the dispenser.
- Minimum noise and vibration during operation due to ultra-precise balancing mechanisms.
- The magnetic ring keeps the cutlery from falling into the chopper.
- Weight slightly less than 7 kg.
- The kit comes with a universal pusher that can be used both as a plate scraper and as a plug for the dispenser hole.
- Five-year manufacturer's warranty.
- The price is 26 thousand.
- The presence of not too reliable polymer nodes.
Self-installation of a food waste disposer
As a matter of fact, installing a dispenser is a simple matter. Especially if the device was chosen in strict accordance with the above tips, and the consultants of the household appliances store recommended the optimal volume of the chopper working tank.
If the dispenser is electric, it will be necessary to bring electricity directly under the kitchen sink. And here it will not do with an ordinary conductor, it is precisely an isolated current supply system that is needed.


Important: a smooth-walled siphon is required to connect the disposer drain pipe to the sewer. Bottled is absolutely not suitable
The corrugated siphon is also not recommended for installation, since it does not have the necessary rigidity, so it can become clogged at any time in the “knee” area.
In the countertop or directly in the sink, you need to make a hole for the pneumatic button, and then process it with silicone.And for the correct operation of such a button, it is required to cut the pneumatic hose to the desired length.
Fastening type Quik Lock equals strictly horizontally (and without distortions).
When carrying out the dispenser installation, it is necessary to act according to the following step-by-step instructions:
- Dismantle the water seal.
- Remove washer outlet.
- Disassemble the dispenser neck.
- Install the chopper neck on the sink.
- Connect the neck to the dispenser and secure the resulting connection.
- Connect the nozzle to the grinder.
- Connect the water trap first to the dispenser, and then to the sewer drain.
- Install a pneumatic switch-button on the countertop (or directly on the sink).
- Connect the pneumatic hose to the grinder.
- And plug the installed dispenser into the outlet.
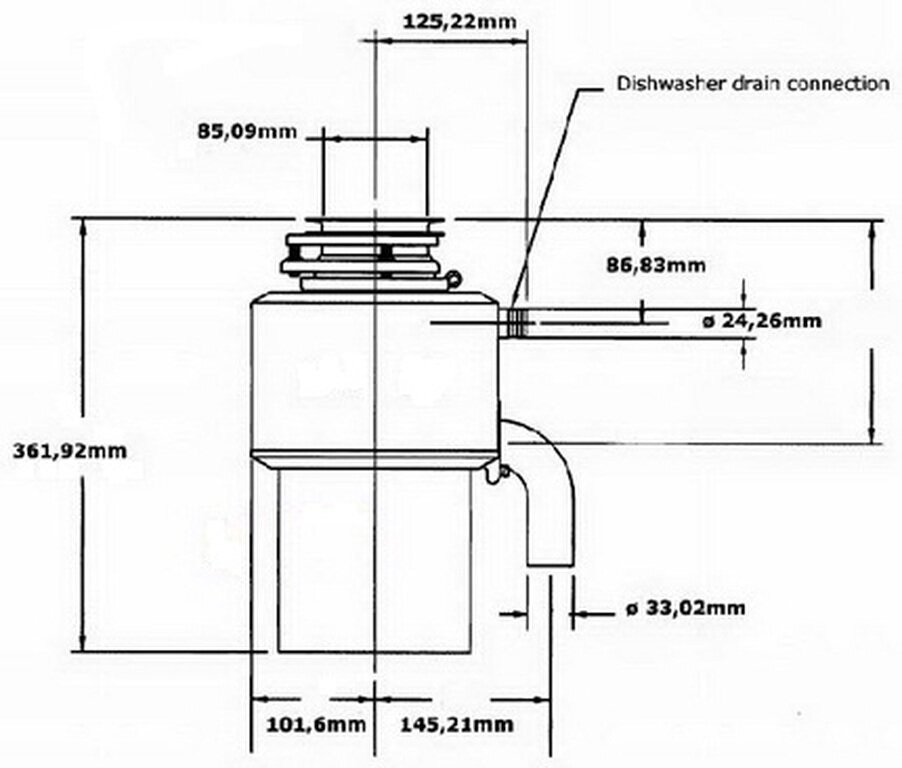
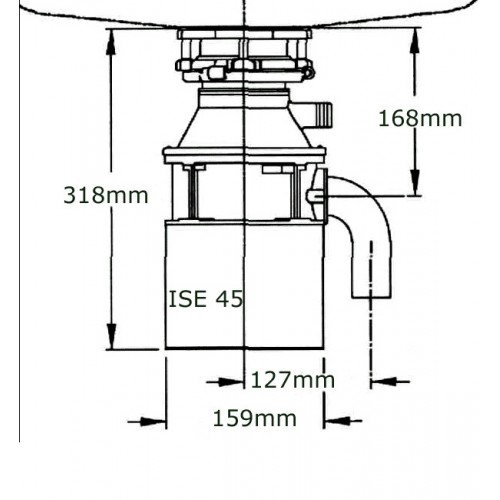
However, before proceeding directly to the installation, it is necessary to check the parameters of the mounted equipment. Checked:
- Disposer height.
- Distance from the bottom of the sink to the center line of the drain. Then it will be necessary to add a dozen millimeters to the result obtained, if we are talking about a metal sink.
- The distance from the drain hole center line to the very end of the nozzle.
- The width of the installed dispenser.
- Distance from the center line of the instrument (vertically) to the center line of the filter connection.
To organize the drain and prevent water accumulation in the working chamber of the grinder, the level of the drain pipe is lowered towards the wall, starting from the instrument outlet.
Important Model Selection Options
When deciding whether to purchase a useful kitchen appliance, you should pay attention to the following characteristics of the model:
Dimensions, shape.The parameters of the chopper are important for its installation in a certain place in the kitchen. In some cases, the shape of the model may also have some influence.
When choosing a model, you should pay attention to its dimensions: it must match the compartment where it is planned to be placed, as well as the dimensions of the sink and drain
Power. The indicator is important for electric disposers, since it depends on it what types of garbage the utilizer will process, as well as the speed of its operation.
It is important to remember that especially powerful shredders (from 1300 W) consume a large amount of electricity. For a family of 4, it is enough that the device has a power of 550-1200 W
Rotational speed. This characteristic is important for electric shredders, in which it is incorporated into the design. For mechanical models, the rotation speed depends solely on the pressure of the water.
The volume of the chamber for crushing waste. The size of the capacity is largely determined by the needs of a particular family. For two people, a small tank is fine, while a large family needs larger options.
When buying a large tank, it is important to ensure that it fits under the sink. It is also important to consider that cells that are too small have a hard time handling a lot of waste, which can cause them to become clogged.
The use of stainless steel. Parts made of this durable and reliable material do not corrode.
Thanks to the steel elements, the devices can function in difficult conditions. The best option is a model made exclusively of stainless steel, which, however, affects the cost.
To reduce costs, some manufacturers use this material to finish the inner surface or individual parts of the dispenser.
When choosing such a model, it is important to ensure that elements made of other materials are coated with an anti-corrosion coating.
Not bad if the model will have such features as:
- automatic protection system against overloads, voltage surges in the network, ingress of foreign objects;
- the possibility of reverse rotation of the disk;
- the presence of several speeds for setting various operating modes;
- reinforcement in the drain shale, which guarantees reliable operation with no leakage;
- the ability to connect to the filter;
- the availability of spare parts (some manufacturers add them to the kit) and the availability of service centers where repairs can be made.
Although these factors usually affect the cost of the product, they can significantly improve the quality of work.
Possible additional features
Many manufacturers equip their products with a number of additional features. The most common include:
Silver Guard is a protective system that prevents accidental contact with spoons, forks and other metal objects, which allows you to extend the life of the dispenser.
Bio Shield is a technology that prevents the development of microorganisms, as well as suppresses possible unpleasant odors.
Torque Master - laser balancing of the moving elements of the electric dispenser mechanism. The system allows you to increase the number of revolutions and smoothness, which improves noise isolation during operation of the device and reduces its vibration.


Master Mounting System - a well-thought-out design of the device, thanks to which even a novice master will be able to install or dismantle the grinder.
The dispenser package may also include a variety of nozzles that are used to process various types of household waste.
A number of models of modern utilizers also include additional pushers that facilitate operation and improve work efficiency.
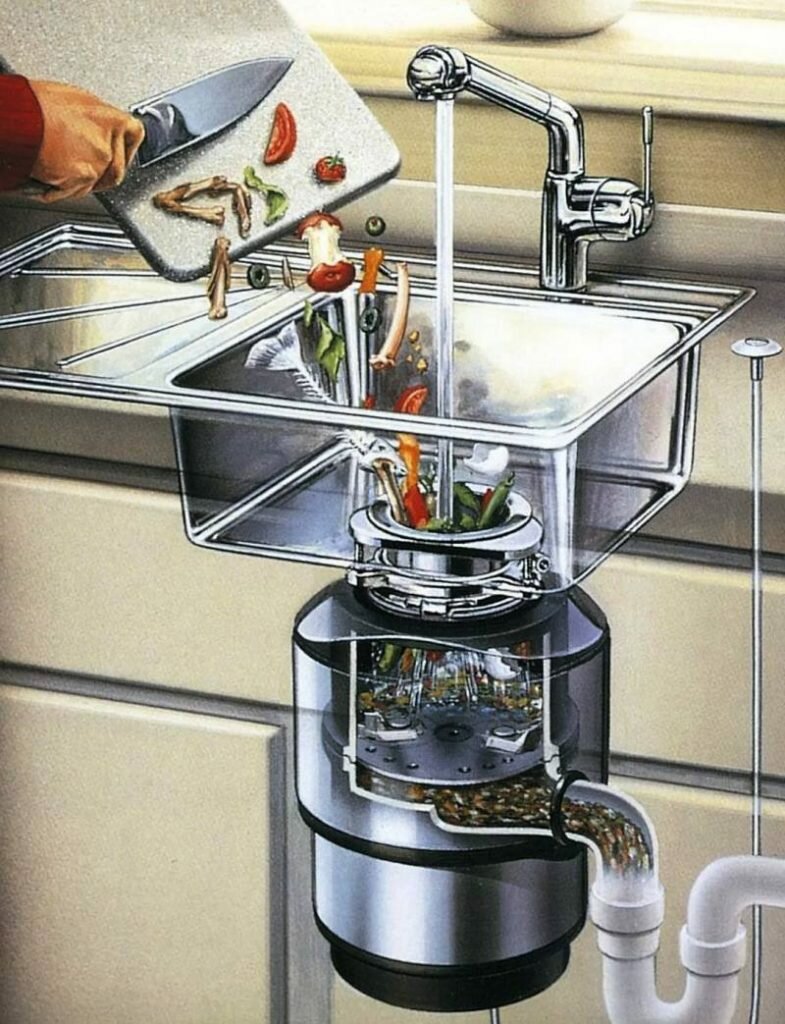
How to choose a sink waste disposer?
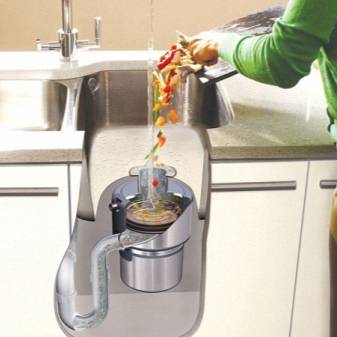
In most cases, cooking is accompanied by the appearance of food waste that needs to be disposed of. Today, the trash can has been replaced by modern equipment that can grind and send waste along with domestic waste into the sewer system.
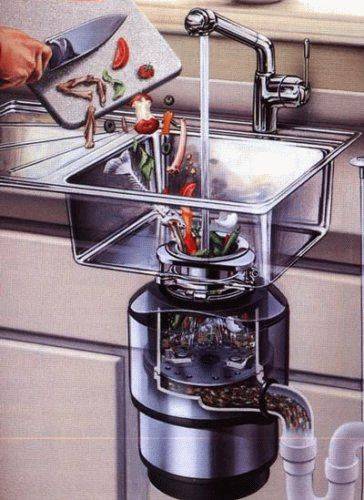
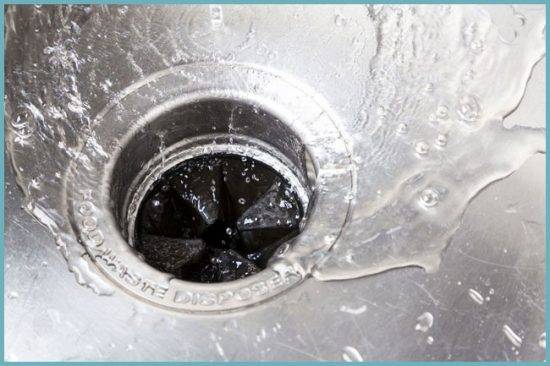
The recycling device will quickly and easily cope with fruits and vegetables, small fish and chicken bones, watermelon peels, paper napkins and towels, seeds, egg shells, bread crumbs, etc. With the advent of a chopper or, as it is also called, a disposer in the kitchen for the sink, the hygiene of the room increases significantly, unpleasant odors disappear. At the same time, there is no risk of clogging of sewer pipes, because the utilizer grinds waste to particles measuring 3 millimeters in diameter.
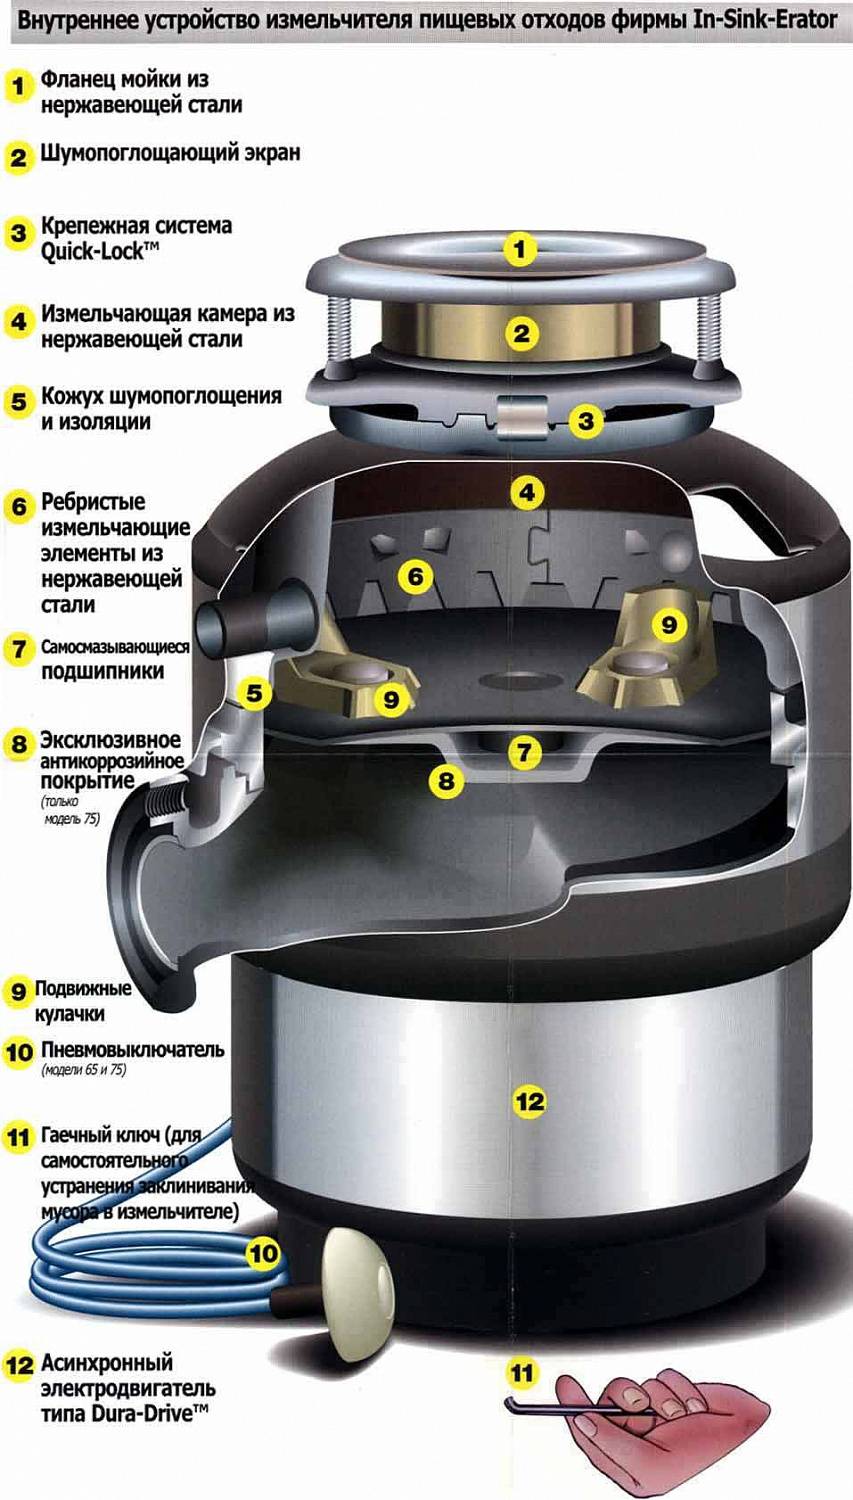
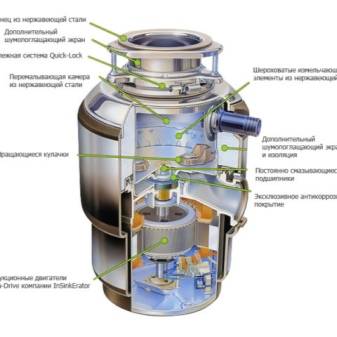
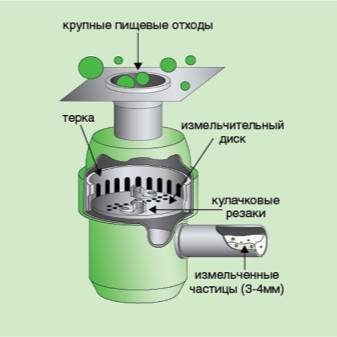
Sink Waste Disposer
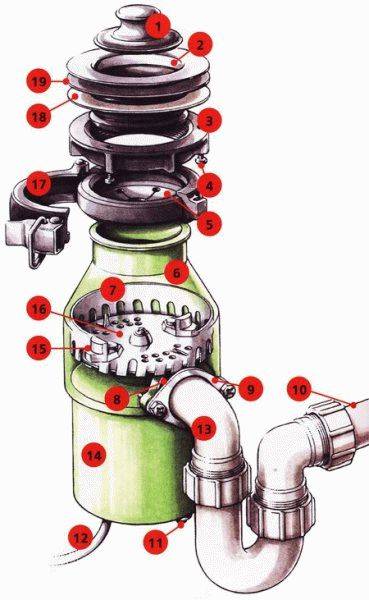
where 1 is a plug, 2 is a drain funnel, 3 is a fixing nut for draining, 4 is a locking screw, 5 is a splash guard, 6 is a working tank, 7 is a knife, 8 is an outlet gasket, 9 is a pressure pad, 10 - drain pipe, 11 - return button, 12 - electric cord, 13 - outlet fitting, 14 engine housing, 15 - rotary cam cutter, 16 - disk, 17 - clamp, 18 - fiber gasket, 19 - rubber gasket.
Today you can buy both electrical and mechanical devices. Mechanical devices are equipped with cutting blades, with the help of which fibrous and hard waste is crushed, clogging of the sewage system is prevented.
Varieties of electronic waste shredders:
- with continuous loading. The principle of operation of the device is as follows - first the utilizer itself is turned on and only then waste is loaded into it;
- with portion loading of waste. First, a portion of food waste is placed in the working chamber, after which the equipment is turned on.
As far as the cost of using a kitchen recycler, it will cost you no more than running a 100W light bulb. At the same time, it is worth noting the indisputable advantage that the disposer can provide you with - cleaning the walls of sewer pipes from greasy deposits. And this suggests that it will be possible to save on cleaning the sewer system.
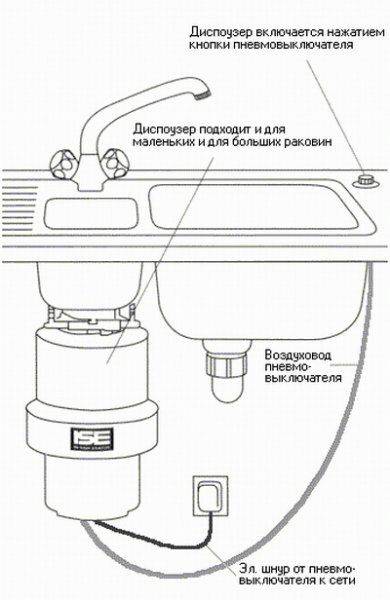
The principle of operation of the device
The dispenser is extremely easy to use. Consider the principle of operation of the device on the example of a utilizer with continuous loading.All that is required of you is to turn on cold water, press the device button, throw waste into the drain hole of the sink and, after the sound of the engine running “idle”, turn off the device. Next, you need to flush the sewer for 10 seconds and you can repeat the operation again.
It is not recommended to load large bones, onion husks, corn cobs, polyethylene products, threads into the garbage chopper located in the sink.
If prohibited waste enters the appliance, protective device will operate, which will disable it. In this case, only the master will be able to return the device to working condition.
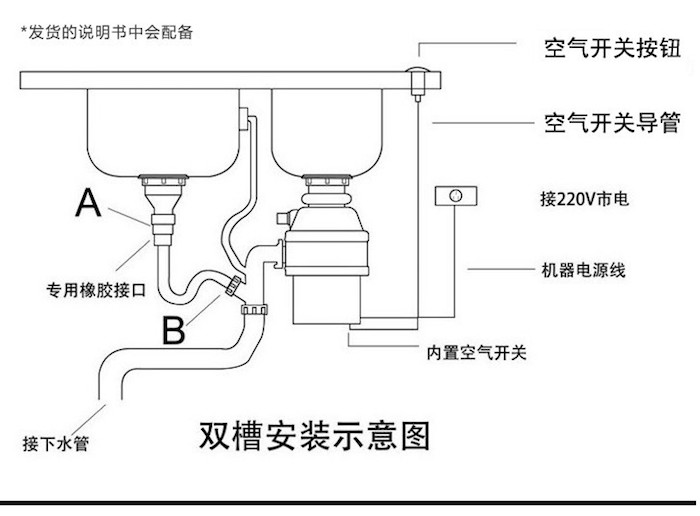
Installing the grinder in the sink - the main steps
- We turn off the water and disconnect the sewer pipes from the sink.
- We place a rubber gasket on the flange.
- We connect the chopper mount to the sink and then connect the device itself.
- We connect one end of the drain pipe to the dispenser, the other to the sewer pipe. We connect the electrical cord to the outlet (the outlet must be grounded). Some dispenser manufacturers recommend using a separate line.
- We test the equipment. We turn on the cold water and press the button, put the waste in the sink and make sure that the device is working correctly.
There are models of waste disposal for the sink, the design of which does not provide a separate switch. They are designed for batch loading. After the tank is filled with waste, the neck cap is turned. This cover is inserted into the drain hole of the sink and acts as a switch.
Tips
The long operation of the dispenser depends not only on the quality of the factory assembly, but also on the correct installation, operating conditions, regular maintenance, and breakdown prevention. It does not matter whether appliances are installed in undermounted sinks or on sinks glued into the countertops.
Safety precautions when using household waste disposers:
-
control the operation of the dispenser from turning it on to turning it off if children have access to the device;
-
do not use the sink for extraneous purposes, such as washing your hair;
-
do not put hands, table utensils inside the grinding chamber;
-
push waste only with the help of special devices;
-
when worn, replace the spreader;
-
do not store flammable materials near the dispenser, remove the trash can from under the sink;
-
do not use chemicals, flammable liquids.
To keep the chopper in service longer, manufacturers give several recommendations.
-
Grind waste only under a strong jet of cold water. The water pressure must be at least 6 l/min.
-
-
Send hard waste like animal bones and fruit seeds for grinding. This will help in cleaning the camera. You should not be afraid of the breakdown of the disposer, it is designed for the processing of such waste.
-
After the end of the working cycle, continue to drain the water for 10-20 seconds. During this time, the sewer drain will be cleaned, most of the crushed waste will be washed out of the chamber.
-
Do not litter the space under the dispenser. At the bottom of the device is a reset button, access to which is required at all times.
-
Use a magnetic catcher. It is a flexible tape with magnets attached to it.It is located on the outer circumference of the sink drain, prevents metal objects from entering the disposer chamber. Not all manufacturers include traps in the kit.


In this case, the following actions are not allowed.
-
Do not pour hot water into the drain during operation. At high temperatures, the fats contained in the waste soften, settle on the walls of the grinding chamber, drain pipes. Over time, their accumulation provokes the growth of oil deposits, a decrease in throughput, and an unpleasant odor. In such cases, the system has to be sorted out and thoroughly cleaned.
-
Do not turn off the water before the end of the grinding cycle, interrupt the cycle. With a lack of liquid, blockages occur in the discharge pipes, since the water leaves the grinding chamber much faster than the waste.
-
Do not grind non-food waste. Fragile (glass, ceramics) materials can be thrown out by the grinder or damage the pipes. The paper dissolves to a mushy state, clogs the drain. Food film, threads, hair are wound on rotating elements, making it difficult to move them.
-
If you don't want the drain to clog, don't chop fibrous vegetables and fruits like artichokes.
-
Periodically, the dispenser needs to be washed, as part of the crushed waste accumulates in the chamber, causing difficulties in operation and an unpleasant odor. At the same time, the use of products containing chlorine and other aggressive components is prohibited.
Recommended cleaning method:
-
unplug the grinder from the outlet;
-
clean the accessible part of the chamber with a hard washcloth;
-
close the sink drain with a blocker and fill halfway with lukewarm water, then add 2-3 tablespoons of baking soda or dish detergent;
-
turn on the device in the network, start the cycle, remove the blocker - the dispenser will be washed.
Emergencies are most often caused by stuck waste. In most cases, the problem is solved by stopping the grinder and then cleaning the chamber. Next, you need to wait 5 minutes and reboot the device.
In case of more serious breakdowns, for example, the inoperability of the motor, you cannot avoid going to a service center.
How to install a food waste disposer on the sink, see the video below.