- 2 How to choose a hand pump?
- 2.1 What are the steps for manufacturing and connecting a hand pump?
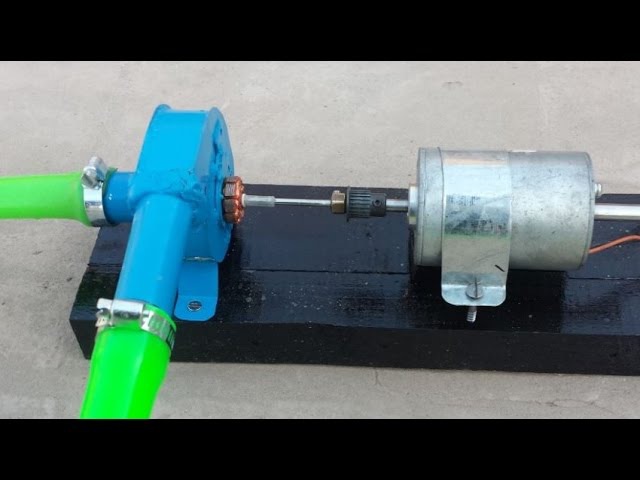
- Possible options for do-it-yourself hand pumps
- Mini water transfer pump
- How to make your own pump?
- Step 1: Building the Case
- Step 2: Building the lids
- Step 3: Additional parts on the body
- Step 4: Piston Assembly
- Step 5: Installing the valves
- Step 6: Fitting the inlet pipe
- Step 7: Mounting the Handle, Stem and Bracket
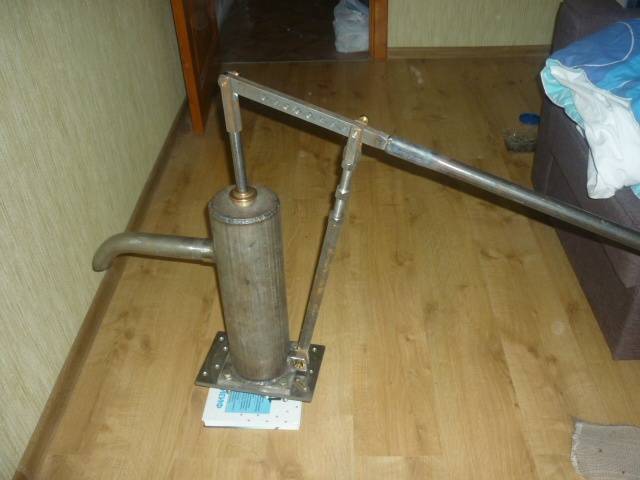
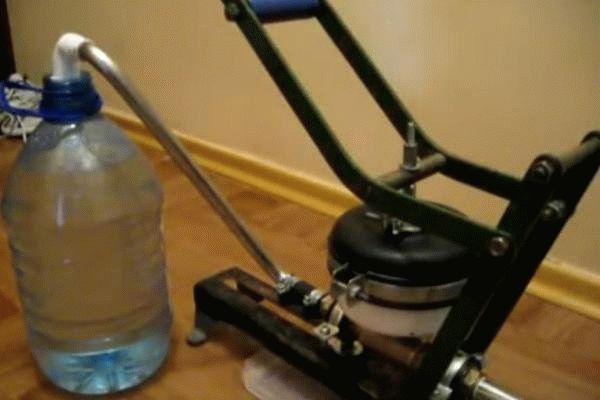
- DIY hand pump
- Draining through the handle
- Side drain assembly
- Spiral hydraulic piston
- How to make a mini pump yourself
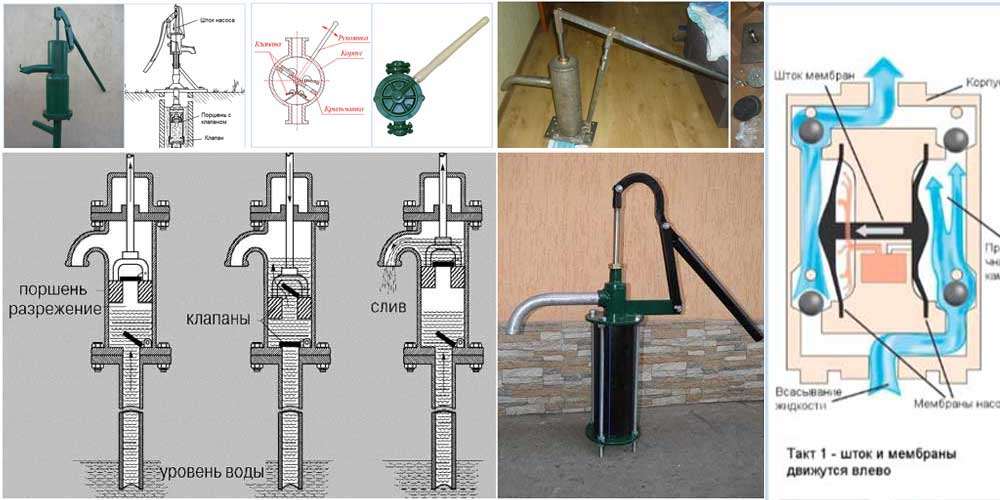
- 1 Operational features of hand pumps
- 1.1 Advantages and disadvantages
- 1.2 Classification of hand pumps
2 How to choose a hand pump?
The choice of a manual fluid transfer pump will depend on a number of factors:
Well depth.
The most important criterion when buying equipment or making it yourself. To lift water from a shallow depth (up to 10 m), you can use simple mechanisms with a piston system. If you have to pump liquid from an Abyssinian well with a depth of 10-30 m, you will have to choose a device with a rod system.
Well diameter.
Experts recommend drilling a well with a diameter of more than 4 inches - then any pump with a hand lever will work to supply water from depth.
Mounting method.
When selecting a device, you need to think in advance whether there is a need for its further movement to another object. Such a need often arises when liquid is taken from the river for household needs, and from a well for drinking.
period of use.
The main element of a hand pump is a piston in a pipe
On sale there are models designed for year-round use, as well as inexpensive options with a plastic case for use in the summer.
By considering every detail in advance, you can be sure that the hand pump for pumping water will meet the user's expectations.
2.1 What are the steps for manufacturing and connecting a hand pump?
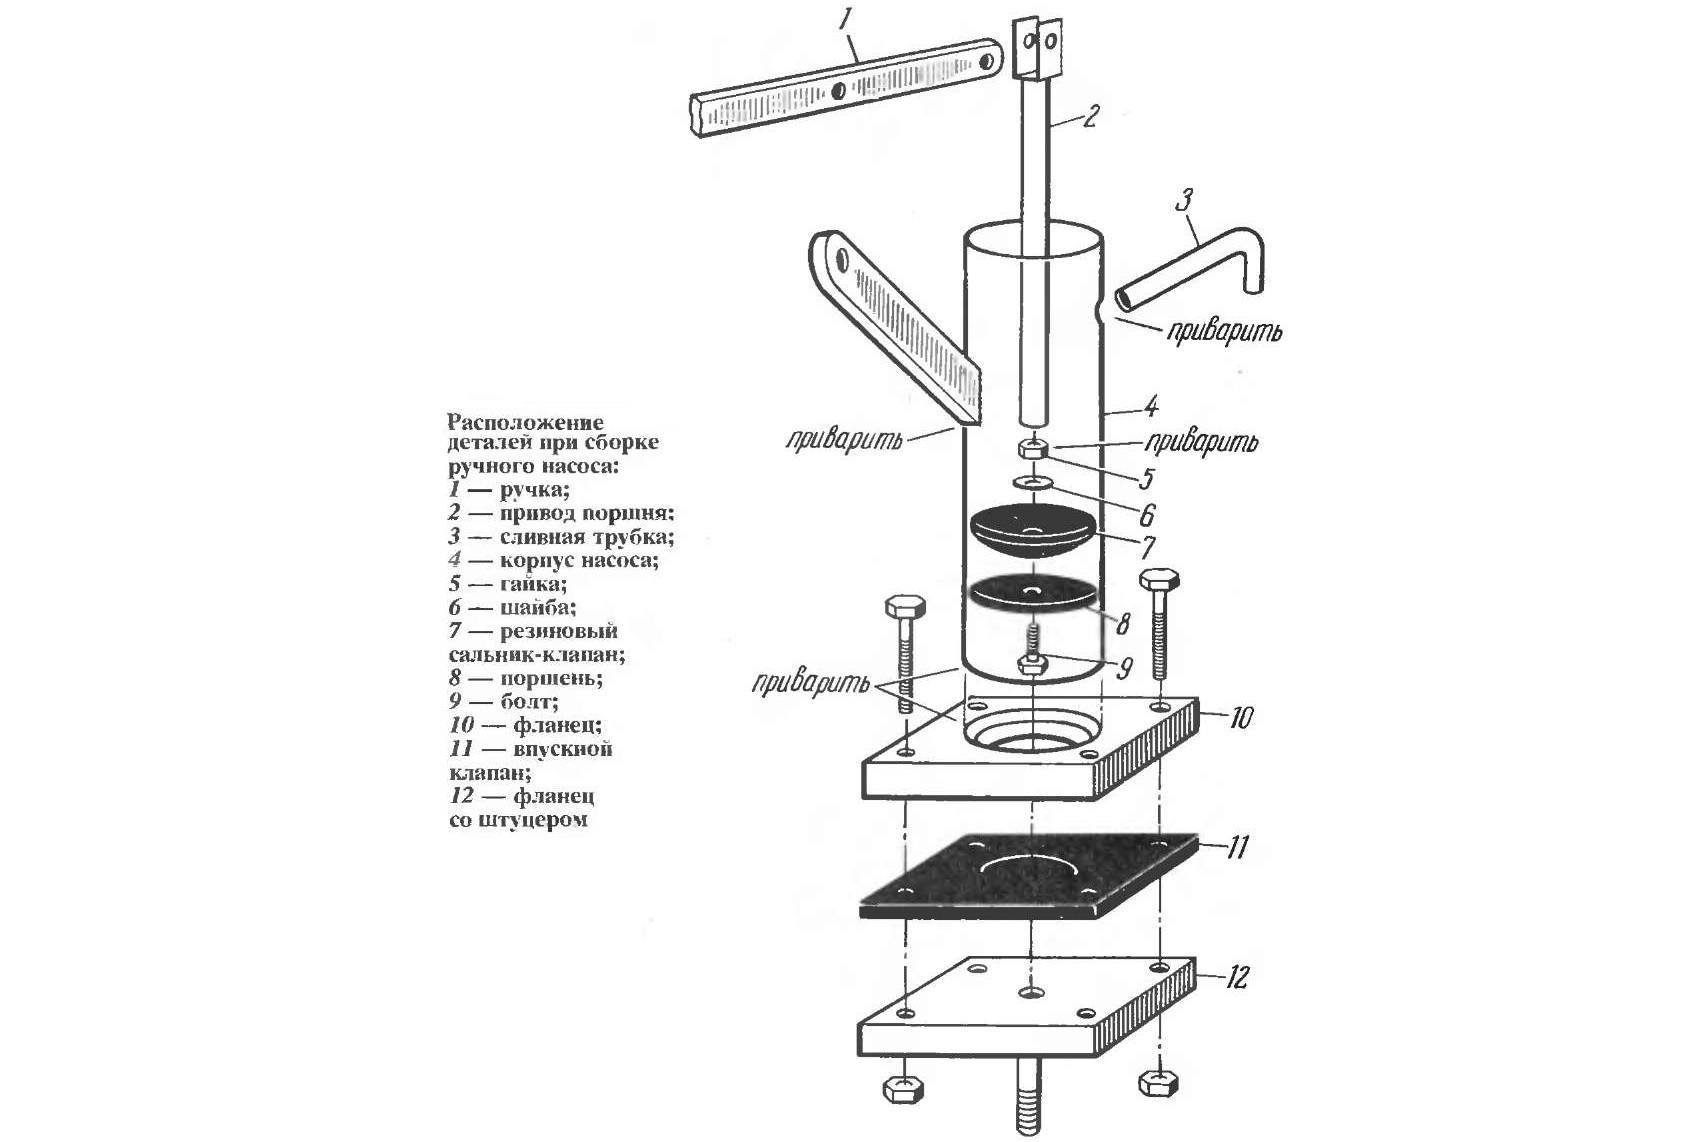
Assembling a hand pump with your own hands from improvised means is a feasible task for every man. The main thing is to strictly follow the indicated instructions:
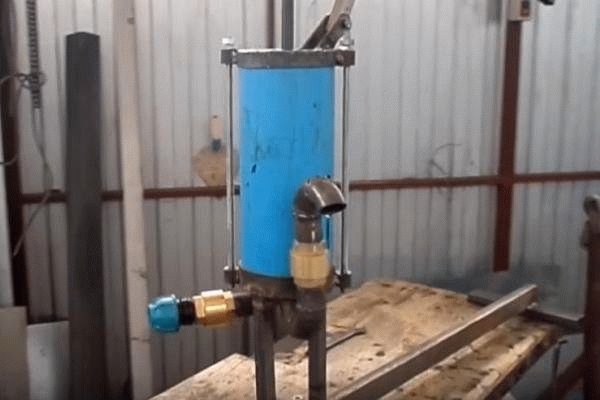
We make the body.
For the body of a homemade pump, you will need a metal cylinder - it can be a piece of an old pipe or an unnecessary sleeve from a diesel engine. The length of the segment should be about 60-80 cm, and the diameter should be over 8 cm.
To ensure the high-quality operation of future equipment, it is necessary to machine the inner surface of the pipe on the machine. By ridding the metal of unevenness, you will ease the effort that will be required to pump water.


Cut out the lid.
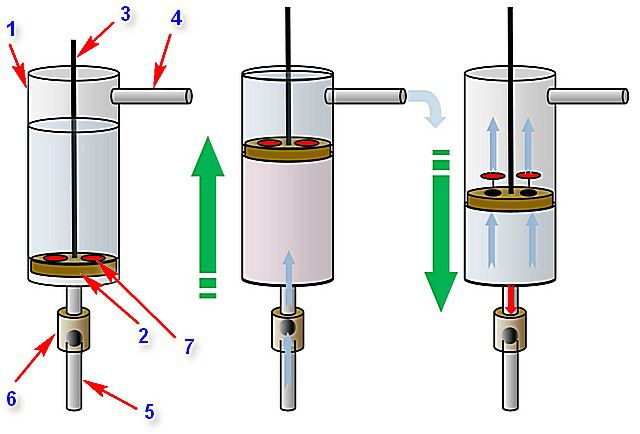
For its manufacture, you can use metal or plastic. In the cover, be sure to make a hole for the stem. When the design is ready, the piston is placed inside. After that, the bottom is closed with exactly the same lid with a valve. A pipe for water supply is welded on the side.
Piston installation.
The piston can be made of wood, plastic or metal, the main rule is that it must be sealed with a rubber ring.When installing this structural element, it is necessary to leave a minimum gap between the walls of the housing, then water will not seep through.
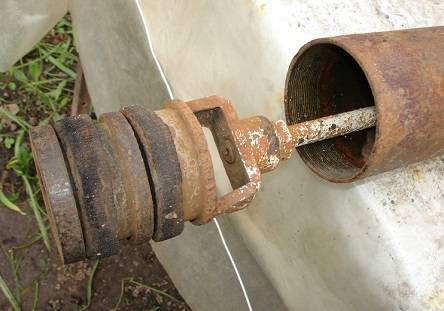
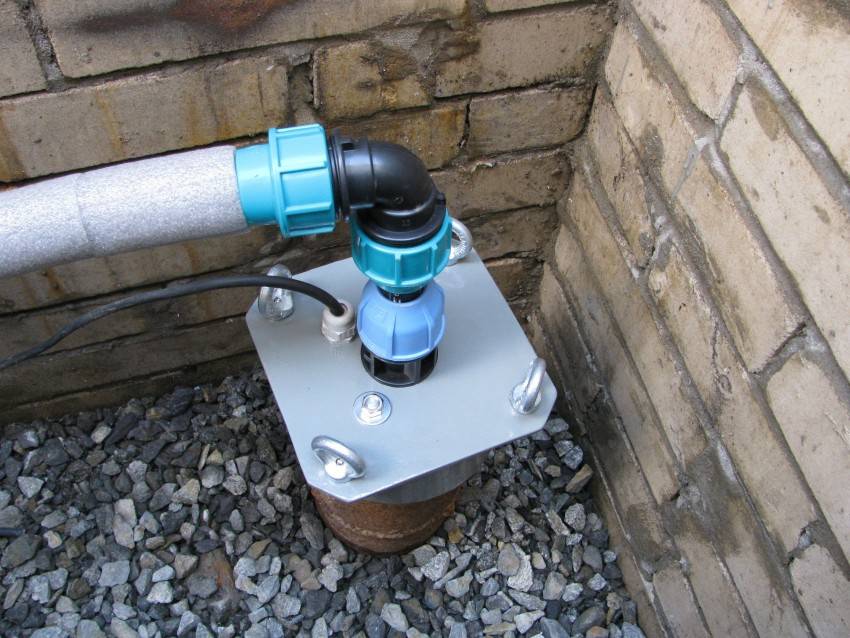
Connecting the inlet pipe to the well.
Elements for creating a hand pump with your own hands
The inlet pipe that supplies water to the inside of the device must be strong and durable. To ensure these characteristics, choose reinforced hoses, rigid plastic elements or steel pipes.
Valve installation.
Check valves are special holes that are created in the piston body and the bottom cover of the metal cylinder. They determine the performance of the entire system. Valves prevent fluid from returning back to the inlet pipe.
To create them, you can use thick rubber, which is fixed on the hole with rivets.
Decorative work.
A homemade hand pump should have a comfortable handle. Its shape can be any, the main thing is to securely attach the element to the stem. In addition, the pump itself must be fixed on the prepared site using a flange.
Having carried out the whole complex of works of the above works, you will ensure an uninterrupted supply of water on your own site.
Possible options for do-it-yourself hand pumps
There are many options for raising water to the surface, and, accordingly, the designs needed are different in each case. All hand pumps for pumping water, made in a handicraft way, differ only in the complexity of the assembly of the structure. To create them, a particularly rich base of technical knowledge is not required, it is enough to make efforts and desire. The financial side of the issue is simply negligible, and sometimes it will be enough to have any handy materials that are in abundance in the country.Let's consider in more detail how to make a do-it-yourself water pump for household needs.
Mini water transfer pump
To pump out any liquid, devices that do not require long assembly are especially popular. It is this mini water pump that can be quickly constructed from plastic lemonade containers. Its convenience also lies in the fact that there is no need for electricity. You can use it constantly, without putting any restrictions on water resources.


This is the simplest design from the whole huge list. You can make a homemade pump for overflowing water with your own hands in just a few minutes. Suitable starting materials are: a rubber tube or hose, necks from plastic bottles with caps. Such a device is extremely necessary to have on any personal plot where frequent and intensive watering is required.
The essence of the operation of such a pump is to pump liquid from one container to another.
First of all, you need to make a valve in the form of a drop. The lid is taken and a circle with a smaller diameter is cut out of the inner lining, with a small segment on the side. Instead of a gasket You can use regular electrical tape. Now we drill a hole with a diameter of up to 8 mm in the bottle cap. The finished valve is inserted into the lid and the cut neck is screwed into it. We put any thin tube into the valve hole and put on top of it a piece from another bottle, in the form of a funnel. On the other hand, a discharge hose is put on.
Now everything is ready to go! The intake part is immersed in a container of water and after one sharp movement of the hand up and down, the liquid begins to rise through the hose. There is no need to do anything further, since the process of gravity is turned on.
A do-it-yourself pump for an aquarium works on a similar principle. With its help, you can greatly facilitate the pumping of dirty water from a large tank.
Almost all pumps perform the same function - it is pumping water from point a to point b. Since not everyone is able to purchase an expensive pump to supply their household with water resources, it becomes relevant and essential to make a pump with your own hands.
Pumping water from the well will not be so tedious if you use similar units for this. By placing a water intake hose in any reservoir nearby, a well or a pit, you can freely irrigate the entire season. This versatile device is useful for removing excess water from the basement, for draining pits and much more.
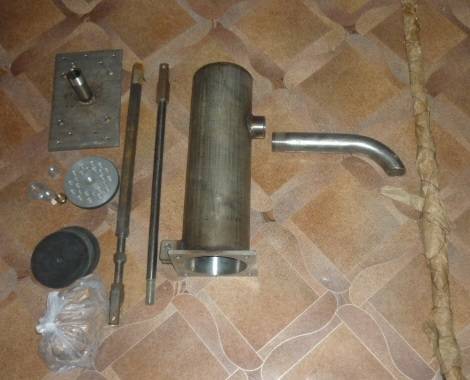
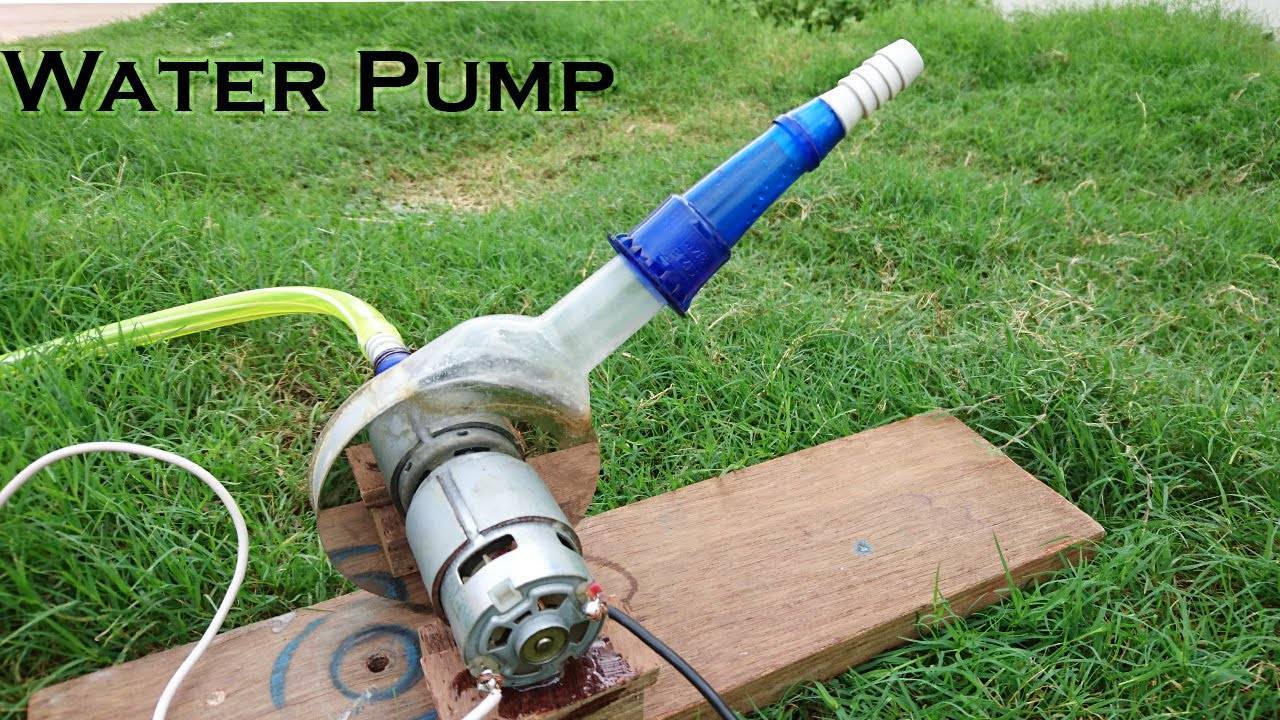
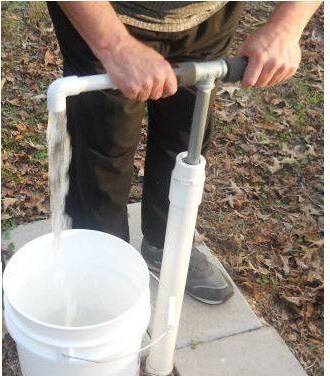
How to make your own pump?
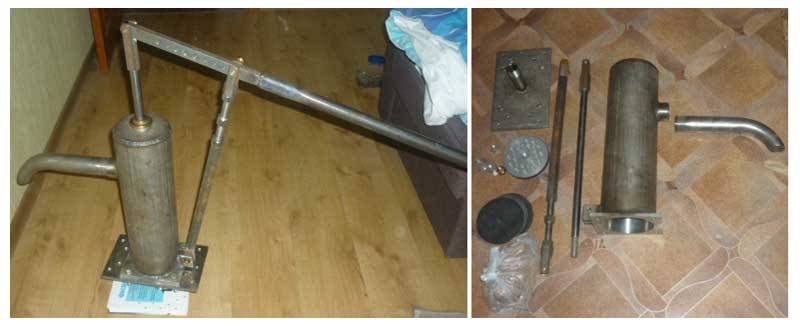
Every man who is at least a little familiar with the tool has the opportunity to save money and not purchase a commercial version of the pump, and in any household there are components for the simplest device. At first, drawings can cause difficulty, it will be easier to make them if we figure out in what order we will assemble a home-made unit.
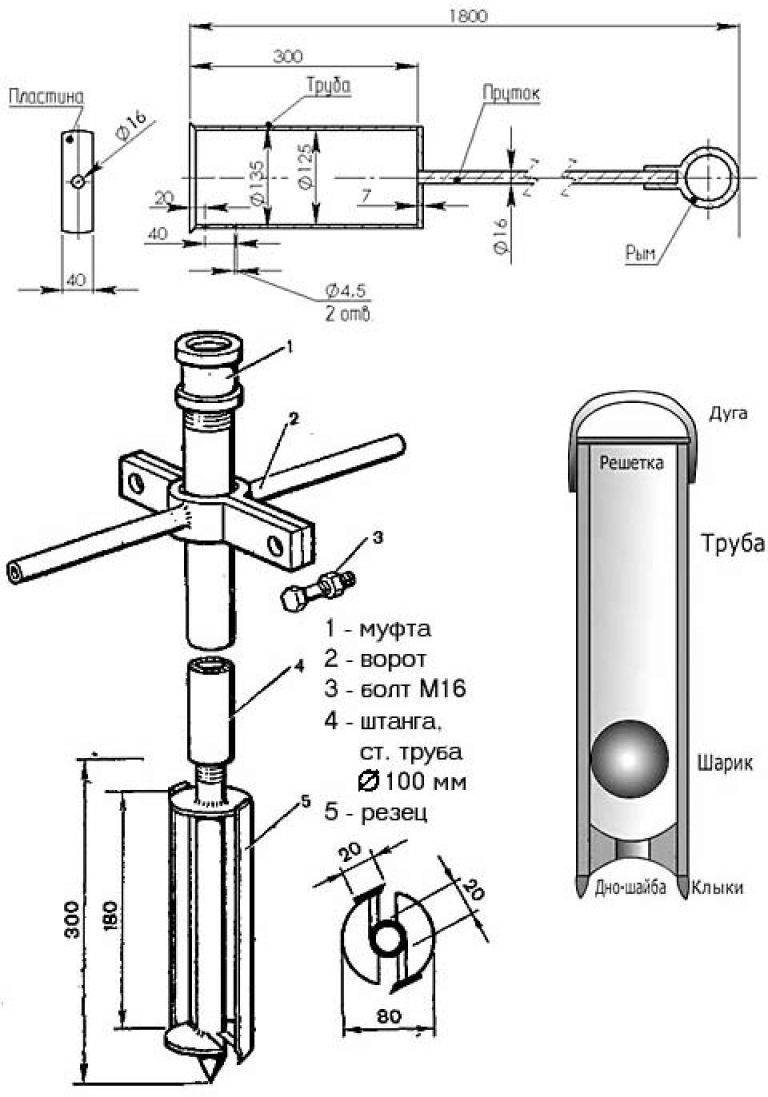
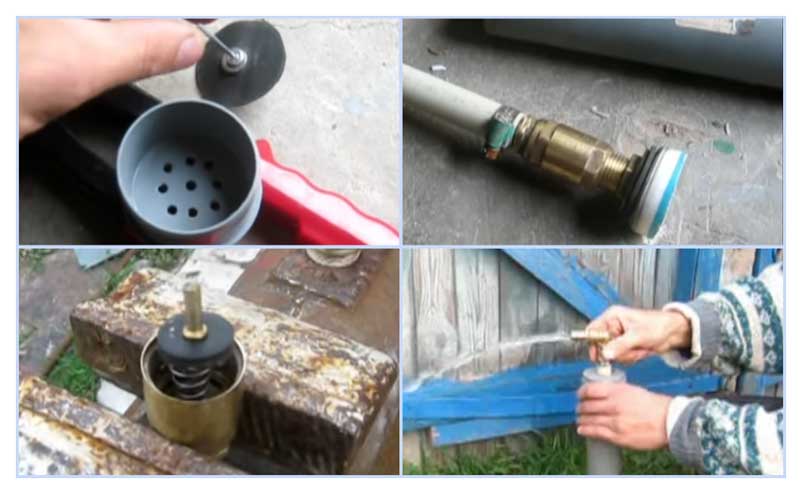
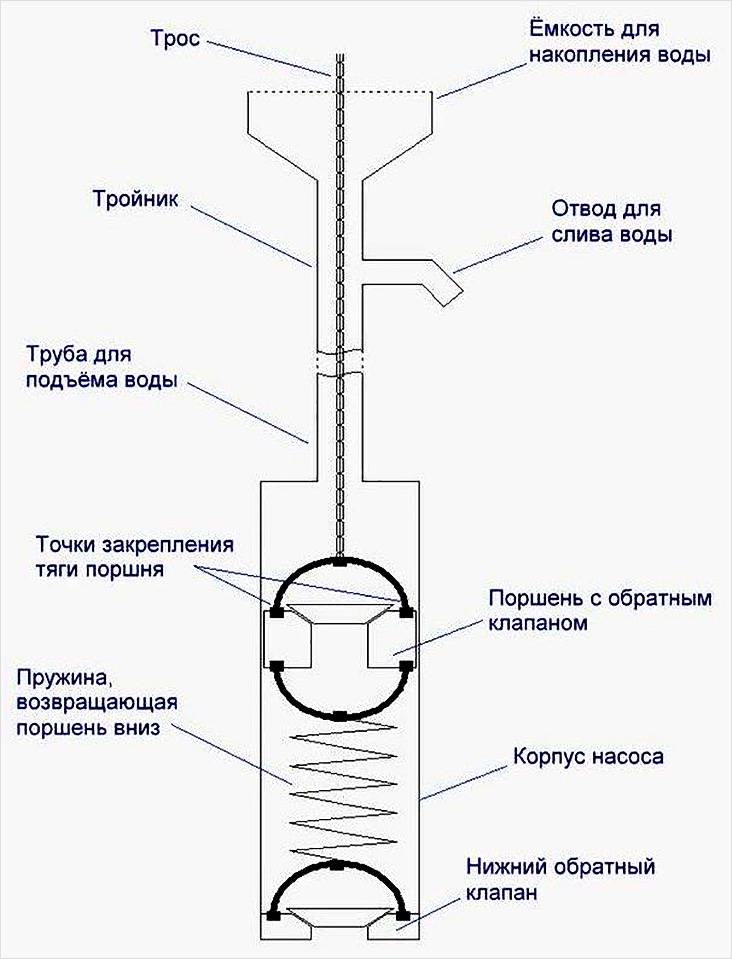
Step 1: Building the Case
For the base, you will need a piece of metal pipe, the diameter of which should be at least 8 cm, and the length - 60–80 cm. In this case, the thickness of the cylinder walls can be any. The main condition is the smoothness of the inner surface and the absence of corrosion on it. It is best to do the processing on the machine. The presence of the slightest unevenness will affect the operation of the piston and its wear.
Step 2: Building the lids
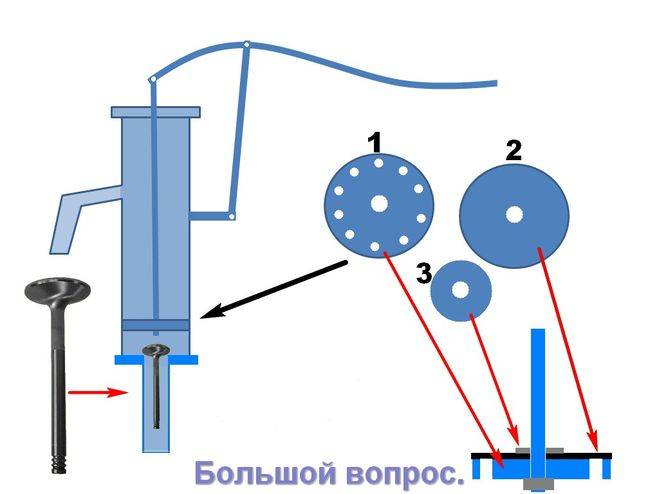
The cylinder must be closed on both sides. To do this, it is necessary to cut out two “round pieces” from plastic or metal that can tightly cover the diameter of the pipe. Given that you will operate a home-made pump in the winter, it is preferable to use metal in order to avoid breaking the cover during icing. The presence of at least one (upper) threaded cover can be considered an absolutely ideal solution. This will greatly facilitate the operation of the pump in case of possible breakdowns. Holes must be made in the middle of the covers. At the top - for the stem, at the bottom - for the disc valve.
Step 3: Additional parts on the body
At a distance of about 20 cm from the upper edge of the cylinder, a drain “spout” should be made. It is usually made from a small piece of pipe, the diameter and length of which can be chosen independently at your discretion. It would also be useful to attach to the bottom of the flange, thanks to which it is possible to fix the assembled structure to the surface.
Step 4: Piston Assembly
The material for the manufacture of this part can be any. Wood, plastic, metal - it all depends on how the master himself sees the conditions for its operation. Just do not forget about the winter, as well as the properties of some materials to expand and swell when wet. Also, do not miss the need to make a hole for the piston valve. The next condition is that the diameter of the piston should be such that the edges adjoin the inner walls of the housing as tightly as possible. Be that as it may, it is necessary to additionally provide this part with one or two rubber rings that exclude this gap.
Step 5: Installing the valves
The production of these parts is possible both from rubber, silicone, and from metal and plastic.It all depends on the imagination of the designer. The main thing is the observance of the principle of movement "in one direction". So, a valve fixed at the bottom of the pump must freely let in water drawn from a well or well and at the same time reliably close the inlet and withstand the pressure of a piston moving down. And vice versa: the piston valve must work flawlessly, letting fluid into the top of the pump when the piston is lowered and reliably close the hole when it tends to the top position. A little hint: devices resembling riveting in shape do an excellent job with similar functions.
Step 6: Fitting the inlet pipe
This part of the pump must be welded to a hole drilled in the bottom of the device and equipped with an inlet valve. You can do it a little differently: cut a hole in the bottom of the unit corresponding to the diameter of the pipe and provide it with a screw thread. Then assemble the valve that blocks the outlet from the pipeline directly on it. It remains only to make a thread on the outside of the pipe and simply screw the pump housing onto it. A prerequisite for this part of the unit is the ability to endure significant temperature changes, corrosion resistance. The best material for pipes is hard plastic or steel.
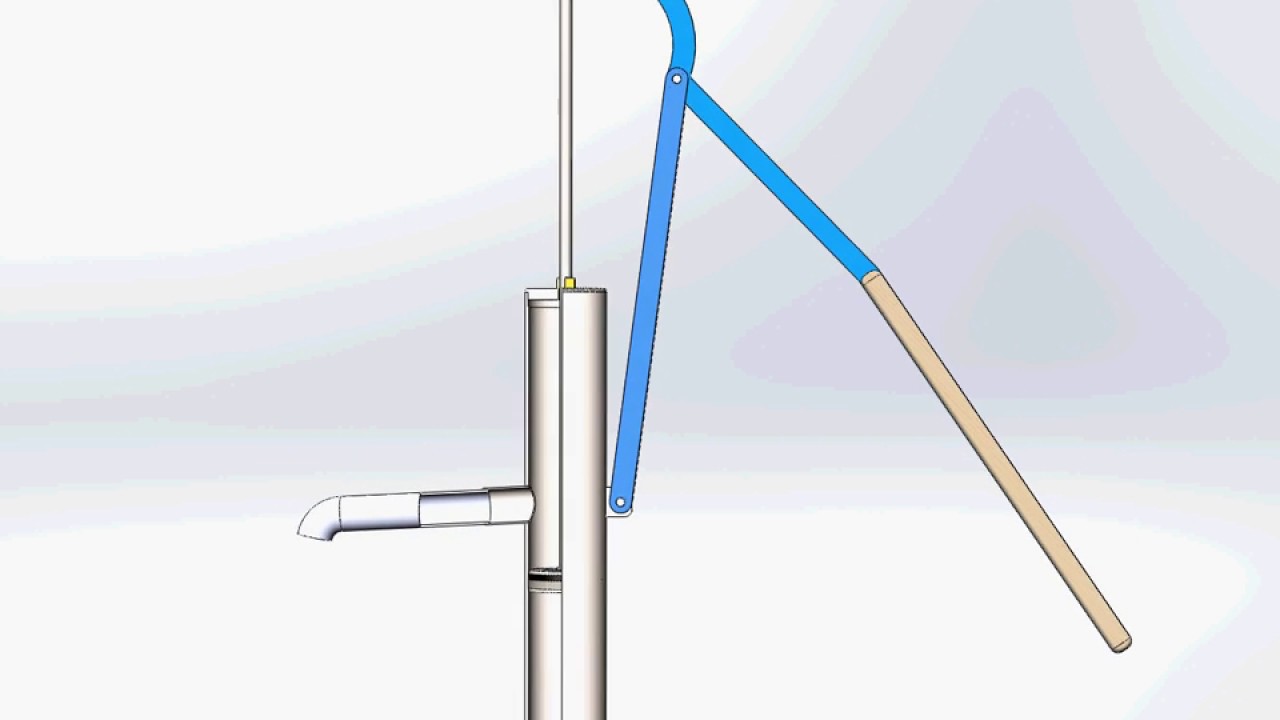
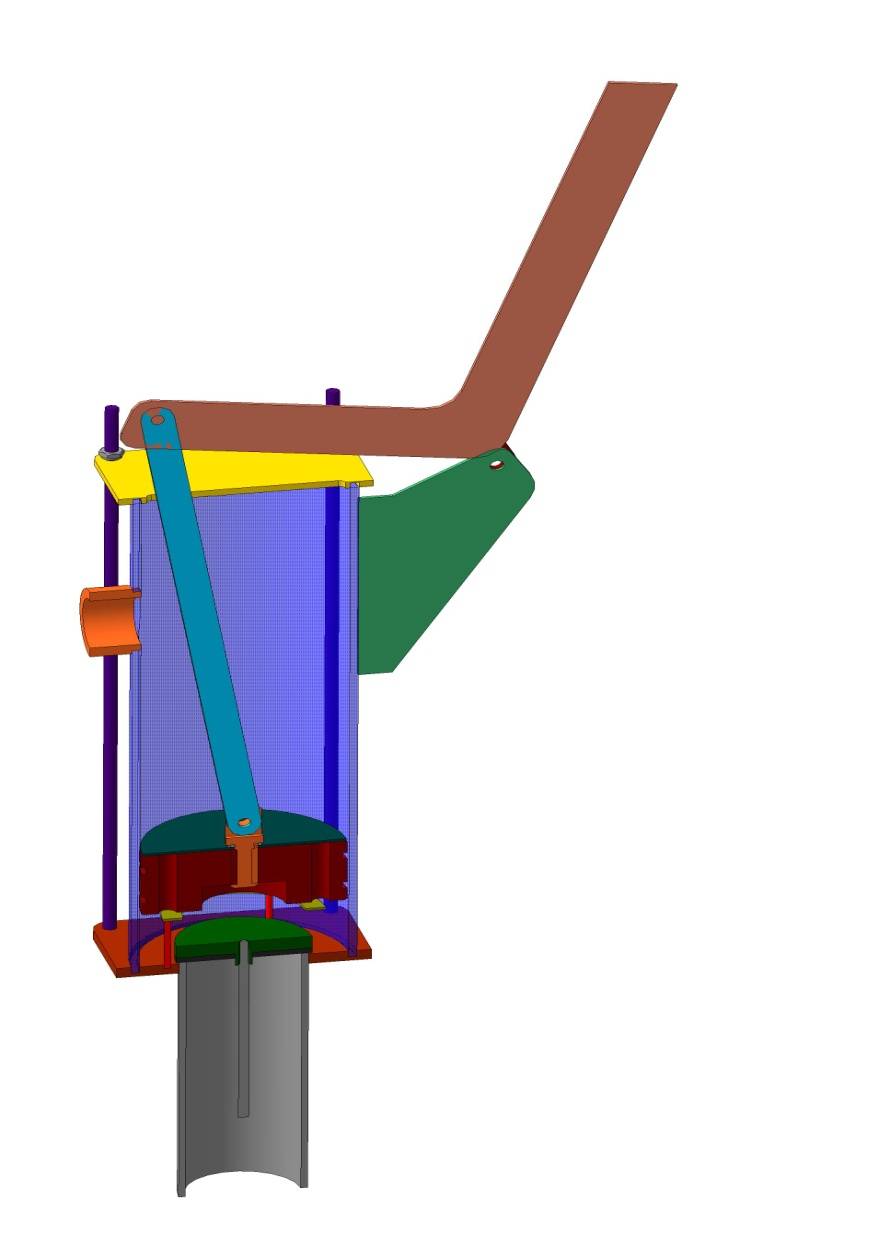
Step 7: Mounting the Handle, Stem and Bracket
So we have almost assembled a water pump with our own hands. You need a comfortable handle, it is fixed on a bracket rigidly fixed on the outside of the case. The main thing is that the lever arm should be such that it is possible to raise the piston without much effort. The place that you have to take with your hand can be provided with a rubber or silicone pad.The rod must be securely fastened to the piston inside, and its outer end - with a hinge with the end of a long handle. Now it will be easy and convenient to operate your homemade pump.
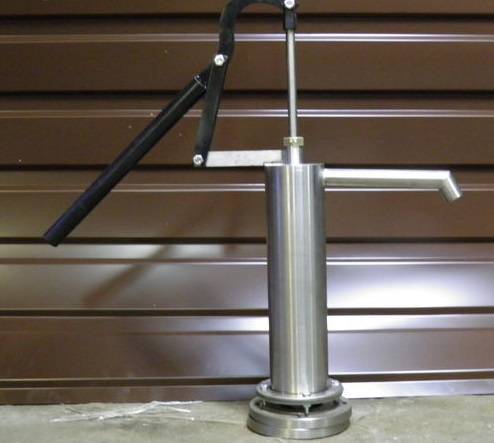
DIY hand pump
The manual pumping system described below can be taken as the basis for creating a stationary water-lifting post in a well or well.
We need:
- PVC sewer pipe 50 mm with several outlets, plug, cuffs-seals - 1m.
- Check valve 1/2″ in the amount of 2 pcs, sewer pipe PPR 24 mm,
- Also rubber, bolts and nuts with 6-8 mm washers, several clamps, fitting clamps and other plumbing parts.
There are several ways to assemble such a pump.
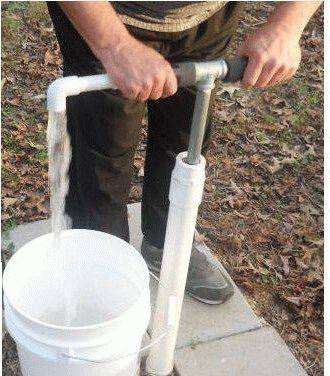
Draining through the handle
This model is the simplest of those that can be assembled at home: the stem is made of a PPR pipe, the water in it rises and pours out from above. The sleeve is made from a pipe with a diameter of 50 mm and a length of 650 mm. The pump turns out to be the simplest of the home ones - water rises along the piston rod, which is made of a PPR pipe and pours out from above.


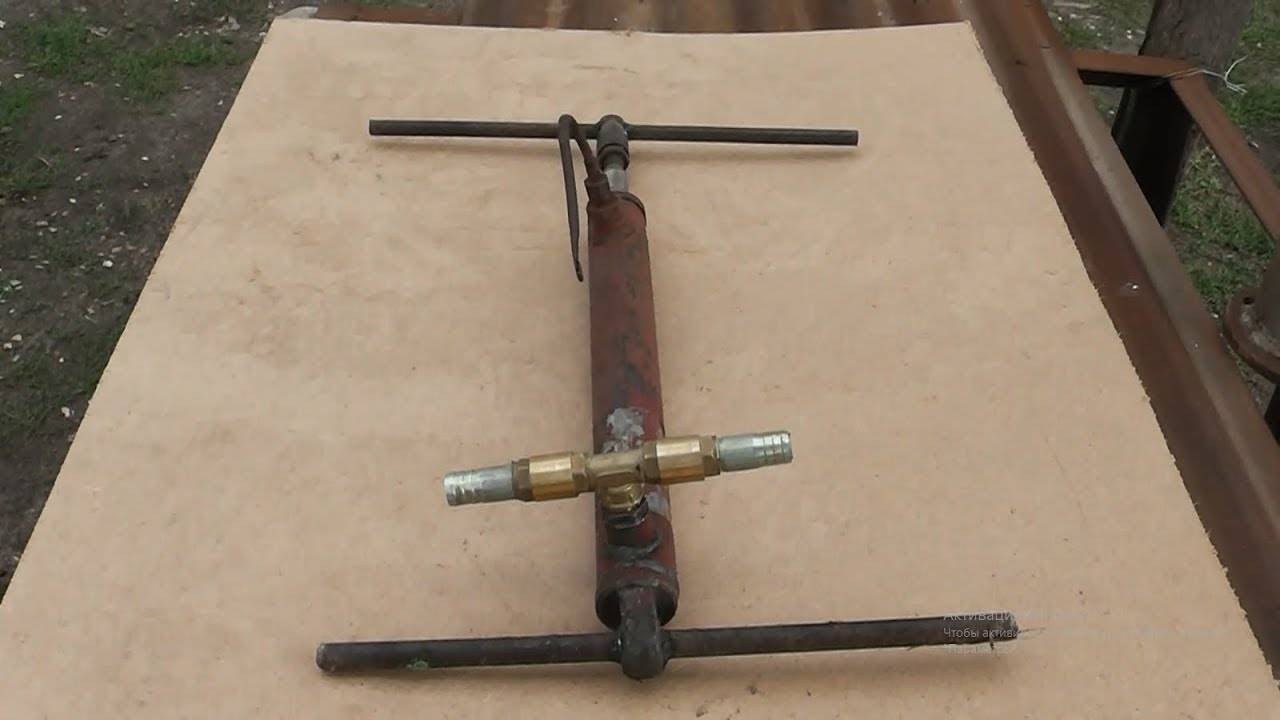


Draining water through the handle
So:
- We make a sleeve from a pipe with a diameter of 50 mm and a length of 650 mm. The valve should be annular petal: drill 10 holes with a diameter of 6 mm, cut out a round rubber flap in the amount of 3-4 pieces with a diameter of 50 mm.
- We fix the flap in the center of the plug using bolts or rivets (a self-tapping screw will not work). Thus, we get a petal valve. You can not make the valve yourself, but cut it into the factory end cap. In this case, the cost of the pump will increase by 30%.
- We install a plug into the sleeve, using sealant through the heaters, while additionally fixing it with self-tapping screws through the wall of the sleeve base.
- The next element of the pump is the piston. A check valve is installed in the PPR pipe.
- For the manufacture of the piston head, you can use the spent nose of the sealant 340 ml. The pipe is preheated and placed in the sleeve. Thus, the head will acquire the desired shape and size.
- Then it is cut and installed in series on the check valve using a coupling with an external thread, or a union nut is used.
- We insert the piston into the base of the pump and make an upper plug, which may not necessarily be airtight, but the rod must be held evenly.
- We install the squeegee on the free end of the pipe, put a hose on it. A pump of this design is very reliable, but a little inconvenient - the water drain point is in constant motion and is located close to the operator. This type of pump can be slightly modified.
Side drain assembly
Everything is done as follows:
We include a tee-angle of 35 degrees in the sleeve. We make large holes in the rod pipe, while not violating rigidity, as an option, you can use a rod rod.
- The main advantage and advantage of the described pumps is the low price of the structure. A factory valve costs about $4, a pipe about a dollar per 1 meter. And all other parts in total will come out for 2-3 dollars.
- Get a pump that costs less than $10. Repair of such pumps will also cost a penny by replacing a few "other" cheap parts.
Spiral hydraulic piston
Do-it-yourself manual water pump in this design is a little more difficult to make. But it does have more performance.This type of piston is most often used when pumping water from reservoirs over a short distance.
So:
- The device is based on a carousel with blades, resembling a water mill wheel in appearance. The river flow just drives the wheel. And the pump in this case is a spiral from a flexible pipe 50-75 mm, which is fixed to the wheel with clamps.
- A bucket with a diameter of 150 mm is attached to the intake part. Water will enter the pipeline through the main assembly (pipe reducer). You can take it from both the factory pump and the sewer pump.
- The gearbox must be tightly fixed to the base, which is motionless, and located along the axis of the wheel.
The maximum rise of water is equal to the length of the pipe from the fence, which is in the water during operation. This distance is obtained from the point where the pump is immersed in water to the point where it exits. It is this distance that the pump intake bucket travels. - The system of operation of such a pump is simple: when it is immersed in water, a closed system with air sections is formed in the pipeline, water flows through the pipe to the center of the spiral. The only disadvantage of such a water pump is that we are a reservoir as an activator, so its use is not suitable for everyone.
This pump will serve as an excellent watering agent in the season. Its price depends on the material used.
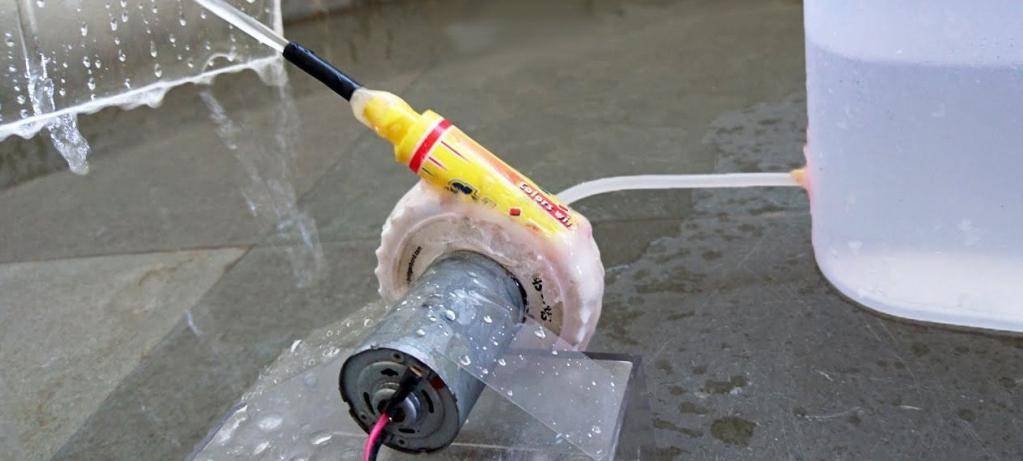
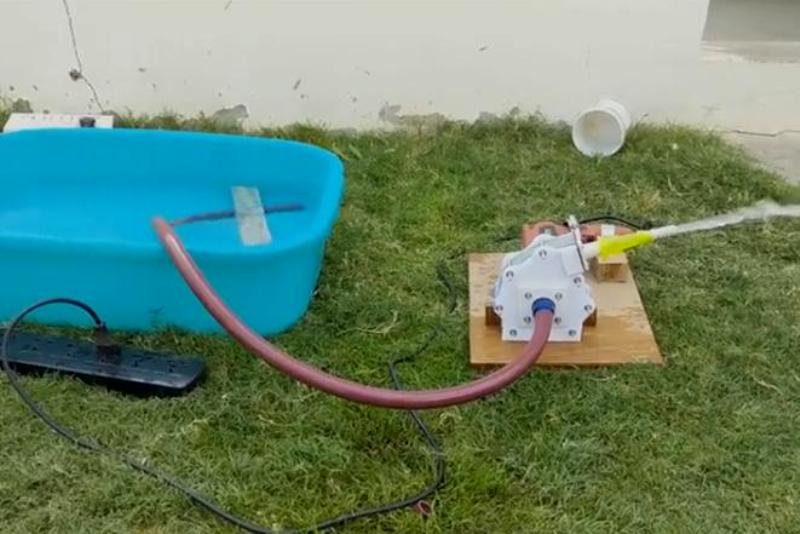
How to make a mini pump yourself
Sometimes craftsmen want to make a mini water pump on their own. One of such devices can be proposed below. For work you will need:
- The motor is electric.
- Ballpoint pen.
- Super glue, better quick dry and waterproof.
- From a deodorant cap.
- A small gear, about the size of a cap.
- Four plastic pieces 10 x 10 mm.
Work instructions:
- All teeth are ground off at the gear, which is then adjusted to the size of the cap.
- Plastic pieces are glued with glue through 90 degrees opposite each other.
- To form the pump housing, the walls of the cap are cut off, leaving them 1.5 centimeters high.
- Holes are drilled on top of the body for fixing the axis of the motor and on the right for fixing the handle body.
- The ballpoint pen is disassembled, leaving only the body, and glued in the cap to the side hole.
- The motor is glued to the upper opening of the housing.
- An impeller is attached to the axis of the motor.
- A plastic panel is cut out, the diameter of which is the same as the cap.
- A hole is drilled in the water intake panel and it is hermetically glued to the body.
What mini-pumps you can make yourself, how they work can be clearly seen in the video in this article.
The idea was born to make a mini fountain myself. The design of the fountain itself is a separate story, and this article will discuss how to make a pump for circulating water with your own hands. This topic is not new and has already been described more than once on the Internet. I'm just showing my implementation of this design. If anyone is too lazy to do it, then such pumps are sold on Aliexpress in the region of 400 rubles (price for February 2016).
So let's get started. A nasal drop bottle was used as the body. Who cares, I will write the dimensions of some parts. So, the inner diameter of the bubble is 26.6 mm, the depth is 20 mm. A hole slightly larger than the diameter of the motor shaft is drilled in it from the back side, and a hole for water outlet (4 mm in diameter) is drilled on the side. A tube is attached to it first with superglue, and then with hot glue, through which water will subsequently rise to the top of the fountain. Its diameter is 5 mm.
We also need a front cover. I drilled a 7mm hole in the center of it. All body is ready.
A hole for the shaft is drilled in the base. The diameter of the base, you know, should be less than the diameter of the body. I have about 25 mm. In fact, it is not needed at all and is used only for strength. The blades themselves can be seen in the photo. Made from the same box and cut to the diameter of the base. I glued everything with superglue.


The motor will drive the impeller. It was taken out, most likely, from some kind of toy. I don’t know its parameters, so I didn’t raise the voltage more than 5 V. The main thing is that the engine should be "smarter".
I tried another with a speed of 2500 rpm, so he raised the column of water very low. Next, you need to collect everything and seal it well.
And now the tests. When powered by 3 V, the current consumption is 0.3 A in load mode (that is, immersed in water), at 5 V - 0.5 A. The height of the water column at 3 V is 45 cm (rounded down). In this mode, he left it in the water for an hour.
The test went well. How long it will last is a good question that only time can answer. When powered by 5 volts, the water rises to a height of 80 cm. All this can be seen on the video.
The summer cottage and the presence of a well on it are a joy for every nature lover. Especially if electricity is supplied to the village and it is possible to pump water for irrigation from a well using a powerful unit.
But what to do in the event that there is no electricity at all or it was temporarily cut down ?! Of course, you can carry water to the beds just with buckets, but it's tiring, and just a long time.Especially if the garden lands have a large area.
We bring to your attention a solution to the dilemma - assembling a water pump with your own hands. And believe me, such a water machine will work, albeit a little slower than an electric pump, but still, quite productively. Consider several options for hand-assembled pumps.
Is it worth thinking that the production of your own pump at home is not profitable and will not lead to anything. We are ready to prove the opposite to you, referring to several advantages of such work:
- Firstly, the summer resident will always have a device at hand to supply water from the well upstairs, even if the electricity is turned off.
- An important point is the saving of the family budget. So, electricity tariffs are growing by leaps and bounds, and a powerful pump in working order winds up a lot of kW. Such cycles of the pump, even for the purpose of watering the beds in a month, can result in a tidy sum for the average family.
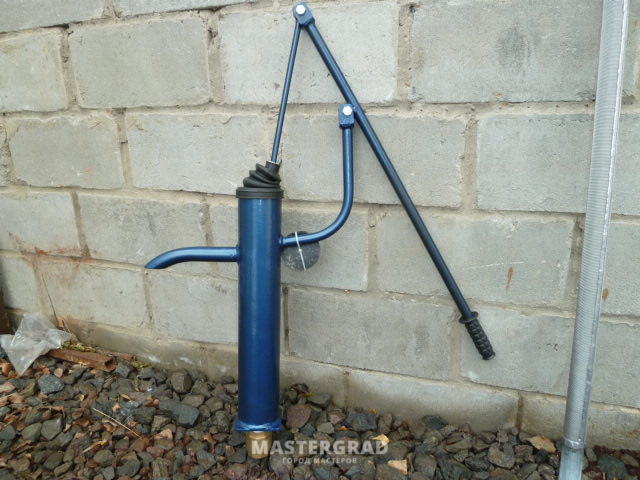
1 Operational features of hand pumps
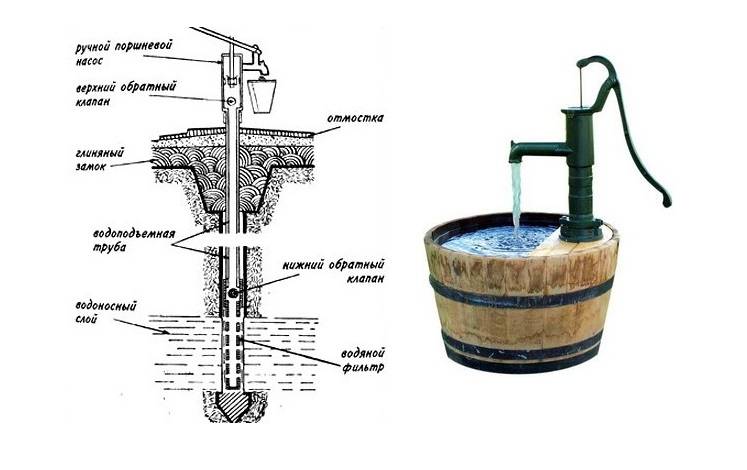
Water manual well pump - This is a special device for pumping liquid to the surface under pressure. Equipment of this type is driven by human efforts by pressing a special lever mechanism.
The operation of manual installations requires the use of physical force, so it is rational to use them in areas with a low need for water.
Of course, the speed of work and the volume of liquid raised by the pump are incomparable with automatic systems, but the lack of an uninterrupted source of electricity is forcing summer residents to increasingly introduce this particular format of devices.
1.1 Advantages and disadvantages
The manual method of raising water from a well has a number of advantages and disadvantages.The positives include:
- The simplicity of the equipment was the reason for its quick installation.
- Installation of the system is possible in almost any conditions.
- Saving resources - the pump is driven by human effort, without requiring an electrical connection.
- The device consists of unified components and parts, which, if necessary, are subject to replacement - this feature allows you to maximize the life of the installation.
- A hand pump is much cheaper than its counterparts.
- You save money on putting the equipment into operation, because the process is so simple that it does not require the involvement of a specialist.
Hand pump for a well in a metal case
The disadvantages of using a hand pump come from the features of its design:
- The need for the application of physical force - pumping water occurs only by pressing the lever mechanism.
- Low performance - the pump shows modest results in terms of fluid delivery compared to automatic systems.
Despite some negative points, hand pumps for wells are in high demand, because sometimes this is the only way to ensure water supply.
1.2 Classification of hand pumps
Pumps for pumping water from an Abyssinian or other well perform the same function, but their design and principle of operation are somewhat different from each other. Depending on the specified criteria, equipment with a manual mechanism is classified into two categories:
- piston pumps;
- rod pumps.
Manual piston pumps are used in cases where the water in the area is located at a shallow depth - up to 10 m.
It will not be difficult to build such a simple device with your own hands and mount it at your summer cottage.
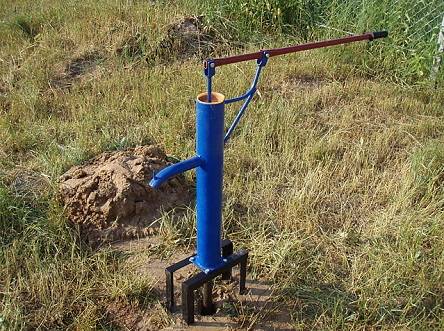
Hand pump for a well on the site
The manual deep-well rod pump is a more complex mechanism that is designed to pump water from an Abyssinian well or any other depth of 10-30 m. Its design consists of a cylinder, a piston and a very long rod, which, under the action of a lever, starts the entire system. The rod pump is located directly in the well, while its rod is immersed in the water layer to a depth of about 1 m.


To figure out which type of product is right for your environment, you will have to study the basic equipment selection criteria.


