- Basic structural elements
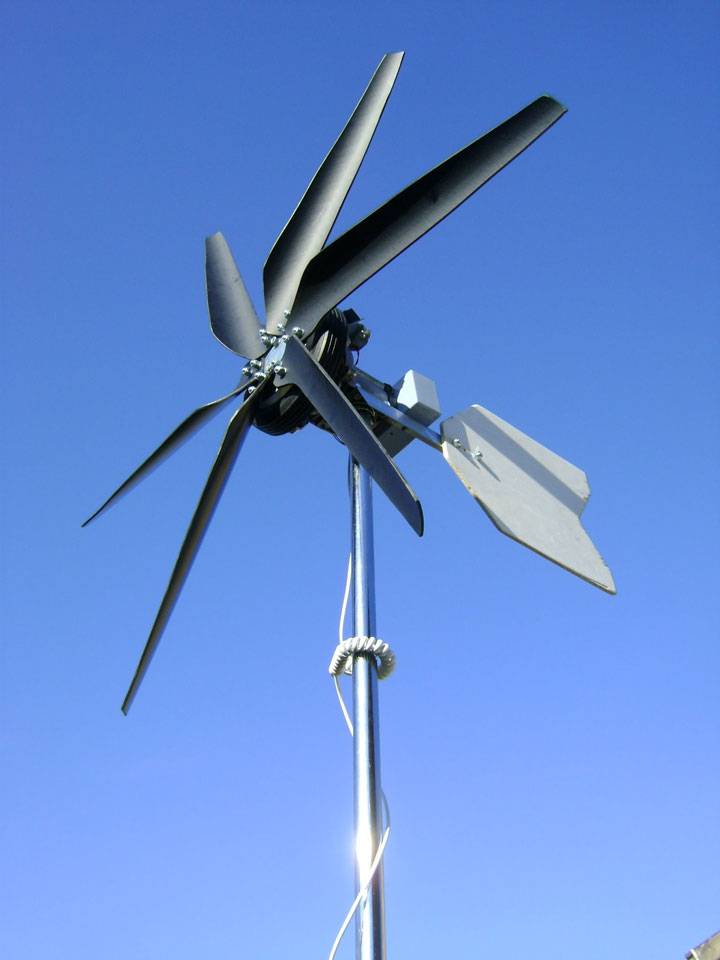
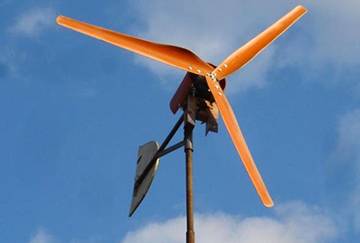
- wind wheel
- Mast
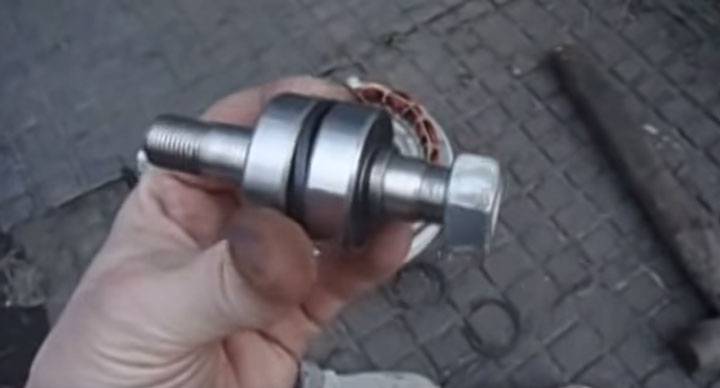
- Generator
- Which windmills to choose
- Material selection
- From PVC pipe
- aluminum
- fiberglass
- Stator manufacturing
- How to make a vertical type wind generator yourself
- DIY vertical wind generator
- Used materials and equipment
- Making a vertical windmill
- DIY generator
- Assembly process
- Main characteristics
- PVC pipe blades
- We make a windmill with our own hands
- The principle of operation of the wind turbine
- Features of manufacturing blades for a wind generator with your own hands from various materials
- Chinese electronic alternative
Basic structural elements
Despite the wide variety of wind turbines and methods of their manufacture, they all consist of the same structural elements.
wind wheel
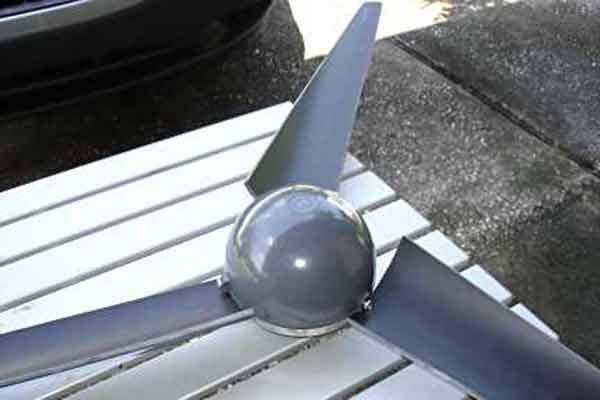
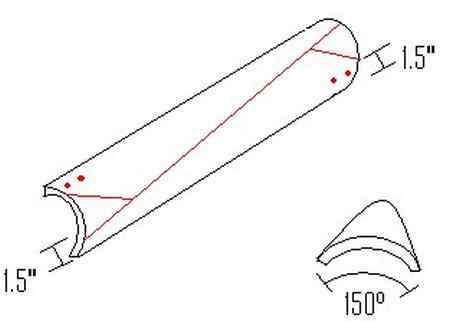
Blades are considered one of the most important elements of a wind turbine. Their design affects the operation of other components of the generator. Various materials are used to make blades.
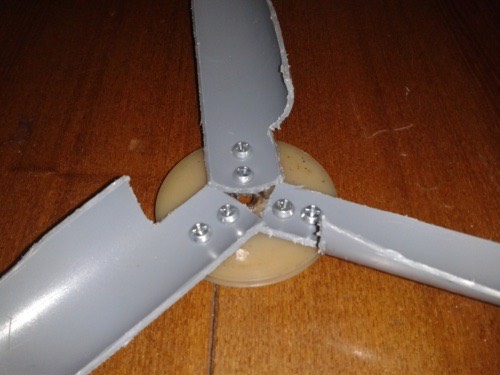
Before manufacturing, you need to calculate the length of the blade. If a pipe is taken for manufacturing, then its diameter must be at least 20 cm, with a planned blade length of 1 meter. Next, the pipe is cut into 4 parts using a jigsaw.One part is used to make a template, according to which the rest of the blades are cut. After that, they are assembled on a common disk, and the whole structure is fixed on the generator shaft. The assembled wind wheel must be balanced. Balancing must be carried out in a room protected from the wind. If the operation is carried out correctly, the wheel will not spontaneously rotate. In the case of spontaneous rotation of the blades, they are undermined until the entire structure is in balance. At the very end, the accuracy of rotation of the blades is checked. They should rotate in the same plane, without any distortions. The permissible error is 2 mm.
Mast
The next structural element of the wind turbine is the mast. Most often, it is made from an old water pipe, the diameter of which should not be 15 cm, but the length should be up to 7 meters. If there are any structures or buildings within a radius of 30 meters from the planned installation site, in this case the height of the mast is increased.
In order for the entire installation to work as efficiently as possible, the bladed wheel rises above the surrounding obstacles by at least 1 meter. After installation, the base of the mast and the pegs for fixing guy wires are poured with concrete. As extensions it is recommended to use a galvanized cable with a diameter of 6 mm.
Generator
For a wind turbine, you can use any car generator, preferably with a higher power. They all have an identical design and require alteration. A similar alteration of a car generator for a windmill involves rewinding the stator conductor, as well as manufacturing a rotor using neodymium magnets.To fix them securely, it is required to drill holes in the rotor poles. Installation of magnets is carried out with alternation of poles. The rotor itself is wrapped in paper, and all the voids that form between the magnets are filled with epoxy.
In the process of sticking magnets, their polarity must be observed. Therefore, the rotor is connected to a power source. The included rotor creates a magnetic field and each magnet is glued into place by the side that is attracted.
To connect the rotor, you can use any power supply with a voltage of 12 volts and a current of 1 to 3 amperes. The connection is made in such a way that the removable ring located closer to the fangs is the minus, and the positive side is located closer to the end of the rotor. Magnets installed in the gaps of the rotor or fangs cause the generator to self-excite, and this is considered their main function.
At the very beginning of the rotation of the rotor, the magnets begin to excite the current in the generator, which also enters the coil, leading to an increase in the magnetic fields of the fangs. As a result, the generator produces a current with an even greater value. It turns out a kind of current circulation when the generator is excited and further powered by its own rotor, on which electromagnetic poles are installed. The assembled generator must be tested and measurements of the obtained output data must be made. If the unit produces approximately 30 volts at 300 rpm, then this is considered a normal result.
Which windmills to choose
Well, for those who live far from substations and VL-0.4kv, it is worth purchasing the most powerful windmill models that you can afford.Since from the power that is indicated in the pictures, you will get no more than 15%.
Another category of consumers, quite deservedly, makes a choice not in favor of Chinese factory models, but, on the contrary, prefers home-made windmills from self-taught masters. It also has its benefits.
For the most part, the inventors of such devices are competent and responsible guys. And in almost 100% of cases, without any problems, they can return the installation if something went wrong, or it needs to be repaired. This will definitely not be a problem.

In industrial Chinese windmills, the appearance is certainly prettier. And if you still decide to buy it, immediately after checking it with an electric drill, do preventive maintenance and replace Chinese scrap metal with bearings with high-quality grease.
If there are large bird nests near you, it does not hurt to purchase an additional set of blades.
Chicks sometimes fall under the distribution of a spinning "mini mill". Plastic blades break and metal ones bend.

And I would like to end with wisdom from those users who did not listen to all the arguments and came across all the problems described above. Remember, the most expensive weather vane for a home is a wind turbine!
Material selection
The blades for a wind device can be made of any more or less suitable material, for example:
From PVC pipe
It is probably the easiest thing to build blades from this material. PVC pipes can be found in every hardware store. Pipes should be chosen those that are designed for sewerage with pressure or a gas pipeline. Otherwise, the air flow in strong winds can distort the blades and damage them against the generator mast.
The blades of a wind turbine are subject to severe loads from centrifugal force, and the longer the blades, the greater the load.
The edge of the blade of a two-bladed wheel of a home wind generator rotates at a speed of hundreds of meters per second, such is the speed of a bullet flying out of a pistol. This speed can lead to rupture of PVC pipes. This is especially dangerous because flying pipe fragments can kill or seriously injure people.
You can get out of the situation by shortening the blades to the maximum and increasing their number. Multi-bladed wind wheel is easier to balance and less noisy
Of no small importance is the thickness of the walls of the pipes. For example, for a wind wheel with six blades made of PVC pipe, two meters in diameter, their thickness should not be less than 4 millimeters. To calculate the design of the blades for a home craftsman, you can use ready-made tables and templates
To calculate the design of the blades for a home craftsman, you can use ready-made tables and templates.
The template should be made from paper, attached to the pipe and circled. This should be done as many times as there are blades on the wind turbine. Using a jigsaw, the pipe must be cut according to the marks - the blades are almost ready. The edges of the pipes are polished, the corners and ends are rounded so that the windmill looks nice and makes less noise.


From steel, a disk with six stripes should be made, which will play the role of a structure that combines the blades and fixes the wheel to the turbine.
The dimensions and shape of the connecting structure must correspond to the type of generator and direct current that will be used in the wind farm.Steel must be chosen so thick that it does not deform under wind blows.
aluminum
Compared to PVC pipes, aluminum pipes are more resistant to both bending and tearing. Their disadvantage lies in the large weight, which requires measures to ensure the stability of the entire structure as a whole. In addition, you should carefully balance the wheel.
Consider the features of the execution of aluminum blades for a six-blade wind wheel.
According to the template, a plywood pattern should be made. Already according to the template from a sheet of aluminum, cut blanks of blades in the amount of six pieces. The future blade is rolled into a chute with a depth of 10 millimeters, while the scroll axis should form an angle of 10 degrees with the longitudinal axis of the workpiece. These manipulations will endow the blades with acceptable aerodynamic parameters. A threaded sleeve is attached to the inner side of the blade.
The connecting mechanism of a wind wheel with aluminum blades, unlike a wheel with blades made of PVC pipes, does not have strips on the disk, but studs, which are pieces of a steel rod with a thread suitable for the thread of the bushings.
fiberglass
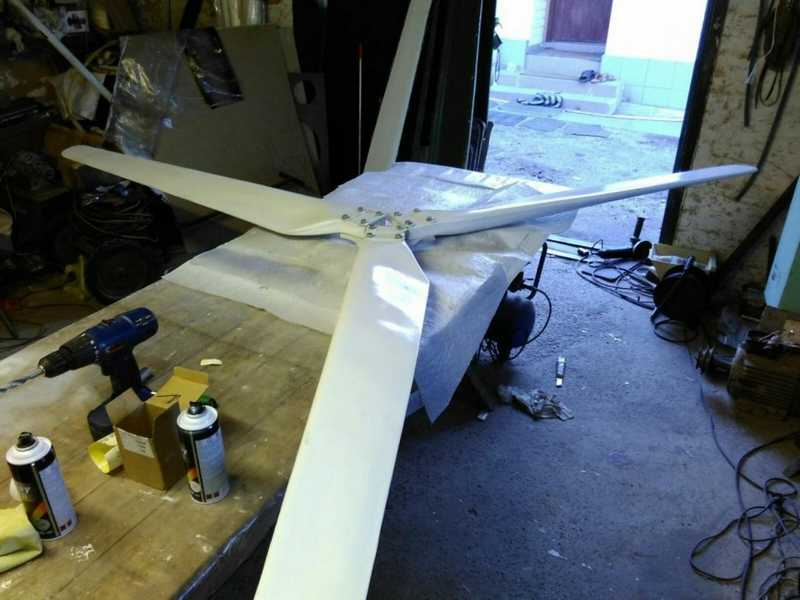
Blades made from fiberglass-specific fiberglass are the most flawless, given their aerodynamic parameters, strength, weight. These blades are the most difficult to construct, because you need to be able to process wood and fiberglass.
We will consider the implementation of fiberglass blades for a wheel with a diameter of two meters.
The most scrupulous approach should be taken to the implementation of the matrix of wood.It is machined from the bars according to the finished template and serves as a blade model. Having finished working on the matrix, you can begin to make blades, which will consist of two parts.
First, the matrix must be treated with wax, one of its sides should be covered with epoxy resin, and fiberglass should be spread on it. Apply epoxy to it again, and again a layer of fiberglass. The number of layers can be three or four.
Then you need to keep the resulting puff right on the matrix for about a day until it dries completely. So one part of the blade is ready. On the other side of the matrix, the same sequence of actions is performed.
The finished parts of the blades should be connected with epoxy. Inside, you can put a wooden cork, fix it with glue, this will fix the blades to the wheel hub. A threaded bushing should be inserted into the plug. The connecting node will become the hub in the same way as in the previous examples.
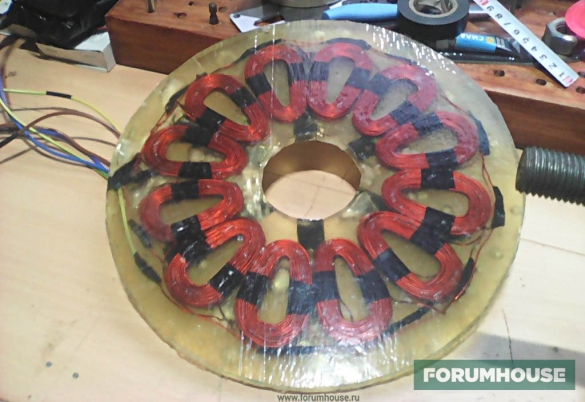
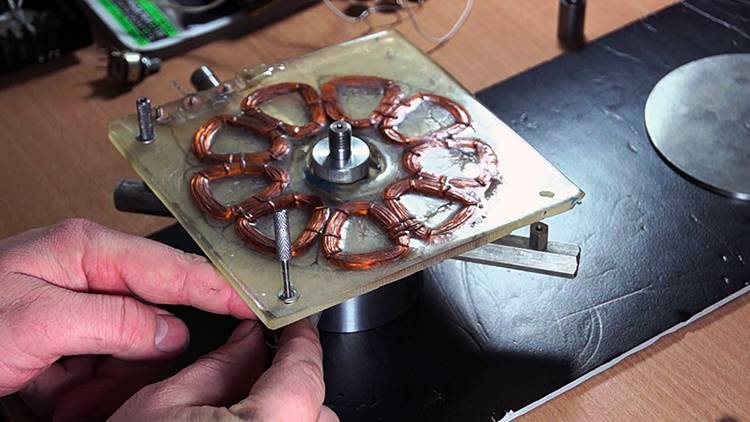
Stator manufacturing
As you can see in the photo, the coils are shaped like an elongated drop of water. This is done so that the direction of movement of the magnets is perpendicular to the long side sections of the coil (this is where the maximum EMF is induced).
If round magnets are used, the inside diameter of the coil should roughly match the diameter of the magnet. If square magnets are used, the coil windings must be configured in such a way that the magnets overlap the straight lengths of the windings. The installation of longer magnets does not make much sense, because the maximum EMF values occur only in those sections of the conductor that are located perpendicular to the direction of the magnetic field.
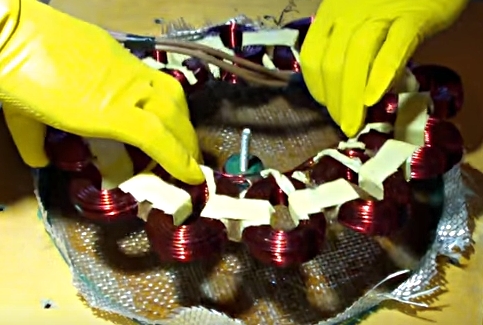
The manufacture of the stator begins with the winding of the coils.Coils are easiest to wind according to a pre-prepared template. Templates are very different: from small hand tools to miniature home-made machines.

The coils of each individual phase are connected to each other in series: the end of the first coil is connected to the beginning of the fourth, the end of the fourth to the beginning of the seventh, etc.
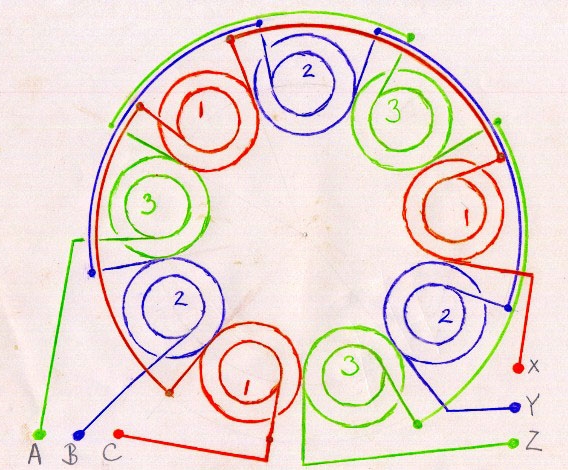
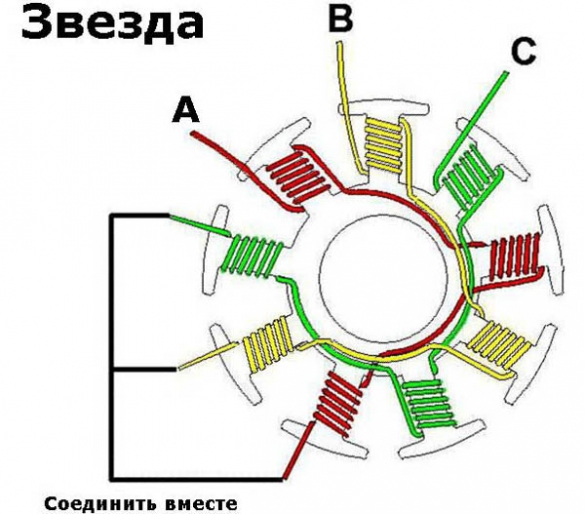
Recall that when the phases are connected according to the “star” scheme, the ends of the windings (phases) of the device are connected into one common node, which will be the neutral of the generator. In this case, three free wires (the beginning of each phase) are connected to a three-phase diode bridge.
When all the coils are assembled into a single circuit, you can prepare a mold for pouring the stator. After that, we immerse the entire electrical part in the mold and fill it with epoxy.
Aleksei2011
Next, I post a photo of the finished stator. Filled with regular epoxy. I put fiberglass on top and bottom. The outer diameter of the stator is 280 mm, the inner hole is 70 mm.
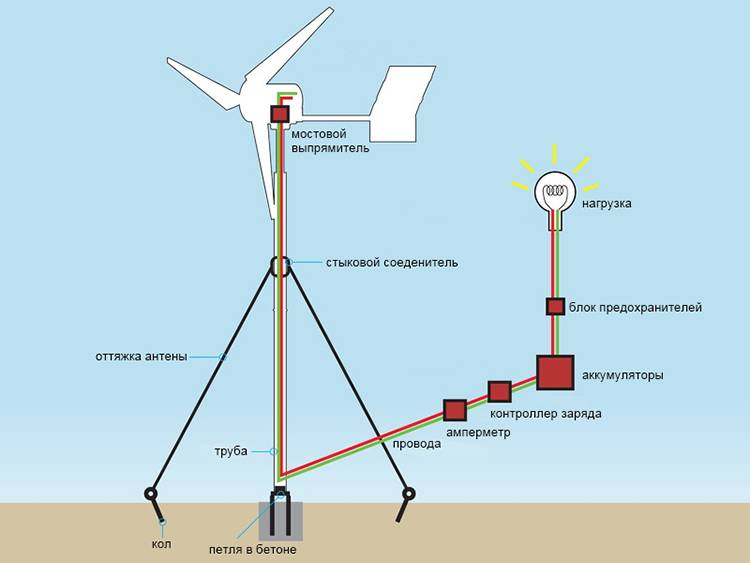
How to make a vertical type wind generator yourself
Self-manufacturing of a wind generator is quite possible, although not as simple as it might seem at first glance. You will need to either assemble the entire set of equipment, which is very difficult, or purchase some of its elements, which is quite expensive. The kit may include:


- wind generator
- inverter
- controller
- battery pack
- wires, cables, accessories
The best option would be the partial purchase of finished equipment, partial DIY manufacturing. The fact is that the prices for nodes and elements are very high, not accessible to everyone.In addition, the high one-time investment makes one wonder if these funds could be spent in a more efficient way.
The system works like this:
- the windmill rotates and transmits torque to the generator
- an electric current is generated that charges the battery
- the battery is connected to an inverter that converts direct current to 220 V 50 Hz alternating current.
Assembly usually starts with a generator. The most successful option is to assemble a 3-phase design on neodymium magnets, which allows you to generate the appropriate current.
Rotating parts are made on the basis of one of the most accessible systems for recreating with your own hands. The blades are made from pipe sections, metal barrels sawn in half or sheet metal bent in a certain way.
The mast is welded on the ground and installed in a vertical position already finished. As an option, it is made of wood immediately at the installation site of the generator. For a solid and reliable installation, a foundation should be made for the supports and the mast should be fixed with anchors. At a high height, it should be additionally secured with stretch marks.
All components and parts of the system require adjustment to each other in terms of power, performance settings. It is impossible to say in advance how efficient a wind turbine will be, since too many unknown parameters will not allow us to calculate the characteristics of the system. At the same time, if you initially lay the system under a certain power, then the output is always quite close values. The main requirement is the strength and accuracy of the manufacture of nodes so that the operation of the generator is sufficiently stable and reliable.
DIY vertical wind generator
Used materials and equipment
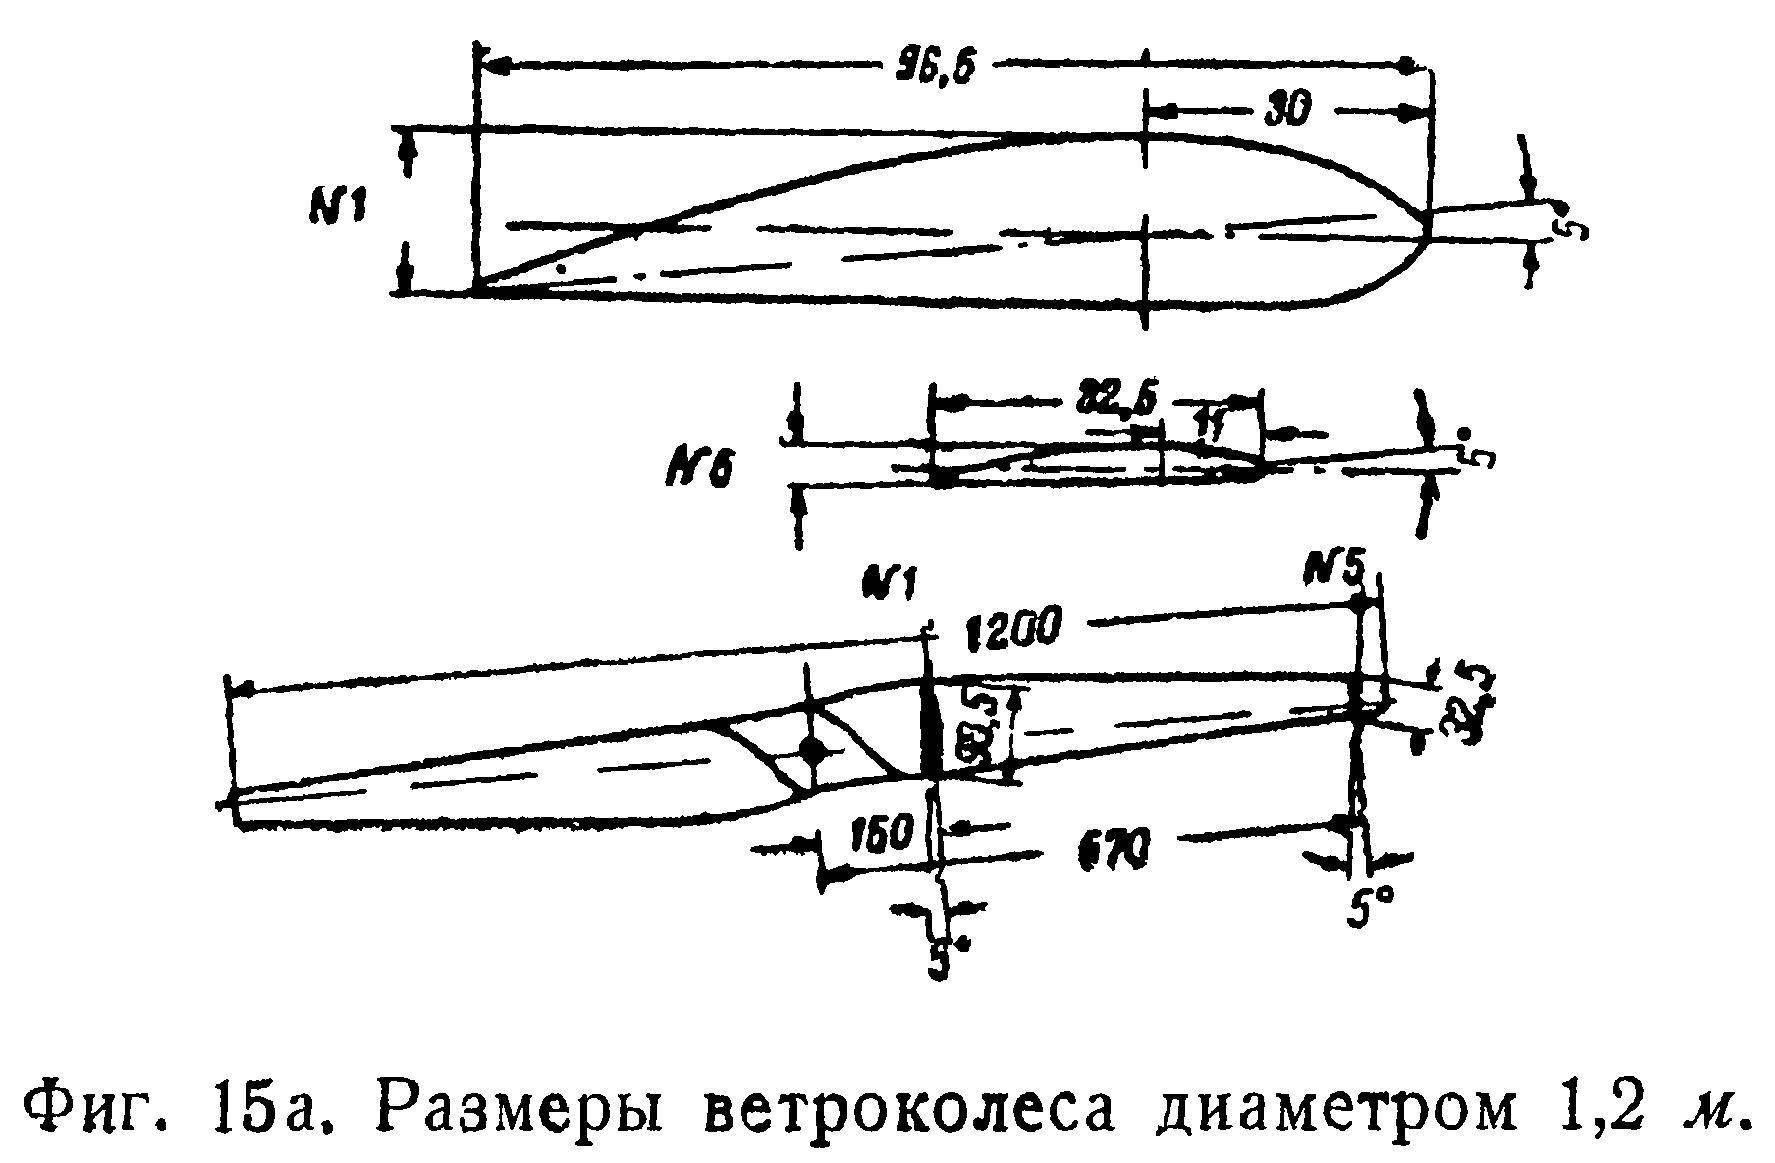
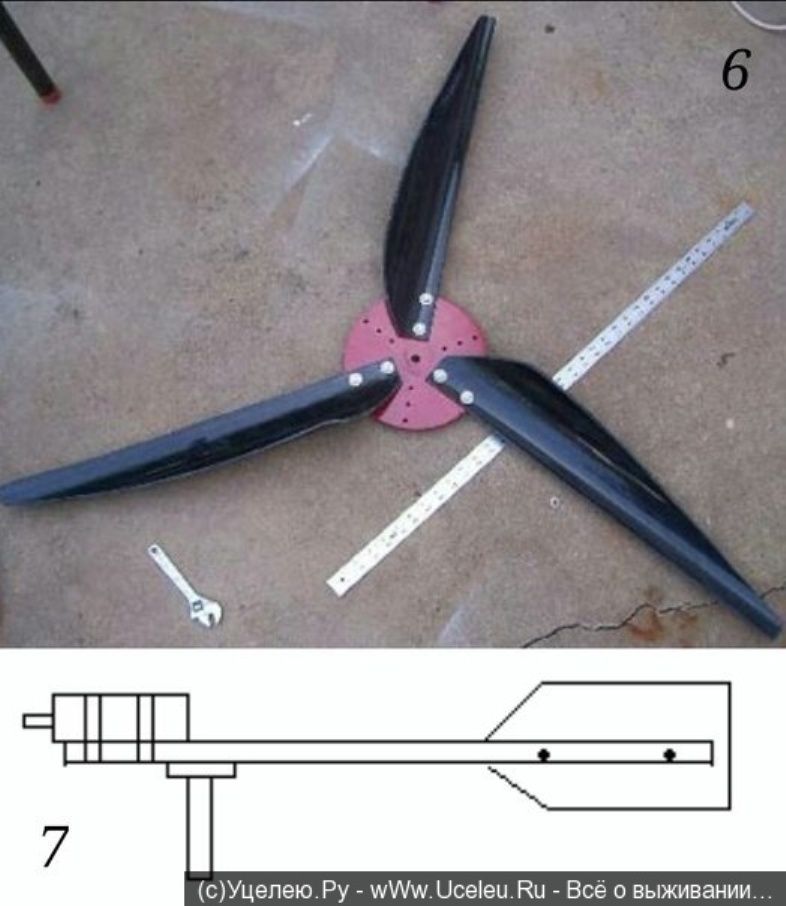
Turbine dimensions can be chosen arbitrarily - the larger, the more powerful. In the example, the diameter of the product is 60 cm.
 To make a vertical turbine you will need:
- Pipe Ø 60 cm (preferably stainless steel - galvanized, duralumin, etc.).
- Durable plastic (two discs with a diameter of 60 cm).
- Corners for fastening the blades (6 pcs. for each) - 36 pcs.
- For the base - a car hub.
- Nuts, washers screws for fastening.
Equipment and tools:
- Jigsaw.
- Bulgarian.
- Drill.
- Screwdriver.
- Keys.
- Gloves, mask.
To balance the blades, you can use a small metal plate, magnets, and with a slight imbalance, you can simply drill holes.
Drawing of a wind generator device
Making a vertical windmill
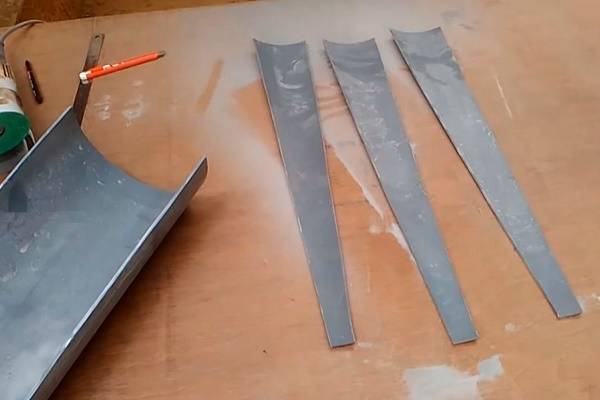
- The metal pipe is cut lengthwise so that 6 identical blades are obtained.
- Two identical circles are cut out of plastic (diameter 60 cm). This will be the upper and lower turbine support.
- To make the construction a little easier, you can cut a circle Ø 30 cm in the center of the upper support.
- Depending on how many holes are on the automobile hub, exactly the same holes are marked on them for mounting in the lower plastic support. Drilled with a drill.
- According to the template, you need to mark the location of the blades (two triangles forming a star). The places of fastening of the corners are marked. On two supports it should turn out identical.
- It is better to cut the blades not one at a time, but all at once (a grinder is used).
- The attachment points of the corners should also be noted on the blades. Then drill holes.
- With the help of corners, the blades are attached to the base circles with bolts and nuts through washers.
The longer the blades, the more powerful the unit will be, but the more difficult it will be to balance it, in a strong wind the structure will “loose”.
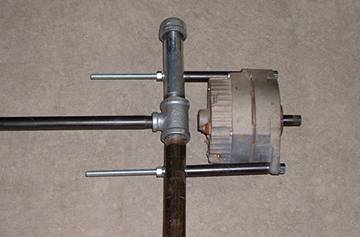
DIY generator
 For a windmill, you need to select a self-excited generator with permanent magnets (these were used in the T-4, MTZ, T-16, T-25 tractors).
If you put a conventional car generator, their voltage winding is powered by a battery, that is: no voltage - no excitation.
This means that if you install an autogenerator + battery, and there is a weak wind for a long time, the battery will simply be discharged and when the wind appears again, the system will not start.
Or make a wind generator on neodymium magnets with your own hands. Such a unit will give out with a weak wind of 1.5 kW, maximum, with a strong wind of 3.5 kW. Step Instruction:
Two metal pancakes are made, 50 cm in diameter.
12 neodymium magnets on each (about 50 x 25 x 1.2 mm in size) are attached to them around the perimeter with super-glue. Magnets alternate: "north" - "south".
Pancakes are placed opposite each other, the poles are also oriented "north" - "south".
Between them is a homemade stator. These are 9 coils of copper wire with a cross section of 3 mm. 70 turns each. Between themselves, they are connected according to the "star" scheme and filled with polymer resin. Coils are wound in one direction. For convenience, the beginning and end of the winding must be marked (for example, with electrical tape of different colors).
Homemade windmill generator made of neodymium magnets
The stator thickness is about 15 - 20 mm. In its manufacture, it is necessary to provide for the outputs of the windings from the coils through bolts with nuts.They will power the generator.
The distance between the stator and the rotor is 2 mm.
The essence of the work is that the north and south of the magnets are reversed, which causes the electric current to "run" through the coil.
The rotor magnets will be very strongly attracted. To connect the parts smoothly, you need to drill holes in them and cut the threads for the studs. The rotors are immediately aligned with each other and, gradually, with the help of keys, the upper one lowers to the lower one. After all, temporary hairpins are removed.


This generator can be used on both vertical and horizontal models.
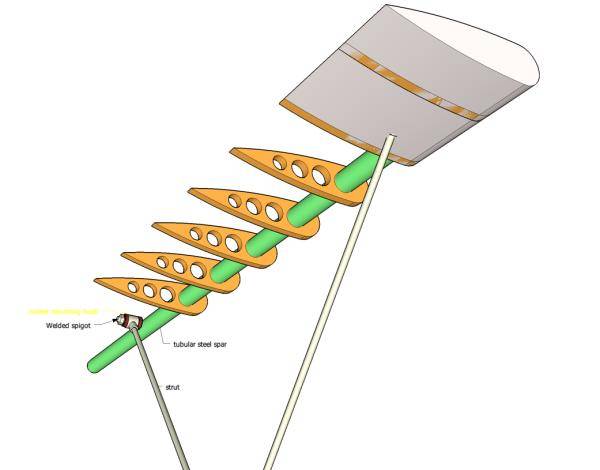
Assembly process
- A bracket for mounting the stator is installed on the mast (it can be three or six bladed).
- A hub is fixed above it with nuts.
- There are 4 studs in the hub. They turn on the generator.
- The generator stator is connected to a bracket fixed to the mast.
- A bladed turbine is fixed to the second rotor plate.
- From the stator, the wires are connected by terminals to the voltage regulator.
Main characteristics
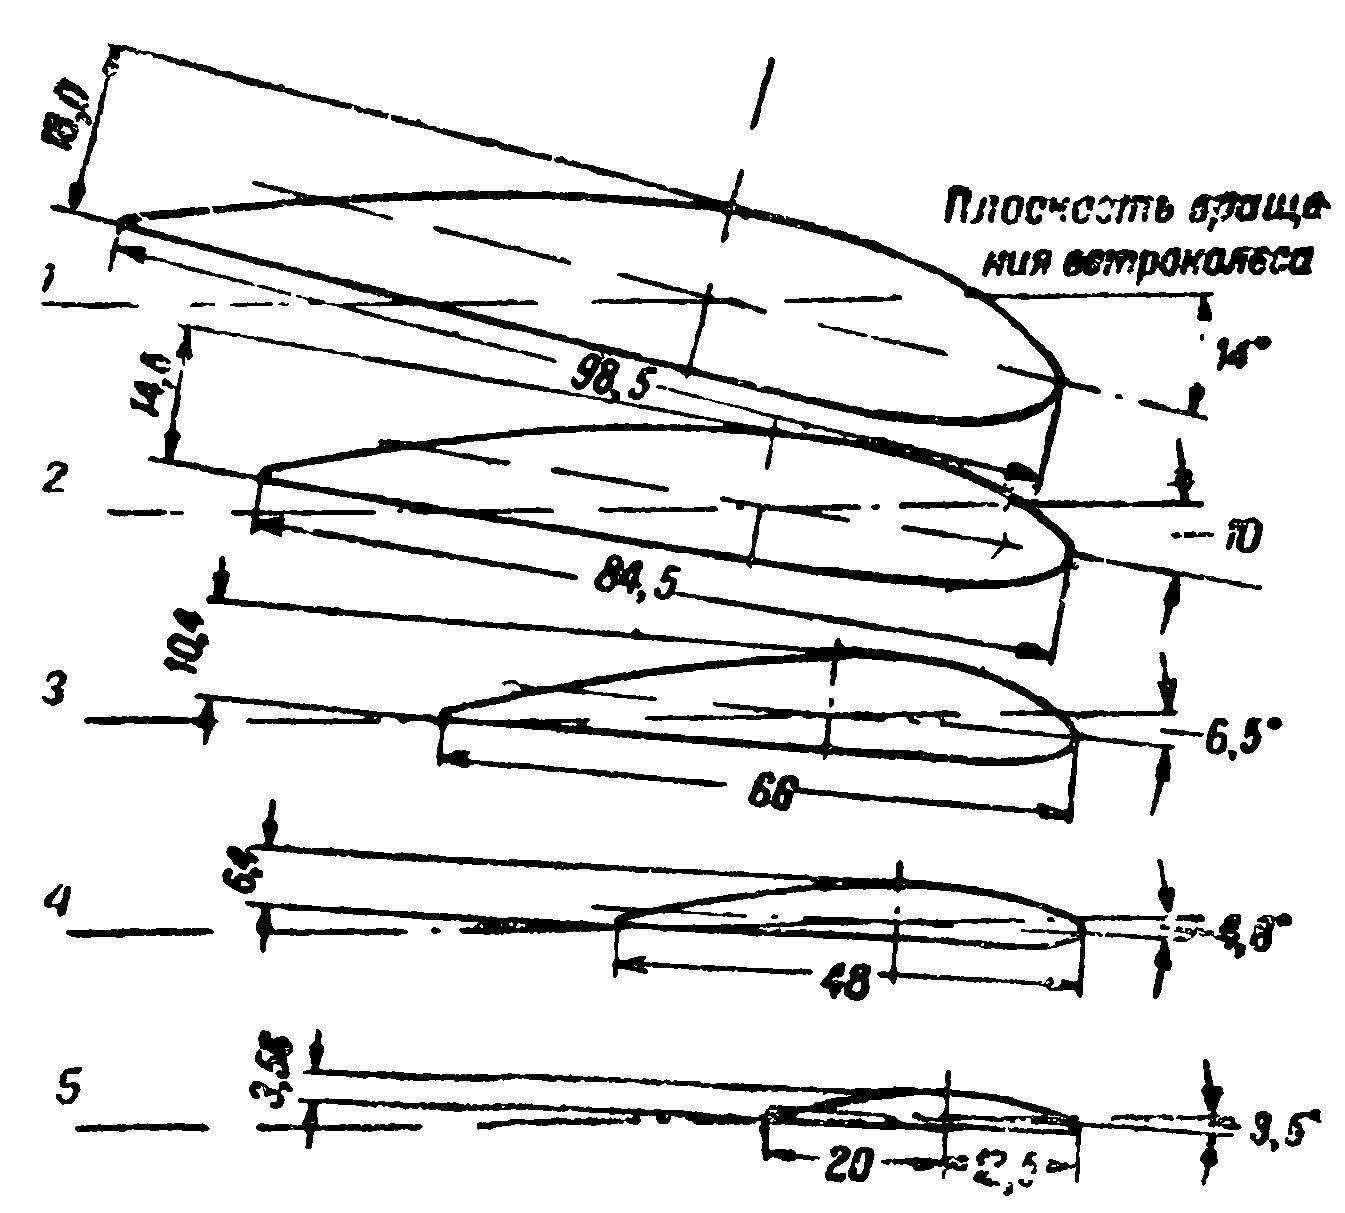
The performance of a wind generator depends on the number and size of the blades installed on it, which is clearly seen from the formula:
N=pSV3/2, where
N is the power of the air flow, which determines the power of the device;
р – air density;
S is the area swept by the wind generator;
V is the wind speed.
The main characteristics of this element of technical devices of this type are:
Geometric dimensions.
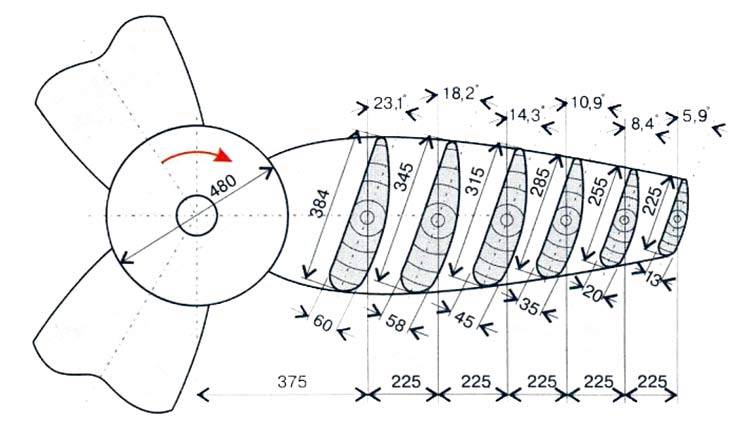
According to the diagram below:
R is the radius that determines the swept area of the device;
b - width, determines the speed of a particular model;
c - thickness, depends on the material from which it is made and design features;
φ - installation angle determines the location of the plane of rotation of the blade with respect to its axis;
r is the section radius or inner radius of rotation.
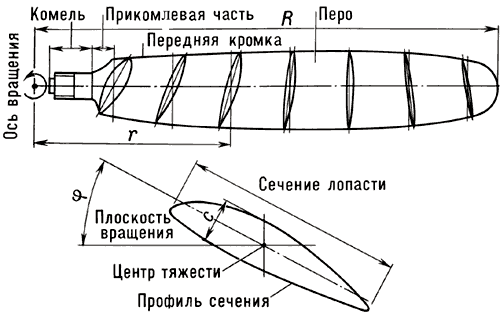
- Mechanical strength - determines the ability of the element to withstand the loads applied to it and depends on the material used in the manufacture and its design.
- Aerodynamic efficiency - determines the ability to convert the translational motion of wind energy into rotational motion of the wind generator shaft.
- Aeroacoustic parameters - characterize the level of noise produced during the operation of the wind turbine.
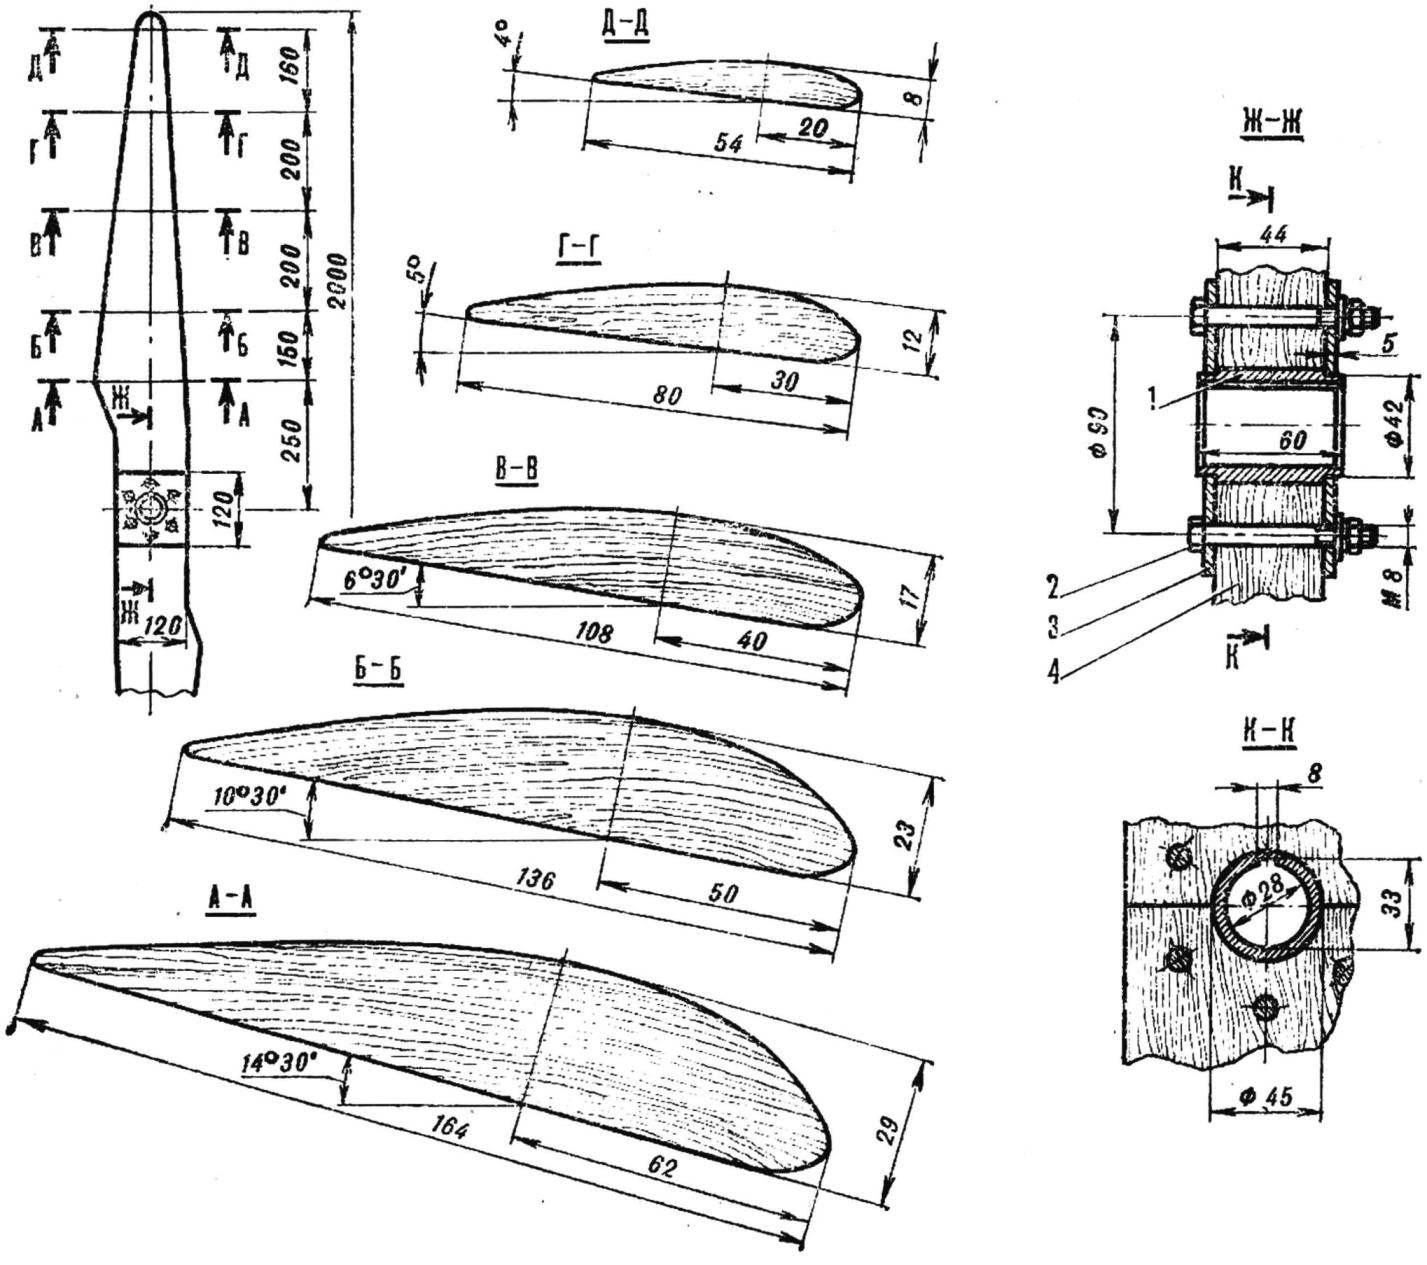
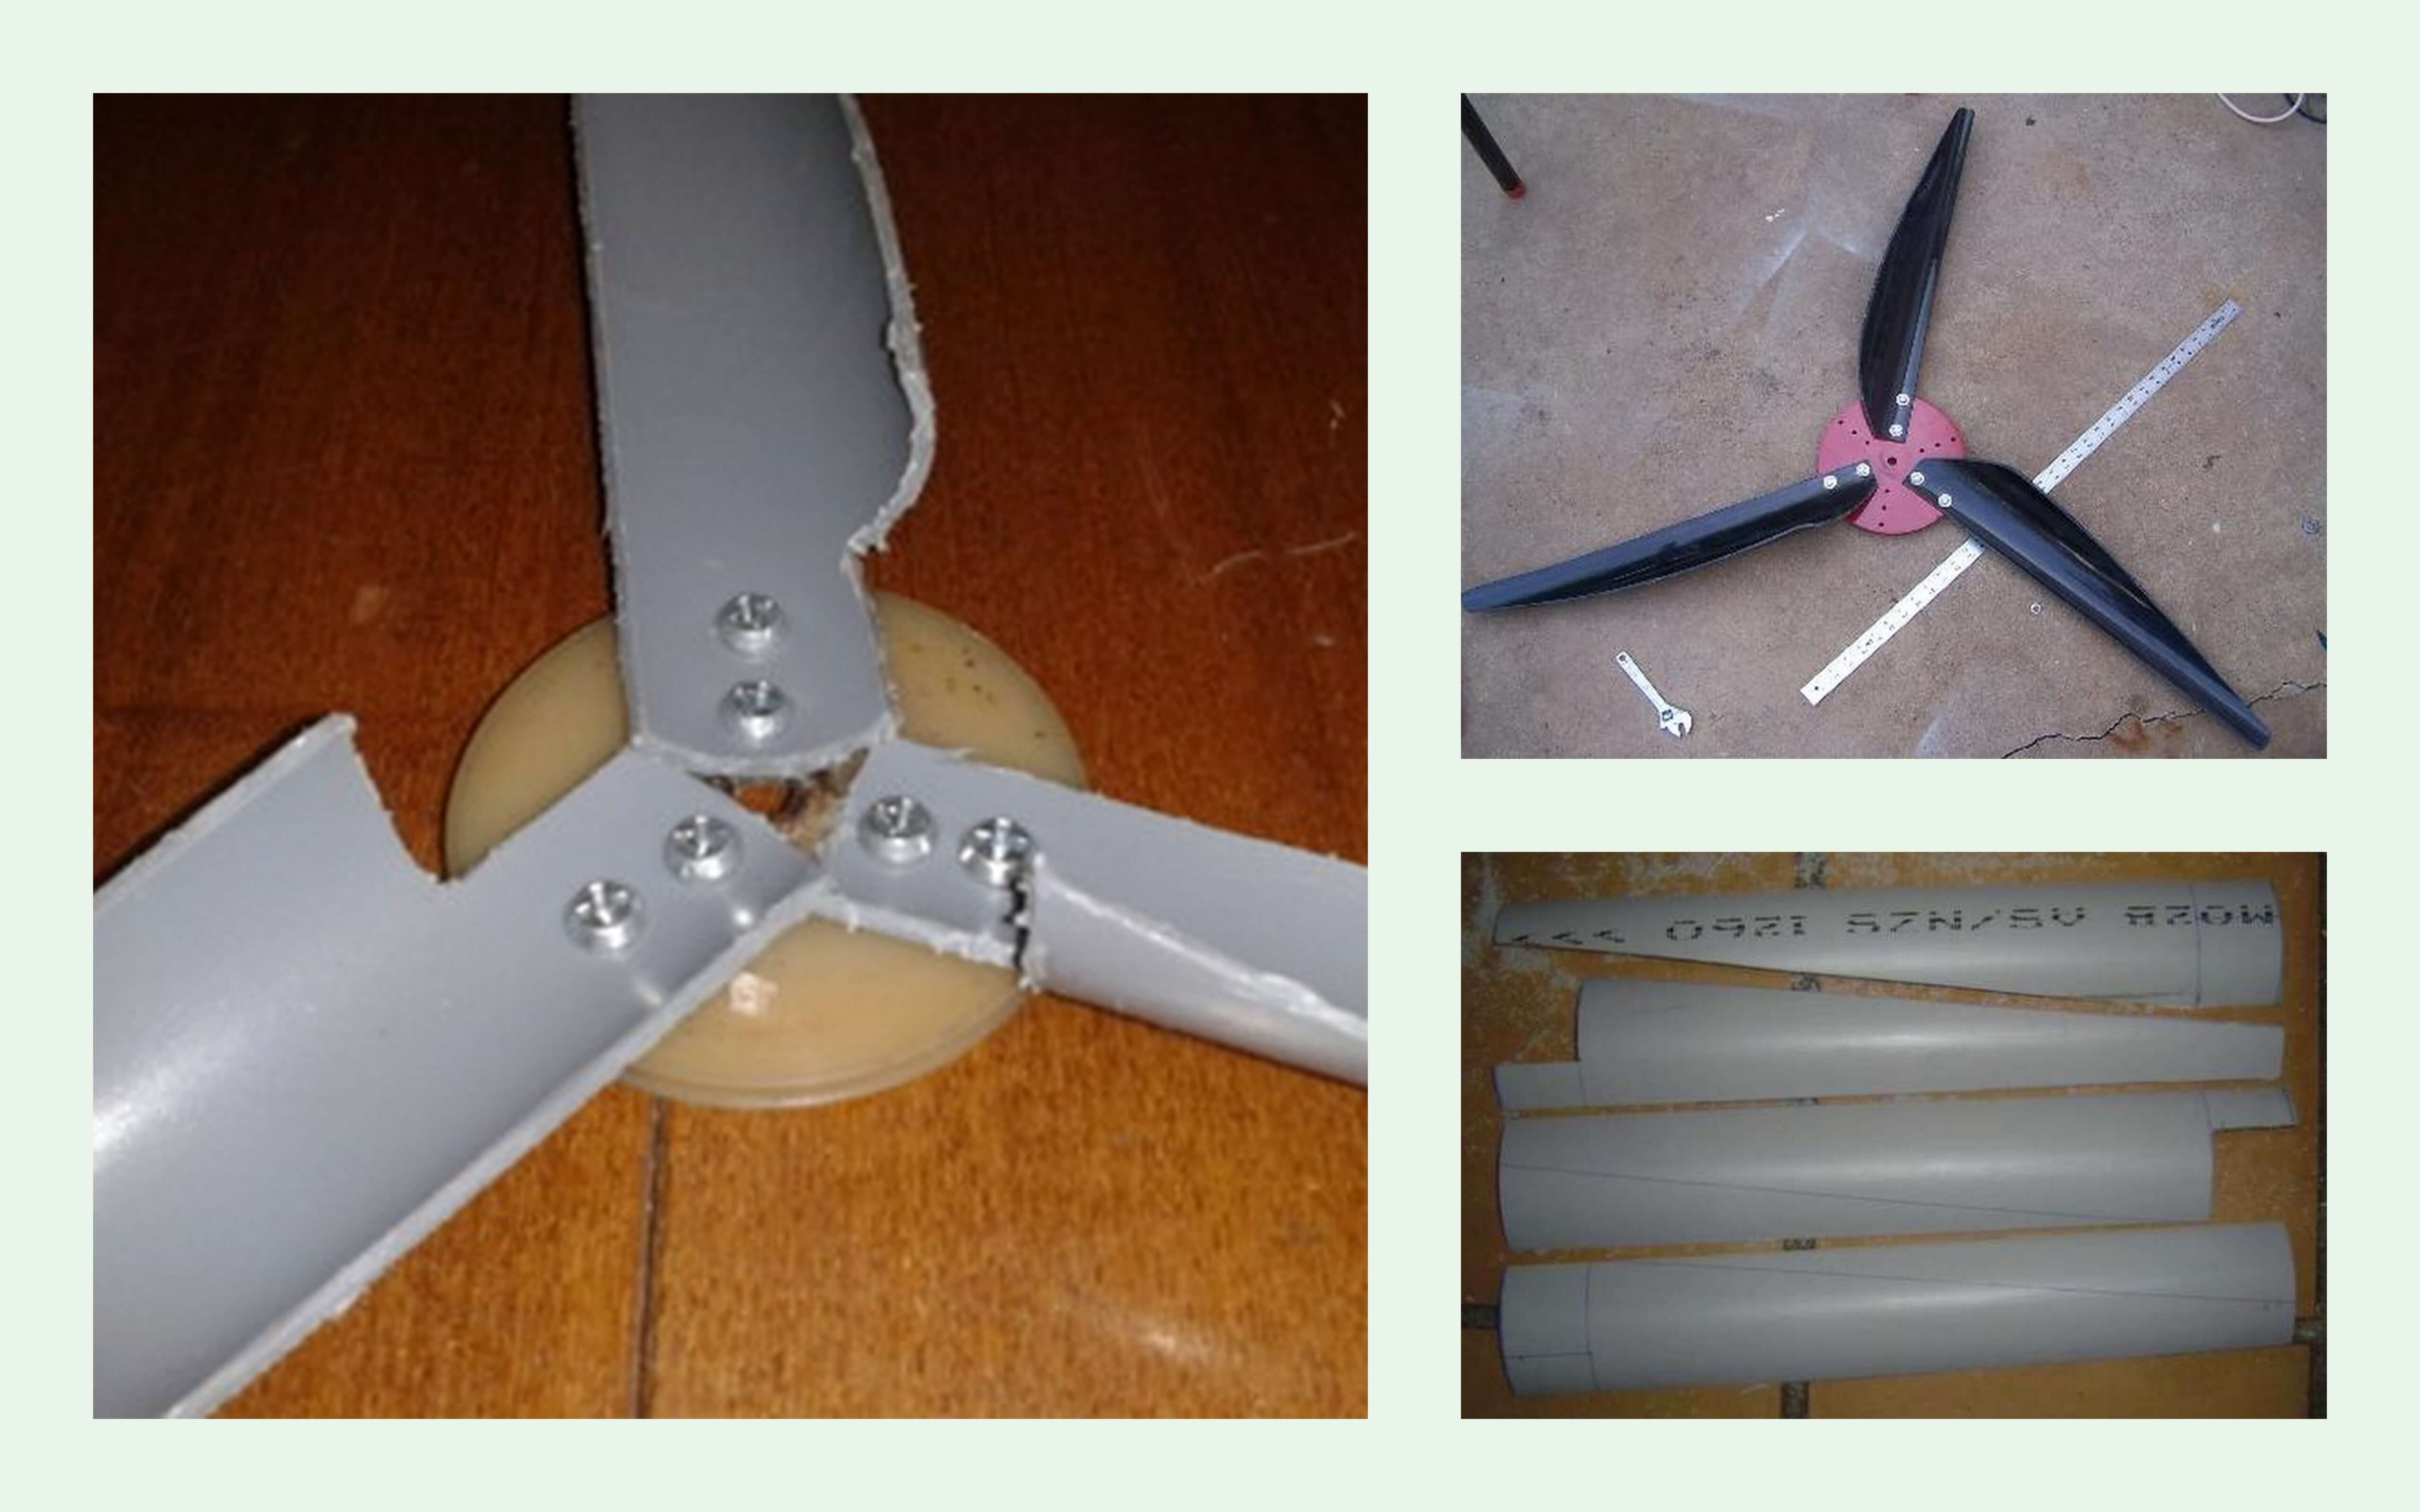
PVC pipe blades
Equally important is the choice of material for the manufacture of wind turbine blades. The easiest way to make wind turbine blades is from a plastic pipe. PVC pipes, which can be purchased at any hardware store, are perhaps the most suitable material. It is necessary to use pipes with the required wall thickness (designed for sewage or pressure gas pipelines), otherwise the incoming air flow with a sufficiently strong wind can bend the blades, which will lead to their destruction against the generator mast.
pvc pipes with markings for cutting
It should be remembered that the blade of a wind generator experiences considerable loads from centrifugal force, the greater, the longer the blade. The speed of movement of the end part of the blade of a two-blade wheel of a household wind generator is hundreds of meters per second, which is comparable to the speed of a pistol bullet (the tip of the blade of an industrial wind generator wheel can reach supersonic speeds).
A PVC blade may not withstand the tensile load at such high speeds, and shrapnel fragments flying at the speed of a bullet poses a real threat to human life and health. The conclusion is obvious - we reduce the length of the blade by increasing the number of blades. In addition, a wind wheel with a large number of blades is much easier to balance and creates less noise.
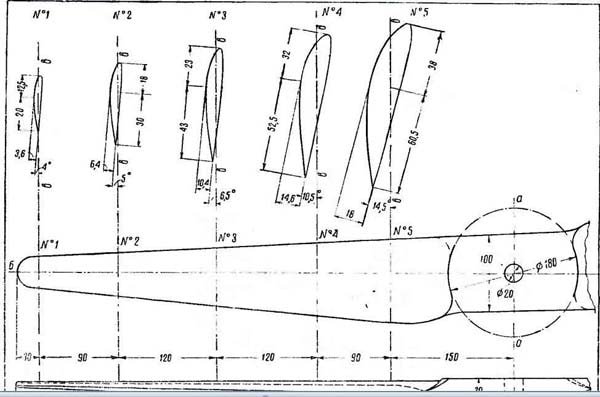
Consider the manufacture of blades for a six-blade wind wheel with a diameter of 2 m from PVC pipe. To ensure the necessary tensile and bending strength, the wall thickness of the pipe must be at least 4 mm. Calculating the profile of the blades of a wind turbine wheel is a complex and time-consuming process that requires highly specialized knowledge, so it would be more rational for an amateur master to use a ready-made template.
Blade template made of PVC pipe with a diameter of 160 mm
The template must be cut out of paper, attached to the wall of the pipe and circled with a marker. Repeat the procedure five more times - six blades should be obtained from one pipe. We cut the pipe along the lines obtained with an electric jigsaw and get six almost finished blades. It remains only to grind the cuts and round the corners and edges. This will give the wind wheel a neat appearance and reduce the noise of operation.
To connect the blades to each other and attach the wheel to the turbine, it is necessary to make a connecting unit, which is a disk cut out of steel with six steel strips welded or cut out at the same time. The specific dimensions and configuration of the connecting node depend on the generator or DC motor that will serve as the heart of the mini wind farm.We only point out that the steel from which the connecting unit is made must be of sufficient thickness so that the wheel does not bend under the pressure of the wind.
We make a windmill with our own hands
1. Wind turbine blades
The wind wheel is the most significant structural element of the device. It converts wind force into mechanical energy. Thus, the selection of all other elements depends on its structure.


The most common and effective types of blades are sail and vane. For the manufacture of the first option, it is necessary to fix a sheet of material on the axis, placing it at an angle to the wind flow. However, during rotational movements, such a blade will have significant aerodynamic resistance. In addition, it will increase with an increase in the attacking angle, which reduces the effectiveness of their functioning.
The second type of blades works with higher productivity - winged ones. In their outlines, they resemble the wing of an aircraft, and the costs of the friction force are reduced to a minimum. This type of wind turbine has a high utilization rate of wind energy at low material costs.
The blades can be made from plastic or plastic pipe as it will be more productive than wood. The most efficient is the wind wheel structure with a diameter of two meters and six blades.
2. Wind turbine generator
The most acceptable option for wind generating equipment is a converting asynchronous generating mechanism with alternating current.Its main advantages are low cost, ease of acquisition and breadth of distribution of models, the possibility of re-equipment and excellent operation at low speeds.
It can be transformed into a permanent magnet generator. Studies have shown that such a device can be operated at low speeds, but quickly loses efficiency at high speeds.
3. Wind turbine mount
To fix the blades to the casing of the generator, it is necessary to use the head of the wind turbine, which is a steel disk with a thickness of up to 10 mm. Six metal strips with holes are welded to it for attaching the blades to them. The disk itself is attached to the generating mechanism using bolts with locknuts.
Since the generating device is able to withstand maximum loads, including from gyroscopic forces, it must be firmly fixed. On the device, the generator is installed on one side, for this the shaft must be connected to the body, which looks like a steel element with threaded holes for screwing onto the generator axis of the same diameter.
For the production of a support frame for wind-generating equipment, on which all other elements will be placed, it is necessary to use a metal plate with a thickness of up to 10 mm or a piece of a beam of the same dimensions.
4. Wind turbine swivel
The rotary mechanism provides rotational movements of the windmill around a vertical axis. Thus, it makes it possible to turn the device in the direction of the wind.For its manufacture, it is better to use roller bearings, which more effectively perceive axial loads.
5. Current receiver
The pantograph functions to reduce the likelihood of twisting and breaking the wires coming from the generator on the windmill. It contains in its design a sleeve made of insulating material, contacts and brushes. To create protection from weather phenomena, the contact nodes of the current receiver must be closed.
The principle of operation of the wind turbine
A wind generator or wind power plant (WPP) is a device that is used to convert the kinetic energy of a wind stream into mechanical energy. The resulting mechanical energy rotates the rotor and is converted into the electrical form we need.
The principle of operation and the device of a kinetic windmill are described in detail in the article, which we recommend that you read.
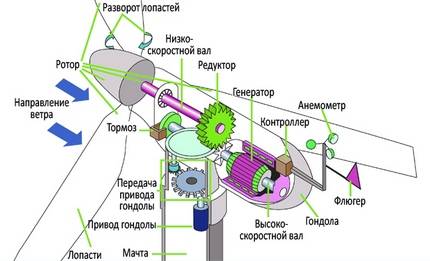
The structure of the WUE includes:
- blades that form a propeller,
- rotating turbine rotor
- the axis of the generator and the generator itself,
- an inverter that converts alternating current to direct current used to charge batteries,
- battery.
The essence of wind turbines is simple. During the rotation of the rotor, a three-phase alternating current is generated, which then passes through the controller and charges the DC battery. Next, the inverter converts the current so that it can be consumed, powering lighting, a radio, a TV, a microwave oven, and so on.
The detailed arrangement of a wind generator with a horizontal axis of rotation allows you to imagine well what elements contribute to the conversion of kinetic energy into mechanical energy, and then into electrical energy.
In general, the principle of operation of a wind generator of any type and design is as follows: in the process of rotation, there are three types of force acting on the blades: braking, impulse and lifting.

This scheme of operation of a wind turbine allows you to understand what happens to the electricity produced by the work of a wind generator: part of it is accumulated, and the other is consumed
The last two forces overcome the braking force and set the flywheel in motion. On the stationary part of the generator, the rotor forms a magnetic field so that the electric current goes through the wires.
Features of manufacturing blades for a wind generator with your own hands from various materials
The shape of the blade and the efficiency of the wind turbine largely determine the materials used. Among the most common:
PVC pipes
Presented for sale in a wide range, which allows you to choose the best option, taking into account the size of the future design. Preference should be given to products for a gas pipeline or sewerage - their density will make it easy to withstand even strong gusts of wind. But it is worth considering that the centrifugal force increases the load on the blades in proportion to the increase in their length. The edges of the wind turbine rotate at a speed of several hundred meters per second. And an accidental rupture of the pipe can cause injury to people nearby.


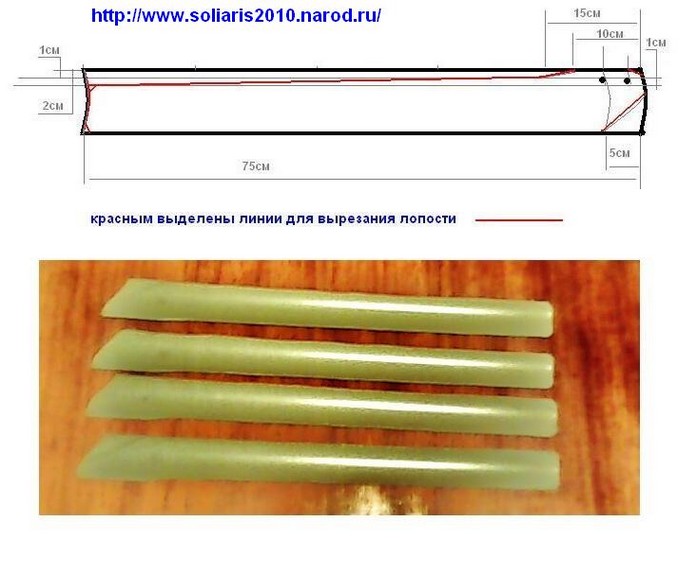
The solution to the problem can be to reduce the length of the structure with a simultaneous increase in their number. This design works with less noise and rotates confidently even in light winds. When choosing a material, it is necessary to take into account the thickness of the pipe, on which the density of the blade depends.Do-it-yourself drawing for wind turbine blades is done using special tables developed on the basis of practical experience. They will help you easily determine the desired material parameters, depending on the desired number of parts and their length.
Processing and forming the blades of PVC pipe will take a minimum of time. According to the markup, segments of the desired length are cut out, after which they are cut along and slightly opened. Sanding the edges gives the product a more aesthetic and neat appearance, and also helps to reduce the noise level. The finished parts of the structure are installed on a steel base, the thickness of which is calculated taking into account the future wind load.
Aluminum
The main advantage of aluminum, unlike other materials for wind turbine blades, is increased strength and resistance to bending and tearing. But the increased weight of metal, compared to plastic, makes it necessary to take special measures to strengthen the structure and carefully balance the wheel.
Blades are made in the following order. First, a pattern is cut out of the plywood sheet, according to which the construction blanks are cut. Molding in a 10mm deep trough gives products a winged shape with excellent aerodynamic characteristics. A threaded sleeve is attached to each blade, with the help of which all parts are assembled into a single structure.
Fiberglass
According to experts, this material is the optimal combination of characteristics for making do-it-yourself wind turbine blades. Light weight, high strength and excellent aerodynamics are the main advantages of the material. But its processing at home is somewhat difficult. First, a matrix is designed and cut out of wood.A layer of epoxy resin is applied to one of the surfaces and a piece of fiberglass of a suitable size is laid on top. Then the layer of resin and fiberglass is laid out again and this sequence is repeated three or four times. The resulting workpiece is dried during the day. Only half of the part is made this way.
The described procedure should be repeated as many times as the number of blades planned to be installed on the wind turbine. The finished elements are connected with epoxy resin and a wooden cork with a threaded bushing is placed inside and glued for mounting on the metal base of the structure.

Chinese electronic alternative
Making a wind turbine controller with your own hands is a prestigious business. But given the speed of development of electronic technologies, the meaning of self-assembly often loses its relevance. In addition, most of the proposed schemes are already obsolete.
It turns out cheaper to buy a ready-made product, made professionally, with high quality installation, on modern electronic components. For example, you can purchase a suitable device at a reasonable cost on Aliexpress.
So, for example, among the offers of the Chinese portal there is a model for a 600-watt windmill. A device worth 1070 rubles. suitable for 12/24 volt batteries, operating current up to 30 A.
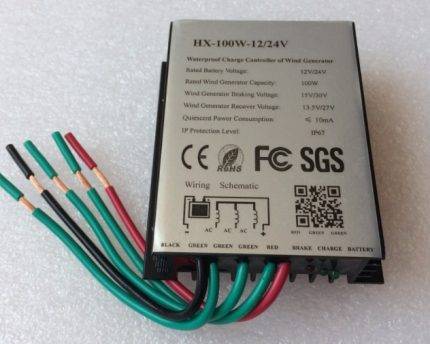 Quite decent, designed for a 600-watt wind generator, a Chinese-made charge controller. Such a device can be ordered from China and received by mail in about a month and a half.
A high-quality all-weather controller case measuring 100x90 mm is equipped with a powerful cooling radiator. The housing design corresponds to the protection class IP67.The range of external temperatures is from - 35 to + 75ºС. A light indication of the wind generator state modes is displayed on the case.
The question is, what is the reason to spend time and effort on assembling a simple structure with your own hands, if there is a real opportunity to buy something similar and technically serious?
Well, if this model is not enough, the Chinese have very “cool” options. So, among the new arrivals, a model with a power of 2 kW for an operating voltage of 96 volts was noted.
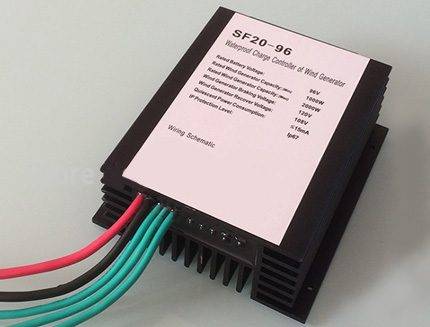
Chinese product from the new arrival list. Provides battery charge control, working in tandem with a 2 kW wind generator. Accepts input voltage up to 96 volts
True, the cost of this controller is already five times more expensive than the previous development. But then again, if you compare the costs of producing something similar with your own hands, the purchase looks like a rational decision.
The only thing that confuses about Chinese products is that they tend to suddenly stop working in the most inopportune cases. Therefore, the purchased device often has to be brought to mind - naturally, with your own hands. But it is much easier and simpler than making a do-it-yourself wind turbine charge controller from scratch.
For lovers of homemade products on our website there is a series of articles devoted to the manufacture of wind turbines:
- Do-it-yourself wind generator from a car generator: windmill assembly technology and error analysis
- How to build blades for a wind generator with your own hands: examples of self-made blades for a windmill
- Do-it-yourself wind generator from a washing machine: instructions for assembling a windmill
- How to calculate a wind turbine: formulas + practical calculation example