- Driver repair (LED) lights
- The main malfunctions of LED lamps for 220 volts
- 1. Failure of LEDs
- 2. Failure of the diode bridge
- 3. Poor soldering of lead ends
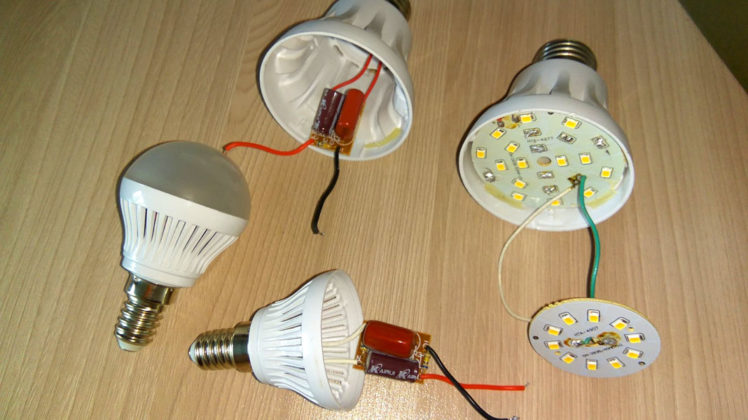
- How to disassemble
- LED lamp device
- Common causes of malfunctions
- How to connect an LED to a 220 volt network
- Calculation of the resistor for the LED
- Calculation of the quenching capacitor for the LED
- Driver repair
- Creating an E27 LED lamp from an energy-saving one using a ready-made driver
- Step-by-step instructions for making an LED lamp
- LED Damage - Repair Instructions
- Do-it-yourself LED lamp repair: device and principle of operation
- How to identify damage
- Summing Up About LED Bulb Repair
- Conclusion
Driver repair (LED) lights
Repair of a portable light source depends on its circuit design. If the flashlight does not light or shines weakly, first check the batteries and change them if necessary.
After that, in drivers with batteries, they check the details of the charging module with a tester or multimeter: bridge diodes, input capacitor, resistor and button or switch. If everything is OK, check the LEDs. They are connected to any 2-3 V power source through a 30-100 Ohm resistor.
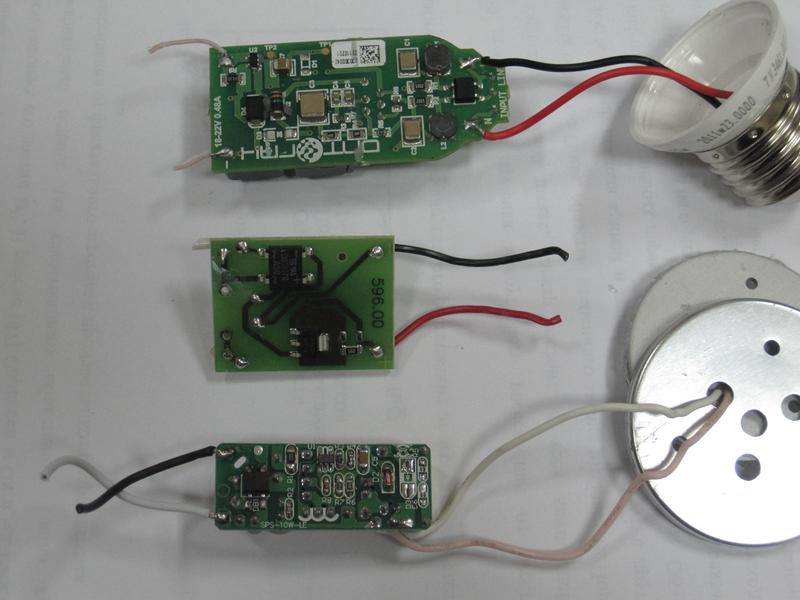
Consider four typical lamp circuits and the malfunctions that occur in them. The first two are powered by batteries, they have a charging module from the 220 V network.
Schemes of a rechargeable flashlight with an inserted 220 V charging module.
In the first two options, LEDs often burn out both through the fault of consumers and due to incorrect circuit design. When removing the flashlight from the socket after charging from the mains, the finger sometimes slips off and presses the button. If the pins of the device have not yet been disconnected from 220 V, a voltage surge occurs, the LEDs burn out.
In the second option, when the button is pressed, the battery is connected directly to the LEDs. This is unacceptable, as they can fail the first time they are turned on.
If during the check it turned out that the matrices had burned out, they should be replaced, and the lights should be finalized. In the first option, it is necessary to change the connection scheme of the LED, indicating that the battery is charging.
Schematic diagram of a LED flashlight driver on a battery with a button.
In the second option, instead of a button, you should install a switch, and then solder one additional resistor in series with each light source. But this is not always possible, since often an LED matrix is \u200b\u200binstalled in the lanterns. In this case, one common resistor should be soldered to it, the power of which depends on the type of LED elements used.
Diagram of a battery-powered LED flashlight with a switch and a resistor added in series.
The rest of the lights are powered by batteries. In the third variant, the LEDs can burn out during the breakdown of the diode VD1. If this happens, it is necessary to replace all defective parts and install an additional resistor.
Battery powered flashlight circuit (without additional resistor).
Battery powered flashlight circuit (with a resistor added to the circuit).
The main elements of the latest version of the flashlight (microcircuit, optocoupler and field effect transistor) are difficult to verify. This requires special devices. Therefore, it is better not to repair it, but to insert another driver into the case.
The main malfunctions of LED lamps for 220 volts
Based on many years of experience, if the 220V LED lamp does not light up, then the reasons may be as follows:
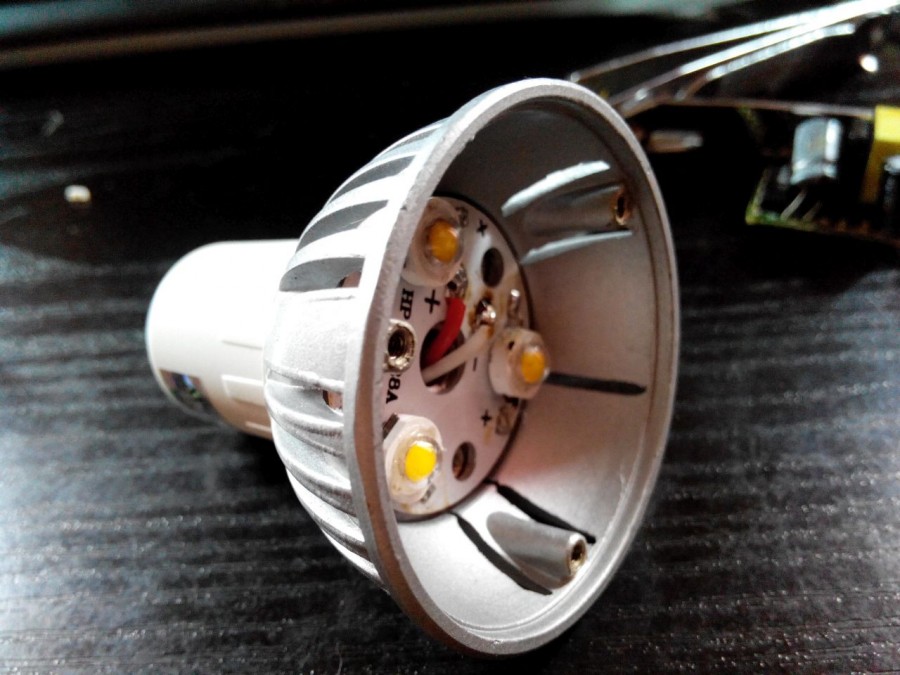
1. Failure of LEDs
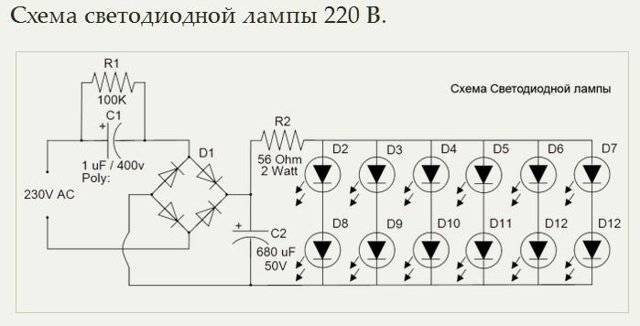
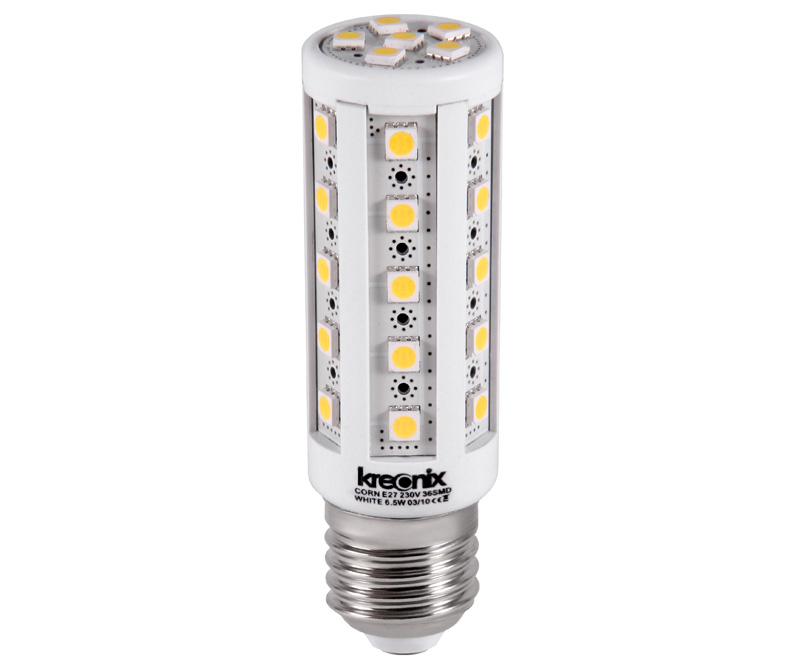
Since in an LED lamp all the LEDs are connected in series, if at least one of them comes out, the entire bulb stops glowing because an open circuit occurs. In most cases, LEDs in 220 lamps are used in 2 sizes: SMD5050 and SMD3528.
To eliminate this reason, you need to find the failed LED and replace it with another one, or put a jumper (it is better not to abuse the jumpers - as they can increase the current through the LEDs in some circuits). When solving the problem in the second way, the luminous flux will slightly decrease, but the light bulb will again shine.
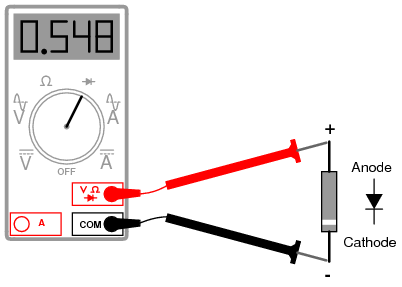
To find a damaged LED, we need a low current (20 mA) power supply or a multimeter.
To do this, apply "+" to the anode, and "-" to the cathode. If the LED does not light up, then it is out of order. Thus, you need to check each of the LEDs of the lamp. Also, a failed LED can be determined visually, it looks something like this:


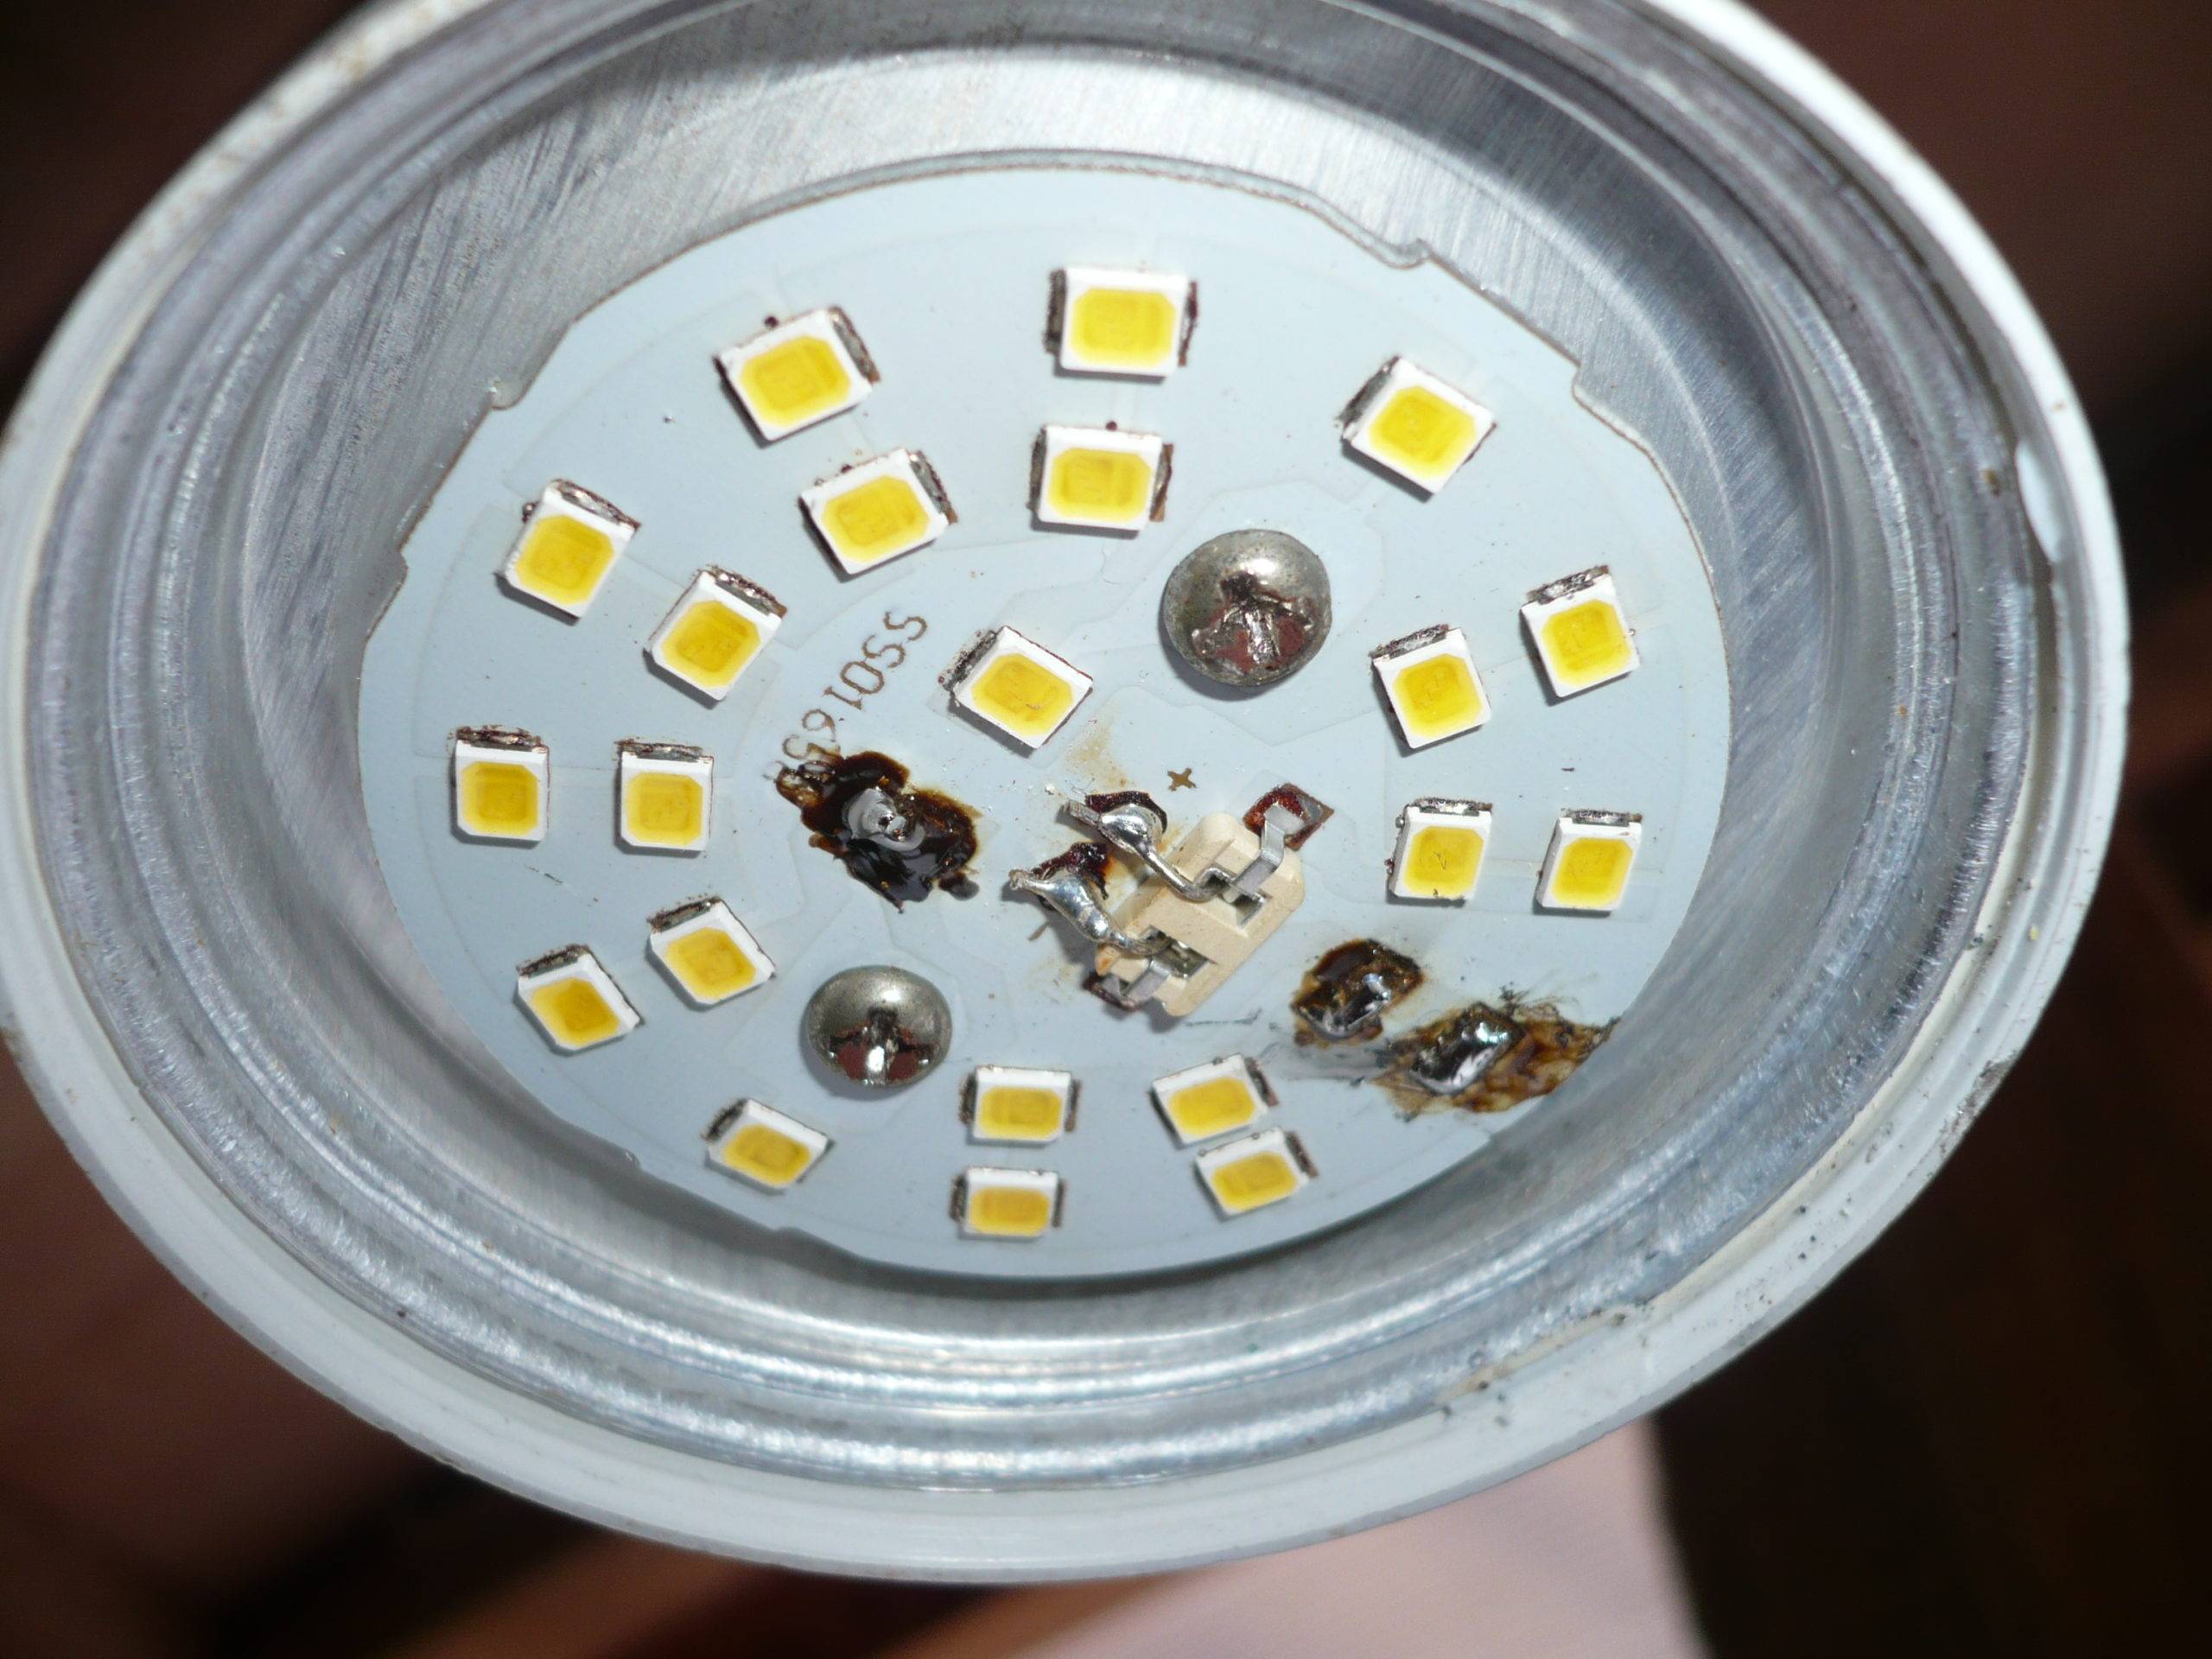
The reason for this failure in most cases is the lack of any protection for the LED.
2. Failure of the diode bridge
In most cases, with such a malfunction, the main reason is a factory defect. And in this case, the LEDs often “fly out”. To solve this problem, it is necessary to replace the diode bridge (or bridge diodes) and check all the LEDs.
To test the diode bridge, you need a multimeter. It is necessary to apply an alternating voltage of 220 V to the input of the bridge, and check the voltage at the output. If it remains variable at the output, then the diode bridge is out of order.
If the diode bridge is assembled on separate diodes, they can be unsoldered one by one and checked with the device. The diode should only allow current to flow in one direction. If it does not pass current at all or passes when a positive half-wave is applied to the cathode, then it is out of order and needs to be replaced.
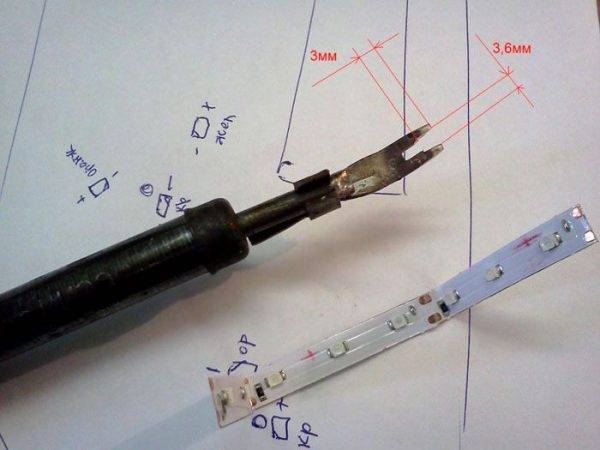
3. Poor soldering of lead ends
In this case, we will need a multimeter. You need to understand the circuit of the LED lamp and then check all the points, starting with the input voltage of 220 V and ending with the outputs of the LEDs. Based on experience, this problem is inherent in cheap LED lamps, and in order to eliminate it, it is enough to additionally solder all parts and components with a soldering iron.
How to disassemble
Repair of an LED light bulb begins with the fact that it must be disassembled. There is no vacuum in it, so it is possible. Diffuser and base are usually separated without problems. They are connected by means of notches on various parts.
Most of the parts of the LED lamp are held on by snaps.
There are two options. Easier to disassemble and more complex. In a simple case, the parts of the lamp are connected only by mechanical latches. In a more complex, in addition to the latches, there is also silicone, which ensures the waterproofness of the lamp.Such specimens can be operated at high humidity. You need to disassemble the LED lamp like this:
- Hold the base in your hands and turn the radiator counterclockwise. The diffuser is removed in the same way.
- In some LED bulbs, the connections are filled with silicone. In this case turn, don't turn, nothing moves. Looking closely, you can see the sealant. In this case, a solvent is needed. You draw it into a syringe (without a needle or with a thick needle), carefully inject the liquid around the perimeter. It is necessary to withstand it for 5-10 minutes, and then try again. From the first time it is usually impossible to disassemble the LED light bulb, but three or four visits help.
The boards inside the lamp are either inserted into the grooves, or are also held on by latches. It is easier to push them away with a flat screwdriver, while simultaneously squeezing the board up. The force should not be excessive, as the latches are plastic and may break.
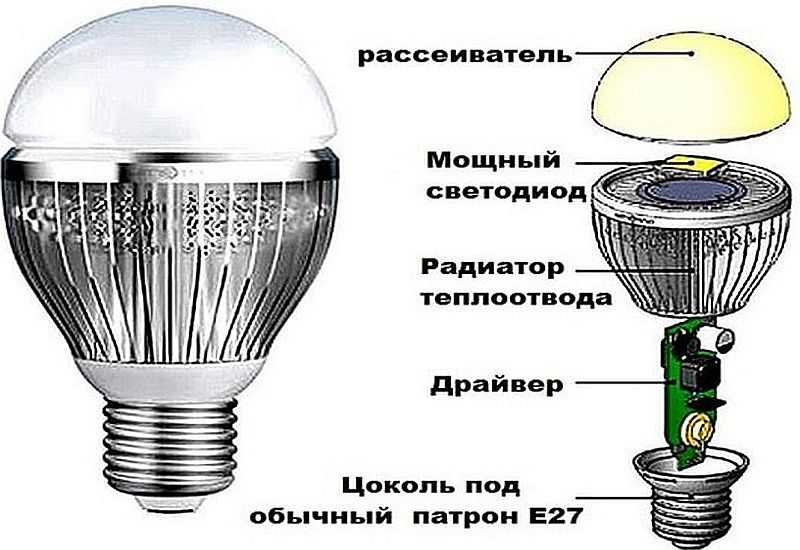
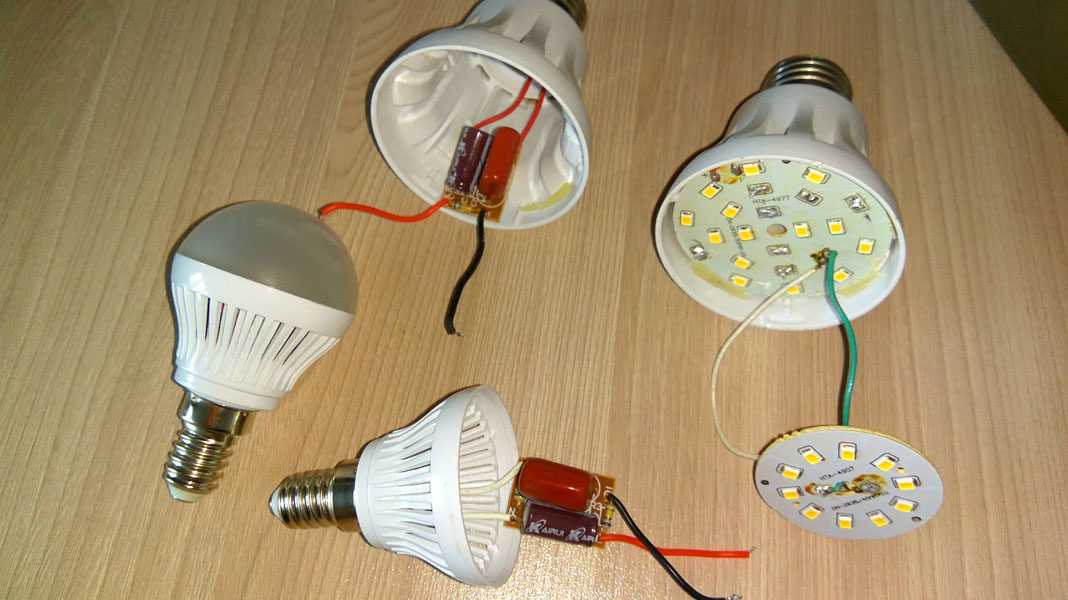
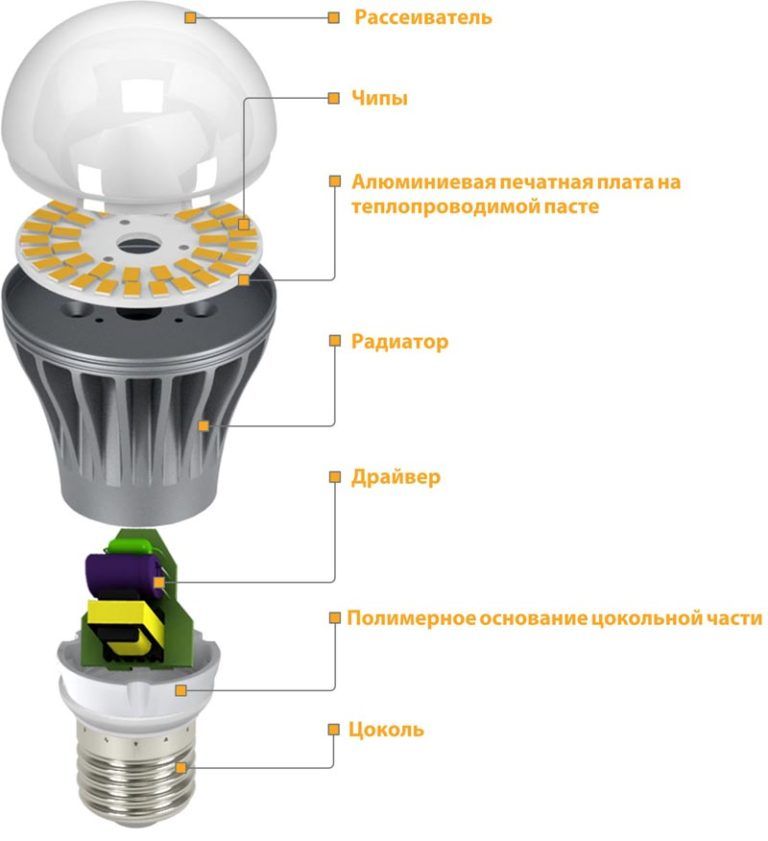
LED lamp device
The device of the LED lamp is typical. Inside there is a driver, which is a kind of printed circuit board with various radio elements installed. The operation of the device involves power supply with the contact of the cartridge, which is transmitted to the terminals of the base. Two wires are necessarily suitable for the base, through which the process of supplying voltage to the driver is carried out. And now the driver carries out the process of supplying direct current to the board, on which the LEDs are located.
The driver itself is a specialized electronic unit, which can also be called a current generator.It is thanks to the driver that the process of converting the supply voltage into current is carried out, which is necessary for the stable glow of the diodes.
Common causes of malfunctions
Incorrect operation and sudden voltage drops in the central electrical network often lead to the failure of an LED lamp. The diode elements themselves in this case remain operational, but the driver may deteriorate.
A factory defect is a very possible variant of a malfunction. Basically, nameless products are subject to it, however, this can happen for branded products, although such cases are extremely rare and are usually detected at the purchase stage.
Shocks and vibrations will not cause damage to the diodes, but they will affect the driver in the most negative way. The integrity of the structure and the accuracy of fit to the board of working elements may be violated
If the luminaire itself is not well ventilated, the driver will overheat. As a result, this will adversely affect its functioning and provoke a breakdown.
The lamp will begin to flicker and blink sensitively, irritating the eye when the current-limiting resistor deteriorates, and will completely stop burning if the capacitor fails.
All these moments are unpleasant, but you should not panic. You can fix the problem without much effort at home with your own hands.
An improperly organized electrical system in a house or apartment will have a bad effect on the Led element and lead to its failure.
Plus, it will increase the load on the wiring and, possibly, create additional problems in the near future. Therefore, it is better to entrust its arrangement to professionals.
When purchasing a light bulb from a well-known brand at a low price, you should be careful.Products may be counterfeit and will not work out the period declared by the manufacturer
Repair will require financial costs, time, and is unlikely to justify itself in this case
During operation, a violation of the basic crystal structure of semiconductor diodes can occur in the lamp.
This problem is provoked by the reaction to an increase in the level of injected current density from the side of the material from which the semiconductor is made.
When the soldering of the edges is carried out poorly, heat removal loses the necessary intensity and weakens. The conductor overheats, an overload occurs in the system and a short circuit disables the lamp.


All these little things are not fatal and are subject to inexpensive repairs in terms of time and finances.
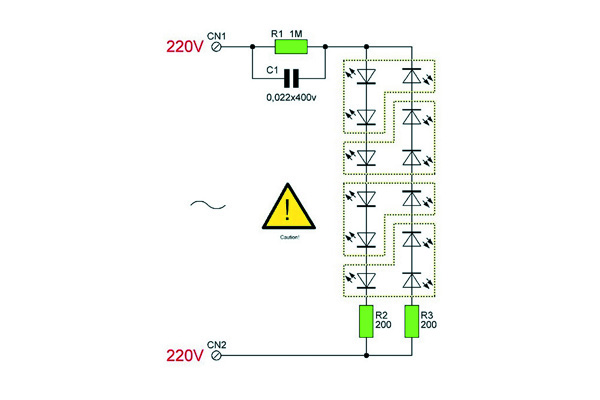
How to connect an LED to a 220 volt network
An LED is a type of semiconductor diode with a supply voltage and current much lower than in a household power supply. When connected directly to a 220 volt network, it will instantly fail.
Therefore, the light emitting diode is necessarily connected only through a current-limiting element. The cheapest and easiest to assemble are circuits with a step-down element in the form of a resistor or capacitor.
The first thing you need to know when connecting to a 220V network is that for a nominal glow, a current of 20mA must pass through the LED, and the voltage drop across it should not exceed 2.2-3V. Based on this, it is necessary to calculate the value of the current-limiting resistor using the following formula:
- where:
- 0.75 - LED reliability coefficient;
- U pit is the voltage of the power supply;
- U pad - the voltage that drops on the light emitting diode and creates a luminous flux;
- I is the rated current passing through it;
- R is the resistance rating for regulating the passing current.
After appropriate calculations, the resistance value should correspond to 30 kOhm.
However, do not forget that a large amount of heat will be released on the resistance due to the voltage drop. For this reason, it is additionally necessary to calculate the power of this resistor using the formula:
For our case, U - this will be the difference between the supply voltage and the voltage drop on the LED. After appropriate calculations, to connect one led, the resistance power should be 2W.
An important point to pay attention to when connecting an LED to AC power is the reverse voltage limitation. This task is easily handled by any silicon diode, designed for a current not less than what flows in the circuit.
The diode is connected in series after the resistor or in reverse polarity in parallel with the LED.
There is an opinion that it is possible to do without limiting the reverse voltage, since electrical breakdown does not cause damage to the light emitting diode. However, reverse current can cause overheating of the p-n junction, resulting in thermal breakdown and destruction of the LED crystal.
Instead of a silicon diode, a second light emitting diode with a similar forward current can be used, which is connected in reverse polarity in parallel with the first LED. The downside of current-limiting resistor circuits is the need for high power dissipation.
This problem becomes especially relevant in the case of connecting a load with a large current consumption.This problem is solved by replacing the resistor with a non-polar capacitor, which in such circuits is called ballast or quenching.
A non-polar capacitor connected to the AC network behaves like a resistance, but does not dissipate the power consumed in the form of heat.
In these circuits, when the power is turned off, the capacitor remains undischarged, creating a risk of electric shock. This problem is easily solved by connecting a shunt resistor with a power of 0.5 watts with a resistance of at least 240 kOhm to the capacitor.


Calculation of the resistor for the LED
In all the above circuits with a current-limiting resistor, the resistance calculation is carried out according to Ohm's law:
R = U/I
- where:
- U is the supply voltage;
- I is the operating current of the LED.
The power dissipated by the resistor is P = U * I.
If you plan to use the circuit in a low convection package, it is recommended to increase the maximum power dissipation of the resistor by 30%.
Calculation of the quenching capacitor for the LED
The calculation of the capacitance of the quenching capacitor (in microfarads) is made according to the following formula:
C=3200*I/U
- where:
- I is the load current;
- U is the supply voltage.
This formula is simplified, but its accuracy is sufficient for connecting 1-5 low-current LEDs in series.
To protect the circuit from voltage surges and impulse noise, a quenching capacitor must be selected with an operating voltage of at least 400 V.
It is better to use a ceramic capacitor of the K73-17 type with an operating voltage of more than 400 V or its imported equivalent. Do not use electrolytic (polar) capacitors.
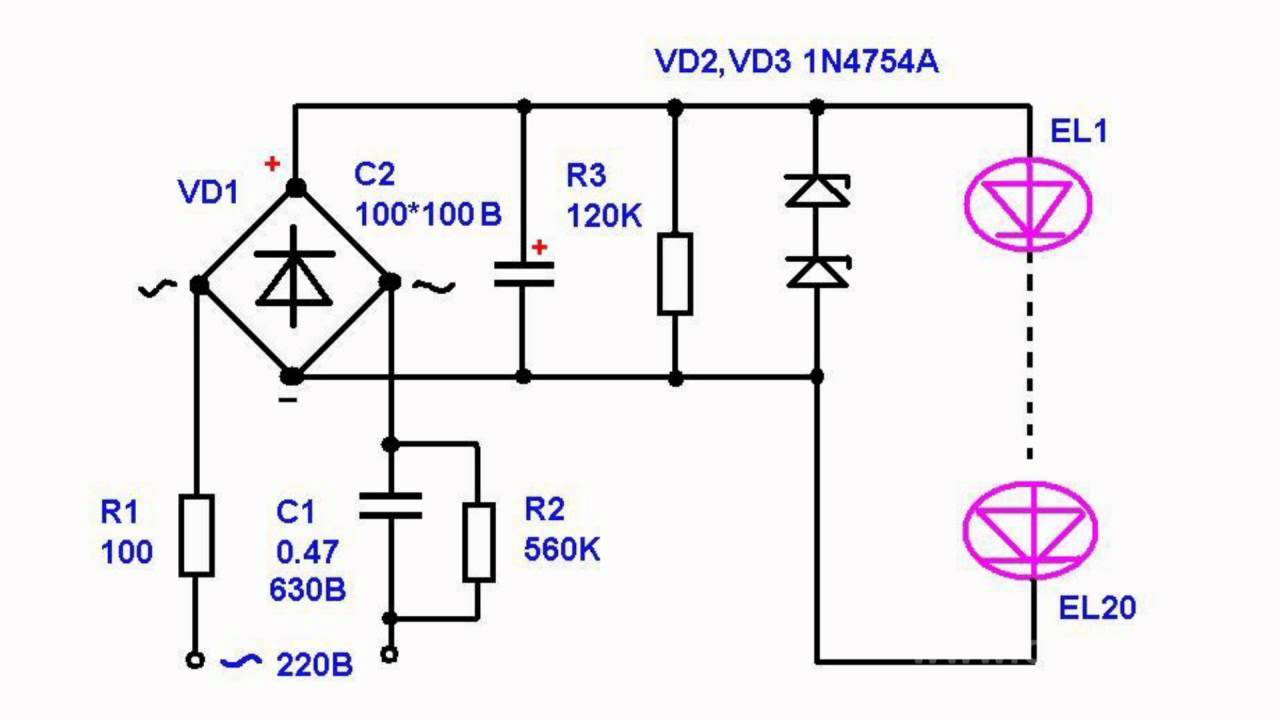
Driver repair
The weak point of the drivers are the current-limiting resistors. They are checked first. You can replace burned-out elements with the same or the closest resistance value.
The semiconductor diodes of the rectifier and capacitor are checked with a multimeter in the resistance test mode. However, there is a faster way to check the health of this section of the circuit. To do this, the voltage across the filter capacitor is measured. The expected value is calculated by multiplying the nameplate voltage on one diode by their number. If the measured voltage does not correspond to the required one or is equal to zero, the search continues: the capacitor and diodes are checked. If the voltage is normal, look for an open between the LEDs and the driver.
Diodes can be checked with a multimeter without soldering them from the board. A short circuit in the diode or its breakage will be visible. When closed, the device will show zero in both directions, when broken, the resistance in the forward direction will not correspond to the resistance of an open p-n junction. You will recognize it on serviceable elements. A short circuit in the diodes additionally leads to the failure of the limiting resistor.
Kinds LED lamp drivers
Repairing a transformer driver is a little more complicated than usual. But with the inverter will have to tinker. There are more details in it, and most importantly, it always includes a microcircuit. In order to make a conclusion about its malfunction, you will either need to study in detail the principle of operation of the driver, or make sure that all the parts surrounding it are in good condition.
Rate the quality of the article
Your opinion is important to us:
Creating an E27 LED lamp from an energy-saving one using a ready-made driver
For self-production of LED lamps, we need:
- Failed CFL lamp.
- HK6 LEDs.
- Pliers.
- Soldering iron.
- Solder.
- Cardboard.
- Head on shoulders.
- Skillful hands.
- Accuracy and care.
We will remake a defective LED CFL brand "Cosmos".
"Cosmos" is one of the most popular brands of modern energy-saving lamps, so many zealous owners will definitely have several of its faulty copies.
Step-by-step instructions for making an LED lamp
We find a faulty energy-saving lamp, which has been with us for a long time “just in case”. Our lamp has a power of 20W. So far, the main component of interest to us is the base.
We carefully disassemble the old lamp and remove everything from it, except for the base and the wires coming from it, with which we will then solder the finished driver. The lamp is assembled with the help of latches protruding above the body. You need to see them and put something on them. Sometimes the base is attached to the body more difficult - by punching dotted recesses around the circumference. Here you have to drill the punching points or carefully cut them with a hacksaw. One supply wire is soldered to the central contact of the base, the second to the thread. Both are very short.


The tubes may burst during these manipulations, so care must be taken.
We clean the base and degrease it with acetone or alcohol
Increased attention should be paid to the hole, which is also carefully cleaned of excess solder. This is necessary for further soldering in the base.
The base cover has six holes - gas discharge tubes were attached to them
We use these holes for our LEDs
Place a circle of the same diameter cut with nail scissors from a suitable piece of plastic under the upper part. Thick cardboard will work too. He will fix the contacts of the LEDs.
We have HK6 multi-chip LEDs (voltage 3.3 V, power 0.33 W, current 100-120 mA). Each diode is assembled from six crystals (connected in parallel), so it shines brightly, although it is not called powerful. Given the power of these LEDs, we connect them three in parallel.
Both chains are connected in series.
As a result, we get a rather beautiful design.
A simple ready-made driver can be taken from a broken LED lamp. Now, to drive six white one-watt LEDs, we use a 220 volt driver, for example, RLD2-1.
We insert the driver into the base. Another cut out circle of plastic or cardboard is placed between the board and the driver to avoid a short circuit between the LED contacts and the driver parts. The lamp does not heat up, so any gasket is suitable.
We assemble our lamp and check if it works.
We have created a source with a light intensity of about 150-200 lm and a power of about 3 W, similar to a 30-watt incandescent lamp. But due to the fact that our lamp has a white glow color, it visually looks brighter. The part of the room illuminated by it can be increased by bending the LED leads. In addition, we received a wonderful bonus: a three-watt lamp can not even be turned off - the meter practically does not “see” it.
LED Damage - Repair Instructions
If a burned-out LED is “guilty” of the inoperability of a 220 V LED lamp, it can be repaired. How to do it yourself, we will consider in stages.
Restoring the lamp will be easier if you prepare spare LEDs of the SMD type and the required size. But in the example below, we will present a more complicated repair. We will show how to disassemble the old device to remove the necessary component.
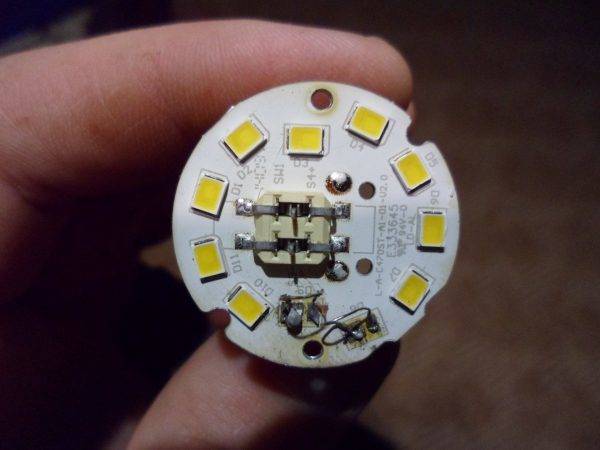
Dismantling the LED lamp is not difficult.
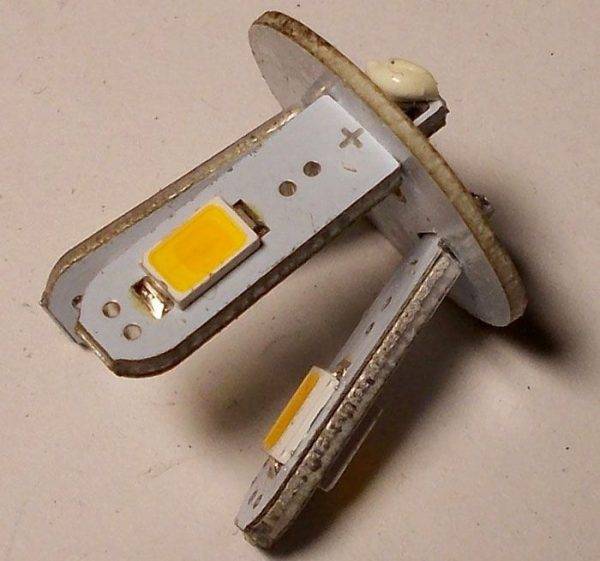
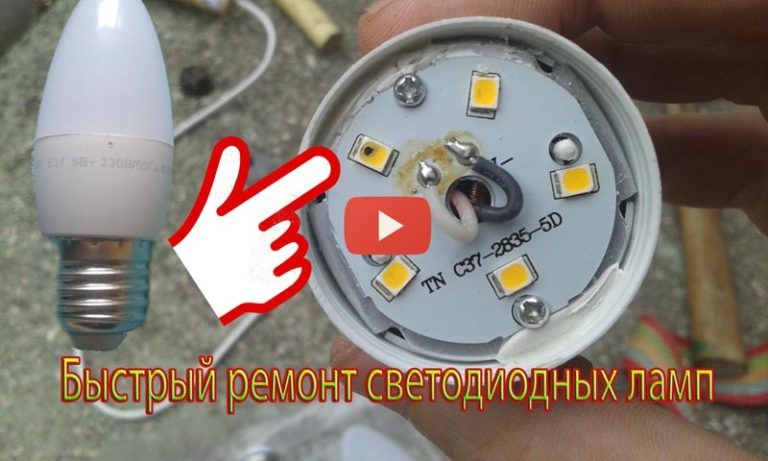
Remove the diffuser with a twisting motion.
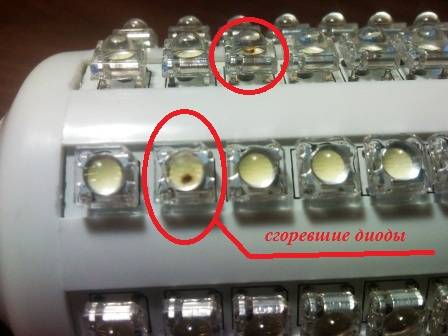
The photo shows where the faulty LED is - it is blackened. Because of one burnt component, all the others stopped working. LEDs are interconnected.
The example uses a special design for repairing LED lamps. Wooden board with a fixed cartridge and a key switch. Allows you to check and conveniently fix the device when performing repairs.
To remove the LED, the donor board must be secured with a special “third hand” mechanism in the “crocodile” clip. At the bottom, heat with a building hair dryer. After the solder melts, remove the components with tweezers, set aside
This method is much more convenient when compared with using a soldering iron.
In the same way, remove the burnt component
Before changing the LED, it is important to pay attention to the matching of the contacts. Using tweezers and a building hair dryer, install a new component.
Place the board on a dielectric pad to check if it works.
Testing is carried out with a multimeter
If the LED is good, it will light up.
In the process of restoring an LED lamp, experienced craftsmen advise testing neighboring components as well. They can be damaged due to prolonged exposure to high temperatures.
Place the board in its original place.To carefully fix the element, use heat-resistant glue. Solder the power wires.
Connect the diffuser and check the operation of the 220 V LED lamp.
Repairing it with your own hands is not as difficult as it might seem at first glance. The main thing is to strictly follow the instructions.
Do-it-yourself LED lamp repair: device and principle of operation
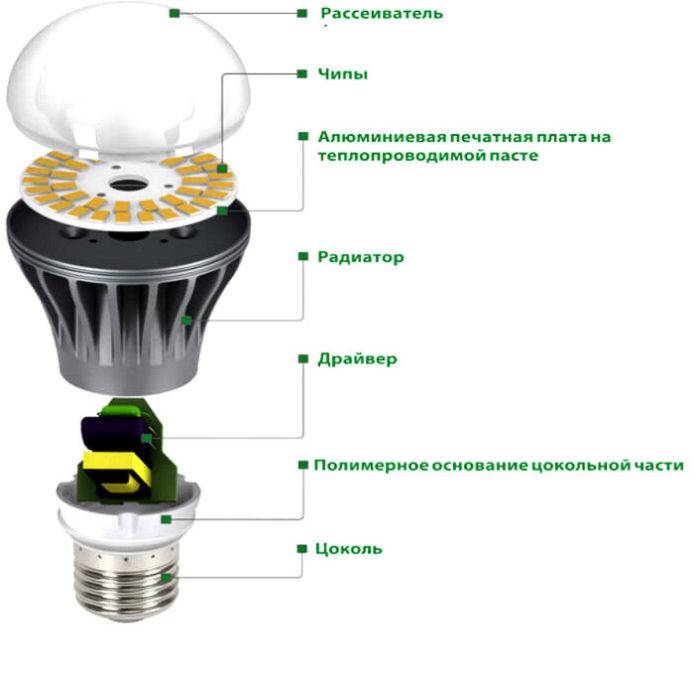
Before you decide how to disassemble the LED lamp, you need to understand its device. The design of this light source is not complicated: a light filter, a power board and a housing with a base.
The diagram shows a similar device design
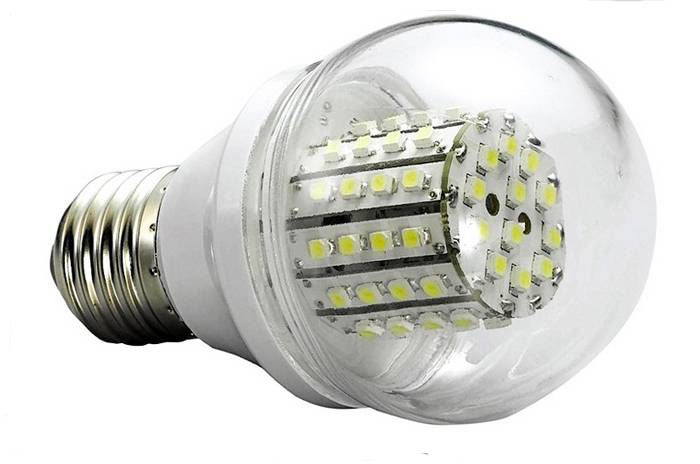
Cheap products often use capacitors, which are designed to limit voltage and current. There are 50-60 LEDs in the light bulb, which are a series circuit. They form a light emitting element.
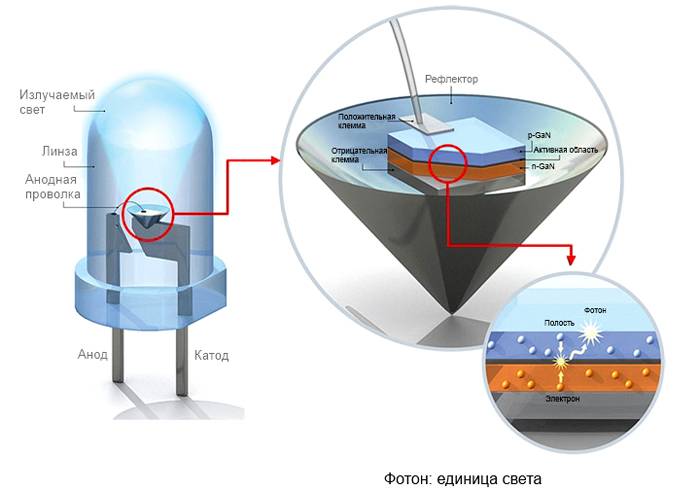
The principle of operation of products is similar to the functioning of semiconductor diodes. In this case, the current from the anode to the cathode moves only directly. What contributes to the emergence of streams of light in the LEDs. Parts have little power, so the lamps are made with many LEDs. To remove the discomfort from the rays produced, a phosphor is used, which eliminates this defect. The device eliminates heat from spotlights, as light fluxes decrease with heat loss.
How the design works can be seen in the presented diagram.
The driver in the design is used to supply voltage to the diode groups. They are used as a converter. Diode parts are small semiconductors.The voltage is transferred to a special transformer, where some deceleration of operating parameters is performed. At the output, a direct current is formed, which allows you to turn on the diodes. Installing an additional capacitor prevents voltage ripple.
It is not always possible to determine the malfunction of the LEDs without dismantling the case
LED lamps come in different types. They differ in the features of the device, as well as in the number of semiconductor parts.
How to identify damage
In order to quickly determine the malfunction, you need to have a good idea of \u200b\u200bhow the LED lamp works. Its design is much more complicated than that of conventional lighting fixtures. Each model consists of a base, a built-in driver - a current stabilizer, a diffuser housing, as well as diodes - sources of light radiation.
The work of LED light sources is based on the process during which electrical energy is converted into light. After the power is turned on, voltage is supplied to the diode bridge. After passing through the entire circuit, the voltage is rectified and it is already supplied to the LED block with a normal operating value. Therefore, LED lamps are designed to be connected to a 220 V network, and the stabilization of electrical parameters to the required values is carried out using the built-in driver.
Most often, the lamp stops working when any element of the circuit fails. Before disassembling and LED lamp repair, you need to check for other possible problems. Sometimes there may simply be no voltage on the switch itself, that is, the reason is no longer in the lamp itself, but in the wiring.However, as practice shows, most often the problem is in the lamp itself. In order to detect a malfunction, the lamp must be carefully disassembled by separating the body parts.
The design features of some models do not allow them to be disassembled in the usual ways. You can separate the body parts only after heating the body with a hair dryer. After disassembly, a visual assessment of the degree of damage is carried out. You should start with the appearance of the board parts, then the quality of the soldering of the LEDs is checked to detect possible deposits and melted areas. In the absence of visible damage and deformation, troubleshooting should be continued using a tester or multimeter.


Summing Up About LED Bulb Repair
LED lamp repair is a promising business
After all, it does not matter whether it is the replacement of a separate radio element or a whole driver (board), it will still be much cheaper than buying a new LED lamp. The only recommendation is the use of radio elements with higher performance
Perhaps this is the use of resistors with more power, capacitors for more voltage, or simply the use of radio components from well-known and well-deserved brands. This will allow for as long as possible not to return to the repair of a lighting device that is so necessary in our everyday life - an LED lamp.
Conclusion
The cost of LED lamps is slowly but surely declining. However, the price still remains high. Not everyone can afford to change low-quality, but cheap, lamps or buy expensive ones. In this case, the repair of such lighting fixtures is a good way out.
If you follow the rules and precautions, then the savings will be a decent amount.
We hope that the information presented in today's article will be useful to readers. Questions that arise in the course of reading can be asked in the discussions. We will answer them as completely as possible. If someone had experience of similar works, we will be grateful if you share it with other readers.
And finally, by tradition, a short educational video on today's topic:


