- The toilet in the house should be warm
- What you need to know when buying a toilet
- Hanging bidet installation
- Installation installation
- Attaching the bidet to the installation
- Connection
- Installation installation
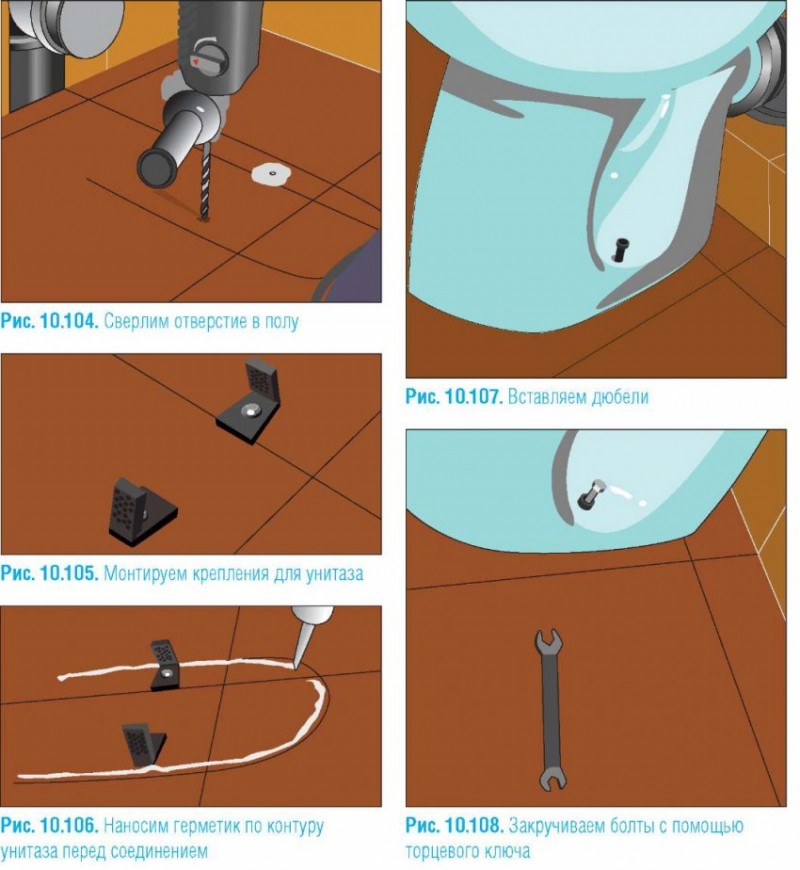
- Preparatory stage
- Mounting the device
- Installation connection
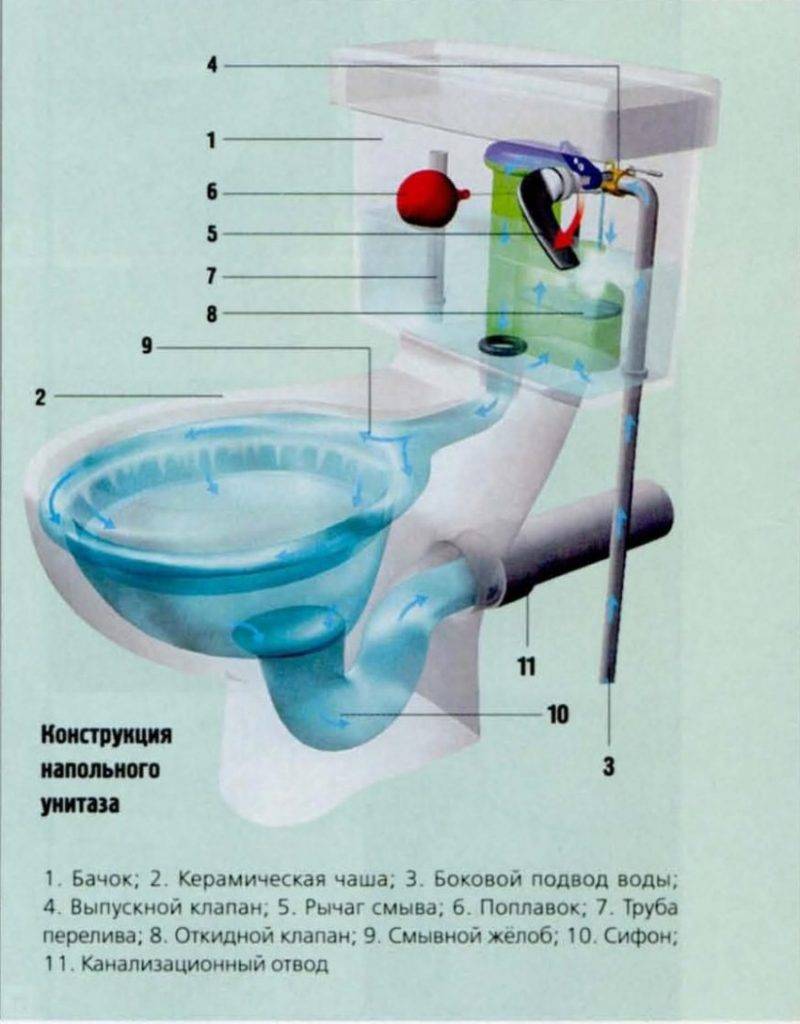
- DIY toilet installation photo
- Types of floor toilets
- Installation installation
- How to remove an old toilet
- Hidden cistern
- Installation of a drain tank and connection to the water supply
- Installing a cistern on a toilet shelf
- Hanging cistern installation
- Pros and cons of toilet bowls with bottom connection
The toilet in the house should be warm
You should start by determining a suitable room for arranging. It should be small (3x2 m is enough), allowing you to place all the planned plumbing elements and accessories inside.
The best solution would be to choose a room with at least one external wall in order to minimize the work on organizing sewage disposal. Otherwise, you need to plan the laying of sewer pipes inside the basement, which will complicate the connection process and make it more expensive.
Sometimes they fence off part of a large room and equipment there for a bathroom with all the necessary communications.The strength of this solution is the ability to choose the location and allocate the required number of square meters for the quality arrangement of the toilet room. The disadvantage will be the loss of living space.
When choosing the location of the bathroom in the house, it is necessary to take into account that:
- sewage was removed through pipes along the minimum path;
- the room was sufficiently removed from the bedrooms, kitchen or dining room;
- it should be possible to supply water pipes, sewage disposal to the room, and the issue of ventilation should also be thought out.

An example of arranging an electric floor heating in a bathroom
What you need to know when buying a toilet
The main criteria that you should pay attention to when choosing a plumbing fixture are not only its model, brand and color, but also its dimensions. Need to measure before buying a toilet distance from sewer to doors to the toilet room, and the result must be divided by 2. The result is the maximum size of the device that can be installed in this room.
The result is the maximum size of the device that can be installed in this room.
The color and shape of the toilet bowl is chosen in accordance with the interior design of the toilet room, it should match the design to the maximum. When purchasing plumbing, they certainly check its integrity and completeness. The existing mechanisms in it should work easily, without making creaking sounds.
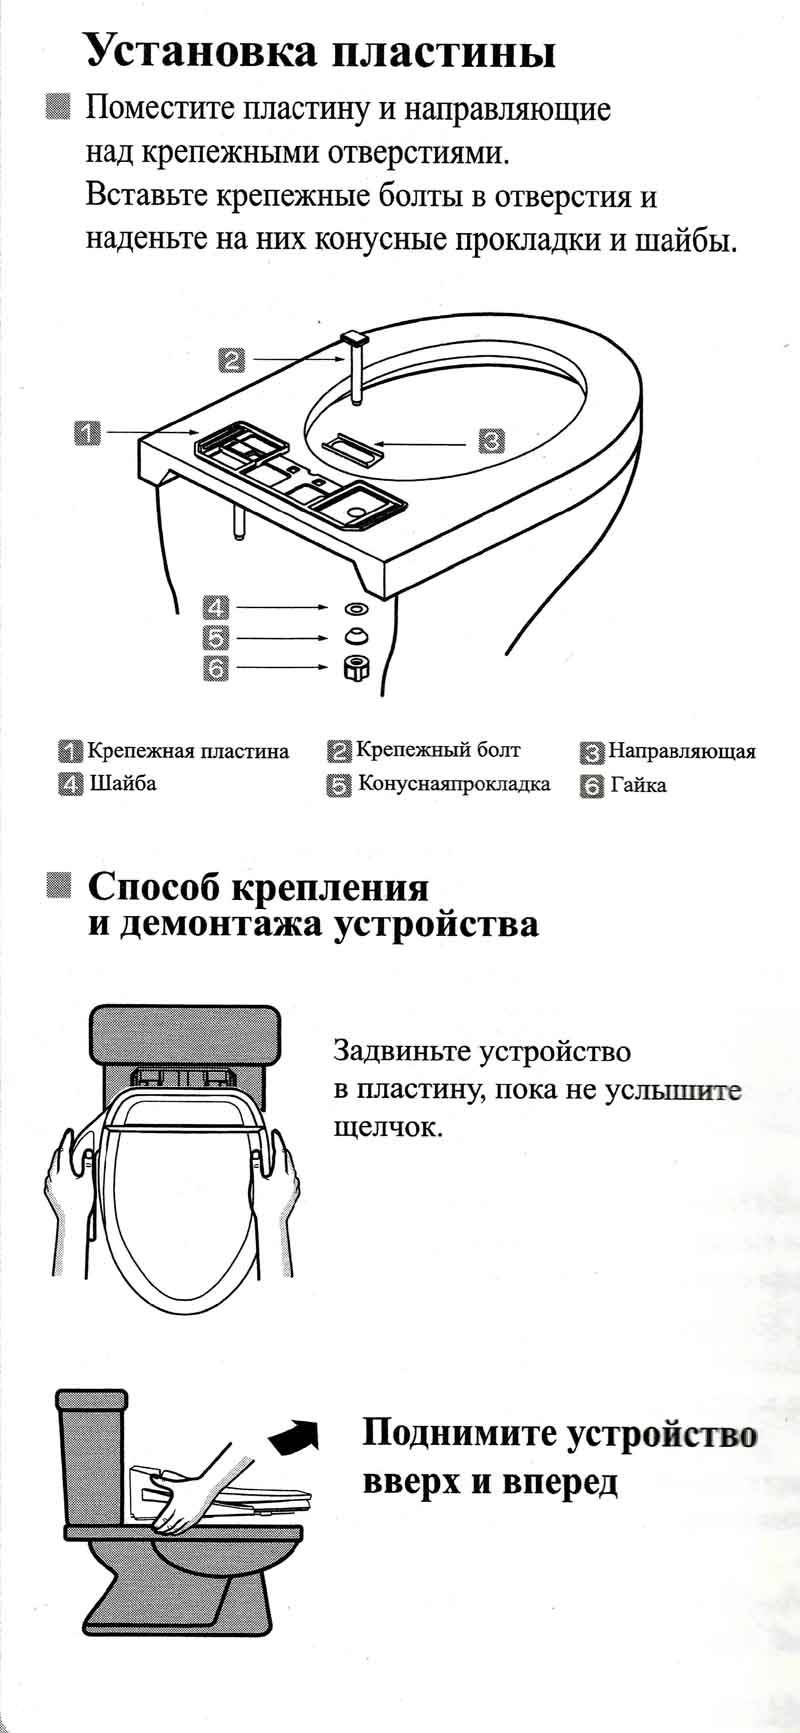
Hanging bidet installation
Installation of a hanging bidet consists in the systematic passage of the following steps:
- installation installation;
- fixing a plumbing device;
- connection to sewerage and water supply.
Installation installation
The installation of the bidet installation is carried out according to the following scheme:
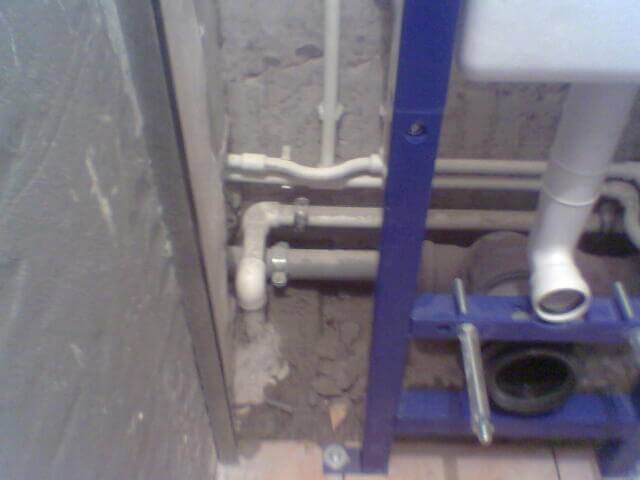
- a recess is made in the wall for mounting the installation. The dimensions of the recess should be slightly larger than the overall dimensions of the device;
- water pipes and a sewer inlet are connected to the place of the proposed attachment of the bidet;
- going to be installed. Detailed assembly instructions are attached to each device, so this stage, as a rule, does not cause problems;
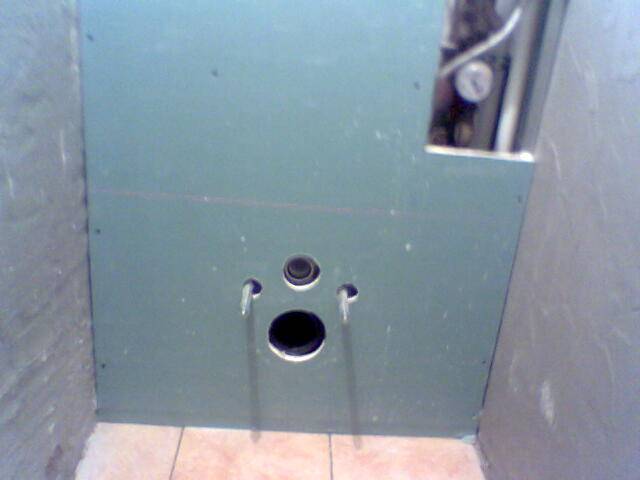
- markings are made on the floor and back wall for mounting the device;
- holes for mounting bolts are prepared;
- the installation is fixed;
- open space can be sewn up with drywall or other selected materials.
Assembling and fixing the installation for mounting a hanging bidet
When installing the installation, it is important to strictly observe the geometry of the device and the parallelism of the main elements of the floor surface
Attaching the bidet to the installation
How to install a bidet on installation? To do this, a number of steps are followed:
- studs are inserted into special holes to fix the bidet. For strength, metal studs are attached to the back wall of the bathroom;
Bolts for fixing the bidet to the installation
- a special gasket is installed on the installation to protect the sanitary ware. If the gasket is not supplied with the installation, then it can be replaced with a regular silicone sealant. The sealing composition is applied to the attachment area of the plumbing device and the time is waited until it dries completely;
Installing a gasket to protect the plumbing fixture
- the bidet is fixed on studs with bolts.
The installation of the bidet with the installation is completed. It remains to connect the plumbing device to the water supply and sewerage.
Connection
Connecting a bidet: instructions must be supplied with the plumbing fixture. In most cases, the connection is made in the following way:
- a built-in mixer is installed in the place where the water pipes are connected;
- flexible hoses connect the device to the bidet pipes of the central water supply.
When connecting flexible hoses, it is important to take care of maximum tightness. In some situations, regular gaskets installed at the ends of the eyeliner are not enough
To seal the threaded connection, it is recommended to use flax or FUM tape.
Water supply to bidet
The plumbing device is connected to the sewer through a siphon. This device is a must:
- the siphon is connected to the drain hole of the bidet. Between the plumbing fixture and the siphon, rubber rings are required to seal the drain;
- the corrugated pipe from the siphon is inserted into the sewer inlet, which was previously connected to the installation. This connection method is considered the most optimal and allows repairs to be made in a short time, even if any element needs to be replaced.
Connecting a bidet drain to a sewer pipe
Thus, knowing the simplest instructions and having the necessary set of tools, you can install and connect a bidet of any type with your own hands.
Installation installation
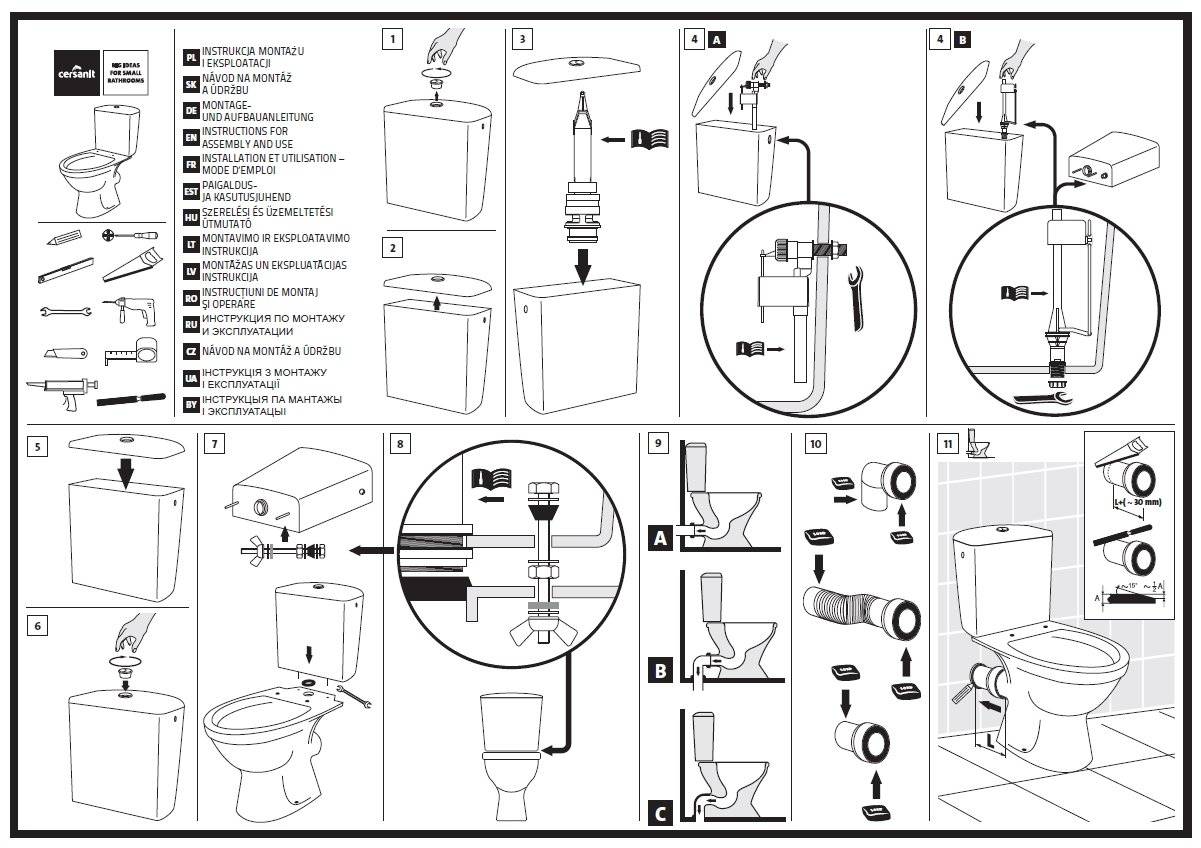
Consider how to install the installation for the toilet. The entire installation process consists in the systematic implementation of the following main stages:
- preparation for installation;
- fixing the installation;
- device connection.
Preparatory stage
The first stage of equipment installation - preparation - includes:
- preparation of tools necessary for work;
- selection of a place for installation of the structure.
It is more expedient to install a toilet bowl in a place:
- equipped with water and sewer pipes. If the installation of the toilet bowl is carried out far from communications, then it is necessary to carry out additional work to lengthen the pipelines, which will lead to an increase in time and money costs;
- where the toilet will not interfere. In apartments, special niches are most often provided, which saves a small space of the toilet room. If the toilet is located in a country house, then a place is selected that is remote from the kitchen and living quarters.
To do the job, you will need the following tools:
- tape measure, building level, marker for measuring work;
- drill, puncher and a set of drills for preparing mounting holes;
- wrenches for assembling the structure and its fastening.
Tools required for mounting the installation
At the preparation stage, it is important to check the presence of all fasteners included in the installation kit, water and sewer connections, as well as o-rings necessary for connecting communications.
Mounting the device
Do-it-yourself installation is carried out according to the following scheme:
- frame assembly. If a block installation is mounted, this step is skipped. When assembling the device, it is recommended to strictly adhere to the attached diagram and securely fix all fasteners;
Instructions for assembling the device
marking places on the wall and floor for fixing bolts
When carrying out work, it is important to take into account the dimensions of the decorative finish of the room;
Determining where the frame is attached to the wall and floor
- drilling holes and inserting dowels for further fixing the installation;
Preparation of holes for fastening the structure
fixing the frame of the installation
When installing equipment, it is important to observe the following parameters:
the fastening elements of the toilet bowl, located on the installation frame, must be at a distance corresponding to a similar parameter on the toilet bowl itself;
the outlet of the sewer pipe should be located at a height of 23 cm - 25 cm from the floor;
the optimal height of the hanging toilet is 40 cm - 48 cm from the floor tiles or other finish;
Recommended installation distances
The most important step in installing the frame is its alignment in the horizontal and vertical directions. The frame is adjusted with special screws provided for by the design of the equipment.


- drain tank installation. When fixing the toilet bowl, it is necessary to take into account the height of the drain button. The most universal is a distance of approximately 1 m from the floor of the toilet room. This parameter is considered optimal for using the toilet by both children and adults;
Installation of a cistern for a wall-mounted toilet bowl
- installation of fixtures for the toilet.
Installation of fasteners for the toilet
Installation connection
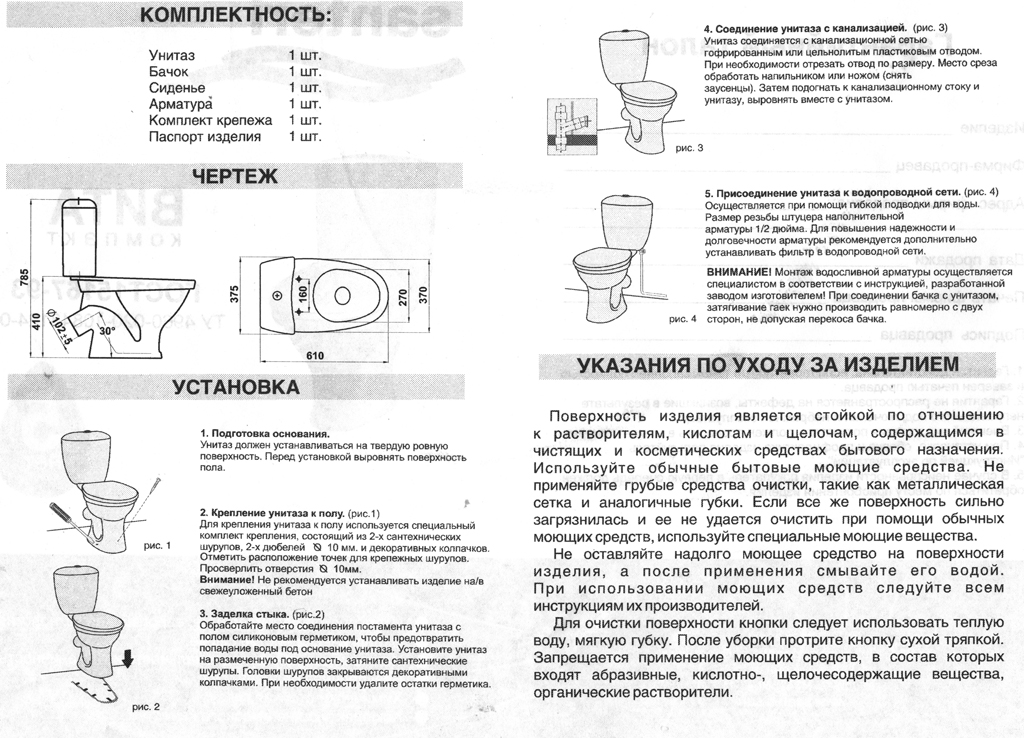
Water supply to the drain tank can be performed:
- side;
- above.
The choice of water connection method depends on the design of the used tank. For water supply, it is recommended to use rigid plastic pipes, and not flexible pipes, since the service life of the pipes far exceeds the life of the pipe.
For strength, the junction of the pipe and the tank is sealed with a gasket and treated with a sealant.
Connecting the drain tank to the water supply
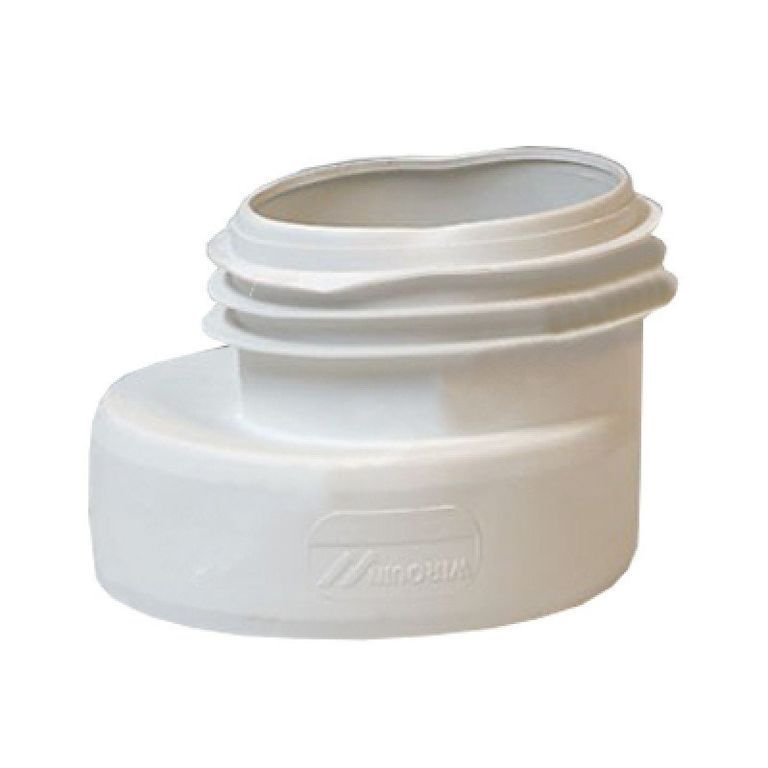
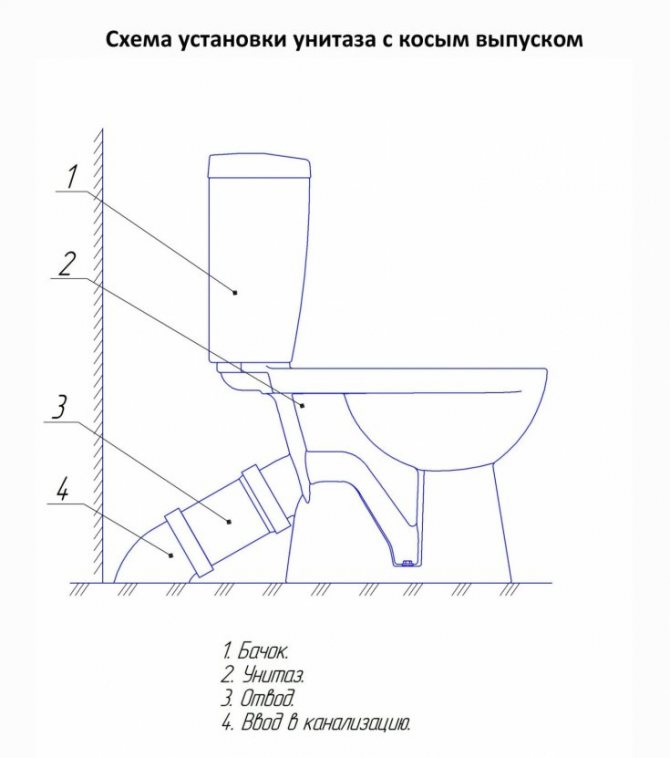
The toilet bowl and the sewer pipe can be connected:
- by cutting into the pipe. Such a connection is considered the most optimal, but it is not always possible to perform it in practice, since it is quite difficult to combine the drain from the toilet bowl and the pipe;
- using a plastic adapter;
- using a corrugated pipe.
If a direct connection is not possible, it is recommended to use plastic adapters, since the service life of the corrugated pipe is shorter.
The complete process of installation and connection of the installation can be viewed on the video.
After installation and complete connection of all devices, you can proceed to the final finishing of the niche and attaching the toilet bowl.
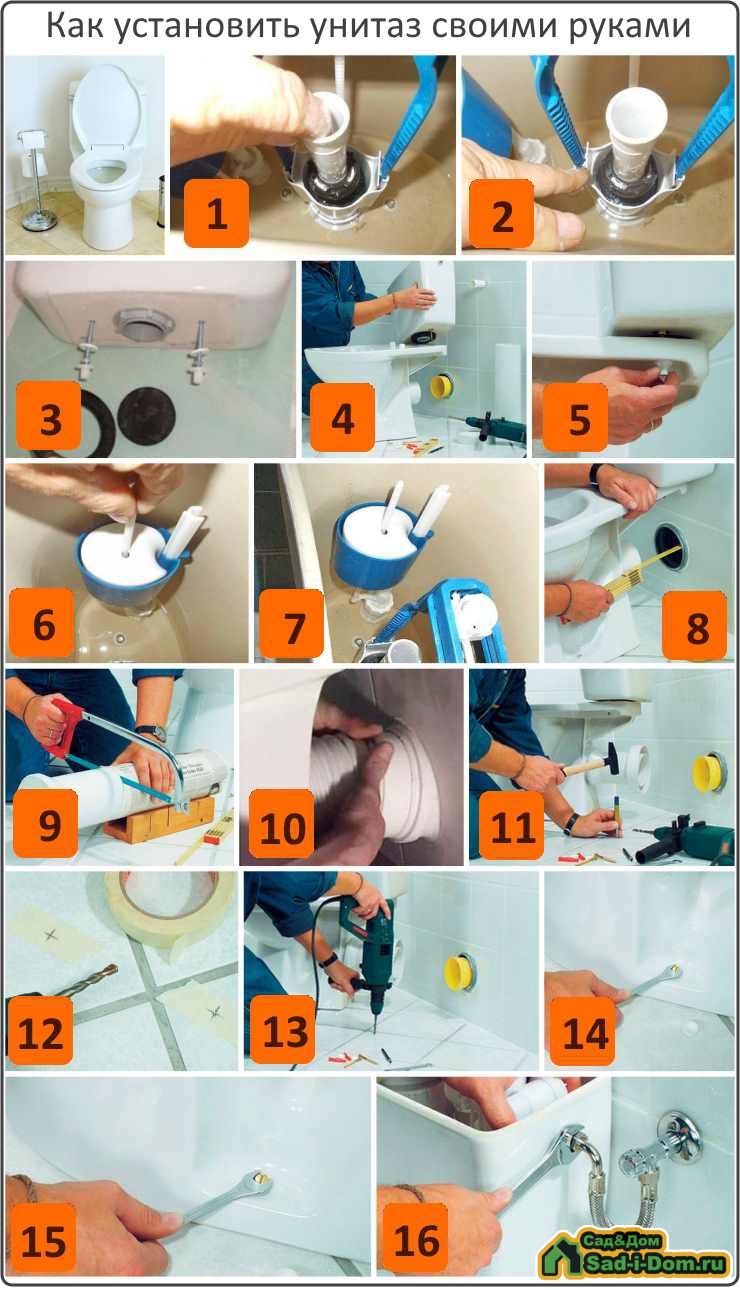
DIY toilet installation photo


We also recommend viewing:


- Do-it-yourself siding installation
- Warm floor do it yourself
- Bath with your own hands
- Do-it-yourself self-leveling floor
- DIY decorative putty
- Do-it-yourself fence posts
- Do-it-yourself stretch ceiling
- Do-it-yourself ceiling lighting
- Do-it-yourself warming of the loggia
- DIY partition
- DIY wiring
- DIY wooden floor
- Do-it-yourself slopes
- How to make DIY paint
- DIY bricklaying
- DIY decorative plaster
- Do-it-yourself fence from corrugated board
- DIY fireplace
- Do-it-yourself home insulation and the main methods of thermal insulation
- mesh fence
- Do-it-yourself installation of plastic windows
- Do-it-yourself interior decoration
- DIY fence
- How to make a balcony with your own hands
- Do-it-yourself oven
- Do-it-yourself door
- DIY gazebo
- Pour concrete with your own hands
- Do-it-yourself formwork
- DIY liquid wallpaper
- Do-it-yourself floor screed
- Do-it-yourself foundation
- DIY frame house
- Hallway with your own hands
- Do-it-yourself ventilation
- Do-it-yourself wallpapering
- DIY concrete ring
- Do-it-yourself roof
- Do-it-yourself laminate flooring
- Staircase to the second floor with your own hands
- Do-it-yourself blind area
- DIY bathroom renovation
- Do-it-yourself polycarbonate
- Do-it-yourself door installation
- Do-it-yourself drywall
- Do-it-yourself arch
- Sheathe clapboard with your own hands
- DIY house project
- DIY gate
- DIY shower cabin
- Do-it-yourself tile laying
Types of floor toilets
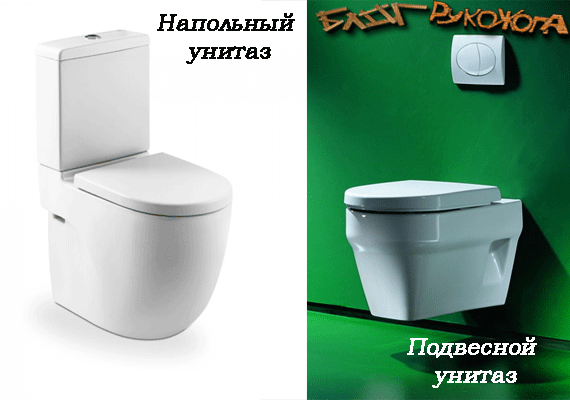
There are two types of toilet bowl: hanging and floor. The most common model is the floor toilet, which has several advantages:
- a wide range of manufacturers
- more familiar model for most people
- availability of budget options
- installation does not require much preparatory work
When choosing an irreplaceable thing for a bathroom, you should pay attention to the type of sanitary bowl
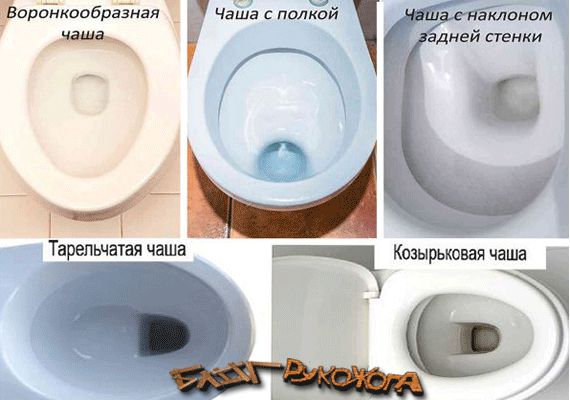
According to their structure, they can be divided into three types:
Poppet
The main advantage is the design feature of this type of bowl. One of the walls has a protruding part. This structure allows you to avoid splashing during rinsing, but odor may occur during use.
Kozyrkovaya
In this model, the structure of the rear wall is made with a slope. This type does not splash during flushing, and also prevents the appearance of an unpleasant odor during operation. This type of bowl requires careful care, using special brushes.
funnel-shaped
When flushing, there are small splashes, but the shape of such a bowl is the most hygienic and does not require special care. Imported manufacturers most often produce models of this type.
In the plumbing store, toilet bowls with various drain barrels are presented, which differ in design and installation method.
The types of drain barrels include:
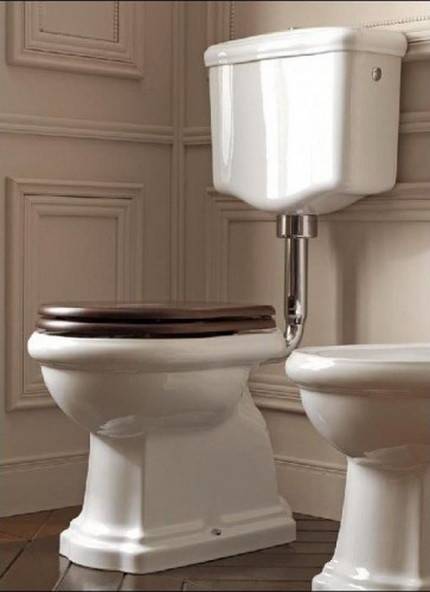
compact
- is the most common model. This view is mounted on a ledge behind the toilet. Between the elements there is a rubber gasket. Installation is carried out using the screws included in the kit. Some companies also produce models with a one-piece construction of a barrel and a toilet bowl.
separate
This model is perfect for a small bathroom. Allows you to save space, due to the lack of a rear ledge for a drain barrel. In this case, the barrel is mounted on the wall and connected to the toilet with pipes and hoses. This type provides a better flush, since the water pressure has more pressure.
concealed installation system
the drain barrel is located inside the false - walls. Flushing is carried out using a button that goes out. If necessary, dismantling, together with the button, you can replace the internal components of the tank.
Ways to drain floor-standing toilets can also vary. Among the presented assortment there are lever and push-button. The second option includes more modern models. There are types with two buttons. When you press one, half of the water contained in the tank is flushed, two buttons - respectively, the entire volume of liquid.This option saves money water and reduce the payment for supplied resource.
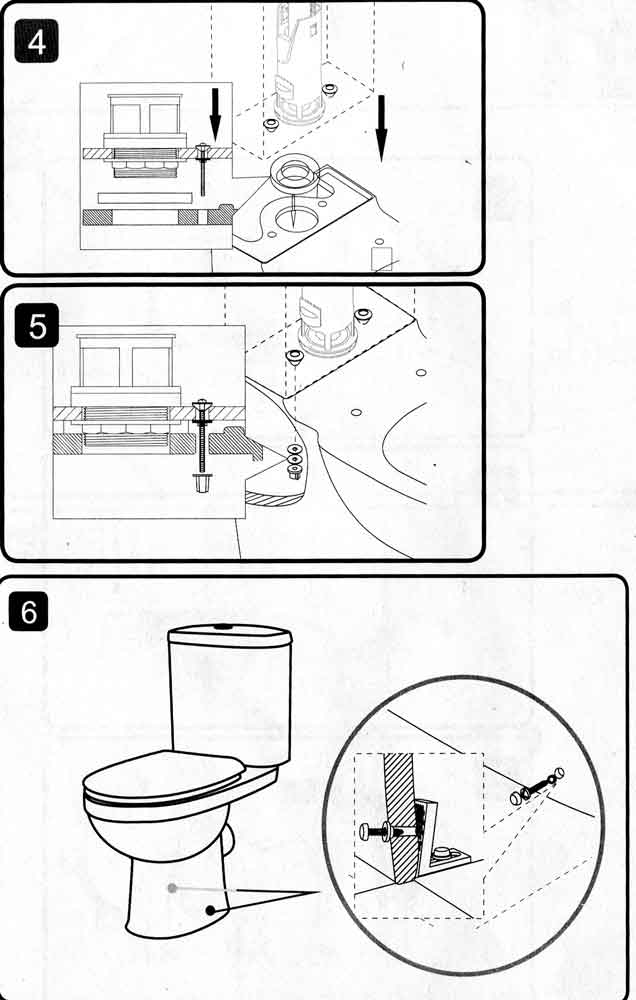
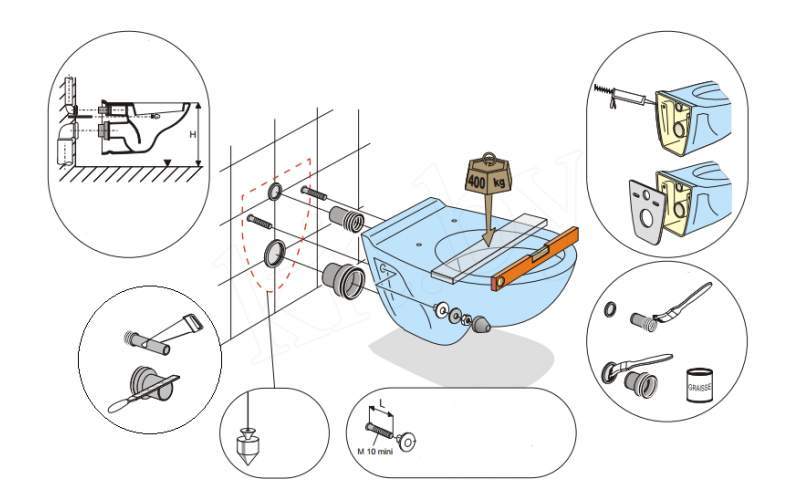
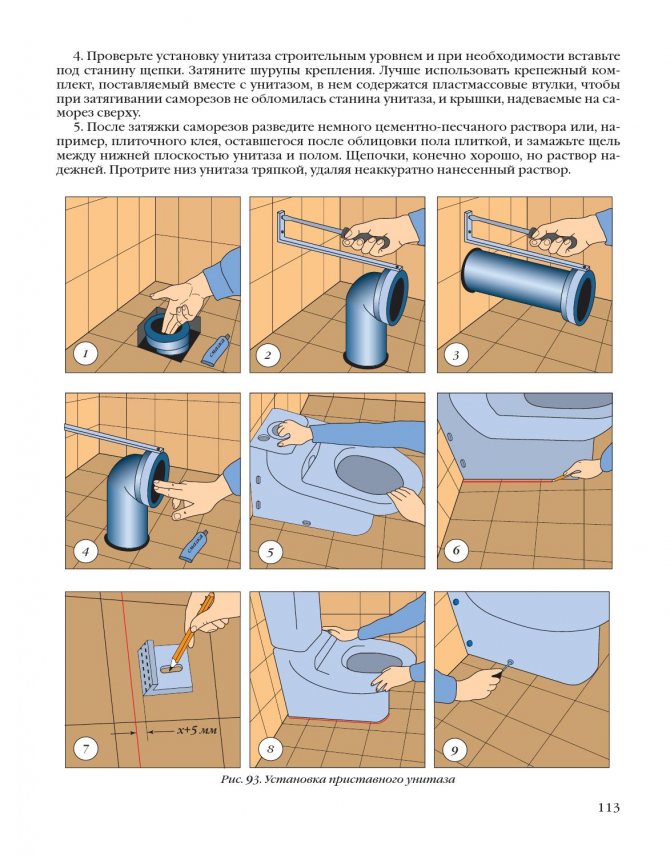
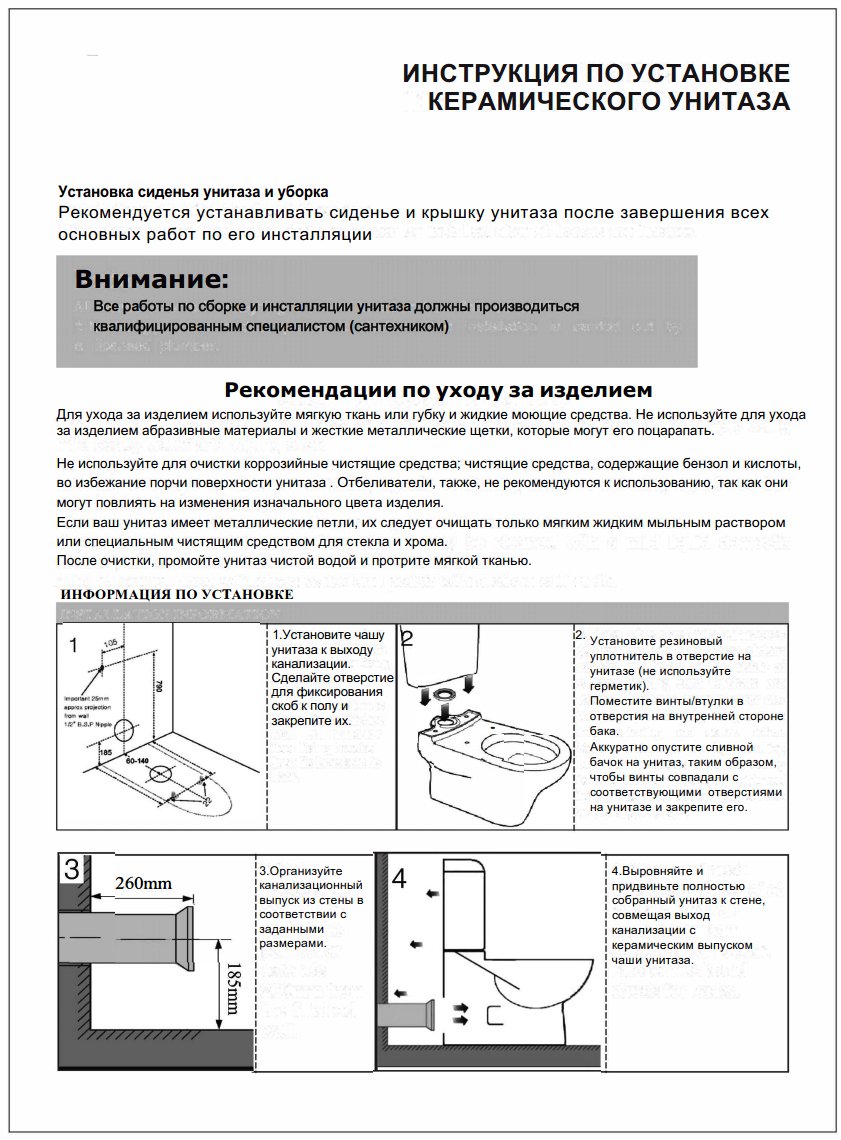
Installation installation
Installing the installation do-it-yourself toilet bowl on a special frame fixed to the wall is a more expensive process, but faster and more reliable. The installation will be fixed to the floor and a solid wall.
The technological sequence is as follows:
1. Fixing the metal frame. It has corresponding holes with which it is fixed to the surfaces with dowels. Two points for fixing to the floor and two to the wall. Sewer and water pipes are connected to the installation site. The installed frame must be checked for evenness using a spirit level. It is necessary to maintain exact parallelism to the wall to be installed, because even slight distortions can lead to interruptions in operation and even breakdowns. Horizontal adjustment is carried out with wall mountsthat change their position.
This stage also involves setting the height of the hanging toilet. It will depend on the height of the residents, usually 0.4 m. The height of the bowl can be adjusted in the future.


2. Leading to the drain tank of water. You can use a flexible or rigid system. Professionals often use hard, because. she can last longer. Flexible hoses can also be used, but if they fail, it will not be possible to get to them and replace them quickly. During the installation of the liner, the valve valve of the tank, as well as the drain from it, must be closed.
After connecting, check the reliability of the connections. To do this, open the water supply and start filling the tank.If there are leaks, they are fixed. Water may remain in the tank.
3. Connection to the sewer. The toilet drain hole must be inserted into the outlet of the sewer pipe using the appropriate corrugation, but some models can be connected without using it. At the end of the connection, check the tightness of the system by test drains. To do this, you will need to temporarily screw the bowl to the frame. After that, remove it again, it will be installed in the final installation.
The correct connection of the sewer pipe must be performed even before the installation is started. Pipe diameter - 100 mm. It must be laid with an appropriate slope. You can read about it in the corresponding article.

4. Closing with plasterboard sheets. The installation of a wall-hung toilet must be accompanied by a decorative finish of functional elements. To finish the bathrooms, you must purchase a waterproof double drywall. It is more durable than normal. Sheets are required to be mounted to metal profiles and directly to the toilet frame. The installation instructions must contain the necessary information on the cutting method, indicating the points for cutting holes.
Sheathing can be done in two ways: over the entire wall area or only along the installation plane. The second method involves the formation of a small shelf above the bowl, which can be used to place the necessary items.
Subsequently, the installed barrier is finished with tiles or panels together with the rest of the area of \u200b\u200bthe room.
5. In conclusion, it is necessary to install the toilet on the installation, namely the bowl.It should be hung in the appropriate place using two fasteners.
6. The last, most simple step is to install the flush button. They are pneumatic and mechanical. The process is not difficult, because. everything should already be connected to the required opening in the wall. The mechanical button is installed using special pins with their subsequent adjustment. For pneumatic, you only need to connect the appropriate tubes, everything is ready.

In the process of activity, it is necessary to especially control the process of mounting the installation frame,
because the course of further installation will depend on the correctness. Figuring out how to install a toilet installation is actually not difficult. It is enough to follow the recommendations of the installation instructions, and in addition to watch the corresponding video about the process, and you will succeed.
Suspended plumbing fixtures are gradually gaining popularity, especially among owners of small bathrooms. However, not everyone likes hanging toilets - outwardly they seem unstable and unreliable. This impression is deceptive, because it is carried out using the installation system, which is hidden behind the finishing material of the wall. Let us consider in more detail the advantages of suspended plumbing objects and get acquainted with the instructions for their installation.
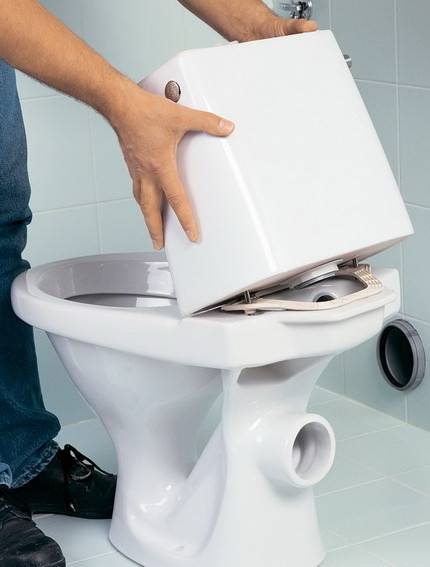
How to remove an old toilet
Dismantling a failed, outdated or simply disliked toilet is a key step in preparing for the installation of new plumbing equipment. And this procedure depends on how the previous model was installed.
On taffeta - a board embedded in the floor and used as a pedestal. Here the mount is screws-"capercaillie" plus rubber washers. Ideally, the pedestal board should be oak, but in practice a variety of wood varieties are used for its manufacture.
If the old toilet is installed on taffeta, it is not difficult to remove it. For this you will need:
- close the valve on the tank;
- turn off the eyeliner;
- remove screws;
- break the solution if the outlet is sealed with cement;
- carefully remove the old toilet.
If there is no need to keep the previous equipment, you can hit the bottom of the bowl with something heavier to break the pipe without problems. Further dismantling will be extremely simple.
On adhesive paste. If the toilet to be replaced was installed in a hurry, the installers could put the equipment on the mastic and rubber cuff without much worry about the quality of work. Dismantling in this case is also very simple: hit the bowl harder, and pull the outlet out of the cuff.
For standard mounts. This method of installing the toilet is considered the most correct, but is rare. Dismantling essentially consists in unscrewing two bolts at the bottom of the toilet bowl, closed with decorative plugs.
Hidden cistern
Such installations are a new word in plumbing design. Modern technologies offer two options: suspended or floor. Installation of a wall-mounted toilet bowl is divided into two stages, one of which is associated with the installation of the bowl, the second is dedicated to the cistern.
First stage. This is where markup matters a lot. With the help of the building level, the main lines are drawn vertically and horizontally. Next, the suspension points are marked. Drill holes for anchors.The tank is hung on the brackets and the water supply is connected. The sewer outlet is tightened with a plastic clamp and lubricated with silicone.
The second stage begins with the assembly of the frame that covers the suspended part. The bezel drawing is attached to the product and you just need to follow the manufacturer's instructions. The only thing worth noting, in addition, the distance between the module and the wall surface should not be more than 200 mm. Otherwise, there will be no reliable adhesion to the surface.
Installation of a drain tank and connection to the water supply
After the equipment is fixed, you can proceed with the installation of the drain tank. There are two varieties of this device, consider the features of fastening each.
Installing a cistern on a toilet shelf
Such equipment is mounted quite simply. At the same time, it does not matter at all when the internal elements of the tank are installed: before or after mounting the devices on the shelf. In general terms, the work is carried out as follows:
- We put the tank in place. We first take special rubber gaskets and lubricate them on both sides with silicone for better sealing.
- We place the gaskets on the toilet shelf exactly above the drain holes and install the tank.
- We fasten the shelf and tank with bolts. We are waiting for the silicone to dry. This will take 15-20 minutes.
- We check the tightness of the resulting connection. To do this, pour water into the tank and see if there are any leaks. If deficiencies are identified, we eliminate them.
After we have installed the drain tank, we proceed to the installation of its internal elements:
- We connect the coupling of the water supply to the tank.
- Attach the float valve to the clutch.
- Screw on the overflow tube.
- We mount the water release lever.
- Install the seat and vertical valve.
- By means of traction we connect the mechanism of descent of water and the vertical valve.
- Fix the float valve.
- We adjust the twist of the float elbow by setting the required angle. The smaller the angle, the less water will flow into the drain tank.
Do not forget to adjust the position of the saddle - many people forget about this moment!
 Before installing the flush tank on the toilet shelf, be sure to install special gaskets that provide the system with the necessary tightness
Hanging cistern installation
Design with a tank fixed above the toilet bowl. Its installation is carried out in this way:
- After the plumbing fixture is installed, we bring the drain pipe from the tank to it.
- We fix the pipe to the toilet using a special coupling.
- Given the height of the drain pipe, we mark the tank attachment points on the wall.
- We disconnect the pipe from the tank, after which we install the equipment on the wall. Fix it securely. We put the drain pipe in place.
After the installation of the tank is completed, we proceed to install its internal elements:
- Install the trigger lever.
- We fix the vertical valve, seat and overflow mechanism.
- We connect the vertical valve, overflow and trigger mechanism with the help of a rod.
- We bring a water pipe to the tank and fix it with a coupling with the obligatory use of a rubber gasket.
- We fix the float valve on the coupling.
- At the right angle, we connect the twist of the float elbow with the valve.
- Adjusting the seat.
- We correct the location of the coupling that connects the toilet bowl and the drain pipe.
To connect the drain tank and the water pipe, we use a flexible hose of the desired length.
After the connection to the water supply is completed, be sure to test the device. We fill the tank with water and flush. We control the operation of all mechanisms. If problems are identified, we fix them immediately.


 The installation height of the hanging tank can be very different. It depends on the model of plumbing equipment
Pros and cons of toilet bowls with bottom connection
The undoubted advantages include:
- neat, aesthetic appearance of the toilet, due to which sewer and water communications are not visible;
- the lower connection is practically silent and economical - the water does not “run”, since the flow of water comes from the bottom of the drain barrel;
- the lower eyeliner is reliable, rarely requires repair.
- this type of eyeliner is difficult to install;
- Difficulties in replacing parts - it is easier to completely replace the system.
The efficiency of sanitary equipment directly depends on the quality of sediment cleaning from the outlet pipe elbow, this function is performed by fittings for the toilet flush tank.