- Plumbing installation - what is it?
- Wall hung toilet
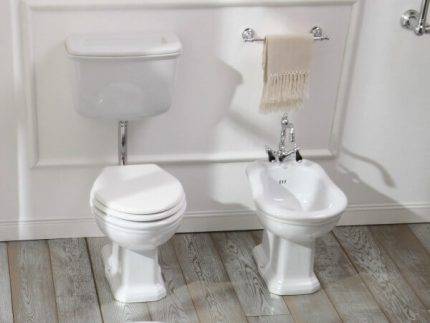
- Something about the bidet
- How to determine the size of the installation?
- Installation installation
- Preparatory stage
- Mounting the device
- Installation connection
- Types of installations for the toilet
- How to carry out pre-marking?
- Piping connection
- Bidet installation installation
- What are bidets?
- The range of Geberit installations
Plumbing installation - what is it?
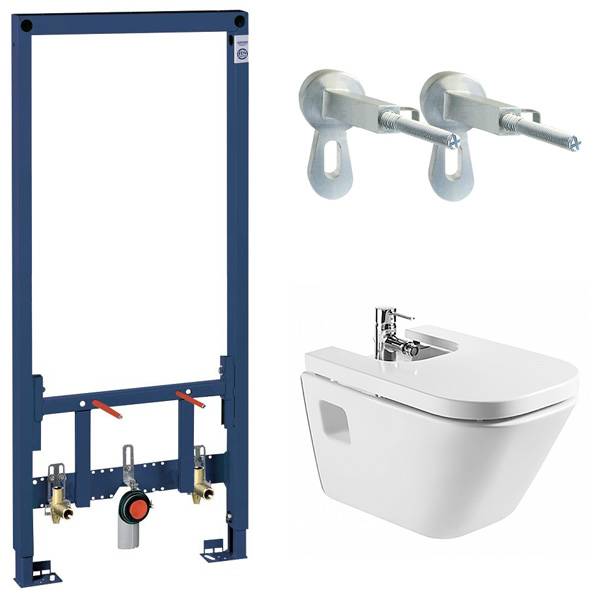
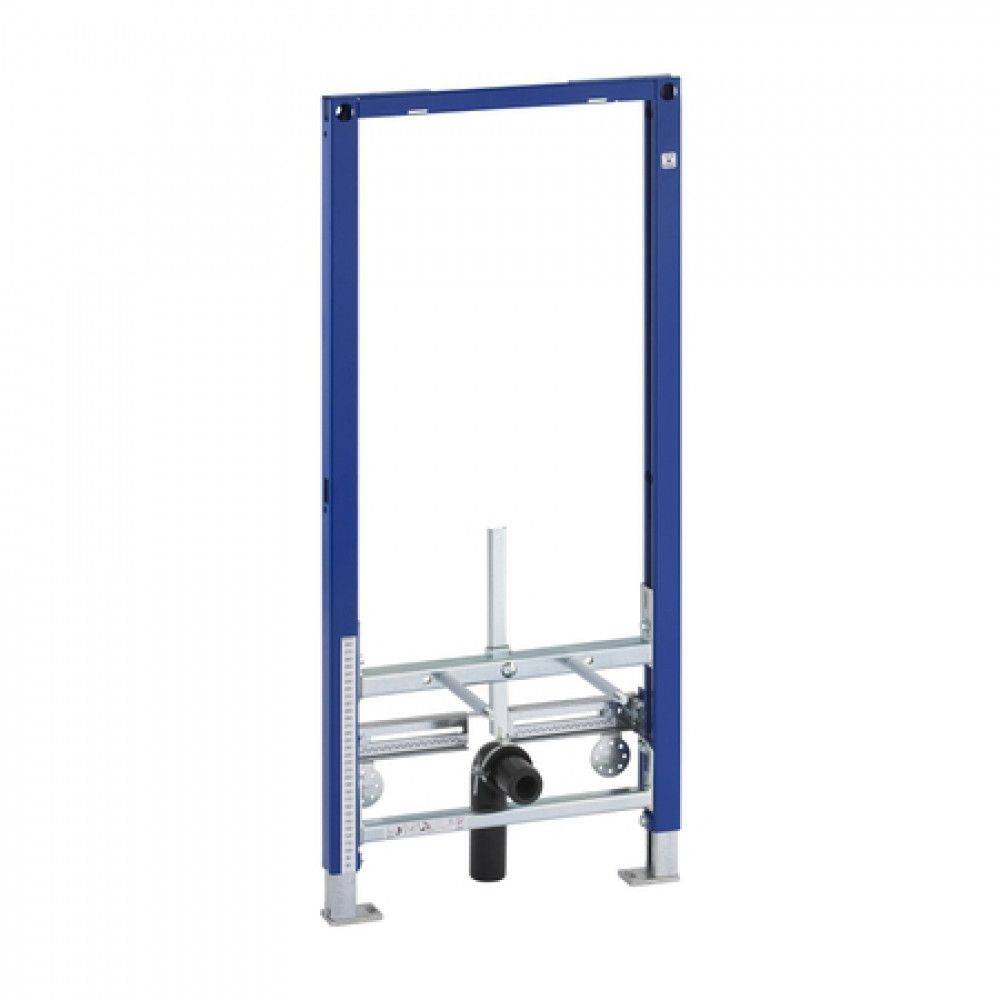
A plumbing installation is a load-bearing metal structure that can support both the weight of the appliance and the operating load. Well, in our case, this is a design for fixing the bidet on the wall or in the corner of the toilet or bathroom.
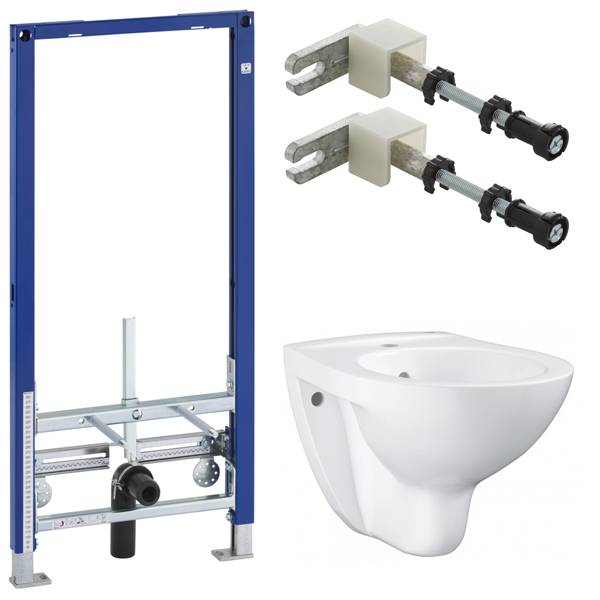
Moreover, there are universal mounting systems with movable brackets that fit any bidet model, and targeted installations produced by manufacturers of sanitary equipment only for their models.
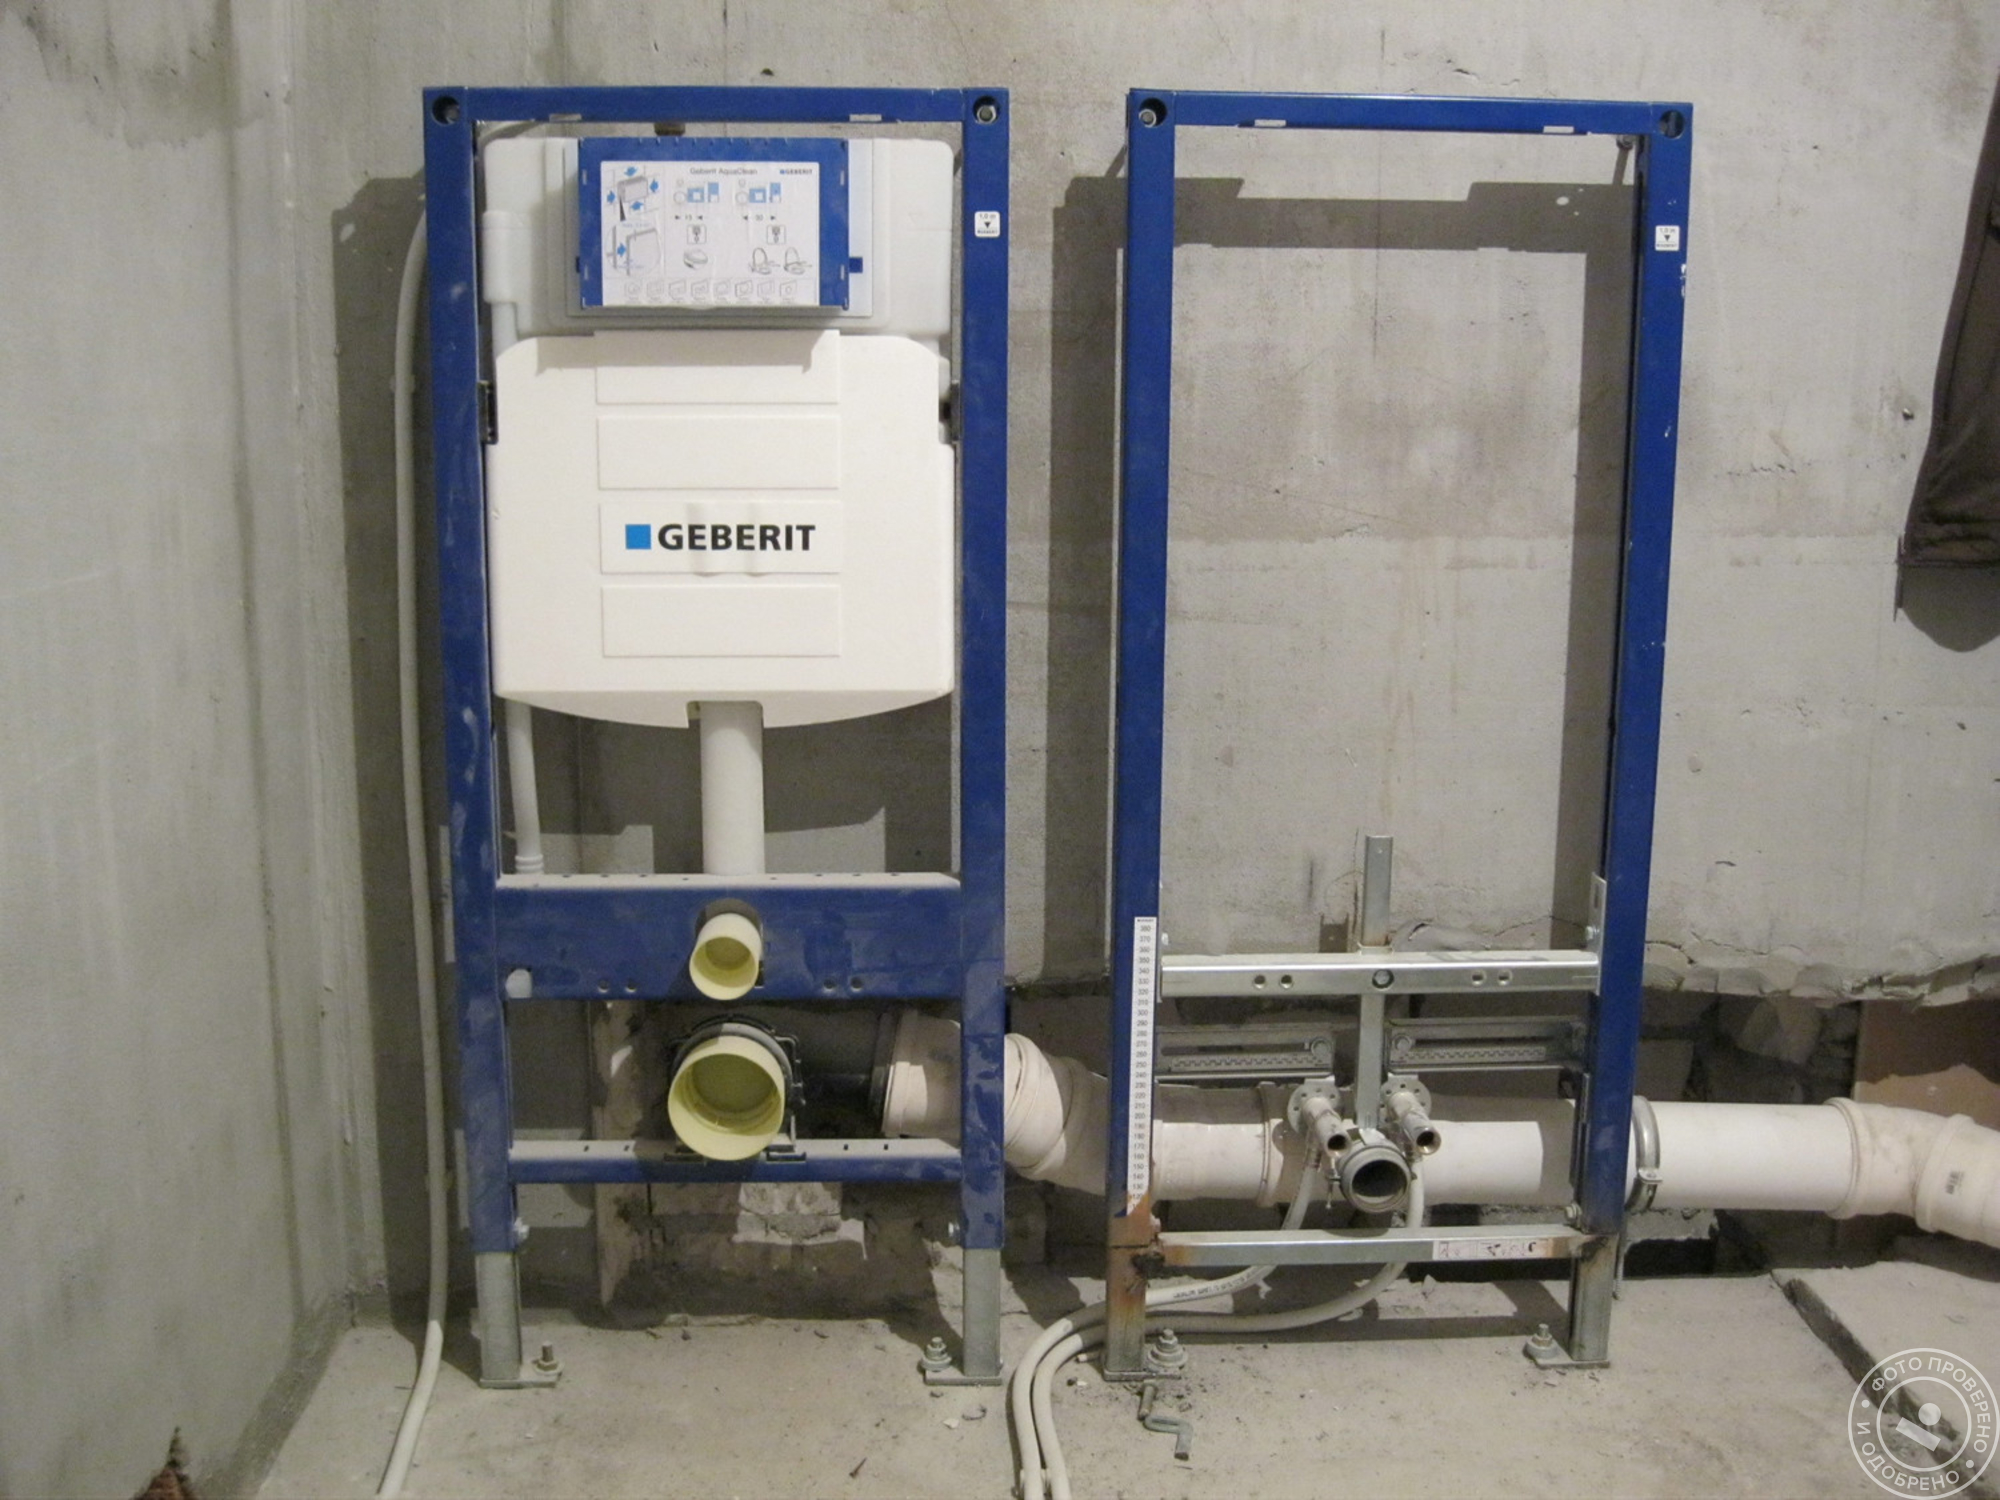
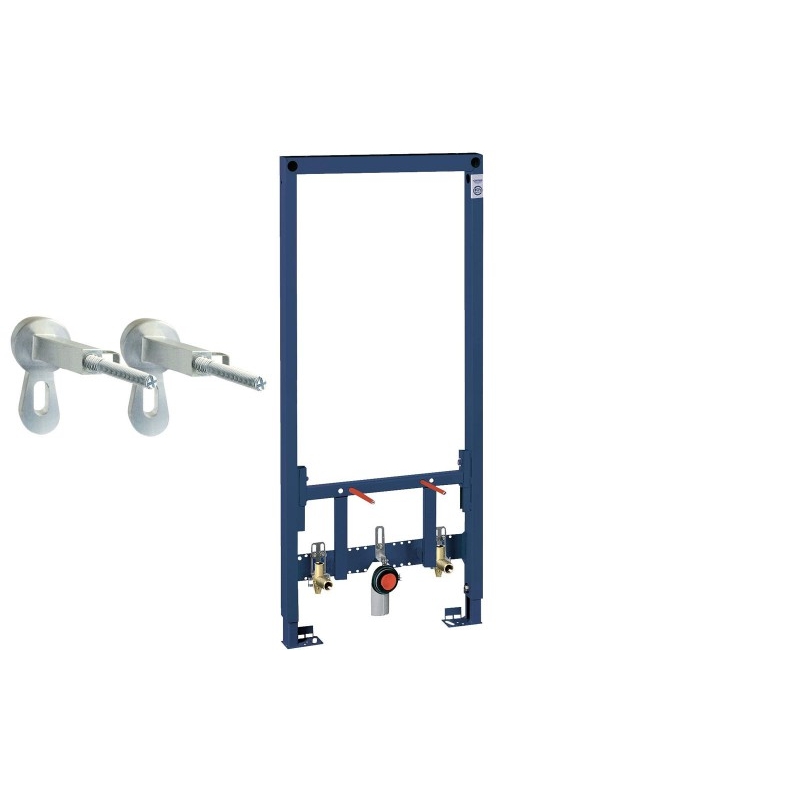
Metal structure, with four brackets for wall mounting
At the same time, both typical and special installations are made in the format of one of two structural schemes, namely:
- As a block installation.
- In the form of a frame installation.
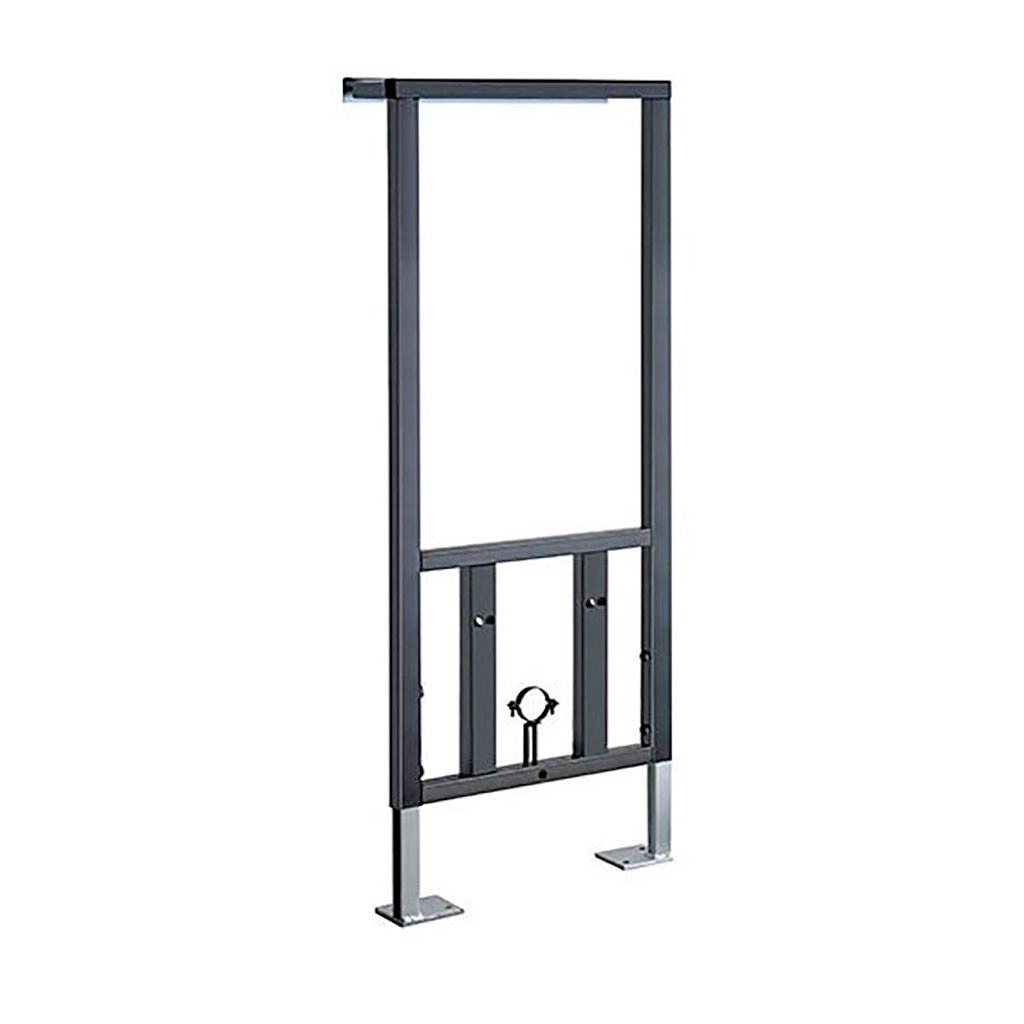
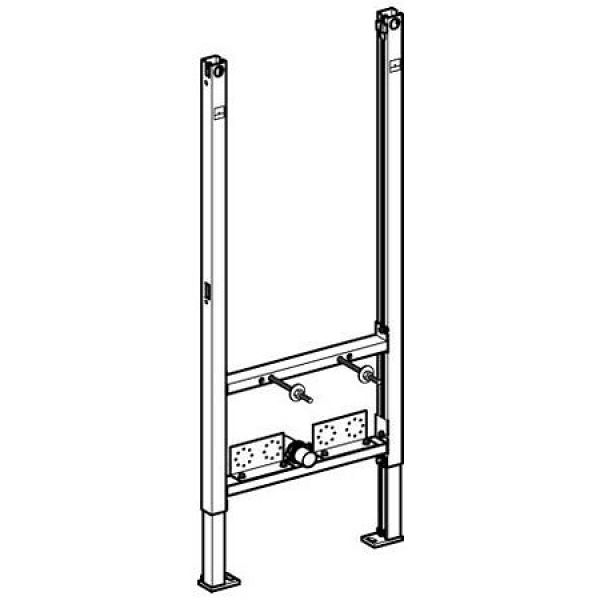
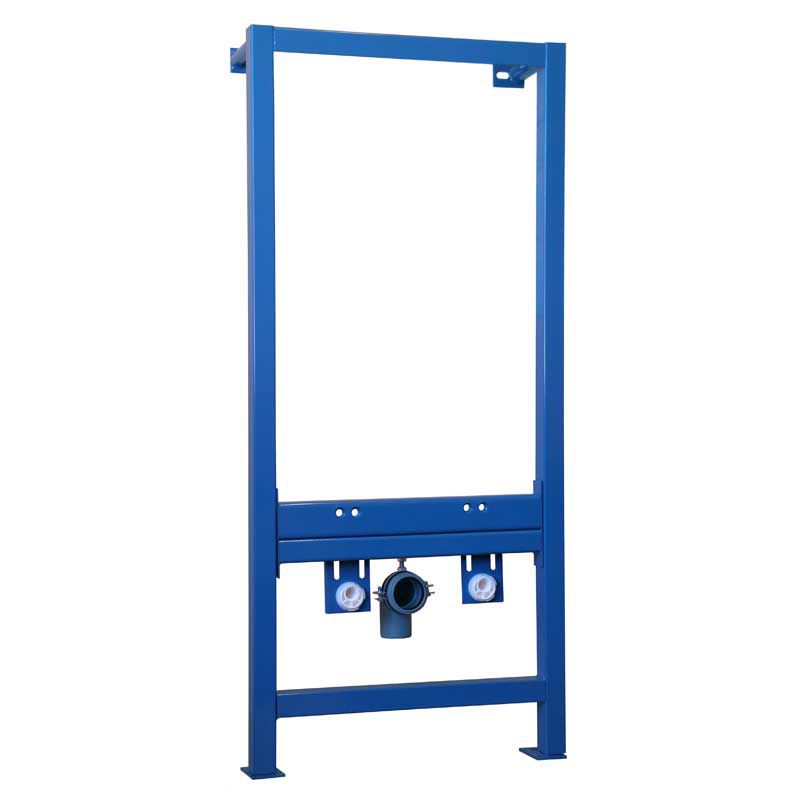
And in our case, a block inhalation for a bidet is a metal structure, with four brackets for wall mounting.That is, a block installation can only be counted on if its supporting surface is a load-bearing (main) wall. After all, it has no support for the ceiling. And, of course, this narrows the scope of such structures.
In turn, a frame installation for a hanging bidet is a completely different type of metal structure, designed as a U-shaped frame resting on a powerful stand. Moreover, this frame is mounted with two brackets on the wall and two more - on the floor. As a result, the frame structure can be adjusted not only to a load-bearing wall, but also to a light partition, corner junction of walls (partitions), a niche in the wall, and so on. In a word, this is a universal mounting structure.
Wall hung toilet
Many are afraid to install hanging-type toilets in bathrooms, since such a design seems unreliable. This opinion is erroneous, since in reality the toilets with the installation can easily withstand a load of up to 400 kilograms.
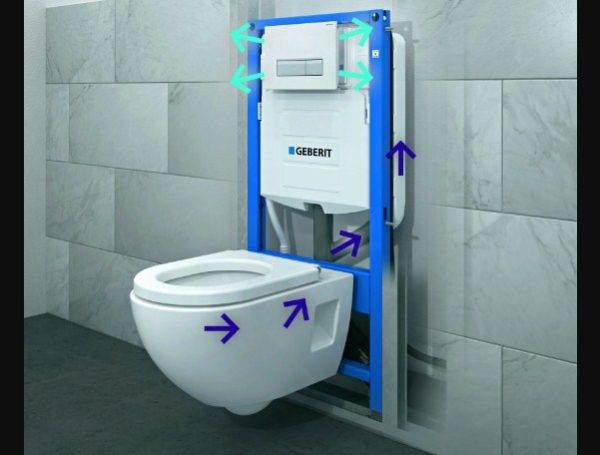
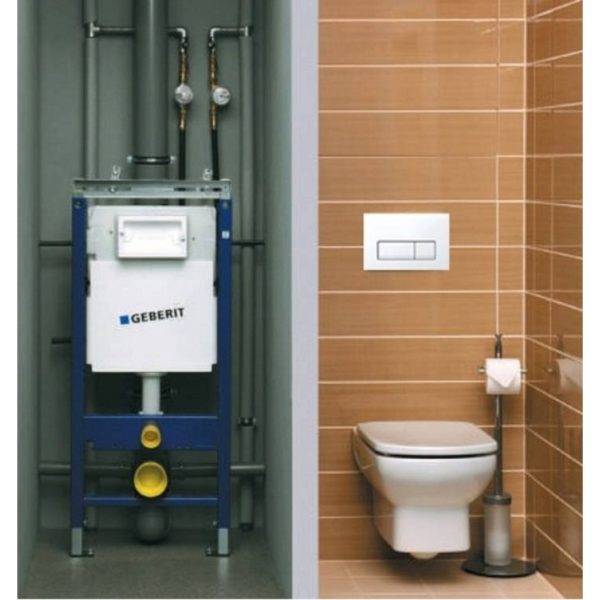
This strength is provided by a steel frame called the toilet installation system. This is the basis for the structure, which is mounted to the surface of the floor and wall. Some models are attached only to the wall.
The metal studs that connect the toilet to the installation frame pierce the facing material. Due to this technology of fastening, the bowl is firmly attached to the wall. The pipes and the tank itself are hidden in the wall, and only the toilet bowl remains visible.
Having considered the mounting options, we will find out which installation for the toilet is better.
Models of this configuration are characterized by large legs and an impressive frame size.The drain tank, made of plastic, is mounted to this frame, but it is decorated with facing material.
For manipulations with the tank, a small hatch is cut out or a removable panel is installed through which the water is shut off or malfunctions are repaired. If the lining does not allow installation behind the tank, a niche of the required size is cut out in the wall, and the drain button is installed in the place where the owners of the house wish.
To figure out which installations with a toilet will fit the bathroom, you should consider the following types of devices:
Block installation. The design consists of a plastic tank, which is placed in a strong frame of metal fittings. Such an installation system is equipped with the fastening elements necessary for a solid installation of the toilet on the wall. The block-type toilet installation is completely wall-mounted, so it is applicable for both hanging and floor-standing bowls.
It is recommended to install this design if the bathroom has a niche of suitable depth. This may be the far wall of the restroom, which is subsequently decorated with a plasterboard partition.
It is important to consider that the installation option is mounted only on a load-bearing wall. Plus block-type designs - budget cost
- Frame installation. Such installation for a toilet bowl differs in the increased reliability and stability. This allows you to securely fix toilets, as well as sinks and bidets. This is due to the material of which the structure consists and the technology of fixing to the surface. The advantage of this option is the ability to mount on the wall, as well as on any site (corner or straight plane).
- Corner installation.A popular option for installing hanging toilets. The plumbing fixture is placed in the corner of the room, which saves free space. This is true in apartments with a small footage of the bathroom. Such an installation for a wall-hung toilet is also attached to the floor or to the floor and wall at the same time, which ensures the strength of the finished structure.
After reviewing these points, you can understand what a toilet installation is and choose the appropriate option.
Before choosing an installation for a wall-hung toilet, you should decide which design features are preferable. The installation location also plays an important role when choosing a mounting system.
It is worth taking into account that the frame will be hidden behind a decorative partition. Therefore, initially choose a quality version of the product
Obviously, it is impossible to purchase the ideal device, since even the most advertised instance has pros and cons. However, the plumbing market is vast, so you can find models that are good enough.


Something about the bidet
If there is absolutely no place to install a bidet, and it is very necessary to use this boon of civilization, it makes sense to consider purchasing a bidet cover or bidet attachment. This is an electronic device that looks very similar to a toilet lid, but is equipped with a number of additional functions.
The electronic toilet lid is a great alternative to traditional bidet models, especially if there is not enough space for new plumbing
The bidet cover is installed directly on the toilet. This device needs to be supplied with water and electricity. Of course, there is no need to connect to the sewer.Electronic devices are equipped with a microprocessor and a control panel, with which you can set the appropriate temperature and water pressure.
Such products are also equipped with a function of blowing warm air, the temperature of which can be set at an acceptable level. Management is carried out remotely using the remote control. Some models have a water filter and air purification.
Among other useful options, it makes sense to note:
- automated supply of liquid soap;
- antibacterial seat cover;
- various modes of jet supply (massage, pulsation, etc.);
- the presence of an air freshener;
- seat heating;
- the presence of a timer;
- automatic nozzle cleaning system, etc.
High-quality bidet covers are very easy to use, they are in no way inferior to the traditional versions of this plumbing device, while making it possible to solve the problem of lack of space for an additional appliance.
Such an electronic device requires mandatory grounding. It is recommended to bring a separate cable from the shield to power the bidet cover, as well as install a residual current device.
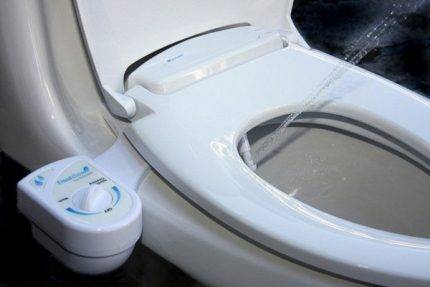
Instead of a full-fledged bidet cover, you can use its simplified version - a bidet cover, the installation of which is much easier than the stationary version of this type of plumbing.
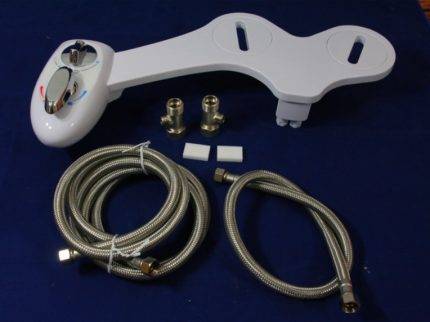 The device, which replaces a full-fledged bidet, is equipped with two flexible eyeliners. The length of the bellows hose for hot water is 2 m, for cold - 65 cm. Two 9/16″-1/2″ tees are included with the device
The procedure for installing and attaching the lining is as follows:
A very simple alternative to a bidet is a hygienic shower with a small watering can. It is connected to hot and cold water pipes through a mixer, and a watering can with a suitable length of hose is hung next to the toilet. Of course, this is not as convenient as a traditional bidet or an electronic equivalent in the form of a lid, but this option will cost relatively cheaply.
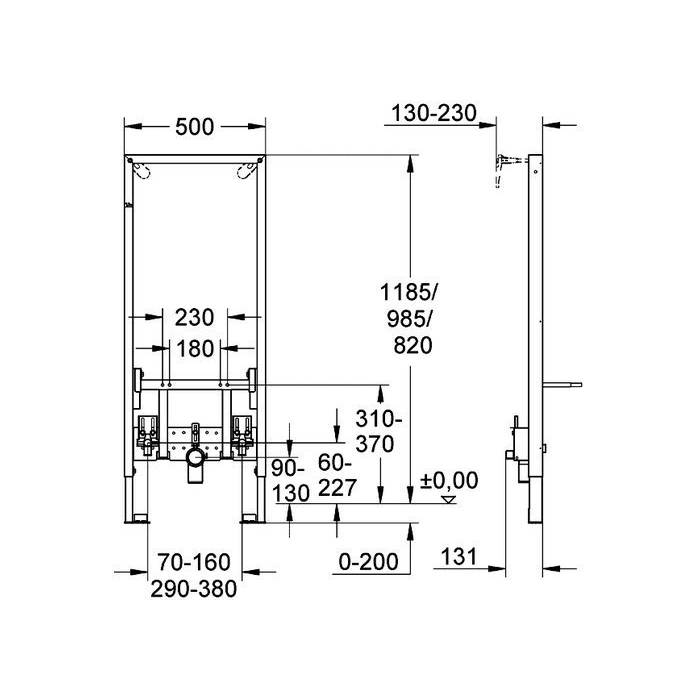
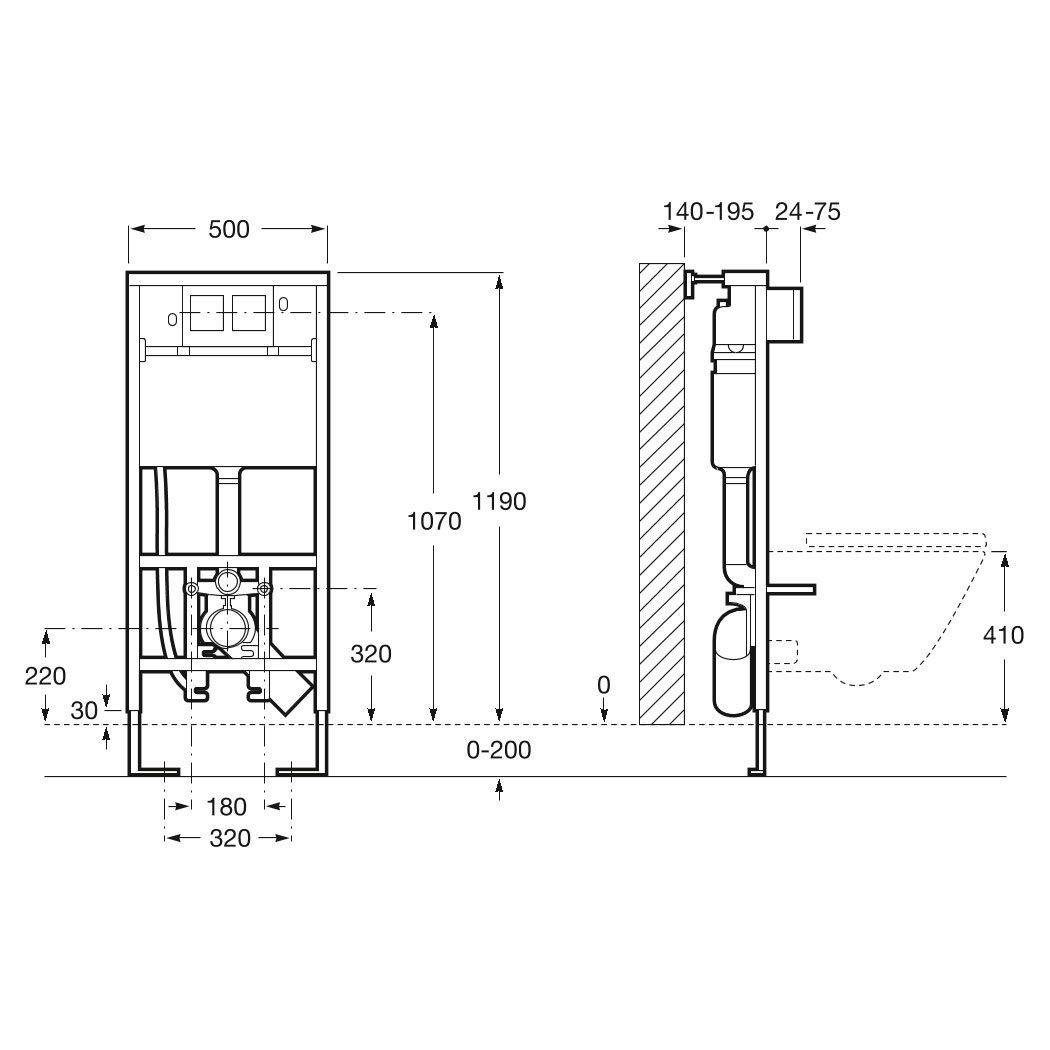
How to determine the size of the installation?
Since the correct choice of installation dimensions is too important a question, we will dwell on it in a little more detail. So, the dimensions of the installation for the toilet should fit the parameters of the niche. But they must take into account the features of the suspended structure.
In order to avoid mistakes, it is necessary to carry out a careful measurement. But if an error did occur, for example, you purchased a too narrow installation, then you can make a correction. But it is a completely different matter when the dimensions of the installation do not correspond to the dimensions of the toilet bowl. In this case, there is nothing left but to return the device to the store and try to exchange it for a more suitable one. To avoid such difficulties, it is necessary to measure all the necessary parameters in advance.
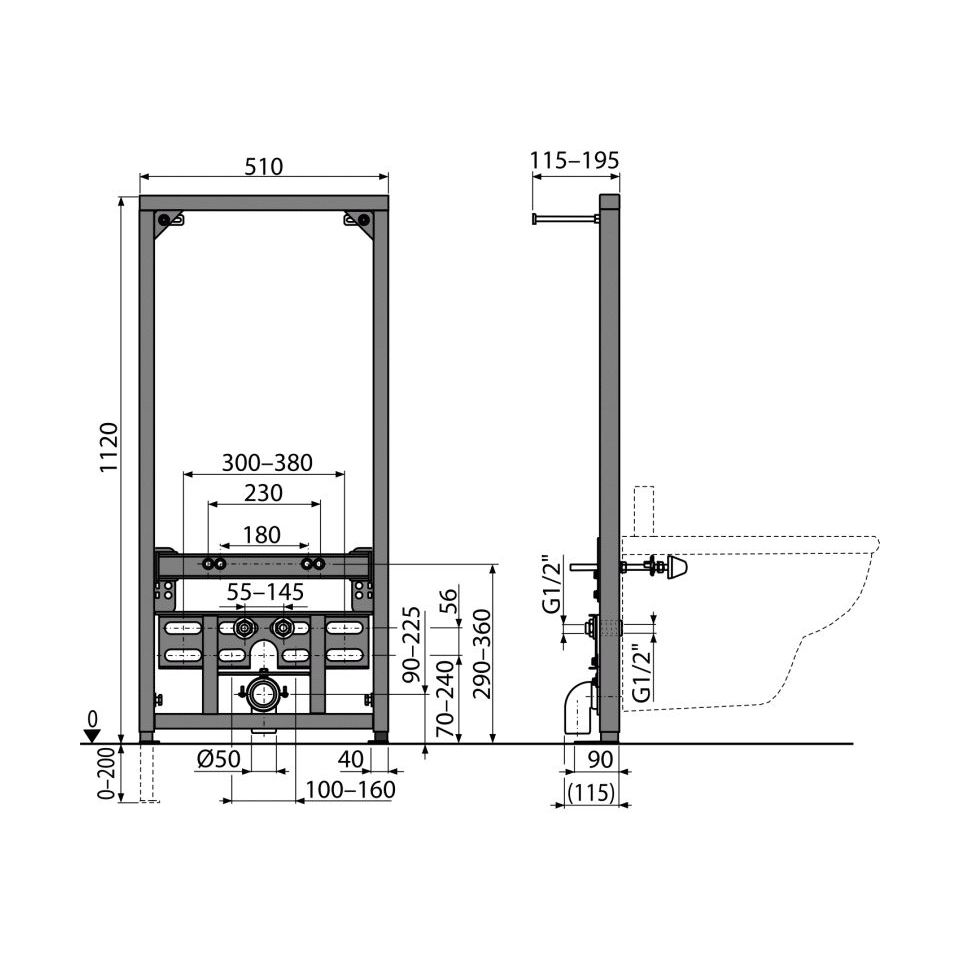
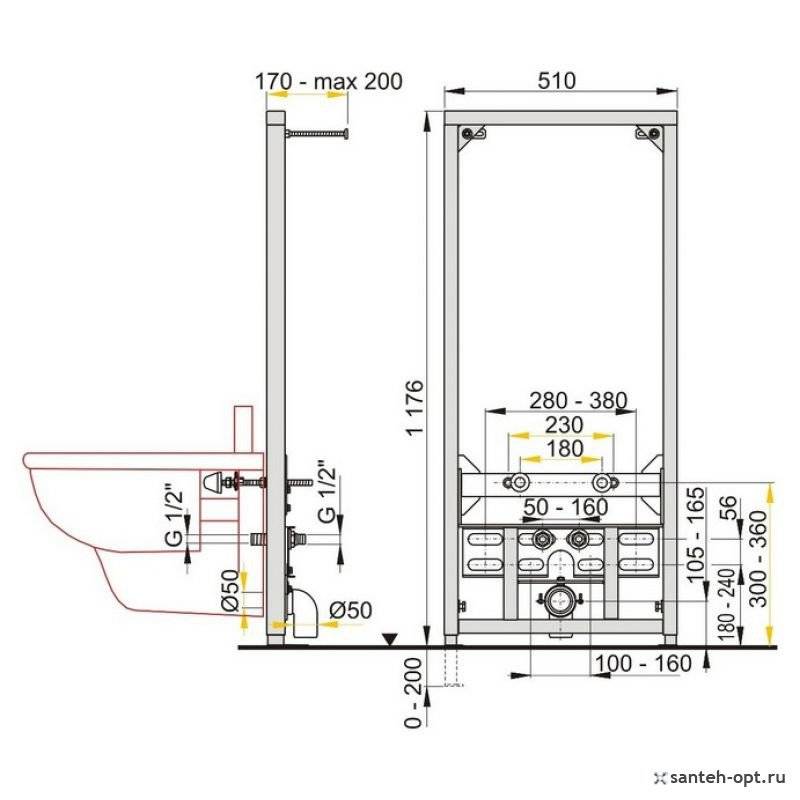
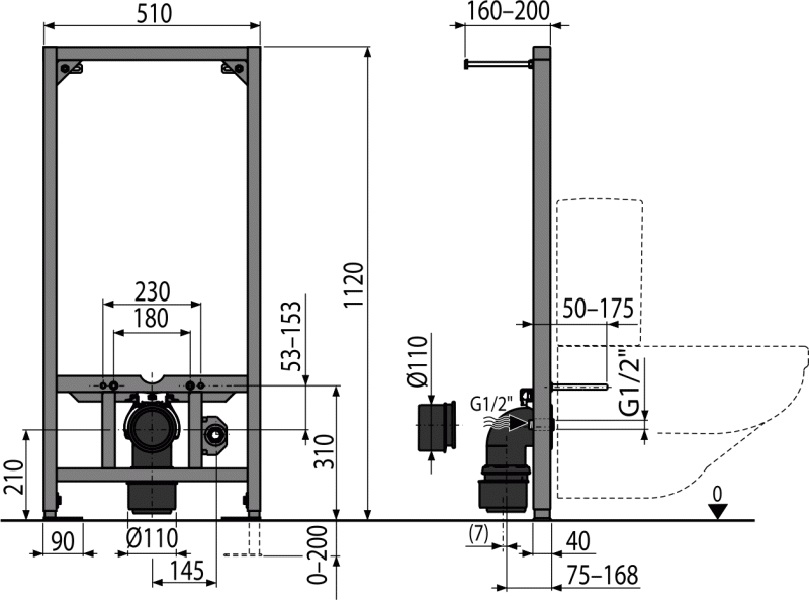
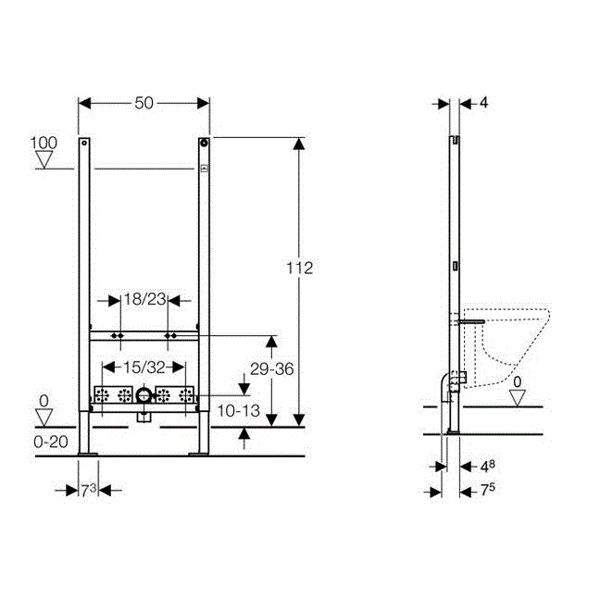
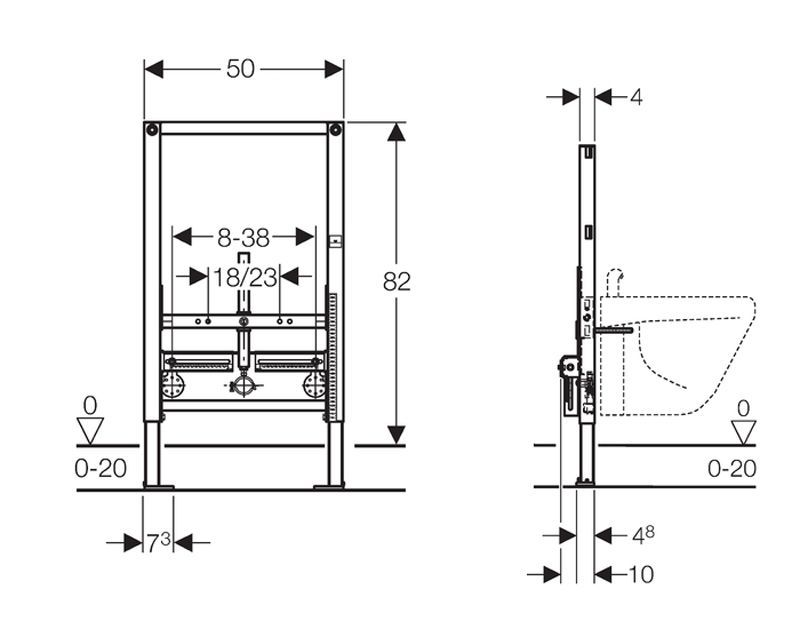
Thus, we found out that the dimensions of the installation can be different. It depends on the dimensions of the toilet itself, and the niche where it is attached. However, the most common sizes are the installations, which are 112 cm high and 50 cm wide.
Installation installation
Consider how to install the installation for the toilet. The entire installation process consists in the systematic implementation of the following main stages:
- preparation for installation;
- fixing the installation;
- device connection.
Preparatory stage
The first stage of equipment installation - preparation - includes:
- preparation of tools necessary for work;
- selection of a place for installation of the structure.
It is more expedient to install a toilet bowl in a place:
- equipped with water and sewer pipes. If the installation of the toilet bowl is carried out far from communications, then it is necessary to carry out additional work to lengthen the pipelines, which will lead to an increase in time and money costs;
- where the toilet will not interfere. In apartments, special niches are most often provided, which saves a small space of the toilet room. If the toilet is located in a country house, then a place is selected that is remote from the kitchen and living quarters.
To do the job, you will need the following tools:
- tape measure, building level, marker for measuring work;
- drill, puncher and a set of drills for preparing mounting holes;
- wrenches for assembling the structure and its fastening.
Tools required for mounting the installation
At the preparation stage, it is important to check the presence of all fasteners included in the installation kit, water and sewer connections, as well as o-rings necessary for connecting communications.
Mounting the device
Do-it-yourself installation is carried out according to the following scheme:
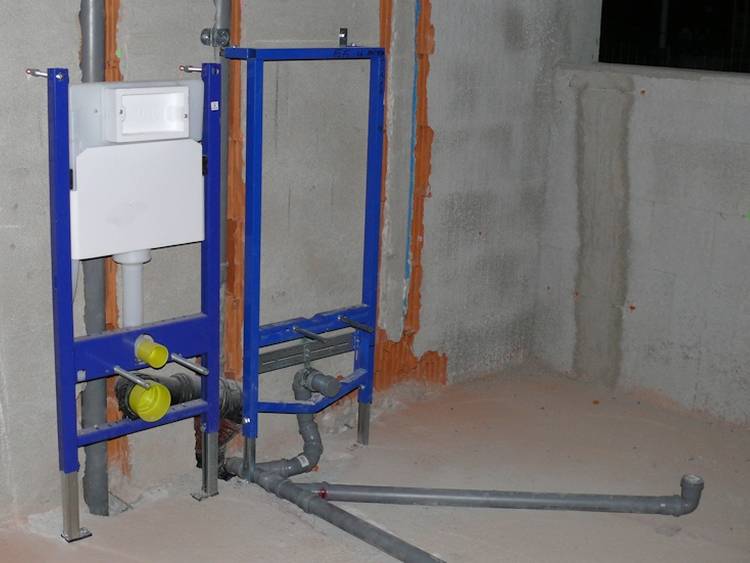
- frame assembly. If a block installation is mounted, this step is skipped. When assembling the device, it is recommended to strictly adhere to the attached diagram and securely fix all fasteners;
Instructions for assembling the device
marking places on the wall and floor for fixing bolts
When carrying out work, it is important to take into account the dimensions of the decorative finish of the room;
Determining where the frame is attached to the wall and floor
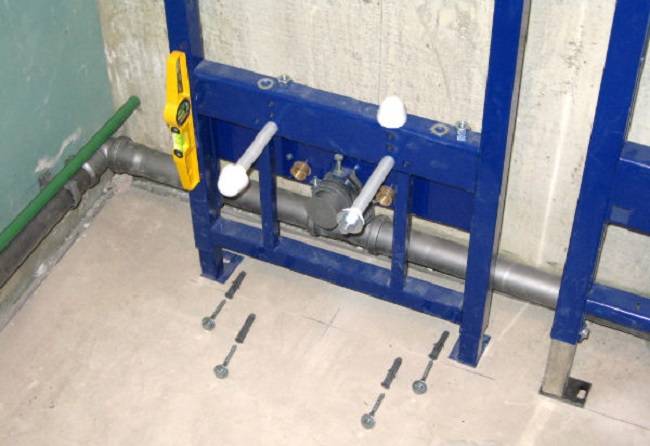
- drilling holes and inserting dowels for further fixing the installation;
Preparation of holes for fastening the structure
fixing the frame of the installation
When installing equipment, it is important to observe the following parameters:
the fastening elements of the toilet bowl, located on the installation frame, must be at a distance corresponding to a similar parameter on the toilet bowl itself;
the outlet of the sewer pipe should be located at a height of 23 cm - 25 cm from the floor;
the optimal height of the hanging toilet is 40 cm - 48 cm from the floor tiles or other finish;
Recommended installation distances
The most important step in installing the frame is its alignment in the horizontal and vertical directions. The frame is adjusted with special screws provided for by the design of the equipment.


- drain tank installation. When fixing the toilet bowl, it is necessary to take into account the height of the drain button. The most universal is a distance of approximately 1 m from the floor of the toilet room. This parameter is considered optimal for using the toilet by both children and adults;
Installation of a cistern for a wall-mounted toilet bowl
- installation of fixtures for the toilet.
Installation of fasteners for the toilet
Installation connection
Water supply to the drain tank can be performed:
- side;
- above.
The choice of water connection method depends on the design of the used tank. For water supply, it is recommended to use rigid plastic pipes, and not flexible pipes, since the service life of the pipes far exceeds the life of the pipe.
For strength, the junction of the pipe and the tank is sealed with a gasket and treated with a sealant.
Connecting the drain tank to the water supply
The toilet bowl and the sewer pipe can be connected:
- by cutting into the pipe. Such a connection is considered the most optimal, but it is not always possible to perform it in practice, since it is quite difficult to combine the drain from the toilet bowl and the pipe;
- using a plastic adapter;
- using a corrugated pipe.
If a direct connection is not possible, it is recommended to use plastic adapters, since the service life of the corrugated pipe is shorter.
The complete process of installation and connection of the installation can be viewed on the video.
After installation and complete connection of all devices, you can proceed to the final finishing of the niche and attaching the toilet bowl.
Types of installations for the toilet
To date, there are 2 types of installations that have their own design features.
Block structures
mounted only on the main walls and consist of a plastic tank with fittings. A set of fasteners is additionally attached to the toilet bowl. This type of installation for toilets is installed in a pre-prepared niche and is completely hidden in the wall. The main advantage of this design is accessibility, but if there are no main walls in the bathroom, then installation is impossible.
After buying a toilet, many decide to install it themselves. The procedure is very simple and does not require special skills. Increasingly, people are buying in order to save space, there is an additional design - installation, it provides fastening of the toilet to the wall.In such cases, installing a toilet installation with your own hands can raise a number of questions. To provide a complete picture of the work process itself, there is a special toilet installation instruction that will help in gaining all the necessary knowledge.
Let us consider in more detail the entire sequence of work that must be carried out when installing the installation of a wall-mounted toilet bowl.
Before starting work, you need to check the availability of all the tools that may be needed in the process. This is a tape measure, pencil or marker, a hammer drill with concrete drills, a building level, cap and open-end wrenches.
Now you should unpack the box with fasteners, see if everything is in stock. Manufacturers try to complete their products as much as possible so that a person does not have to buy additional fasteners. Therefore, it is enough to compare the equipment available with the one indicated in the instructions. Let's start the workflow.
The first step is to start applying the markup, which will indicate the place of attachment. Consideration should be given to the location of sewer drains to ensure the installation procedure is as simple as possible. Typically, the installation system should be located at a distance of 14 mm from the wall.
Now it is necessary to mark the attachment points of the drain tank, usually it is located at a height equal to 1 meter from the floor level.
It is also necessary to mark on the wall and floor the points of attachment of the installation elements.
After marking, it is necessary to make holes in the wall, floor, where the installation fasteners will be located, using a perforator, insert dowels into the holes.
Regardless of the type and features of the installation, it will require horizontal and vertical fastening.
Mounting anchors must be installed in the holes with installed dowels, with their help the installation will be attached to a vertical plane.
When installing, it is important to follow the sequence so that in the future there is no need to adjust the vertical level.
Now you can install the installation design itself, attach it to the levels.
It is very important to install the chassis in a level position relative to the vertical and horizontal levels.
Only after the installation is installed correctly, it is possible to tighten all fasteners and bolts, firmly fixing the structure.
Now comes the stage at which the sewer is connected to the installation, it is fixed.
The design was initially equipped with special plastic clamps, which will greatly facilitate the work and speed up the execution.
After all work is completed, you need to once again make sure that the installation is secure, that the bolts are properly tightened, and that the design complies with the levels. At this stage of control, one should be extremely careful, any inaccuracy or poor fixation of the structure in the future can lead to breakage.


How to carry out pre-marking?
To perform the markup, they take a simple pencil or marker, a tape measure and a building level. All measurements are made taking into account the dimensions of the installation itself. In order for the subsequent installation to be correct, first determine the location of the central axis of the structure and mark it with a straight line.
Then, with a tape measure, measure the distance from the conditional edge of the installation to the wall - it should not be less than 13.5 mm.They mark with strokes on the wall the area where the drain tank is supposed to be located and mark on the floor and walls the places for the equipment fastening mechanisms.
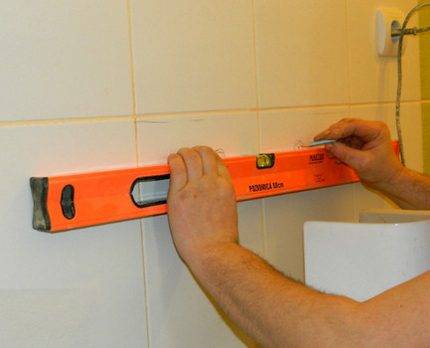
When marking, it is imperative to use a level. It will help to align the system vertically and horizontally, which will ensure its subsequent correct operation.
Properly made markup makes it possible to install the installation exactly where it will not clutter up the space and interfere with the entrance and exit to the bathroom.
Piping connection
Connecting a plumbing fixture to the plumbing system is based on the use of a conventional mounted or built-in faucet. In the first case, the connection is carried out in the same way as installing a traditional faucet on the sink, and the second option requires mandatory gating.
As a rule, all mixers are sold with instructions or the so-called connection diagram, according to which:
- fixing the mixer;
- leading to the mixer hoses for flexible piping;
- connection of a flexible eyeliner to a tee of a water pipeline.
Low installation
As practice shows, it is advisable to install a separate shut-off valve, which will allow you to shut off the water supply to the plumbing fixture offline. In this case, it is much easier to carry out such basic activities as a scheduled preventive inspection and repair of the bidet.
It is equally important to correctly connect the installed plumbing fixture to the sewer system using a special siphon, a corrugated hose, and a rubber cuff, through which the connection being made is sealed.
Bidet installation installation
Work on the installation of the structure should be carried out as carefully and carefully as even small flaws made can lead to improper functioning of the device.
Given the fact that the system involves hidden fixation of plumbing equipment, in case of improper construction work, the dismantling of the metal structure cannot be avoided. As a result, the wall cladding will suffer.
Consider the rules that should be considered in the process of installing a bidet installation.
The frame structure is attached to the floor, wall, and the block structure - exclusively to the wall covering.
For a strong fixation of the frame, special attention must be paid to the floor, the surface of which must be perfectly flat. Otherwise, the skew of the frame towards the bidet cannot be avoided.
Remember, the installation of the frame structure should begin from leveling the floor.
Adjustment of the height of the attachment points is carried out with the help of retractable legs, which are able to raise the product more than 35 cm above the floor level.
You can level the bidet level immediately after fixing the frame to the ceiling.
- To regulate the "depth" of the location of the metal structure, special extension cords are used.
- It is necessary to align the device before fixing the product to the wall, since after its placement, there is no possibility of adjusting the position of the supporting frame.
- To fix a frame or block installation, anchor bolts are used, which are pre-screwed into the drilled holes.
The diameters of the fasteners are selected depending on the weight of the bidet, as well as on the expected maximum operating load.


Stages of installation installation.
- fit the frame to the supporting surface
- mark the points of location of anchor bolts;
- drill blind holes for fasteners;
- install and fix the frame to the supporting surfaces using anchors;
- adjust the position of the frame with the help of legs, extensions;
- screw the anchor up to the stop.
As you can see, it is not difficult to install an installation for a multifunctional toilet, the main thing is to use high-quality materials and unquestioningly follow the manufacturer's instructions, taking into account the above rules.
What are bidets?
A bidet is a sanitary ware designed for personal hygiene. Externally, the device is very similar to a conventional toilet, but technically it is a low-hanging washbasin.
It is also connected to the sewer, but instead of a tank there is a faucet or a fountain. There are floor-standing bidet models and a hanging version. The first is mounted on the floor, and the second is hung on the wall.
When choosing a bidet, you should consider not only the method of its installation, but also other design features. For example, a mixer can be either a conventional two-valve or single-lever, with a ball mechanism. The latter is considered more convenient.
A bidet is a small personal hygiene appliance that can be extremely convenient for sick and elderly family members.
The spout is designed in such a way that the water jet can be directed upwards at a suitable angle. In some models, there is no spout at all, water flows from the bottom of the bowl in a small fountain, the direction of which can also be adjusted.The design of the product should be chosen in accordance with the style of sanitary ware that is already in the bathroom.
There are retro models of modern bidets, and products made in trendy high-tech style.
It is equally important to consider the size of the plumbing fixture, especially when it comes to a small bathroom. There should be some space around the bidet so that the visitor to the bathroom can comfortably use it.
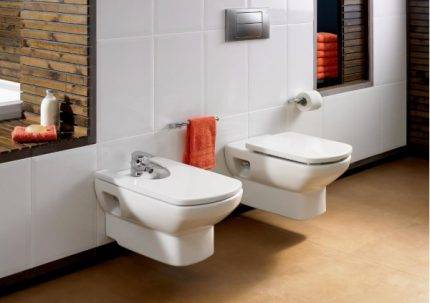
Wall mounted bidet models are compact and easy to clean the bathroom. The toilet bowl and bidet, made in the general style, look very impressive.
Mounted models look very compact, but for their installation you should use a special installation, which should be placed in a niche behind the bowl, or behind a special false panel. To accurately take into account all these points, you should carefully measure with a tape measure both the space intended for installing the bidet and the device itself.
An excellent alternative to a free-standing bidet is an intelligent toilet, which practically combines the functions of both types of plumbing in one body:
The range of Geberit installations
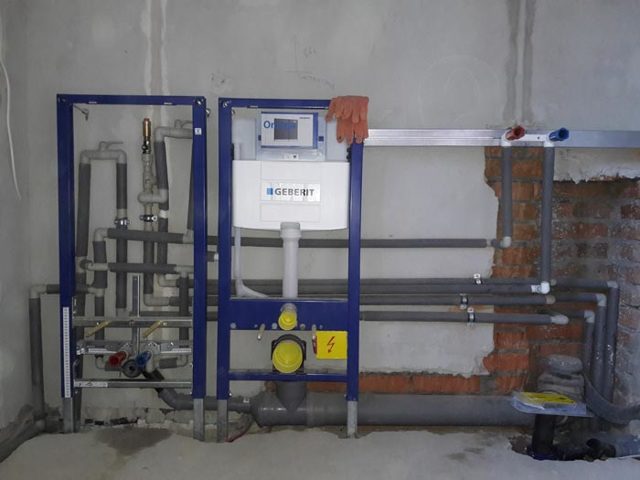
The installation system is a set of profiles rigidly interconnected into a single frame structure with the possibility of adjusting the spatial position of individual elements. The installation is used for attaching suspended plumbing fixtures, hidden plumbing to toilet bowls, urinals, bidets, sinks, cold water and hot water communications, sewerage, and electrics.
The Swiss manufacturer Geberit produces installations for fixing the following types of plumbing and fixtures:
- toilets and bidet toilets;
- urinals, bidets;
- washbasins, drains, kitchen sinks;
- bathtubs, shower systems;
- shower with sewerage in the wall;
- supports, handrails for the disabled.
The frame structure is separated from the wall at some distance or mounted as an island, sheathed on the outside with sheet material. This allows you to hide pipes, cables, flexible hoses, and other elements of engineering systems inside it.
Users often get confused with the name of Geberit installations. The correct name for the frame structure is Geberit Duofix. However, the manufacturer initially uses several options for completing it with mounting elements for specific plumbing equipment. Therefore, other names of his products appear in the title. The marking of the frame structure is deciphered as follows:
- Geberit Delta installation – a frame for a wall-mounted toilet bowl with a concealed flushing cistern Delta;
- installation Geberit Sigma - frame structure for plumbing with vertical mounting, cistern Sigma 8 cm or 12 cm thick;
- installation for the Geberit Duofix Omega toilet bowl - the installation height of the Omega cistern is 82 cm or 98 cm;
- Geberit DuoFresh installation - frame with odor removal elements;
In other words, in the frame structures of the installation systems, the distance between the uprights and the horizontal bars can vary. The frame can be reinforced with two side posts for fixing handrails for people with disabilities.
 Frame construction with handrails for the disabled.
In free-standing installations, racks are usually reinforced with additional elements. The flush cistern key can go to the front surface of the structure or be located on top or on the end.