- How does an IR system work?
- Stage 3 - installation of infrared floor heating
- 1. Preparation (learning security measures)
- Safety rules for installing IR floor heating:
- 2. Preparation of the thermostat installation site
- 3. Foundation preparation
- 6. Laying infrared floor heating
- 7. Installation of clips
- 8. Connecting the wires of the infrared floor
- 9. Installing the temperature sensor for the thermostat
- Do-it-yourself installation of a cable underfloor heating under a tile
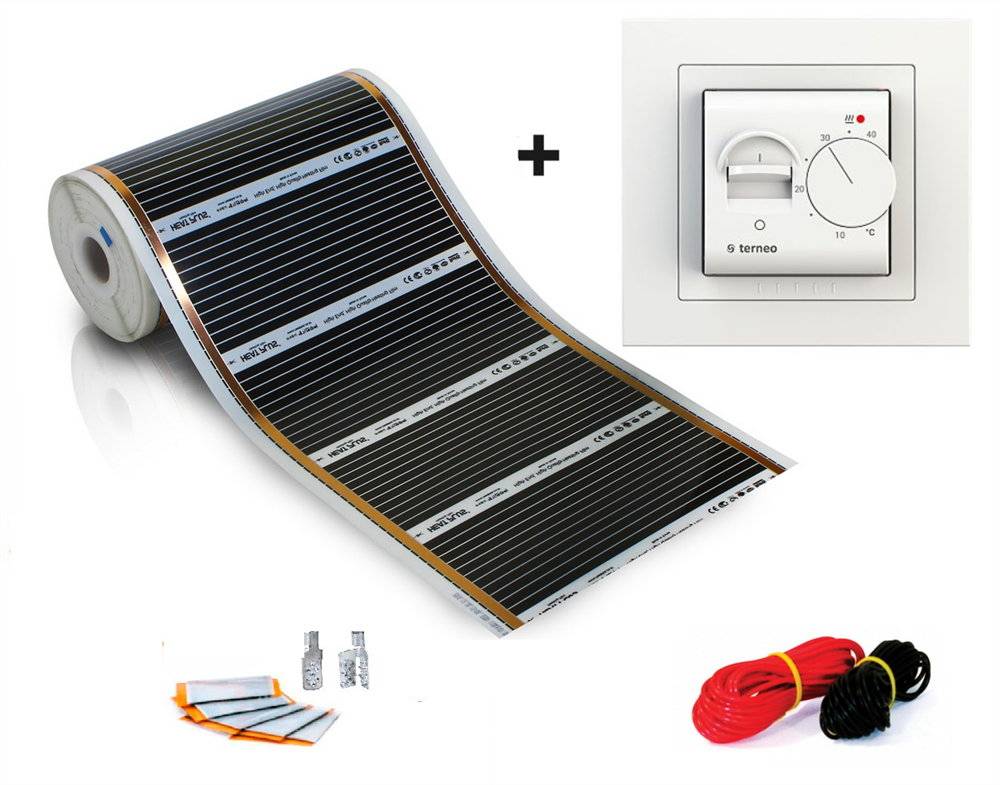
- Warm floor infrared film Monocrystal
- Options for system installation
- Connecting the floor to the power supply
- What should be the basis
- Electricity consumption of infrared floor depending on the area
- How to connect film underfloor heating
- Cross section of wire for underfloor heating
- Stages of installation and connection
- Possible mounting errors
- Underfloor heating film installation
- Advantages and disadvantages of infrared floors
- Constructions
- Features of laying IR film under different coatings
- Under the laminate
- under tile
- Under linoleum
- Conclusions and useful video on the topic
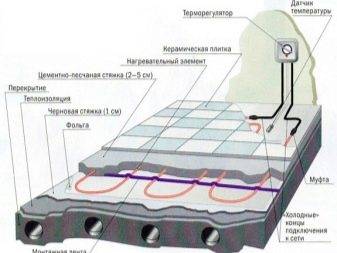
How does an IR system work?
Infrared warm floor is a rather complex system, which cannot be made independently at home.
The system is based on a unique nanostructure that is capable of generating infrared radiation invisible to the human eye.
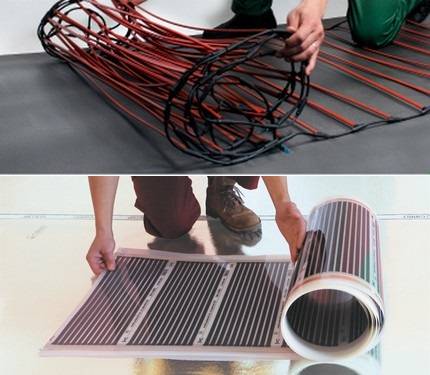
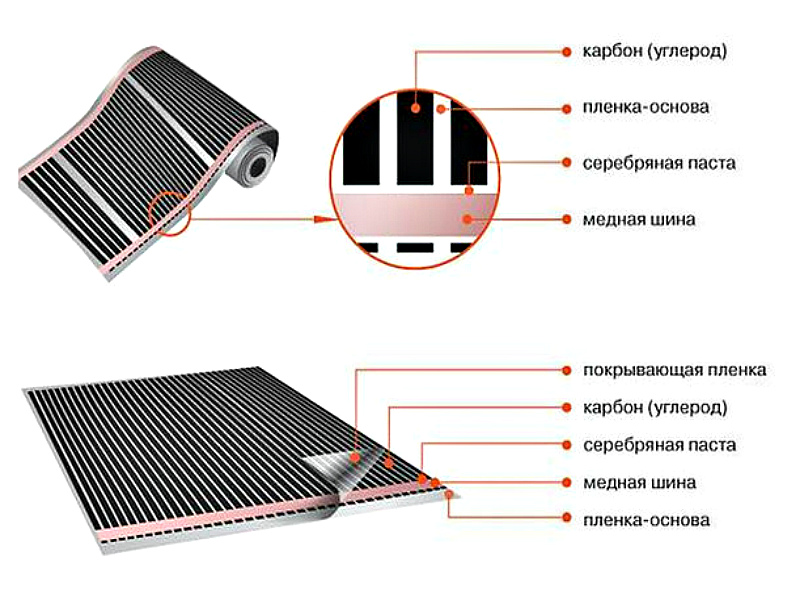
Depending on the type of heating elements, IR systems are divided into two main types: rod and film
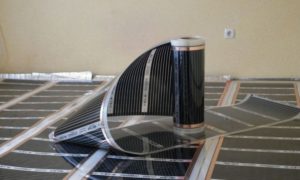
Film systems are made of strips of carbon paste - high-strength carbon fiber, which are hidden under a heat-resistant polyethylene film.
All strips, the thickness of which does not exceed ten millimeters, are located at an equidistant distance of 10-15 mm and are connected in parallel by flat current-carrying bars protected by a silver coating.
Under the action of an electric current supplied to the tires, carbon elements begin to emit infrared radiation, the wavelength of which in the bioresonance range varies between 9-20 microns
The core systems are based on graphite-silver rods, inside of which carbon material is laid. They are interconnected by stranded wires and soldered in a protective copper sheath. The systems are available as individual cables or prefabricated coils.
Infrared rays in such systems act in a straight line, and therefore cause heating not of the surrounding air, but of objects located inside the room: flooring, furniture, walls and ceilings. Due to this property, the speed of IR heating is much higher than traditional analogues - electric and water systems.
Among the undeniable advantages of infrared film underfloor heating are:
- Environmental friendliness. Infrared rays are similar in effect to sunlight and therefore have a beneficial effect on all living organisms. They don't have any side effect.
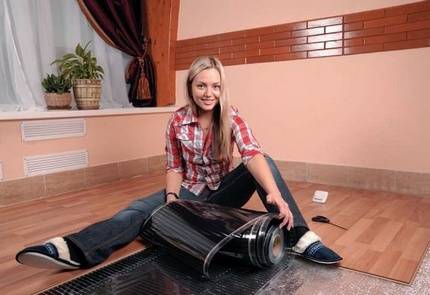
- Ease of installation.The design features of the system allow, at minimal cost and effort, to produce high-quality installation, having only basic skills in construction work.
- Compatibility with different types of coating. Laying infrared floor heating can be done immediately "dry" under the carpet, parquet board, linoleum or laminate.
Due to the fact that the heating elements in the film system are tightly laminated with a polymer layer, they are not afraid of accidental dents and punctures, as well as exposure to moisture. But even if one of the carbon strips is damaged due to the parallel connection scheme, the remaining elements will continue to work.
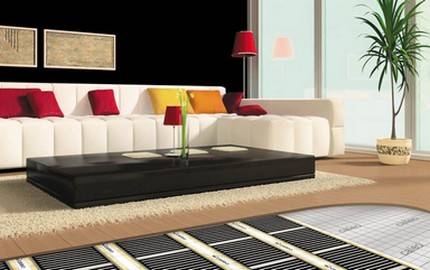
The thickness of the thermal film does not reach even 5 millimeters, and therefore practically does not “eat up” the height of the room. Thanks to this, it can be safely installed under almost any coating. In addition, such a film can be placed on vertical surfaces, fixed to the walls and ceiling, providing zonal heating of the room.
The weak point of the system is the fear of “locking”, in which heated areas can fail under the weight of large objects installed on them.
For this reason, the film material is laid only in those areas where large equipment and furniture will not stand.
Caution should be exercised when using IR systems in wet areas, as there is a risk of electric shock
Electricity consumption for the operation of infrared floor heating directly depends on the mode of operation of the system and the working area of the room. We also recommend that you read our other article, which describes in detail the film type of heating for rooms.
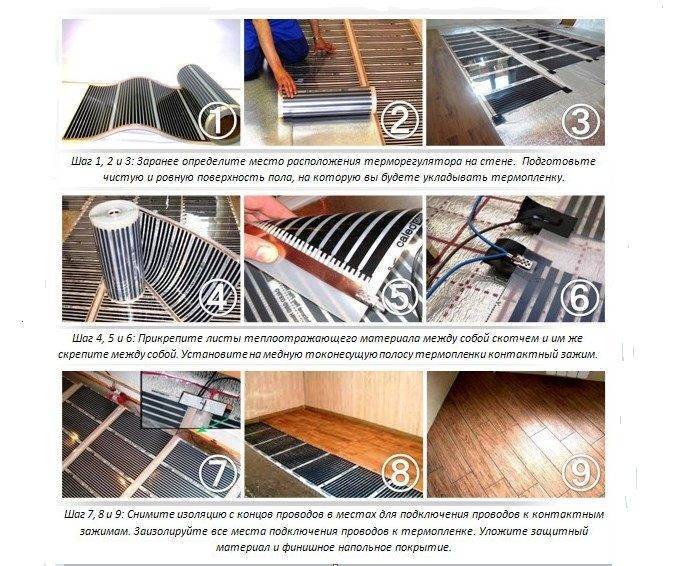
Stage 3 - installation of infrared floor heating
Step-by-step instructions for beginners with no experience in construction:
1. Preparation (learning security measures)
If the work is performed by a non-professional, you need to familiarize yourself with
installation technique and safety measures:
minimize walking on the laid film. Protection
film from mechanical damage, possible when moving on it,
achieved through the use of soft covering material (thickness from 5
mm);
do not allow installation of heavy objects on the film;
prevent the instrument from falling onto the film.
Safety rules for installing IR floor heating:
It is forbidden to connect a heating element to the power supply
film rolled up;
film installation is carried out with no power supply;
connection to the power supply is carried out strictly according to SNiP and
PUE;
film installation rules are observed (length, indents,
no overlaps, etc.);
only suitable insulation is used;
installation of the film under furniture and other heavy
items;
installation of a film under low-standing objects is excluded.
These are all items that have an air gap between the bottom
surface and floor less than 400 mm;
contact of the film with communications, fittings and
other obstacles;
isolation of all contacts (terminals) and lines is ensured
cut conductive copper busbars;
the film floor is not installed in rooms where high
risk of frequent water ingress;
obligatory installation of an RCD (protective device
shutdowns);
break, cut, bend the heating cable;
mount the film at temperatures below -5 °C.
2. Preparation of the thermostat installation site
Includes wall chasing (for wires and sensor
temperature) to the floor and drilling a hole for device. Power on
the thermostat is supplied from the nearest outlet.


Advice. It is advisable to lay the wires in the corrugation, this technique
will simplify maintenance and repair if necessary.
3. Foundation preparation
Infrared film is laid only on a flat and clean surface.
surface. Horizontal deviation of the surface exceeding 3 mm is also
unacceptable. Masters recommend treating the surface with a primer.
Note. Dismantling of the old floor (rough) is not required,
if its surface is not satisfactory.
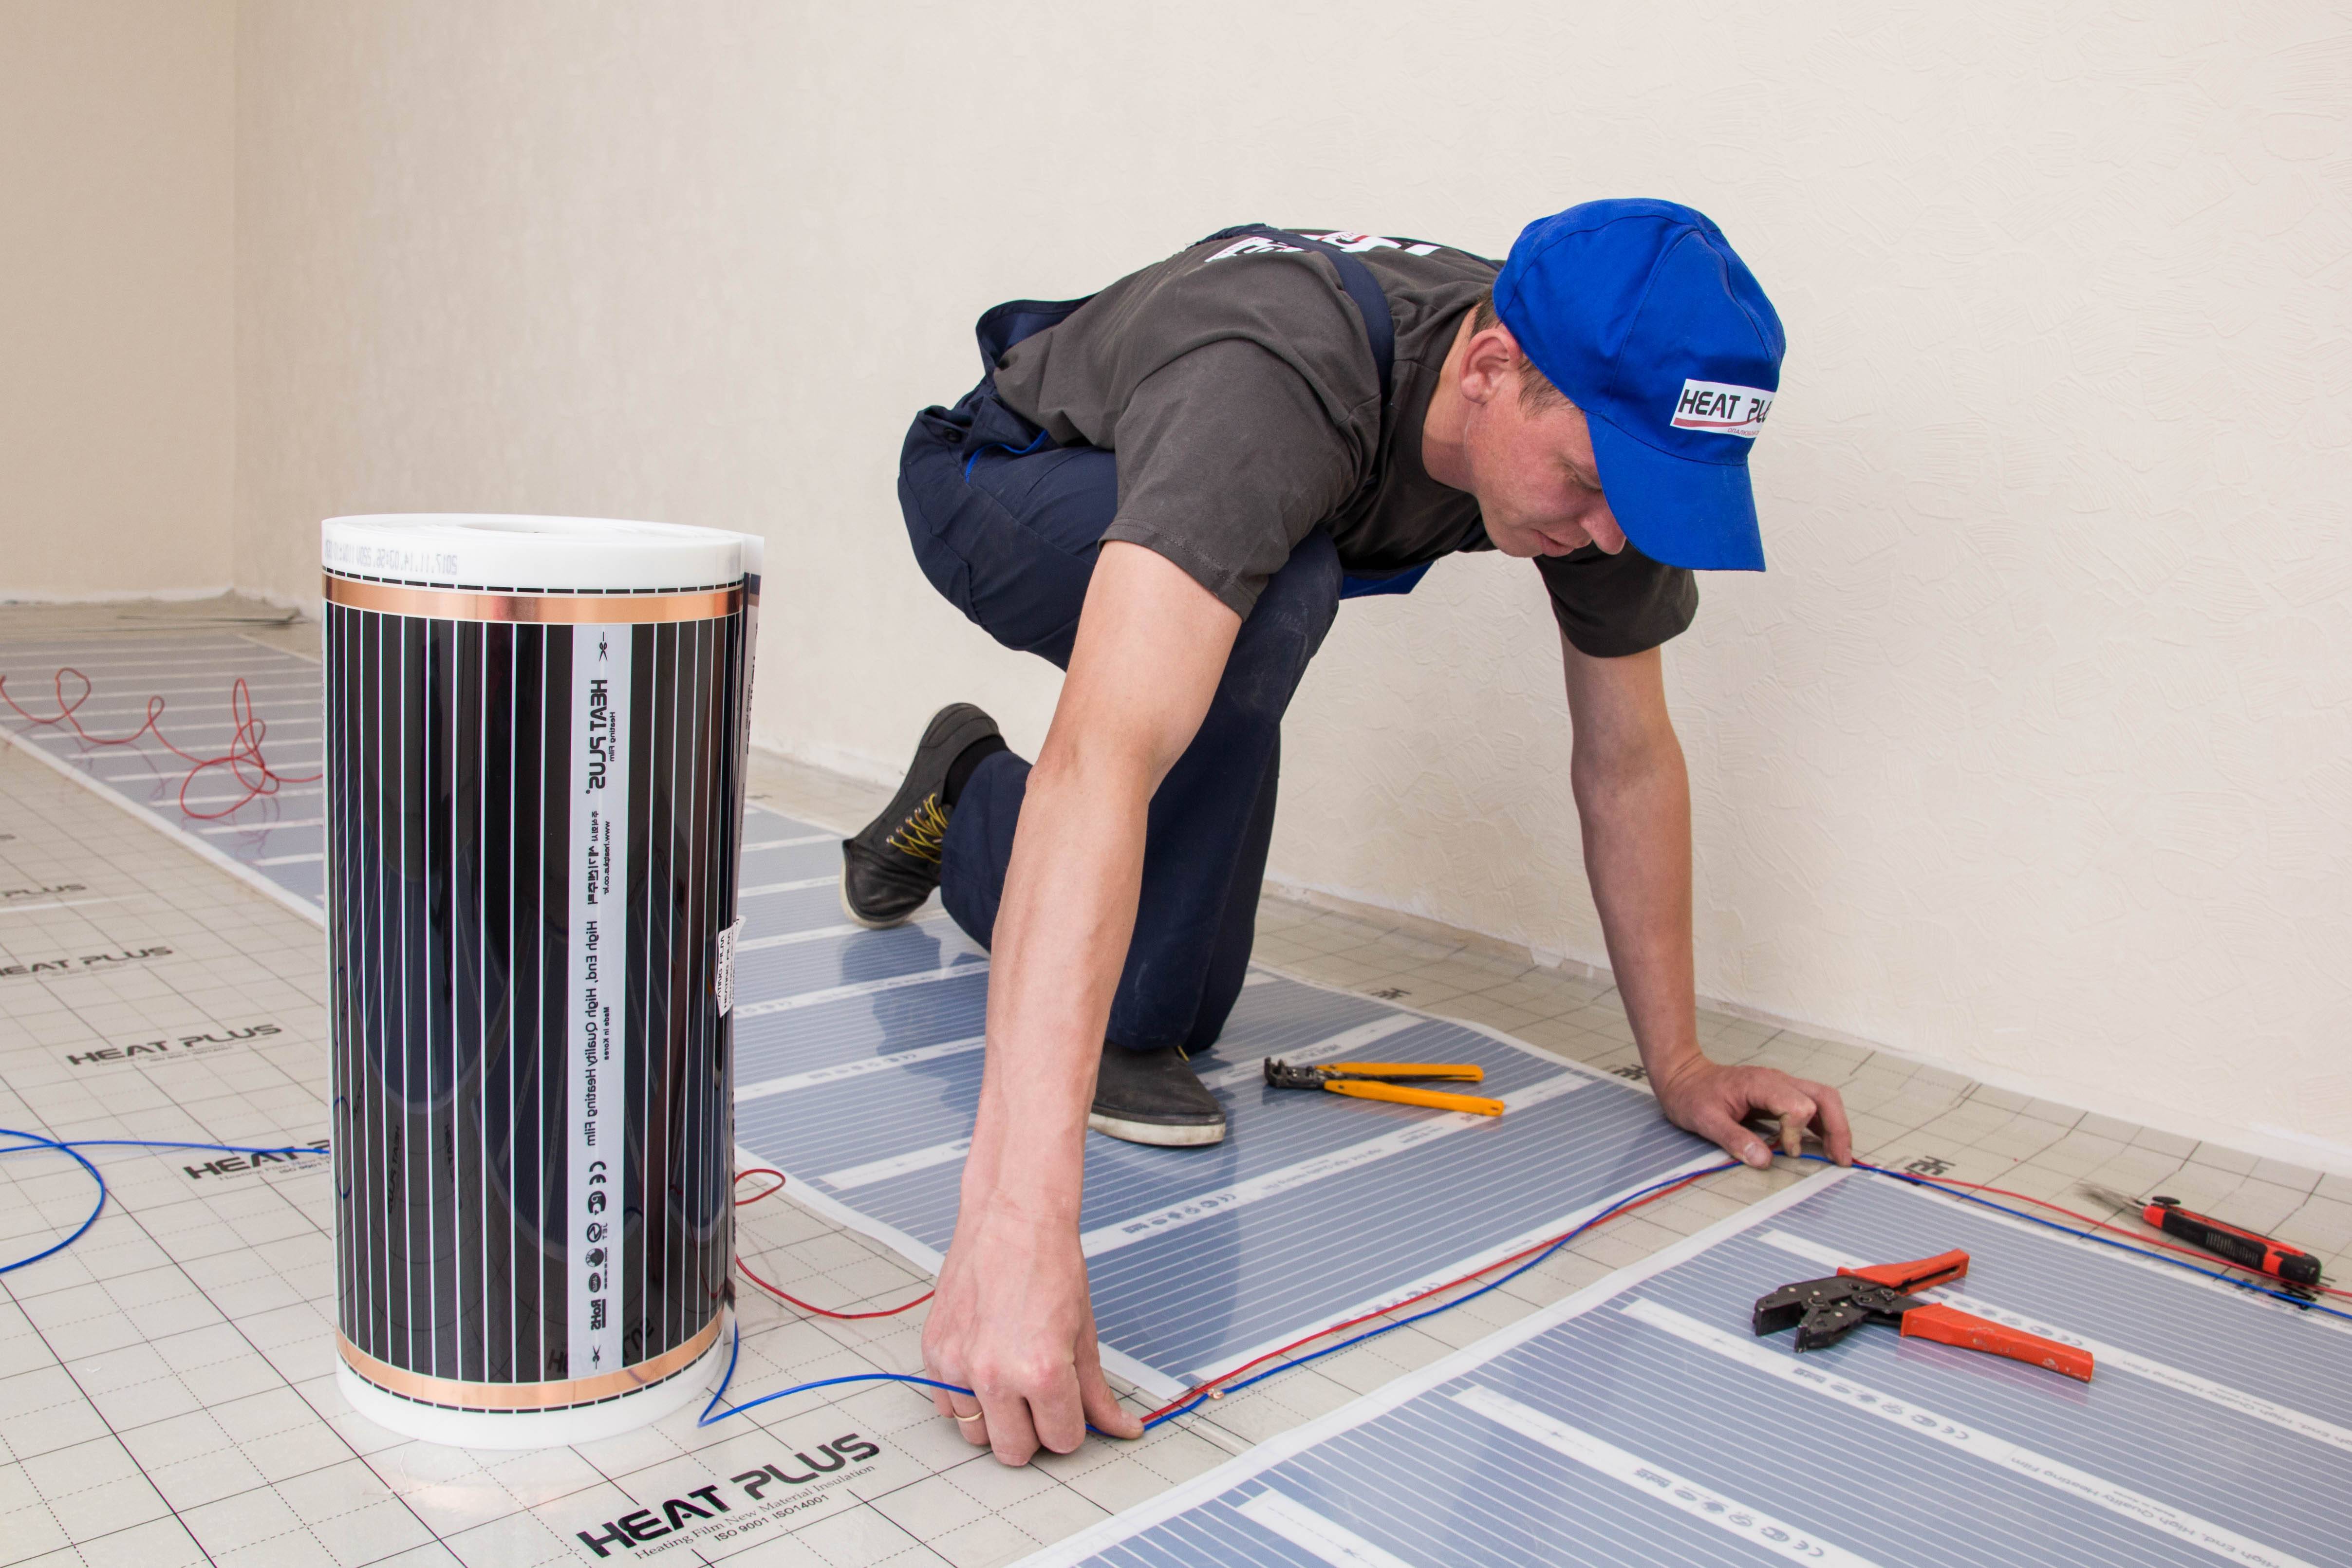
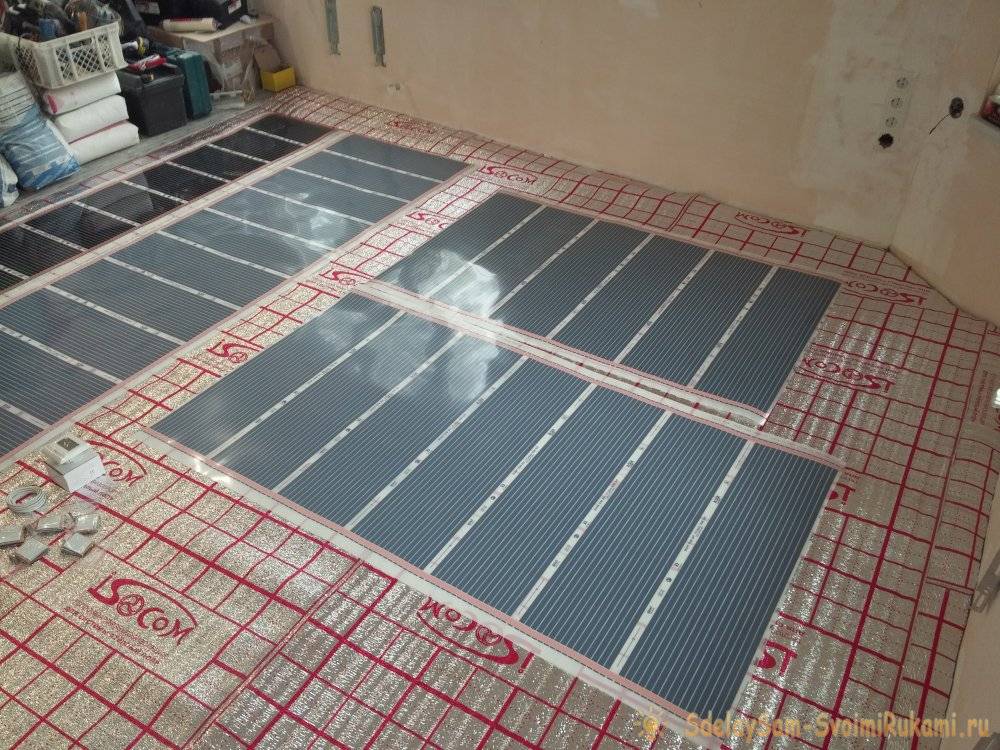
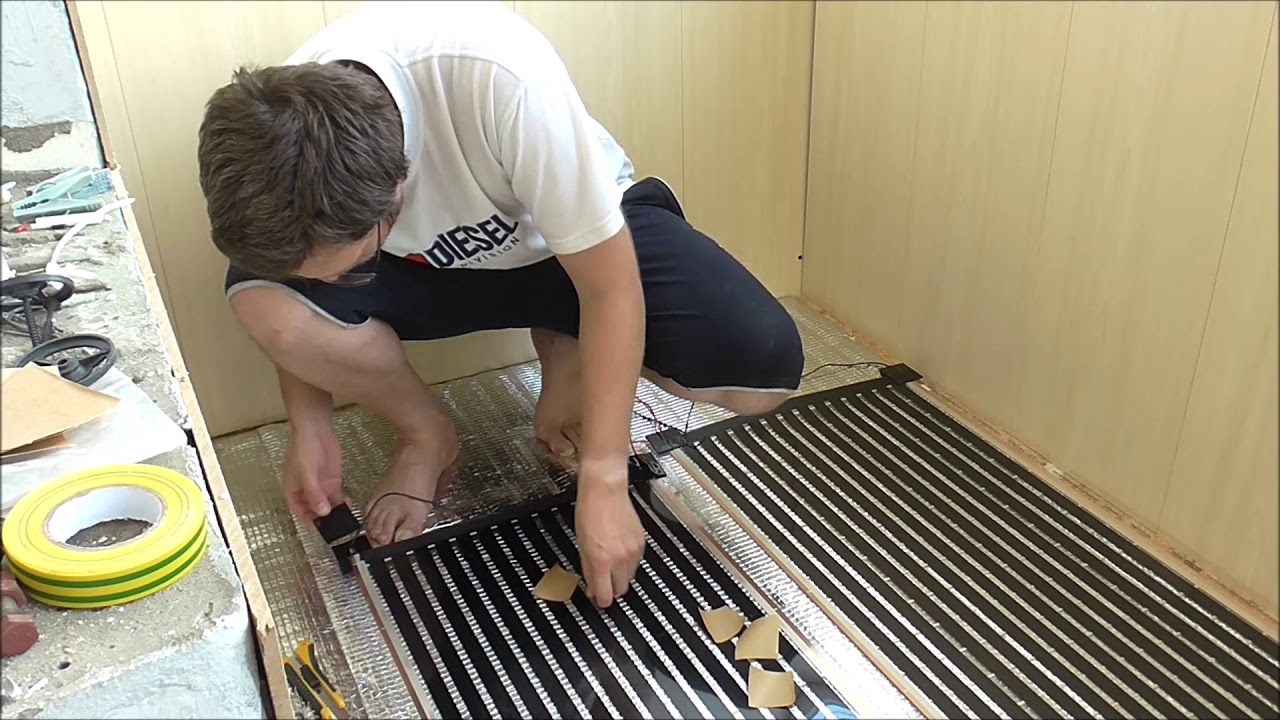
6. Laying infrared floor heating
drawing markings for laying on the floor;
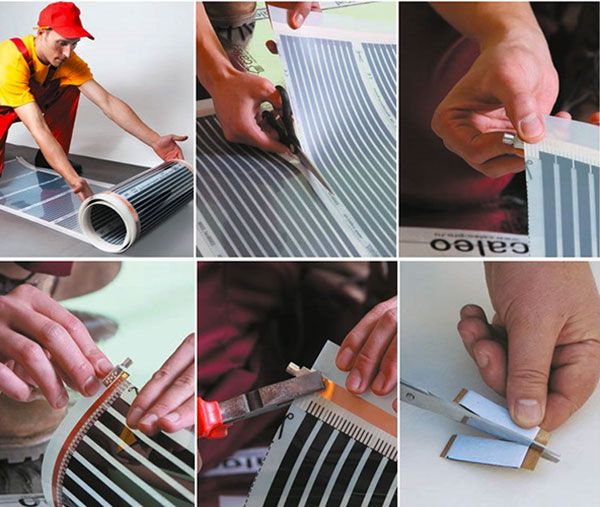
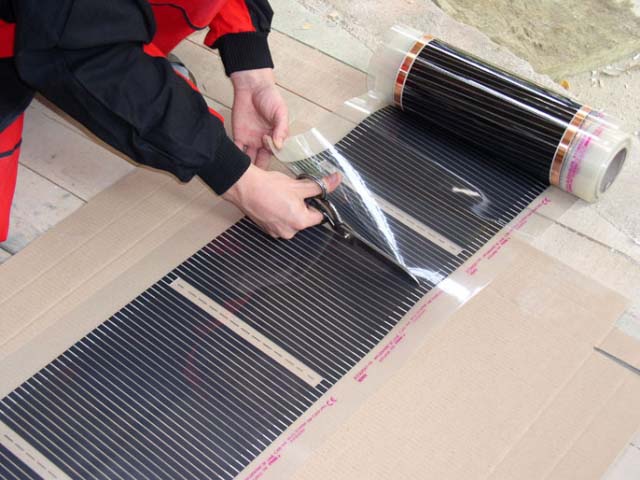
preparation of a strip of film of the desired length
note
film can only be cut along the cut line; the film is located towards the wall, which
designed to install a thermostat. Oriented strip copper
heater down;
Oriented strip copper
heater down;
the film is located towards the wall, which
designed to install a thermostat. Oriented strip copper
heater down;
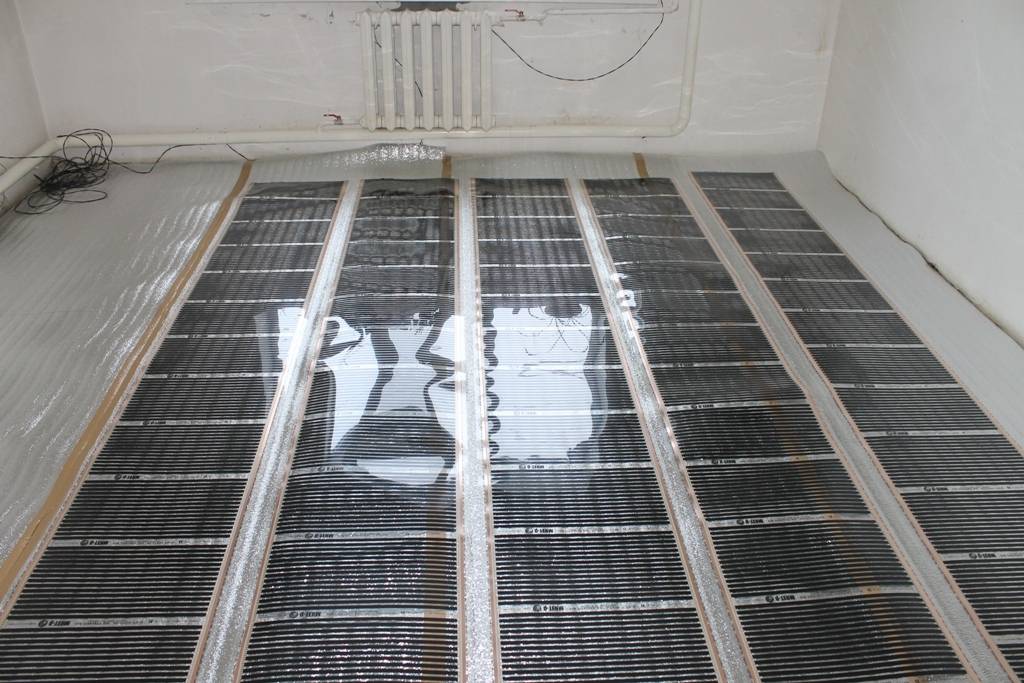
the recommended distance from the wall of 100 mm is maintained;
the recommended distance (gap) between
edges of infrared film sheets of 50-100 mm (film overlap is not
allowed);
strips near the walls are glued to the insulation with adhesive tape
(squares, but not a solid strip). This will avoid shifting the canvas.
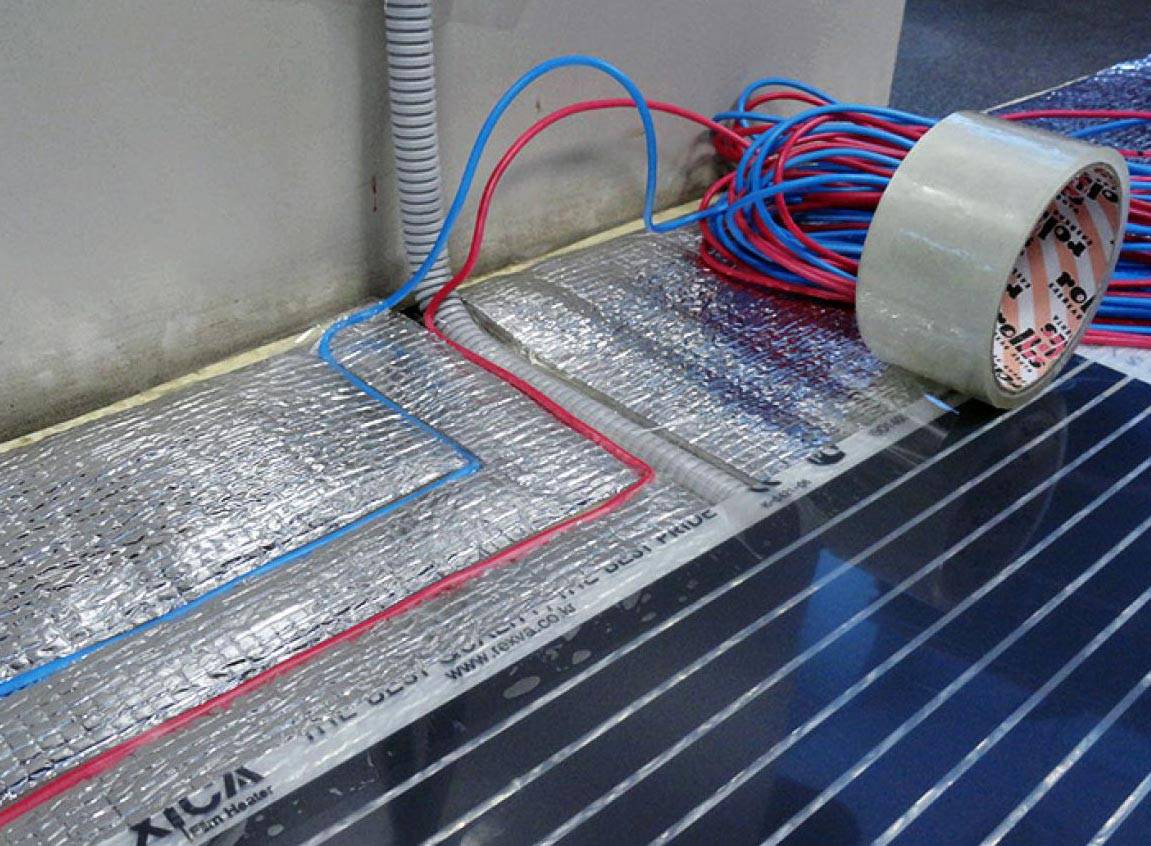
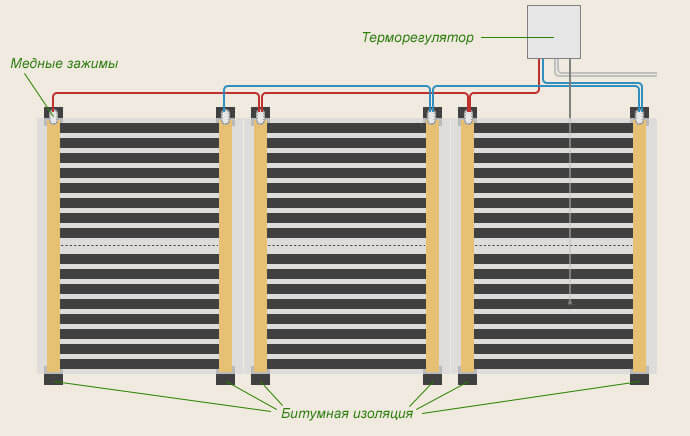
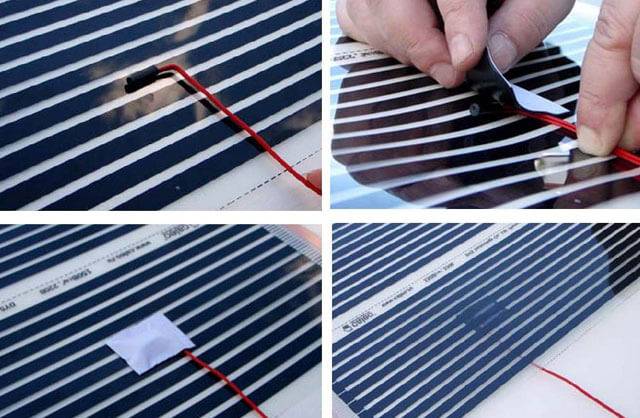
7. Installation of clips
At the ends of the copper bus you need to attach metal
clamps. When installing, it is necessary that one side of the clamp fits between the copper
tire and film. And the second was located above the copper surface. Crimping in progress
evenly, without distortion.
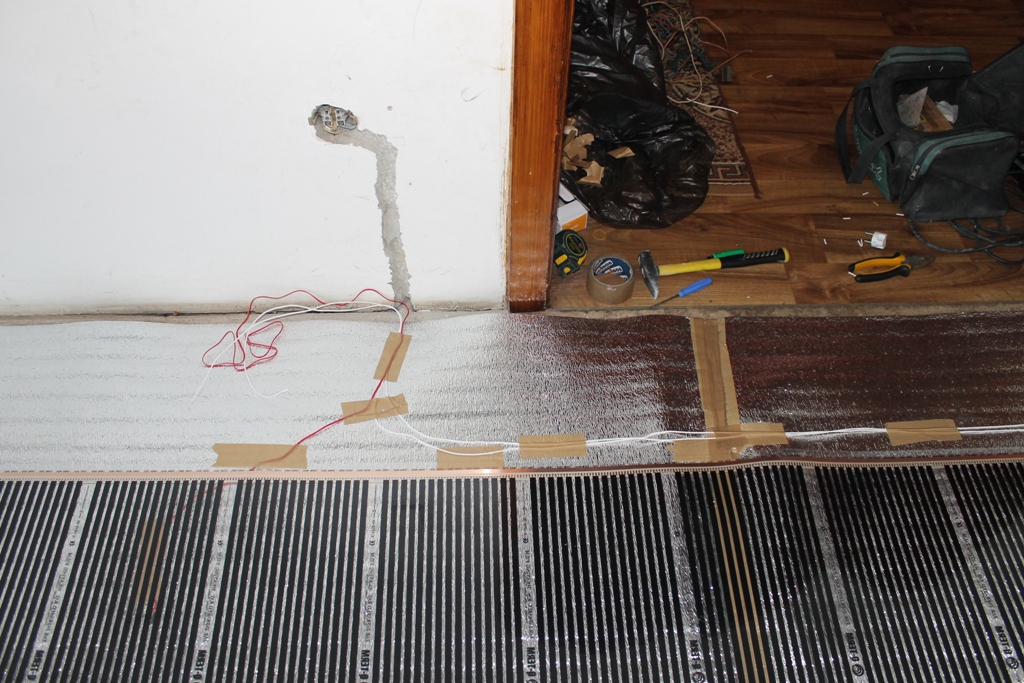
8. Connecting the wires of the infrared floor
The wires are installed on the clamp, followed by
insulation and tight crimping. The ends of the copper bus are also insulated in place
cutting. The requirement of parallel connection of wires is observed (right with
right, left to left). In order not to get confused, it is convenient to use a wire of different
colors. Then the wires will be laid under the plinth.
Advice. To prevent the clip with the wire from protruding above the film, its
can be placed in a heater. A square is pre-cut in the insulation
under clamp.
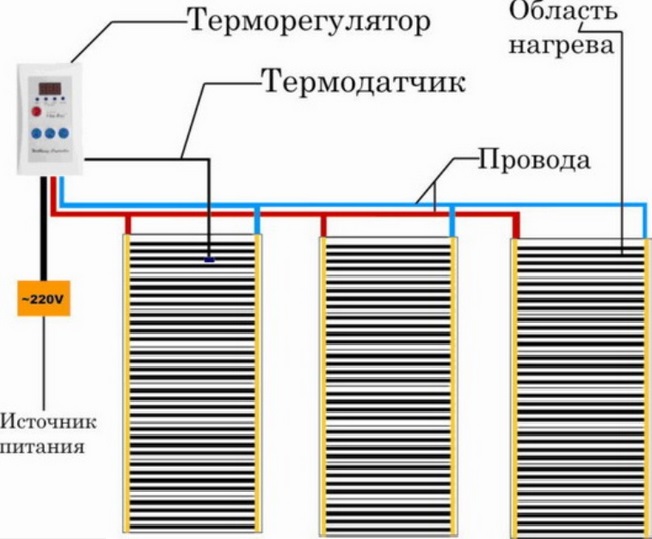
9. Installing the temperature sensor for the thermostat
The temperature sensor is recommended to be installed in the center
the second section under the film. To prevent the sensor from being damaged during movement, under it
you need to cut a hole in the insulation.
Installation of a temperature sensor for underfloor heating film
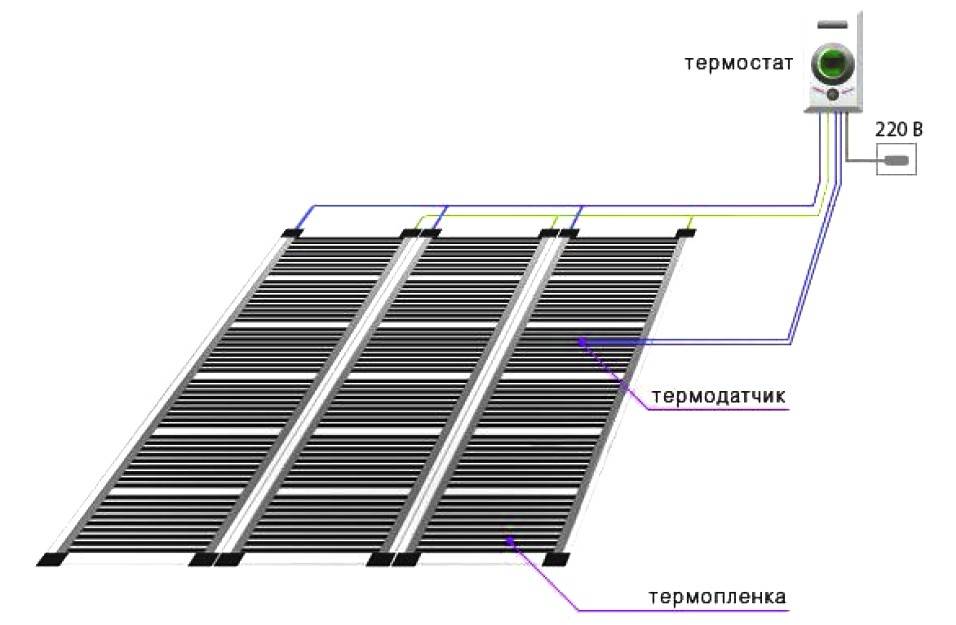
Wiring diagram for film floor heating thermostat
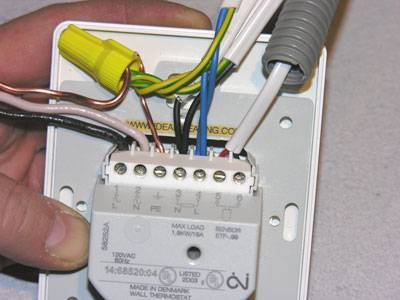
Connecting a thermostat for infrared floor heating
Do-it-yourself installation of a cable underfloor heating under a tile
When choosing this type of heating system, two aspects are important - the correct laying of the cable itself (taking into account the intensity of its heating, the location of massive furnishings) and the correct filling of the screed. Finishing work is carried out according to standard rules, stop on the nuances of laying tiles we won't be here.
The preparation of the floor is carried out in the same way as with the installation of a conventional screed - the partially destroyed and lost strength of the old coating, fragments of the old screed must be removed, all debris and dust are removed.Taking into account the fact that a cable will be laid in the screed, it is necessary to take the waterproofing of the ceiling (subfloor) as carefully as possible and perform thermal insulation under the screed.
Next, the cable laying scheme is determined. The choice depends on the area of \u200b\u200bthe room, the number of individual pieces of wire, its type (single or two-core). Below are some popular schemes.
When choosing a scheme, be sure to take into account the position of furniture that is heavy and tightly attached to the floor, as well as sanitary equipment (if we are talking about a bathroom, toilet or combined bathroom).
The laying spacing (h) is determined based on the total laying area and the required level of heat transfer. Let's say for a bathroom with a total area of 8 sq.m. the laying area will be (minus the dimensions of the shower stall, sink, toilet bowl and washing machine) 4 sq.m. The level of comfortable floor heating requires at least 140…150 W/sq.m. (see table above), and this figure refers to the WHOLE area of the room. Accordingly, when the laying area is halved compared to the total area, 280 ... 300 W / m.kv are required


Next, you need to take into account the heat transfer coefficient of the screed (for ceramic tiles, as mentioned earlier, it may not be taken into account)
If we take an ordinary mortar (cement-sand) with a coefficient of 0.76, about 400 W are required for each square meter to obtain a heat amount of 300 W of initial heating.
Taking the data from the table above, we get a wire length of 91 m (total power 1665 ... 1820 W) for all 4 sq.m. styling. In this case, the laying step is chosen at least 5 ... 10 cable diameters, the first turns are located at least 5 cm from vertical surfaces.You can approximately calculate the laying step using the formula
H=S*100/L,
Where S is the laying area (namely, laying, not premises!); L is the length of the wire.
With the selected parameters
H=4*100/91=4.39cm
Given the need for indentation from the walls, you can take 4 cm.
When planning the installation, it is important to follow the following rules:
- no loops or twists! The cable should not be laid in loops, it is possible to connect individual fragments only with the help of special terminals;
- it is unacceptable to connect the "warm floor" to the house electrical network directly, exclusively through a special regulator (usually included in the delivery);
- to extend the life of the system, protect it from power surges (stabilizers, fuses) and follow the installation technique recommended by the manufacturer.
The sequence of work is as follows:
- the primary layer of the screed is poured, a strobe is made in the material for laying a channel - supplying a cable to the thermostat, usually the supply is made in a corrugated tube;
- on it (after complete curing, of course) thermal insulation is mounted with a heat-reflecting layer;
- cable laying with a reinforcing mesh or tape in compliance with the planned step;
- cable outlet to the thermostat;
- pouring the top layer of the screed (3 ... 4 cm). Connecting the cable to the mains is only permissible after the screed has completely cured.
Unfortunately, if the cable is incorrectly installed or damaged, an error can be detected only when you try to turn it on, therefore, for repairs, you will have to open and redo the screed. Therefore, the masters recommend checking the cable's performance throughout its entire length (including connections and external control devices) before pouring the mixture.
Warm floor infrared film Monocrystal
Monocrystal is located in Ukraine and is the only manufacturer of IR floors in the CIS. Thanks to South Korean technologies that are used in the manufacturing process of IR films, products from this brand have taken a strong position in the construction market.
The main difference between the Monocrystal models is that there is no silver paste in them. To achieve the necessary electrical contact, products from the Ukrainian brand are equipped with a thicker layer of carbon paste. In this way, stabilization is achieved between the copper bar and the heating device.
Consider the main technical characteristics of the Monocrystal IR floors:
film width - from 30 to 60 cm;
Special graphite film for tiles - produced by the Ukrainian company "Monocrystal"
- step - 20-25 cm;
- powered by an electrical network with standard voltage (220V);
- maximum power indicator - up to 200 W / m²;
- the maximum heating temperature of the material reaches 50°C.
The operating life of the IR film from the manufacturer Monocrystal is 10 years. The model range includes the following varieties: linear, perforated, solid. Perforations are organized for compatibility with tiled flooring. Film heat-insulated floors under a tile enjoy wide popularity at buyers.
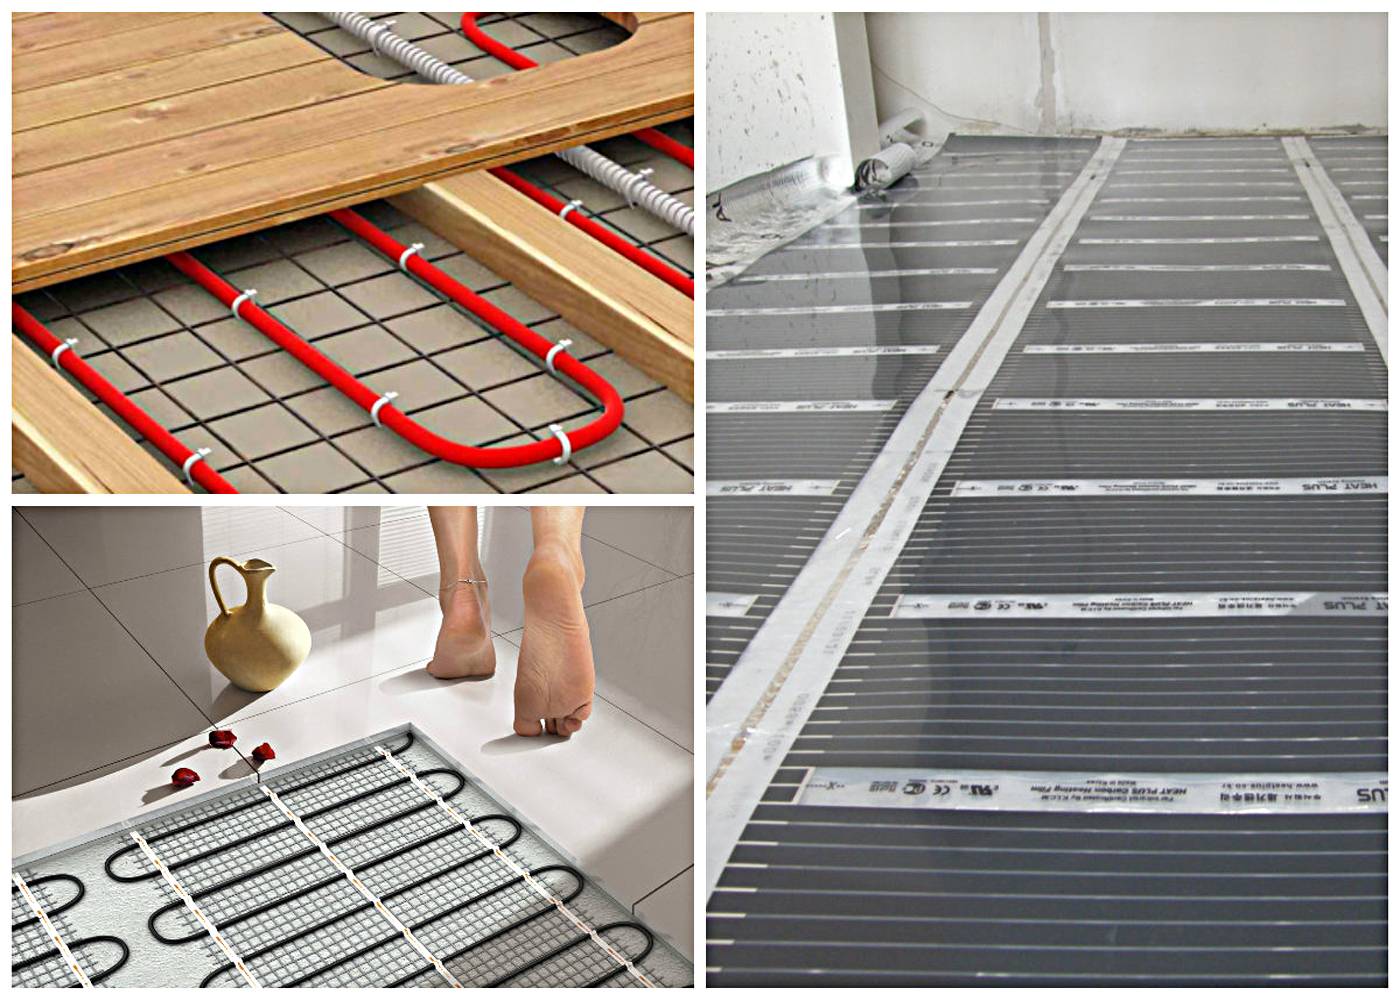
Options for system installation
There are several ways to lay a warm floor under ceramic tiles or other coatings:
cable system. For a device of this design, the cable is laid by hand. It can be single-core, two-core or ultra-thin.The technology of laying the cable floor involves pouring a screed of considerable thickness (in some cases up to 5-6 cm). This reduces the height of the room, which can only be allowed at the stage of installing a rough foundation. Laying the cable system requires a certain amount of experience and knowledge. It is imperative to make a calculation for the effective device of the entire structure. A significant advantage of such a system is its low cost compared to other technological schemes;
Scheme of laying a cable electric floor under a tile
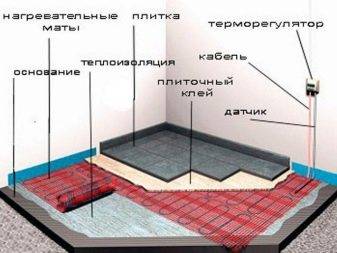
heating mats. This option is most often used for ceramic tiles. Heating mats consist of a thin polymer mesh base, on which the cable is laid according to a certain pattern. For their installation, it is not necessary to fill in a cement-sand screed of considerable thickness. For do-it-yourself laying mats, it is enough to use ordinary tile glue. Using a thin layer of mortar, the elements are fixed, after which the tiles are installed;
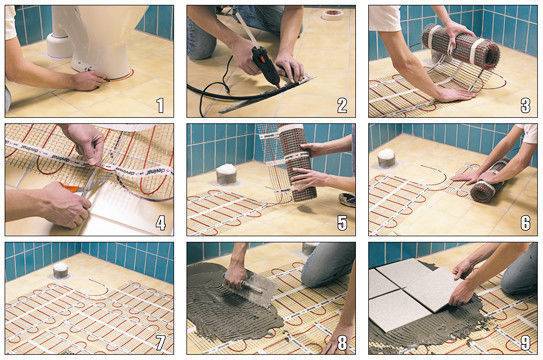
Instructions for laying electric mats under tiles
film floor. Consists of thin elements which are soldered in a polyethylene film. This design prevents contact of the heating mechanism with moisture. Depending on the materials used for the manufacture of plates, carbon and bimetallic film floors are divided. Technology of laying heating elements under the tile with your own hands implies the use of constructions of the exceptional first type. They do not corrode and are repairable;


Correct underfloor heating film installation under tiles
water heating. Laying this type of system is ideal for rooms with a large area.Its installation requires special skills, and neglecting the recommendations of specialists leads to a decrease in work efficiency or to the formation of serious defects. It consists of pipelines through which hot water circulates. Underfloor heating technology involves pouring a thick layer of cement-sand screed, which significantly reduces the height of the room.
Laying a warm water floor under do-it-yourself tiles
Connecting the floor to the power supply
When you have finished placing the strips of infrared film, it's time to start directly connecting the underfloor heating film to the network.
To do this, follow these simple guidelines:
- Prepare wires with a cross section of at least 2.5 square meters. mm, strip them and bring them to the previously installed clamps. Attach the wires with pliers and insulate on both sides using two pieces of bitumen insulation;
Install the thermostat in a pre-selected location. It is desirable that it is located as close as possible to the outlet;
Lay the installation wires under the baseboard or in the recess of the heat-reflecting material;
Check again that all cuts and connections are carefully insulated!
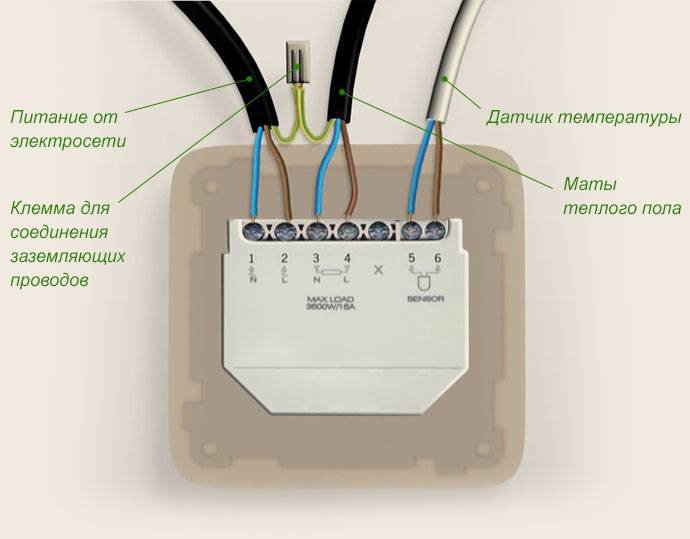
Use the diagram enclosed in the infrared floor kit and connect the wires to the thermostat in the specified sequence;
Place the temperature sensor under the floor heating element using bituminous insulation. Choose for this a place where the load on the device will be minimal.
It remains only to connect the power supply to the thermostat itself.
 At this stage, if you are not a professional electrician, it is better to take the help of a specialist.
If you decide to act on your own, remember that regulators with a power of more than 2 kW should be connected through a separate machine.
To test the design, set the temperature to no more than 30°C and test each strip of infrared film individually. If they all heat up evenly, then the underfloor heating is installed correctly.
Using an indicator screwdriver, check the insulation and wire connections. There should be no sparking or heating here.
Once you have verified that the system is working, cover it with plastic wrap or other suitable protective material. Glue all joints with adhesive tape.
After that, you can start installing the flooring.
What should be the basis
Subfloor requirements are minimal. This is a big advantage infrared floor heating installation in front of the water It is enough to clear the subfloor of debris, make sure that it is dry. Smooth out small holes.
How to install an infrared warm floor if the irregularities are large? It is advisable to pour a thin screed if the differences in irregularities exceed 3 mm, but installation should be started only after the concrete has dried.
It is recommended to lay a waterproofing layer on the subfloor of the first floor in a private house - an ordinary polyethylene film of about 50 microns. Seal joints with adhesive tape.
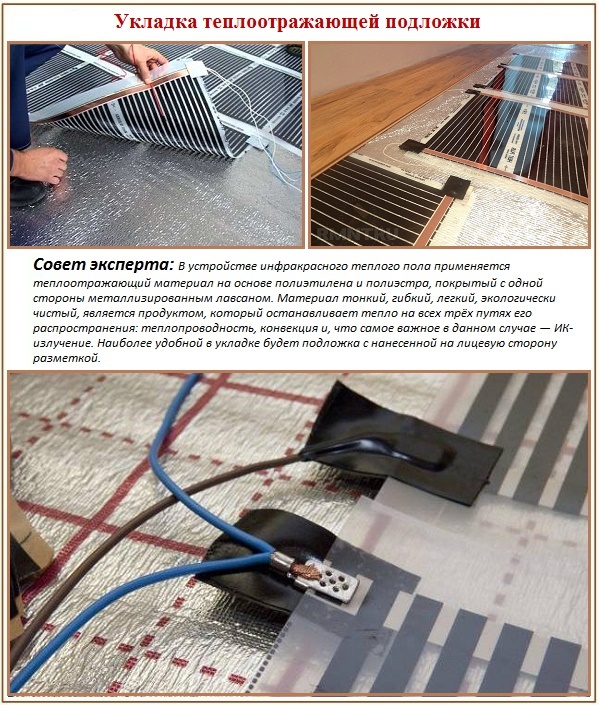
Then heat insulating mats are laid. Hydro and heat insulating layers are spread over the entire surface of the room.
Electricity consumption of infrared floor depending on the area
The use of programmed regulators allows you to reduce electricity consumption in the absence of the owners, in general, you can save up to 90 percent of the energy consumed per day. How much energy does a warm floor consume? This shows power. No one can give exact numbers for all systems, the consumption depends on various factors, but you can make an approximate calculation.
For example, the power of the system is 140 W / sq.m, while some sections do not work at full capacity - up to 100 W / sq.m. The total consumption per hour for the heated area will be: 100 W/sq.m. multiply by the area.
The power depends on the type of room, systems are used for the main heating up to 210 W/ sq.m., in bathrooms you can use floors with a power of 150 W / sq.m., in kitchens - up to 120 W / sq.m.
When determining the electricity consumption, you can use the calculator, in which you should enter data on the power of the device, the operating time per day and the number of devices. The following factors influence consumption:
- Coating material;
- The quality of the thermal insulation of the room;
- Air temperature outside the window;
- Selected temperature regime;
- Room attendance;
- Device type.
It has been proven that the savings when using a floor heating system are tangible. At the same time, with faster heating, the number of saved watts increases slightly. The use of infrared floors allows you to create a cozy warm environment for a comfortable stay.
voice
Article Rating
How to connect film underfloor heating
The connection begins with the connections of the film to each other. Use clamps from the kit. It is dangerous to use other clamps or some kind of improvised material.
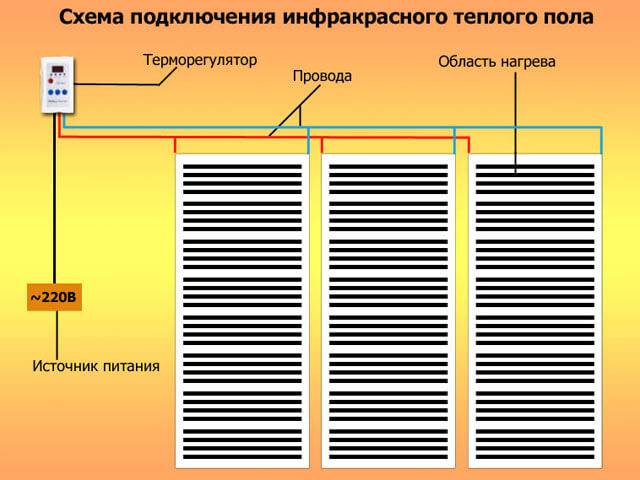
The strips are connected strictly in parallel. A detailed diagram is attached to the instructions..
Contacts that are not used to connect wires (on the opposite side) must be insulated with overlays from the kit.
The temperature sensor is installed in the center of the thermal film strip, not far from the place where the thermostat is attached. A recess is cut out in the heat insulator for the temperature sensor.


Then proceed to connect the film and the temperature sensor to the thermostat. The entire system is connected to the mains only through differential circuit breaker.
Before you mount the finish coating, you need to make sure that everything is done correctly. The warm floor is turned on at full power and wait a few minutes. If the entire floor has warmed up, there is no smell of burnt plastic, no extraneous clicking is heard, there is no spark, then everything is fine.
Cross section of wire for underfloor heating
The first thing I want to note is that all wires MUST be copper. The mats use a copper bus, and when copper is combined with aluminum, oxidation and burnout of the contact occur. Therefore, if you don’t want problems in the future, we use only copper wires.
When choosing wiring for infrared underfloor heating, it is important to consider the quadrature and power of the heated film. It is important to correctly calculate the total consumption of each meter of material
To date, there are different types of IR films on the market, their power can vary from 150 to 500 watts per square meter.
For example, a room of 18 m2 is covered with infrared film in a house. Film with a capacity of 150 W / m2. We get the total power of the warm floor - 2.7 kW (150 W * 18 m2). For such power, a wire with a cross section of 1.5 mm2 is suitable. This can be seen by looking at the GOST calculation tables.But I still recommend taking the cross section of the supply cable at least 2.5 mm2. Since manufacturers often underestimate the cross section, so to speak with a margin.
What brand of wire is best to use? It is desirable to connect electrical strips of underfloor heating using stranded copper wire. Unlike a single-core (monolithic) one, it has good flexibility, which will come in handy for laying under a laminate. One of these is the wire of the PV-Z brand, which has many cores in the design. Such a wire is convenient in that it is more flexible and there will be no difficulty with its installation.
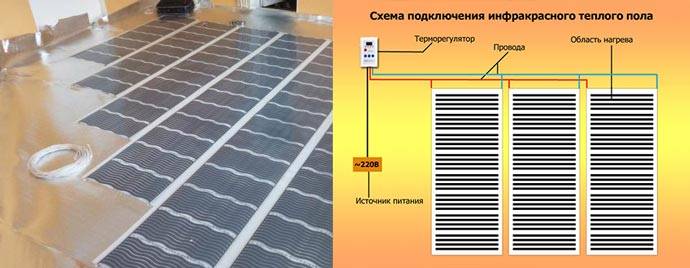
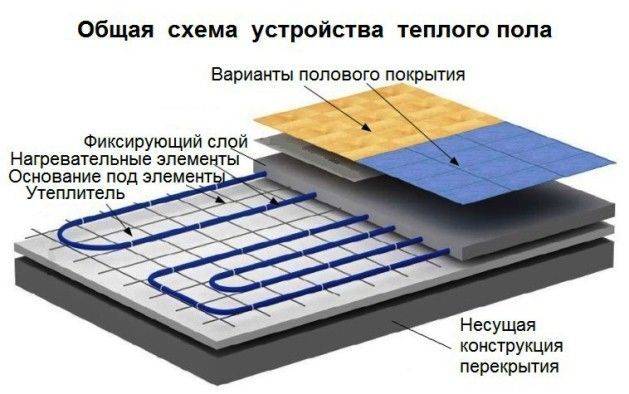
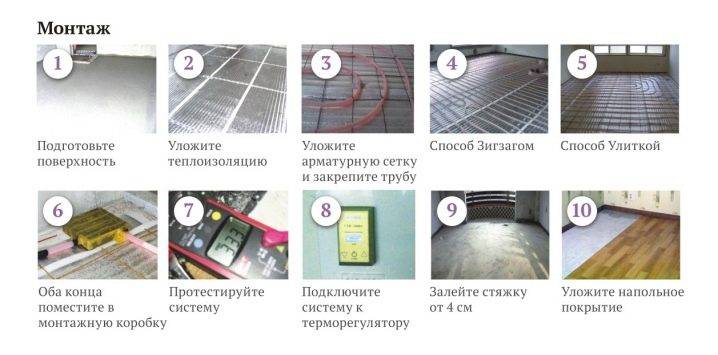
Stages of installation and connection
To imagine how to connect an infrared warm floor, the installation process can be divided into several stages:
- underfloor heating drawing
- leveling the rough base, laying out the hydro and thermal insulation layers;
- preparation of a place for mounting the thermostat;
- laying infrared film and connecting heating elements;
- initial testing;
- installation of a temperature sensor;
- thermostat connection
- system performance testing;
- laying polyethylene (additionally and hard coating for carpet or linoleum)
- finishing coating.
The scheme for connecting the infrared floor is not complicated, it is enough to carefully study the instructions and get acquainted with the secrets of experienced craftsmen.
Possible mounting errors
For the correct functioning of the film heating system, perfect precision in laying and connecting the entire device is required. In the process of performing independent installation work, mistakes are often made. Therefore, you should know what you can not do when installing such equipment:
- lay the film overlap;
- install one thermostat on two separate circuits;
- fasten the film to the base with nails or other sharp fasteners;
- install equipment near other heating appliances;
- connect the device without isolating the contacts to the electrical network;
- use a foil containing material as a substrate;
- cover the system with cement mortar;
- install dimensional pieces of furniture in the places where the film passes;
- bend material with a carbon mixture at a right angle.
To avoid damage to the film during repair work in the room, it is recommended to maintain accurate laying patterns.
Compared to many other floor heating systems, the installation of film heating equipment is much easier. Following the diagrams and instructions specified by the manufacturer, the installation of the device can be done by hand. But to connect the system to the network certain professional skills are required. Therefore, the process of connecting all devices must be carried out by a qualified electrician.
Underfloor heating film installation

Tools for the job
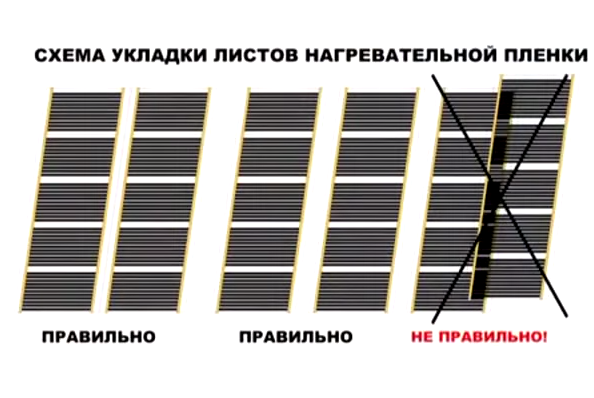
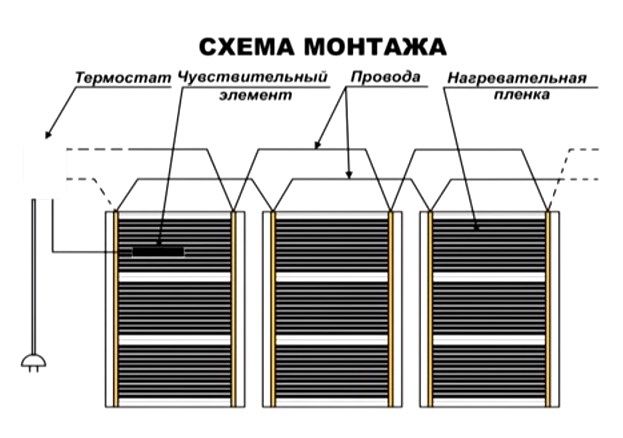
Laying schemes

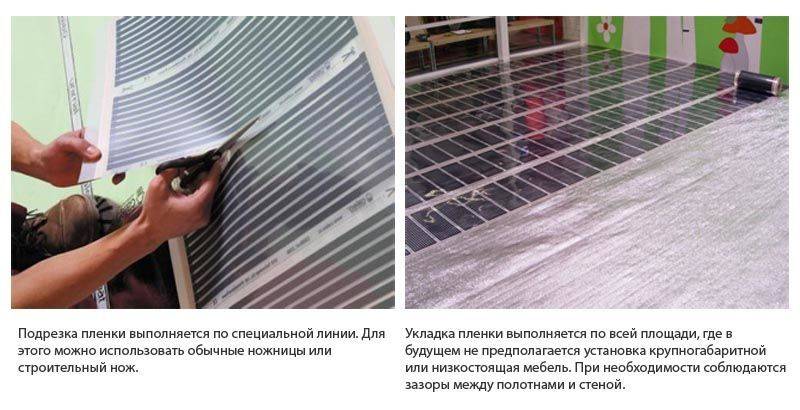
Film cutting options
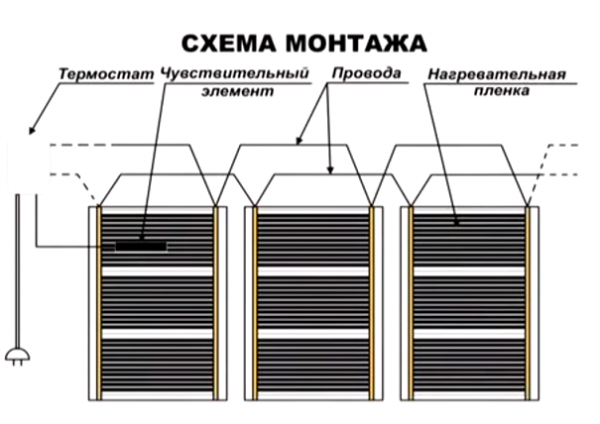
Mounting diagram
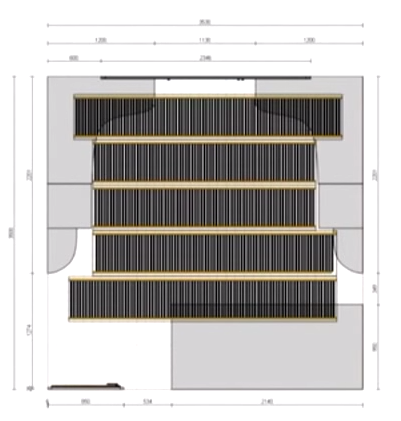
Indoor installation diagram (including furniture)
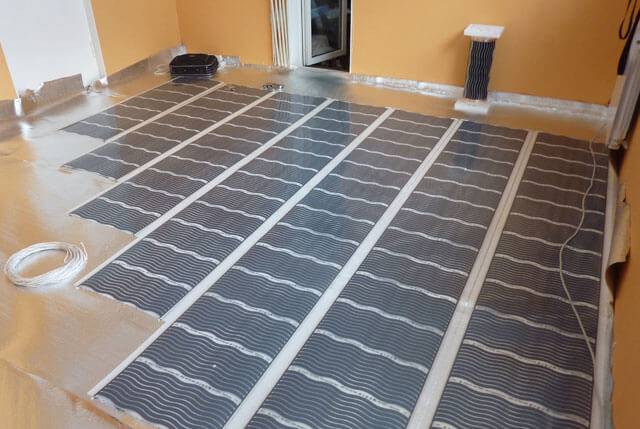
First, decide on the area of the floor that you want to heat. It is unacceptable to lay the film under heavy furniture and appliances, such as cabinets, chests of drawers, a refrigerator or a washing machine. The distance from the edge of the film to the place where such furniture will stand should be 20 cm. The same distance should remain to the walls.Mark the boundaries of the future location of the film with a marker or bright tape.
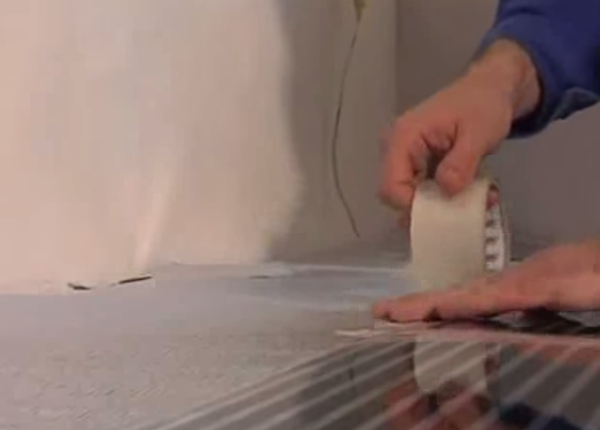
The film is fixed with adhesive tape
Lay the film along the long side of the room, this will reduce the number of electrical connections in the entire system. Usually, the manufacturer somehow marks the top of the film, if there are no marks, then the film is double-sided and can be laid on either side. It is necessary to cut the film strictly along the cut line drawn by the manufacturer.
When the entire floor is covered, you can start connecting.
Advantages and disadvantages of infrared floors
Sometimes you can find posts that IR floors are harmful to human health, although not a single confirming fact has been proven. On the contrary, IR radiation is installed in saunas, hospitals, maternity hospitals and other institutions. Consider first the advantages of infrared underfloor heating.


- Infrared floor heating does not burn oxygen in the room. Breathing in a room is much easier as the humidity and oxygen content remain high.
- It works absolutely silently, without vibrations, the air in the room does not circulate, which is very useful if there are people in the family who are allergic to dust and wool.
- Infrared radiation heats with health benefits, this is the same sunlight that kills pathogens in the room.
- It is installed under any floor covering: you can lay tiles, parquet, linoleum or laminate on an infrared floor, and it will work at 100%.
- The thinnest system, does not change the height of the room, which is very useful when renovating an apartment (there are no thresholds).
- The room warms up evenly, there are no temperature differences at the top and bottom of the room.
- Significant cost savings.The floor turns on much less often, works only when it is needed and quickly raises the temperature to the desired value.
- Ease of installation - there is no need to cover it with a screed, you can lay the floor after repairs in an apartment or house.
Infrared floor under laminate, parquet, tiles and screed
Today in Europe, more than 64% of buildings use infrared flooring as an auxiliary heating system, and more than 20% of buildings use it as the main source of heat. However, there is a small "fly in the ointment" in this barrel of honey. Now we will consider the disadvantages of infrared floor heating:
- High current consumption at system startup. The system is very economical, since 100% of the film area is switched on for a short time, but not every wiring can withstand such a short-term load. On average, 10 sq.m. films consume about 2.2 kW, that is, 25 sq.m. will consume about 5.5 kW. For a modern room, this will not be a problem, but the old "Khrushchev" and "Stalin" can only withstand up to 5 kW according to the passport. It is necessary to study the technical documentation of the house before installing such a floor.
- Difficulties arise when changing heating zones. 30-40% of the area of the room remains free when installing the film, you can initially put furniture there, but in order to make a rearrangement, you must take into account the location of the infrared floor. Otherwise, the furniture may become very hot.
- High starting price of materials. You need to invest a lot of money, which pays off only over time.
- Another disadvantage of infrared floor heating is the dependence on electricity. No light, no heat.If you do not have a generator available, it is better not to use IR floor heating as the main source of heat in the room.
Most owners of modern houses and apartments in new buildings will not experience such shortcomings, since a large area and an abundance of kilowatts of electricity in the technical documentation decide a lot. But no matter how you choose infrared floors, the pros and cons of this technology are relative and you need to choose everything individually.
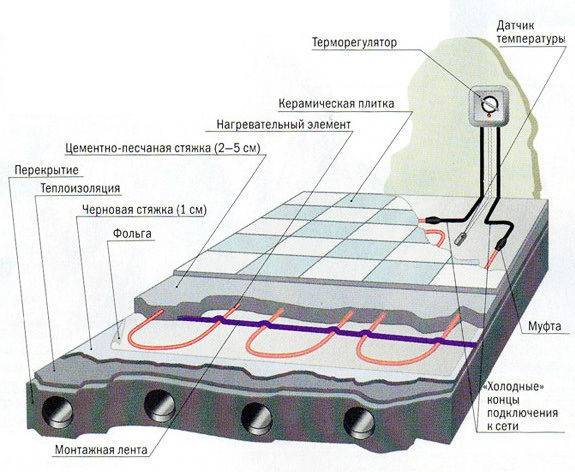
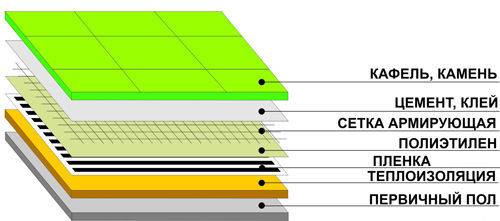
Constructions
The room in which you plan to install underfloor heating must be reliably protected from drafts and other heat loss options. Therefore, all heating components should be installed exclusively on a heat-insulating layer, which does not allow energy to be wasted on heating floor slabs, along with heat being lost to the atmosphere.
If we talk about the design of the floor with heating, then the heating cable must be placed on the heat-insulating layer and fixed with mounting tape. There is a snake inside the cable, in which a corrugated pipe is laid at the same distance between the turns. A temperature sensor is placed in this pipe, which is responsible for the heating level of the entire system in the house.
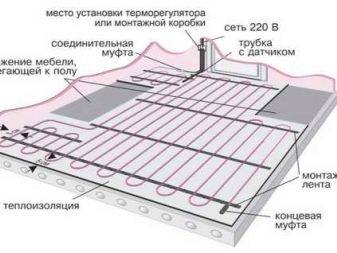
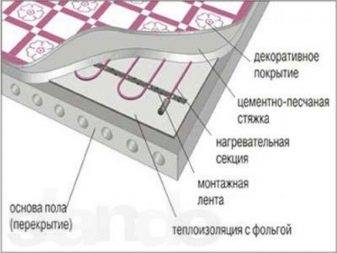
When all the heating components are laid, the screed can be poured on top. The layer thickness is determined based on the structure of the cable
It is important that the layer has a flat surface without voids. A tile or other floor covering is laid on top of the screed
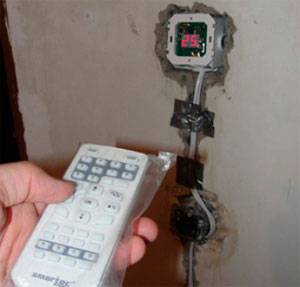
The thermostat is on the wall. The place should be chosen taking into account its comfortable work. The automated operation of the floor with electric heating depends on it.
To protect the electrical circuit from leakage, you need to connect an RCD to the circuit breaker.
Features of laying IR film under different coatings
Depending on the coating materials, the principle of installing the heater may differ. Let's consider each of them.
Under the laminate
Infrared film floor heating systems emit a small amount of electromagnetic radiation during the heating process. The intensity of this radiation is low and does not pose a threat to health.
When working, no special conditions are required. First, the floor is leveled, a thermal insulator is installed, and then a warm floor is laid. Then the laminate itself is applied.
under tile
 You can cover the top of the thermal film with polyethylene, but only if it is environmentally friendly. Otherwise, when heated, toxins may be released.
When laying insulation under the tile, certain features must be observed. For gluing tiles, it is necessary to use a special glue that will not melt under the influence of high temperatures.
Under linoleum
Manufacturers and craftsmen recommend laying the film along the longer of the sides, this will reduce the number of cuts in the heating film when cornering.
To ensure the optimal level of heating, you should buy a film of low power up to 150 kW. Then the linoleum will retain its properties and will not delaminate. The principle of laying is no different from the previous methods.
Conclusions and useful video on the topic
Video #1 You will learn everything about laying the core floor from this video instruction:
Video #2 Choosing the type of electric floor will become easier if you check out this video:
Video #3 How not to spend too much when buying a floor heating system will teach the author of this video:
Heating the house with the use of electric underfloor heating will maintain a comfortable temperature regime. The temperature difference between the top of the room and the floor will be minimal. If you choose the right system, accurately calculate everything and do the installation work yourself, then you can win in terms of finances.
And what type of floor heating did you prefer for arranging your own dacha/apartment? Perhaps you have a desire to share the intricacies of editing, known only to you? Please write comments in the block below, ask questions, post photos on the topic of the article.


