- Locked Quartz Vinyl Tile
- How to lay the infrared floor with your own hands
- Stage 3 - installation of infrared floor heating
- 1. Preparation (learning security measures)
- Safety rules for installing IR floor heating:
- 2. Preparation of the thermostat installation site
- 3. Foundation preparation
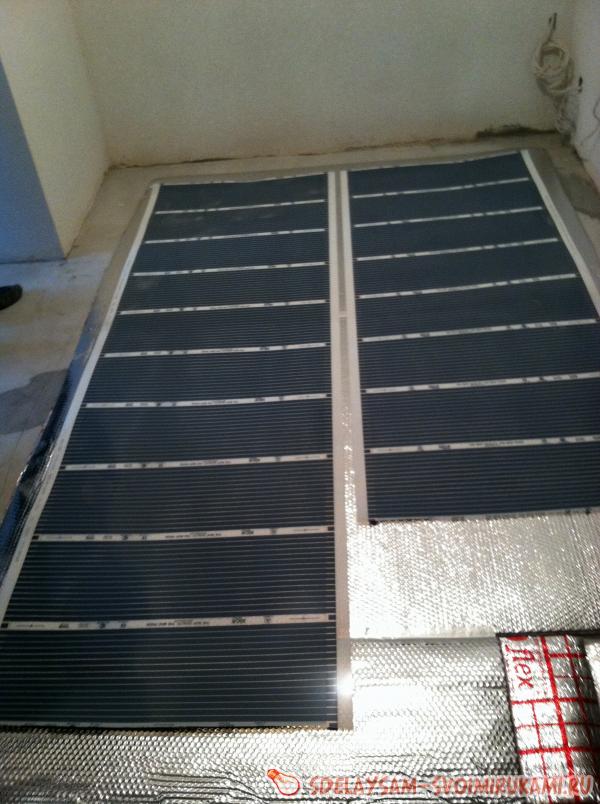
- 6. Laying infrared floor heating
- 7. Installation of clips
- 8. Connecting the wires of the infrared floor
- 9. Installing the temperature sensor for the thermostat
- Important installation questions
- Floor heating device
- Laying infrared floor heating: technology
Locked Quartz Vinyl Tile
When laying interlocking tiles on a “warm floor”, the condition must be observed - to leave compensation gaps along all walls from 5 to 10 mm. The gaps allow the tile to move as it expands so that the joints are not damaged.
Castle tiles Art East recommended for use with electrical heating systems, it is not advisable to use water heating. Heating temperature is not more than 28 ° C . In general, the castle tile is sensitive to temperature changes and changes its size. The temperature gap must be left at least 1 cm. This also applies to installation with "warm floors", and use on balconies, rooms on the south side, where heating in the sun can occur.
The manufacturer does not recommend the use of any substrate under the interlocking tiles, both during normal installation and when laying on a warm floor.
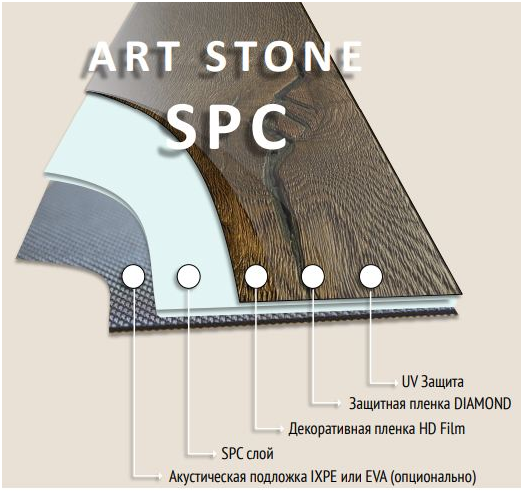
At the brand Art East there is one more collection art STONE 33/42 class, which stands out for its structure. This tile uses a rigid SPC board as a load-bearing base. Such a plate is a stone-polymer (Stone Polymer Composite).
Unlike quartz-vinyl laminate with WPC (Wood Polymer Composite) board, STONE tiles from ART EAST:
78% calcium carbonate and free of blowing agent, wood flour and plasticizers;
thinner, but at the same time stronger, more resistant to dimensional stability when changing humidity and temperature;
more durable due to the same denser structure.
ART STONE SPC is an interlocked stone resin tile that has been laboratory tested to outperform WPC floors. All these characteristics make the Stone collection tiles the most suitable material for underfloor heating than other PVC interlocking tiles.
Tests show that ART STONE can also withstand temperatures above 28°C. But the brand representative still recommends not taking risks and using this limitation during operation. Art Stone interlocking tiles can be used with any kind of underfloor heating systems.
PVC interlock tiles floor Click – composed of 30% quartz. Compared to other quartz-vinyl coatings, it is soft. Floor Click Quartz-Vinyl Laminate with "warm floors" changes its dimensions and can also expand when installed in areas with intense sunlight (south-facing, floor-to-ceiling windows, etc.).When laying, be sure to leave a gap of 1 cm. It is also desirable to perform expansion joints under the thresholds at the entrances to the rooms and every 8-10 meters of a continuous canvas. Use 1.5mm or 1mm thick LVT underlay. It is not recommended to lay on infrared heating, tiles can rise at the joints.
Castle tile collection Decoria - the material is hard and fairly stable, contains up to 70% quartz sand. The manufacturer advises to use a substrate when laying on a concrete screed, otherwise the floors begin to crackle. It is allowed to use with heating systems, including film ones. Use with water systems where the temperature may exceed 28 degrees is not desirable.
It is possible to lay decoria interlocking tiles with or without expansion joints (sills).
tile Alpine floor on locks can be laid on heating systems. It is better to use a cable type to regulate the temperature and keep it no higher than 28 ° C. A clearance around the perimeter of 8-10 mm is required.
How to lay the infrared floor with your own hands
Despite the novelty of this technology and the “high materials” from which the infrared warm floor is made, laying it with your own hands is easier than pouring a screed in a warehouse. Now we will consider detailed instructions on how not to pay money to employees and do everything yourself.
STEP 1: make calculations of the area on which you need to lay a warm infrared floor. Please note that household appliances, furniture without legs, and even flowers should not be located above the floors. Heating elements must not be overlapped, covered with skirting boards or decorative elements. Wiring must be no closer than 5 cm from the floor film.The distance from fireplaces, radiators and stoves is 25 cm or more. "Take with a margin" should not be, it is better to put a little less. As a rule, the floor occupies from 50 to 70% of the area of the room.


Option for laying the infrared floor around the furniture
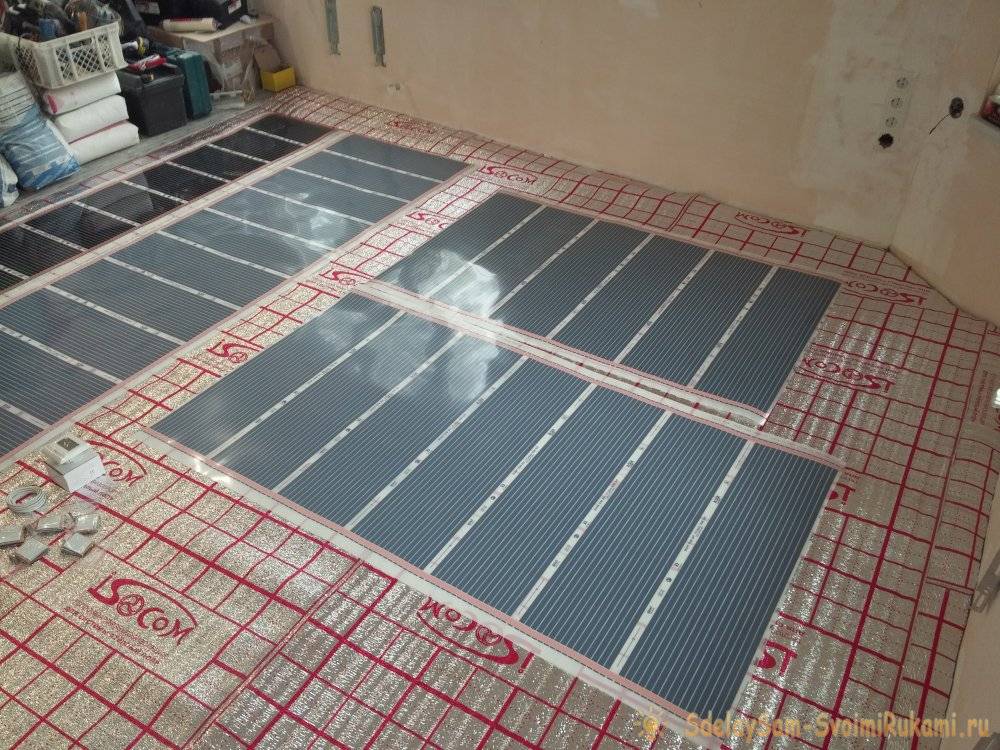
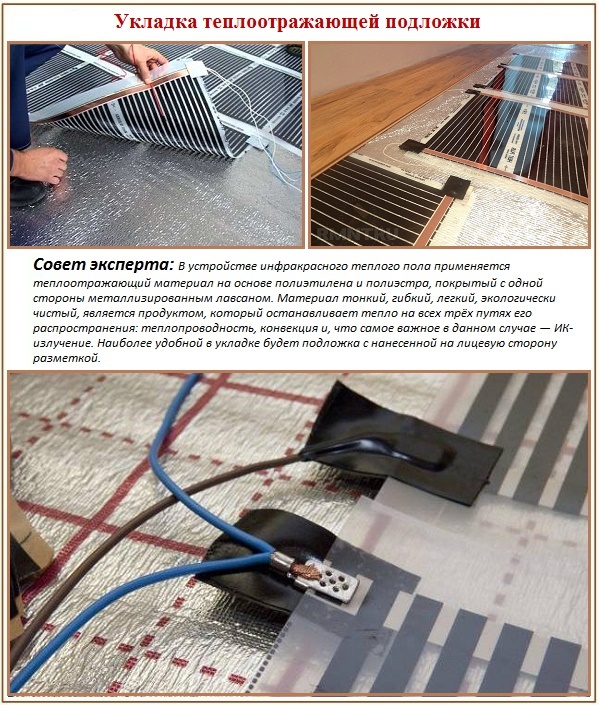
STEP 2: laying thermal insulation and vapor barrier. First you need to level the floor and remove all piercing and cutting objects from it (nails, screws, pebbles, etc.). Next, we lay a reflective film, put a vapor barrier on top of it (overlap - 25 cm).
Laying a vapor barrier under the infrared floor
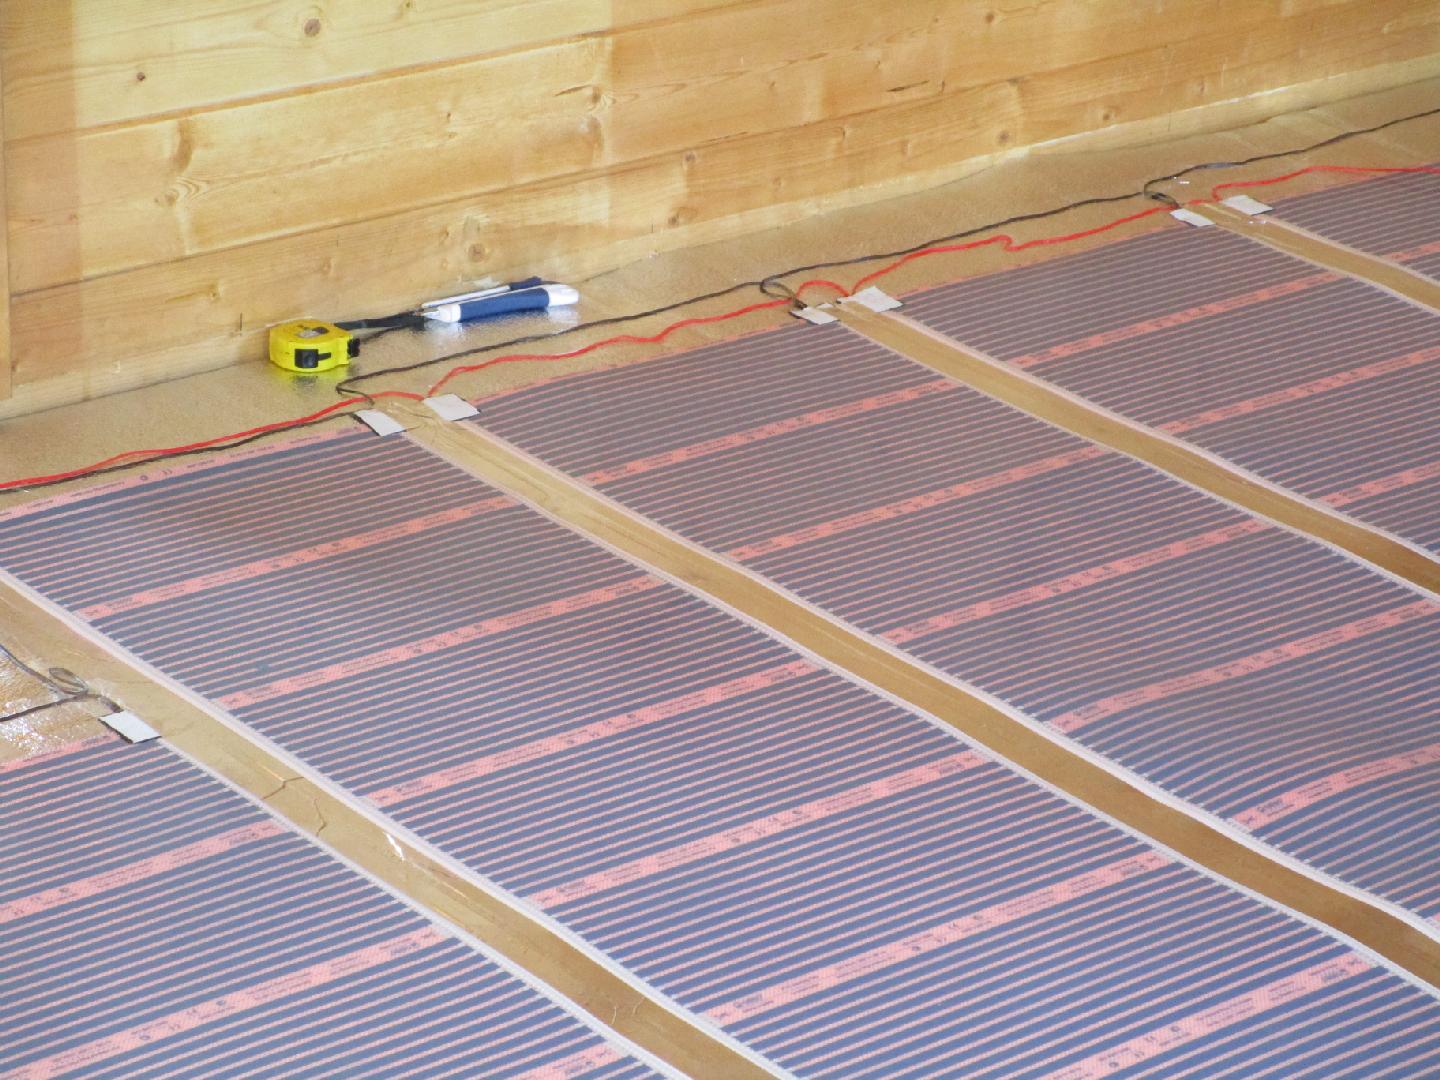
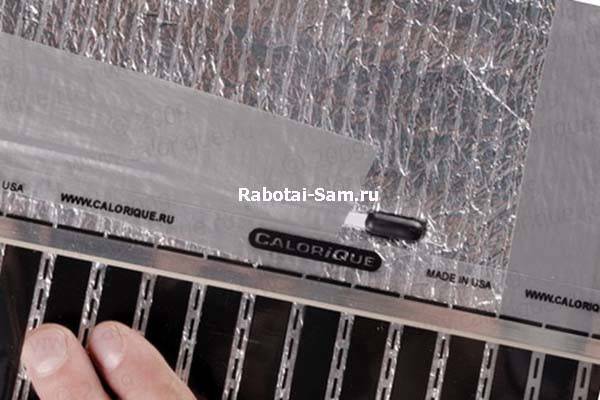
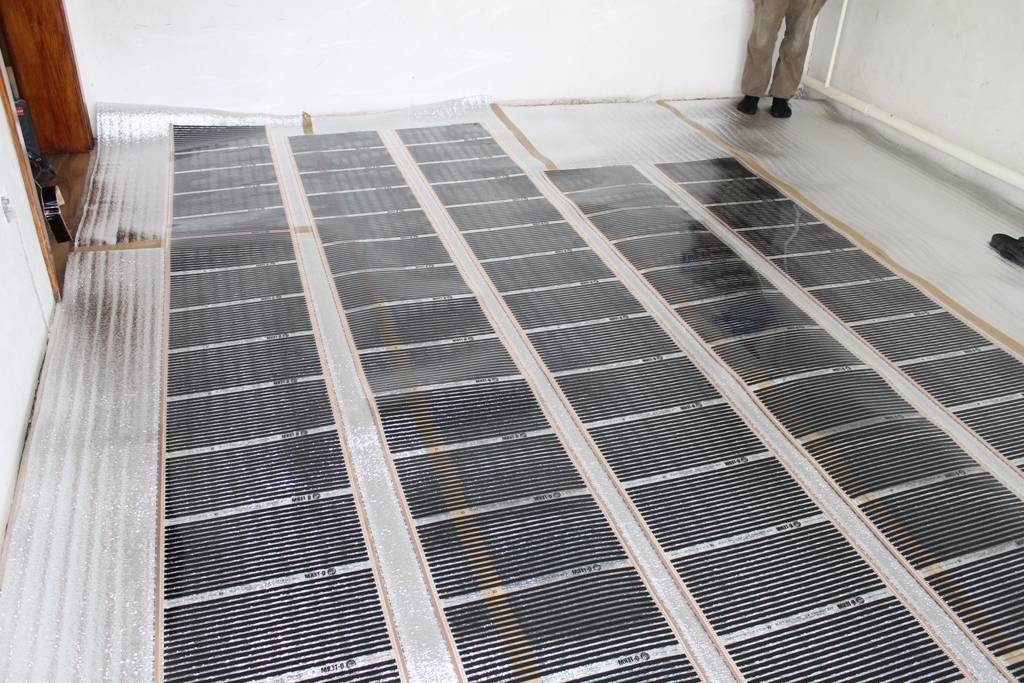
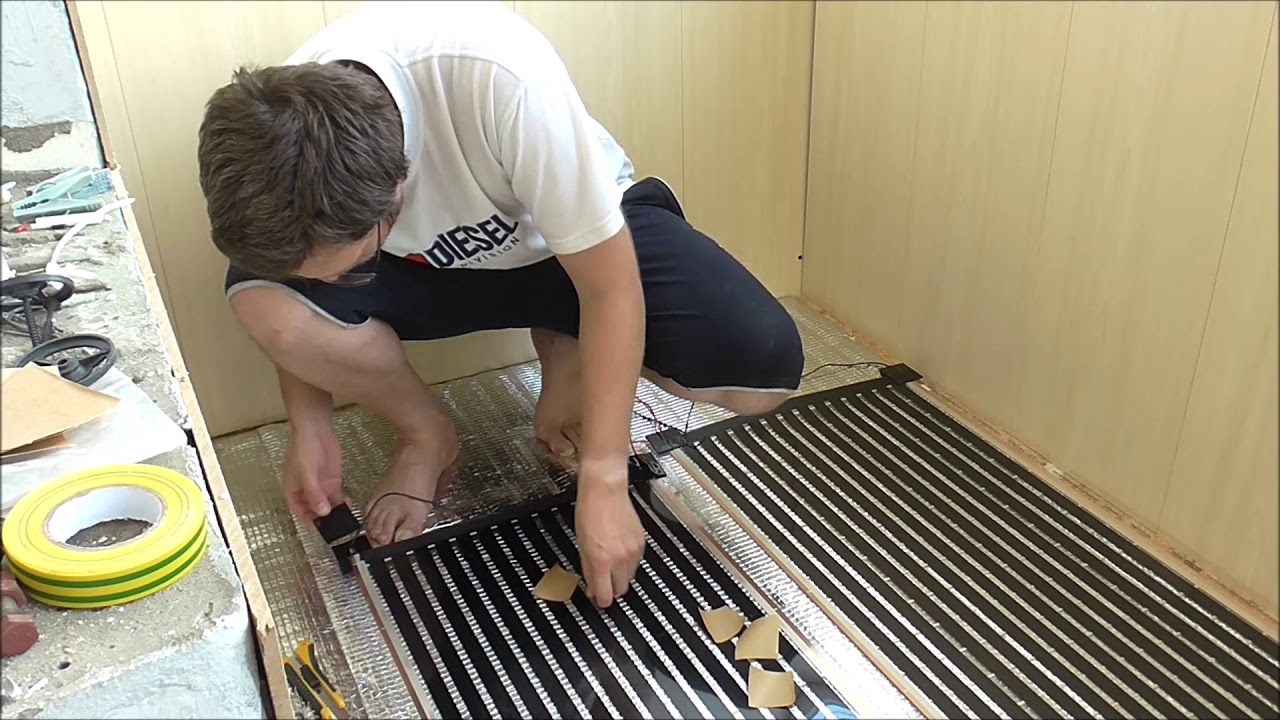
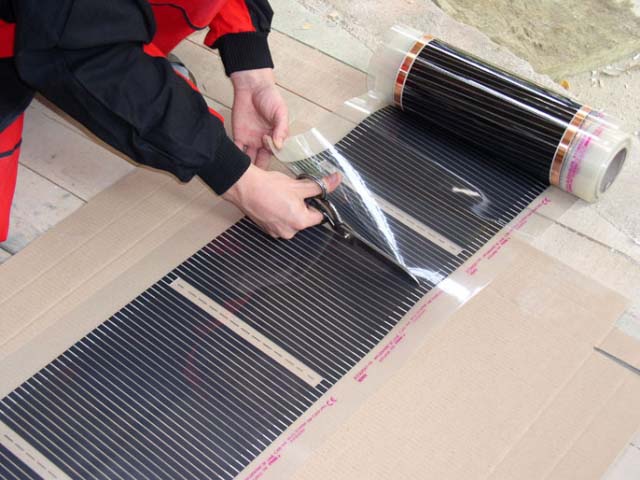
STEP 3: lay the thermal film. It's time to learn how to lay the infrared floor. The main thing here is to realize one rule - all materials after laying should lie with the inscriptions up. Only then will you heat yourself, and not the ceiling of your neighbors from below. Electrical work is reduced to a simple fastening of the strips of the infrared floor to each other. There are regular plugs for connection on each of them.
STEP 4: search for "jambs". We look at the insulation on the twists of the infrared wire strips, check their connection to the network, measure the resistance. If no short circuits are detected, the floors will work correctly. If you find a problem, clean the contact, isolate and check again for a short circuit each strip and all together.
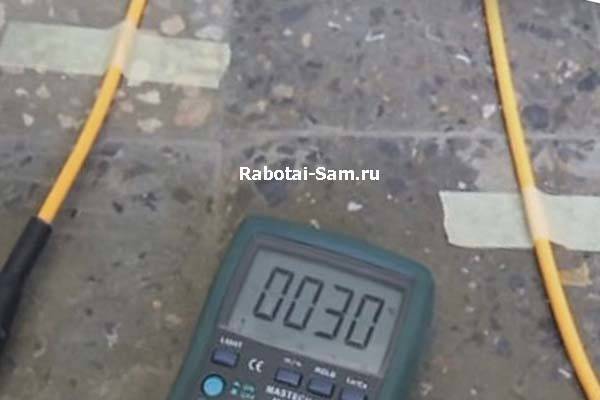
Measure floor resistance
STEP 5: connect the temperature sensor. The head of this device should be located under the thermal film, it can be glued with tape to the thermal insulation under the infrared floor. It is advisable to make a recess in the screed for the sensor head and the sensor itself, which should be placed at a distance of 20 cm from the edge of the warm floor.It is advisable to shove it at the threshold, so that later you do not forget where it is and, if necessary, replace the device without any problems.
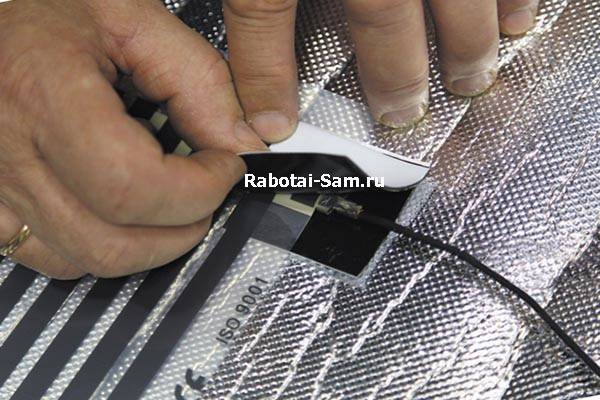
Isolate the clamp
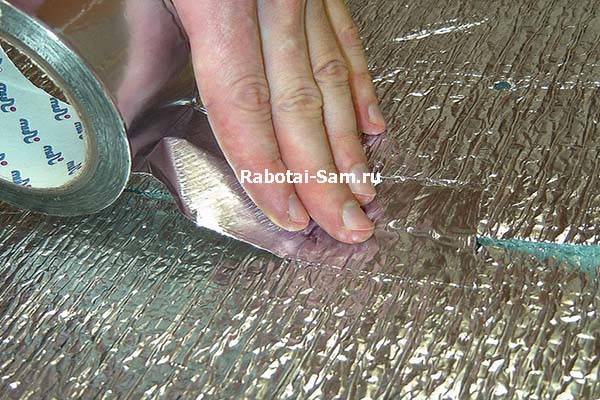
STEP 6: do-it-yourself inspection of the quality of the infrared floor installation. We turn on the heating, wait 2-3 minutes, notice we put our hand on the film. It should be absolutely cold, but radiate heat equal to summer sunlight. If everything works, you can close the floor with a vapor barrier with an overlap of 25 centimeters, fasten everything with tape.
Touch the floor to check
STEP 7: floor covering. Consider installing screed and ceramic tiles. The main option is a wet screed. Here you need to take a reinforcing metal mesh 25x25 mm, screw it with dowels around the perimeter of the infrared floor and between the strips (it would be better to mark them in advance). Next, 3-4 centimeters of concrete are poured.
It will be possible to use the infrared floor only 30 days after the work. The second option is a dry screed on the infrared floor. Dry mixes and gypsum fiber sheets are laid on top of the thermal film according to the installation instructions for these materials. After 24 hours, you can start laying tiles, there are no features of this process.
Important: try not to put heavy loads on the floor during its installation. Also, do not hammer in dowels or drill holes without accurately marking the location of the infrared floor, so as not to damage it.
The rods are quite fragile, and if they are damaged, the entire system will not function. It is better to measure 7 times and cut 1 time.


Stage 3 - installation of infrared floor heating
Step-by-step instructions for beginners with no experience in construction:
1. Preparation (learning security measures)
If the work is performed by a non-professional, you need to familiarize yourself with
installation technique and safety measures:
minimize walking on the laid film. Protection
film from mechanical damage, possible when moving on it,
achieved through the use of soft covering material (thickness from 5
mm);
do not allow installation of heavy objects on the film;
prevent the instrument from falling onto the film.
Safety rules for installing IR floor heating:
It is forbidden to connect a heating element to the power supply
film rolled up;
film installation is carried out with no power supply;
connection to the power supply is carried out strictly according to SNiP and
PUE;
film installation rules are observed (length, indents,
no overlaps, etc.);
only suitable insulation is used;
installation of the film under furniture and other heavy
items;
installation of a film under low-standing objects is excluded.
These are all items that have an air gap between the bottom
surface and floor less than 400 mm;
contact of the film with communications, fittings and
other obstacles;
isolation of all contacts (terminals) and lines is ensured
cut conductive copper busbars;
the film floor is not installed in rooms where high
risk of frequent water ingress;
obligatory installation of an RCD (protective device
shutdowns);
break, cut, bend the heating cable;
mount the film at temperatures below -5 °C.
2. Preparation of the thermostat installation site
Includes wall chasing (for wires and sensor
temperature) to the floor and drilling a hole for the appliance. Power on
the thermostat is supplied from the nearest outlet.


Advice. It is advisable to lay the wires in the corrugation, this technique
will simplify maintenance and repair if necessary.
3. Foundation preparation
Infrared film is laid only on a flat and clean surface.
surface. Horizontal deviation of the surface exceeding 3 mm is also
unacceptable. Masters recommend treating the surface with a primer.
Note. Dismantling of the old floor (rough) is not required,
if its surface is not satisfactory.
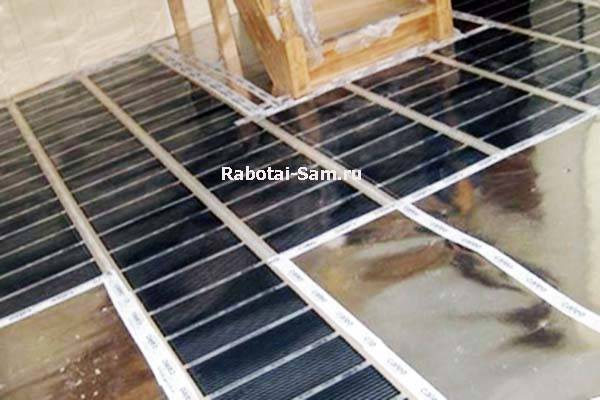
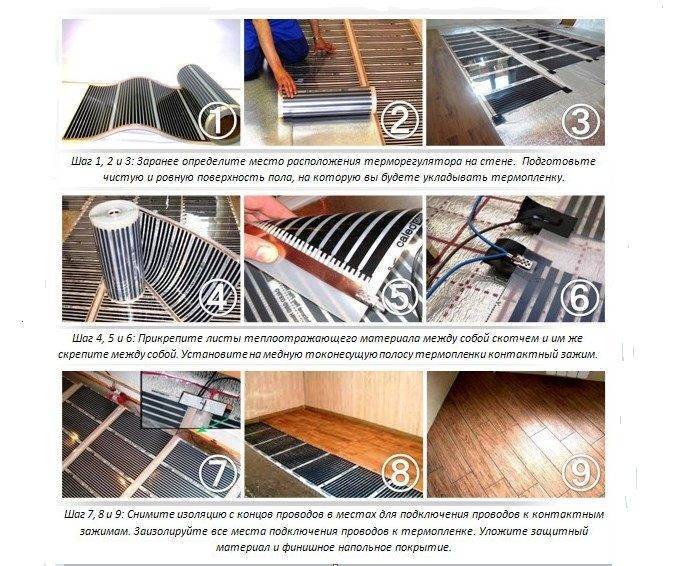
6. Laying infrared floor heating
drawing markings for laying on the floor;
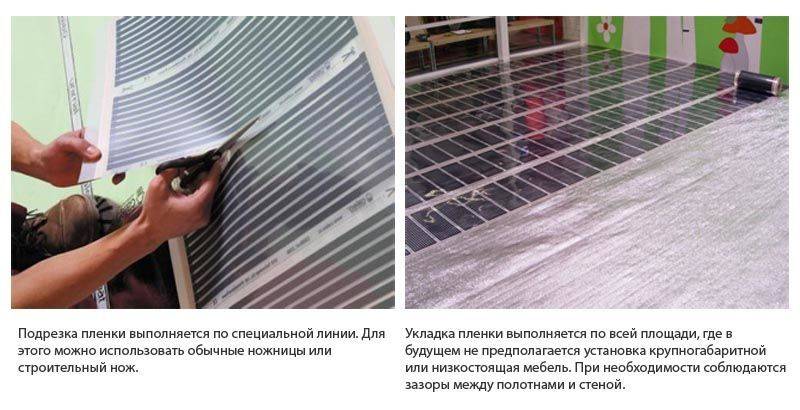
preparation of a strip of film of the desired length
note
film can only be cut along the cut line; the film is located towards the wall, which
designed to install a thermostat. Oriented copper strip
heater way down;
Oriented strip copper
heater down;
the film is located towards the wall, which
designed to install a thermostat. Oriented strip copper
heater down;
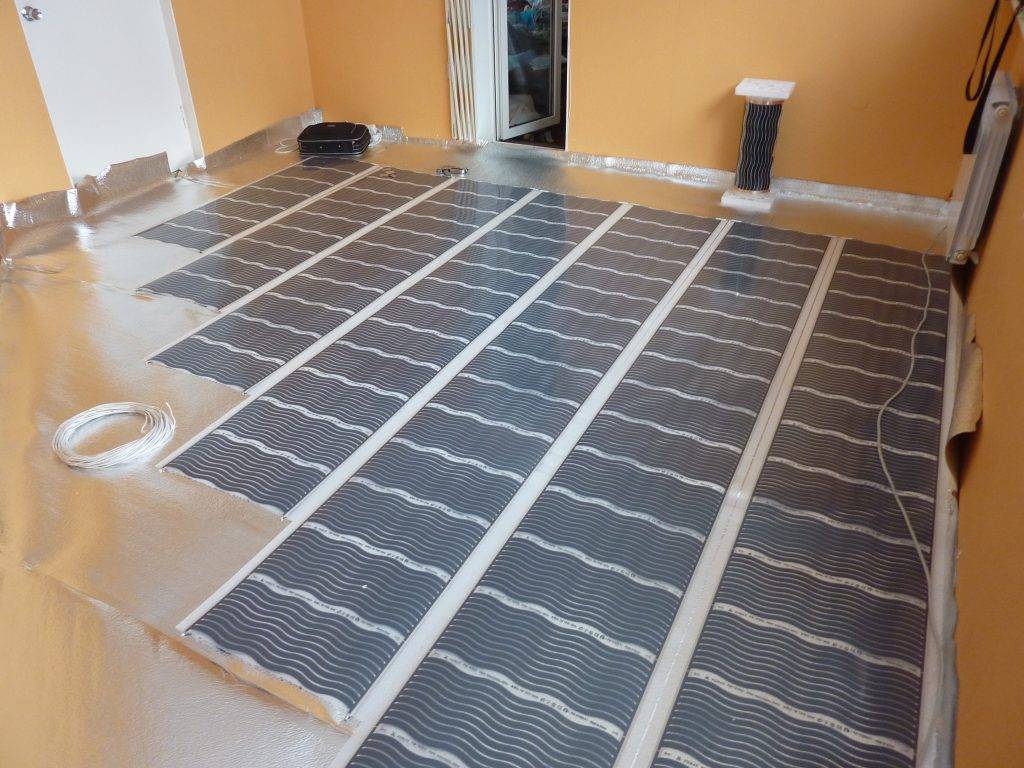
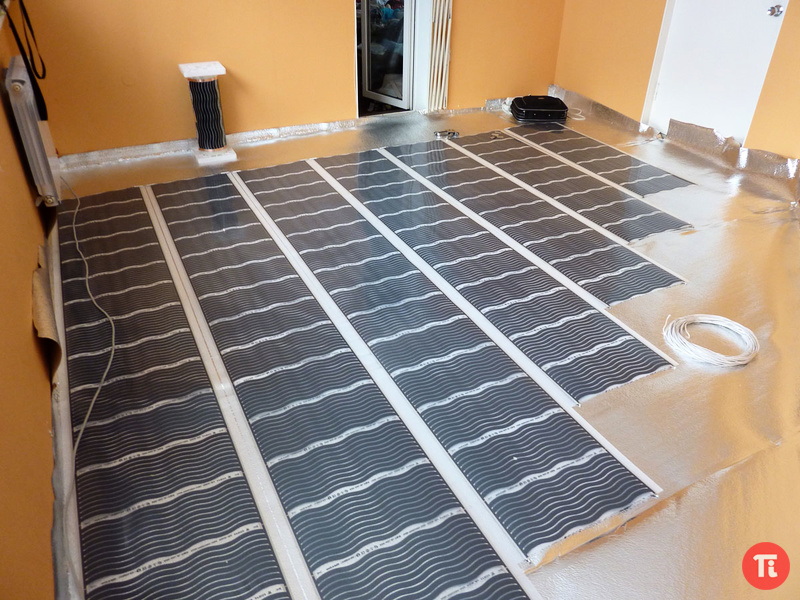
the recommended distance from the wall of 100 mm is maintained;
the recommended distance (gap) between
edges of infrared film sheets of 50-100 mm (film overlap is not
allowed);
strips near the walls are glued to the insulation with adhesive tape
(squares, but not a solid strip). This will avoid shifting the canvas.
7. Installation of clips
At the ends of the copper bus you need to attach metal
clamps. When installing, it is necessary that one side of the clamp fits between the copper
tire and film. And the second was located above the copper surface. Crimping in progress
evenly, without distortion.
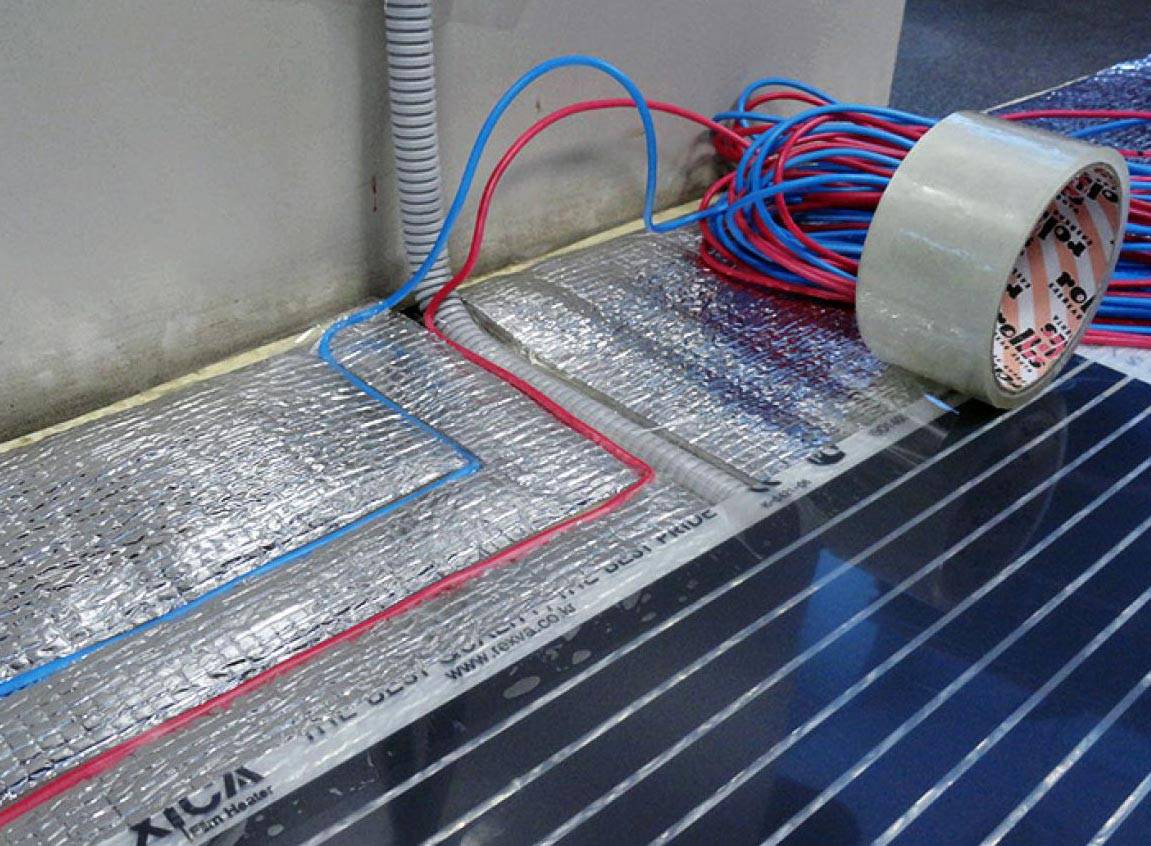
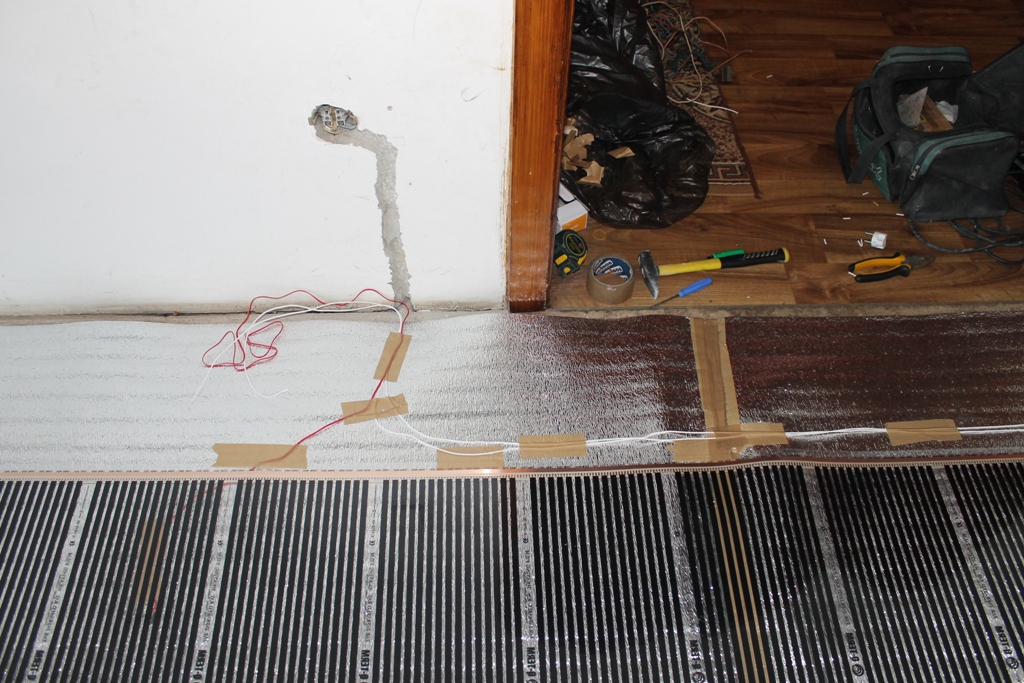
8. Connecting the wires of the infrared floor
The wires are installed on the clamp, followed by
insulation and tight crimping. The ends of the copper bus are also insulated in place
cutting. The requirement of parallel connection of wires is observed (right with
right, left to left). In order not to get confused, it is convenient to use a wire of different
colors. Then the wires will be laid under the plinth.
Advice. To prevent the clip with the wire from protruding above the film, its
can be placed in a heater. A square is pre-cut in the insulation
under clamp.
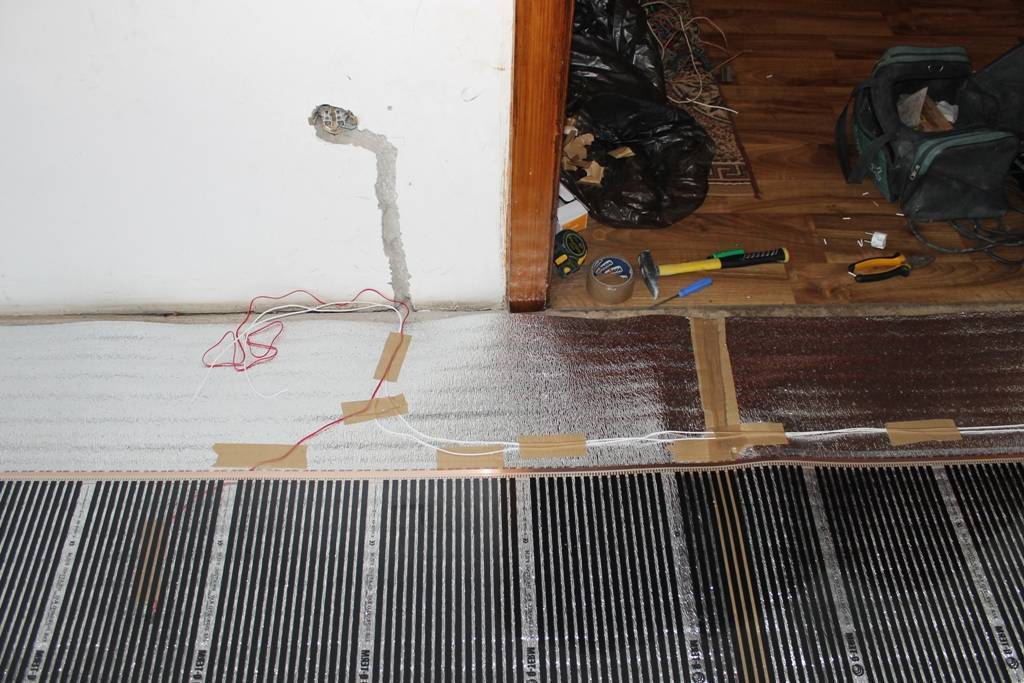
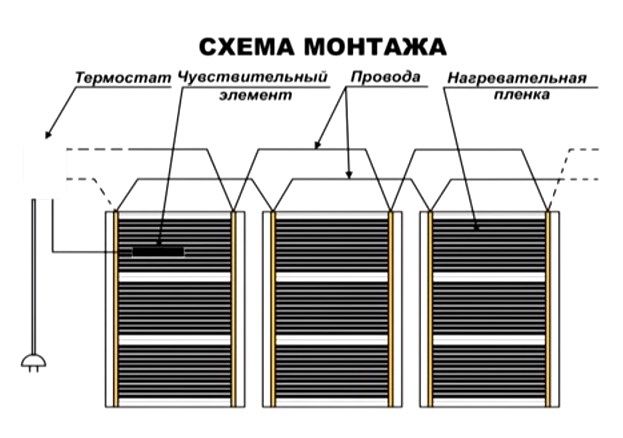
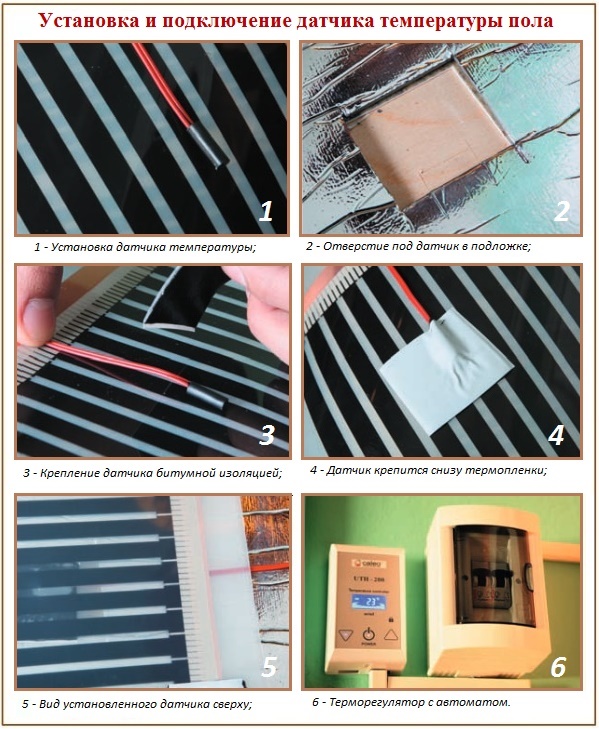
9. Installing the temperature sensor for the thermostat
The temperature sensor is recommended to be installed in the center
the second section under the film. To prevent the sensor from being damaged during movement, under it
you need to cut a hole in the insulation.
Installation of a temperature sensor for underfloor heating film
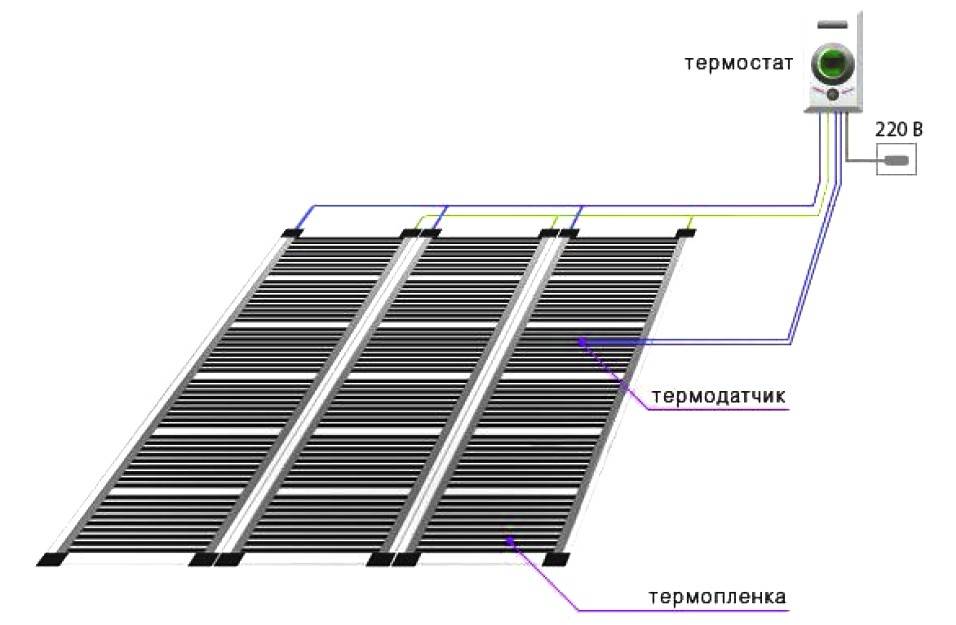
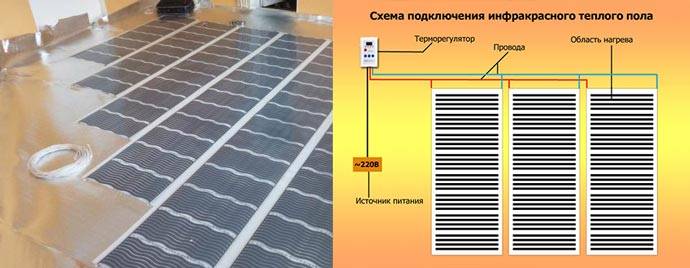
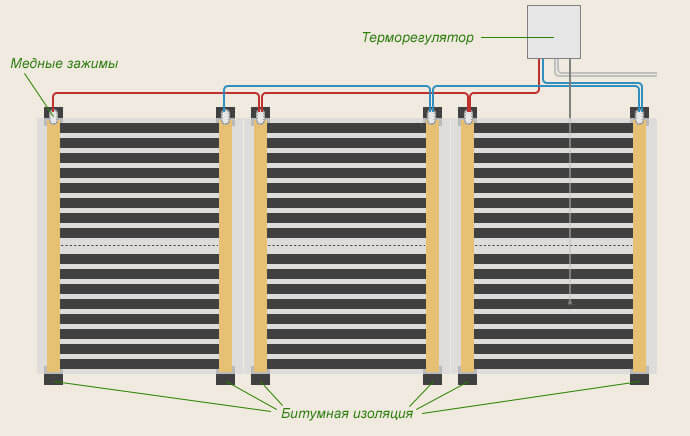
Wiring diagram for film floor heating thermostat
Connecting a thermostat for infrared floor heating
Important installation questions
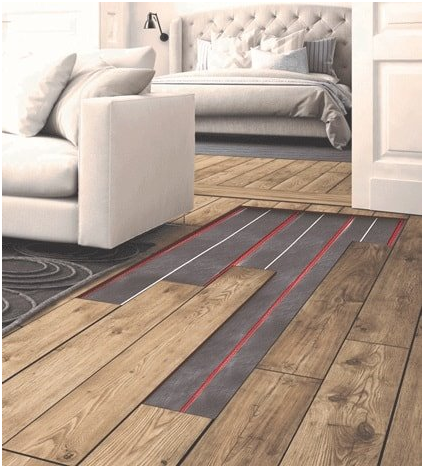
The film is laid under most finishing coatings: parquet, laminate, tile (we said about additional conditions above). The only remark: if the material is soft, like linoleum or carpet, a protective layer of plywood or fiberboard is additionally laid on top. This is necessary so as not to accidentally damage the heating elements with careless strong mechanical impact. Under materials that have high thermal insulation (for example, cork), it is undesirable to lay the film
Another significant feature of the thermal film is that it cannot be laid in a screed, like other models of heating floors.
Under materials that have high thermal insulation (for example, cork), it is undesirable to lay the film.Another significant feature of the thermal film is that it cannot be laid in a screed, like other models of heating floors.


The emission of IR bands is close to the emission spectrum of solar rays. The waves emitted by them are in an absolutely safe range, so the installation of a film underfloor heating can be carried out in any type of room. It is used to heat children's rooms, bedrooms, rooms where the sick and the elderly live.
Instagram mirklimatavoronezh
Instagram proclimat_perm
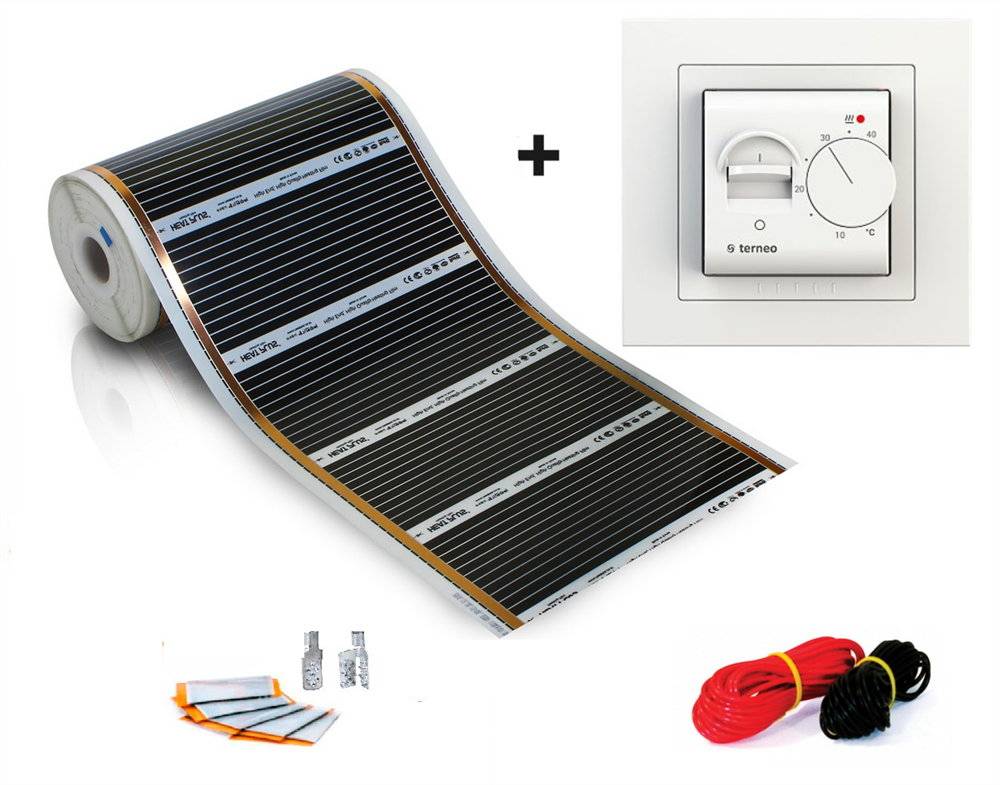
Floor heating device
Laying and connection scheme do-it-yourself heating elements is as follows:
The installation of the thermal film takes place towards the wall where the thermostat will be placed. Which side to lay it - does not depend on the manufacturer or the power of the heating elements. Any thermal film is installed with a copper strip down. The individual strips must not overlap.
The current-carrying wire is stripped at the end (8-10 mm). The prepared tail is installed inside the contact clamp.
The clamp together with the wires is installed on the film heating element. One of its ends should be located on the copper bus, and the other - inside the structure. Pliers are used for secure fixation.
The insulation of the place where the copper bus is cut and the place where the electrical wire is connected is carried out using vinyl mastic tape.
The number of connection points should be minimal, but for efficient operation, the maximum length of one strip is 8 m. All elements are connected to each other in parallel.
Before connecting the system to the thermostat, it is tested
It is important to find out what load will fall on the device.If it is at least 20% less than the value indicated in the thermostat's passport, you can continue installing underfloor heating.
The temperature sensor is installed under the film closer to the middle of the second section
For its installation, it is necessary to cut a hole in the heat-insulating material and the base of the appropriate size. To lay the cable to the thermostat, you also need to make a small groove.
The wires through which the infrared floor heating is connected to the thermostat and the network are led to the baseboard. This will reduce the level of pressure on them from the flooring. To remove them, a shallow groove is made in the heat-insulating substrate. After laying the wires, they are fixed with tape. Near the wall, the cables must not protrude beyond the thermal insulation. To do this, a deeper groove is made in this area for their installation.
The heating elements are connected to the thermostat in the same way as other underfloor heating systems. The mounting scheme is indicated by the manufacturer on the instrument case. Most often, a cable from the network is connected to 1, 2 sockets, a warm floor to 3, 4, and a temperature sensor to 6, 7. The ground wires are connected to each other with a terminal.
After connecting all the elements of the system to the thermostat, the warm floor is put into operation. To test heating, set the maximum temperature that will provide optimal conditions in the room. In this mode, there should be no overheating or sparking at the points of contact installation. The warm floor must have a stable temperature over the entire surface.
If the installation of a warm floor with your own hands was successful, proceed to the installation of the selected floor covering. Under it, a plastic film must be laid to protect the system from moisture.
Laying infrared floor heating: technology
The first step is to plan the placement of the thermal film strips, connectors, and sensors. Measure the length of the thermal film strips. Calculate the required amount of thermal film and reflective substrate for a given area. From the calculations, you need to exclude the area of \u200b\u200bthe places that will be located under the furniture (sofas, cabinets, and so on). Laying a heat-insulating substrate, unlike a thermal film, is calculated for the entire area of \u200b\u200bthe room.
Schemes of heat distribution from a heating radiator (left) and an infrared heater (right).
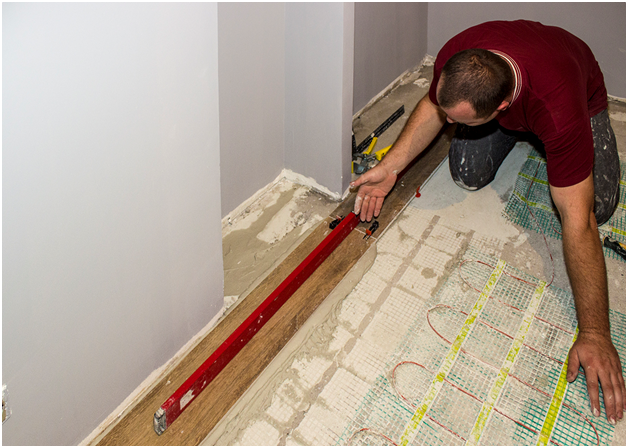
Installation of a thermostat. Determine in advance the future location of the thermostat in the wall, leaning it against the wall, visually align and make a mark with a pencil. For a built-in thermostat, it is necessary to punch places for the supply wires and under the thermostat.
Foundation preparation. It is necessary to clean the floor of dirt and dust with a brush or vacuum cleaner and remove all surface irregularities. If the surface is wet, dry it thoroughly.
Laying of thermal insulation material. Lay a heat-insulating substrate over the entire area of \u200b\u200bthe room. The film corresponding to the required dimensions is cut along special cutting lines. Attaches to each other with tape.
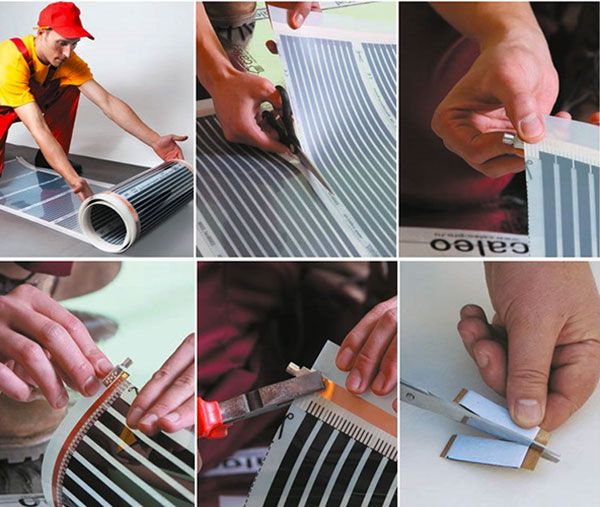
Laying of an infrared heat-insulated floor. Cut strips of thermal film to the desired length.The film can be cut in any place: either in the place specified by the manufacturer, or between separate heating elements. It is necessary to isolate the cut sides of the thermal film. In case of cutting at the place indicated by the manufacturer, only the collector plates are to be insulated. The entire width of the thermal film is insulated if a cut is made between the individual heating elements. Each strip is laid out on the floor surface according to the prepared plan, and marks are made with a pencil for cutting through the strobe. The distance between the strips of thermal film should be at least 1-2 cm, and from the walls - 5-10 cm. It is necessary to ensure that the strips of thermal film do not overlap each other and accidentally overlap.
Connection of contacts. One of the ends of the terminal is inserted into the gap between the layers, the other end of the terminal must be on the side of the copper bus above the thermal film. To connect the contact terminals, the copper and silver bus is stratified at the end of the thermal film. Connect the wires to the terminal. 0 is supplied to one copper strip of the thermal film, and the phase is connected to the other. The terminal with the help of pliers must be pressed gently and firmly.
Several strips of thermal film should be connected in parallel, as in the diagram.
Wiring diagram for infrared floor heating.
Contact points are isolated. With the help of insulating material mastics on both sides, the connection points of the terminals are insulated. On the reverse side of the thermal film, the copper bus is insulated with strips (2.5x5 cm) of bitumen tape.


To give the floor surface an ideal evenness, the supply wires are sunk into pre-cut grooves in the heat-insulating material. Wiring can be done under the plinth.
Installing the floor sensor.The temperature sensor is connected to the thermostat. The sensor is fixed on the underside of the thermal film and glued with adhesive tape. The temperature sensor and wires must also be placed in recesses so that the floor surface is even. To do this, you must first designate places for strobes. Marked strobes are cut with a circular saw or cut through with a section. Wires in thermal insulation are fixed with adhesive tape. It is also necessary to make cutouts of thermal insulation under the contacts to obtain a flat floor surface. The thermostat must be connected to the network and the operation of the entire system must be checked. The resistance is measured, the result is recorded in the guarantee.
The laying plan for infrared floor heating is sketched on the back of the warranty.
Lay any finishing floor covering: laminate, carpet or linoleum. Before laying the coating, a polyethylene film must be laid on top of the thermal film to protect it from water ingress. The film is applied with an overlap of sheets of 20 centimeters.
Laminate panels can be laid directly on the plastic film. The top coat of carpet or linoleum is placed on pre-laid sheets of fiberboard or plywood. At the same time, it is necessary to lay the sheets of the primary floor in such a way as not to damage the thermal film itself.


