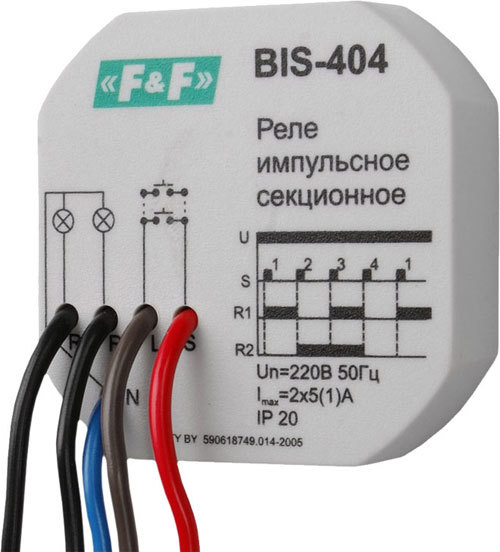
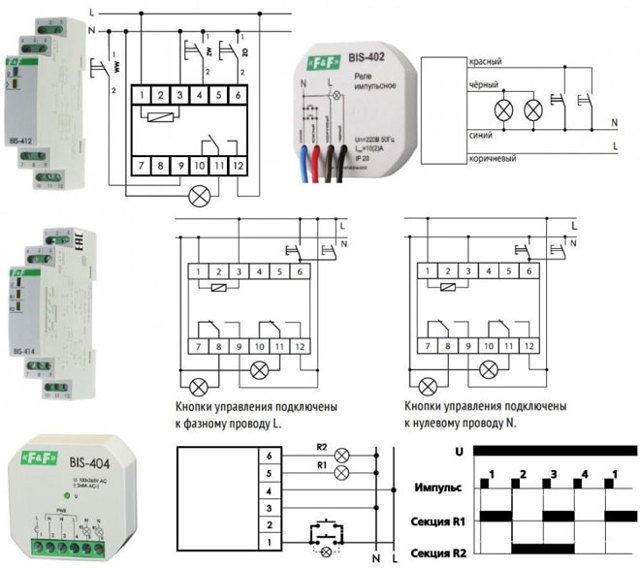
- Impulse relay for installation in the junction box
- Connecting a backlit three-pin button: diagram
- What functions does the street lighting relay have?
- Centralized lighting control with one button
- How to connect an impulse relay
- Varieties of impulse relays
- Electromechanical
- Electronic
- Main technical characteristics
- Impulse relay and its device
- Pulse relay connection diagram
- Varieties
- Pulse relay - pros and cons
- Tips & Tricks
- Conclusions and useful video on the topic
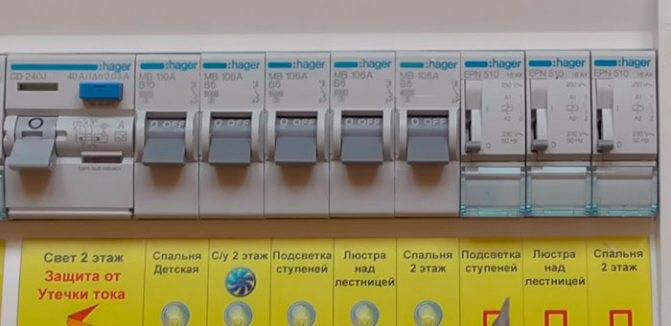
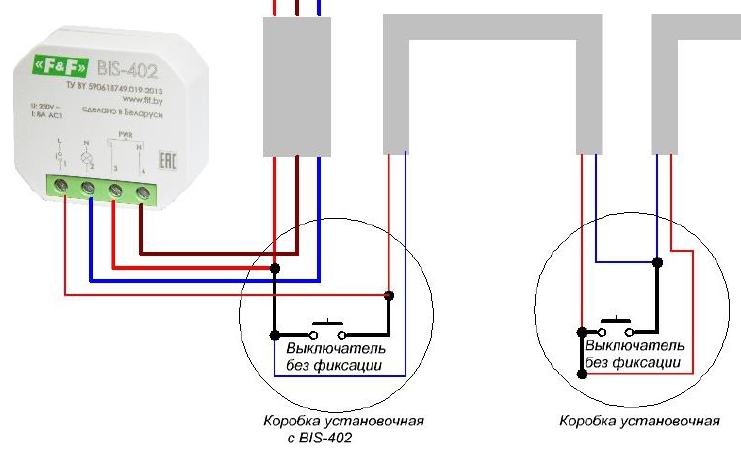
Impulse relay for installation in the junction box
In addition to panel options, there are also hinged ones, for installation behind a false ceiling or directly into a switch box.
With their help, you can organize the transfer of lighting in your apartment from single-keyboards to impulse switches. Change the switches in the junction boxes to buttons and switch the wires in the junction box.
This is how this circuit looks like when an impulse relay is connected, directly in the junction box under the ceiling.
Scheme No. 3
At the same time, you have little to change in the electrical panel, and you get an excellent lighting control option, similar to walk-through switches.
When connecting several lamps at once from a standard impulse switch, and not just one light bulb, be sure to mount a cross-module or terminal blocks.
It is unlikely that it will be possible to start two, three cables per relay (there will be no restriction on the thickness of the wire). We'll have to scatter them in different blocks.
What other types of impulse relays exist? There is, for example, with a time delay function.
It can be used to delay both when the light is turned on and when it is turned off. You leave your own cottage in the evening and press a special button in the house.
This gives you time to calmly walk along the illuminated paths to the gate, and only after that the light will automatically turn off.
This method does not even require the installation of separate switches on the street.
You can also connect an exhaust fan in the bathroom to such relays. Leaving the bathroom, press the button, and the fan continues to work for the period of time you set.
What are the disadvantages of impulse relays? Some models of individual manufacturers are sensitive to voltage drops.
What is the risk? And the fact that the light on some lamps will turn on and off spontaneously with unstable voltage.
Many more are annoyed by the constant clatter and clicks during relay operation. Especially this sin el.mekhanicheskie species. They consist of a lever and contact system, coils, plus springs.
You can tell them apart by the lever on the front. With it, the relay is manually transferred from one position to another.
The board with a microcontroller is built into the electronic ones. There is nothing special to click in them, and they are less noisy.
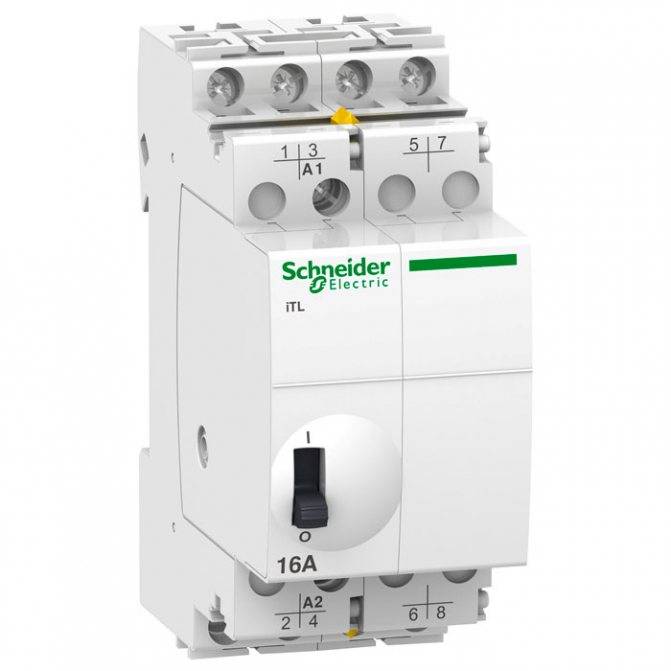
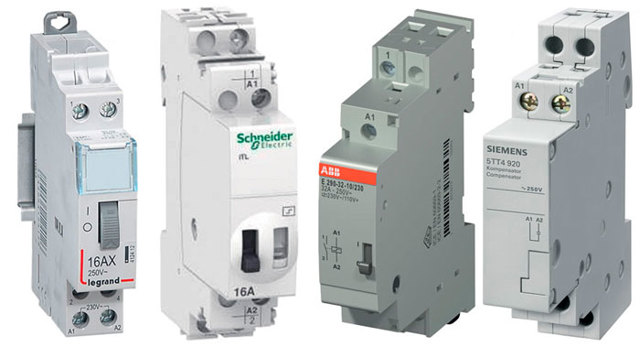
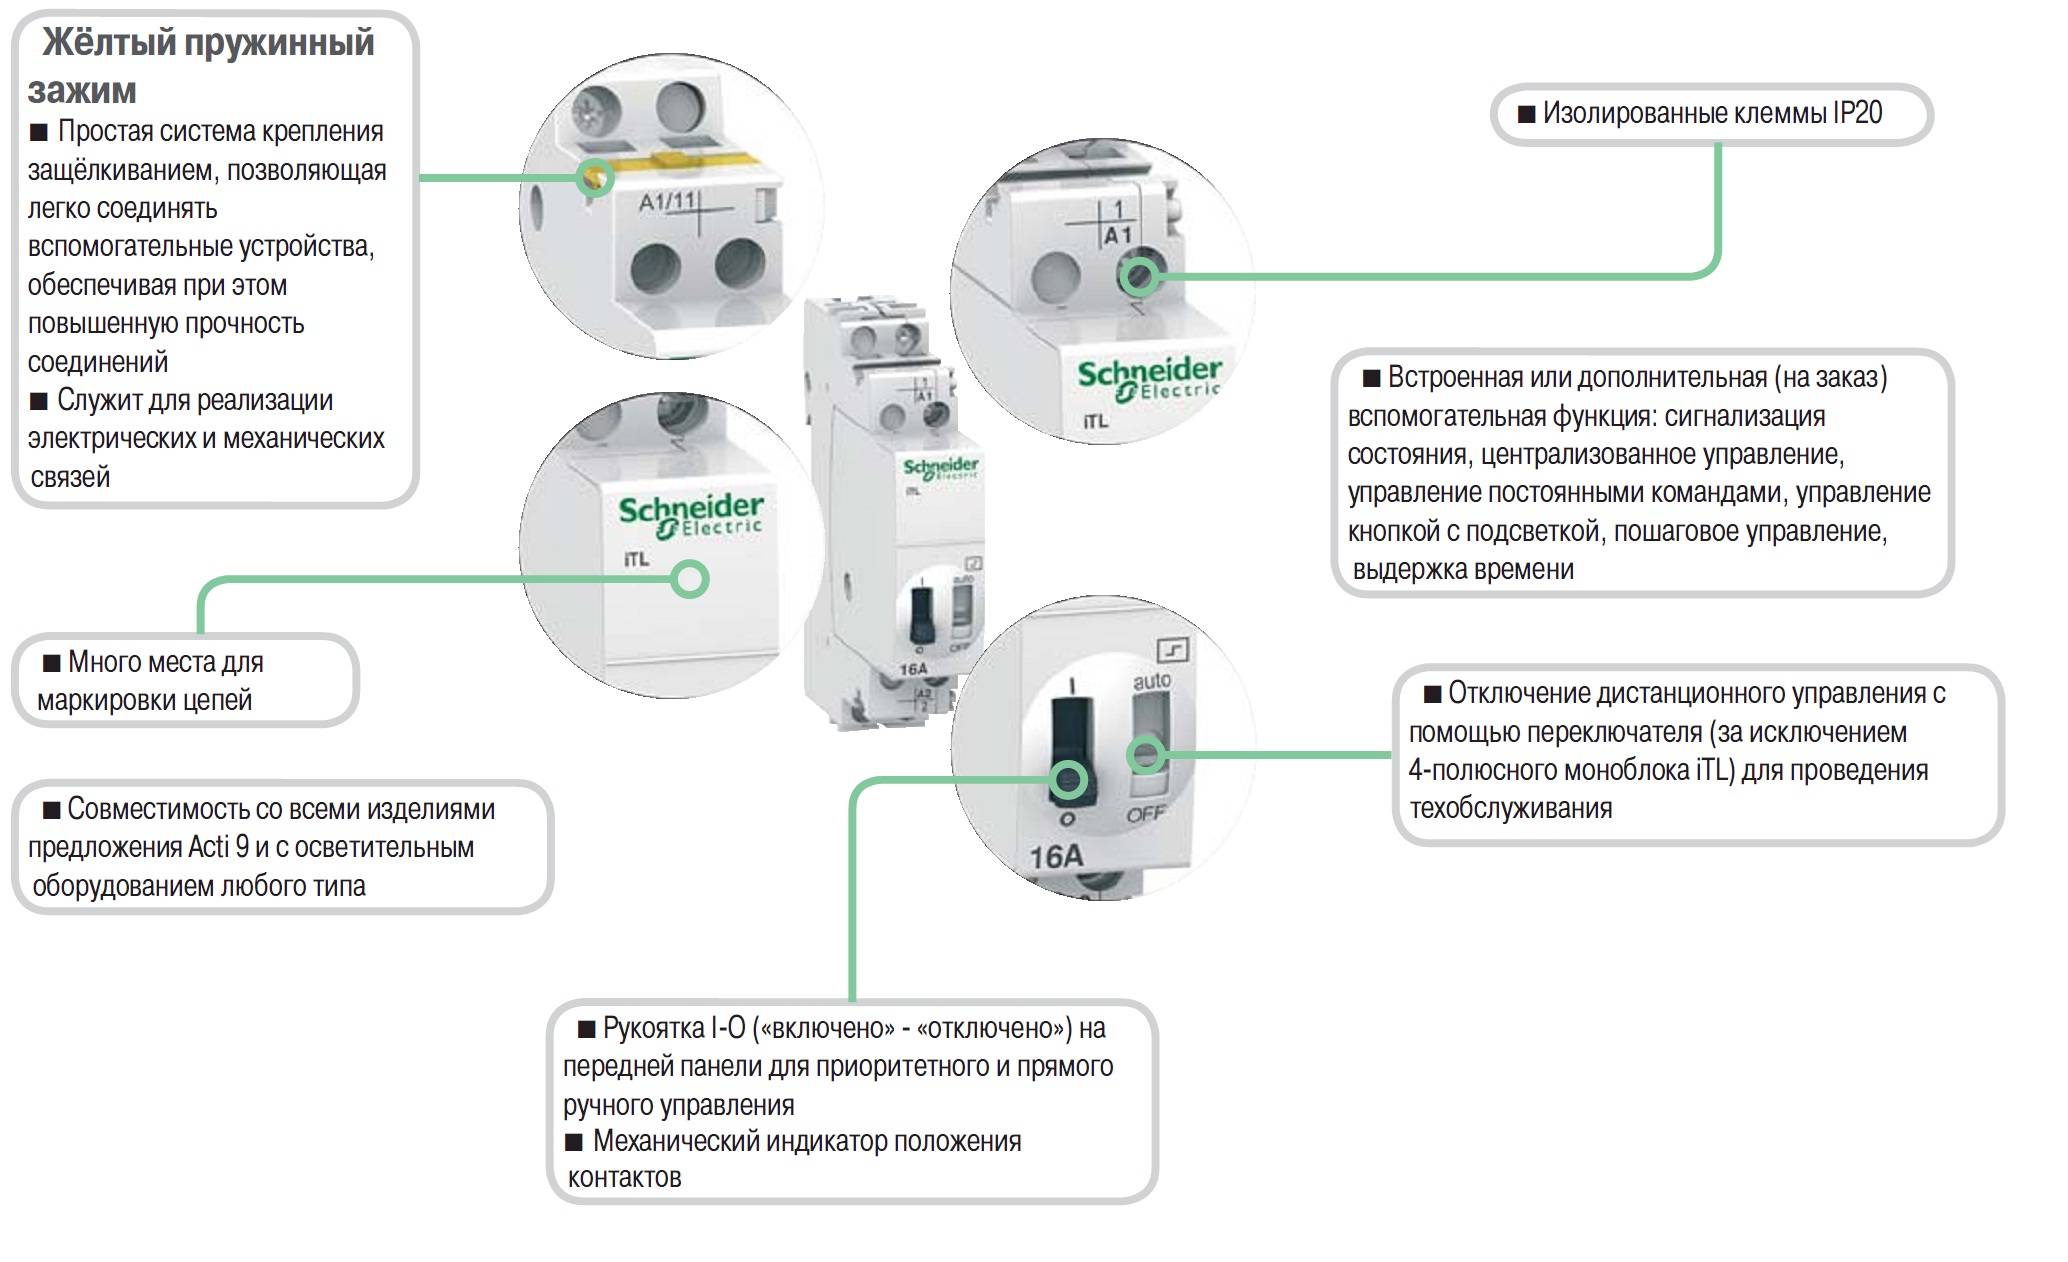
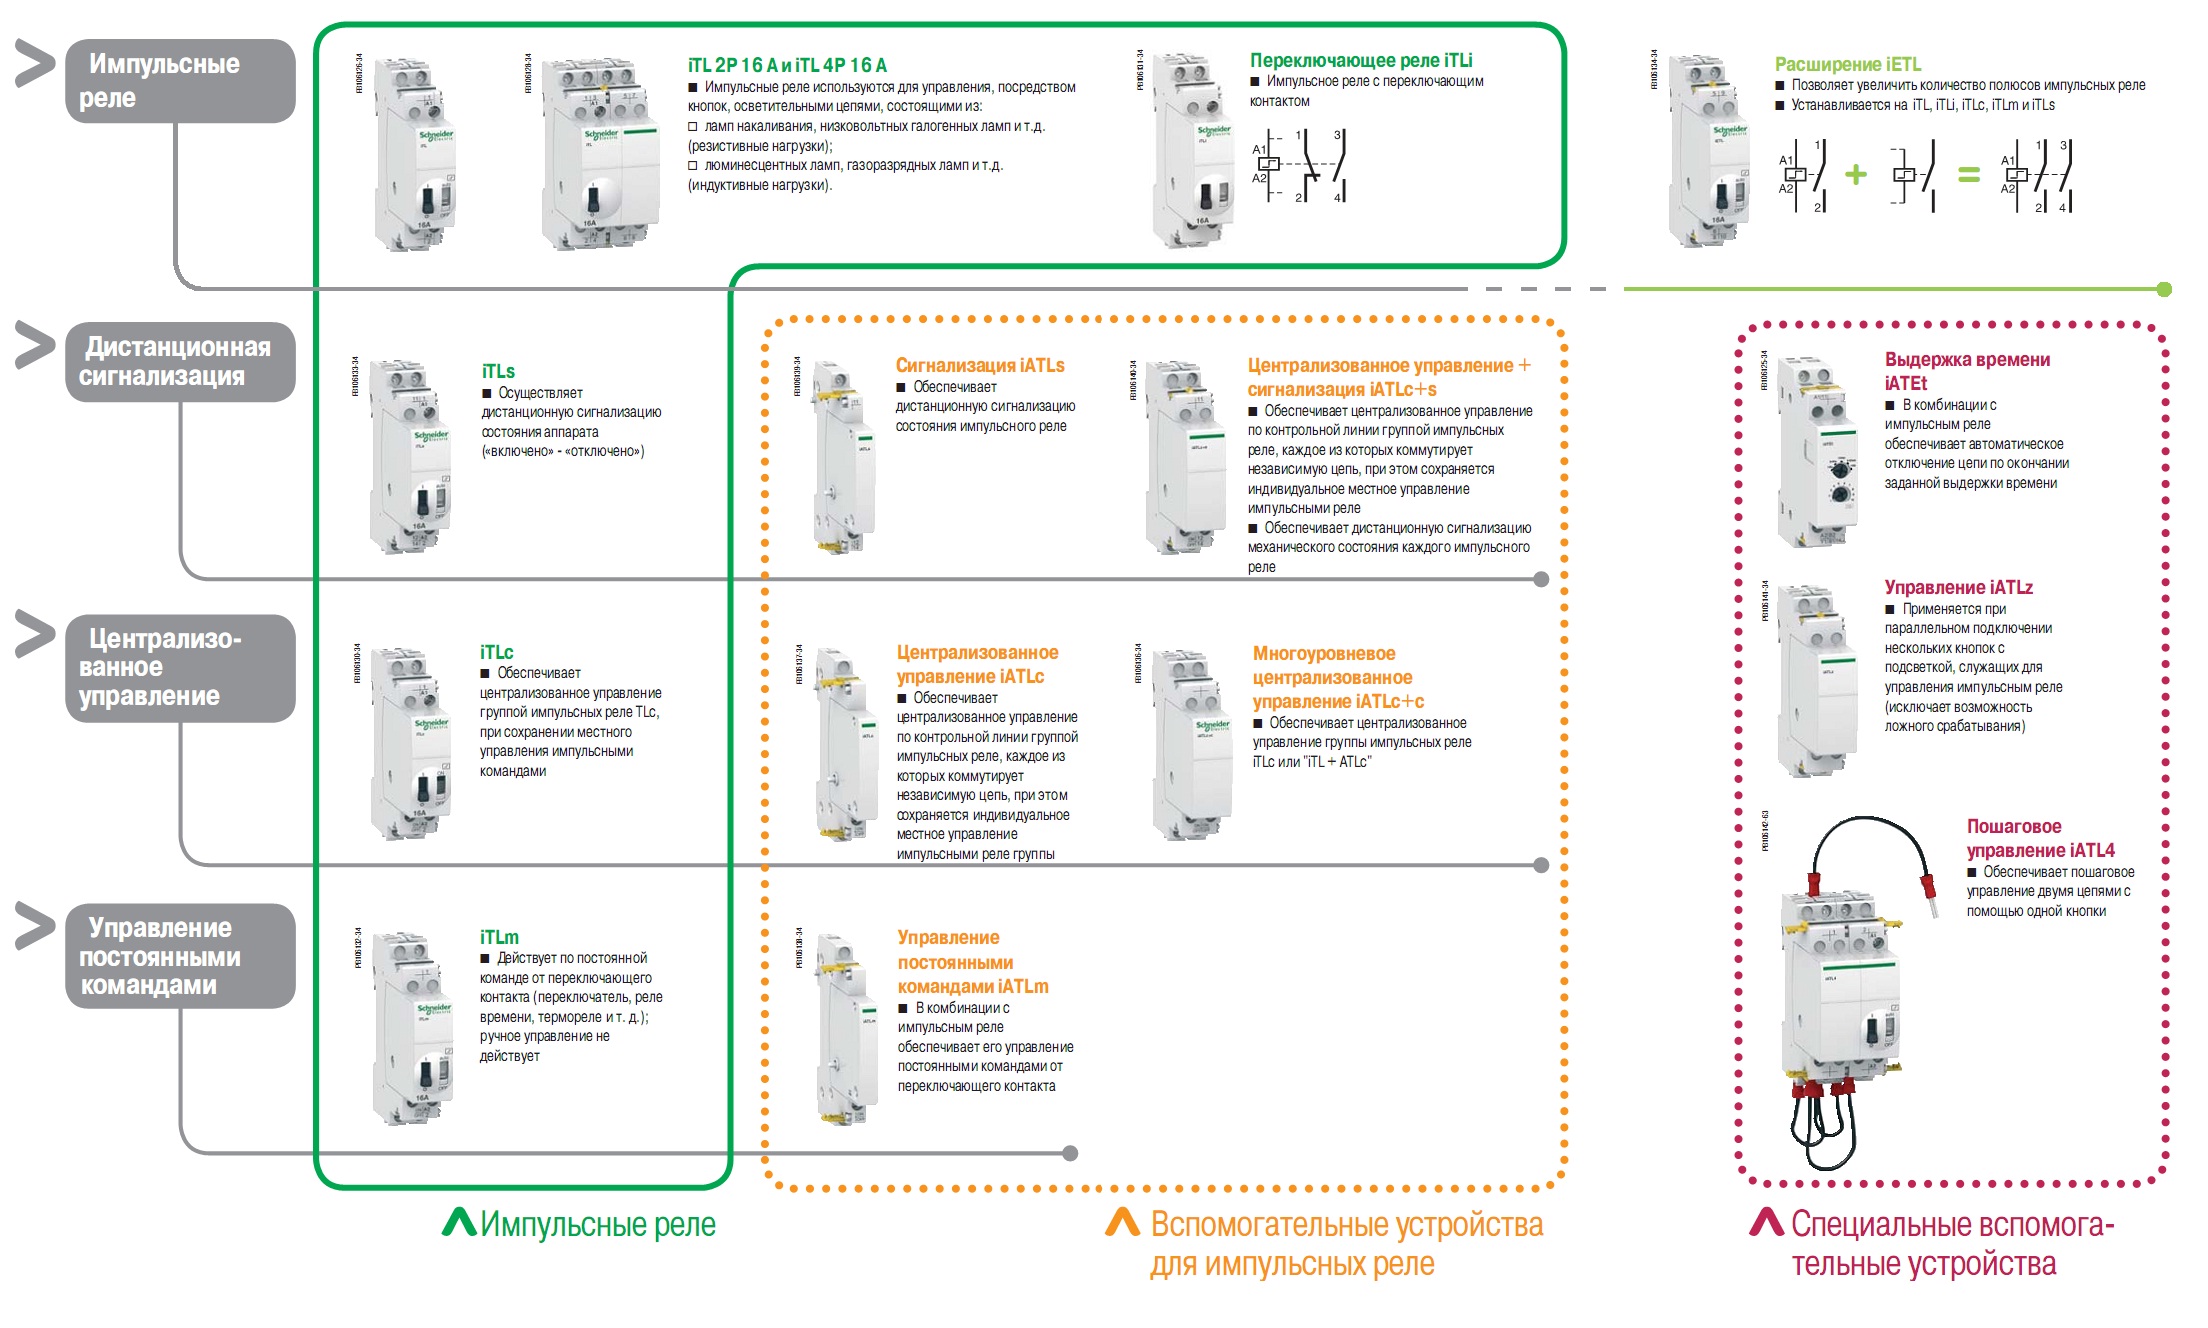
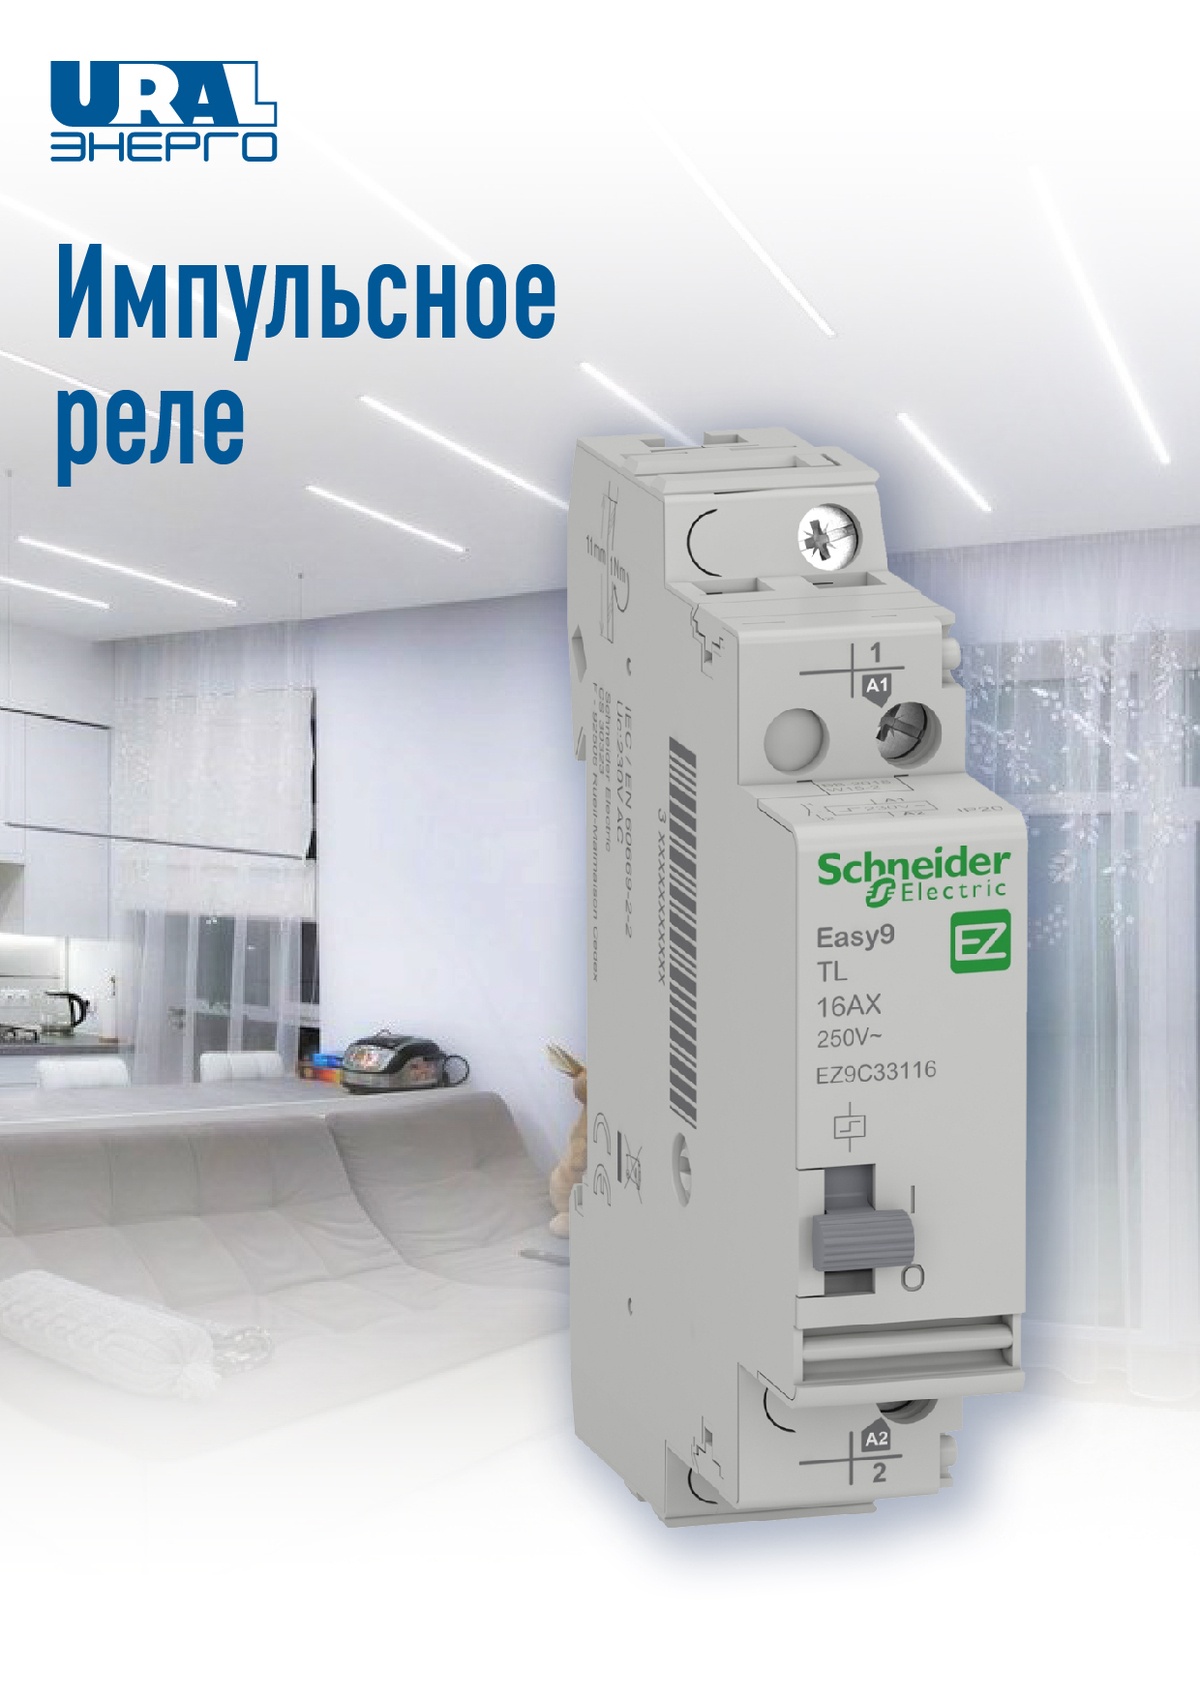
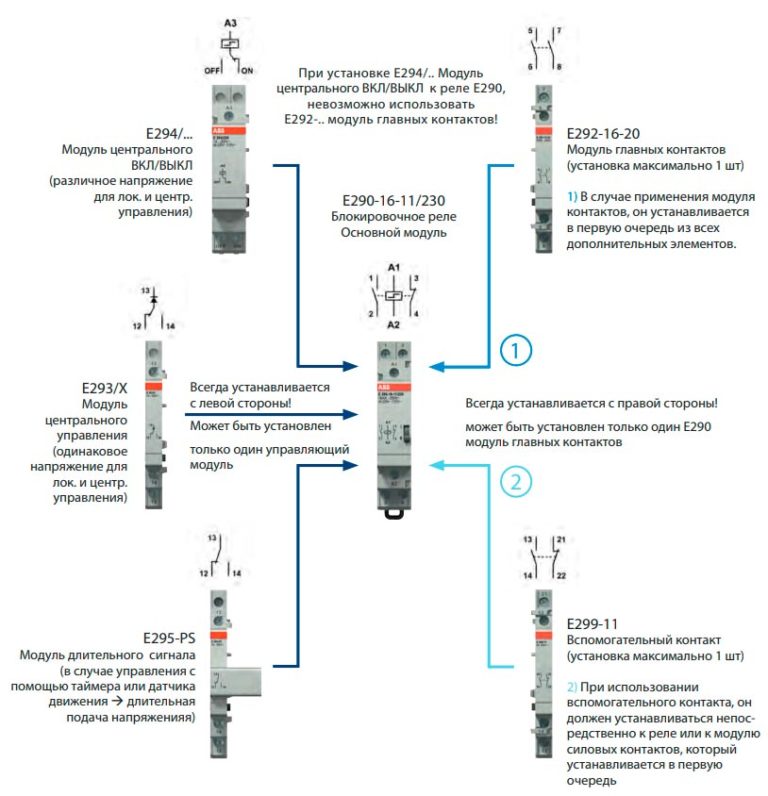
To have fewer problems, choose relays from well-known and long-established brands.Such as - ABB (E-290), Schneider Electric (Acti 9iTL), F&F (Biss) or domestic Meander (RIO-1 and RIO-2).
ABB has a very large choice of adding all sorts of overlays and additional “goodies” to the main E290 model.
Meander RIO-2 has a useful function for working with conventional single-gang switches.
To do this, this relay must be switched to mode No. 2 and connect your own light switch to each of the inputs Y, Y1 and Y2 (3 pieces in total).
As a result, you will get the mode of operation of cross switches based on ordinary one-key switches. When you press any of them (on or off), the output will change and the contacts on the relay itself will switch, turning on or off the light bulb.


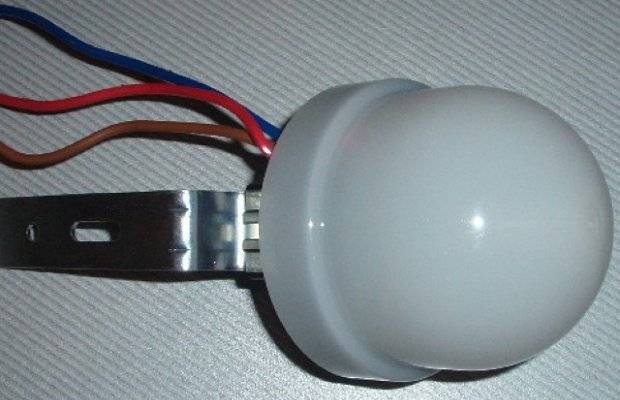
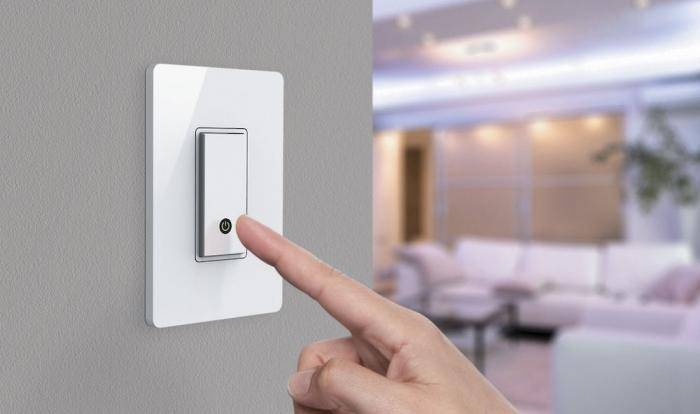
Connecting a backlit three-pin button: diagram
In order to supply and disconnect voltage to various devices, or to temporary and permanent electrical circuits, you can install a conventional three-pin button, which in turn will serve as an additional indicator.
The button consists of:
- Plastic case with transparent button;
- Three metal contacts;
- Neon or diode illumination with a resistor.
These devices have a sealed housing, but the contacts for connecting conductors are located outside. Therefore, before connecting the button, it is necessary to consider the place of its installation.
The buttons are installed in various devices, regardless of the case material, the main thing is that the contacts do not touch the metal parts of the cases.
After the installation site is selected and prepared, you can proceed to connect the device. First of all, it is necessary to tin the contacts and solder three wires.
Then, one of the contacts coming from the network is connected directly to the button itself.For convenience, you can mark them from left to right, from position (off) to position (on). Having connected the wire to the left contact, we connect the remaining two wires.
The second network wire must be bifurcated and one of the wires connected to the button, and the second to the device. The middle contact of the button is connected to the second contact of the device. Ready!
What functions does the street lighting relay have?
Today you can find many models of light relays. They differ by country, manufacturer, functions, and design. For example, the sensor can be located in a housing (for outdoor use) or be remote, in which case it is mainly installed indoors. Depending on whether the device is used inside the building or intended for street lighting, it has a different outdoor design. So, the former are mounted in an electrical panel, and the latter are located in a reliable sealed housing and are designed for outdoor installation.
Light relay for street lighting
The simplest devices consist of a photocell with a relay and work, focusing on the degree of illumination. But over time, this design has been improved, and today light relays with a motion sensor are in greatest demand. Such devices work not only at night (you set the threshold yourself), but also react to movement. That is, with the onset of darkness, the light will turn on if there is some movement nearby. During the day, the device turns off completely.

Time relay
But devices that combine all three functions - a time counter, a motion sensor and a photocell - will allow you to combine settings.The most recent developments in this area can be considered a photo relay for street lighting with a programming function. In this case, any control program is installed. For example, the computer can adjust the settings depending on the season.
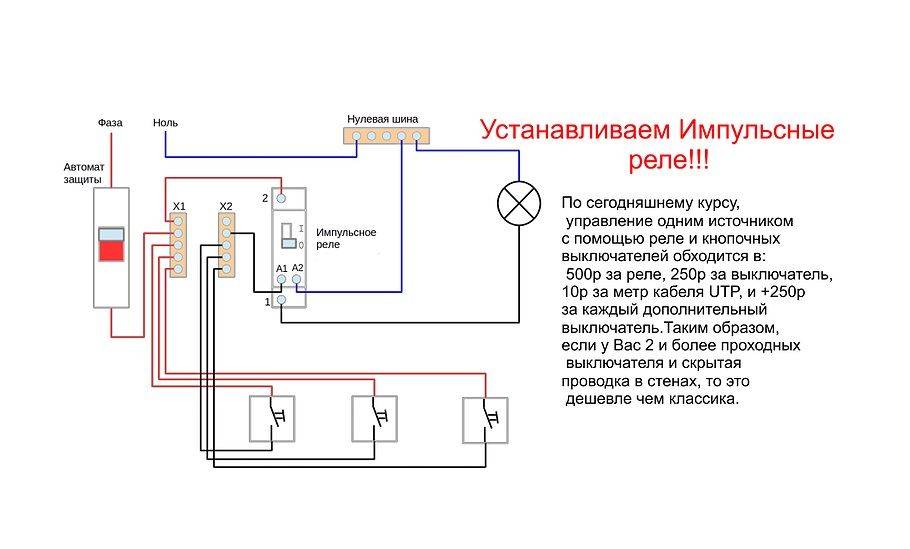
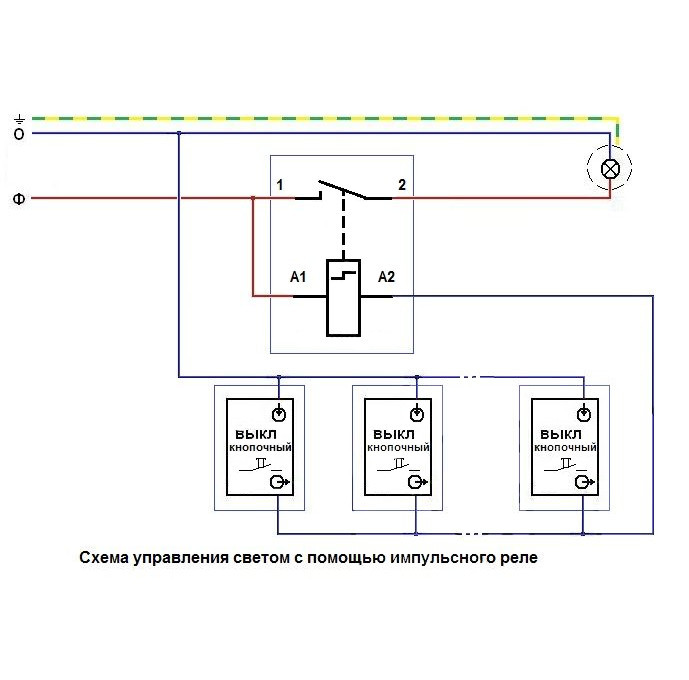
Centralized lighting control with one button
On models with the so-called central or centralized control, in addition to the above, there are also additional ON and OFF terminals.
When voltage is applied to them, the relay is forced to either turn off (OFF) or turn on (ON).
They are used when assembling a circuit with a master button or a master switch. That is, leaving the house, with just one button, you can centrally turn off the light on all floors and in all rooms.
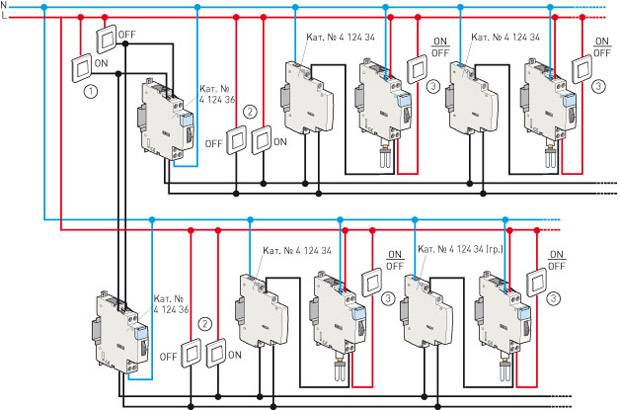
Here is such a circuit assembled for several group lamps connected from different impulse relays. Note that in this case all relays must be centrally controlled, otherwise the circuit will not work.
Scheme No. 2 - with central control
For ABB pulsers, the central control unit can be purchased separately and connected to the left side of the E290 relay.
Just be extremely careful when assembling such a control circuit in a three-phase 380V shield.
In the presence of a three-phase system, some lighting groups are powered from different phases in order to evenly distribute the load.
In this case, it is impossible to connect all the OFF and ON contacts on the relays with jumpers, as is often done in single-phase shields. You will have to transfer all control circuits to a separate machine and it is from it that the phase of the same name is supplied to turn on and off all impulse relays at the same time.


And then, this is possible when using el.mechanical models.For electronic ones, you will have to do the decoupling through intermediate relays.
How to connect an impulse relay
To properly connect an impulse relay, you need to understand what contacts it has and what they are responsible for.
As a rule, this is:
two contacts per power coil A1-A2
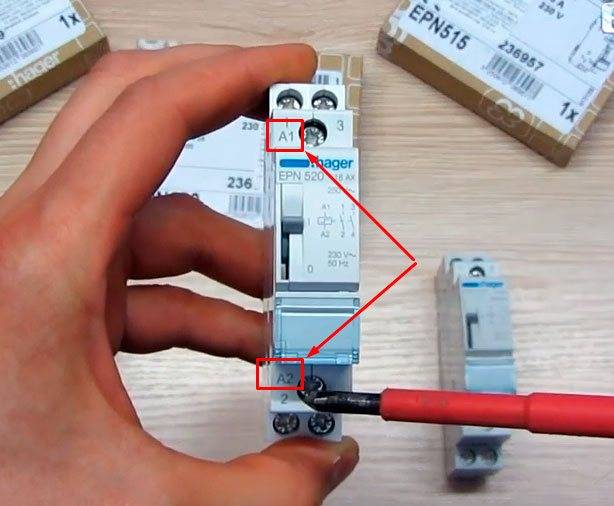
On one of them, phase or zero comes constantly, and on the other, just the same impulse is given after pressing the button.
power contacts 1-2, 3-4, etc.
Passing through them, the current flows to the lamp.
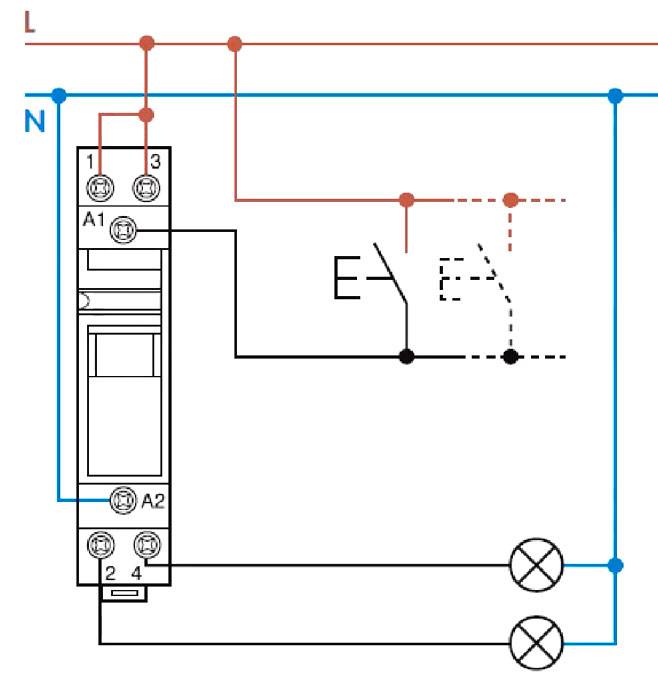
Here is the simplest scheme for connecting one impulse relay per group of pushbutton switches.

Scheme No. 1 Please note that in the impulse relay, the load does not pass through the button at all. By pressing it, you just give an impulse to the coil, which closes the power contact
In some models, a control pulse can be applied both through the phase conductor and through the zero one.
Imagine that a significant and extensive part of the electrical wiring in your house will not even be constantly energized, as is the case with ordinary light switches. How much it will increase fire and electrical safety!
Some varieties have several contacts at once. From them, you can connect two, three or more lighting groups.
The passage of the entire load through the relay means that burning or burning out of contacts on the buttons is practically impossible. Many, rejoicing at this circumstance, boldly underestimate the cross section of lighting lines to 0.5mm2 or 0.75mm2. Or even “throw” a twisted pair.
However, do not forget about the rules, which clearly state that all group lines to lamps in residential premises must be carried out with conductors with a cross section of at least 1.5 mm2.
At the same time, please note that all relays (group or single) must be connected after the machine
It protects:
coil
control cable
the lamp itself
Without it, in the event of a short circuit, your electrical wiring will simply burn out.


The relay itself does not protect against overloads or short circuits.
Therefore, when assembling a circuit in a panel, you seem to “hang” one or more impulse relays on each lighting machine.
Varieties of impulse relays
There are big differences between some relays, so they can be divided mainly into 2 categories:
- electromechanical relays;
- electronic impulse relays.
Electromechanical
This type of device consumes electricity only at the time of operation. The locking mechanism ensures high reliability and saves electricity. The system works well: it means protection against fluctuations in the network, which lead to false positives.
The design is based on: a coil, contacts, a mechanism with buttons for turning on and off.
Relays of the electromechanical type are considered more reliable and convenient to use, as they are not afraid of interference. Plus, there are no high requirements for the installation site.
Electronic
Electronic impulse relays have a characteristic feature: they use microcontrollers. Thanks to this, they have extended functionality. For example, such devices allow you to add a timer. Other additional features help in building complex lighting systems.
At the heart of the design: an electromagnetic coil, microcontrollers, semiconductor switches.
Electronic relays are more popular than other types due to the functionality and variety that can be added to them: you can create products for lighting of any complexity. It is also possible to select them for any voltage - 12 volts, 24, 130, 220. Depending on the installation, such relays can be DIN-standard (for electrical panels) and conventional (with other mounting methods).
Main technical characteristics
Relays can be classified according to the following parameters, depending on the purpose and scope:
- the return coefficient is the ratio of the armature output current to the pull-in current;
- output current is the maximum value of the current in the coil when the armature exits;
- retraction current - the minimum value of the current in the coil when the armature returns to its original position;
- setting - the value of operation within the limits specified in the relay;
- trigger value - the input signal to which the device responds automatically;
- nominal values are voltage, current and other quantities that underlie the operation of the relay.
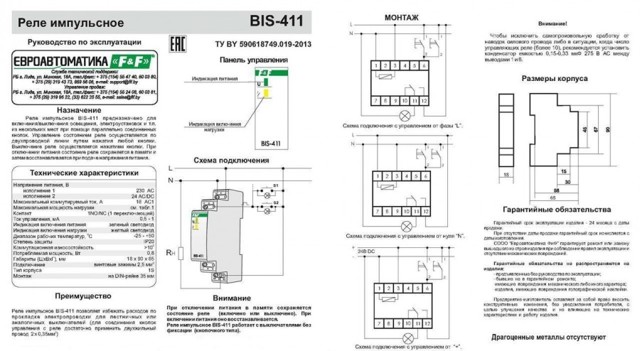
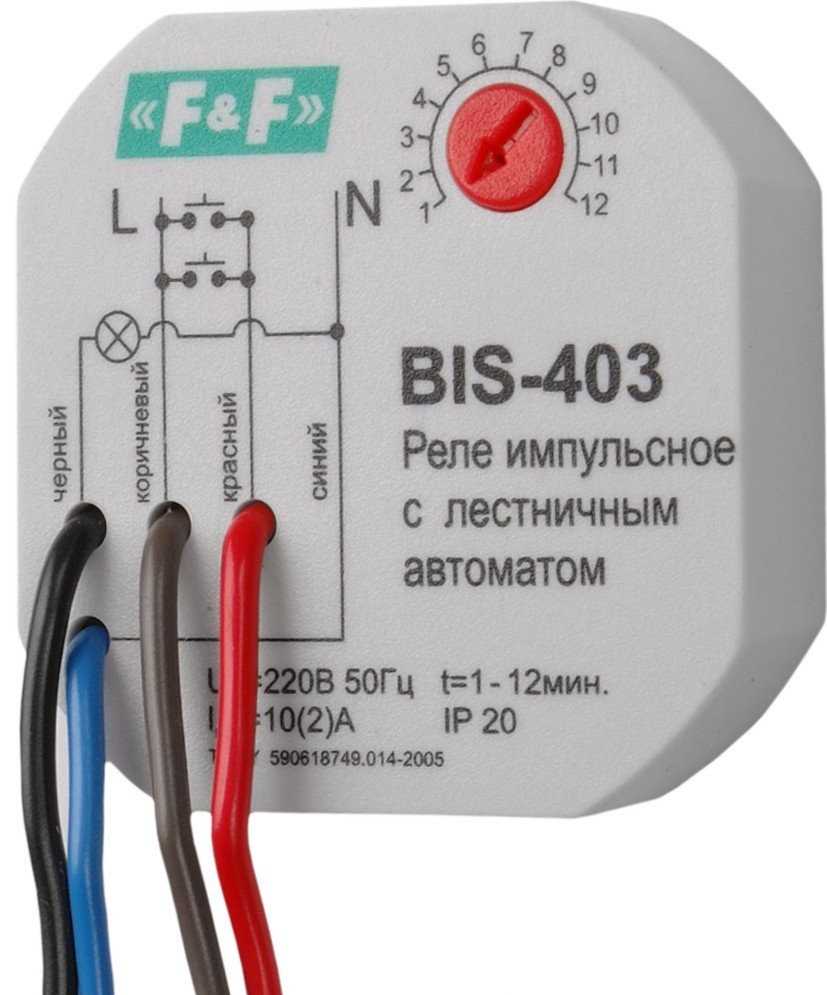
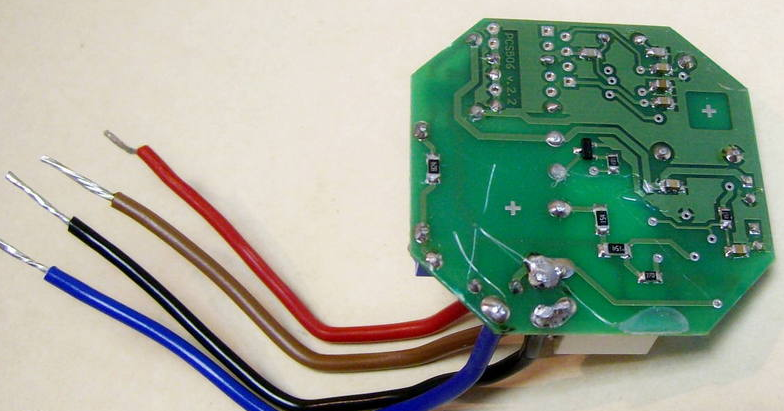
Impulse relay and its device
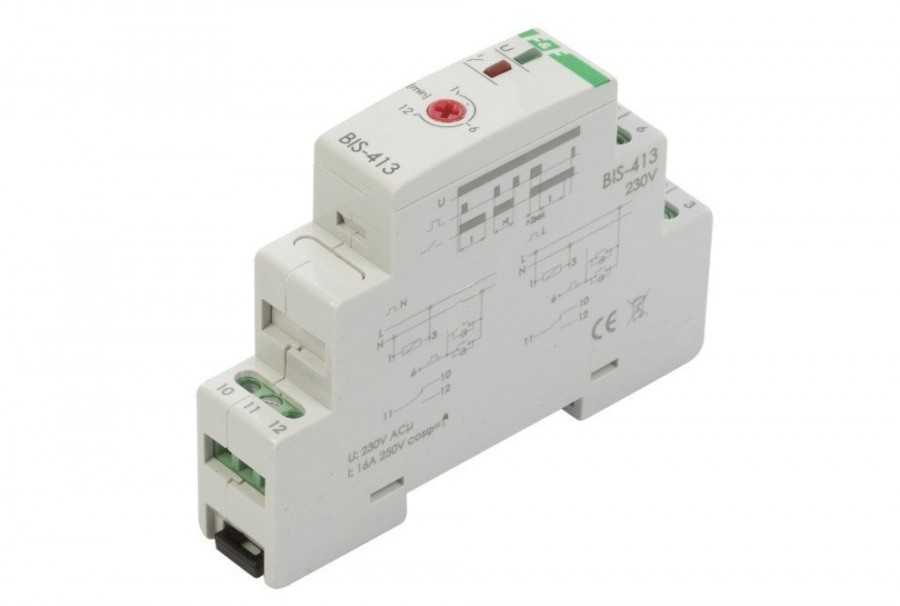
In order for you to understand in detail and understand the device of an impulse relay, we decided to consider its operation on an impulse relay with a BIS-403 ladder automat. The body of this device is considered to be of high quality, but it is assembled without a single bolt. All parts that are installed in it are connected using thermal adhesive. On the box provided by the manufacturer, you can see that this device must be installed in a mounting box.
This impulse relay primarily consists of the ST 78522 controller. It also has a 5 volt voltage regulator. Also in its design you can find rectifiers and diodes.
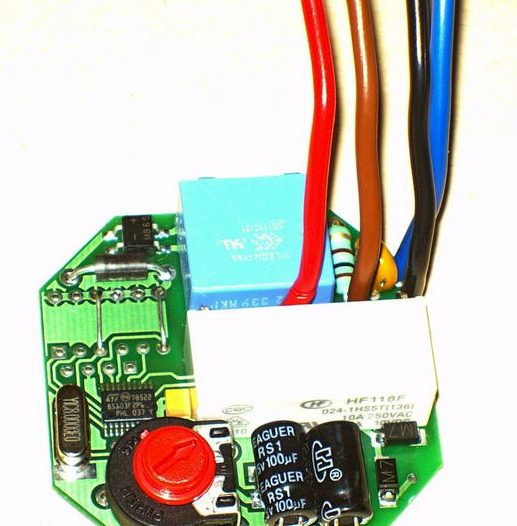
This device should control the passage of current through a conventional relay. Thanks to the contacts that are installed in this relay, it is possible to determine the switching power. This device is capable of withstanding a load of 2 amperes. If your load is more than 0.5 kW, then you will need to install an additional contactor. For better protection, you will need install a circuit breaker.
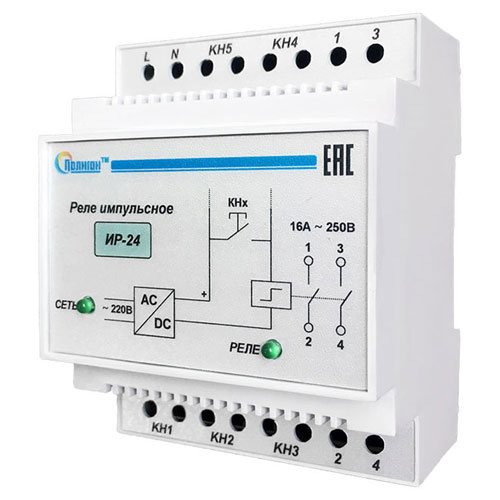
Pulse relay connection diagram
The switch for lighting control by impulse relays must be with an open and non-latching contact. Such a switch has an opening spring of the contact group. This switch only works when the key is pressed. The first press turns on the polarized relay, and the next press turns it off.
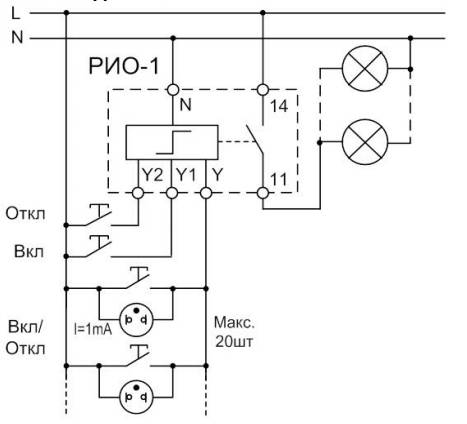
Wiring diagram for one impulse relay RIO - 1
When you enter a long corridor, one press turns on the lights, and when you exit, pressing another switch, the lights turn off. The number of such switches of one device can be up to 20, depending on the manufacturer. There are such types of relays as: electromagnetic, the principle of operation of which is based on switching the contact group with an electromagnet and electronic devices in operation are similar to electromagnetic
Timers can be built into the relay, which turn on the lighting at a predetermined time. The connection diagram of the impulse relay has four types of switching. One output is intended for the phase of the supply voltage, the second one is connected to the working zero, the output for connecting buttons and switching the phase through contacts for connecting lighting.
Scheme of central connection of two impulse relays RIO - 1
The neutral wire to the lighting lamps is supplied separately.The number of switches connected to the device is not more than indicated in the passport, with a larger number of switches, false operation is possible. The device includes an electronic control unit for a polarized relay with an electromagnetic coil. The relay supply voltage can be from the mains, DC 12 V or AC 24 V.


The RIO-1 bipolar relay circuit has Y contacts that alternate between turning on and off the lighting, the Y1 input only turns on the lighting, and Y2 turns off the lamps. Terminal N is designed to connect zero, and a group of normally open contacts 11 - 14 switches the load.
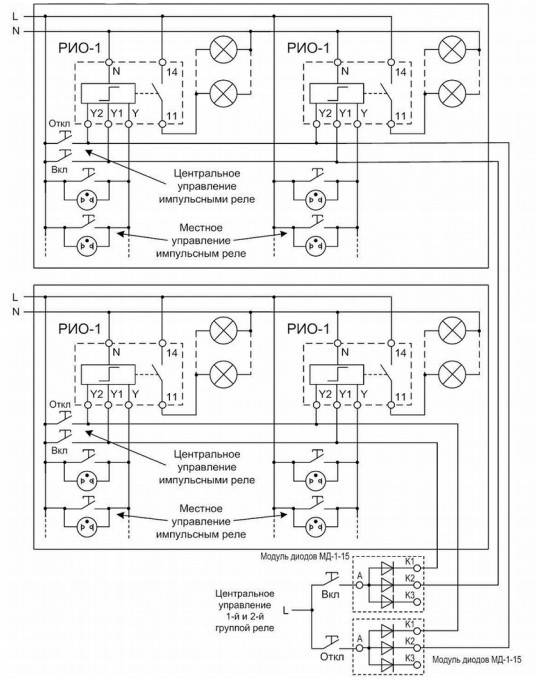
Scheme of central control of two groups of impulse relays RIO - 1
The bipolar device does not have current protection, so install it along with the circuit breaker. With a heavy load of lighting, the lamps are connected through a magnetic starter. Pulse relays are afraid of vibration, so they are not installed next to electromagnetic starters. The load is connected via pins 11-14. Pressing the Y switch turns on the light, and pressing it again turns it off.
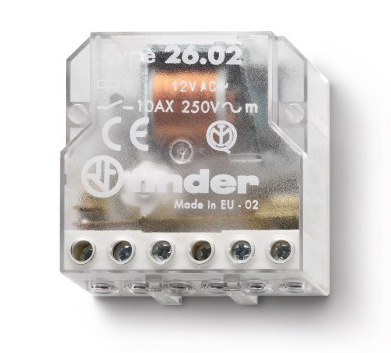
Varieties
Today, such a device is presented on the market under various trademarks. The most popular are the following:
- ABB,
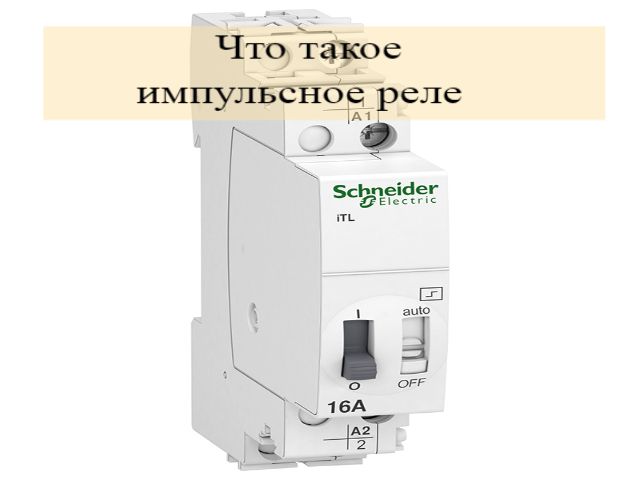
- Schneider Electric,
- legrand,
- IEK,
- Finder and others.
They all work on the same principle of driving a coil, which is affected by a short voltage pulse. The operating cycle includes an impulse action, during which the device turns on and off. The principle of cyclic control is used in all relay models.
It is used in models of various types:
- electromagnetic;
- induction;
- magnetoelectric;
- electrodynamic.
In automation systems, electromagnetic modifications are most often used due to their reliability, based on the principle of the action of electromagnetic force in the ferromagnetic core of such a device when current is applied to the coil. The contacts are switched on by a frame, which in a certain position attracts to the magnetic core, and in the second position is retracted by a spring.
Pulse relay - pros and cons
Positive and negative features differ depending on the type of inductive relay. From the above it follows that the relays are divided into two types: electromechanical and electronic.
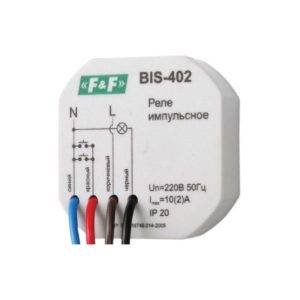 Pulse relay BIS-402
Electromechanical relays have the following advantages. They are very reliable in use, and also have excellent tolerance to high mains voltages.
The disadvantages of such models can be: lack of indication of the location of the contacts; performing the same function.
The advantages of electronic relays are:
- their safe use;
- great opportunities to control electrical circuits;
- the design includes indicator LEDs;
- good performance in the field of regulation of lighting fixtures;
- accessories can be added to the device.
A significant advantage of the electronic type of relay is the ability to perform several functions.
The disadvantages of such a relay can be: response to high impulses; susceptibility to the magnitude of the voltage; Interference in the mains can cause false trips of the relay.
Compared with electronic types, electromechanical relays are very popular among consumers due to their reliability and ease of use. The operation of an electronic device requires an additional power source, and phase and zero must always be present. In addition, they have reduced immunity to interference.
At the same time, the installation of an impulse relay is an inexpensive process, since no power cable is required for its installation. In this case, a lot of effort and financial investments will not be expended.
Tips & Tricks
Before purchasing and installing an impulse relay, it would be useful to familiarize yourself with the most common mistakes that may occur at this stage. Experienced craftsmen who install this type of switching systems are often advised to adhere to the following recommendations:
- If an electronic pulse type relay is purchased, then it is better to give preference to models equipped with a timer. Thanks to this function, you can set the automatic power off after a certain period of time. Such a function will be very useful for organizing lighting on the street, as well as in rooms that are visited often, but not for long.
- If you plan to install switches (buttons) with backlight, then you should check with the seller in advance that the relay can work with such elements of electrical fittings. Many IRs are very sensitive to the appearance of even a small current in the electrical circuit, and the presence of a resistive element will activate the system. In addition, the device may deteriorate, because the coil will be constantly energized.
- During installation work, all parts through which electric current flows must be well insulated. For this purpose, you can use special heat-shrink tubing, as well as PVC electrical tape.
- If there is a small child in the house, then it is better to install buttons to activate the relay higher. Such products are well insulated and practically safe during operation, but children often start playing with the buttons for a long time keeping them on. Such actions often lead to failure of pulse relays of the electromechanical type.
- Most models of impulse relays with a coil are designed for 220 V. Such products are very easy to connect to the electrical network, but if you need to ensure a high level of safety in wet rooms, then you should choose models for 12 or 24 Volts.
- If it is necessary to install several impulse relays that will be used to turn off various lighting devices, then models with central control should be selected. Such a device can be forcibly turned off by applying an electric current to one of its contacts. Therefore, if you connect several of these elements to one switch, then you can turn off all the lights in the house at the touch of a button.
- If there is no desire or opportunity to purchase new buttons to turn on the light using a pulse relay, then ordinary switches can be redone. For this purpose, it is necessary to install small springs under the keys so that after the pressing stops, they return to their original position.
- When installing a large number of pulse switches, to save space, the buttons can be placed in one socket.
The impulse relay is a very interesting product in its design and functionality, which can and should be used to organize more comfortable control of lighting fixtures. If a quality device is selected, and the installation of the product is carried out without errors, then such a system will last for many years.
Conclusions and useful video on the topic
The video material tells about the device, operation, application and history of the creation of this type of device:


The following plot details the principle of operation of solid state or electronic relays:
The use of impulse relays is increasingly used in modern electrification systems. Increasing demands on the functionality and flexibility of lighting control, material savings and safety create a continuous impetus for the improvement of contactors.
They are reduced in size, simplified structurally, increasing reliability. And the use of fundamentally new technologies at the heart of the work allows them to be used in harsh conditions of dusty industries, vibration, magnetic fields and humidity.
Please write comments in the box below. Ask questions, share useful information on the topic of the article, which will be useful to site visitors. Tell us about how the impulse switch was selected and installed.


