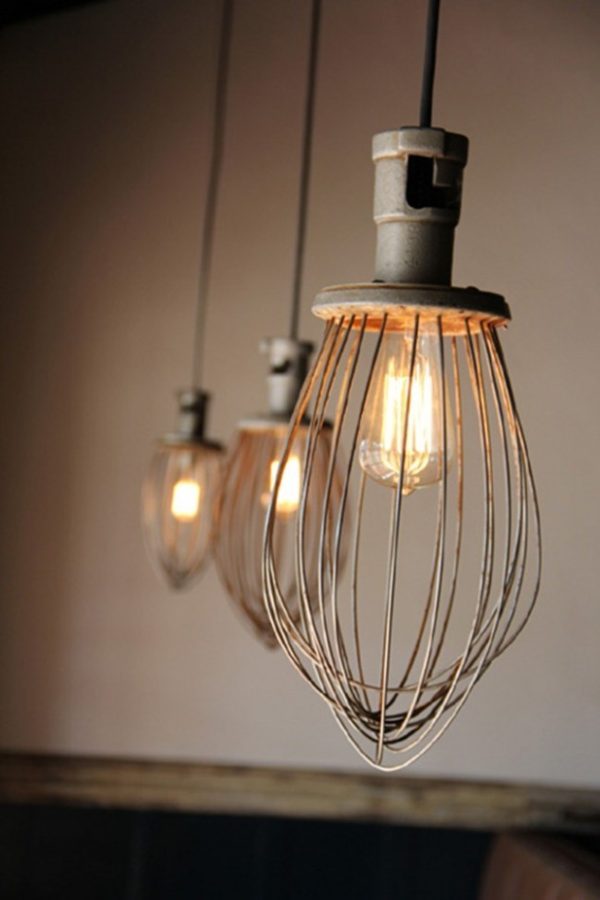
- From kitchen utensils
- Fabric lampshade decoration
- Lampshade in Provencal style
- Lampshade with fabric flowers
- Do-it-yourself lampshade from scraps
- Lampshade made of unusual materials
- The choice of material for a homemade chandelier
- Driftwood lamp
- The main elements of the living room
- Curtains
- Cushioned furniture
- indoor flowers
- wall decor
- Unusual decor elements
- Choosing a lamp for a homemade chandelier
- Chandeliers from kitchen utensils and cutlery
- Lamps from dishes
- Cutlery chandeliers
- How to make a paper lampshade with your own hands
- Origami paper lampshade
- What do you need to work
- Detailed instructions for making a lampshade using the origami technique
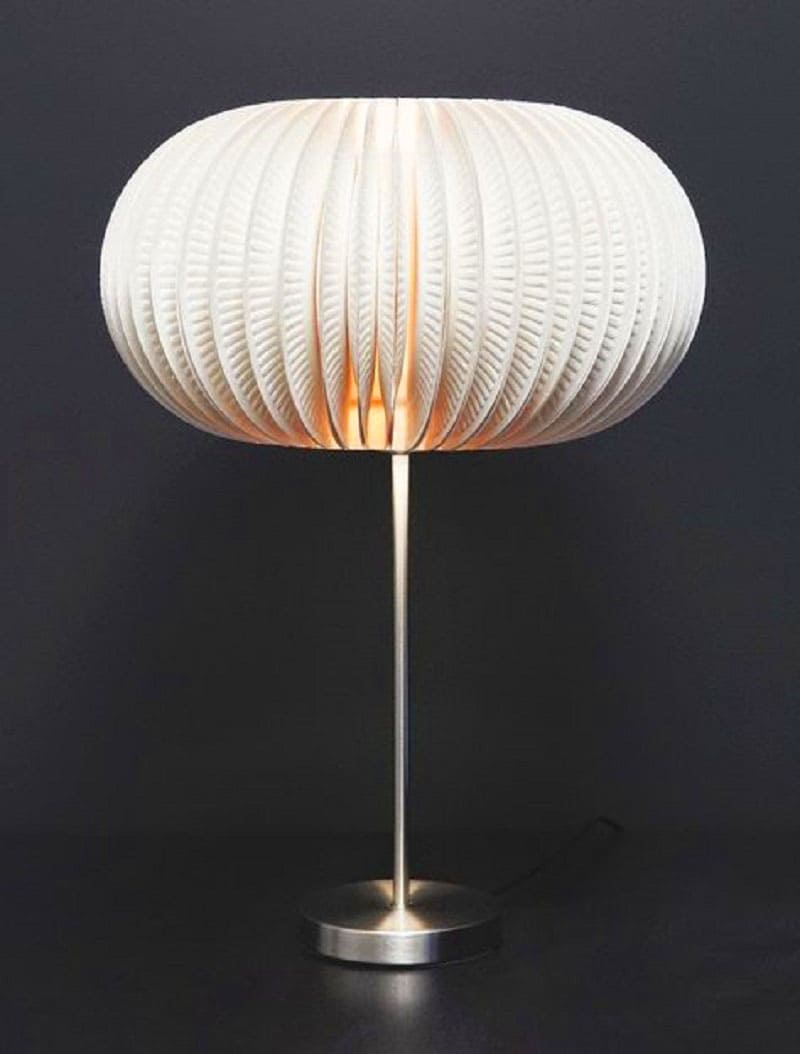
- Lampshade from disposable paper plates
- What do you need to work
- Manufacturing instructions
- Advantages
- Textile
- Painting monetization
- Precious Bookmarks
- From threads
- colored paper
- Plafond of threads
- Color solutions
- Plafond of threads
- Tree-paintings and more
- DIY lamp
- Chandelier from discs
- Minimalist lampshade
- From threads
- How to make a frameless lampshade from threads
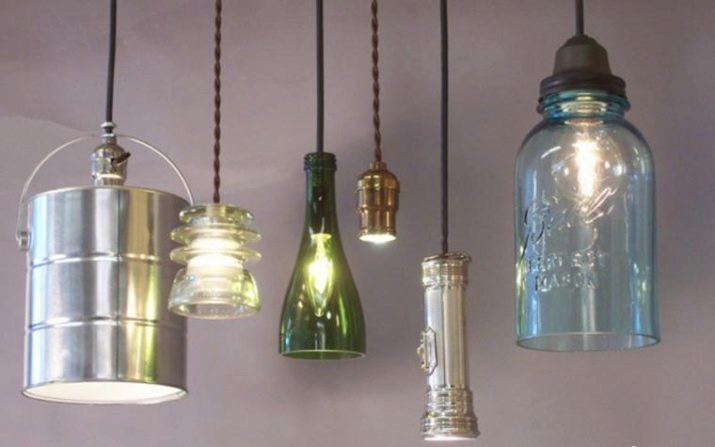
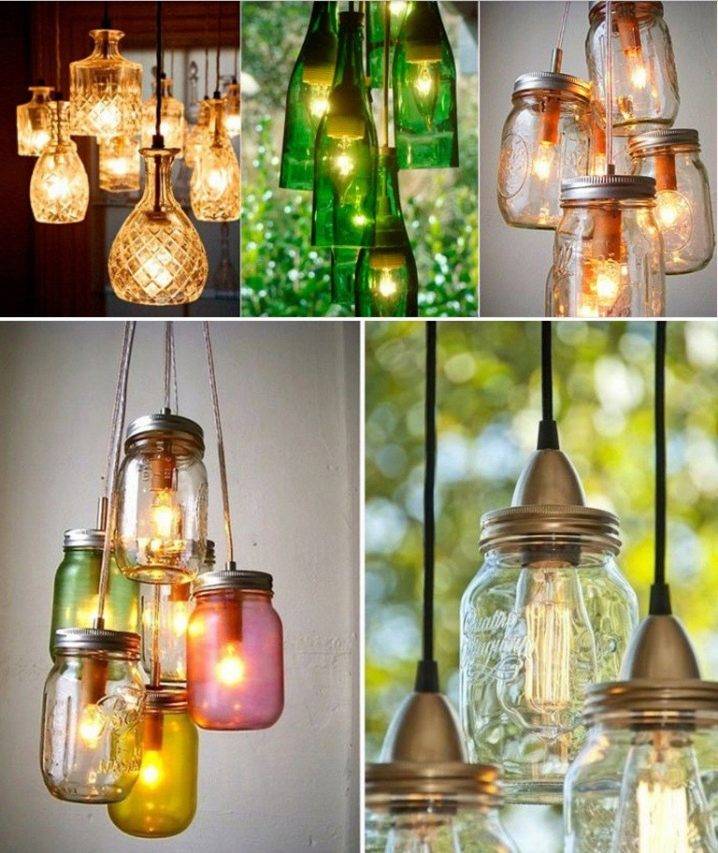
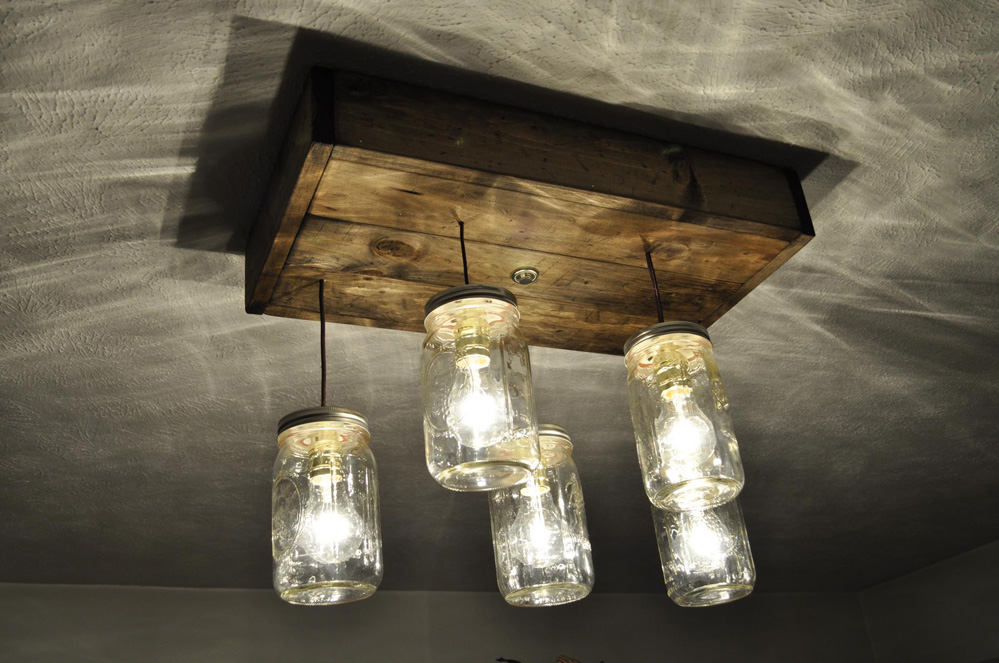
- From glass jars
From kitchen utensils
Ordinary objects, without which the kitchen space is not imagined, can also help in creating unusual lamps.
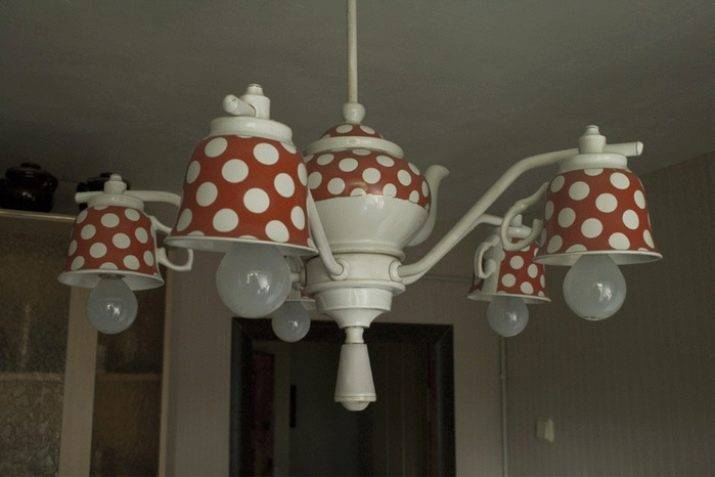
Tea cups. An old outdated service can turn an ordinary chandelier frame into a masterpiece.The teapot is located in the center of the chandelier itself, and the cups and saucers are at the edges. Depending on the design of the frame, the cups can be placed bottom up or down.
Small lamps made of cups suspended at different heights will look very stylish.
Spoons and forks. To create an unusual ceiling, you will need plastic spoons. Their handle is cut off. The resulting parts in a checkerboard pattern are pasted over a plastic bottle with a capacity of 5 liters. This chandelier looks like a big cone. If desired, it can be painted.
7photos
If you do not cut off the handles of the spoons, but direct them to the outside of the lampshade, then such a chandelier will look like a needle-shaped aster.
The easiest way to create an unusual chandelier is to paste over an old lampshade with them. White and silver spoons will look very impressive.
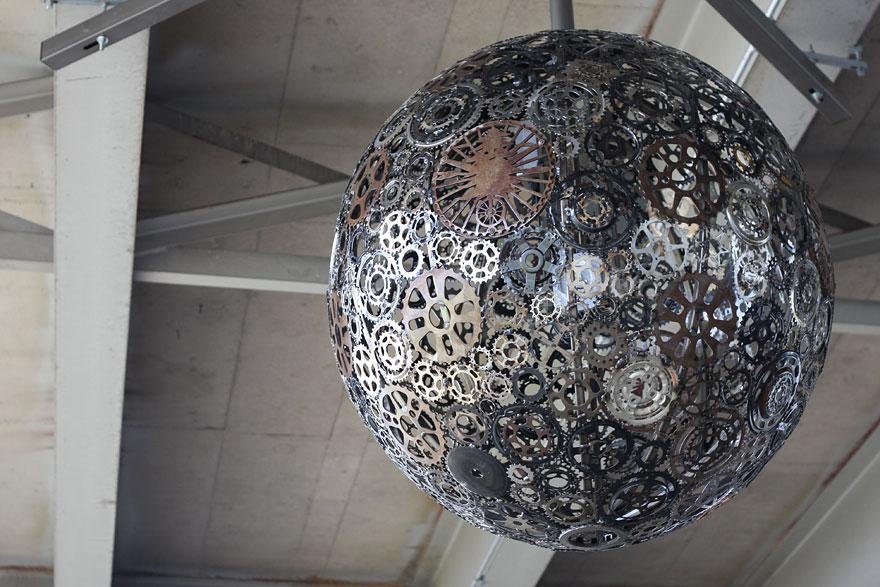
Another option for creating a chandelier plastic forks and spoons - form a ball out of them. Looks futuristic.
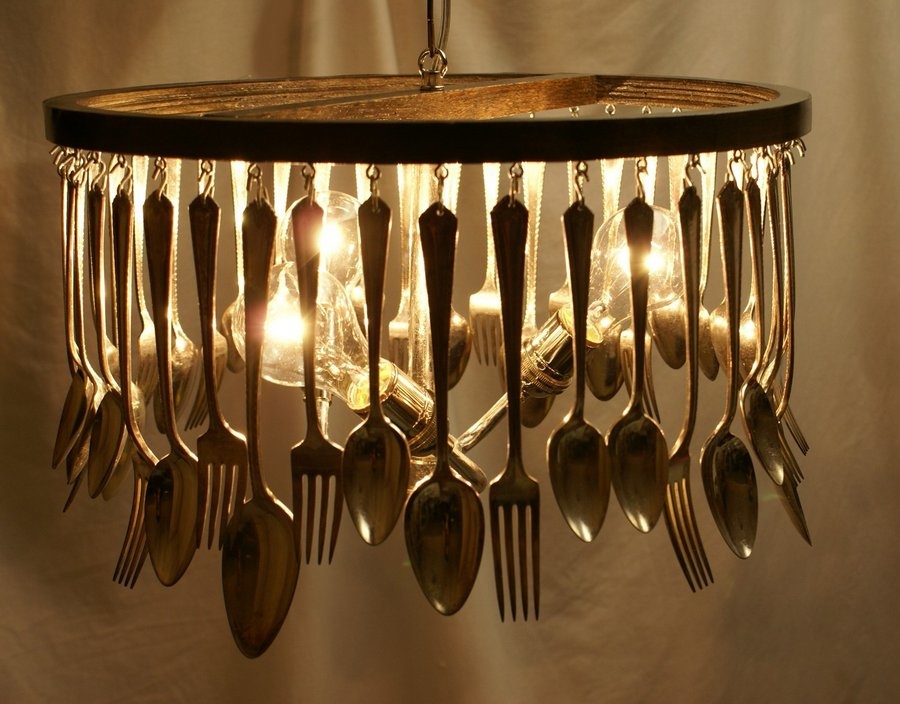
If iron spoons are placed on a round frame, you get a spectacular chandelier with several tiers in the spirit of the Middle Ages. You can add a row of tea cups by hanging them on the handles.
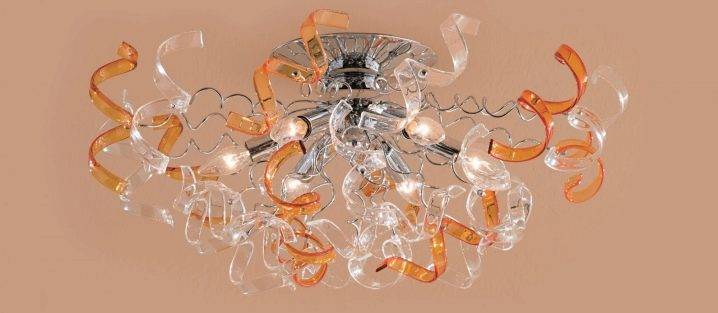
A chandelier with forks alternating with chains, large glass pendants and beads looks in the same style.
8 photos
When making a chandelier with your own hands, you not only create a unique thing, but also put a piece of your soul into it. The joy of creativity is an incomparable feeling. Such a piece of furniture will radiate warmth in every sense of the word.
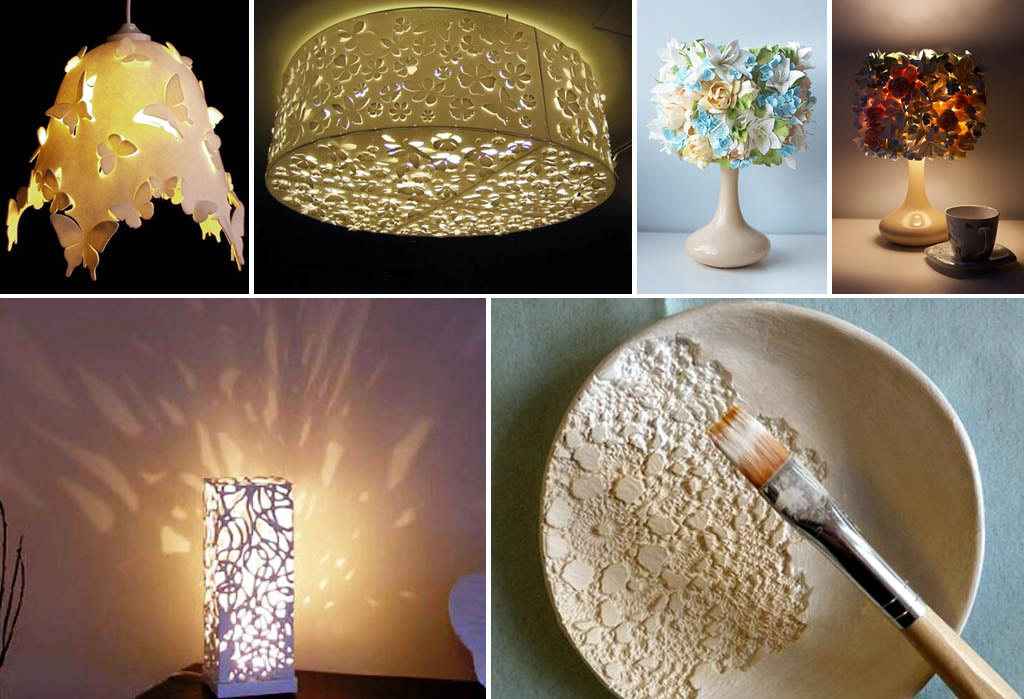
Fabric lampshade decoration
A table lamp with a lampshade looks much nicer than just an ordinary bare lamp. But if a solid color is chosen for the lampshade, then you can decorate it in an original way.Here are some ideas on how to make an interesting fabric lampshade decoration.
Lampshade in Provencal style
In order to decorate a plain lampshade, you will need a piece of fabric and a fringe. Usually, green, turquoise and pastel shades of colors are used for the Provence style, checkered colors or floral patterns are also suitable.
First you need to choose a suitable fabric for a plain lampshade and cut out two strips from it - one to decorate the top of the lampshade. This strip of fabric should be long enough to completely wrap around the circle and make a bow. The second strip should have the circumference of the bottom of the lampshade, and a fringe must be sewn to it. You can do this on a sewing machine.
All free edges of the fabric must be processed so that it does not crumble. After that, using glue or thread with a needle, you need to attach the fringed ribbon to the base of the lampshade so that the fringe hangs down.
Then you need to decorate the top of the lampshade. To do this, you need to glue or also sew the ribbon along the circumference, and tie the free edges with a bow.
Lace can also be used for a Provencal-style lampshade. This element is good because it can be simply glued to the fabric.
You can make lace flowers, stripes, or completely glue the fabric lampshade with lace napkins.
Lampshade with fabric flowers
Another unusual idea that will allow a table lamp with a lampshade to look like a flower bed is decorating with fabric flowers.
Fabric of delicate shades is perfect for flowers, you can use, for example, organza or chiffon, or you can simply take, for example, an old sweater, cut strips and twist roses out of them.
The lampshade can be decorated with just a few flowers, but if you have time and patience, you can make a whole bunch of flowers to completely cover the lampshade.
Do-it-yourself lampshade from scraps
If there are many pieces of different fabrics at home, you can make a lampshade from multi-colored shreds.
For to do such a lampshade, it is necessary to use the technique of sewing pieces to the fabric base. The easiest way is to cut a piece of fabric to the size of the frame and divide it into several wedges.
Then you need to sew patches to each wedge the way you like - you can sew strips of fabric diagonally, or make small squares. So that the process does not drag out, it is better to use a sewing machine.
After that, all the wedges with patches will need to be sewn together and glued to the base of the lampshade.
Such a lamp can perfectly fit into the country style!
Lampshade made of unusual materials
When the lampshade is made independently, you can give free rein to your imagination and experiment. To make an original thing, you must first find an unusual material.
It is very interesting, for example, in the kitchen, a lampshade made of burlap can look. This fabric transmits light well. Such a lampshade can be decorated with some wooden details, for example, clothespins or wooden beads and buttons.
You can also use grandmother's old lace napkins to decorate. Also on such a lampshade you can write something with white or black paint, as they usually write on bags.
For a teenager's room, you can sew an American-style lampshade. This will require denim. And you don’t have to buy it, you can just cut old jeans - every person will surely have such a thing.
Such a lampshade can be decorated, for example, with a denim pocket, where you can insert an artificial flower or a piece of a checkered handkerchief. Also for such a lampshade, you can use the application. For this, pieces of leather are suitable.
For example, for a lamp that will stand in a girl's room or bedroom, you can sew a delicate mesh lampshade. This fabric can be found in any sewing store.
It will be interesting to look at the lampshade, which is made of several layers of mesh - it will resemble a ballerina's tutu or a fluffy skirt.
The following two tabs change content below.
Magazine founder, blogger, coach. We invite authors, designers and shops to cooperate.
The choice of material for a homemade chandelier
In order to make a handmade lamp, a variety of materials are used:
- glass;
- wood;
- plastic.

In addition, sometimes, to make a chandelier at home, they use very unusual things:
- paper;
- cardboard;
- disks;
- straw;
- branches;
- wine bottles and more.

When choosing this or that material, it is necessary to take into account your own preferences and the style used in the design of the room.

In addition to the material, the devices may differ in manufacturing techniques. The most common are:
- Japanese origami;
- macrame;
- weaving;
- thread;
- knitting;
- application;
- embossing.

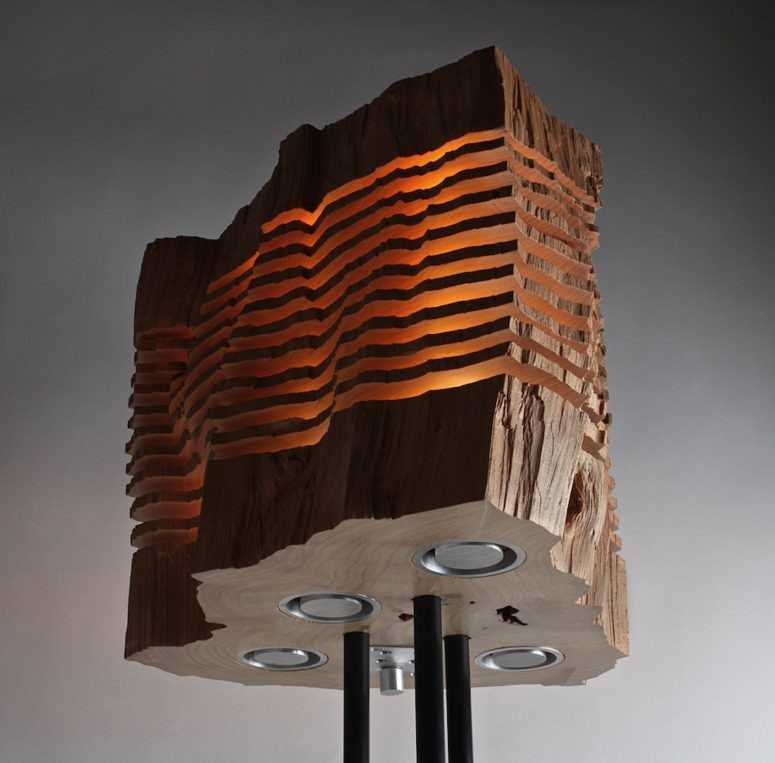
Driftwood lamp
This creative idea will not require much effort and expense to implement - use the snags found in the forest under your feet. They are exclusive in themselves: each branch bend is unique. All you need to do is find a suitable specimen, clean it of bark and excess wood, then dry it thoroughly. For drying, a ventilated place away from direct sunlight is suitable.


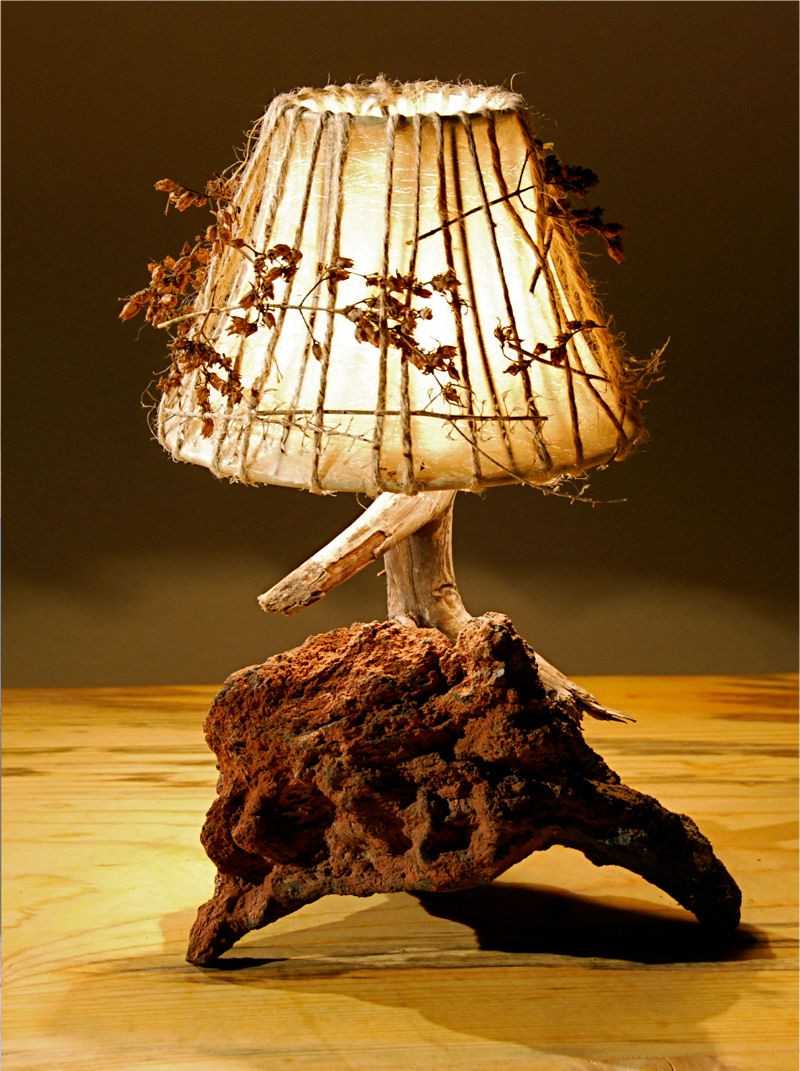
After complete drying, it is necessary to sand the snag well with sandpaper. Determine the side that will be attached to the ceiling. With a blade, make grooves on it into which you will lay the wires. At the end of work with wires, the holes must be carefully puttied, and then stained with putty in the color of the tree.

Cartridges are attached to the ends of the driftwood, you can think of various ways to attach them. At the end, treat the wood with varnish. It is necessary to put several layers with drying each. Choose acrylic or waterproof varnish.

The main elements of the living room
A kind of quintessential interior design is the living room. If the kitchen is the heart, then the living room is the “face” of the house, its front part.

Living room wall decoration with natural stone
Curtains
Curtains give the room a finished look. Refine windows. They can be different in texture, design, color. It all depends on the style of the living room. If this is a classic style, then the curtains should be made of heavy dense fabrics. Velvet, brocade. If this is a Provence style, then chintz, silk-satin curtains will do. High-tech style, loft may not require the use of curtains at all.

Curtains made of beads look much more original than an ordinary door, and making them is very simple, you just need to purchase a lot of beads or beads
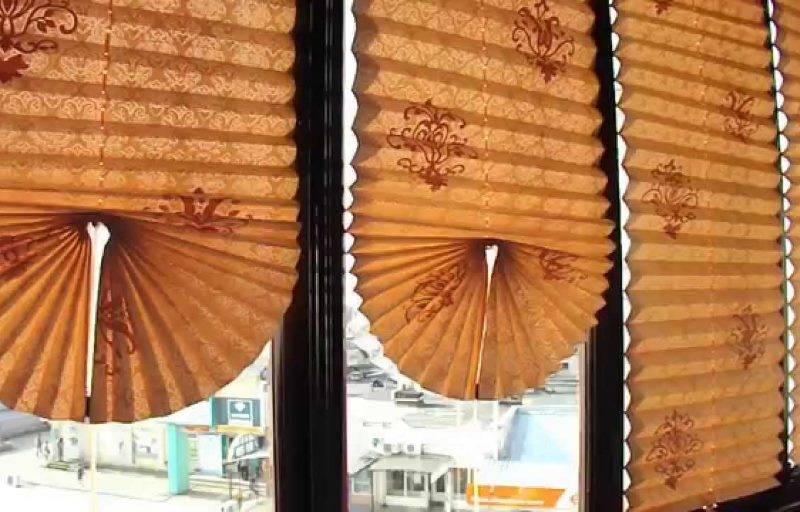
Homemade blinds from paper wallpaper
Cushioned furniture
Sofas, poufs, armchairs - they should be comfortable, functional and in shape correspond to the style of the interior.

You can buy the original set of furniture

The child will like the sofa of the original form
indoor flowers
Dracaena, date palm.Even one such plant of medium size in the original tub will be a bright accent in the interior. With their help, you can divide the room into zones. Emphasize the advantages of the living room and mask the flaws.
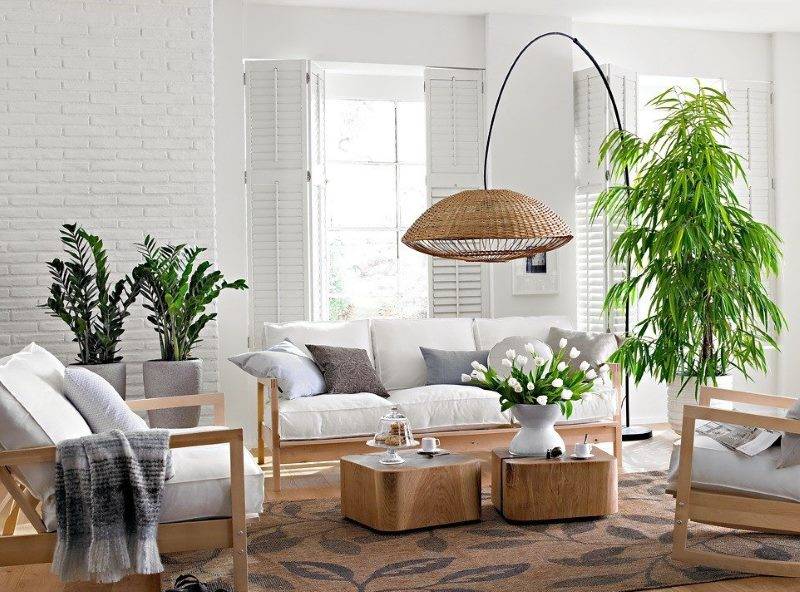
The larger the room, the larger plants you can decorate it with.
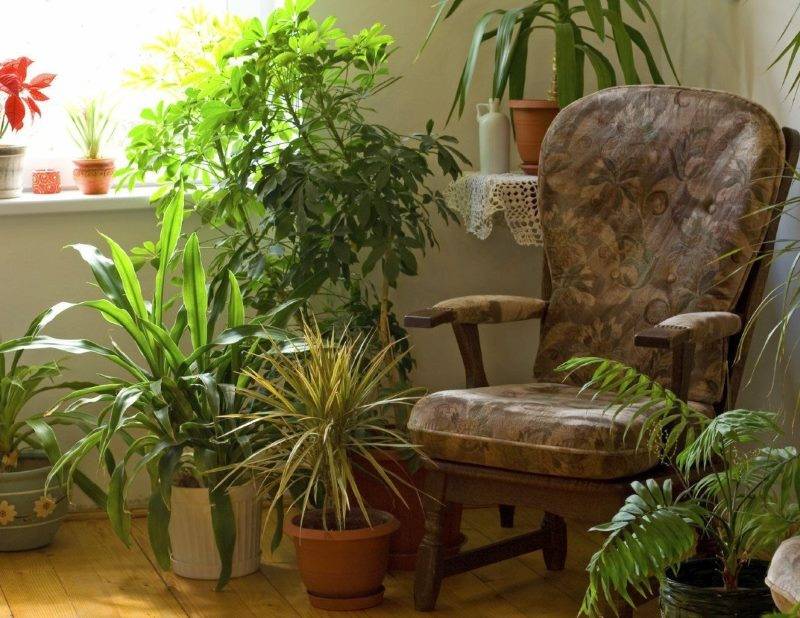
Indoor plants should be selected especially carefully if allergy sufferers live in the house.
wall decor
Mandatory attribute of the living room. Now eclecticism is in fashion, so completely different beautifully designed paintings will do. It can also be mirrors, photographs, posters, decorative plates, panels, watches.
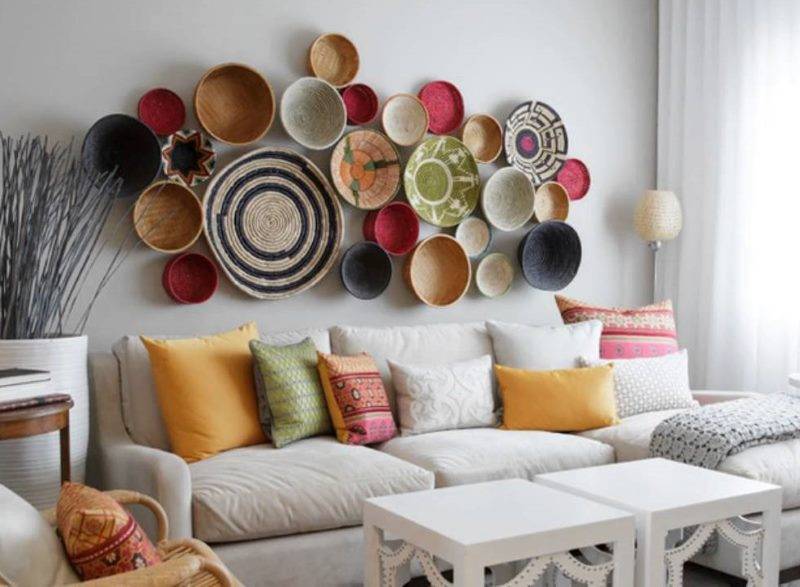
Wall decoration with colorful plates

Pictures can not just be hung on studs, but fixed with hangers with clips.

Original clock made of cardboard and river pebbles
Unusual decor elements
Aquarium, grandfather clock, figurines.
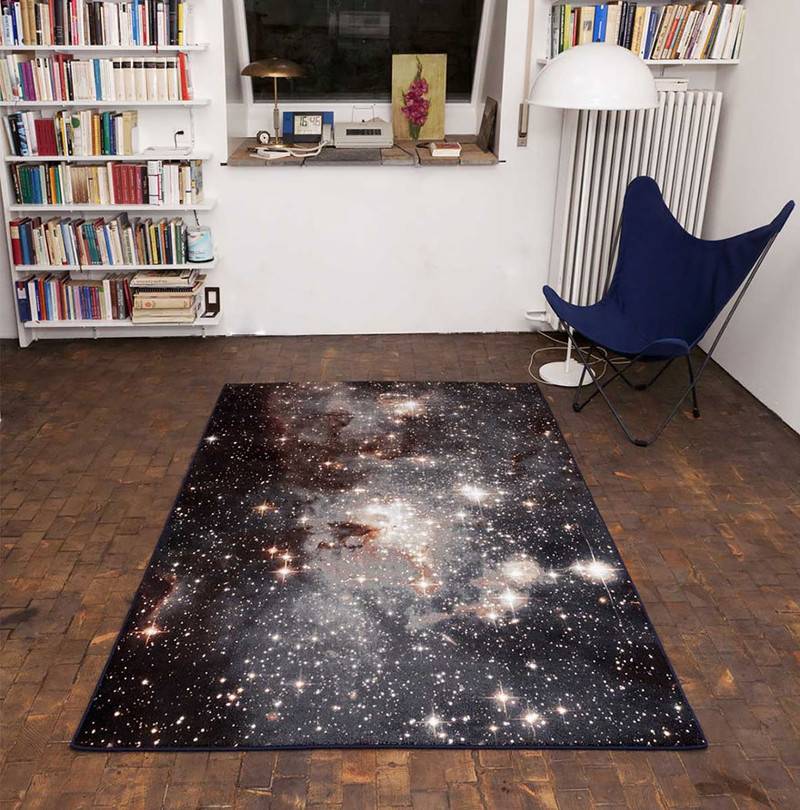
Space rug depicting star galaxies

An unusual map of the world made of twine stretched between decorative carnations
Choosing a lamp for a homemade chandelier
To make the chandelier made from scrap materials made by you look even more attractive, you need to choose the right light bulbs for it. The following recommendations will help you:
Choose a lamp of suitable power. Remember that overly powerful products can cause a fire.
Look at the number of lumens. The larger it is, the more natural the lighting.
Consider matching the shape of the light bulb to your appliance. For some models of chandeliers, light bulbs of a strictly defined shape are required. Only then will they work efficiently and correctly reflect the light rays.
Be sure to check the expiration date.If you plan to use the lamp often, then look at the lamps with the longest lifespan.
Take an interest in what kind of light the lamp will glow - cold or warm. For the home, it is better to purchase an option with a warm shade of light.
So the situation will seem more comfortable.
Do not ignore the energy consumption of the light bulb. Products with low energy consumption are considered the best choice.
Check for the presence of mercury in the lamp - this determines how it is disposed of
Mercury-containing products cannot simply be thrown into the trash. They must be handed over to special collection points.

Chandeliers from kitchen utensils and cutlery
Over the years, a lot of extra dishes are collected in the kitchen, which is a pity to throw away, and you no longer want to use. It turns out that it can find unexpected uses.
Lamps from dishes
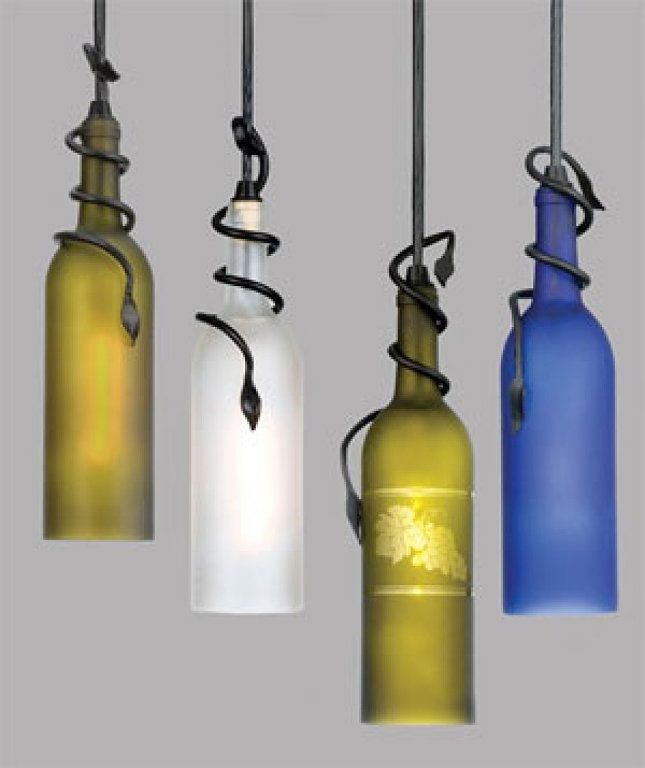
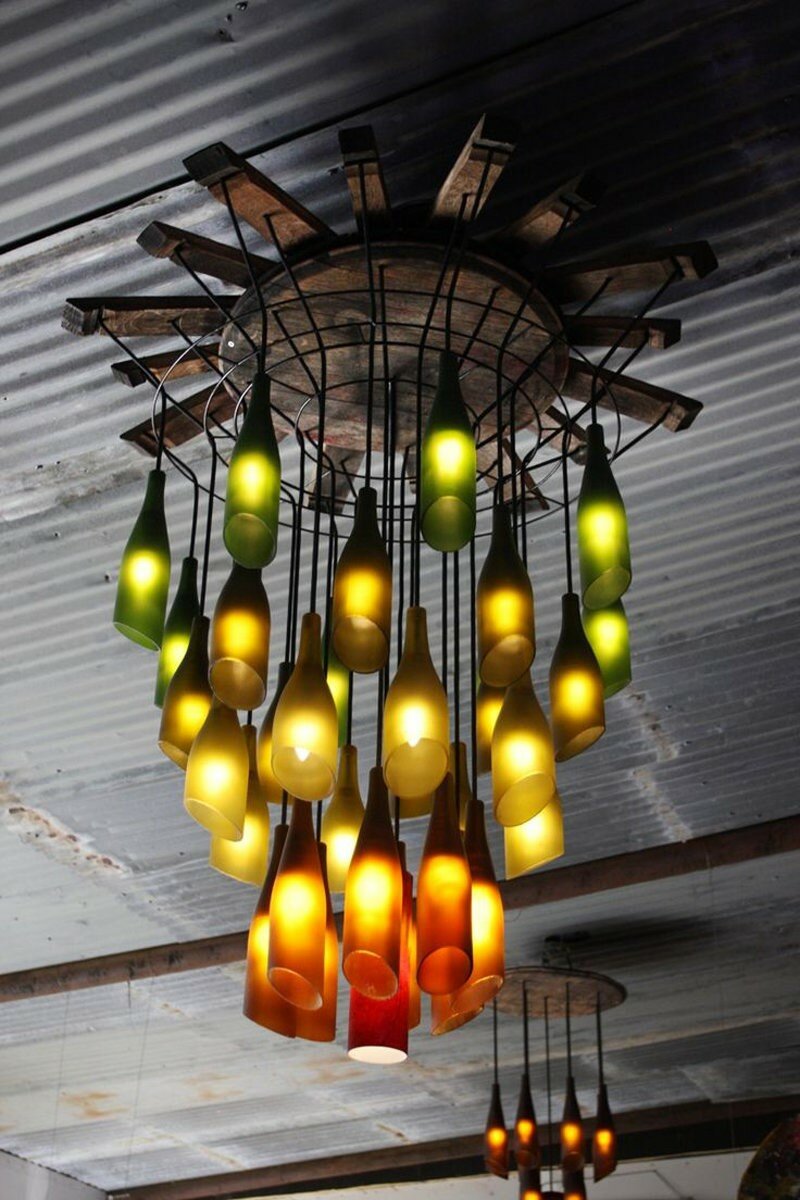
Charming bottle chandelier
You can not make ceiling lamps for kitchen lamps yourself, but use various utensils and utensils: tea and coffee cups, bowls, vases, etc.


Examples:
From tea cups with saucers. In their bottoms with a ceramic crown, you need to drill round holes for cartridges and glue cups with saucers using epoxy glue.

Such shades can be hung on cords at different heights or fixed to the frame of an old chandelier.
By the same principle do-it-yourself lamps are made from cans painted in the desired color, colanders, pots and even pyramidal graters.
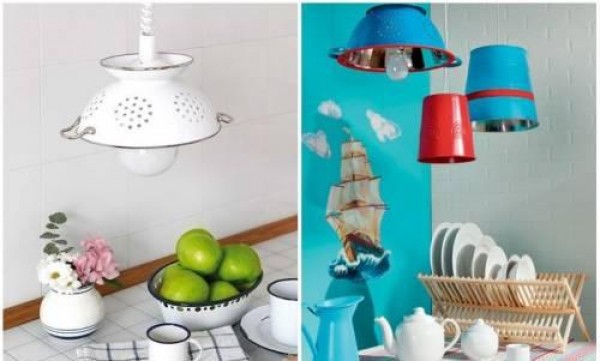
Need for invention is cunning
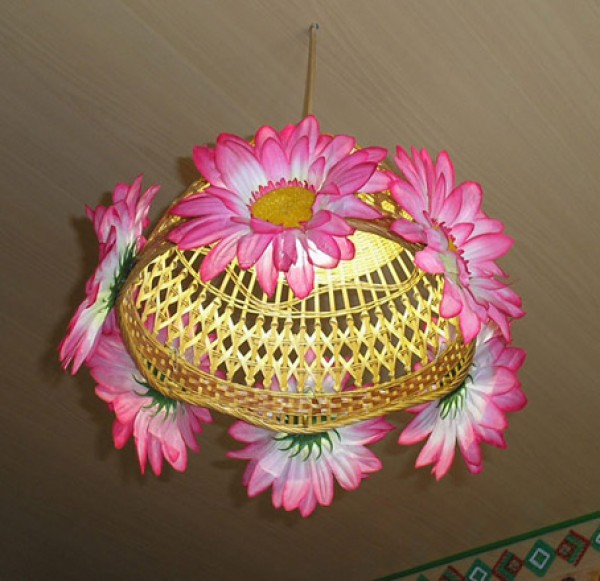
Why not a lampshade wicker straw basket?
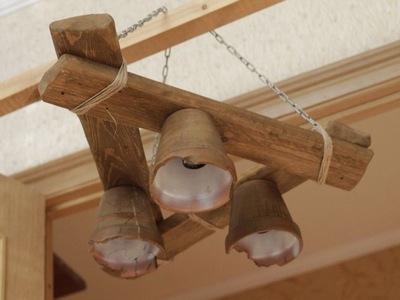
And if you are a little smarter, you can make not a hanging chandelier, but such a ceiling lamp by laying the wires in the grooves cut out on the back of the wooden dies.

An interesting idea for a kitchen in the style of a Russian village
There is a similar option for a modern interior.
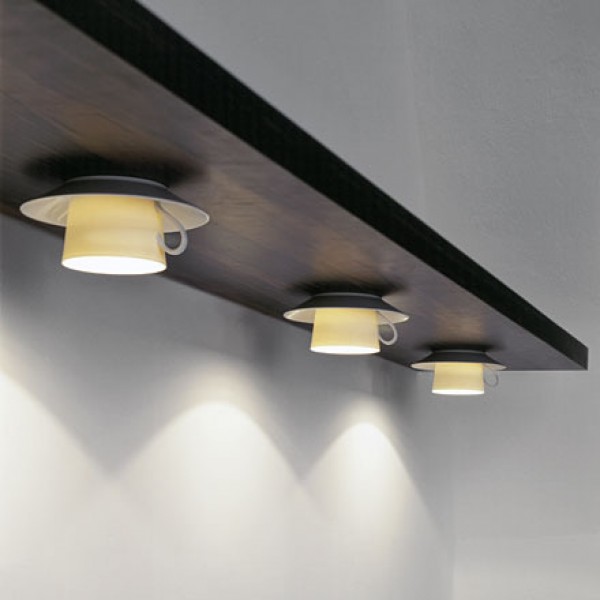
This functional shelf with coffee cup lights can be hung above the dining table.
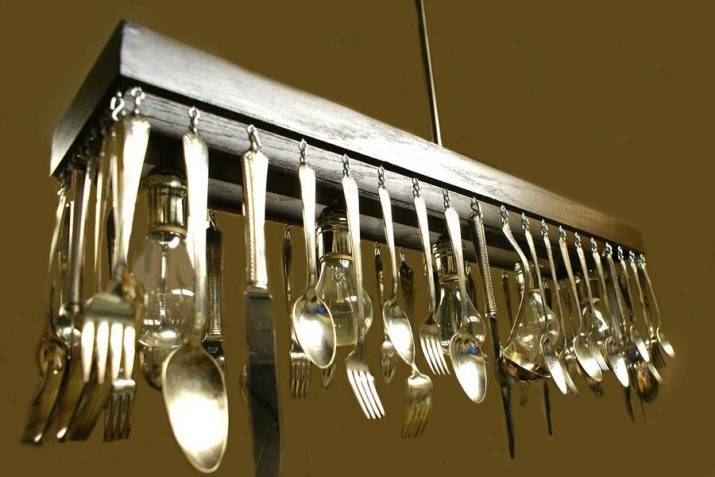
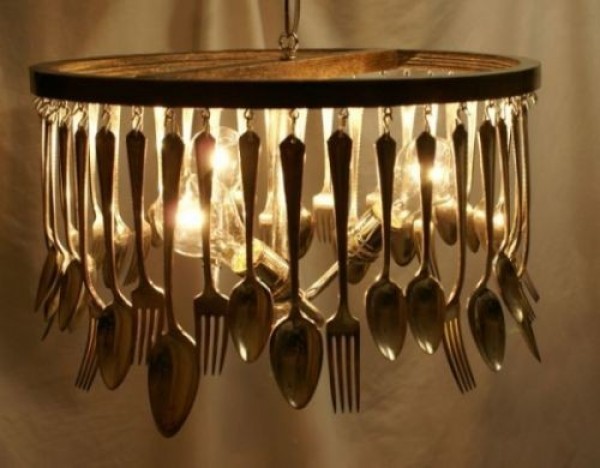
Cutlery chandeliers
The easiest way is to use frames from old chandeliers, preferably multi-tiered ones, for their manufacture. Such, for example:

Soviet chandelier hanging in almost every apartment
I just have a similar rarity in the attic, which has lost almost all the pendants. So they can be replaced with spoons, forks and other ladles by drilling holes in the upper part of the handles and threading rings into them.
If there is no such treasure, it does not matter. To make similar chandeliers from scrap materials with your own hands, you can take hoops of different diameters or cut circles out of plywood with a jigsaw and connect them with chains.
Single row chandelier
The second way to attach cutlery to the frame is to bend them so that the handle of the spoon or fork itself takes the form of a hook and clings to the base.
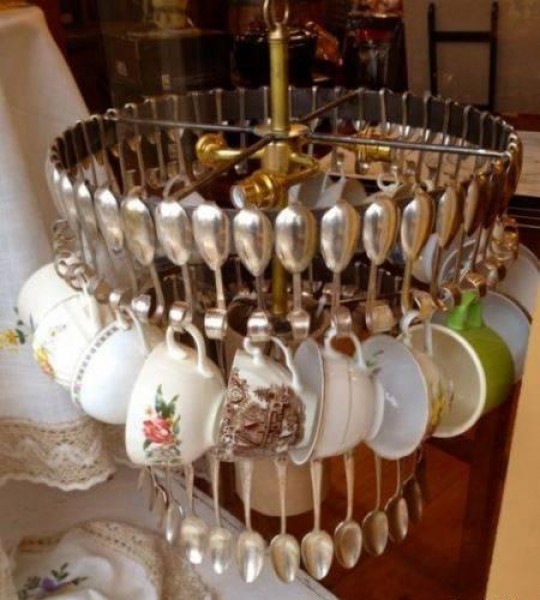
Here it is done the other way around: the spoons cling to the frame with the upper part, and the cups are hung on the hook handles.
To be honest, these options are too… creative for me. But maybe someone will like it.
How to make a paper lampshade with your own hands
Paper is a versatile material. Firstly, it's cheap, and secondly, even if you spoil something, you can simply redo it at no cost.
Origami paper lampshade
You can make a unique lampshade with your own hands from light plain solid wallpaper using the origami technique. In the evening, the play of shadows will attract the eye, creating a romantic mood.
What do you need to work
For work we need:
- frame for a cylindrical lampshade;
- white dense wallpaper, you can take with a textured base;
- a sheet of yellow paper to create a template in sizes 30 × 21 cm;
- ruler;
- glue "Moment";
- plastic five-liter bottle;
- pencil;
- scissors and ruler.
Detailed instructions for making a lampshade using the origami technique
Consider a master class on creating a lampshade using the origami technique in more detail.
| Illustration | Work description |
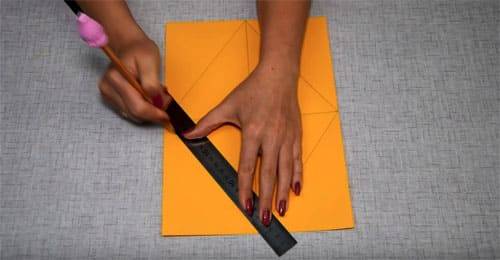 | Connect the center points diagonally, horizontally and vertically as shown in the figure. |
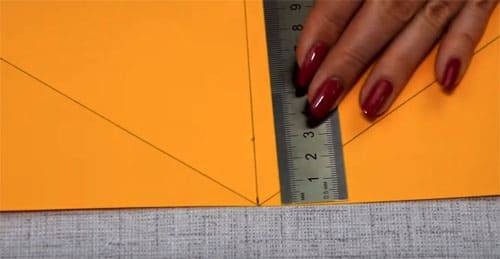 | Retreat from the central point along the width of the leaf 4 cm towards the middle, along the long side - 3 cm. |
 | From the marked points, draw an arc with a compass with a radius of 2.5 cm. |
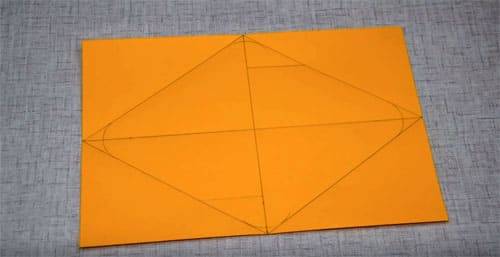 | On the width of the sheet from the junction of the arc with the line, retreat 3 cm and draw a line to the right on both sides. |
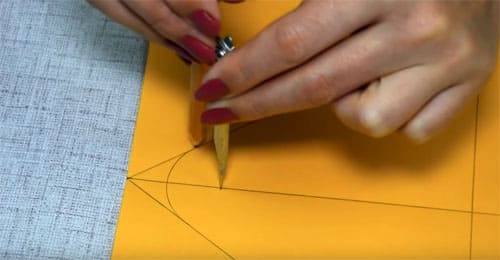
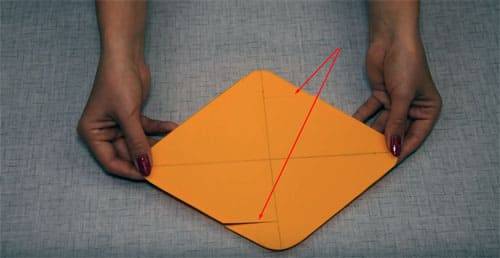 | Cut out the template and cut it as shown in the picture. |
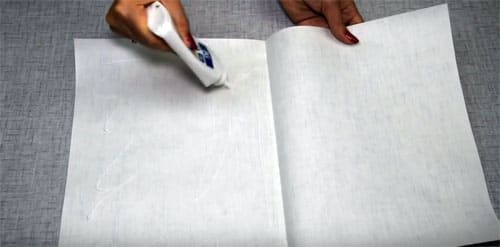 | Cut off a sheet of white wallpaper, fold it in half, coat one side of the PVA and spread the glue evenly with a brush. |
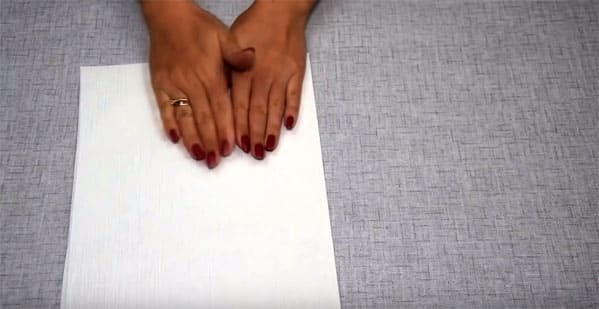 | Fold the paper in half and iron the surface carefully. |
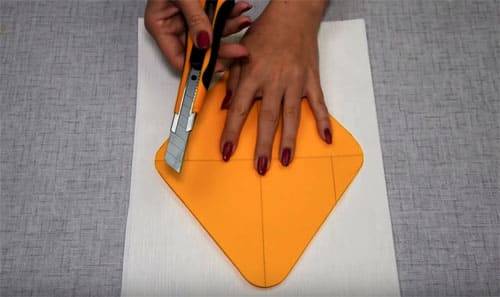 | Attach the blank to paper and cut out the outline with a clerical knife. |
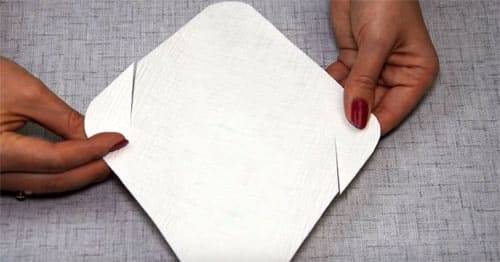 | Make cuts as on the template. |
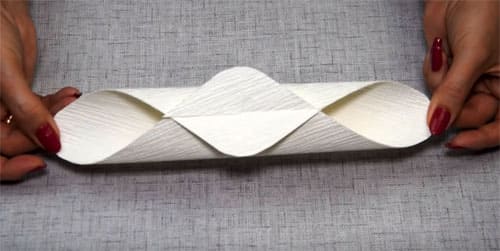 | Roll the sheet into a tube, securing the sides in the slots. |
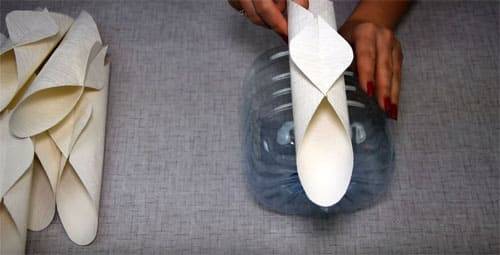 | Cut off the neck of a plastic five-liter bottle and glue the blanks with glue "Moment". |
 | On the base, make a hole for the cord and fix the cartridge with the LED bulb. |
 | Agree, it turned out a real work of art. |
You can watch the video in more detail about the whole process:
 Watch this video on YouTube
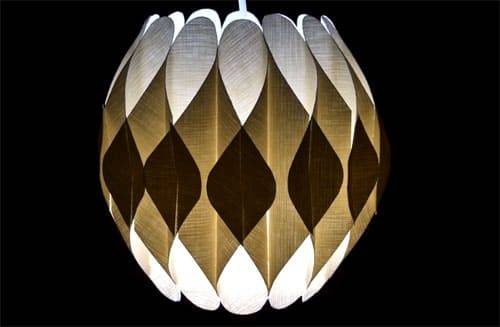
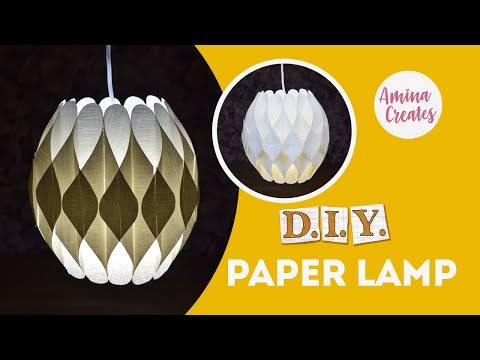
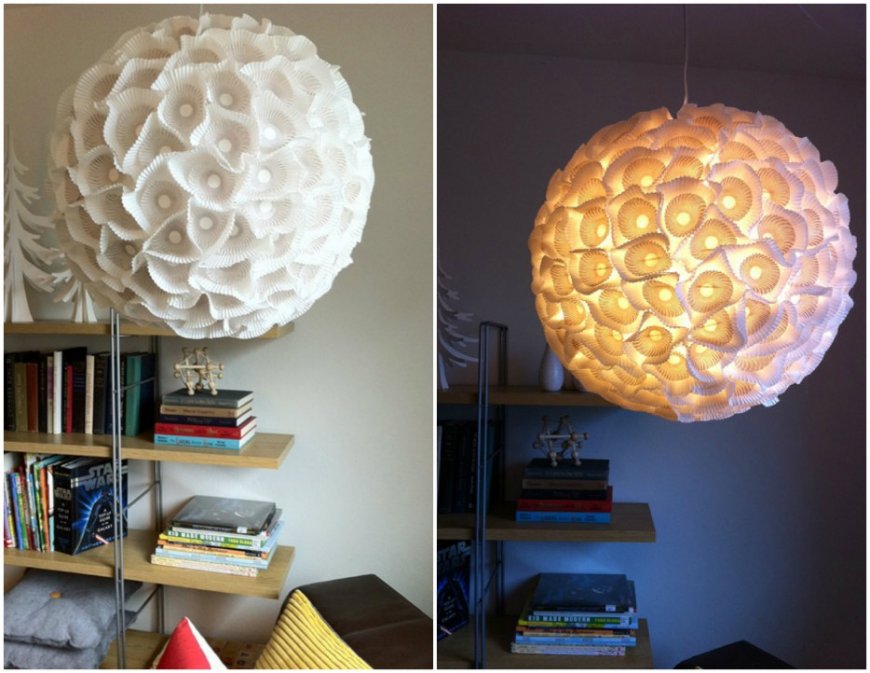
Lampshade from disposable paper plates
The original lampshade for a cylindrical base can be made from plain paper plates.Such a lamp will serve as a night light in the nursery or create a romantic mood in the interior in the evening, it will successfully fit into the living room and study, as well as into the bedroom.
What do you need to work
For work we need:
- thermal gun;
- frame 13 cm high and 15 cm in diameter, previously pasted over with white paper;
- paper plates with a diameter of 18 cm - 50 pcs.;
- ruler, scissors and pencil.
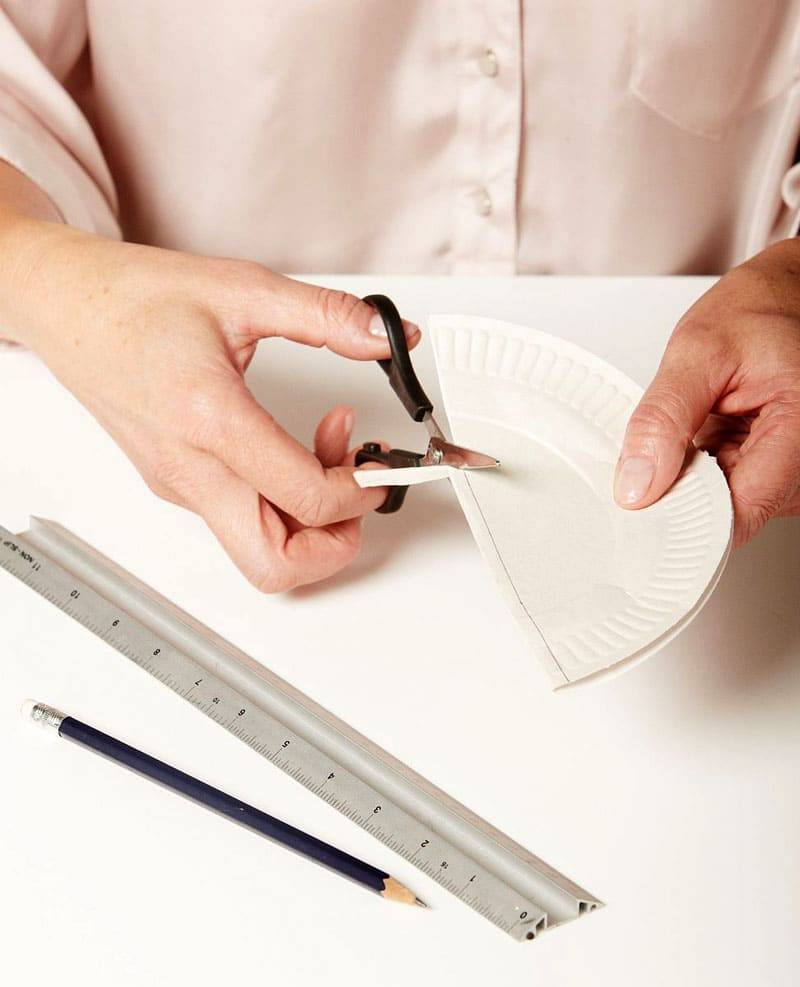
Manufacturing instructions
Looking at the laconic design of the lamp, no one will guess that it is made from ordinary disposable plates. You can experiment with shades and additionally color the material or decorate it as you wish. So, step by step instructions for making a lampshade.
- Fold the plate in half, measure from the center line 0.5 cm to the side and cut. We will use this blank as a template.
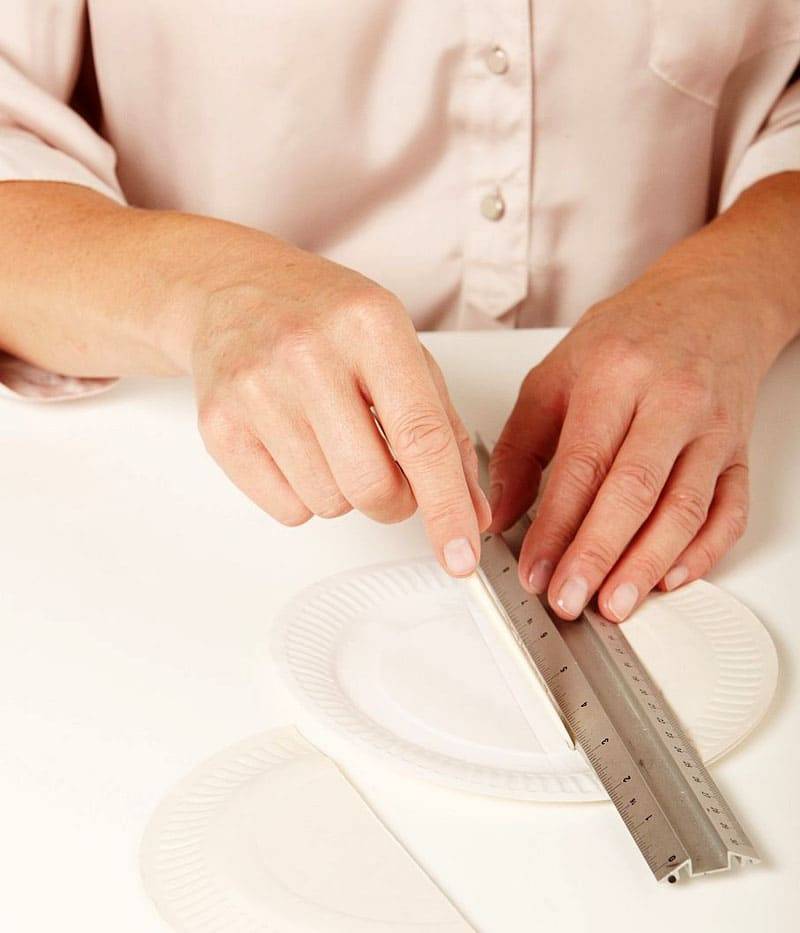
- Attach the template to each plate, first on one side, push the cut line with knitting needles or scissors, then repeat the steps on the other side. You should learn 2 parallel lines.
- Fold the plate along the lines, the fold width should be no more than 1 cm.
- Glue the plates to the frame as close as possible to each other with the place of the fold.


 It is very easy to calculate the number of plates, for this the diameter of the frame must be divided by the width of the fold
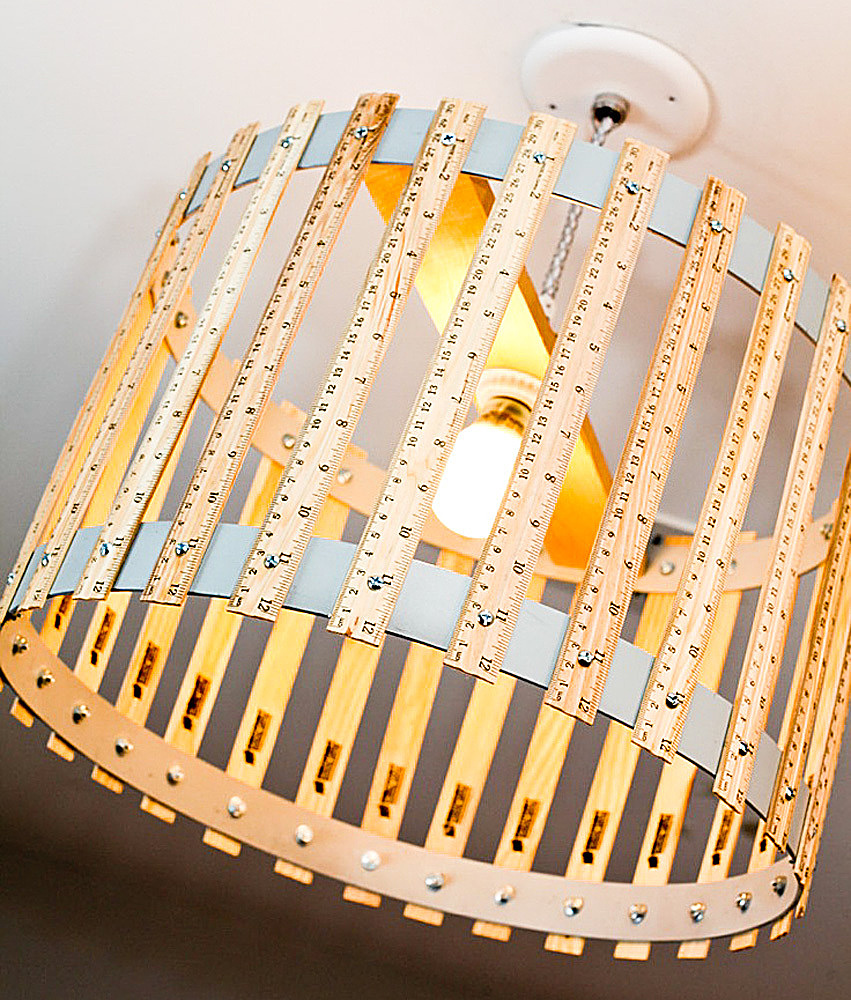
Advantages
The main advantage of homemade wooden chandeliers is the material. Today, when plastic has become widespread throughout the world, everything natural and environmentally friendly is especially appreciated. What are the benefits of a wooden slatted chandelier?
guaranteed environmental friendliness - wood is a clean material that does not harm health; ease of execution, which is ensured by the pliability of the material; no restrictions regarding the appearance of the product - working with your own hands, you can create a chandelier that is ideally suited to the chosen design of the room; positive impact on the emotional state - proven that wooden objects have a calming effect.
Important! Homemade chandeliers made of coniferous wood not only have a beautiful appearance, but also help get rid of respiratory diseases. Pine and spruce are especially healing
Textile
The window is the lightest and brightest place in the kitchenwhich always grabs attention. Window decoration, out of the general concept of repair, instantly cheapens the entire interior

The worst solution for the kitchen will be blinds. They destroy the atmosphere of comfort, giving the room an office style. In addition, blinds are a magnet for dust and dirt. Given the abundance of moisture, grease and odors in the kitchen, washing them is unrealistic.


Therefore, to decorate the window in the kitchen, it is better to choose other types of textiles. At the same time, the curtains should organically fit into the kitchen project. So, bright curtains can become both a stylish interior detail and an inappropriate spot that cheapens the image.

Painting monetization
Decorating money is a luxury task. After all, everyone likes them. But if you turn on the fantasy, then the financial gift will be presented with a touch of elegance.
Take:
- cardboard 2 types;
- cork sheet;
- 15-20 rubles in small coins;
- PVA;
- stationery knife;
- ruler, pencil
Cut cardboard and balsa wood into the same size. Focus on A4 standard.Glue both parts, put under weight, wait a couple of hours. Cut out the outline of a tree trunk, glue it to the main background. Sort the coins into 3 groups: pennies, 10 and 50 kopecks. Rubles will come in handy later. Gradually glue one at a time, starting with a larger diameter, forming a beautiful monetary crown. Stick to a chess layout. Finish under the tree with "ruble" grass. Attach an envelope on the back, put some money, give it to a good friend!
Precious Bookmarks
In the modern world of computer technology, books have also acquired an electronic format. But for some of us, the ritual of reading the good old books in their original form still takes place. And a luxurious bookmark will not only additionally emphasize its significance and value, but will also become a decorative highlight of your interior. Such a thing is easy to do with your own hands.
For decor, any jewelry is suitable - beads, brooches, stones.
For work, you will also need: wide colored ribbons (velvet or satin), scissors, thread, needles, wire cutters, glue and clips for decoration.
Think of the perfect combinations for your taste.
Glue the ribbons well, folding them in half.
We make out the ends with clips.
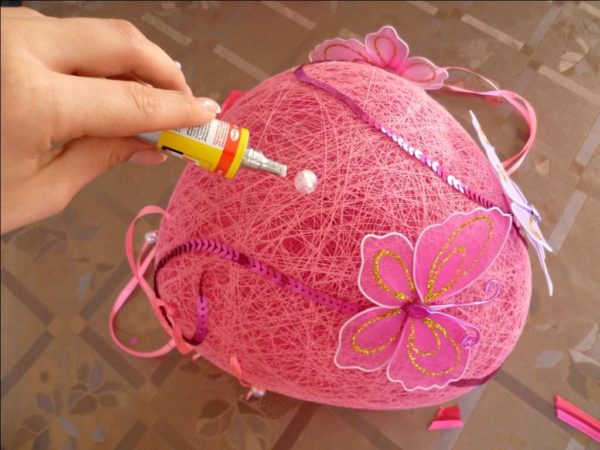
From threads
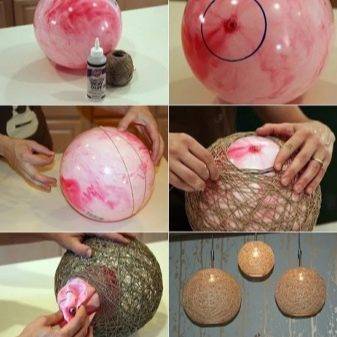
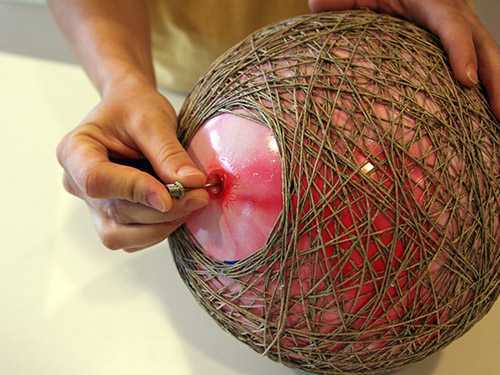
Threads allow you to simply create a light lampshade that looks very stylish. It will perfectly fit into the interior of any kitchen, it remains only to choose the appropriate color of the threads. Thick cotton threads are ideal in this regard, but woolen threads are not suitable.
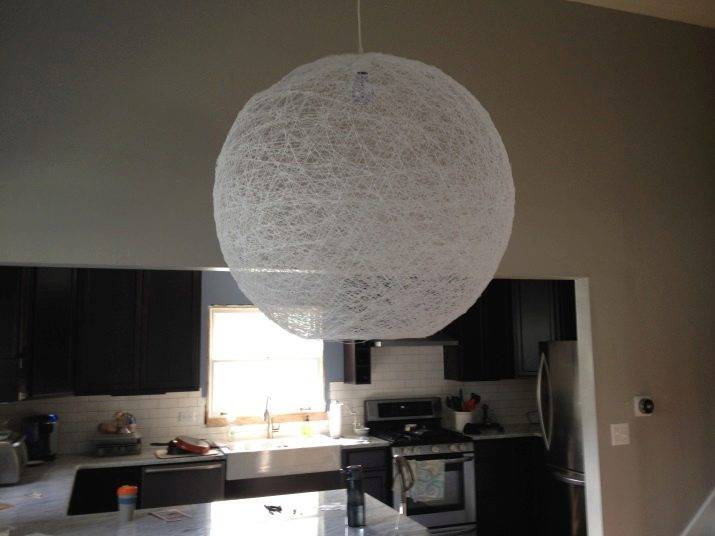
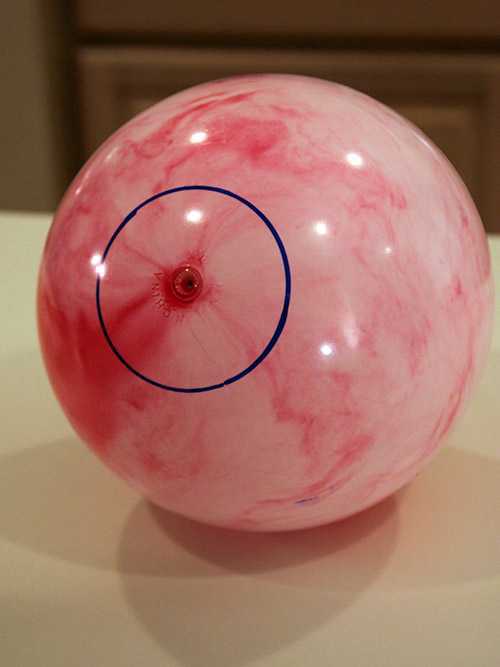
- In order to make a chandelier for the kitchen from threads, inflate a balloon. Its size determines the dimensions of the future lampshade. At the base of the ball, use a marker to draw a small circle.
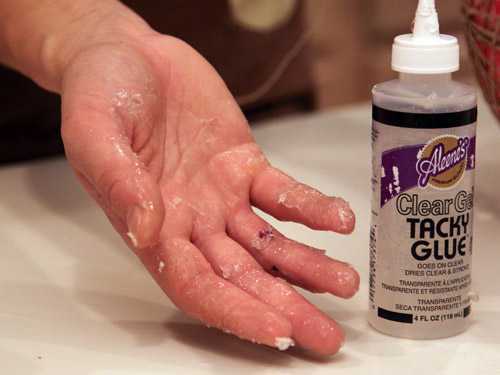
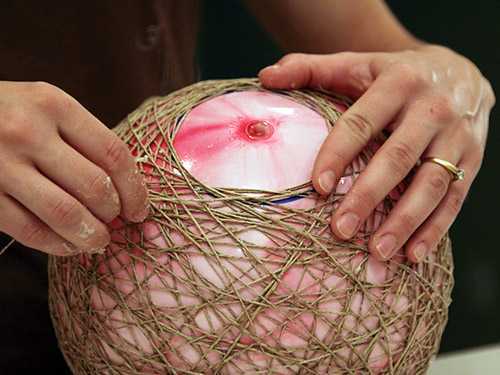
- PVA glue should be poured into a small cup and gradually, processing the thread with it, wind it in a chaotic manner around the ball. The threads should not touch the drawn circle. It is not worth processing a large section of the thread at once. Be patient, as the work will be monotonous and long, but the result will be amazing. You can simplify the work if you pierce a bottle of glue (closer to the base) and pull a thread through it.
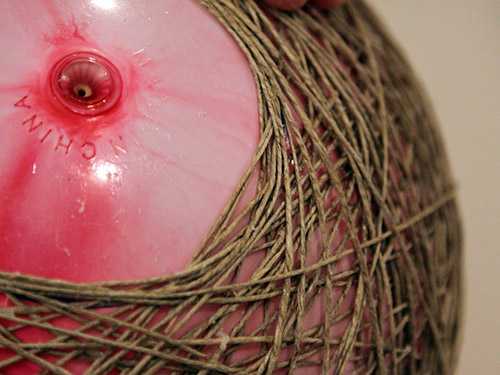
- After the entire ball is covered with a layer of thread soaked in glue, leave it to dry for a day. If the resulting frame is rigid, the product is ready and the ball can be blown off. We specially drew a circle around which it was not necessary to wind the threads in order to pull out the deflated balloon through the hole formed. This step of the process requires care.
- It remains to cut a hole for the cartridge and hang the lampshade in the kitchen. Additionally, such a chandelier can be decorated with paper or fabric butterflies, flowers.
colored paper
An interesting option is to decorate the wall with colored paper. For this, a “blank” wall, without windows and doors, is suitable. Purchase several sets of paper in all the colors of the rainbow from the store. Directly on the wall, the sheets are attached to glue or a clerical pin. Arrange the composition with irregular shapes, but with the order of the colors of the rainbow.
A rainbow of colored paper on the wall with a transition to the ceiling
If there is a closet near the wall, it's not scary. Its outlines can be beaten in the same way. Use the corner of the room. Place this composition on two walls at once.
Another option. Cut out a pattern or tree from colored paper. This can also be done in the corner of the room. Glue the trunk, branches and leaves. Make the last bright shade.The open shelves, which are located on the continuation of the tree branches, perfectly complement this work of art. Use bright, contrasting colors. The dark green or brown color of the tree branches will go well with bright pink leaves, as well as white shelves. Additionally, attach a birdhouse to the tree.
Colored paper tree on the wall of the children's room
Tree on the wall of the living room with photos from the family album
Paper origami looks great on the walls. Glue multi-colored butterflies in a flock sitting on rose flowers. In bright weather, when the rays of the sun hit, the composition will cast beautiful shadows.
A flock of butterflies seemed to have fluttered out from behind the back of the sofa.
Butterfly is made in 4 steps from colored paper
You can cut contour butterflies from cardboard and decorate them to your taste.
The ceiling can also be decorated with paper origami. Glued figurines are hung on strings. At the same time, the composition made by figures at different heights looks beautiful. The color scheme is varied.
Paper cranes can be made with your children
Snowflakes "Ballerinas" from white paper
Plafond of threads

The easiest to manufacture, but no less attractive, is a lamp made on the basis of threads.
Necessary materials:
threads. As a material, you can use ordinary cotton or woolen threads, 100 m long. The color scheme is selected based on the design idea and the color scheme of the interior;
adhesive agent. When making a filament shade for a chandelier, it is better to use PVA;
Balloons. For the shape of the ceiling you will need 2 balloons;
Petrolatum.


Instruction:
Since the lampshade should have the size of a ball, you need to inflate the ball of the desired size and mark with a marker the place where there should be no threads;
The threads are treated with glue, the ball is coated with petroleum jelly;
Now threads are wound around the ball, after which the ball should dry out for a day;
To get a full-fledged ceiling, you need to burst and carefully remove the ball;
After that, the lamp can insert into cartridge.
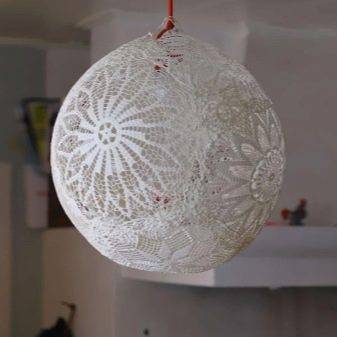
This type of ceiling lamp manufacturing can be supplemented with elegant lace, thereby making a chandelier of original design.
1
A brief overview of the types and styles of wooden lamp designs
Many people like classic lanterns that illuminate an open space. The wooden part of the garden lantern will perfectly fit into a cozy composition. With the help of such lighting, you can create a real idyll, especially on hot summer evenings.
For owners of beautiful country houses, made in the style of old wooden castles or taverns, lighting fixtures made with wooden elements would be appropriate. A large chandelier made of natural wood will decorate the entire interior. For example, a wooden wheel chandelier.
An original proposal for a wooden lamp for the living room is a chandelier that has been twisted with natural wood veneer strips. This three-dimensional, intriguing shape will provide a subtle play of light and shadow in every living room. And during the day it will be a decoration. Wood veneer coated with acrylic lacquer will delight others for many years.
An addition to the interior in the style of minimalism will be a wooden floor lamp or table lamp, made in a thin, simple and strict geometric shape without curls and various additional decorations.Finished with acrylic lacquer, they will add charm to any bedroom.
For a stylish decoration of the interior of the sauna (bath), it would be appropriate to use lamps in the appropriate style. A decorative grille made of wooden planks of various designs will not only become an elegant and harmonious decor for a steam room, but will also protect the lamp from possible damage and will contribute to soft light dispersion, creating a relaxing effect.
If you are bored with the monotony of the interior, in particular, in matters of lighting, and you are ready to change the design of the lamps yourself, feel free to get to work!
Recommended
How to properly install a toilet do it yourself - a step-by-step master class Painting walls in an apartment - a master class for beginners Connecting a boiler - a step-by-step master class
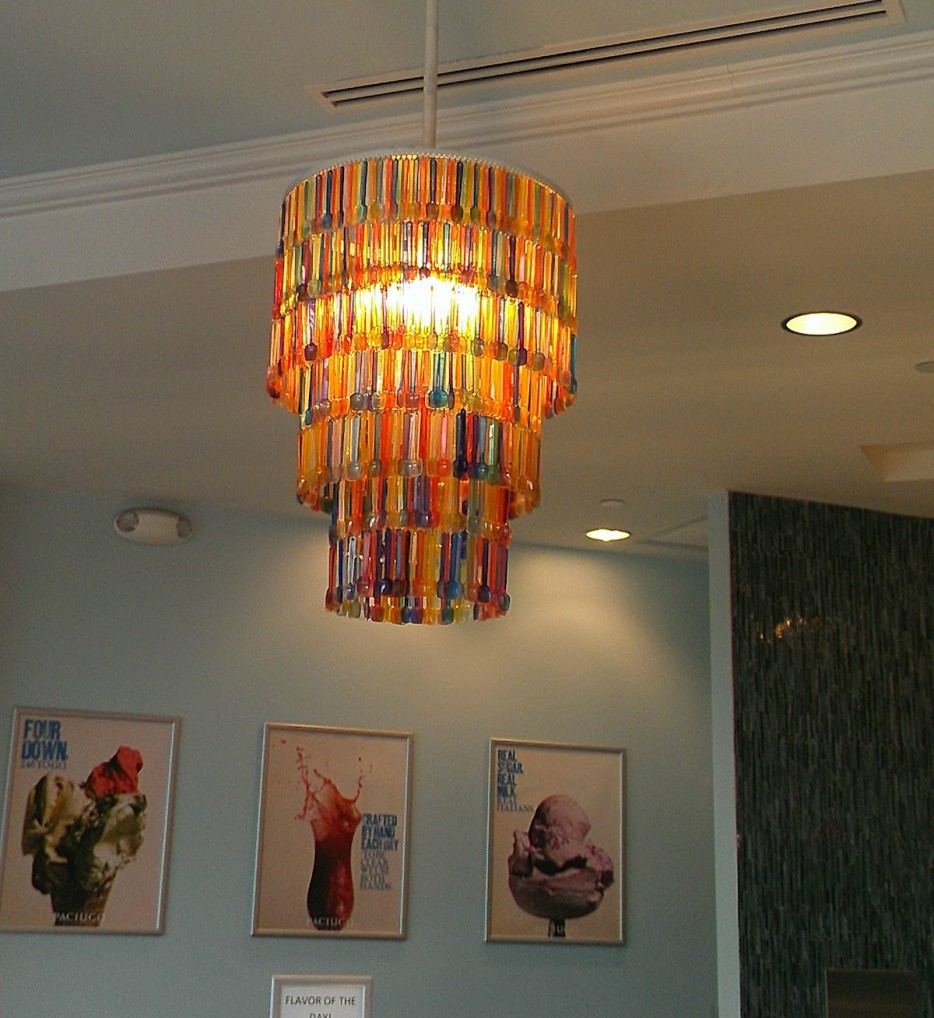
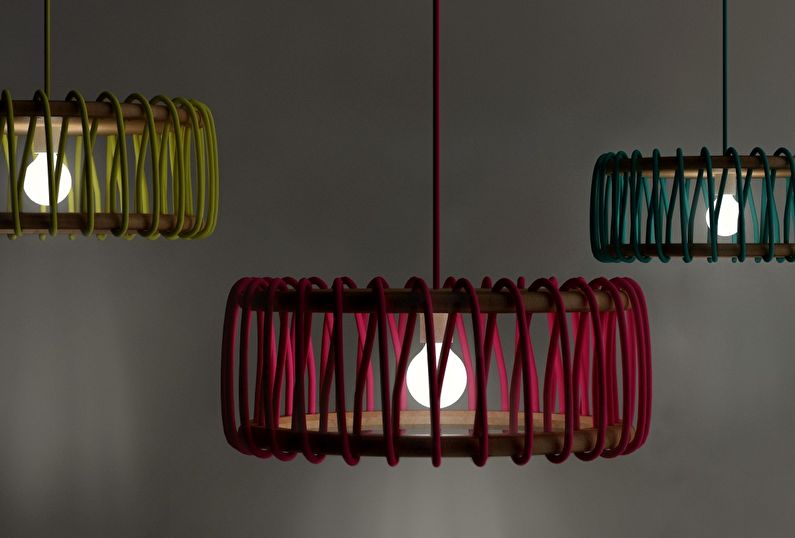
Color solutions
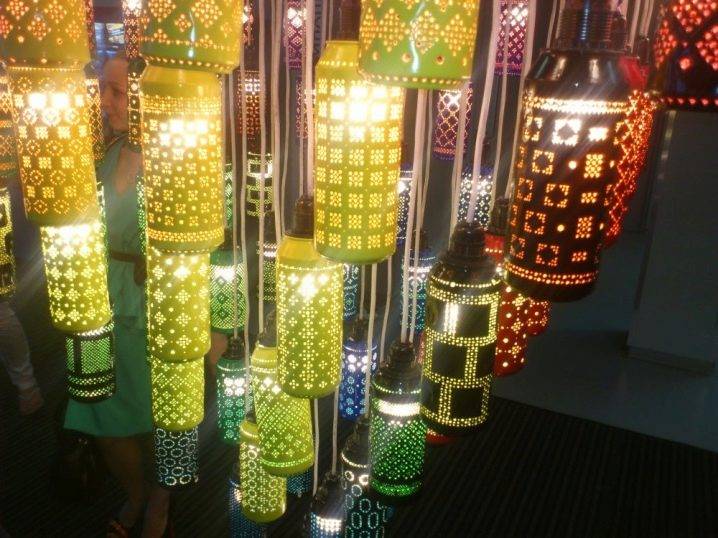
When choosing designer chandeliers, you should pay attention to the color scheme of the models. On sale you can find many colors, but not all of them are able to harmoniously fit into the interior of the room.
Coloring is a significant part of a competent choice.
For fans of experimentation, there are bold tones of red, black, blue, green and other colors. Designers are advised to choose chandeliers, the color of which will occupy the second predominant place in the interior. For example, if the room is decorated in black, and the small components have white pigment, a white chandelier will suit you.
If the interior has a large number of bright details, you should pay attention to neutral and unobtrusive chandeliers in their shade.Turning to the question of choosing a color, you will notice that designer chandeliers are presented in a wide range of colors and combinations for any interior.
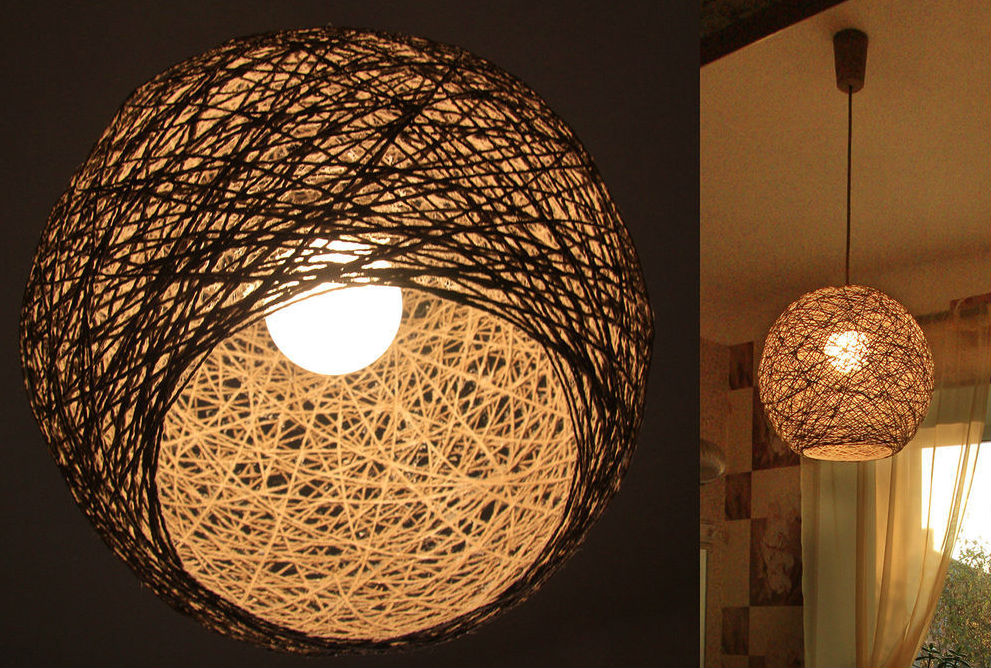
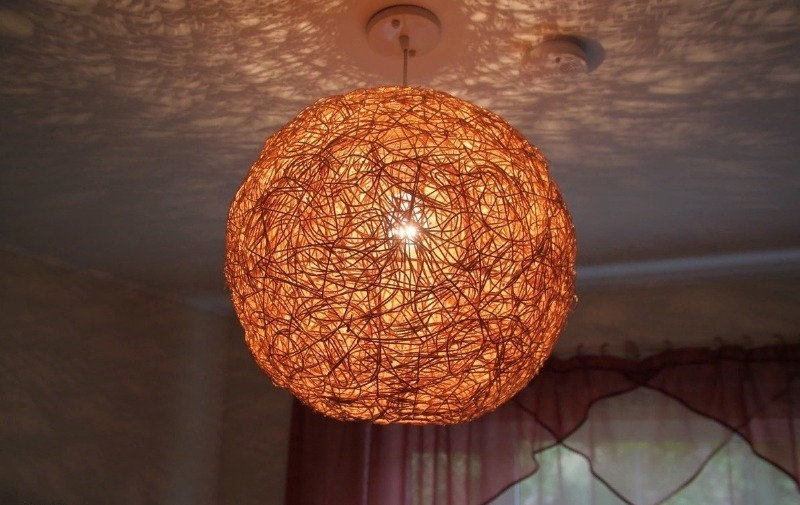
Plafond of threads
A plafond of threads can be of any size, color and shape.
The easiest to manufacture, but no less attractive, is a lamp made on the basis of threads.
Necessary materials:
- threads. As a material, you can use ordinary cotton or woolen threads, 100 m long. The color scheme is selected based on the design idea and the color scheme of the interior;
- adhesive agent. When making a filament shade for a chandelier, it is better to use PVA;
- Balloons. For the shape of the ceiling you will need 2 balloons;
- Petrolatum.
Making a chandelier in this way is very simple.
Instruction:
- Since the lampshade should have the size of a ball, you need to inflate the ball of the desired size and mark with a marker the place where there should be no threads;
- The threads are treated with glue, the ball is coated with petroleum jelly;
- Now threads are wound around the ball, after which the ball should dry out for a day;
- To get a full-fledged ceiling, you need to burst and carefully remove the ball;
- After that, the lamp can be inserted into the cartridge.
To implement incredible ideas, even plastic straws can come in handy.
This type of ceiling lamp manufacturing can be supplemented with elegant lace, thereby making a chandelier of original design.
Tree-paintings and more
Plant motifs have always been very popular - it is impossible to do without them in an eco-interior, some types of oriental, provence, vintage. Pictures on wooden surfaces are made using:
- acrylic or oil paints, brushes by drawing;
- dye from a can through a stencil;
- burning with a magnifying glass, a special apparatus;
- pulling colored threads between nails driven into a piece of wood;
- by gluing wooden branches in the form of a tree onto a plank surface, followed by applying paints and varnishes.

There is another original way: transferring a photo to a wooden surface. How to do it: you need a picture printed on a laser printer, the smoothest board, acrylic gel. Gel is applied to the wood, the photo is placed face down, smoothed. They wait until it dries enough, soak the paper with water, wash it to the very drawing. Next, the plane should be varnished, with decoupage glue - the picture is ready.
Daisies on the board are drawn with brushes of different thicknesses and in three colors - white, yellow, brown. Fluffy dandelions are depicted on a tree with a burning device using thick and thin nozzles. To make a picture of threads and nails, the necessary contour is drawn on a board or plywood, along which small carnations are driven in with a hammer, knitting or embroidery threads are stretched between them. The base can be pre-stained in a contrasting color.
DIY lamp
The modern direction of hand made is absolutely not limited in materials. For crafts use not only industrial goods for creativity, but also improvised materials.

In order to make the device yourself, you need to know some features:
When creating a lamp, use modern LED or energy-saving light bulbs. Do not use standard incandescent lamps, as when heated, they can damage the body of the device.


If you decide to restore an old lamp, then be careful when disassembling it, especially when it comes to wires. Do not forget to make sure that they are intact and working, and it is best not to take risks and buy new wires.

If you decide to make a lamp for the street with your own hands, then when buying lamps, pay attention to the possibility of their operation at sub-zero air temperatures.

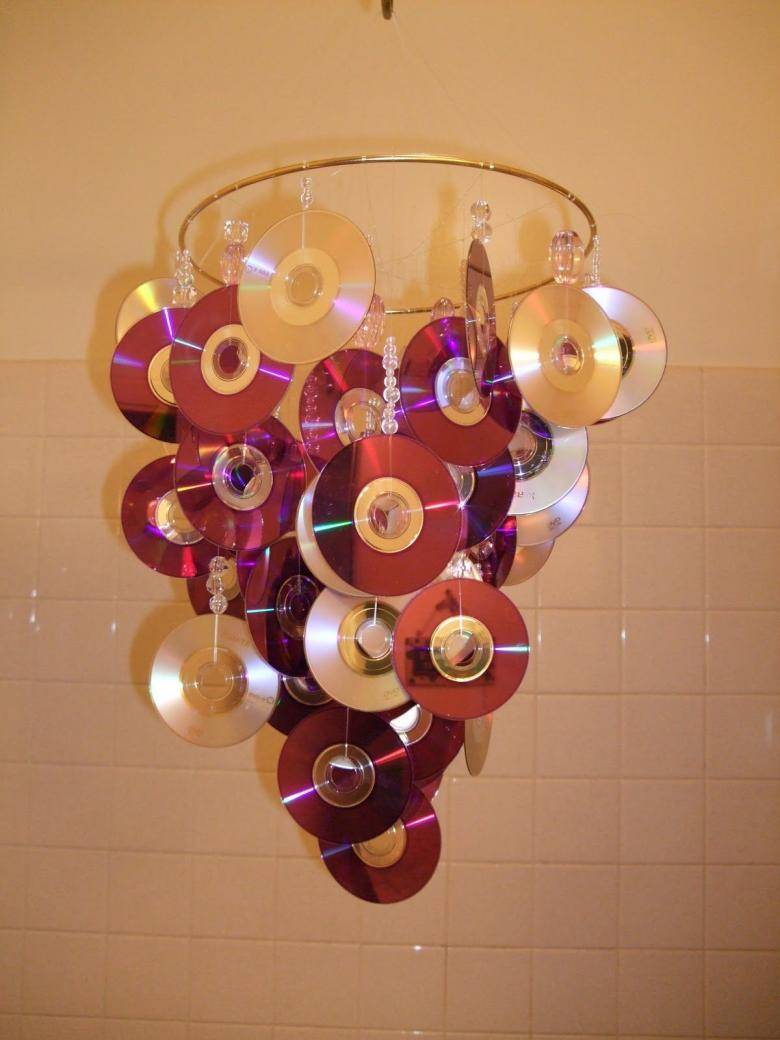
Chandelier from discs
If you have a lot of discs that you don’t need, but it’s a pity to throw them away, then you can make a beautiful chandelier out of them.
Materials for work:
- two round wooden discs, slightly larger in diameter than the discs themselves. At the same time, the thickness of wooden disks should be different;
- wooden or metal rack;
- lamp;
- disks;
- switch starter.
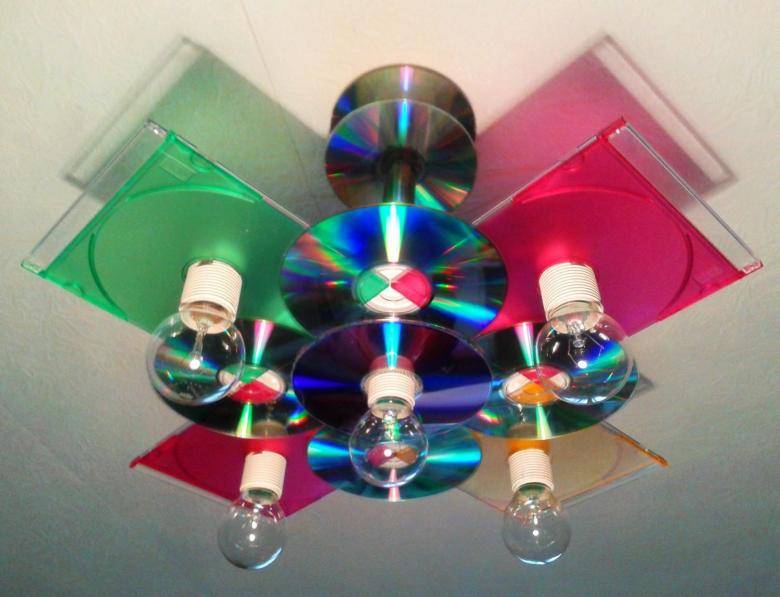
Work process
- In a wider circle of wood, we make a hole and install a starter in it.
- Then we connect the lamp and string disks on it.
- We place racks around and fix them in a circle of disks.
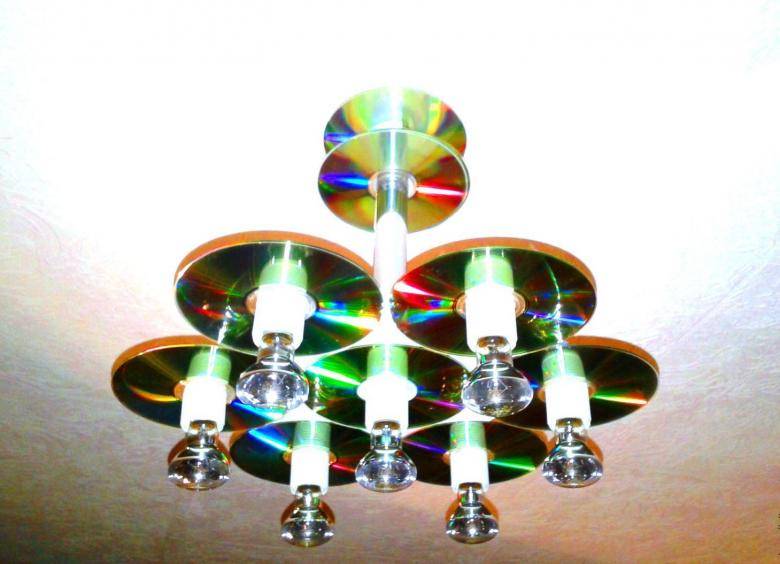
In finished form, such a chandelier will not require careful maintenance. But you should be careful, because the edges of the discs are quite sharp. Therefore, place the product in such a way that children cannot reach it.
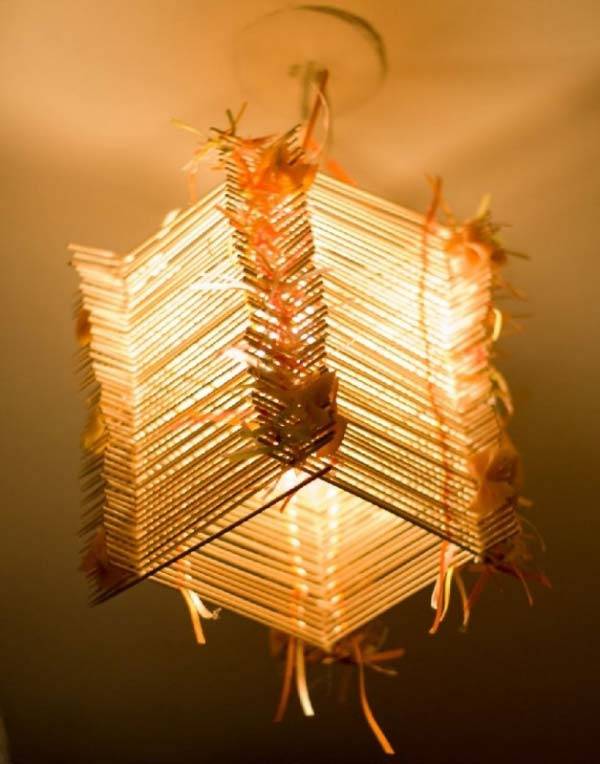
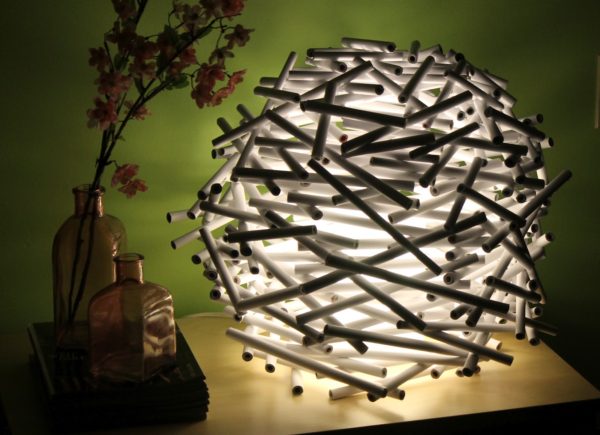
Minimalist lampshade
The lampshade made of origami will easily fit into any interior.
A do-it-yourself lampshade for a chandelier looks stylish and original, where a set of plastic bottles or plastic spoons acts as the main material. Moreover, such a ceiling will be not only stylish, but also inexpensive.
Using various materials, you can get a lovely thing.
To make an original lamp from plastic spoons, you will need the following materials:
- Plastic bottle;
- plastic spoons;
- Glue for plastic.
Implementation of the idea:
- In order to create an unusual lamp, you need to cut the bottom of the plastic container, and cut off the handles of the spoons.
- Then, with the help of glue, the spoons are fixed on the bottle. In order for the ceiling to turn out beautiful, you need to stick the spoons neatly, in an orderly manner and as close as possible, so that the ceiling resembles fish scales.
Moreover, the shape of the chandelier can be any. So, it can be a lamp in the form of an open lotus flower or coconut.
Another option for a do-it-yourself chandelier in a minimalist style can be a lamp from plastic bottles "Birch Leaves" You can make a ceiling "Birch Leaves" from bottles of any color.
To give the plastic the desired shape, it is enough to heat it up a little.
You can make a lighting device from bottles as follows:
- First, leaves are made from bottles, for this the bottles are cut, and then a leaf of the desired shape is cut out of each piece;
- Next, each leaflet from plastic bottles needs to be slightly melted so that it is slightly curved;
- Then, using a hot needle, a hole is made at the base of each leaflet. After that, with the help of wire, the leaves are fixed on the lampshade.
From threads
Prepare threads, yarn or twine, PVA glue, a balloon and follow these instructions:
- Inflate the balloon to the desired size.
- Draw a circle in its upper part, the diameter of which corresponds to the bulb holder.
- Draw a larger circle at the bottom of the balloon.
- Soak the threads with glue and wrap them around the ball, avoiding the surface of the drawn circles.
- When the glue is completely dry, deflate the balloon and remove it from the cover.
- Carefully fasten the cartridge with the lamp in the thread "plafond" - and the chandelier is ready.
If you wish, you can decorate the product with any decorative elements or paint it in a different color using spray paint.
How to make a frameless lampshade from threads
It is quite possible to prepare a ceiling for a lamp or chandelier, even if there is no frame. The shape may be cylindrical, rectangular or round.

For a round product you need:
- Balloon;
- Cotton thread or twine;
- PVA glue with a brush;
- Scissors.

Step by step process:
- Inflate the balloon to the required size and secure with a thread.
- Cover the inflated surface liberally with glue using a brush.
- Gradually wind the thread from the ball around the ball in different directions, leaving room for the light bulb holder. Periodically lubricate with glue. A thread ball is formed. Repeat the glue on top.
- Leave for 1 day and wait for the product to dry completely.
- Pierce the ball and easily remove it from the thread structure. In this case, the form should be preserved.
- Now you can try on the ceiling. Decorate as desired with beads, flowers, sequins.


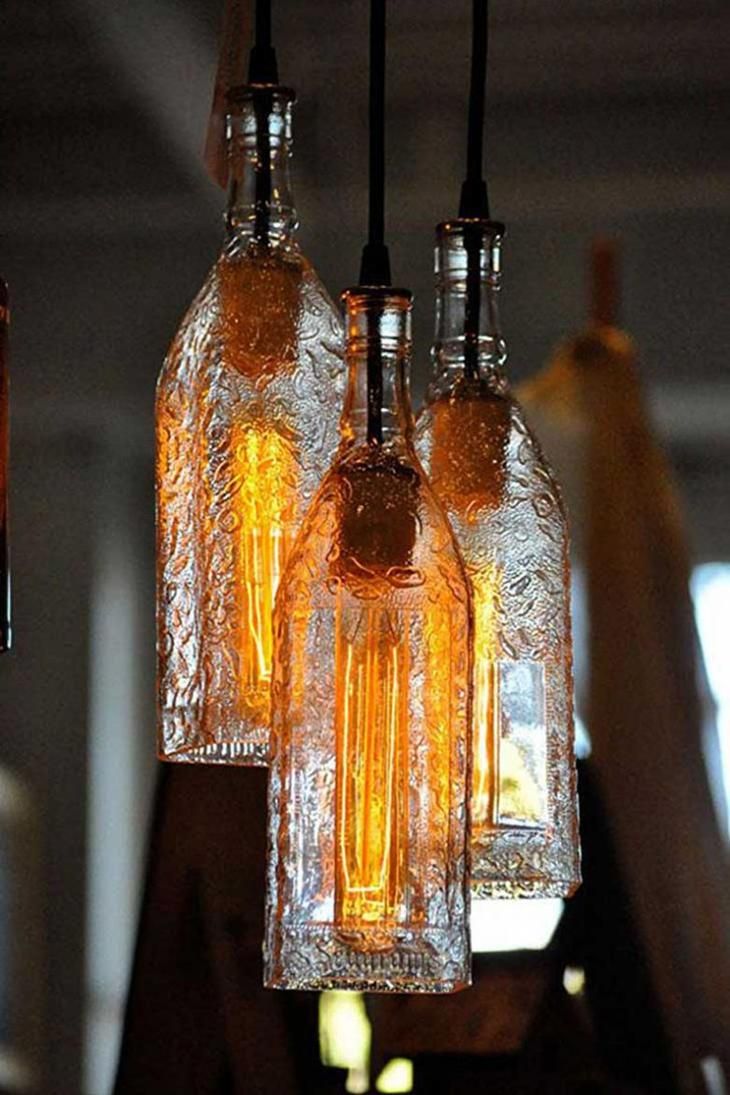
From glass jars
The advantage of a glass jar chandelier is that glass is a heat-resistant material and it is safe to use ordinary incandescent lamps with this material. For work, special cans will be needed, that is, those whose lids are unscrewed.
- On the lid of the can in the center we outline the contours for the cartridge. To get the circle diameter the right size, remove the screw cap from the chuck and circle it with a marker. Next, a hole is cut along the contour. This can be done with a drill by drilling holes as close as possible to each other and squeezing out the resulting circle.
- A cartridge with a light bulb is inserted into the hole formed. It remains only to screw the jar on the lid.