- How to make a floor structure
- Necessary materials and tools
- Preparatory work
- Step by step instructions for making
- Rules for the safe operation of a biofireplace
- Step by step instructions for making
- Desktop
- Floor
- Wall
- Decorating a burner for a biofireplace
- Instructions for making a compact model
- Assembly instructions
- Video: a variety of designs and design styles for biofireplaces
- General information
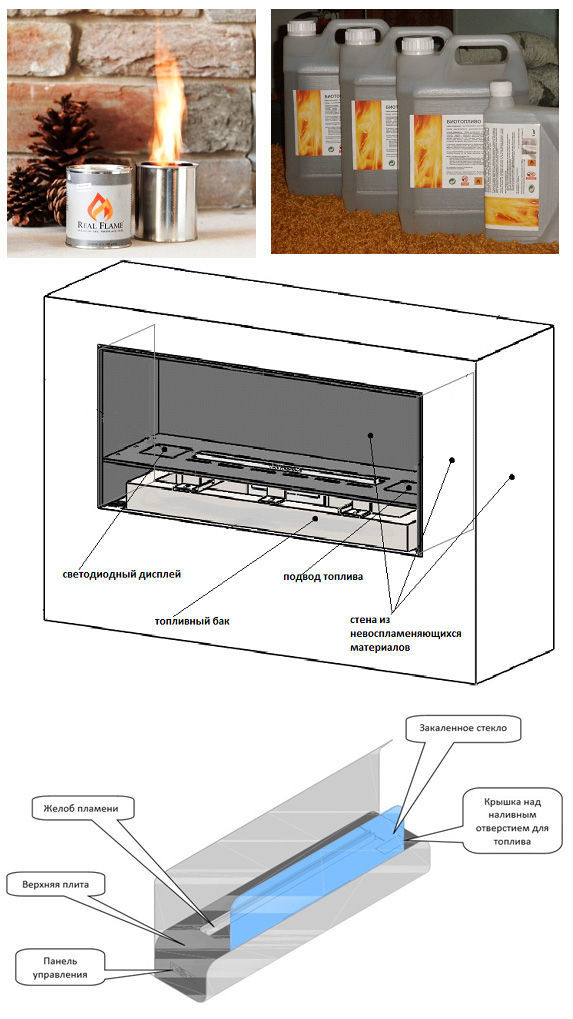
- Biofireplace device
- Product varieties
- Advantages and disadvantages
How to make a floor structure
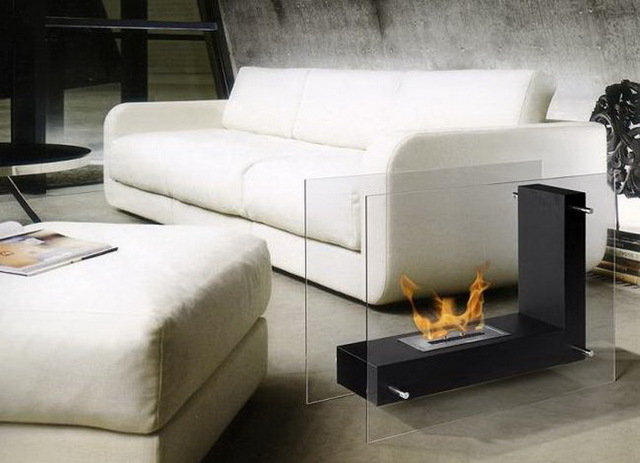
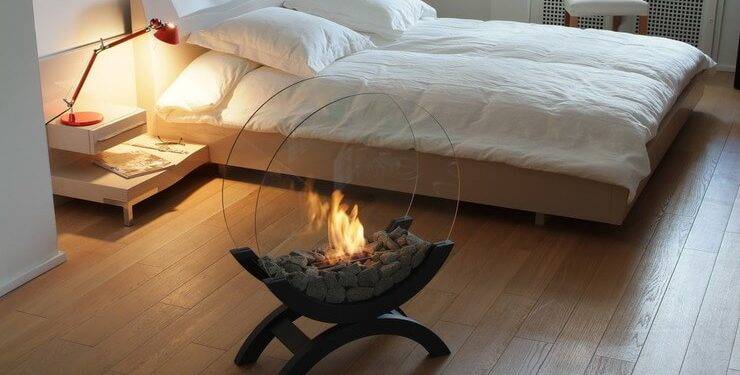
 The floor structure fits into any interior, as it imitates wood-burning fireplaces
The advantage of outdoor biofireplaces is in a variety of shapes and sizes. They can resemble a geometric figure, a bowl or a cabinet, remain stationary or mobile. But the heating block for them must be made of metal. The case itself can be made of stone, wood, plastic, ceramics or drywall. The main thing is to ensure that the fire does not affect fire hazardous elements.
Necessary materials and tools
- heating block;
- non-combustible drywall (1 sheet);
- metal profile with guides and rack elements (8 - 9 m);
- dowel-nails, self-tapping screws for metal and with a countersunk head;
- heat-resistant adhesive for tiles, putty;
- scissors for metal, a screwdriver, a knife for cutting drywall;
- insulating materials (2 sq.m);
- ceramic tile;
- grout (about 2 kg);
- building level, tape measure;
- wood or other material for the mantelpiece;
- decor for decorating a finished biofireplace.
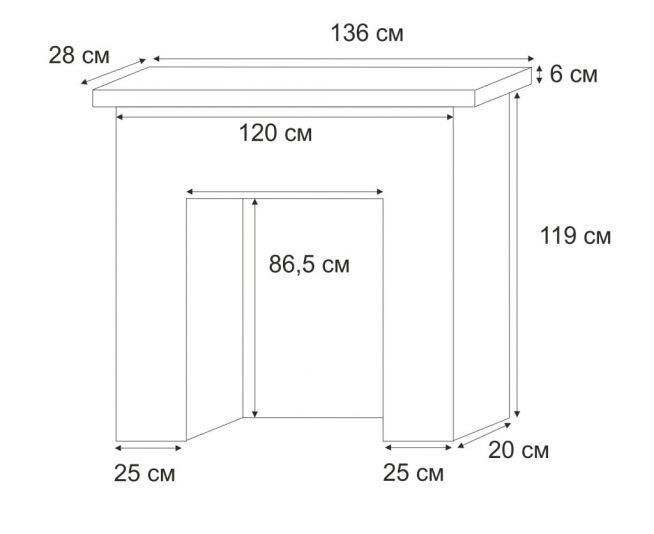
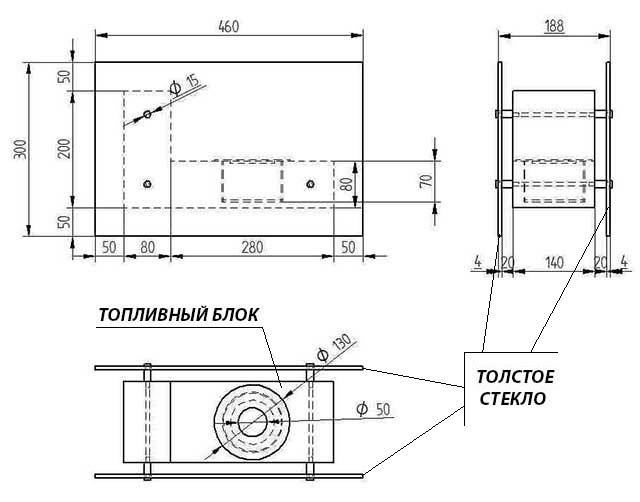
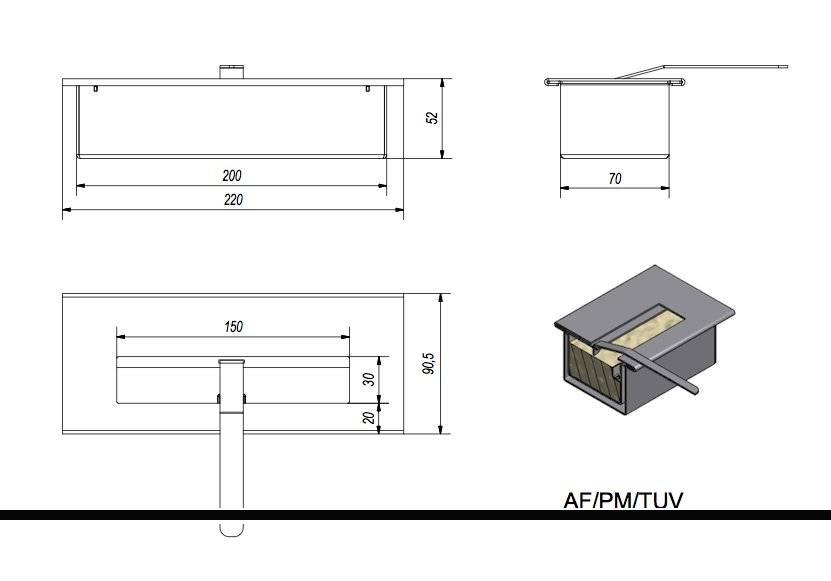
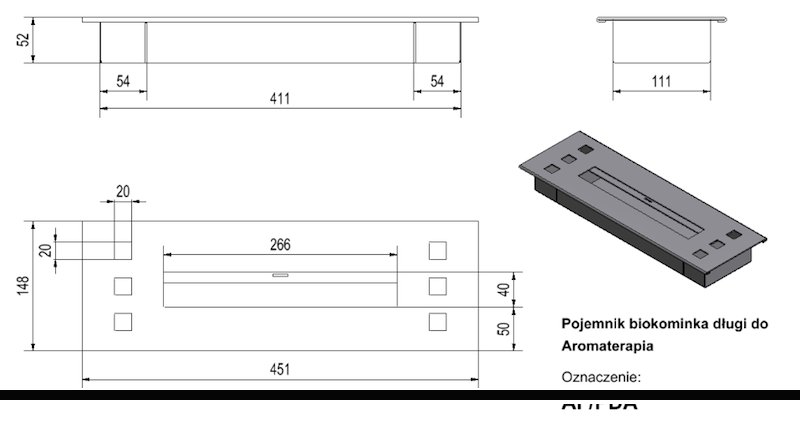
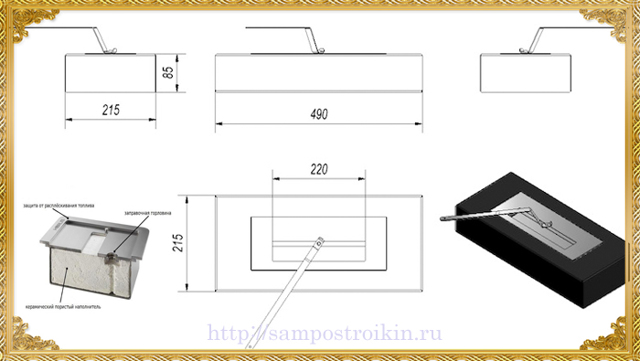
All calculations must be done taking into account the size of the place for the future biofireplace. One of the options is shown in the drawing.
Preparatory work
 The drawing must be created taking into account fire safety
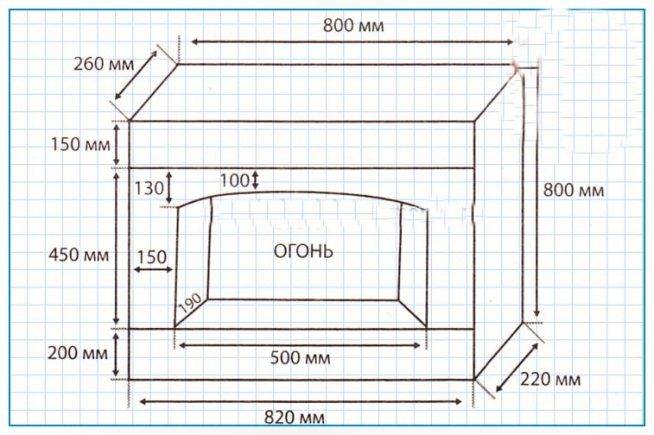 This option provides for the arrangement of the furnace
At this stage, it is necessary to decide on the size and design of the bio-fireplace: large or small, wall-mounted, corner or located in the center of the room. After that, a drawing or sketch is created, taking into account the fire safety of the object. When calculating its dimensions, you need to ensure that the distance from the hearth to the walls of the structure and the mantelpiece is at least 15 - 20 cm. After that, based on the drawing, markings are applied to the wall and floor.
Step by step instructions for making
 The process involves the implementation of several stages: from fastening the profile to decorating the sheathed drywall
- Frame assembly. According to the finished marking, pre-prepared guide profiles are attached. Then rack elements are inserted into them, which are subsequently fixed with self-tapping screws. The plumb line controls the verticality.
- Fastening profiles to the wall with dowel-nails. In this case, the racks are additionally fixed with jumpers.
- Laying insulating material in the walls of the structure. They can serve as compressed basalt wool.
- Plasterboard sheathing. To do this, it is necessary to mark the drywall sheets and cut off unnecessary elements with a special knife.The main thing is to make an incision on one side, breaking the material on the other. When sheathing the future structure, you need to screw in the screws at a distance of 10 - 15 cm from each other. Upon completion of these works, gypsum plaster should be applied.
- Finishing biofireplace. To do this, the walls and bottom of the body are glued with ceramic tiles, with the exception of the recess for installing the burner.
- Seam grouting. After it, a mantelpiece is mounted, and the structure itself is decorated with prepared decorative elements - stucco, mosaics, facing bricks.
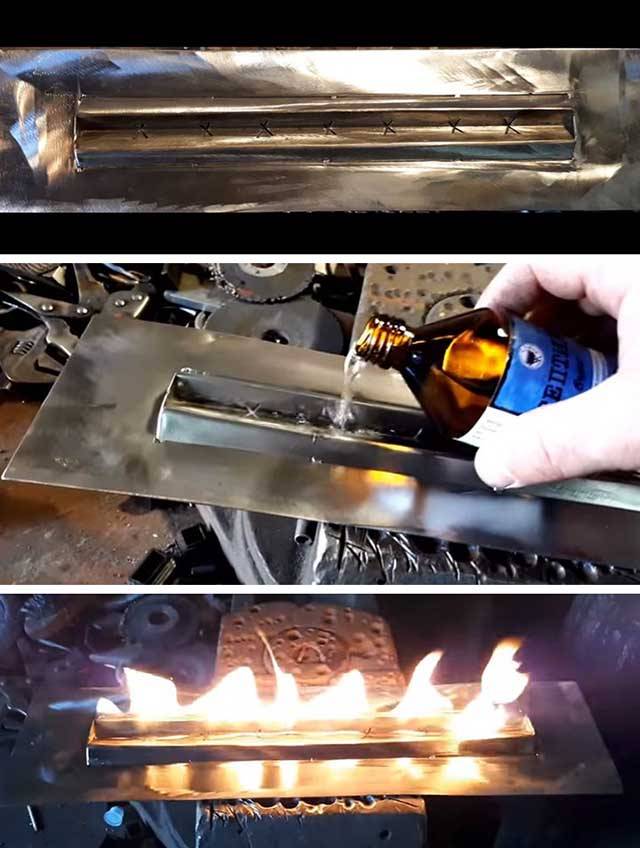
- Burner installation. It can be purchased or made independently from a metal glass into which the wick is lowered. In the latter case, it will not be possible to adjust the height of the flame, but you will not have to pay for the factory design either.
The final step may be the installation of a wrought iron or heat-resistant glass grate, which will provide an additional level of security for the household.
Due to the bulkiness of outdoor biofireplaces, they are often designed in the form of corner structures. The latter can be symmetrical or asymmetrical, when a column is installed instead of one of the rear walls near the fireplace. Their installation practically does not differ from the installation of standard floor biofireplaces, with the exception of the drawing.
Rules for the safe operation of a biofireplace
- Rules for the safe operation of a biofireplace
- Do not leave open flames unattended.
- The ignition of the fireplace is carried out only by adults. Children are prohibited.
- You can not put a fireplace near the fan, in a draft.
- During combustion, the fireplace must not be moved. Movement is possible after the fire is completely extinguished.
- It is forbidden to put a fireplace where combustible substances are stored.Gasolines, varnishes, paints, other liquids.
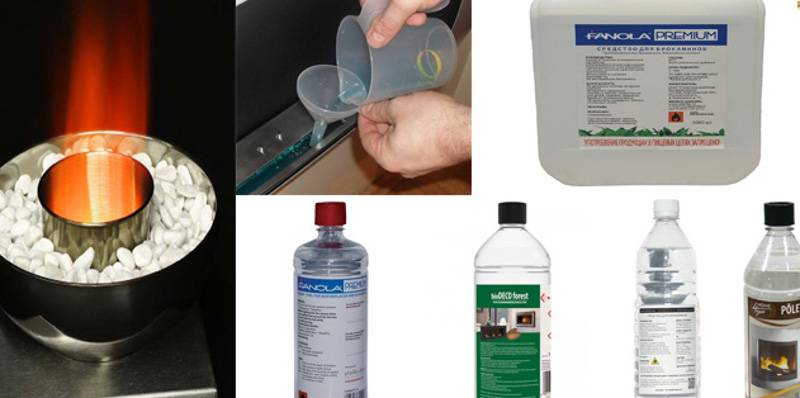
- Fill the container with fuel only through the funnel.
- It is forbidden to put any objects on the body of the device.
- It is forbidden to burn any type of fuel, except for a specially designed type.
- You can not make changes to the design of the system without understanding what and how to do.
- It is strictly forbidden to add fuel during the combustion process. A fire will happen instantly.
- Do not smoke while refueling.
- Spilled fuel must be wiped up. Otherwise, fire may occur.
- Don't lean over the fireplace. Keep hands away from fire.
- Do not cover the structure with anything. This will lead to a fire.
- To extinguish the flame of the fireplace, you need a special metal plate.
- To refuel again, you need to wait 15 minutes after extinguishing the fire. The device must cool down.
- It is forbidden to remove the tank while the fire is burning.
- It is forbidden to use ordinary matches, lighters. You need to use special accessories for these purposes.
- If the fuel does not burn, it has a low temperature. Let it warm up to room temperature.
- Closer than 1 meter from the fireplace, nothing should be.
- As you can see, the biofireplace device is a simple device. The rules of operation are just as easy to follow.
Step by step instructions for making
The modern industry offers consumers ready-made bio-fireplaces, as well as various accessories and parts for their manufacture. Having a set of parts, you can make a biofireplace according to the original sketch. We offer several options for simple designs.
Desktop
To make a table fireplace, the following parts are needed:
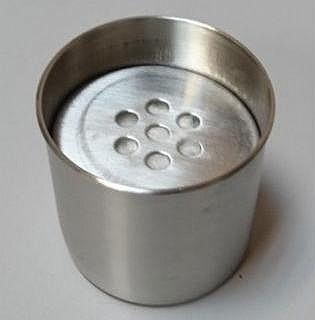
- Metal box - the basis for the fuel tank;
- Bank or mug made of stainless steel;
- Metal grid;
- Heat resistant glass;
- Lace-wick;
- sealant;
- Decorative stones.
Pebbles not only decorate the fireplace, but also allow you to save more heat.
Installation consists of the following steps:
- Protective screen manufacturing. Focusing on the dimensions of the metal box-case, cut out 4 pieces of glass. Then, a case is made from these elements, fastening the glass blanks with a sealant.
- The glued screen is attached to the base box.
- A prepared mug-fuel tank is placed in the center of the box and covered with a mesh cut to fit the body. For strength at the corners, it is recommended to grab the mesh by welding.
- A cord-wick is attached to the center of the grid, the lower end is lowered into the fuel tank mug.
- Decorative stones are laid on the grid.
Floor
Outwardly, a floor-standing biofireplace can exactly repeat a real one, laid out of brick, but you can give the device a completely original, unique shape. The base is made of a metal profile lined with drywall, wood, plastic or metal. First of all, they are determined with dimensions and prepare a drawing.
Outdoor fireplace does not take up much space and fits perfectly into the interior
Installation consists of the following steps:
- Wall marking and frame installation. A rectangular box is made from a metal profile and attached to the wall. The vertical racks of the body are fastened with jumpers. The base of the fireplace is also made of metal profiles.
- Frame sheathing. The mounted frame is sheathed with prepared sheets of drywall (or other material).
- The inner walls of the niche under the burner are sheathed with heat-resistant material. A layer of stone wool is mounted on the back wall.
- The seams are sealed with a mesh (serpyanka), sealed with gypsum putty. Then the entire surface is cleaned with sandpaper and coated with a primer.
- Facing. Drywall is pasted over with facing material: decorative stone, plastic, tiles, etc.
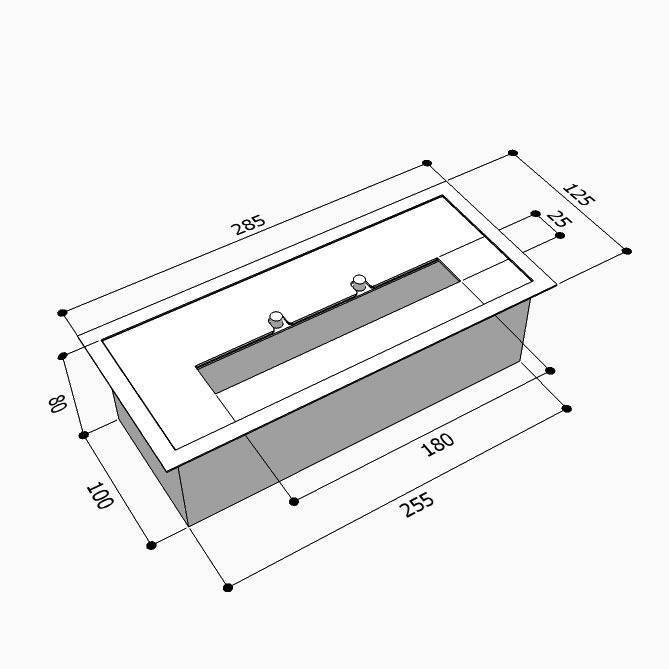
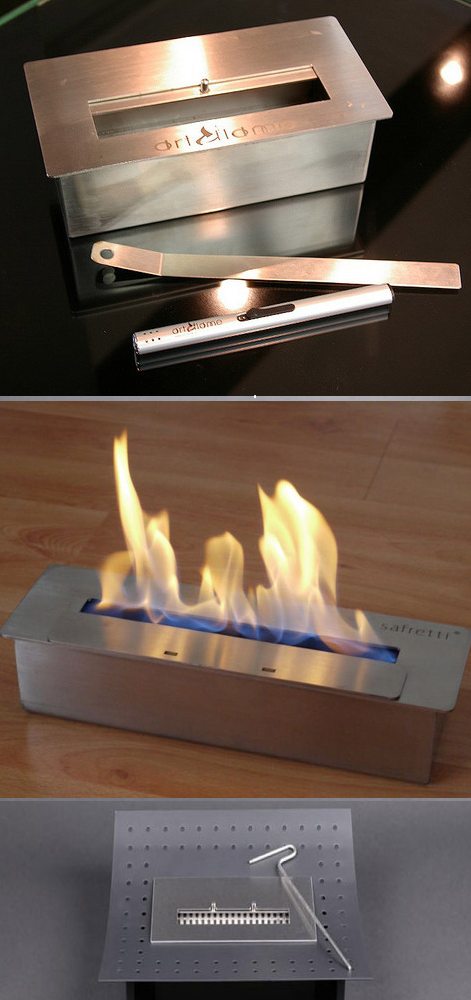
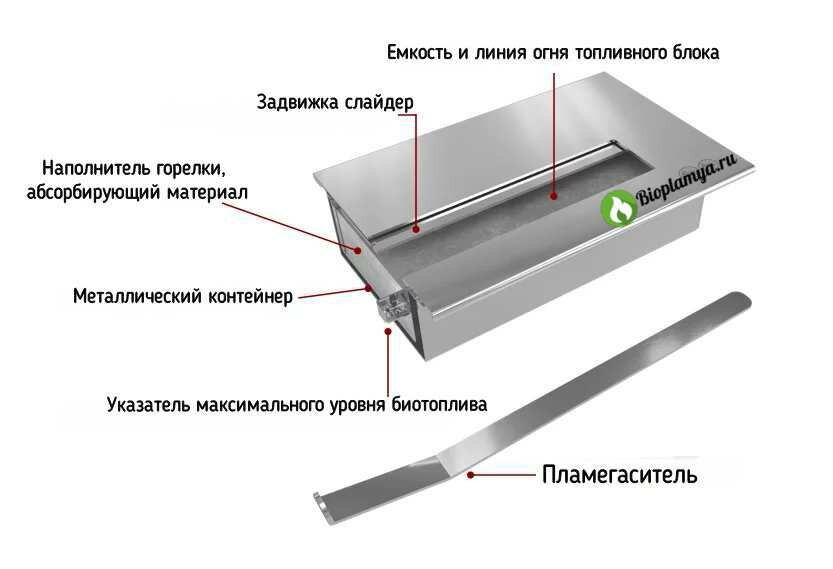
- Tank and burner installation. A rectangular box is made of a metal sheet with a thickness of more than 3 mm, corresponding to the dimensions of the base of the case. A burner is mounted on it - a metal cartridge. The top panel of the burner is a metal plate with slots. The box is installed in the base of the prepared frame. For safety, a metal sheet is placed under the body with the burner.
- Safety glass installation. The front wall of the fireplace is covered with heat-resistant glass, cut to the size of the niche.
- Fuel tank decor. Decorative stones or ceramic firewood are laid around the burner.
- Burners with fuel are covered with a metal mesh, stones or decorative firewood are laid on top.
Wall
The design of the wall-mounted fireplace generally coincides with the floor version. The basis of the wall model is a metal case of an elongated rectangular shape. The fireplace is a metal frame sheathed with plasterboard. A housing with a fuel tank is installed inside the frame.


The wall-mounted biofireplace is a flat elongated frame
The back wall is covered with a stainless steel sheet. A layer of stone wool (2-3 cm) is laid between the sheet and the wall. The protruding edges of the cotton wool are covered with metal corners. The front wall of the fireplace is covered with a glass screen.
Decorating a burner for a biofireplace
In the finished case of a home-made bio-fireplace, you can easily change the content. Suitable as accessories:
Stones: having the same or different sizes, smooth or textured, transparent or colored.
Stones can be laid out not only on the surface of the lattice, but also outside.
Ceramic logs: sized to imitate a real fire.
Stylized objects laid out nearby, such as tools for lighting and extinguishing a bio-fireplace, a poker and tongs, as well as fuel in a decorative and safe package, will help to emphasize the atmosphere.
See other content at
Instructions for making a compact model
Considering that the cost of such devices is quite high, many craftsmen are interested in how make your own biofireplace for the room.
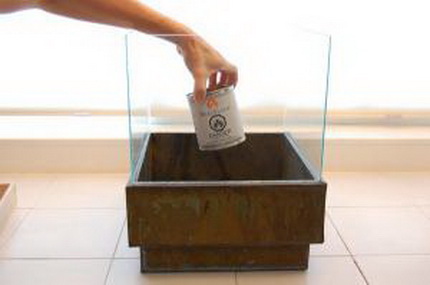
This is a fairly simple task, especially if you make a compact desktop or floor model. It can be conditionally divided into two components: a fuel tank and a glass case. As a second, you can use an old aquarium without a bottom.
For small-sized biofireplaces, you can make a fuel tank from an ordinary metal can. Its dimensions should be such that the container is hidden inside the base.
For work we need the following materials:
- a metal box that will be used as a base;
- metal tank for fuel tank;
- lace for wick;
- a sheet of glass if there is no aquarium;
- silicone sealant;
- metal grid;
- small pebble.
From the tools you need to prepare a glass cutter, scissors.
Let's get to work and start with the body. It will be a parallelepiped or a cube without a lid and bottom. We determine the dimensions of the future structure and, accordingly, the length and width of its walls. A sheet of glass is laid on a flat horizontal surface, washed and degreased.
We apply a ruler to the line of the future cut and press it to the sheet. To prevent the ruler from slipping, you can stick an adhesive plaster on it.


We take a diamond glass cutter, put it on a sheet and lead it away from us without strong pressure. The cut line should be colorless and thin. If for some reason we did not like the resulting line, it is absolutely impossible to circle it. You should retreat 1 mm and draw a new line. After completing the cut, move the glass to the edge of the base so that it coincides with the cut line.
Carefully tap the cutting line with the tool head, then, with a careful but precise movement, break off the glass remaining on the weight. In this way, we cut out all four parts of the desired size.
Now they need to be glued together with silicone sealant. To do this, generously coat the side edges of the parts and connect them. Let the sealant dry. To do this, we fix the resulting structure between any fixed objects and leave it in this position for a day.
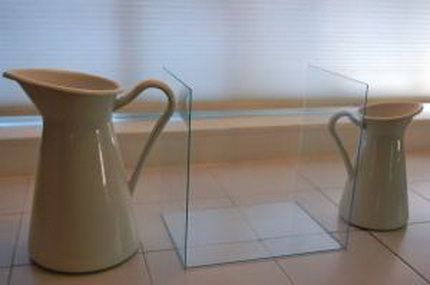
In order for the glued structure to dry in a stationary state, it must be fixed in any suitable way, for example, enclosed between bulky objects
We clean the dried case from excess sealant. It will be convenient to do this with a blade. We proceed to the manufacture of the base of the biofireplace. It should be a box made of metal, corresponding in size to the glass case.
The latter should be easily and securely installed on a metal base. A metal can should also be installed inside the base, which will act as a fuel tank.
It is desirable that the volume of the tank is large enough so that you do not have to refill the biofireplace too often. The bank is installed in the center of the structure. A part is cut out of a durable metal mesh, the size of which matches the base. It is laid on top of the fuel tank and fixed along the edges of the base.
We make a wick from the prepared cord and lower it into the fuel tank. Types of homemade biofireplace burners and instructions for their manufacture are discussed in our other article.
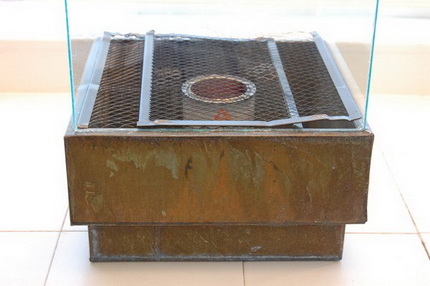
Fine-mesh metal mesh will become a reliable base for laying decorative stones or ceramic firewood - aesthetic elements to decorate the device
We lay pebbles or any other stones on top of the grid so that they completely cover it. Stones will perform not only a decorative function. They will partially remove the heat that will be transferred from the burner to the metal mesh.
This way you can protect the glass from cracking. Now you can put the glass case back in place. The compact biofireplace is ready for use.
Assembly instructions
Having collected the components for the biofireplace, you can begin to assemble the device. Step-by-step instructions will allow you to assemble a biofireplace with your own hands without unnecessary difficulties:
The first thing we need to do is glue the protective glass screen. Silicone sealant dries in the region of the day, so the glass is connected in advance.


Creating a glass protective screen
Then you need to assemble, find, make a metal frame in the form of a box in which the burner will be installed and on which you will put a protective screen.
Suitable metal frame
Protective screen installation
At the next stage, the burner is placed in the frame.If the fuel was sold in a tin, then it may well play this role. If the container was plastic, you can use any tin can of a suitable size.
We place the burner in the frame
We put the wick in the jar, bring it to the grid and close it with decorative stones.
Preparation of the metal mesh
Installing the grid inside the frame on the burner
We cover the resulting structure with a protective screen, lay decorative elements and the home-made bio-fireplace is ready.
We close the grid with decorative stones
We launch a biofireplace
Ecological handicraft fireplace
As you can see, creating an alcohol fireplace with your own hands is quite simple, but this is provided that it is small in size. For large-sized systems, the construction of a special portal will be required. The easiest way to build a structure is from drywall, an easy-to-use and inexpensive material. In this case, the procedure will be as follows:
- The first step is to prepare a platform for the biofireplace. It is necessary to protect the floor from high temperatures. You can make a screed on the floor or lay a brick.
- Then, a biofireplace frame is built from a metal profile, which is securely attached to the floor and wall. Insulating material is laid inside the ceilings.
- The resulting structure is sewn up with drywall on the outside, and smoothed out with tiles or metal sheets inside. Refractory materials will protect the drywall box from the harmful effects of fire.
Construction of a portal for an eco-fireplace
- From the outside, the biofireplace box is decorated in accordance with the interior of the room. Looks great stone finish, plastic panels under the brickwork.Forged items are also welcome, especially matching accessories next to the fireplace. You can put firewood next to the portal, and throw decorative ceramic models of firewood into the firebox of a biofireplace.
- A fuel block is installed inside the resulting portal. If the system is massive, it is best to purchase a ready-made device from a store.
- To protect the environment, a protective glass screen is installed on the fuel block.
The resulting bio-fireplace will undoubtedly become the main element of the room, and a real, live fire will allow you to create a full-fledged comfort in your home.


We hope that now you understand how to make a biofireplace at home. If you are quite ready to carry out the manipulations described above, create a biofireplace with your own hands, but if such work scares you, then just buy a finished device in the store. It is noteworthy that such devices are sold assembled, so you will not have difficulties in starting the system. Read the instructions, turn on the device and enjoy the live fire.
This is interesting: Which water heater to choose for an apartment and a house - an overview of companies with reviews
Video: a variety of designs and design styles for biofireplaces
Making a biofireplace with your own hands is possible without much cost and effort. Such models are characterized by a simple design, which guarantees their strength and safety. The principle of operation of such installations has remained unchanged since ancient times. Today they are in demand again, thanks to new ecological fuel materials. The increased demand for these models testifies to their usefulness and effectiveness.
General information
Making a biofireplace is a rather difficult undertaking that requires a significant investment of time and money. In addition, you need to have the skills of such work, or at least have a general idea of \u200b\u200bit.
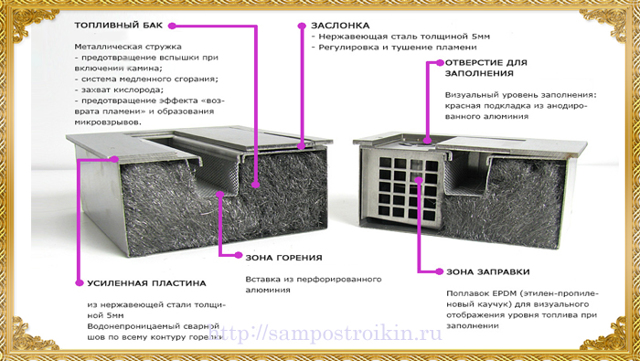
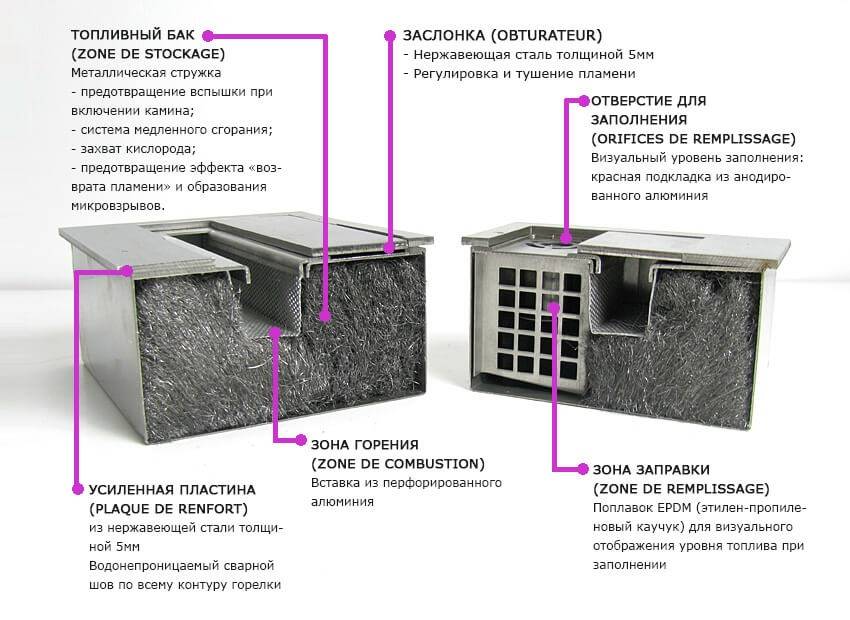
Biofireplace device
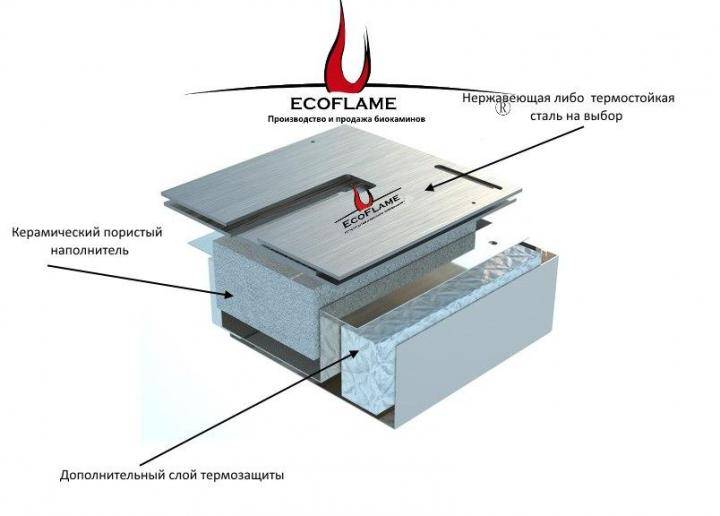
Before you make a biofireplace with your own hands, you need to study in detail how it works. Regardless of the type, it consists of the same elements. These include the following:
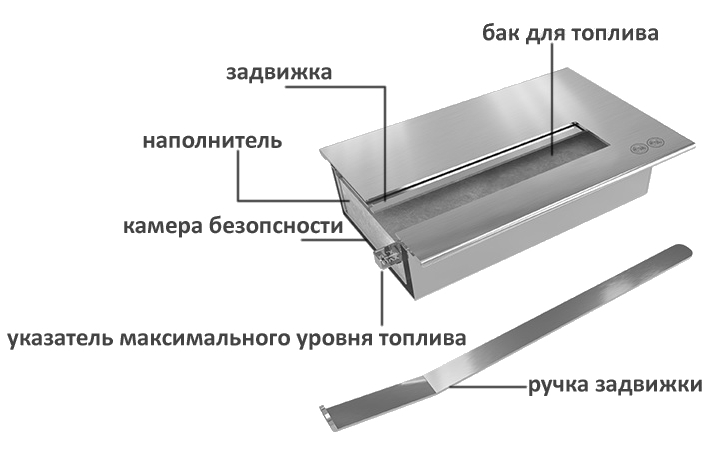
- Heating block. This element can be a fuel tank with a valve or an ordinary burner. As a rule, the block is made of stainless steel or metal. The material is chosen quite thick, which helps to protect the device from the effects of high temperatures and increase the duration of its operation. The volume of the fuel tank can vary from 60 ml to 5 liters.
- Frame. Its shape and dimensions directly depend on the interior design. Among the many models, open and closed cases stand out. In both cases, you can choose an original design that fits perfectly into the room and helps create comfort and warmth in it.
- Decorative elements. These small parts are made of refractory materials and are intended to decorate the product. Most often, they can be various stones for burners, forged grates, ceramic logs and other attributes of fireplaces.
3 id="raznovidnosti-izdeliy">Varieties of products
Before making biofireplace for apartment with your own hands you need to decide on the location of its location in the room. The type of product you choose will depend on this factor. There are three main options:
Desktop. These are small structures that can be made in various shapes and decorated with miniature elements.The flame in them is located behind a special protective screen, which eliminates the possibility of accidental burns and the formation of a source of ignition. Table products perform only a decorative function and do not heat the room at all.
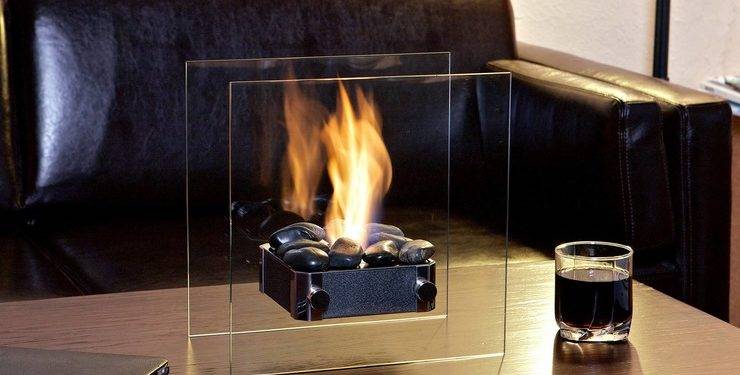 Decorative desktop biofireplaces are safe to use
Wall. These biofireplaces are made of glass or metal. Their length can reach 1 meter, which will make the device quite heavy. Because of this, it is necessary to provide special fasteners to maintain a weighty structure.
 Wall-mounted bio-fireplaces are suitable for any rich and status room
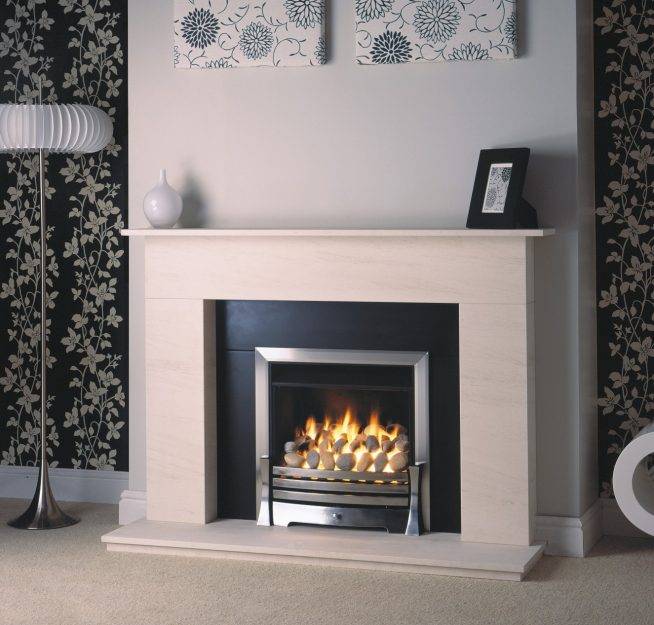
Floor. This is the most beautiful and frequently used type of biofireplace. He gained his popularity due to the similarity with real wooden products. Floor-standing devices can be mounted in a wall or a niche, or located in the corner of a room.


 Floor - the most common type of biofireplace
Advantages and disadvantages
A self-made eco-fireplace, like any other device, has its positive and negative sides. There are much more of the first, so you can safely choose the type and begin its installation. At the same time, do not forget about the shortcomings, as they can greatly affect the comfort in the room and create additional inconvenience for its owners.
> The advantages of biofireplaces include the following:
Simplicity of design. The product does not require expensive additional equipment, chimney and ventilation. In addition, the installation is carried out without coordination with various authorities and neighbors.
Ease of construction. As a rule, even the largest models rarely weigh more than 100 kg. This feature simplifies the process of transportation and installation.
Safety
By following the simplest precautions, the risk of injury or fire is minimized.
Environmental friendliness. During operation, the decorative device does not emit substances harmful to the human body and does not pollute the atmosphere
In addition, no smoke or soot is generated during operation.
Ease of maintenance. Even a child can control a biofireplace. To do this, you do not need to know the design features, but simply study the provided instructions.
Additional air humidification. This useful function is based on the release of carbon dioxide and water vapor.
The negative characteristics include:
- Small amount of heat generated. Even the most powerful and overall products are not able to heat the room in which they are installed.
- The need for frequent ventilation of the room and the arrangement of good ventilation.
- The high cost of the device.
iv class="flat_pm_end">


