- Installation of a hygienic shower
- Installation of a wall-mounted shower
- Installing the faucet on the sink
- Built-in toilet shower
- Installation of the bidet cover
- Features of mounting a wall-mounted hygienic shower
- Product varieties
- Features of installing a hygienic shower with a concealed mixer
- Practical tips for choosing
- Production material
- Design features
- Manufacturer
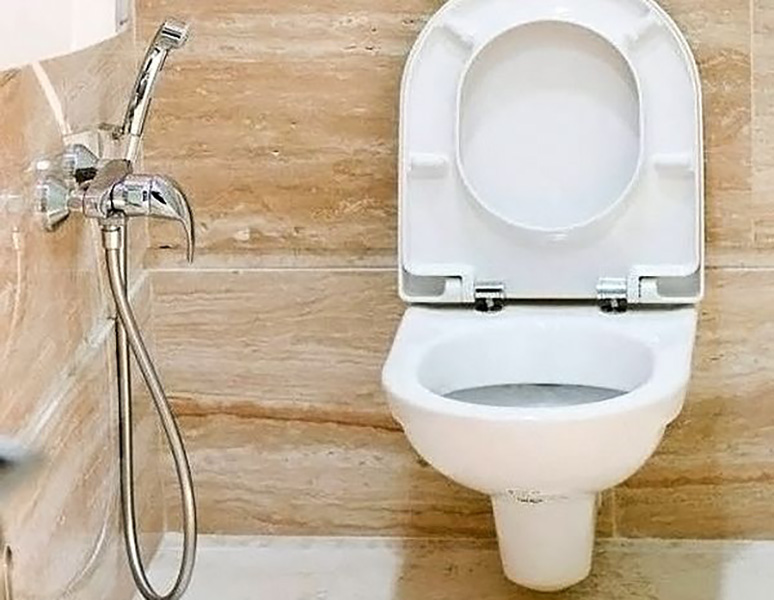
- What is a hygienic toilet shower
- Varieties of fixture
- Tip number 2: individual approach
- Self-installation of a hygienic shower
- Installation height
- wall mount
- Installing a shower on a sink
- Mixer installation
- Installation of the bidet cover
- Features of the assessment of the main elements of a hygienic shower when choosing
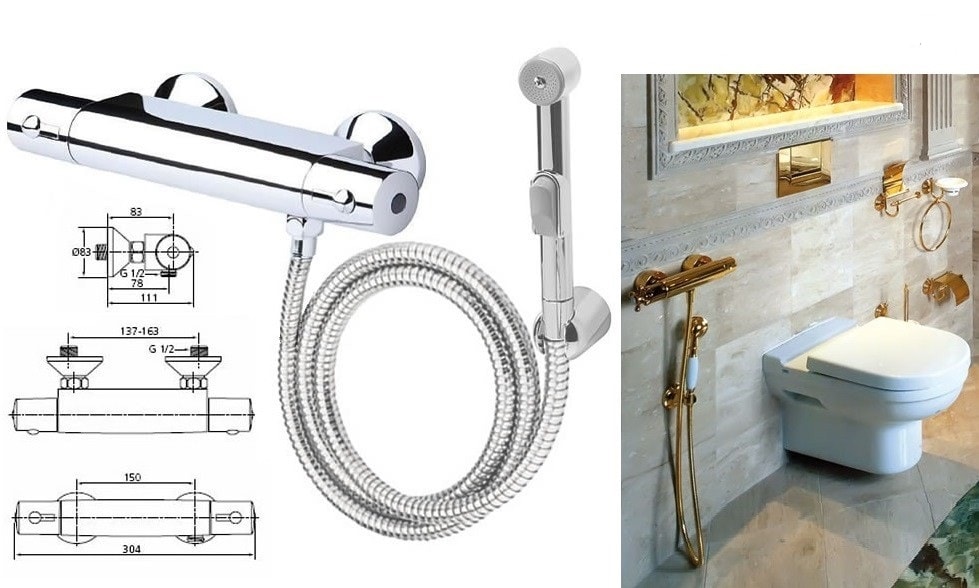
- Hygienic shower mixers
- Shower head and flexible hose
- How to choose
- Do-it-yourself installation of a hygienic shower in the toilet
- How to install a shower toilet
- Installing a bidet lid on a toilet
- Installing a wall-mounted hygienic shower
Installation of a hygienic shower
It is not enough just to purchase a plumbing fixture. It still needs to be properly installed.
It is extremely important to do this correctly, because the comfort of its use depends on it. Consider how to install various options for a hygienic shower
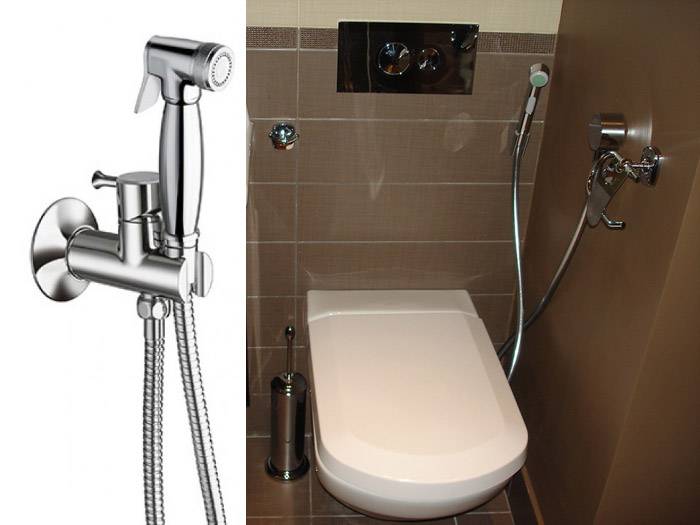
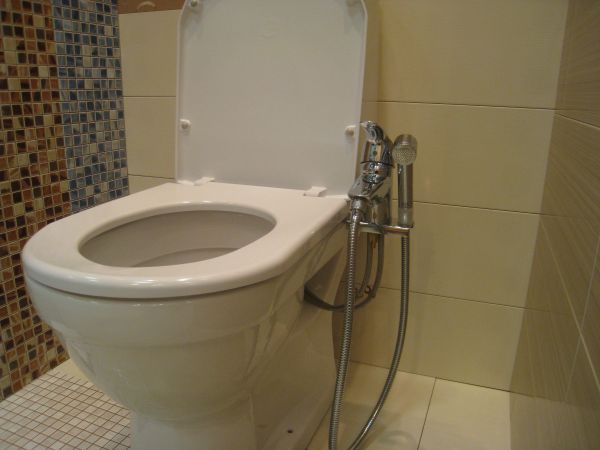
Installation of a wall-mounted shower
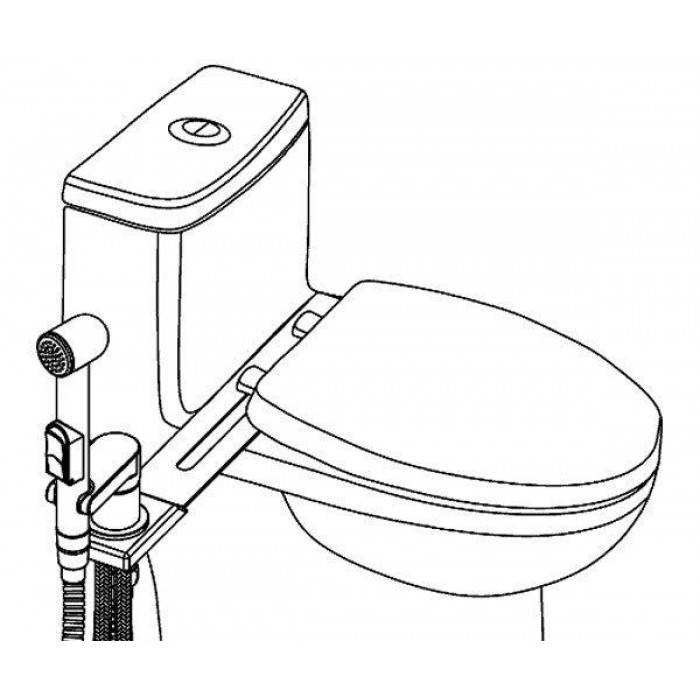
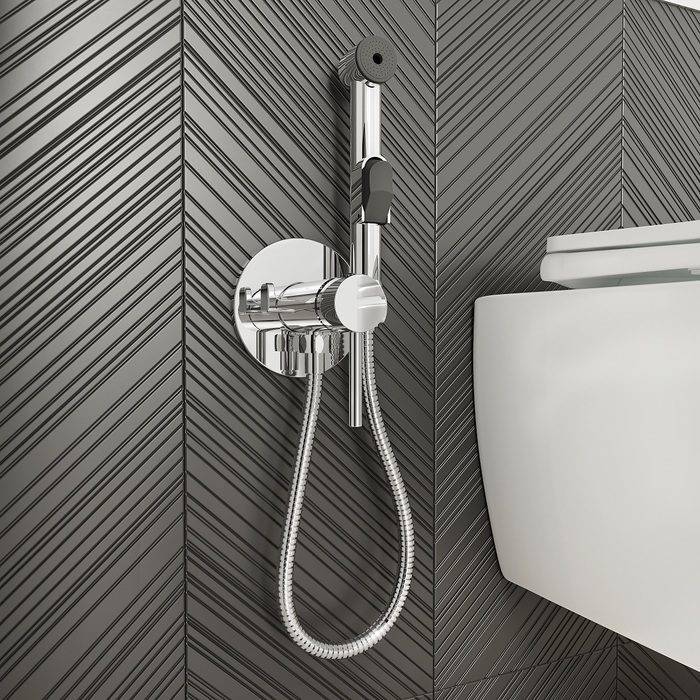
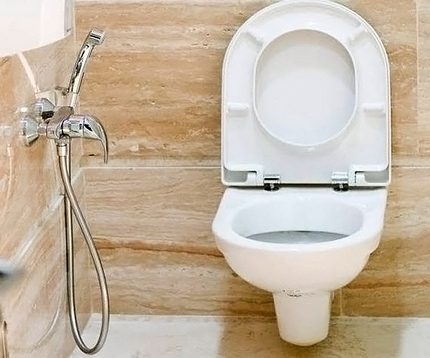
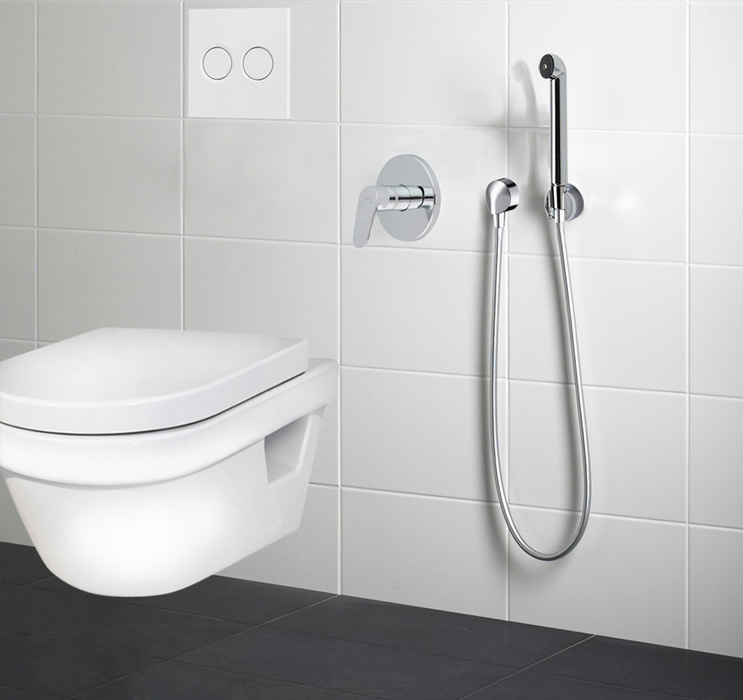
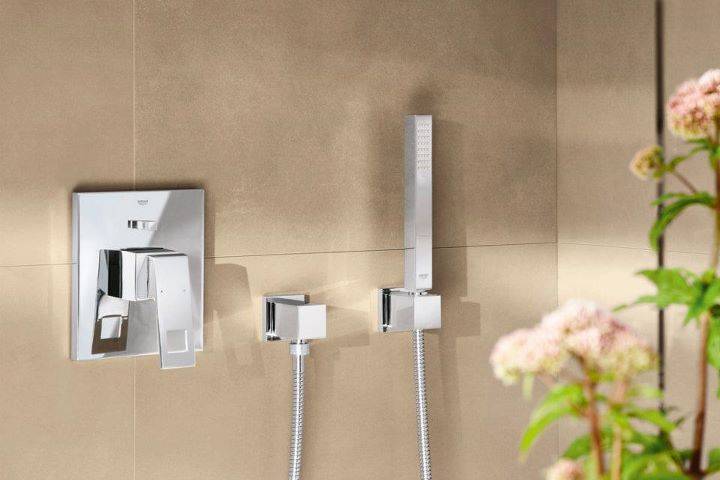
A well-made installation of a shower on the wall can decorate a bathroom, especially if you choose a device in the same style as the design of the room. Wall mounting can be carried out in two ways - open and closed.
Open mounting is easier as it does not require any dirty work. The mixer is mounted on the wall with anchors or dowels, using a drill. A holder for a watering can is screwed next to the mixer.
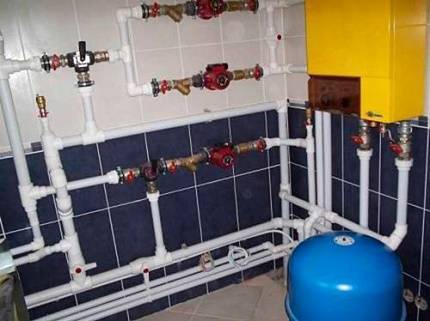
Installation of a hygienic shower in a toilet in a closed way involves equipping a special recess in the wall in which the mixer will be hidden. Only the control lever and the holder with a watering can will remain visible.
In any case, it is necessary to bring water pipes to the mixer inside or outside the wall and connect them. Often a thermostat is built into such a system, which is also mounted on the wall.
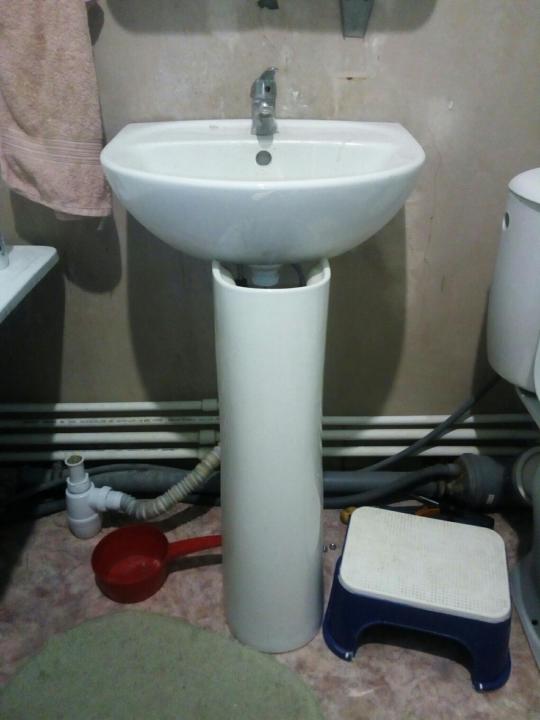
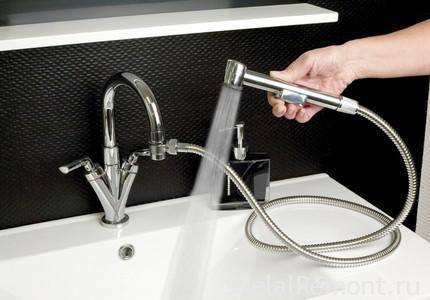
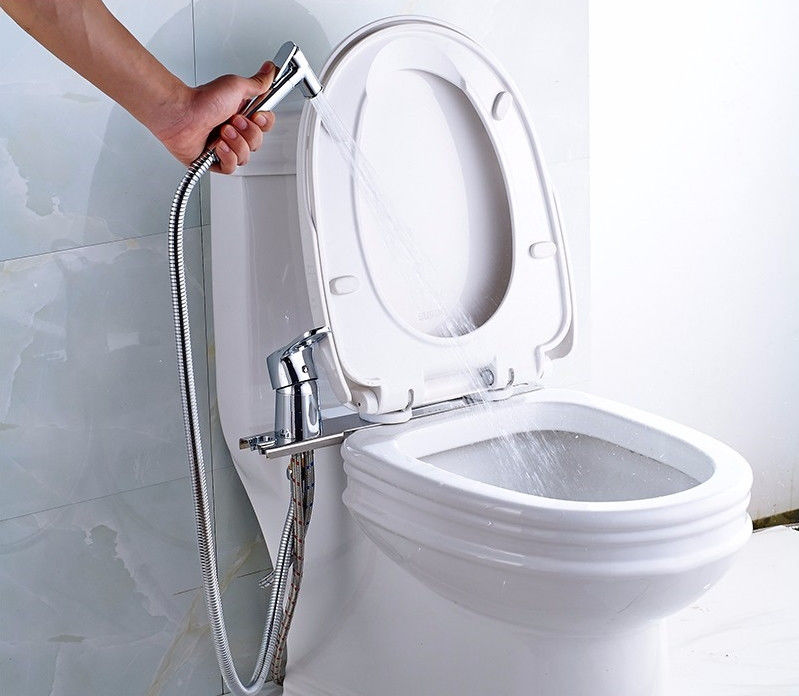
Installing the faucet on the sink
When there is a sink in the bathroom, it is not difficult to conduct a hygienic shower for the toilet from it. First you need to decide on the type of faucet on the sink. If it is already installed, then you may not need to purchase a new device. A prerequisite is the presence of a watering can of a special form, designed for hygiene procedures.
If there is no mixer yet, then buy just such a mixer, as described above. Its installation is not difficult. The flexible hose should freely reach the toilet. Usually it works in conjunction with a spout. When the faucet is open, water flows into the spout, and when the button on the shower is pressed, the water rushes into the flexible hose.
Built-in toilet shower
When a toilet with a hygienic shower (bidet toilet) is installed in the room, the old toilet is first dismantled. In its place, a new device is installed and attached to the floor or wall. In the new room, the toilet is immediately installed in a permanent place.
When the built-in hygienic shower in the toilet is connected, the connection diagram is as follows:
- water hoses are connected to the mixer;
- the mixer is inserted into the existing hole and fastened there;
- the ends of the hoses are wound onto water pipes;
- shower tests and mixer operation are carried out;
- if a retractable nozzle is used, its operation is checked.
Installation of the bidet cover
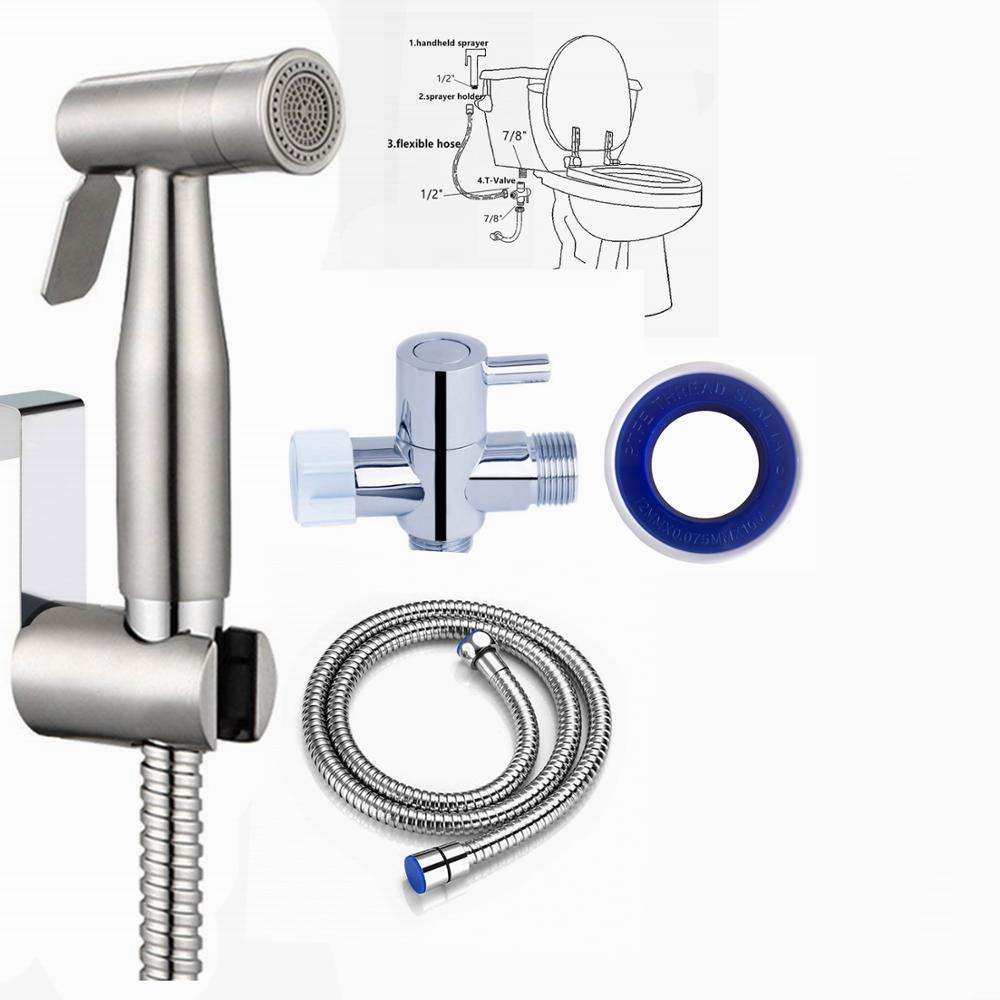
This work can be easily carried out on your own, since it does not involve violating the integrity of the walls and tie-in to the plumbing system. It is enough to purchase a tee, which will be installed next to the toilet bowl.
Do-it-yourself installation of this type of hygienic shower in the toilet is carried out in the following sequence:
- the old lid is removed from the toilet, and a bidet lid is attached instead;
- the water in the system is blocked;
- the tank is completely drained;
- the supply hose is unscrewed, through which water flows into the tank;
- a tee is installed between the water pipe and the tank. One end of the tee enters the tank, and the other is connected to the toilet lid;
- if the device is controlled by an electric drive, then it is connected to a socket specially designed for this purpose.
When buying a hygienic toilet shower, try to focus not only on the price, but also on well-known manufacturers that specialize in the production of such accessories.Thus, you will provide yourself with high-quality equipment, the purchase of which you will not regret.
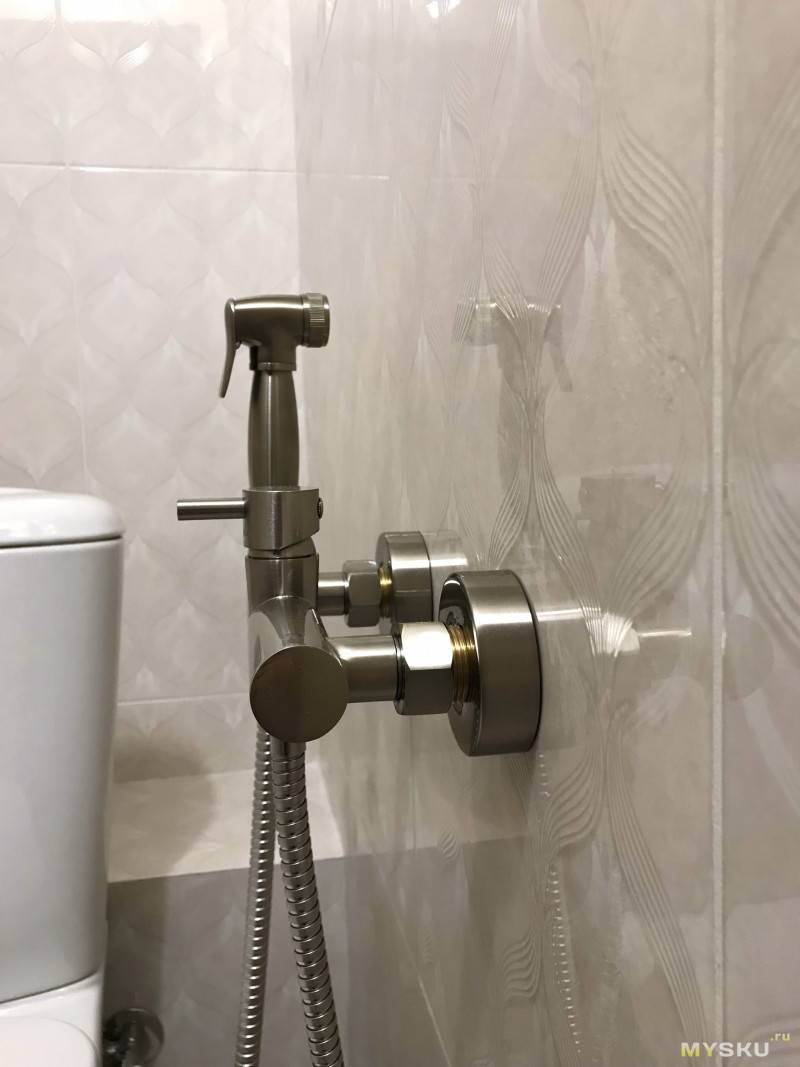
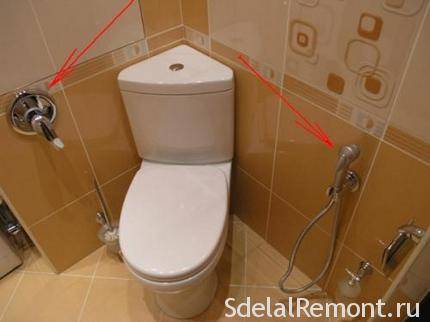
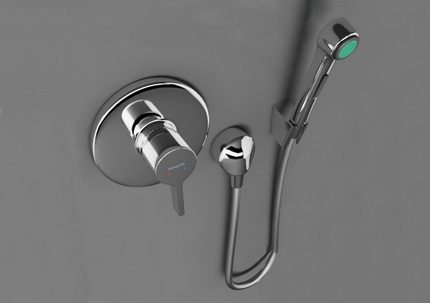
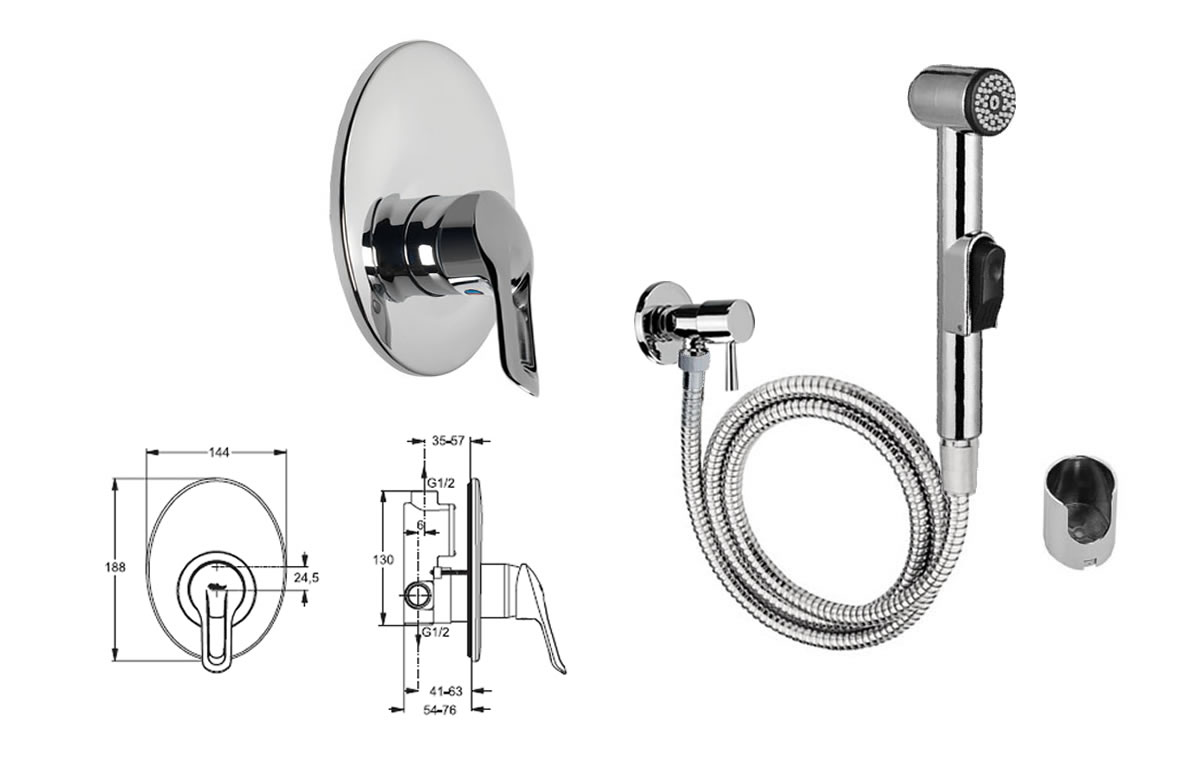
Features of mounting a wall-mounted hygienic shower
If you provide for the installation of a wall-mounted outdoor or built-in hygienic shower in advance, then the installation of external elements will not be difficult. When choosing one of these options, the place for mounting the structure can be chosen arbitrarily, but in such a way that it is convenient for both users and for connecting hot and cold water pipes (pipes) to the device.
Hygienic shower with built-in single-lever mixer.
There are many different installation diagrams for this device - the choice of the required option depends on the design of the purchased product and the place of its installation.
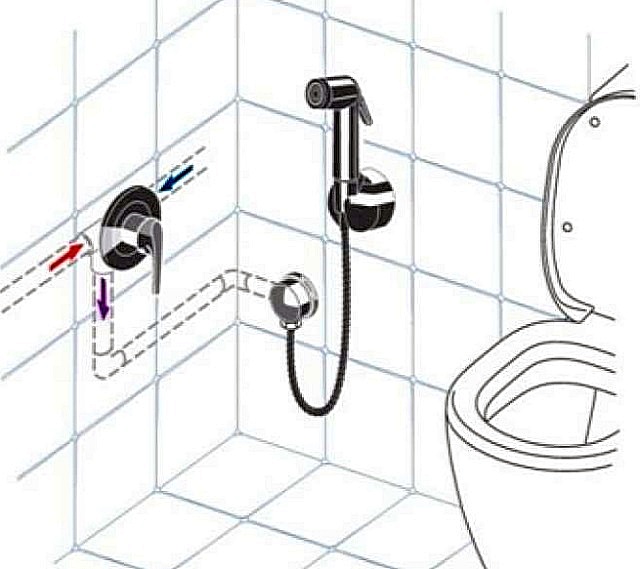
One of the options for connecting pipes to the faucet and to the water outlet of the shower hose, when they have to be spaced apart in order to increase comfort in use.
Installation work includes several stages:
It is best to find a convenient place to place such equipment, to make a kind of fitting. To do this, you will have to sit on the toilet, and, holding out your hand, determine where it will be comfortable to reach the faucet lever and shower head. This area is worth marking on the wall.


- Next, you need to determine the shortest path for the passage of water pipes from the main highways to the installation site of the mixer, fixing it on the wall with a pencil. If the hose is connected to a holder that has a separate design, then a line is also drawn from the mixer to the place of its installation.
- To the location of the mixer and the water outlet, cuts are cut in which the pipes for supplying cold and hot water will be placed.
Concealed polypropylene pipes from the water supply to the faucet, and from the faucet to the water outlet of the shower.
- If it is planned to mount a mixer model built into the wall, then a nest is cut for it (a recess of the required dimensions), into which it is recommended to embed a plastic box. It will protect the wall from moisture, and the mixer from building dust and finishing mortar.
- To supply water to the mixer, it is recommended to use polypropylene pipes, the connection of which is carried out by welding. Docking in this way will eliminate the possibility of leaks. And given that the pipes remain hidden in the wall, this is a very important point.
- The plastic pipes are connected to the mixer using special straight or angled threaded fittings.
- So, hot and cold water pipes are connected to the mixer. Then a common pipe is drawn from it to the installation site of the water outlet, to which the shower hose will be connected. Through this section of the pipe, water of the required temperature, prepared by the mixer, will flow into the hose.
- After the installation of the pipes is completed, they are covered with plaster mortar flush with the main surface of the wall. Outside, only the body of the mixer cartridge with the control rod and the water socket remain for the subsequent installation of the shower itself.
- The wall is lined with decorative material, in which holes are cut through the protruding parts of the system.
- Further, a decorative cap is installed on the protruding thread of the mixer head, which will close the unsightly appearance of the opening remaining in the finish, which, as a rule, does not have completely smooth edges. Then the adjusting lever is installed.In a similar way, a water outlet is “tied up”. As already mentioned, it can be combined with the bracket or located separately. The easiest option is when it is completely combined with a mixer.
- The last step is to assemble the hose with the shower head, and then connect it to the appropriate water outlet, bracket or faucet - depending on the model.
With mixers of external installation, everything is much simpler. Their installation is practically no different from the installation of the most conventional mixer. That is, eccentrics are screwed into the water sockets, the center distance and the horizontal position are precisely positioned. And then, with the help of union nuts with the installation of gaskets, the mixer itself is simply screwed on.
Screwing in the eccentrics and their correct positioning is perhaps the most difficult operation when installing wall-mounted outdoor faucets. All subsequent steps are simple and straightforward.
In conclusion, it can be noted that exact instructions with the application of the installation diagram for a specific model of a hygienic shower are usually included in the product package. So the main information will have to be drawn from there - there may be some nuances.
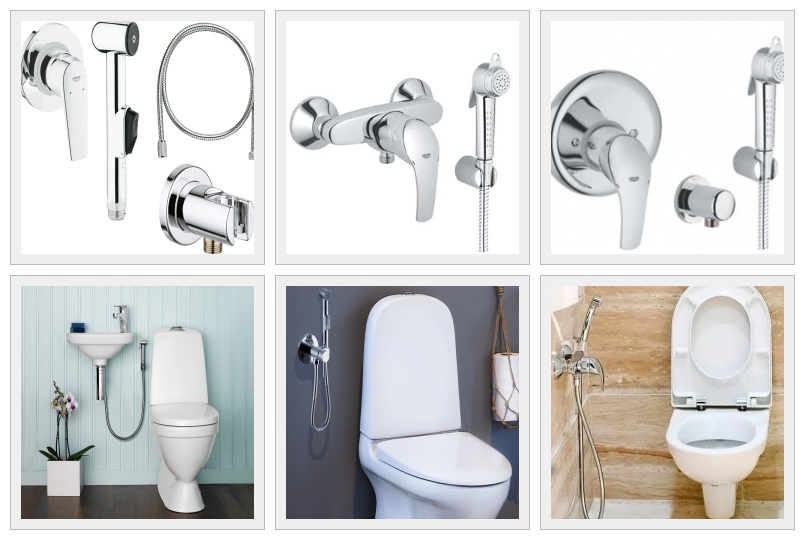
Product varieties
today's market hygienic shower models presented with several options. Each of them has its own characteristics and features in the application. The water connection can be hidden in the wall, as well as located in a conspicuous place. In this case, built-in models imply some kind of repair if the device breaks down.
The design of the device is simple and in order to use it, you only need click on the buttonlocated on the watering can, before opening the mixer valve.
If a thermostat is provided on the watering can, then the temperature is set only once, and subsequently it remains the same as it was set. In this case, the shower system will remember the desired temperature and will output it every time you turn on the watering can.
In order not to bother with repairs, in the process of connecting water to the mixer, simply lay the necessary pipe by connecting it to the nearest plumbing fixture.
Hygienic shower with sink. If the bathroom involves the location of the sink next to the toilet, then you must choose a faucet equipped with a third outlet for water. Then, if necessary, water will be supplied to the shower head. Such a device works like this: when the tap is opened, water is supplied to the nose of the mixer, and is held there until the control button is pressed. As soon as the button is pressed, the water flows to the hygienic shower head. Such a shower model will perfectly fit into a small-sized or combined bathroom. A variety of product options, allows you to fix the shower directly on the sink. And if the bathroom is very small, you should try to choose a sink with a corner placement, which is installed above the toilet bowl. Such a move will save additional space in the room.
Installation of this type of hygienic shower is quite easy and is equivalent to installing a conventional sink. The main design feature: mixer with a third outlet. After using the tap, do not forget that it is necessary to turn off the mixer, otherwise the water from it will flow into the sink.
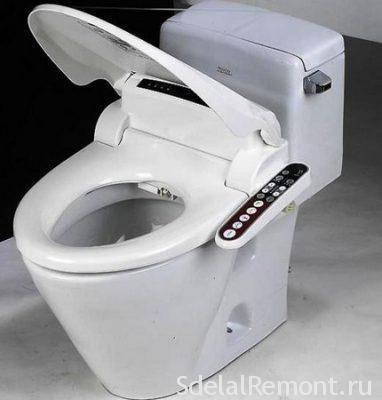
Toilet-bidet.This is a multifunctional device that looks like a standard toilet, but is equipped with a special nozzle for water supply. The nozzle must be retractable and have a power button. Usually it is placed on the rim of the toilet bowl.
The water supply to the mixer in such devices is connected to the installation from below through a separate hose.
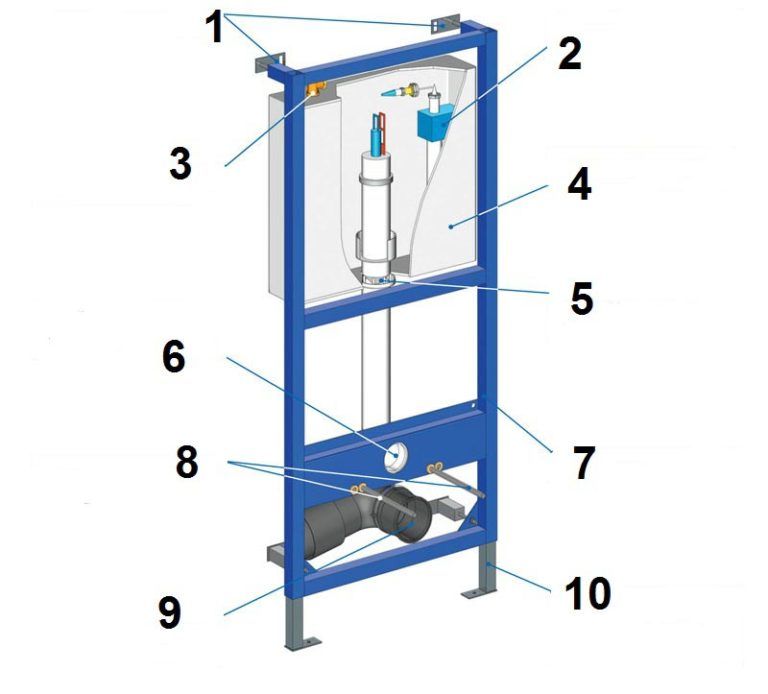
Such a universal device is good because it can be used both in conventional toilet bowls and in hanging ones, which significantly saves space in the bathroom. The design of the installation itself is a metal frame on which the bowl is attached. By pressing the button on the toilet, the nozzle extends and supplies water at the desired temperature. At the end of use, the nozzle hides in its place. The pipe connection to such a toilet bowl - bidet is carried out behind a false wall. The model is compact, but has a high cost, which depends on the set of additional features and the manufacturer.
Bidet cover. Another option for a hygienic shower. Such a cover has a certain set of functions, which may include heating water to the desired temperature. The toilet lid is portable. It is equipped with control buttons that allow you to select one or another function. The lid itself is connected to the sink or to the tee, which is responsible for supplying water to the drain tank.
Bidet covers are mechanical and electronic. The latter option is mains powered, more expensive, and may have additional features. However, in the absence of electricity, the possibility of using a bidet cover is reduced to zero, due to the fact that the water will be heated from the power supply.
A variety of models allows you to choose exactly the option that is most suitable for a bathroom with certain conditions.
Features of installing a hygienic shower with a concealed mixer
- In the place where the mixer will be installed, it is necessary to drill a recess, having previously measured the dimensions of the mixer to be hidden.
- Ditch the pipe ditches from the finished recess to the water source to which the mixer is planned to be connected.
- Lay water pipes, connecting them to the water supply.
- Install the mounting box together with the functional parts of the mixer in the prepared recess.
- Connect the mixer to the water supply.
- Check whether all pipe connections are really tight enough - subsequently, for such a check, you will have to disassemble the wall.
- Close up the strobes, level the walls and plaster them, and then carry out cosmetic repairs.
It will not be easy to cope with such work - you need not only to have special documents, but also some experience in performing repairs. Therefore, if possible, it makes sense to entrust the installation of a hygienic shower with a concealed mixer to professionals.
Practical tips for choosing
When choosing a hygienic shower for the toilet, you need to pay attention to important selection parameters:
Production material
This type of fixture uses the same materials as traditional shower models. In the upper price segment copper, bronze and brass. Stainless steel products are cheaper.


Budget models are made from silumin and plastic.
 When purchasing a wall model of a hygienic shower made of plastic, it is worth considering the option when the flexible hose is pulled into a metal hose coated with imitation of any metal
The showerhead, regardless of whether it is made of plastic or metal, must have "rubberized" holes for water.
When choosing between plastic and silumin, give preference to the first option, since polymer products are much more durable and easier to use.
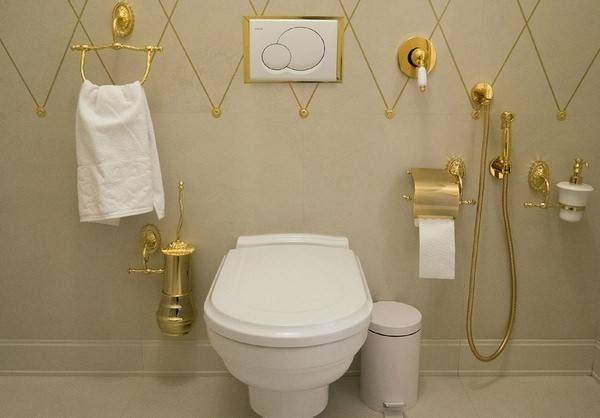
Design features
When choosing between a wall-hung and floor-mounted version of a toilet bowl equipped with a hygienic shower, take a closer look at the wall-mounted plumbing. And the reason is not even that such models look elite and modern.
Suspended plumbing saves space and greatly simplifies the cleaning process.
When buying mixing equipment, pay attention to the length of the hose: without this condition, it is impossible to ensure maximum comfort in using the device
When choosing a shower with an electric heater, keep in mind that it needs reliable grounding.
In addition to this, in the vast majority of such models they have serious power, which will certainly entail additional costs for paying for electricity.
Manufacturer
Professional plumbers recommend choosing faucets made in Germany and Finland. These are products of trademarks: Grohe, Geberit and Hansgrohe.
Manufacturers that have proven themselves in the market guarantee the consumer the high-quality operation of the equipment produced during the entire period of operation.
 The design of most models of European-made faucets already provides for the presence of a built-in hygienic shower
Regardless of the version of the hygienic shower for the toilet, to extend the life of the equipment, turn off the water every time after using and turning off the button.
This will reduce the pressure of the water pressure in the stopcock of the watering can, preventing the possibility of a rupture of the rubber hose placed in the corrugated sleeve.
Video selection of options for the execution of sanitary equipment for hygiene procedures:
What is a hygienic toilet shower
On the modern market for sanitary devices, there are several models of a hygienic shower:
- Toilet-bidet. The device is a nozzle that is mounted in the toilet. It can be mounted directly into the base of the sanitary ware or be pulled out on a special fitting.
- Bidet cover. Pretty handy addition to the usual toilet. The product is universal, so it can be used with any model of plumbing. It is a cover in which the control unit is mounted. It allows not only to supply water, but also to give it a comfortable temperature, as well as to smoothly lower the lid of the toilet seat.
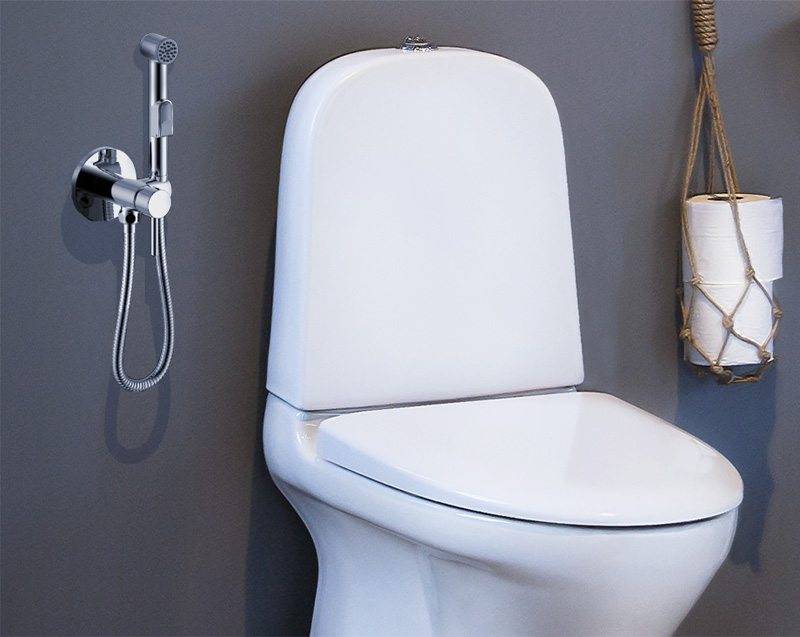
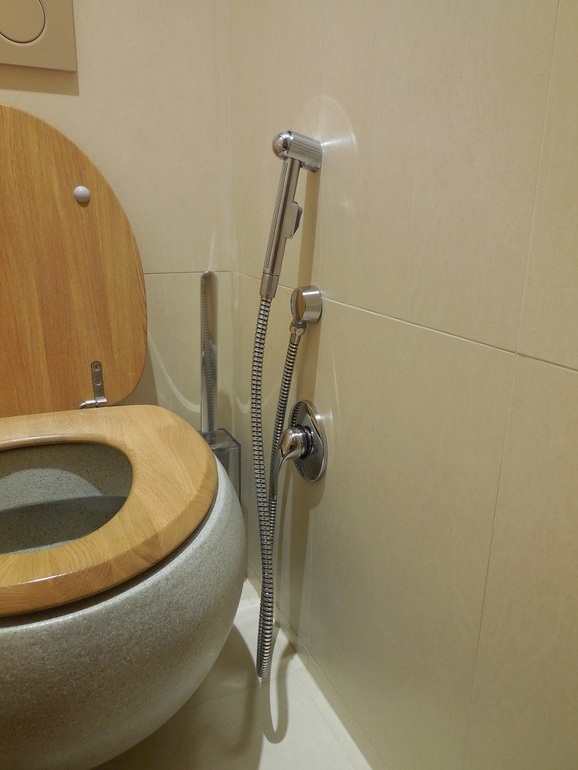
- Model mounted on the wall. One of the most common options. The design looks like an ordinary shower with a watering can, which is fixed in a comfortable place for use on the wall of the room.
- Shower connected to the sink. The model is convenient when the toilet is located in close proximity to the washbasin. To do this, you need to install a special mixer with several outlet pipes.
Varieties of fixture
There are several adaptation options. Despite the fact that they have a different appearance and mounting options, they are all easy to install.There are the following varieties:
- Toilet-bidet. This is a special design in which the shower is built. The nozzle can be fixed in the plumbing structure itself or on a retractable fitting. The control unit is installed in the water drain tank. The dimensions of such plumbing are larger than those of a conventional toilet. In addition, it is more difficult to install such a model than other options. The cost of the product is higher.
- Bidet cover. Makes a high-tech fixture out of ordinary plumbing. In this lid is installed a mixer, a control unit that regulates the soft lowering of the lid, drying and water temperature. On sale are electronic versions of the bidet cover. These are more functional, comfortable to use devices. The disadvantage of an electronic product is one - high cost.
- Wall construction. The easiest option for a hygienic shower. The device mixer is installed on pipes passing in the bathroom. The holder itself is mounted on the wall next to the toilet. The watering can is connected to the mixer with a flexible hose. The device is easy to use - first you need to set a comfortable temperature on the mixer. The water supply is regulated by a button located on the watering can of the product.
- Embedded model. The mixer of this design is installed in the wall and tiled. It is not visible from the outside. Here there are only a flexible hose and a watering can. This option looks more aesthetically pleasing, but it is not always possible to install the structure - space is required for mounting the mixer.
- Shower connected to the sink. This option is suitable for a combined bathroom. Since there is a sink in the room, the easiest option is to connect the fixture to it.To install it, you will need to purchase a sink faucet, which will have a hose outlet. The advantage of this version of the device is that after the shower is turned off, drops of water will drain into the sink. Otherwise, the product is no different from a conventional wall-mounted shower.
Tip number 2: individual approach
Separately, it is necessary to take into account the presence of households of different heights and ages. For children, plumbing, accessories (bathroom appliances, towel racks), handrails at a low height are often installed. If children do not have a separate bathroom, they put a comfortable bench in front of the washbasin. For the elderly, on the contrary, the toilet and bidet should be placed higher to make it easier for them to climb.
80-110 cm above the floor - the height at which the washbasin bowl should be. Ideally - 90 cm, unless, of course, people of average height use the bathroom. The height of the countertops of bathroom furniture (tables, cabinets, chests of drawers, moidodyrs) should also be the same. If your apartment (house) does not have a children's bathroom, take care of a small bench so that children can perform procedures without obstacles, looking at their reflection in a mirrored cabinet.
Self-installation of a hygienic shower
When the model is selected and purchased, you can proceed to the installation. It is not necessary to invite a plumber for this, any man can handle a simple task. Mounting method will depend on the selected model.


If this is a wall-mounted option, it is important to determine the correct location. This is easy to do - you need to sit on the toilet and reach out to the wall
At the most convenient height, a mount for a small watering can is made.There are a few important things to keep in mind before getting started.

Installation height
The faucet and watering can holder can be mounted on the same wall or on different ones. The main task that affects comfort during use is to choose the right height. There are no specific standards, installation is carried out based on personal preferences.
The product will look aesthetically pleasing if the mixer hose in its free state does not touch the floor, so you should not install structural elements too low. When tiling, it is necessary to choose a place at the junction, without decor and patterns.
When choosing a height for a mixer, it is necessary to take into account the age and health of the household. If one of the relatives has signs of diseases that restrict movement, you can sacrifice aesthetics and place the shower near the floor, in a conspicuous place.

wall mount
For a wall-mounted product, you should choose an open type of installation. The mixer is mounted on the surface of the wall through which water will be supplied. A watering can holder is installed nearby at a convenient height.
Now you can proceed to the installation of flexible hoses. Between all elements of prefabricated structures, rubber gaskets must be placed. This will help avoid leaks. If seals are not included, they must be purchased separately.
You can also mount the shower to the wall in a hidden way. The option involves organizing a niche, creating a box. Water supply is provided by specially laid pipes, which are also hidden in a niche. Only a platform with a lever, a holder, a watering can remain on the surface. The method is more aesthetic, but not suitable for all rooms.The possibility of installation is affected by the thickness of the walls, the location of the ventilation shafts.
Installing a shower on a sink
Installation is possible with a special model with its own outlet and an additional hole for a tap. This is a great option for a combined bathroom in which the sink is located next to the toilet. The process of installing the device for intimate procedures is very simple. The length of the hose with a watering can should be enough to use the shower in the toilet area without tension.
For greater comfort of use, the mixer must be purchased with a thermostat. This will allow you not to be distracted during hygiene procedures by constantly regulating the water temperature. The device will allow you to set your own temperature and save it automatically.

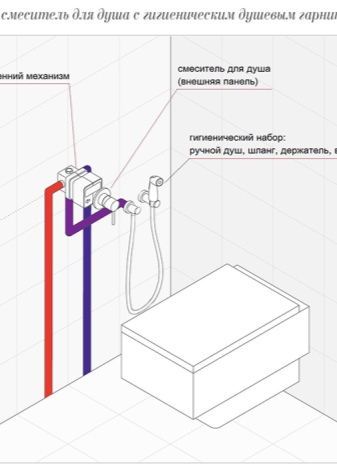
Mixer installation
As already mentioned, a faucet for a plumbing fixture such as a hygienic shower can be wall-mounted or built-in. Which mixer installation option to choose is decided by the owner of the apartment, taking into account his wishes.
The wall-mounted version is installed directly on the pipes that run in the bathroom. For this purpose, you can use almost any faucet that has an outlet for the shower hose. Having installed such a mixer, a hose is screwed to it, and then connected to a hygienic watering can. The holder on which the watering can will hang is installed directly on the toilet or on the wall next to it.
With the built-in version, the mixer is hidden behind a panel that is fixed to the wall. This will help to hide the eyeliner inside the wall so that it is not visible to the users.Such a mixer works on the same principle as all the others, only water comes from behind the wall through a hose connected to a watering can on one side and to a mixer on the other.
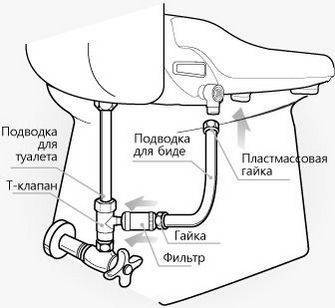
Installation of the bidet cover
The installation procedure is extremely simple
- Change the old seat. To do this, unscrew the lambs - plastic nuts located under the toilet, near the tank.
- Remove the old cover, replacing it with a new bidet seat. Tighten the new winglets in place of the old ones, securing the seat securely. It is better to do the whole procedure with your fingers - they usually do not tighten much, and they can be accidentally damaged with a wrench or pliers.
- Shut off the water - for this it is enough to close the valves on the pipes of the riser.
- Unscrew the hose that supplies water to the toilet tank. The tank does not need to be touched.
- Fix the water hose, wind the tow around the inlet pipe, and then install the tee on it. The center tap must have an internal thread. The same branches that have an external thread must be installed vertically.
- Connect the hose connecting the water supply to the tank to the upper branch of the tee.
- Using a special filter that purifies water, connect a flexible hose or corrugation to the lower outlet, connecting it to the water supply.
Most of the work has been completed. However, the bidet cover must be connected not only to the water supply, but also to the electrical network. But there will be no problems here - if the bathroom has a free outlet, then connect the bidet cover to it. Otherwise, you will have to use an extension cord. If you are planning a bathroom renovation, then it makes sense to involve electricians to install an additional outlet in order to get rid of meters of extra wire.
Features of the assessment of the main elements of a hygienic shower when choosing
Having decided to install a hygienic shower to a regular toilet in the bathroom, you should be aware that the designs of the models can vary significantly. Therefore, it is necessary to decide which of them will be the most convenient in a particular case.
Hygienic shower mixers
The faucet of wall-mounted and hygienic showers installed on the sink can be single-lever and double-lever. There are no specific recommendations for choosing a mixer according to this criterion, so each user can choose the most convenient one for himself. However, it will be useful to know the features of these structures:


Single-lever version of the mixer on a complex device installed on the washbasin.
Single-lever models are equipped with one handle, with the help of which the pressure and temperature of the water supplied to the watering can are adjusted. The convenience of this device lies in the fact that the setup takes a small amount of time, while all manipulations are comfortable to perform with one hand.
Double-lever external model of a hygienic shower.
Double lever mixers. Adjusting the temperature and water pressure in these models is done using two handles or flywheels, which is not very convenient, as it takes more time to achieve the desired result. The advantage of this mixer design is the large volume of the cavity for mixing hot and cold water.
Still, we have to admit that today the most popular option among consumers is single-lever models - because of the convenience of their operation.
Shower head and flexible hose
A flexible hose and a shower head most often come with a faucet.But if desired, these design elements can be purchased separately. The best option would be to use those accessories that are offered by the system manufacturer. The main criteria for choosing these devices are the anti-corrosion properties of the material of their manufacture, the tightness of the connecting nodes, the comfort in operation, and, of course, the aesthetic appearance.
The hose can be purchased separately if you are not satisfied with the length of the faucet included in the kit. As a rule, it is 1500 mm, but there are also models with shorter ones - manufacturers are “greedy”. Besides. The hose must be really flexible - there are such “samples” that are difficult to bring under this definition, and which, in their “flexibility”, look more like supply hoses.
When choosing a shower head, you should pay attention to the presence and configuration of the key. Examples of watering cans for a hygienic shower
Examples of watering cans for a hygienic shower.
The best thing when choosing is to try to hold the watering can in your hand and test it for ease of use. On many models of watering cans, a key or lever is provided, when pressed, the shower turns on. The button-key is located on the handle of the watering can, and the lever is most often located on the back of the shower head.
The simplest options for watering cans do not have a blocking device; water is supplied from them when the lever on the mixer is turned on. The convenience of such devices is highly questionable.
How to choose
Criterias of choice:
- Mounting type. For small bathrooms, wall mounting of taps is rational. Fashionable on-board mount is used for acrylic bathtubs.Built-in installations organically fit into modern interiors, but require the preparation of channels for communications, appropriate wall cladding. Floor installation is the prerogative of spacious open-plan apartments, cottages.
- Design. A cast short spout is suitable for a separate tap on the washbasin, a long swivel spout is alternately used for washing, bathing. Shower systems are ideal for cabins, shower trays.
- Type of locking and regulating mechanism. The ceramic cartridge is the most reliable, durable. Valve mixer heads are cheap, break more often, but are repairable. The ball joint is unpretentious to hard water. Zero pressure switches are preferred.
- Method of flow and temperature control. Heating limiters, full opening - cartridge option. Smoothness of regulation improves with the expansion of the sector of the stroke of the lever. The elderly and children will be protected from injury by installing a thermostatic mixer.
You cannot check the composition of brass, it is advisable to avoid details of a reddish tint, with dark spots, try to examine the internal surfaces without coating. Good brass uniform yellow color.
Statements about the dangers of nickel, lead contained in brass have not been confirmed: no significant dissolution of these elements can occur during the opening of the tap. Rather, heavy metal salts remaining after poor water treatment will harm the body.
Pay attention to the wall thickness of fittings, eccentrics. Thin ones will push through the gaskets, causing a leak, or even break off along the thread. Short threads are easy to strip
The best fittings are turned from rolled bronze, as latent pores are possible in brass castings.
Short threads are easy to strip. The best fittings are turned from rolled bronze, as latent pores are possible in brass casting.
Reliable flexible connections are made of corrugated stainless steel, shower hoses are also preferably made of stainless steel with anti-twist bars. Easier to clean silicone watering cans and aerators. Their regular work is important for saving water due to the air saturation of the jets.
Learn about the warranty. Minimum resource:
- buildings - 5 years;
- cartridge - 3 years;
- handles, shower set - 3 years.
Check out the information about the model on the official website of the manufacturer. Find out the addresses of services, find out from consultants the possibility of replacing spare parts with analogues. Learn more from Plumber Practitioners.


Promoted brands will be 15 - 30% more expensive than little-known classmates. Overpayment for a name, controversial artistic expressiveness is the lot of the top segment. The middle class is not only profitable, reliable, but often spectacular and stylish. It is advisable to consider economy options from 5000 rubles.
When purchasing a product, find out if the store is an official dealer of the brand, otherwise you risk buying a fake. Check the presence of a passport, the correctness of the record of the date of purchase, save the receipt.
Do-it-yourself installation of a hygienic shower in the toilet
Naturally, the process itself and the features of installing shower equipment for a toilet depend on its type, each of which we have listed above. So, some types need major repairs for their installation, while other structures can be installed so that the walls remain intact, and the plumbing does not have to be changed either.
How to install a shower toilet
This design is installed by analogy with a simple toilet, except that you need to additionally supply water and install a mixer. The water connection is carried out in the following ways to choose from:
- connect the cold water pipe to the ball valve, and then to the flexible hose;
- connect both pipes to a hidden mixer, then hot water will come out of the nozzle;
- connect both of them to the thermostat, where you can fix the desired temperature of the water.
Also, the design can be floor-standing and not differ from a conventional toilet bowl or suspended, then the tank is mounted on the wall.
Installing a bidet lid on a toilet
To equip your toilet with a bidet cover, you need to follow these steps:
- close the shut-off valve, shutting off the water supply to the tank and draining water from it;
- remove the water supply hose to the tank;
- remove the old toilet lid;
- put a tee;
- install a hose that will connect it to the tank;
- insert a bolt into the plug, and then it into the plate;
- we connect it with the main part of the structure;
- install the main part of the structure and insert the bolts into the holes on the toilet;
- we fix them below with the help of seals and plastic washers;
- tighten the nuts;
- we attach the structure to the tee and check the water supply.
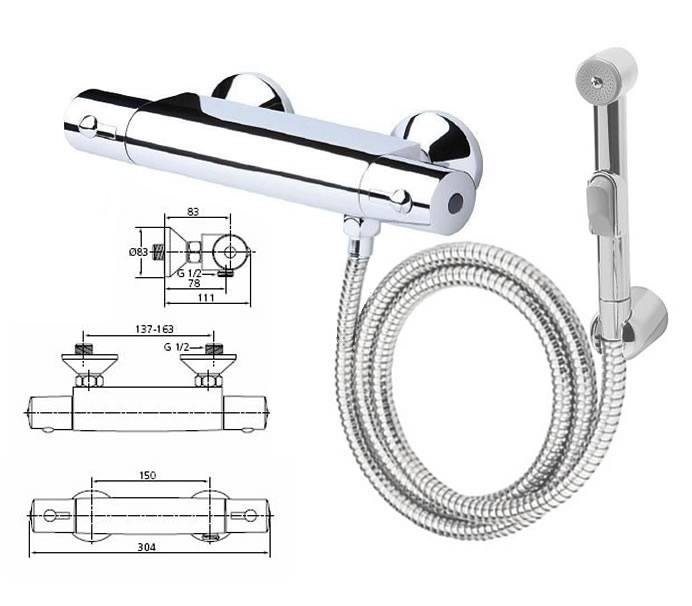
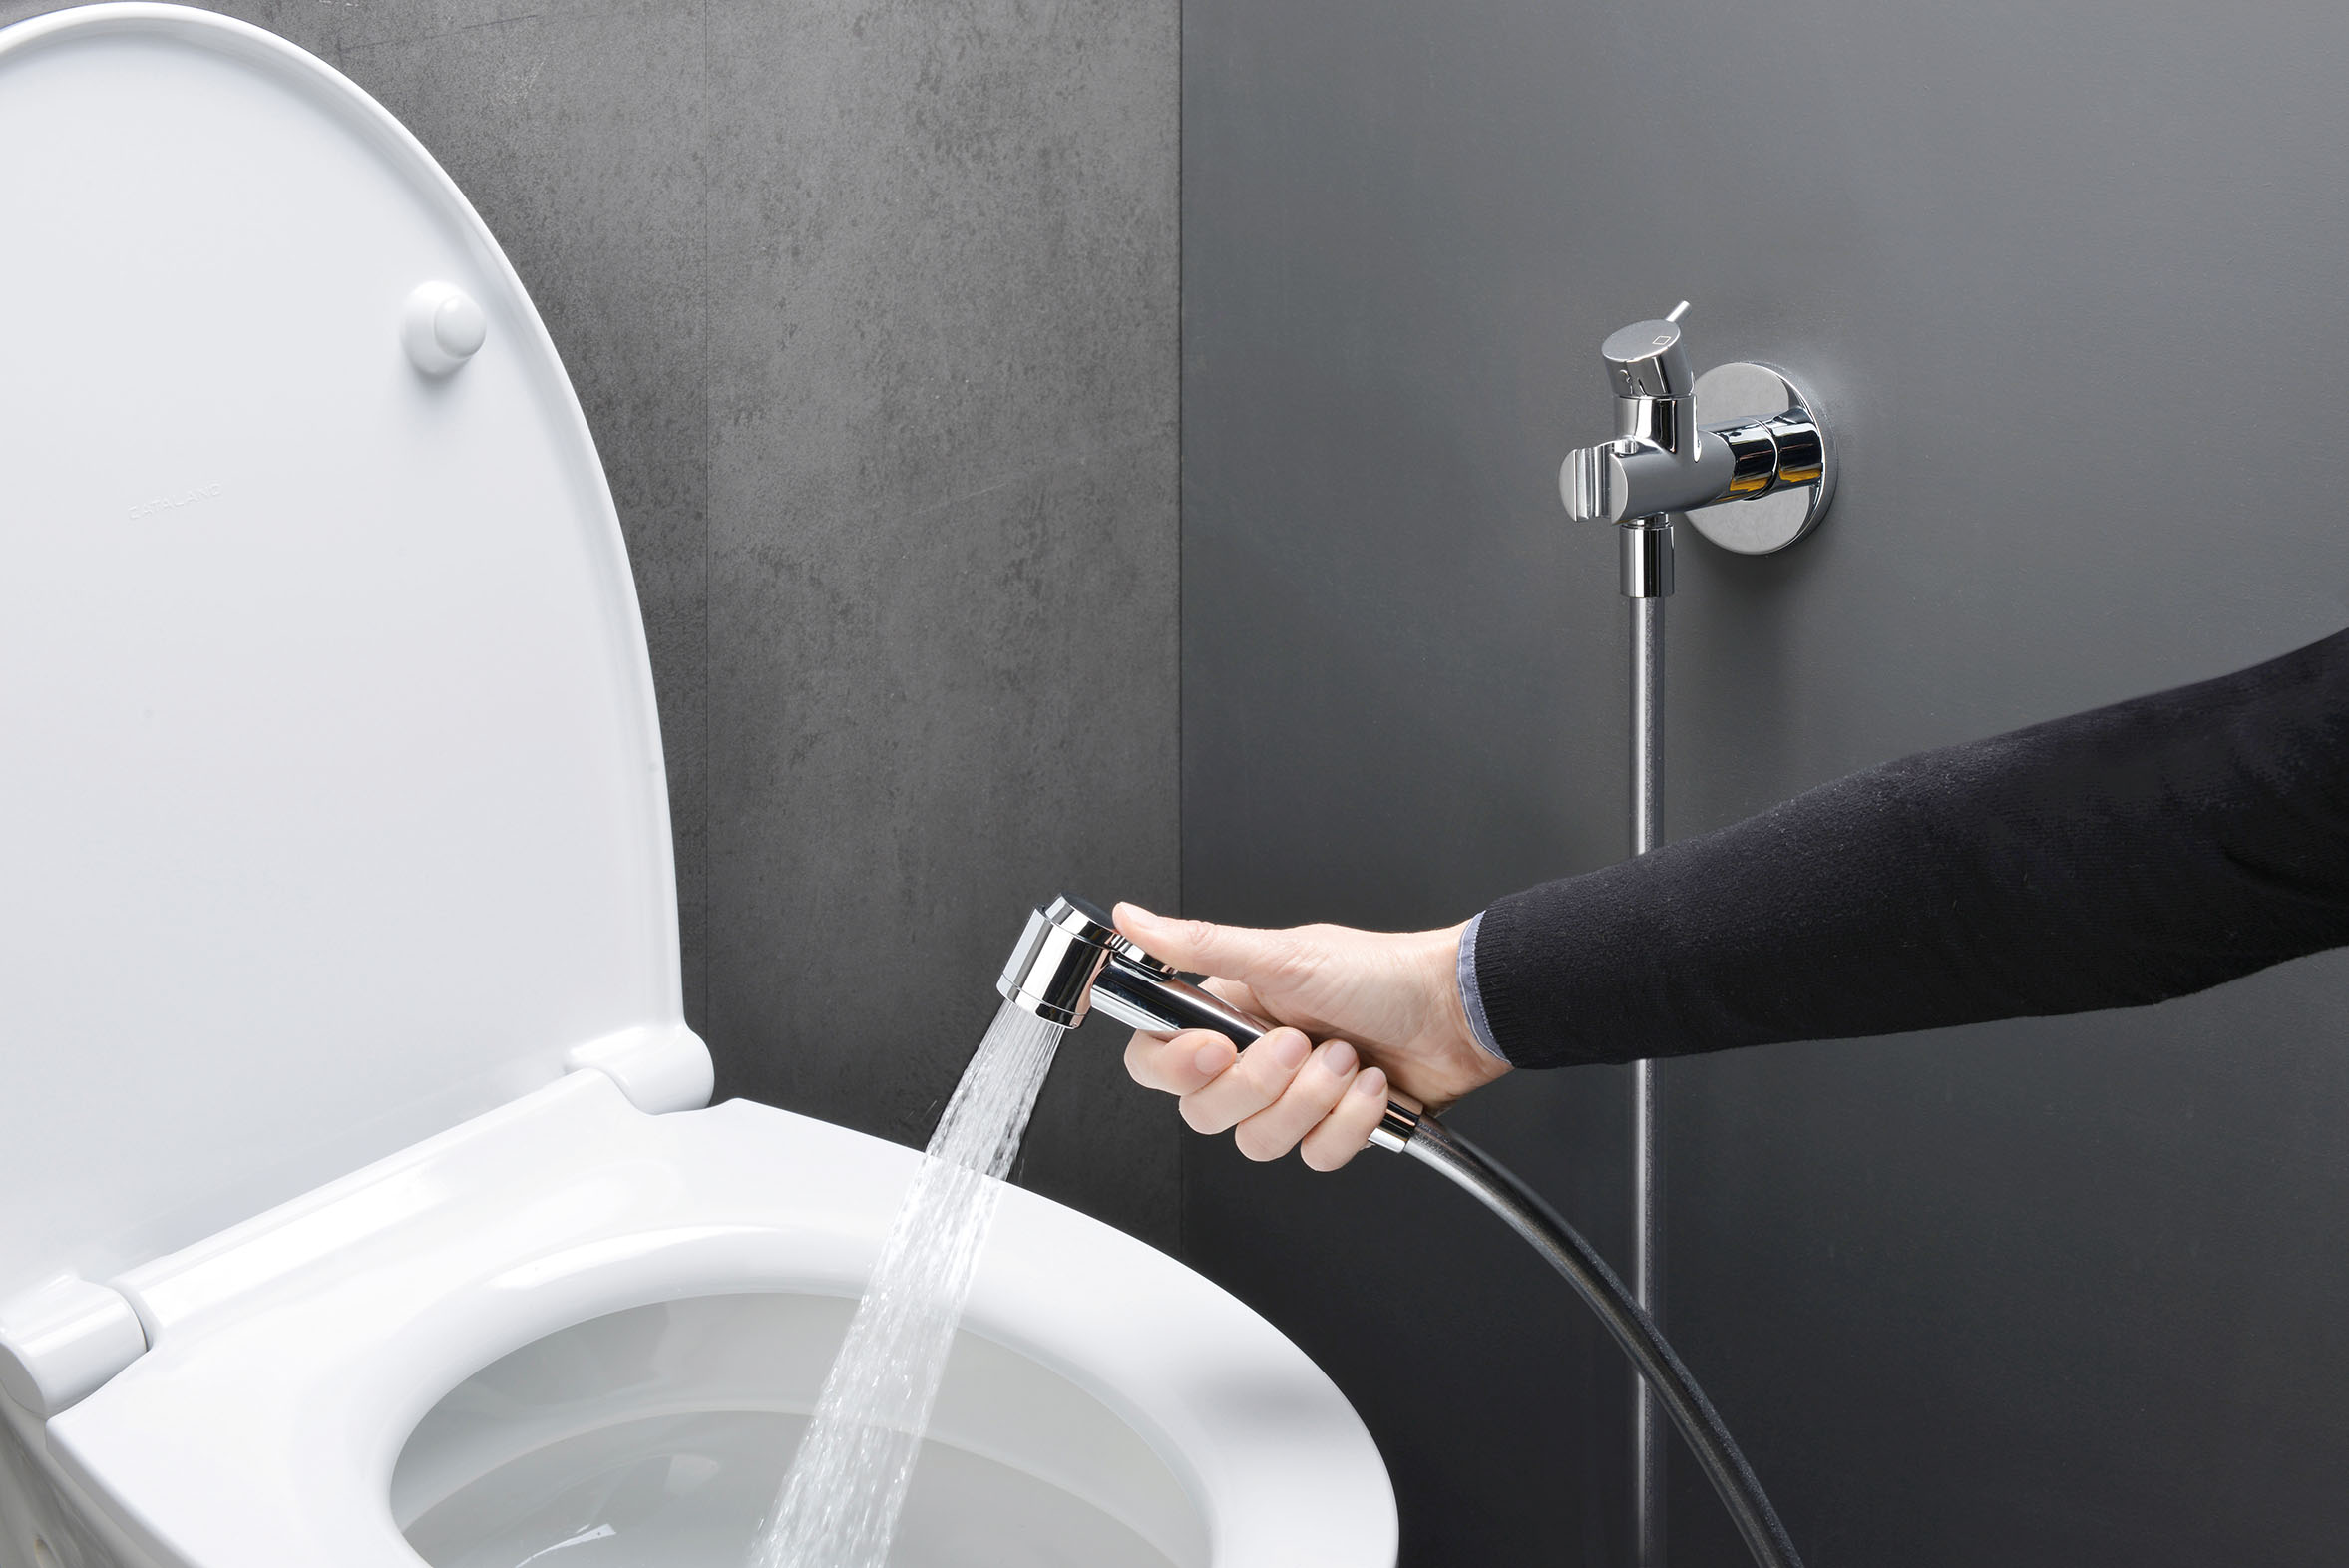
Installing a wall-mounted hygienic shower
You can install a wall-mounted shower structure yourself if you follow the requirements in the instructions attached to it. Special tools are not needed for this. The installation kit for an outdoor type shower for a wall includes the following items:
- watering can;
- hose;
- mounting plate;
- leuk holder;
- installation diagram of the structure.
If you install the structure on pipes, you can take any mixer with one hose outlet.
So, one end should be screwed to the faucet hose, and the other attached to the watering can and inserted into a special holder on the wall. In order for the design to serve you as long as possible, you must not forget about regularly shutting off the water after turning off the shower, regardless of the model. Otherwise, the hose and stopcock in the watering can, which will constantly succumb to water pressure, will not be able to work normally very soon.
And if you are not sure that your family members will constantly shut off the water behind them, then it is better not to put a shut-off button, but then you will have to do everything manually using the mixer handles, but this is not very convenient, but there will be no water leaks.
For the manufacture of the wall structure, stainless materials are used, which are pre-processed. Also in the assortment you can find models "under gold" or "under bronze".
The watering can is made of plastic, which is covered with a thin chrome layer, although sometimes you can see metal watering cans. It includes rubber nozzles, which are necessary for directing the water jet and so that water does not splatter all over the room.
The hose is most often also plastic, but in order to protect it from frequent kinks, it is often equipped with special metal inserts.
And when choosing models where there is a mixer in the complex, it is better to choose with built-in cartridges, which will then be easy to replace with new ones.