- The process of waterproofing the floor in the bathroom: stages of work
- DIY waterproofing in the bathroom
- Wall waterproofing features
- Waterproofing "waterstop". Completing of the work
- Waterproofing wooden walls in the bathroom
- How to properly apply waterproofing material?
- How to make bituminous waterproofing on a wooden floor
- Training
- Water Repellent Barrier Materials
- Waterproofing bathroom walls: features
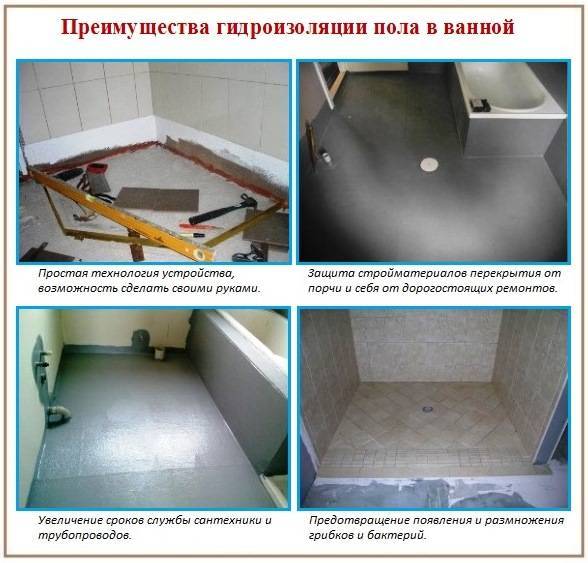
- The main purpose of waterproofing
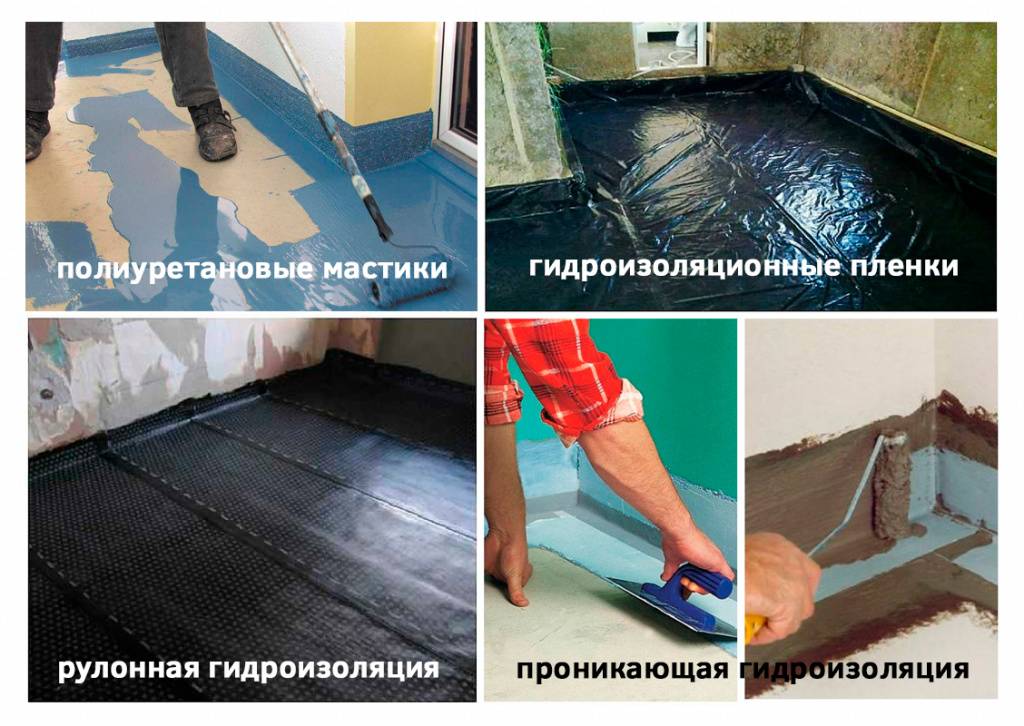
- Gluing waterproofing
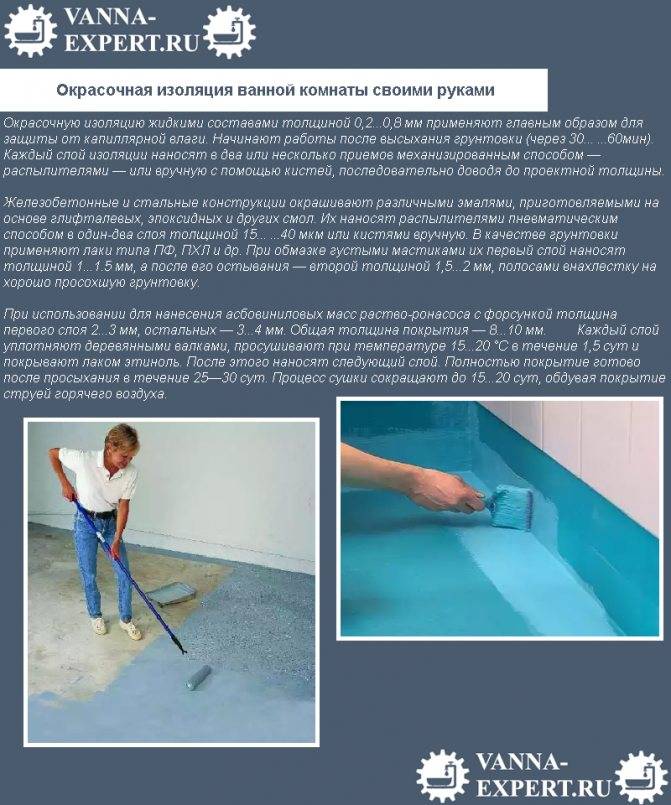
- Coating waterproofing
- What materials to choose for waterproofing walls?
- What is bituminous (coated) waterproofing made of?
- Pasting materials
- The best way to protect the floor from water
- Waterproofing device by pasting
- Specifics of the waterproofing device
- Bathroom waterproofing technology
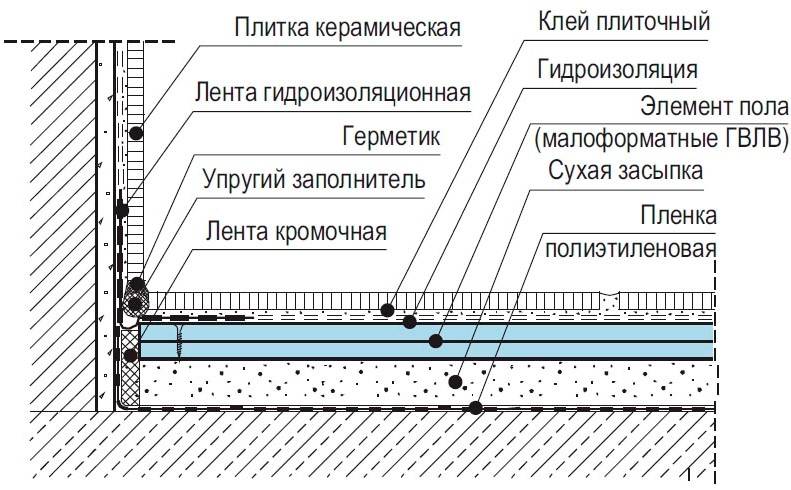
The process of waterproofing the floor in the bathroom: stages of work
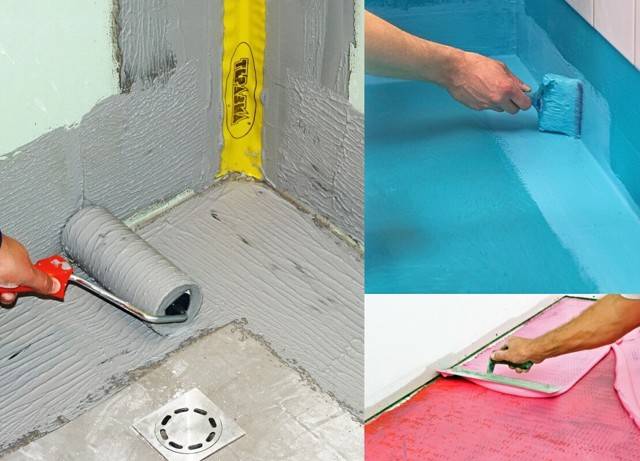
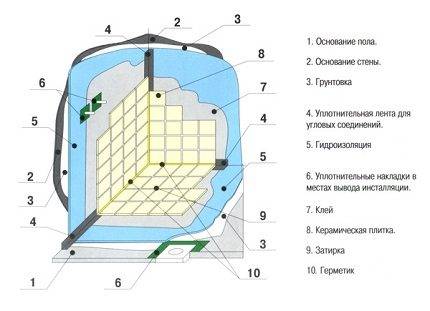
Scheme of the waterproofing device in the corners of the bathroom.
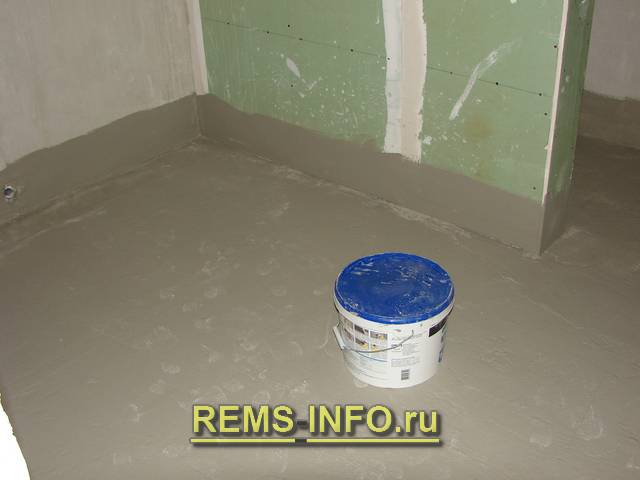
The floor surface should be carefully covered with a primer, such an operation should be carried out in 2 layers so that the adhesion of the screed and waterproofing is the best.
It is necessary to take into account the fact that the corners and joints of all structures must be protected by a special waterproofing tape.After that, we can assume that all general work has been successfully completed, you can proceed to the main stage. There are several types of bathroom floor waterproofing.
There are several types of bathroom floor waterproofing.
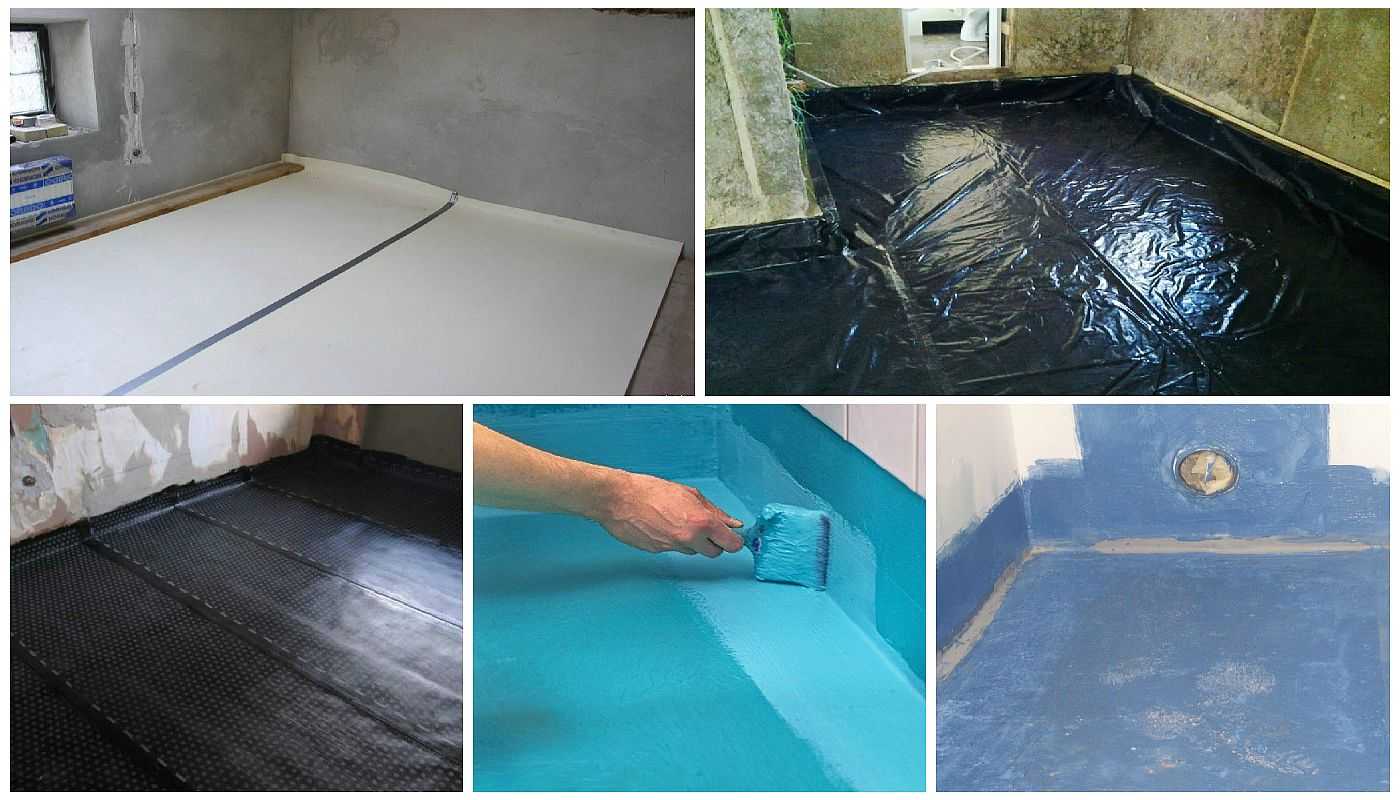
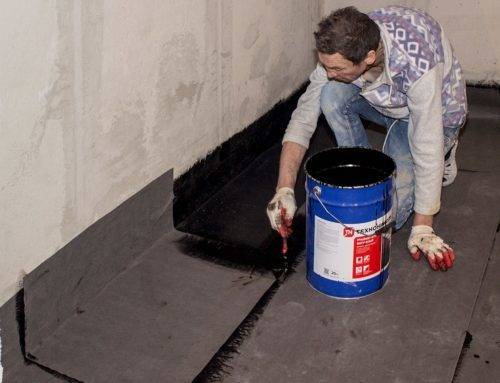
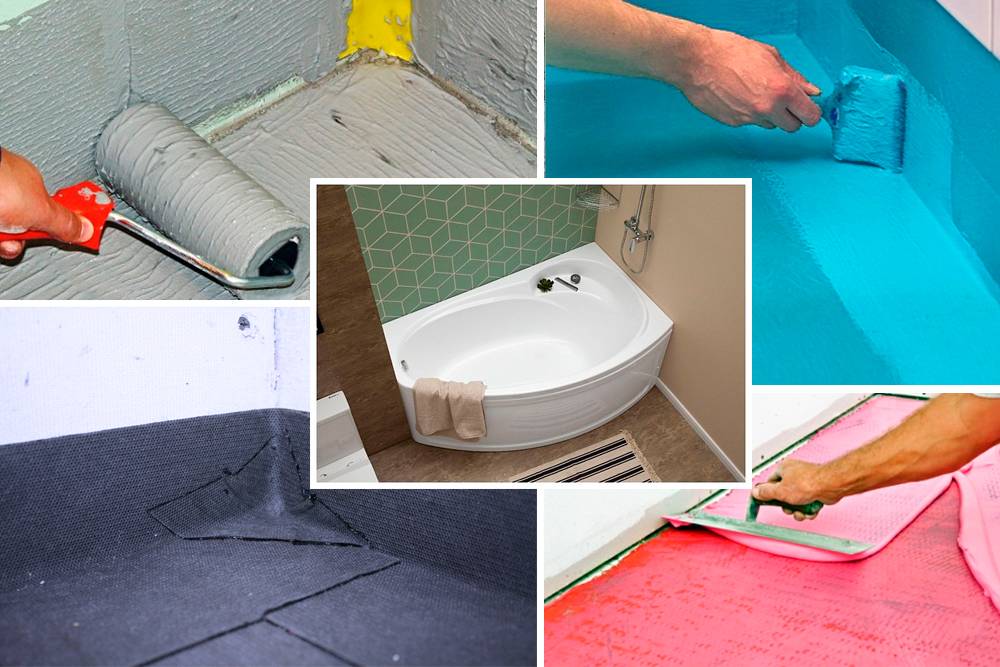
Pasting method of waterproofing floors. To implement this method, you will need appropriate bitumen roll reinforced materials. Such materials can be laid without any problems by means of a burner, which heats up their layers, and then they are glued due to the fact that an adhesive solution is applied to the surface. After this work is done, the floor can be walked on without fear that the surface will be damaged.
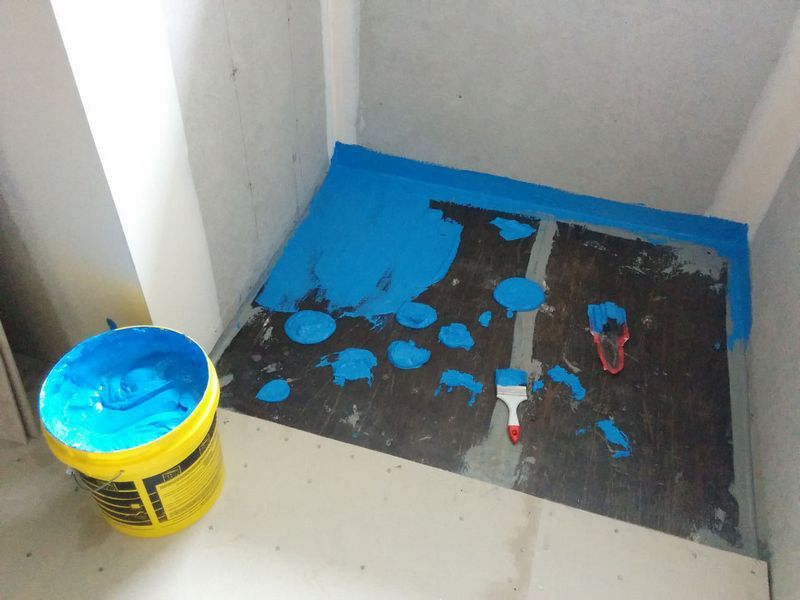
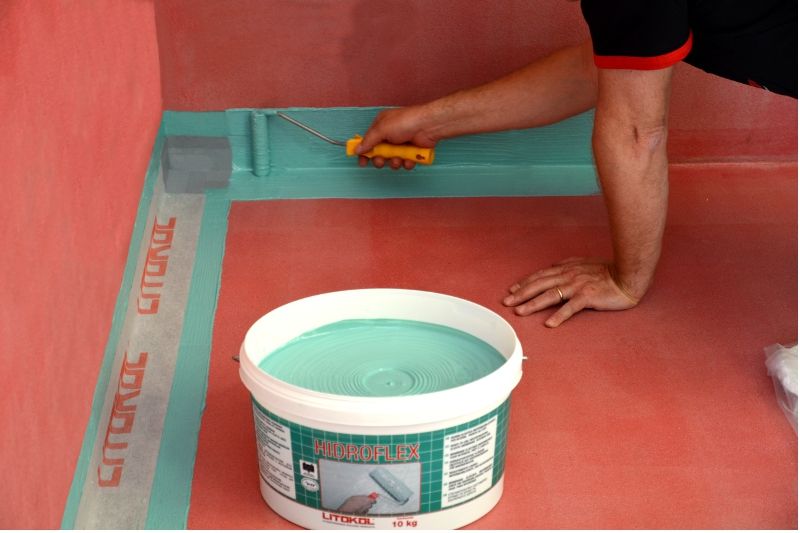
The coating type of floor waterproofing is very popular. Here you will need to use special mastics, which are applied to the surface with a spatula, and the application should be as even as possible. To achieve the best result, such an operation is performed in 2 layers, and the time interval between their application should be from 4 to 6 hours. In order for the operation to be performed with maximum success, you need to choose the right waterproofing material, before use, you should carefully read the instructions
Studying the instructions is especially important in cases where the material must be prepared independently (for this, 2 components are thoroughly mixed - dry and liquid)
Scheme of laying rolled waterproofing.
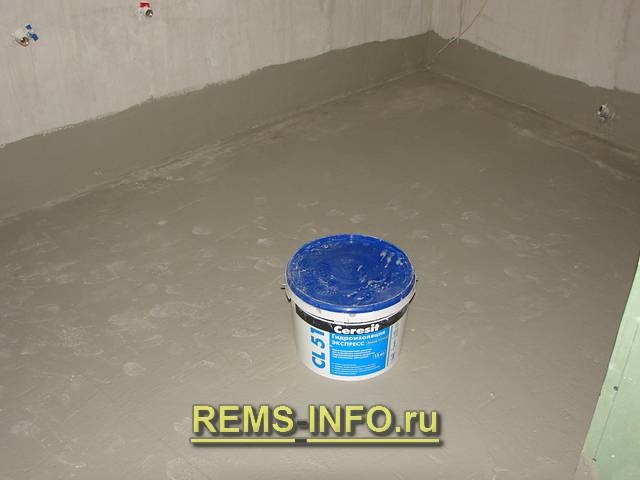
If the floor in the bathroom is made of concrete or it is cement-sand, then it is recommended to make an impregnating waterproofing. To do this, you need to perform such work as applying a special composition that has the ability to penetrate to a depth of 5 mm.It turns out a dense layer that does not tend to get wet.
After that, you can proceed to work such as laying tiles and grouting. This is done in the usual way, but the materials used are different: it is imperative to use special glue, and as for the grout, it must have waterproofing properties. When it comes to tile sizes, larger tiles are required for laying on the floor than for walls. This provides an additional barrier against moisture ingress.
Thus, such work is not very difficult, and if everything is done according to the instructions, then there is no doubt that all work will be completed with maximum success. Many people prefer to entrust the work to specialists. There is nothing wrong with this, if you choose good masters, then the result will be satisfactory. But then the question arises, why pay a lot of money to craftsmen when the bathroom can be equipped with your own hands.
The cost of such work will be much less, which is also very important.
DIY waterproofing in the bathroom
Waterproofing a bathroom in a wooden house.
It is a series of works aimed at protecting the premises from moisture, which in the future can destroy the structure of the structure.
Stages of waterproofing works:
- preliminary preparation of the place where the corresponding work will be carried out;
- laying and sealing the waterproofing layer.
When installing the coating, it is necessary to exclude the ingress of carcinogens into the room. In this case, it is recommended to use a certain material that contains bitumen.


Bathroom areas that need to be insulated.
Waterproofing in the bathroom is carried out using the following materials:
- pasting;
- coating.
All materials used for installation must meet the following requirements:
- safety;
- environmental friendliness;
- hypoallergenicity;
- availability;
- compatibility with a variety of surfaces.
Wall waterproofing features
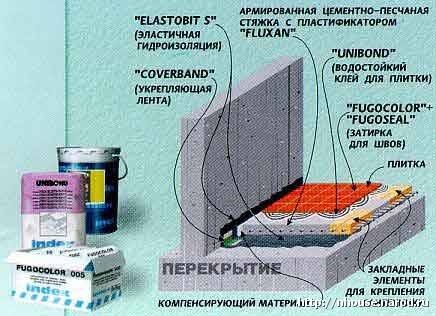
In order for the waterproofing mixtures applied to the walls to perfectly cope with their functional features, it is necessary to resort to materials based on cement-polymer compositions. After all, if you use bitumen and products with it, bitumen, as a fluid material, can begin to flake off over time. Pipes, joints and corners must not be ignored, special cuffs must be put on them, and the corners themselves between the walls and the floor are glued using a sealed tape designed for waterproofing work.
Before and after the implementation of wall insulation, the entire surface is primed. For reliability, waterproofing bathroom walls under tiles involves applying a building reinforcing mesh to the mortar, which allows you to firmly hold the adhesive and ceramic tiles.
Waterproofing "waterstop". Completing of the work
Prepare the surface: clean from dirt, prime, repair defects. Let dry.
Prepare a portion of the working solution according to the instructions on the packaging of the material. Carefully observe the proportion of water and mixing mode
For maximum strength of the finished layer, it is very important to follow the preparation technology exactly.
Apply with a brush the first layer of the composition. Thoroughly rub the material into the surface
Make final strokes in one direction.
Let the first coat dry (usually 24 hours).
Apply the second layer perpendicular to the first. Make sure there are no gaps.
Dry the second layer. You can start tiling.
Waterproofing wooden walls in the bathroom
The best wall material for a wooden house is moisture resistant GKLV. Strength with a thickness of 12.5 mm, a perfectly flat surface significantly reduce the complexity of laying tiles. It is mounted on a metal frame or glued.
Wooden structures before installing drywall are carefully isolated from possible moisture. Films, compositions such as Maxiwood are used (when using painted, untreated places are clearly visible).
The ends of the sheets before fixing are coated with the composition that will be used in the future. This operation is also done with the heads of self-tapping screws.
A layer of waterproofing is applied to the fixed sheets of drywall. But before that, it is recommended to glue with a special tape not only the junctions, but also the joints of the sheets.
How to properly apply waterproofing material?
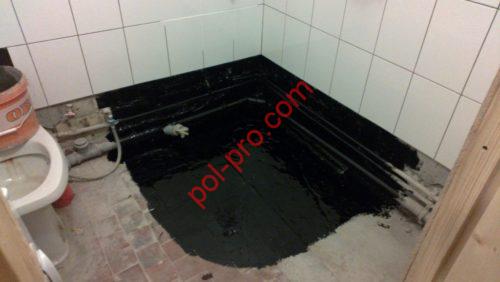
Before applying waterproofing, the surface is cleaned and primed with deeply penetrating compounds. After the primer dries, a layer of bituminous mastic is poured, with special attention being paid to sealing the cracks present in the places of laying communications and smearing the corners. Remember, while the mastic dries, you can not dust
A day after the bituminous mastic has dried, the next layer of waterproofing is laid in the form of canvases cut to the size of the bathroom
Remember, while the mastic dries, you can not dust. A day after the bituminous mastic has dried, the next layer of waterproofing is laid in the form of canvases cut to the size of the bathroom.
Their number is calculated taking into account the fact that they will overlap, overlapping each other by 10-15 cm.
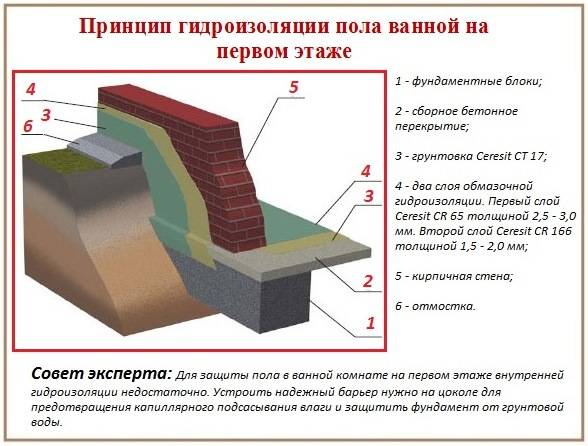
The floor in the bathroom is recommended to be lower than in the rest of the house. A small margin in height will save the entire house from flooding in the event of a sudden emergency such as a pipe break or a leak in the connection, a washing machine breakdown and other incidents.
Waterproofing the floor will prevent water from entering the basement or lower floor of the house. Water will stand until its level rises above the left stock.
Particular attention is paid to the so-called “wet” zone, which, in addition to the floor, includes walls near the bathroom, shower cabin, and around the washbasin within a radius of 50 cm. The ceiling in the bathroom is made of moisture-resistant plasterboard or glossy PVC panels.
Wooden structures, disguised behind the finish, are primed and smeared with mastics
The ceiling in the bathroom is suspended from moisture-resistant drywall or glossy PVC panels. Wooden structures, disguised behind the finish, are primed and smeared with mastics.


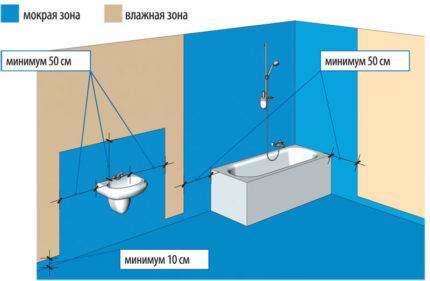 Scheme of mandatory places for applying waterproofing in the bathroom room in a wooden house taking into account the minimum distances around plumbing fixtures
How to make bituminous waterproofing on a wooden floor

Bituminous mastic for waterproofing the floor in the bathroom is good because it is applied in a thin layer, but when hardened, it becomes a solid, reliable and durable material to protect against moisture. It is ideal for concrete floors. It is also applied to a wooden base. But there are some nuances here.
The boards are coated with a two-component composition, which includes liquid rubber (rubber) and an activator necessary for hardening. If the boards do not fit tightly, the liquid agent may flow down. Defense loses its qualities. In order for mastic waterproofing to hold well and be effective, the base is especially carefully prepared.
- Dirt and dust are removed from the rough flooring.
- Logs of thick slats are laid across the boards in increments of 30-40 cm.
- A vapor barrier sheet is laid on top.
- Next, lay the plates of expanded polystyrene, which plays the role of insulation. Thanks to it, a solid stable surface is formed.
- The joints between the heat-insulating material and the lags are filled with a sealing compound.
Liquid rubber (rubber) mixed with an activator is applied to the base prepared in this way. The operation is carried out quickly, as the composition instantly seizes. For work use a roller. They are carried out along the walls, capturing 20 cm each. Corners and joints are especially carefully smeared.
This composition dries faster than conventional bituminous mastic, so the result can be evaluated on the same day. The waterproofing layer must have a smooth, uniform surface. To improve the quality of moisture protection, the composition is applied twice.
The adhesive used to secure ceramic flooring does not adhere well to rubber. It is recommended to lay a reinforcing mesh and pour a thin layer of concrete screed to attach tiles to it.
This "layer cake" makes the structure heavier. Before starting work, check how firmly the draft boards hold. If necessary, they are strengthened from below with additional lags.
The waterproofing constructed in this way is not only suitable for wooden floors.It is made on a concrete base. It is a reliable protection against moisture in the bathroom, washing bath, pool. The main thing is to follow the manufacturer's instructions and let the material dry thoroughly. Haste in the performance of such work leads to a deplorable result.
Viewed: 1 573
Training
Before starting repair work in the bathroom, you must first determine the humidity zones, regardless of whether it is a new building or the room has already been renovated. Often these can be walls and floors that are directly exposed to water. How to protect yourself from moisture? Showers, bathtubs, washbasins, and walls in the bathroom that are exposed to moisture must first be carefully waterproofed. The waterproofing procedure itself is described step by step in the article below, however, you need to know which waterproofing to choose for the bathroom.
It is necessary to isolate places from water using one- and two-component liquid mixtures for waterproofing.
The composition of waterproofing materials includes a sand-cement mixture, chemical plasticizers and polymer fillers. Thanks to polymeric substances, larger particles are bound, and a moisture-proof film is formed. As for the cement, which is part of the waterproofing, with its help the solution turns into a durable monolith. Well, the plasticizer creates excellent conditions for preventing this waterproof shell from cracking.
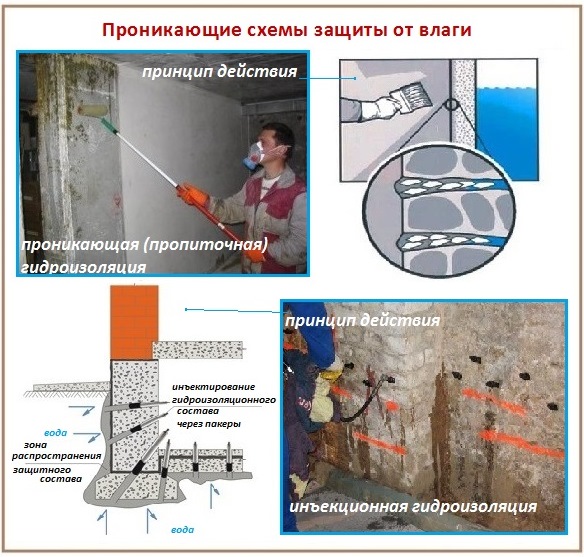
Water Repellent Barrier Materials
For hundreds of years of stubborn opposition to water and its destructive power, mankind has come up with many effective protective schemes, the number of which is replenished with stable regularity.Now in the arsenal of builders and owners of residential suburban and urban residential facilities there are:
- panels and plates for mounting water-repellent lining;
- welded and glued flexible materials that form a moisture protective cover;
- paint compositions and coating paste mixtures that envelop the treated surface with a waterproofing layer with a thickness of several tenths of a mm to 1.5 cm;
- sprayed coatings that create a foam-cement or foam plastic barrier in the way of water;
- waterproofing plaster, at the same time leveling the walls;
- polymer filling and cement-sand screed enriched with hydrophobic components and fiber for reinforcement;
- impregnations and injections that change the structure of porous building materials, thereby increasing moisture-proof properties and strength.
Depending on the technical specifics of the object, the waterproofing of which is to be built, choose the type of one or two materials that work perfectly in pairs. It is not realistic to determine in absentia what type of waterproofing products and the method of their application will be the optimal solution to the problem. However:
- we take into account that to protect hygienic premises and bathrooms, excessively powerful insulation is not required, as for foundations;
- remember that do-it-yourself waterproofing of the bathroom will be built, which means that it is desirable that the technology of the device be extremely simple;
- Let's calculate the approximate costs, and ...
Comparing the builder's own skills with the ability to implement complex schemes, and financial savings with the ability to purchase expensive materials, we will focus on the two simplest and cheapest methods. It's a wrap and a wrap.For the implementation of waterproofing by coating and gluing, a wide variety of finished products are produced that differ in composition, price and application technology. It is among them that it is necessary to determine the appropriate option, but only after a decision has been made on the upcoming scope of work.
Waterproofing bathroom walls: features
In addition to the floor in the bathroom, it is worth taking care of the waterproofing of the walls, as they are exposed to a lot of water, especially in the shower and bath areas. Waterproofing material should be applied to a prepared flat surface.
It is very important to prime all walls. To do this, you can use the same primer as for floor work.
In addition, the use of a primer with an antiseptic effect is welcome. It prevents the formation of fungi and mold, which is very important in conditions of high dampness.
To insulate the walls of the bathroom, it is better to use mixtures on polymer-cement basis. Bituminous insulation is not recommended for walls.
It has such a property as fluidity, and over time, it may begin to peel off from a vertical surface.
When applying waterproofing, special attention must be paid to internal corners and places on the walls where pipes are removed. To isolate sections of pipe outlets, special cuffs must be put on them.
To increase the waterproofing of the corners, they can be glued with a special waterproofing tape.

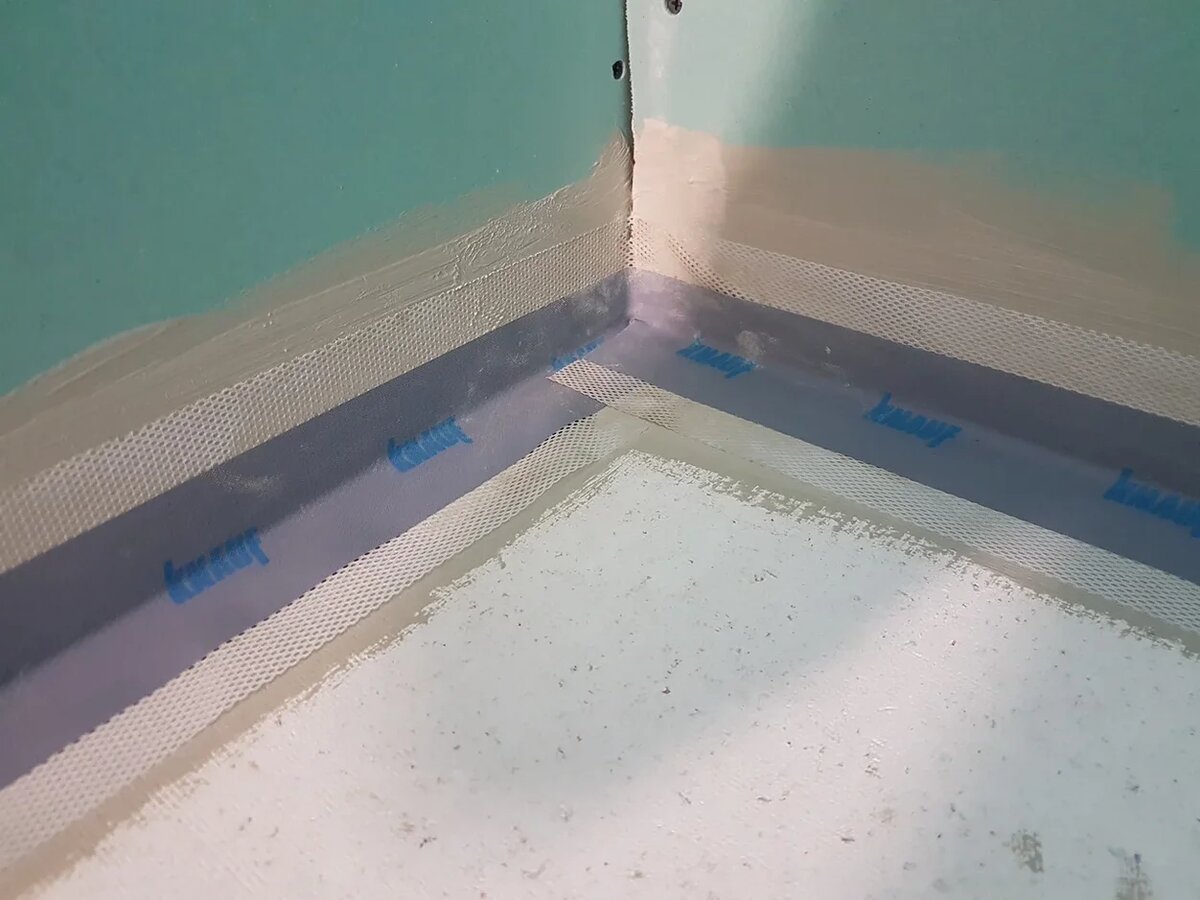


During the application of the insulating layer, it is possible to partially fix the reinforcing mesh.It will increase the strength and reliability of the base before facing the walls with ceramic tiles. In addition, the glue on such a grid holds much better.
The main purpose of waterproofing
Bathroom waterproofing plan.
Properly made waterproofing of the room protects all structural elements from exposure to moisture, steam and different temperature regimes. As a result, the premises will be properly operated and not subject to harmful influences, which will significantly increase the service life.
In addition, waterproofing can protect the property of the lower floors from damage in case of leaks.
Therefore, it is very important to make
The choice of waterproofing material directly depends on the characteristics of the room, surfaces and available budget.
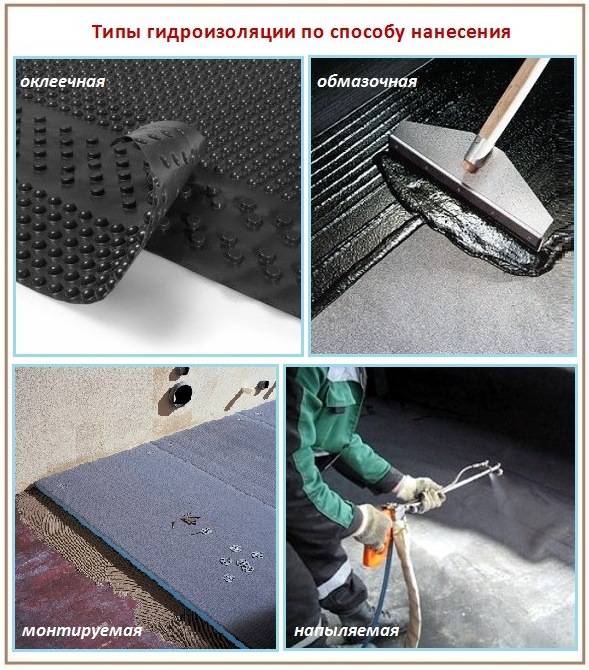
Waterproofing in the modern market is divided into two types:
- coating: pastes, mastics, liquids, powders;
- pasting: canvases or rolled materials.
Gluing waterproofing
Roll waterproofing can be made of polyester, fiberglass or fiberglass. Such canvases for the highest possible moisture resistance are abundantly impregnated with bitumen. To simplify the installation of such waterproofing, it can be welded and self-adhesive. The disadvantage of such an insulating material is a strong smell, which will remain indoors for a long time.
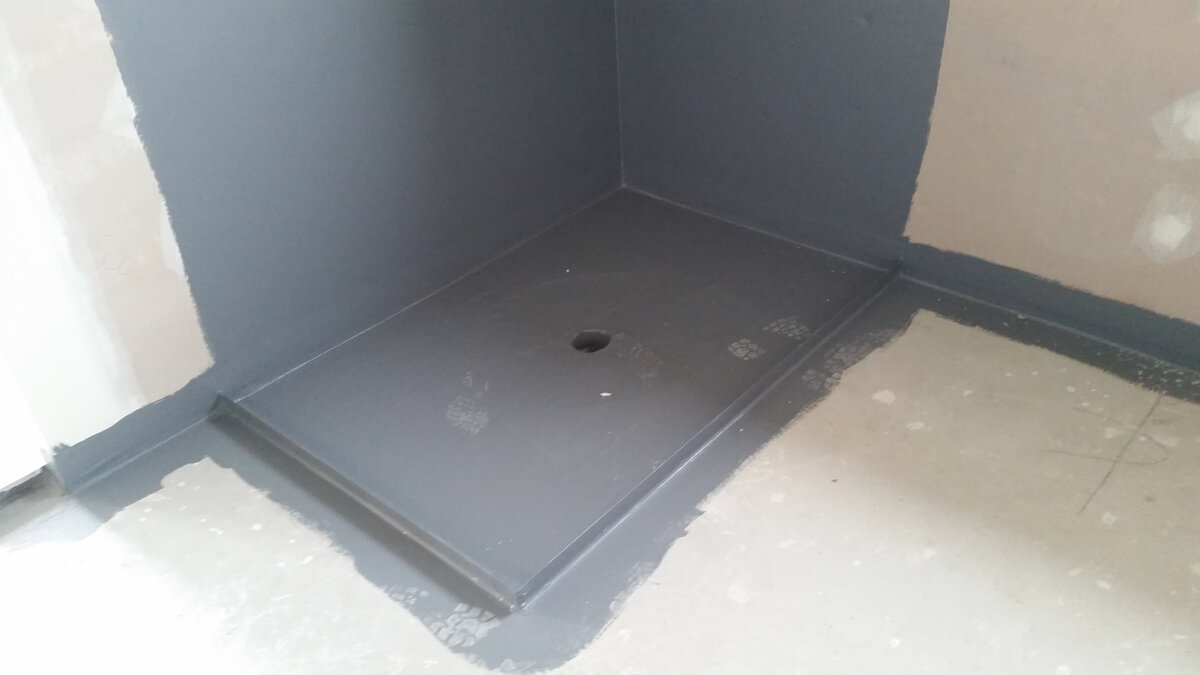
Coating waterproofing
Before laying the waterproofing, the surface must be cleaned, leveled and primed.
Such waterproofing is much more popular than pasting. Using such insulating materials, you can significantly reduce the repair time, as well as skip some intermediate processes.
Coating waterproofing is represented by bitumen-polymer and bitumen-rubber mastics, the basis of which is oxidized bitumen. To improve the technical qualities of such mastics, plasticizers, solvents, fillers and modifiers are introduced into the composition. Thanks to this composition, the mastic perfectly adheres to the surface. It can cover any surface of the wall and floor.
Cement-polymer materials are also very popular. They include cement crystals, chemicals and mineral fillers.
The surface covered with such a waterproofing material has the ability to "breathe". Cement-polymer waterproofing can be used on flexible surfaces.
What materials to choose for waterproofing walls?
To waterproof the walls of the bathroom under the tiles, several different types of materials are used:
- Bituminous and polymeric mastics. A very popular waterproofing option. Simple application technology, efficiency and durability make it extremely popular. Mastics of many brands are universal and suitable for premises of any purpose.
- Impregnation. These are liquid formulations that are applied to the base with rollers or cysts. They are easy to use, serve as long as the building material itself, with which it was processed. At the same time, the base is strengthened and its service life is extended.
- Membrane. When choosing membranes, you should carefully familiarize yourself with the scope of a particular material. The instructions should clearly indicate that the membrane of this brand is suitable for internal waterproofing of premises. It is undesirable to choose too dense films, because. they are less flexible.
- Expanding cement. It increases in volume during the solidification process.Thanks to this, cement fills the smallest cracks and crevices, reliably clogging them and preventing moisture from entering.
What is better to use for bathroom waterproofing? Coating and impregnating compounds are often chosen for tiles.
For their application, you do not have to hire professional builders, all the work can be done by hand, and this is a serious cost savings.
In recent decades, finishing panels have become popular, which initially have water-repellent properties.
The only disadvantage of this type of waterproofing is the high cost, but if the budget allows, then this is a great option, because the panels will last for several decades.
Features of mounting moisture-resistant panels are described in the video tutorial:


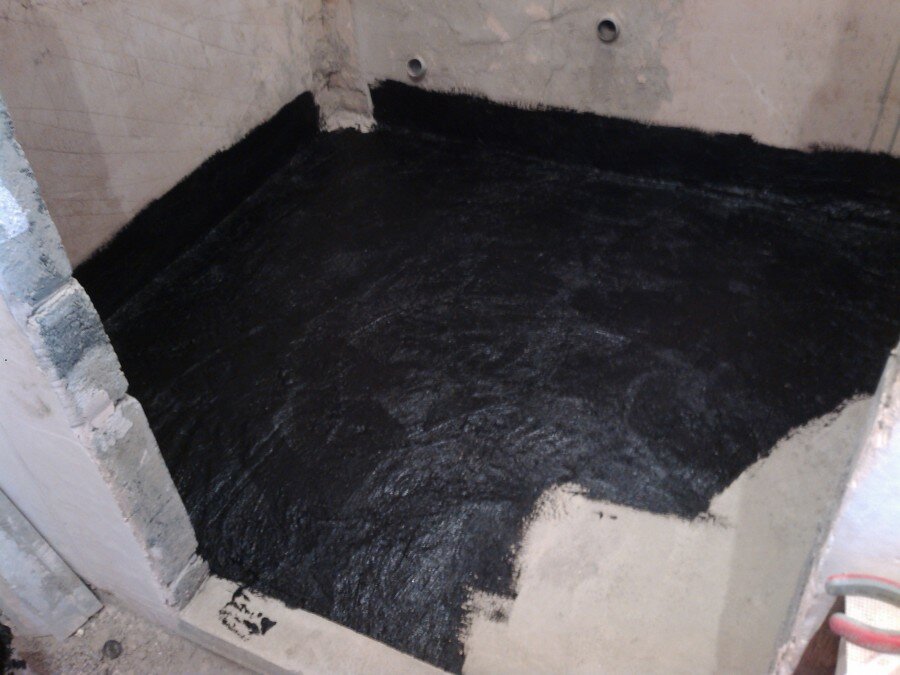
What is bituminous (coated) waterproofing made of?
Bituminous waterproofing is considered the most reliable. This is due to the use of liquid components that penetrate into all microcracks, chips, minor damage to the base. This property is especially important for bathrooms and kitchens. To create such protection, different products are used:
- bitumen-latex mixtures;
- liquid rubber, rubber;
- roll materials.
Bitumen-latex mixture is sold in hardware stores ready for use. It's called mastic. It consists of binders and polymeric fillers. The tool is prone to stretching and recovery, does not contain harmful components, toxic impurities. Mastics perfectly cope with temperature changes and aggressive environmental influences. The material is widely used to protect floors from moisture in bathrooms.
Liquid rubber, rubber - a composition that is easily applied to the surface, and when solidified, blocks the penetration of water. Roofing material is used as roll materials. His canvases are held together with liquid compounds.
Bituminous floor waterproofing is the best and most affordable do-it-yourself version of a moisture protection device. The technology of its creation is called coating. It is used in small spaces. Such as the bathroom.
Pasting materials
This is essentially the same bitumen reinforced with polyester or fiberglass. Depending on the cost of such waterproofing, there are materials containing polymers and other additives. According to the method of application, they are divided into self-adhesive and guided. The former act like ordinary stickers, the protective film is removed, and the roll itself is rolled out over the surface to be treated. Guided ones are mounted using a gas burner. The roll is laid out on the surface, treated with heat, then rolled out with a heavy roller.
The biggest advantage of gluing is its undeniable cost-effectiveness - not a single coating mixture will cost you as cheaply as several rolls of finished waterproofing. An additional advantage is the speed of installation, plus no need to wait until the treated surface is ready to take on the next stage of repair work.
The negative aspects include, first of all, the unpleasant and persistent smell of the bitumen itself.
Of no small importance is the need for careful surface preparation - laying rolls requires a perfectly flat and dry base.It should also be remembered that inaccuracies in execution can negate all the efforts expended, therefore, gluing the waterproofing panels should be done with the utmost care.
The best way to protect the floor from water
Numerous methods of floor waterproofing have a common goal - the creation of a continuous coating, shaped like a pallet with 10-20 cm sides on the walls. A kind of container made by this method will collect condensate flowing down the walls in streams, spilled and splashed water. A monolithic waterproofing layer will not let moisture into the ceiling, prevent the destruction of the base. At the same time, it will get rid of rot, the resettlement of fungi and harmful odors emitted by these unpleasant representatives of the biosphere.
The goal is one, but there are many ways to achieve it. In fact, choosing the best option without knowing the specific technical conditions is not realistic. The choice of the most suitable waterproofing, the type of which determines the technology of its construction, depends on:
- on the state of the processed rough surface;
- from the materials from which the floors are made;
- from the terms allotted for the complete arrangement of the floor;
- from the number of storeys;
- from the ability to reduce the height of ceilings and from a number of nuances, which can only be revealed while being at the facility.
The area of \u200b\u200bthe room, the complexity of its configuration, the presence of a building hair dryer or burner and the ability to use them can influence the choice. It is impossible to ignore such significant arguments as the cost of the material and the complexity of execution.
It is highly doubtful that any technology meets all the conditions presented, but after a careful assessment of the pros and cons, the best method can still be selected.
Waterproofing device by pasting
On the surface to be protected, water-repellent gluing options are fused with preheating by a gas burner or glued. Gluing is carried out using a mastic recommended by the manufacturer of polymer glue or adhesive coating applied to the back surface of the roll or sheet. The elements of the continuous coating being created are overlapped, the joints are puttied or glued with the mastic used to process the rough base.
The oldest representatives of rolled materials are the well-known roofing material, roofing felt and glassine. They are now being aggressively replaced by insulating studded membranes, which are installed if it is necessary to ensure the removal of steam and prevent the penetration of moisture, for example, on wooden floors. There is a rolled waterproofing that does not allow moisture or steam to pass through.
Structurally, pasting products of the latest generation are a multilayer flexible material with a base made of fiberglass, polyester or glass roofing material. On both sides of the base there are layers of polymer-binders. In order for the pasting waterproofing to be rolled up, convenient for storage and transportation, a protective film of polyethylene is applied over the working polymer-binder layers.
Attractive pasting quality - budget price, negative sides:
- the need for preliminary measurements and cutting;
- careful preparation of the base, height differences of 2 mm within 2 m are not allowed;
- the use of a burner for the built-up type;
- the difficulty of working in small spaces;
- time-consuming laying process with thorough leveling of corners and laying panels.
It is quite difficult to stick waterproofing, the material can be damaged by careless movement, broken through when forming an angle with a spatula, and the welded version can be overheated to a tear. But masters who want to save money cannot be stopped by listing complications, it is better to familiarize them with the technology and rules for waterproofing a bathroom by gluing.
Specifics of the waterproofing device
The task is greatly simplified if the home master acquires a self-adhesive material, from the back of which you just need to separate the protective polyethylene sheath, then glue it and roll it with a heavy roller.
Do not forget that before the construction of pasting protection:
- walls and floor need to be leveled and wait for the complete loss of moisture with screed and plaster;
- remove dust and motes preferably with a vacuum cleaner;
- cover twice with soil;
- carry out waterproofing of butt joints;
- if necessary, apply polymer glue or waterproofing mastic.
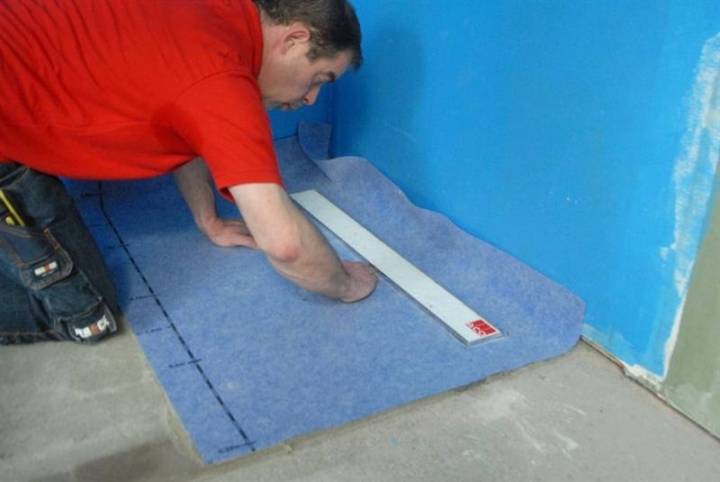
The rolled material is cut out according to the dimensions carried out in advance. It is recommended to keep the cut strips or sheets in the unfolded state for about a day.


The number of layers created by the rolled material depends on the planned degree of waterproofing reliability. To protect the walls and floor in the bathroom, 2 layers are enough, but their number can reach 5.
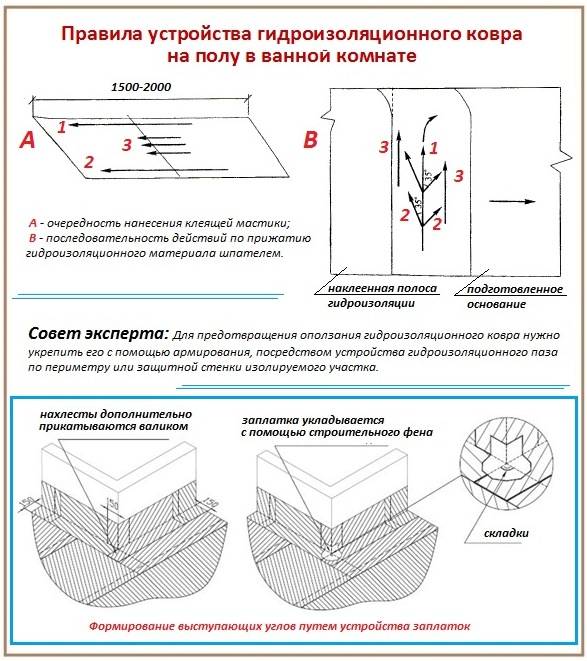
When creating a multilayer insulating carpet, we will alternate the adhesive substance with a carpet created from strips.Be sure to take into account that they cut out with an allowance for the formation of the sides, and do not glue those 100-120 for the bathroom area or 10-15 cm for the floor bowl from both edges of the cut panel:
- the first cut strip is laid in a way that is convenient for the master. The place of commencement of work does not matter, because. you can move along the rolled waterproofing immediately after gluing;
- the edges are coated with mastic and the next strip is laid with an overlap, the value of which should not reach, and even more so exceed 20 cm;
- after the installation of a continuous canvas on the floor, allowances for the floor boards or for the protective zone around the bathroom, shower, sink are glued to the walls. Strips of adhesive waterproofing on vertical surfaces begin to be glued from the bottom, moving up.
- mastic or adhesive component is again applied on top of the laid waterproofing layer;
- the strips of the second layer are placed across the previous ones, leaving the allowances not glued. After attaching these allowances to the walls, a waterproofing bowl will be formed with the sides necessary for protection from all sides.
In this way, building materials are protected from the negative effects of moisture. If you are not too lazy and build a waterproofing protection, the main building materials and finishes will last much longer. You will not need to spend money on repairs, the purchase of new bathroom furniture and the replacement of plumbing. It is not difficult to calculate what will actually be cheaper.
Bathroom waterproofing technology
Regardless of the choice of material and method of waterproofing, the starting step should be to prepare the surface for subsequent processing.All planes planned for application of materials must be cleaned of dirt, worn coatings, traces of oil products and grease-containing compounds.
In order for the waterproofing of the bathroom with your own hands to be effective, you need to pay attention to the following nuances:
- before fixing the roll layer on the wall or laying it on the floor, alignment should be carried out; before applying the mastic, these measures are not needed;
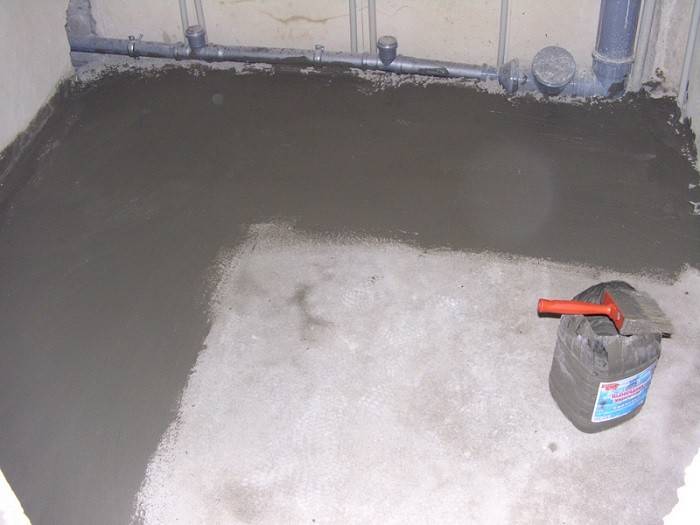
- the concrete surface must be sanded, a weak layer removed, the so-called "concrete milk", damage and cracks should be patched, repaired with special compounds;
- concrete is moistened before waterproofing, but accumulation of excess water is not allowed on the floor surface.
In order to form the maximum insulating effect, it is recommended to carry out additional insulation of the junction of structural components and joints between elements. To do this, a groove is made in the seams with a depth of not more than 3 cm, which must be filled with a special solution. A more affordable way is to glue the butt joints with insulating tape.

Essential recommendation: Before applying any waterproofing material, the subsurface should be treated with a primer to optimize adhesion. Perfectly working in tandem with an insulating coating material will be a primer composition of a similar class. Those wishing to insulate the bathroom using rolled self-adhesive materials should prefer compounds that are compatible with the base, you can simply cover the surface with waterproofing paint. The soil must be dry before further work.
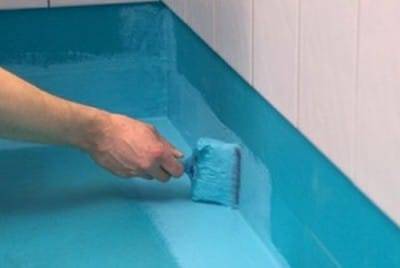
Among the coating materials on the market there are formulations prepared for application and dry mixes, for the preparation of which you need to carefully study the manufacturer's instructions and follow all the points specified in the instructions. A homogeneous mixture prepared or made independently is applied with a flat brush, a special roller or a construction spatula, evenly distributing the coating material over the surface. If the manufacturer advises multiple applications, each of the subsequent layers is directed "to the cross" of the previous one. Between the application of layers, the interval specified by the manufacturer must be observed, which is required for complete hardening. At least a day should pass after treatment with coating materials, after which it will already be possible to proceed with the lining.
All work consists in cutting and fixing the waterproofing material. The shape of the layer laid on the floor should resemble a trough. The final stage is the treatment of joints with a silicone-based sealant.
For owners who are puzzled by the question “how to make waterproofing in the bathroom as cheap as possible”, repairmen are advised to simply cover the surfaces with a waterproofing coloring composition that excludes the penetration of vapors and moisture. The cast version is not advised, it is effective, but difficult to perform independently. The backfill layer of insulation will be too powerful and not particularly effective.


