- Features of hydrodrilling technology
- Hydrodrilling with rotary tie-in
- High pressure rock washing
- Drilling technologies
- screw method
- core drilling
- Percussion drilling method
- Manual rotary water drilling
- On the sand
- Work technology
- A little about well repair
- How to make hydroponics from pipes?
- Preparation of materials
- Construction assembly
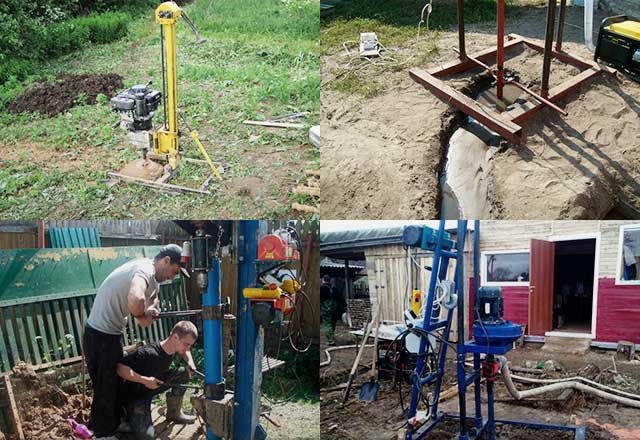
- Other models of drilling rigs
- Drilling rig with "cartridge"
- Simple screw installation
- Taking measurements and landscaping
- Homemade MGBU
- Drilling rig drawing
- Drill swivel, rods and locks
- Do-it-yourself drawings of locks on MGBU
- drilling head
- Homemade winch and motor - gearbox
- How does pipe hydroponics work?
- DIY drilling
- screw method
- Shock-rope method
- Manual hydraulic drilling
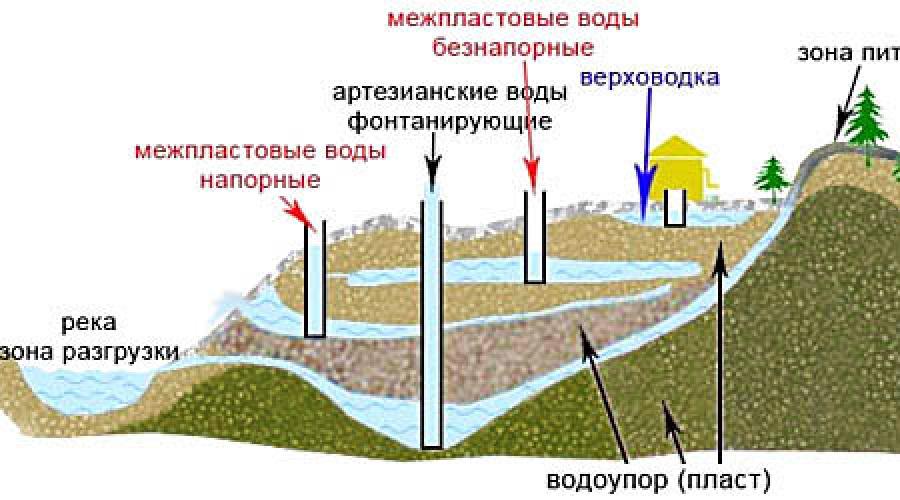
Features of hydrodrilling technology
Most drilling technologies use water as a flushing agent to remove rock and soil from the borehole cavity. In the hydrodrilling system, water is used as one of the tools to break the rock in the well cavity. There are two types of hydraulic drilling schemes currently in use:
- Soil crushing by the combined action of water pressure and cutting bits of a drill rod.Due to the softening of the soil, cutting the bottom of the well with a cutting edge requires 10 times less effort than with dry and semi-dry drilling;
- Washout scheme of hydraulic drilling. If the soil is relatively loose and contains a large amount of sand, then the well can be easily punched, washing away the rock with high water pressure.
- Impact drilling with a chisel and water pressure.
Important! Any high-pressure schemes require the use of a special gear assembly mounted on the cut of the drill rod. The reducer provides both rotation of the core and water supply from the pump inside the rod
Hydrodrilling with rotary tie-in
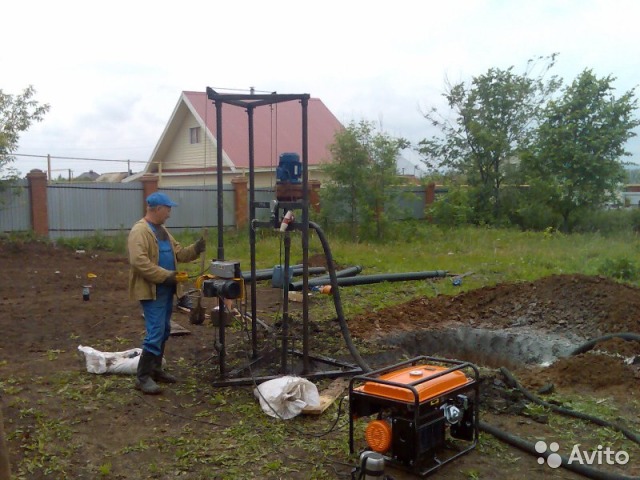
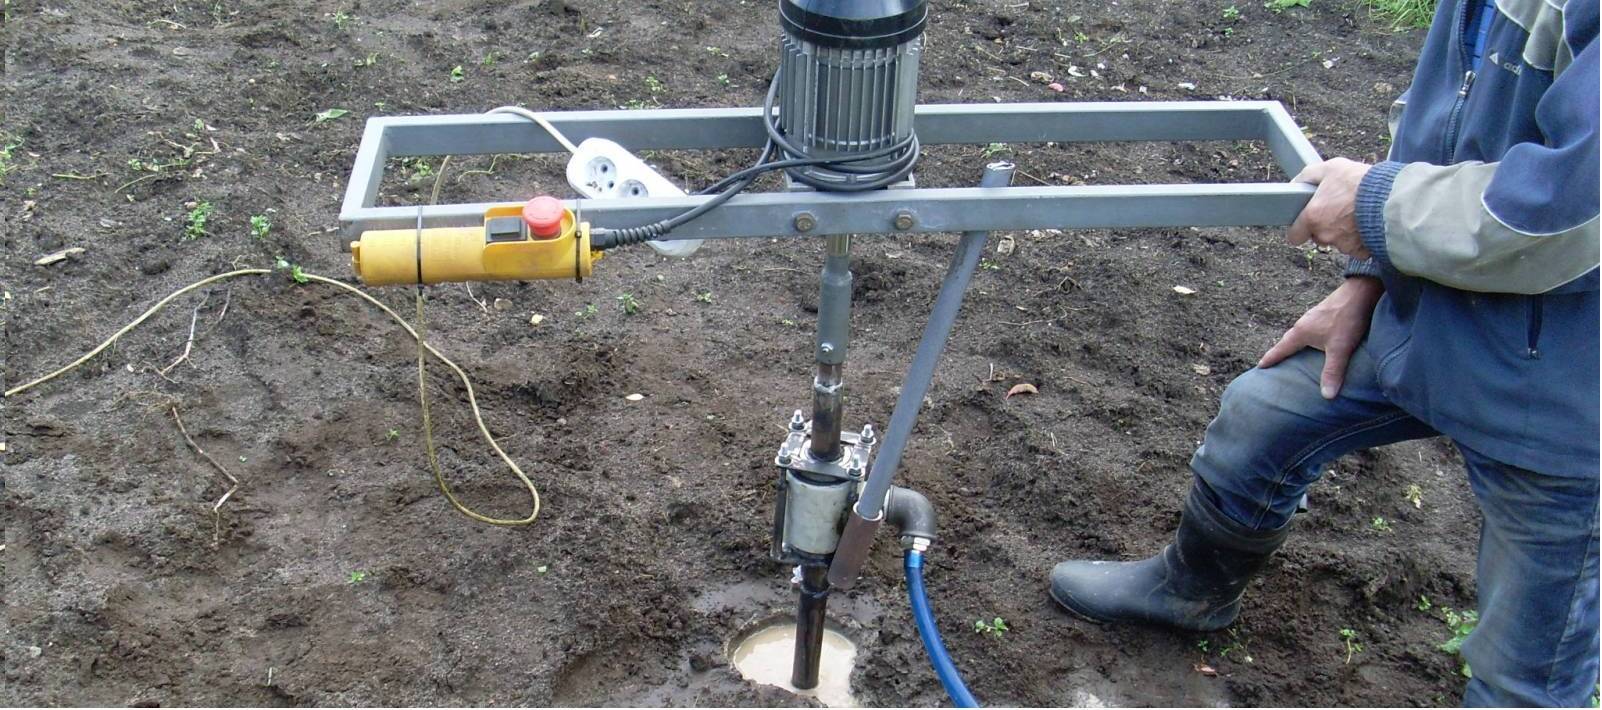
Even with a strong saturation of clay or loam with water, it is very difficult to destroy the rock only with the pressure of water, therefore, a drill bit on a rotating rod is used for hydraulic drilling, as in the video:
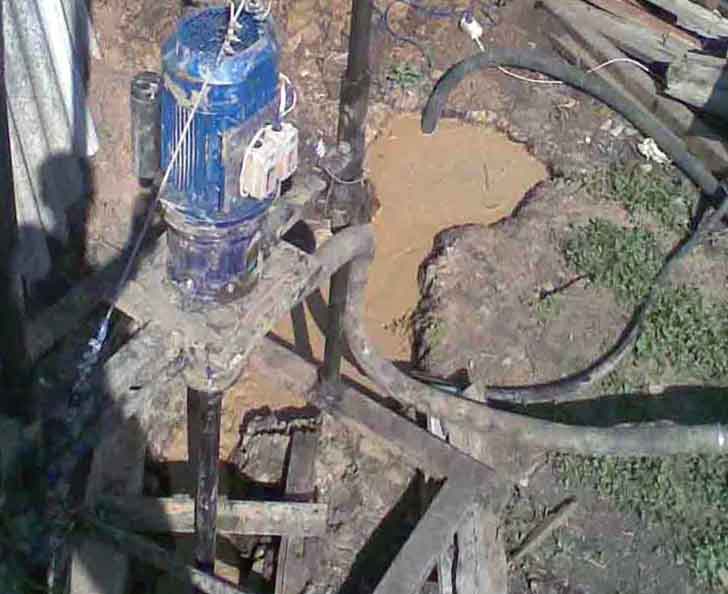
The rod is rotated by an electric motor through a chain drive. The lock at the top of the drill rig allows the new rod to be installed and engaged with the main pipe without stopping.
The task of the crown is to destroy and grind the rock to the minimum size at which the flow of return water can carry the crushed mass out of the trunk. Rotary hydraulic drilling scheme exists with a direct or reverse water supply scheme. In the first case, water is injected into the rod, cools the tool, flushes out the rock from under the cutting bits, and lifts the rock and soil through the annulus into the sludge trap.
In the second case, water is poured into the well through the annulus and discharged through the internal cavity of the rod. This method of hydrodrilling is used for cases when it is necessary to obtain the maximum quality of the walls of the well and avoid contamination of the water intake with clay mud.This, in turn, ensures maximum water recovery of the well.
The combined use of water pressure and cutting tools allows you to drill wells in limestone, old clay, shale and formations with a high content of clastic fragments of soft sedimentary rocks. The maximum depth of the trunk, as a rule, does not exceed 50 m.
High pressure rock washing
For sand and sandy loam, hydraulic drilling of wells can be carried out according to a simplified scheme, in which the shaft is formed only by erosion of the granular mass of soil. In industrial conditions, a similar hydraulic drilling scheme with a working pressure of up to 300 atm. allows cutting soft quartz and sedimentary deposits. At a pressure of 450 atm. calcite, spars and granite are cut.
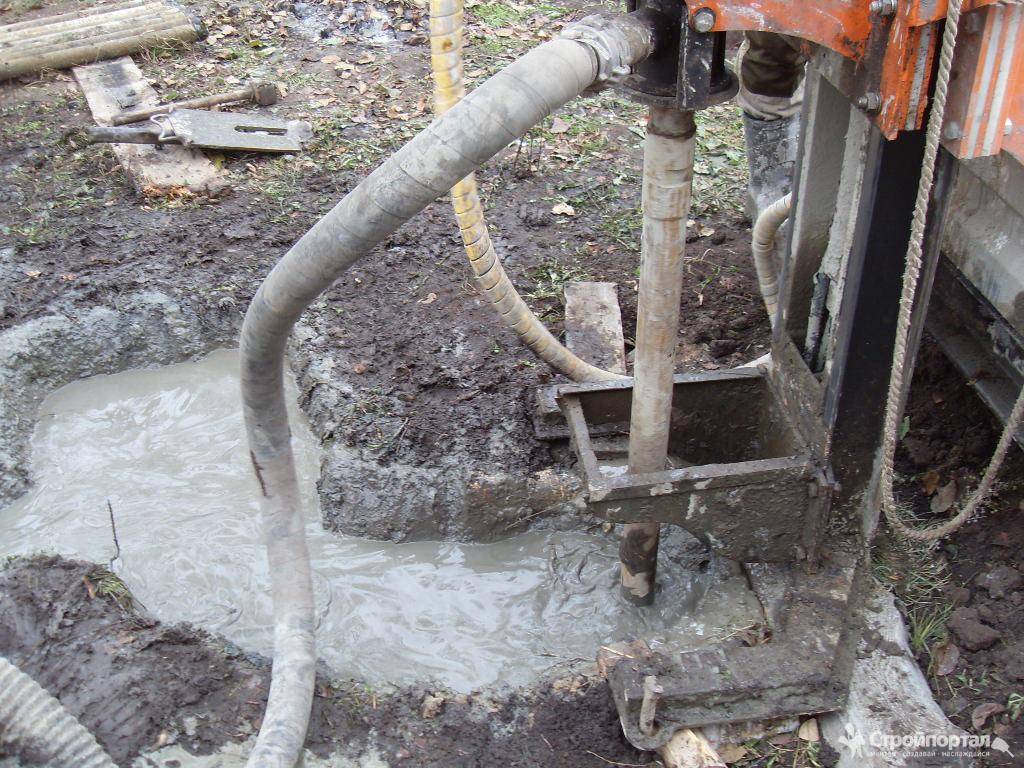
For domestic conditions, the operating pressure rarely exceeds several tens of atmospheres. It is practically impossible to perform hydraulic drilling of a well to a depth of more than 20 m using a washout method. The positive aspects of the washout technology include the absence of a rotary machine and the simplification of work. Often, only a gate and a pump are used for hydro-drilling by washing out. The rod, through which water is supplied under high pressure, is mounted on a tricycle carriage and rotated manually using a gate.
Percussion bits are also used to effectively destroy the rock at the bottom of the well. In this case, sharpened bits and hard alloy bayonets are mounted at the end of the drill rod. When applying weak, but frequent blows, while simultaneously turning the rod around the axis, the sharp edge of the chisel splits small stones into small fragments that are carried out by the flow of water.The method is quite effective for working on limestone layers, but it is absolutely not suitable for viscous and mobile loams.
Drilling technologies
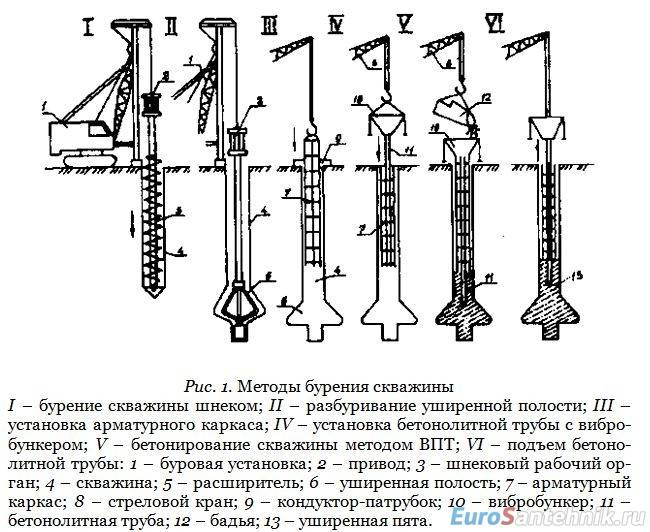
There are a bunch of different well installation methods that are successfully used to complete this job. Each method has unique properties that will help provide the necessary conditions. Having mastered various kinds of techniques, calmly carry out drilling on your own. Let's take a look at each method:
screw method
Method applied well drilling at a shallow depth. A special tool is taken, a drill, with which the earth is cut through and carried out with welded blades. If the blades are attached at a right angle, all the debris will have to be removed. If the blades are attached at an angle of less than 90 degrees, then all the debris will not have to be removed.
The technology should be used on gravel and loamy soils. Other areas cannot be drilled using the auger method. If necessary, consider all conditions.
core drilling
There is a certain tool - a pipe, at the end there is a core funnel, equipped with sharp teeth made of resistant and high-quality metal. The tool can drill through dense, hard rocks. The core barrel completely destroys all solid soil with a chisel, after which the bit drills and throws out all the accumulated waste in the pipe.
Drilling occurs due to the rotation of the column with the tube, it goes deeper into the ground and creates the well we need with a certain width equal to the cross section of the part used. Unnecessary garbage is thrown upstairs with a projectile called "Glass". A heavy sledgehammer is used to remove the rock.In self-drilling by this technique, the supply of clean water is provided, water with small pieces of clay. The solution to this problem is to strengthen the walls.
Percussion drilling method
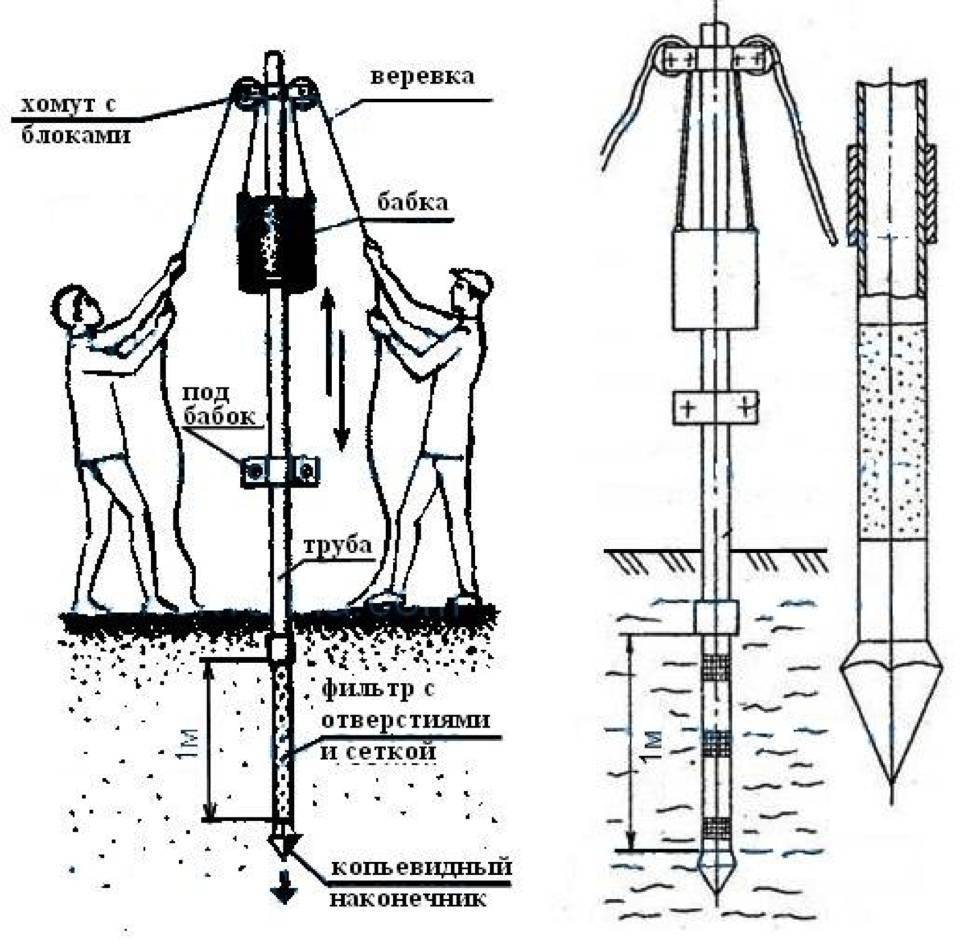
A piece of equipment called a tripod is used. A two-meter-high structure, which is constructed right at the installation site. A block is attached to the top of the tripod. A cable is thrown through the block, and a bailer is installed at the end. The essence of the device is to lower it and raise it up using a cable. The bailer is cleaned of debris through a hole located at a distance of 50 centimeters from the bottom of the frame.
Drilling by percussion-rope wells on its own, provides a raising of the drilling device to a height that the tripod allows, and then it is lowered back under the force of gravity. Allows you to break the breed. Debris is collected with a bailer. Remember, you should always build a tripod.


Manual rotary water drilling
In this method, the trunk is created thanks to the drill, which looks like a huge drill. Breaks a stream in the ground, creating rotations. The channel is needed in order to get the necessary water-bearing layer. The device is of high quality when drilling wells independently for water in gravel and loamy soils. In unstable, sandy areas, the well can be closed with a spoon drill.
On the sand
To drill wells in sand, it is enough to take the methods described above, auger or shock-rope methods. One difficulty in this drilling is cleaning the channel from cuttings. It is necessary to carefully approach the work in this technique, initially, removing the loose topsoil.Constantly monitoring the filling of the blades or bailers with sludge. To facilitate the work, you can periodically add water to the channel, after which, slowly lower the device inward, making a well.
Work technology
Experienced workers recommend starting drilling wells in the morning, since the process usually takes a long time and can even take several days. The soil is different everywhere, and accordingly, various nuances are possible in working with it. Let's talk about sandy soils. For drilling in such soil, it is necessary to prepare the maximum supply of water, since working with sand involves a large absorption of fluid. Immediately before starting work, you need to knead the clay solution.
To do this, clay is loaded into a pit with water and mixed with a mixer. The consistency of the liquid should resemble kefir. When such a drilling fluid enters the well, it does not go into the sand, like ordinary water, but gradually clogs the walls of the hole, forming a kind of vessel. Be sure to check the serviceability of the winch, pump for pumping water and other tools. Since in the process of punching sandy soil, stops are not possible. The casing pipe must be lowered immediately, otherwise collapses are possible and work will have to be started almost from the beginning.
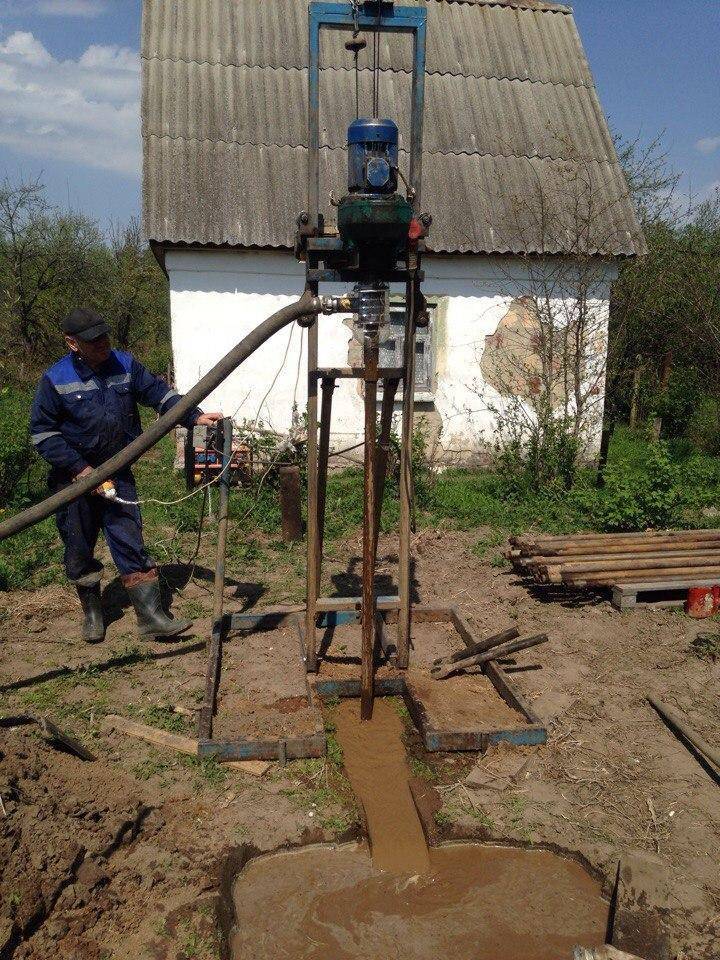
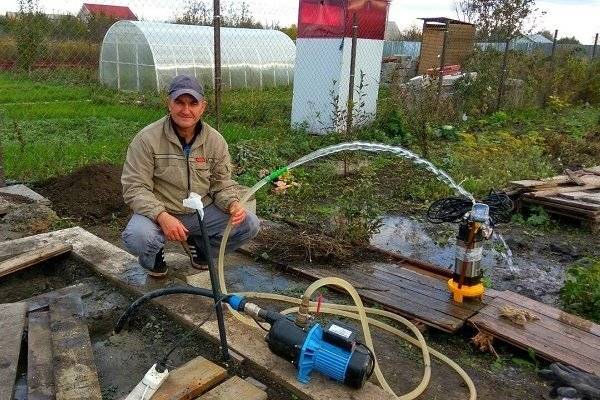
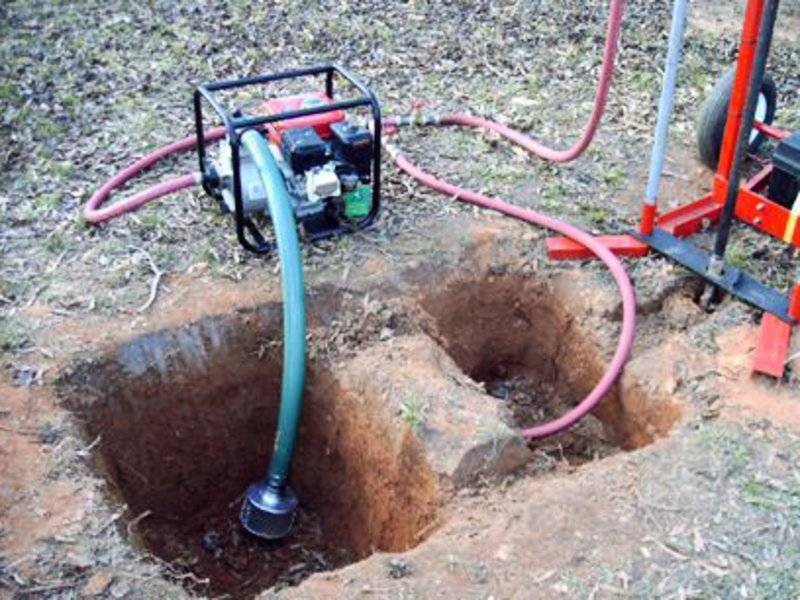
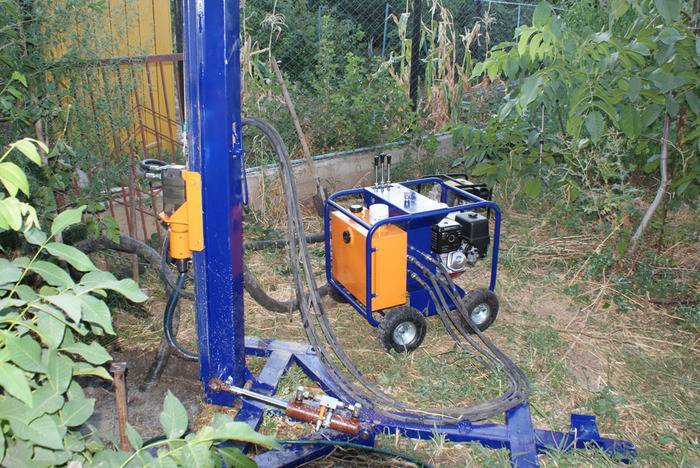
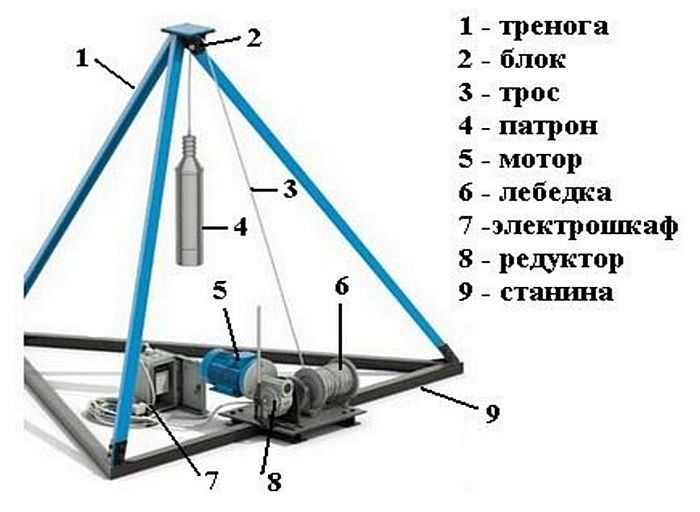
The diagram shows the device of a small-sized drilling rig, with the help of which hydraulic drilling is carried out.
The drilling procedure is quite simple. The motor pump supplies the drilling fluid to the hoses. Through the swivel, the liquid enters the rods, to the working drill. The solution polishes the walls of the well, which makes them stronger, acts on the drilling tool, helping it to pass the rock, and cools the elements of the installation. After working out, the liquid is discharged into the sump-filter.In this tank, the soil captured by water from the well will settle to the bottom, and the cleaned drilling fluid will flow along the tray into another pit. Now it can again be used in the process of MBU operation.
A small nuance: the composition of the drilling fluid depends on the type of soil. If during the work it is clear that the soils are changing, adjustments should also be made to the composition of the drilling fluid. The drilling process continues until the aquifer is reached. If one rod is not enough, you can add the next until you reach clean water. MBU manufacturers usually guarantee the operation of their device at a depth of up to 50 m. However, in practice, craftsmen use such installations to pierce wells up to 120 m deep. After reaching the aquifer, the well is flushed with plenty of clean water.
A little about well repair
Or why you can’t do the repair yourself, but entrust it to professionals?
So:
- The main reason for a well to go out of operation is most often filter clogging, or sand compaction in the pipeline due to irregular use of water.
- You can get a dirty filter yourself and clean it, but if the reason is in the pipe, then effective methods of specialists are needed.
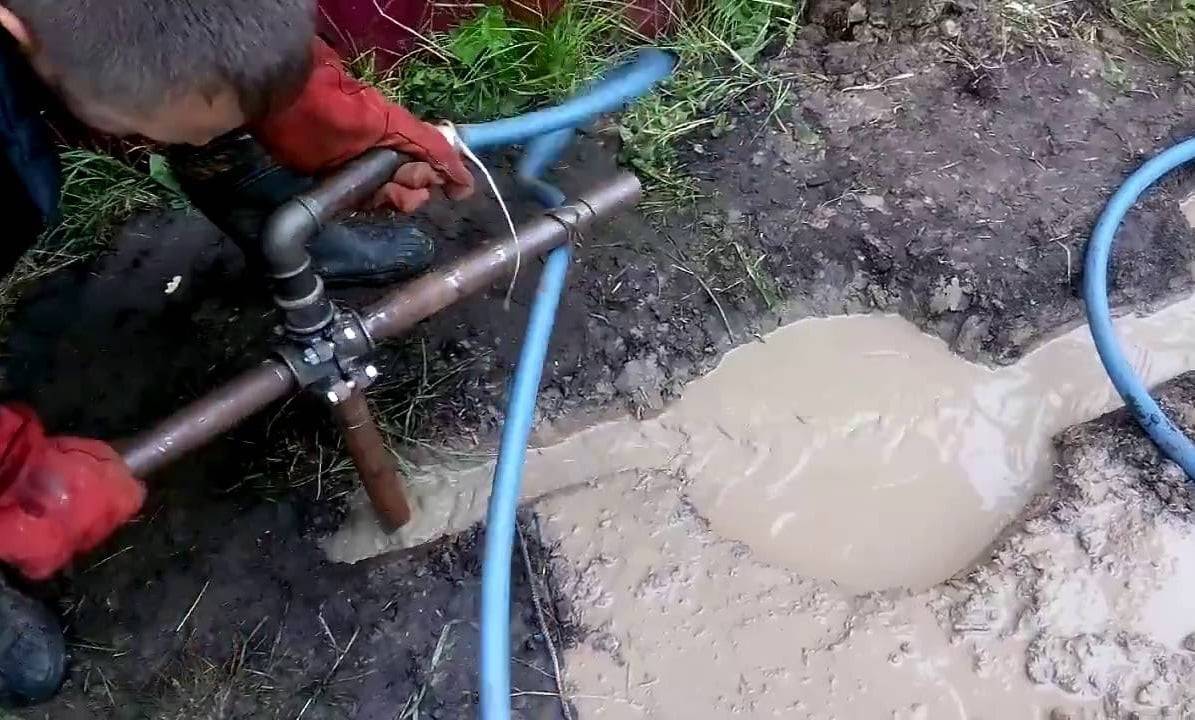
- They flush the well under the pressure of water. Why water is pumped into the pipe under high pressure, and the dirt is carried out. An uncontrolled splash of dirty liquid can occur, which does not please the people doused with it, and this is considered a disadvantage of this method.
- The pipe is cleaned with an air stream, with the same principle of operation, but this method can damage the filter, which is also undesirable.
- The most acceptable and safest way remains - pumping out the dirty liquid with a pump. The filter is not damaged, there is no dirt around.
- It is possible to pour special food acids into the well, which have the ability to quickly restore the well. The process is simple, the acid is poured, the well remains with it for some time, then the dirty liquid is pumped out.
- High cleaning efficiency - explosion in the wellbore. But it can happen, like the pharmacist in The Elusive Avengers, when he shifted the explosives, so here, you can damage not only the filter, but also the pipe.
How to make hydrodrilling wells with a submersible pump can be clearly seen in the video. This article proposes to familiarize yourself with the general provisions on hydrodrilling.
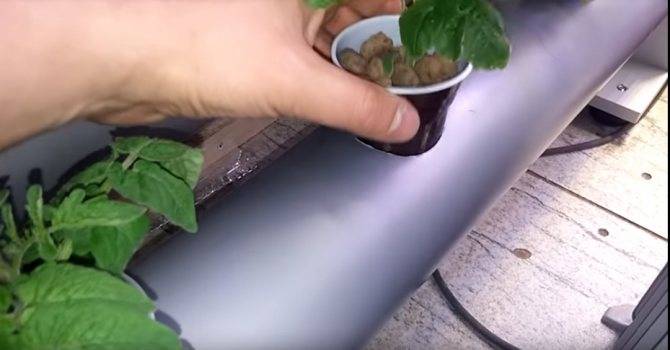
How to make hydroponics from pipes?
Hydroponic home-made installations can be of completely different modifications. It can be:
- multi-stage structures designed for several dozen pots;
- ringed, allowing you to grow plants around the perimeter of the greenhouse or create small flower beds for 4-6 sprouts;
- straight-line installations, the easiest to assemble and operate. The length of such beds depends solely on the possibilities of the room.
Depending on the goals set and the selected modification of the hydroponic installation, the set of parts will change. For example, when assembling a looped structure, tees and corners cannot be dispensed with. Whereas for a linear installation, the necessary parts are limited to a straight sewer pipe of a suitable diameter and a pair of plugs.
Preparation of materials
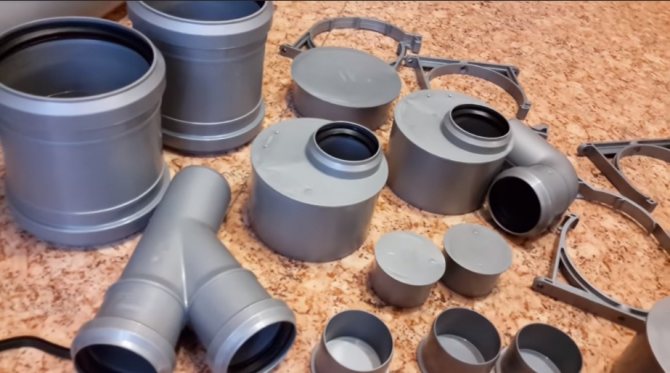
After choosing a model, you can start searching for materials. Consider the assembly of the second and most versatile option. If desired, this type of hydroponic setup can be converted into a multi-tiered setup or simplified to a linear one by removing the corner connections. For this modification, you will need the following items:
- PVC corners 900 - 4 pcs;
- PVC tees - 4 pcs;
- Plastic sewer pipes:
- Gaskets (seals);
- plug;
- Plastic pots for indoor flowers;
- Aquarium compressor;
- Tubes for the aquarium compressor;
- Nozzles for spraying air;
- Tees for oxygen tubes.
Seals do their job well, but in some situations you may need a sealant (silicone) to process the joints. It is also useful for attaching tubes. In addition, you need a drill for assembly (if you don’t have one, you can make holes in the plastic with a calcined nail), a hacksaw.
Construction assembly
If you have all the necessary materials, the assembly of the structure will take no more than an hour. Let's consider it step by step:
- First you need to saw off the middle drain from 3 of the 4 tees. These are future holes for seedling pots. In our version, there will be three. If it is necessary to increase the number of plants, straight segments are inserted between the tees, in which round holes of the appropriate diameter are cut.
- Seals are inserted into separate parts of the structure. Then all the details are closed using corners.
- The side of the flower pots is perforated and inserted into the prepared holes. The pots should match the size of the holes in the pipe and fit snugly into place.
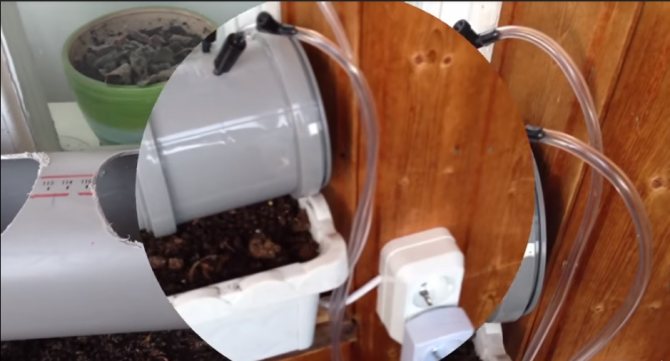
The basis of the hydroponic setup is ready. So that the water does not stagnate and the root system does not rot, the assembled installation must be equipped with a pump that will drive the water through the pipes, saturating it with oxygen. Or design a special aeration. The second option is no less effective, and at the same time more affordable for home use. Let's start the installation:
- We cover the remaining 4 tee with a plug, and make two holes in it: one for the air tube, the second for the float.
- We pass a transparent tube into the hole and stretch it along the entire length of the structure.
- Near the holes for the pots in the tube, we make a small incision and fasten the tee.
- We put a small piece of tube on the tee, at the second end of which a foam rubber sprayer is installed.
- We fix the sprayer with silicone as close as possible to the pots.
- We put the free end of the tube on the compressor outlet.
It remains to make a float that will indicate the water level. It is made from improvised means. To do this, you need a piece of foam and a long thin rod. Risks are applied to the rod and brought out into the second hole of the plug.
Other models of drilling rigs
In general, the assembly process of most of the existing varieties of drilling rigs remains the same. The frame and other elements of the structure under consideration are prepared in a similar way. Only the main working tool of the mechanism can change.


Read the information on the manufacture of various types of installations, make a suitable working tool, and then attach it to the support frame and connect it to other required elements using the recommendations from the instructions discussed above.
Drilling rig with "cartridge"
Drilling rig with "cartridge"
The main working element of such a unit is a cartridge (glass). You can independently make such a cartridge from a thick-walled pipe with a diameter of 100-120 mm. The optimal length of the working tool is 100-200 cm. Otherwise, be guided by the situation.When choosing the dimensions of the support frame, you will have to take into account the dimensions of the cartridge. Think over everything so that in the future it will be convenient for you to use the finished drilling rig.
The working tool should have as much weight as possible. From the bottom of the pipe section, make triangular points. Thanks to them, the soil will loosen more intensively and quickly.
Do-it-yourself drilling rig
If you wish, you can leave the bottom of the workpiece even, but it will need to be sharpened.
Poke some holes in the top of the glass for attaching the rope.
Attach the chuck to the support frame using a strong cable. Choose the length of the cable so that in the future the cartridge can freely rise and fall down. When doing this, be sure to take into account the planned depth of the source.
To increase the efficiency of excavation, you can connect the assembled unit to an electric motor. The cable with the cartridge in such a situation will be wound on the gearbox drum.
It is possible to ensure the cleaning of the bottom from the soil by including a bailer in the structure.
Using such an installation is very simple: you first manually create a recess in the drilling site with a diameter greater than the diameter of the working cartridge, and then begin to alternately raise and lower the cartridge into the hole until the required depth is reached.
Simple screw installation
Homemade auger
The main working element of such a mechanism is the drill.
Drilling auger drawing
Diagram of an interturn screw ring
Make a drill from a metal pipe with a diameter of 100 mm. Make a screw thread on the top of the workpiece, and equip an auger drill on the opposite side of the pipe. The optimal drill diameter for a homemade unit is about 200 mm.A couple of turns is enough.
Drill disc separation scheme
Attach a pair of metal knives to the ends of the workpiece by welding. You must fix them in such a way that at the time of the vertical placement of the installation, the knives are located at a certain angle to the soil.
Auger drill
To work with such an installation was most convenient, connect a piece of metal pipe 1.5 m long to the tee. Fix it by welding.
Inside the tee must be equipped with a screw thread. Screw the tee itself onto a piece of a collapsible one and a half meter rod.


It is most convenient to use such an installation together - each worker will be able to take on a one and a half meter pipe.
Drilling is performed in the following order:
- the working tool goes deep into the ground;
- 3 turns are made with a drill;
- loosened soil is removed and removed.
Method of drilling a well for water using an auger
Repeat the cycle until you reach about a meter deepening. After the bar will have to be lengthened with an additional piece of metal pipe. A coupling is used to fasten pipes.
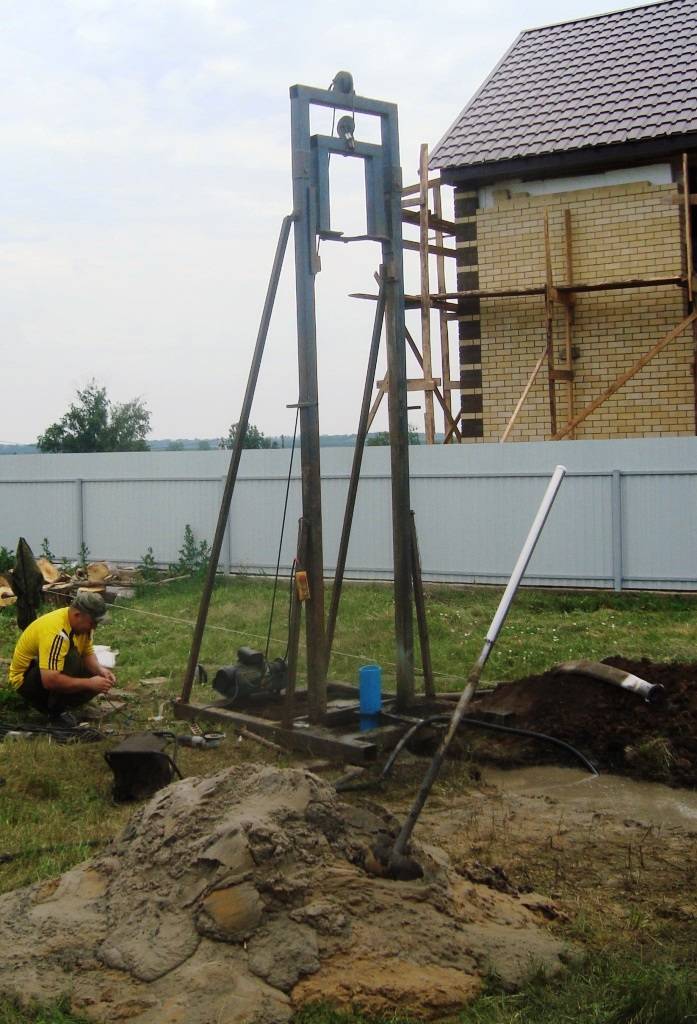
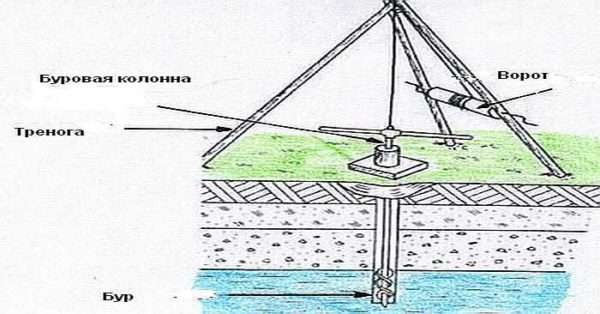
If it is planned to build a well deeper than 800 cm, fix the structure on a tripod. At the top of such a tower there should be a hole large enough for the unhindered movement of the rod.
In the process of drilling, the rod will need to be periodically increased. With an increase in the length of the tool, the mass of the structure will also increase significantly, it will become very difficult to manage it manually. For convenient lifting of the mechanism, use a winch made of metal or durable wood.
Now you know in what order simple drilling rigs are assembled and how to use such units.The knowledge gained will help you significantly save on the services of third-party drillers.
Successful work!
Taking measurements and landscaping
Before the technical process of drilling wells with water under pressure, it is necessary to carry out preparatory work. They consist of the following steps:
Calculation of the depth of the water reservoir
This is important for preparing the required length of pipes and determining the features of the drilling process. To do this, you need to get a map of the area with geodetic designations, take care in advance of the fluid used for the drilling rig in the amount of 5-21 m³.
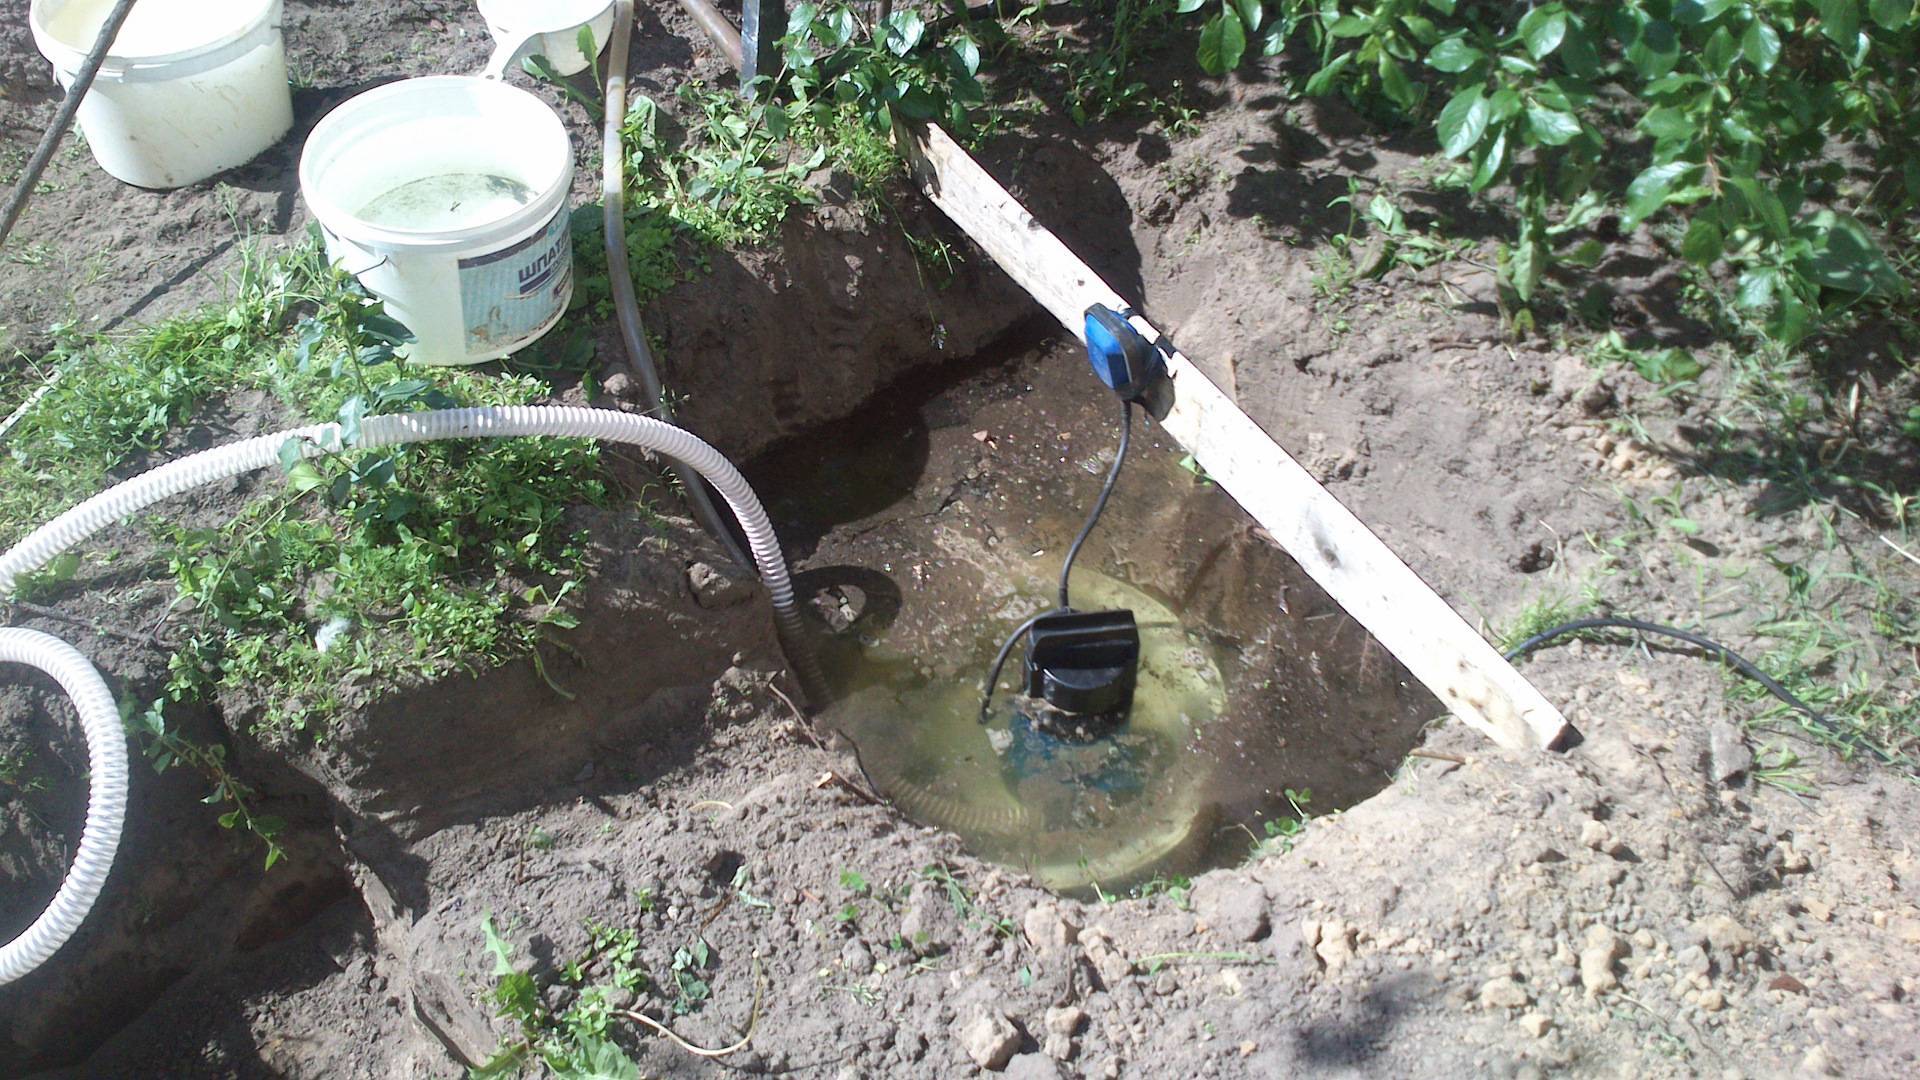
Preparing the site for work. This drilling method implies the presence of two tanks of 1 m³ each for filtering the drilling fluid and subsequent use in the drilling rig
These containers are interconnected by a special channel and protect the surrounding area from excessive pollution.
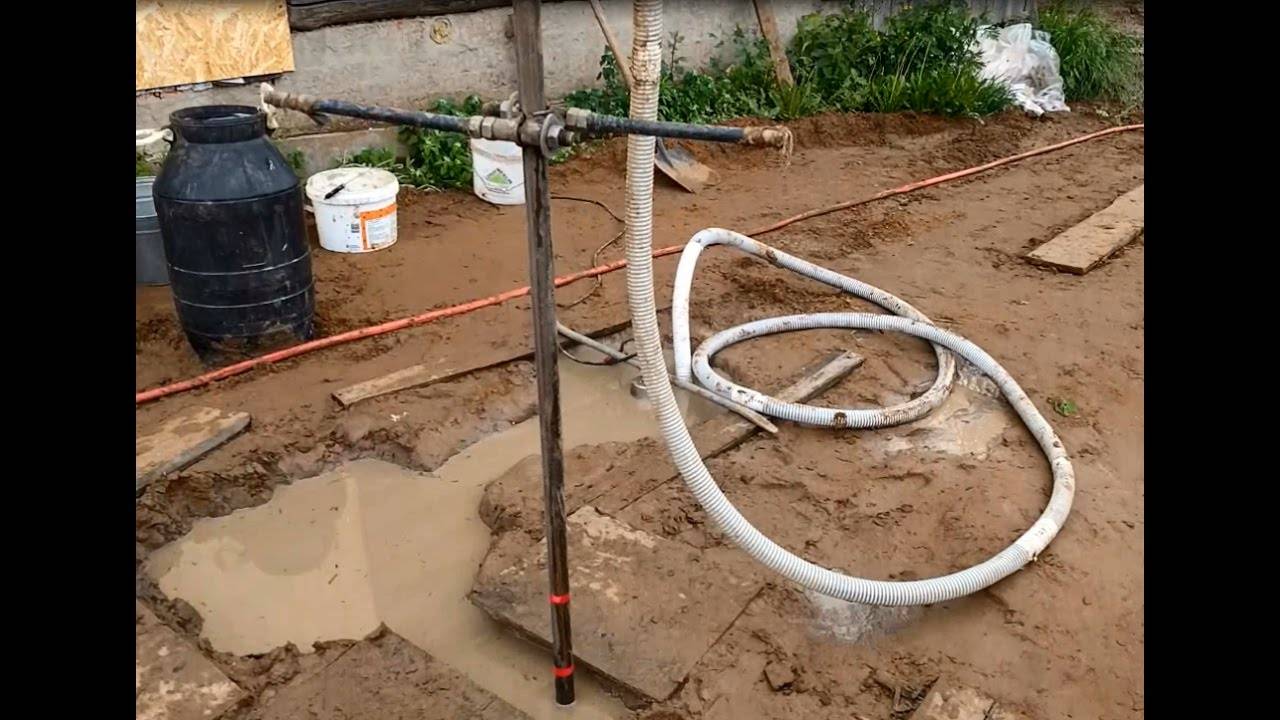
The drill itself is installed in a strictly vertical position, the intake hose for the pump is located in the first tank. From where through it the liquid enters the drill shaft.
This drilling method implies the presence of two tanks of 1 m³ each for filtering the drilling fluid and subsequent use in the drilling rig. These containers are interconnected by a special channel and protect the surrounding area from excessive pollution.
The drill itself is installed in a strictly vertical position, the intake hose for the pump is located in the first tank. From where through it the liquid enters the drill shaft.
Specified drilling rig is distinguished by its ease and efficiency of energy use.It is an ideal option for private use, as it does not require additional theoretical knowledge and extensive practical experience. All that is required is strict adherence to the strict sequence of the technological process.
Homemade MGBU
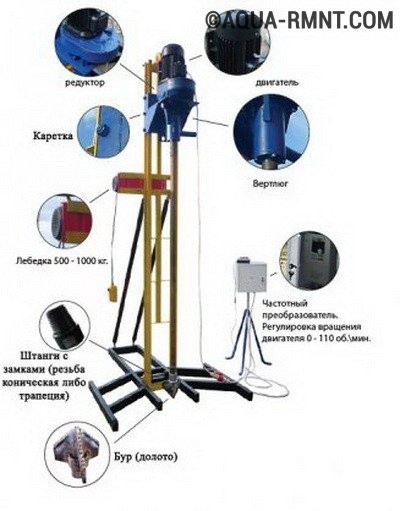
This diagram shows the main working units of the MGBU, which you can make according to our drawings.

Drilling rig drawing
The assembly of the drilling rig begins with the frame. Racks for the frame on the drilling rig are made of DN40 pipe, wall thickness 4mm. "Wings" for the slider - from DU50, thickness 4mm. If not with a 4mm wall, take 3.5mm.
You can download drawings for a small-sized drilling rig from the links below:
- Upper frame: chertyozh_1_verhnyaya_rama
- Lower frame: chertyozh_2_nizhnyaya_rama
- Drill slider: chertyozh_3_polzun
- Slider sleeve: chertyozh_4_gilza_polzun
- Frame assembly: chertyozh_5_rama_v_sbore
- Engine and slider: chertyozh_6_dvigatel_i_polzun
- Node A MGBU: chertyozh_7_uzel_a
Drill swivel, rods and locks
Drilling swivel and drilling rods at first, we recommend that you purchase ready-made ones. In the manufacture of these parts, the accuracy of processing is very important, since the load on these nodes is large.
We do not recommend making a swivel from improvised means. One slightest inaccuracy - and it will fail.


If you decide to order a swivel, you will need to find a turner with a CNC machine.
For the swivel and locks you will need steel:
- Locks - 45 steel.
- Swivel - 40X.
You can download a drawing of a home-made drilling swivel here: do-it-yourself swivel for MGBU
You can save on the purchase of ready-made nodes, but it will take a lot of time to find a master.But it's worth it - homemade parts are much cheaper than purchased ones. To get started, purchase parts for samples. Turners work better when they have drawings and templates on hand.
If you have factory samples, it will be much easier to check the quality of work. For example, if a turner made drill rods and locks, then you take factory and home-made parts and screw them together to check the quality of the thread. Match must be 100%!
Don't buy delivery parts. This is necessary so as not to buy a marriage - this, unfortunately, happens. And most importantly - if you order delivery from afar, you can wait more than one month.
Do-it-yourself drawings of locks on MGBU
We advise you to make a thread on drill rods in a trapezoid - it is no worse than a cone. But if you then order to turners, then it is more difficult to make a conical thread.
If you make or buy locks for drill rods separately, then take simple seam pipes for rods if you drill no deeper than 30 meters (3.5 mm thick and an inner diameter of at least 40 mm). But the welder must weld the locks to the pipes! In vertical drilling, the loads are large.
For drilling deeper than 30 meters, only thick-walled pipes with a wall of 5-6 mm should be taken. Thin rods are not suitable for great depths - they will tear.
- Download the lock on the bar No. 1: chertyozh_zamok_na_shtangu_1
- Bar lock 2: chertyozh_zamok_na_shtangu_2
drilling head
It is not difficult to make a simple drill yourself. A drill is made from ordinary steel. If you decide to make it from alloyed, then keep in mind - it is difficult to weld! We need a welder.
Drill head drawing for download: chertyozh_bur
If there are a lot of stones at the drilling site, then buy drills from firms that are adapted for solid soils.The higher the price, the harder the alloys on the drills and the stronger the drills themselves.
Homemade winch and motor - gearbox
In the manufacture of a mini drilling rig, the RA-1000 winch is used. You can take another, but preferably with a carrying capacity of at least 1 ton (or better, more). Some drillers put on two winches, one electric and the second mechanical. In the case of a wedge of the drill string, it helps a lot.
To facilitate the work, it is better to buy and connect two remote controls: one for reverse and engine movement, the other for the winch. This will save a lot of energy.
A motor - gearbox for drilling wells for a home-made mini drilling rig will require 60-70 rpm, a power of 2.2 kW. Weaker won't fit.
If you use more powerful, you will need a generator, since it will not be possible to connect to a voltage of 220 volts. If you make a hydrodrill with your own hands, take the motor-reducer models: 3MP 31.5 / 3MP 40 / 3MP 50.
How does pipe hydroponics work?
Currently, craftsmen have developed many modifications of hydroponic systems, adapted to individual capabilities and needs. But the bulk of the designs are based on one of three basic principles of functioning:
- Tidal. When choosing this method, the solution is supplied to the roots for a short time at regular intervals. During the outflow of the nutrient solution, the root system is saturated with oxygen.
- capillary irrigation. This type has a mixed technology. The root system of the plants is placed in a light and very loose substrate, and the nutrient solution is continuously supplied in small amounts in the form of drip irrigation.
- Drip irrigation. The liquid continuously flows to the roots through small channels.The solution that the plants do not have time to consume descends into the container through the drainage outlet hoses.
Most often, professional growers use the classic hydroponics options: the first or third. The second option gives good results when growing small root crops.
DIY drilling
screw method
Working with an auger is the easiest manual way. It is used only to obtain shallow sources, the water from which will be used for technical purposes.
For self-drilling, you need a drill, which, when screwed into the ground, destroys the rock and captures the soil with its blades. Periodic pulling out of the auger is necessary to clean it from sludge. This work is done without helpers.


In addition to the drill, you will need a tripod to which the auger is attached, a lifting mechanism (manual with a winch or mechanized). Drilling is impossible without these devices. Even a few people will not be able to lift a drill with soil from a sufficient depth.
The most difficult is drilling strictly vertically. Only a fixed drill will give the necessary verticality, without which the pipes are deformed. To ensure proper verticality, after passing 2 meters, you need to install a temporary metal pipe - a conductor, which will set the correct direction of movement.
A downhole conductor is an additional pipe with a larger diameter than the casing pipe. The conductor in the upper part of the wellbore protects against wall collapse during drilling and does not allow surface water to pass through.
The auger method can be used in soft soils. If the auger rests on a moraine, then you will have to repeat the process in another place. Quicksands are also of great difficulty.Softened soil is difficult to pull to the surface. Only the auger, which has blades bent to the top, helps.
Shock-rope method
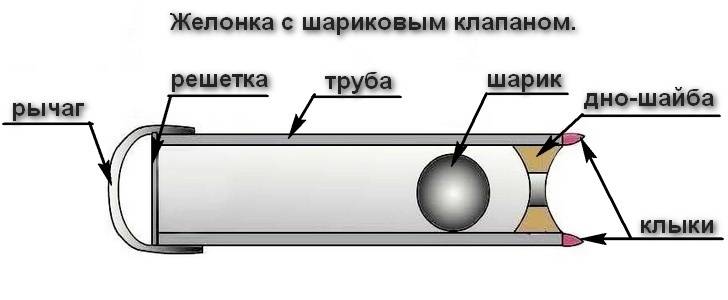
For a source in clay and loamy soils, use the shock-rope method. This method is more time consuming, but reliable and simple. For work, a drill glass is used - this is a cylinder with honed edges.
The essence of the method is to raise the glass (in other words, the cartridge) to the height from which it is dropped. Upon impact, the cylinder becomes clogged with soil. Raising the glass to the surface, the excess soil is removed.
The shock-rope method is good for almost all soils. But you need to make a lot of effort, so hydraulic systems are often used to raise the cartridge.
The percussion-rope technology is also good in that it shows when water-bearing sand appears. Upon reaching which, a bailer with a valve is used, capable of lifting liquefied soil.
A bailer is a hollow metal cylinder for lifting liquefied rock and mud from a well to the surface.
Manual hydraulic drilling
Water drilling is effective in sandy soil. The problem of hydrodrilling is rocky soil. A manual drill for a well will not pass stones; a shock-rope drilling rig is needed.
Video instruction for hydrodrilling:
Regardless of the method, when sampling the soil, it is necessary to case the well with pipes. You will need to install a perforated filter and a pump.


