- Where to drill a well
- Operating procedure
- Preparation of the drilling site
- Assembly and leveling of the plant
- Placement of technological tanks
- water pump
- Artesian wells
- About method
- Features of the installation of casing pipes
- How can you drill a well yourself?
- Types of water intake workings and soils
- Homemade MGBU
- Drilling rig drawing
- Drill swivel, rods and locks
- Do-it-yourself drawings of locks on MGBU
- drilling head
- Homemade winch and motor - gearbox
- Features of hydrodrilling
- A little about well repair
- Types of wells
- Hydrodrilling methods
- Tip drilling
- Exfoliation and washing out of soil by water pressure
- Rotary drilling
- Completion of work
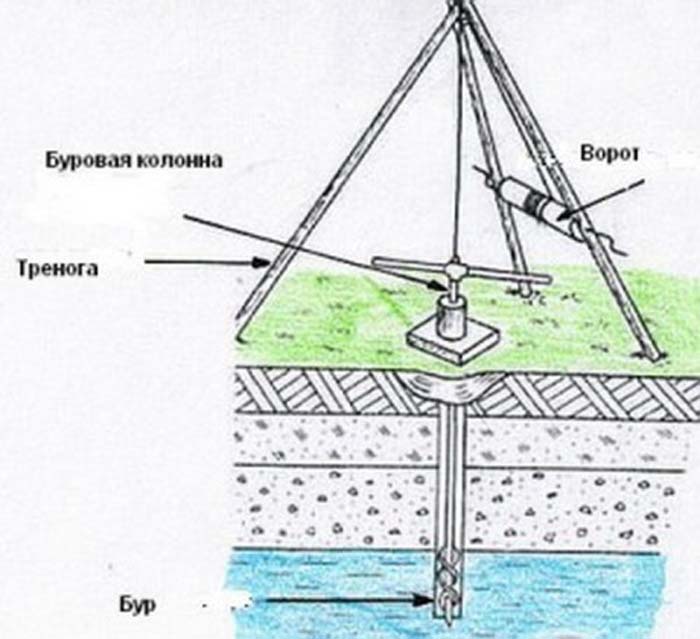
Where to drill a well
A drilled well is not transferred anywhere - it is not a house, not a garage, not a tent, not a barbecue. There are three unshakable rules for choosing a well drilling site.
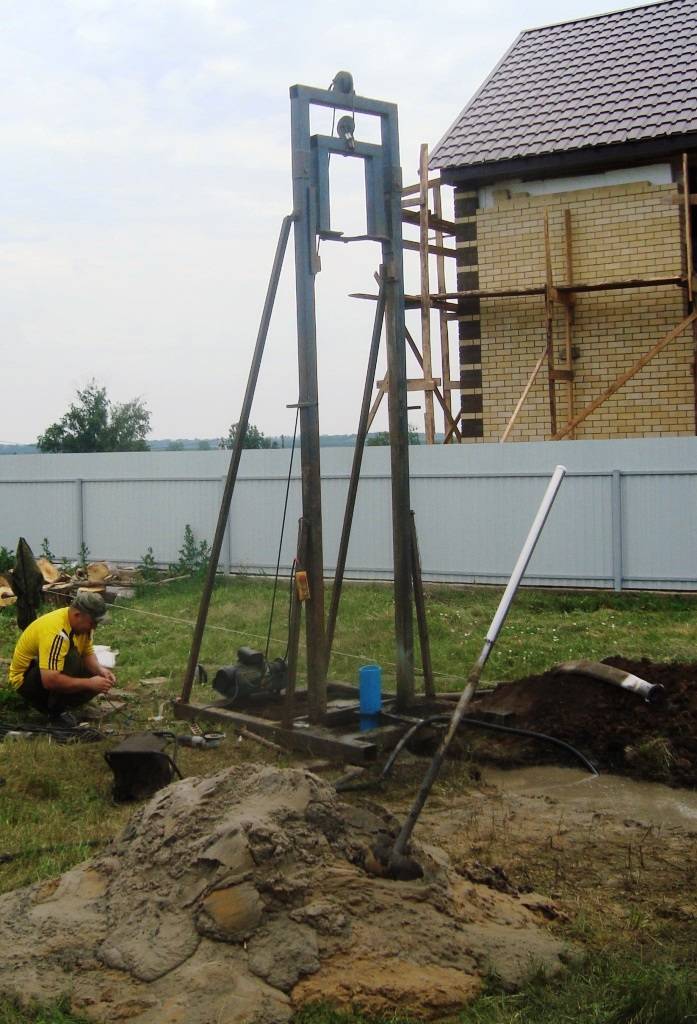
First. To make it convenient for drillers to work. There should be a flat or slightly inclined area approximately 4 by 8-10 meters of rectangular shape, on which a three-axle machine is placed, above which there are no wires (the mast rises 8 meters up), under which there are no communications and which is from buildings, building foundations, tree roots, fence removed by 3 - 4 meters.
Second rule. To make it convenient to use the well.It should be drilled as close as possible to the place of water consumption (to the boiler room, bathhouse, kitchen), so that you do not have to dig many meters of stupid trenches throughout the site.
And the third rule. So that the well is drilled in a place suitable for the arrival of equipment on it again for repair work within the warranty period. Any well repair (to deepen, re-casing, flush, pick up fallen objects) is carried out only by a drilling machine, there is nothing to do with your hands. If such an entrance is impossible, no company will be able to fulfill guarantees. If the well is in a caisson, in order for the machine to lower the drilling tool through the caisson, the well cover and wells must be on the same axis.
Working platform when drilling with the URB 2A2 rig
Operating procedure
General algorithm of actions. A specific list of activities is determined individually, taking into account local specifics.
Preparation of the drilling site
It consists in cleaning and leveling the soil for the further installation of the MBU and the placement of containers for the washing liquid.
Assembly and leveling of the plant
The last one is very significant. If the tool goes into the ground at least at a slight angle, then under such conditions, drilling will not last long, and the installation of casing elbows will be significantly complicated.
Placement of technological tanks
If it is possible to replenish water supplies (for example, from the water supply system), then this is taken into account when choosing a place. The length of the connecting sleeve "reservoir - barrel" is also taken into account.
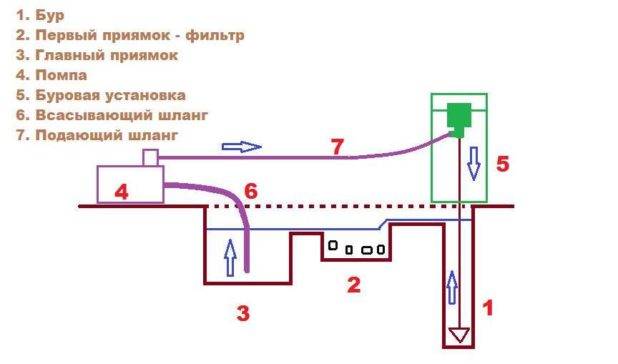
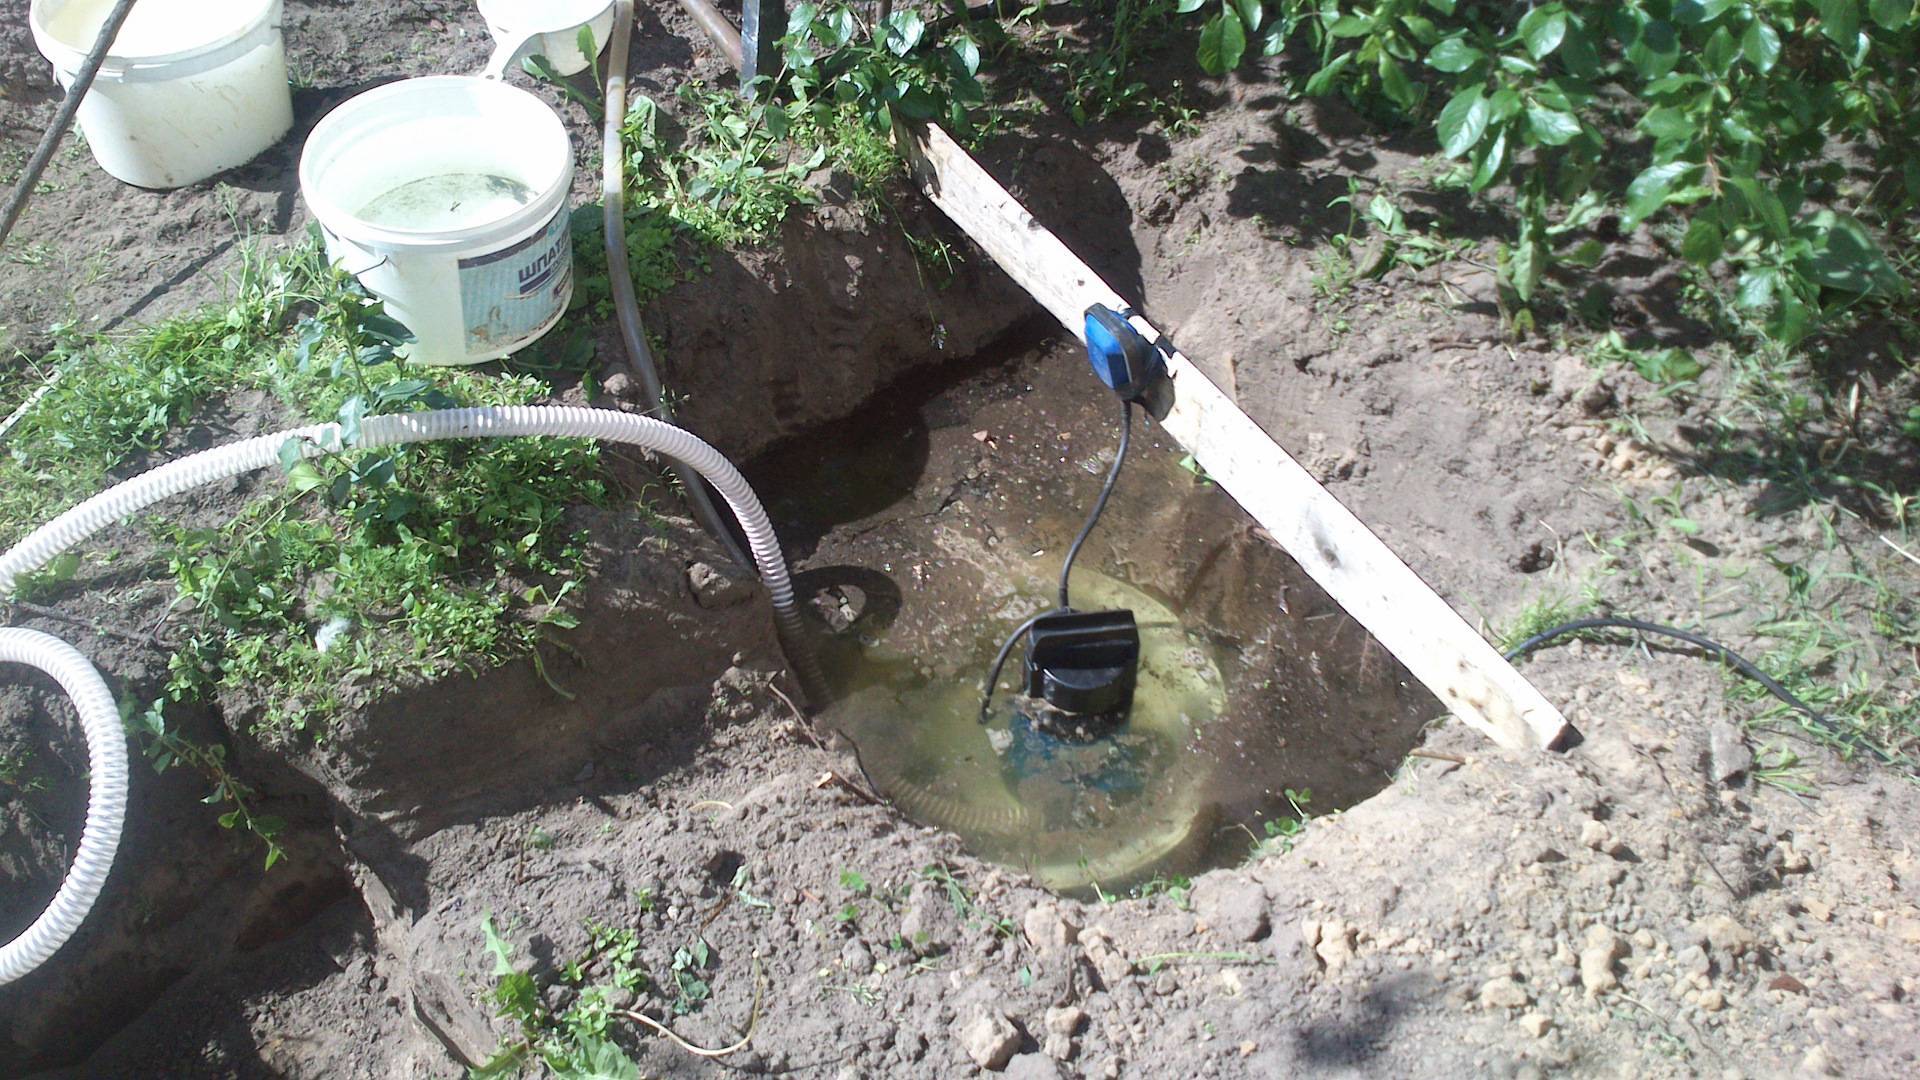
Feature - you need to take into account that the liquid coming from the barrel must go somewhere. When the well is pumped (but it will be later, after drilling and installation of casing pipes), it is simply diverted.In this case, the water enters the same place - into the container (“pit”), that is, it circulates in a circle. Therefore, the first tank after the MBU performs the function of a filter, that is, it cleans the process fluid from large fractions. During the drilling process, it is periodically cleaned.
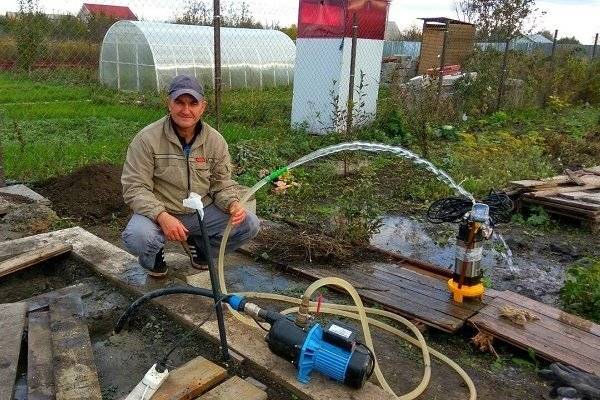
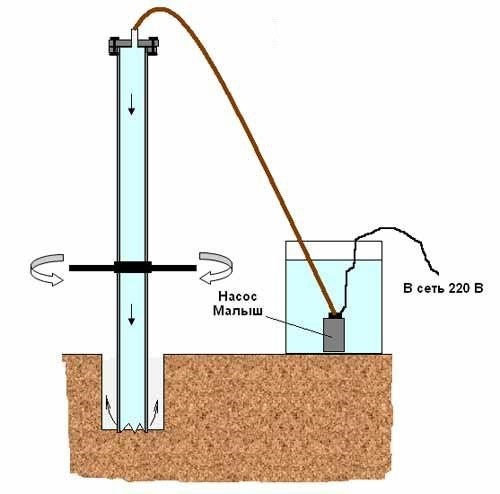
water pump
The point of its location is determined by the ease of use and all the same linear parameters of the hoses. One - in the tank, the other - to the MBU.
Everything else is quite simple. The drill "bites" into the ground, and the motor pump supplies the prepared liquid, which strengthens the walls of the pit and at the same time cools the working tool.
If this technology is compared with the “dry” drilling method, in which it is necessary to periodically remove the tool from the pit (together with the soil), clean it, and load it back, then the advantages are obvious.
It is more expedient to pump in a clay solution, which is easy to prepare with an electric drill and a butterfly nozzle (about 185 - 205 rubles; sold in any specialized store). By consistency, it should resemble kefir. Such preparation gives a double effect - the walls are strengthened, and the fluid flow is reduced.
The soil is heterogeneous over the entire depth, and in the process of sinking, the tool encounters its various layers. Based on their composition, the "recipe" of the technological solution should be adjusted.
Artesian wells
The difference between such a device and a "sandy" well is that drilling is carried out to limestone layers (depth 40 ... 200 m), and not sandy ones. Groundwater does not seep into such layers, as a result, the water is cleaner. In addition, in limestone, the pressure of the liquid is higher, which ensures its rapid rise to the desired height (up to the creation of a natural fountain).
The arrangement of an artesian-type well is carried out in steps, since the casing pipe is required only on loose soil layers and cannot be too long. The diameter of the hole is reduced twice: after the end of the casing pipe and in the middle (on a certain depression) of the lime layer. It has to do with drilling technology.
Attention: the use of artesian waters is regulated and controlled by the state, so the construction of such a structure on private territory is a rare occurrence. The cost of issuing permits, drilling, setting up a "sanitary zone" is 8 ... 12 thousand
dollars.
In addition, drilling requires a platform of 12x9 m without power lines located nearby, as well as heavy large-sized equipment. Therefore, the construction of such wells in private ownership is very limited.


About method
This method is suitable for different types of soil:
- Sandy;
- sandy loam;
- loamy;
- Clayey.
This method is not suitable for rocky soil, since its principle is to soften the rock with water pumped into the drilling zone using a pump, which greatly facilitates the process. Waste water enters the pit next to the installation, and from there it returns to the well through hoses. Thus, the whirlpool has a closed system and a lot of liquid is not required.
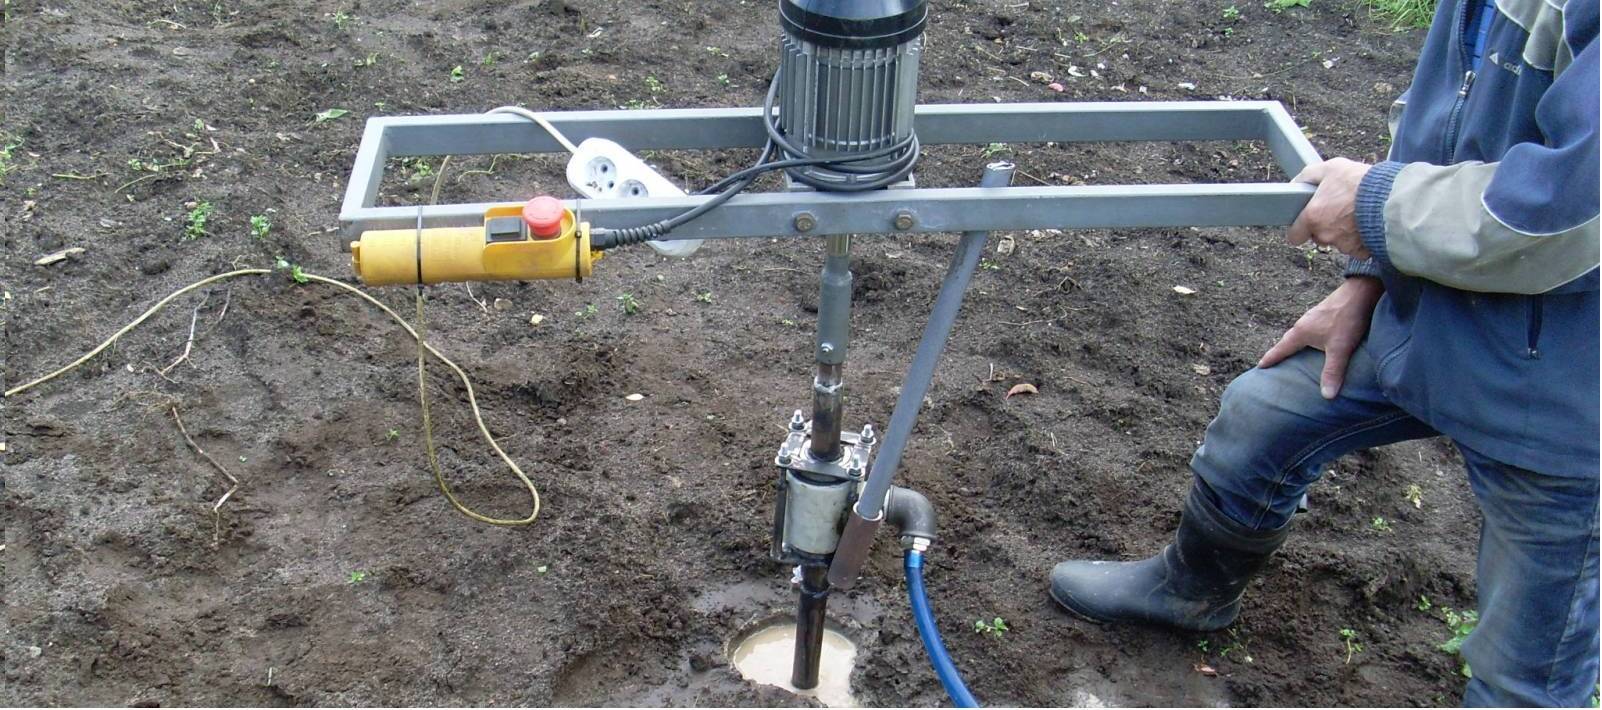
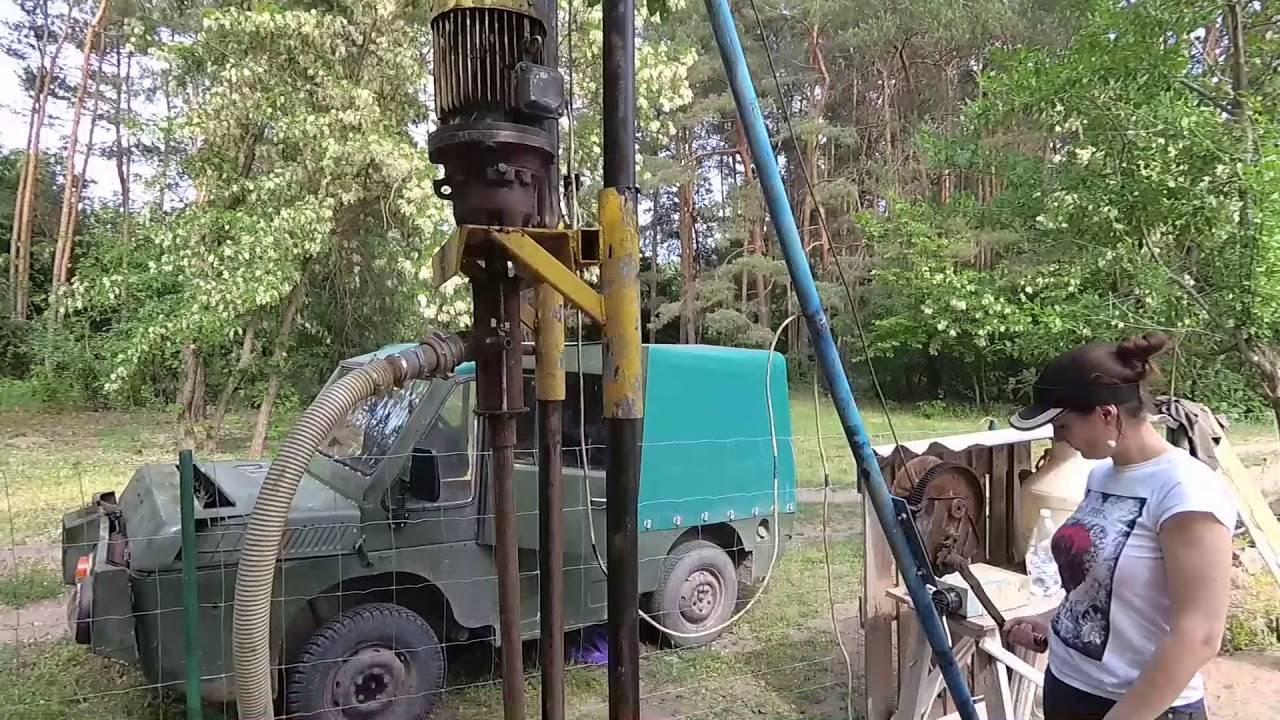
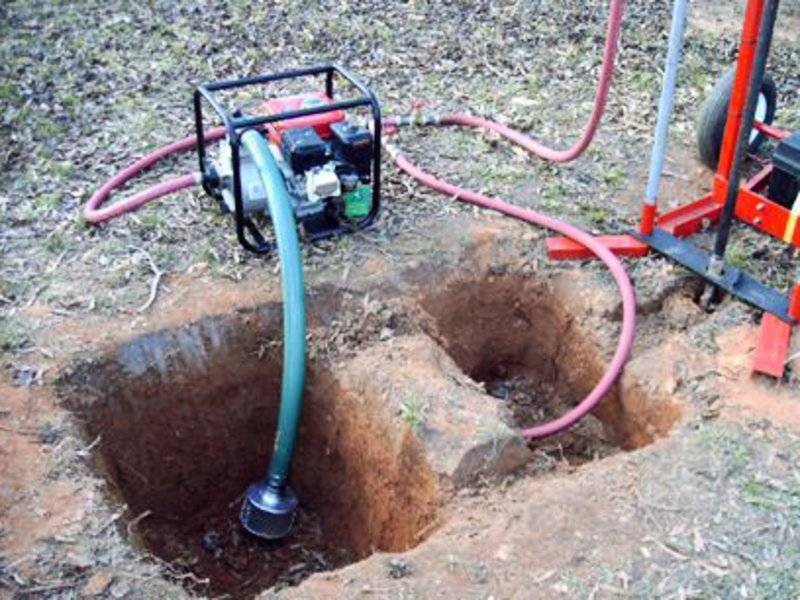
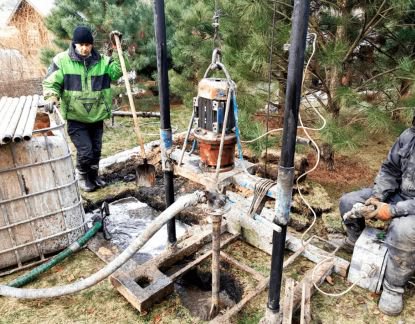
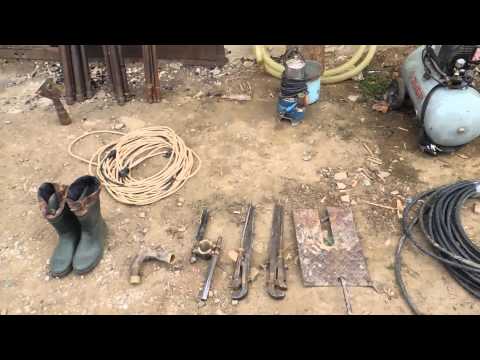
Hydro-drilling of wells is carried out by a small-sized drilling rig (MBU), which is a collapsible mobile structure of compact size and light weight. It consists of a bed, which is equipped with:
- A reversible motor with a gearbox (2.2 kW) that creates torque and transmits it to the drilling tool.
- Drill rods and drills.
- A manual winch that raises and lowers the equipment when building up the working string with rods.
- Motor pump (not included).
- Swivel - one of the contour elements with a sliding type of fastening.
- Hoses for water supply.
- A petal or exploration drill in the shape of a cone, which is used to penetrate compacted soils and center the equipment.
- Control unit with frequency converter.
The presence of rods and drills of different diameters allows drilling wells of different depths and diameters. The maximum depth that can be passed with the MBU is 50 meters.
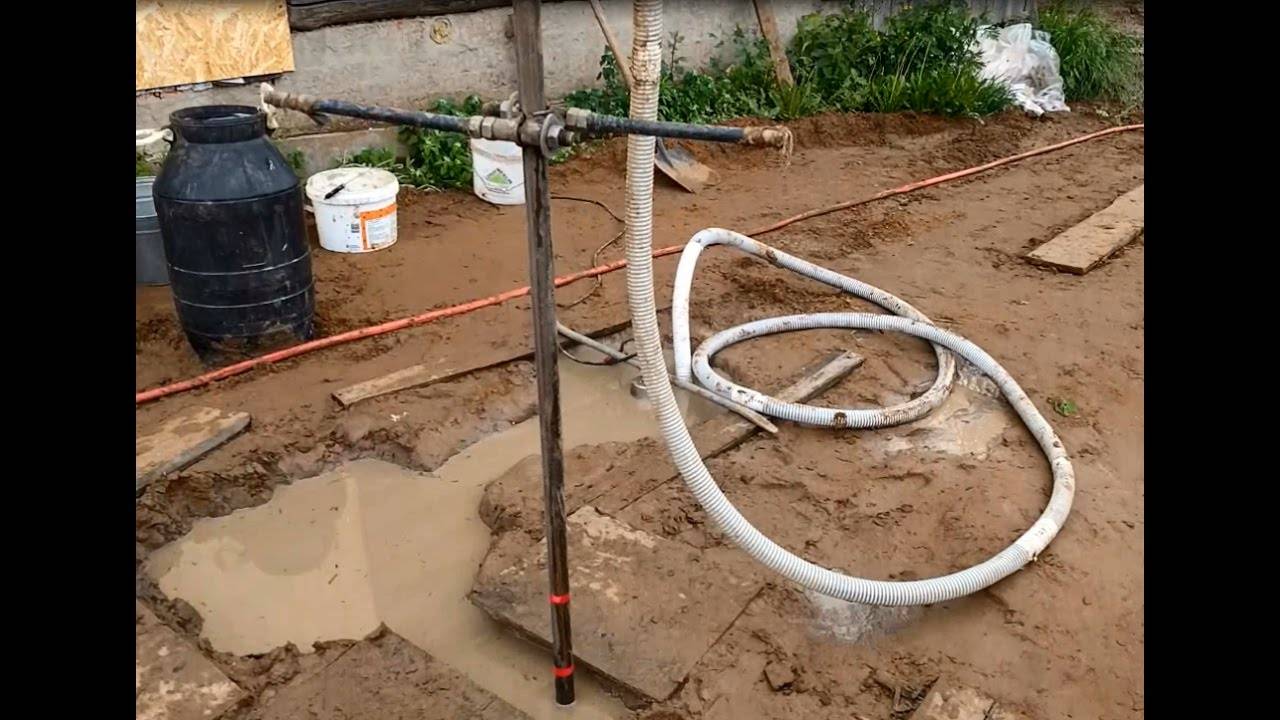
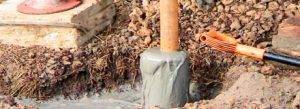
Water well drilling technology consists of several stages. A frame is mounted on the site, an engine, a swivel and a winch are attached to it. Then the first elbow of the rod is assembled with a head in the lower end, pulled up to the swivel with a winch and fixed in this knot. The elements of the drill rod are mounted on a conical or trapezoidal lock. Drilling tip - petals or chisel.
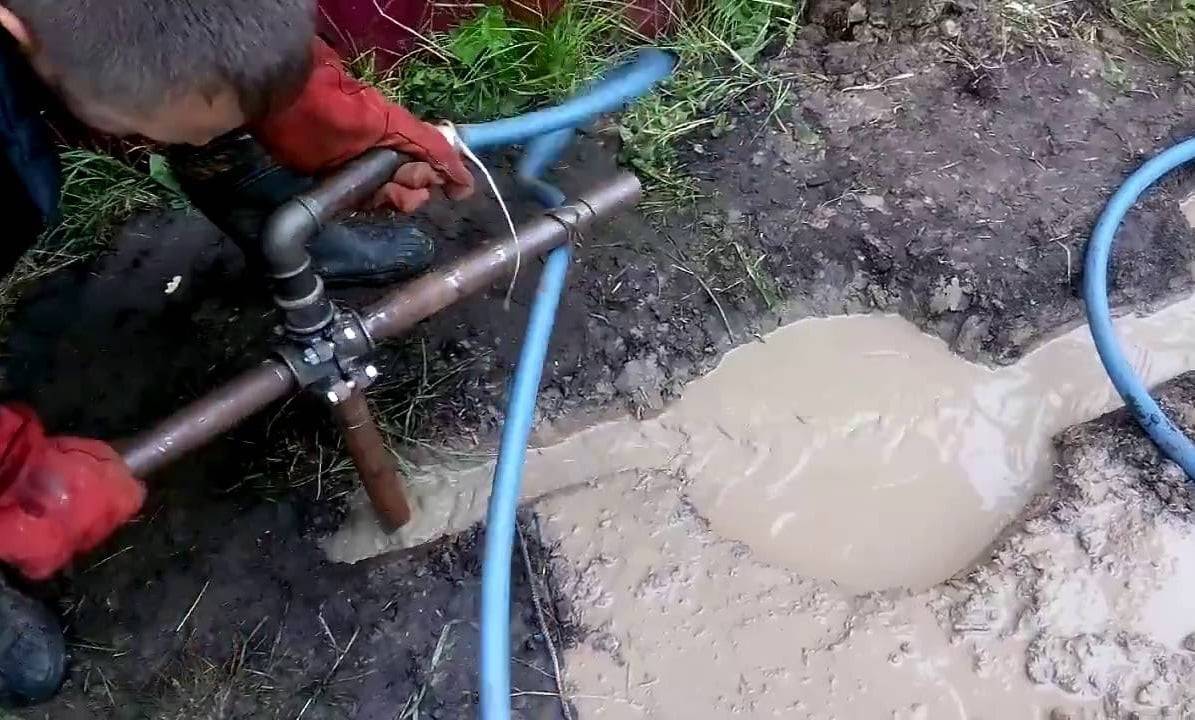
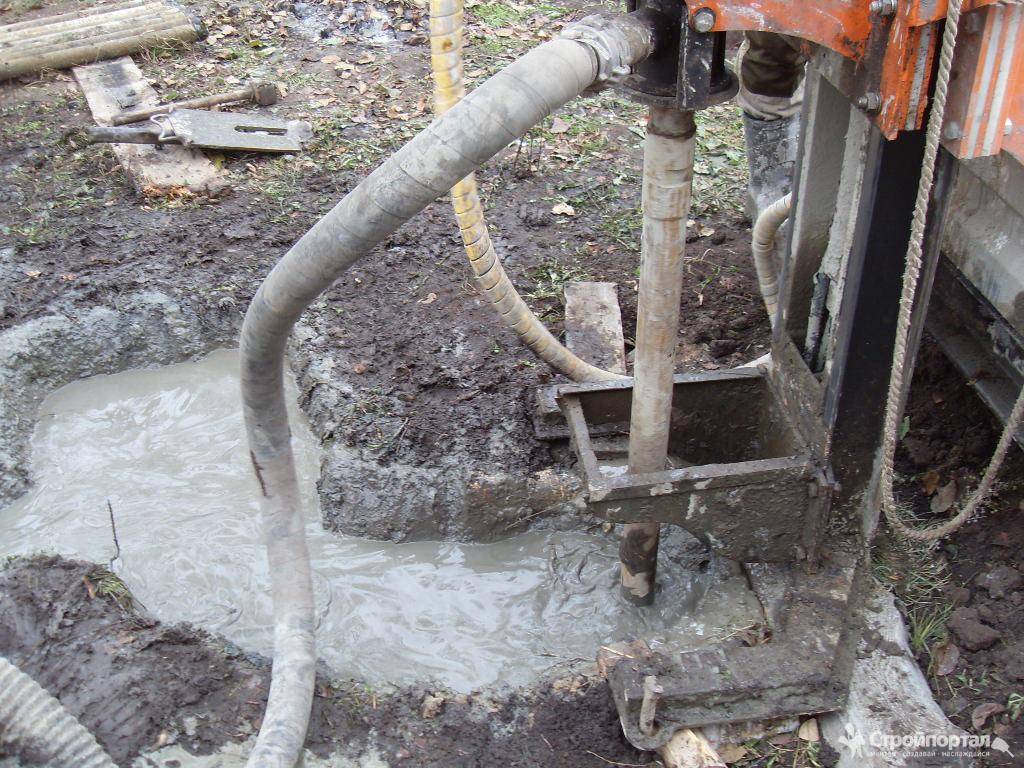
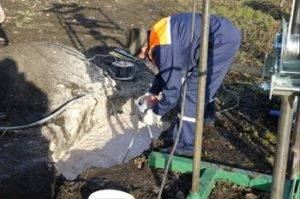
Now we need to prepare the drilling fluid. Near the installation, a pit is made for water or drilling fluid in the form of a thick suspension, for which clay is added to the water. Such a solution is poorly absorbed by the soil.
The intake hose of the motor pump is also lowered here, and the pressure hose is connected to the swivel. Thus, a constant flow of water into the shaft is ensured, which cools the drill head, grinds the walls of the well and softens the rock in the drilling zone. Sometimes an abrasive (such as quartz sand) is added to the solution for greater efficiency.
The torque of the drill rod is transmitted by a motor, below which the swivel is located. Drilling fluid is supplied to it and poured into the rod. The loosened rock is washed to the surface.Waste water is reused many times as it flows back into the pit. The technical fluid will also prevent water release from the pressure horizon, as back pressure will be created in the well.
As the well passes, additional rods are set until the aquifer is opened. After drilling is completed, a filter with casing pipes is inserted into the well, which are threaded and extended until the filter enters the aquifer. Then a cable with a submersible pump with a hose and an electric drive is lowered. Water is pumped until transparent. The adapter connects the source to the water supply.
This is interesting: Purification of water from a well - we learn from all sides
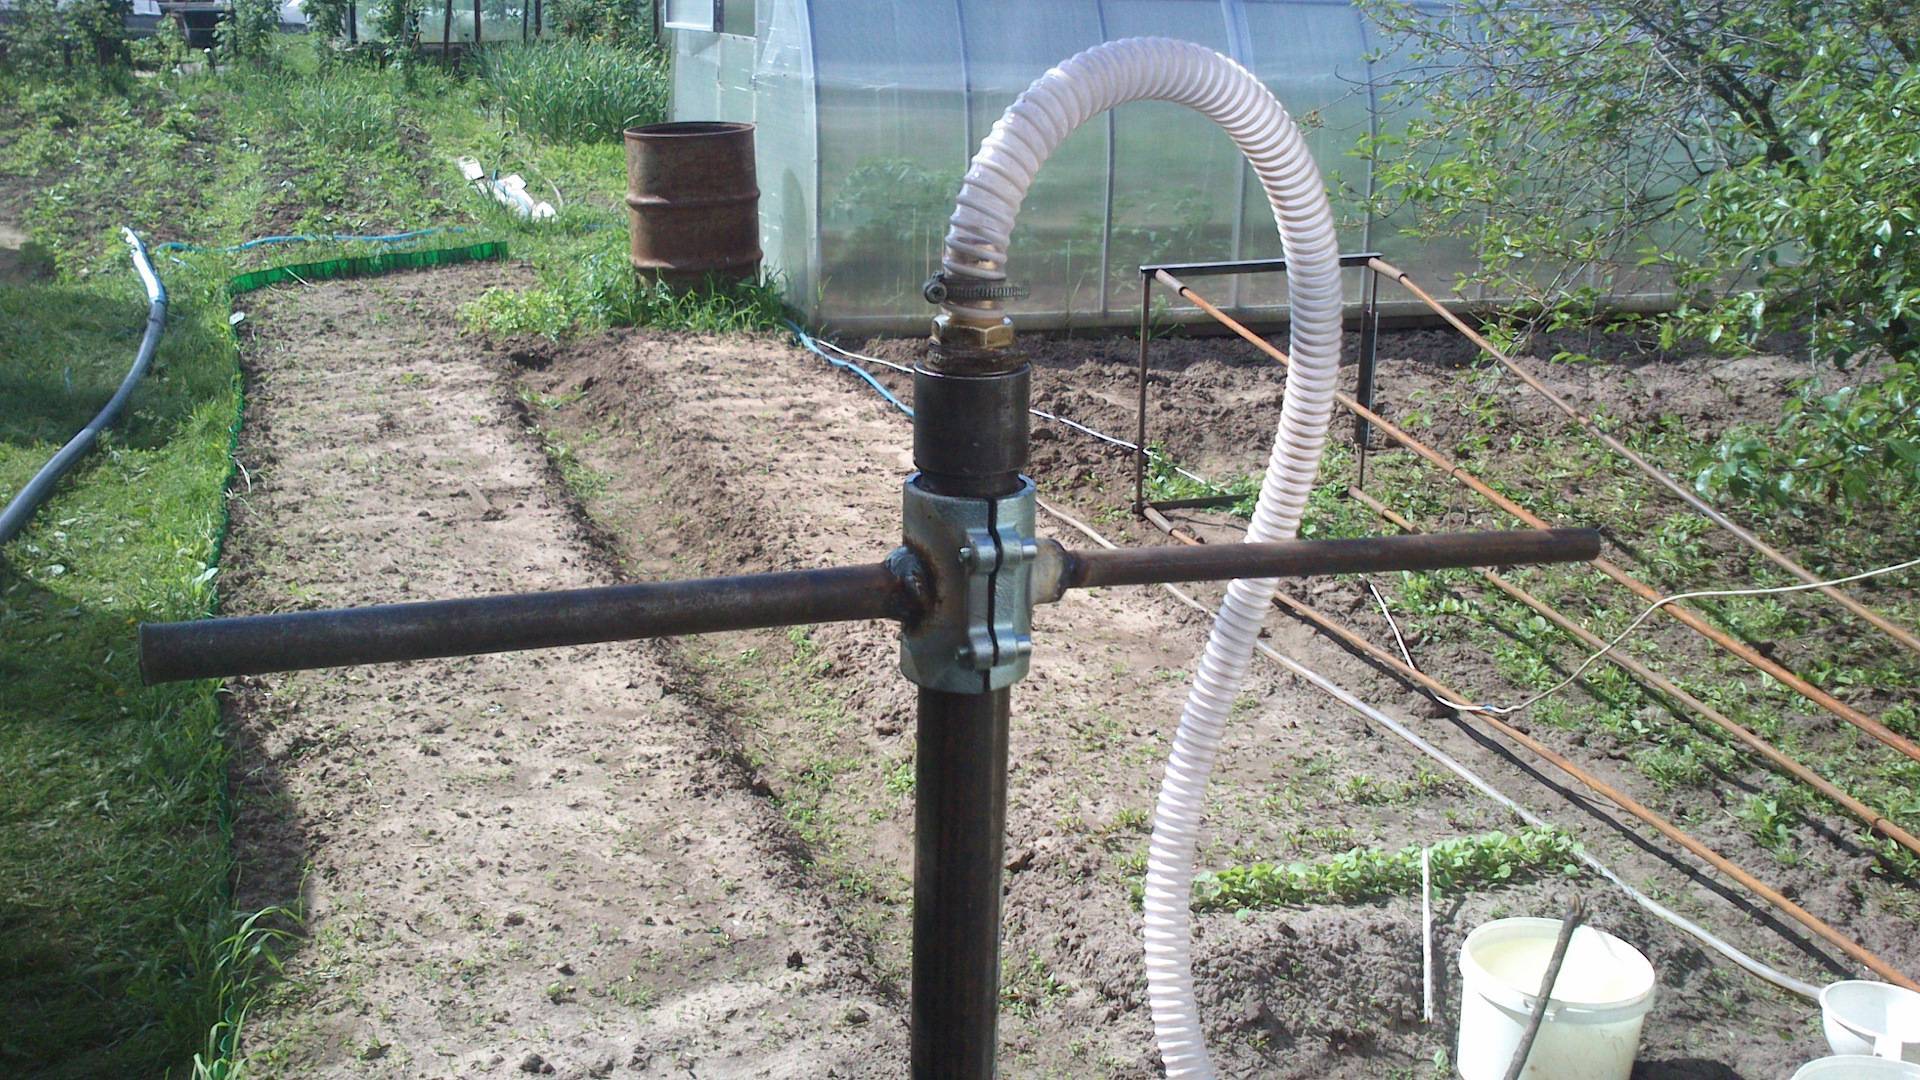
Features of the installation of casing pipes
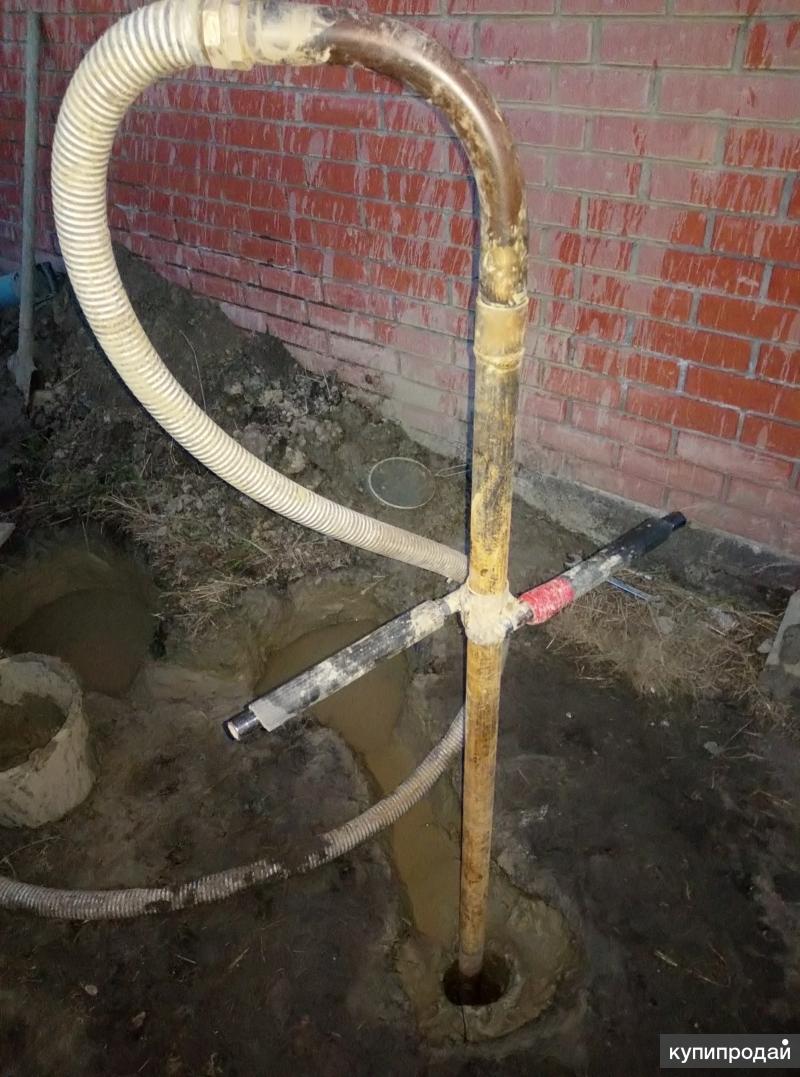
After flushing the well, the drill rods are carefully removed. It should be borne in mind that if the parts are difficult to lift, then the flushing was insufficient. Now you can install the casing pipes. They can be metal, asbestos-cement or plastic. The latter option is the most widespread, since it is very durable, does not corrode and deform. Most often, pipes with a diameter of 125 mm are installed; for shallow wells, the 116 mm option is suitable. Sufficient wall thickness of parts - 5-7 mm.
For the best quality of the supplied water and additional purification of it from dirt, filters are used: sprayed, slotted or home-made. In the latter case, the simplest option can be considered as follows: with the help of a grinder, cracks are made across the entire casing across.To make a filter of higher purification, many holes are drilled in the pipe, then the part is wrapped with a special mesh or geofabric for better filtration, everything is fixed with clamps. A casing pipe with a filter at the end is lowered into the well.
A well filter of this type can easily be made independently. To do this, holes are drilled in the casing, which are best covered with a layer of geotextile or special mesh on top.
If the installation is difficult due to the presence of a strong water carrier, which quickly “washes out” the wells, you can try the following. Slots are cut or holes are drilled in the tip screwed onto the filter. A head is put on the pipe, to which the pressure hose from the pump is attached. Then the most powerful water pressure is turned on. After these manipulations, the casing should easily enter the water carrier. After installing the casing, half a bucket of gravel can be poured into the column as an additional filter.
The next step is another flushing of the well. This is necessary to wash out the water carrier, which was saturated with drilling fluid during drilling. The operation is performed as follows. A head is put on the pipe, a hose from the motor pump is fixed, and clean water is supplied into the well. After washing, the column is evenly and densely covered with gravel. Now you can lower the pump on the cable and use the well. A small nuance: the mechanism cannot be lowered to the very bottom, otherwise it will fail very quickly. The optimum depth is just below the water column.
The process of hydrodrilling a well for water is quite simple and quite affordable for independent implementation.However, before starting work, you need to carefully study the instructions, and best of all, take part in drilling under the guidance of specialists. Despite the apparent simplicity, there are many nuances known only to professionals. If there is no experience or desire, you can invite specialists who will punch a well quickly and at an affordable cost and equip it. The owner will only have to rejoice at the appearance of an autonomous water supply system in his house.
How can you drill a well yourself?
There are several ways that allow you to drill on your own:
Drilling and arranging a well can solve the problem of water supply for several decades in advance.
- The rotational method (aka rotary) is the most commonly used. With this method, the drilling tool is screwed into the rock;
- Percussion - with this method, they strongly hit the drill rod, thus deepening the projectile as much as possible. In particular, it is the impact method that equips a well-needle;
- The method is shock-rotational - with this, a rod with a drill set equipped at the end is raised and lowered with force, thereby loosening the soil. Then they produce rotational movements, taking the rock inside the projectile;
- Rope-impact method - with this method, drilling shells are either raised or lowered on a special rope, while ensuring rock intake.
The above methods are referred to as the so-called dry drilling. You can organize them on your own. But with wet drilling (hydro drilling), it is first necessary to provide a special drilling fluid in the water layer, which could soften the hard rock. This type of drilling is very specific and will require industrial equipment.In this case, the crushed rock particles are brought to the surface by the spent solution.
Types of water intake workings and soils
Before starting drilling, you should study the composition of the soil at the site in order to at least roughly imagine your future well.
Depending on the characteristics of the aquifer, there are three types of wells:
- Abyssinian well;
- filter well;
- artesian well.
The Abyssinian well (or well-needle) can be arranged almost everywhere. They punch it where the aquifer lies relatively close to the surface and is confined to the sands.


For its drilling, driving technology is used, which is not suitable for the construction of other types of wells. All work can usually be completed within one business day.
This scheme allows you to study the features of the device of various wells in order to better understand the technology of their drilling and choose the appropriate method (click to enlarge)
But the flow rate of such wells is small. To provide the house and the plot with enough water, it sometimes makes sense to make two such wells on the site. The compact dimensions of the equipment make it possible to arrange such a well right in the basement without any problems.
Filter wells, which are also called "sand" wells, are created on soils where the aquifer lies relatively shallow - up to 35 meters.
Usually these are sandy soils that lend themselves well to drilling. The depth of the filter well usually varies between 20-30 meters.
This diagram clearly shows the device of the filter well. A filter must be installed at the bottom of it to prevent sand and silt from entering the water.
Work in a good scenario will take two to three days.The filter well needs good maintenance, since the constant presence of sand and silt particles in the water can cause silting or sanding.
The typical life of such a well can be 10-20 years. The period may be longer or shorter, depending on the quality of the well drilling and its further maintenance.
Artesian wells, they are wells “for limestone”, are the most reliable, since the water carrier is confined to bedrock deposits. Water contains numerous cracks in the rock.
Silting of such a well usually does not threaten, and the flow rate can reach about 100 cubic meters per hour. But the depth to which drilling is to be carried out usually turns out to be more than solid - from 20 to 120 meters.
Of course, drilling such wells is more difficult, and it will take much more time and materials to complete the work. A professional team can cope with the work in 5-10 days. But if we drill a well on the site with our own hands, it may take several weeks, and even a month or two.
But the effort is worth it, because artesian wells can last half a century, or even more, without problems. Yes, and the flow rate of such a well allows you to supply water not only to one house, but also to a small village. Only manual drilling methods are not suitable for a device of such development.
The physical and mechanical properties of soils are also of great importance when choosing a drilling method.
In the course of work, it may be necessary to go through a variety of layers, for example:
- wet sand, which can be drilled in almost any way relatively easily;
- water-saturated sand, which can only be removed from the trunk with the help of a bailer;
- coarse-clastic rocks (gravel and pebble deposits with sandy and clay aggregates), which are drilled with a bailer or a glass, depending on the aggregate;
- quicksand, which is fine sand, supersaturated with water, it can only be scooped out with a bailer;
- loam, i.e. sand with abundant inclusions of clay, plastic, well amenable to drilling with an auger or core barrel;
- clay, a plastic rock that can be drilled with an auger or a glass.
How to find out what soils lie under the surface, and at what depth is the aquifer? Of course, you can order geological studies of the soil, but this procedure is not free.
Almost everyone chooses a simpler and cheaper option - a survey of neighbors who have already drilled a well or built a well. The water level in your future water source will be at about the same depth.
Drilling a new well a short distance from an existing facility may not follow exactly the same scenario, but it will most likely be very similar.
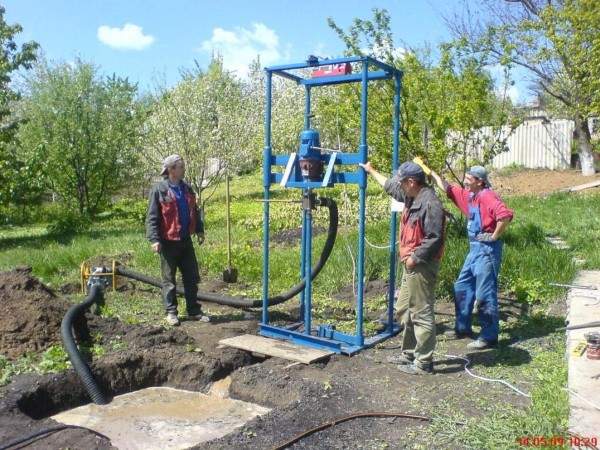
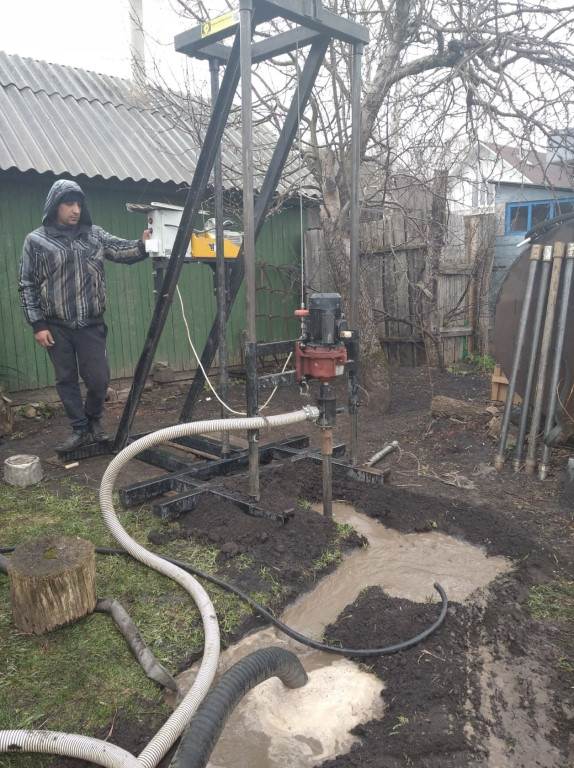
Homemade MGBU
This diagram shows the main working units of the MGBU, which you can make according to our drawings.
Drilling rig drawing
The assembly of the drilling rig begins with the frame. Racks for the frame on the drilling rig are made of DN40 pipe, wall thickness 4mm. "Wings" for the slider - from DU50, thickness 4mm. If not with a 4mm wall, take 3.5mm.
You can download drawings for a small-sized drilling rig from the links below:
- Upper frame: chertyozh_1_verhnyaya_rama
- Lower frame: chertyozh_2_nizhnyaya_rama
- Drill slider: chertyozh_3_polzun
- Slider sleeve: chertyozh_4_gilza_polzun
- Frame assembly: chertyozh_5_rama_v_sbore
- Engine and slider: chertyozh_6_dvigatel_i_polzun
- Node A MGBU: chertyozh_7_uzel_a
Drill swivel, rods and locks
Drilling swivel and drilling rods at first, we recommend that you purchase ready-made ones. In the manufacture of these parts, the accuracy of processing is very important, since the load on these nodes is large.
We do not recommend making a swivel from improvised means. One slightest inaccuracy - and it will fail.
If you decide to order a swivel, you will need to find a turner with a CNC machine.
For the swivel and locks you will need steel:
- Locks - 45 steel.
- Swivel - 40X.
You can download a drawing of a home-made drilling swivel here: do-it-yourself swivel for MGBU
You can save on the purchase of ready-made nodes, but it will take a lot of time to find a master. But it's worth it - homemade parts are much cheaper than purchased ones. To get started, purchase parts for samples. Turners work better when they have drawings and templates on hand.


If you have factory samples, it will be much easier to check the quality of work. For example, if a turner made drill rods and locks, then you take factory and home-made parts and screw them together to check the quality of the thread. Match must be 100%!
Don't buy delivery parts. This is necessary so as not to buy a marriage - this, unfortunately, happens. And most importantly - if you order delivery from afar, you can wait more than one month.
Do-it-yourself drawings of locks on MGBU
We advise you to make a thread on drill rods in a trapezoid - it is no worse than a cone. But if you then order to turners, then it is more difficult to make a conical thread.
If you make or buy locks for drill rods separately, then take simple seam pipes for rods if you drill no deeper than 30 meters (3.5 mm thick and an inner diameter of at least 40 mm).But the welder must weld the locks to the pipes! In vertical drilling, the loads are large.
For drilling deeper than 30 meters, only thick-walled pipes with a wall of 5-6 mm should be taken. Thin rods are not suitable for great depths - they will tear.
- Download the lock on the bar No. 1: chertyozh_zamok_na_shtangu_1
- Bar lock 2: chertyozh_zamok_na_shtangu_2
drilling head
It is not difficult to make a simple drill yourself. A drill is made from ordinary steel. If you decide to make it from alloyed, then keep in mind - it is difficult to weld! We need a welder.
Drill head drawing for download: chertyozh_bur
If there are a lot of stones at the drilling site, then buy drills from firms that are adapted for solid soils. The higher the price, the harder the alloys on the drills and the stronger the drills themselves.
Homemade winch and motor - gearbox
In the manufacture of a mini drilling rig, the RA-1000 winch is used. You can take another, but preferably with a carrying capacity of at least 1 ton (or better, more). Some drillers put on two winches, one electric and the second mechanical. In the case of a wedge of the drill string, it helps a lot.
To facilitate the work, it is better to buy and connect two remote controls: one for reverse and engine movement, the other for the winch. This will save a lot of energy.
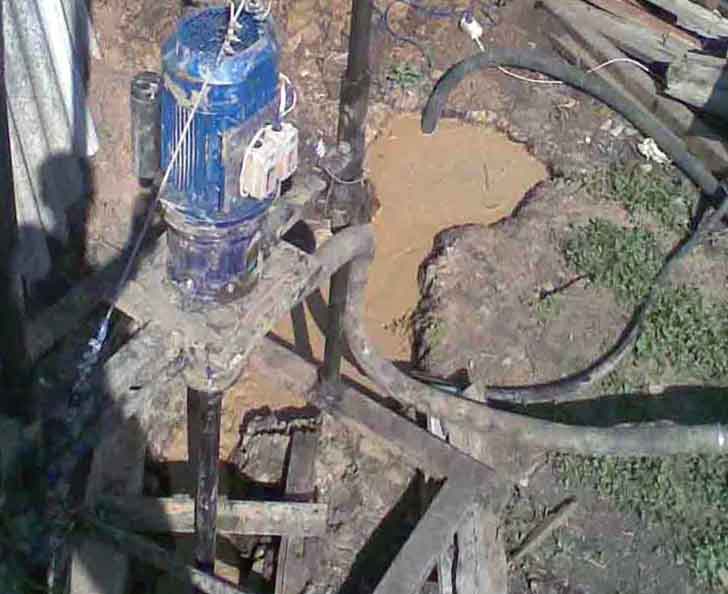
A motor - gearbox for drilling wells for a home-made mini drilling rig will require 60-70 rpm, a power of 2.2 kW. Weaker won't fit.
If you use more powerful, you will need a generator, since it will not be possible to connect to a voltage of 220 volts. If you make a hydrodrill with your own hands, take the motor-reducer models: 3MP 31.5 / 3MP 40 / 3MP 50.
Features of hydrodrilling
The method consists in extracting the waste rock with water injected into the mine cavity under pressure.The drilling tool for removal of the destroyed layers is not applied.
The technology consists in a combination of 2 processes:
- the formation of a vertical well in the ground through the alternate destruction of soil layers;
- extraction of crushed soil fragments from the wellbore under the action of a working fluid.
The process of mixing the solution for drilling.
The creation of the necessary force required to plunge the cutting tool into the rock is facilitated by the dead weight of the equipment, consisting of a string of drilling rods and equipment for pumping fluid into the well.
To make a washing solution in a separate pit, a small amount of clay suspension is mixed in water, it is stirred with a construction mixer to the consistency of kefir. After that, the drilling fluid is directed into the borehole by a motor pump under pressure.
During hydraulic drilling, the liquid medium performs the following functions:
- removal of fragments of destroyed rock from the body of the water mine;
- cutting tool cooling;
- grinding the internal cavity of the pit;
- strengthening of the mine walls, which makes it possible to reduce the likelihood of the collapse of the working and falling asleep with the dump of the borehole shaft.
From pipe segments 1.5 m long, connected by threaded fasteners, a column is formed, which lengthens due to the growth of fragments as the well is deepened.
Hydrodrilling technology is optimal for rocks with a high concentration of sand and clay. It is not advisable to use this technique for arranging an autonomous source on rocky and swampy soils: massive and viscous soil layers are heavily washed out with water.
A little about well repair
Or why you can’t do the repair yourself, but entrust it to professionals?
So:
- The main reason for a well to go out of operation is most often filter clogging, or sand compaction in the pipeline due to irregular use of water.
- You can get a dirty filter yourself and clean it, but if the reason is in the pipe, then effective methods of specialists are needed.
- They flush the well under the pressure of water. Why water is pumped into the pipe under high pressure, and the dirt is carried out. An uncontrolled splash of dirty liquid can occur, which does not please the people doused with it, and this is considered a disadvantage of this method.
- The pipe is cleaned with an air stream, with the same principle of operation, but this method can damage the filter, which is also undesirable.
- The most acceptable and safest way remains - pumping out the dirty liquid with a pump. The filter is not damaged, there is no dirt around.
- It is possible to pour special food acids into the well, which have the ability to quickly restore the well. The process is simple, the acid is poured, the well remains with it for some time, then the dirty liquid is pumped out.
- High cleaning efficiency - explosion in the wellbore. But it can happen, like the pharmacist in The Elusive Avengers, when he shifted the explosives, so here, you can damage not only the filter, but also the pipe.
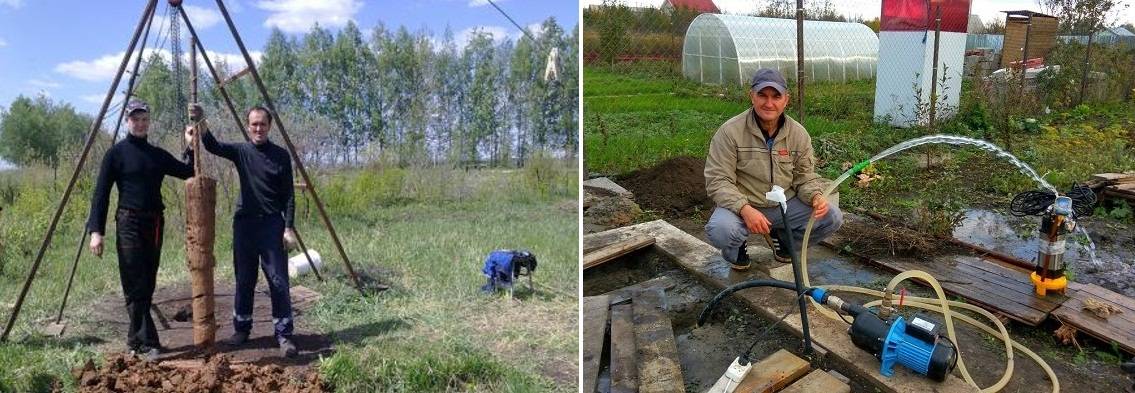
How to make hydrodrilling wells with a submersible pump can be clearly seen in the video. This article proposes to familiarize yourself with the general provisions on hydrodrilling.
Types of wells
Before you start work, you need to choose the appropriate type of well.In accordance with how deep the water layer lies, there are three main types of penetrations:
- Abyssinian well.
- Filter well.
- Artesian well.
Now let's look at the features of each development. The Abyssinian well is a simplified version of penetration, which can be drilled almost anywhere. A significant disadvantage of such a well is the relatively low quality of the water. Most often it is used for irrigation or other similar needs. Such water is not suitable for consumption or can be used only after multi-level purification. This is due to the fact that waters lying at shallow depths are fed by precipitation and contain harmful impurities.


Regardless of the type of well, a pump is mandatory
To prepare the Abyssinian well, which is often referred to as a well-needle, the driving technology is more often used, which cannot be used to work on other types of penetrations. If you have the necessary equipment and assistants, you can complete the work on the manufacture of such a well within one day.
Before you drill a well with your own hands, it is recommended to calculate in advance what kind of water supply is needed. For example, if you need to provide a house, a bathhouse, or other outbuildings, it is better to opt for a filter well - its flow rate is sufficient, and drilling such a penetration is relatively simple. The depth of the water layers in this case is from 20 to 30 meters.
Artesian springs are called the best option - they do not silt up, since the water is contained in rock crevices, does not contain harmful impurities, does not need to be filtered and is completely drinkable.Its only drawback is the depth of water, which can range from 30 to 100 or more meters. Probably, almost everyone is now thinking about how to drill a well under water with their own hands, given such a significant depth. Unfortunately, in no way, this type of well is given here only as an example; it is impossible to get to artesian waters through artisanal methods.
Artesian well
Hydrodrilling methods
Tip drilling
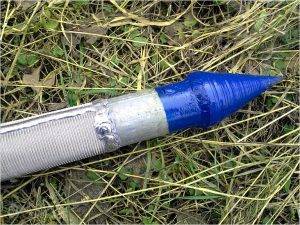
sharp tip
A pointed, notched tip is welded onto the head of the rod. It destroys the dense layer of the earth. When the rod built into the MBU with a drill is rotated, it consistently deepens into the soil. Destroyed rocks are washed out with bentonite mortar.
During washing, clay particles adhere to the walls of the mine, thereby strengthening them. Dirt that comes out to the surface accumulates in the sewer storage tank. The solid particles remain at the bottom, while the filtered liquid flows into another sump. Further, the water mass washes out excess soil from the mine. The cycle is repeated.
Do-it-yourself hydrodrilling of wells with a tip allows you to make a well up to 30 m deep.
Exfoliation and washing out of soil by water pressure
It is important to properly make a recess in the ground, prepare a special solution (water and hydrochloric acid in a ratio of 1: 20,000). Casing pipes should be run into the mine as soon as an aquifer is found. The gap between the shaft wall and the pipe should be cemented
This will prevent the penetration of melted and free-flowing groundwater into the trunk
The gap between the shaft wall and the pipe should be cemented. This will prevent the penetration of melted and free-flowing groundwater into the trunk.
Slag receivers must be deep. In this case, the soil particles will remain at the bottom and will not float up during the next water intake.
When applying this method, it is important to know that it will be possible to drill a well in loose soil. Hydro-drilling will not work in the ground where there are solid layers of Jurassic clay - water simply cannot pass them. The maximum depth of the well will be 15 m
The maximum depth of the well will be 15 m.
Rotary drilling
Underground layers are destroyed by means of a cone bit mounted in the MBU, which is significantly loaded for weighting. It rotates, receiving energy from the internal combustion engine. It is impossible to create these conditions on your own. Therefore, rotary hydro drilling should be entrusted to professionals.
Rotary drilling
During rotary hydraulic drilling, the soil is washed in two ways: direct and reverse.
With direct flushing, drilling fluid is poured into the drill rods, which, flowing down, cools the bit and mixes with the deformed soil. Through the annulus, the chemical mixture with the earth flows out of the well and flows into the slag receiver. Drilling material is fed into the casing pipe by a motor pump. Its narrow cross-section contributes to the high flow rate of the drilling fluid. From which the soil is destroyed very quickly. However, clay drilling fluid does not allow to fully open the aquifer. Therefore, it is best to use purified water for washing.
During backwashing, water enters the well by gravity through the annulus, and is pushed up with mud from the inside of the drill pipes. At the same time, the maximum flow rate is maintained and the aquifer is completely opened. Liquid, under pressure, leaving the face, removes large slags
It is important to seal the wellhead and provide the drill pipe with a stuffing box.
Backwash
The flow rate, duration of the operating period and water quality depend on the selected method of hydraulic drilling. Therefore, before drilling, you should consult with experts on the question of which drilling method will be most effective.


Completion of work
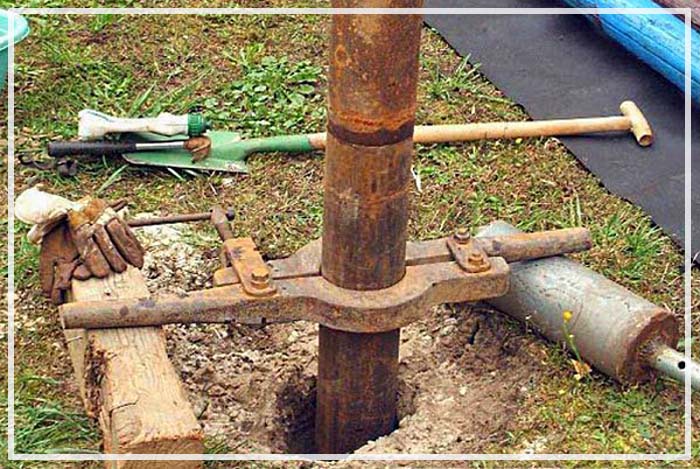
Example of a drill clamp that is used when extracting equipment
The goal has been achieved, it remains only to dismantle the equipment and start using the equipped well. But there are a few important points that are not always taken into account the first time.
Watching the video, users often notice that the drill is easy and simple to get. In fact, sometimes it's easier to buy a new one than to get an old drill.
To prevent this from happening, take these tips into service:
- When pulling out the drill after reaching aquifers, it is necessary to fix the part of the equipment remaining in the new well with a special clamp. This is done so that the drill does not turn in the pipe wrench and does not collapse.
- There is no clamp, take the strongest cable, make a loop on the upper fragment of the drill, tying the second edge to the tree, and now you can unscrew the top of the drill.
There is no tree, let it be a log, on which the cable can be fixed in the middle. Now that the drill has been taken out, there is very little left - to rinse the well with clean water, for which a pump is useful and swing.
As you can see, do-it-yourself hydro-drilling of wells is not the most complicated technology. The installation can be used repeatedly, the main thing is that the pump or motor pump does not fail.And using the advice and watching the video from professionals, any user will be able to quickly and cost-effectively acquire their own source of tasty and clean water.


