- Stations without hydraulic tank
- Types of hydraulic tanks for water supply systems
- What is a hydraulic accumulator
- Installation of a heat accumulator
- Causes of breakdowns and ways to eliminate them
- Setting up a hydroaccumulator for water heating
- Do-it-yourself open tank
- Volume calculation
- The design of the accumulator
- Do-it-yourself installation steps for a hydroaccumulator for water supply systems
- Choosing a hydraulic tank connection scheme
- Connecting the accumulator to the water supply system
- What pressure should be in the accumulator: we check the system for operability
- 4
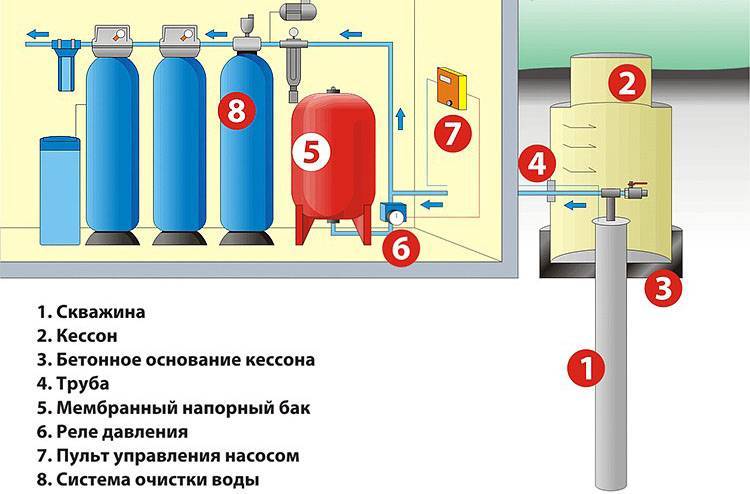
Stations without hydraulic tank
If you decide to use a pumping station and not connect a hydraulic tank to it, then such equipment also has the right to life and functions quite well. In this case, the only negative will be the constant on / off of the pump at the moment the tap is opened. It is clear that such work can disable the pump many times faster. Or at some point it will burn out (not even the most reliable pump from a European manufacturer is immune from this).
In addition, the station does not provide a supply of water here, and therefore, in the event of a power outage, there is likely to be no water.
The advantage of such an installation is its compactness and a much greater pressure of water in the system.
Types of hydraulic tanks for water supply systems
Hydraulic accumulators available on the market, the principle of operation of which is the same, are divided into several types according to a number of features and functional features. First of all, according to the installation methods, they distinguish:
- Horizontal - used for large volumes of water. It is somewhat more difficult to operate due to the low location of the neck (you have to completely drain the water to change or inspect the working membrane or spool).
- Vertical - used for small and medium volumes. Easier to operate, since there is no need to completely drain the water and dismantle part of the piping, as is the case with horizontal tanks.
According to the temperature of the working fluid, hydraulic tanks are:
- For hot water - a heat-resistant material is used as a material for the membrane. Most often it is butyl rubber. It is stable at water temperatures from +100-110 degrees. Such tanks are visually distinguished by red color.
- For cold water - their membrane is made of ordinary rubber and cannot work stably at temperatures above +60 degrees. These tanks are painted blue.
Rubber for both types of accumulators is biologically inert and does not release any substances into the water that spoil its taste or harm human health.
According to the internal volume of hydraulic tanks there are:
- Small capacity - up to 50 liters. Their use is limited to extremely small rooms with a minimum number of consumers (in fact, this is one person). In the version with a membrane or hot water cylinder, such devices are often used in closed-type heating systems.
- Medium - from 51 to 200 liters.They are used exclusively for hot and cold water supply. They can give water for some time when the water supply is turned off. Versatile and reasonably priced. Ideal for houses and apartments with 4-5 residents.
- Large volume from 201 to 2000 liters. They are able not only to stabilize the pressure, but also to provide consumers with a supply of water for a long time in the event that its supply from the water supply is turned off. Such hydraulic tanks have large dimensions and weight. Their cost is also great. They are used in large buildings such as hotels, educational institutions, sanatoriums and hospitals.
What is a hydraulic accumulator
The design of the accumulator is simple, but at the same time it is a complex mechanism that eliminates the need to turn on the pump every time the tap is opened in the house in order to draw a mug of water.
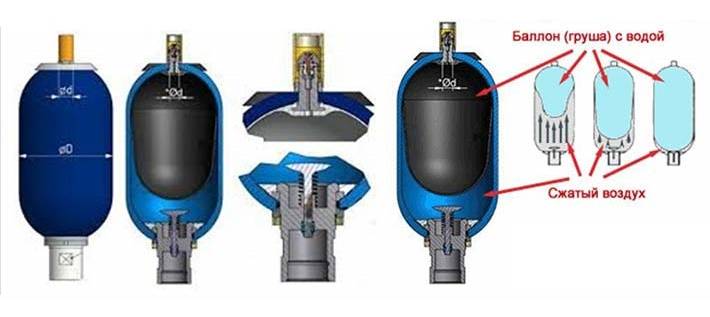
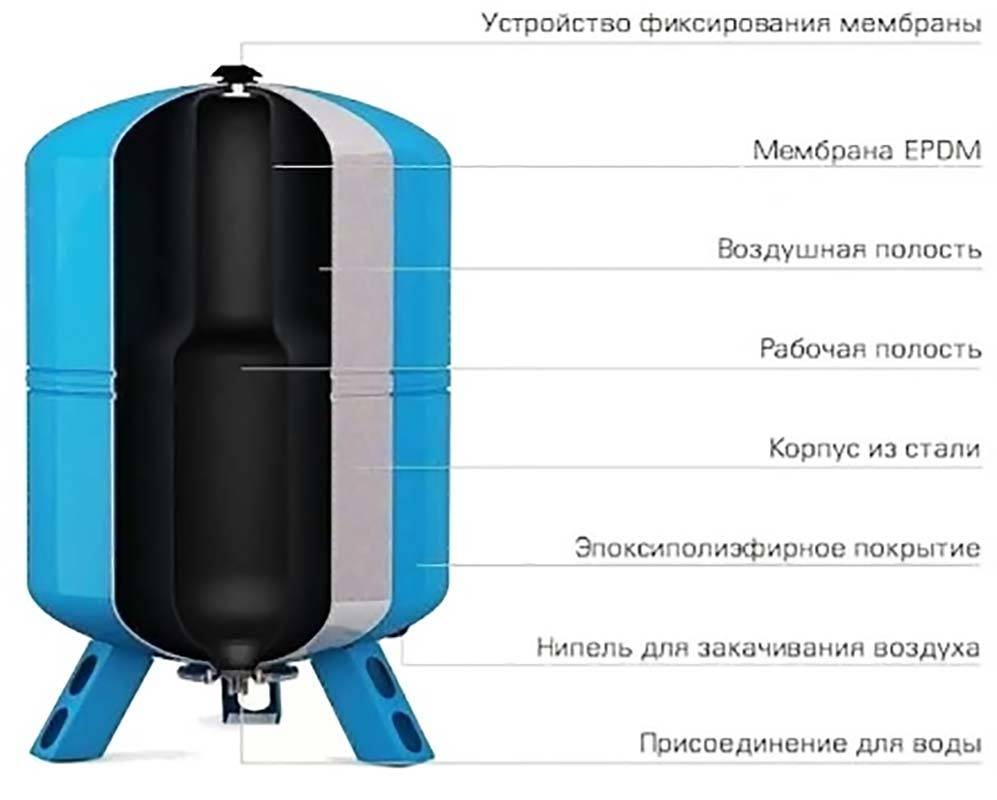
Structurally, the accumulator can be divided into the following components:
- Frame. This is a steel base that resembles an expansion tank. This tank is designed for operating pressure ranging from 1.5 to 6 atmospheres. However, the pressure value can be increased to 10 atmospheres, but only under the condition of short-term exposure. Otherwise, the tank may not withstand, and it will explode.
- Rubber tank or "pear". This is an elastic membrane that is fixed to the inlet of the tank, and is located directly in the inside of the receiver. Water enters the pear through the inlet flange with a valve. This flange is attached to the neck of the accumulator tank.
- Nipple. It is located on the opposite side of the intake valve.The main purpose of the nipple is that it serves to pump air into the design of the receiver housing.
For ease of use of the tank, legs are welded to its metal base. In addition, for the convenience of using the accumulator, an electric motor with a pump is located next to it. To reduce the flow at the connection of the pump to the tank, the electric motor is located mainly on the top of the accumulator. To do this, a support bracket is welded to the tank in the upper part.
Hydraulic accumulators also come in vertical and horizontal. If the horizontal one is intended directly for installation together with the pump, then the vertical one is used to install it separately.

Installation of a heat accumulator
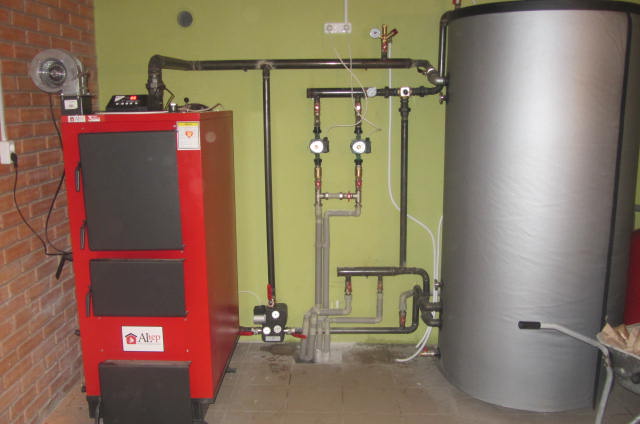
Make a detailed diagram
When developing a drawing, you need to take into account where the heating accumulator is located, the insulating layer, the height of the accumulator capacity, the presence of drainage for drainage - factors to reduce heat loss;
Build a manifold-distributor into the system, making sure that the various systems are connected correctly;
Having connected the parts of the pipeline, check the tightness of the connections;
Connect the storage tank;
Connect the circulation pump;
After completion of assembly do-it-yourself work, conduct a test control of the tightness and correctness of the connections .. In order for the pump not to turn on every time a tap is opened in the house, a hydraulic accumulator is installed in the system. It contains some volume of water, sufficient for a small flow
This allows you to practically get rid of short-term switching on of the pump.Installing a hydraulic accumulator is not difficult, but you will need a certain number of devices - at least - a pressure switch, and it is also desirable to have a pressure gauge and an air vent
It contains a certain amount of water, sufficient for a small flow. This allows you to practically get rid of short-term switching on of the pump. Installing a hydraulic accumulator is not difficult, but you will need a certain number of devices - at least - a pressure switch, and it is also desirable to have a pressure gauge and an air vent


In order for the pump not to turn on every time a tap is opened in the house, a hydraulic accumulator is installed in the system. It contains a certain amount of water, sufficient for a small flow. This allows you to practically get rid of short-term switching on of the pump. Installing a hydraulic accumulator is not difficult, but a certain number of devices will be required - at least - a pressure switch, and it is also desirable to have a pressure gauge and an air vent.
Causes of breakdowns and ways to eliminate them
Despite a fairly strong and durable design, it happens that the accumulator for water supply fails. There are several reasons for this. Very often there is airing of the water line. An air lock is formed in the pipeline, which prevents the normal circulation of water. The cause of airing the water supply is the accumulation of air inside the membrane. It gets there along with the flow of water, and gradually accumulates, spreading through the pipeline.
In hydraulic tanks with a vertical installation method, a special drain nipple is installed in their upper part to bleed the air accumulated in the membrane. Small drives, with a volume of less than 100 liters, are usually carried out in a horizontal pattern. Blowing air into them can be a little more difficult.
The procedure here is carried out in several stages:
- The hydraulic accumulator is disconnected from the power supply.
- All water is drained from the system until the storage tank is completely empty.
- Then all valves in the pipeline system are closed.
- The hydraulic tank is connected to electricity and refilled with water.
The air accumulated inside the accumulator will leave together with the discharged water.
Setting up a hydroaccumulator for water heating
When buying equipment, you should remember that the tank is under pressure
Therefore, during installation, it is necessary to be as careful as possible and in no case release the air pumped into the compartment. After the installation of all elements of the heating circuit is completed and the test filling it with coolant is completed, it is necessary to adjust the gas pressure in the accumulator housing
With excess pressure, the coolant simply will not enter the membrane cavity, and with reduced pressure in the gas chamber, the unit will not be able to effectively perform its functions.
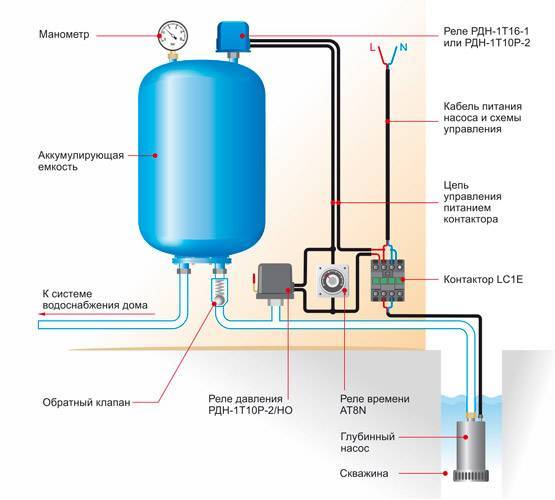
Checking the correct setting of the accumulator is carried out using a pressure gauge. The coolant is pumped into the system and its pressure is checked by the boiler pressure gauge. Having reached the recommended mark, the coolant supply valve closes and the pressure in the air chamber of the accumulator is checked using a pneumatic pressure gauge.For normal operation of the system, it is recommended to set the pressure in the tank to 0.2-0.3 bar less than in the heating circuit. If you set the pressure in the air chamber at the same level as in the system, then if signs of an emergency appear, the membrane will simply not be able to accept the required amount of coolant. As the liquid enters the membrane from the circuit, the pressure in the tank will also increase, and the moment may be missed when it would have been possible to prevent an accident by removing literally 2-3 liters of liquid from the system. And at reduced pressure, the effect is reversed, the membrane is very sensitive to changes in pressure in the circuit and quickly removes peak loads, absorbing liquid much faster.
When adjusting the pressure, you can reduce it simply by pressing the nipple and releasing a certain amount of air, but you can add it simply by connecting a car pump to the nipple and making a few strokes.
The air pressure in the air chamber is considered optimal at a working fluid pressure in the system in the range of 1.2-1.3 bar, an indicator equal to 1.0-1.1 bar.
Do-it-yourself open tank
open tank
Another thing is the expansion tank for heating an open house. Previously, when only the opening of the system was assembled in private homes, there was even no question of buying a tank. As a rule, an expansion tank in the heating system, the scheme of which consists of five main elements, was made right at the installation site. It is not known whether it was possible, in general, to buy it at that time. Today it is easier, as you can do it in a specialized store. Now in the predominant majority of housing is heated by sealed systems, although there are still many houses where there are opening circuits.And as you know, tanks tend to rot and it may be necessary to replace it.
A store-bought heating expansion tank device may not meet the requirements of your circuit. There is a possibility that it won't fit. You may have to make it yourself. For this you will need:
- tape measure, pencil;
- Bulgarian;
- welding machine and skills to work with it.
Remember safety, wear gloves and work with welding only in a special mask. Having everything you need, you can do everything in a couple of hours. Let's start with what metal to choose. Since the first tank is rotten, then you need to make sure that this does not happen to the second. Therefore it is better to use stainless steel. It is not necessary to take a thick one, but also too thin. Such metal is more expensive than usual. In principle, you can do with what is.
Now let's take a step-by-step look at how to make a tank with your own hands:
action first.
Metal sheet marking. Already at this stage, you should know the dimensions, since the volume of the tank also depends on them. A heating system without an expansion tank of the required size will not work correctly. Measure the old one or count it yourself, the main thing is that it has enough space for the expansion of water;


Cutting blanks. The design of the heating expansion tank consists of five rectangles. This is if it is without a lid. If you want to make a roof, then cut out another piece and divide it in a convenient proportion. One part will be welded to the body, and the second will be able to open. To do this, it must be welded onto the curtains to the second, immovable, part;
third act.
Welding blanks in one design.Make a hole in the bottom and weld a pipe there through which the coolant from the system will enter. The branch pipe must be connected to the entire circuit;
action four.
Expansion tank insulation. Not always, but often enough, the tank is in the attic, since the peak point is located there. The attic is an unheated room, respectively, it is cold there in winter. The water in the tank may freeze. To prevent this from happening, cover it with basalt wool, or some other heat-resistant insulation.
As you can see, there is nothing difficult in making a tank with your own hands. The simplest design is described above. At the same time, in addition to the branch pipe through which the tank is connected to the heating system, the following holes can be additionally provided in the scheme of the expansion tank for heating:
- through which the system is fed;
- through which the excess coolant is drained into the sewer.
Scheme of a tank with make-up and drain
If you decide to make a tank with your own hands with a drain pipe, then place it so that it is above the maximum fill line of the tank. The withdrawal of water through the drain is called an emergency release, and the main task of this pipe is to prevent the coolant from overflowing through the top. Make-up can be inserted anywhere:
- so that the water is above the level of the nozzle;
- so that the water is below the level of the nozzle.
Each of the methods is correct, the only difference is that the incoming water from the pipe, which is above the water level, will murmur. This is more good than bad.Since make-up is carried out if there is not enough coolant in the circuit. Why is it missing there?
- evaporation;
- emergency release;
- depressurization.
If you hear that water from the water supply enters the expansion tank, then you already understand that there is a possibility of some kind of malfunction in the circuit.
As a result, to the question: “Do I need an expansion tank in the heating system?” - you can definitely answer that it is necessary and mandatory. It should also be noted that different tanks are suitable for each circuit, so the correct selection and correct setting of the expansion tank in the heating system is extremely important.
Volume calculation
How to choose a hydraulic accumulator for water supply systems? You can get an answer by calculating the key parameters, first of all, the volume.
To perform calculations of the optimal volume of a hydraulic tank, you must first determine for what purpose it will be used, which devices can be installed for use for various purposes. Often their installation is carried out in order to prevent frequent switching on of the pump.
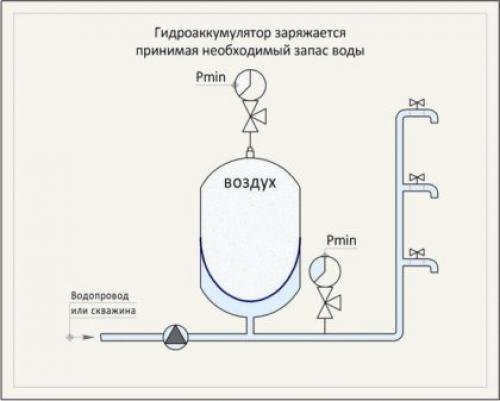
- Accumulators are also used to maintain system pressure when the pump is off.
- These devices are often mounted to provide a reserve of water.
- Some owners install them to compensate for peak water consumption.
If you decide to use a hydraulic accumulator together with your water supply system, then you should know that the closer the pumping equipment is located to this device, the higher its efficiency will be.
For example, if the pump is located in the basement, there is one hydraulic accumulator next to it, and the second one is in the attic, then you can see that the volume of water will be less on the hydraulic tank located in the upper part of the house, since the system water pressure will be less. When a hydraulic accumulator is located in the basement or on the first floor, the filling level will be the same.
When choosing a hydraulic accumulator in order to exclude frequent switching on of pumping equipment, several factors must be taken into account. Experts do not recommend turning on the pump more than once a minute
Domestic water supply systems are most often equipped with equipment that has a capacity of 30 liters per minute. Taking into account the fact that in the device, 50% of the total volume is water, and the rest is air, a battery with a capacity of 70 liters can easily cope with this task.
Experts do not recommend turning on the pump more than once a minute. Domestic water supply systems are most often equipped with equipment that has a capacity of 30 liters per minute
Taking into account the fact that in the device, 50% of the total volume is water, and the rest is air, a battery with a capacity of 70 liters can easily cope with this task.
When a hydraulic accumulator is installed to compensate for peak values in water consumption, it is necessary to take into account the flow characteristics that the water consumption points in the house have
- The toilet consumes an average of 1.3 liters per minute.
- Per shower, the consumption rate is from 8 to 10 liters per minute.
- Kitchen sinks require about 8.4 liters of water per minute.
When there are two toilets, then with the simultaneous operation of all sources, their total consumption is 20 liters
Now it is necessary to take into account the percentage of the actual filling of the tank with water and the fact that the pump is turned on no more than 30 times per hour. Having such results, we can assume that a hydraulic accumulator with a capacity of 80 liters is quite enough
The design of the accumulator
Any hydraulic device or system has two important components. It is air and water. Whatever we consider: the plumbing of the house, the heating system, pumps, a hydraulic accumulator, an expansion tank, everywhere air and water come into contact with each other. In plumbing systems, their contact is not permissible (air locks), while in other systems, water and air act in mutual tandem. One such device is a hydraulic accumulator.
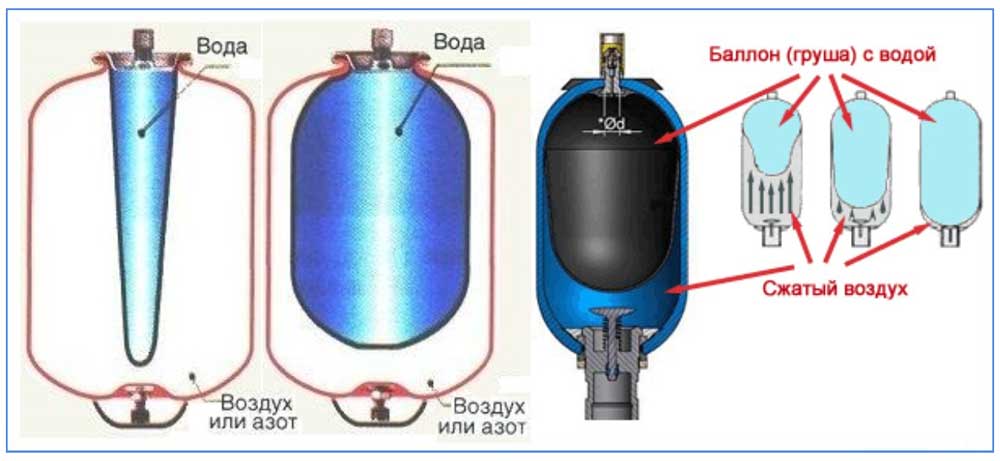

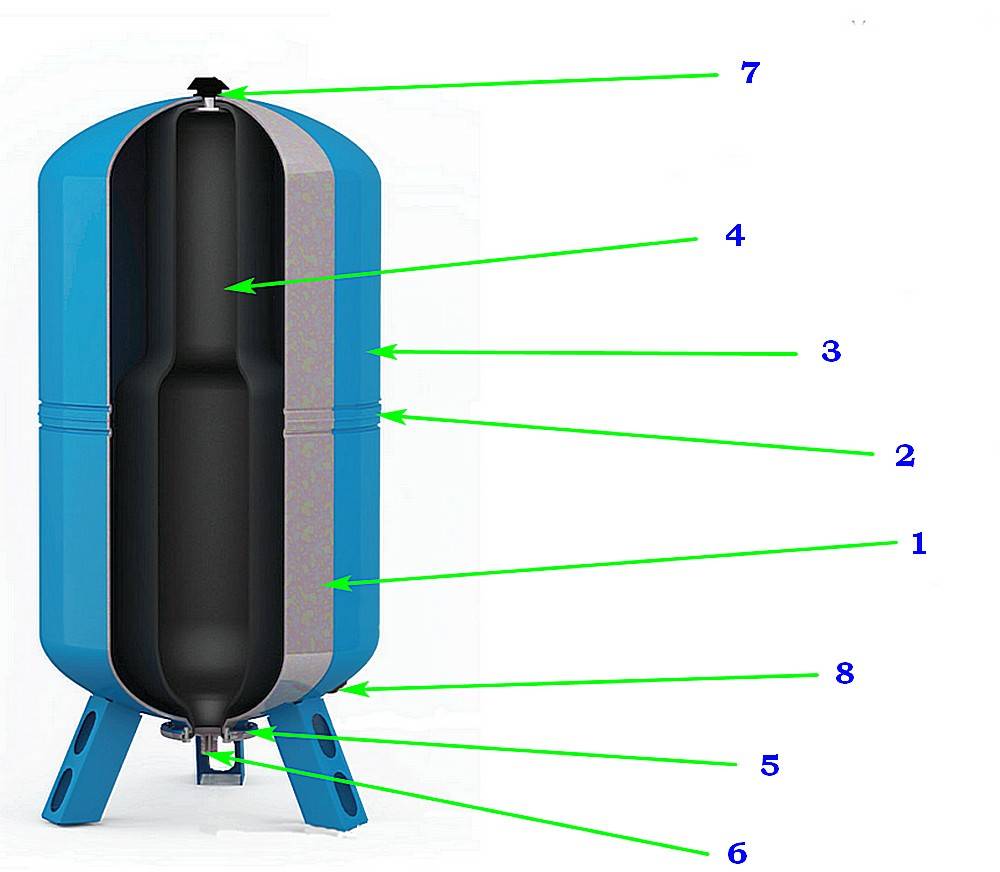

By design, the accumulator is divided into two parts. One part of the accumulator is filled with water, the other part is filled with air. These parts are separated by a special membrane or "pear". The membranes are made of rubber, bitulin or ethylene propylene (EPDM).
The entire structure of the accumulator is enclosed in a housing made of carbon steel or stainless steel.
Water from the water supply source of the house enters the tank of the accumulator and air is pumped in; special membranes are used to regulate the flow of water and air. The hydraulic accumulator is equipped with auxiliary devices for water circulation (from stagnation) and membrane rupture sensors.
Consider the operation of the accumulator in more detail
Do-it-yourself installation steps for a hydroaccumulator for water supply systems
Work on the installation of the purchased accumulator is carried out in several stages.The first thing to do is check the pressure in the air chamber. This is done simply, using a car pump or compressor equipped with a pressure gauge. The pressure is made slightly greater than the rate at which the pump turns on. The upper level is set from the relay and is set one atmosphere above the primary level.
Next, you should decide on the installation scheme.
Choosing a hydraulic tank connection scheme
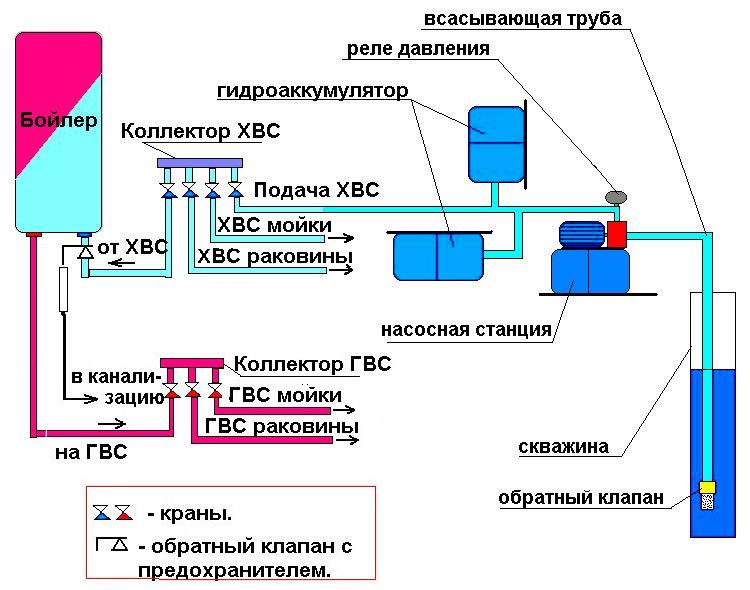
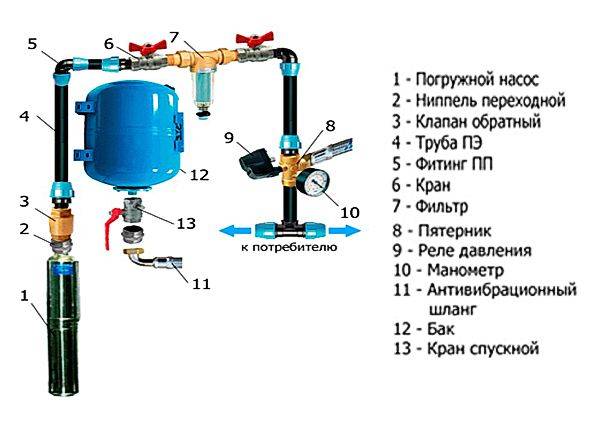
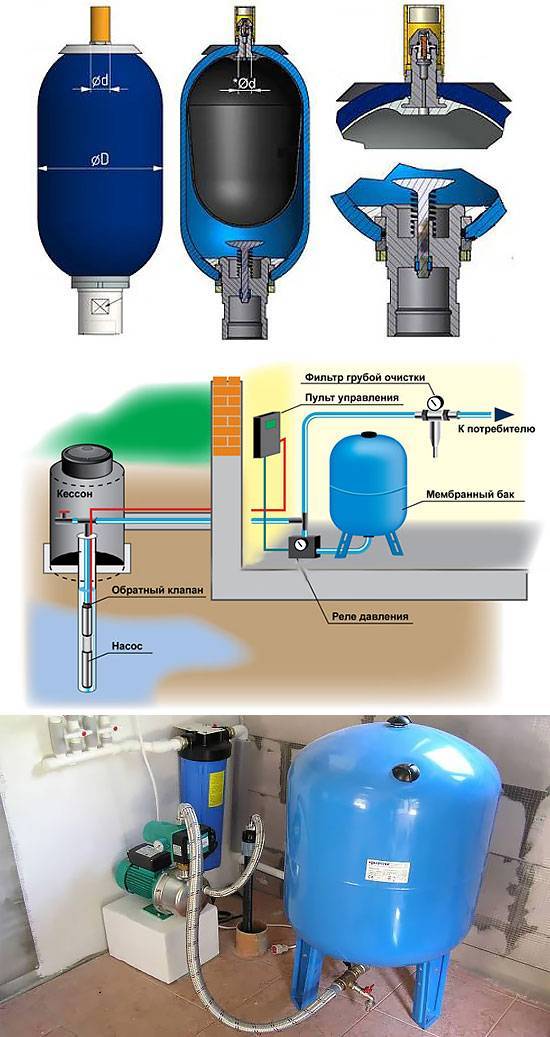
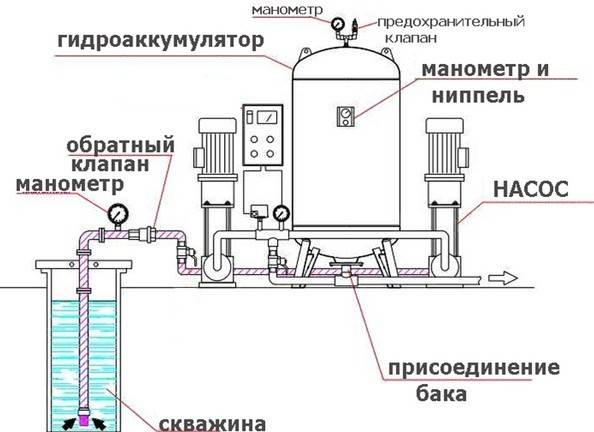
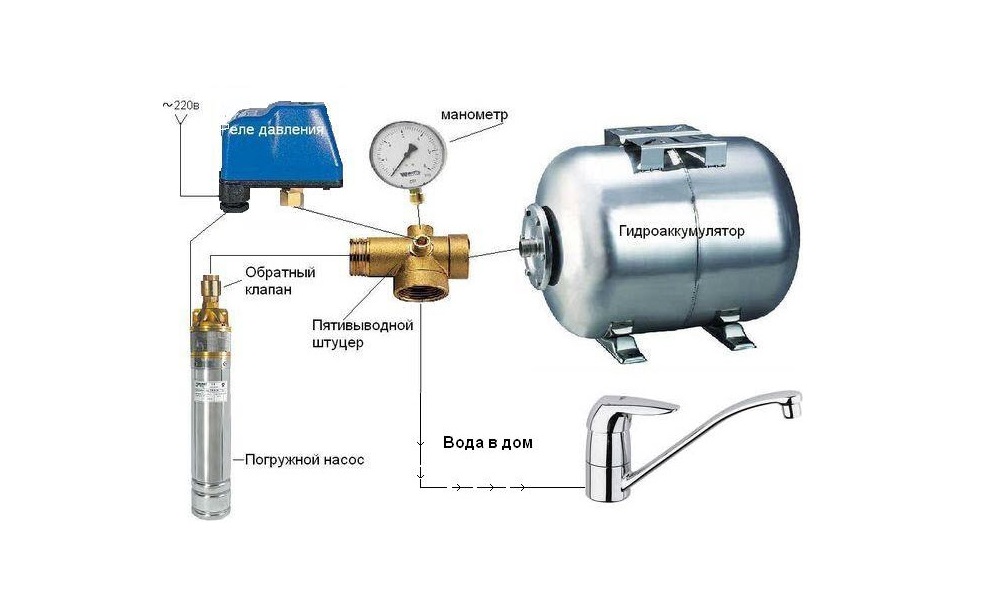
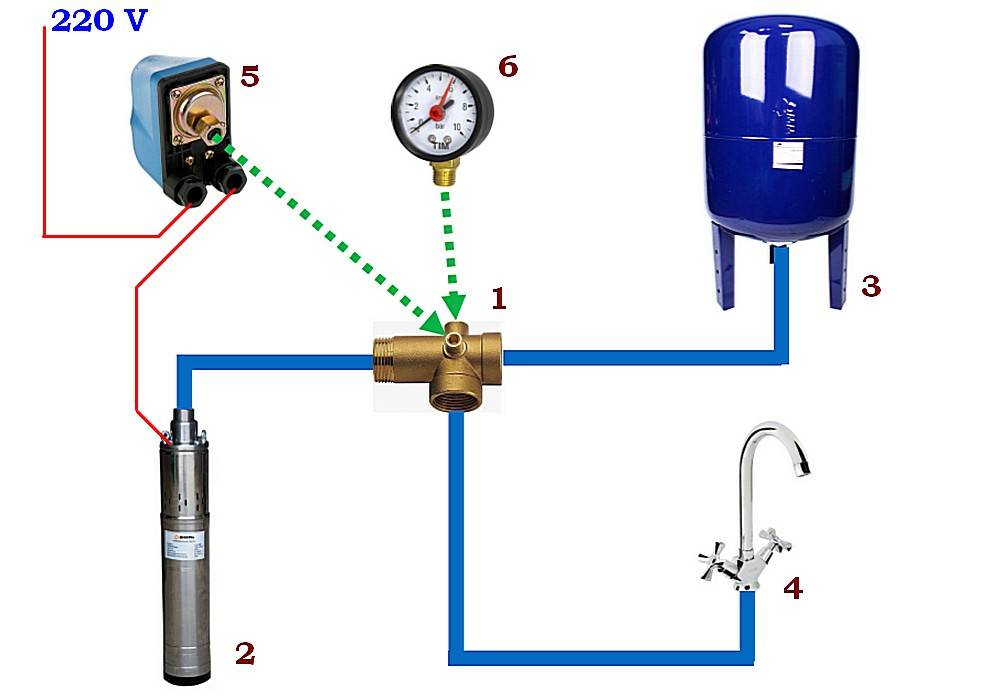
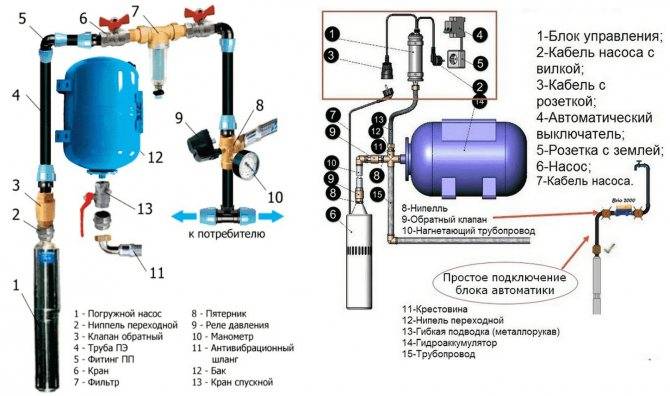
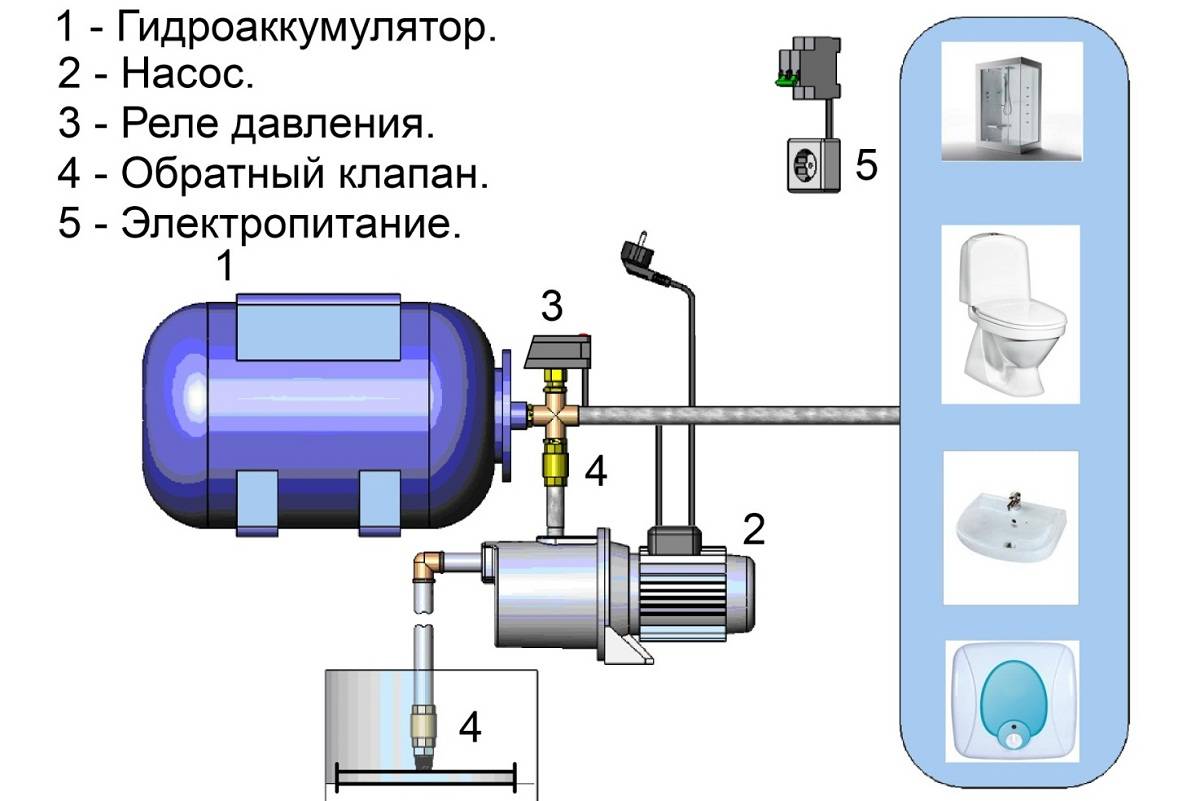
The most convenient is the connection diagram of a hydraulic accumulator with a five-pin collector. Installation is carried out according to the scheme, which is in the technical documentation. A collector with five outlets is screwed to the fitting of the accumulator. The remaining 4 outputs from the collector are occupied by a pipe from the pump, water supply to the dwelling, a control relay and a pressure gauge. If it is not planned to install a measuring device, then the fifth output is muted.
Connecting the accumulator to the water supply system
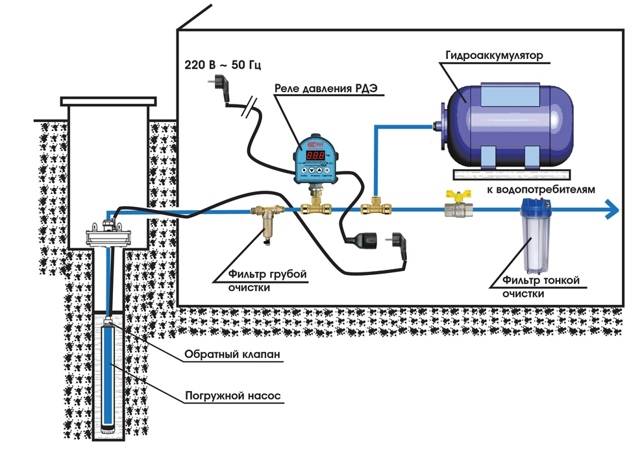
After assembling all the nodes, the pump (if the system is equipped with a submersible pump) or the hose (if the pump is surface) is first lowered into the well or well. The pump is powered. That, in fact, is all.
Important! All connections are made with winding FUM tape or flax. It should be understood that the pressure in the system will be quite high. However, you should not be too zealous either, everything is good in moderation.
Otherwise, there is a risk of breaking the nuts on the fittings.
However, you should not be too zealous either, everything is good in moderation. Otherwise, there is a risk of breaking the nuts on the fittings.
Having dealt with the installation, you can move on to the issue of replacing the membrane, which often fails in models with a vertical arrangement. Here we will make a step-by-step instruction with photo examples.
| Photo example | Action to take |
|---|---|
| First, we unscrew the bolts of the flange of the dismantled hydraulic tank. They are wrapped "in the body" or tightened with nuts - depending on the model. | |
| When the bolts are out, the flange can be easily removed. Let's put it aside for now - to pull out the failed pear, you need to unscrew one more nut. | |
| Expand the container. At the back is a purge nipple. The nut also needs to be removed. There may be two of them, one of which acts as a locknut. This is done with a key of 12. | |
| Now, with a little effort, the pear is pulled out through the large hole on the side of the flange. | |
| We lay out a new pear, we expel air from it. This is necessary to make it more convenient to install it in the tank. | |
| Having folded four times in length, we put it into the container completely, including the part that was outside during dismantling. This is done so that it is possible to get the nipple into the hole intended for it. | |
| The next stage is not for people with a full physique. Experienced craftsmen say that in order to install the nipple for the accumulator in place, sometimes you have to call your wife for help - they say, her hand is thinner. | |
| Once in the hole, it is imperative to make a nut so that during further assembly it does not go back. In this case, you will have to start all over again. | |
| We straighten the pear seat and tighten the nuts on the nipple. The matter remains small ... | |
| ... - put the flange in place and tighten the bolts. When tightening, do not be zealous over one screw. Having pulled everything up a little, we begin broach through the system of opposite units. This means with six bolts the order is as follows - 1,4,2,5,3,6. This method is used in tire shops when pulling wheels. |
Now it is worthwhile to deal with the necessary pressure in more detail.
What pressure should be in the accumulator: we check the system for operability
The factory settings of the hydraulic tanks imply a set pressure of 1.5 atm. It does not depend on the volume of the tank. In other words, the air pressure in a 50-liter accumulator will be the same as in a 150-liter tank. If the factory settings are not suitable, you can reset the indicators to values \u200b\u200bthat are convenient for the home master.
Very important! Do not overestimate the pressure in the accumulators (24 liters, 50 or 100 - it doesn’t matter). This is fraught with failure of faucets, household appliances, pump. 1.5 atm., installed from the factory, not taken from the ceiling
This parameter is calculated on the basis of numerous tests and experiments.
1.5 atm., installed from the factory, are not taken from the ceiling. This parameter is calculated on the basis of numerous tests and experiments.


4
Balloon and membrane containers are mounted according to two methods. If you use surface pumping equipment, the accumulator is connected according to the following scheme:
- Determine the pressure inside the container. Its indicator must be 0.3–1 bar less than the pressure required to start the pumping equipment (a specific number is usually indicated on the pump relay).
- Connect the fitting to the hydraulic tank. It must have 5 outputs - for connecting a water pipe, a pump, a storage tank directly, a pressure gauge, a pumping unit and a relay. The fitting is connected to the accumulator through a flange, which is equipped with a special valve (throughput) or a rigid hose.
- Screw all other elements of the system to the fitting.
- Seal all joints with tape or sealant and tow.
Hydraulic accumulator connection diagram
When installing the equipment, pay special attention to the connection of the pressure switch. Under its cover there are two contacts - a pump and a network. You need to connect the appropriate wire to each of them.
This is easy to do if the contacts are signed. Otherwise, you will need to call a professional electrician. After installing and connecting the tank, be sure to check the system for leaks. If there are any, seal the connections better
You need to bring the appropriate wire to each of them. This is easy to do if the contacts are signed. Otherwise, you will need to call a professional electrician. After installing and connecting the tank, be sure to check the system for leaks. If there are any, seal the connections better.
The valve is necessary to prevent the backflow of water into the well. This is his only task. After installing the check valve, a hydraulic tank can also be connected to the water supply system according to the scheme already known to you. Now you know everything about the principle of operation, the device and the intricacies of mounting storage tanks. Feel free to install a hydraulic accumulator so that there are never interruptions in water supply in your home!
Installation and installation of the accumulator is carried out in accordance with the standard installation instructions. How to install a hydraulic accumulator right? An important condition for proper installation is compliance with the following rules:
- Installation of the accumulator must begin with setting the initial pressure of the gas space in accordance with the values \u200b\u200bobtained during the calculations;
- in a system with a hydraulic tank, a safety valve must be installed;
- on the pipeline, to the place of installation of the hydraulic tank and in the direction of water flow, it is necessary to install a check valve;
- some of the manufacturers produce associated fittings that can circulate water through the tank during drawdown;
- a drain valve should be installed to drain the water and shut-off valves protected from accidental closures (these manipulations are necessary for proper maintenance);
- the dimensions and weight of accumulators with a volume of more than 750 liters can make installation much more difficult for you. Be sure to check if this container will pass through the doorway.
When installing, it is necessary to strengthen the hydraulic tank with a margin of safety. To reduce noise and vibration to zero, the tank should be fixed with rubber pads to the floor. It is also a good idea to connect to the pipeline through flexible, also rubber adapters.
An important condition is that the cross section of the piping should not narrow at the entrance to the hydraulic system.
Another feature of the first filling of the accumulator with water must be done very slowly and with a weak pressure of water. The fact is that the rubber walls of the pear are still new, and can stick together, and a powerful pressure of water can easily tear it. Before starting operation, if necessary, all the air inside the pear is removed. Failure to follow these rules will lead to the fact that you will have to buy a membrane for the accumulator again.
Mount the hydraulic tank in such a way that they have free access.It is best to entrust this process to professionals, as they know how to install the accumulator correctly. Indeed, quite often the reason for the failure of the tank is even such trifles as a mismatch in the diameter of the pipes, or unsettled low pressure. In such situations, experiments are not needed.
