- How an electric generator works
- What it is
- Construction of a rotary windmill
- The procedure for finalizing the windings
- Zero wire method
- The legality of installing a wind turbine
- Do-it-yourself principles for making blades for a wind generator
- Materials and tools
- Drawings and calculations
- Production from plastic pipes
- Making blades from billets of aluminum
- fiberglass screw
- How to make a blade out of wood?
- How to build a free energy generator with your own hands?
- Varieties of electricity generators
- Option #1 - asynchronous generator
- Option # 2 - device with magnets
- Option #3 - steam generator
- Option # 4 - wood burning device
- Coil preparation
- The device and principle of operation of the gas generator
- The main stages of the operation of a gas generator
- Homemade gasoline generator: pros and cons
- How to get energy from the ether with your own hands?
- Principle of operation
- Smartphone metal detector
- Mounting magnets
- Summing up
- Conclusion
How an electric generator works
The principle of operation of the electric generator is based on the physical phenomenon of electromagnetic induction. A conductor passing through an artificially created electromagnetic field creates an impulse that is converted into direct current.
The generator has an engine that is capable of generating electricity by burning a certain type of fuel in its compartments: gasoline, gas or diesel fuel. In turn, the fuel, entering the combustion chamber, during the combustion process produces a gas that rotates the crankshaft. The latter transmits an impulse to the driven shaft, which is already capable of providing a certain amount of energy at the output.
The principle of operation of the device is quite simple, but exactly as long as there is no need to consider each individual process. It must be understood that Faraday's law on the principles of magnetic induction, which is used in an electric generator, will give the desired result only when certain conditions are created. The main one is the correct calculation and connection of the main structural units.
Regardless of the fuel and power consumed, electric generators have two fundamental mechanisms: a rotor and a stator. The rotor is necessary to create an electromagnetic field, so it is based on magnets equidistant from the core. The stator is stationary, allows you to set the rotor in motion, and also regulates the electromagnetic field, due to the presence of metal blocks of steel.
Do-it-yourself electric generator manufacturing option is shown in the video
What it is
The very term "free energy" appeared even when internal combustion engines were introduced on a large scale, when the problem of obtaining the required amounts of energy depended on the coal consumed. Wood and oil products were also taken into account. By free energy, it is customary to understand such a force, for the production of which it is not necessary to spend a large amount of fuel. This means that no resources are required.Including when they create a self-powered transgenerator.
Now they are creating fuel-free generators that implement such schemes. Some of them began to work long ago, receiving energy from the sun and wind, and other similar natural phenomena. But there are other concepts aimed at circumventing the law of conservation of energy.
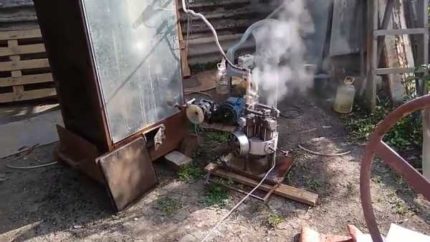
Tesla installation
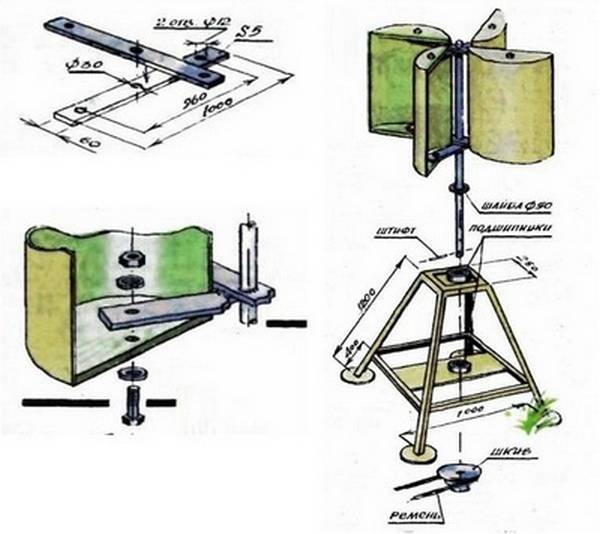
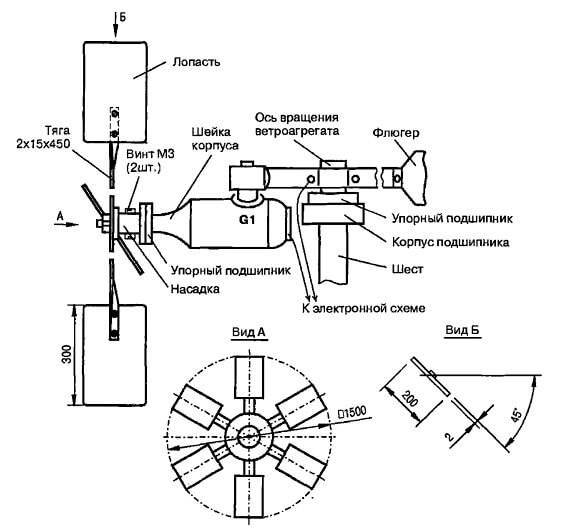
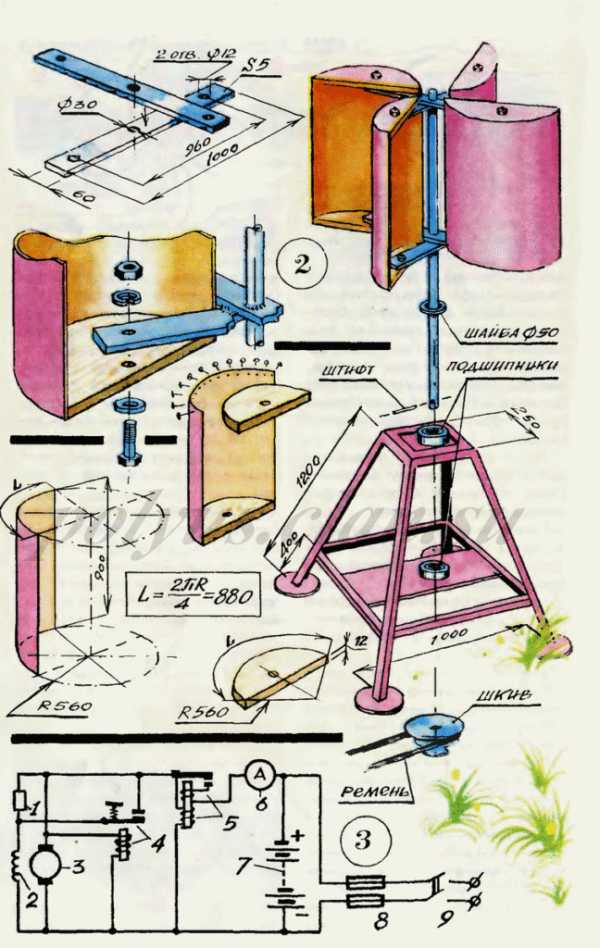
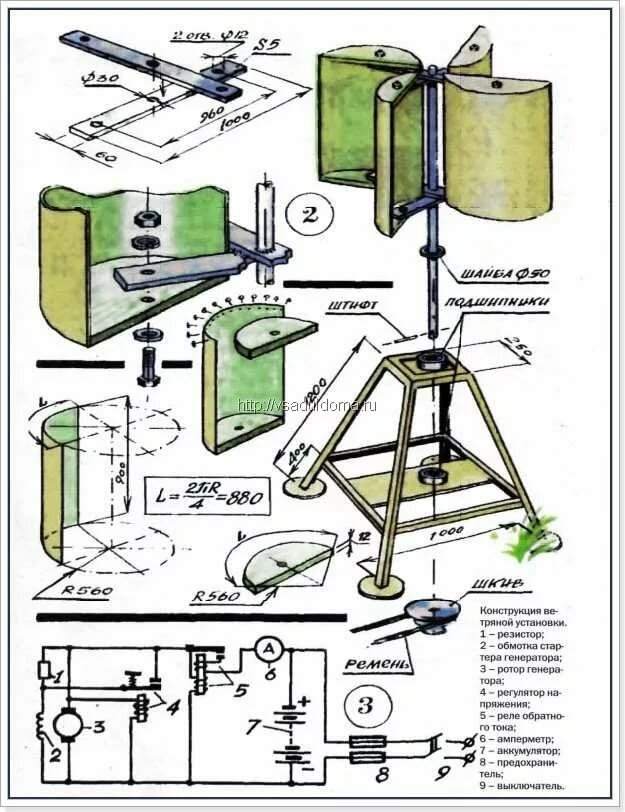
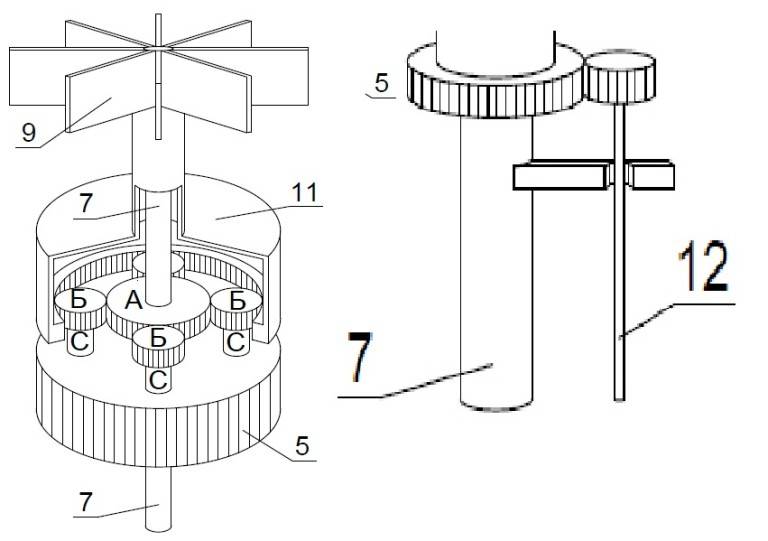
Construction of a rotary windmill
Today there are a huge number of models for independent work. But as an example, we should consider a rotary installation with a vertical type of rotation. Materials needed for work:
- An old metal barrel or drum with a broken washing machine.
- Automotive generator.
- Acid battery (if desired, you can use a helium battery model in the work).
- Button switch.
- Clamps, wires, bolts, nuts.
- Relay from the car to control the battery charge.
- Bulgarian is necessary for cutting metal surfaces. In some hard-to-reach places, metal scissors will be needed.
- A set of additional tools: a construction pencil and a tape measure for marking, a set of drills, screwdrivers.
You will also need a part for mounting the mast, the height of which does not exceed 15 meters. The blades can be made in two different variations: removable and continuous models.
The procedure for finalizing the windings
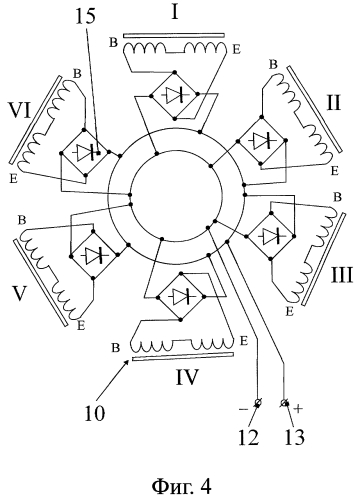
Before making a generator from an asynchronous motor, you should deal with its stator coils, interconnected and included in the supply line according to a certain scheme.
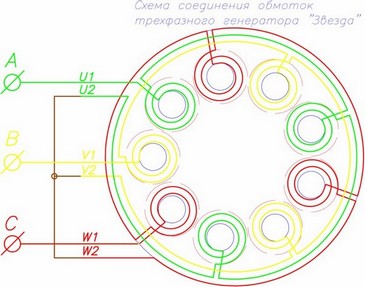
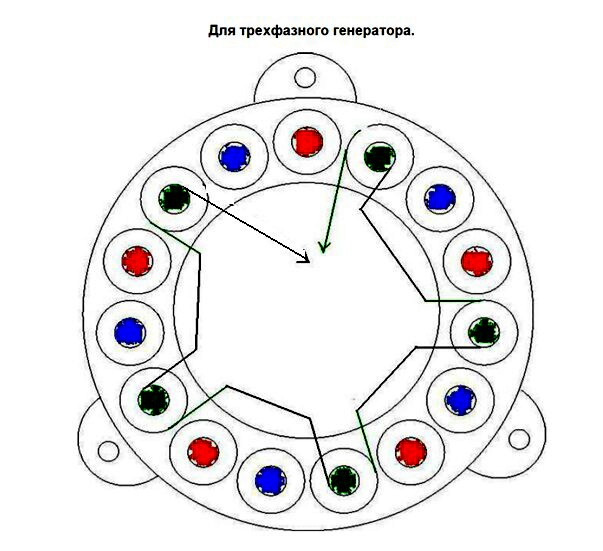
Additional Information. For the classic connection of asynchronous mechanisms, two types of stator windings are used: according to the so-called "star" or "triangle" scheme.
In the first case, all three linear coils (A, B and C) on the one hand are combined into a common neutral wire, while their second ends are connected to three phase lines. When turned on by a “triangle”, the end of one coil is connected to the beginning of the second, and its end, in turn, to the beginning of the third winding, and so on until the chain closes.
As a result of such a connection, a regular geometric figure is formed, the vertices of which correspond to three phase wires, and there is no neutral wire at all.
For reasons of ease of installation and safety of operation in household circuits, a star connection is usually selected, which makes it possible to organize local (repeated) protective grounding.
When modifying the engine, remove the cover of the junction box and gain access to the terminals, which, under normal conditions, receive a three-phase supply voltage. In generator mode, these contacts should be connected to the supply line with three-phase household consumers connected to it.
To organize a single-phase power supply (outlet lines and lighting circuits, in particular), they will need to be connected at one end to the selected phase contact A, B or C, and at the other - to a common neutral wire. The order of connecting wires to an asynchronous motor is shown in the following figure.
Thus, a do-it-yourself generator assembled from a three-phase motor will be loaded on all supply circuits, and end consumers will receive the standard power they are entitled to.
Zero wire method
Voltage is supplied to a residential building using two conductors: one of them is a phase, the second is zero.If the house is equipped with a high-quality ground loop, during a period of intensive electricity consumption, part of the current goes through the ground into the ground. By connecting a 12 V bulb to the neutral wire and ground, you will make it glow, since the voltage between the zero and ground contacts can reach 15 V. And this current is not fixed by the electric meter.


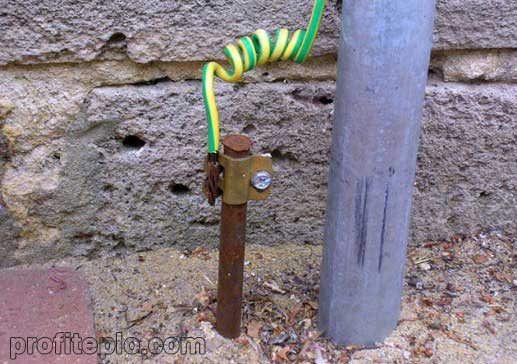
Extraction of electricity using a neutral wire
The circuit, assembled according to the principle of zero - energy consumer - earth, is quite working. If desired, a transformer can be used to equalize voltage fluctuations. The disadvantage is the instability of the appearance of electricity between zero and ground - this requires the house to consume a lot of electricity.
Despite the fact that such a system uses the earth for work, it cannot be attributed to the source of terrestrial electricity. How to extract energy using the electromagnetic potential of the planet remains open.
The legality of installing a wind turbine
Alternative energy sources are the dream of any summer resident or homeowner whose site is located far from the central networks. However, when we receive bills for electricity consumed in a city apartment, and looking at the increased tariffs, we realize that a wind generator created for domestic needs would not hurt us.
After reading this article, perhaps you will make your dream come true.
A wind generator is an excellent solution for providing a suburban facility with electricity. Moreover, in some cases, its installation is the only possible way out.
In order not to waste money, effort and time, let's decide: are there any external circumstances that will create obstacles for us in the process of operating a wind turbine?
To provide electricity to a dacha or a small cottage, a small wind power plant is sufficient, the power of which will not exceed 1 kW. Such devices in Russia are equated to household products. Their installation does not require certificates, permits or any additional approvals.
In order to determine the feasibility of installing a wind generator, it is necessary to find out the wind energy potential of a particular area (click to enlarge)
However, just in case, you should ask if there are any local regulations regarding individual power supply that could create obstacles in the installation and operation of this device.
Claims may arise from your neighbors if they experience inconvenience associated with the operation of the windmill. Remember that our rights end where other people's rights begin.
Therefore, when buying or self-manufacturing a wind turbine for a home, you need to pay serious attention to the following parameters:
Mast height. When assembling a wind turbine, it is necessary to take into account the restrictions on the height of individual buildings that exist in a number of countries of the world, as well as the location of your own site. Be aware that near bridges, airports and tunnels, buildings that are more than 15 meters high are prohibited.
Noise from gearbox and blades. The parameters of the generated noise can be set using a special device, after which the measurement results can be documented
It is important that they do not exceed the established noise standards.
Ether interference. Ideally, when creating a windmill, protection against tele-interference should be provided where your device can provide such trouble.
environmental claims. This organization can prevent you from operating the facility only if it interferes with the migration of migratory birds. But this is unlikely.
When creating and installing the device yourself, learn these points, and when buying a finished product, pay attention to the parameters that are in its passport. It is better to protect yourself in advance than to be upset later.
- The expediency of a windmill is justified primarily by a sufficiently high and stable wind pressure in the area;
- It is necessary to have a sufficiently large area, the useful area of \u200b\u200bwhich will not be significantly reduced due to the installation of the system;
- Due to the noise accompanying the work of the windmill, it is desirable that there be at least 200 m between the neighbors' housing and the installation;
- The steadily increasing cost of electricity convincingly argues in favor of a wind generator;
- The installation of a wind generator is possible only in areas whose authorities do not interfere, but rather encourage the use of green types of energy;
- If there are frequent interruptions in the construction area of the mini wind power plant, the installation minimizes the inconvenience;
- The owner of the system must be prepared for the fact that the funds invested in the finished product will not pay off immediately. The economic effect may become tangible in 10-15 years;
- If the payback of the system is not the last moment, you should think about building a mini power plant with your own hands.
Do-it-yourself principles for making blades for a wind generator
Often, the main difficulty is determining the optimal dimensions, since its performance depends on the length and shape of the wind turbine blades.
Materials and tools
The following materials form the basis:
- plywood or wood in another form;
- fiberglass sheets;
- rolled aluminum;
- PVC pipes, components for plastic pipelines.
Blades for do-it-yourself wind generator
Choose one type of what is available in the form of residues after repair, for example. For their subsequent processing, you will need a marker or a pencil for drawing, a jigsaw, sandpaper, metal scissors, a hacksaw.


Drawings and calculations
If we are talking about low-power generators, the performance of which does not exceed 50 watts, a screw is made for them according to the table below, it is he who is able to provide high speeds.
Next, a low-speed three-blade propeller is calculated, which has a high starting rate of breakaway. This part will fully serve high-speed generators, whose performance reaches 100 watts. The screw functions in tandem with stepper motors, low-voltage low-power motors, car generators with weak magnets.
From the point of view of aerodynamics, the propeller drawing should look like this:
Production from plastic pipes
Sewer PVC pipes are considered the most convenient material; with a final screw diameter of up to 2 m, workpieces with a diameter of up to 160 mm are suitable.The material attracts with ease of processing, affordable cost, ubiquity and abundance of already developed drawings, diagrams
It is important to choose high-quality plastic to prevent cracking of the blades.
The most convenient product, which is a smooth gutter, it only needs to be cut in accordance with the drawing. The resource is not afraid of exposure to moisture and is undemanding in care, but can become brittle at sub-zero temperatures.
Making blades from billets of aluminum
Such screws are characterized by durability and reliability, they are resistant to external influences and are very durable. But keep in mind that they turn out to be heavier as a result, when compared with plastic ones, the wheel in this case is subjected to scrupulous balancing. Despite the fact that aluminum is considered quite malleable, working with metal requires the presence of convenient tools and minimal skills in handling them.
The form of material supply can complicate the process, since common aluminum sheet turns into blades only after giving the blanks a characteristic profile; for this purpose, a special template must first be created. Many novice designers first bend the metal along the mandrel, after which they move on to marking and cutting blanks.
Blades made of billet aluminum
Aluminum blades show high resistance to loads, do not react to atmospheric phenomena and temperature changes.
fiberglass screw
It is preferred by experts, as the material is capricious and difficult to process. Sequencing:
- cut out a wooden template, rub it with mastic or wax - the coating should repel glue;
- first, one half of the workpiece is made - the template is smeared with a layer of epoxy, fiberglass is laid on top. The procedure is promptly repeated until the first layer has had time to dry. Thus, the workpiece receives the required thickness;
- perform the second half in a similar way;
- when the glue hardens, both halves can be connected with epoxy with careful grinding of the joints.
The end is equipped with a sleeve, through which the product is connected to the hub.
How to make a blade out of wood?
This is a difficult task due to the specific shape of the product, in addition, all the working elements of the screw should eventually turn out to be identical. The disadvantage of the solution also recognizes the need for subsequent protection of the workpiece from moisture, for this it is painted, impregnated with oil or drying oil.
Wood is not desirable as a material for a wind wheel, as it is prone to cracking, warping, and rotting. Due to the fact that it quickly gives and absorbs moisture, that is, it changes mass, the balance of the impeller is arbitrarily adjusted, this negatively affects the efficiency of the design.
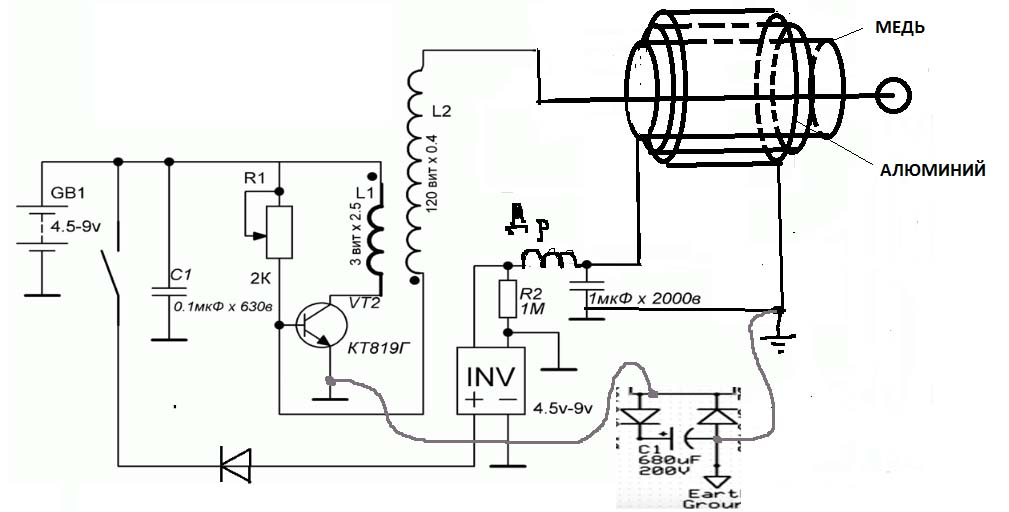
How to build a free energy generator with your own hands?
Generators are created on the basis of the following components and devices:
- A battery and a resistor with a nominal value of 2.2 KOM. It must be included in the drawing.
- Ferrite ring of any magnetic conductivity.
- Capacitor with a capacity of 0.22 microfarads, designed for voltages up to 250 volts.
- Thick copper bus, whose diameter is about 2 millimeters. In addition, thin copper wires are taken in enamel insulation, with a diameter of 0.01 mm.Then the radiant installations give the result.
- A plastic or cardboard tube, whose diameter is 1.5-2.5 centimeters.
- Any transistor with suitable parameters. Well, if in the basic configuration, in addition to the generator, there will be an additional instruction. Otherwise, it is impossible to engage in the implementation of practical schemes for self-powered free energy generators.
Interesting. In the case of additional decoupling between the supply and high-voltage circuits, a special input filter is used. You can not put such a device, but apply voltage directly.
For assembly, you can use a fiberglass board, or another base with similar characteristics. The main thing is that the surface should contain a radiator with all the necessary fixtures. Both coils are wound on a plastic tube so that one is placed inside the other. A coil to coil is wound with a high-voltage winding, also located inside. Sometimes this is also required by home-made impulse fuel-free power generators.
The shape of the generated pulses must be checked for operability when the assembly is completed. To do this, take an oscilloscope, digital or electronic
When setting up, you should pay attention to only one important parameter - the presence of steep edges, which distinguish the generated sequence of rectangular contacts
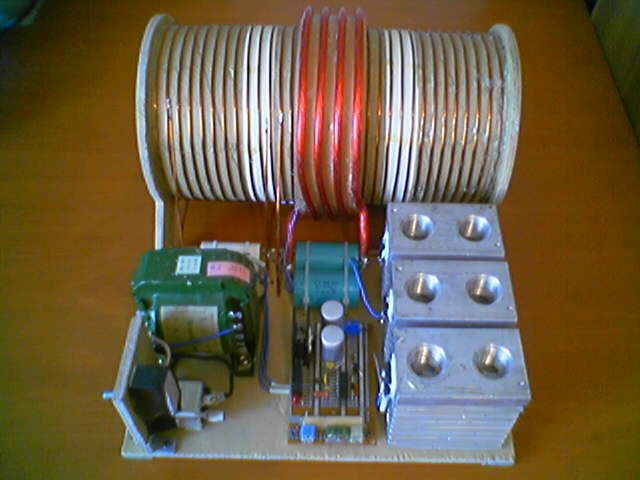
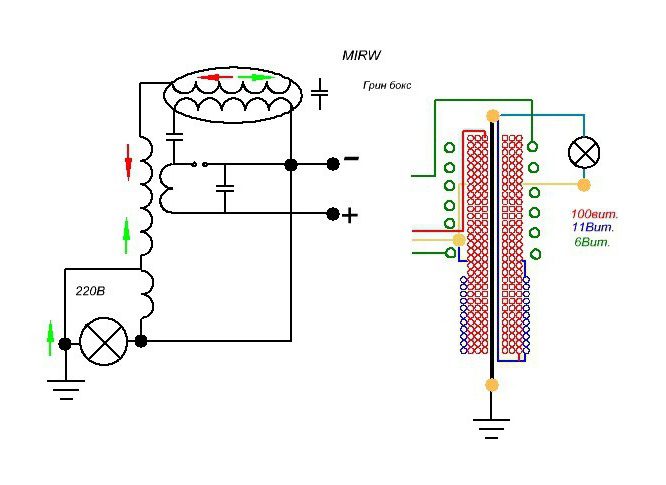
 Fuelless generators
Varieties of electricity generators
Usually a home-made generator at home is made on the basis of an asynchronous motor, magnetic, steam, wood-fired.
Option #1 - asynchronous generator
The device will be able to generate a voltage of 220-380 V, based on the performance of the selected motor.
To assemble such a generator, you only need to start an asynchronous motor by connecting capacitors to the windings.
The generator based on an asynchronous motor synchronizes itself, starts the rotor windings with a constant magnetic field.
The motor is equipped with a rotor with a three-phase or single-phase winding, cable entry, short-circuit device, brushes, control sensor
If the rotor is of a squirrel-cage type, then the windings are excited using the residual magnetization force.
Option # 2 - device with magnets
For a magnetic generator, a collector, step (synchronous brushless) motor and others are suitable.
 Winding with a large number of poles increases the efficiency. In comparison with the classical circuit (where the efficiency is 0.86), the 48-pole winding allows you to make the generator power more
During the assembly process, the magnets are mounted on a rotating axis and installed in a rectangular coil. The latter generates an electrostatic field during the rotation of the magnets.


Option #3 - steam generator
For a steam generator, a furnace with a water circuit is used. The device works due to the thermal energy of steam and turbine blades.
 To make a steam generator yourself, you will need a furnace with a water (cooling) circuit
It is a closed system with a massive, non-mobile plant requiring control and a cooling circuit to convert the steam into water.
Option # 4 - wood burning device
For a wood-burning generator, stoves are used, including camping ones. Peltier elements are fixed to the walls of the furnaces and the structure is placed in the radiator housing.
The principle of operation of the generator is as follows: when the surface of the conductor plates is heated on one side, the other is cooled.
 To make a wood-fired generator yourself, you can use any stove. The generator is powered by Peltier elements that heat and cool the conductor plates.
An electric current appears at the poles of the plates. The greatest difference between the temperatures of the plates provides the generator with maximum power.
The unit is more efficient at sub-zero temperatures.
Coil preparation
Ideally, you need to make a detailed calculation of the parameters of the coils. But, for a low-power generator operating at low speeds, an approximate calculation can also be made. For this device, coils are sufficient, in which the total number of turns will be in the range of 1000-1200.
To increase power, increase the number of poles. Make coils using thick wires to minimize resistance and, accordingly, increase the current strength.
After assembling the generator, it should be checked. To do this, it is not necessary to attach the unit to the windmill. Just connect measuring devices to it and try to rotate it manually.
The device and principle of operation of the gas generator
All autonomous power supplies work on the principle of converting one energy into another.
The design of the gas generator consists of three parts:
- Gasoline internal combustion engine. Low-power units are equipped with a two-stroke engine, and powerful units are equipped with a four-stroke engine.
- Current generator.
- Block of electrical modulation.
All elements are mounted on a single support. In addition to the main parts, the gasoline generator is equipped with additional elements:
- fuel element.
- battery.
- Manual starter.
- Air filter.
- Silencer.
The main stages of the operation of a gas generator
- Gasoline is poured into the generator tank.
- In the engine, after burning carbon fuel, gas is formed. It rotates the crankshaft with the flywheel.
- Rotating, the crankshaft transmits power to the generator shaft.
- When rotation with a high frequency of the primary winding is reached, the magnetic fluxes are shifted - the charges are redistributed.
- Potentials of the required magnitude are created at different poles. However, to obtain alternating current, from which industrial and household appliances can operate, an additional device is needed - an electrical modulation unit. You can use transformer or inverter.
- Thanks to the inverter, you can bring the voltage to the required value - 220 V with a frequency of 50 Hz. In addition to the main purpose, with the help of an electrical modulation unit, impulsive overvoltage and interference are removed. The unit also monitors current leakage. The block protects the unit from short circuit and overload.
Homemade gasoline generator: pros and cons
Some experts argue that if a gasoline generator is assembled carefully and competently, then it will last as long as the factory counterpart. They provide the following arguments in their support:
- possible modernization - the device can be adjusted at any time to suit your own needs;
- savings - for example, for the purchase of a factory-assembled gas generator with a small capacity (0.75–1 kW), you will have to spend from 9 thousand to 12 thousand rubles;
- satisfaction from the completed project.
Proponents of factory assembly are skeptical about "handicraft" models and counter-arguments, arguing about the shortcomings of homemade products:
- The practical savings of assembling generators is negligible.Buying parts of a gasoline generator separately will cost quite a lot. To assemble the generator, it is better to use the parts of unnecessary devices.
- It is difficult to find an engine and generator that have optimal parameters.
- To manufacture a gasoline generator, you must have knowledge, special skills and be able to work with tools. The implementation of the project itself can take a long time.
- Factory-assembled gas generators are equipped with self-diagnosis - this unit monitors the operating parameters of the device. In addition, the generator includes an automatic start device - the unit starts working as soon as the electricity is lost in the network. Also, the gas generator can be equipped with other additional devices that are not available in "handicraft" models.
- Unlike factory homemade home-made gasoline generators, they usually have large dimensions and weight.
How to get energy from the ether with your own hands?
Microquantum ethereal flows in many such generators are the main sources of energy for generators. You can try to connect systems through capacitors, lithium batteries. You can choose different materials depending on the indicators they give. Then the number of kW will be different.


So far, free energy is a phenomenon little studied in practice. Therefore, there are many gaps in the design of generators. Only practical experiments help to find the answer to most questions. But many major manufacturers of electronic devices are already interested in this direction.
You will be interested in what is phase and zero in electricity
Principle of operation
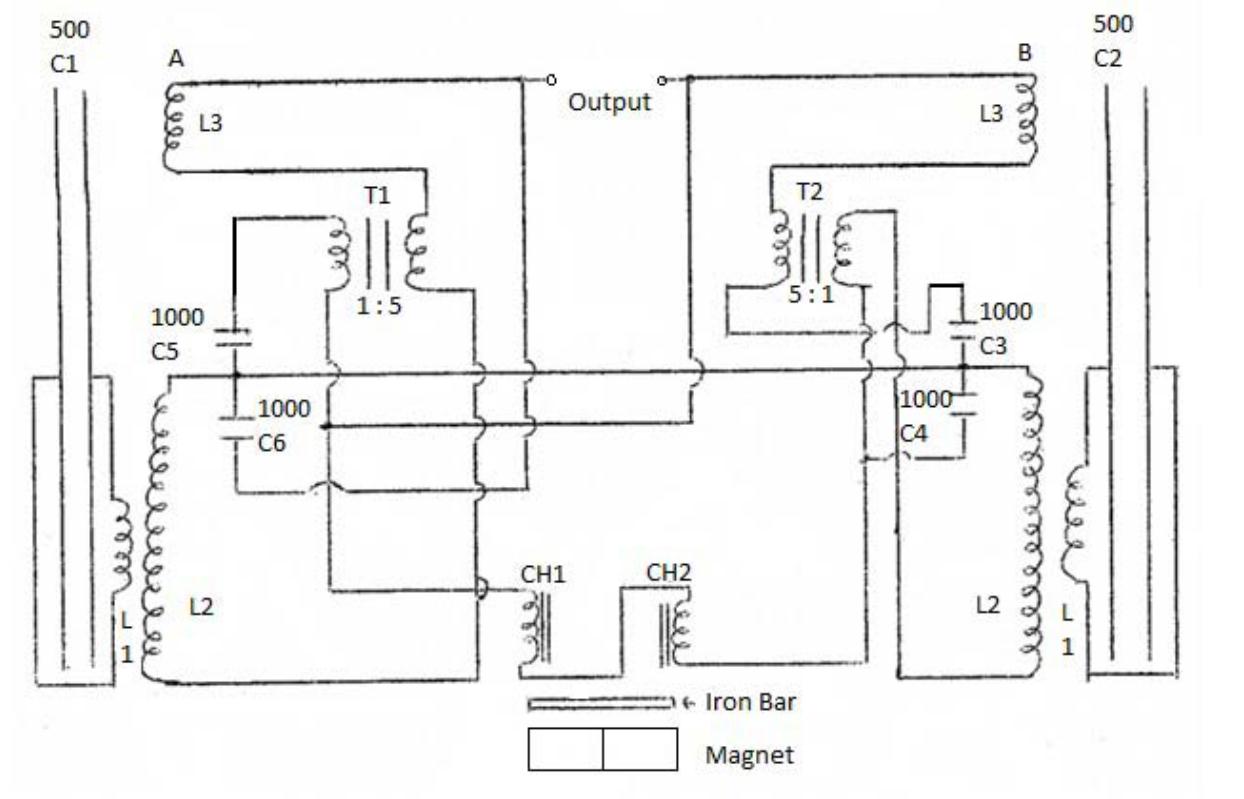
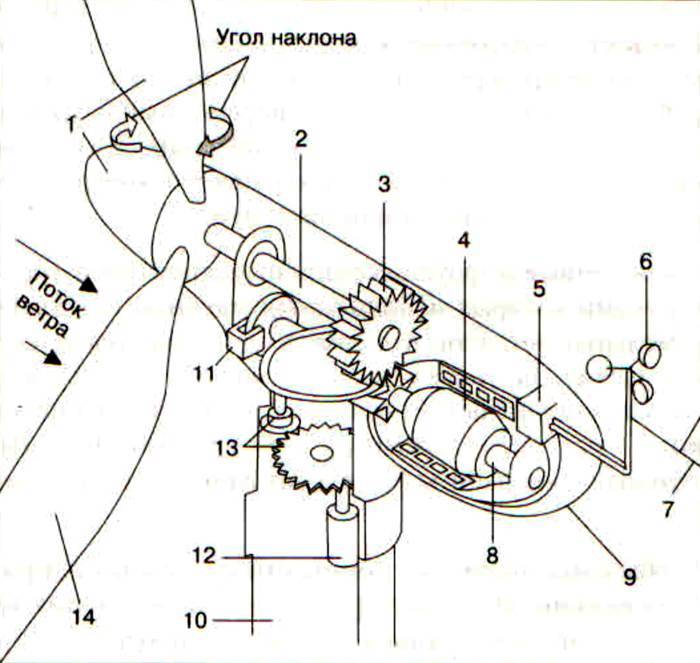
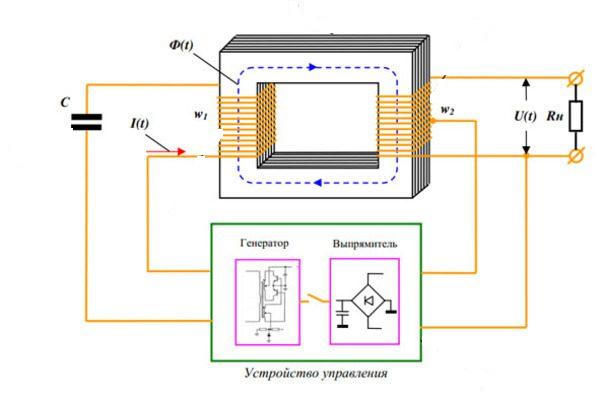
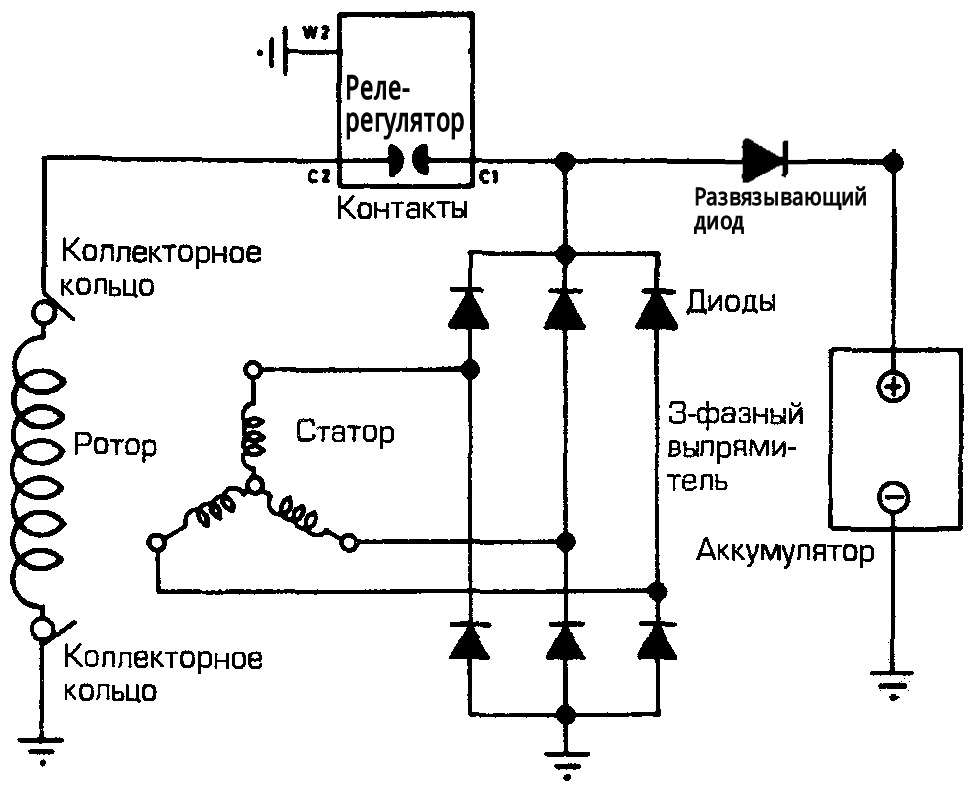
In low-cost industrial gas generators, frequency and voltage adjustment is performed in two stages. The first stage is mechanical. The principle of its operation is based on the fact that as the electrical load increases, the engine speed decreases. The engine speed sensor is mechanically connected to the carburetor throttle, so any change in speed is compensated by adjusting the throttle position automatically. The second stage of adjustment is carried out electronically. The figure above shows a diagram of a typical inexpensive gas generator.
The principle of operation of electronic speed stabilization is based on the dependence of the capacitor resistance on the frequency of the current. The diagram shows a stabilizing winding (L3) loaded on a capacitor (C1). When operating at rated load, the output voltage is 220 V with a frequency of 50 Hz. Since the frequency of the output voltage directly depends on the number of revolutions per second, a change in the rotation speed of the generator rotor causes an unambiguous change in the voltage frequency on all generator windings.
The resistance of a capacitor depends on the frequency of the applied voltage. The higher the frequency, the lower the resistance. As a result, the current through the stabilizing winding varies depending on the load on the generator. With a decrease in load, the number of revolutions increases, respectively, the frequency increases and the resistance of the capacitor decreases. The current through the winding (L3) increases and its braking value on the generator rotor increases. In this way, speed adjustment occurs continuously and instantaneously during the operation of the generator.
Electrical stabilization operates in a small range of changes, so the main adjustment function is assigned to the mechanical regulator. Here, the range of adjustments is much wider, but at the expense of responsiveness. The internal combustion engine has inertia, and the change in the number of revolutions is a little late when adjusting the throttle (this characteristic of the engine is called throttle response). Sudden load jumps can cause the adjustment system to oscillate.
It is difficult to make such a control system on your own, and the electronic one requires alteration of the generator. The advantage of such a control scheme is to obtain a sinusoidal voltage with minimal waveform distortion.
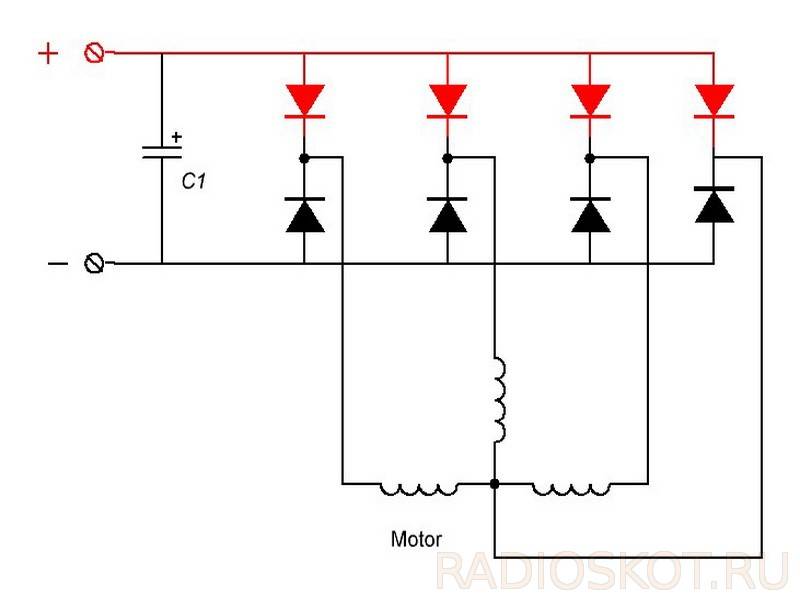
More complex generators are made according to the inverter circuit with double conversion (Fig. below).
Inverter gasoline generator
The alternating voltage of the generator is supplied to the rectifier, and then to the transistor converter, at the output of which a stabilized voltage of the required value is obtained. The presence of a rectifier removes restrictions on the stability of the generator frequency, and the transistor converter generates voltages regardless of the load. The disadvantage of inverter generators is their high cost and distortion of the output voltage waveform.
Smartphone metal detector
The principle of operation of a metal detector from a smartphone

A simple do-it-yourself metal detector can be obtained from a smartphone. Android phones have a built-in digital compass. Each metal object disturbs the magnetic field around the phone so that the phone can determine if there is metal nearby.This would be a pretty smart solution if not for one exceptional case - magnets.

Magnets have a fairly strong magnetic field around smartphones, so the program starts to go crazy as soon as the gadget approaches a magnetized object.

Not surprisingly, the minimum field value in one of these programs is about 40 microtesla, because the phone's speaker also has a magnet.

What will be required:
- 1 smartphone
- 1 selfie stick

Mounting magnets
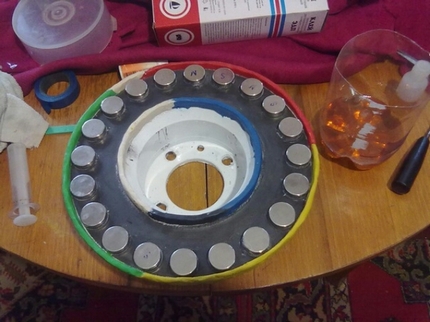
The magnets should be fixed on the rotor disks. For a standard hub, 20 magnets of size 25x8 mm will suffice. Magnets must be arranged with alternating poles.
It is better to make a paper template, which is attached to the disk, and magnets are placed on it.
Ideally, rectangular magnets should be used. Before applying, mark each magnet at the poles so as not to get confused when alternating.


The attracting sides are "+", the repulsive ones are "-". Magnets need to be fixed with reliable glue. For additional fixation from above, they should be filled with epoxy resin.
Summing up
Yes, saving today has become “fashionable”! The expedient introduction of fundamentally new energy technologies in the future will allow people to abandon the use of nuclear, thermal, gasoline, diesel and gas turbine stations. People who have learned to “produce” electricity destroy themselves with their own hands, using outdated, but extremely beneficial for “some” methods of obtaining energy vital to humanity.In the case of timely measures taken, we will still be able to return the planet Earth to its original appearance, leaving the depleted bowels alone, and help our cosmic home to restore the ecology brought to a catastrophic state.
Conclusion
Thus, a do-it-yourself electric generator can be an excellent option for alternative power supply.
Its power will be enough to provide electricity to building appliances, as well as small household appliances. Since the work is done with electricity, people who do not have the slightest idea of the seriousness and danger of the manipulations being performed may not succeed in the generator.
It's no secret that a do-it-yourself generator will be 5 times cheaper, but it's not a fact that its productivity can compete with a purchased factory-assembled model equipped with automation. Such an undertaking should be abandoned in such cases:
- if there is no self-confidence and knowledge;
- when several assembly attempts failed;
- if the appropriate equipment and measuring instruments are not available;
- if there is no skill in calculations and selection of instrument components, as well as in reading diagrams.
If you have all the necessary structural details, you can try to assemble the unit with your own hands. If the procedure was unsuccessful, you can always resort to the help of purchased models. Buying an electric generator has only one drawback - it's high cost. However, in some cases, it is fully justified by the accuracy of the workflow, as well as the possibility of independent control of the entire process of processing and converting direct current to alternating current.


