- Detailed description of the main stages of work: tie-in to the water supply
- Materials: cast iron and others
- Do-it-yourself installation in 7 steps: clamp, saddle, sewerage scheme, coupling
- Insertion into the water main
- welding method
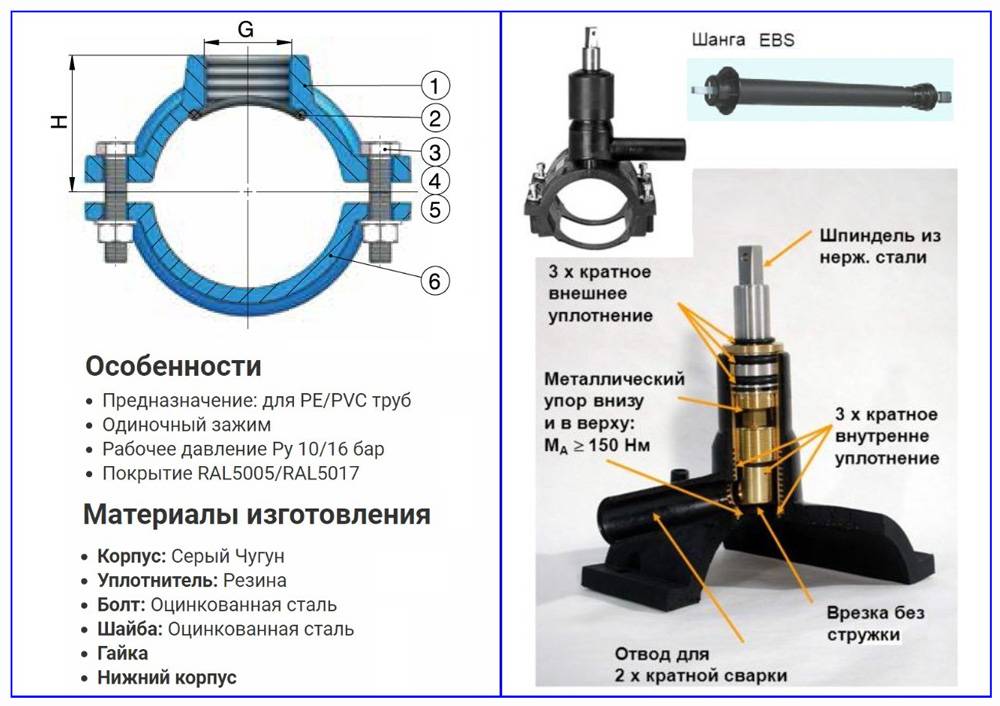
- Clamp
- Rules for connecting a house to a central water supply
- For reference: types of clamps
- Independent search for pipes underground
- Metal detector application
- Environmental Protection
- Rules for piping in a dwelling
- How to connect to a common water main
- Working with cast iron pipelines
- Device for tapping into the water supply under pressure
- Saddle installation
- Purpose of main pipelines
- Tapping into a pipe under water pressure
- Conclusions and useful video on the topic
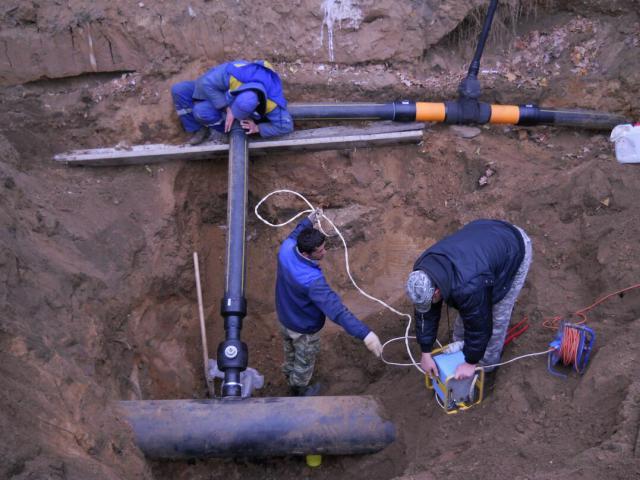
Detailed description of the main stages of work: tie-in to the water supply
When deciding how to make a tie-in to the water supply without turning off the pressure in the central system, you must carefully familiarize yourself with each stage of the work. In the beginning, it is necessary to calculate the route of the pipes. A depth of 1.2 m is considered optimal for them. Pipes should go straight from the central highway to the house.
Materials: cast iron and others
They can be made from the following materials:
- polyethylene;
- cast iron;
- Cink Steel.
Artificial material is preferable, since the tie-in to the water supply does not require welding in this case.
To simplify work on the tie-in place, a well (caisson) is built. For this, the pit is deepened by 500-700 mm. A gravel cushion is filled up at 200 mm. Roofing material is rolled out on it, and concrete 100 mm thick with a reinforcing grid of 4 mm is poured.
A cast plate with a hole for a hatch is installed on the neck. Vertical walls are coated with a waterproofing substance. The pit at this stage is covered with previously selected soil.
The channel breaks through manually or with the help of an excavator. The main thing is that the depth meets the requirements of the project. It is below the border of soil freezing in this climatic zone. But the minimum depth is 1 m.
For tie-in, it is better to use artificial material
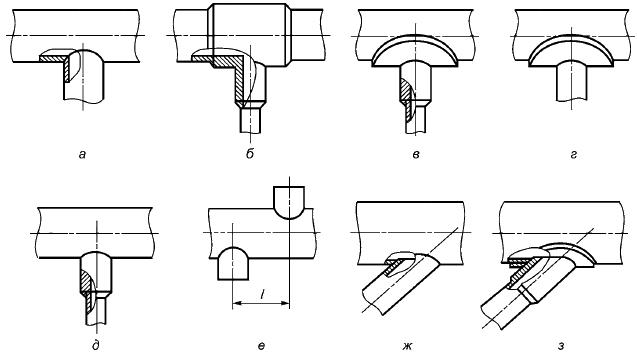
Do-it-yourself installation in 7 steps: clamp, saddle, sewerage scheme, coupling
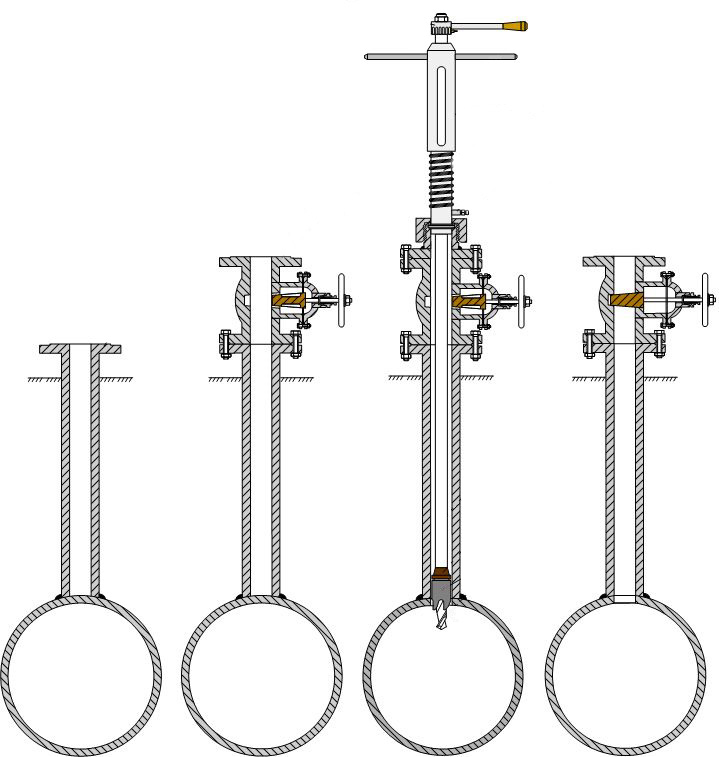
The installation process takes place according to the following technology.
- The device for tapping under pressure is located in a special collar pad. This element is installed on a pipe previously cleaned from thermal insulation. The metal is rubbed with sandpaper. This will remove rust. The cross-sectional diameter of the outgoing pipe will be narrower than that of the central one.
- A clamp with a flange and a branch pipe is installed on the cleaned surface. On the other side, a gate valve with a sleeve is mounted. A device is attached here in which the cutter is located. With her participation, an insertion into the general system is carried out.
- A drill is inserted into the pipe through an open valve and a gland of a blind flange. It must match the size of the hole. Drilling in progress.
- After that, the sleeve and cutter are removed, and the water valve closes in parallel.
- The inlet pipe at this stage must be connected to the flange of the pipeline valve. The protective coating of the surface and insulating materials are restored.
- Along the route from the foundation to the main canal, it is necessary to provide a slope of 2% from the tie-in to the inlet outlet pipe.
- Then a water meter is installed. A shut-off coupling valve is mounted on both sides. The meter may be in the well or in the house. To calibrate it, the shut-off flange valve is closed and the meter is removed.
This is a common tapping technique. The puncture is carried out in accordance with the type of material and design of the reinforcement. For cast iron, grinding is performed before work, which allows you to remove the compacted outer layer. A flanged cast-iron gate valve with a rubberized wedge is installed at the tie-in point. The body of the pipe is drilled with a carbide crown. It matters what material the cutting element is made of. A cast iron flanged valve requires only strong crowns, which will have to be changed about 4 times during the tapping process. Tapping under pressure into a water pipe is carried out only by competent specialists.
For steel pipes, it is not necessary to use a clamp. The pipe must be welded to it. And already a valve and a milling device are attached to it. The quality of the weld is assessed. If necessary, it is additionally strengthened.
The polymer pipe is not ground before a pressure tapping tool is put on the puncture site. The crown for such material can be both strong and soft. This is another reason why polymer pipes are considered beneficial.
The next step involves testing. Stop valves (flanged valve, gate valve) and joints are checked for leaks. When pressure is applied through the valve, air is bled. When water begins to flow, the system is inspected with the channel not yet buried.
If the test is successful, they bury the trench and the pit above the tie-in. Works are carried out in compliance with safety regulations and in accordance with the instructions.
This is a reliable, productive method that does not disturb the comfort of other consumers. Work can be done in any weather
Therefore, the presented method is so popular today. Connecting to the water supply is a very important technical event.
Insertion into the water main
The characteristics of the main water supply system are as follows: such a pipeline is laid on the main streets, pipes with a diameter of 100 to 2000 mm are used. Insertion requires access to one of the two possible options given task:
- welding - a thread is welded, which is necessary for the installation of a crane, which is used to connect a pipe going to a particular house;
- overhead clamp - used when there is no possibility of blocking the flow of water.
The depth of the line determines the location of the tie-in. If the main pipe is at a decent depth, then the tie-in is made in its upper part, and otherwise - with a branch to the side. Let's take a closer look at the mentioned options.


welding method
When using this method, it is advisable to first turn off the water supply, and then proceed to a direct tie-in.Why you need to burn a hole in accordance with the diameter of the thread, which then needs to be welded.
At the same time, the process of such work does not always look exactly like this. In some cases, tapping into a water pipe is carried out without shutting off the water supply. This can be explained by the elementary absence of shut-off valves or by the fact that such fittings exist, but they are old, which does not allow them to be used for their intended purpose. In practice, the following set of actions is expected:
- the place of the tie-in is selected, where the thread is welded;
- then a full bore valve is screwed on;
- a hole is drilled through the installed faucet, ensuring that the perforator is protected from water by a rubber or cardboard screen;
- at the end of the previous process, the drill bit is pulled out sharply, and the tap closes.
Drilling should be done at high RPM, as this reduces the chance that the drill will jam. This tie-in method is problematic, due to the high water pressure in the main water supply. If the pressure exceeds 5 atm., Then it is necessary to refuse to independently carry out such work. In this case, you should contact specialized organizations, and not take the initiative.
Clamp
The option of using an overhead clamp, if it is necessary to tie into the line, is quite suitable when working with pipes made of different materials: steel, polypropylene, polyethylene, etc.
In practice, such a tie-in has the following procedure:
- water is turned off;
- an overhead clamp is attached to the pipe, taking into account the fact that this mounting element must be one size larger than the pipe;
- a seal is placed under the clamp, usually made of rubber or silicone, which is necessary to ensure the tightness of the connection;
- by welding, a thread is attached to the clamp;
- the crane is mounted;
- water is supplied.
In the same way, a tap is made into a water pipe without turning off the water, but only if the pressure does not exceed 5 atm. To a greater extent, this method is suitable when working with a polyethylene pipe - a simpler drilling process. When the pipe and clamp are made of metal, there is no need to fix the clamp. As for the polyethylene pipe, this is not the case, which is explained by the presence of a large linear expansion of this product. This forces the use of epoxy to seat the yoke.
Rules for connecting a house to a central water supply
The fundamental document regulating the connection of a centralized line to the water supply system is the government decree of July 29, 2013 No. 644, which defines the rules for cold water supply and drainage.
Its main provisions consist of the following points:
- In addition to the above document No. 644, the procedure for connecting objects is determined by federal laws on urban planning and “On water supply and sanitation”. The basis for the installation work is a standard contract for connection to a centralized water supply line.
- An applicant who wants to join a centralized water supply system or significantly increase the volume of water consumption must submit an application to the territorial authorities.Within 5 days (the calculation period is only in working days), he is required to provide data, based on the water supply scheme in the area, about the organization engaged in water management in the territory of the connected residential building.
- Then representatives of local authorities or the customer himself apply to the water utility for the issuance of technical conditions for tapping into the central water supply. If the customer knows the required volume of water supply, then he can apply to the water utility to conclude an agreement by collecting the necessary package of documents without waiting for the receipt of technical conditions.
- The service that has the right to perform work under the contract is the organization: issuing the technical conditions and the corresponding permit, its successor or the owner of the water supply line. After accepting the documents, it must verify them within 3 working days according to the list below. In addition, the balance ratio of drainage and water supply, the technical feasibility of carrying out activities, taking into account the height (number of storeys) of the facility, the pipeline section on which the tie-in should be made, are determined.
- If the documents were received incomplete or incorrectly drawn up, the balance is incorrectly correlated or the pressure characteristics of the water main of the source do not supply water to the specified number of floors, the authority sends a notification to the customer no later than 3 days. It states that within 20 days the customer is obliged to provide the missing information or change the requirements for documentation, that is, correlate them with the technical characteristics of the line.
- If new or changed data is not received within 20 days, the application is canceled, about which the customer receives a notification within 3 days after the decision is made.
- If all documents are provided and there is a technical possibility of carrying out installation operations, the water utility sends the connection agreement, technical conditions and payment calculation to the customer within 20 days.
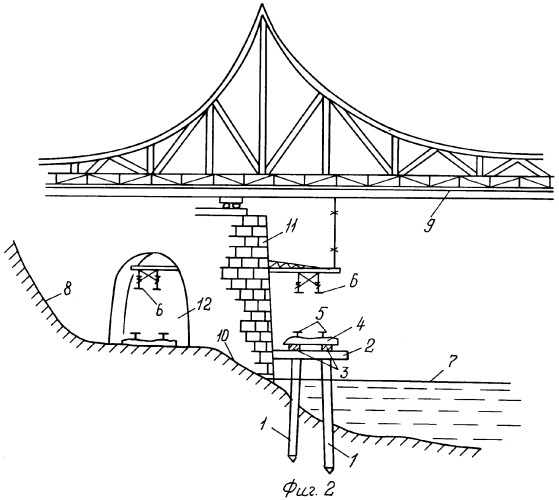
Rice. 2 An example of piping to which plumbing fixtures are connected
- The legislation does not allow the refusal of the water supply service to draw up an agreement and fulfill obligations to connect to the line with the existing technical feasibility.
- If connection to the line is not possible for technical reasons, an individual project is drawn up that allows performing these works by another method.
- In accordance with the standard contract, payment is made in the following amounts and in the order:
- 35% up to 15 days after the drafting of contractual documents;
- 50% within 90 days during the work, no later than their actual completion;
- 15% within 15 days after the drawing up and signing of the final acts, which are a guarantee of the technical possibility of supplying water to the customer no later than its actual receipt.
- The contract for water supply is drawn up for the period specified in it and can be automatically extended one month before the end of its term, if the parties have not announced its suspension or change.
For reference: types of clamps
Insertion with clamps can be used on water supply systems from elements made of various materials. However, you need to understand the difference between individual types of clamps and be able to choose the right option.
- Clamp-clip. Does not apply if tapping is carried out under pressure.If it is possible to shut off the water pressure and drain the remnants, it is considered an ideal option, since it has a simple design and is very inexpensive. Such a clamp can be purchased both in metal and in plastic.
- Saddle clamp. Designed for mounting just under pressure. The water pressure is blocked by a special shutter mechanism.
- Drill clamp. It is attractive in that the unit includes a mechanism that, after mounting the outlet, is not removed from the pipe, playing the role of an adjusting or gate valve.
- The electrically welded saddle clamp is ideal for installation with plastic pipes. The kit includes a cutter of the appropriate diameter. The disadvantages include the need for additional tools for installation during tie-in.
If you are dealing with a plastic plumbing system, use the clamps of the last two varieties.
Independent search for pipes underground
Of great importance is the material from which the desired elements are made. It depends not only on how to find water pipes in the ground, but also what to look for, and what to do.
Technology is different and modern method of independent search underground utilities can be aimed at determining the location of:
- Metal plumbing for hot and cold water.
- Steel heating "T" in the collectors.
- Power cables and wires of communication systems.
- Cast iron sewer lines.
- Plastic, polyethylene, polypropylene pipelines;
- Metal-plastic and ceramic technical means of provision and removal.
Metal detector application
If the pipe was laid at a depth of up to one and a half meters, it can be detected using metal detectors (professional, semi-professional or amateur). At the same time, the presence of insulation and waterproofing on the “T” does not interfere with the procedure.

The price of equipment can reach up to 130 thousand rubles. This means that for a one-time use, its purchase is impractical. Cheap models cost up to 6 thousand, but they are less effective.
Environmental Protection
When designing the construction of main pipelines, one should not forget about precautionary measures to protect the environment. Substances transported through networks often have chemically harmful characteristics and, if leaked, can create environmental disasters of a local type.


First of all, the design must have all the technical characteristics for its use in certain climatic conditions. Pipes should be insulated and protected from damaging corrosive effects. The possibility of destruction of the pipe surface should be minimized.
In difficult temperature conditions or in active seismic regions, it is necessary to supply pipelines with special insulation and install compensators along their length.
Backbone networks are an important component of the infrastructure of any country, so their design and installation are regulated by strict standards. For each type of line, pipes and the type of installation are selected, taking into account the climatic and other conditions in which the planned network will operate.
Rules for piping in a dwelling
There are two main wiring methods - serial and parallel, each of them has its own advantages and disadvantages. In the first case, water supply equipment and plumbing fixtures are connected to the line in series, this technology saves pipe materials, but at the same time, the pressure at the most remote point can differ significantly from that at the entrance of the main to the house.
With the collector method, fittings and pipes take more, but the pressure in all branches is approximately the same. Often, piping is done in a mixed way, connecting closely spaced autonomous water supply equipment and plumbing fixtures in series into a branch of one line.
Rice. 8 Parallel (collector) wiring
The installation of water supply in a private house should be carried out according to uniform rules that specialists need to know, the information can also be useful to the owners when carrying out work on their own. The main points of the plumbing instructions are the following requirements:
- The pipeline must be located strictly vertically and horizontally, the lines must not intersect.
- When connecting sections of the highway using collapsible compression fittings, it is necessary to provide free access to each junction point.
- A shut-off ball valve is installed at the inlet of each branch from the line.
- It is mandatory to install a sand filter at the entrance to the water main of the house.
- To maintain a constant pressure, the outlets from the line are made of a smaller diameter than the main line.
Rice. 9 Serial wiring method with connected water supply equipment
How to connect to a common water main
Before crashing into a water pipe under high fluid pressure, familiarize yourself with three technology options that vary depending on the material of which the pipes are made (they can be polymer (PP), cast iron, galvanized steel).
For a polymer central route, a tie-in into a pressurized water pipe looks like this:
- A trench no less than one and a half meters in size is excavated, the area where the work will be done is exposed, and a trench is being dug from it to the house;
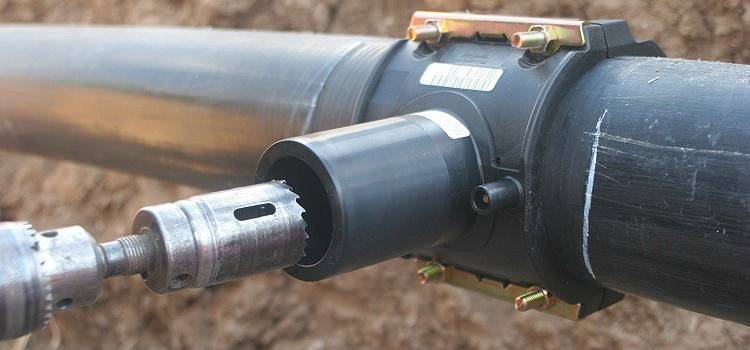
- At the end of the earthmoving work, a saddle is prepared for tapping into the water supply system - this is a collapsible crimp collar that looks like a tee. The straight outlets of the saddle are divided in half, and a valve is installed on the vertical outlet to shut off the pressure. A pipe is drilled through the tap with a special nozzle for tie-in. The most reliable saddle scheme is collapsible welded. It is easy to divide such a clamp into two halves, assemble it over the tie-in section, and weld it to the main route. Thus, the clamp for tapping into the water supply is welded into the body, providing a reliable and absolutely hermetic water supply to the dwelling;
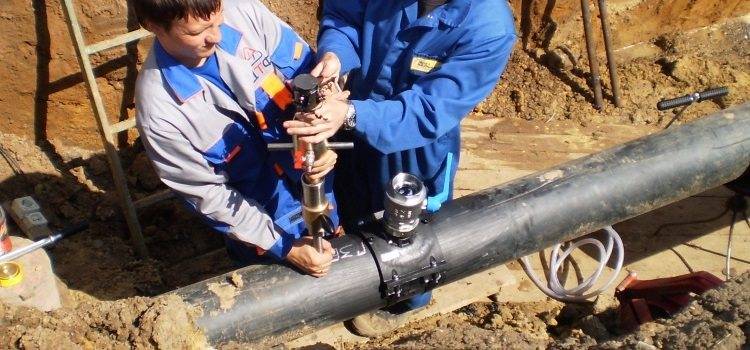
- The pipe is drilled with a conventional drill and an electric drill. Instead of a drill, you can use a crown, but the result is important, not the tool;
- A through hole is drilled until a jet of water comes out of it, after which the drill is removed and the valve is closed. For safety reasons, at the end of the drilling process, the electric tool is replaced with a hand drill or a brace. If you drill a hole not with a drill, but with a crown, then it will automatically ensure the tightness of the drilling site.In addition to these options, there is a solution using a special cutter, which is rotated by an adjustable wrench or an external brace;
- The last stage of the tie-in to the central water supply is the establishment of your own water supply, laid in a trench in advance, and connecting it to the central route with an American compression coupling.
For complete control of the insertion point, it is advisable to equip a revision above it - a well with a hatch. The well is equipped as standard: a gravel-sand cushion is made at the bottom, reinforced concrete rings are lowered into the trench, or the walls are laid out with bricks. Thus, even in winter it will be possible to shut off the water supply if it is necessary to repair it in the house.
For a central water supply pipe made of cast iron, a saddle tie-in looks like this:
- To tap into a cast-iron pipe, it must first be thoroughly cleaned of corrosion. At the very place of drilling, the top layer of cast iron is removed by a grinder by 1-1.5 mm;
- The saddle is built into the pipeline in the same way as in the first paragraph, but to completely seal the joint between the pipe and the crimp, a rubber seal is laid;
- At a further stage, a shut-off valve is attached to the clamp nozzle - a valve through which the cutting tool is inserted.
- Next, the body of the cast iron pipe is drilled, and do not forget about the need to cool the cut site, as well as change the crowns in a timely manner.
- A hole is drilled for tapping into the main water supply with a hard-alloy victorious or diamond crown;
- The last step is the same: the crown is removed, the valve is closed, the insertion point is scalded with special electrodes.
A steel pipe is slightly more ductile than a cast-iron pipe, so the tie-in of the pipes is carried out according to a technique similar to the solution with a polymer line, but the saddle is not used, and before making a tie-in into a galvanized steel water pipeline, the following steps are implemented:
- The pipe is exposed and cleaned;
- A branch pipe of the same material as the main pipe is immediately welded onto the pipe;
- A shut-off valve is welded or screwed onto the pipe;
- The body of the main pipe is drilled through the valve - first with an electric drill, the last millimeters - with a hand tool;
- Connect your water supply to the valve and the pressurized tie-in is ready.
Working with cast iron pipelines
Cast iron pipe under pressure can be drilled using special clamps with bimetallic crowns.
It is important to know the following features of this process:
cast iron is an extremely fragile material, which requires care from the worker;
before drilling the pipe, you need to clean it from the anti-corrosion coating;
it is unacceptable to overheat the crown on the collar;
equipment must be operated at low speed.
After the stripping is completed, it is necessary to install a collapsible type saddle in place of the tie-in. This place must be sealed with rubber pads. The pipe itself is drilled with a carbide crown, which cannot be replaced during the procedure.


The insertion sequence is as follows:
- The pipe is excavated and cleaned in the right place.
- The top layer of hardened cast iron is cut with a grinder.
- A collapsible saddle is mounted. Sealing the joint between the fittings and the clamp is carried out by means of a rubber seal.
- The shut-off valve is then attached to the flange outlet required for insertion of the crown.
- The pipe is drilled with constant cooling of the cutting area.
- The crown is removed and the water is turned off with a valve.
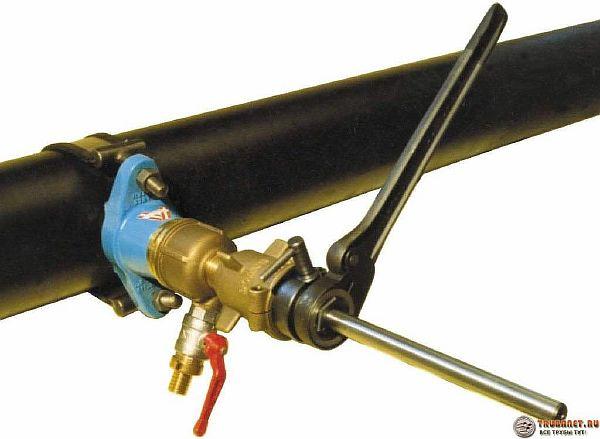
Device for tapping into the water supply under pressure
Crashing into the pipeline system with a stoppage of pumping is associated with significant material losses. To perform such an operation, you must:
- Relieve pressure in the water supply and drain the water in it. This is due to a significant interruption in the water supply of all facilities involved in this pipe.
- Make a hole in the pipe wall in an accessible way.
- Install a drain pipe, mount a faucet or valve on it.
- Mount the connection node from the outlet to the internal wiring in the house and on the site.
- Check all connections for tightness.
- Fill the pipeline with water, release air pockets, raise the pressure in the system to the required value.
It is obvious that the time and energy costs with this connection technology are very significant.
Therefore, a technology has been developed and applied for installing bends on pipes under pressure without stopping the functioning of the water supply system.
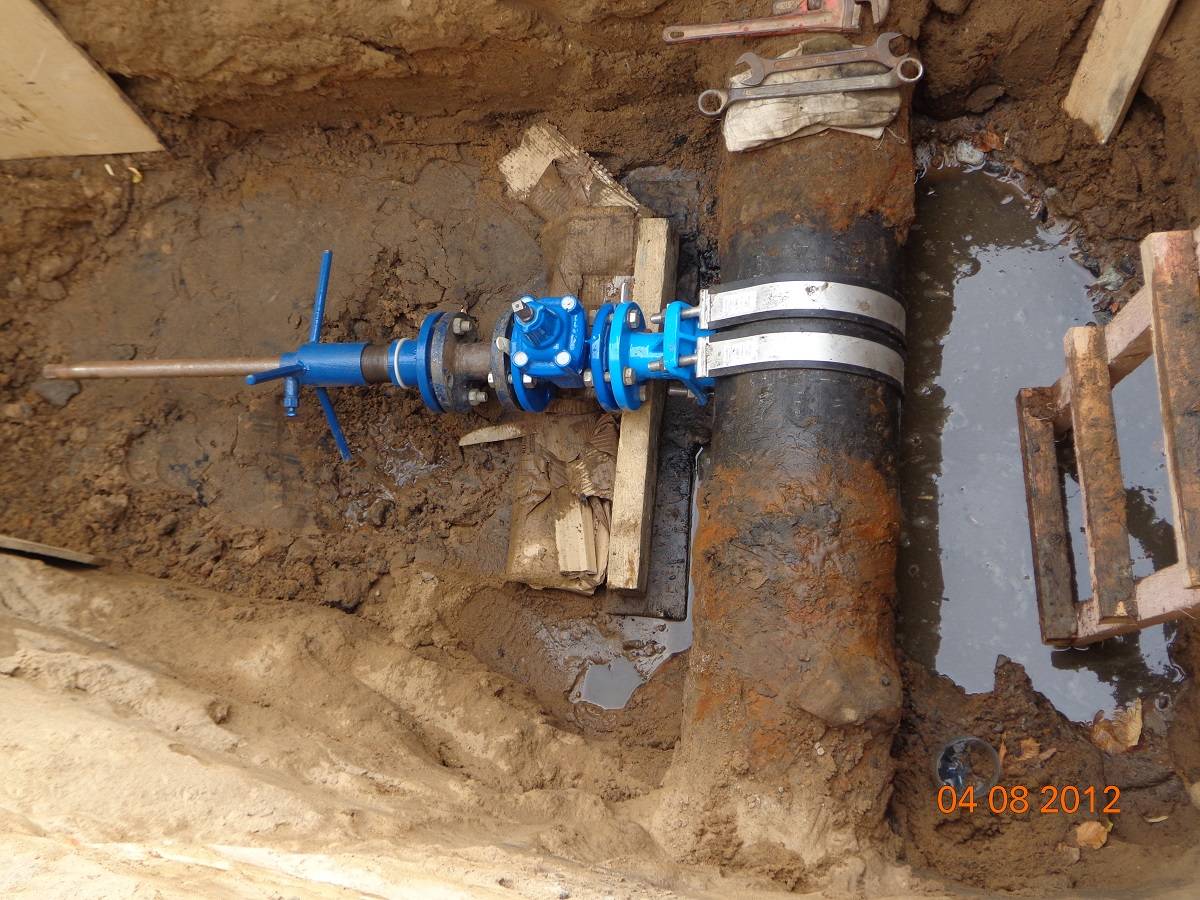
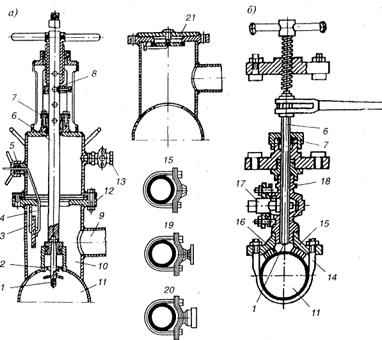
Before you make a tie-in into the water supply under pressure, you should install a special saddle clamp on the pipe, the so-called "saddle". It is a split coupling, which is pulled together with screws.
A rubber gasket is used for sealing. A flange or a piece of pipe is made on the half-coupling for inserting a drill. The rubber sealing option is used in the production of a tie-in into a plastic pipe.
When drilling pipes made of cast iron or steel, a saddle is used in the form of a covering layer of plastic material applied to the inner surface of the coupling.
Currently, universal transactions that are made from a metal strip are widely used. Them the design resembles a clamp for cars.
Given the constant improvement of the tool, we pay attention to the device in which the cutter is installed and a tap is used, installed on the side to drain water when passing through the wall. Three-piece saddles are used for use with large diameter pipes
For use with large diameter tubes, three-piece saddles are used.
Saddle installation
This structural element is fastened with screws. In this case, tightening must be done by tightening the screws alternately so that the halves of the coupling converge evenly, without distortion. On steel pipes, careful surface preparation is necessary, up to processing with a wire brush or emery cloth.
When drilling for tapping into a cast-iron water pipe under pressure, the axial force on the tool must be applied with less pressure to avoid wall fracture, since cast iron is brittle.
Purpose of main pipelines
Through industrial and main pipelines, raw materials are transferred over long distances. A lot of substances can be transported - from gaseous or liquid to bulk. Ultimately, these substances end up at their destination, which is households, industrial facilities and processing plants.
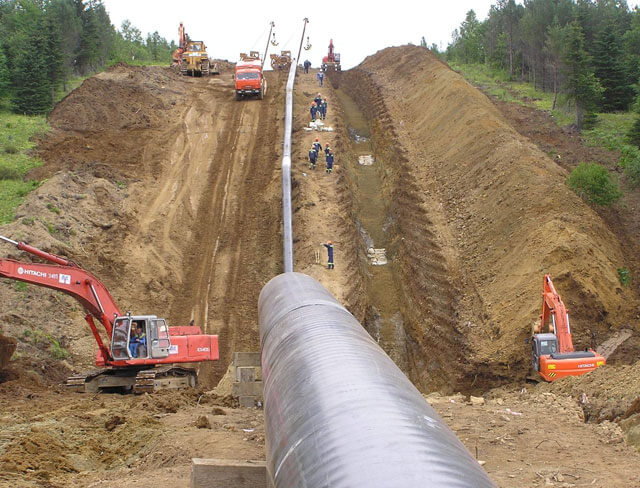
The constant development of infrastructure leads to regular updating of safety requirements for main pipelines, especially considering the degree of their impact on human life - these structures allow the transmission of energy, without which life is impossible in any country.
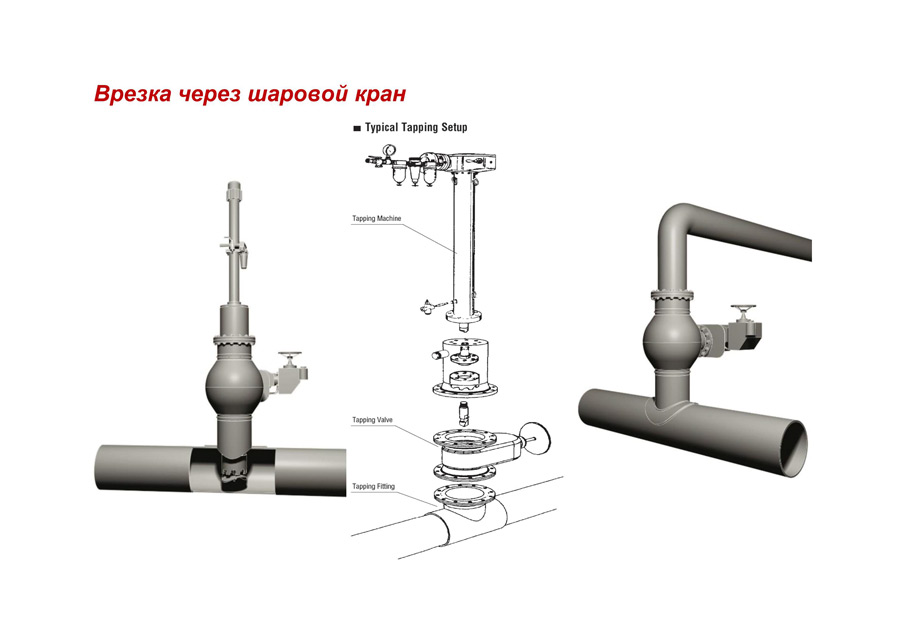
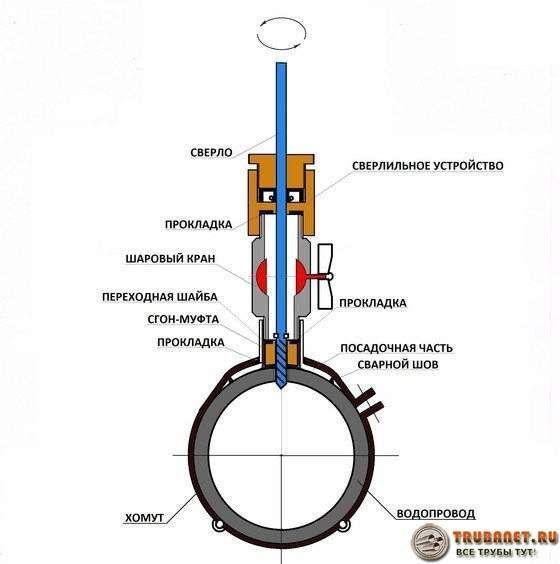
Tapping into a pipe under water pressure
To crash into a pipe under pressure, you need one
compression connection - saddle. This connection can be purchased at
plumbing stores, but before buying, check what diameter your pipe is,
in which to crash.


We install the clamp on the pipe and tighten the bolts connecting its halves. When tightening the bolts, distortions between the halves of the saddle must be avoided. It is desirable to tighten the bolts crosswise.
Installation of a compression joint on a pipe under water pressure.
After that, an ordinary ball valve of suitable diameter must be screwed into the thread of the saddle. How to choose a high-quality ball valve and open it if it is jammed can be found in this article.
It remains only to drill a hole in the pipe through the open
ball valve.
First, we determine the diameter of the drill. For getting
good water flow, it is desirable to drill a hole as large as possible
diameter. But in this case, the ball valve has its own hole. it
the hole is smaller than the inside diameter of the faucet thread. Therefore, the drill will have to
pick up this hole.
During drilling, it is important not to hook the fluoroplastic
seals inside the ball valve. If they damage the crane will stop holding
water pressure
For drilling plastic pipes, it is best to use
pen drills for wood or crowns.With these drills, PTFE seals
cranes will remain intact and such drills will not slip off the pipe in the very
start of drilling.
During drilling, you do not need to worry about the chips, it will be washed
water flow when the hole is drilled.
To drill holes safely and easily, there are several
tricks.
Since in the process of making a hole there is a high probability of pouring water over it, it is not advisable to use a power tool. You can of course use a mechanical drill or a brace. But they will be difficult to drill metal pipes. You can use a cordless screwdriver, even if it is flooded with water, then the electric shock will be insignificant. But a screwdriver at one important point may not have enough power. When the hole is almost drilled and the drill bit has almost passed the pipe wall, it can get stuck in the metal pipe wall. And then the situation will turn out that water is already flowing under pressure on the tool, and the hole has not yet been drilled to the end. This may not necessarily happen, but it is worth remembering.
Particularly desperate people use an electric drill, but the work is done with a partner who turns off the drill from the outlet when water appears.
To protect the instrument from the flow of water, you can put it in a plastic bag.
A plastic bag wrapped around a screwdriver.
Drilling a hole in a pipe through a ball valve.
Or put a circle with a diameter of 200-300 mm of thick rubber directly on the drill, which will act as a reflector. You can even use thick cardboard instead of rubber.
Cardboard-reflector, dressed on an electric drill drill.
There is another simple and affordable way. Plastic is taken
1.5 liter bottle.A part with a bottom of about 10-15 cm is cut off from it, and in
a hole is drilled in the bottom. We dress this bottom on the drill with the cut off part
from a drill and with such a device we drill a pipe. The bottle should cover
a crane. The flow of water will be reflected by a semicircular bottom.


Conclusions and useful video on the topic
Roller #1. Tips of the master for the production of tapping under pressure:
Roller #2. The principle of operation of the device for tie-in:
Roller #3. Consequences of poor installation:
Manipulations for tapping under pressure must be carried out taking into account all the above recommendations and rules. If the conditions are not met, there is a high probability of violating the integrity of the system, which will nullify all efforts and lead to disastrous consequences.
Do you want to share useful information about tapping into an existing water supply? Have questions about the topic of the article, found controversial points in the material? Please leave it in the box below.


