- If several convectors in a row
- Installing an underfloor heating system
- Work specifics
- Homemade gas convectors
- Option 1. Heater based on IR burner
- Option #2. Using a Decommissioned Heater
- Option #3. Upgrading with a duct fan
- Gas connection
- Building regulations
- Cutting parts and installing the boiler
- Making a cauldron from a pipe
- Execution of the electrical model
- Installation of a gas stove and convectors
- Advantages and disadvantages of the system
- Procedure for checking and starting the instrument
- The cost and quality of a gas convector
- gas convector
- Gas supply: main stages
- Installing a gas convector: what you can do yourself and what not
- Diagram of the internal structure and materials
- Results
- Conclusions and useful video on the topic
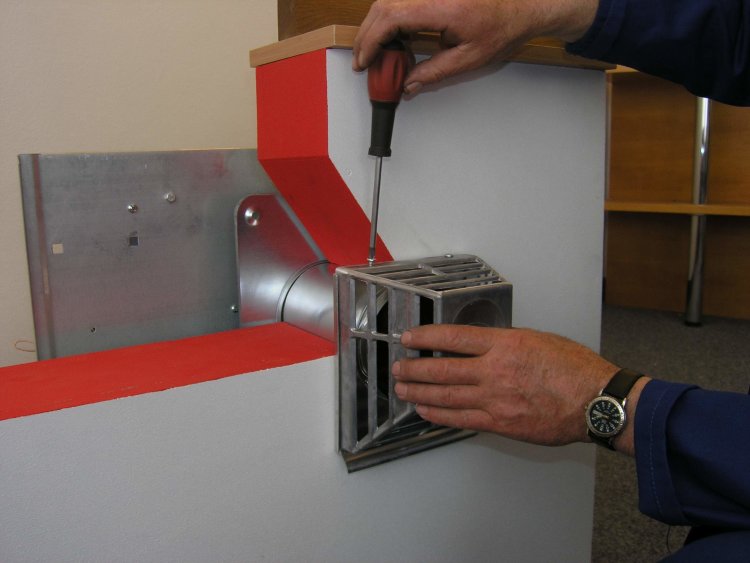
If several convectors in a row

The following nuance should be taken into account. In our case, 3 floor convectors for water heating were installed, each of which reaches 1800 cm in length. The equipment is equipped with its own gratings
But if necessary, you can always contact the appropriate company and order a solid grating together with the convectors, which will allow you to hide the ugly seams formed when two convectors are connected together.Such seams differ from the general lattice, which violates the overall aesthetics
The equipment is equipped with its own gratings. But if necessary, you can always contact the appropriate company and order a solid grating together with the convectors, which will allow you to hide the ugly seams formed when two convectors are connected together. Such seams differ from the general lattice, which violates the overall aesthetics.
In a situation where the underfloor water heating convector is too long, the easiest way out will be to simply cut a hole in the wall of the required shape, which will allow the convector to go deep into the wall, but this is not the best way out. Of course, you can cover up the remaining cracks, but do not forget about the mobility of the grating. If it is pulled out once, a large gap will remain, which will certainly turn out to be a source of drafts, because drafts are always present behind the wall, especially if the installation was carried out in violation of the rules.

It is better to shorten the convector, it has rivets on the end, which should be disassembled and drilled. Next, the excess part of the equipment is cut off, everything inside is removed. We unscrew the rail, pull out the decorative strips, cut them off. We no longer put the rivets back, instead of them we fasten the bolts onto the nuts. We cut the lattice, we collect everything in place. If there is the necessary distance to the heat exchanger, you can shorten the equipment on either side, choose the side that is more convenient for you to work with.
In general, ideally, all dimensions should be agreed upon at the stage of choosing floor convectors or other heating equipment, so that in the future you do not have to resort to additional manipulations.Such planning will avoid the forced cutting of convectors. In order to carry out the installation of convectors correctly, you need to perform certain preparations.
In addition to size, it is also important not to make a mistake with the choice of thermal power of the equipment.
Installing an underfloor heating system
For rooms with large glazing surfaces (balcony windows, facade glazing or access to a terrace, loggia, etc.), a floor convector is currently the best solution.
Floor (in-floor) heaters are mounted depending on the duct used or with an underestimation (for butt mounting) or at the floor level. The sidewalls used in the installation of boxes should not be visible. The standard version uses aluminum frames with F and U profiles and decorative frames in silver. For the correct installation of floor convectors, the following recommendations are taken into account:
- the heat exchanger must be located at a greater distance than the fan;
- connections of the water supply to the heat exchanger are made with flexible hoses or sleeves in a metal braid;
- a heat exchange system must be connected to the heating system on a threaded connection and a thermostatic valve must be used;
- the coolant is supplied to the heating pipe (register) through a separate supply line, located as far as possible from the fan;
- the convector is considered to be properly mounted if it is placed strictly horizontally, the upper edges of the box are not damaged and the decorative frame is at the floor level (tolerance 1.5-2 mm).
The fan is attached to the heater body using magnets or Velcro (for a steel blower body). Bolts are used to level the box relative to the floor.The same anchor type clamps are used to fix the convector before pouring the floor with concrete. To eliminate the deformation of the box body, it is necessary to install spacers and act on the heater with a vertical load. At the final stage, it is necessary to install a siphon and a condensate outlet pipe.
Work specifics
Today, various types of heat exchangers are produced. In general, the features of their work, as well as the design characteristics, are similar. The properties of the structure of such an element:
- Full body available.
- The presence of output and output pipes.
- Brake mechanism for combustion products. Its role is played by valves with cutouts that are installed on the axles.
The shutters can be rotated. A zigzag chimney of various lengths is formed. Valves can be adjusted to achieve the most effective ratio of thrust and heat transfer. Safety standards are followed.
In this video you will learn how to make a heat exchanger:
Homemade gas convectors
Among the developments of home-made convectors that convert gas into thermal energy, there are not too many different solutions. This is due to the danger of errors in the construction of devices operating on blue fuel. The slightest miscalculation can lead to an explosion, poisoning, fire.
However, there are several interesting designs worth considering. They can come in handy in heating cottages, country houses, trailers, tourist tents, garages.
Option 1. Heater based on IR burner
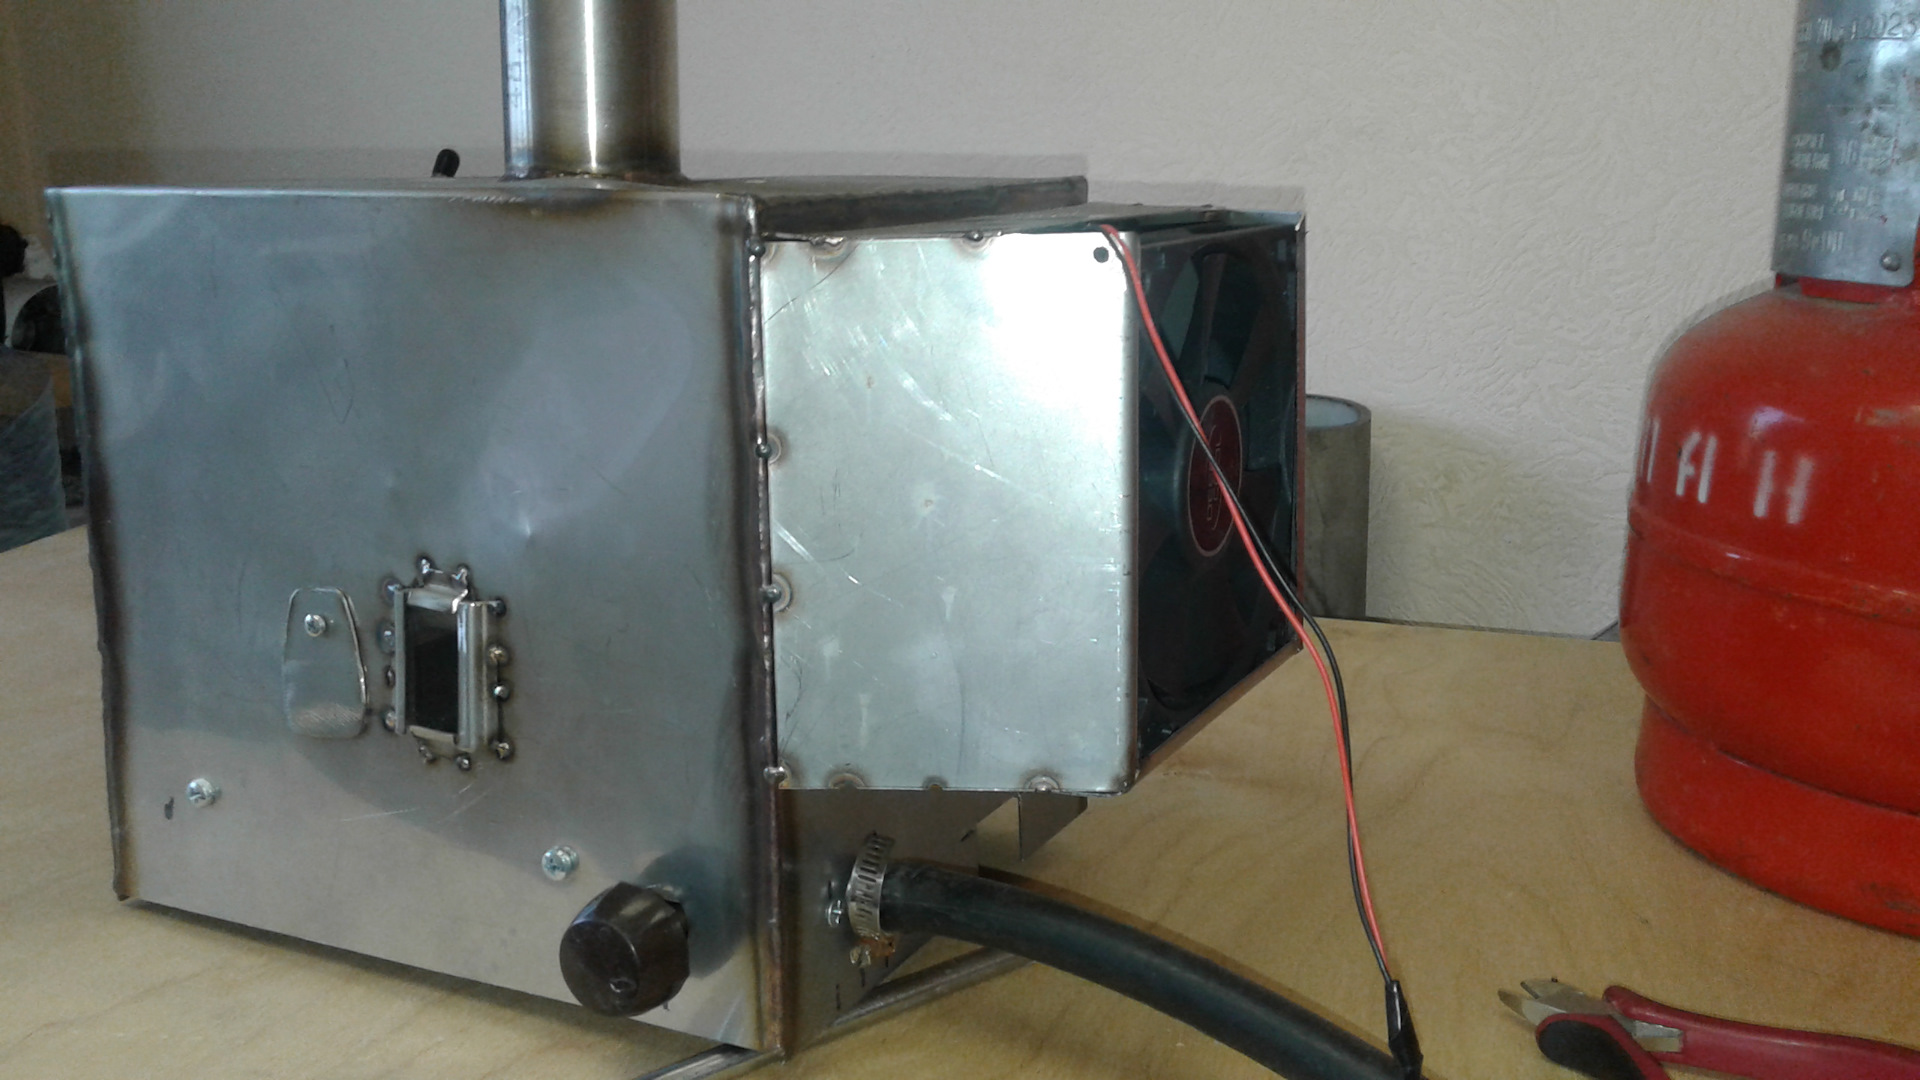
In fact, this is just a refinement of the usual infrared gas burner of the Solarogaz brand. The device runs on bottled gas. The inventor and executor of the idea used the GII-2.3 model, the working panel of which can be installed horizontally.

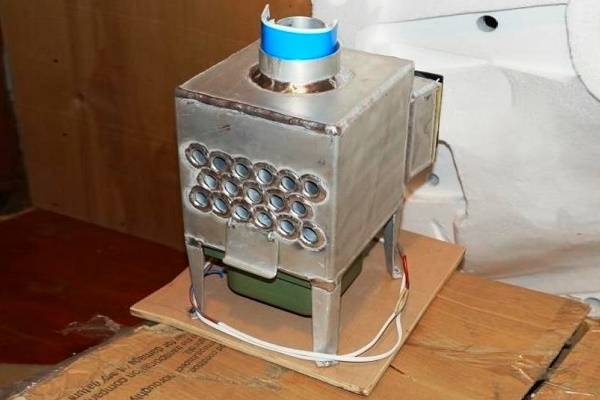
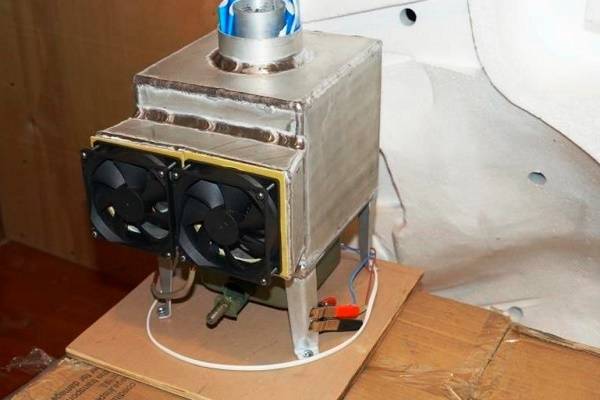


On this working panel, which normally heats the space by flameless processing of gaseous fuel, they simply welded and installed the original heat exchanger. It is a metal cube, with metal tubes laid inside the case.
The heat exchanger does not have a bottom, it would prevent the passage of heat waves. At the top there is a branch pipe for connecting a chimney. A pair of fans from the computer is installed at the back to speed up the flow of air currents.
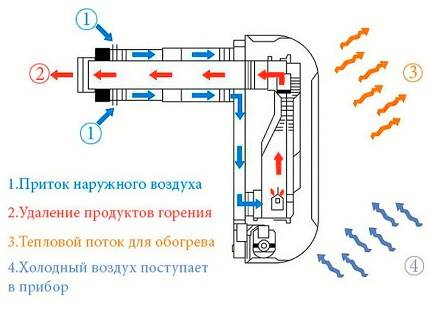
Structurally, this model resembles a heater for air heating systems. According to the principle of action - too. The air drawn into the tubes of the device is heated by a gas burner, then it is forced out of the tubes by a fresh portion of cold air.
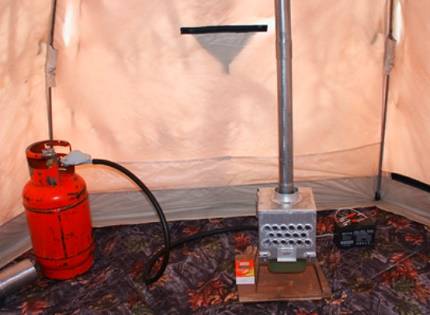
A mobile convection heater on gas is suitable for tourists, fishermen with hunters, lovers of traveling in a camper. It just needs to be connected to the cylinder, and the rigid or corrugated pipe installed on the branch pipe should be taken out of the tent
According to the owner of the invention, the modified burner heats up the tent much faster than it does, but without a heat exchanger. All products of gaseous fuel processing are discharged through a pipe connected to a branch pipe. Oxygen does not burn, gas consumes sparingly. For fishermen, hunters and tourists, this is a real find.
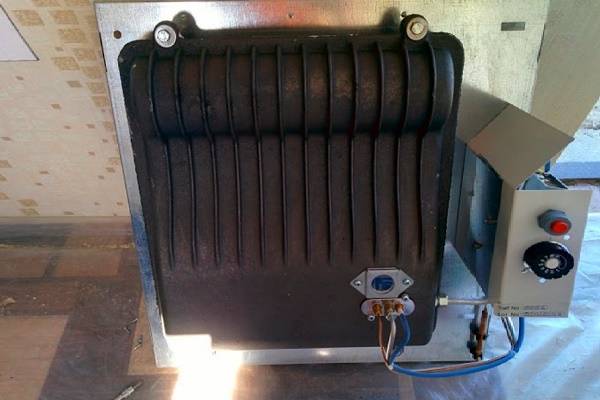
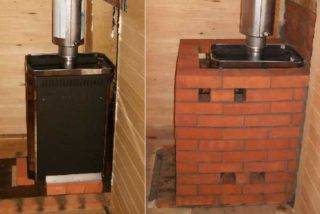
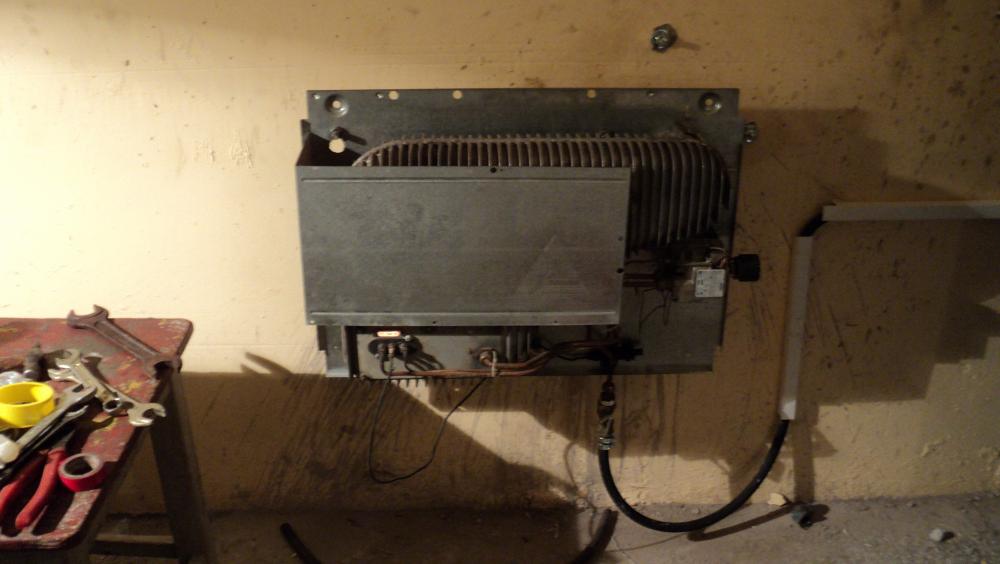
Option #2. Using a Decommissioned Heater
This option is generally extremely simple, it was invented to save on garage heating. The whole revision consisted in repairing the decommissioned convector and removing the casing. The result made it possible to significantly increase heat transfer and heating rate, but it has problems with safety.
First, the seal is broken.In case of accidental damping, the gas valve of the heater will, of course, stop supplying.
However, with constant burning, oxygen from the air mass in a confined space will be burned out, so you will need to regularly ventilate the garage in one gulp or build forced ventilation.
Secondly, an open heat exchanger can easily cause a burn. But where children do not run, this can not be considered a minus.
An adult is unlikely to forget that the case has been removed from the heater and that if you move it carelessly near the device, you can get burned.
With a similar solution, but used to heat the trailer, the following video will acquaint you:
A 30 m² garage is heated by a convector without casing in about five minutes. Gas consumes no more than 500 rubles in the winter month. In autumn and spring, it works less often, which means that the costs are even reduced.
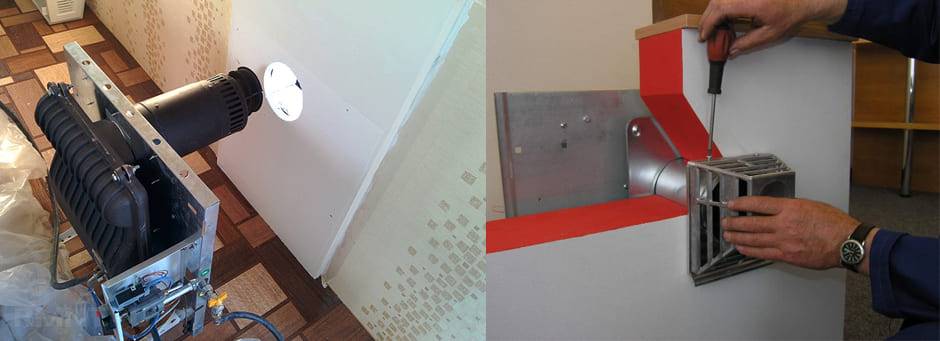
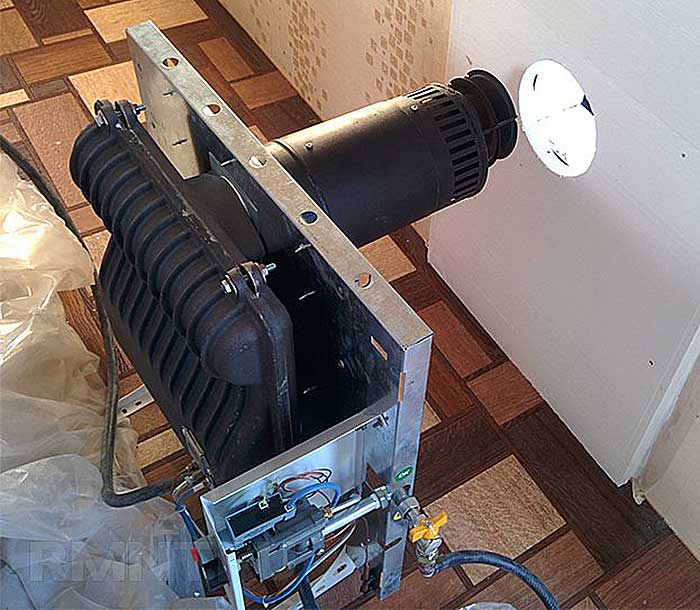
Option #3. Upgrading with a duct fan
The essence of the alteration is to install an air duct with an exhaust fan on the front grille. The heat generated by the convector is directed to the working area of the owner. There are no special tricks, but there is a significant reduction in heating costs.
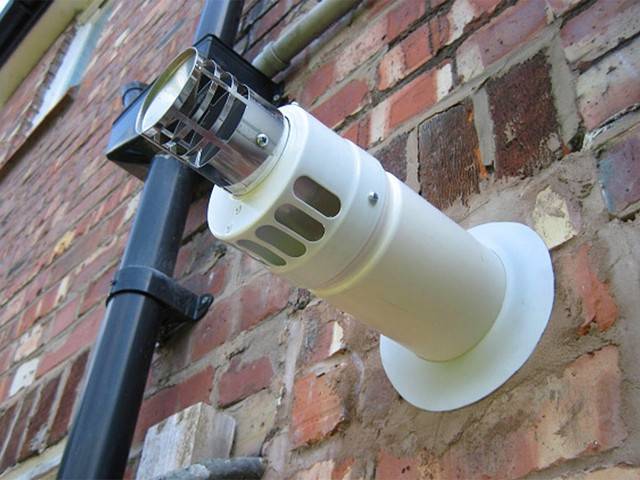
The products of combustion are removed outside the object as usual - through a coaxial pipe, through which fresh air is supplied to the burner to maintain the flame. This homemade product is much safer than the previous model, but it will still be necessary to periodically ventilate the treated room. Indeed, without a doubt, she will “drive” clouds of dust.
Gas connection
Friends, at this stage it is important to be extremely careful! Let's say that you do not have the skills to work with gas appliances - then it is better to contact specialists to perform the following work
Installation of a gas heater to a gas supply source is carried out according to the following algorithm.
- Let's imagine that there is a special branch with a thread on a gas pipe. Then you just need to screw a gas valve onto this pipe. If there is no special withdrawal, then it will need to be done!
- The next step is to bring the gas pipe to the convector and connect them with a fitting. This process is not rushed.
- Fix the connected pipe with special clips. The distance between them is 1 meter. To do this, it will be necessary to drill holes on the outer wall of the building.
- Treat fittings and pipe joints with silicone to ensure tightness.
- Be sure to call a gas service representative so that he can verify that the installation and connections are correct.
Building regulations
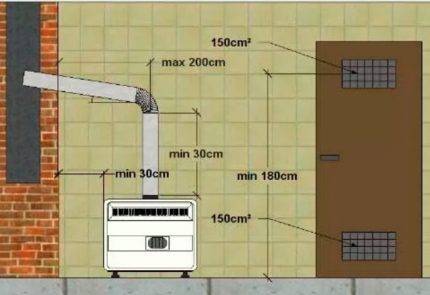
Pipes are allowed to be laid in the outer walls of the building, but the diameter of the outer casing should not be less than the thickness of the fence. The vertical deviation is allowed no more than 30 °, the horizontal deviation is 1 m. A cut is made at the points where the pipe passes through the ceiling structure.


Norms of chimney distances:
- to fireproof structures - 5 cm;
- to slow-burning (plastered walls and wood ceilings) - 25 cm;
- to slow-burning, upholstered with asbestos sheet and galvanized - 10 cm, if the insulation protrudes 15 cm beyond the edge of the channel on both sides.
The chimney is checked for tightness if the device uses the principle of self-manufacturing. The chimney outlet above the roof is closed.If smoke accumulates in adjoining ducts or adjacent rooms, then the chimney is loose or not isolated.
The requirements for smoke channels are:
- the density is sufficient to keep gases and smoke out;
- the diameter matches the outlet pipe of the heating unit;
- when arranging, permitted materials are used;
- chimneys provide the required draft force;
- there should be no blockages, blockages inside the pipes;
- are not installed in the area of wind backwater.
Cutting parts and installing the boiler
Before starting the assembly of home-made wood-burning boilers, you will need to complete a drawing, taking into account the features of the heating system for a private house. Products have the form of 2 compartments, located "matryoshka". The outer box is a combustion chamber, the inner box is a reservoir for heating water. The elements do not communicate with each other.
Part preparation is done like this:
- The walls of the unit are cut out of a sheet of metal.
- Partitions for the stove are made of metal with a thickness of 10-12 mm.
- A hole for a chimney with a diameter of 10 cm is made on the top part.
- The sides are welded to the bottom, and then - on the vertical parts, metal strips 3 cm wide under the grate.
- Support strips for partitions are attached to the side parts.
- They are made and installed on the hinges of the door, doors for the firebox and ash pan are cut out.
- Partitions are attached in the form of a labyrinth - they will increase the heating efficiency by creating an air barrier.
- A sleeve 20 cm high under the chimney is welded onto the cover with a hole.
- The cover is welded to the body, the chimney is mounted.
Making a cauldron from a pipe
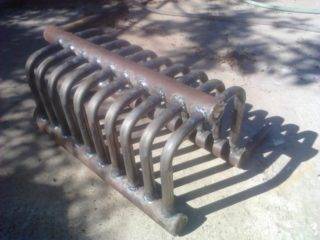
The boiler on wood or coal is made of a pipe and has a U-shape. On the top there is a fitting, on the bottom there is a return line.The unit is easy to make if you follow the step-by-step recommendations:
- Selection of tools and materials. You will need several metal pipes with a diameter of 1.5-2 inches, as well as a welding inverter, a grinder with a nozzle for cutting metal, a tape measure, a hammer.
- Cutting a metal pipe to size.
- Welding the edges of the lower part in the form of the letter P.
- Burning holes for vertical posts.
- Arrangement of vertical elements from corners or pipes of smaller diameter.
- Production of the upper part from a pipe of the same diameter and holes for vertical parts.
- Welding the fitting on the supply pipe and air blower.
- Execution of the firebox and blower. Rectangular holes 20x10 cm are cut out in the pipe for the firebox and 20x3 cm for the blower.
Execution of the electrical model
A do-it-yourself electric boiler for heating a house is made using the following materials and tools:
- angle grinders or grinders;
- welding inverter machine;
- multimeter;
- sheet steel with a thickness of 2 mm;
- adapters for connecting to the system;
- Heating elements - heaters can be bought or assembled independently;
- steel pipe 159 mm in diameter and 50-60 cm long.
The algorithm for creating an electric type unit consists of the following steps:
- Execution of branch pipes for connecting to a system of pipes. You will need 3 elements 3, 2 and 1.5 inches in diameter.
- Making a container for a tank from a pipe. Markup is made, a hole is cut through it and the seams are processed.
- Welding pipes to holes.
- Cutting out two circles from a pipe of a larger diameter for the heating compartment.
- Welded to the top of a 1.25" diameter spigot.
- Making space for the heater. Two holes are made in the bottom.
- Connecting the boiler with pipes to the system.
- Installation of a low-power heating element with a thermostat on the upper branch pipe.
Installation of a gas stove and convectors
It is forbidden to install the convector at a distance of less than 4 meters from open sources of fire, including a gas stove. The hose suitable for the convector must have a dielectric insert, this will prevent a fire in the event of a short circuit in the wiring in a wooden house.
An important factor is the grounding of sockets located near the gas stove and convectors, although in a wooden house they must be grounded a priori.
There are three types of supply hoses that are allowed to a gas stove in a wooden house, namely:
- Rubber fabric - its plus is that it does not conduct electric current, but it is more susceptible to mechanical damage compared to analogues;
- Metal sleeve - when using it, a dielectric insert is necessarily inserted from the gas stove to the main, and otherwise it has the best performance among analogues. In addition, it is recommended by the latest approved standards. Its only disadvantage is the price, it bites;
- Rubber with a metal braid - it is more able to withstand severe shocks, and also, thanks to the rubber core, does not conduct current.
When buying a metal hose, you should pay attention to its coating, some manufacturers oriented to other markets, with other standards, use yellow insulation, which does not fulfill its main functions. Always ask for supporting documents when purchasing, and keep them in a safe place
Advantages and disadvantages of the system
Biogas plants have many advantages, but there are also enough disadvantages, so before starting design and construction, you should weigh everything:
- Recycling. Thanks to a biogas plant, you can get the most out of the garbage that you would have to get rid of anyway. This disposal is less hazardous to the environment than landfill.
- Renewability of raw materials. Biomass is not coal or natural gas, the extraction of which depletes resources. In agriculture, raw materials appear constantly.
- Relative small amount of CO2. When gas is produced, the environment is not polluted, but when it is used, a small amount of carbon dioxide is released into the atmosphere. It is not dangerous and is not capable of critically changing the environment, because. it is absorbed by plants during growth.
- Moderate sulfur emission. When biogas is burned, a small amount of sulfur is released into the atmosphere. This is a negative phenomenon, but its scale is known in comparison: when natural gas is burned, environmental pollution with sulfur oxides is much greater.
- Stable work. Biogas production is more stable than solar panels or windmills. If solar and wind power cannot be controlled, then biogas plants depend on human activity.
- You can use multiple settings. Gas is always a risk. To reduce potential damage in the event of an accident, several biogas plants can be dispersed around the site. If correctly designed and assembled, a system of several fermenters will work more stable than one large bioreactor.
- Benefits for agriculture. Some types of plants are planted to obtain biomass.You can choose those that improve the condition of the soil. For example, sorghum reduces soil erosion and improves its quality.
Biogas also has disadvantages. Although it is a relatively clean fuel, it still pollutes the atmosphere. There may also be problems with the supply of plant biomass.
Irresponsible plant owners often harvest it in ways that deplete the land and upset the ecological balance.
Procedure for checking and starting the instrument
A home-made boiler starts only when the system is filled with water, the wiring and connections are inspected. In the presence of forced circulation, a pump is installed for uniform heating of the coolant. In systems with natural circulation, a slight slope is made at the exit to the return line. Pinched or torn power cables are replaced or re-insulated so that the heating element does not fail. To protect against voltage fluctuations, an RCD is mounted.


The heating unit is cleaned of dust and dirt, and then painted with a heat-resistant agent. The surface needs to be sanded and primed before applying the paint. The coating is applied in 2 layers.
Water is supplied in communications so that there are no air jams. To control the airing use taps on the radiators. Next, turn on the boiler to the network, waiting for warming up. The water temperature is checked with a multimeter.
The cost and quality of a gas convector
Prices for gas convectors are formed depending on the manufacturer and the power of the device. The cost of the device is also affected by its quality.So, a gas convector of one Ukrainian manufacturer, bought last year for 900 hryvnias, functioned smoothly for a year. In total, there were two such devices in operation. One of them failed after working for 5 months. Further repair of the device turned out to be unprofitable. It was more expedient to buy a new gas convector than to repair the old one. The second such device worked for the entire heating season and was turned off. With the onset of the next heating season, it was not possible to start the device. Its repair was also extremely unprofitable.
What can not be said about two Turkish-made gas convectors. These devices were purchased for 1000 and 1500 hryvnias (200 and 300 dollars at last year's exchange rate). Different in power, but from the same manufacturer, they successfully worked the entire heating season, were turned off and put back into operation with the onset of cold weather without problems.
Thus, you see a striking difference in quality from different manufacturers.
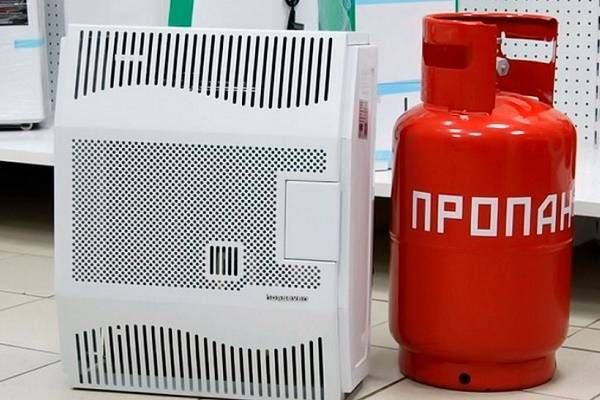
gas convector
Of all the convector-type heaters, gas is called the most economical and most independent of the mains.
And this is very important, because the quirks of the weather do not have the best effect on the power supply system, giving rise to quirks in itself.
Indeed, a gas heater will warm you in the midst of a blizzard, when the electric convectors for heating “go out” along with the entire system due to strong winds, tangled or icy wires, or other troubles that power lines are subject to every winter.
Power for this type of convectors is a gas supply network, or even the most common household gas cylinder. True, when choosing such a convector, it should be borne in mind that every rule has exceptions. In this case, these are convectors with a fan, which, although they operate on gas, are dependent on the mains - the fan requires it.
Advantages of a gas convector:
- price affordability;
- high efficiency of space heating;
- low cost of heating.
Flaws:
Gas supply: main stages
The installation of the gas convector has been completed, now you need to deal with the gas supply. This stage is quite complex and responsible at the same time. To supply gas, do the following:
Scheme of operation of a gas convector.
- According to regulatory documents, the pipe suitable for the convector must run along the street. There are two options here: the first - the pipe has a pre-extracted threaded connection, the second - there is no such connection. If there is a thread, then you can screw on the gas valve yourself, which will shut off the gas supply to the convector. In the absence of a withdrawal, it must be done. To do this, call professional gas welders from the local Gorgaz or a similar office.
- After installing the gas cock, it is necessary to lead a metal-plastic pipe to the convector itself. Using a tape measure, calculate the length of the pipe, simultaneously determining the presence of fittings.
- You need to buy a pipe and fittings. The principle of the purchase is that the seller needs to clarify the presence of a certificate of conformity of these pipes and fittings for this type of work.
- Lay the pipe, fix it with clips every m. To install the clips, you need to drill holes in the wall.
- When installing the necessary fittings, carefully lubricate the pipe and the fitting itself with silicone, which will give an additional seal.The silicone will also act as a lubricant and make pipe installation easier.
As a result of the work, you should get a convector mounted on the wall with a gas pipe connected to it.
Now the last stage of the installation remains. A test run is required.
Scheme of installation of a gas convector.
Before starting, open the gas cock and go over all the joints of the fittings and threaded connections with a brush moistened with an aqueous solution of soap or shampoo. So you can notice the inflated bubbles (if any), which indicate gas leaks. If this happens, close the gas supply valve immediately. After checking the joints, start the convector. To do this, hold down the gas supply button for one minute. So the gas will have time to pass through the pipes and get into the combustion chamber. Press the piezo igniter, the spark should ignite the gas. A blue flame will ignite in the furnace.
Adjust the operation of the convector by setting a comfortable temperature. During the first few hours of operation, you may experience an unpleasant smell of burning oil. This is normal, since the convector is new and the combustion chamber is burning. If the smell lingers for a long time, then it is worth turning off the gas and re-checking all joints and threaded connections.


It is advisable that all work on the installation of gas convectors be performed by a professional who has sufficient experience in performing such work. This is also due to the fact that self-installation of the convector can void your warranty for the device. The gas convector must be taken over by Gorgaz. You must have documentary permission for the tie-in in your hands.In addition, all installation decisions, as well as the conclusions of the commissioning commission of the device, must be documented and signed in an appropriate way.
Installing a gas convector: what you can do yourself and what not
By and large, the entire installation of a gas convector can be divided into two stages - this is the direct installation of the device and its connection to the gas main. Let's look at these steps in more detail.
- How to install a gas convector. To begin with, we get acquainted with the manufacturer's instructions - in most cases, you can find all the necessary information regarding the requirements for installation and operation in it. According to the installation conditions, we select a place for installation, after which we punch a hole in the wall at the required height and, depending on the type of convector, install the assembled unit either on the floor or hang it on the wall. The space between the air intake and smoke exhaust pipe is carefully sealed with mounting foam. Everything, we can say that the convector is installed and ready for gas connection.
-
Connection to the gas pipeline. I will not tell anything here - even if you connect it yourself and do everything right, you will not be able to put the gas convector into operation. Or rather, hand it over, but before that you will be fined a tidy sum - unfortunately, carrying out work related to gasification is an unsafe occupation, and a license for their implementation is issued only to serious organizations.
And in conclusion, I’ll add only one thing to the topic - gas convectors are effective only when heating small areas.We talked about this a little above, and if it is necessary to establish heating for a large house, you should not look in their direction - you can’t find anything better than a liquid system with a central heating boiler and batteries for large buildings.
Author of the article Alexander Kulikov
Diagram of the internal structure and materials
As mentioned above, the main task of the heating system - heating the air - is solved by a heat exchanger. Therefore, the choice of its configuration, size and material of manufacture should be carried out with particular care. In the first two points (configuration and size) there is a consensus.
So, the most effective is the S-shaped position of the tubes in a finned radiator, which ensures uniform heating of the metal and rapid return of the body to the passing stream. Dimensions are set in proportion to the power of the device. With the material of manufacture is more difficult.

The buyer or assembler of the system will have to choose from several options, each with its own advantages and disadvantages.
The most popular are:
- Steel is cheap, heats up quickly, but also cools down quickly. It is subject to corrosion, and therefore is relatively short-lived, gradually loses its effectiveness during operation.
- Cast iron is another budget solution, but more promising than steel. Cast iron is fragile, so it should be carefully installed, and the large specific gravity of the material imposes additional requirements on the reliability of mounting the system on the wall.Among the advantages of cast iron is a high heat capacity, that is, the ability to give off accumulated heat for a long time even after the burner is turned off.
- Aluminum alloys - due to their low weight, high strength and chemical stability, they are able to function reliably for a long time. In terms of heat capacity, they are practically not inferior to cast iron, but they are much more expensive.
- Copper - provides maximum heat capacity, is practically not subject to corrosion, perfectly withstands temperature and pressure drops, is convenient in molding and installation. However, you will have to pay well for such versatility - copper heat exchangers are the most expensive of those offered on the market today.
After analyzing the advantages and disadvantages of each of the materials, we can conclude that in gas convectors of industrial production, heat exchangers made of cast iron and aluminum alloys are preferable, as they provide the best value for money.
In homemade devices, it is better to give preference to aluminum alloys or copper as more reliable and less demanding on the skills of the assembler.
Another dilemma to be solved is whether the system is equipped with an open or closed type combustion chamber.
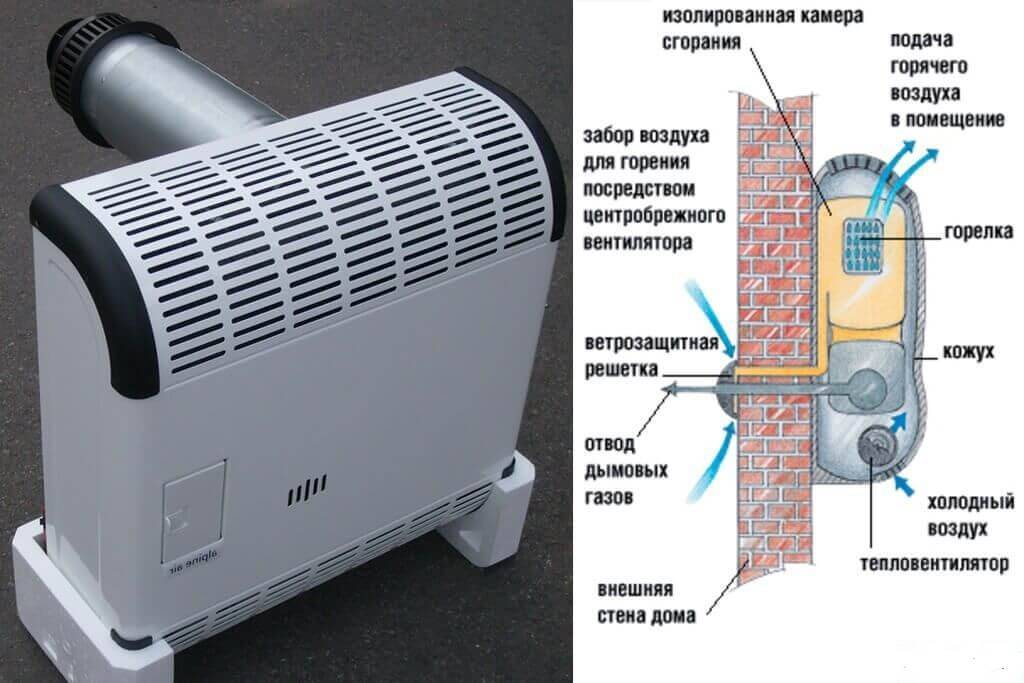
- An open chamber takes cold air directly from the room, warming it up and removing combustion products into the external environment. However, if the installation is wrong, the exhaust is not efficient enough, or the room is poorly ventilated, there may be a lack of oxygen and an increase in the concentration of carbon monoxide. It is recommended to install a convector with an open combustion chamber only in non-residential premises.
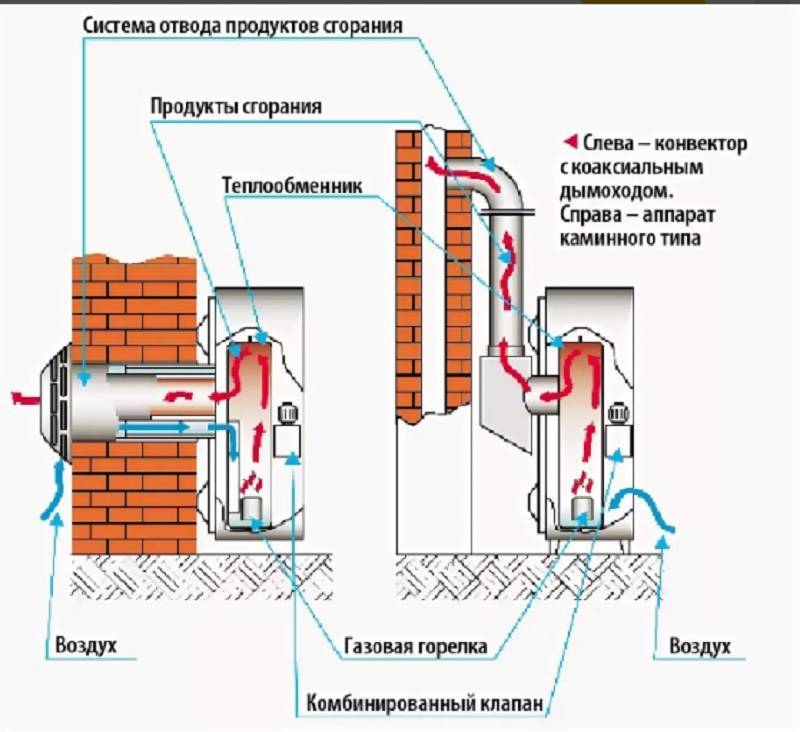
- The closed chamber injects atmospheric air through a coaxial pipeline.In the opposite direction, combustion products move along it, which preheat clean air through the pipeline wall. Such a system is more reliable and safer, it is compact and easy to install. However, a closed chamber is not without certain drawbacks - its operation requires electricity, which is not always convenient in country conditions, in addition, the price of a convector with a closed-type burner is always higher.
And the last feature that was already mentioned above is the presence of a fan heater. Everything is simple here - the more powerful the fan, the faster the heated air will reach remote rooms and walls, providing a more even distribution of heat. And as the fan power increases, the noise level and power consumption increase. In powerful devices, the fan also prevents the heat exchanger from overheating, thereby extending its service life.
Results
Convector heating is a very good option for space heating. Convectors can be recommended for installation both in small apartments and in large country houses. They have good performance and efficiency.
Homemade - this word means that the product is made by hand, but sometimes it is used with some kind of disparaging connotation. Meanwhile, this is far from being the case. The most expensive hand-built cars in the world are created according to individual projects. How to call them? Homemade? Everything that provides the life of mankind is created by human hands.
The topic of this article is homemade home heating, but its goal is not to teach, but to give an overview of those homemade options that talented people put into practice.Of course, self-manufacturing requires certain knowledge, experience, tools and materials for work. Only in this case it is possible to manufacture a high-quality and safe heating device no worse, and in many cases even better than industrial boilers.
Most often, craftsmen begin the creation of a heating system by determining the type of boiler, creating drawings and subsequent construction of the boiler. This work is not easy, therefore, without good knowledge of the device and the principle of operation of the selected type of boiler, experience, the availability of the necessary tools and materials for its installation, it is difficult to perform it.
Gas boilers are difficult to manufacture on their own, because this is equipment of increased danger and special technical requirements are imposed on it. Attempts to make homemade are limited by the need to obtain a quality certificate and permits from supervisory authorities. It is problematic to pass all the required checks for compliance with quality parameters. But do-it-yourself repair of the convector is acceptable. Most often, the central pipe of the coaxial output burns out and it can and should be replaced.


Boilers of this type are characterized by extreme simplicity and low safety requirements during installation. An electric boiler can be compared to conventional electrical appliances that are used in the house. The only drawback is the high and ever-increasing price of electricity. But for a garage or a summer house, if it turns on sometimes, it’s quite suitable.
Boilers using liquid fuels are also easy to manufacture. The high price of injectors can serve as an obstacle to manufacturing.
This class of boilers, and they are divided into wood, pyrolysis and pellet, is the most popular for self-production. A do-it-yourself wood-burning heating boiler is one of the simplest and cheapest, but its efficiency is quite low. There are many drawings and practical advice on the manufacture of this type of boiler on the Internet. A wood-burning boiler can operate on any type of solid fuel.
Two-chamber pyrolysis boilers are quite expensive to manufacture on their own. They have two combustion chambers. In one, fuel burns with minimal access to oxygen. That is, the process of pyrolysis or dry distillation of wood takes place. The gas released from the wood burns in the second chamber with the release of a large amount of energy. Craftsmen learned how to make a pyrolysis boiler from a gas cylinder with their own hands, economical and perfectly working. The easiest way to make a boiler is from a gas cylinder with a capacity of 50 liters.
Often, apartment owners do not want to throw away old batteries when it comes time to replace them with new units, since there is an option to make an additional heater from them with your own hands. This is quite feasible if you familiarize yourself with the necessary information and know about the materials suitable for assembly. A heater from an old battery is a good option, suitable for an additional source of heat.
Conclusions and useful video on the topic
The video will discuss how to make a propane gas burner yourself:
With a small supply of tools at hand, a gas burner diagram and the necessary materials, every home craftsman can assemble a propane burner
At the same time, it is important to comply with fire safety rules and use only high-quality materials that are approved for use in the domestic gas supply system. But if you are not confident in your own abilities, it is better to purchase such a device in a store.
If you had to assemble a propane burner yourself, please share your knowledge with our readers, tell us which option you chose. Why was he chosen and were there any difficulties in the process of work. Perhaps you have a diagram of the device and a photo of the finished homemade product - attach visual information in the discussion of the material.