- Methods for piping gas to the stove
- Gasification from the city system
- Individual gasification
- Advantages and disadvantages of gas ovens
- Advantages and disadvantages
- Voting: what is the best modern stove-stove?
- Brunner IRON DOG
- Fixing the pipe
- Seam sealing
- Metal sauna stove
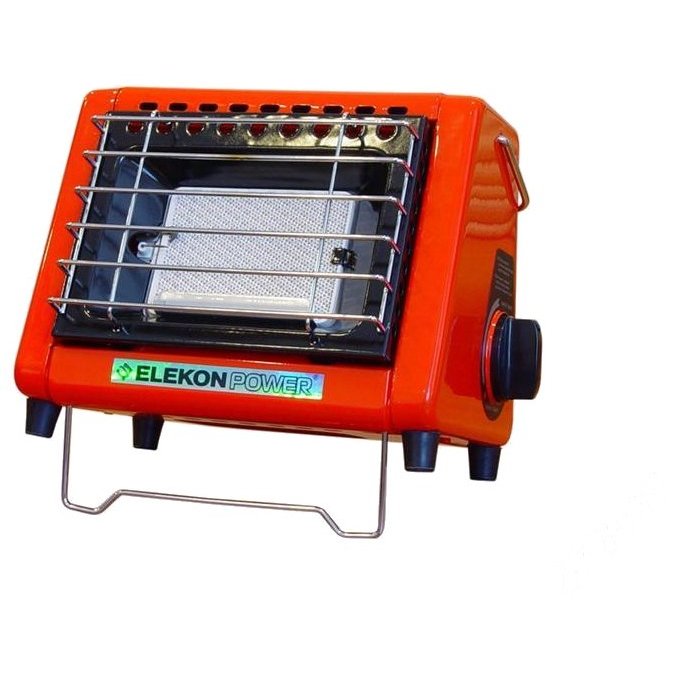
- Gas bath stove from a cylinder
- Do-it-yourself gas oven for baths
- How to make a gas-generating furnace yourself?
- DIY gas fireplace
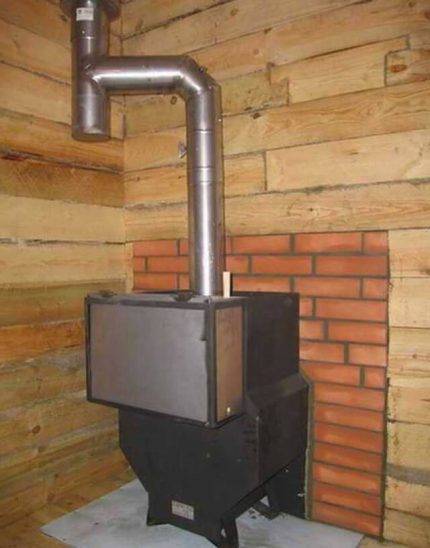
- The process of building a chimney
- Safety rules and design measurements
- Installation of all elements of the system
- Fireplace for gas heating at home
- How to properly connect the muffle furnace to the power source
- Block mounting
- Material selection
Methods for piping gas to the stove
There are two ways to gasify a bath:
- From the citywide system.
Individually with a balloon.
Gasification from the city system
gas in the bath can be carried out from the city pipe. If a gas pipe passes through the site, then it is more profitable to power the bath from it. Let's make a reservation right away, this is a labor-intensive business and requires knowledge and permissions. The price for the services of specialized companies is high, but once you bring gas to the bathhouse you can not worry for many years. And paying gas bills will be less expensive than buying fuel in bottles each time.
For urban gasification, it is necessary to perform a number of activities:
- Obtain and approve a number of documents: a gas supply project, agree on technical conditions and draw up an estimate.
Purchase equipment and pipes and install.
Prepare test and technical documentation, hand over the work to the local gas service.
Crash into the system, install and register the meter, start and receive documents for maintenance and fuel supply.
It is difficult to do all of the above items on your own, it is easier to call a specialist. Moreover, the city gas company itself will provide and carry out pipes to the heating device.
Individual gasification
You can power the stove from a gas cylinder, which can be of various sizes. Individual gasification suitable for plots where there is no city line. A gas cylinder can be purchased at any specialized store. But such gas supply is rather unsafe.
Safety first, the cylinder should not be installed in the bath, its place is on the street. The place is chosen easily accessible and ventilated, that is, the balloon cannot be forced with various objects and hung with things. A fire extinguisher is hung nearby or a small box of sand is installed.
Advantages and disadvantages of gas ovens
The market offers consumers a wide variety of energy carriers. At the present stage of economic development, one of the most profitable and efficient fuel options is gas.
The use of gas as a power source for heating equipment is beneficial in that its cost does not hit the consumer's pocket. In addition, the gas has a high efficiency.The operation of heating devices on gas is easy to use, economical and safe.
This kind of homemade heater is often used for a wide variety of purposes. It can be used to heat the greenhouse, garage, boxing. Due to mobility and low assembly cost, portable heaters can be taken even on camping trips.
The advantages of using gas ovens include:
- fast, efficient and high-quality space heating;
- mobility and compactness of gas equipment;
- the ability to quickly move the furnace to the right place;
- independence from government communications, power outages and many other factors.
Gas equipment, like any other, has its drawbacks. However, they are relative and easily circumvented.
The disadvantages include:
- the use of gas is strictly regulated by regulations;
- owners of non-residential premises will have to obtain a number of agreements and permits from the gas industry and other government agencies;
- drawing up the necessary project can cost a round sum;
- the use of reduced and bottled gas requires compliance with safety measures.
In order for the gas stove to perform its function as efficiently as possible in the room, protective screens are necessary. Such structures are equipped with reflective surfaces, thanks to which warm air does not escape, but is reflected and heats the entire area of the box.
Craftsmen are constantly improving their skills and applying new techniques to design home-made units. Some modern handmade gas heaters are equipped with special blowers that allow you to control the flow of warm air.
Open combustion furnaces require the design and installation of a ventilation system and the provision of air humidification. When the device burns oxygen, the air becomes dry. This often leads to headaches and sore throats.
Advantages and disadvantages
Main advantages:
- almost instantaneous heating of the garage;
- the equipment is mobile and compact, it can be moved around the box, installing it in the right place;
- unaffected by power outages.
Among the shortcomings are:
- when using natural gas, many approvals and checks of gas equipment and pipe connections to the garage will be required. And the high price of project documentation will make you think about the feasibility of this method of box heating;
- devices powered by liquefied, bottled gas are explosive;
- thermal energy is not accumulated, so it will be necessary to equip surfaces with protective screens with reflective surfaces. In this case, the warm air, reflected, will fall down and heat the box, and not heat the floor slab;
- using open burning stoves there is a high risk of headaches and sore throats. Fire burns oxygen and makes the air dry. Therefore, it will be necessary to carry out a forced ventilation system and install a humidifier.
Modern gas ovens are designed with disadvantages in mind. Gas furnaces of the catalytic type do not use fuel combustion during operation. For a better and responsible choice, knowledge of the types of garage heating devices will be required.


An example of a gas heater for a garage
These devices are divided into:
- Infrared heater equipped with a burner made of ceramics.This is an effective method, in which the burner gives off heat not only to the air, but also to the objects surrounding the furnace. Heat accumulates and gradually enters the room.
- Gas convector. In this device, natural or bottled gas is burned in a closed furnace. For better operation, it will be necessary to make a forced ventilation for air to enter the furnace, which is necessary for combustion and removal of exhaust gases into the chimney. Such work will avoid the combustion of oxygen and lowering the humidity of the air.
- Heat gun. Such equipment is able to quickly heat the room, but also cannot accumulate heat. This option increases fuel consumption, so the guns are suitable for heating garages with natural gas or for short-term space heating.
- Modern devices operating on the principle of gas oxidation with oxygen and the release of a large amount of thermal energy. The equipment is not cheap, expensive materials are used as catalysts. Advantages - light weight, ease of operation, but you will need to take care of an alarm system or fire extinguishing.
Voting: what is the best modern stove-stove?
| A photo | Name | Rating | Price | |
|---|---|---|---|---|
| The best factory models of Russian-made stoves | ||||
| #1 | Potbelly stove POV-57 | 99 / 1005 - votes | Learn more | |
| #2 | Termofor Fire-battery 5B | 98 / 100 | Learn more | |
| #3 | META Gnome 2 | 97 / 100 | Learn more | |
| #4 | Furnace Potbelly stove Teplostal | 96 / 1003 - votes | Learn more | |
| Popular potbelly stoves from world brands | ||||
| #1 | Keddy | 99 / 100 | Learn more | |
| #2 | Guca Lava | 98 / 100 | Learn more | |
| #3 | Vermont Castings | 97 / 1001 - voice | Learn more | |
| #4 | JOTUL | 96 / 1001 - voice | Learn more | |
| #5 | Brunner IRON DOG | 95 / 100 | Learn more |
What would you choose from modern bourgeois stoves or would you advise to purchase?
Brunner IRON DOG
Save the voting results so you don't forget!
You must vote to see the results
After the potbelly stove is installed and ready for operation, it is necessary to install a chimney that can function properly, keep the heat in the room and at the same time prevent combustion waste from entering the air of the room where the stove is installed. To do this, you need to correctly calculate the diameter of the pipe, its length and think about how it will bring smoke to fresh air.
The outlet of the pipe above the roof should be located according to certain rules:
- The chimney is located at a distance of up to 1500 millimeters from the roof ridge, which means that the outlet of the pipe should be located at a height of 50 centimeters above the top of the ridge,
- With a distance to the visor of 150-300 centimeters, the outlet of the pipeline can be placed on the same level with it,
- If the chimney is located near the edge of the roof, then its outlet should be slightly lower than the ridge, or on the same level with it,
The second option for the pipe exit is through the wall, and not through the roof. In this case, the end of the chimney should be located just below the top of the roof ridge.
Do-it-yourself installation work should begin with the choice of a place where the outer and inner elements of the furnace should be connected. An attic or space under the roof is perfect for this purpose. The first element of the future chimney is installed on the potbelly stove itself, on which the second, third and so on are placed next (depending on how many sections the chimney will include).
It is necessary to extend the flue pipe until it reaches the previously determined place at the junction of the two elements.
In the ceiling, you need to make a hole, the diameter of which will be 5-10 cm larger than the diameter of the pipe: this will be required in order to cover the pipe at the point where it passes through the floors with heat-insulating material. If there are insulating materials or other easily flammable objects in the cracks between the ceilings or near the pipe, they must be removed: when the pipe warms up from the smoke and its temperature rises, the risk of fire of the heat-insulating material will increase with it.
A passage glass is inserted into the cut hole in the ceiling, through which the chimney pipe must be passed. Then you need to dock the pipe coming from the inside of the room with the outside of the chimney. The chimney should end above the roof level, approximately 10 cm above it. The place where the hole for the pipe outlet will be cut out is equipped according to the same principle as the pipe outlet inside the building:
- the hole must be larger than the chimney pipe itself;
- a layer of heat-insulating material must be placed between the roofing materials and the pipe.
Fixing the pipe
The smoke outlet pipe is passed through a hole in the roof and fixed with a sheet of tin or other metal. As an alternative to tin, you can also use another non-combustible fixative - bricks, which are installed in the gap between the chimney and the roof. However, in order for the bricks to hold the pipe firmly, a stand must be built for them from the inside. All cracks in this place are covered with ordinary clay.
Seam sealing
After the entire structure is assembled, you need to take the sealant and, without sparing it, lubricate all the joints and seams to prevent smoke from entering the living room from the chimney
Sealant for these purposes must be selected with special attention - only one that is not afraid of high temperatures is suitable
Unfortunately, some sealants will simply "melt" on a hot pipe, while others will dry out easily. One way or another, but the sealant, which is unstable to high temperatures, will lose its properties and will not be able to protect the room from smoke.
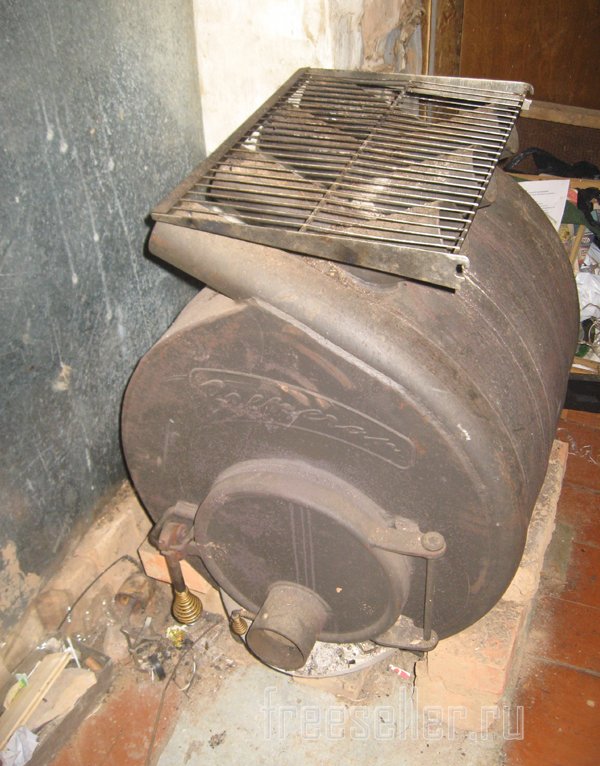
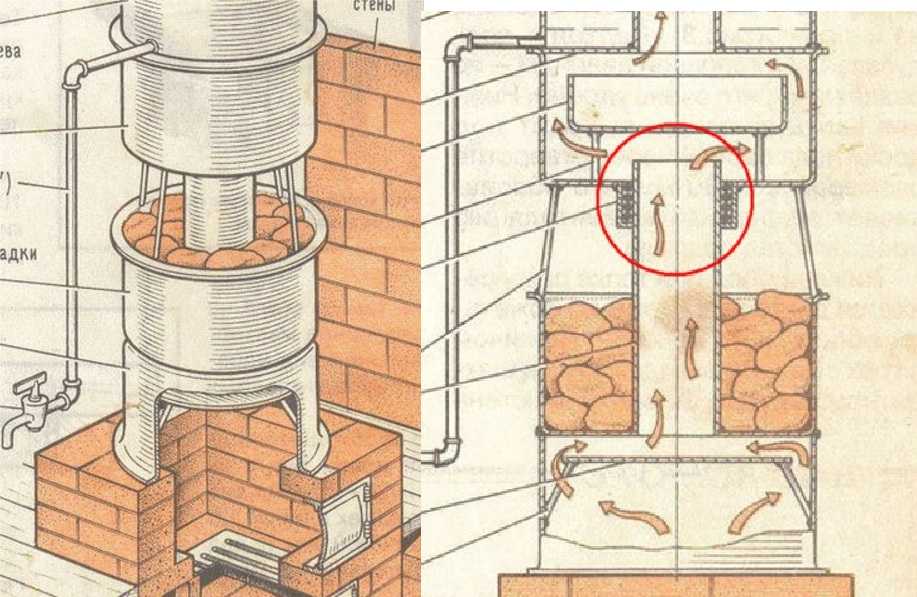
Metal sauna stove
To achieve good steam in the bath, you need a good brick oven. It will keep you warm for as long as possible. However, such a furnace requires a serious foundation. This requires additional money and time.
In order not to spend money on pouring the foundation, you can make your own metal furnace. The creation of such a furnace does not require a deep study of the schemes, and its effectiveness has been proven by practice.
Despite the fact that the metal furnace heats up quickly, it cools down just as quickly. This is her main shortcoming.
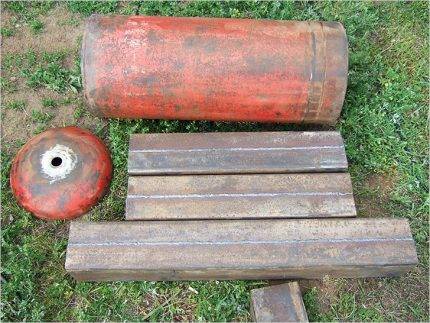
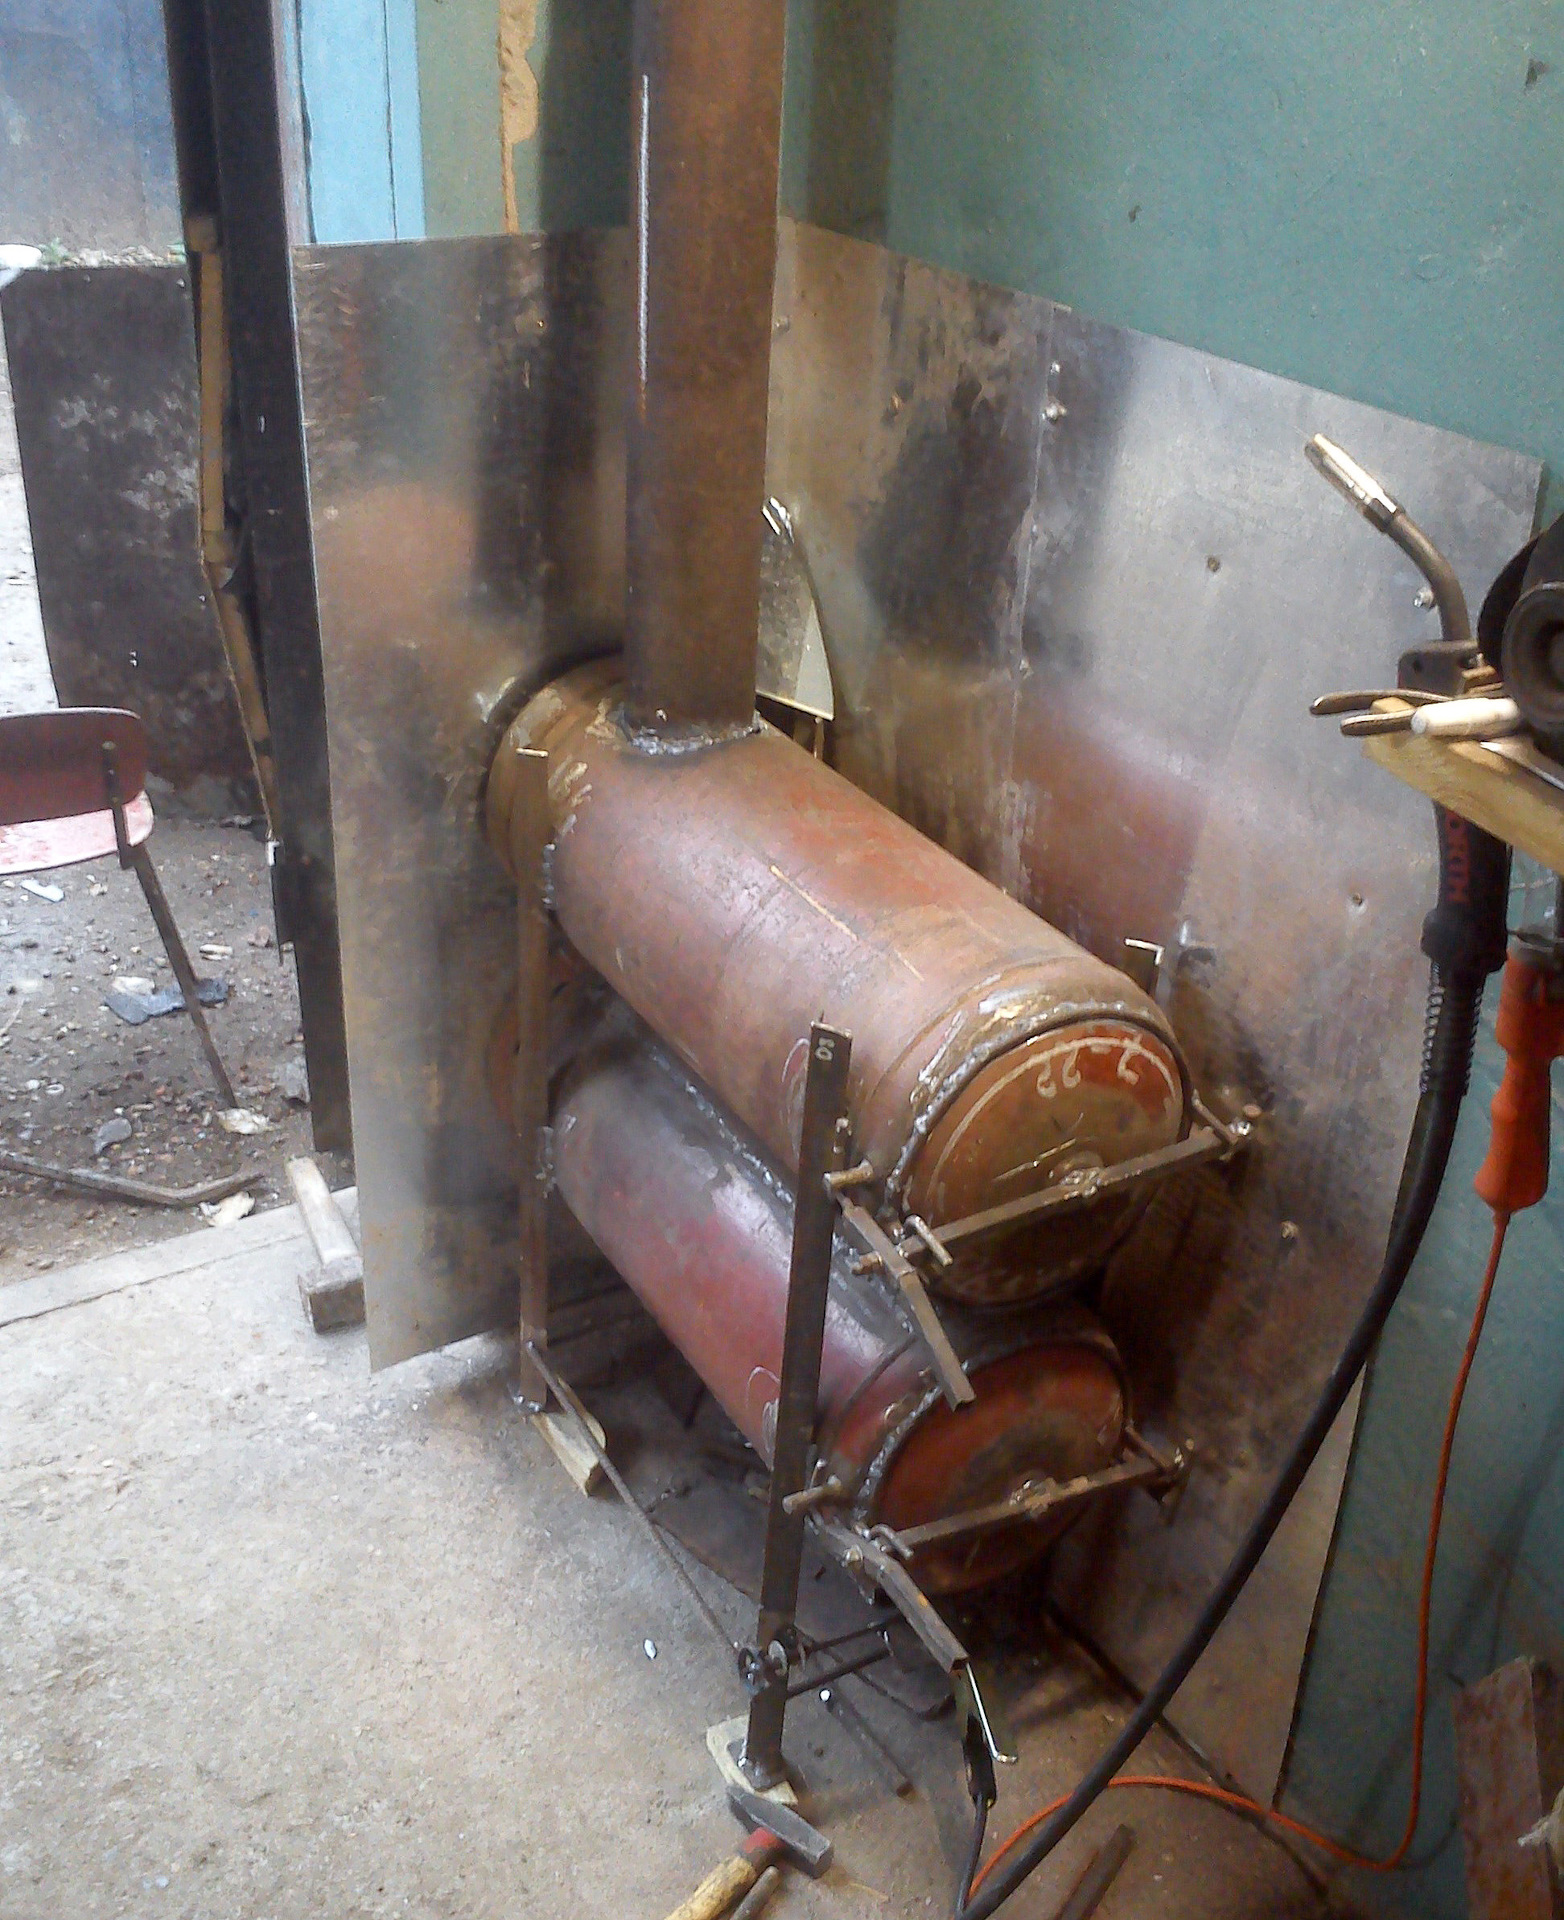
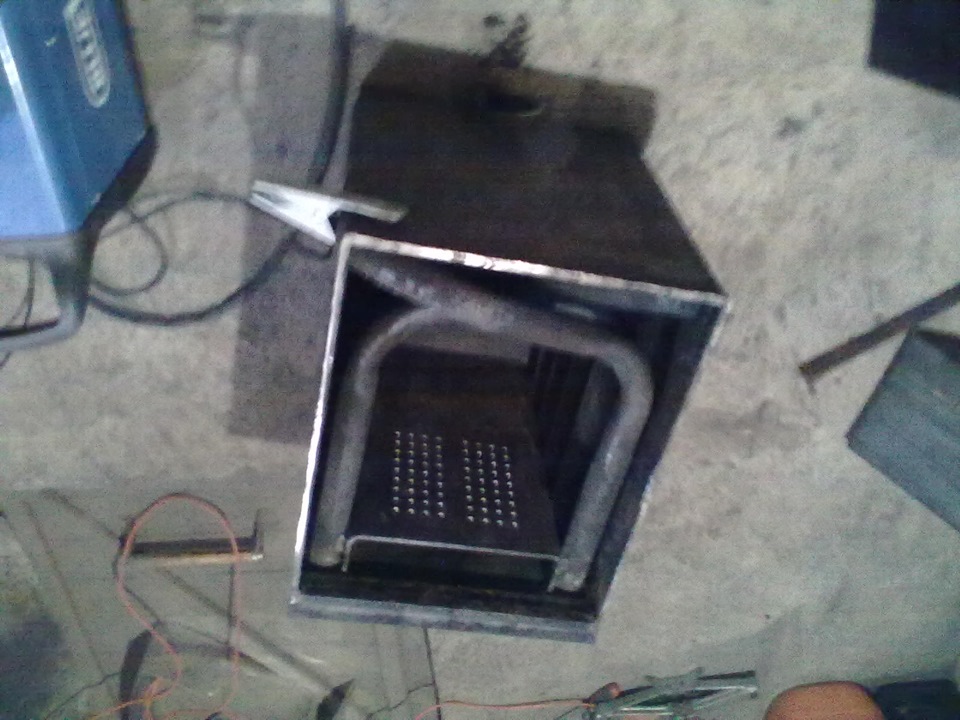
In order to assemble such a structure, you will need a metal container, sheets of metal or pipes of various diameters, a gas burner, a grinder, a welding machine. Those who do not know how to use a welding machine can make a body from an ordinary pipe. This doesn't make the stove worse.
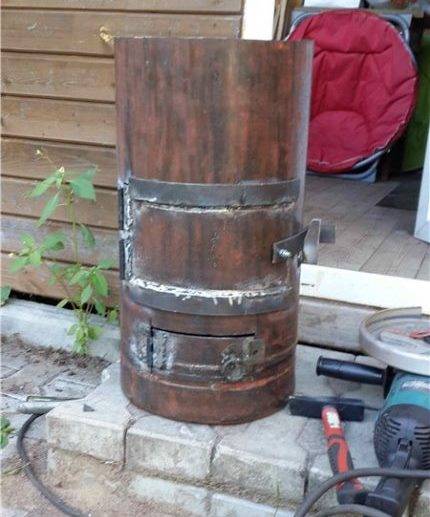
Gas cylinders and pipes can be selected in other sizes. The size of the required parts depends on the size of the heated steam room. If its area is large, then it is worth making the stove larger. She will do her job in the most efficient way.


The result is a stove about 80 centimeters wide and about one and a half meters high. A heater and platforms for installing a water tank are mounted on top. Thus, to form an atmosphere of soaring in the steam room, it will be necessary to pour water on the stones.
When drawing up a conditional drawing, you need to take into account the exact dimensions of all parts. Initially, you need to find a pipe or gas cylinder 180 centimeters high and 80 centimeters in diameter. In this case, the walls of the pipes must be thick enough - from 0.4 cm or more.
You will also need a metal sheet one centimeter thick, a steel bar with a diameter of one centimeter, cast iron or steel doors, a chimney pipe, a gas burner and a faucet. All material can be purchased at a hardware store. You will also need a tool: a grinder and a welding machine. They can be rented or borrowed from friends.
First of all, at the place where the metal furnace will be installed, the base is being prepared. It needs to be leveled. It is necessary to cover the foundation with refractory material.
Two rows of refractory bricks are laid out on top. Do not forget that the ceiling and all walls at a meter distance from the furnace must be covered with fire-retardant material.
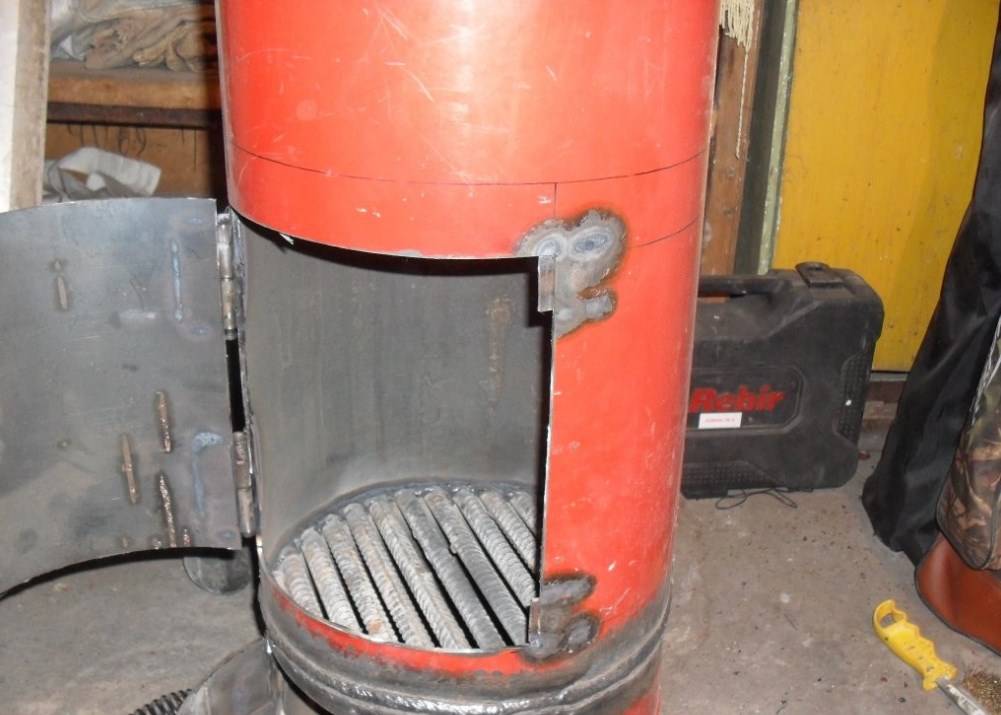
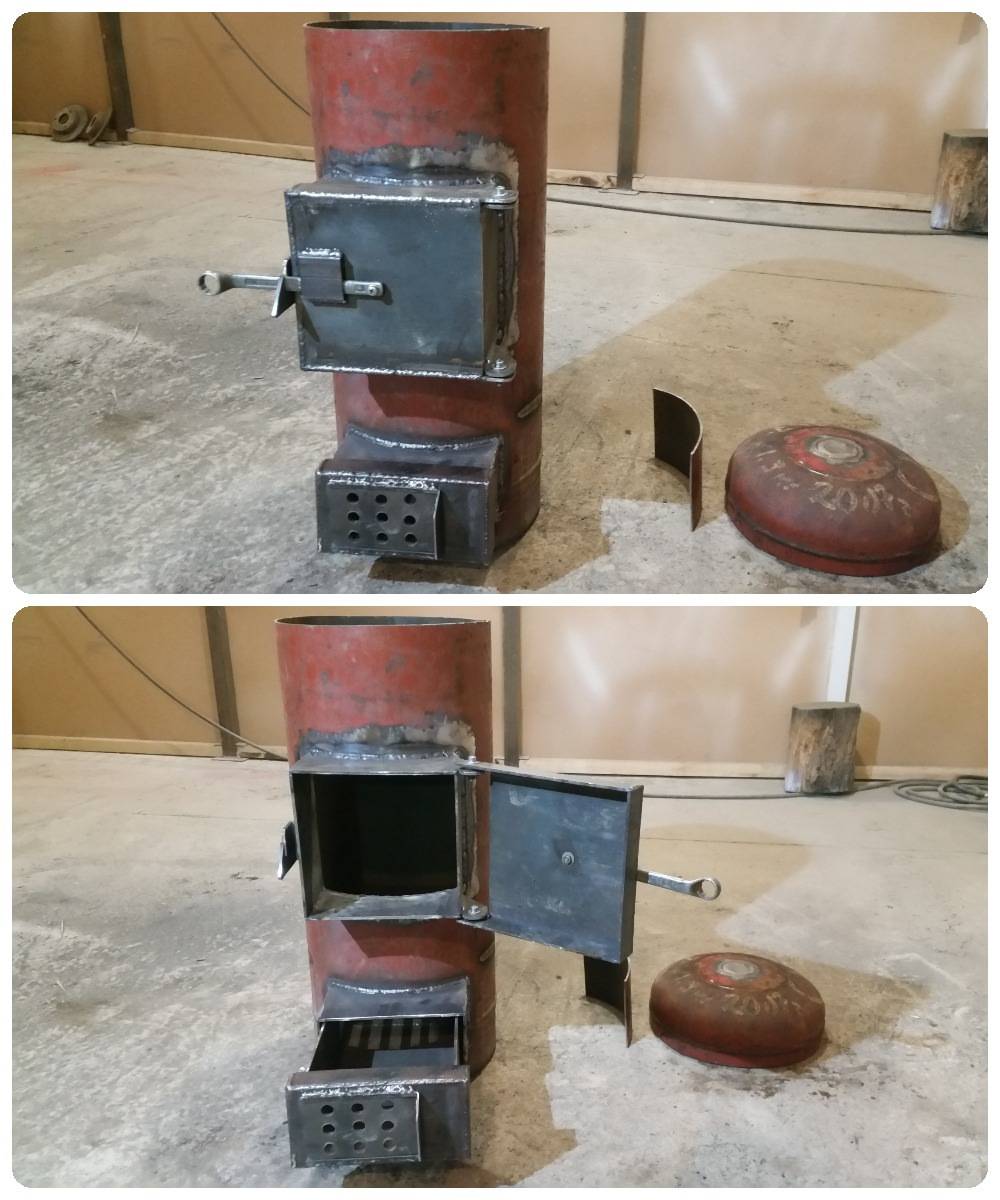
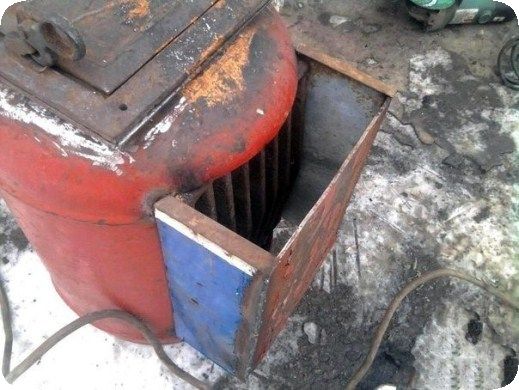
The manufacture of the furnace is carried out in several stages. First you need to cut the pipe with a grinder into two parts, one of which will be the body of the furnace, and the second will be used to heat the water barrel.
In the lower part of the first section of the pipe, a grinder makes a rectangular hole measuring 20 × 5 centimeters. This method provides access to the gas burner.
The vast majority of gas ovens have approximately the same device and assembly and installation sequence.The water tank is installed on top or welded on the side. If there is a desire to install an advanced model, then you can additionally install a number of elements and devices that will automate the control of the furnace
In the middle of the first pipe section, another rectangular hole of the same size is cut. Brackets are welded on which the mesh will be held. The cells of the grid should be smaller than the size of the stones that will be laid on it.
A tap is welded at the bottom of the second pipe. Then a second piece of pipe is attached to the heater. In this case, it is necessary to check the seam for tightness. Next, you need to weld one door, and hang the second on hinges.
The pipe is insulated with refractory bricks or other material. After welding all the elements, the burner is installed and the furnace is ready for use. It is worth remembering that a metal furnace heats up to high temperatures, so it is imperative to cover all nearby surfaces with refractory material.
Collect gas sauna stove with your own hands is not difficult. To implement such an idea, you need to observe safety precautions and follow the recommendations. Thanks to self-assembly, you can save a lot of money, and the effectiveness of this design is not much inferior to store models. Before you start assembling the stove, you need to carefully prepare the room.
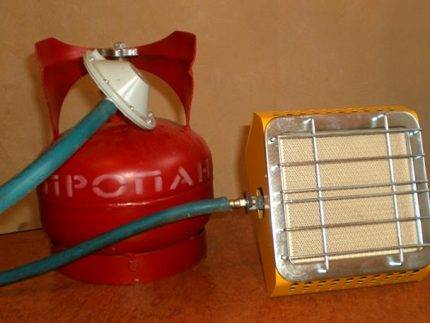
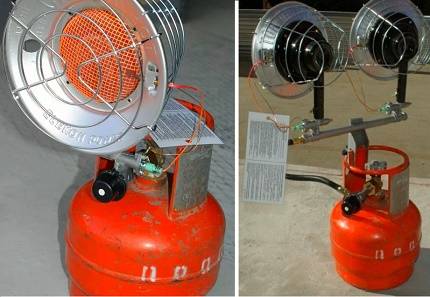
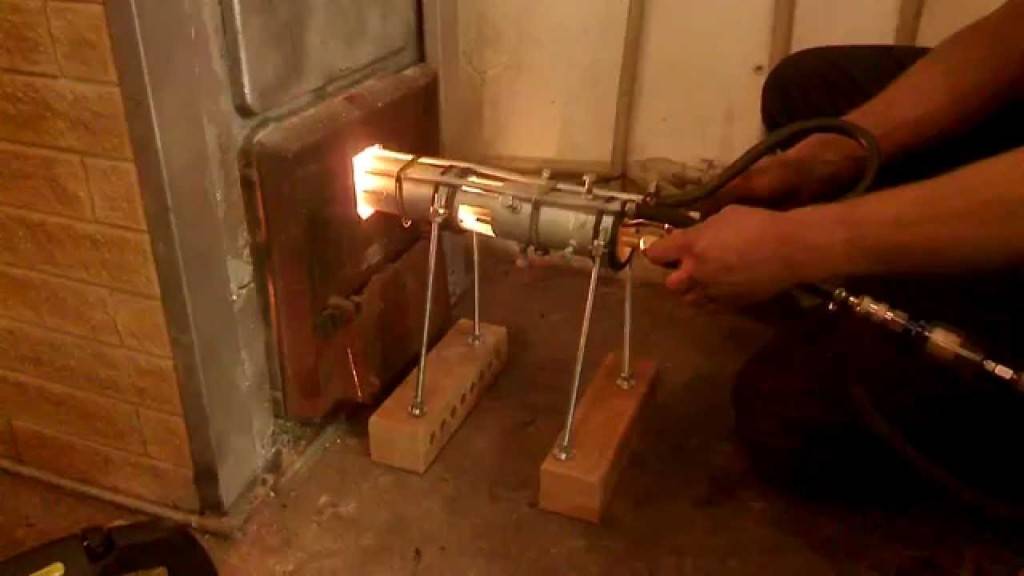
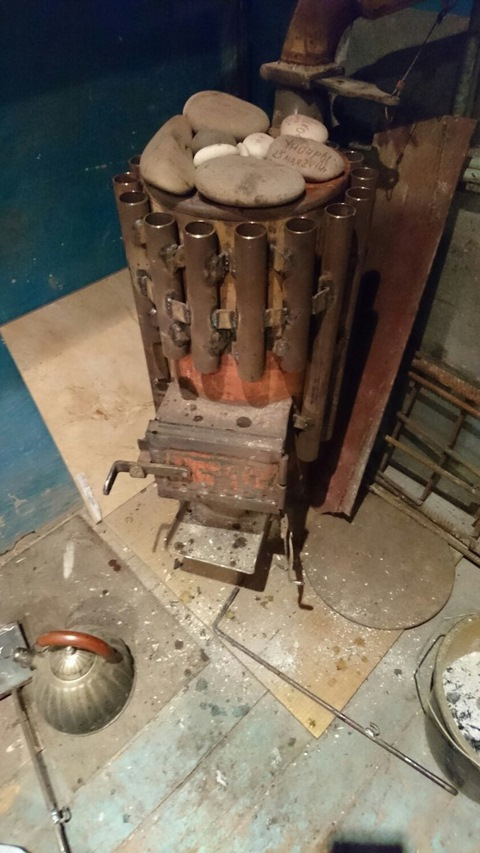
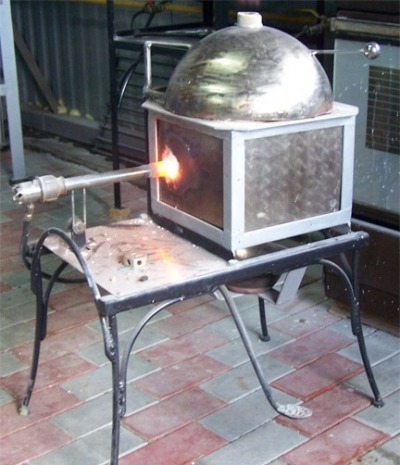
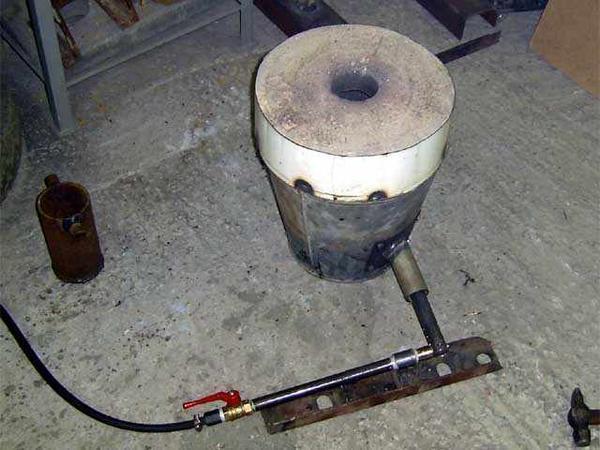
Gas bath stove from a cylinder
For self-assembly of a gas stove for a bath, you will need to collect and purchase the following materials:
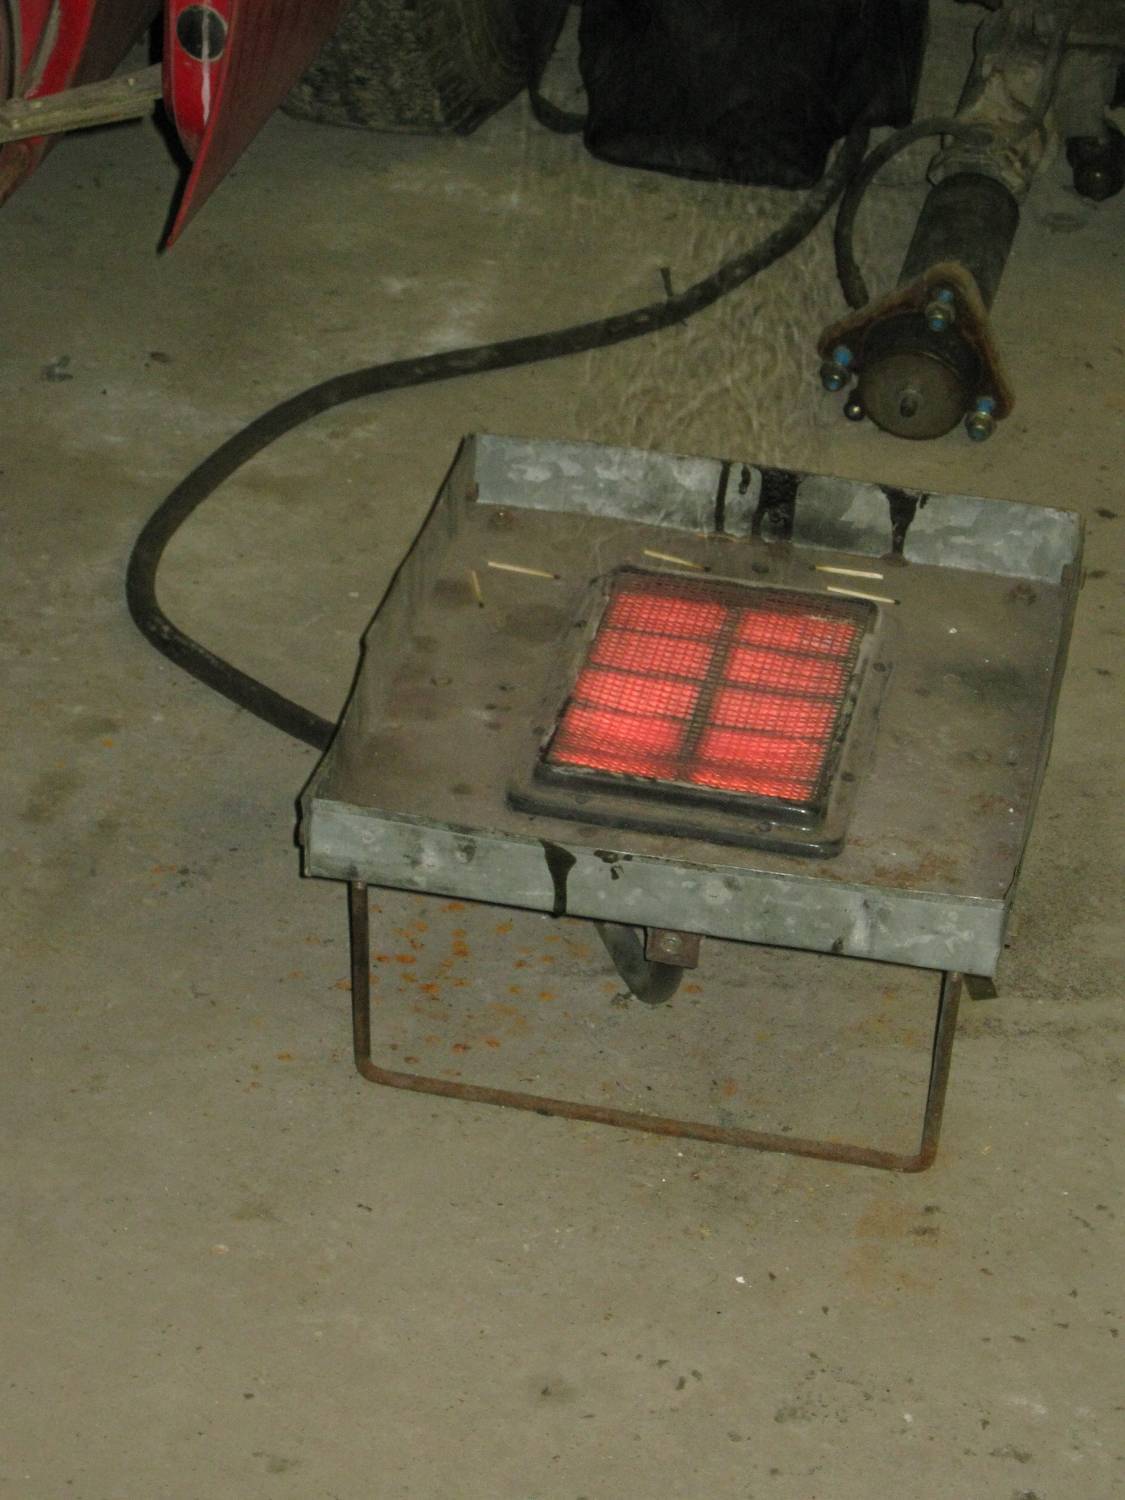
- In the construction market or in a store with gas equipment, you need to buy an atmospheric burner.
- Find an old but not rusty gas cylinder.A new cylinder, a large diameter pipe or a sheet of metal with a thickness of 8 to 16 millimeters is also suitable.
- For the base of the heater, you will need thick metal, for example, a brake disc from a car. It will last at least a few years.
- A gas pipe with a diameter of 5 centimeters and a length of approximately 3 meters.
- A pipe with a diameter of 10 centimeters, which will be used to remove gases.
- Some copper or bronze elements to connect parts.
- Additionally, you will need to acquire the following tool: grinder, welding machine, drill, measuring instruments.
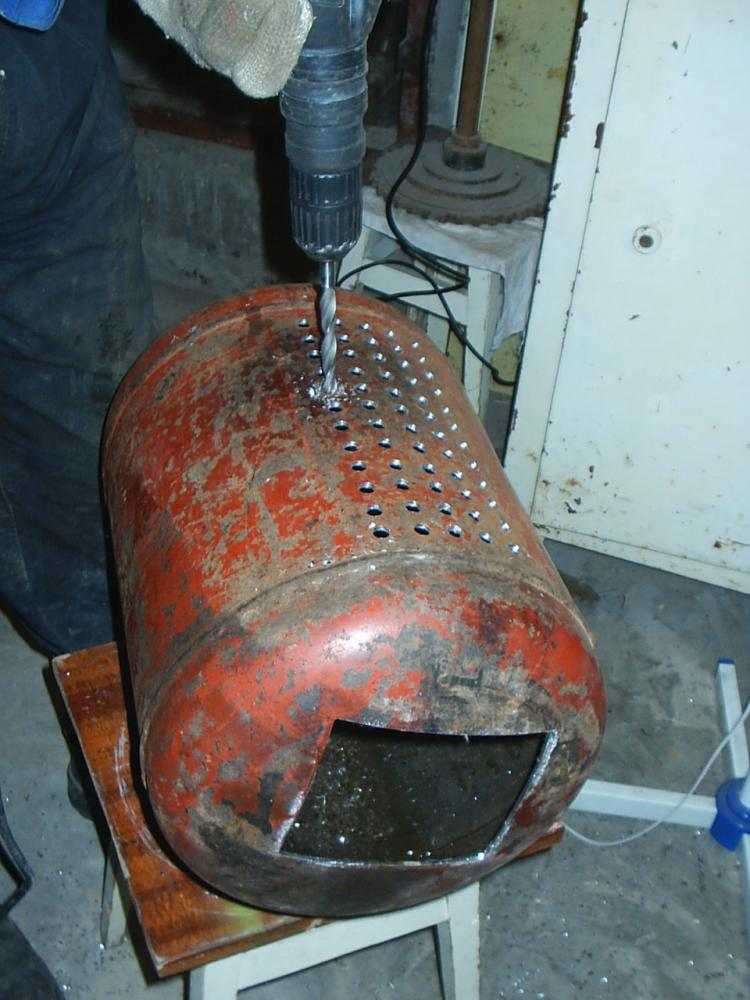
After assembling a complete set of tools, it is necessary to cut off the extreme part of the cylinder with a grinder so that the cut diameter is equal to the outer size of the brake disc. Then, using welding or a drill with bolts, you need to attach the disc to the cylinder.
The next step is to prepare the air supply pipe. In a pipe with a diameter of 5 centimeters, you need to drill about ten five-mm holes.
Also, a hole with a diameter of about 55 millimeters is made at the bottom of the balloon. A whole, that is, not drilled, part of a five-centimeter pipe should exit the cylinder by about two meters. It must be welded to the balloon.
First you need to cut the blanks with a grinder according to the sketch. Then weld all the components using a welding machine. After completing these procedures, all welds must also be wiped. The same grinder copes well with this task.
In the same way, a pipe is welded that will supply gas.An adapter is attached to the second end of this pipe, with which it will be possible to connect the device to a gas pipe or gas cylinder.
I turn a hole on the cylinder for the chimney and weld the corresponding pipe. With the help of a grinder, a rectangular hole is also cut out under the door. Hinges are welded and the door is hung directly on them. You also need to attach a handle to the door.
Thus, a simple model of a gas furnace will be made. Gas is supplied through the pipe to the burner. The combustion process is started, depending on the burner, by piezo ignition or by an electric pulse.
Do-it-yourself gas oven for baths
What needs to be prepared for the construction gas sauna stove:
- atmospheric burner.
- Gas cylinder (not old), or a pipe with a diameter of 50 - 60 cm, or metal 8 - 16 mm thick.
- The base of the heater can be made from a car brake disc, very thick metal will not burn out for a long time.
- Two gas pipes 50 mm in diameter.
- A pipe of 100 mm in diameter for removal of gases.
- Copper or bronze fittings.
- Tool (welding machine, grinder, drill, locksmith, measuring tools, etc.)
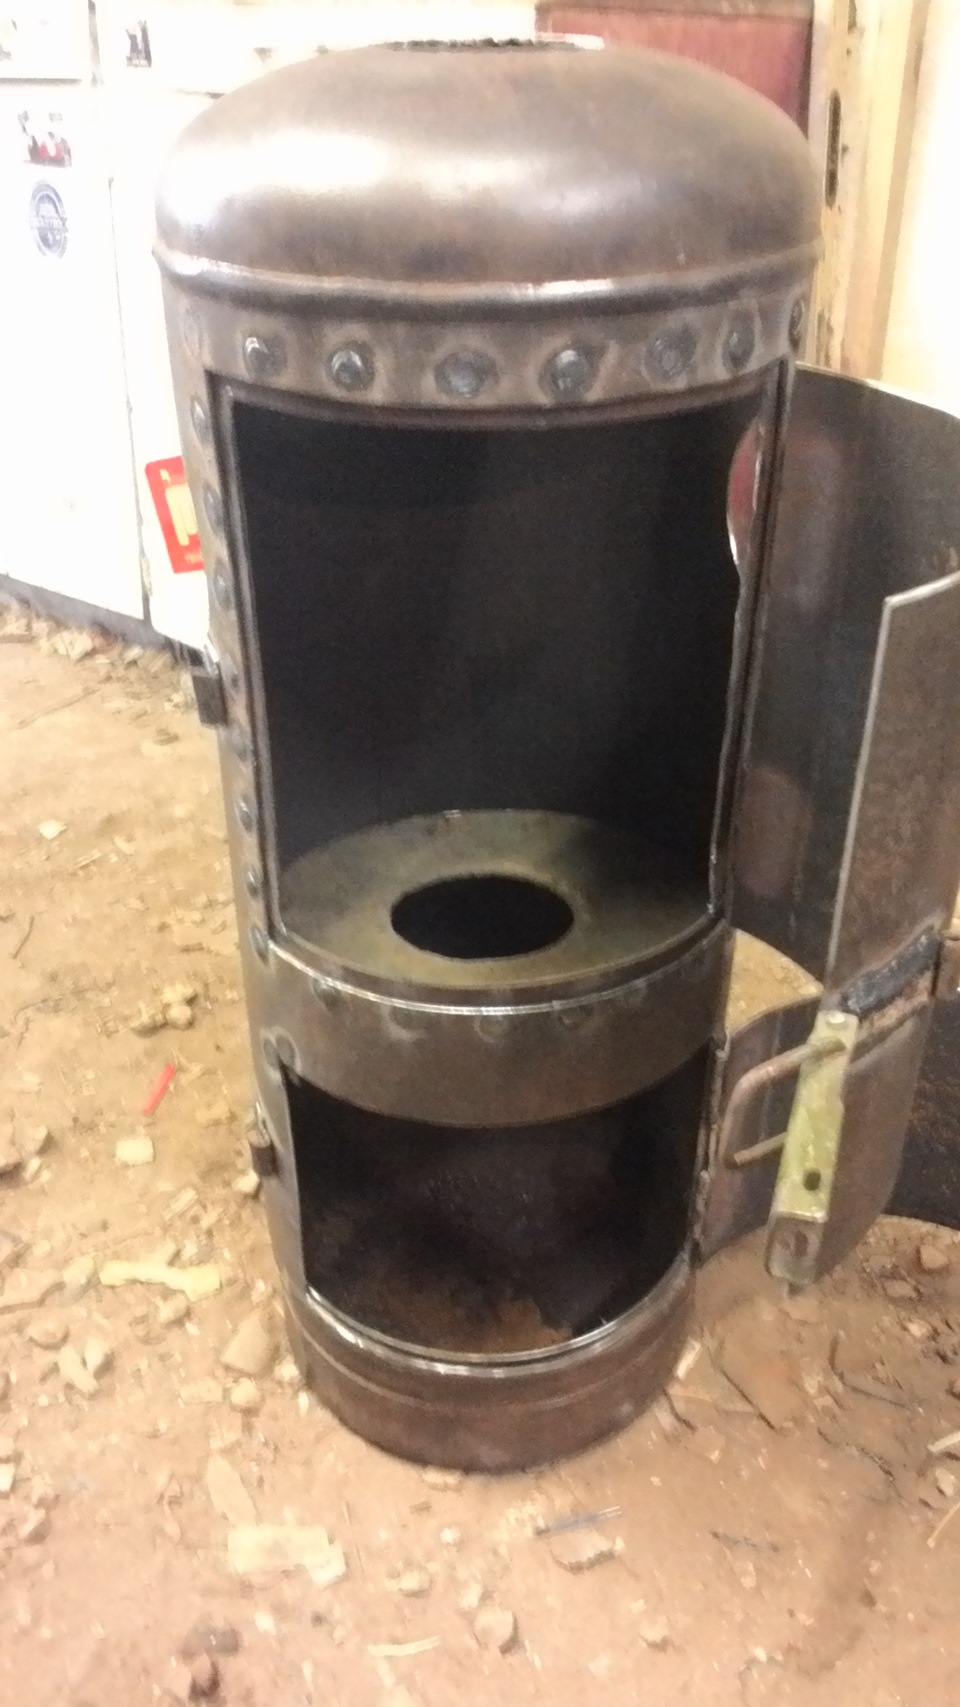
The edge of the cylinder is cut so that the cut diameter matches the outer size of the brake disc. The disc is attached by welding or bolts.
Gas oven device
A pipe is made that will bring air into the combustion chamber. Several holes are drilled in the pipe section (about 10 pieces), after which a place is prepared for it in the lower part of the furnace body. The hole in the housing should be slightly larger than the diameter of the tube. It is welded so that the edge without holes protrudes out of the cylinder by about 20 cm.


Everything must be done especially carefully when working with a pipe that will supply gas. At one end, an adapter is installed that connects the pipe to the gas source, and the second is welded into the furnace next to the air pipe.
Further actions are exactly the same as in the manufacture of a conventional boiler. A chimney pipe is welded in the upper part of the cylinder (it must be solid, without seams).
At the request of the owner, legs can be installed. Fill the stone.
Getting steam from a gas stove is more difficult than from a wood stove. You need to heat it longer, and choose stones more carefully, with good heat capacity.
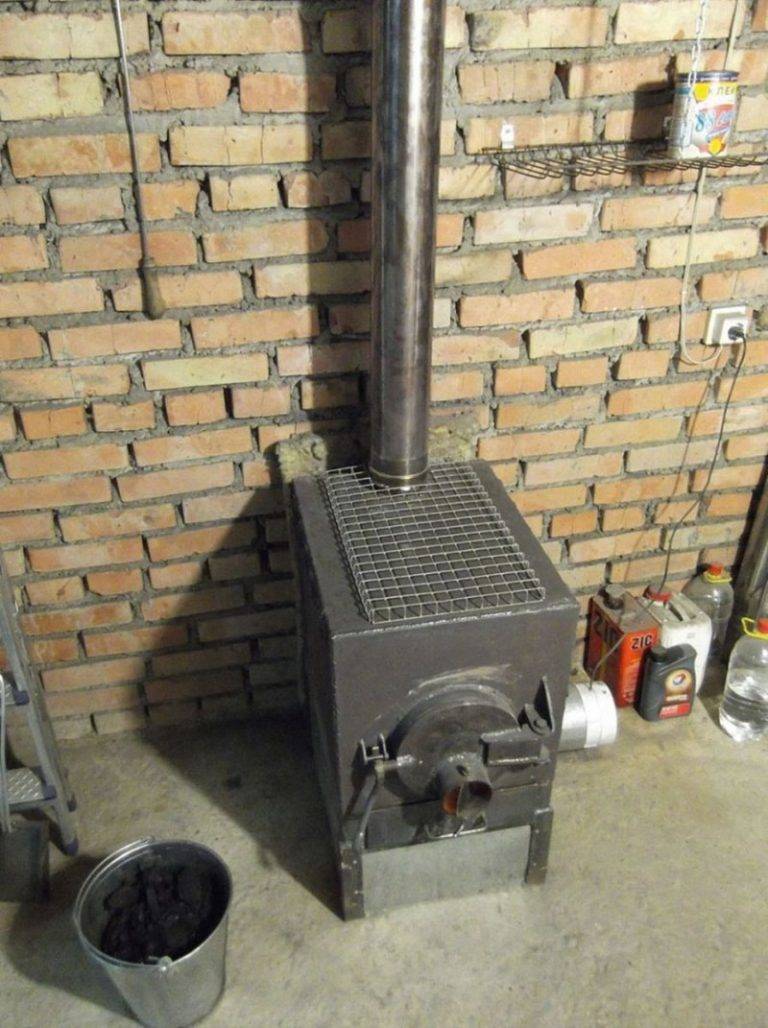
How to make a gas-generating furnace yourself?
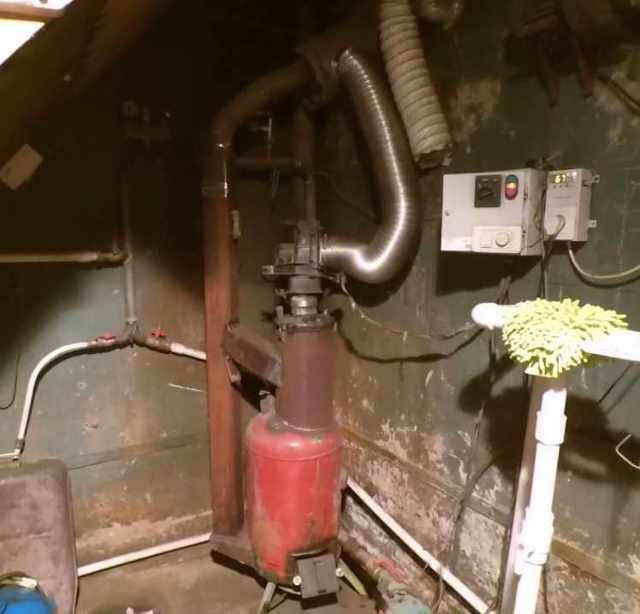
Gas generators, which are also called pyrolysis boilers, are increasingly used in everyday life. They are used for heating residential and commercial premises, cooking, obtaining hot water, captivating with high efficiency, environmental friendliness and ease of maintenance. However, industrial designs are expensive, so the best solution for a zealous owner will be a gas-generating stove, made from improvised materials with his own hands.

Functioning and design features
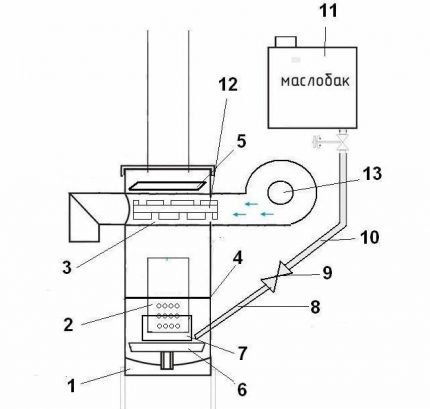
The main principle underlying the work is the gasification of solid organic fuel when it is burned under conditions of oxygen deficiency. In the process of its decomposition (pyrolysis), solid organic matter in a gas-generating furnace does not burn, but slowly smolders, forming a large amount of combustible gas, which mainly consists of methane and carbon monoxide. The resulting gas from the combustion chamber enters the afterburning compartment, where it mixes with heated air and burns, releasing a lot of heat.Depending on the design features, the gas generator can heat the coolant jacket, give off heat to the environment, or perform both of these tasks.
Such furnaces demonstrate high efficiency, which is several times higher than traditional ones in terms of efficiency. Unlike classic solid fuel boilers, the owner of the pyrolysis boiler is able to flexibly control the operating modes and change the heating temperature of the coolant. To do this, it is enough to increase or decrease the amount of air supplied to the furnace of the gas-generating furnace. Combustible gas can be extracted from almost any solid fossil fuel: firewood, coal, peat and even linoleum. But in everyday life, the first and wood processing waste is most often used. The most common type of wood-burning gas generator is a pyrolysis oven, from which gas is not taken, but is burned to produce thermal energy.
The main design feature is the presence of two combustion chambers. In one, the process of decomposition of organic fuel takes place, and in the other, the resulting gas is burned. Moreover, the afterburner in the first case is located in different ways: under the gasification compartment, above it, or on the side. The internal structure and scheme of a gas-generating wood-burning stove for domestic needs are simple, and any home craftsman can do it.
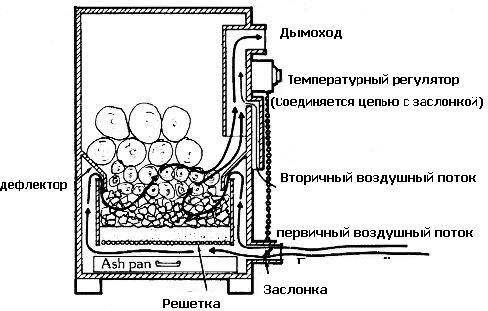
Classic pyrolysis equipment should include:
- The body inside which the working elements of the furnace are mounted.
- A filling chamber (bunker) for placing firewood or wood waste.
- Compartment for afterburning the gas emitted by the furnace.
- Grate for holding solid fuel and coals.
- Doors for loading firewood and removing ash from the gas generator.
- Air damper system to control the supply of oxygen to the working area of the device.
What you need to make
Since home-made options are usually made from available materials at hand, they cost the owner much cheaper than their industrial counterparts. To create the simplest wood burning gas generator with your own hands you will need: metal sheets with a thickness of at least 3 mm or a piece of iron pipe (barrel), steel corners measuring 5x5 or 4x4 cm, hinges and latches for doors, a chimney of the required dimensions and configuration. The number of elements and dimensions of these materials will depend on the volume of the room to be heated and the additional tasks of the stove (heating water, cooking).
DIY gas fireplace
Another convenient option for space heating is a gas fireplace. The purchase of such a device will cost a tidy sum, although the most savvy can independently assemble and equip a fireplace in their box without particularly large financial investments.
This kind of fireplace can be powered both directly from a gas pipe and from a gas cylinder.
On the Internet you can find a wide variety of drawings of gas fireplaces. Also, some users can purchase prefabricated structures, independently lay out brickwork and assemble a fireplace from pre-prepared parts.
The design consists of the following main elements:
- ordinary fireplace insert or decorative, decorating the room;
- a fireplace body made of refractory metals - cast iron or other alloys;
- a burner that supplies gas;
- gas supply system.
After determining the place where the structure will be installed, it is necessary to prepare it for the start of the construction of brickwork. There must be a solid foundation. You also need to install the chimney. After the erection of the fireplace, it can be decorated with a variety of decorative elements to the taste of the owners.
The fireplace is laid only from refractory bricks. When erecting a structure, care should be taken to ensure passage to the gas valve. After the internal elements of the masonry are installed, and communication is connected to the gas burner, you should make sure that the entire system is tight.
With the help of a valve, in the future it will be possible to regulate the force of gas supply and, consequently, the amount of heat generated. Gas workers advise turning the burners down with holes - this will protect them from contamination and moisture.
Also, the burner should be strengthened with protective mesh elements. This will reduce the load on the burner from the decorative material.
A gas supply pipe covered with refractory materials is supplied to the fireplace insert. The gas burner is installed with holes down and masked with artificial refractory material
The introduction of some modern devices will slightly automate the operation of the fireplace. So you can connect a gas supply control system that depends on the level of heat generated or a system for automatically shutting off the gas supply. All modifications are freely available on the market, and their purchase depends on the desire and ability of the owners.


A beautiful decoration of the fireplace bowl is made using a variety of stones, glass, and ceramics.In addition to the interior decoration outside, the fireplace can be decorated with tiles or in another way. The main thing is that it be a refractory material.
It is easy to assemble a gas oven yourself with your own hands. To do this, you must adhere to the design scheme and safety precautions.
Subject to all the requirements and recommendations, the assembly of the furnace will be an exciting and inexpensive task. Self-assembly of such a design will save significant funds
First of all, before installing a gas stove for heating a room, it is worthwhile to carry out a number of preparatory measures. If you do not insulate the room, then even the most powerful equipment will not give a serious result.
Therefore, it is important to carry out procedures for external and internal insulation, as well as equip reflective surfaces.
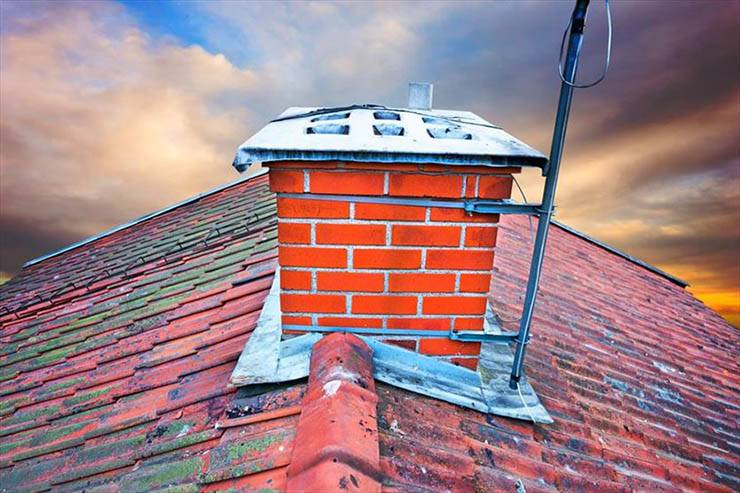
The process of building a chimney
The complexity of the process of erecting a chimney for a potbelly stove in the country directly depends on the location of the stove in the room. For example, leading a pipe through a window is much easier than making a hole for a chimney in the roof. In this regard, before installing a potbelly stove, the design features of the building should be taken into account.
Safety rules and design measurements
If the installation of the stove is planned outdoors, then the chimney device will not cause great difficulties, the main thing is to choose a suitable place
It is important to remember that the stove structure should be located away from flammable objects and outdoor activities.
The construction of a chimney in a room will require knowledge of safety rules that will help to avoid a fire. The material from which the pipe is made must have increased heat resistance and easily withstand temperatures above 1 thousand degrees.If it is planned to install a potbelly stove near walls sheathed with clapboard or plastic, then the part of the wall located in close proximity to the stove is sheathed with refractory material.
 Do not forget to determine the size of the pipe
The hole through which the chimney will enter the ceiling must also be made with non-combustible materials, since the entire structure becomes very hot during operation of the stove. For these purposes, a special glass is used to prevent contact of the hot pipe with the edges of the hole. If more than one potbelly stove is installed in the building, then a separate chimney system is made for each of them.
After calculating the diameter of the pipe for the potbelly stove, you will need to calculate the total length of the pipeline, but first you need to accurately determine the location of the stove in the room. Then determine the specific place where the chimney will be brought out. When measuring the length of the pipeline outdoors, it must be taken into account that the height of the pipe above the ridge should be equal to 1.3-1.7 meters.
 In the room itself, it is more difficult to carry out installation work
Installation of all elements of the system
Installing a stove installed outdoors is not difficult. To assemble the system, you will need a pipe of the required diameter, which is put on the pipe extending from the potbelly stove. The pipe must be put on the nozzle, and not inserted into it. Otherwise, smoke will seep out at the junction of the nodes. The procedure for installing a chimney system in a room is much more complicated and consists of several stages:
- a piece of pipe is securely attached to the furnace nozzle;
- the pipeline is extended using connecting elbows;
- the chimney is passed through the passage glass and led to the roof or outside the wall;
- all connecting nodes are securely fixed.
The section of the pipeline located on the street must be insulated with heat-resistant material. During the operation of the potbelly stove, condensate inevitably accumulates on it. To get rid of the condensate accumulated in the system, a tee is installed on the outer section of the pipeline, equipped with a faucet to drain the liquid. In the place where the horizontal and vertical pipelines are connected, an inspection window is made to facilitate cleaning of the chimney.
The final stage is to check the functionality of the chimney system. If it was possible to correctly make a chimney for a potbelly stove, then after igniting the stove, the necessary draft will be created and the smoke will be quickly removed outside. During combustion, care must be taken to ensure that smoke does not seep into the junctions of the nodes. If a smoke leak is detected, the connections must be sealed with a heat-resistant sealant.
Fireplace for gas heating at home
At the cost of equipment, gas fireplaces are comparable to electric or wood-burning counterparts. But gas fuel is much cheaper.
And, unlike firewood, gas heating with a fireplace in a country house assumes that there are no problems with ash. Plus, you don’t have to constantly monitor the operation of the firebox and take care of splitting logs.
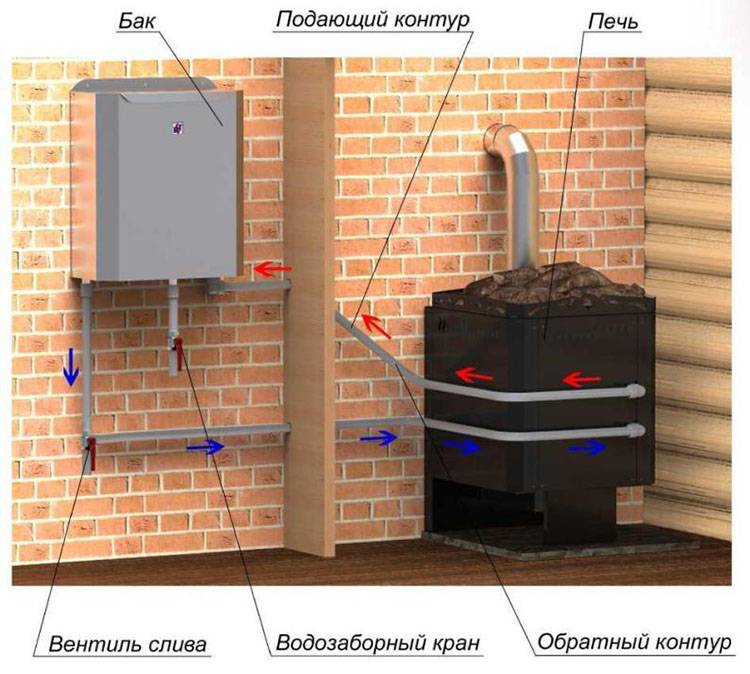
Fireplaces that convert gas into heat energy are used in heating systems, because. are not equipped with devices necessary for servicing two circuits


By type of installation, gas fireplaces are:
- wall-mounted;
- island;
- embedded.
According to the general design and internal content (burners, automation, combustion chamber arrangement), they completely repeat gas boilers.In both cases, the technology for connecting to networks is identical. Differences exist only in the principle of space heating.
According to the principle of connecting and organizing the heating system, gas fireplaces are similar to floor heating boilers
A hot water boiler was originally designed to heat water, and an ordinary fireplace was designed for air convection from the body and front screen, behind which fuel is burned.
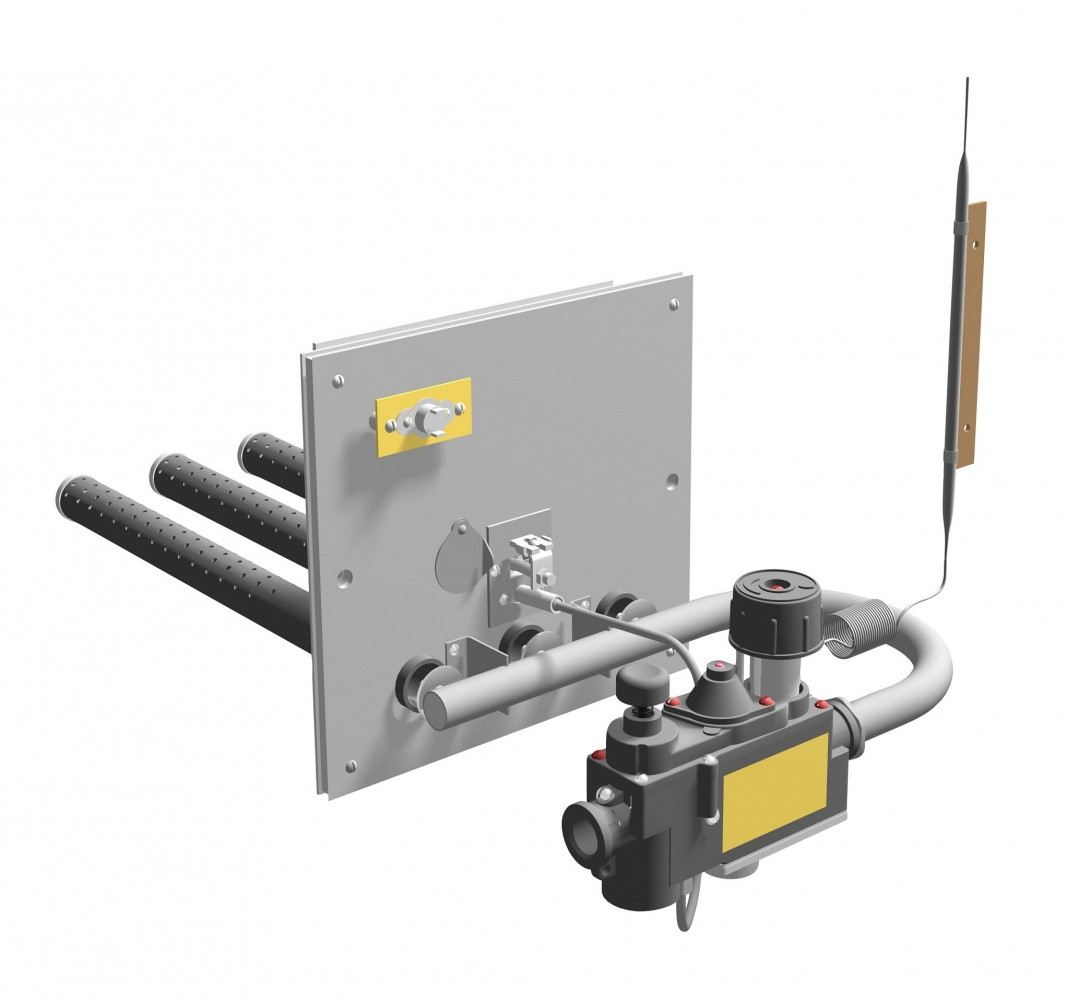
How to properly connect the muffle furnace to the power source
In the absence of experience with electrical appliances, it is better to contact a professional electrician. To connect the device to the network, you need to purchase:
- thermostat;
- large terminal block made of heat-resistant plastic;
- small terminal blocks made of heat-resistant plastic for splicing wires;
- contactor (electromagnetic starter);
- two-wire electrical wire;
- electric plug;
- standard electrical box.
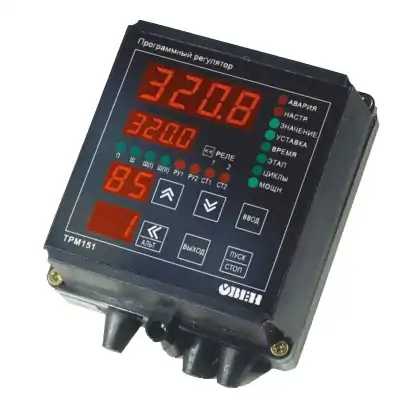
For this furnace, a single-channel thermostat M-1-K was selected, which regulates the temperature of the working chamber up to 1300 degrees. The device is able to work on a complex schedule, with its help set the time and temperature of heating.
Reference. The cross section of the nichrome wire and its length, the diameter of the coil of the spiral, the cross section of the connecting wires and other parameters of the electrical circuit are calculated from reference books and selected in advance.
The element has 7 connectors for connection (two terminals for power wires, two for connecting a thermocouple, three for a relay). The device is controlled by four buttons. When the thermostat is on, the indicator light is on. The device comes with two brackets for mounting in the shield and detailed instructions for connecting.
Block mounting
Installation of the block is carried out in the following order.
- The contacts of the thermocouple and the spiral are insulated and the terminal blocks are connected to two-wire wires.
- Connect the plug to the power cord.
- A thermostat, a contactor and a large terminal block are attached to the shield.
- A thermocouple, a muffle coil, a power wire with a plug are connected to the thermostat through a contactor and a terminal block.
The electric muffle furnace must be grounded.
Material selection
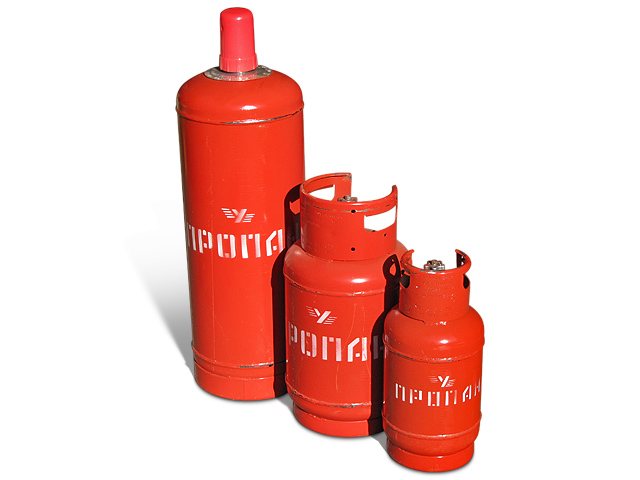
The correct choice of the cylinder is the key to the successful manufacture of the furnace
To get a quality product, you need to choose the right bottle. After all, not every gas container is suitable for the manufacture of potbelly stoves.
Therefore, it is worth paying attention to such aspects:
First of all, you should pay attention to the material from which it is made.
Preference should be given to all-metal products
Cylinders made of composite material are not heat resistant.
Equally important is the capacity. Here you should focus on the footage of the room that is supposed to be heated
If we are talking about a private house, you will need a cylinder with a volume of 50 liters, a length of 85 cm and a diameter of 30 cm. Any type of fuel is suitable for this design.
To heat a separate room, it will be enough cylinders for 27 liters or 12 liters. Of these, it is possible to build furnaces with a capacity of 5-7 kW and 2-3 kW, respectively.
But it is not recommended to use industrial gas cylinders with a volume of 40 liters - they are heavy and narrow.
From small containers with a capacity of 2 to 10 liters, you can make a camping version of the stove.