- Positive and negative qualities of a gas burner
- Building a gas furnace
- Gas burner design
- Production of a gas burner
- Characteristics and types of injection burners
- The principle of operation of the burners
- Classification of burners according to the main features
- Nozzle for gas burner
- Gas burner: price and characteristics of some popular models
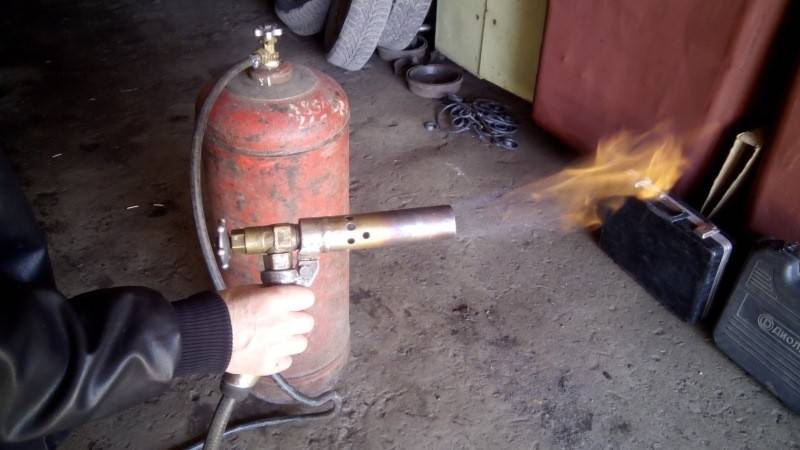
- Homemade device from a gas burner
- Safety regulations
- What to do?
- atmospheric
- ejection
- supercharged
- Combustion control
- Gasoline burner from a telescopic antenna
Positive and negative qualities of a gas burner
The gas burner has the following positive qualities:
- a large number of types of devices;
- safety during operation;
- most models are compact and lightweight;
- long preparation for use is not required;
- does not leave a deposit and a smell;
- fire pressure can be adjusted;
- you can always find out what the device consists of, and, if necessary, assemble a homemade burner.
Cons of using a burner:
- at temperatures below -30 ° C, the operation of the device becomes problematic;
- a cylinder with a combustible substance cannot be refilled on its own.
Building a gas furnace
Before you start building a gas forge do-it-yourself horn, you need to determine the parameters of the hearth - its area.
There is a tricky formula for this:
N=H×F
N is the productivity of the hearth, which depends on the tension H and the area of the hearth F. It is calculated that the gas supply rate in the range from 1 to 1.5 m/s is sufficient to optimally maintain the required temperature in the hearth.
Scheme of a gas burner for a forge.
You know the area of your workshop and the approximate number of forging parts in kilograms that you plan to produce. With this data, you derive the tension of the hearth with a maximum allowable upper limit of 150 kg/m².
Required materials to get started:
- refractory brick type dinas or fireclay;
- plates with a thickness of at least 5 mm from heat-resistant steel;
- steel profile for racks, frame and forge damper;
- pipe for the chimney and ventilation duct made of steel;
- putty for sealing cracks between bricks with heat-resistant properties;
- sheet metal or an additional layer of refractory bricks for lining on the outside;
- burners from double-circuit boilers of high power;
- fan;
Gas forges can also be open. With it, everything is much simpler, it will be enough to arrange grates with air supply for greater heating efficiency. In this case, the combustion gases are removed by a fan made of heat-resistant metal.
The support frame is best placed close to one of the walls of your workshop. The choice of wall must be made taking into account the fact that a chimney and a ventilation pipe will be needed, so it is better not to use adjacent walls, if any.
Racks and the frame itself are best welded from low-alloy steel according to drawings that can be downloaded on the Internet.Low alloy steel is strong, light and, most importantly, resistant to specific high-temperature corrosion. The outer lining must be thought out in advance in order to immediately make holes in the support frame for its fastening.
Now about refractory bricks and masonry
It is important to buy real certified fireclay bricks made in accordance with GOST 390-79. If you purchase a non-standard brick, you run the risk that ordinary bricks will start to melt already at a temperature of 1000 ° C
Forge device.
The second type of refractory bricks is dinas. These bricks are more expensive, but more resistant to high temperatures: they withstand a regime with a level of 1800 ° C. They are lighter than fireclay bricks due to the high proportion of silicon salts in their composition.


If you have the opportunity, it is better to lay out the hearth with dinas bricks: forges made of refractory dinas bricks are more durable and withstand the most severe temperature conditions.
Lay the bricks with a mortar of refractory clay with the addition of chamotte and dinas powder in a clear proportion of 60:40. Treat the chimney and fan along the perimeter with metal corners.
The most important final stage is the drying of the entire structure. After it, you need to check how the fans for the forge forge work. And only then it will be possible to make a test inclusion.
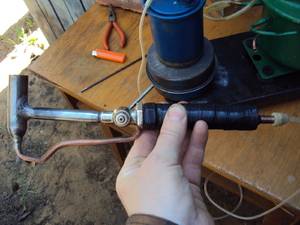
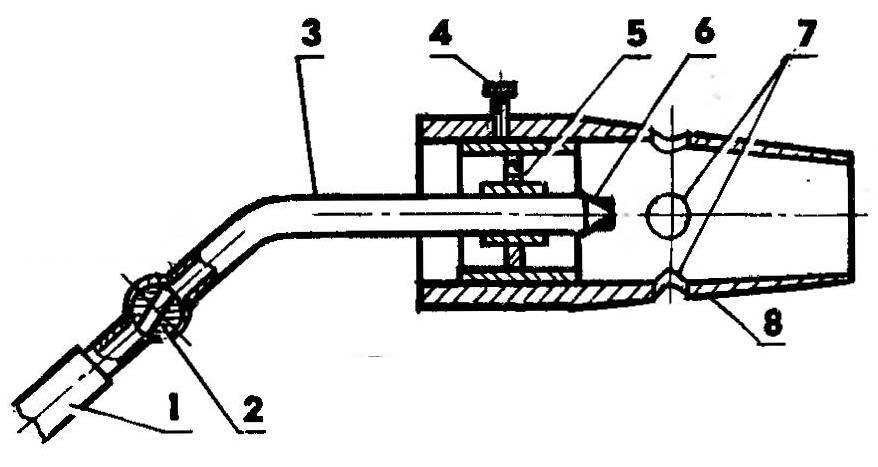
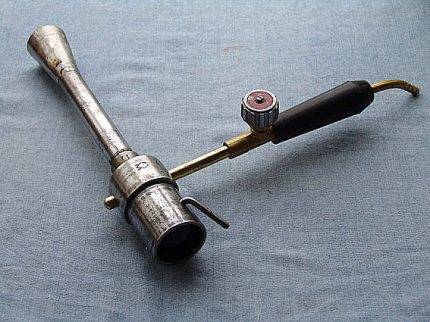
Gas burner design
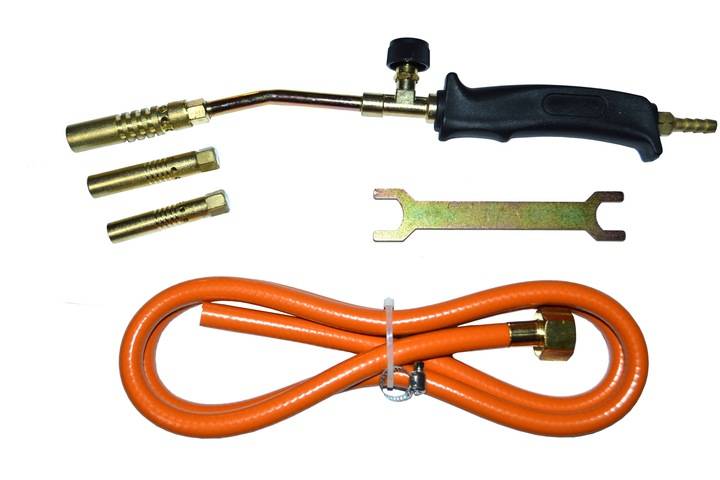
Hardware stores sell a large number of different models of gas burners for safe use. For example, a popular propane-powered design can be of various modifications, even the size of a regular jewelry pen. The advantages of factory models lies in a high degree of safety and product certification.But on the other hand, the design is not complicated, and it will not be difficult to make such a tool at home. And since any product in the store is not cheap, especially the burner, it is possible and necessary for novice craftsmen to learn how to do it on their own.
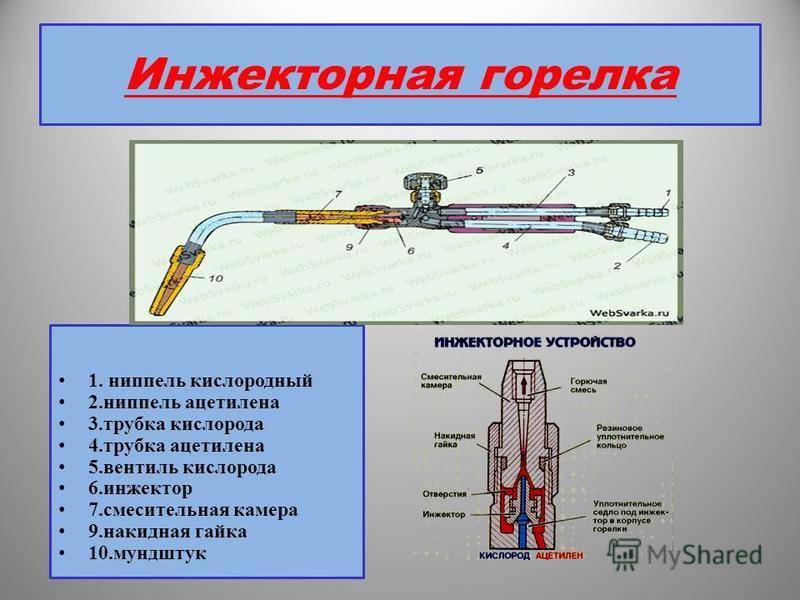
The following elements are included in the gas burner device:
- metal body;
- nozzle;
- reducer;
- fuel supply regulator;
- node for fixing the balloon;
- head.
 The metal case is also equipped with a special glass, with which the fire in the burner will not be blown out. The design includes a metal handle. As an alternative, other materials can be used for it. Its dimensions should not exceed 100 centimeters. A wooden holder is installed on the handle, and then the hose is pulled. There is also a gearbox with a valve. They can regulate the amount of combustible gas, its length and, accordingly, the supply. A similar design is also equipped with a gas ignition nozzle.
A gas burner is also called a propane burner. This indicates that propane gas or a mixture of propane and butane is used as fuel for it. Such a substance is filled with a special container or cylinder, which is located behind the burner.
Many are interested in how to make a burner with their own hands. As can be seen from the list, the design of a gas hand burner is not complicated, but on the contrary, it is even very simple for self-production. It does not have complex elements that require spending a lot of money and time. It will take a little time and labor to produce it.And if it is mandatory to study all the diagrams and drawings from professionals, as well as treat the work responsibly, then a convenient and safe device will come out.
If we talk about the use of such a burner, then it can be different. For example, there is a burner for a boiler, a gasoline-air design, a home-made design from a burner for heating with household gas, etc. They even manage to make a burner from a lighter. Such a design, of course, is not suitable for performing the functions of a gas cutter, but for some purposes it can be used. There are also burners for melting copper already with a built-in nozzle.
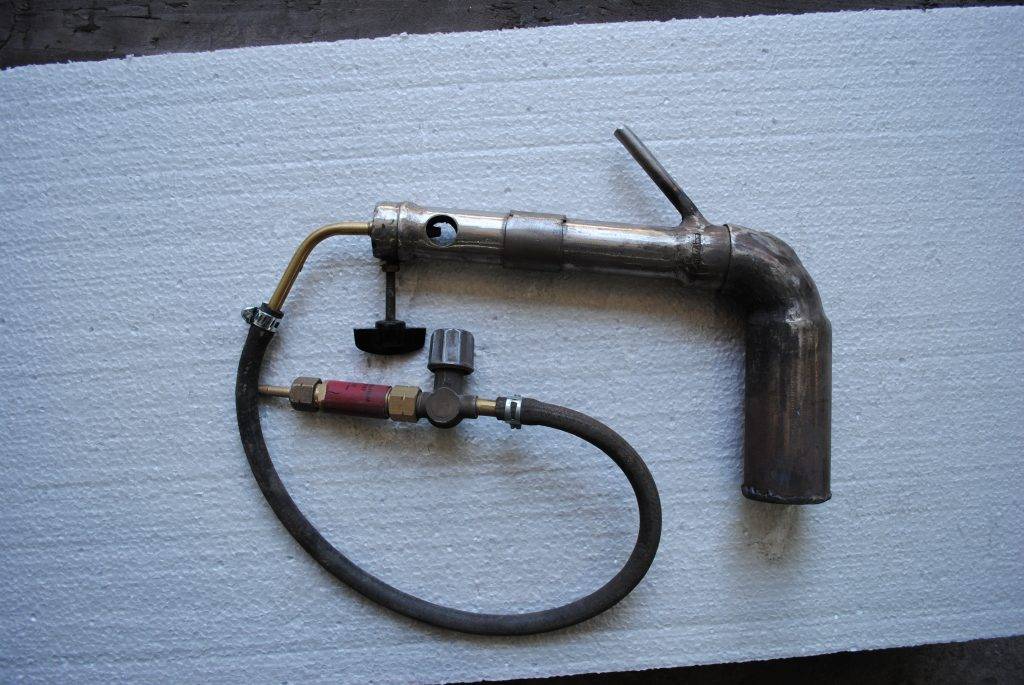
Production of a gas burner
Starting to independently manufacture the device, it is necessary to prepare tools for work and select the required material. First of all, choose the material for the handle. There are no strict requirements, so everyone can use their imagination and possibilities. The main requirements for the handle are: its ease of use, so that it does not overheat during operation. Experience shows that it is advisable to use a ready-made handle. For example, a handle from some failed soldering iron, boiler or other household appliance.
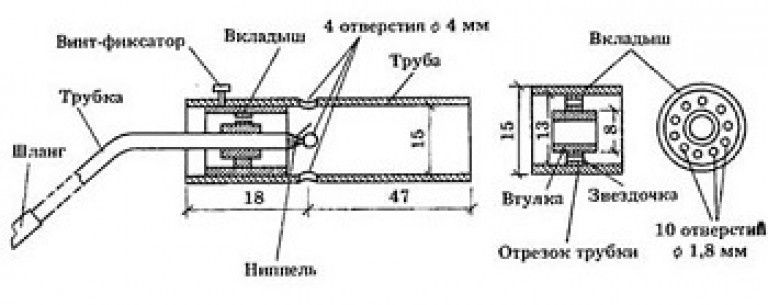
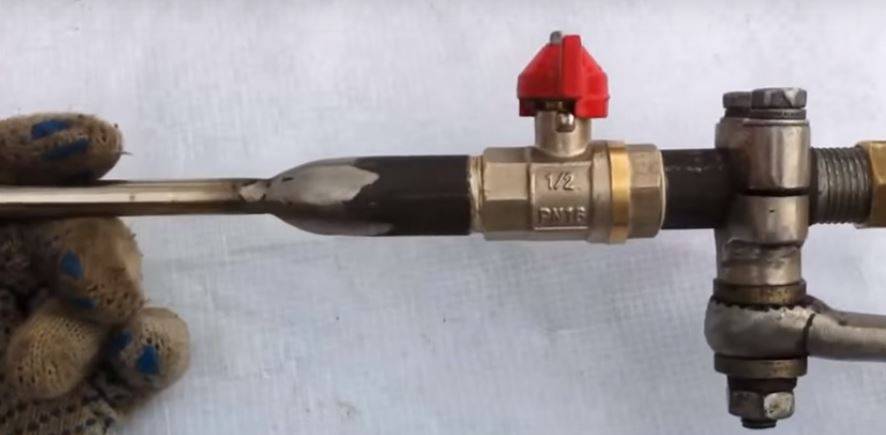
Steel is used to make the supply tube. Choose a steel tube with a diameter of not more than 1 cm and a wall thickness of 2.5 mm. The made felling is inserted into the prepared handle. There it must be securely fastened. The mounting method is selected in accordance with its capabilities.
After that, the divider is securely fixed in the body. A small clearance should be provided for the inner flange.The recommended clearance should be approximately 5mm. Such a gap will provide the necessary deceleration of the gas flow rate that enters the igniter. Slowing down will allow more reliable ignition of the burner.
We recommend: Do-it-yourself installation of a circulation pump: instructions, connection, photo work
The nozzle is made from a metal rod. It will provide gas supply to the combustion area. It is made in the following way. With a drill with a diameter of 2 mm, a blind hole is carefully made in the nozzle body. Then drill a hole with a 4mm drill bit. It is necessary to create a jumper. They are carefully riveted and polished.


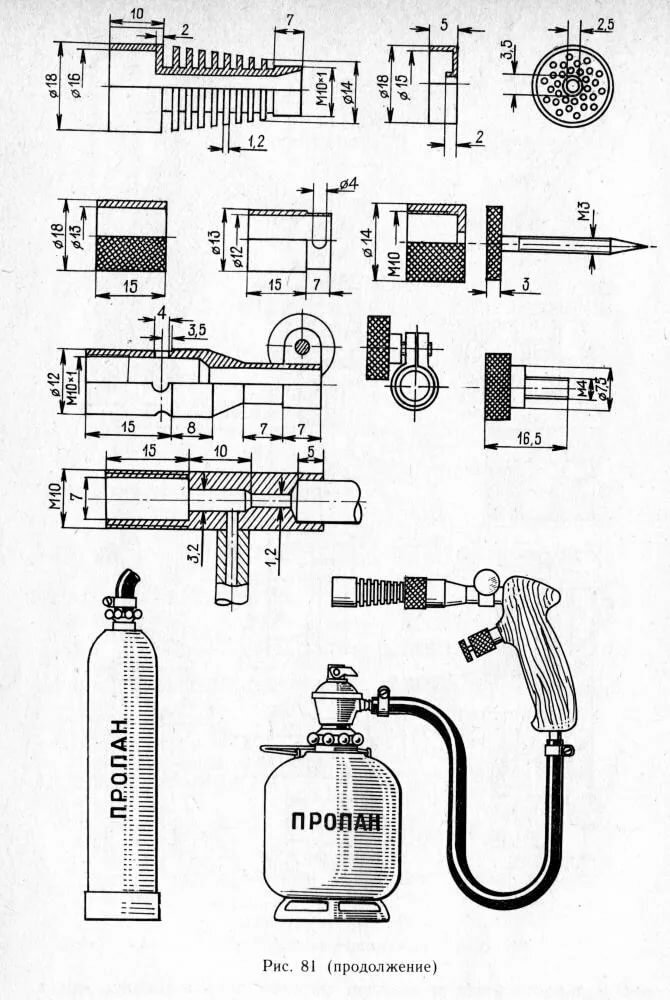

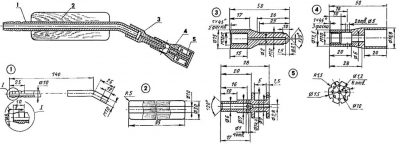
Gas burner drawing
The end of the manufactured tube is connected to the outlet of the reducer. A flexible hose is used for connection. The material is selected from the list of approved materials for domestic gas systems. It can be a special rubber or a special fabric material. To ensure reliability and fire safety, it is more expedient to use certified material. The hose is put on the tube and secured with a standard clamp.
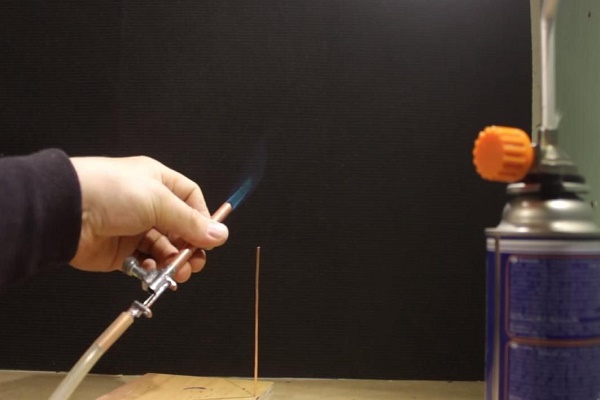
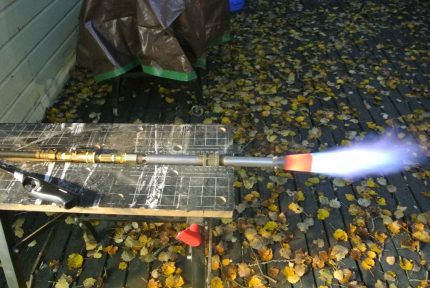
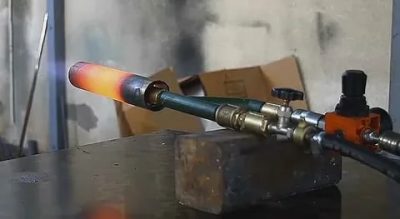
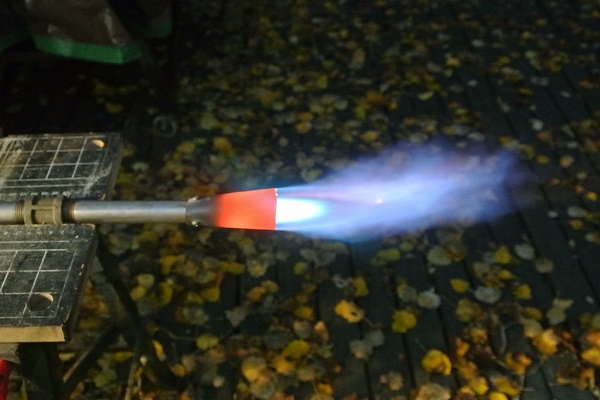
After completing the assembly of the entire apparatus, it is required to set the optimal pressure in the cylinder. Before lighting the burner, the entire gas supply system, mixing with air, should be carefully checked for possible leaks. If they appear, they must be eliminated. Only after all checks can the burner be ignited. The burner must provide a burning jet length of up to 50 mm.
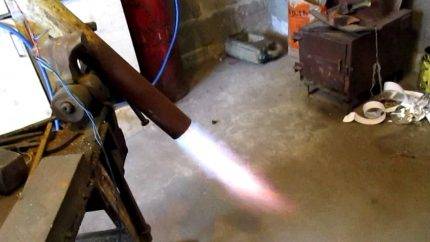
Properly self-assembled burner will serve as a reliable assistant in business for a long time. It will be the tool that will help solve many everyday problems without resorting to the use of an expensive tool.
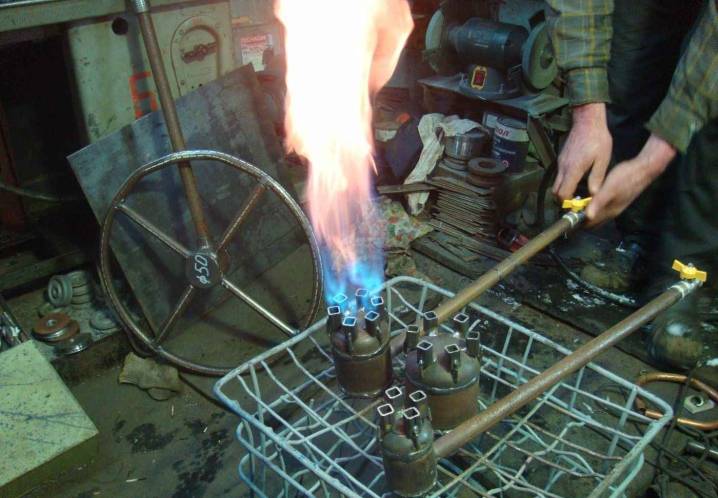
Characteristics and types of injection burners
The degree of metal waste when it is heated for forging, the intensity of scale formation on the surface, and the total gas consumption depend on the design of the hearth burner. In closed forges, short-flame burners are used.
Their design guarantees rapid mixing of the combustible mixture, which ensures high efficiency. Combustion products are removed from the working space of the hearth evenly and as efficiently as possible.
The principle of operation of the burners
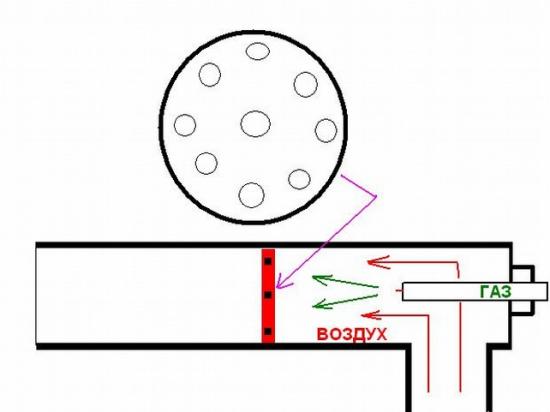
In burners of this type, propane is burned from a gas pipeline or cylinder. Here, the mixture of gas and air is formed due to ejection, i.e. suction of the latter inside the burner under the influence of the energy of a pressurized gas jet.
In the area where the air is taken in, a rarefaction appears, due to which the air itself moves in a given direction. Mixing in the burner body, the working mixture breaks out of it under pressure, creating the desired temperature.
The quality of the gas burner depends on the constancy of the ratio of the volume of gas and air. Changes in gas density affect the air intake capacity of the burner.
 The combustion device, or burner, is the main component of the gas furnace. Its operation depends entirely on the correct manufacture of this key element.
All changes in combustion temperature must be accompanied by similar changes in the supply of air required for ignition.
If the indicators are unbalanced, it is necessary to adjust the injection coefficient to achieve its stability. This is achieved by changing the gas pressure or by adjusting the air damper.
Classification of burners according to the main features
They are classified according to different criteria. Based on the volume of primary air sucked in, there are burners of partial mixing and full. The main characteristics of the former are the injection coefficient and the multiplicity.
The injection ratio is determined by the ratio of the volumes of air injected and required for 100% gas combustion. The expression "injection ratio" means the ratio between the volume of primary air and the gas consumption of the burner.
 Combustion of gas mixed with air in the injection burner occurs in a special nozzle - a tunnel made of refractory material
Injection burners used in home forges are of low (up to 5 kPa) gas pressure and medium - from 5 kPa to 0.3 MPa. When the gas in the burner is at a pressure of 20-90 kPa, the air suction power remains practically unchanged, even when the gas pressure and rarefaction in the hearth undergo changes.


When the pressure drops below this bar, the injection coefficient increases, the pressure drops, and the rarefaction in the hearth increases. Depending on the presence of a distribution manifold, there are single- and multi-torch burners.
There is a division according to the number of nozzles: with one nozzle - single-nozzle, with several - multi-nozzle. Place these elements in the center or scattered. On this basis, there are burners with a central nozzle and a peripheral one.
Nozzle for gas burner
The nozzle turned out to be the simplest and the gas supply is regulated only from the cylinder reducer. But if the divider is made in accordance with the drawing presented above, the adjustment will be more accurate and it can be done directly on the burner.Do-it-yourself low-power burners are unpretentious to gas quality, they can work both on a mixture of propane and butane, and on propane. In addition, such a burner is much more economical than industrial designs.
A do-it-yourself gas burner is certainly not a tool of paramount importance in the garage, but there are times when you simply cannot do without it, and making the simplest fixture will take very little time. Good luck with all your experiments!
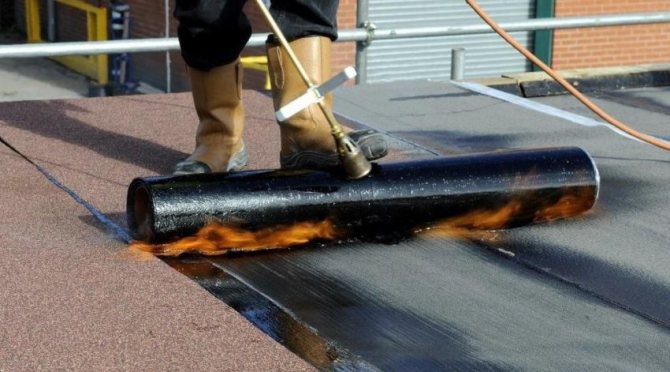
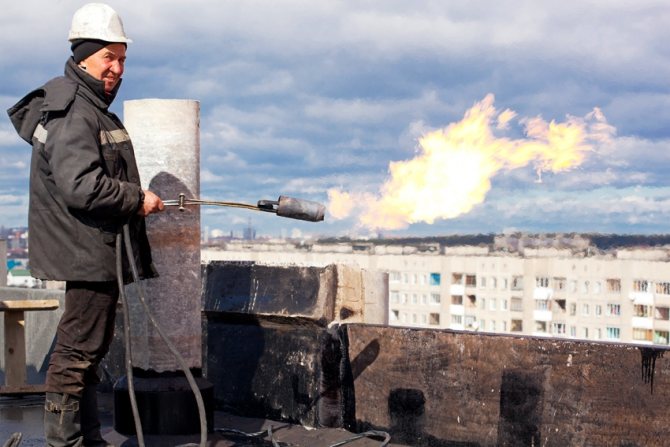
Gas burner: price and characteristics of some popular models
Gas burners for roofing are the safest tools. They are easy to use, light, able to create a flame of sufficient power. Modern manufacturers offer models that work without oxygen:
- GG-2 - propane burner for the roof. This is the best option for craftsmen who perform repair work with their own hands. Differs in acceptable cost;
- GG-2U - a device similar to the previous version, but this model is characterized by a shortened version of the gas supply hose for a gas burner. Such a device is ideal for performing work in hard-to-reach places on the roof, as well as for gluing joints;
Before buying a burner, it is important to read the specifications of the model and check the quality certificates.
- GG-2S - a model that belongs to professional tools, runs on propane. The main advantage of the device is that the device can be used even in strong winds. The device is equipped with two valves and consists of two housings, making it easier to control the operating modes of the device;
- GGS1-1.7 is a universal design, which, despite its small size and weight, is characterized by a high degree of performance. The device can only be used on flat horizontal areas;
- GGK-1 - this burner is heavier than previous designs, equipped with a very durable glass. This model is suitable for firing old paint, wooden surfaces, as well as for waterproofing work. Fuel is supplied using a special lever.
- GGS1-1.0 is used for small works of small volumes. Optimally used on roofs with a large angle of inclination;
- GGS1-0.5 is used for minor repairs. The model is characterized by low fuel consumption;
- GGS4-1.0 consists of four sockets, thanks to which the entire roll is heated simultaneously. The use of this option allows you to increase productivity and save fuel;
Gas burners for roofing are considered the safest tool
- GV-3 is a propane torch designed for welding and even manual soldering of metal. The diameter of the glass is 5 cm;
- GV-111R is used for melting bituminous materials, firing a layer of paint.
- GV-550 and GV-900 are very easy-to-use designs that differ from each other only in the maximum flame length. The first model is more suitable for performing tasks at the junction points of the roof, and the second device allows you to work standing up to your full height, since the length of the torch reaches 90 cm;
- GV 500 is used to perform welded work during the laying of roofing materials. This model easily melts bitumen.The flame temperature of the GV 500 gas burner is 300 °C;
- GV-850 is a burner with a special valve, thanks to which it is possible to regulate the amount of technical gas supply from the cylinder with high accuracy. Also, a lever is installed here, with the help of which the master adjusts the length of the torch. This gas burner does not work on pure propane, but on a mixture that contains technical oxygen. The price of a gas burner for roofing GV-850 is 1700-2200 rubles.
As you can see, the choice of gas burners is very wide, and where to buy a burner: in a store or on the website - depends on the desires of customers. The main thing is to read the characteristics of the model and check the quality certificates for the product.
Gas burners are easy to use, lightweight, able to create a flame of sufficient power
Homemade device from a gas burner
Using the method we have proposed, you can assemble a not too powerful, but convenient, compact, portable gas heater. Such a device is suitable for heating small rooms, a garage, a small greenhouse, a basement or a tent.
To assemble the structure, a gas burner-primus is used. It is used for cooking. This scheme is also applicable when using collet valve cylinders.


Gas burners and stoves are connected to steel or composite gas cylinders. They work from any mixture of liquefied gases
In addition to the burner, you will need the following material at hand:
- tin sheet of small area;
- round metal sieve;
- rivets.
You will also need some tools: an electric drill with a small drill bit, a riveting device and metal shears.
The operation of homemade gas devices requires increased attention to detail from the user.The safety of the user directly depends on whether the safety precautions are observed or not.
The assembly of the device is carried out as follows. First you need to take a pre-prepared tin sheet and attach a sieve to it. The sieve must be circled with a marker or construction pencil around the circumference.
After that, a sieve is laid down and with a pencil with a ruler on the tin over the circle, rectangular ears or the so-called sweep are carefully drawn. One ear should be slightly longer than the remaining three.
Then you need to take scissors and carefully cut out the lined workpiece.
It is important to cut the parts so that there are no irregularities on their surface.
After the circle is cut out of the sheet, it must be attached to the burner with bolts. To do this, you need a drill, with which you carefully drill even holes. Then you need to trim the drilled holes and erase the remnants of the metal with a file or cut (grind) with a grinder.
As a result, it is possible to assemble a heater with a vertically or horizontally located gas cartridge. It depends on the type of burner and on the desire of the collector.
At the resulting design, you need to bend the rectangular ears on top and attach a metal sieve. The main task of the sieve during the operation of the heater will be heat dissipation. This design can be improved by additional use of a grid.
First of all, another circle with ears is additionally cut out of the tin sheet. Its dimensions must match the dimensions of the first part. Then, using a drill, it is necessary to drill holes in the cut out circle, which should be located at a small distance from the edge of the workpiece.After that, you need to cut a small strip from the grid.
The cut out narrow strip is attached above the sieve to the first and to the second tin circle by the ears with the help of rivets. The ears should be bent at an angle of 90 degrees. As a result, the design will resemble a metal cylinder.
After making such a gas heater with your own hands using a gas burner, the design must be checked. You need to make sure that it is safe to use. The gas cartridge is connected to the burner, the gas supply is turned on, the burner lights up, and the device starts heating the room.
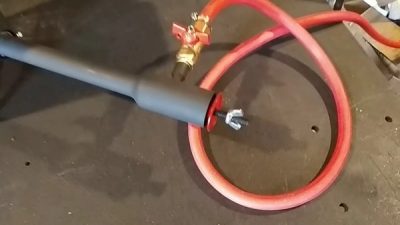
Using an adapter hose, you can connect such a burner to a large gas cylinder. Then you do not have to spend extra time on replacing and refueling the gas tank. A gas reducer must be installed on the cylinder, which protects the structure from the reverse movement of gas and allows you to adjust the pressure.
It is convenient to pour gas from one container to another with similar home-made or factory-made hoses, as well as connect the heater to a gas source
It is worth remembering that manufacturers of gas cartridges do not recommend reusing their products and refilling cartridges.
Using a similar approach, you can design a larger homemade gas heater. Such devices will already resemble gas stoves and can be powered directly from a gas pipe or a large cylinder. Naturally, the power of such a furnace is enough to heat a larger room.


However, such structures are not so easy to move from one place to another, they take up a lot of space and often require additional construction of a chimney and ventilation system.
Safety regulations
- When working with fire tools, sparks are very often formed, which can get on the cornea of the eye and lead to loss of vision. To avoid this danger, work should be carried out in special dark protective glasses;
- At the beginning of work, the regulating locks should be opened only halfway, or even a quarter, and only then the burner mixture should be ignited;
- After ignition, it is imperative to adjust the pressure and power of the flame for each specific case;
- It is forbidden to kindle from a large open flame or a burning object: the flame can spread to nearby combustible objects or worker's clothing;
- The ignition process is carried out with sulfur matches or a small lighter, with direct regulation of the flame;
- At the end of the work, the supply of the combustible mixture is blocked by shut-off valves, which leads to the extinction of the burner flame. It is forbidden to extinguish it in another way;
- After the burner has stopped working, the fuel supply regulator should be carefully checked: it should be completely closed and covered with a protective cap.
After that, the device is removed to a special place until the next time.
What to do?
Gas burners of low power for everyday life and small-scale private production are classified according to performance indicators as follows. way:
- High-temperature - for precision welding, jewelry and glass work. Efficiency is not important, it is necessary to achieve the maximum flame temperature for a given fuel.
- Technological - for metalwork and blacksmithing. The flame temperature is highly desirable not lower than 1200 degrees, and subject to this condition, the burner is brought to maximum efficiency.
- Heating and roofing - achieve the best efficiency.The flame temperature is usually up to 1100 degrees or lower.
Regarding the method of fuel combustion, a gas burner can be made according to one of the following. schemes:
- Free-atmospheric.
- Atmospheric ejection.
- Supercharged.
atmospheric
In free-atmospheric burners, the gas burns in free space; air flow is provided by free convection. Such burners are uneconomical, the flame is red, smoky, dancing and beating. They are of interest, firstly, because by excess gas supply or insufficient air, any other burner can be transferred to a free-atmospheric mode. It is in it that the burners are set on fire - at a minimum of fuel supply and even less air flow. Secondly, the free flow of secondary air can be very useful in the so-called. one and a half circuit burners for heating, because greatly simplifies their design without sacrificing safety, see below.
ejection
In ejection burners, at least 40% of the air required for fuel combustion is sucked in by the gas flow from the injector. Ejection burners are structurally simple and allow you to get a flame with a temperature of up to 1500 degrees with an efficiency of over 95%, therefore they are used most widely, but cannot be made modulating, see below. According to the use of air, ejection burners are divided into:
- Single-circuit - all the necessary air is sucked in at once. With a properly profiled gas duct, over 10kW of power show an efficiency of over 99%. With your own hands are not repeatable.
- Dual circuit - approx. 50% of the air is sucked in by the injector, the rest goes into the combustion chamber and/or afterburner.They allow you to get either a flame of 1300-1500 degrees, or a CPL of over 95% and a flame of up to 1200 degrees. Used in any of the above ways. Structurally quite complex, but repeatable on their own.
- One and a half circuit, often also called double circuit - the primary air is sucked in by the flow from the injector, and the secondary freely enters a limited volume (for example, a furnace furnace), in which the fuel burns out. Only single-mode (see below), but structurally simple, therefore they are widely used for temporary start-up of heating furnaces and gas-fired boilers.
supercharged
In pressurized burners, all air, both primary and secondary, is forced into the combustion zone of the fuel. The simplest supercharged micro burner for bench soldering, jewelry and glass work can be made by yourself (see below), but making a supercharged heating burner requires a solid manufacturing base. But it is the pressurized burners that make it possible to realize all the possibilities of controlling the combustion mode; According to the terms of use, they are divided into:
- Single mode;
- dual mode;
- Modulated.
Combustion control
In single-mode burners, the fuel combustion mode is either determined once and for all constructively (for example, in industrial burners for annealing furnaces), or set manually, for which the burner must either be turned off or the technological cycle must be interrupted with its use. Dual-mode burners usually operate at full or half power. The transition from mode to mode is carried out in the course of work or use. Heating (winter - spring / autumn) or roofing burners are made dual-mode.
In modulated burners, the supply of fuel and air is smoothly and continuously regulated by automation, which works out according to a set of critical initial parameters. For example, for a heating burner - according to the ratio of temperatures in the room, outdoor and coolant in the return. There can be one output parameter (minimum gas flow, highest flame temperature) or there can also be several of them, for example, when the flame temperature is at the upper limit, fuel consumption is minimized, and when it falls, the temperature is optimized for this process.
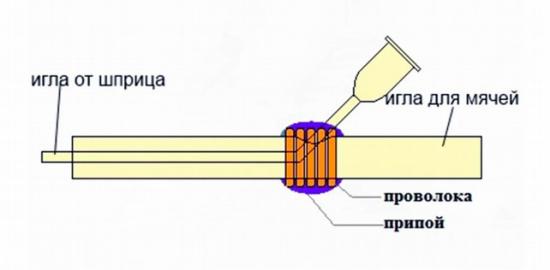
Gasoline burner from a telescopic antenna
Sometimes, in the production of homemade products, it becomes necessary to warm up, or even melt, any part or material. Many models of burners can be purchased in stores, but what kind of homemade person does not try to make the tool he needs with his own hands. The author of this homemade product decided to make a gasoline burner from improvised materials. Tools and materials indoor antenna from the TV; jar of baby juice with a lid; aquarium compressor (external) with hose; drill ; drill; file; soldering iron; nail 120; ball needle; head-key on 4.5.
First, the author disassembles the antenna. Having cut off the antenna from both sides, he pulls out the tubes and gets 3 tubes of different lengths and diameters. In the middle of the largest tube, a through hole with a diameter of 4 mm is drilled. To make a faucet, the author cuts off a piece of 15 mm from a medium diameter tube. At a distance of 5mm from the edge, a 3mm hole is drilled. He puts a piece of the tube on the nail pointing to the hat. Marks on the nail where the tube hole is located. Marks the cut line 4mm below the tube. Drills a hole with a diameter of 2 mm in a nail. Cuts the nail along the previously marked line.Inserts a faucet into a hole drilled in a large tube. Aligning the holes in both tubes solder them. So that the nail does not pop out, the stopper does. Having cut off a piece of 4 mm from the middle tube, he puts it on a nail inserted into the faucet. Solders the edge of the nail and the cut piece. It is necessary that the nail turns in the faucet. Further, in order not to break, the author inserts a piece of wire into the thinnest tube and bends around it around the can, forming a semicircle of 70-80 degrees. Makes a nozzle. Cuts off the head from the needle for balls. Solder the needle at an angle to the semi-circular tube. This is done so that you can then insert the nozzle into a large tube. Marks on the tube with a tap the hole where the nozzle will be inserted, given that the end of the nozzle should stick out of the tube for a couple of millimeters, and the opposite end of the nozzle tube. The excess can be cut off. Having made a hole (not through), inserts the nozzle. If necessary, the end of the tube can be trimmed. Cuts the edge of the tube into 6 pieces and bends them inward. Insert the opposite end and solder both sides of the tube. Next, he makes the burner head. Having cut off 5mm from the key-head, it expands the hole with a drill by 5mm and puts it on the nozzle. Makes a container for fuel. Drills two 4mm holes into the lids of the jar - their holes are opposite each other. He inserts the middle tube into one of them so that it does not reach the bottom of the jar by 1 cm. Stepping back from the lid 2 cm cuts it off. Having sawed off another 2.5 cm from the tube, he inserts it into the second hole in the lid. Solder the tubes to the lid. The tube from the compressor is connected to the long tube of the tank, and the burner is connected to the short one. Pours gasoline into the container and, observing safety precautions, sets fire to the burner. More details can be seen on the video. Source
Become the author of the site, publish your own articles, descriptions of homemade products with payment for the text. Read more here.