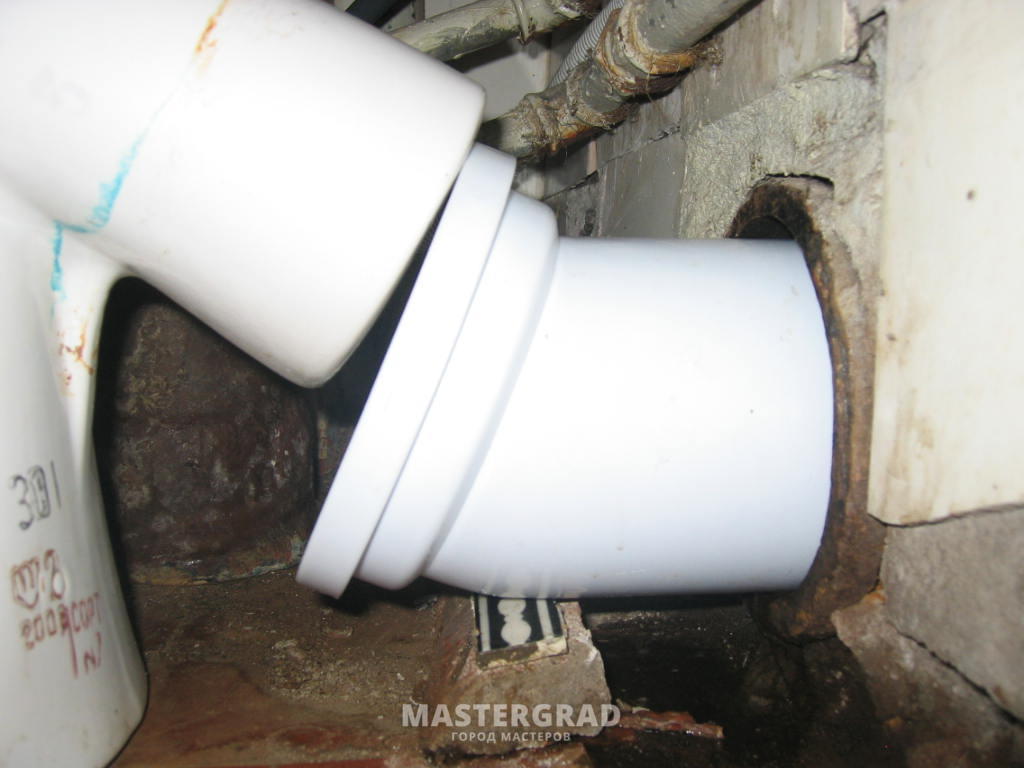
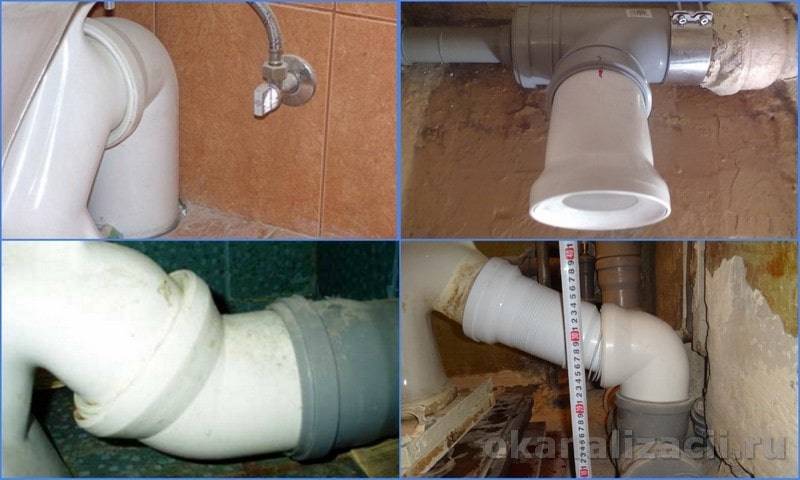
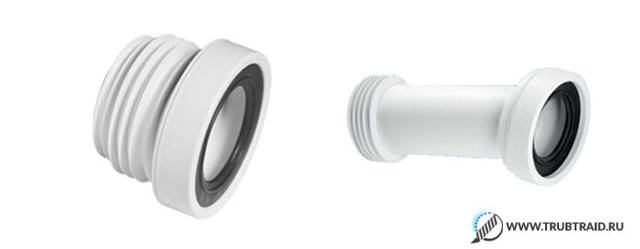
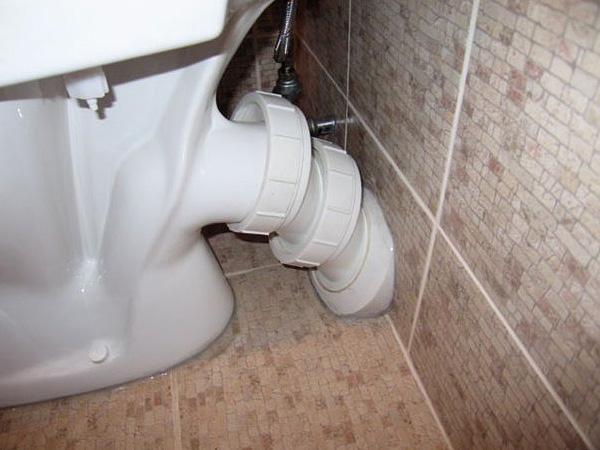
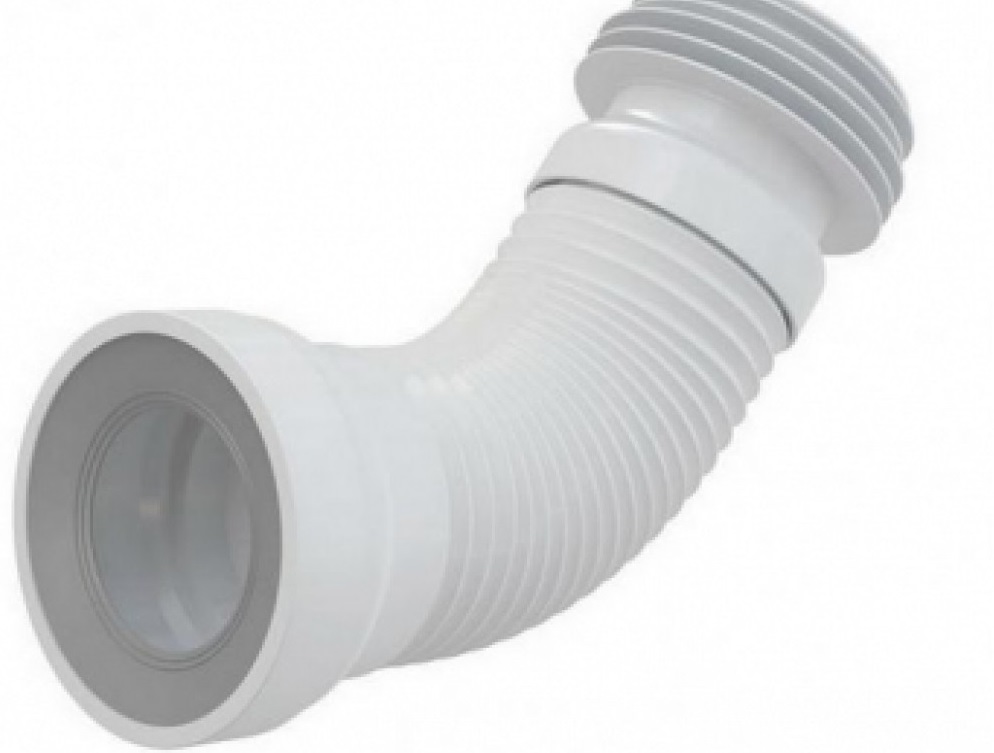
- Connection with corrugation
- Plastic sewer connection
- Features of the installation
- Check valve system
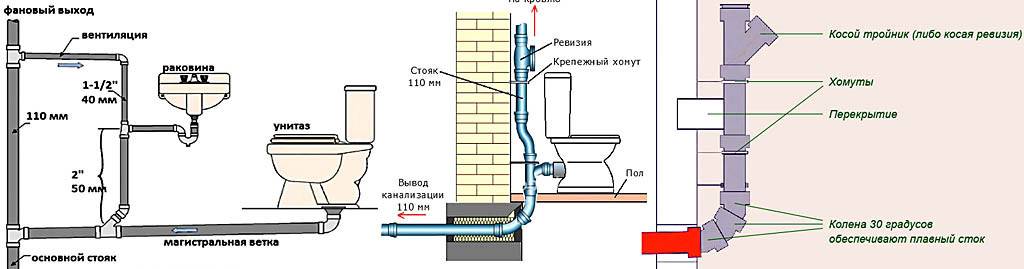
- Ventilation riser for sewerage
- Requirements that fan risers must meet
- Mounting Features
- Repair work
- Tips
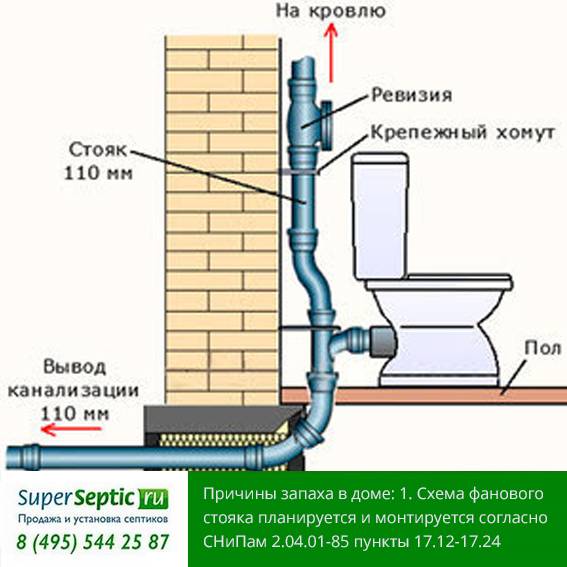
- Rules for installing a fan riser
- Check valve for internal and external sewerage
- Installation instructions
- Fan pipe repair
- Kinds
- Technical requirements
- Installation
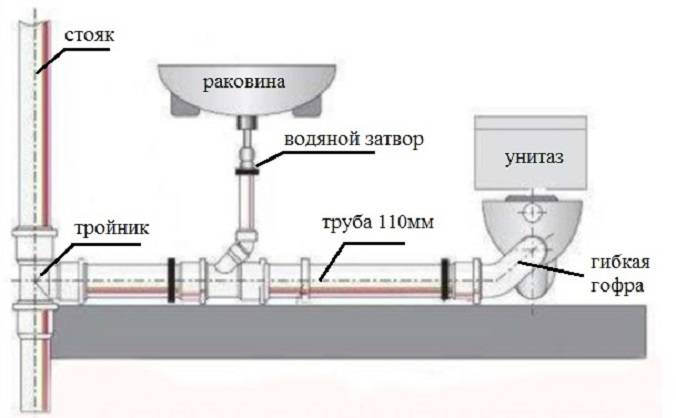
- How to connect the toilet to the sewer using corrugations?
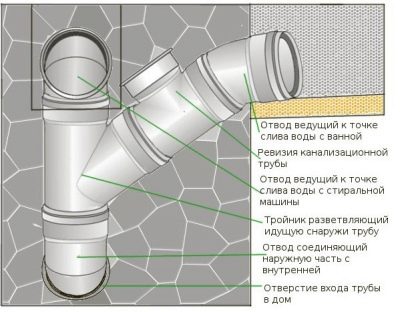
- Basic pipe connection schemes
- Perpendicular to floor
- Parallel to the floor
- at an angle
- The expediency of using a fan valve
- Conclusions and useful video on the topic
Connection with corrugation
Connecting the toilet with corrugations is done in three steps:
- Fixing the corrugated pipe in the socket of the sewer pipeline with sealing the joint with sealant.
- Fitting a toilet with marking the points of its attachment to the floor.
- Fixing the device and the corrugated outlet into it with final sealing with silicone of the second joint.
Such a connection method should not cause difficulties. The toilet bowl here does not have to be perfectly aligned exactly along the line so that the outlet clearly matches the entrance to the sewer. You can move it a little to the side.
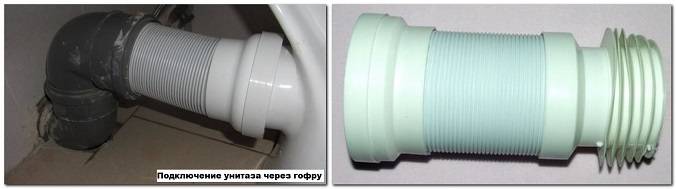
Connection through the corrugation should be used only in the most extreme cases, when other methods are not possible.
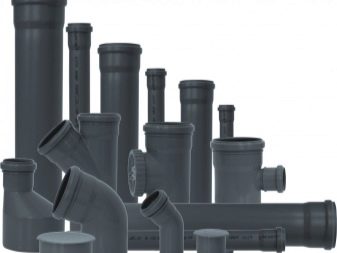
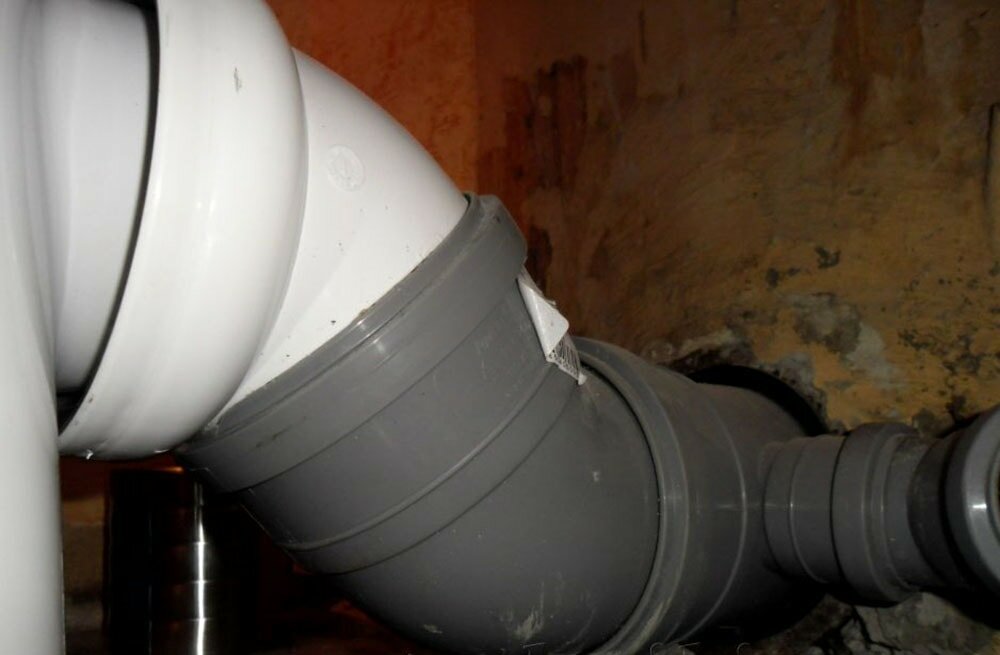
Plastic sewer connection
Modern construction technologies include the use of plastic pipes for sewer systems. And often the question arises about the methods of connecting the toilet to the plastic part of the sewer.
Connection types of plastic pipe elements:
- Gluing method. This method involves connecting two parts of different diameters using a special glue. But the difference shouldn't be big. The method consists in degreasing the surface of the parts to be joined, then glue is applied to the smaller part and inserted into the larger one. Excess glue itself comes out of the gaps between the two parts.
- Application of welding technology. This type of installation requires a professional approach. This method of connecting to a sewer riser involves the use of special equipment that heats the plastic elements. The parts are heated, then tightly pressed against each other until the seam cools completely.
- Fitting method. This method requires the purchase of additional parts that are used to connect plastic elements.
Features of the installation
The installation of such a riser can be carried out independently. First of all, for this you need to purchase suitable pipes. You need to understand that the design is a direct continuation of the sewer pipeline, so the pipes from which the main system is assembled are quite suitable for it.
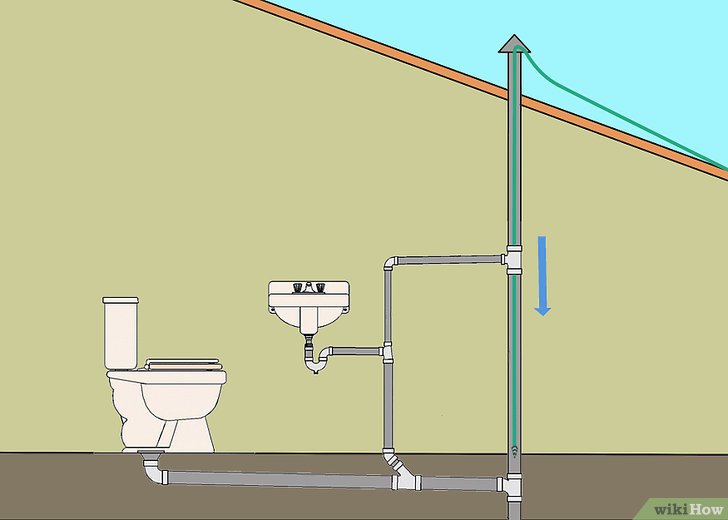
To ensure the pressure and temperature difference necessary to create traction, it is recommended to choose a place in a heated room for the initial section of the riser.The final section, on the contrary, must be placed in a cold one. This should be an open place, then the draft created in the pipe will freely remove unpleasant odors into the atmosphere. The actual installation of the device is extremely simple: the installation of the structure is carried out in a pre-prepared ventilation duct.
There are two practically equivalent options for the competent arrangement of a fan pipe: the removal of a ventilation riser to the roof and the installation of a check valve
Check valve system
Equipment put in place can be equipped with a special system called a check valve. It allows normal operation without the ventilation riser to the roof. In addition, the device is necessary for:
- Correction of insufficient slope of the sewer pipe.
- Prevention of ingress of mechanical impurities and rodents into the system.
- Obstacles to the return of wastewater to plumbing fixtures.
The non-return valve on the fan pipe must be installed without the use of all kinds of coatings and silicone. Surface must be clean and dry
Depending on the type of non-return valve, it can be installed outside or inside the element. The device is directed towards the movement of drains, its elements, made in the form of petals, must be curved towards the plumbing fixture. Internal installation involves thorough cleaning and subsequent degreasing of the inner surface of the pipe, where the insert will subsequently be installed. Experts strongly do not recommend using various lubricants during installation, including silicone ones, designed specifically for sewers. All installation work is carried out only on dry surfaces.
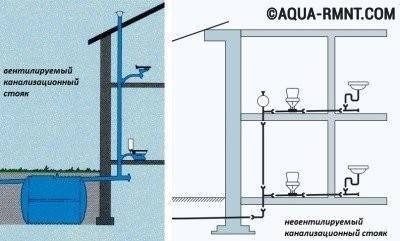
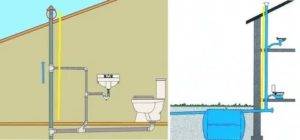
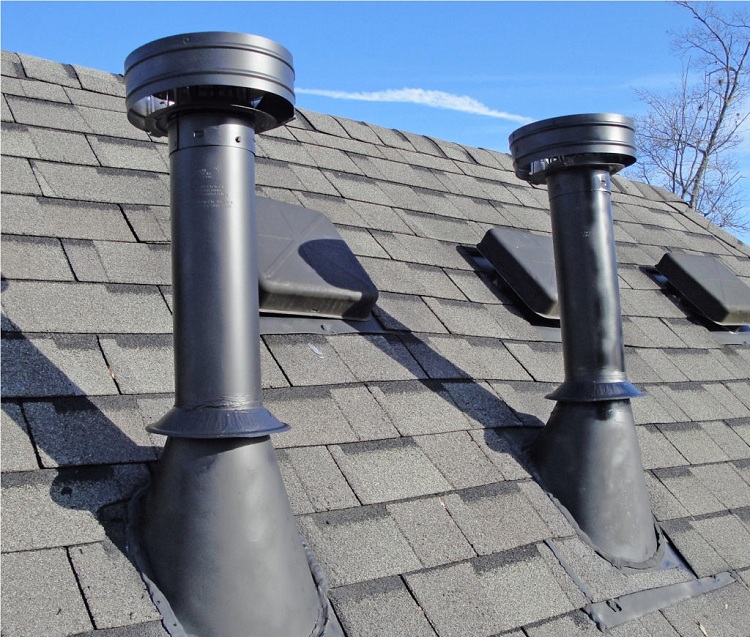
Ventilation riser for sewerage
Traditionally, the upper part of the fan pipe is brought to the roof in the form of a ventilation riser. According to the recommendations of building SNiPs, the height of the structure should be at least 0.5 m on a pitched roof, 0.3 m on a flat unexploited surface and 3 m on an operated roof. At the same time, the minimum distance from the riser to the opened balconies or windows horizontally must be at least 4 m. It is strictly forbidden to combine the outlet of the fan pipe with stove chimneys or ventilation.
Bringing the device to the attic is strongly discouraged. It is also forbidden to install a vent pipe outlet directly under the roof overhang, since snow falling and sliding from the roof can easily damage it. All sorts of additional structures for the hood, such as wind vanes or deflectors installed at the outlet of the sewer riser, will not give the expected effect. On the contrary, according to experts, they provoke the appearance of condensate in the system, which is fraught with blocking of the outlets if it freezes.
Sewerage without ventilation is possible. But will the owner of a dwelling where such a system is installed agree to get used to the constant smell of sewage? A competent installation of a fan structure will easily solve an unpleasant problem, especially since you can do it yourself. After carefully reading the instructions, you can safely get down to business. As a result, the house will not only shine with cleanliness, but also smell of it.
Requirements that fan risers must meet
Certain criteria have been developed for air risers. During the installation of the system, it is advisable to check with them:
- When the pipe is brought to the roof, it must rise above the roof by at least 30 cm.
- If an attic or attic is built, the minimum pipe length should be three meters.
- The gap between the pipe and a nearby light opening or loggia is made at least 4 meters long.
- The fan system, in accordance with existing standards, is carried out through rooms with heating or must have an individual heater.
- It is not allowed to lead the air pipe through the chimney.
- The upper component of the fan riser is equipped with a protective grate that prevents insects and birds from penetrating into the structure.
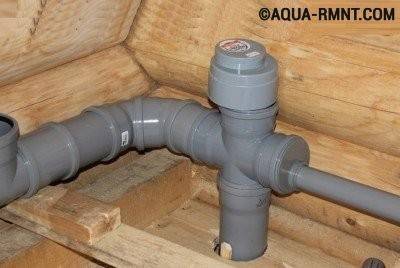
Mounting Features
Installation is carried out in the following sequence:
- Begin to collect elements at the bottom of the contour. Connect with a tee, one hole of which is directed upwards.
- An element of the fan pipe is inserted into the opening of the tee, the joint should be located above the attic floor.
- The junction is isolated with silicone sealant.
- Every 1.5 meters, the pipeline is fastened to the wall with clamps.
The fan pipe, as part of the riser, is displayed on the roof. On a pitched roof, it should protrude 0.5 m above the ridge, if the roof is in use, the distance increases to 3 m.
Repair work
When repairing this system, consider the following:
- The volume of the tubular product must be greater than or the same as the riser.
- The end of the pipe should be placed in such a way as to create a weathering of an unpleasant odor.
- They stretch such networks in heated rooms and end up cold. They are not placed in attics, otherwise a bad smell will penetrate into the rooms from there.
- The design of housing is tied to fan systems, as they are especially visible on the attic and roof.
- Such a network is repaired by connecting to one drain riser, while the remaining risers are equipped with valves.
The material presented shows what a fan pipe is (see for sewerage), and makes it clear that, despite the simplicity of installation actions, all work must be carried out strictly according to existing rules. And, if any difficulties arise, you can always turn to specialists for help and get qualified advice or help from them.


Watch the video
Tips
The outlet of the fan pipes is directed in such a way that the accumulations of sewer gases are removed by the wind. It is unacceptable to place the output in those places where they will concentrate and stagnate, even if no one visits these places. If for some reason it is not possible to bring the sewer pipe to the ventilation system, then the outlet from the fan circuit can be led out through the wall.
Decorative rosettes perfectly help to cope with the negative aesthetic effects of such a solution. To bundle several fan pipes, tees are used, designed for angles of 45 or 135 degrees.
In the event that the attic of the house is used, it is necessary to increase the height of the output to 3 m. All fan risers going through unheated rooms must have a thermal protection layer.
Plastic pipes should be led out through ceilings with metal sleeves. From above it is worth mounting a cover and a grid - they will protect small insects from penetrating into the fan system.Instead of a fan pipe, an air valve can sometimes be used, installed above the revision part of the riser. But such a solution is applicable only in houses where there is no more than one sanitary unit. Vacuum valves, regardless of their quality, quickly become clogged and cease to perform their main functions.
The problem with valves also arises when the siphon (hydraulic seal) is deprived of water. In this situation, the whole system becomes useless. In addition, a hydraulic shutter, even in ideal mode, is not able to 100% protect against unpleasant odors - it must be supplemented with supply and exhaust ventilation ducts. Only a complete fan system can provide good air in homes with toilets, bathrooms, washing machines and dishwashers.
Fan pipes are mainly produced from PVC. But it is much better to choose multilayer structures based on polypropylene, as they have an increased level of sound insulation due to the presence of special additives. Increased wall thickness and optimal design at the corners also help them to dampen extraneous sounds. In order not to be mistaken with the selected dimensions of the fan pipes, it is recommended to carry out careful engineering calculations of the entire system.
It is advisable to make a minimum of turns, and if you resort to them, then only at an angle of 45 degrees. The connection is made mechanically: socket. Any docking station must be equipped with a rubber seal that makes the riser airtight. It is advisable to choose clamps with gaskets that suppress vibration and install them in 700 mm increments.In houses made of natural or artificial stone, as well as when using reinforced concrete floors, pipes must be passed through them using fireproof cases.
Sufficient protection against fire and mechanical damage is guaranteed by cutting steel pipes. In most cases, such cases are mounted directly during the arrangement of the ceiling. The key cut-off factors are the settlement of the house and the thermal deformation of the pipe from the inside. The sleeve should exceed the diameter of the fan pipe by about 10 mm.
Most often, these materials are:
- mounting foam;
- oiled rope;
- rope impregnated in bitumen;
- silicone sealant.
To bring the fan system through the roof, it is allowed to use a special passage device. It is made both universal and adapted to a specific roofing material. Sometimes the fan pipe is pulled inside the chimney with a corresponding increase in its cross section.
It is forbidden to stretch the forced ventilation in the same place.
It should also be borne in mind that if there is a septic tank in the house, then ventilation will need to be openly removed. It is unacceptable to install valves in unheated rooms, where the accumulation of condensate can completely block their operation.
It is very important to buy components exclusively from well-known manufacturers - the products of anonymous and little-known companies are rarely of high quality, and shortcomings are discovered only in a critical situation. It will not be possible to find differences in appearance - even consulting a specialist when buying does not always help
See the next video for more details.
Rules for installing a fan riser
According to the instructions of SNiP 2.04.01-85, the installation of a fan sewer is mandatory if the building height is above 2 floors.However, for a one-story building, the use of this device may be necessary. In a country house, where residents are only in the summer, the number of sanitary appliances is minimal, the fan pipe can not be used.


The country house of permanent residence is saturated with plumbing. Often these are several toilets, a shower, a bathtub, a jacuzzi, a dishwasher and a washing machine, and other water drain points. The location of the septic tank is important, a distance of less than 8 m is not sufficient. For the correct and comfortable operation of the sewage system, the installation of a vent pipe is necessary.
Check valve for internal and external sewerage
Check valve for downpipes
In the event of a sewer blockage, while the owner is thinking about how to clear the blockage, the accumulated feces can return to the house.
To avoid such a situation, a check valve must be installed on the fan pipe:
- The non-return cylindrical valve with a cover is inserted into the outlet pipe immediately after the toilet is installed;
- When draining the water, the lid opens and then closes with a stainless steel spring. Thanks to this design, the lid cannot be opened from the outside by faecal masses trying to get back;
- The tightness of the connection between the valve and the pipes is achieved by using rubber rings;
- The service life of the check valve reaches several decades.
Installation instructions
Installation of a fan pipe
Having figured it out what is needed the pipe is a fan pipe, the main stages of its installation should be considered in more detail:
First of all, when replacing pipes in an apartment or a private house, the old sewer system is dismantled
Today, cast iron products are already obsolete, so they should be replaced with plastic funnel pipes, while being careful.
Dismantling is carried out by turning off the riser and sequentially disconnecting the structural elements.
-
A new fan pipe begins to be installed from the lower stiffness point located in the main riser. In the case of a country house, installation begins from the place where its foundation begins.
Holes are drilled in the supporting structures and a fan pipe is installed, securing it with clamps. After the plumbing is installed, a fan outlet is brought to the toilet. - In some cases, a flexible sewer sewer pipe creates difficulties when connecting to other pipes. In this case, the O-rings are pre-lubricated with liquid soap or silicone, facilitating their entry.
-
When installing a fan pipe, only metal clamps should be used, which ensure the reliability and strength of the structure, as well as allow you to select deviations from the marking lines that may occur during pipe assembly. The stud on a standard metal clamp has a convenient screw structure that allows you to precisely adjust the elements to be connected.
- Noise insulation of the fan pipe is carried out using mounting foam or mineral slabs.
Fan pipe repair
Replacement of fan pipes
When repairing a fan pipe, the following nuances should be considered:
- The diameter of the pipe must be greater than or equal to the diameter of the riser on which the installation is made;
- The end of the pipe is positioned so as to ensure the removal of an unpleasant odor by the wind;
- The pipe is laid in warm rooms, and finished in a cold zone (except for the attic), since the temperature difference creates the necessary pressure drops in different parts of the pipe, and the pipe leading to the attic will lead to an accumulation of an unpleasant odor there, which will then penetrate into the living quarters;
- The design of the house is directly related to the vent pipes, especially if there are several risers and, accordingly, several vent pipes, which is especially noticeable on the roof and on the attic floor.
Vacuum valves
The fan pipe is repaired by direct connection to one sewer riser, while vacuum valves are installed on the remaining risers, which are rubber seals equipped with springs. A working sewer creates a vacuum in such a valve, as a result of which it opens, sucking air from the room into itself. After equalizing the pressure in the riser, the spring closes the valve, preventing the unpleasant odor from escaping.
After reading this article, it should become clear to you what a fan pipe is, which prevents the penetration of unpleasant odors into the bathroom, and from there to other rooms.
Moreover, it is important not only to install a fan pipe, but it is desirable to replace the existing cast-iron pipe with a plastic one, which has greater smoothness from the inside, which does not allow deposits to stick to the pipe cavity from the inside, clogging it. In addition, the use of plastic pipes greatly simplifies the repair process in the bathroom when replacing pipes in the bathroom and toilet.
Kinds
For sewage, you can use fan pipes made of cast iron or plastic.Cast iron is only compatible with cast iron, plastic is much more versatile, so plastic is recommended when repairing and replacing broken parts. Metal products are now rarely used also because they are not flexible enough and their range is too scarce. Most often, installation is carried out in a sewer line with a diameter of 110 mm.


Professionals believe that fan lines made of dissimilar materials are not very durable. Ideally, all sewer parts should be selected from one substance. If such a solution is not possible, then it is worth consulting with qualified engineers how this or that combination of materials used will behave. The fan pipe can have almost any geometry - it is permissible to lead it vertically or horizontally. There are even separate options that are mounted at an angle.
The exit from any fan system will certainly be located outside the residential building, otherwise no efforts will help to cope with the harmful odors that have appeared.
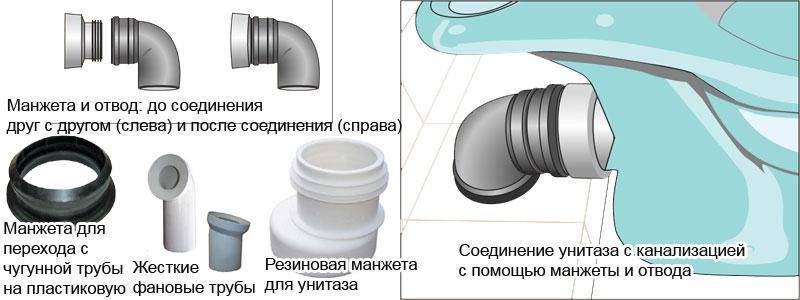
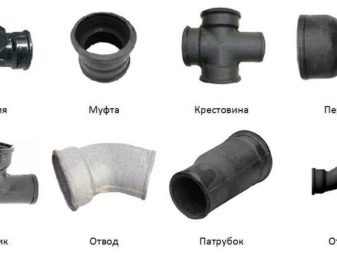
When installing both cast-iron and plastic pipelines, the same products are used as for waste channels:
- fitting;
- pipes;
- bends;
- rubber cuffs;
- transition blocks;
- clamps (with their help, the line is attached to walls and other surfaces).
Technical requirements
There is no regulation for the outlet pipe that defines the diameter. Usually, for this purpose, a pipe similar to a sewer is used in apartment buildings.
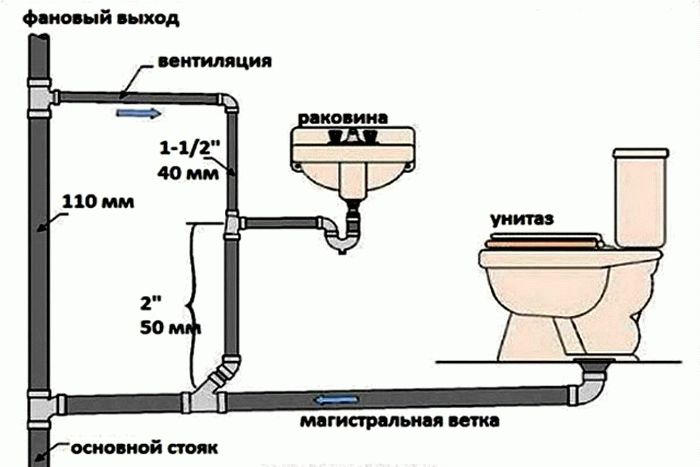
Suppose, in a private house, a pipe with a diameter of 5 cm is used to drain from the sink, the drain tank hole is 7 cm, the toilet pipe is 10 cm.In this case, a roof drain pipe with a diameter of 10 cm can be used for the fan riser.
Practice confirms that such a pipe is sufficient to ensure constant pressure in the drainage system and to carry out ventilation in it. If we are talking about a one-story private house in which only one toilet is installed, then here you can do without installing a fan riser.

Air supply and exhaust system
This is due to the fact that the drain in this case will not be able to create a sufficiently strong decrease in pressure so that unpleasant consequences can be felt.
However, in some cases, fan risers on the roof are necessary:
- If the house has at least two apartments with fully equipped sewerage systems, provided that they are connected to a common network.
- A sewer exit to the roof for ventilation of the riser is required in a house where there are more than two floors.
- In the presence of an equipped horizontal sewer distribution, provided that three or more plumbing fixtures are connected to it.
Fan chimney on the roof
It is also necessary to provide:
- Although sewer risers usually have a diameter of 10 cm, however, sometimes there are situations when a pipe with a diameter of 5 cm is used for this. Then the outlet of the vent pipe to the roof is mandatory.
- If the house has a pool that discharges water into the sewer system, the use of the design in question is also necessary. This is due to the fact that in such a situation it is possible to discharge a large amount of water.
- A fan riser, access to the roof are needed in cases where the flow occurs in private septic tanks located next to the house.
- If the house is one-story, but the bathroom and toilet are located on different levels, and the drain occurs in one pipe.

Fan pipe with outlet to the roof
Installation
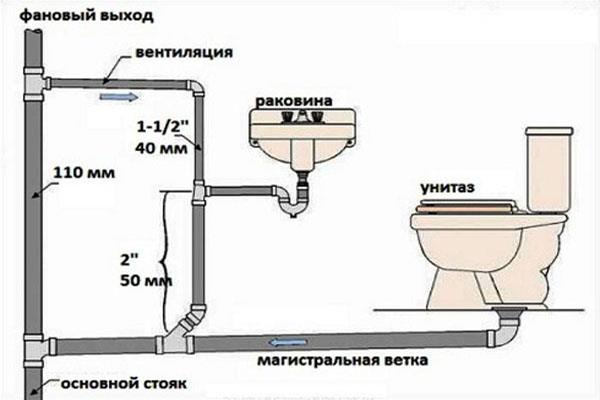
Before you install a fan pipe, you need to calculate its dimensions. To install a corrugated pipe and a waste pipe, a branch with a diameter of 110 mm is used. This indicator depends on what diameter the drain pipe has. Most often, the drain from the toilet is made with a cross section of 75 mm, but with a strong pressure of water, it can overlap, which will create some inconvenience. Therefore, for its additional protection, a larger diameter fan pipe is used.
Scheme: fan ventilation
Another major point of the installation is that the outlet pipe must be located in a place where sewer odors will be ventilated with fresh air. It is advisable to place it in an open space or directly combine it with ventilation ducts.
Video: preparation and installation of cottage sewer pipes
Basic rules for installing a flexible fan ventilation pipe:
- The section of the fan connection is always larger than the size of the main pipe, otherwise the connection will not be airtight and may be broken with a high pressure of sewage;
- The reinforced sewer sewer pipe should be led out under a cold room that is not heated, but start in a warm one, this will help organize proper ventilation. At the same time, according to SNiP, attics (because the fan must go down) and outdoor premises are not suitable for installation, since it is necessary to provide excellent thermal insulation of the pipe;
- Most often, one such ventilation is installed for the whole house. To ensure branching, a special cross is used. Sometimes a tee is used.In some cases, with the wrong layout of the building, you can make several ventilation for each bathroom, but then for each scheme is developed individually.
After you have decided what fan ventilation and sound insulation are for, you need to proceed with the installation of the pipe. To do this, you first need to prepare the work process. The water in the riser is turned off, and the pipe is cut in the intended place. Depending on the type of ventilation arrangement, you can install the pipeline horizontally or vertically. Horizontal placement will not disturb the beauty of the interior, but is considered a more complex design than vertical.
Scheme: installation of a fan pipe
After communication with the socket is introduced into the prepared main pipeline to a certain depth. Some masters use a detachable fan pipe for ease of installation. The sliding design is allowed, if necessary, to clean the sewer system.


Regardless of which diameter of the external or internal fan pipe has been chosen, it is not necessary to install a vacuum check valve in it.
What it is? The vacuum valve or gasket is used for the following purposes:
- Protection of sewage from rodents and other animals;
- To prevent the return of drains. There are quite frequent cases when a return pipe was not installed at all in the sewer riser, then in case of an accident, feces can go back to housing;
- If there is a problem with mixing, the valve prevents artificial impurities from returning to the sewer;
- With its help, complete sealing of drains is ensured.
Installing a check valve is a simple but very important process for installing a sewer system. To begin with, the water in the riser is blocked, the pipe is completely wiped from the inside and degreased with special compounds
It is very important not to lubricate it with silicone sealants or adhesives - they can adversely affect the integrity of the valve
After that, a special insert is inserted into the pipe, which will later serve as the basis for the fan. Then, the vacuum valve is mounted. It must be snapped into the pipe, but make sure that the petals of the device are open, bent to the base.
If the knee size is within 110 mm, then you must also use a special adapter. This is a box with additional taps, which will help to make a tighter connection between the valve and the line. Another option for installing the valve is directly into the pipe, then the connection is a cut pipe into which the valve is inserted along with the fan.
check valve
You can buy communication at any plumbing store, a white fan pipe of 75 brands such as Mcalpine, Jimten, Plastimex, Sanmix, Viega is very popular (price depends on size, reinforcement and other characteristics).
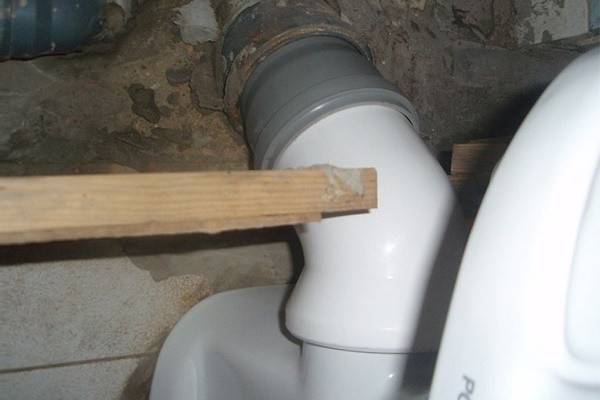
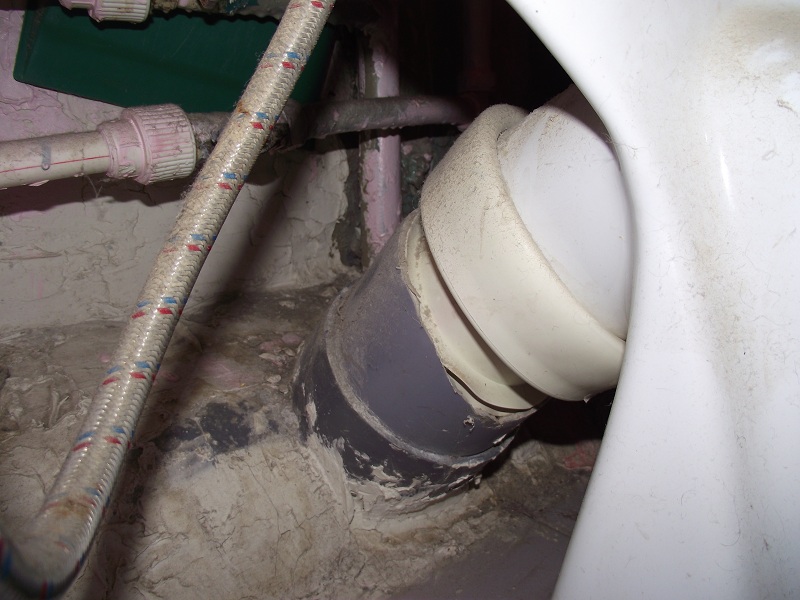
How to connect the toilet to the sewer using corrugations?
We insert the corrugation of the desired diameter into the sewer pipe. Be sure to coat the attachment points with silicone compound to prevent leakage.
Then they mark the places on the floor where the fasteners need to be placed, set the toilet aside and drill holes in the floor, then insert the dowels, but do not screw them in yet.
If there are no leaks, the corrugated pipe is inserted into the toilet and firmly fixed with a sealed solution. Check the toilet again for leaks, and then screw the toilet.
Important! It is necessary to check the toilet bowl for strength and stability, if it staggers, you need to disassemble it again, unwind it and find out the reason. It may be necessary to strengthen some places with cement
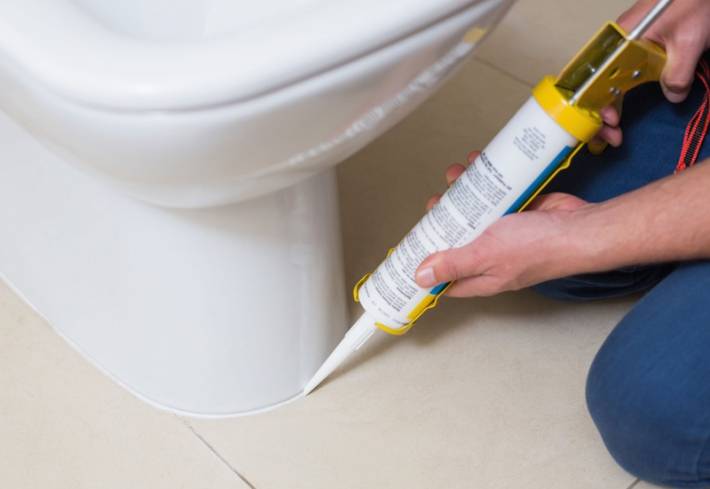
After everything is checked and fixed, grease the toilet bowl with tiles with a silicone sealed compound.
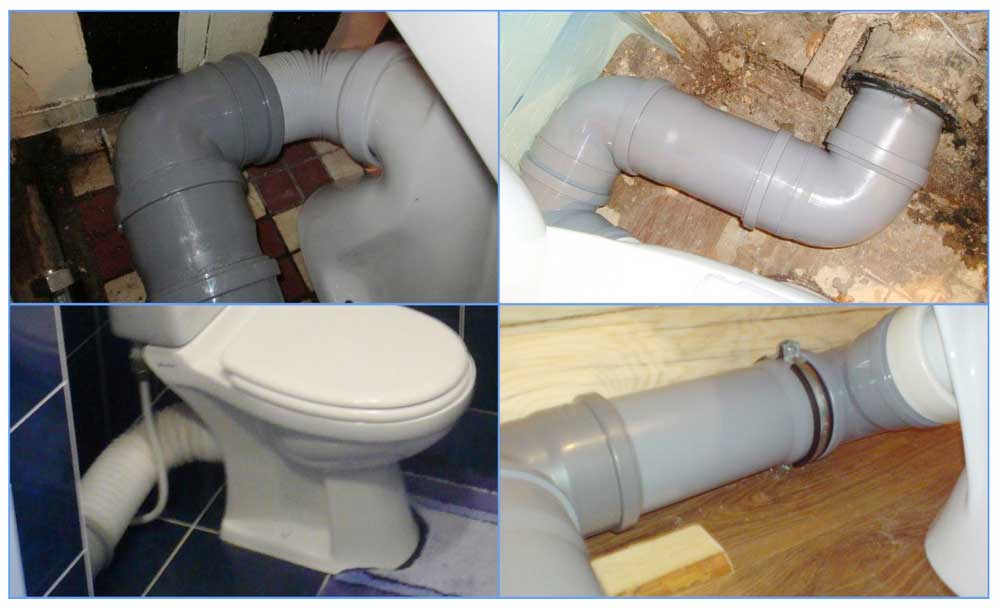
Basic pipe connection schemes
The scheme for connecting the toilet to the sewer pipe depends on which plumbing fixture. All products differ in the release position.
The most common schemes in use today are the following:
- connection directly to the wall, used when installing toilet bowls with a horizontal outlet;
- installation at an angle, when the drain can go both to the floor and to the wall, is implemented during the installation of a plumbing fixture with an oblique outlet;
- connection vertically suitable for installation of toilets with vertical outlet.
Installing a sewer pipe for a toilet is a rather troublesome business, however, you can do it yourself. The first step is to decide on the model of the toilet. The choice will depend on the personal preferences of the owner, on his financial capabilities, as well as on the sewer system of the house and on the layout of the bathroom.
Perpendicular to floor
Attaching a toilet bowl to a sewer pipe in this way was very popular in the middle of the last century. Today, plumbing fixtures with vertical outlet are produced in very limited quantities, as there are more disadvantages than advantages.
The main advantage of this design is that the toilet can be installed very close to the wall, which is especially true for a small bathroom. Another advantage of the connection, when the sewer pipe is vertical, is that it looks quite neat and attractive from the outside. There are no extra ends, pipes, transitional parts.


Connecting the toilet to the sewer pipe is carried out in several stages:
- in the place where the toilet will have to stand, we install a screw flange with a lock;
- a sewer pipe is installed in the middle of the flange;
- now the plumbing fixture is mounted, twisted;
- the last thing you need to fix the pipe.
If we talk about the shortcomings of such a scheme, then one cannot help but pay attention to the fact that the wiring is under the floor, respectively, there is no access to the pipes. In the event of an emergency, it will be very difficult to carry out repairs. You will have to rip off and install the floor back, and this is not only a waste of money and effort, but also damage to the aesthetics of the room.
Parallel to the floor
This scheme is implemented in the case of installing a toilet bowl with a horizontal outlet. The drain pipe will be parallel to the floor, and come out from behind, pushing against the wall. In order to perform a high-quality sewer system, it is necessary to prepare sealing cuffs that provide a hermetic connection between the wall and the plumbing fixture.
Connecting the toilet to the sewer pipe in this way begins with the fact that the plumbing fixture must be attached to the floor with dowels. After that, you can perform work on connecting the sewer pipe to the toilet.
This scheme is popular because of the ease of installation, but you can only connect a pipe to a plumbing fixture if the house has a vertical riser.
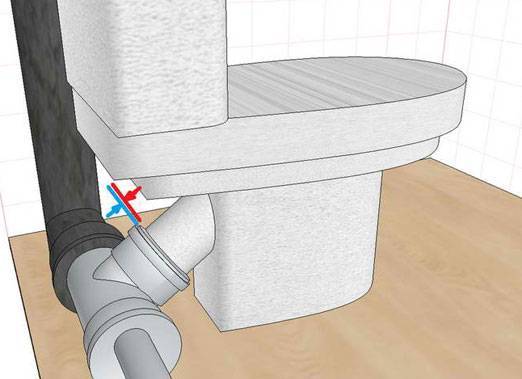
at an angle
If you need to decide how to connect the toilet to the sewer pipe, many owners choose an angled connection scheme. It is used if an oblique outlet is implemented in the plumbing fixture. The only drawback of this type is that there must be some distance from the toilet to the wall, which is necessary for the correct installation work, however, this can pretty much spoil the aesthetics of the room.
The main advantage of this option is that the sewer pipe is extremely rarely clogged, because all the garbage goes into the sewer much faster than if a horizontal connection scheme is used.
Installation work is carried out in several stages, at each of which it is necessary to follow the recommendations of professionals so as not to encounter troubles during operation.
- the release of the toilet bowl must be lubricated with a solution, which includes drying oils and minium;
- a tarred strand with a released end is wound on top;
- the strand is smeared with red lead;
- the oblique outlet of the plumbing fixture is fixed in the hole of the sewer pipe.
The expediency of using a fan valve
If for some reason there are no technical possibilities for arranging ventilation for the sewer riser in the house, you can use special vacuum valves. Such devices, albeit not fully, but are able to replace the fan pipe.
- The drain valve for sewerage structurally consists of a sealing rubber seal, equipped with a slightly tensioned spring.
- Fan valves are installed at the end of the sewer riser located indoors.
- In the process of movement of wastewater through the pipe, a vacuum is created inside the fan valve, due to which the seal opens and the vacuum is compensated due to the inflow of air from the room.
- After the pressure is equalized, the spring closes the seal, preventing the penetration of an unpleasant odor into the house.
- Also, the use of non-return valves, in addition to the central riser, is possible on horizontal pipes of 50 mm in diameter, which makes it possible to protect against the penetration of unpleasant odors through the siphon.
Before using a fan valve for sewage, you need to understand that its service life is negligible, which requires frequent replacement. That is why it cannot be considered an equivalent replacement for fan sewer ventilation.
Conclusions and useful video on the topic
For a better understanding of the above instructions, it is recommended that you familiarize yourself with the following video review:
Connecting your own toilet to the sewer system is easy. To do this, it is advisable to buy in advance a model of equipment that will most aesthetically fit into the interior of the bathroom.
With a minimum of tools, sealant and properly selected fittings, you can install the toilet using the above instructions in a few minutes.
Do you have practical skills in installing and connecting a toilet bowl to a sewer? Please share your knowledge, experience with our readers or ask questions. The comment form is below.