- Courses for welders
- Pipe welding
- Mistakes of beginner welders
- How to choose electrodes for welding
- Arc ignition
- How to weld a seam
- Welding vertical seams
- How to weld a horizontal seam
- Ceiling seam
- Safety precautions for electric welding
- Preparing for welding
- Tips: how to learn how to cook with electric welding yourself
- Manual arc welding technique. How to cook by welding
- Arc welding
- Semi-automatic metal inert gas welding (MIG)
- Tools and equipment
- Equipment types
- Tools and equipment
- Common rookie mistakes
- Types of welding machines
- transformer
- inverters
- Electric welding technology
- How to light an arc
- Welding speed
Courses for welders
Welding can be mastered in special courses. Welding training is divided into theory and practical training. You can study in person or remotely. The courses teach welding technology for beginners and other important wisdom. Important is the opportunity to learn how to cook by welding in practical classes under the supervision of a teacher. Students are given an idea about the available equipment for welding, the choice of electrodes, safety rules.
You can study individually or with a group.Each option has its own advantages. When studying individually, you can master only those knowledge that can be useful in the future. But when studying in a group, there is an opportunity to hear the analysis of the mistakes of their fellow students and thus acquire additional knowledge.
After completing the courses and passing the exams confirming the acquired knowledge and practical skills, a certificate of the approved sample is issued.
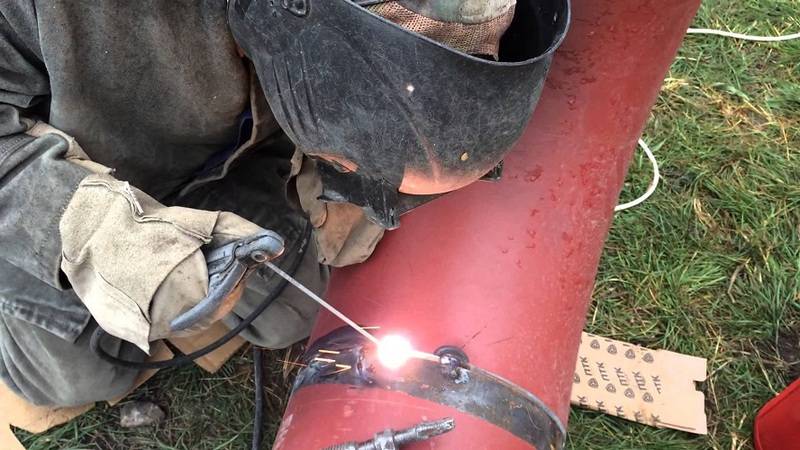
Pipe welding
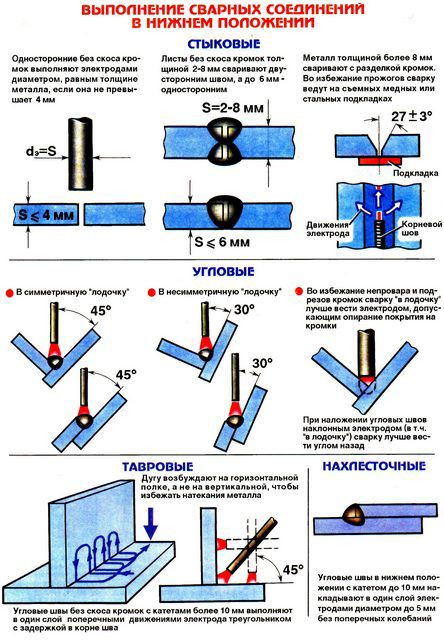
With electric arc welding, it is possible to make a horizontal seam that runs along the circumference of the pipe and a vertical one that runs on the side, as well as top and bottom seams. The most convenient option is the bottom seam.
Steel pipes must be welded end-to-end, while welding all the edges along the height of the walls. During operation, the electrode must be installed at an angle of 45 degrees - this is done in order to reduce the influx inside the products. The width of the seam should be 2-3 mm, height - 6-8 mm. If welding is overlapping, then the required width is already 6-8 mm, and the height is 3 mm.
Immediately before starting work, it is necessary to carry out preparatory procedures:
- You need to clean up the item.
- If the edges of the pipe are deformed, then align them or cut them off with an angle grinder, or in a simple grinder.
- The edges where the seam will pass must be cleaned to a shine.
After preparation, you can get to work. It is necessary to weld all joints continuously, fully welding. Pipe joints with a width of up to 6 mm are welded in 2 layers, with a width of 6–12 mm in 3 layers and with a wall width of more than 19 mm in 4 layers. The main feature is the constant cleaning of pipes from slag, i.e. after each completed layer, it is necessary to clean it from slag and only then cook a new one.Particular care must be taken when working on the first seam, it is necessary to melt all dullness and edges. The first layer is carefully checked for cracks, if they are present, then they must be melted or cut down and welded on again.
All subsequent layers are welded by slowly turning the pipe. The last layer is welded with a smooth transition to the base metal.
Mistakes of beginner welders
To learn how to cook with electric welding, you need to consider the main mistakes that beginners make:
- Moving the electrode too fast, resulting in an uneven seam.
- Too slow movement of the seam, while holes and burns are formed in the metal.
- Too uneven and flat seam. The main error here is in the angle of the electrode.
- Metal failure. This happens because the 5 mm gap between the metal and the electrode was not respected, i.e. the gap was too small.
- Otherwise, when the gap is too large, the metal does not boil through.
All of the above errors are only the most gross. There are many more nuances that can only be understood with experience.
When welding thin-walled metal or profiles, a careful approach to work is required. Thin parts can be welded by applying a cleaned electrode and welding directly on top of it.
Welding on non-ferrous metals is strikingly different, since it requires other electrodes. A special protective environment is also needed. Now you can buy universal devices that cook almost any metal.
There are also semi-automatic devices for working with thin-walled metals. Its essence lies in the deposition of a special wire.
How to choose electrodes for welding
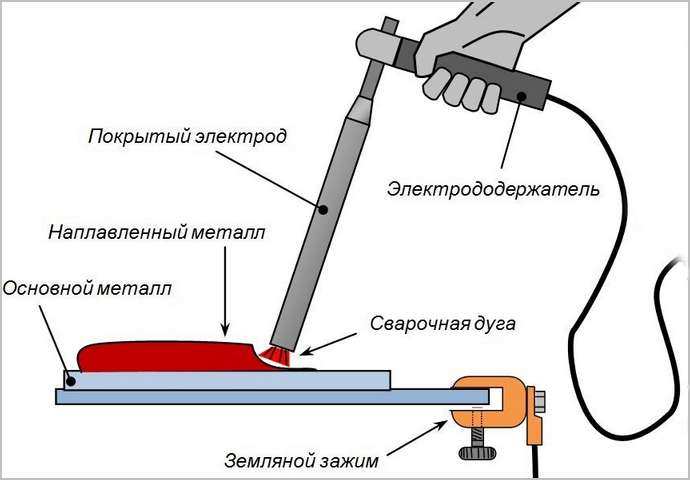
An electrode is a metal rod that allows you to conduct current to the workpiece to be welded. There are various brands of electrodes, but for welding steel, conventional electrodes for an inverter with a diameter of 3 mm are suitable. The thicker the metal, the larger the diameter of the electrodes for welding should be chosen.
It is very important that the electrodes for welding training be of high quality, and, of course, dry. When using damp electrodes, it is very difficult even for an experienced welder to strike the arc and keep it in a stable state.
Therefore, if you decide to learn how to weld, you should use only high-quality consumables for these purposes.
Arc ignition
Then you need to turn on the inverter. This simplest procedure for electric welding is performed by turning on the toggle switch. The current value should be set with a regulator, which is easy to see on the front panel of the unit. For the selected electrode, a current of 100 A is suitable. Lower the mask and proceed.
First of all, you need to work out the skill of ignition of the arc. With the new electrode, this is done by simply swiping it across the part. Remember how you light matches. If the electrode was already in use, then they need to knock on the metal surface. It happens that the electrode in the hands of beginners sticks to the metal. This is easily corrected by sharply tilting the electrode to the side. In case it was not possible to tear off, you need to turn off the inverter. Then the sticking points will disappear by themselves.


The ignited electrode forms a welding arc. To maintain it, you need to learn how to maintain a distance to the metal of 3-5 mm. When approaching, a short circuit may occur, accompanied by sticking. When moving away, the arc will disappear.
How to weld a seam
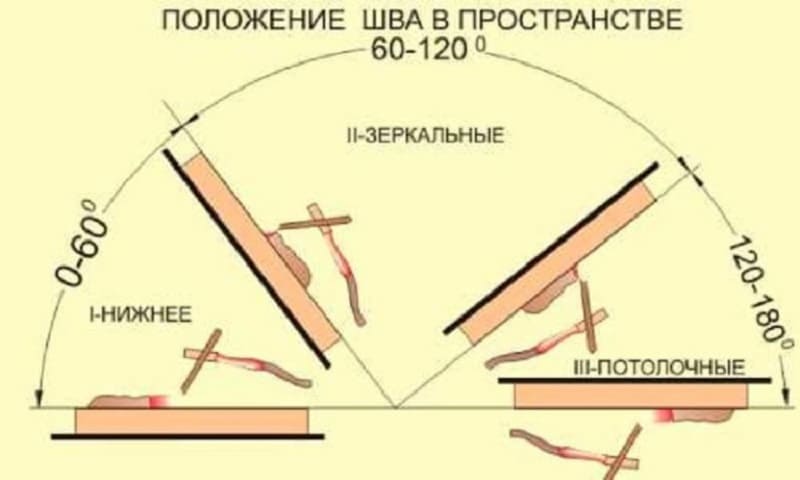
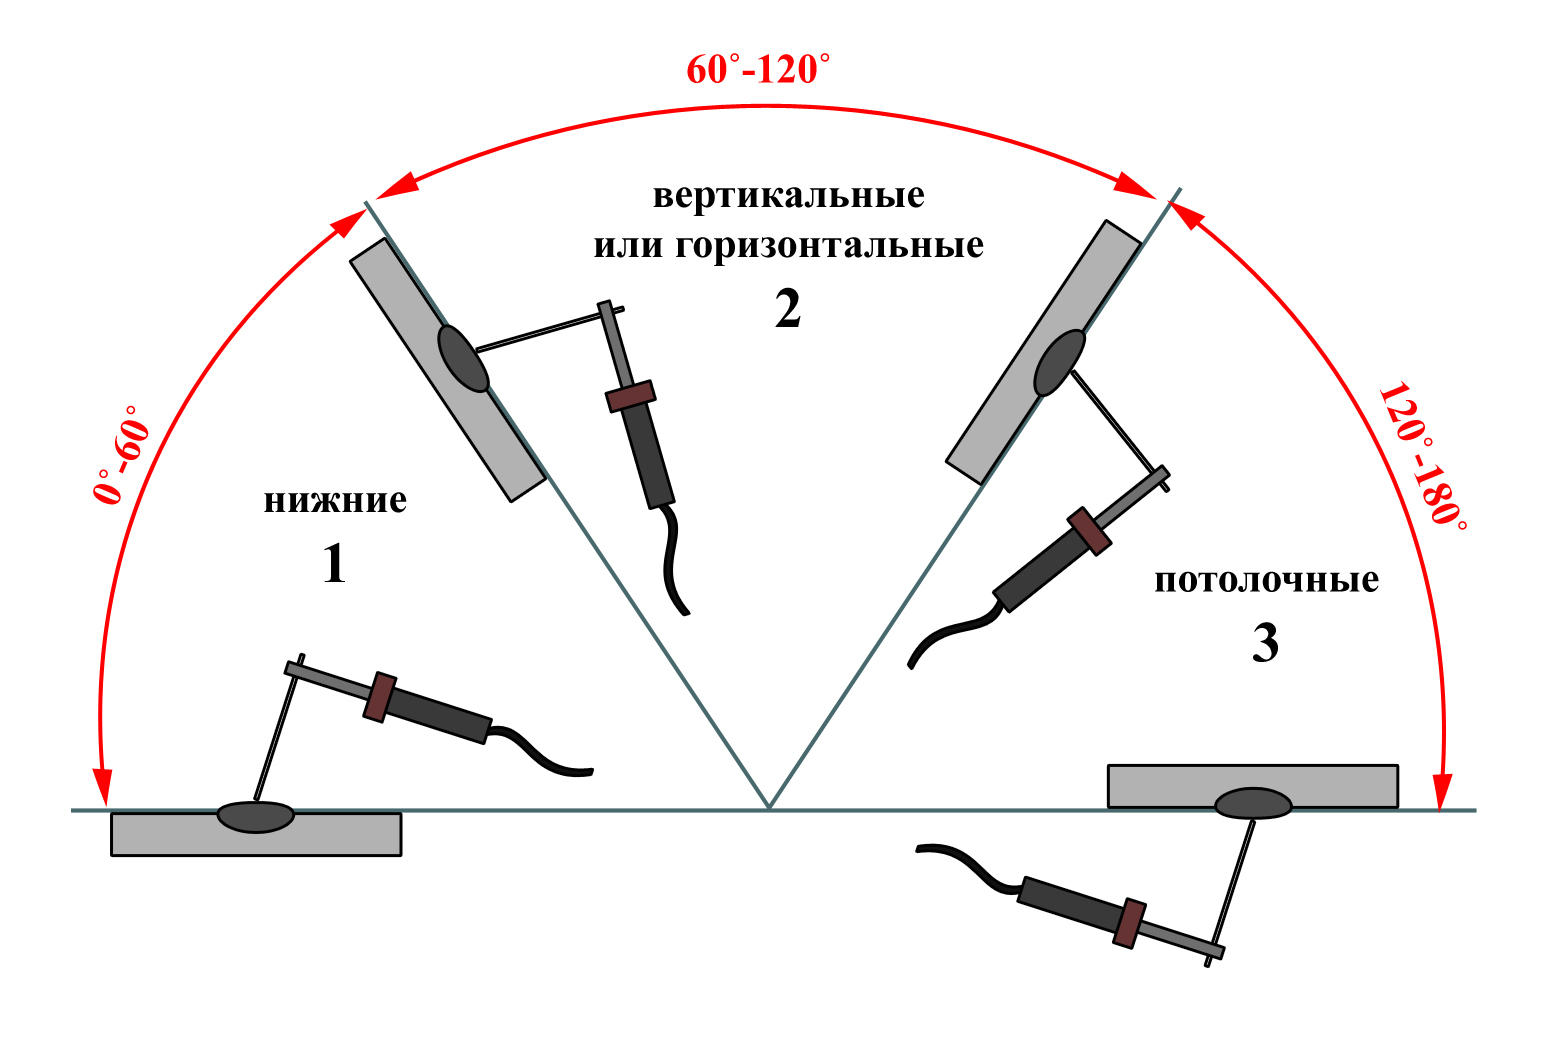
When welding in the lower position, no difficulties arise even for a novice welder. But all other provisions require knowledge of technology. Each position has its own recommendations. The technique for making welds of each type is discussed below.
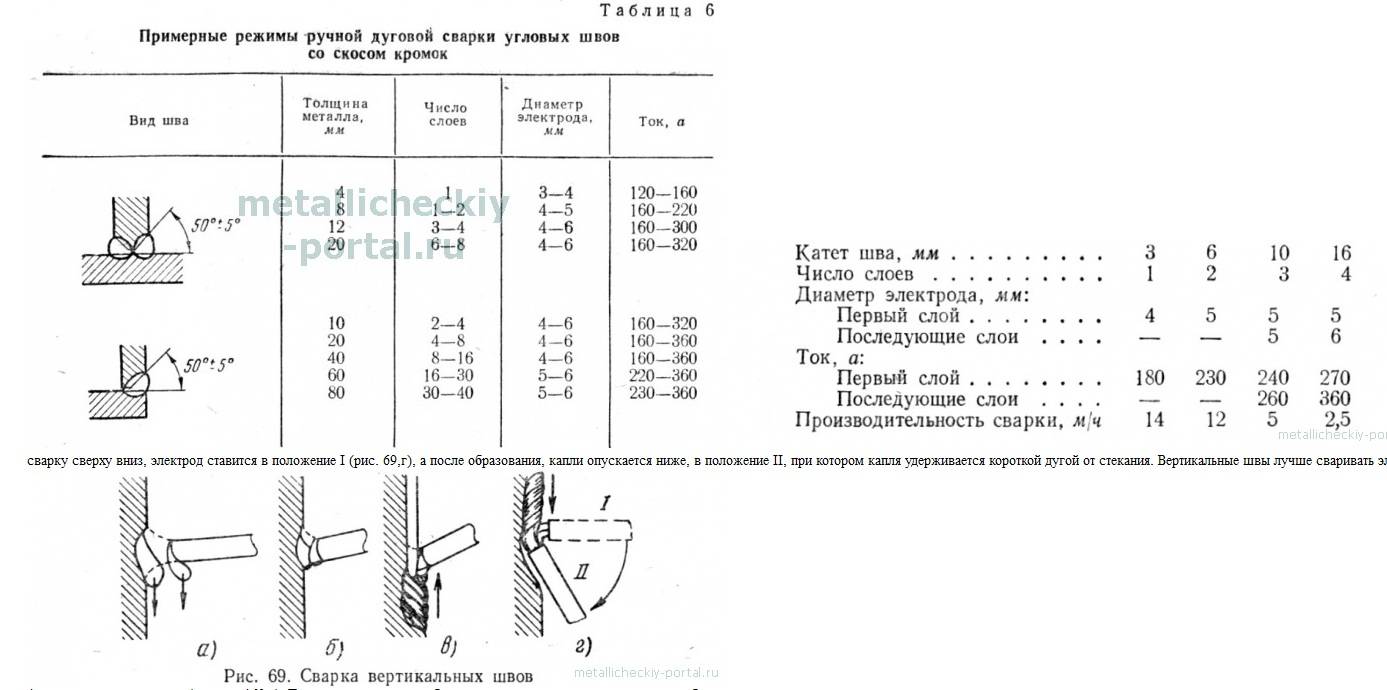
Welding vertical seams
During welding of parts in a vertical position, the molten metal slides down under the action of gravity. To prevent droplets from coming off, a shorter arc is used (the tip of the electrode is closer to the weld pool). Some craftsmen, if the electrodes allow (do not stick), generally lean them on the part.
Metal preparation (grooving) is carried out in accordance with the type of joint and the thickness of the parts to be welded. Then they are fixed in a predetermined position, connected with a step of several centimeters with short transverse seams - “tacks”. These seams do not allow the parts to move.
A vertical seam can be welded from top to bottom or from bottom to top. It is more convenient to work from the bottom up: this is how the arc pushes the weld pool up, preventing it from lowering down. This makes it easier to make a quality seam.
How to weld a vertical seam from the bottom up: the position of the electrode and possible movements
This video shows how to properly weld a vertical seam by electric welding with the movement of the electrode from bottom to top without separation. The short roll technique is also demonstrated. In this case, the electrode movements occur only up and down, without horizontal displacement, the seam is almost flat.
It is possible to connect parts in a vertical position with an arc separation.For novice welders, this may be more convenient: during the tear-off time, the metal has time to cool. With this method, you can even rest the electrode on the shelf of the welded crater. It's easier. The pattern of movements is almost the same as without a break: from side to side, with loops or a “short roller” - up and down.
How to cook a vertical seam with a gap, see the next video. The same video tutorial shows the effect of current strength on the shape of the seam. In general, the current should be 5-10 A less than recommended for a given type of electrode and metal thickness. But, as shown in the video, this is not always true and is determined experimentally.
Sometimes a vertical seam is welded from top to bottom. In this case, when starting the arc, hold the electrode perpendicular to the surfaces to be welded. After ignition in this position, heat the metal, then lower the electrode and cook in this position. Welding a vertical seam from top to bottom is not very convenient, it requires good control of the weld pool, but in this way you can achieve good results.
How to weld a vertical seam by electric welding from top to bottom: the position of the electrode and the movement of its tip
How to weld a horizontal seam
A horizontal seam on a vertical plane can be carried out both from right to left and from left to right. There is no difference, to whom it is more convenient, he cooks like that. As when welding a vertical seam, the bath will tend to go down. Therefore, the angle of inclination of the electrode is quite large. It is selected depending on the speed of movement and current parameters. The main thing is that the bath stays in place.
Welding horizontal seams: electrode position and movements
If the metal flows down, increase the speed of movement, warming up the metal less.Another way is to make arc breaks. During these short intervals, the metal cools down a little and does not drain. You can also reduce the current a little. Only all these measures are applied in stages, and not all at once.
The video below shows how to properly weld metal in a horizontal position. The second part of the video about vertical seams.
Ceiling seam
This type of welded joint is the most difficult. Requires high skill and good control of the weld pool. To perform this seam, the electrode is held at right angles to the ceiling. The arc is short, the speed of movement is constant. Perform mainly circular movements that expand the seam.


Safety precautions for electric welding
Electric welding of metal is accompanied not only by the release of heat, sparks, etc. If handled improperly, you can easily get an electric shock.
Therefore, before taking hold of the electrode holder for the first time, fulfill a number of the following requirements:
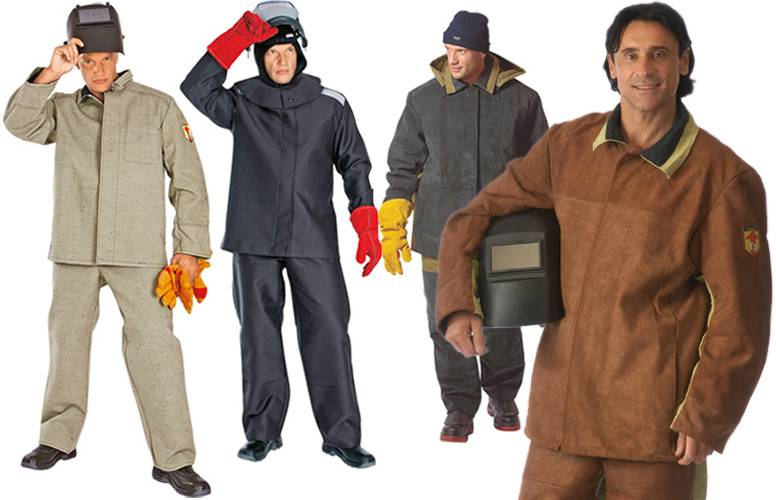
- Protect your eyes. For these purposes, there are special masks for welders or their predecessors, shields with light filters;
- Be sure to work in overalls, it must be made of non-combustible materials, arms and legs must be covered;
- Use rubberized shoes and gloves, welder's leggings. This way you minimize the risk of electric shock.
We must not forget that electric welding, among other things, is also dangerous by electric shock. Therefore, it is impossible to cook by welding on the street when it is even raining lightly. Also, you can not cook in containers from fuel, gas, etc. You should always wear rubberized overalls to protect your hands and feet.
Today, for household welding, inverters are most often used. These are lightweight and mobile devices that can weld steel, cast iron, and stainless steel.
Preparing for welding
Electric welding training is a practical process that requires some training. First of all, you need to take care of security. The work of a welder is quite dangerous:
- Possibility of burns from splashes of molten metal;
- Poisoning with toxic secretions at high temperatures;
- Possibility of electric shock;
- Eye injury if safety goggles are not worn.
The right choice of equipment and equipment for electric welding is the key to a safe process. For welding work you will need:
Suit made of dense fabric, completely covering the body, arms and legs;
Special glasses can be used to protect the eyes, but we recommend paying attention to masks. They will also protect the face and are safer in the welding process;
Quality equipment for welding;
electrodes;
A bucket of water to eliminate possible fires;
The right spot for welding
It is preferable to stay outdoors and remove all nearby flammable objects.
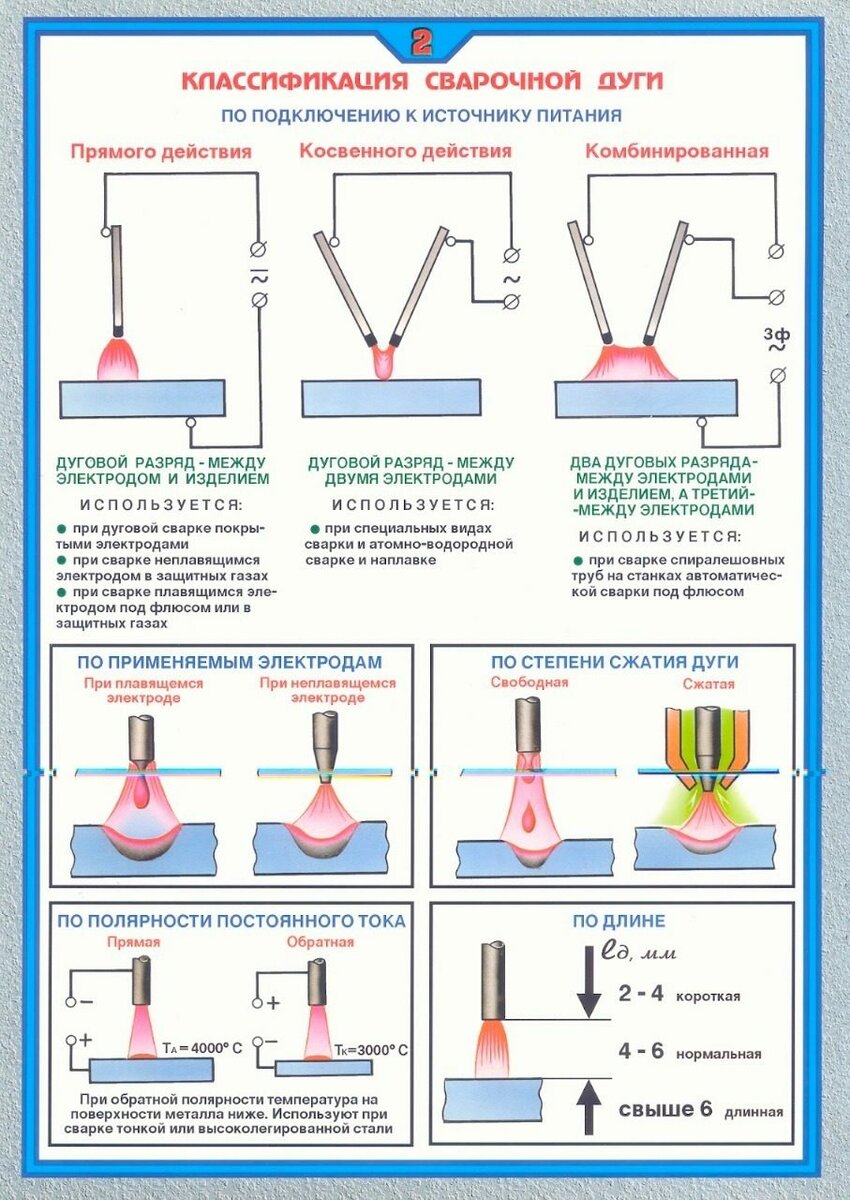
The modern market represents a wide selection of electric welding machines, the variety of which comes down to three main types:
- A transformer that converts alternating current for welding. This type of welding machine often does not give a stable electric arc, but eats up a lot of voltage;
- The rectifier converts to direct current from the consumer network. These devices allow to obtain an electric arc of high stability;
- The inverter allows you to convert the current from the household network to direct current for welding. These units are characterized by ease of arc ignition and high performance.
Welding for beginners: video tutorials - watch and learn the nuances.
Beginners are advised to choose electrodes such as solid rods that are coated with a consumable composition. With such electrodes, it will be easier for a novice welder to make an even seam. The size of the rods for a beginner is 3 mm.
Tips: how to learn how to cook with electric welding yourself
It is quite possible to weld a metal structure on your own in 1 day if you know how many electrodes are required, which ones you need to use, and provided that the product is not too large.
And what else you need to keep in mind to learn how to cook on your own:
It is important for a welder not only to work correctly, but also to learn the basics, in particular, what mode of operation is required for a particular material, since the metal can be steel, alloys, or fabrics such as the color of met.
Be sure to study the methods by which you can make a specific seam.
It is necessary to correctly approach the choice of electrodes and welding wire.
If initially it is not required to become a professional of the highest category, then you can learn welding yourself if you watch video tutorials, drawings with seams, and also study the advice of professionals. The training will be long, but possibly productive, especially if you gradually try to produce seams, increasing the amount of work experience.
Many people prefer to use a resant, as the technique can withstand prolonged loads, which allows you to quickly bring the matter to an end. At the first attempts to work with welding, it is better to use a real inverter, and only then, with great experience, it is possible with any other device. With regards to the electrodes, it is advisable to choose "3".They are easy to use, and most importantly, they do not overload the electricity network.
In general, welding equipment is divided into types - transformer, rectifier, inverter. Why popularity remains behind inverters? They are compact, light weight, and very easy to handle for a beginner. At the first steps to learning welding, it is worth taking simpler types of metal and preferably even elements so as not to complicate the task.


Before welding, you need to prepare:
- Bucket with water;
- Hammer for churning slag;
- iron brush;
- A mask that protects the face and neck area;
- Gloves made of special fabric impregnated with a composition to prevent ignition and burnout of the canvas;
- Special clothes with long sleeves.
Do not forget that the welded business is a fire hazard, and therefore it is strictly forbidden to be nearby combustible or flammable objects in order to exclude serious consequences.
Manual arc welding technique. How to cook by welding
Before proceeding to practical exercises, I would like to once again remind you of safety precautions. No wooden workbenches and combustible materials near the place of work. Be sure to put a container of water in the workplace. Be aware of the risk of fire.
In order to figure out how to properly weld by welding, we present to your attention detailed instructions and a video of the welding process.
First try to strike the arc and hold it for the required time. To do this, follow our advice:
- Using a metal brush, it is required to clean the surfaces of the parts to be welded from dirt and rust.If necessary, their edges are adjusted to each other.
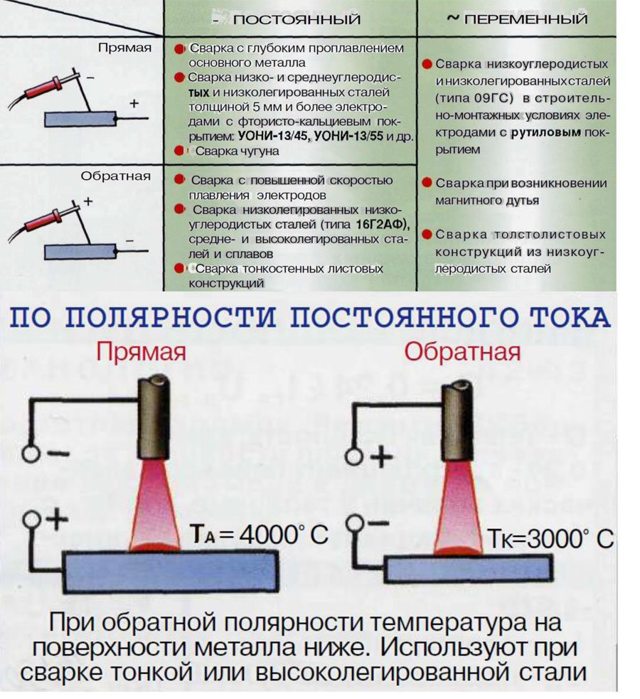
- It is best to learn how to cook by electric welding correctly with direct current, so connect the “positive” terminal to the part, install the electrode in the clamp, and set the required current strength on the welding machine.
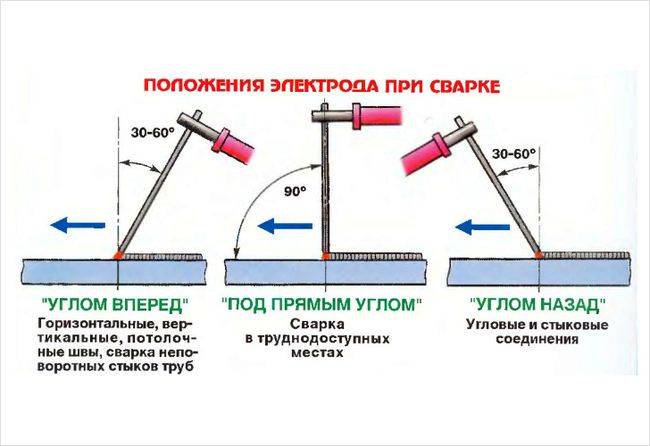
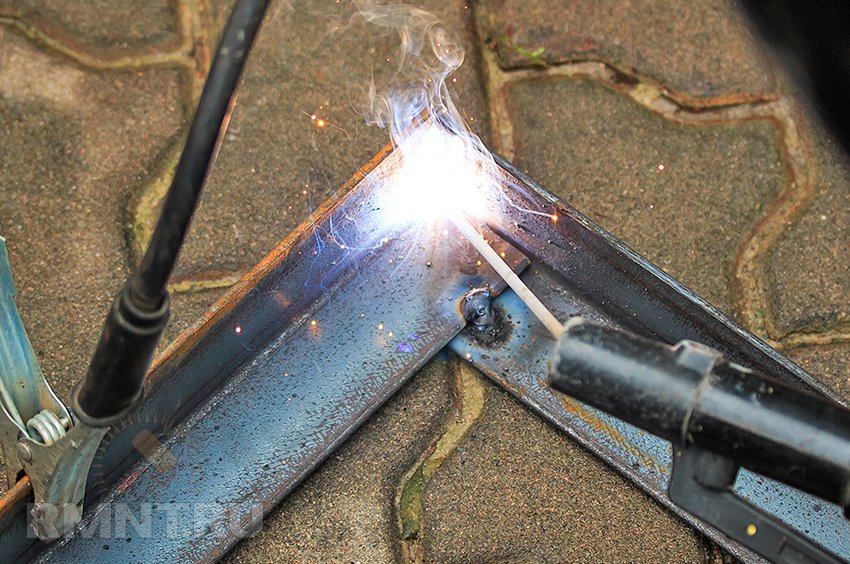
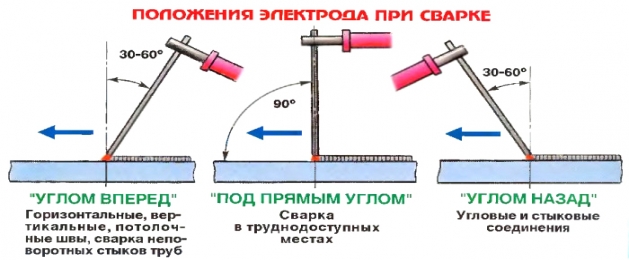
- Tilt the electrode with respect to the workpiece at an angle of about 60° and slowly pass it over the metal surface. If sparks appear, lift the end of the rod 5 mm to ignite the electric arc. Perhaps you failed to get sparks due to a layer of coating or slag on the edge of the electrode. In this case, tap the part with the tip of the electrode, as suggested in the video on how to properly weld with electric welding. The resulting arc is supported by a 5 mm welding gap throughout the entire welding process.
- If the arc lights up very reluctantly, and the electrode sticks to the metal surface all the time, increase the current by 10-20 A. If the electrode sticks, shake the holder from side to side, possibly even with force.
- Remember that the rod will burn out all the time, so only maintaining a gap of 3-5 mm will allow you to keep a stable arc.
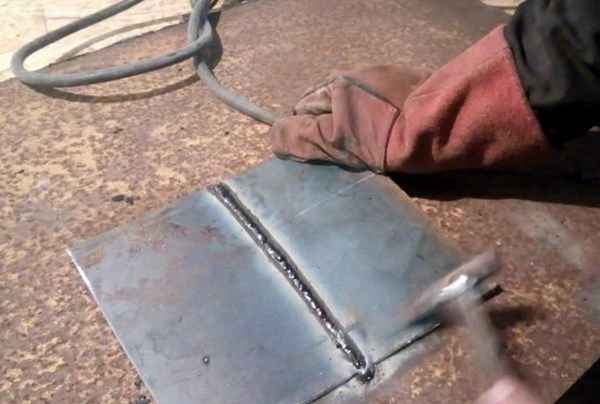
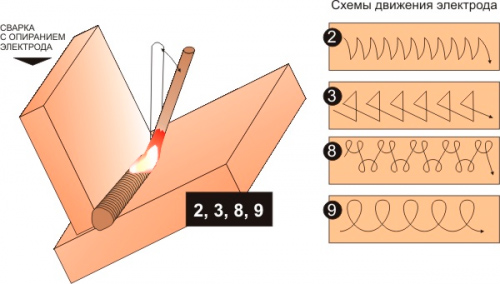
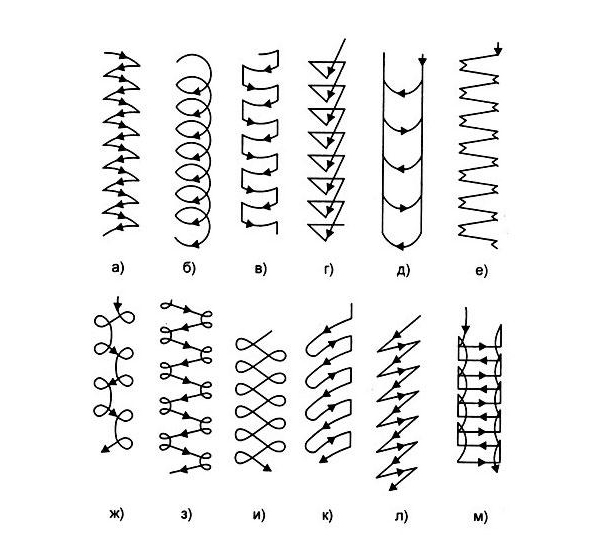
Having learned how to strike an arc, try to slowly move the electrode towards yourself, while making movements with an amplitude of 3-5 mm from side to side. Try to direct the melt from the periphery towards the center of the weld pool. After welding a seam about 5 cm long, remove the electrode and let the parts cool, then tap with a hammer at the junction in order to knock down the slag. The correct seam has a monolithic wavy structure without craters and inhomogeneities.
The purity of the seam directly depends on the size of the arc and the correct movement of the electrode during welding.Watch a video on how to cook by welding, filmed using protective filters. In such videos, you can clearly see how to maintain the arc and move the electrode to obtain a high-quality seam. We can make the following recommendations:
- The required length of the arc is maintained by the translational movement of the rod along the axis. During melting, the length of the electrode decreases, so it is necessary to constantly bring the holder with the rod closer to the part, observing the required clearance. This is what is emphasized in numerous videos on how to learn how to cook.
- Longitudinal movement of the electrode creates a deposition of the so-called filament roller, the width of which is usually 2-3 mm greater than the diameter of the rod, and the thickness depends on the speed of movement and current strength. The thread roller is a real narrow weld.
- To increase the width of the seam, the electrode is moved across its line, carrying out oscillatory reciprocating movements. The width of the weld will depend on the magnitude of their amplitude, so the magnitude of the amplitude is determined based on specific conditions.
The welding process uses a combination of these three movements to form a complex path.
After reviewing the video on how to weld with electric welding and having studied the diagrams of such trajectories, you can figure out which of them can be used for overlap or butt welding, with vertical or ceiling arrangement of parts, etc.
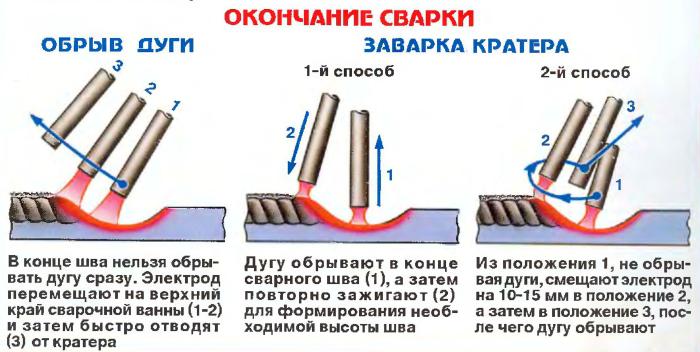
During operation, the electrode will melt completely sooner or later. In this case, welding is stopped and the rod in the holder is replaced. To continue work, slag is knocked down and an arc is set on fire at a distance of 12 mm from the crater formed at the end of the seam.Then the end of the old seam is fused with a new electrode and work continues.
Arc welding
Manual arc welding is widely used in all sectors of the national economy and in everyday life for joining elements of metal structures. Its distinctive properties in comparison with other types of welded joints are:
- The relatively low cost of the welding machine and consumables, which are the electrodes.
- Obtaining high quality welded joints of common grades of metals, including stainless alloys.
- The ability to perform welding work in many hard-to-reach places - this is facilitated by the low weight and ease of connecting the equipment to electricity.
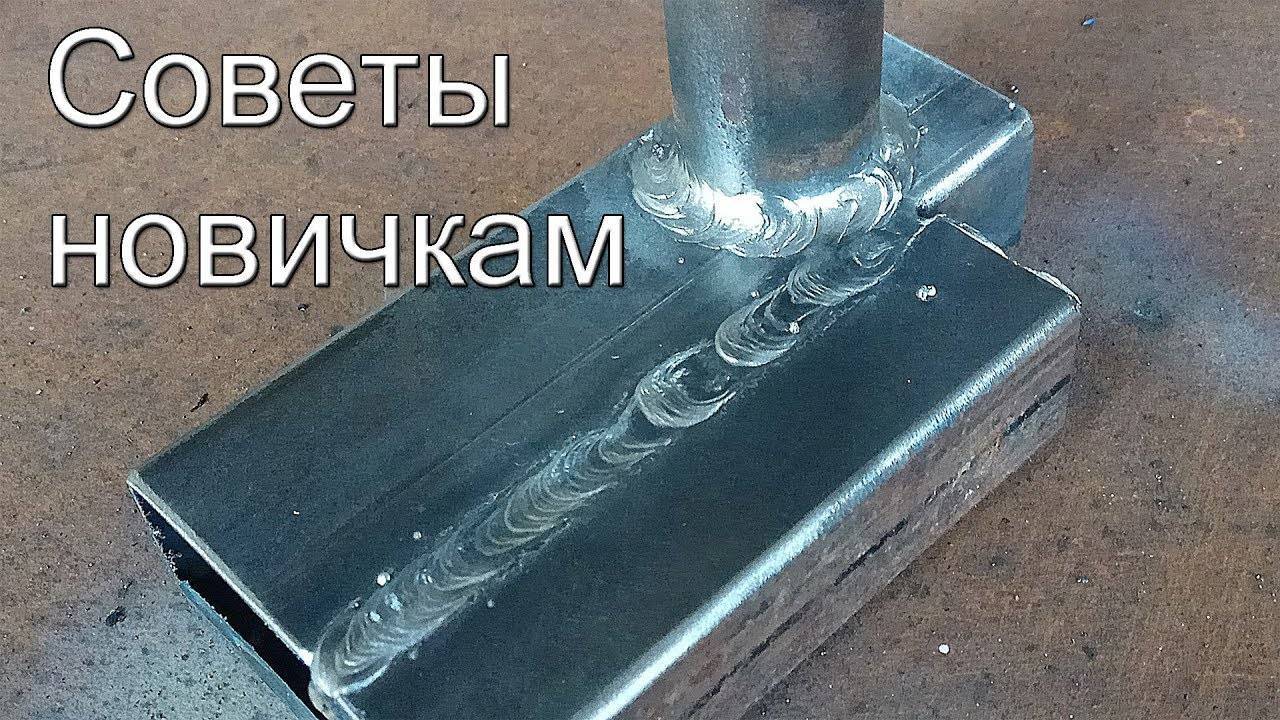
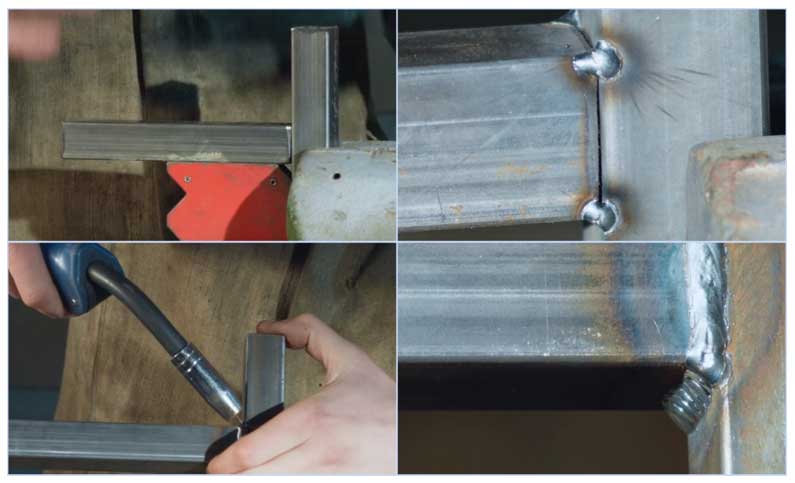
Rice. 7 Welding a thin profile pipe - type of seams
Carrying out work using electric arc welding consists of the following steps:
- The ends of the pipes are prepared for welding, for this they are cleaned of rust, after which the blanks are set at the required distance to fill the seam with metal from the molten electrode, often special devices are used for this.
- The welding machine is turned on, setting the required current according to the built-in indicator, the electrode is inserted into the holder connected to the welding machine, the second end is fixed on the pipe.
- The position of the parts to be welded relative to each other is fixed by spot welding (tacks), after which electric welding is carried out using protective clothing, a mask and gloves of the welder.
- At the end of the work, scale is knocked down and the seam is cleaned with a metal brush.
Semi-automatic metal inert gas welding (MIG)
Thanks to modern technologies, it has become possible to weld profile products in the most simple way in domestic conditions, which does not require much experience and many years of training as a welder.
Rice. 8 How MIG works
Semi-automatic inert gas welding (MIG) is an evolutionary step in the development of conventional arc welding, in comparison with which it has the following advantages:
- Instead of an electrode, a special wire with a diameter of 0.6 to 1.2 mm is automatically fed into the weld pool through the torch, wound into reels - this automates the process and reduces the time for changing electrodes.
- Together with the wire, an inert gas (usually a mixture of carbon dioxide and argon) is supplied to the burner through the welding sleeve - this prevents the formation of slag and improves the quality of the weld.
Thanks to this technology, semi-automatic welding has the following advantages over electric arc machines:
- Allows you to weld thin workpieces with a thickness of 0.5 mm.
- Cooks steel, stainless steel, cast iron, aluminum and non-ferrous metals.
- When carrying out work, there is no slag and there is practically no smoke - this is less harmful to health, improves the quality of the seam compared to electric arc methods.
The disadvantages of MIG include bulkiness (a massive gas cylinder and a wire supply system to the burner are required) and the impossibility of working in strong winds that blow gas out of the welding zone.
Rice. 9 Welding of thin-walled profile pipes in an inert gas environment
Tools and equipment
The technique of manual arc welding is relatively simple and is performed using specialized equipment and electrodes.You will also need auxiliary tools and protective equipment.


Equipment types
There are three types of devices that can be used for do-it-yourself arc welding:
- transformers. The principle of operation of such devices is based on alternating current. It should be noted that they are quite heavy, capable of causing sudden changes in voltage in the general electrical network and are very noisy. It is quite difficult to make an even seam on a transformer; only experienced welders can do it. But if novice craftsmen are trained in arc welding with the use of a transformer, then it will be much easier to work with other equipment;
- rectifiers. The operation of the devices is provided by semiconductor diodes. Units of this type turn alternating current into direct current. These are versatile devices. Almost all electrodes are suitable for them and welding can be carried out on different metals. Compared with a transformer, the welding process is much easier and the arc stability is maintained;
- inverters. They work almost silently. Easy to use due to compactness and automatic settings system. During operation, the device produces a high power direct current by converting the alternating current.
Among all devices, inverters are considered the best. They create a stable arc even during power surges and are multifunctional.
Tools and equipment
Before welding with electric arc welding, you must first prepare personal protective equipment and tools:
- apparatus for welding and electrodes to it.Those who are just learning welding skills should prepare more electrodes;
- auxiliary tools. The arc welding technique involves the removal of the slag that has arisen during welding, and for this you need a hammer and a brush for metal;
- protective outfit. Do not start welding without a special mask, gloves and protective clothing made of dense materials. It is not worth neglecting such means, since human safety depends on them.
If you are working with the device for the first time and want to learn how to properly weld by manual arc welding, it is recommended to pre-prepare training metal elements.
Common rookie mistakes
Scheme of arc welding.
It is common for beginner welders to make mistakes related to ignorance of the basics regarding the use of welding equipment. For example, beginners may not know how to choose the correct polarity for welding with an inverter, which will lead to poor connection formation or even burn-through of the part.
The following main mistakes can be distinguished:
- neglect of safety precautions;
- wrong choice of welding machine;
- the use of low-quality or unprepared electrodes;
- work without trial seams.
For beginners, one feature should be noted separately if you cook Resant by welding. This equipment is very popular, but it has short connection cables, which can be inconvenient to use.
Types of welding machines
There are a large number of models of welding machines of various types on the market.
Of all their variety:
- transformers;
- rectifiers;
- inverters;
- semi-automatic;
- automatic machines;
- plasma;
In a home workshop, transformers are most often used because of their cheapness and inverters because of their simplicity and ease of use. The rest require either special conditions for work, achievable only in production, or special training and long-term acquisition of skills.
transformer
The device of such devices is extremely simple - it is a powerful step-down transformer, in the secondary winding of which a working electrical circuit is included.
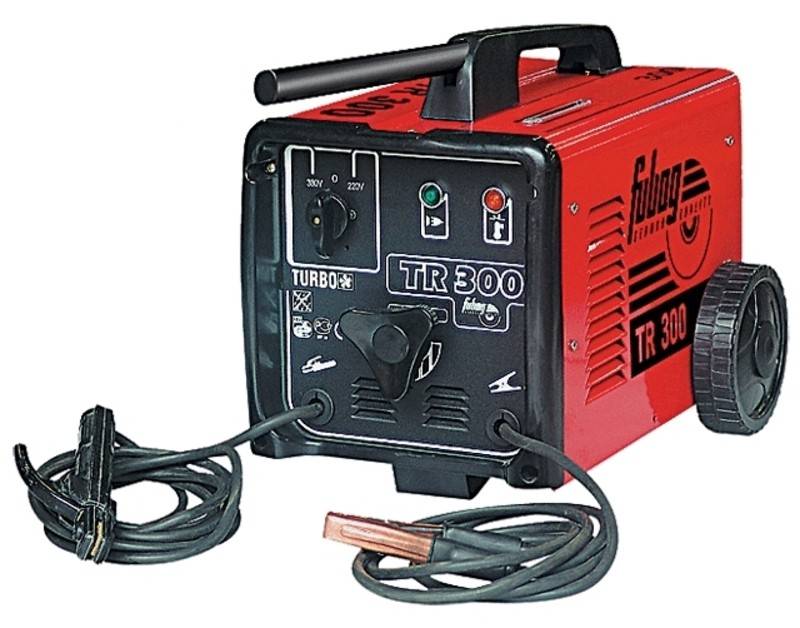
transformer welding machine
Transformer Advantages:
- unpretentiousness;
- survivability;
- simplicity;
- cheapness.
Flaws
- very large weight and dimensions;
- low arc stability;
- work with alternating current;
- causes power surges.
Such a device requires skill and extensive experience from the welder. For teaching a novice welder how to weld properly, it is not suitable.
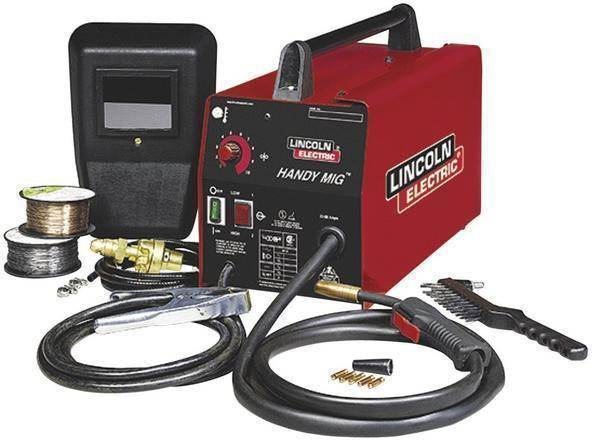
inverters
The inverter apparatus has a much more complex design. The inverter unit repeatedly converts the input mains voltage, bringing its parameters to the required ones. Due to the transformation of high-frequency current, the dimensions and weight of the transformer are many times smaller.
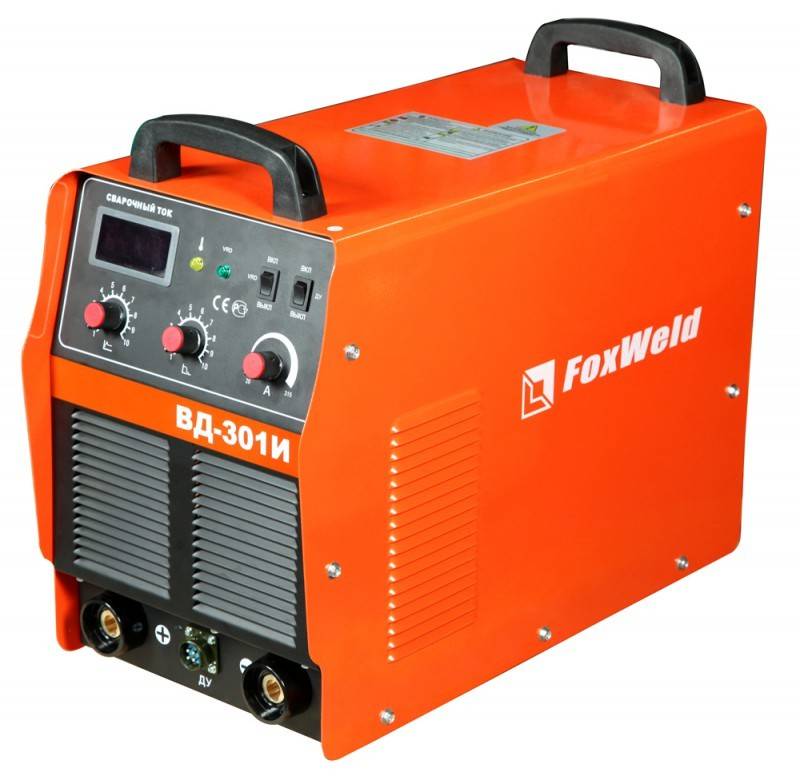
inverter
Advantages of the inverter:
- low weight and dimensions;
- stabilized voltage and current in the circuit;
- additional functions of anti-sticking and hot start;
- the ability to fine-tune the current and arc parameters;
- does not cause voltage surges in the supply network.
The inverter also has disadvantages:
- high price;
- low frost resistance.
Learning how to cook properly is best to start with an inverter.The stability of the arc parameters and additional features that make it easier to start and prevent “sticking” will allow the beginner to focus on the seam and quickly master the technology.


Electric welding technology
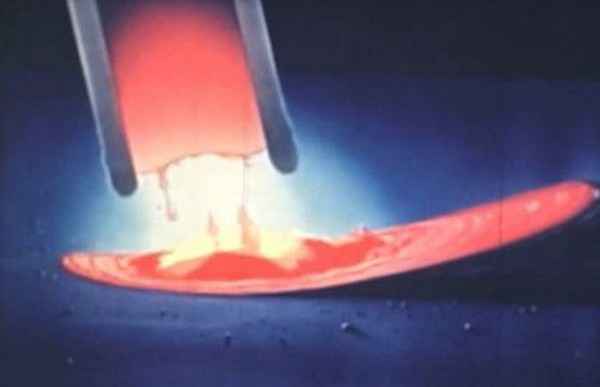
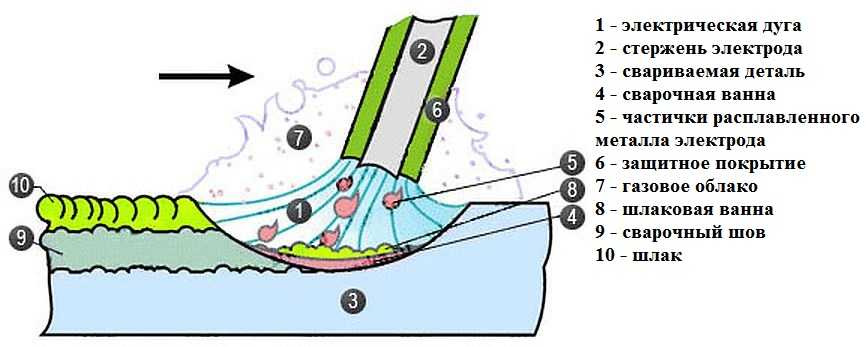
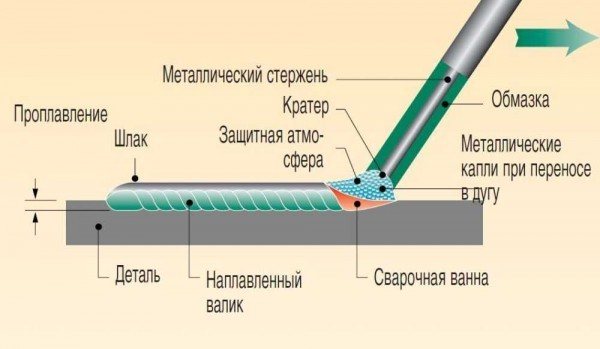
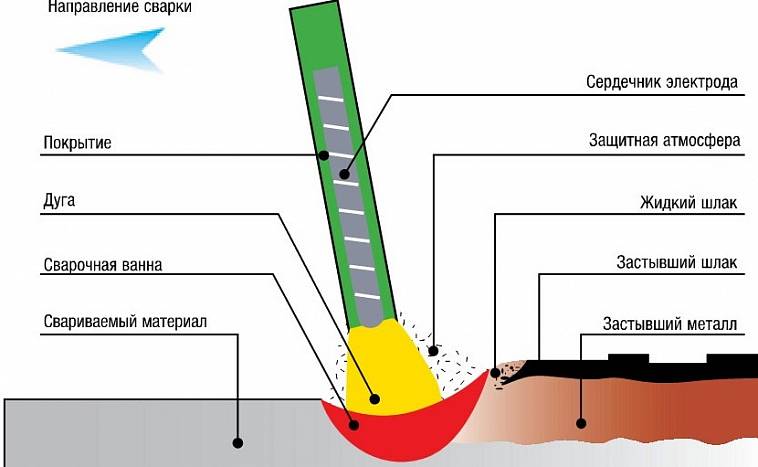
Electric welding is a process that occurs under the influence of high temperatures, above the melting of the metal. As a result of welding, a so-called weld pool is formed on the metal surface, which is filled with a molten electrode, thus forming a weld.
Therefore, the main conditions for the implementation of electric welding are to ignite the electrode arc, melt the metal on the workpieces to be welded and fill the weld pool with it. It would seem, in all simplicity, it is very difficult for an unprepared person to do this. First, you need to understand how quickly the electrode burns, and this depends on its diameter and current strength, and also be able to distinguish slag during metal welding.
In addition, it is necessary to maintain a uniform speed and the correct movement of the electrode during welding (from side to side), so that the weld is smooth and reliable, able to withstand rupture loads.
How to light an arc
Beginning the development of electric welding should be with the correct ignition of the arc. Training is best done on an unnecessary piece of metal, but it should not be rusty, as this will seriously complicate the task and may confuse a novice welder.
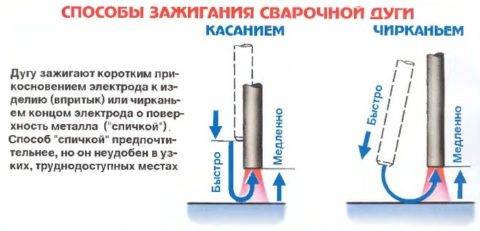
There are two simple ways to start an arc:
- By quickly touching the electrode on the surface of the workpiece and then pulling it up to a distance of 2-3 mm. If you lift the electrode from the metal above, the arc may disappear or become too unstable;
- Striking the electrode on the surface of the workpiece to be welded, as if you were lighting a match.It is necessary to touch the metal with the tip of the electrode, and draw it 2-3 cm along the surface (towards the welding site) until the arc ignites.
The second method of arc ignition is best suited for beginner electric welders, as it is the simplest. Also, short-term guidance on metal warms up the electrode, and then it becomes much easier to cook with it.
After ignition of the arc, it should be kept as close as possible to the surface of the workpiece, at a distance of no more than 0.5 cm. In addition, this distance must be kept approximately the same all the time, otherwise the weld will be ugly and uneven.
Welding speed
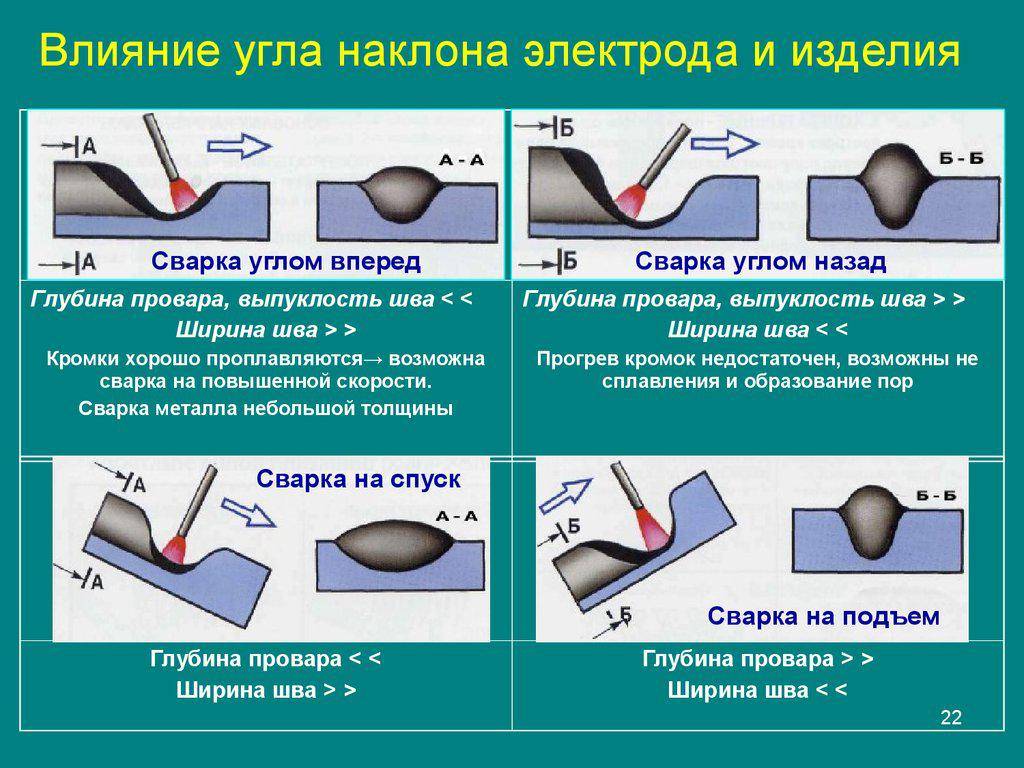
The speed of the electrode depends on the thickness of the metal being welded. Accordingly, the thinner it is, the faster the welding speed is, and vice versa. Experience in this will come with time, when you learn how to light an arc and begin to cook more or less. The pictures below show illustrative examples by which you can understand at what speed the welding was carried out.
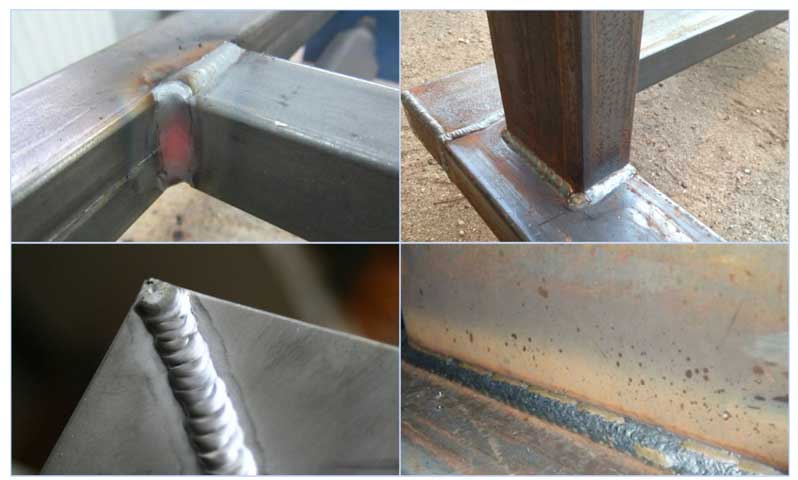
If slowly, then the welding seam turns out to be thick, and its edges are strongly melted. If, on the contrary, the electrode is driven too fast, then the seam is weak and thin, as well as uneven. At the correct welding speed, the metal completely fills the weld pool.
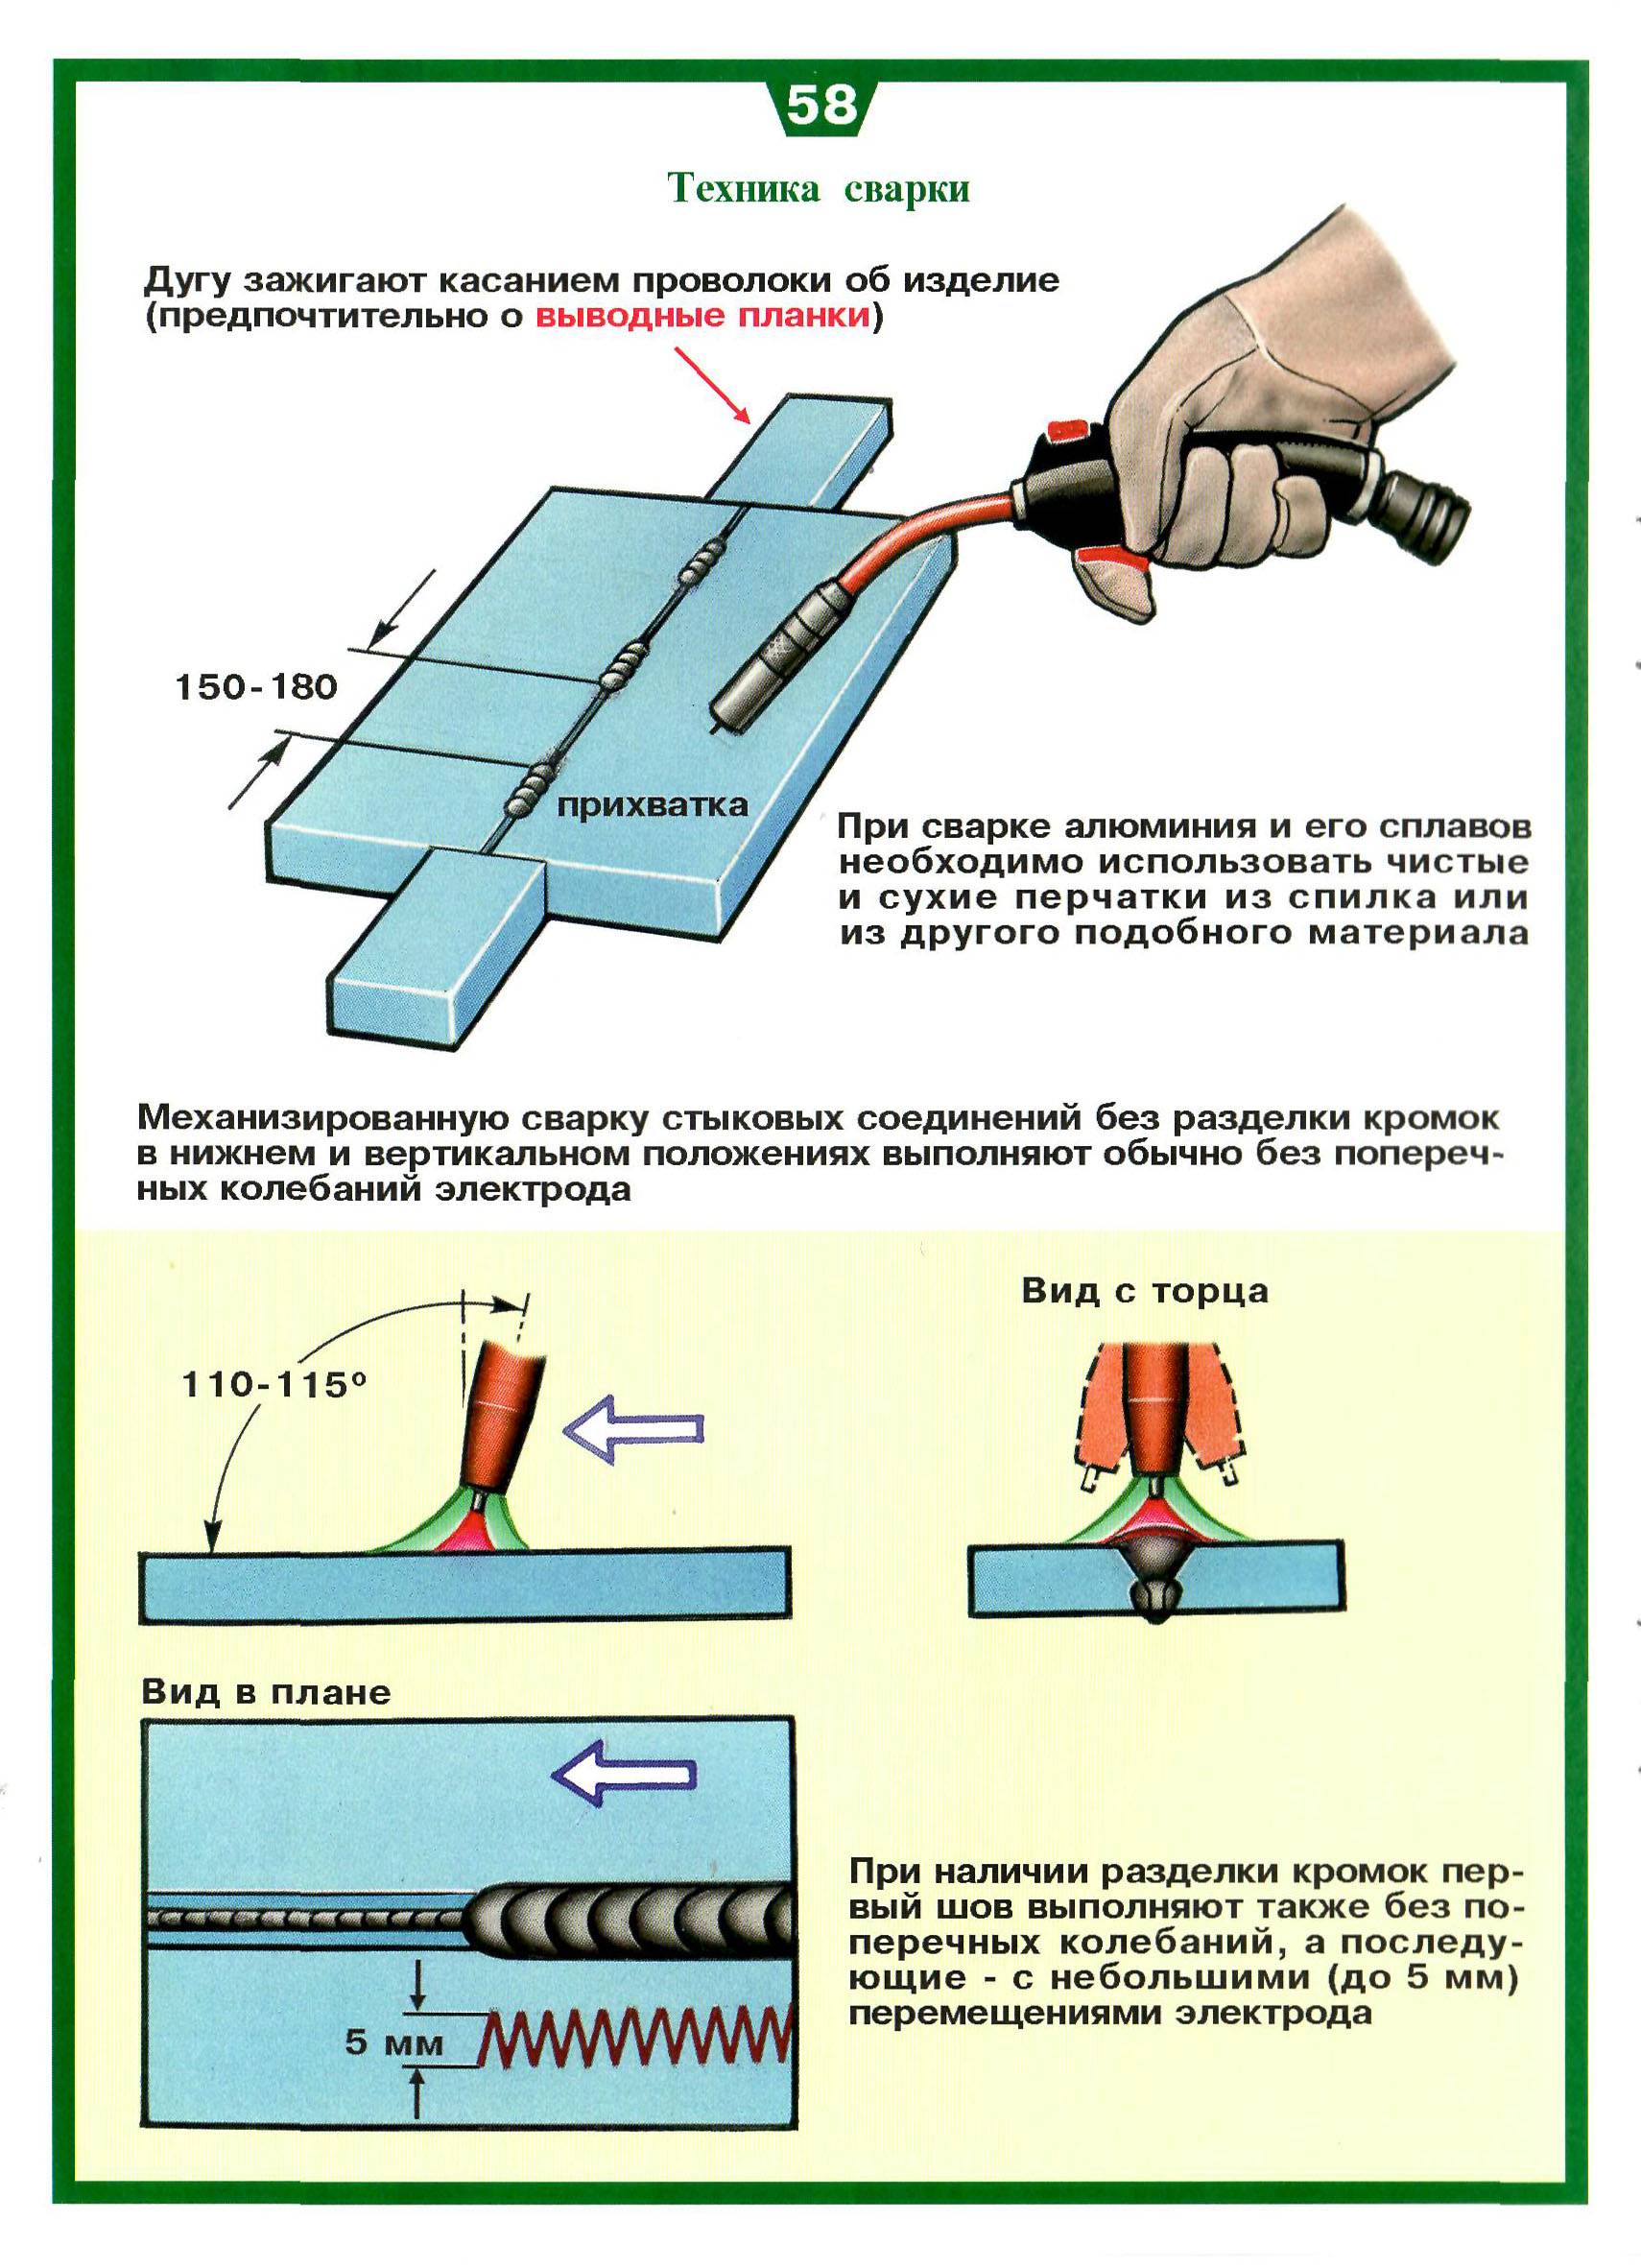
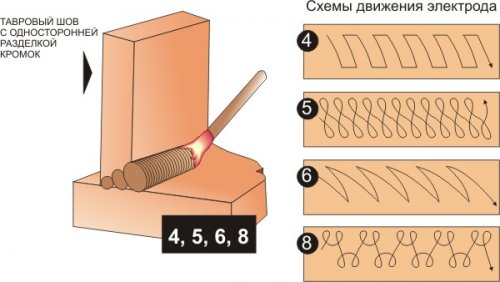
In addition, when practicing welding, you need to monitor the correct angle of the electrode in relation to the metal surface. The angle should be approximately 70 degrees and can be changed if necessary. During the formation of the weld, the movement of the electrode can be longitudinal, translational and oscillatory, from side to side.
Each of these electrode leading techniques allows you to achieve the desired seam, reduce or increase its width, and also change some other parameters.