- Open wiring rules
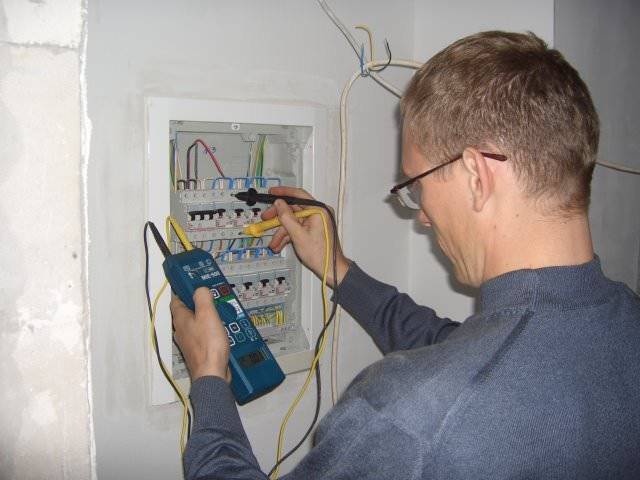
- Starting and checking the operation of the electrical wiring
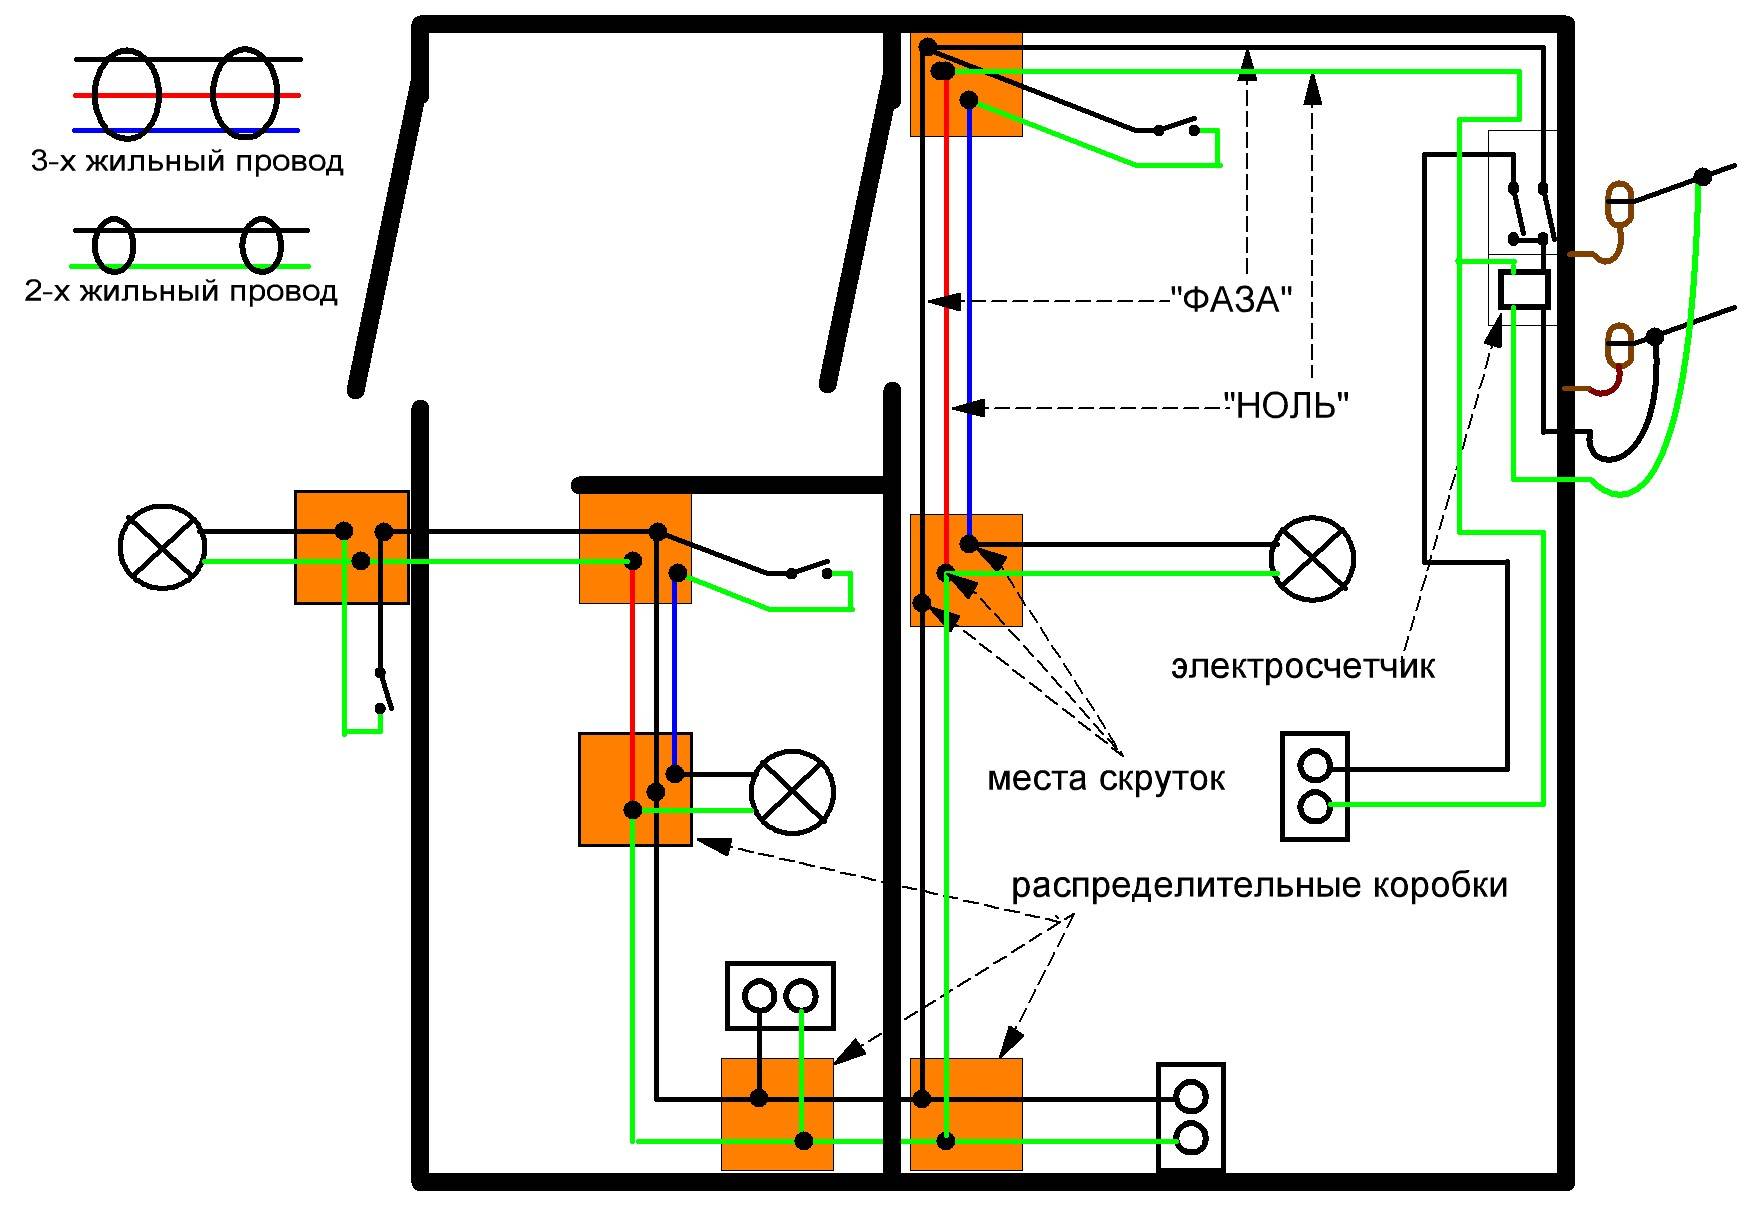
- Installation diagrams
- Basic requirements for wiring in a private house
- No. 6. Cabling in rooms
- Open wiring in cable channels
- Internal wiring in a metal pipe
- Wire connection
- Materials used
- Channels for laying
- Wire selection
- Rules for installing open wiring: a summary of 3 techniques with explanatory pictures
- Technical nuances of wiring in wooden and frame houses
Open wiring rules
Ways of open laying of wires should not contradict the requirements of the PUE.
Therefore, the following products can be used to fasten cables to the wooden surface of walls, partitions or ceilings:
- ceramic or porcelain insulators;
- floor plinths with built-in cable channel;
- corrugated and rigid PVC pipes;
- PVC box;
- metal boxes and pipes.
Specific product names are indicated in the project documentation, and in relation to wooden structures, they must be accompanied by a fire safety certificate and be marked with the “NG” marking as non-combustible.
The installation of cable channels and other mounting elements must be thought out in advance, as protruding parts may interfere with the arrangement of furniture or other interior issues
There are no questions with the choice of cable channels, since in hardware stores you can pick up products both in color and in width, and with a set of related accessories - plugs, rotary elements, adapters.
It is better to choose thick-walled, fairly wide products with a single lock, since boxes with a double lock are more difficult to maintain.
Requirements and recommendations for installation:
- The cable, like protective fittings, must not support combustion, that is, it must be marked "ng". The best option for wooden houses is VVGng-ls (with reduced smoke emission).
- The presence of a metal platform for installation - a fireproof base that increases the safety of using electrical appliances.
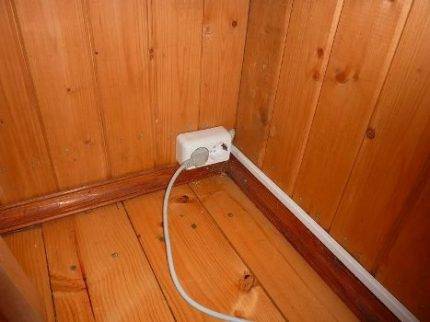
- Switches and sockets - only overhead, external.
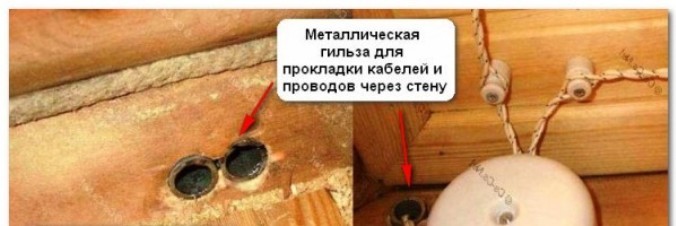
- The use of metal sleeves to organize the transition of the cable through wooden walls, ceilings, partitions.
Pass-through sleeves are segments of a thick-walled metal pipe that should protrude 1 cm on each side of the combustible structure. To prevent the cable from deforming, the edges of the sleeves are protected with plastic overlays.
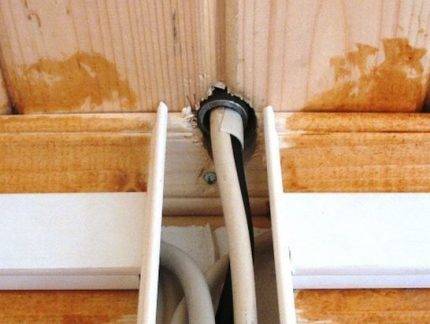
According to the rules, there should not be an open section of wiring between the sleeve and the box. The end of the sleeve coming out of the hole must necessarily go inside the box
When choosing the cross section of an electrical cable for laying in a wooden house, they are guided by generally accepted standards:
- 3 * 2.5 mm - for sockets;
- from 6 mm² - for powerful electrical equipment, for example, electric stoves;
- 3 * 1.5 mm - for the lighting group, etc.
The formation of groups is carried out according to the principle "as little as possible", that is, a block of 4-5 outlets is isolated as a separate line and equipped with a separate machine.
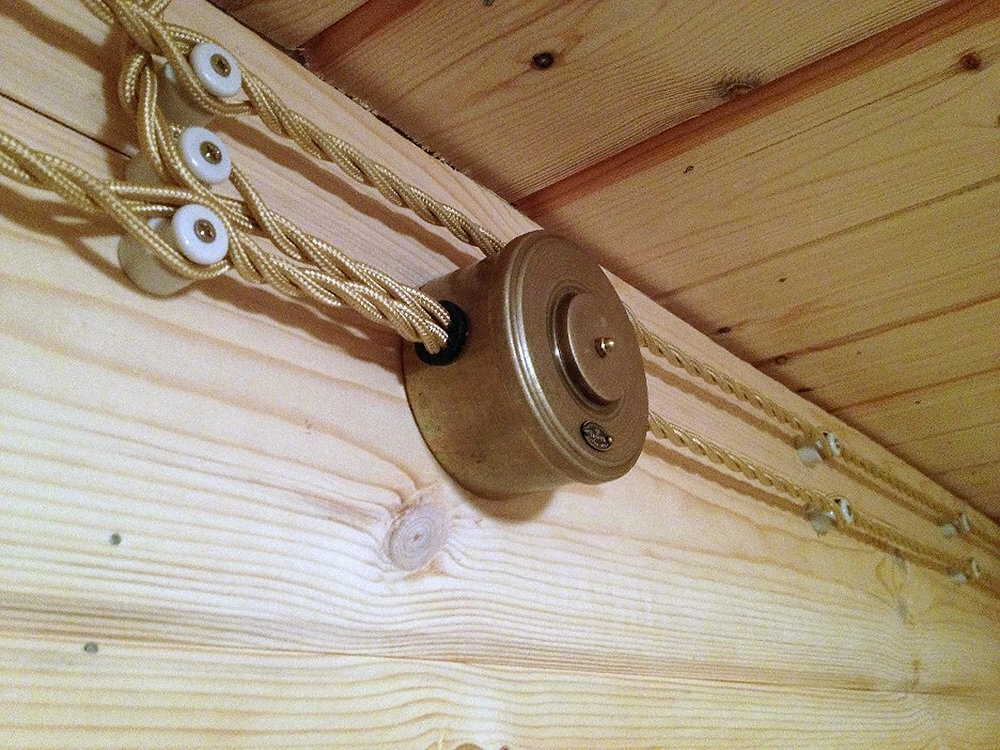
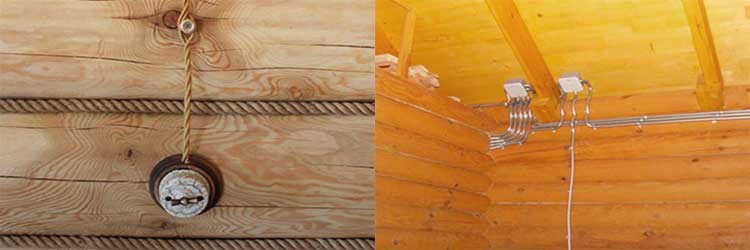
Those who want to get rid of cables use open wiring on insulators. According to the norms of the PUE, it is allowed to place insulated wires in an open form at a distance of 10 mm or more from a wooden surface.
The method that was actively used back in the middle of the 20th century is coming back into fashion, so let's pay attention to retro wiring. Within a few years after the construction of a wooden house, it shrinks, so sagging wires are inevitable.
To keep the lines looking nice without tightening, the wires are secured with cable ties above and below the insulators.
Within a few years after the construction of a wooden house, it shrinks, so sagging wires are inevitable. To keep the lines looking nice without tightening, the wires are secured with cable ties above and below the insulators.
For more information on open wiring, see the article - Open wiring installation: review of work technology + analysis of the main mistakes
Starting and checking the operation of the electrical wiring
When all electrical appliances are connected and the installation is complete, it is necessary to measure the resistance of the electrical wiring in a wooden house. This process is necessary to ensure that the insulation is not damaged.
Resistance measurements are carried out regularly, with a consistency of about once every three years. Resistance measurements will help identify imperfections and help keep the building from short circuits leading to fire.
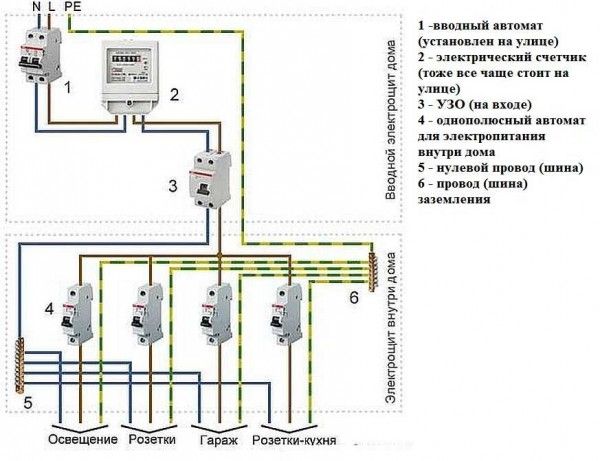
After completing the installation of electrical wiring on your own, you need to contact specialists for a competent examination of the entire complex of installation work. Electricians measure the resistance of the insulation and the grounding conductor.


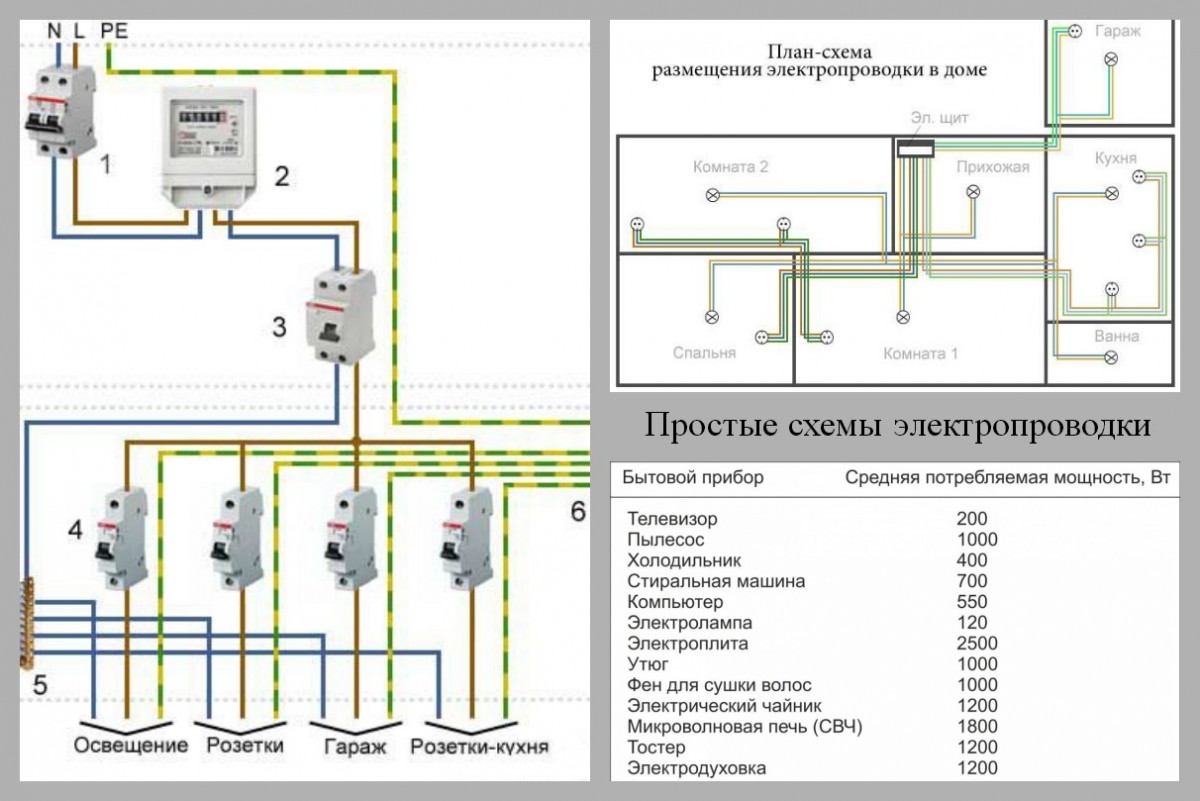
After the work, specialists issue a protocol that confirms the functionality of the entire system. This document should be presented when sealing the electric meter. Most often, for clarity and to facilitate repairs, a diagram indicating the location of the main machines is glued onto the electrical panel.
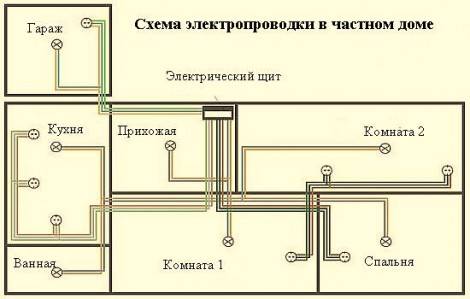
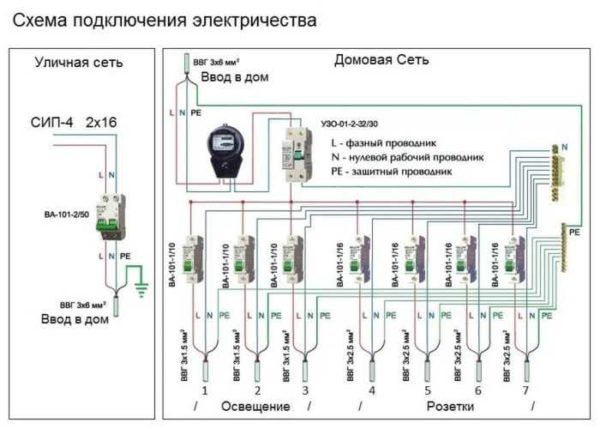
Installation diagrams
Modern standards for providing a private house with electrical energy state: if a transformer (electricity converter) is not installed in the building, then the total power consumption of household appliances should not exceed 15 kilowatts per day. How to calculate this indicator? Add up all the power indicators of appliances that are installed in the home. Did you get a figure of more than 15 kilowatts? Get a transformer. It costs from 500 to 5 thousand rubles. Choose products from trusted manufacturers: OSRAM, Yourled, Toroidal, Eglo.

A wiring transformer in a wooden house converts electricity and redistributes voltage. Install it if all electrical appliances in the building consume more than 15 kilowatts per day
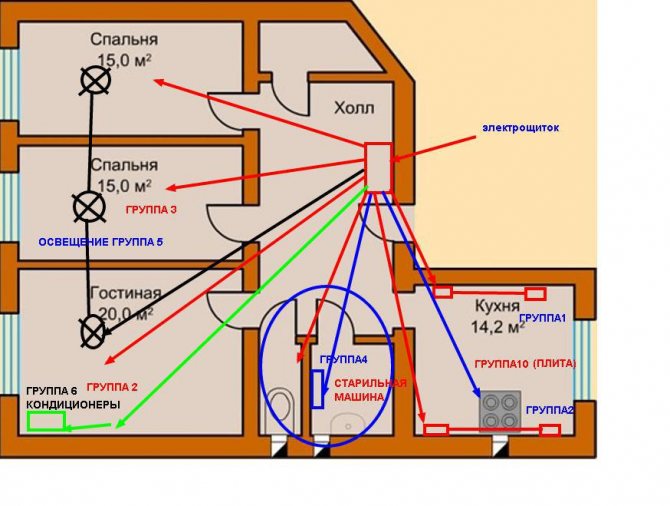
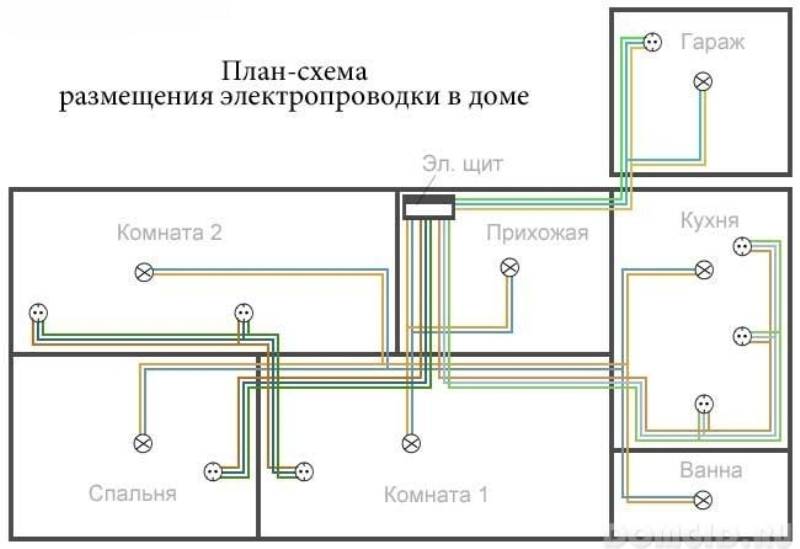
The wiring diagram in the house should be designed taking into account all sockets, switches in the premises. Lighting is "powered" by some groups of cables, powerful electrical appliances - from others.
Please note that:
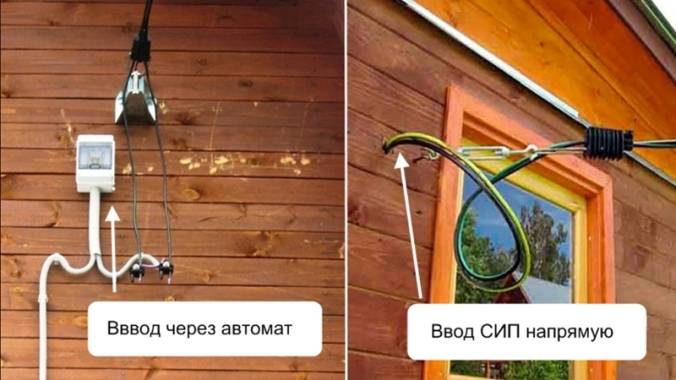
- counters and data entry machines must be placed outside the building so that the readings can be read by employees of the resource supply organization;
- shield, counter, machine must be protected from dust, dirt, water;
- the protective housing for the meter and the shield must be made of metal;
- provide an RCD to save electrical equipment from breakdowns.
To calculate the total power consumption, use the following table:
| electrical appliance | Power in watts |
| Television | 200 |
| A vacuum cleaner | 1000 |
| Fridge | 400 |
| Washing machine | 700 |
| A computer | 550 |
| Desk lamp | 120 |
| Electric stove | 2500 |
| Iron | 1000 |
| hair dryer | 1000 |
| Kettle powered by electricity | 1200 |
| Microwave | 1800 |
| Oven | 1200 |
| Heater | 1400 |
Remember that there are 1000 watts in one kilowatt. Calculating the total power will help you understand whether a transformer is needed in the house or you can do without it.
Important: the table only shows average values. To make an accurate calculation, you will have to find passports from electrical appliances, which indicate how much power they consume per day.
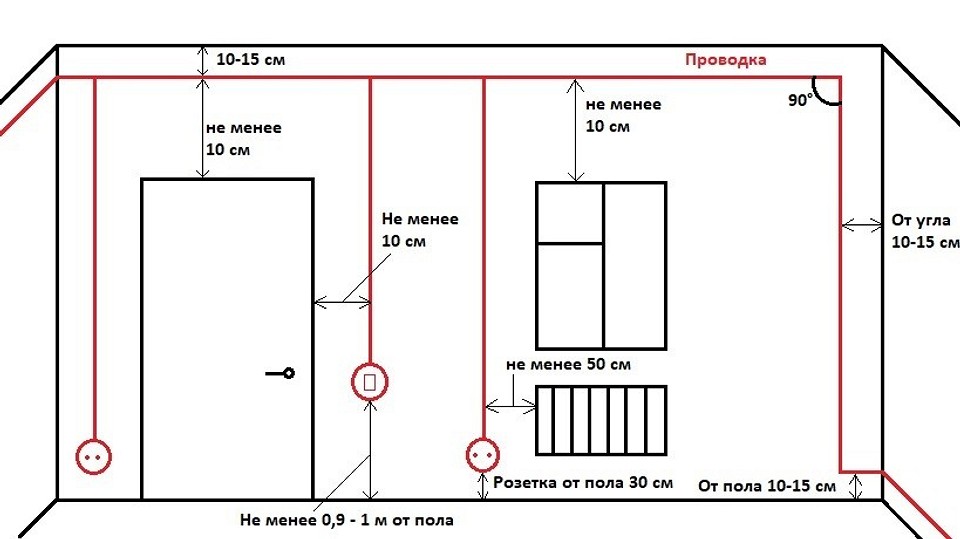
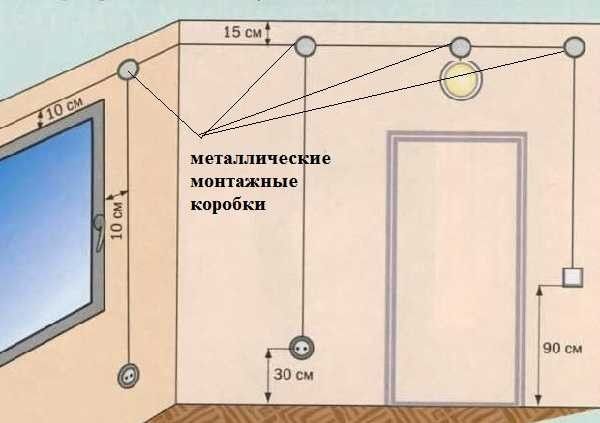
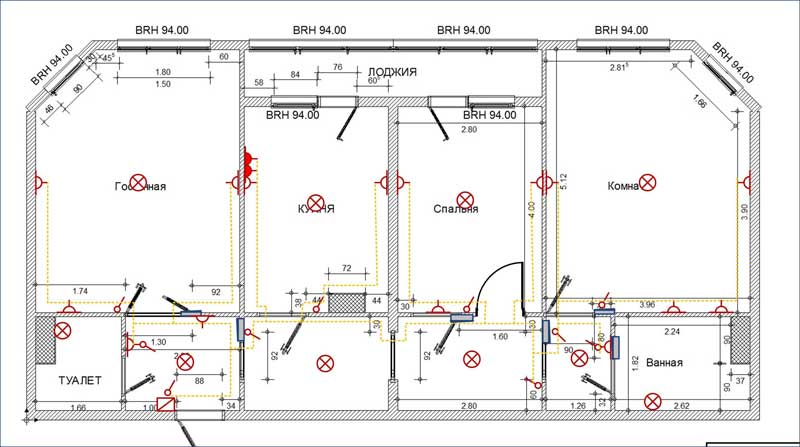
Now draw up a technical plan for providing electricity to the house. It should include the following items:
- places for fixing sockets, switches, lamps, household appliances that are constantly connected to the network (TV, stove, hood);
- choose a cable with three cores. It will provide a voltage of 220 volts in the network. For such a wire, you need to mount sockets with grounding and switches with two buttons (keys);
- junction boxes are installed in the premises. Inside there is a connection of cables to each other;
- the diagram must reflect the power of each electrical appliance that will work in the building;
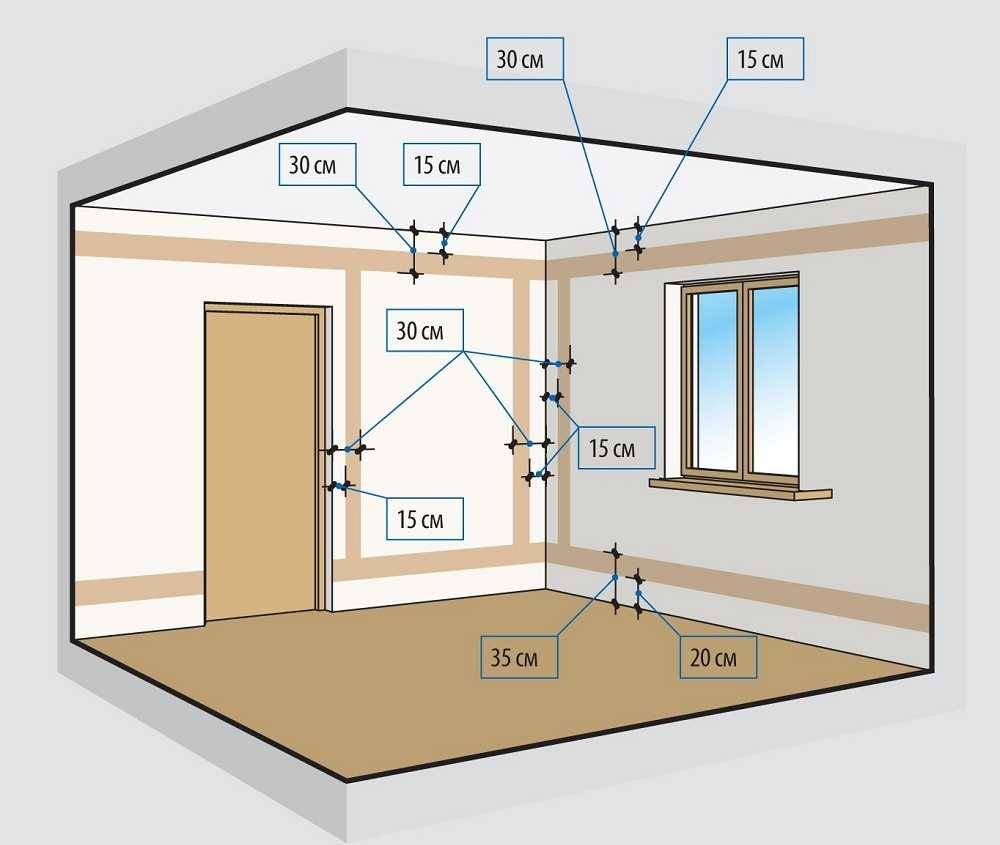
- in the plan it is necessary to note the distance of the wiring from the windows, doors, floor and ceiling. In case of future repairs, this plan will help to avoid damage to the electrical wiring;
- you can only turn the wires 90 degrees - no more and no less (draw this on the diagram).

Wiring in a wooden house can be rotated 90 degrees, no more and no less. Kinks or large bends will cause a short circuit
Basic requirements for wiring in a private house
Before you study the step-by-step instructions for installing electrical wiring in a cobbled, log or any other private house with your own hands, you need to understand the basic rules and requirements for wiring in a timber structure:
- lines must be isolated. To do this, use such non-combustible materials as: PVC, rubber, plastic;
- in no case should aluminum cables be used, only copper, with a cross section of at least 16 square millimeters;

For wiring in a wooden house, only copper cable can be used, aluminum is less resistant to fire. Cross section - 16 millimeters
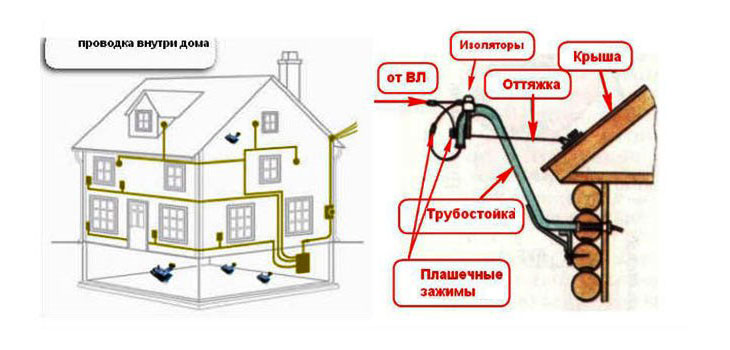
- from the street, the wiring enters the dwelling through a metal sleeve. From room to room - through a metal tube or sleeve;
- experts advise to mount the electrical cable inside the dwelling only in the open. This is handy if there are wiring problems. The user can always find defective places on his own;
- when calculating the thickness of the wire, it is necessary to add a margin - about 20-30 percent;
- do not lay cables in corrugated paper pipes;
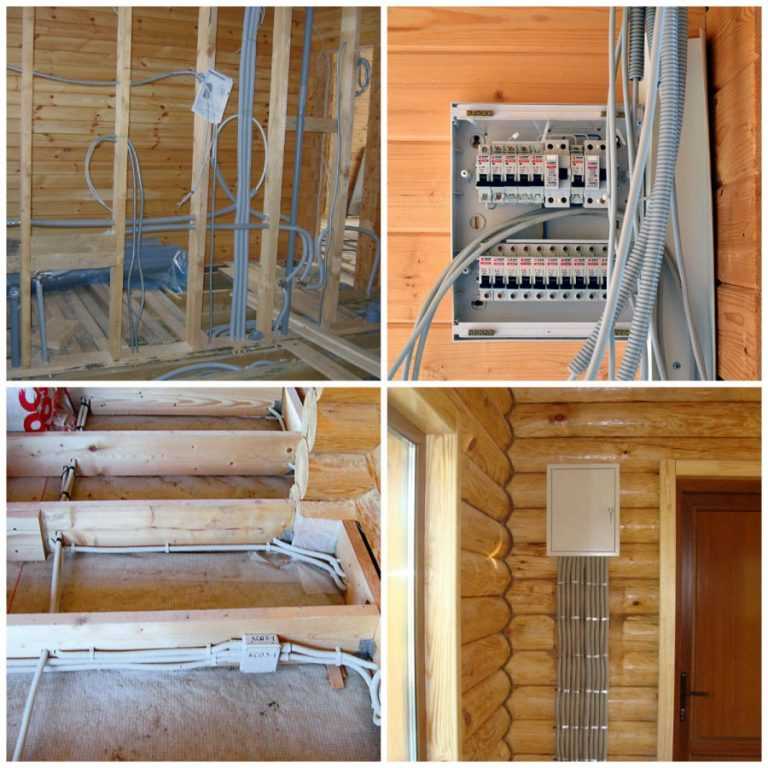
- be sure to install an RCD in the house - a residual current device, it can be located in the electrical panel. In the event of a short circuit, the device will save electrical appliances from premature failure;
- the shield is always separated from the cobbled wall - for this it is placed inside a metal box, closed from dust, dirt, moisture;
- it is better to mount the shield on a brick wall specially built for this purpose.It is desirable to do this (if possible), but not necessary.
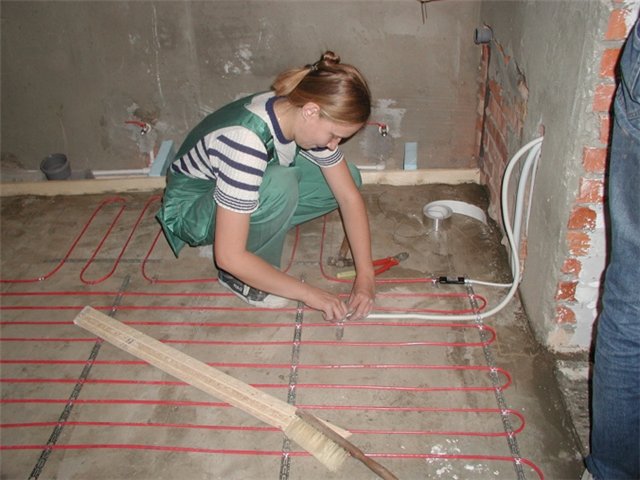
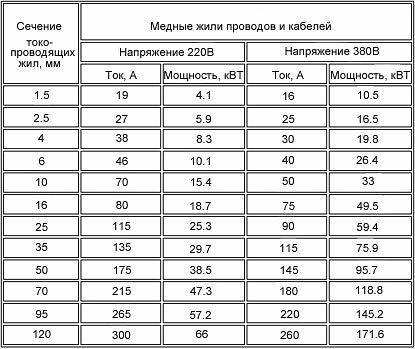
No. 6. Cabling in rooms
The cross section of the wiring cables depends on what load they will be placed on. This is a subject of serious calculations, but you can also use tables in which the cross-section of wires has already been calculated depending on current, power and voltage.
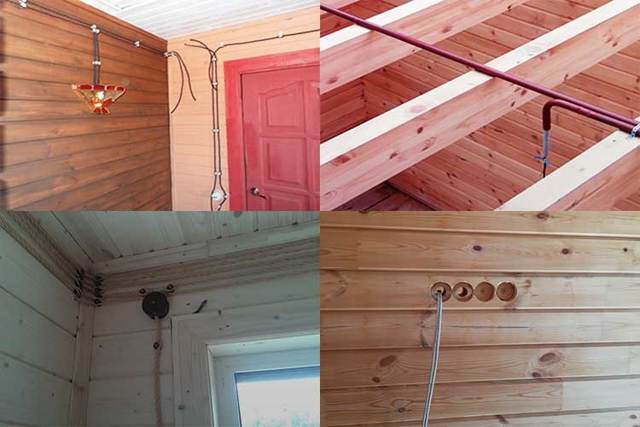
Open wiring in cable channels
Before starting work, it is best to mark the locations of the future location of sockets and switches. It is best for safety and aesthetics in a wooden house to install open wiring in cable channels. They are made of self-extinguishing plastic, are a box with a latch, size and color may vary. The wiring process in this case is as follows:


- choose a cable channel that corresponds to the number of wires and their cross section;
- remove the cover and fix the channel box to the surface with self-tapping screws;
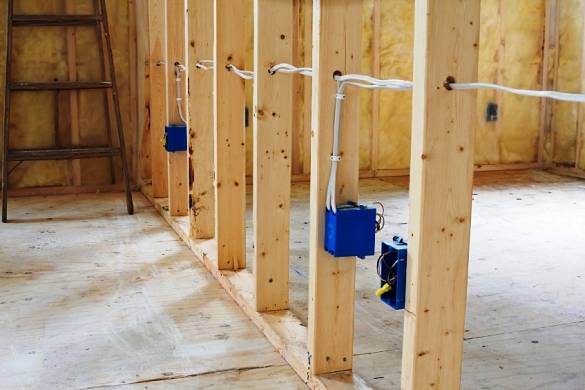
- junction boxes are placed at the cable junctions;
- the base of sockets and switches (only those intended for external wiring are used) are fixed to the designated places;
- the cable is laid in the channel, closed with a lid;
- the ends of the cables will be connected in junction boxes. Connect the cable to sockets, switches and machines.
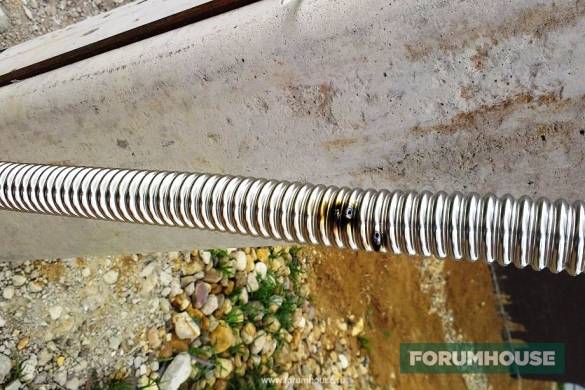
Internal wiring in a metal pipe
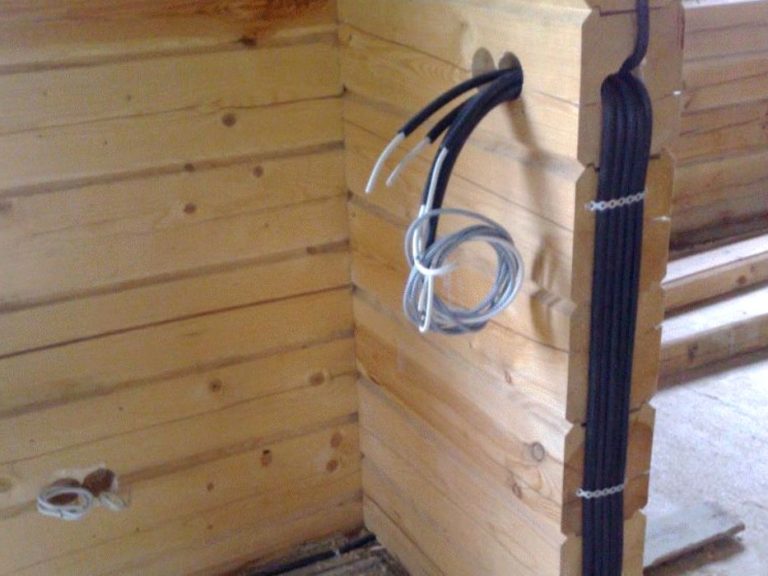
If you decide to install hidden wiring in a wooden house, then the procedure will be as follows:
- preparation of strobes and installation of open junction boxes, they should be freely accessible even after wall cladding;
- the passage of wiring through the walls is done with the help of metal pipes, which are called bushings.First, a hole of the required diameter is prepared in the wall, then a sleeve is placed, along the edges it should have a plastic sleeve. Special metal sleeves are placed under sockets and switches;
- the diameter of the pipe is chosen such that after the installation of all cables, 60% of the free space remains in it. Preference is given to copper pipes, which bend well and are easy to cut. The ends of the pipes after cutting are well ground or they are provided with plastic rims. Pipes are attached to the wooden surface with clamps, to metal sleeves - due to the flaring of the pipe inside the sleeve;
- pull the cable through the pipe and check the insulation;
- connection of cables in junction boxes and connection to sockets, switches.
Wire connection
In junction boxes, wires can be connected in one of the following ways:
- connection with sizami. These are special insulating caps that allow you to connect two wires pre-stripped by 2-3 cm and twisted together. Caps are very easy to put on and are inexpensive;
- the wagami connection is no less simple, but more reliable. A wag with an appropriate number of holes for wires is selected, cables are inserted into them until they click;
- crimping with sleeves is one of the most modern methods, but special equipment is required;
- it is better not to use the old-fashioned method of twisting, followed by insulation with electrical tape in a wooden house.
It remains only to install sockets and switches. For a wooden house, wood-like fittings are best suited, but this is not necessary.This is followed by work on connecting all groups of wires to the shield, installing a meter, RCD and machines.
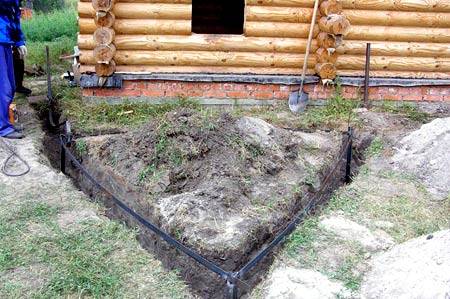
You will also need to perform grounding. To do this, a hole is dug near the house in the form of an equilateral triangle with a side of 1 m. The depth is at least 30 cm. A metal corner or a pin 3 m long is driven into the vertices of the triangle, they are connected to each other with a corner 1 m long using welding. A hole is made in one of the corners and a grounding conductor is fixed in it with a bolt and nut, it is brought out to the switchboard and connected to the grounding bus, and the grounding conductors of the cables are connected to it.
After completion of all installation work, the specialists of the electrical laboratory are called, who carry out all the necessary tests and issue a protocol confirming the correctness of the wiring and its safety. It is recommended to stick the wiring diagram on the inner surface of the shield door - it will be much more convenient to navigate in the event of an accident.
It is necessary to carry out all work on the installation of electrical wiring in a wooden house only if you have the appropriate knowledge and experience. At the slightest doubt, it is better to call specialists - the safety of the house and its residents depends on the quality and correctness of the implementation of all stages of work.
Materials used
Channels for laying
Hidden electrical wiring in a log house is arranged in pre-prepared channels made of refractory materials that can localize any fire in internal spaces
At the same time, attention is paid to its aesthetics and attractiveness, as well as the cost of the installation work itself and the quality of materials according to the residual principle.
Important! In this case, the principle of safe wiring is put forward in the first place, and only then attention is drawn to the decorative features and technical characteristics of the system. Taking into account these conditions, a material is selected that is suitable for arranging wire lines laid along the wooden walls of the building in metal casings (boxes) or in pipes of the same structure
Taking into account these conditions, a material is selected that is suitable for arranging wire lines laid along the wooden walls of the building in metal casings (boxes) or in pipes of the same structure
Taking into account these conditions, a material is selected that is suitable for arranging wire lines laid along the wooden walls of the building in metal casings (boxes) or in pipes of the same structure.
The most suitable, from the point of view of the security of wires hidden in free niches and voids and laid on wooden structures, are the following materials:
- Standard steel casings (boxes) and metal pipe runs;
- Pipe products based on copper;
- Mounting boxes (casings) and corrugated pipes made of fire-resistant PVC materials with concrete or alabaster plugs installed at their ends.
The thickness of the safety plugs (gaskets) is selected in accordance with GOST, and must meet the requirements of the PUE regarding the issues of wiring security.
The advantages of copper pipes include the ease of forming a bend of the required radius (without the need for special devices and tools)
This is especially important in cases where the laying of an extensive network of electrical wires with many branches is organized.
When using steel pipes, certain difficulties may arise in terms of installation and labor costs for molding, but their cost, in comparison with copper counterparts, will be significantly lower.
Note! Sharpened edges of tubular blanks and conduits can damage the wire insulation and lead to undesirable consequences. That is why, when preparing channels, you need to carefully monitor the condition of dangerous edges and cut the original workpieces only with a special cutting tool.
Wire selection
At this stage of work, it is necessary to determine the brand of installation wire suitable for direct laying in steel boxes or pipes. According to the requirements of GOST and the standards stipulated in the PUE, the use of the following types of cable products is considered optimal for wooden buildings:
- Wire VVGng (A) or its variety under the name VVGng-P (A);
- Two more types of cable products related to the same series are VVGngLS and VVGng-PLS;
- Modern wires from a foreign manufacturer NYM.
The multi-core (up to five cores) wires listed in the list with the VVGng marking have reliable double insulation. In accordance with the rules of the PUE, one of the insulating layers (internal) is made on the basis of PVC and has its own color for each core individually.


Additional Information. Generally accepted color standards make wiring much easier, especially when connecting wires to junction boxes, lighting terminals and sockets (see photo below).
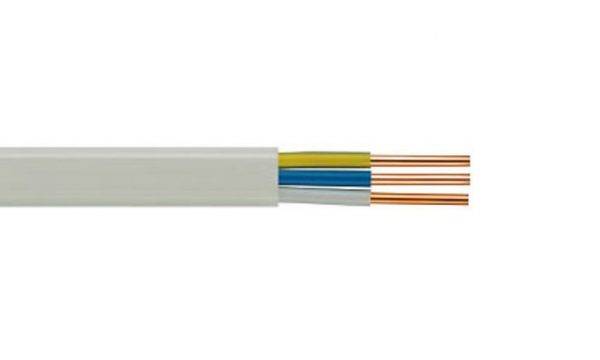
Outside, the VVGng cable has a common insulating coating of a flexible composite - plastic, which makes it possible to operate it in the temperature range from plus 50 to minus 50 ° C.
The characteristics of products under the names VVGng LS, VVGng-P LS almost do not differ from those already considered, except that the insulation of these wires does not emit substances harmful to human health when heated. The cable called NYM is manufactured in accordance with GOST 22483, and has three insulating coatings.
In its production, each of the individual cores is first isolated individually, after which their total assembly is placed in a sheath of composite material, and finally, all this is protected by a coating of non-combustible PVC.
Rules for installing open wiring: a summary of 3 techniques with explanatory pictures
Ensuring an air gap
In old houses, electrical lines were separated from the wood by air space by installing wires on porcelain rollers. Switching points (sockets and switches) were mounted on socket boxes that prevent burning.
Flexible wires were manually twisted and fixed on ceramic insulators attached to building elements.
This method of installation made it possible to visually observe the technical condition of the wires and the safe operation of switches and sockets. Wiring damage anywhere was clearly visible.
The same safety rule is fully preserved in modern retro wiring, which is installed as an elite one in respectable houses, emphasizing their love for antiquity.
This method of installation requires a fairly solid budget. Many homeowners simply cannot afford it. Such equipment is expensive. Stranded wires are produced with protection from light, heat and increased mechanical strength.
Switches and sockets have not only a beautiful design, but also improved switching mechanisms.
Bracket mounting
With this method, the electric cable is separated from the wood by a narrow strip of metal sheet protruding beyond the cable insulation, and fastened with the same brackets.
The cross section of the cores should be up to 6 mm square, and they are all placed inside one cable sheath.
Mounting on brackets worsens the interior of the room. It is more suitable for industrial premises.
Wiring in electrical skirting boards or cable ducts
The safety of the installation technique is based on the use of plastic boxes of various designs that do not support combustion. They are first attached to the walls, and then the wiring is laid inside and the covers are snapped into place.
The big advantage of this method is the possibility of a convenient circuit upgrade by simply adding a cable without the use of complex technologies.
The sale provides a wide range of electrical skirting boards and cable channels with various accessories.
With any method of open wiring, it becomes necessary to lay the cable through wall or other building structures. PUE requires isolating it from wood with metal pipes.


Technical nuances of wiring in wooden and frame houses
So, from the foregoing, it becomes clear that some FORUMHOUSE users believe that the electric cable in wooden houses, with hidden wiring, should be run only in metal pipes. We emphasize - it is in steel pipes, and not in a metal hose, plastic self-extinguishing corrugation or steel corrugated pipe.
The short circuit arc (short circuit) burns through the steel corrugated pipe, and the plastic corrugation, due to its fragility, will not save the wiring from mechanical damage.
Others consider it redundant and rely on foreign experience. For example, in a classic frame using North American technology, an electric cable is pulled straight through wooden racks, in drilled technological holes, without corrugations, metal pipes, etc.
In the "Finnish" version of the frame, the electric cable is usually pulled in the inner layer of counter-insulation embedded in a wooden counter-lattice.
It seems that the technology is available for repetition, because it has stood the test of time, but, as you know, the essence lies in the details.
Firstly: “overseas” it is necessary to make grounding, and double - one goes to the street line, to the shield, the second is independent, connected either to copper pins driven into the ground or to the central water pipe. Plus, there is also a “zero” bus, and each line and electrical appliance (sockets, lamps, etc.) has its own independent grounding.
Secondly: in a three-core "foreign" cable, the copper wire - "ground", goes without a braid. This ensures the operation of the RCD at the slightest damage to the insulation of the wires "zero" and "phase" throughout the route. While in our country the ground wire is insulated and provides protection only to end users.
And this is only part of the nuances that ensure electrical safety. As for houses built from timber, then, having decided to run a cable in a steel pipe, we remember that the tree shrinks over time. Moreover, depending on the moisture content of the source material, this value can be significant. This means that it is necessary to think in advance how to ensure the necessary movement / independence of the steel pipe with the cable so that the beam does not “hang” on it in 2-3 years.

In addition, condensation may form in the steel pipe, and moisture may enter the socket or junction box due to the slope of the route. Another "headache" is how to drive tracks in wooden houses of a large area. It is one thing to lay steel pipes in a wooden cottage of 100-150 sq. m, but a completely different task in complexity - in houses of 300-500 sq. m. In addition to increasing the estimate, special requirements are imposed on the qualifications of workers involved in the installation of electrical wiring in steel pipes.
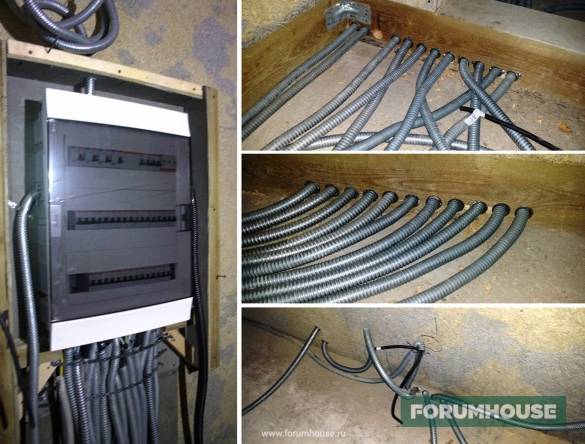
Therefore, examples of the practical implementation of wiring cables in metal pipes are interesting.
A square tube is more convenient to install than a round one.
To do this, we buy a pipe 15x15 mm 300 meters long and a metal corrugation with a diameter of 2 cm, as well as brackets (they are used to fasten corrugations with a diameter of 1.5 cm) for fixing pipes on the walls. Next, we carry out the installation of wiring, not forgetting to first clean the edges of the pipes from burrs!
If this is not done, you can cut through the cable insulation.
What happened in the end, show photos.
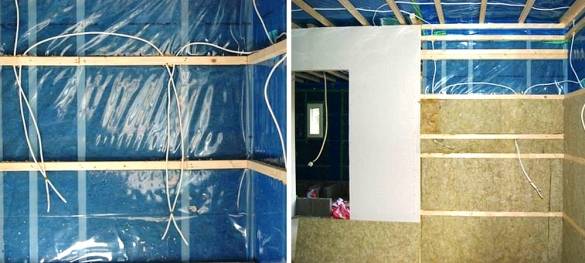
Next photo essay. This is a frame house.


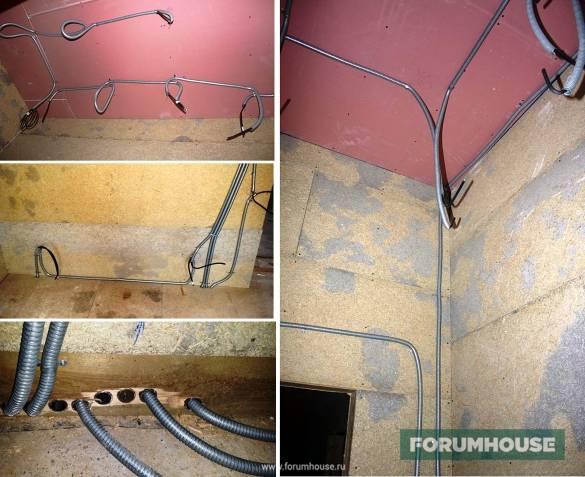
In addition, the cross-section of wires was calculated and protective equipment was selected.The lines were carried out without twists / connections and junction boxes, with whole cables from the switchboard with the machine to the consumer.