- Wiring Methods
- Necessary materials
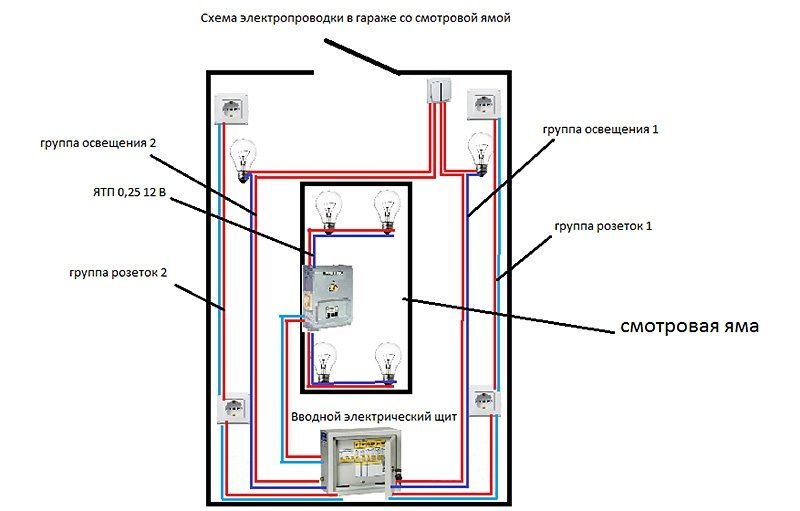
- Wiring in the garage, or how to properly distribute electricity
- DIY wiring
- Wire connection methods
- Breeding Recommendations
- Safety Tips
- Important Requirements
- Necessary materials
- Charting
- Mounting technology
- Principles for designing electrical circuits for garages
- Schema creation rules
- Basic lighting
Wiring Methods
As already mentioned in this article, there are 2 methods of laying electrical wiring in the garage:
Hidden.
Open.
In the first case, strobes are made into which the cable is laid. The wires are fixed in the gates with alabaster or special plastic brackets with an interval of 300 mm. Further, junction boxes are also mounted in a hidden way. After checking the system for operability, all strobes are plastered.
Advice! Take a photo of all wires. Such pictures will come in handy if after a while you want to hang shelves or drill a hole. Otherwise, you can forget exactly how the wires were laid and break through the wiring.

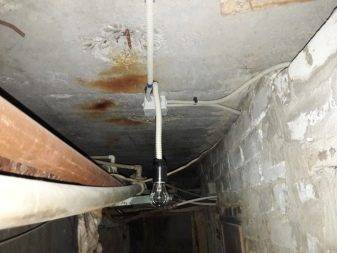
Another method is external. It's simpler and cleaner.It is mainly used in metal or concrete garages, where it is problematic and unrealistic to make strobes. Special boxes are fixed along the walls, along which electrical wiring is laid. The cable is placed in a special corrugation, which will protect it from moisture and other mechanical damage. It is also necessary to use reliable fasteners that will allow you to keep the wiring unchanged for a long time.
Necessary materials
A correctly drawn up wiring diagram will help you quickly calculate the number of cables, automation, sockets, etc. First of all, the cross section and length of the input cable are calculated. To do this, you can use the special table below.
Table calculation of the cable section depending on the power of the network
For example, let's calculate the parameters of the cable and other components for scheme No. 1, which was indicated in the previous section:
- The cross section of the input cable - in this case, a full-fledged auto repair shop is not planned in the garage, so a copper cable of 4–4.5 square meters is ideal. mm.
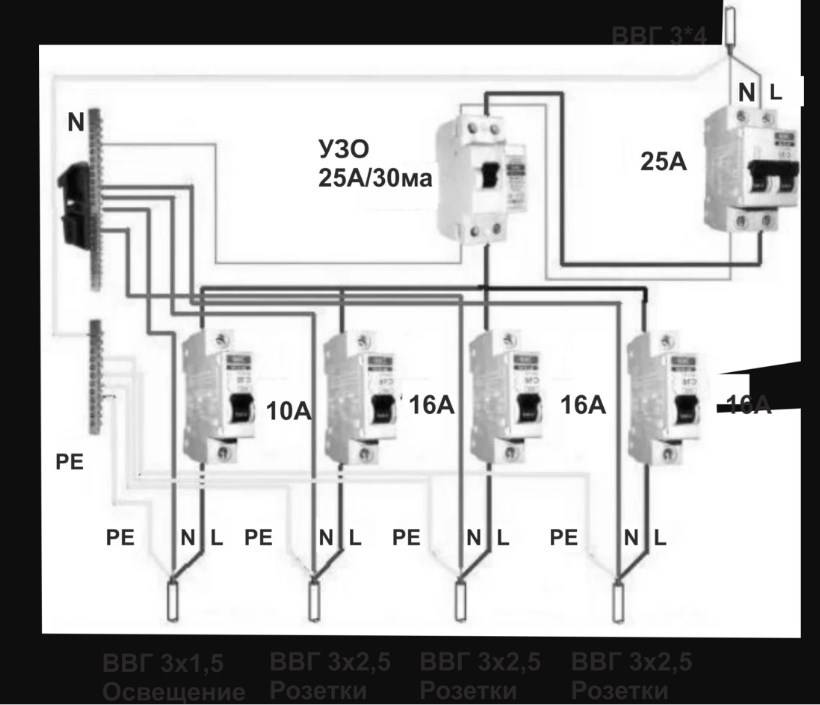
- Electrical panel - enough shield for 9 modules.
-
The cross section of the cable for the socket group - the power of the tool used for car maintenance and repair rarely exceeds 3 kW. With this in mind, the cable section is selected - 1.5–2 mm. sq., but for safety reasons it is recommended to use a copper cable with a cross section of 2.5 mm. sq.
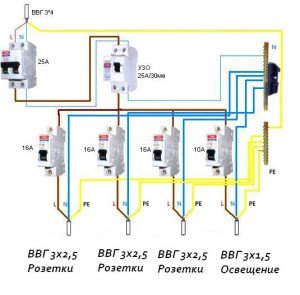
- Outlet group machines - to select the machine, you should calculate the current strength: I \u003d P / U, where I is the current strength (A), P is the load power (kW), U is the mains voltage (V). Taking into account our data, it turns out that I \u003d 3000 / 220 \u003d 13.65 A.It turns out that for each group of outlets you need one 16 A modular machine.
- RCD - a device for a passing current with a power of at least 20 A. The operating current at which the device turns off is strictly 10-30 mA.
-
Sockets - designed for a rated current of 16 A with grounding.
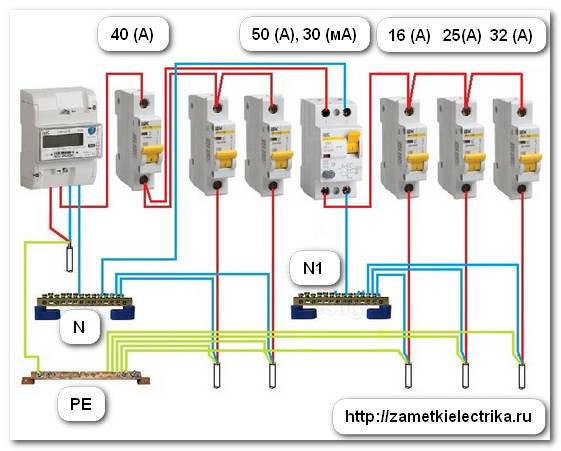
RCD and circuit breaker for the power grid
- The cross section of the cable for the lighting network is calculated taking into account the total power of the lighting fixtures. For example, on the ceiling there are two lamps with a power of 100 W, on the walls there are two lamps with a power of 60 W each. As a result, it turns out that the total power of the devices is 220 watts. For this power, an aluminum cable with a cross section of 1.5 mm is enough. sq.
- Automatons for lighting - the total current power is no more than 400 W, even if you put ordinary 100 W light bulbs in each lighting device. With a correctly selected cable cross-section, a single-pole machine for 10 A is enough.
The cable length is determined based on the optimal route. The cable is purchased with a margin of 10%. It is highly recommended not to buy very cheap products. It is optimal if it is double-insulated wiring and insulating conductors.
Wiring in the garage, or how to properly distribute electricity
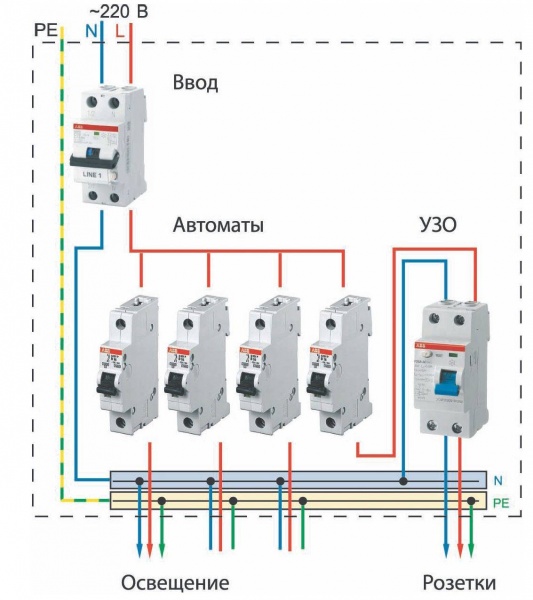
If the light from the power plant to your house comes without problems, and you plan to use this blessing of civilization in your new garage and don’t know what to do yet, we suggest that you read this article. Both electricians and “home-made” know how to properly lay a cable - the latter manage to do miracles with electrical wiring. But even they strictly observe all safety rules.So we read and remember: the internal wiring in our garage does not tolerate any deviations from the well-known ETM complex (electrical protective technical measures). So you have to follow the rules.
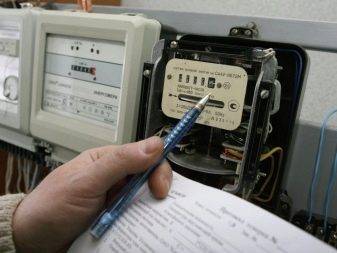
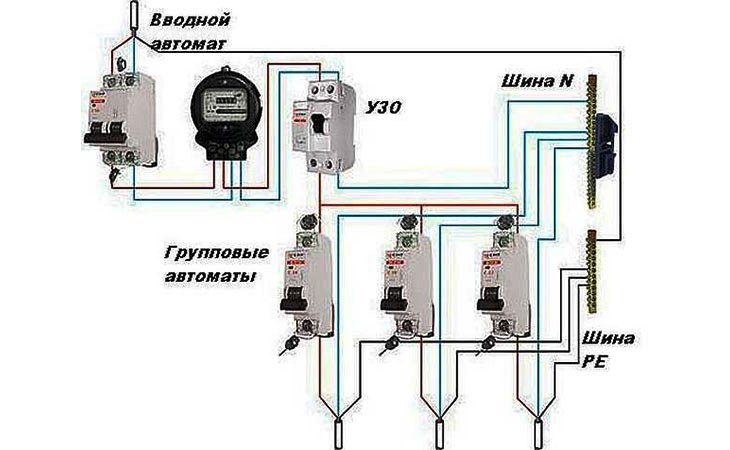
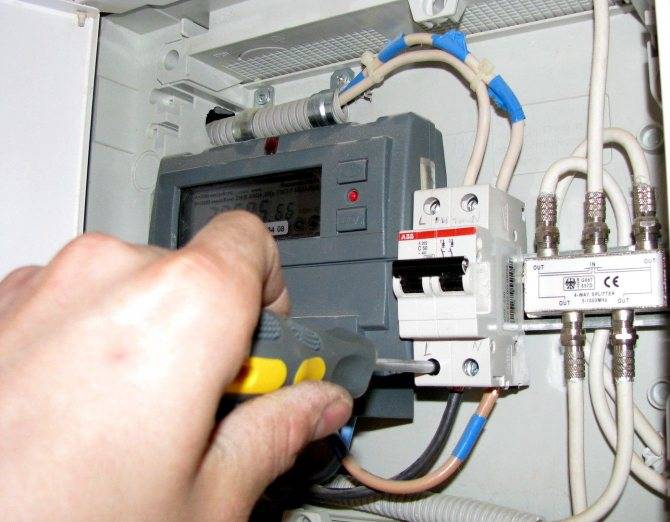
You will also have to take into account all the features of the structure of the building (in different houses may be different wiring system). AT must be looked at firstwhere the garage is located - in the house or as a separate building. In any option, there is a connection to external power networks (this is either an overhead line or a cable laid underground). It also has its own standards and is quite strict, but we will assume that you already have this part of the wiring by default. As in the case of an ordinary apartment or house, the electricity entering the garage must be recorded and calculated by the device (this is necessary for further payment). Many do not like the electric meter, but if you do not want to wait for problems and outages, it is better to put one such device on all buildings at once. Shield with safety devices Ideal for counter installation.


It will be necessary to conduct wiring to the meter from the input device using a cable. Of course, in your garage there will most likely not be as many electrical appliances as, for example, in your kitchen, but nevertheless, some citizens successfully manage to make a real extra room out of their garage - with heating (batteries or even an electric fireplace), with a mini -kitchen (with coffee maker, electric stove and electric kettle), TV, computer, printer and so on. However, such a garage will really look like an extra room on the first floor of your house.Residual current devices (the favorite abbreviation of RCDs among electricians) will also have to be installed here (even if we are talking about an outbuilding). Electricity will pass from the main input distribution device (located near the input of the supply line) through group lines to sockets and the lighting system. It is advisable to install several sockets in the garage. It's better to have a spare than not enough later.
DIY wiring
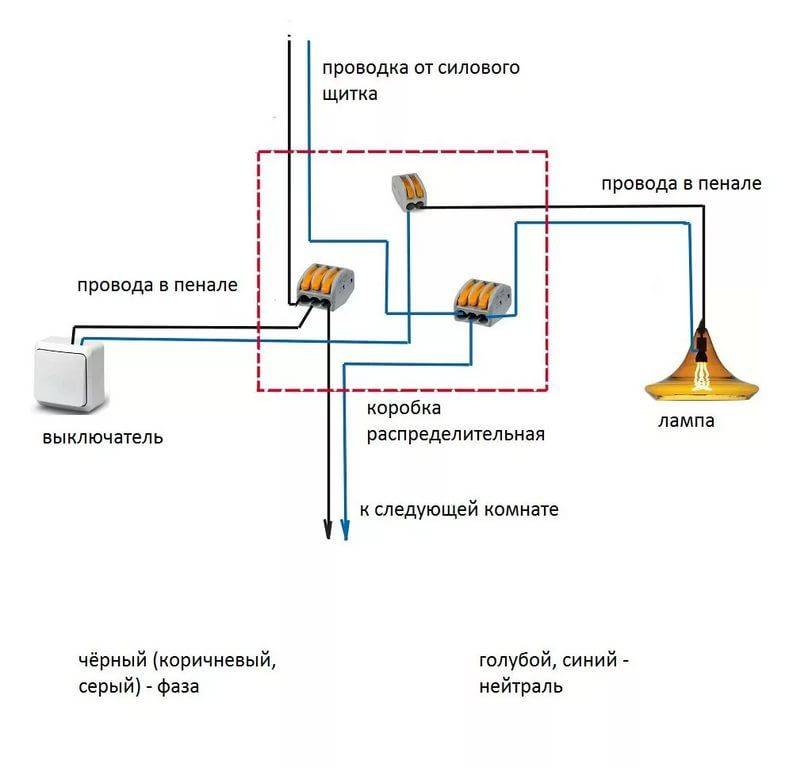
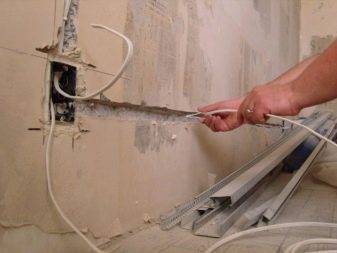
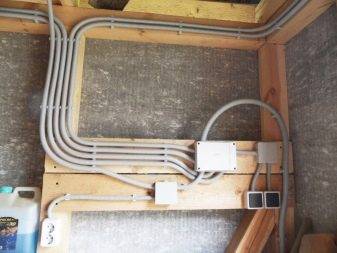
Modern construction trends include hidden wiring. It can be laid in grooves specially made in the walls - strobes. After laying and fixing the cables, they are covered with putty, comparing with the surface of the rest of the wall. If the erected walls will then be lined with sheet materials - drywall, GVL, etc., then strobes are not needed. The cables are laid in the gap between the wall and the trim, but in in this case, only in pleated sleeves. The sheath with laid cables is fastened with clamps to the structural elements.
How should internal wiring be laid? In a private house, when arranging with your own hands, you must follow all the rules
When laying, you need to remember that the inner private house electrical wiring done according to all the rules and recommendations. This is the only way to guarantee safety. The basic rules are:
- wiring only vertically and horizontally, no rounded corners or beveled routes;
- all connections must be made in mounting junction boxes;
- horizontal transitions must be at a height of at least 2.5 meters, from them the cable goes down to the outlet or to the switch.
A detailed route plan, similar to the one in the photo above, must be saved. It will come in handy during the repair or modernization of wiring. You will need to check with him if somewhere nearby you need to ditch or make a hole, hammer in a nail. The main task is not to get into the cable.
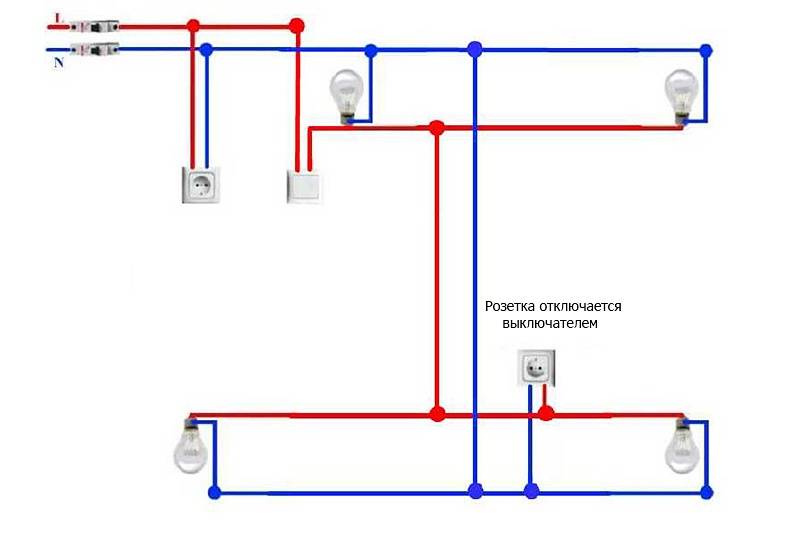
Wire connection methods
A large percentage of wiring problems stem from poor wire connections. They can be done in several ways:
- Twisting. Only homogeneous metals, or those that do not enter into a chemical reaction, can combine in this way. It is impossible to twist copper and aluminum categorically. In other cases, the length of the bare conductors must be at least 40 mm. Two wires are connected to each other as tightly as possible, the turns are stacked one next to the other. From above, the connection is wrapped with electrical tape and / or packed with a heat shrink tube. If you want the contact to be 100%, and the losses to be minimal, do not be too lazy to solder the twist. In general, according to modern standards, this type of wire connection is considered unreliable.
The rules for installing electrical wiring in a private ohm prohibit making twists in the walls (bricking them up) - Connection via terminal box with screw terminals. Metal terminals are soldered in the case made of heat-resistant plastic, which are tightened with screws. The conductor, stripped of insulation, is inserted into the socket, fixed with a screw, using a screwdriver. This type of connection is the most reliable.
Connecting electrical wiring using terminal boxes is fast, convenient, reliable, safe - Connecting blocks with springs. In these devices, contact is provided by a spring. A bare conductor is inserted into the socket, which is clamped by a spring.
And still, the most reliable connection methods are welding and soldering. If it is possible to make the connection like this, we can assume that you will not have problems. At least with connections.
Do-it-yourself installation of electrical wiring in a house requires careful fulfillment of all requirements. This is a guarantee of your privacy and the safety of your private property.
After wires from machine to the point of connection of the socket or switch, they are laid, they are checked for integrity with a tester - they ring the cores among themselves, checking the integrity of the conductors, and each individually to the ground - checking that the insulation is not damaged anywhere. If the cable is not damaged, proceed to installation of a socket or switch. Having connected, they check it again with a tester. Then they can be started on the appropriate machine. Moreover, it is advisable to immediately sign the machine: it will be easier to navigate.
Having finished the electrical wiring throughout the house, having checked everything on their own, they call the specialists of the electrical laboratory. They check the condition of conductors and insulation, measure grounding and zero, based on the results they give you a test report (protocol). Without it, you will not be given a commissioning permit.
Breeding Recommendations
When arranging do-it-yourself wiring in the garage, there are some recommendations that will allow you to make the right scheme and bring it to life. These recommendations include the following:
- for sockets and lighting, separate lines must be drawn;
- for cables, you need to select the optimal section;
- it is best to do zonal lighting;
- for a powerful heater, if it is to be used, a separate line must be drawn;
- all wires must be laid in a straight line: vertically or horizontally;
Wire Location
- the wiring distance to the ceiling must be at least 100 mm;
- in the presence of high humidity, it is necessary to use lighting devices designed for low voltage. Their connection should be carried out through a transformer for 12 - 36 V.
By following these guidelines, you can without problems by hand carry out electrical wiring in the garage.
Safety Tips
With electricity, jokes are bad, so any kind of work on laying electrical cables and connecting electrical appliances must be carried out in strict accordance with the safety regulations.
- First of all, you can work only in the absolute absence of voltage. To turn off the voltage, it is enough to turn off the machines in the shield or unscrew the usual plugs if you still have such obsolete elements installed.
- Work in comfortable clothing that does not restrict movement.
- For carrying out any operations, you can use only high-quality and whole electric tools, without broken connections and uninsulated cables. The handles of all kinds of hand tools must first be insulated with a tape designed for this purpose.

Do-it-yourself wiring in the garage
Treat the work on the wiring device with the utmost responsibility. Take your time, think about each of your further actions. The safety, reliability and durability of electrical wiring depends on the correct installation. Any mistakes can lead to irreparable consequences, remember this. Otherwise, follow the instructions and there will be no problems.


Important Requirements
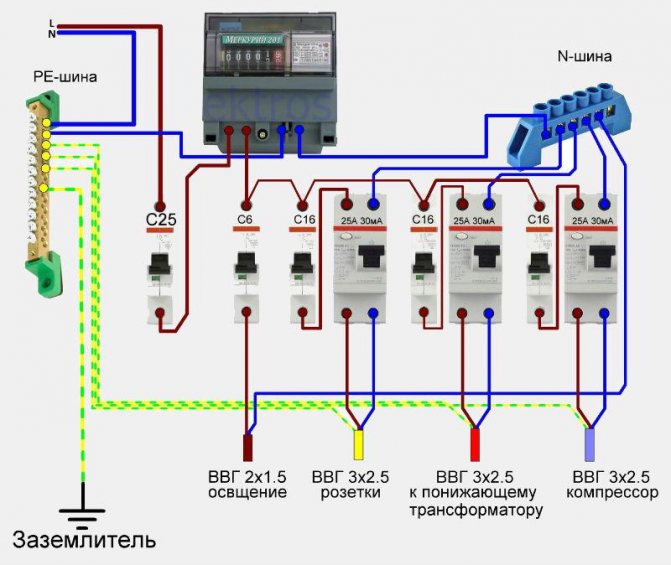
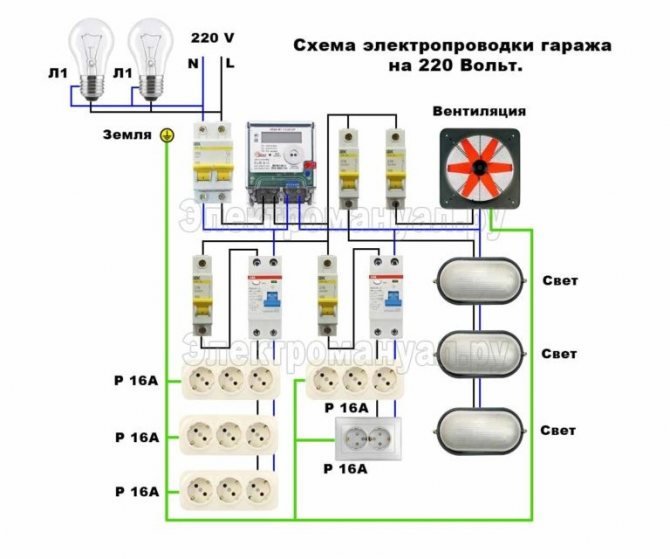
Using a 220 V network imposes much fewer restrictions on the owner of the garage. However, he must definitely purchase a meter that can withstand electricity at 50 Amperes and appropriate cables. The energy supervision is closely monitoring the supply of the load current. In case of violations, he has the right to issue an order to dismantle the illegal electrical network and even impose a fine on “initiative electricians”.

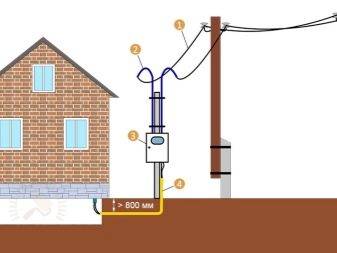
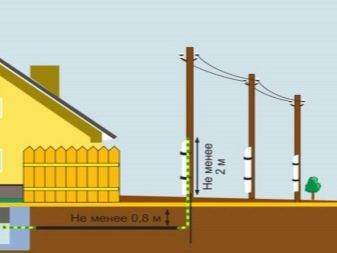
Cables are suspended in the air, held by a supporting steel wire with a diameter of 0.3 cm. According to current regulations, underground lines are supposed to be pulled in corrugated plastic pipeslaid in trenches 0.8 m deep. The bottom of the excavation is sprinkled with sand (layer 0.1 m). A similar line is connected to a personal meter, the segment is protected using a special machine.
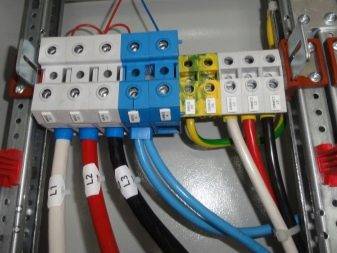
To distribute electrical energy, they use a special electrical panel installed directly in the garage itself. For him, a main machine is provided, the same type as that installed in the apartment (house). These requirements are key, and all other points depend on the scheme used.
Necessary materials
A correctly drawn up wiring diagram will help you quickly calculate the number of cables, automation, sockets, etc. First of all, the cross section and length of the input cable are calculated. To do this, you can use the special table below.
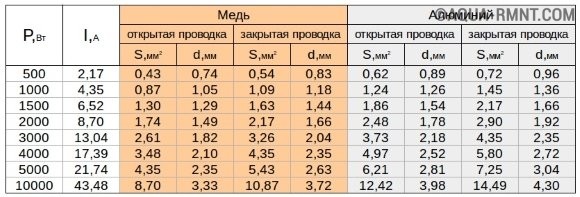
Table calculation of the cable section depending on the power of the network
For example, let's calculate the parameters of the cable and other components for scheme No. 1, which was indicated in the previous section:
- The cross section of the input cable - in this case, a full-fledged auto repair shop is not planned in the garage, so a copper cable of 4–4.5 square meters is ideal. mm.
- Electrical panel - enough shield for 9 modules.
-
The cross section of the cable for the socket group - the power of the tool used for car maintenance and repair rarely exceeds 3 kW. With this in mind, the cable section is selected - 1.5–2 mm. sq., but for safety reasons it is recommended to use a copper cable with a cross section of 2.5 mm. sq.
Cable for wiring of various sections
- Outlet group machines - to select the machine, you should calculate the current strength: I \u003d P / U, where I is the current strength (A), P is the load power (kW), U is the mains voltage (V). Taking into account our data, it turns out that I \u003d 3000 / 220 \u003d 13.65 A. It turns out that for each group of outlets you need one 16 A modular machine.
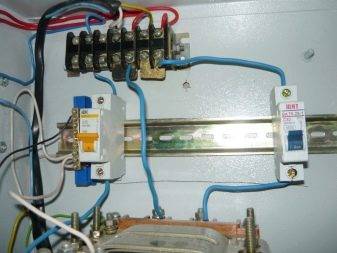
- RCD - a device for a passing current with a power of at least 20 A. The operating current at which the device turns off is strictly 10-30 mA.
-
Sockets - designed for a rated current of 16 A with grounding.
RCD and circuit breaker for the mains
- The cross section of the cable for the lighting network is calculated taking into account the total power of the lighting fixtures. For example, on the ceiling there are two lamps with a power of 100 W, on the walls there are two lamps with a power of 60 W each. As a result, it turns out that the total power of the devices is 220 watts. For this power, an aluminum cable with a cross section of 1.5 mm is enough. sq.
- Automatons for lighting - the total current power is no more than 400 W, even if you put ordinary 100 W light bulbs in each lighting device. With a correctly selected cable cross-section, a single-pole machine for 10 A is enough.
The cable length is determined based on the optimal route. The cable is purchased with a margin of 10%. It is highly recommended not to buy very cheap products. It is optimal if it is double-insulated wiring and insulating conductors.
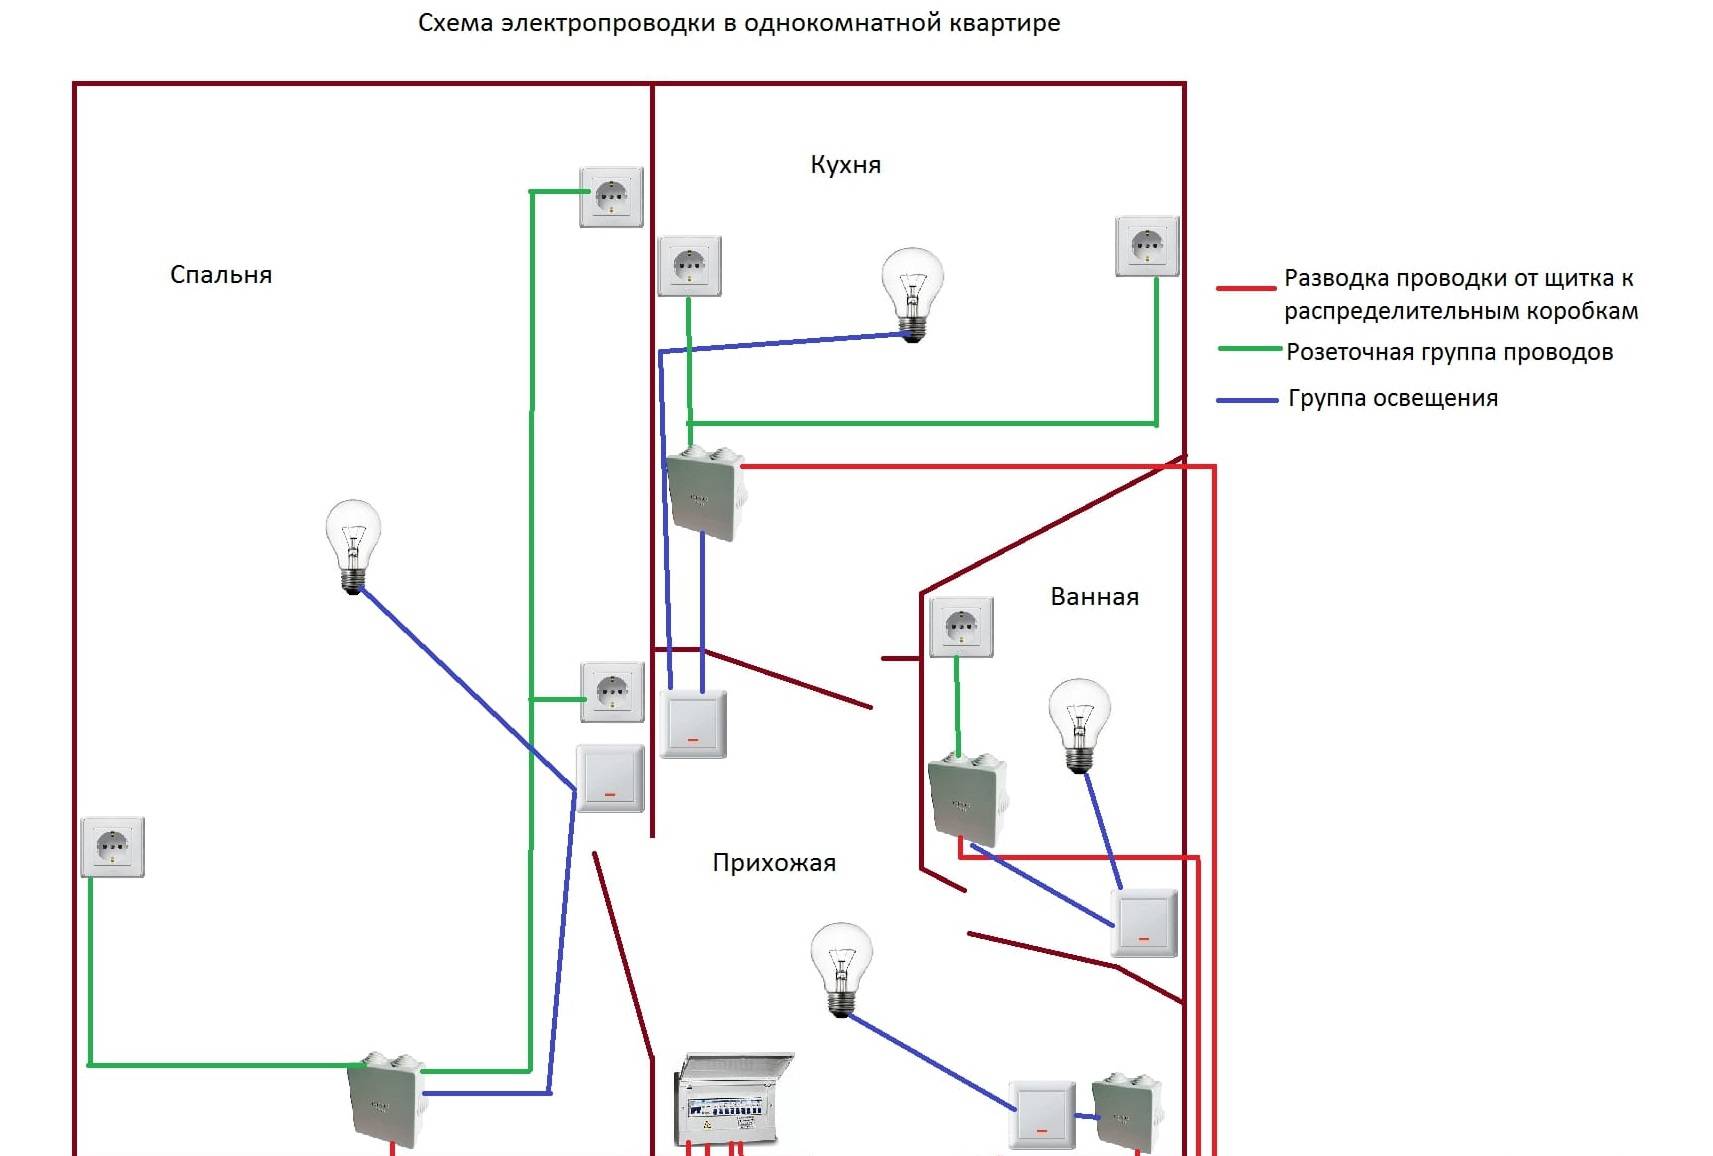
Charting
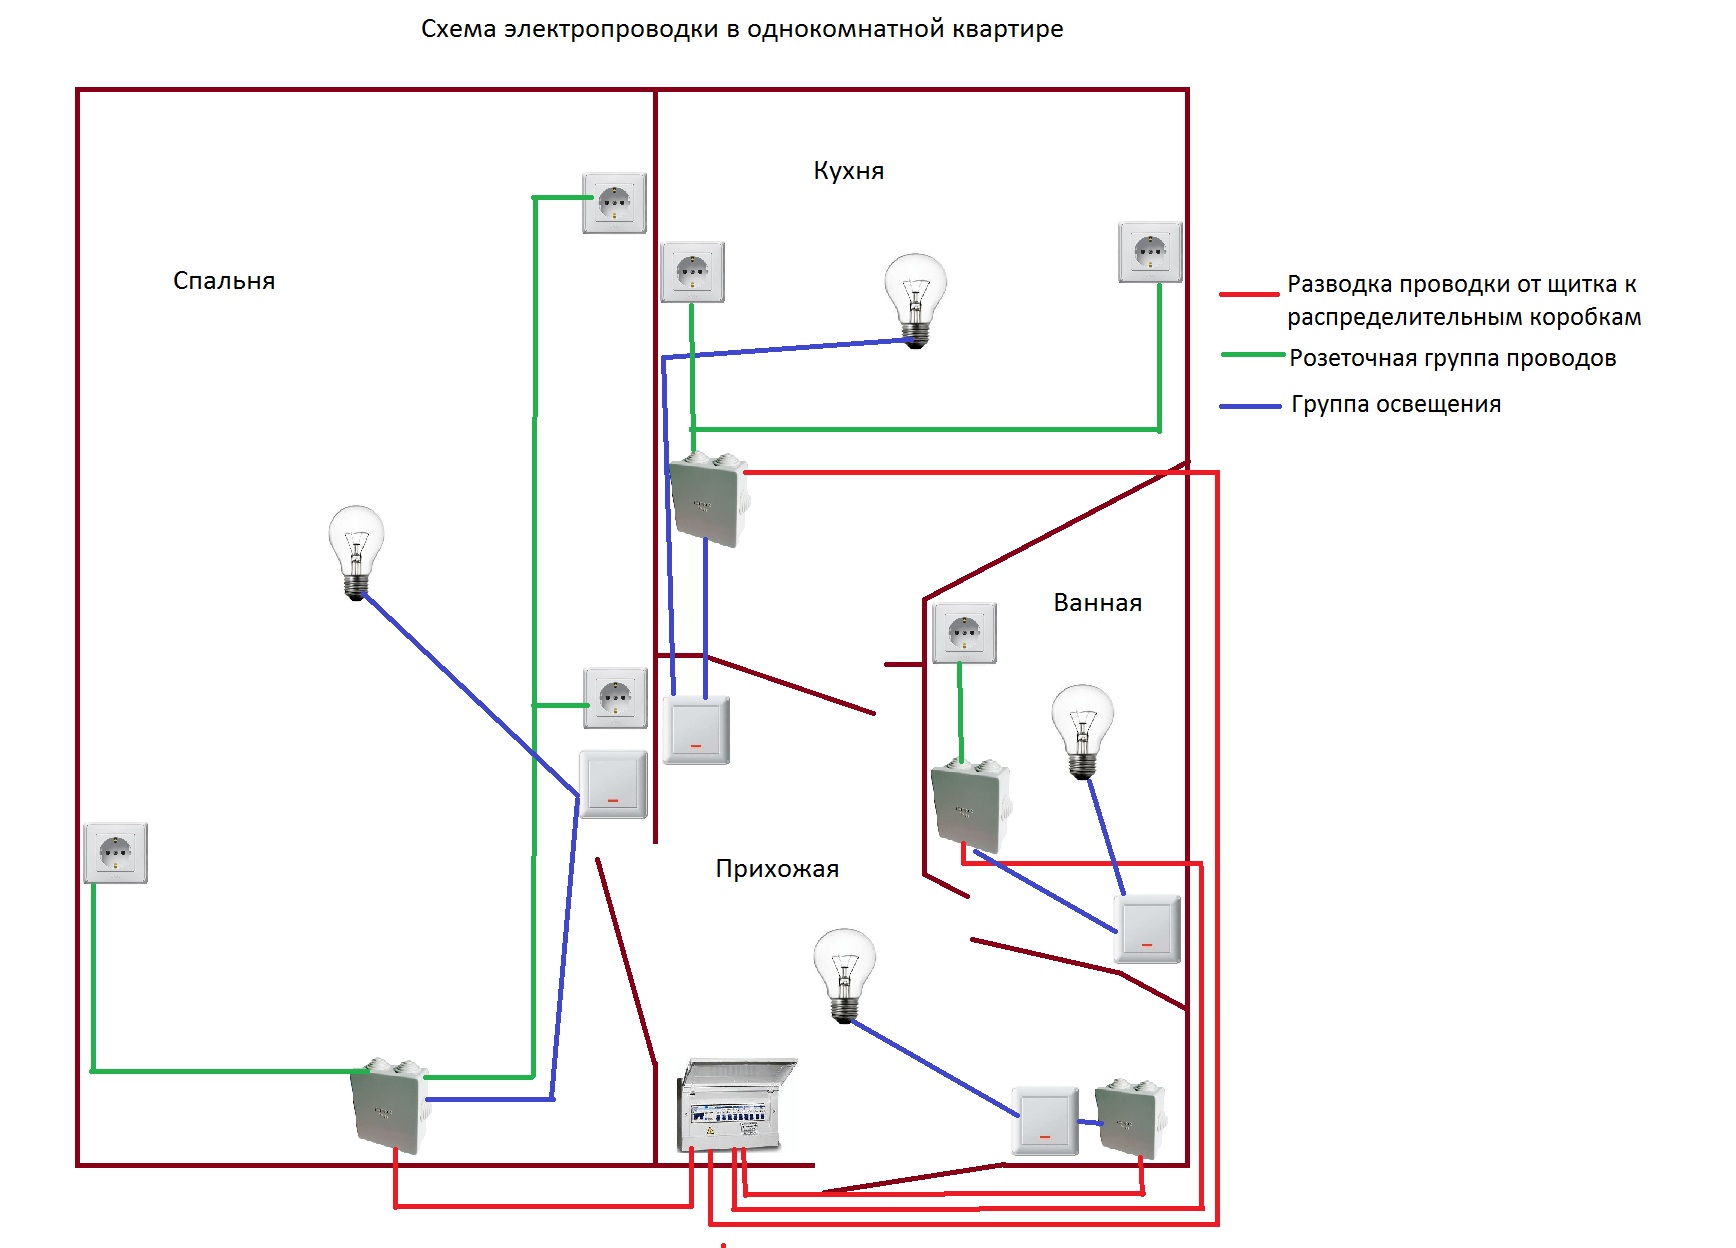
The wiring diagram in the apartment is easy to do with your own hands. To do this, it is recommended to use a photocopy of the housing plan, on which you can conveniently mark the installation locations of sockets, switches, lamps and other constituent elements. How to draw up a wiring diagram before repair, we described in detail in the article.
The starting point of the scheme is the location of the switchboard in the apartment. Usually this place is a corridor, next to the front door, at a height of about 1.5 meters from the floor.
When drawing up the scheme, we recommend that you consider the following tips, rules and regulations:
- In apartments, it is forbidden to ditch load-bearing walls, as well as to make horizontal and vertical strobes. We will discuss this in detail below.
- The route of the apartment electrical wiring must run strictly vertically and horizontally along the walls. This requirement ensures less chance of damage. For example, by the location of the outlet, you can find out exactly where the cable runs, so as not to accidentally drive a nail into it when you hang a picture. Ideally, it is recommended to find the wire in the wall with a special tool before driving the nail. Please note that in Khrushchev and other panel buildings, the cable is laid in channels in the slabs. Due to the stiffness requirements of which, the channels can run diagonally.
- The turn of the track should be carried out only at a right angle.
- It is best to lay a line in the upper part of the wall, at a distance of 20 cm from the ceiling (this height will provide a minimum likelihood of mechanical damage and will not be displayed on the convenience of repair). It is also possible to conduct wiring along the floor, and not the ceiling, using a special electrical plinth.
- Switches in the apartment should be located at the entrance to the room, on the side of the door handle. The height of the switches is not standardized according to GOST and SNiP, but, as a rule, it is either 80 cm or 150 cm. According to the European standard, it is better to install switches lower, moreover, it will be more convenient for children to turn on the light if necessary.
- Sockets are mounted at the bottom (20-30 cm from the floor), but if necessary, they can be placed at any height (for example, in the kitchen above the countertop). Recommended for 10 sq. meters of the room, install at least one outlet, and at least 1 outlet per room. In the kitchen, the number of products should correspond to the number of household appliances, at least 4 pieces are recommended. This is spelled out in SP31-110-2003 "Design and installation of electrical installations of residential and public buildings" paragraph 14.27. The distance from the attachment point to the door and window should not be less than 10 cm.
- Each room must have a junction box.
- Before drawing up an electrical wiring project in an apartment, carefully plan the location of household appliances and furniture. It happens that after electrical work, products can be covered with furniture, or cords from household appliances do not reach the power source.
- The bathroom must have at least 2 outlets (one for connecting a washing machine, the second for a hair dryer). But read the article "sockets in the bathroom" about their correct location.In short, outlets should have protective shutters or be located in an area with the least chance of splashing.
You will surely find these articles useful:
- wiring diagram in a three-room apartment;
- wiring diagram in a one-room apartment.
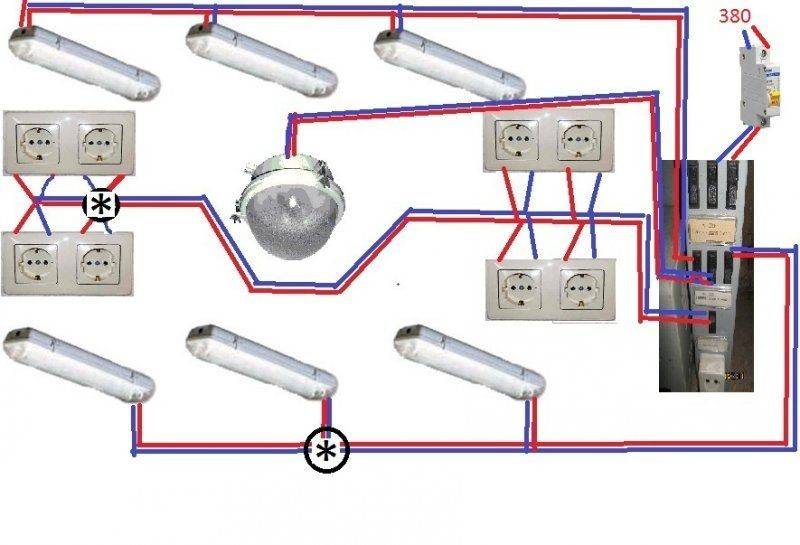
Mounting technology
Having purchased all the necessary materials and tools, you can start pulling the wiring. Where it is not possible to make a bend in the form of a large radius of pipes, it is worth using boxes. They will help distribute the branches and arrange the switches properly. It is necessary to fix both the boxes and the connecting pipes on the supporting structures as carefully as possible. Responsible garage owners do-it-yourself wiring, and those who turn to professionals, always evaluate the tightness of the joints of any pipe and box.


Correctly stretching the cable through the pipe means first bringing the wire inside. To do this, use special heads that will prevent jamming and clamping. Only then comes the turn of tying the cable to the wire and passing it through the pipe. It is advisable to use trays on vertical wiring segments, ceiling lights are suspended on tensioned cables (not under voltage!).
To make the fastening of the wires in the boxes reliable, it is recommended to either clamp them with screws or solder the copper twists. Where to connect aluminum and copper wires, separated by terminals or washers made of other metals
Great attention should be paid to grounding. Not a single step-by-step instruction for wiring in a garage can bypass it
A typical workflow is as follows:
- next to the main building, a steel pipe coated with a zinc layer is driven into the ground, 2 m long;
- a round steel block with a diameter of 0.6-0.8 cm is welded to this pipe;
- a circle of steel is painted with hydrophobic paint and brought into the garage;
- it must be laid to the shield, next to which the terminal is placed;
- behind the terminal is a thick copper wire (thickness is the key to low resistance).

To make a full-fledged workshop, you will have to separate three-phase wiring based on copper cable, the cross section of which is at least 6 square meters. mm. The cable is placed so that up to the ceiling was at least 11 cm, and the socket and the floor should be separated by 50 cm. Gap between pipe and pipe heating, it is desirable to withstand at least 15 cm.
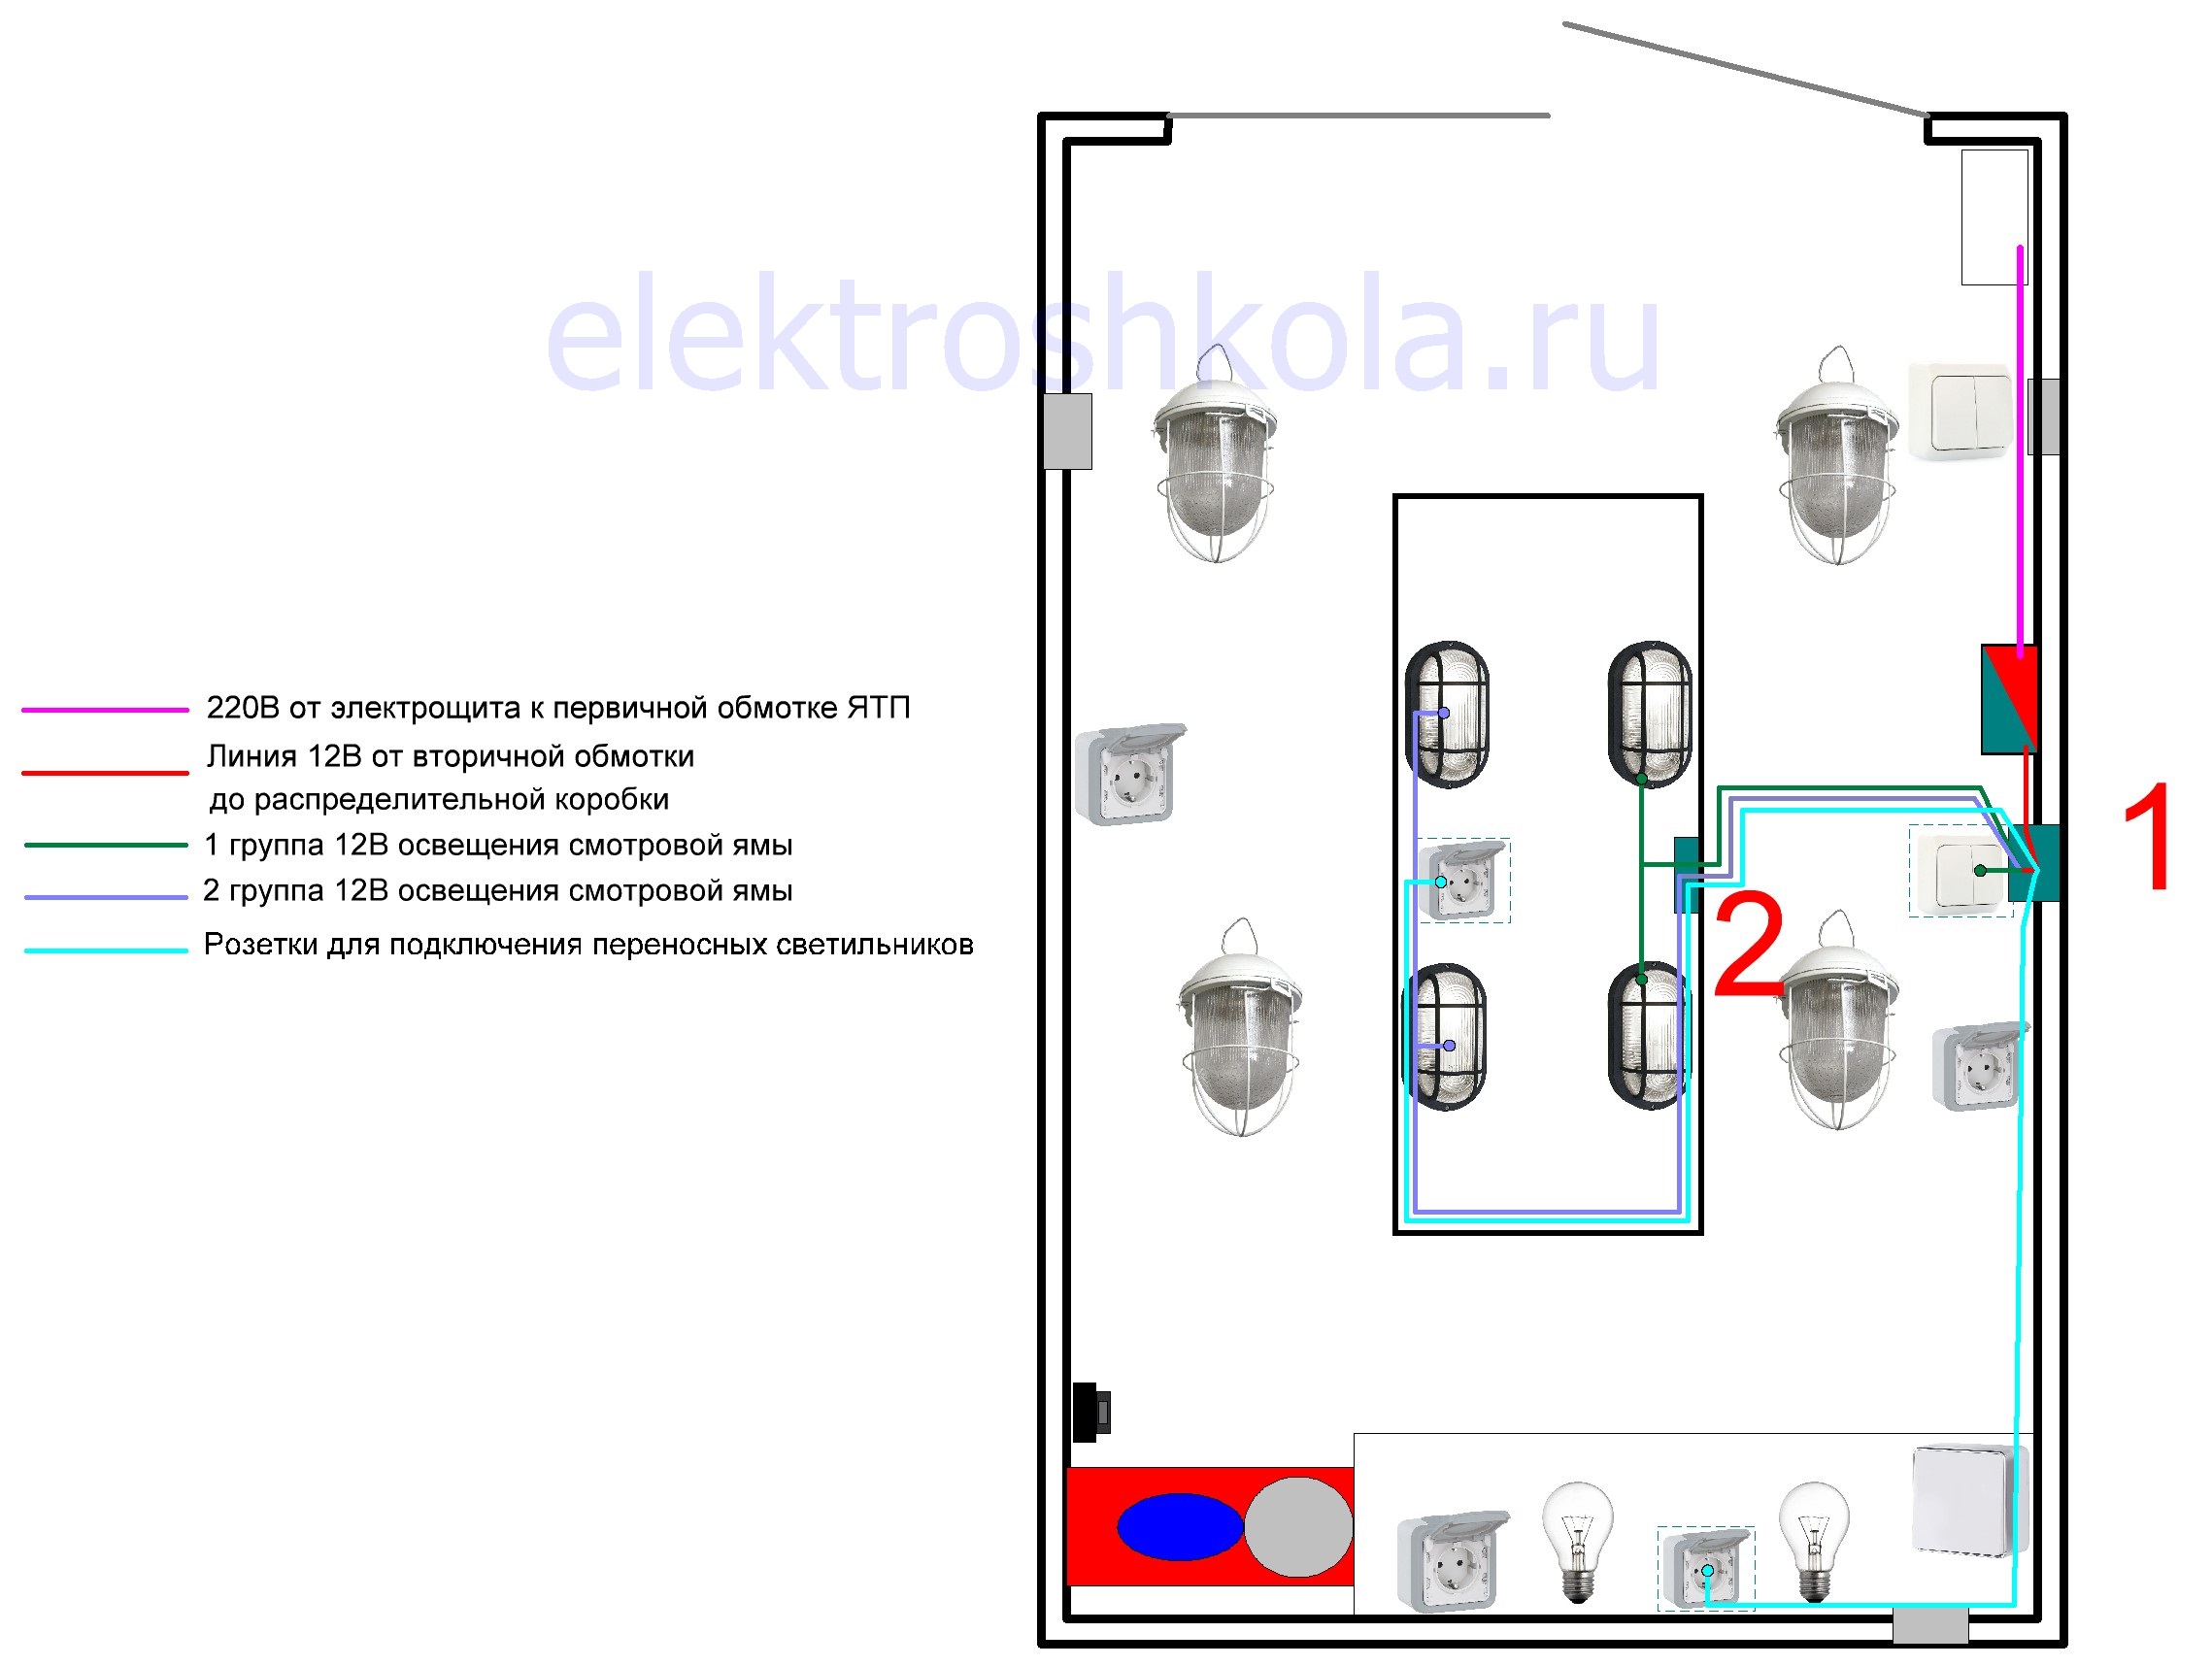
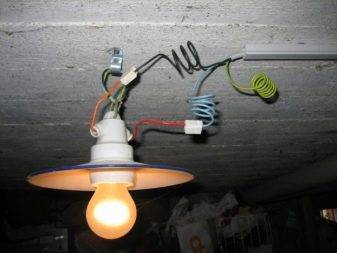
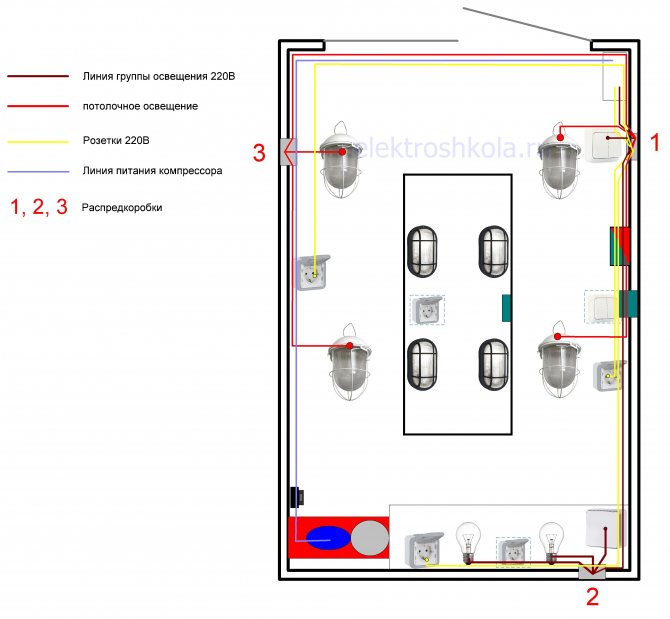
Many garages are equipped with a cellar, and this part of the room also requires special lighting, that is, laying wires and connecting them to lighting fixtures.
The cellar already belongs to damp spaces, where it is necessary to install the electrical network as carefully as possible. And when it is also located in the garage, the severity of the requirements only grows.
Step-down transformers with an output current of 12 V should be used. Only after making sure that the room is completely dry, it is permissible to use standard 220 V electricity.
It is advisable to show the garage to an experienced electrician before starting work and coordinate with him the purchase of all components. This will allow you to take into account the specifics of the created network as accurately as possible, avoid errors in its construction and failures in operation.
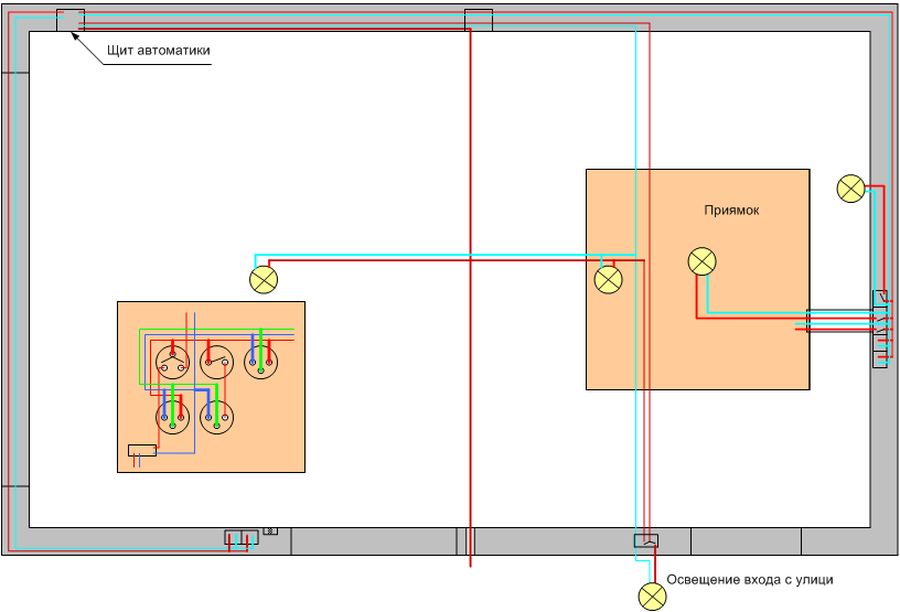
Principles for designing electrical circuits for garages
Preliminary wiring diagram
A simple garage wiring diagram provides for the outdoor location of all elements, such as cables, sockets, switchboards and lamps (see Garage lamps). Many try to hide the cables by laying them in the walls in front of plaster or covering them with finishing materials.


But practice has shown that such a garage wiring diagram is not practical and best there will be surface wiring. To protect the wire in the most likely places of damage, plastic or metal corrugated tubes are used, and special plastic boxes are used for decorative concealment.
Schema creation rules
The easiest way is if the garage is being built on a site to which a power line has already been connected, a separate switchboard is installed. It remains only to run the cable from the shield to the garage. If the latter is a building located far from the main house, then you will have to choose two connection options: from the house or a separate line from a pole located outside the territory of the summer cottage. The second option is more difficult because the air can be carried out by electricians who have access to this type of work. In addition, a separate switchboard will have to be installed in the garage.
Now, as for the wiring diagram in the garage (wires and cables). First of all, the entry point of the external power cable is determined, as well as the installation location of the shield. Then the locations of lamps and sockets are applied to the diagram. All this is connected by wiring lines. What are the requirements for all these elements:
- Wiring lines inside the garage should only be laid in vertical or horizontal directions. No dodges.
- The transition from a horizontal section to a vertical one (and vice versa) is carried out only at a right angle.

Electrical wiring is horizontal and vertical sections
- The distance of horizontal sections from the ceiling or floor, vertical sections from the corners of the building, window and door openings - 15 cm.
- The same distance to heating appliances (radiators, stoves, etc.).
- The number of sockets at the rate of one per 6 m2 or every 4 m.
- The installation height of sockets is 60 cm from the floor surface.
- The installation height of the switches is 1.5 m. They are mounted at a distance of at least 15 cm from the door jambs.
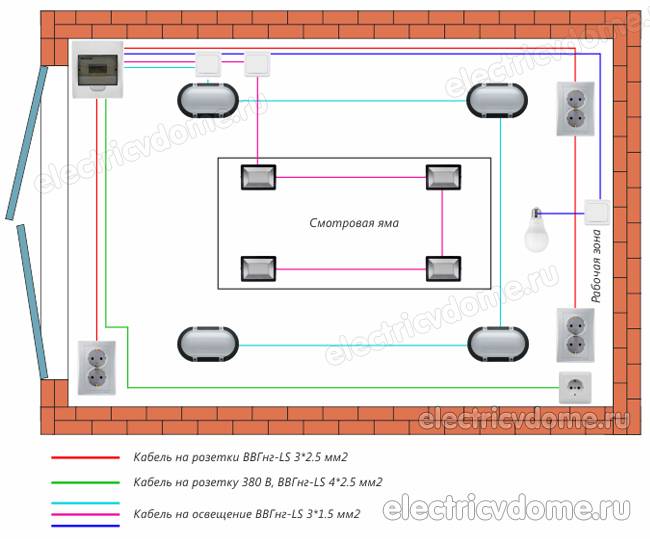
- If the garage has a basement and a viewing hole, then sockets are not installed in them. This also applies to light switches. These elements are mounted in the garage itself in a convenient place.
The optimal solution is a three-phase wiring diagram. In this case, one phase is connected only to lighting fixtures, the other two are scattered over sockets. If a three-phase connection is a problem, then use a single-phase (220 volts). For this option, you will have to accurately calculate the load on the cables and select their cross section correctly. This mainly applies to wires for sockets.
In this case, again, it is better to divide the circuit into two sections: for light bulbs and sockets. And for each loop you will have to pick up a circuit breaker according to the consumed power and current.

Wiring diagram with two sections: lighting and socket
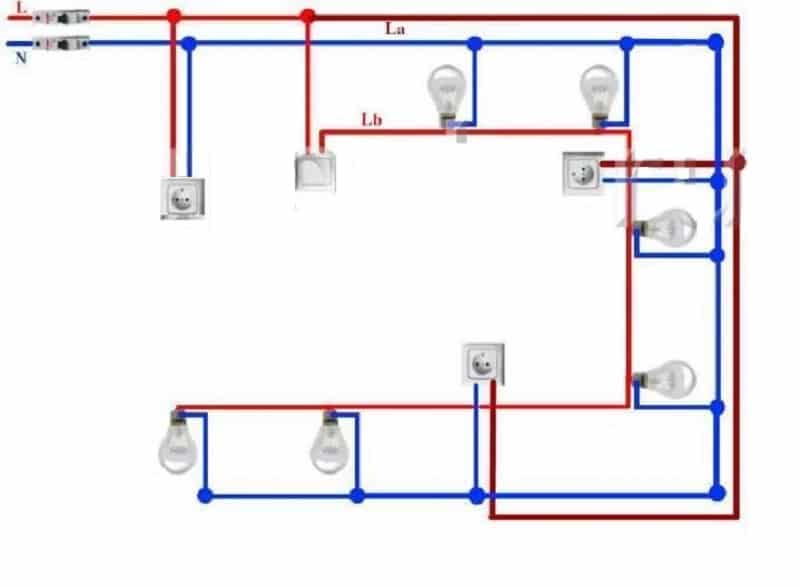
Basic lighting
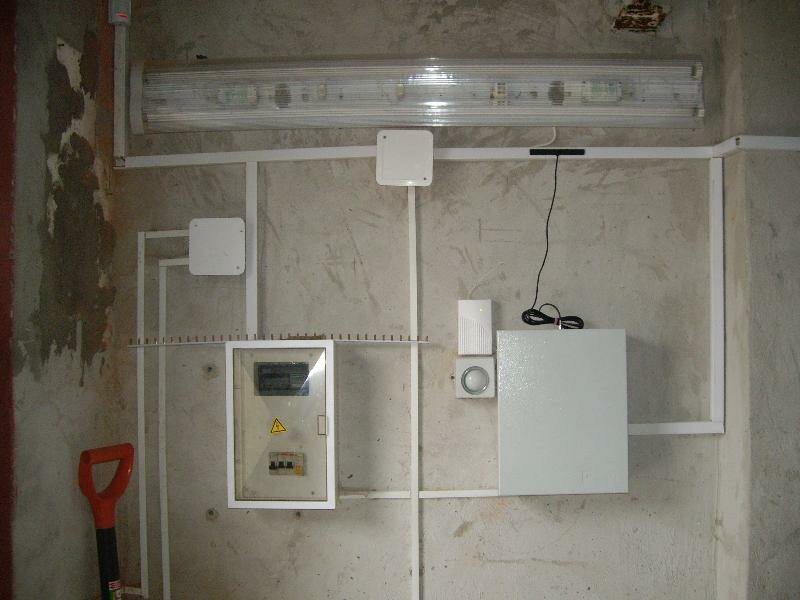
The electrical panel in the garage can be made by many car owners. However, this does not mean that in the absence of knowledge, all work will be done correctly. However, if you have certain knowledge in wiring and follow the correct sequence of work, the price of the electrical panel will be small.
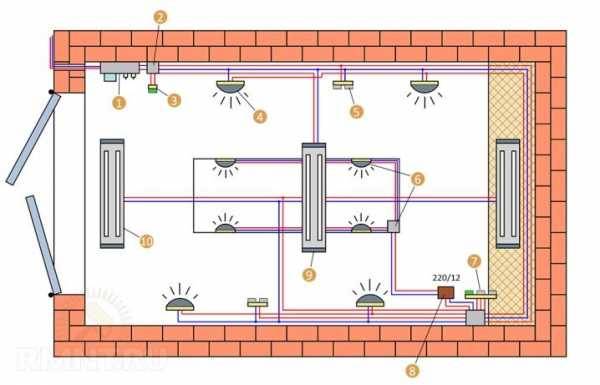
To create a high-quality lighting system, it is necessary to equip the garage with at least four sources. Features of creating basic lighting:
It is better to install the lamps in pairs - on the left and right sides of the machine.
You can also place light sources behind and in front of the car
The placement of the lamps depends on the needs of the car owner.
?Attention! It is important to wire from the electrical panel so that each light source has a separate switch.
In order to have lighting in the basement, you should use a transformer. It is necessary that it distribute electricity to different areas of the basement.
In addition to the transformer and various appliances, you should hang an electric meter in the garage
It must withstand heavy loads.
For example, welding machines old-style ways to issue a load of 50 A
This indicates the need to choose a meter that can withstand such loads.
Attention! It is very important to choose a wiring scheme that will meet safety requirements. It is better to use a cable with a copper core
The garage electrical panel is one of the main elements of the garage power supply system. With it, you can enable and disable individual branches.