- Wiring diagrams in a wooden house
- Selection of cable and wire products
- Socket groups
- Lighting circuits
- Boilers and washing machines
- Ovens, electric stoves
- Heating boilers
- Air conditioners
- Power supply methods
- General information
- Mounting methods
- Features and benefits of a closed laying method
- Features and benefits of open laying
- Features and benefits of laying wiring in a cable channel
- Proper wiring starts with circuit preparation
- Electric meter installation
- Rules for entering electricity into the house
- Number 3. Open wiring in a wooden house
- Drawing up a wiring diagram
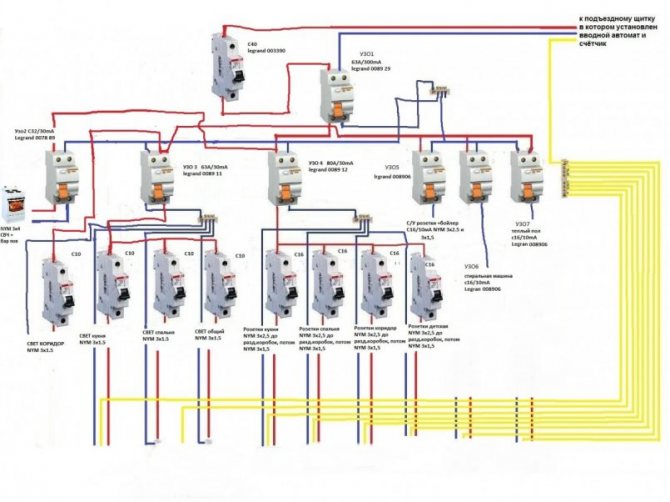
- Do-it-yourself installation of the switchboard
- Options for laying electrical wiring in a wooden house
- in cable channels
- outdoor
- Hidden
- Wiring
- exposed wiring
- 1 Installation requirements and general work plan
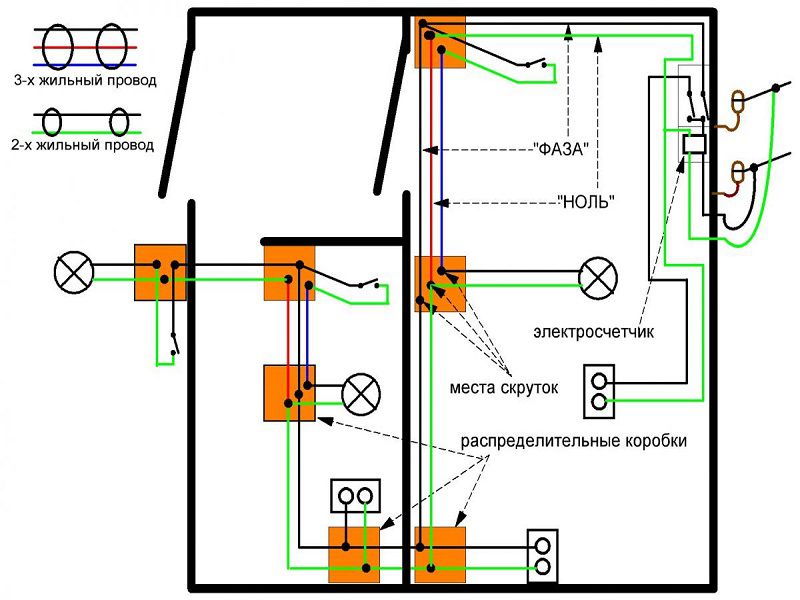
Wiring diagrams in a wooden house
The installation scheme is somewhat different from the wiring diagram. The installation sites for all devices and lines have already been determined, it remains to indicate the sequence of electrical work, that is, the order in which certain devices and equipment are connected.
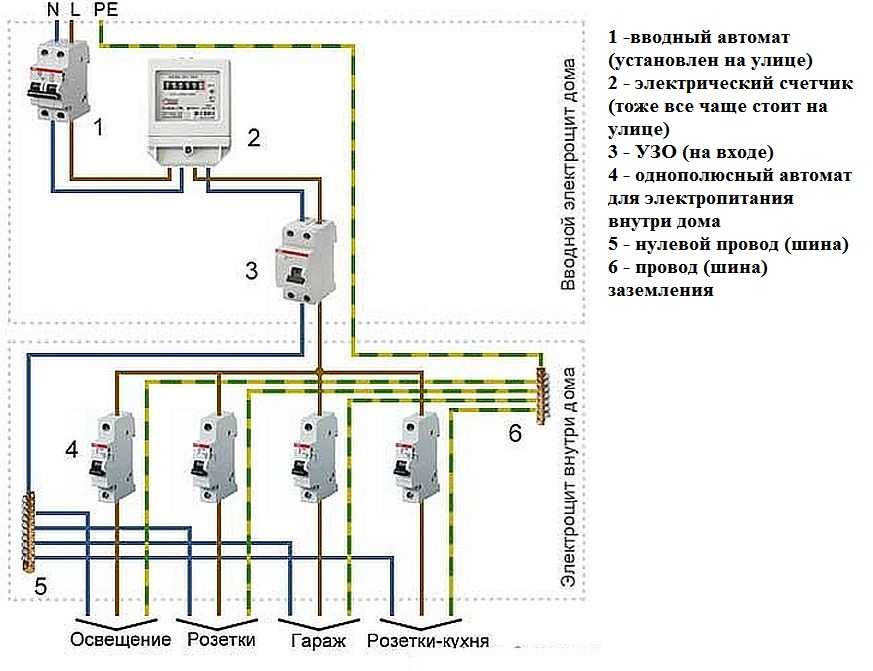
Before starting work, you need to determine the power consumed by all electrical appliances turned on at the same time.If the value obtained is less than 15 kW, an introductory machine is installed at 25 A. If this figure is exceeded, an additional transformer will be required.
Next, the installation of an electric meter and introductory machines is carried out. When installing these devices outdoors, a sealed housing is used, protected from the ingress of dirt, dust and moisture. To make it easier to take readings, the cabinet is equipped with a viewing window.
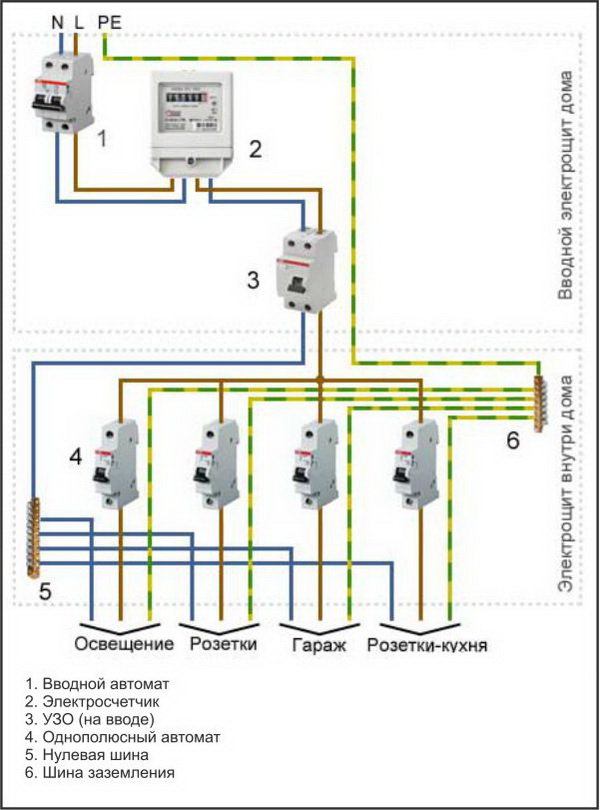
The counter is set after the introductory machine. Then an RCD is installed, which provides an emergency shutdown of the current in the event of a short circuit. Next, the cable is connected to the electrical panel located inside the house. The nominal value of the machine located in the house is one step lower than that installed outside. In case of any violations, it will work first, which eliminates the need to go outside to the input device.
In the home shield there are single-pole circuit breakers, from which wires diverge throughout all rooms. The number of such machines corresponds to the number of consumer groups. For the possible connection of new consumers, free machines are installed in the amount of 2-3 pieces.
Consumption groups in wooden houses can have different purposes. For example, through one machine power is supplied to the sockets, through the other to the lighting fixtures. Powerful equipment - electric stoves, boilers, washing machines - is supplied from personal automatic machines. Separate groups include street lighting and power supply to outbuildings.
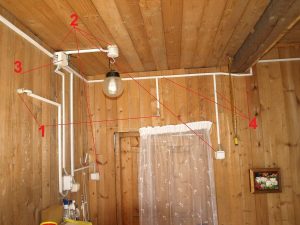
Separate power lines are the best way to ensure the safe operation of a home network.Due to this, the number of potentially dangerous joints is reduced, where oxidation and heating of contacts most often occur. For ease of installation, each line in the diagram is indicated by its own color, indicating the sequence of laying.
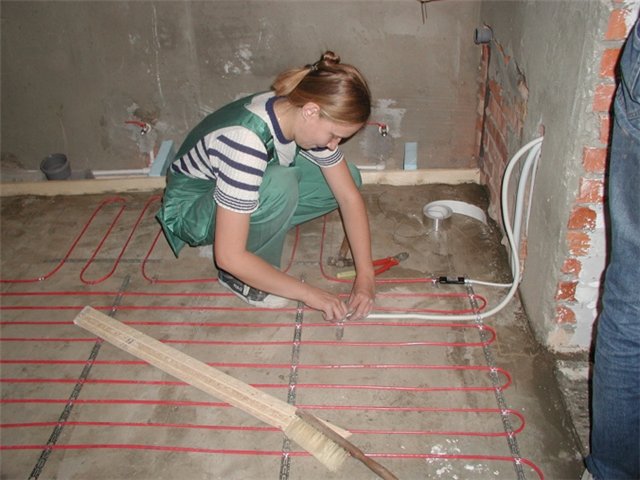
The next step will be the wiring and cables in the premises. In wooden houses, cable lines can be laid in the following ways:
- External (open) wiring. It is laid using insulators. Currently, this method is again becoming popular when decorating rooms in retro style.
- Use of cable channels. In fact, this is the same open wiring, only laid in special trays.
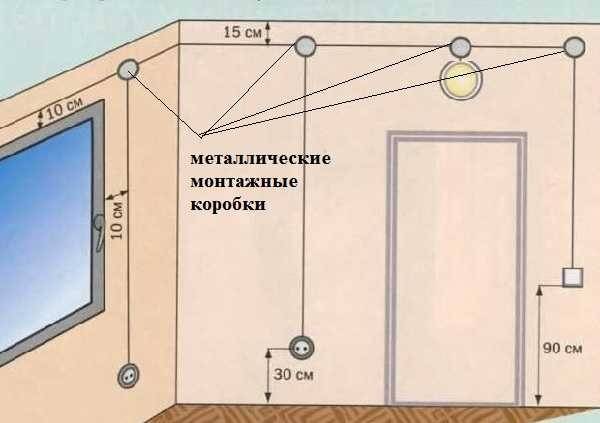
- Internal (hidden) wiring. Its device is possible in the case when it is planned to cover the surfaces of the ceiling and walls. For laying metal corrugated sleeves or metal pipes are used. The bend angles are 90, 120 or 135 degrees, which makes it possible to replace the damaged section of the cable without disturbing the finish. For wire connections, metal boxes with free access to them are used.
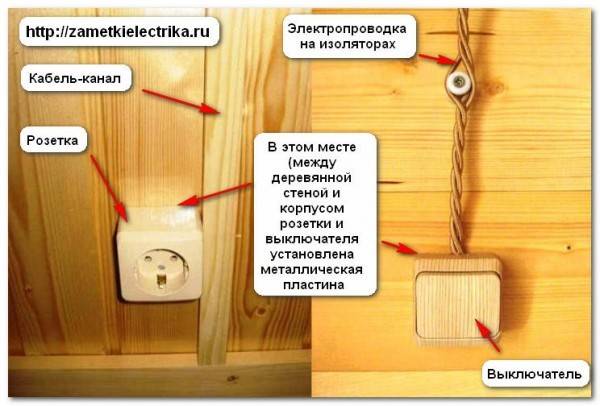
Further, in accordance with the scheme, the installation of sockets or switches is carried out. For wooden houses, there are special models with a metal mounting plate on which the outer panel is installed. Flame retardant plastic certified by the fire authority may be used. For safety reasons, all outlets must have a ground wire.
Selection of cable and wire products

Socket groups
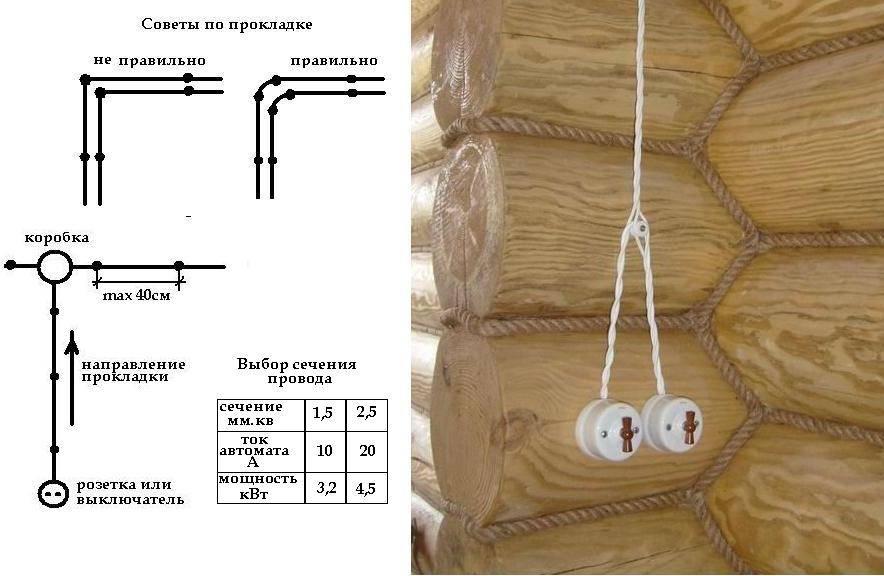
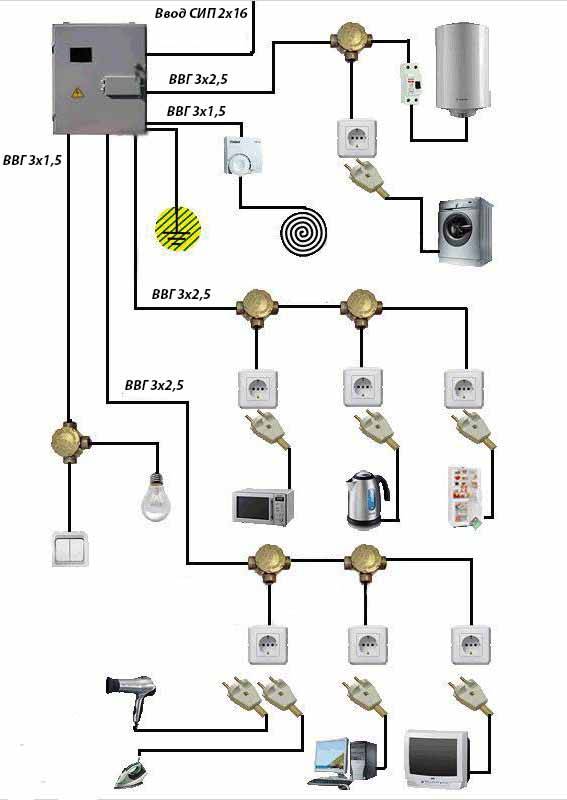
According to many years of experience in electrical work in wooden houses, a PVSng, VVGng or NYM type cable with a 3x2.5 mm marking is used to power the socket groups. This means that 1 cable with 3 cores with a cross section of 2.5 mm2 each should come to each outlet.
The cable cores are color-coded and serve to supply phase (brown or white), zero (blue) and protective earth (yellow or yellow-green).
Lighting circuits
In most cases, a 3x1.5 mm2 cable of the PVSng, VVGng or NYM type is used to power lighting fixtures and decorative elements. It is also worth noting that its cross section may be smaller, since modern lighting uses energy-saving technologies (LED lighting), which significantly reduced power consumption.


Boilers and washing machines
Since both boilers and washing machines contain heating elements that are in contact with water, to protect them, it is necessary to install a separate input from the switchboard and install additional protection.
To connect the above devices, it is necessary to install a cable with a cross section of 2.5 mm2 with at least 3 cores. It can be like PVSng, VVGng or NYM.
Ovens, electric stoves
Depending on the manufacturer and the power of the devices, which can reach 7–15 kW, for reliable operation of the devices, it is necessary to install a cable with a cross section of at least 4 mm2 of the PVSng, VVGng or NYM type.
Heating boilers
If you have a gas heating boiler installed, then for its operation it will be enough to install a cable with a cross section of 3x1.5 mm2, since this will be more than enough to ignite the flame.
If an electric boiler is installed in your wooden house, then you need to look at its operating instructions, which indicate the maximum power and type of supply network (single or 3-phase). Also in the technical documentation, the manufacturer indicates the recommended type of cable and wire products.
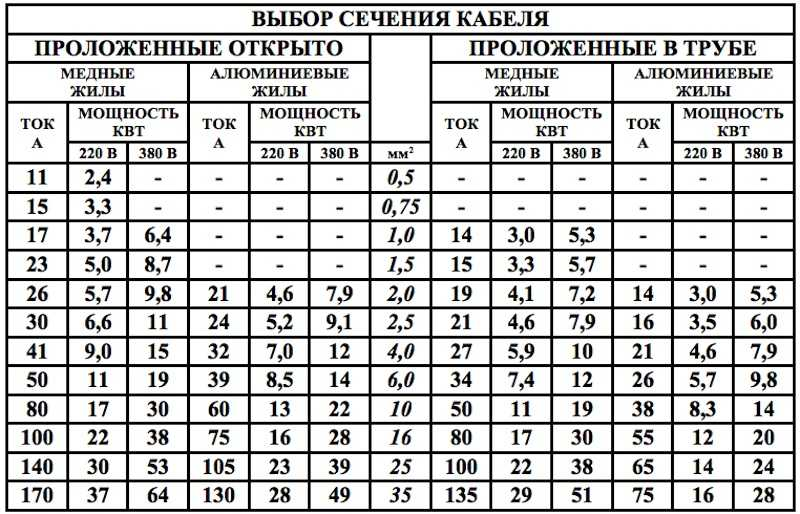
If, for some reason, there is no technical documentation, then you just need to inspect the tag on the boiler, which contains the power of the device and the current consumed, and select the type and section of the cable, according to the following table:
Air conditioners
All climatic equipment must be powered from the distribution board with a solid cable to each air conditioner. In the case of connecting conventional household wall-mounted air conditioners, a cable with a cross section of 3x2.5 mm2 will be enough to connect them.
However, if powerful air conditioners are installed (floor-ceiling, cassette, and so on), in this case, the number of cores and their cross section can be increased depending on the power consumption, which is indicated in the technical documentation.
Power supply methods
What wiring to use for a wooden house - open or closed? The first method involves the external placement of wires on the walls and ceiling. In this case, the cables are fixed in special cable channels, on insulators or on brackets.


The second method can be used if the premises have not yet been completely finished. Wires in such a situation are laid in a metal corrugation or pipe. This is a rather expensive method, but the cables will be securely hidden.

The choice of the type of wiring in a wooden house depends on the experience of the electrician and the presence or absence of tools for specific work.

General information
Mounting methods
Safe electrical wiring in a private wooden house is mounted in three ways: closed (along the inside of walls and ceilings), open (retro wiring) and using cable channels.
Features and benefits of a closed laying method
Hidden wiring is laid through thin metal tubes. The main advantage of such installation is fire safety. The steel from which the carrier pipe is made, in the event of a short circuit or a spark, will not allow fire to spread to combustible materials. In addition, if you hide the wiring inside the walls of wood, then you do not need to finish them from the outside. Experienced electricians recommend using a square pipe or metal corrugated pipes. These materials are more convenient in the process.


The only disadvantage of the closed method is the high price and complexity of wiring.
Features and benefits of open laying
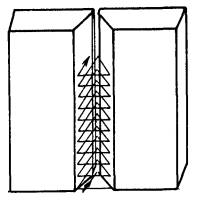
Such wiring is carried out with a twisted cable on ceramic insulators. To reduce the risk of fire during installation, a double-braided wire is used.
Particular attention should be paid to the distance from the cable to the wall. PUE in the Russian Federation regulate at least 1 centimeter
Otherwise, a layer of metal or asbestos will have to be laid between the wall surface and the cable.
The cost of open wiring is considerable, but the aesthetics are on top.
Features and benefits of laying wiring in a cable channel
The use of modern cable channels allows you to install electrical wiring in a wooden house in the shortest possible time.It should be remembered that laying wires in ordinary plastic plinths is prohibited! It is allowed to use only specialized corrugated pipes and cable channels made of non-combustible materials. At the stage of final finishing, they cannot be sewn under drywall!
It will be cheaper and easier to carry out such wiring with your own hands.
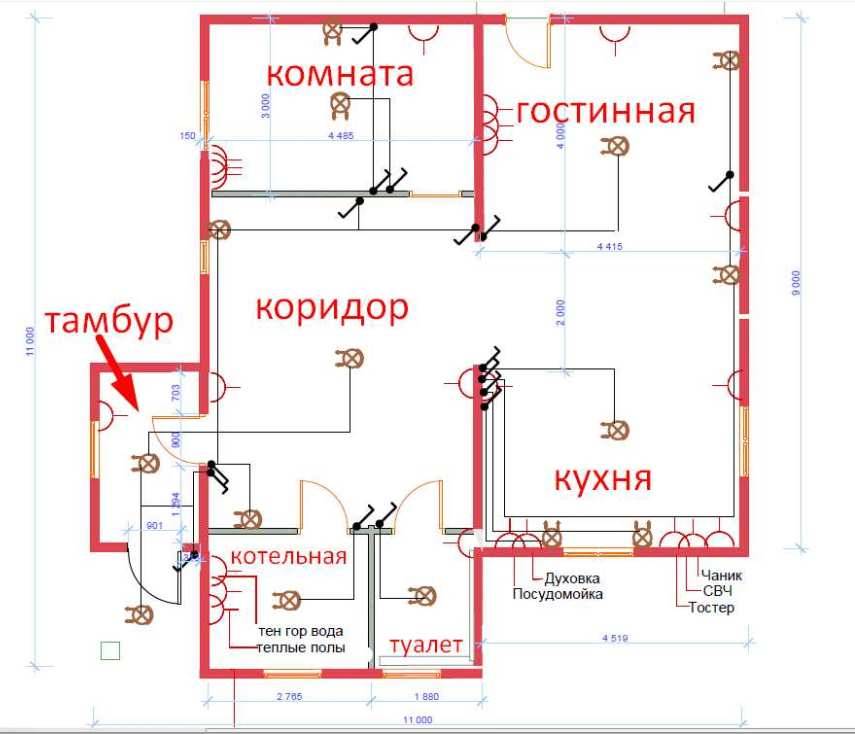
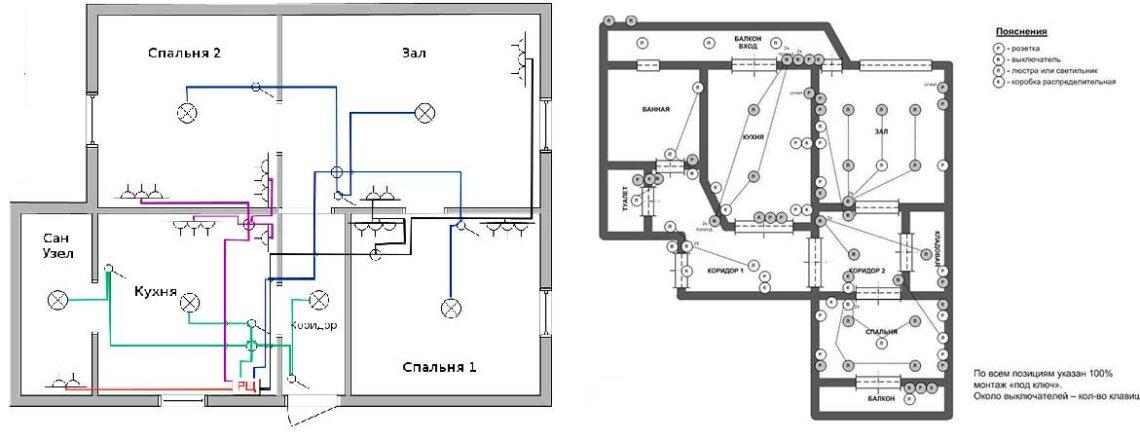
Proper wiring starts with circuit preparation
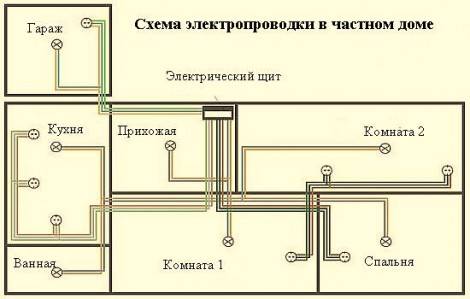
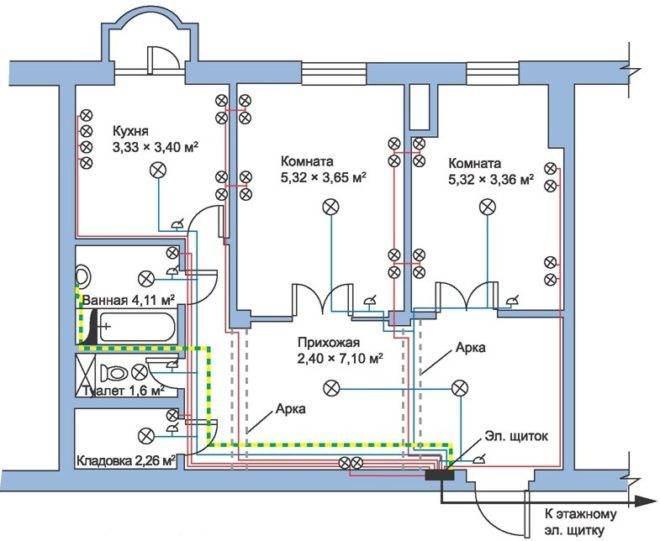
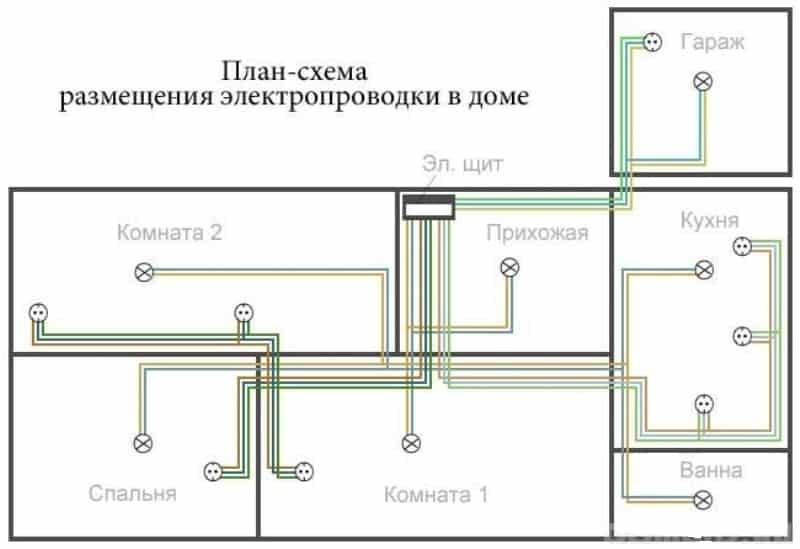
A drawing of the future layout of wires in a private wooden house can even be made by hand. The main thing to do is to mark all cables for wiring, junction boxes, sockets, switches and outlets for lighting fixtures. A well-designed diagram will help not to get confused at the laying stage, and during the operation of the house it will eliminate damage to the wires (for example, if you have to drill a wall).
Sockets and switches should be planned in such a way that in the future they are in the public domain (not behind large furniture or behind doors). step by step instruction with photo and video help you create the perfect layout for your home.
When organizing the space of the kitchen area, the declared power of household appliances should be taken into account. The number of outlets must match the number of appliances. This will ensure their safe operation, as well as facilitate the maintenance of the switchboard.
The right scheme = the most secure network. The power supply of the house is a single, uninterruptedly operating system in which everything is thought out to the smallest detail: from the section and type of cable to the power of the circuit breaker.
Electric meter installation
According to the requirements of the energy supervision authorities, electricity meters in private homes should be installed in places with the possibility of constant access by controlling persons.Consequently, the shield has to be mounted outside, where the components placed in it are exposed to weather conditions. With this in mind, two switchboards are installed in a private house:
- outdoor - to accommodate the electric meter and the required minimum of additional devices (at the expense of the energy supply company);
- internal - located in the house, connected to an external shield, equipped with the equipment necessary for the safe and convenient management of the housing power supply system (at the expense of the owner of the building).
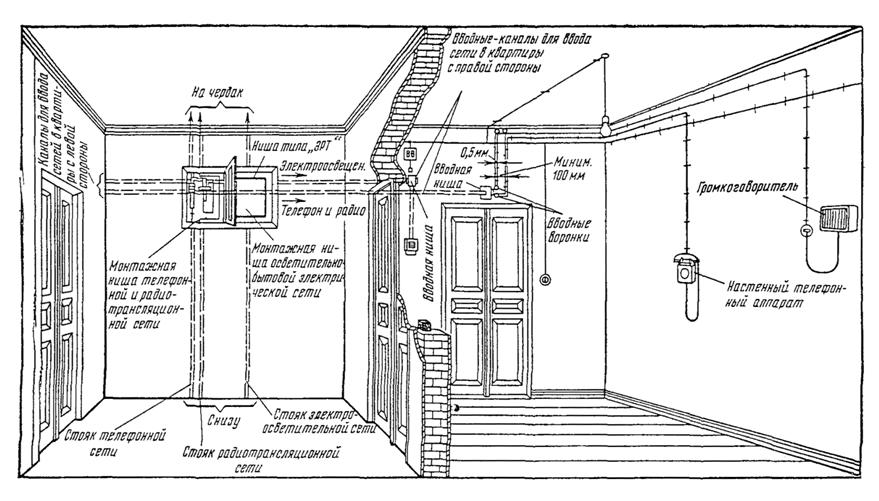
Rules for entering electricity into the house
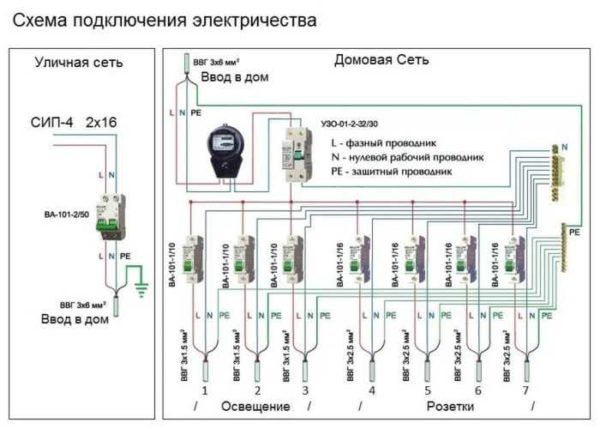
For private households, such an issue as the introduction of electricity into the house is important. Usually it is carried out using a self-supporting SIP wire.
If the power tower is less than 25 m from the house, no additional support poles will be required.

The wire usually stretches to the electrical panel with RCDs located in it, automatic machines and a connection to the ground loop. The transition to a home cable (for example, VVGng) usually occurs in another panel - with metering devices
Input requirements:
- with a wire length of more than 25 m, additional supports are required (a shield can be installed on the pole closest to the house, and a ground loop can be buried nearby in the ground);
- the height of the wire stretched between the supports is at least 2 m above the ground;
- if the wire crosses building structures, it is mounted in a protective pipe;
- the minimum distance from the ground for the connection point of the building is 2.75 m;
- if the wire from the control room to the house is planned to be pulled underground, then it must be placed in a protective sheath, and then in a ditch with a depth of at least 0.7 m.
It is clear that when choosing an underground laying, the input directly into the building must be provided for even during the construction process.
Number 3. Open wiring in a wooden house
Laying electrical wires inside wooden walls is not only very dangerous, but also technically difficult. With the open method, the owner can fix the problem at any time, since access to the wires is always open, so this installation option has become more popular. Of the shortcomings, only unaesthetic is called due to the visibility of the wires, but today this minus can be dealt with.


For open wiring in wooden houses use:
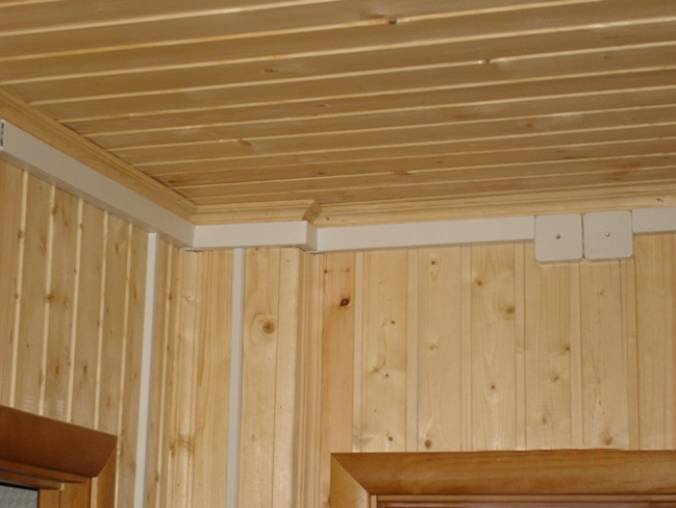
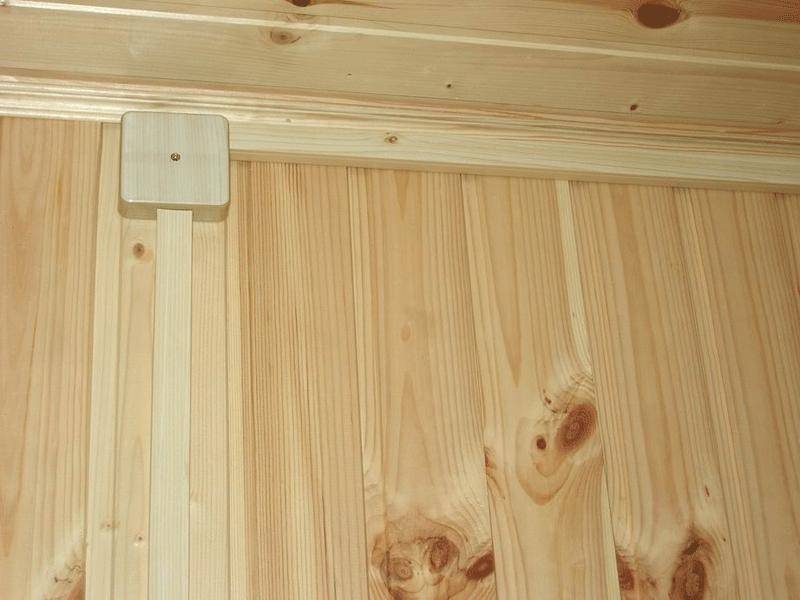
- cable channels, or electrical boxes. This is the most convenient and popular way. Such channels are relatively easy to mount to a wooden surface, and if you choose the right color, they will be minimally noticeable. Manufacturers produce boxes with color and pattern for different types of wood. In terms of aesthetics, cost and ease of access to wires, this is the best option, but correctly calculating the number of necessary elements, turns, corners and plugs is not always easy;
- electrical plinth - the most modern option that allows you to achieve the most aesthetic results. It provides clamps lived;
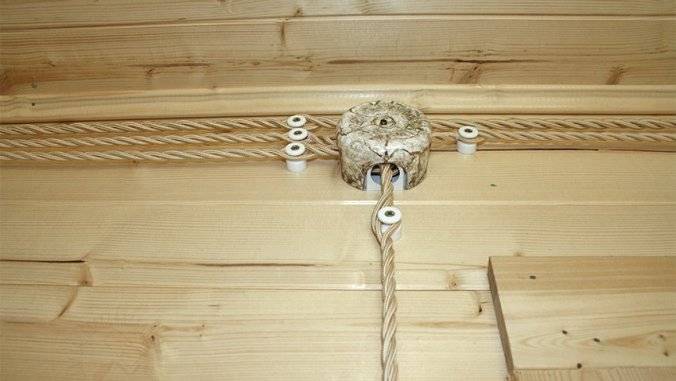
- rollers for isolation. These are small ceramic elements that are mounted on the surface and hold the wiring. All wires will be visible, so in terms of aesthetics, the option is not the best, but it allows you to create a retro-style interior. A similar installation method is usually used in houses built from logs;
- special staples. This is the cheapest and easiest option, but it does not look very good;
- the metal hose is used for open wiring only in non-residential buildings, as the room becomes like a production one. The corrugation, no matter how hard you try, will not lie perfectly, it will sag, and, moreover, collects dust.
Drawing up a wiring diagram
Let's make a reservation right away: we are talking about a single-phase network with a voltage of 220 volts, which is already connected to a private house with an area of 100-150 m² or an apartment. Specialized organizations are engaged in the design and installation of three-phase 380 V electrical networks for large country cottages. In this case, it does not make sense to take on the electrical wiring on your own, because without a power supply project and agreed executive documentation, the management company will not allow connection to its communications.
Do-it-yourself wiring in a private house can be done
Wiring in a private house is done before the start of finishing work. The box of the house is expelled, the walls and roof are ready - it's time to start work. The sequence of actions is as follows:
- Determination of the type of input - single-phase (220 V) or three-phase (380 V).
- Development of the scheme, calculation of the capacity of the planned equipment, submission of documents and receipt of the project. Here it must be said that not always in the technical conditions they will determine the power you declared, most likely they will allocate no more than 5 kW.
- Selection of components and accessories, purchase of a meter, automatic machines, cables, etc.
- Entering electricians from the pole into the house. It is carried out by a specialized organization, you need to decide on the type - air or underground, install an input machine and a counter in the right place.
- Install a shield, bring electricity to the house.
- Laying cables inside the house, connecting sockets, switches.
- Ground loop device and its connection.
- Testing the system and obtaining an act.
- Electrical connection and operation.
This is only a general plan, each case has its own nuances and features, but you need to start with obtaining the technical conditions for connecting to the power grid and the project. To do this, you need to decide on the type of input and the planned power consumption. It must be remembered that the preparation of documents can take up to six months, so it is better to submit them even before the start of construction: two years are given to fulfill the technical conditions. During this time, for sure, you will be able to drive out the wall on which you can put the machine and the counter.
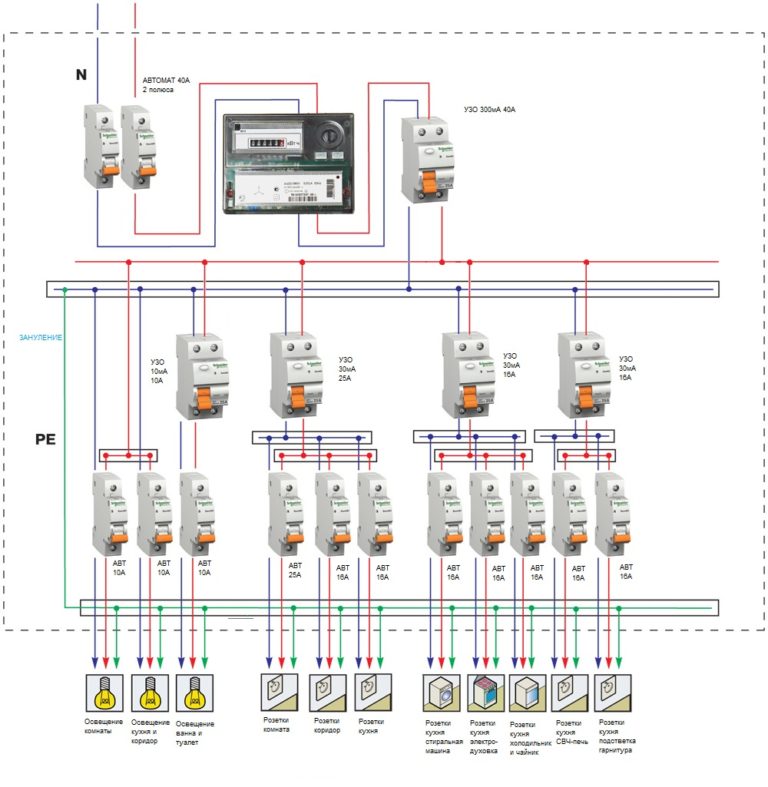
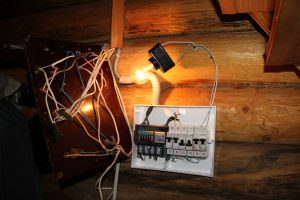
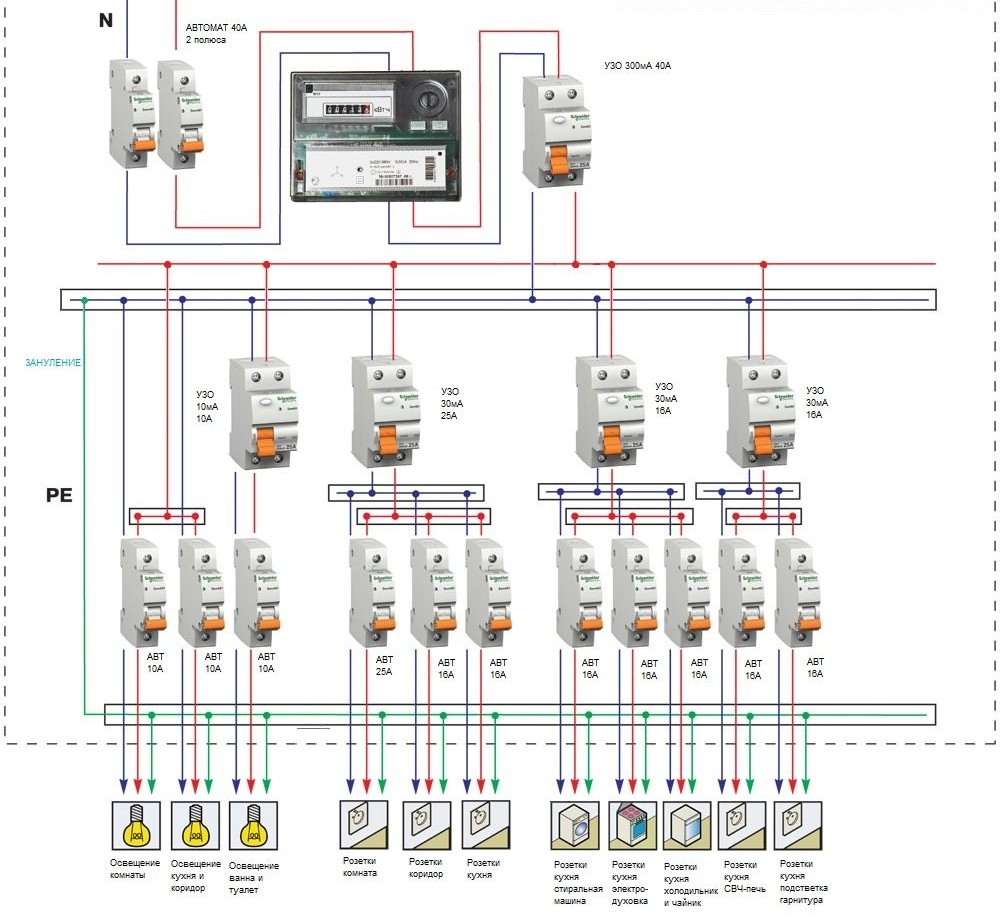
Do-it-yourself installation of the switchboard
The body of the electrical panel is fixed in the place established by the diagram. After that do the following:
- the metering device is mounted in the shield housing;
- an introductory machine is installed on a special metal profile (din rail). Phase and neutral are connected to a two-pole machine;
- output terminals (terminals) of the metering device are connected to the input of the introductory circuit breaker;
 Wire stripping should only be done with the power off.
- the wire is brought into the house and connected to the input terminals of the meter (meter);
- voltage relays, automata for different power groups (sockets, lighting devices), RCDs are mounted on the DIN rail;
- clamps of electrical appliances are connected by a single-core cable.
Options for laying electrical wiring in a wooden house
You can carry out the wiring of electrical wires in a wooden house:
- open way;
- by hidden technology (inside the walls);
- with laying in special cable channels.
in cable channels
Not all professional electricians recommend using cable channels in wooden houses now. The wiring in them is not visible and does not spoil the interior with its appearance.
However, for electricity supply lines, ordinary plastic boxes and plinths cannot be thrown along wooden walls. They are too combustible and everything goes to the fact that this method will be generally prohibited by regulations. If you choose cable channels, then only special non-combustible ones.
It is easiest to lay electrical wiring in cable channels, you just need to choose the right elements
outdoor
The outdoor option involves laying wiring in a wooden house along the walls on ceramic insulators. Typically, a twisted double-braided cable is used for this. And in the end, both in the photo and in reality, it looks quite beautiful.
However, there must be a distance of at least 10 mm between the wire and the wall of the house. Otherwise, an asbestos or iron gasket should be placed between them. But this will definitely not look elegant. This type of installation should be resorted to only in the back rooms, it is not suitable for living rooms.
Outdoor wiring looks nice, but in residential areas, especially if there are small children, it is better not to use
Hidden
Hidden wiring in a wooden house is allowed only in metal pipes (copper or steel). The use of corrugations and any plastic channels is prohibited here. They are not able to completely stop the spread of fire. And in log or timber walls, even the slightest spark inside can lead to their ignition.


This option is difficult to do with your own hands and expensive.But on the other hand, the wires will definitely not be visible, all of them will be laid inside partitions and ceilings.
It is better to entrust the laying of hidden electrical wiring to specialists. A mistake can be very costly.
Wiring
Installation of the wiring of the internal electrical network in a wooden house is carried out in seven stages:
- Marking on the walls of wiring lines and installation locations for sockets, switches, junction boxes, etc.
- Drilling holes for electrical installation products and cable channels.
- Assembly of an introductory shield with protection and an electric meter.
- Laying and connecting electrical wires using terminals or soldering (welding).
- Connecting switches and sockets.
- Insulation resistance test.
- General check of the system for short circuits.
The step-by-step instructions given are standard and do not depend on the material of the walls and the individual characteristics of the wiring diagram being created in a private house. However, for wooden cottages there are some nuances:
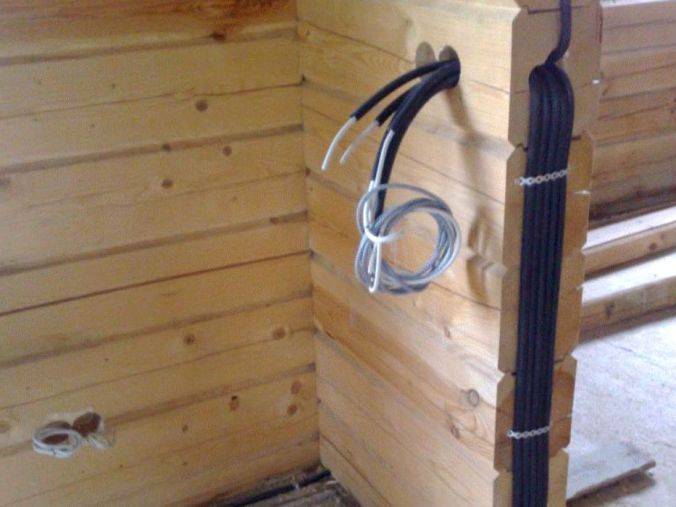
The first is that all the passages of electrical cables through external walls made of wood, partitions and ceilings are made only using metal sleeves (tubes). Even if cable channels and surface-mounted ceramic insulators are used, electrical wiring should pass through wood only with additional metal protection.
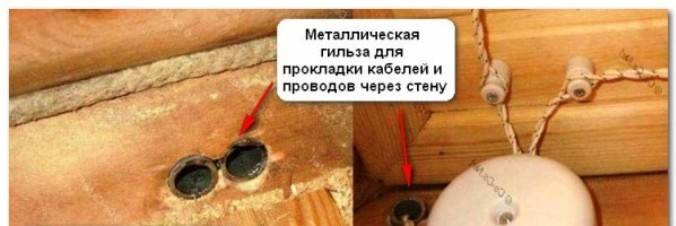
Sleeves for laying electrical wiring in different rooms
The second - the twisting of the cores when connecting is recommended to be excluded. Such places are the most problematic in terms of security and most often heated. In a house made of logs or timber, the terminal is the best and most reliable option for connecting wires. You can also solder or weld them, but this is more difficult and longer.
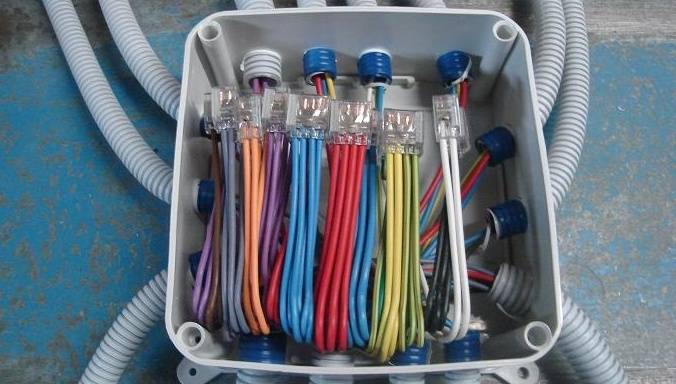
Terminal connection of wires in the junction box
Third - if the wiring is laid under the decor or a false ceiling, then it must be mounted in metal pipes. Open laying is allowed only in uncovered places where the wires remain visible.

It is better to hide wiring under a false ceiling in cable channels
There is nothing particularly difficult. The main thing is to have skills in handling a screwdriver, drill and pliers. And then self-wiring in your house in terms of complexity is approximately how to clean a chimney or build a heated greenhouse yourself without involving hired workers.
exposed wiring
Electrical wiring in a wooden house of this type has been used for a long time. Its advantage is in the relatively low cost and fire safety: any damage to the insulation will be immediately noticed. There is also a drawback - the visible part of the wiring will be striking, but this can be turned into a virtue by making it part of the interior design solution.


 Exposed electrical wiring is fixed on supporting porcelain rollers with a minimum distance of 1 cm from the wall surface. Switches, sockets and mounting boxes are installed overhead. The modern installation method involves the use of two stranded single-core wires twisted in a spiral. Unlike those used before, they are double insulated with high-tech materials. In the mounting box, the conductors of the wires are connected by special terminal blocks.
External laying of cables in boxes and corrugated pipes also refers to the open installation method.
1 Installation requirements and general work plan
If you strictly adhere to the provisions of the PUE and SNiP, it is really possible to equip a reliable and safe power supply system for a wooden house with your own hands. First you need to familiarize yourself with the key requirements of these rules and regulations:
- A competent scrupulous calculation of the cable cross-section is required. Non-combustible material is used for their insulation.
- It is advisable to lay open wiring.
- Concealed wiring is not recommended for wooden structures. If you have to use it, you should work with cables in a metal pipe or in another sheath.
- In the switchboard, a protection device (RCD) and a circuit breaker are mounted and connected.
Wiring is divided into external and internal. The first is laid on the street and is connected to the home network through underground wells and channels or through the air (canopy).
Wiring in a wooden house is laid in stages. Experienced electricians are advised to adhere to the following sequence of work:
- The total capacity of the equipment that is planned to be installed in the dwelling is calculated.
- A power supply project is being prepared.
- Selection and purchase of switches, sockets, wires, technical devices.
- Power is being supplied to the building, a circuit breaker, an electric meter and a switchboard (PS) are connected.
- The cable is bred around the house.
- Mounted lighting fixtures, sockets, switches.
Lastly, the RCD is connected and the grounding system is equipped. After that, do-it-yourself wiring is tested for operability and safety of operation.