- Connecting the thermostat to the system
- Specific power of underfloor heating and its calculation
- The choice of thermal insulation and fasteners for a water-heated floor
- Insulation and heat reflector
- Fixing connections for water heating pipes
- Single pipe wiring and connection to it
- Scheme 4. Connecting a warm floor from a radiator
- Options for the distribution of thermal sections
- How to make a water heated floor?
- Preparatory work
- How to make a water heated floor: types of styling
- Concrete paving system
- Polystyrene system
- How to make a warm floor from heating?
Connecting the thermostat to the system
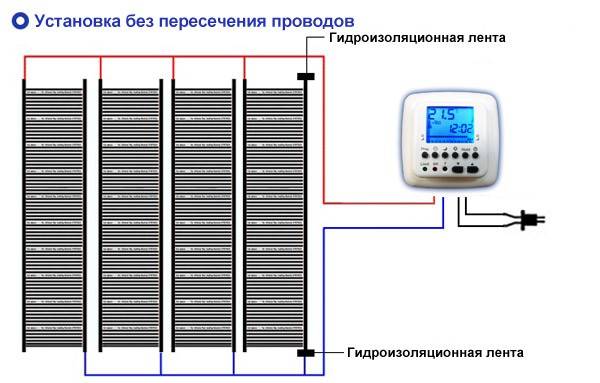
Installation schemes for underfloor heating film
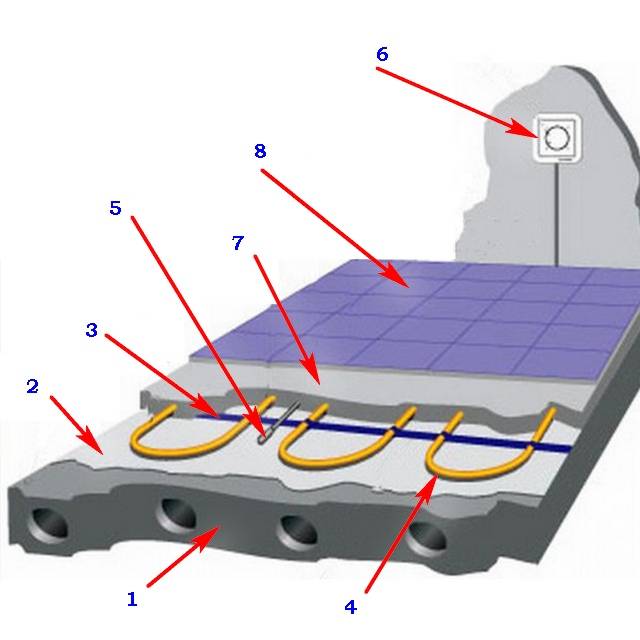
Before connecting a warm floor, regardless of its type, you need to determine the location of the thermostat. This device is used to maintain a stable set temperature indoors. In addition, by means of a thermostat, a direct connection of a warm floor to the network is made.
It is better to install the thermostat near the existing electrical wiring.
Before connecting the thermostat, you first need to decide what method it will be done: powered from the shield or using an outlet.It should be noted right away that these two methods involve the additional inclusion of a circuit breaker in the circuit, which will operate in the event of breakdowns, overheating or short circuits. Its maximum shutdown power is selected depending on the type of underfloor heating.
In most cases, the connection diagram is indicated on the thermostat, which greatly simplifies installation without the help of electricians. If there is no diagram, then the following wires must be connected to the following terminals:
- 1 terminal - network phase;
- 2 terminal - network zero;
- 3, 4 terminals - conductors of the heating element;
- 5 terminal - timer;
- 6, 7 terminals - floor temperature sensor.
This distribution is standard, but it should be understood that different manufacturers may create circuits that require a different connection. It all depends on the design and additional features of the system.
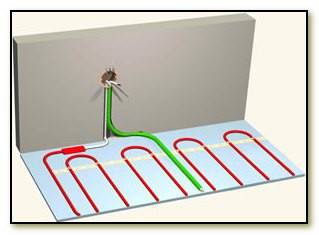
We prepare a place for the installation of a thermostat: we supply power to it (hidden or open, as desired)
Before connecting, you need to cut a small ditch in the wall. It will house two plastic tubes. In the future, the wires of the heating element will be passed into one, and the temperature sensor will be located in the second. At the end of these activities, you can proceed with the installation and connection of the entire underfloor heating system.
Specific power of underfloor heating and its calculation
Advantages of Uriel thermostats
Underfloor heating can be used as the main source of heat in the house, and as heating. For the first type, the calculation is taken approximately 150-170 W per 1 sq.m. Heating is calculated based on the values of 110-130 W per 1 sq.m.
This indicator may vary slightly depending on the type of heated room.For example, rooms where people are constantly occupied must necessarily have very warm floors, and for this reason the calculated power consumption is increased. If this is a kitchen or bathroom, then here you can not overestimate the values \u200b\u200bbecause residents spend little time in them.
Underfloor heating electricity consumption can be controlled
Additionally, when calculating, it is recommended to take into account the number of storeys. If the floor of the apartment on the ground floor is insulated, then the power must be increased by 10-15%. In all higher rooms, you can not increase the value.
electric floor heating
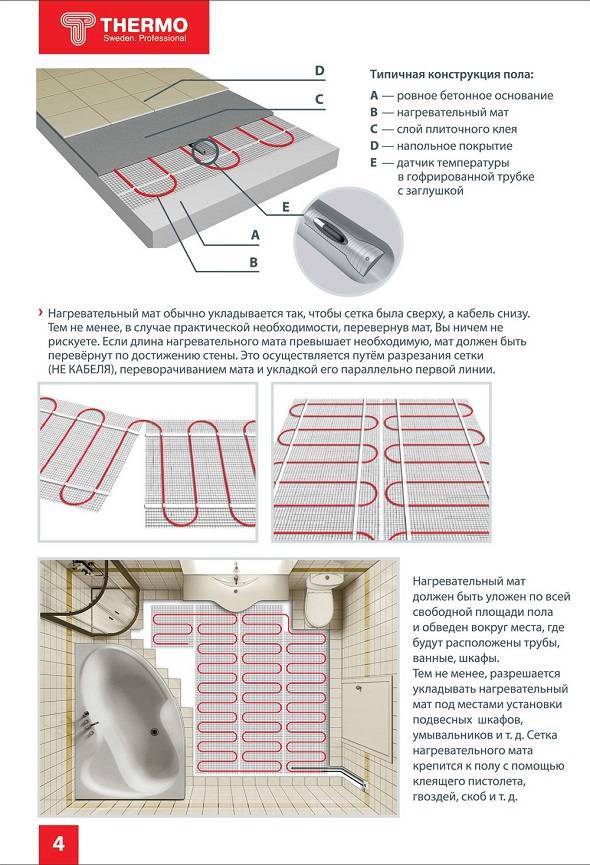
The choice of thermal insulation and fasteners for a water-heated floor
In order for the heat not to go down, a layer of dense foam is laid on the base. The density of the insulation is selected at least 25, and preferably 35 kg / m3. Lighter expanded polystyrene will simply collapse under the weight of the concrete layer.


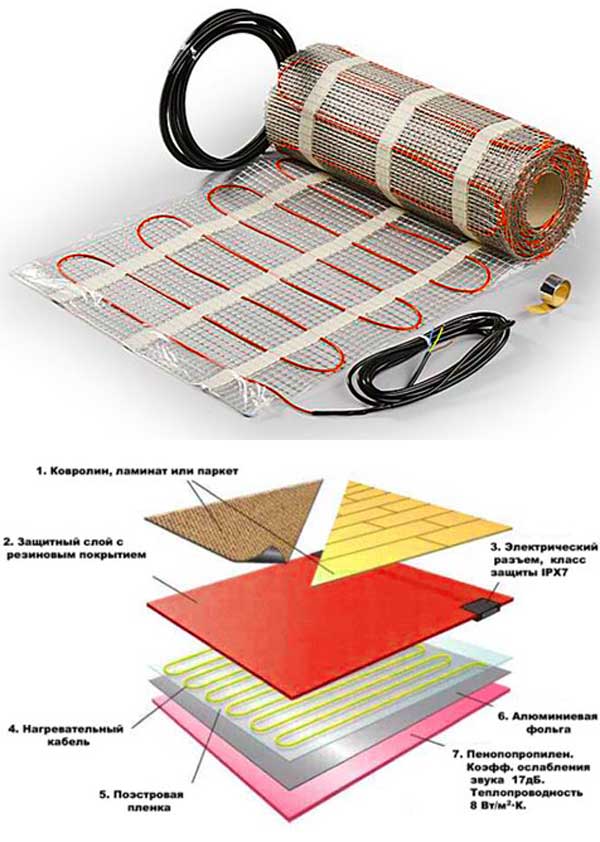
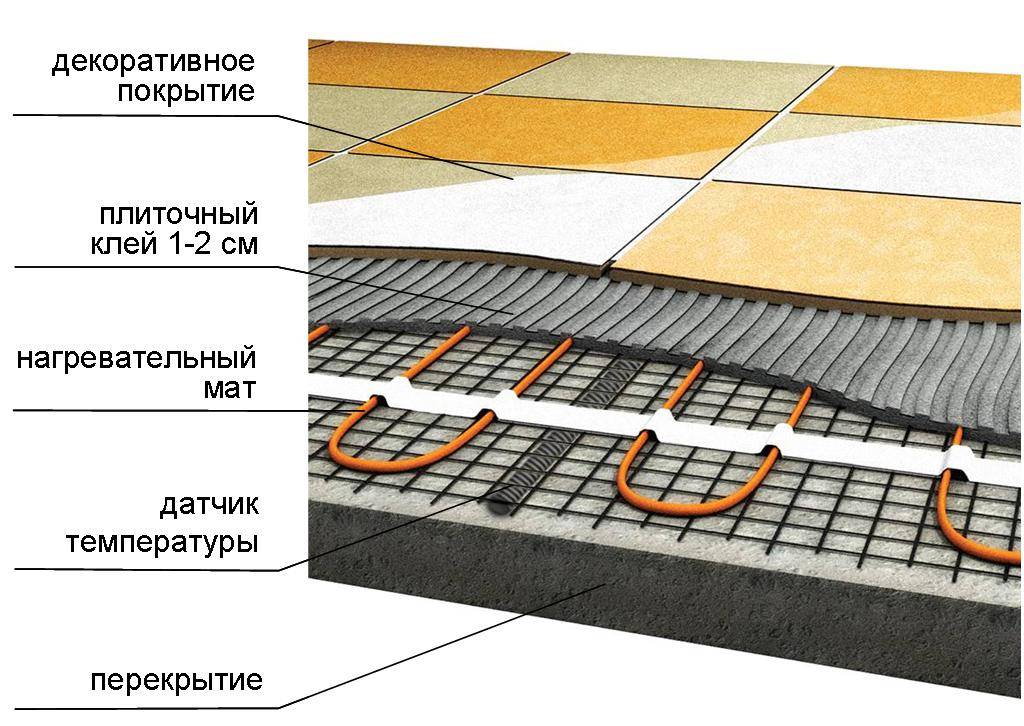

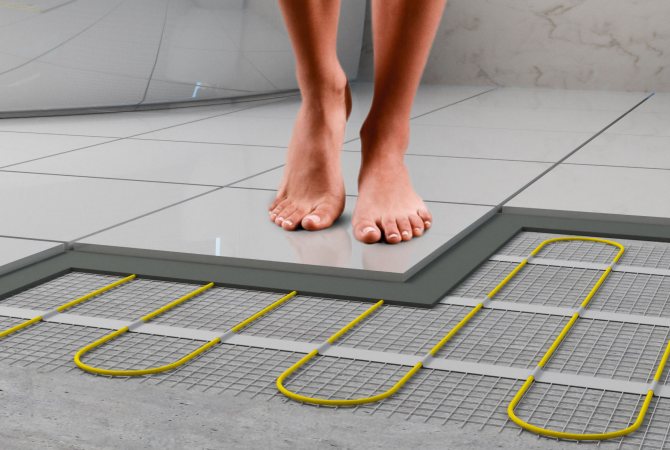
Insulation and heat reflector
The optimal thickness of the insulation is 5 cm. When laying on the ground or if increased protection from the cold is required, when an unheated room is located below, the thickness of the thermal insulation can be increased to 10 cm. To reduce heat losses, it is recommended to lay a heat-reflecting screen made of metallized film over the insulation. It could be:
- Penofol (metallized polyethylene foam);
- Reflective foam screen glued behind radiators;
- Plain aluminum foil.
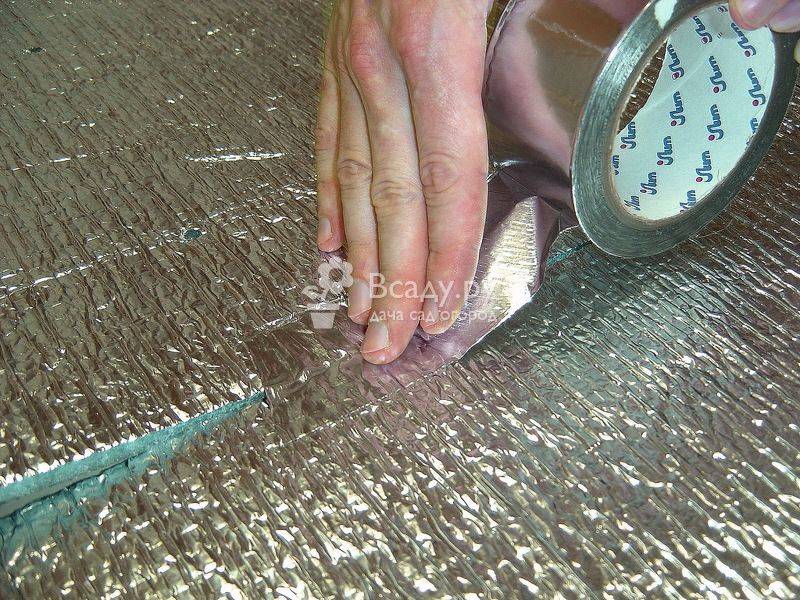
The metallized layer is quickly destroyed from the aggressive action of concrete, so the screen itself also needs protection. Such protection is polyethylene film, which is used for greenhouses and greenhouses. The film thickness should be 75-100 microns.
In addition, it provides the necessary moisture for the maturing concrete screed throughout the entire period of its solidification. Pieces of the film must be overlapped, and the junction must be hermetically glued with adhesive tape.
Fixing connections for water heating pipes
Fasteners for the pipe are installed on the thermal insulation. Its purpose is to fix adjacent pipe branches and place it on the floor in strict accordance with the preliminary plan. The fastener holds the pipe until the concrete screed acquires the desired degree of hardness. The use of fasteners facilitates the installation of the floor and ensures the correct placement of the pipe in the thickness of the concrete pad.
Fasteners can be special metal strips, welded metal mesh, plastic brackets that pin the pipe to the foam base.
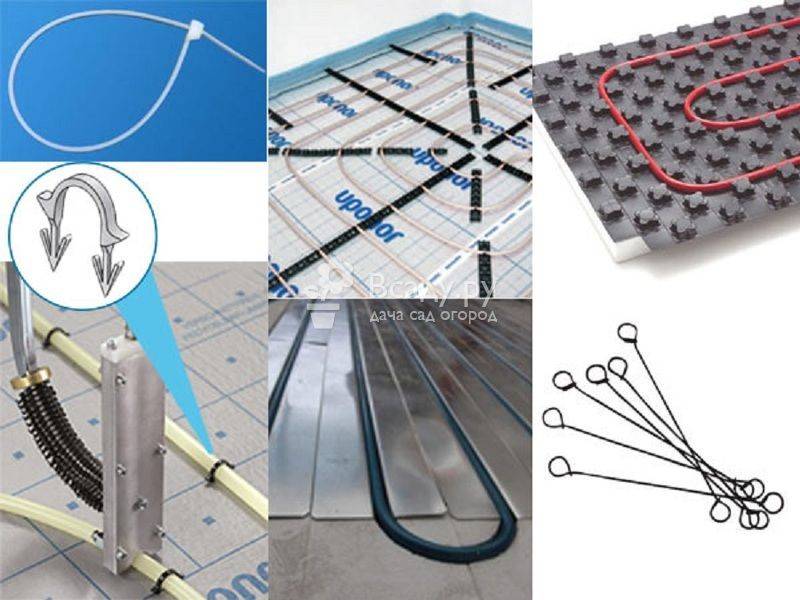
- Metal strips are used with an increased thickness of the concrete pad. They slightly raise the pipe relative to the heat insulator, so that it is closer to the top surface of the concrete pad. The pipe simply snaps into the curly notches of the slats.
- The metal mesh not only secures the pipe, but also reinforces the concrete cushion layer. The pipe is tied to the grid with pieces of wire or plastic clamps. Fastener consumption is 2 pcs. per running metre. In places of rounding, additional fasteners can be used.
- Plastic brackets are installed manually. They pin the pipe to the styrofoam as it is laid. Do-it-yourself semi-industrial warm floors are made using a special stapler. But its acquisition is justified only with intensive professional use.
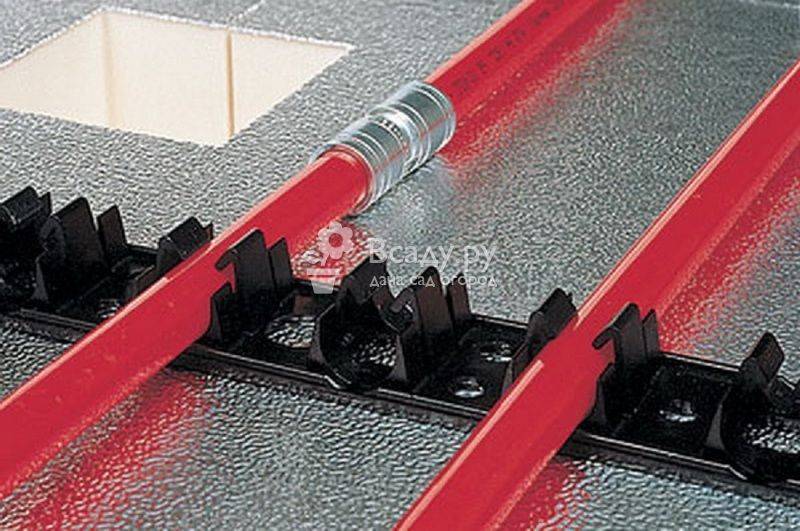
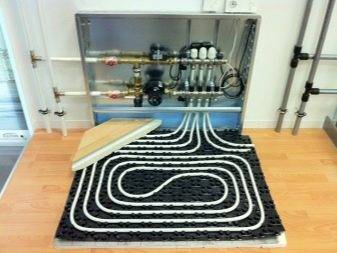
In recent years, manufacturers of underfloor heating systems have begun to offer another very convenient solution.We are talking about special sheets of dense polystyrene foam with a profiled surface. Usually the surface of such sheets is the intersection of grooves or rows of protruding elements, between which heating pipes easily fit.
The surface of the sheets is smooth, extruded, all pores are closed and no additional waterproofing film is required for it. Having a special thermal cutter, grooves in polystyrene foam can be cut independently. But to carry out this work you need at least a minimum experience.
Important!
The metal-plastic pipe is delivered in bays. When laying the coil, it rolls out along the trajectory of the pipe. The pipe must not be pulled out of the lying bay, as this will cause it to twist and may lead to delamination of the inner layers.
Single pipe wiring and connection to it
When there is only one pipe in the system through which the coolant flows, it is called a single-pipe or "Leningrad". Previously, all houses were connected in this manner, but now more efficient working schemes have been developed.
Single pipe wiring
The "Leningradka" is characterized by trouble-free operation and high reliability. Its main disadvantage is the drop in temperature in the direction of movement of the coolant. The first radiators are much hotter than the last ones. Temperatures for remote from the boiler rooms may not be enough. If you connect a floor heating circuit to such a wiring, the temperature will drop even more, plus the hydraulic resistance will increase, which will require the installation of an additional pump.
Bay pipe for underfloor heating
To more or less balance such a system, you will need to meet the following requirements.
- To prevent the temperature on the radiators from dropping, the tie-in must be made on the return section of the line, after all the batteries.
- You need to use a DN pipe for this.
- Such a connection is allowed only to a circuit in which there are no more than 5 radiators.
- To maintain the floor temperature at the same level, a three-way mixing valve must be included in the system.
- This valve is designed in such a way that it constantly mixes hot water with cooled water, keeping the temperature at the same level.
- Together with it, a pump must be included in the circuit for forced circulation. Due to it, water will move even when the valve is completely closed.
Three-way valve for mixing the coolant
No matter how you conjure, the result will always be somewhat negative if you don’t do everything right from the beginning. This system is also rarely used, since its stable operation cannot be called. A running pump creates some pressure inside the circuit to force the coolant to flow in the right direction. When the valve is opened, this pressure is transferred to the radiators, creating additional hydraulic resistance. This causes an imbalance in the radiators and changes the water flow.


When the heating works in this mode, accidents often occur. Therefore, before connecting, think about whether it will be cheaper to stretch the route normally from the boiler, through the mixing unit.
Scheme 4. Connecting a warm floor from a radiator

These are special kits designed to connect one underfloor heating loop to an area of 15-20 sq.m.They look like a plastic box, inside which, depending on the manufacturer and configuration, there may be coolant temperature limiters, room temperature limiters and an air vent.
The coolant enters the loop of the connected water underfloor heating directly from high temperature circuit, i.e. with a temperature of 70-80°C, cools down in the loop to a predetermined value and a new batch of hot coolant enters. An additional pump is not required here, the boiler must cope.
The downside is low comfort. Overheating zones will be present.
The advantage of this scheme for connecting a water-heated floor is easy installation. Similar kits are used when there is a small area of \u200b\u200bunderfloor heating, a small room with an infrequent stay of residents. Not recommended for bedrooms. Suitable for heating bathrooms, corridors, loggias, etc.
Let's summarize and summarize in a table:
| Connection type | Comfort | Efficiency | Installation and setup | Reliability | Price |
| Conventional gas, TT or diesel | ± | ± | + | ± | + |
| Condensing boiler or heat pump | + | + | + | ± | — |
| Three way thermostatic valve | ± | ± | + | + | ± |
| Pumping and mixing unit | + | + | ± | + | — |
| Thermal mounting kit | — | ± | + | + | + |
Master plumbers and experts in heat and gas supply recommend avoiding schemes for connecting a water-heated floor to working heating branches. It is better to feed the heating circuits of the underfloor heating directly to the boiler so that the floor heating can function independently of the batteries, especially in the summer.


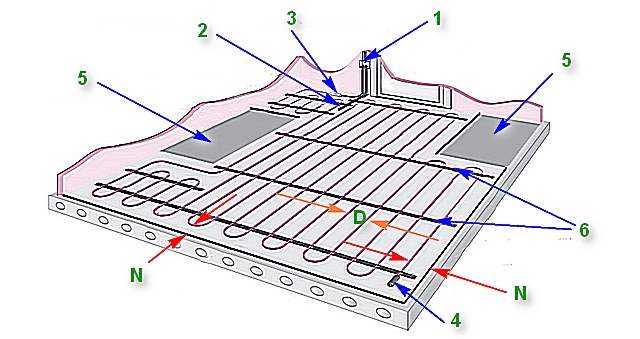
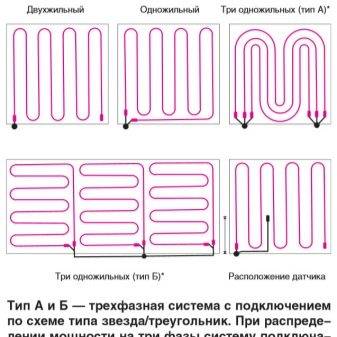
Options for the distribution of thermal sections
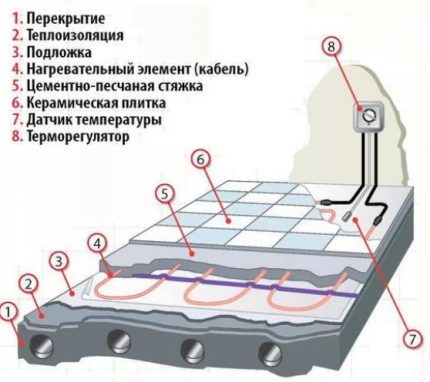
When developing a project for your future electric floor, pay attention to the fact that there are several options for installing the system, which differ in the method of laying the wires:
- mounting in the screed itself;
- you can put the wires on the screed under the floor covering;
- installation over the screed under a clean surface. It can be attributed to film or infrared underfloor heating.
Once you have chosen a styling method that is comfortable for you, the next step is to develop a plan:
- ETP calculations;
- designation of a place for a heating regulator and power supply;
- designation of the place where the heating cable will be installed.
When developing a plan, keep in mind that the wire cannot be placed in areas where large furniture and other items will stand.
How to make a water heated floor?
The role of the heat carrier in such floors is performed by liquid. Circulating under the floor with pipes, heating the room from water heating. This type of floor allows you to use almost any type of boiler.
The following is a concise instruction on how to make a water-heated floor yourself:
installation of a group of collectors;
- installation of a mortise cabinet designed for the installation of collectors;
- laying pipes that supply and divert water. Each pipe must be equipped with shut-off valves;
- the manifold must be connected to a shut-off valve. On one side of the valve, it is necessary to install an air outlet, and on the opposite side, a drain cock.
Preparatory work
- Calculation of the power of the heating system for your room, taking into account heat losses and characteristics.
- Substrate preparation and surface leveling.
- The choice of a suitable scheme according to which pipes will be laid.
When the floor is already in the process of laying, the question arises - how to make the most suitable pipe laying.There are three most popular schemes that provide uniform floor heating:
"Snail". Spiral in two rows with alternating hot and cold pipes. The scheme is practical in rooms with a large area;
"Snake". It is better to start from the outer wall. The farther from the beginning of the pipe, the colder. Suitable for small spaces;
"Meander" or, as they also call it, "double snake". The forward and reverse lines of pipes run parallel in a serpentine pattern throughout the floor.
How to make a water heated floor: types of styling
In order to avoid mistakes in the process of laying a warm water floor, you need to immediately decide on the installation method.
Concrete paving system
Laying of thermal insulation, which will have the following parameters: layer thickness from 30 mm with a density coefficient from 35 kg/m3. It is recommended to use polystyrene or foam insulation.
Special mats with clamps can be a good alternative:
- attaching damper tape around the entire perimeter of the wall. This is done in order to compensate for the expansion of the ties;
- laying a thick polyethylene film;
- wire mesh, which will serve as the basis for fixing the pipe;
- hydraulic tests. Pipes are checked for tightness and strength. Performed within 24 hours at a pressure of 3-4 bar;
- laying concrete mix for screed. The screed itself is installed at a level not lower than 3 and not higher than 15 cm above the pipes. On sale there is a ready-made specialized mixture for floor screed;
- drying of the screed lasts at least 28 days, during which the floor must not be turned on;
- tab of the selected coverage.
Polystyrene system
A feature of this system is the smaller thickness of the floor, which is achieved by the absence of a concrete screed.A layer of gypsum-fiber sheet (GVL) is laid out on top of the system, in the case of a laminate or ceramic tile, two layers of GVL:
- laying of polystyrene boards as planned on the drawings;
- good and high-quality aluminum plates that provide uniform heating and should cover at least 80% of the area, and pipes;
- installation of gypsum fiber sheets for structural strength;
- cover installation.
If the room is heated from a radiator heating system, then a warm floor can be laid from the system.
How to make a warm floor from heating?
Installing underfloor heating without changing the boiler becomes even faster. Therefore, now you will receive tips on how to make a warm floor from heating easier.


Floor preparation, screed and laying the contour is done according to the previous instructions
Pay attention to the difference in composition, as the screed mixture affects the proper functioning of the floor
At the same time, it is very important to take into account all the features of the heated room, possible heat losses and know exactly how to properly make a water heated floor. Might be interesting
Might be interesting