- Kinds
- Material
- Plastic
- Metal
- MDF
- Polystyrene
- Drywall
- PVC
- Acrylic
- Glass or mirror
- Design
- Deaf stationary
- Removable stationary
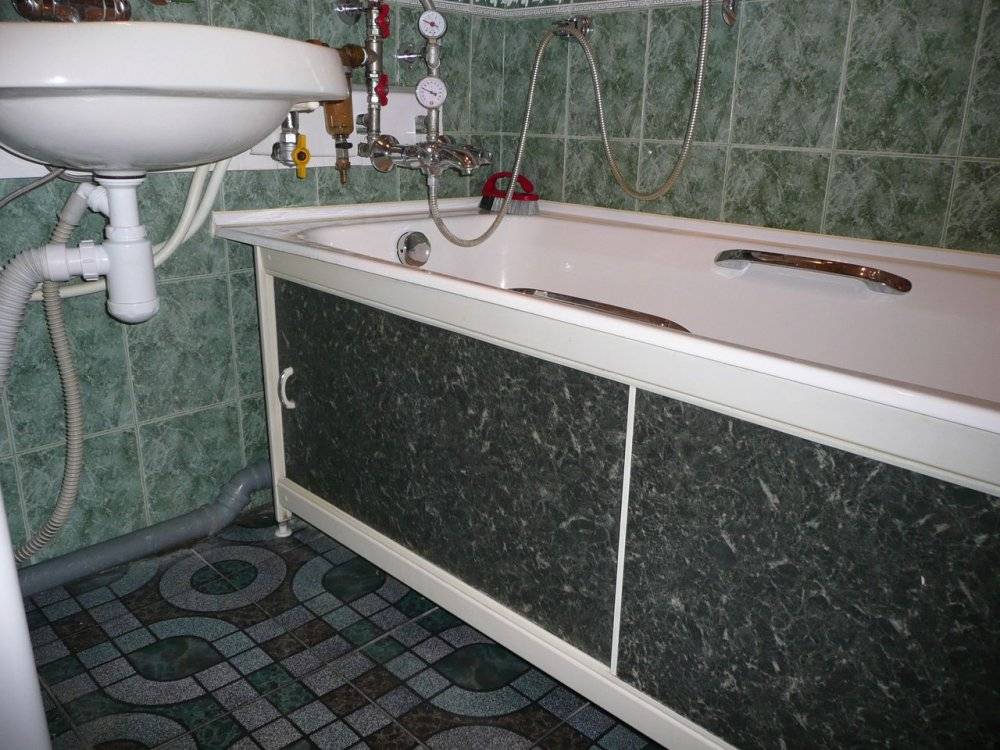
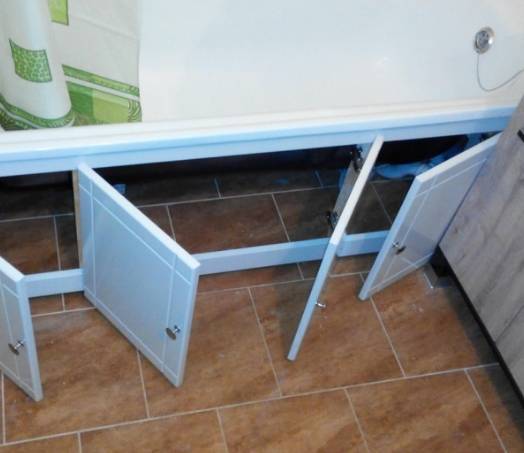
- With hinged doors
- Model with sliding doors
- Do-it-yourself screen manufacturing and installation
- step by step
- Bath Screen Materials
- Screen assembly from plastic panels
- How to install a screen under an acrylic bath
- How to install a blank screen on an acrylic bath
- How to attach a sliding screen to an acrylic bath
- Screen Design Differences
- Subtleties of screen selection
- Installing a purchased screen
- Necessary tools and spare parts
- Assembly (fixing parts)
- How to make a screen out of drywall, MDF, OSB
- Screen mounting:
- How to install a screen under the bath with your own hands analysis of installation technology
- What screen options are popular today?
- The procedure and features of mounting the screen
- How to install a screen for an acrylic bath
- Self-tapping mounting
- On magnets
- For springs
- On clamps
- by surprise
Kinds
Screens are classified depending on the material of manufacture and design features.
Material
Bathroom panels are made from different materials. Products made of polystyrene, PVC and plastic are considered popular. Less often in bathrooms, screens made of glass and metal are used.
Plastic
Plastic models are considered the most popular among consumers, which is explained by the following advantages of panels of this type:
- low price;
- simple installation and operation;
- long service life;
- moisture resistance;
- a wide variety of colors and the possibility of applying patterns.
The main disadvantage of plastic models is that with a slight application of force, the material breaks.
Metal
Metal models are more expensive than plastic ones. Panels made from this material are highly resistant to mechanical damage. As in the case of plastic screens, a variety of patterns are applied to metal screens, which allows the use of such products in various interiors. The main disadvantage of models of this type is that due to scratches and other defects, the panels become rusty.
MDF
MDF models are mainly installed in classic-style bathrooms. Screens of this type are susceptible to moisture. Therefore, for the bathroom, it is recommended to purchase MDF panels covered with a protective film.
Polystyrene
Polystyrene is a lot like plastic. Therefore, screens made of both materials have the same advantages and disadvantages.
Drywall
This material is used to make the base for laying ceramic tiles. Separately, gypsum boards are not used to create screens for a bath.
PVC
PVC panels are characterized by the advantages that plastic products have. The main difference between these screens is that polyvinyl chloride tolerates mechanical stress better.
Acrylic
This type of screens is made of plastic, which is then covered with an acrylic layer. Such products often come with bathrooms made from a similar material. Acrylic models have the same properties as plastic ones, with the only exception: decorative patterns are not applied to this type of panel.
Glass or mirror
It is not advisable to install glass or mirror models in the bathroom. Panels of this type, even with minor loads, break. Installation of mirror models is advisable in cases where there is a need to visually increase the size of the room.
Design
Under the bathrooms, stationary screens or structures with movable doors (hinged or sliding) are installed. Products of the first type are often made from removable panels. The choice in favor of a particular type of construction depends on the purpose of installing the screen.
Deaf stationary
Structures of this type are usually built from durable materials such as brick or metal. Such products provide additional support for the bath and endure external influences, including moisture. Among the disadvantages of stationary structures are the following:
- the load on the floor increases;
- reduced space in the bathroom;
- dismantling is impossible without destroying the structure.
Stationary structures are not installed under acrylic bathtubs.
Removable stationary
Structurally, this type of screens does not differ from the previous one. The difference lies in the fact that for the manufacture of these products, plastic panels are mainly used, which can be removed if necessary.
With hinged doors
The use of screens with hinged doors is justified in large rooms. Such designs provide convenient access to the space under the bathroom.
Model with sliding doors
Sliding panels are mounted on rails that are mounted along the bathtub and the floor. Similar designs are used in small rooms. The use of sliding panels is also justified by the fact that the material, if necessary, can be easily removed and replaced with a new one. The main disadvantage of these models is that when pressed, the panels immediately shift.
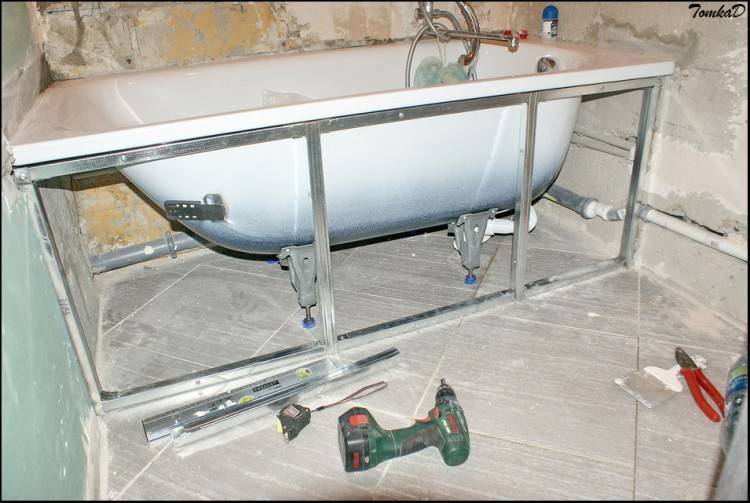
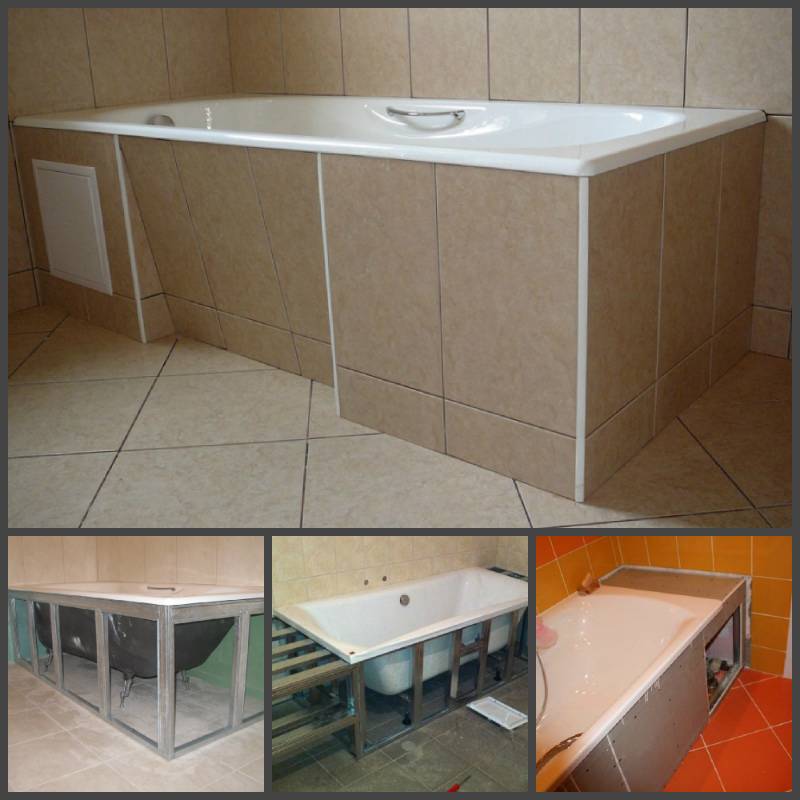
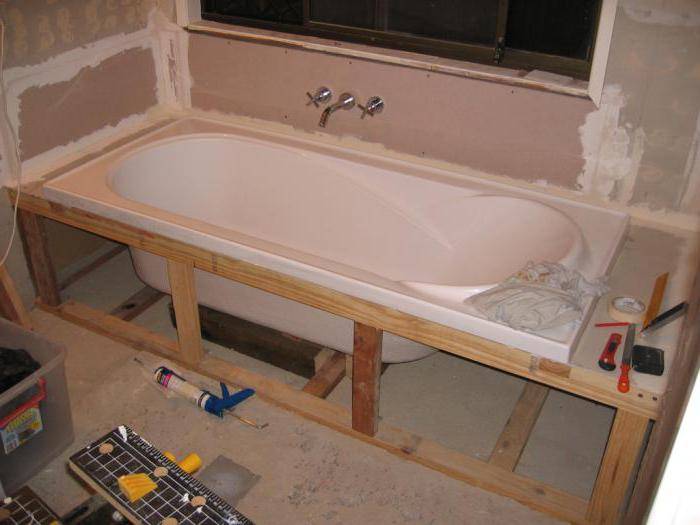
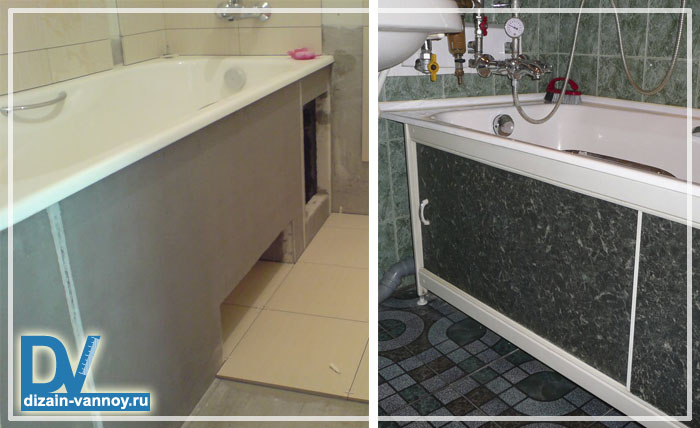
Do-it-yourself screen manufacturing and installation
The most economical option for a homemade screen is MDF and layer lining. The advantage of the model is the interchangeability and easy availability of parts.
step by step
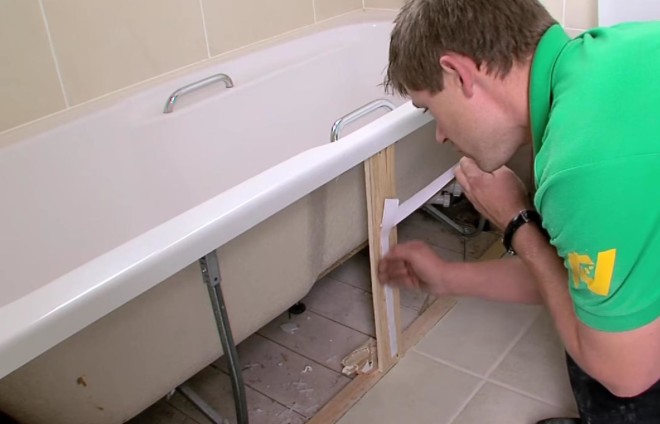
- Applying markup. The first lines are drawn in the direction from the floor along the wall to the intended upper point of the frame. Base lines are drawn on the floor around the perimeter. The application is controlled by the building level.
- Starting profiles are attached to the floor marks with self-tapping screws. Every 50-60 cm, vertical profiles are mounted under the edges of the bath. The joints of the finished frame are additionally treated with silicone sealant.
- A construction knife cuts plastic (or drywall). In the segment for the doors, holes are drilled for the handles.
- We place the cut-out facade under the side of the bathroom and fix it with self-tapping screws on the profile guides.
- Hinges are screwed on and screen doors are hung.
If it is assumed that the front wall is monolithic without openings, the decoration is done with tiles. Before laying the tiles, a primer layer is applied.


Bath Screen Materials
Those materials that you will use in the bathroom should not be afraid of water and moisture, temperature changes
It is also important that they are not prone to rapid destruction from mold or fungus.
You can make the base of the screen from almost any building material, and then finish it on the outside to your liking. For cladding, plastic panels or tiles are used.
Homemade screen options:
-
plastic;
-
plasterboard sheathing of a wooden or metal frame / profile and subsequent finishing;
-
brick base with front tiled lining.
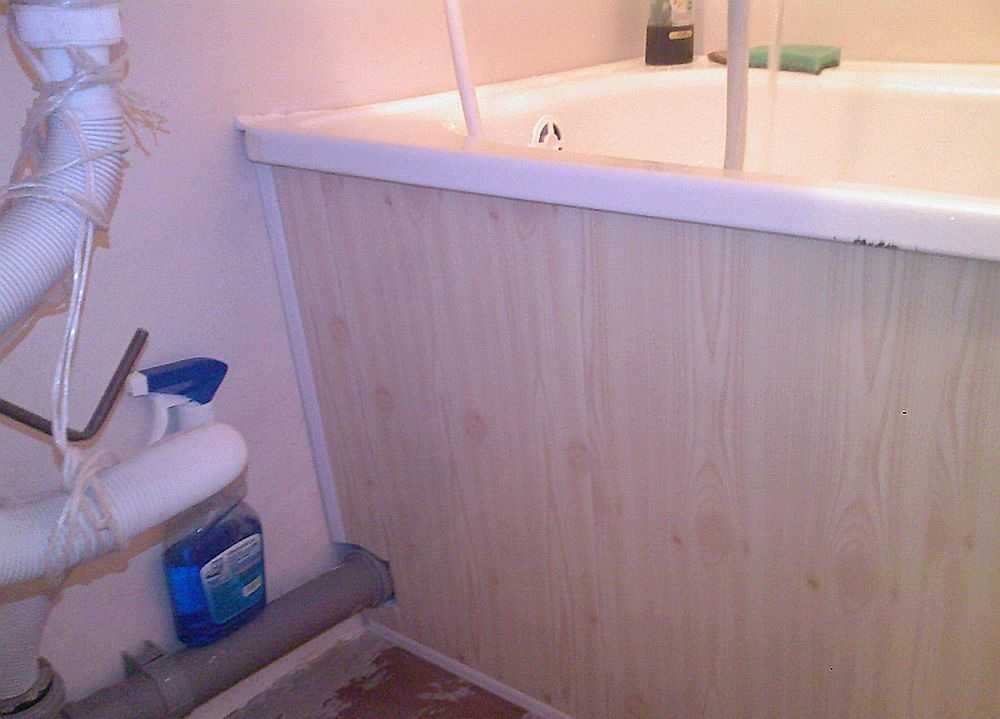
The fastest way is to cover the frame under the bathroom with MDF panels. Strips of plastic or MDF are biologically neutral and practical. These materials are easy to cut and fasten together.
After erection, the brick base will need to be sheathed and plastered or tiled on it. And before installing a wooden frame, the wood must be coated with a special impregnation to protect it from moisture.
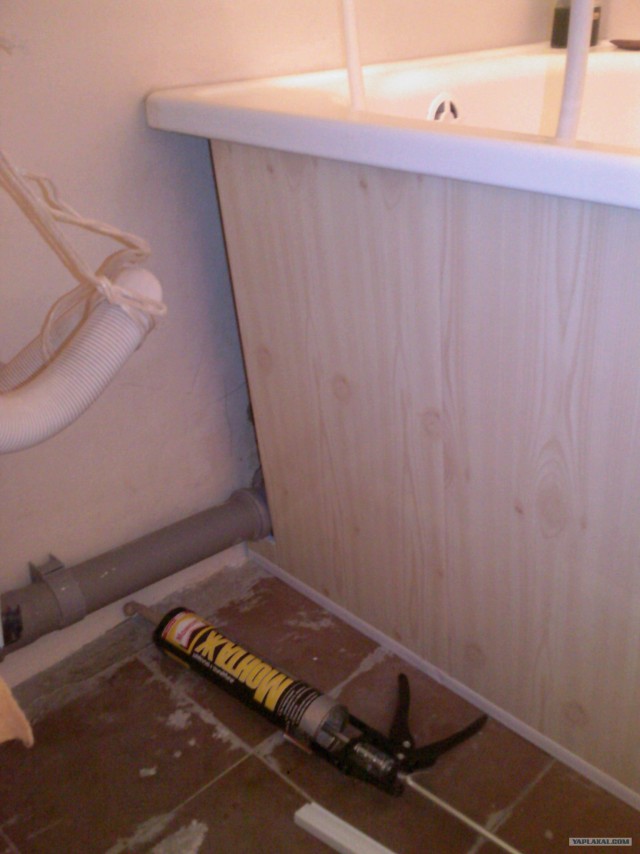
Screen assembly from plastic panels
Technologically, assembling a plastic screen is a fairly simple task and consists in the following. First, along the perimeter of the most installed supporting frame, the starting strip is fastened with self-tapping screws. In places where the product will adjoin the vertical and horizontal elements, a cut is made at an angle of 45 degrees. After that, strips are cut from plastic and inserted into the grooves of the prepared starting strip until the screen is completely filled. The plastic panels of the sliding screen are installed between the guides and the handles are glued on the outside. Corner joints are closed with plastic corners.
Sliding plastic panel
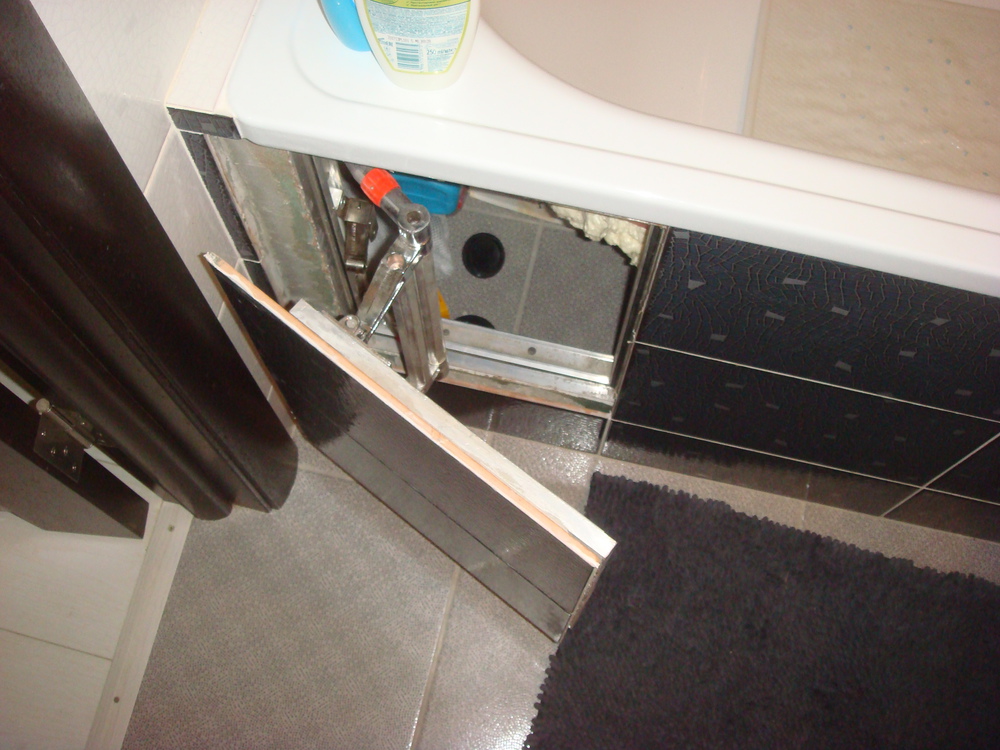
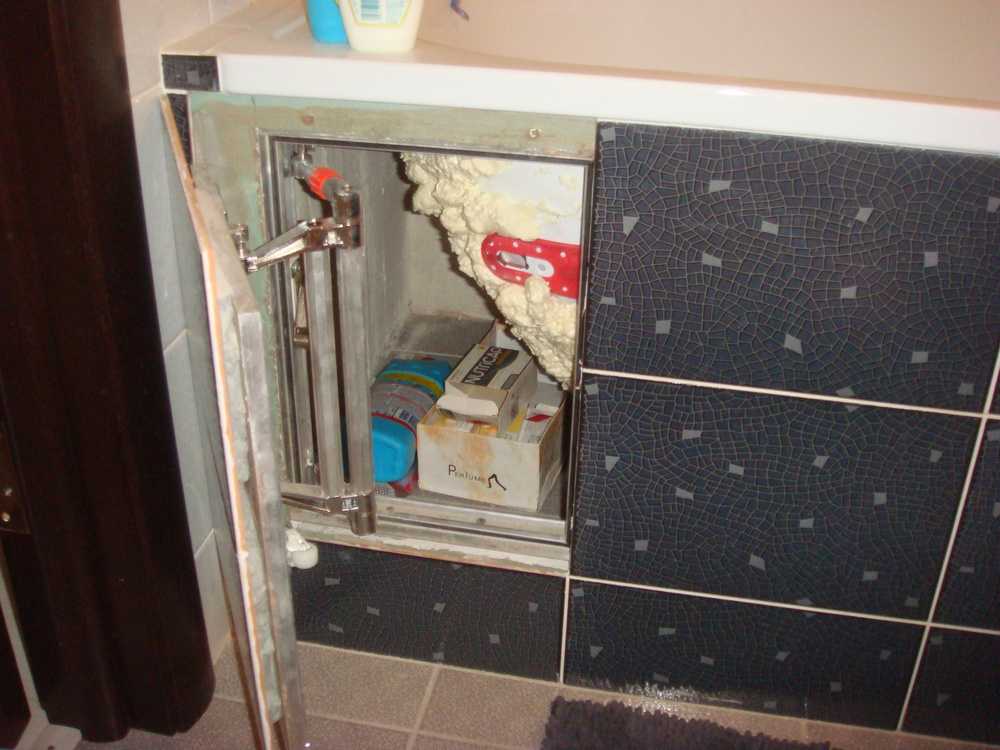
At the end of the installation, an inspection door should be installed on the fixed lintels (usually on the siphon side). Such plastic doors can be bought at any hardware store or made independently from the remaining panels. For additional protection against moisture ingress into the screen, the gaps between the floor surface and the frame fasteners are filled with a special neutral-colored sealant.
The installation of panels on a curved screen is somewhat different, because the bending angle must also be taken into account.
- First of all, you should measure the height of the frame from the top profile to the bottom. Then, using a charcoal ruler, measure the required length and, if necessary, cut off part of the panel with a drywall knife.
- On the extreme first strip, apply a small layer of "liquid nails" glue and fix the starting strip of the same length.
- Each subsequent plastic panel should be inserted into the grooves of the previous panel. From above, the plastic is fixed with “liquid nails” or staples, but only so that the outer side remains without holes. The bottom of the product can be fixed with self-tapping screws to the inside of the aluminum profile.
- The last stage is the most difficult and responsible - the installation of the last panel. To do this, it is necessary to measure the width of the remaining space, apply all calculations to the plastic panel and cut out the missing part of the screen using the same drywall knife. Glue the starting strip on the side of the panel adjacent to the wall. Gently “drive” the panel into the upper and lower strip.
- Decorate the bottom of the screen with a plastic plinth, gluing it to the bottom front side of the screen.
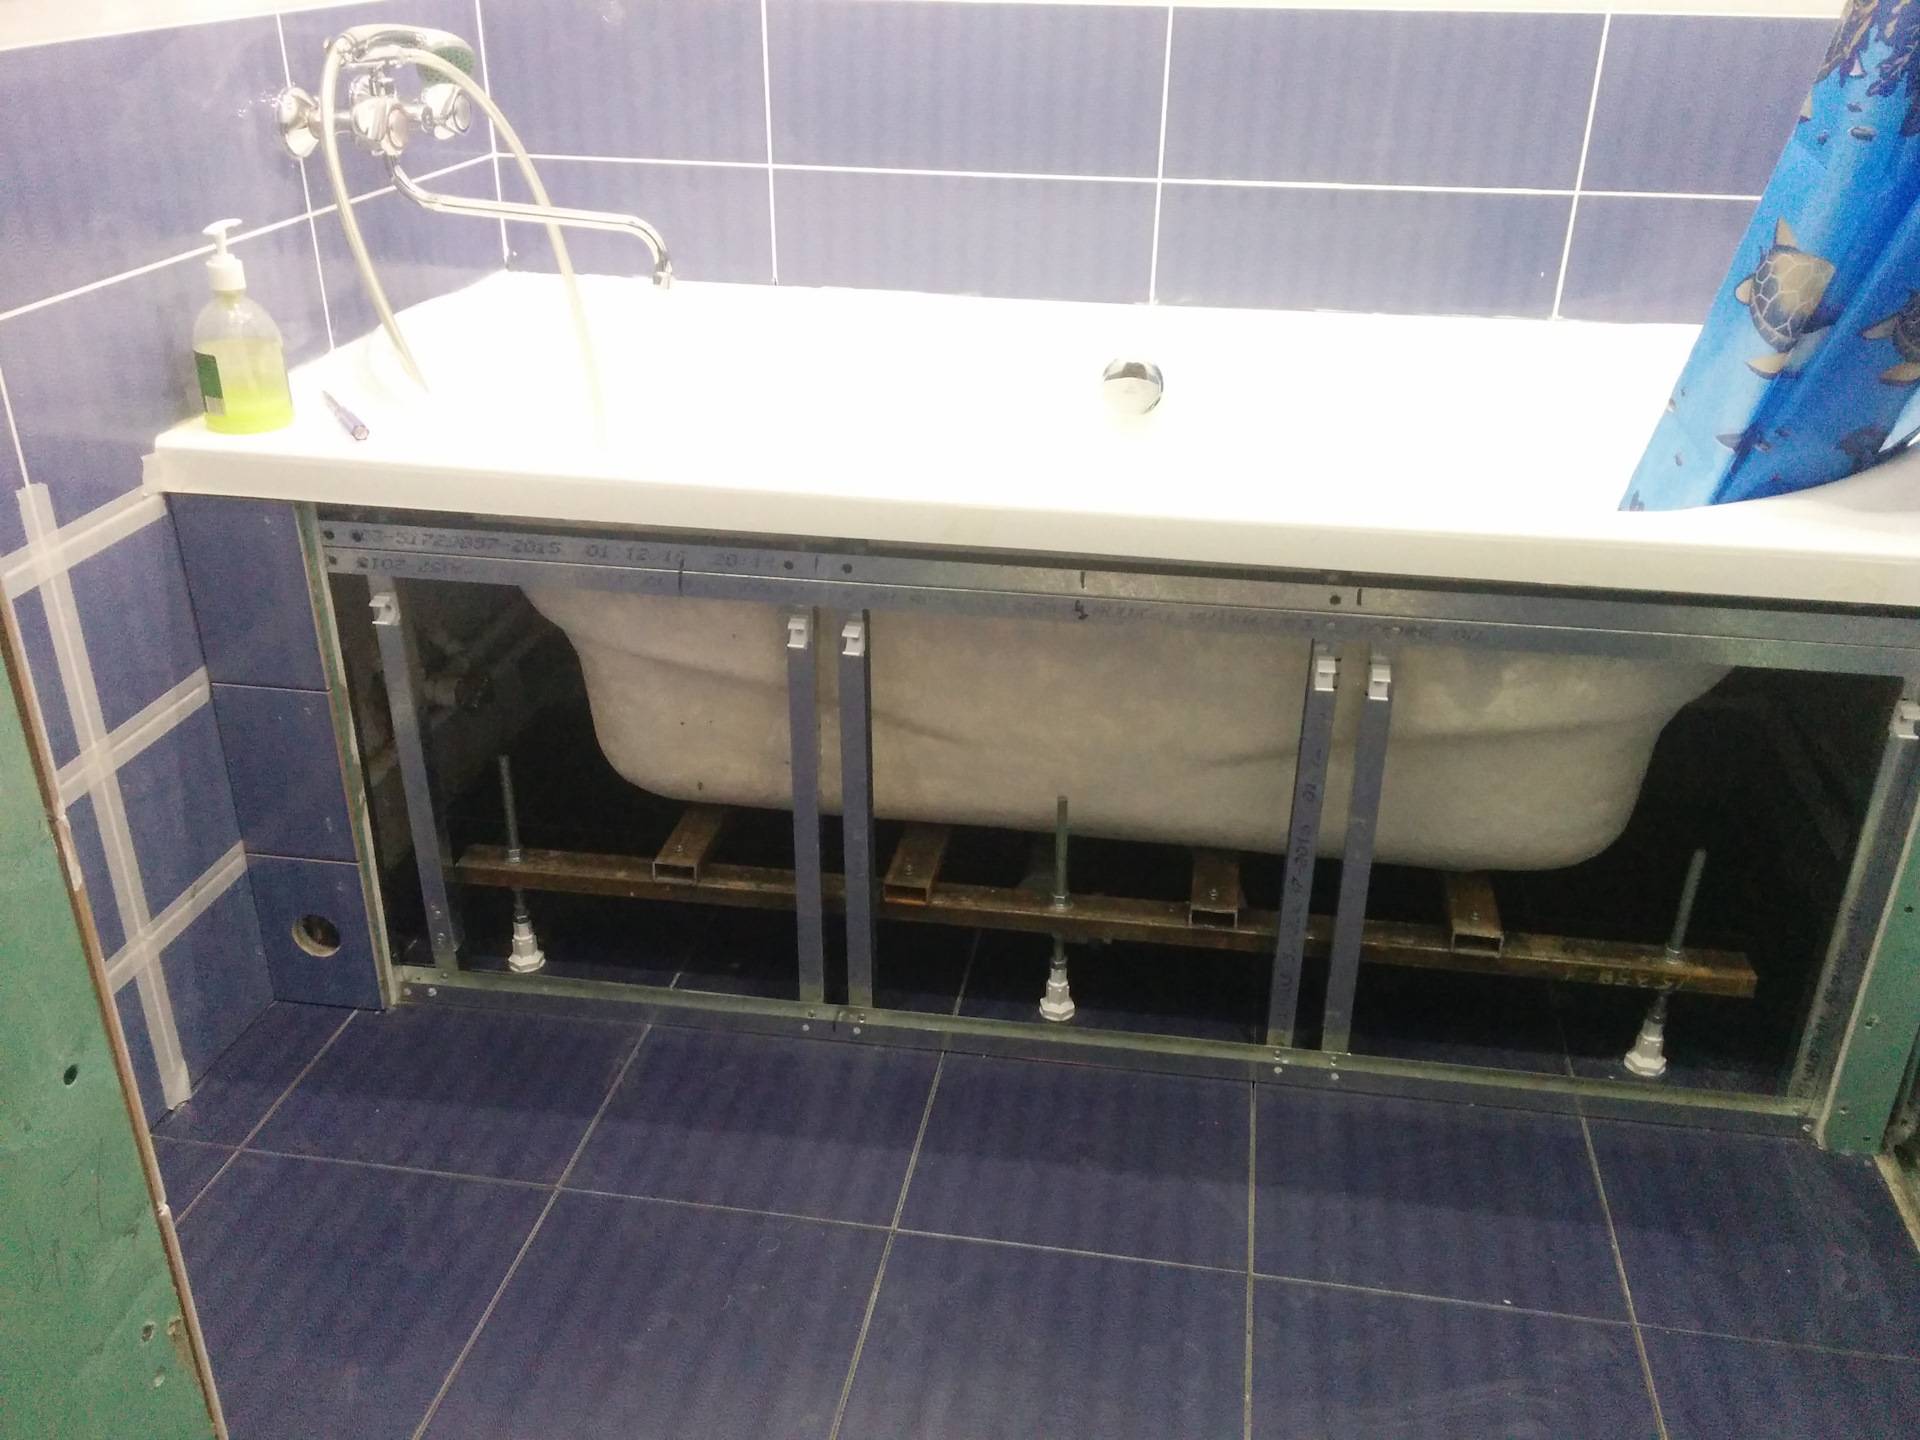
How to install a screen under an acrylic bath
It is quite possible to install a screen under an acrylic bathtub yourself, without inviting specialists for this. The main thing is to follow three basic requirements in the process.
Firstly, the connection of the edges of the panel with the side of the plumbing bowl and the floor should be as tight as possible. This will prevent water from entering the joints and the development of mold and fungus in them. You can ensure tightness in the following way:
- coat the joints with silicone sealant;
- lay a special seal around the edges of the screen.
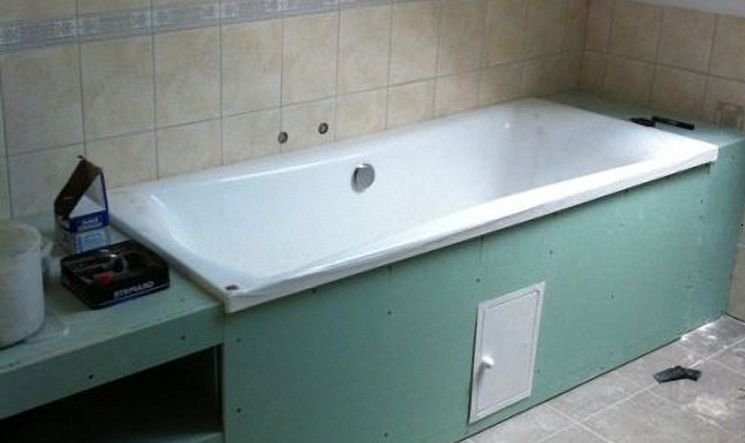
Secondly, the decorative panel, regardless of the type of its design, must provide unhindered access to the pipes. If the acrylic bathtub screen is sliding or hinged, there will be no problems. For a blank screen, provide a removable panel located near the communications.
And thirdly, the screen should be fixed to the acrylic bathtub in such a way that neither the faucet nor the water pipes act as a supporting structure in it. In models that are equipped with plumbing by default, this situation cannot arise. But if you decide to make a decorative shield yourself, be sure to consider this point.
As a rule, the installation of a screen under an acrylic bathtub is carried out at the very last stage of the repair, when all the work on finishing the room has already been completed. If for any reason you need to do this sooner, try to protect the decorative structure from repair contamination. To do this, wrap its doors and frame with a thin cling film. It adheres well to any surface, so you don't need any adhesive tape or other fixing materials.
How to install a blank screen on an acrylic bath
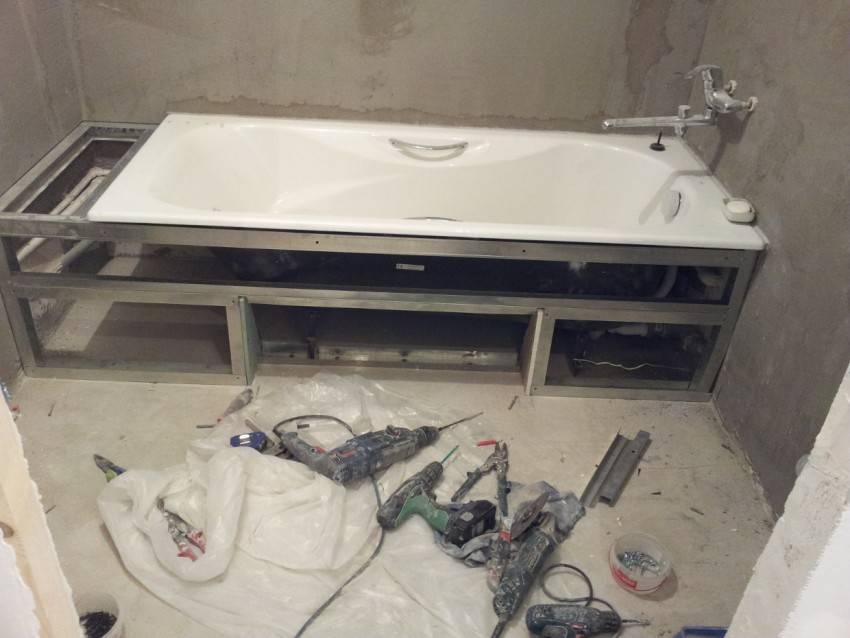
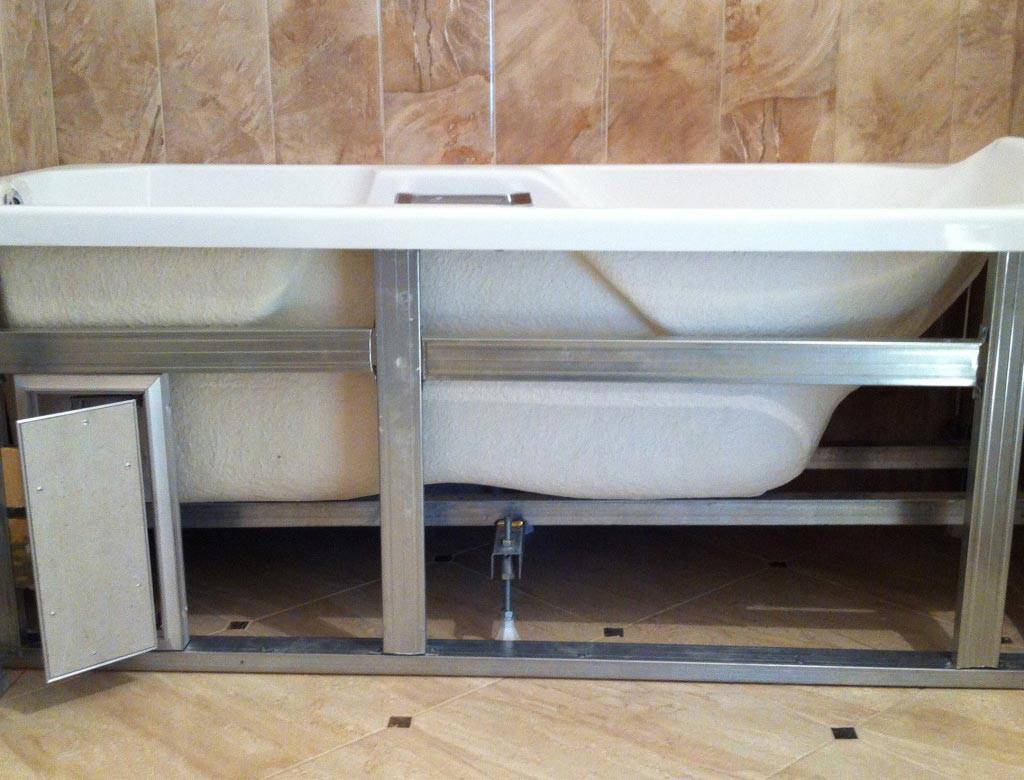
Installing the acrylic bath screen begins with mounting the bracket.It should be done before the plumbing itself is put in the right place. The bracket is attached to the bottom of the bowl to special mortgages. Then, squeeze plates are screwed to the same elements located on the sides of the plumbing, which act as a screen attachment to the acrylic bath. The plates are installed using the fasteners supplied with the decorative panel in such a way that the distance between their edge and the edge of the side does not exceed 2 mm.
Next, the bath is installed in the place allotted for it. Using the adjusting screws on the legs of the bracket, level the position of the bowl according to the level, and also raise it to the desired height, taking into account the dimensions of the decorative panel. Then you should connect all the pipes and check their performance. If at this stage you find that the water does not drain well, check once again that the bowl is level, change its slope and height.
Before fixing the screen on an acrylic bath, marking and fitting is carried out. Mark the center lines of the bracket with a water-based marker or slate pencil. Lean the screen against the bowl, then slide its top edge under the rim of the bowl so that it is between the rim and the wringer plate. Align the trim panel with the center lines of the bracket, making sure everything is level. Then, using self-tapping screws, screw the bottom of the screen to the bracket elements. After that, the heads of the self-tapping screws can be closed with decorative plugs.
How to attach a sliding screen to an acrylic bath
With a deaf or removable decorative shield, everything is more or less clear. And how to attach a sliding screen to an acrylic bath? In fact, the principle will be about the same.


Read: what means can remove the fungus in the bathroom.
Find out how to choose and install a bathtub siphon yourself.
Screen Design Differences
The construction market offers many varieties of such panels for every taste. They differ in design and functionality. Many companies are engaged in the production of custom-made bath screens, which allows us to say with confidence about the large selection of these products.
Consider the varieties of such protective panels, depending on the design features:
- standard;
- multifunctional;
- end.
The configuration of various screen models can be determined independently depending on your finances and technical preferences.
Standard models are the most common and are a plastic panel for which a frame of appropriate dimensions is selected. The multifunctional version differs from the standard one in that it has the ability to adjust the size of the screen for the bath (due to the legs). End panels are used to hide only a certain part of the bathroom.
It is better to choose screens whose fittings are made of galvanized steel
Photos of bath screens can be easily found on the web, which greatly simplifies their selection.
Related article:
Subtleties of screen selection
Before buying a bath screen, you need to think in advance which model is best suited. In this case, several criteria must be taken into account at once:
- functionality;
- price;
- durability;
- complexity of installation;
- appearance.
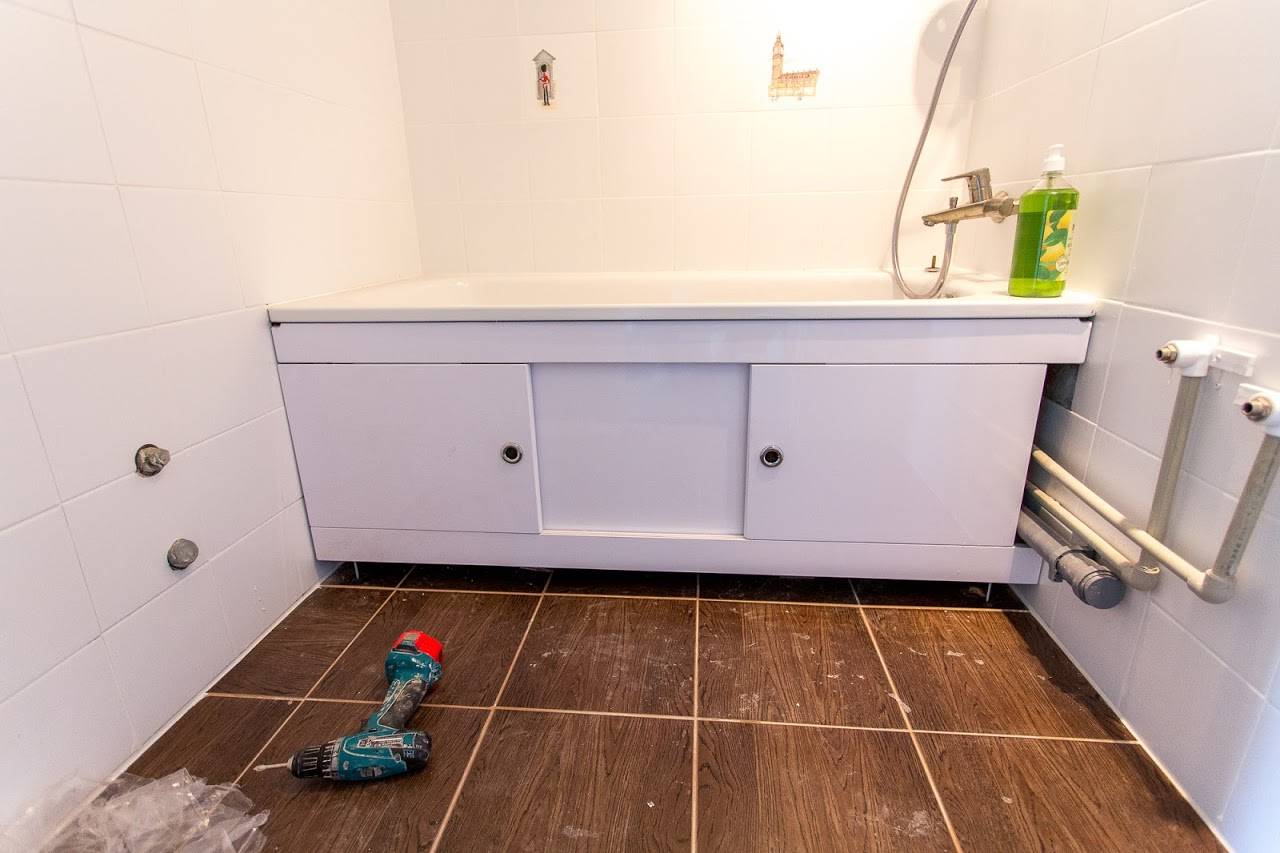
If the screen is needed only to close the unsightly view of communications, you should pay attention to simple removable models or stationary products with a hidden hatch.If the active use of free space under the bathroom is expected, the screen must have doors. The most convenient are products with sliding doors - this is a universal option for rooms of any size.
Swing doors are convenient to use only in a spacious bathroom
The most convenient are products with sliding doors - this is a universal option for rooms of any size. Swing doors are convenient to use only in a spacious bathroom.
All fittings must be made of corrosion-resistant material, otherwise the screen will lose all its attractiveness very soon. It should be noted that plastic fittings wear out faster and are less durable, while parts made of galvanized steel retain their qualities throughout the entire period of operation. When buying, be sure to check the quality of fastening of all elements, the smoothness of the doors and the fit to the frame.
If the repair has not yet been completed, and the exact parameters of the screen cannot be calculated, you should purchase a model with the ability to adjust. Such products have a slightly higher cost, but there are no problems with installation and fitting. But it is best to choose a screen after finishing work is completed, when it is possible to accurately measure and choose the best option.
The decorative design of the screen should correspond as much as possible to the interior of the bathroom in terms of color and texture. In small rooms, mirror screens look very good: the reflective surface visually makes the room more spacious.Photo printing or drawing on the front panel must also correspond to the general style of the interior, otherwise it will not be possible to achieve a harmonious combination. For example, a floral print screen can be very pretty on its own, but it looks out of place in a nautical-themed bathroom. Here, the image of waves, marine life or pebbles on the beach is more suitable. If there are a lot of bright contrasting details in the room, it is better to choose a solid color screen, and vice versa, a model with a large color pattern is perfect for a bathroom in soothing colors.
Installing a purchased screen
When choosing a purchase model of a sliding screen, the following factors should be considered:
- the functionality of the purchased product;
- its cost and service life;
- complexity of installation and design.
In cases where the screen is intended only to hide communications laid under the bathroom, you can get by with the installation of stationary hinged or removable panels equipped with a hidden hatch. The most versatile and easy-to-use option is a screen product with sliding doors, the installation of which will be discussed later.


Necessary tools and spare parts
Before installing the screen under the bath, you should take care of preparing the tool, which must include:
- hacksaws for wood, plastic or metal, used to fit ready-made screen blanks;
- a drill with an impact function or a puncher, necessary for punching mounting holes in the walls;
- a hammer and a set of screwdrivers, as well as a marking set (chalk, twine, level).
In addition, to fix the frame elements, you will need special fasteners (sometimes it comes with the purchased product).After that, it is necessary to check the entire kit, which, in addition to panels, should include ready-made racks and aluminum rails. In addition, plastic plugs, a set of hardware, handles with fasteners and instructions for installing the product are usually attached to it. She should be guided in the process of installing a purchased screen.
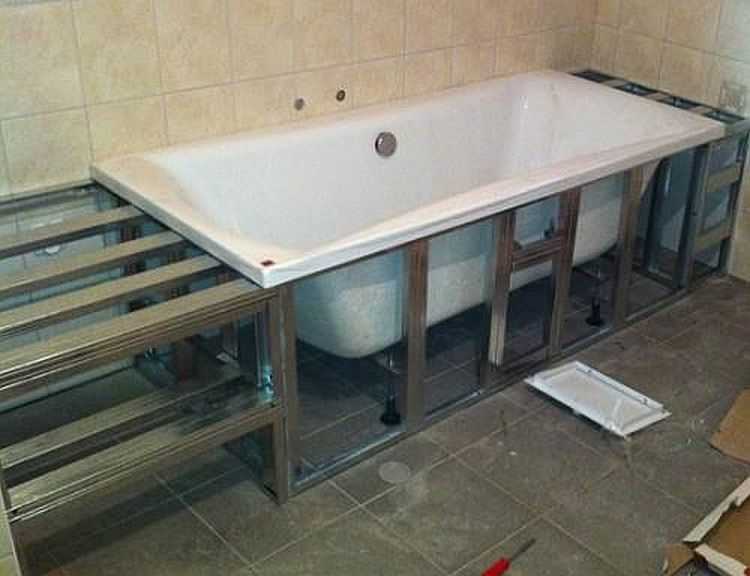
Assembly (fixing parts)
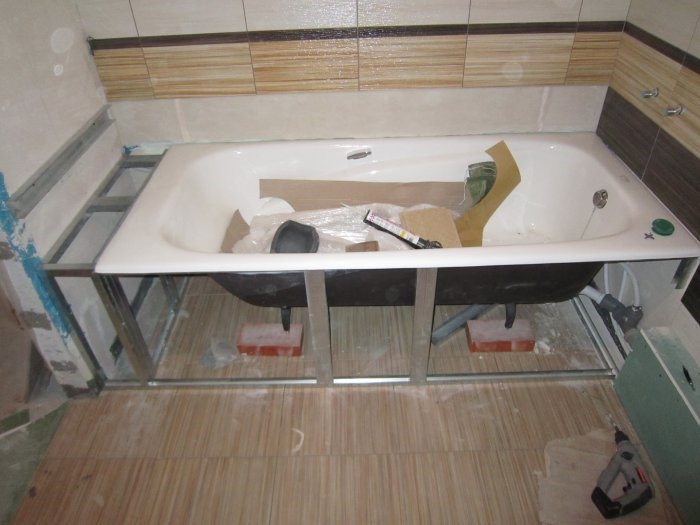
According to the attached instructions, the installation of the screen structure is carried out in stages.
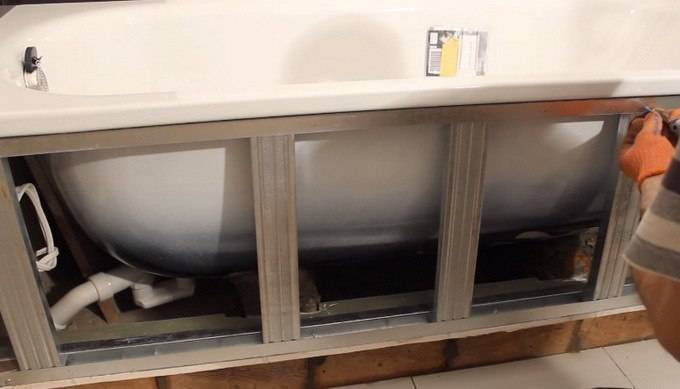
First, both guides are laid on a flat plane so that their grooves are facing inward. After that, racks are placed on top and across them with simultaneous alignment of both mounting holes. Then, in these holes, the self-tapping screws applied to the kit are slightly baited, twisted so that the racks are fixed in the desired position.
Upon completion of fixing the frame, sliding doors are carefully inserted into the grooves of the profiles, after which the entire structure is adjusted in height, and then the hardware on the racks is fully tightened and the plugs are inserted into the ends. At the next stage of assembly, handles are screwed to the doors, and legs are inserted into the support posts and slightly screwed. After that, you should raise the entire assembled structure and bring the upper cut under the side of the bath, aligning its edges vertically
After that, you should raise the entire assembled structure and bring the upper cut under the side of the bath, aligning its edges vertically
At the next stage of assembly, handles are screwed to the doors, and legs are inserted into the support posts and slightly screwed. After that, you should raise the entire assembled structure and bring the upper cut under the side of the bath, aligning its edges vertically.
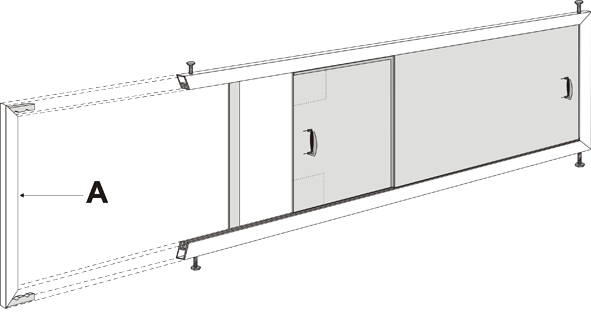
Upon completion of this operation, it remains only to unscrew the legs until they stop, after which the assembled fence should be securely fixed in place.
When assembling a structure with end walls, all these operations are repeated for each of the sides of the bath, after which all three elements are attached to the support posts using suitable hardware.
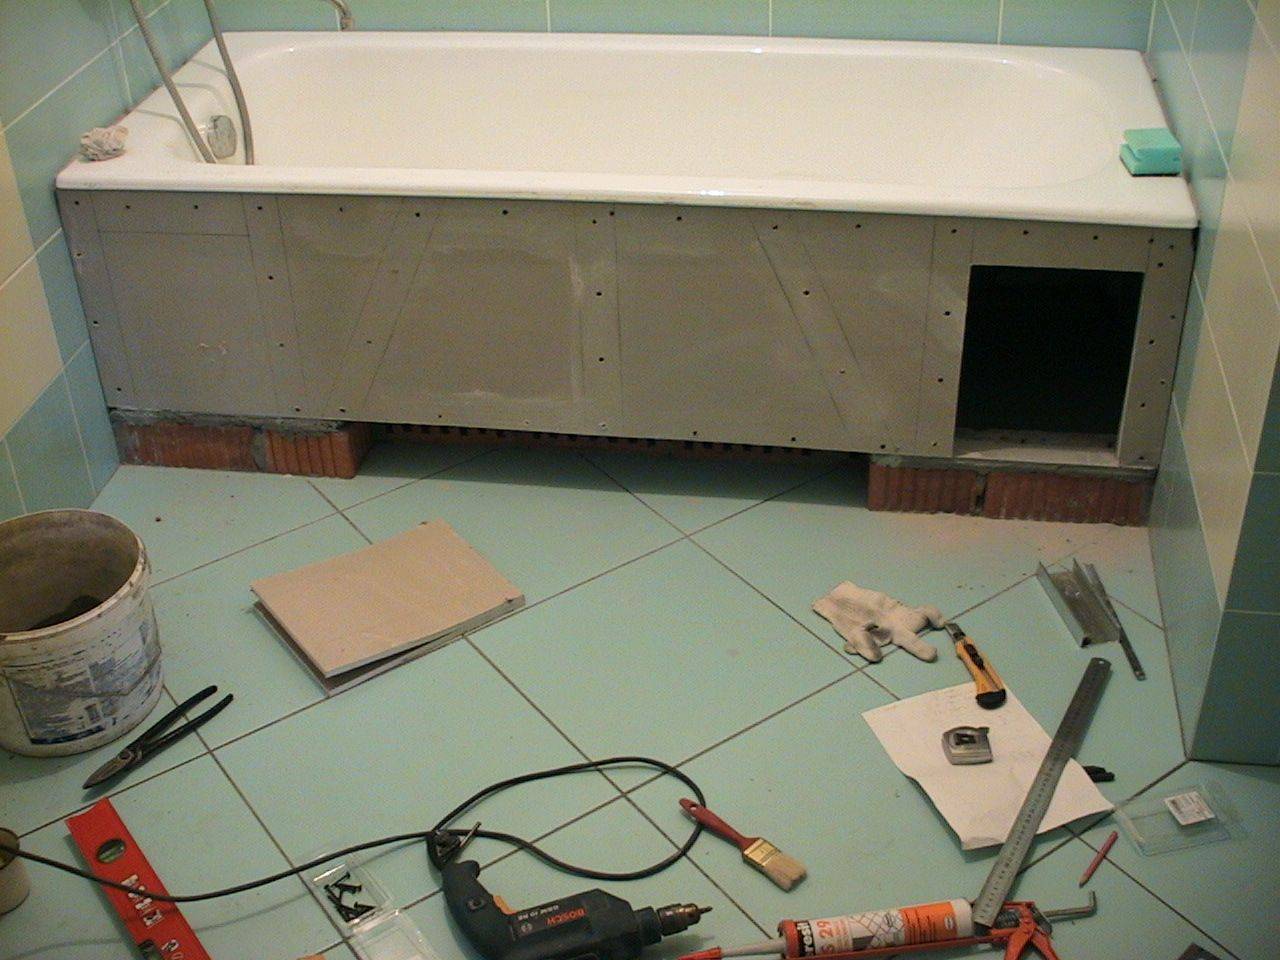
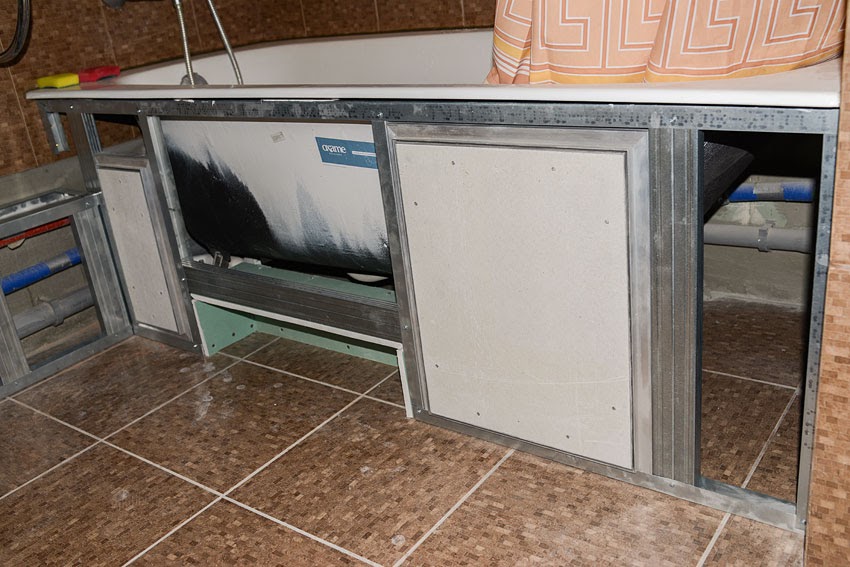
How to make a screen out of drywall, MDF, OSB
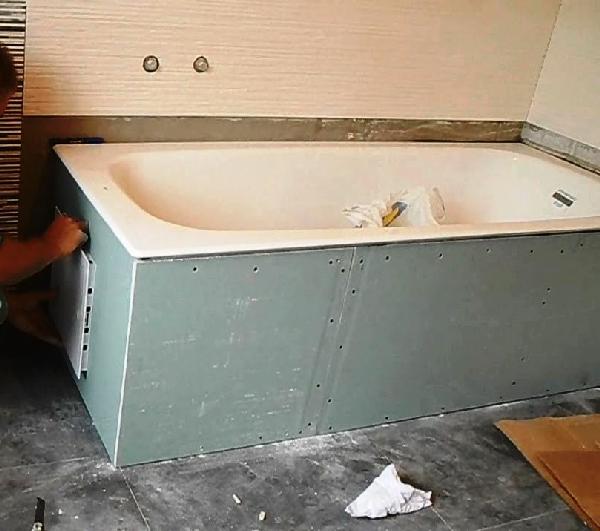
Working with drywall is easy, its cost is low. First, a frame is installed, optimally from a metal profile, it can also be made from a wooden beam measuring 0.4 x 0.4 cm. The beam is pre-treated with an antiseptic, it is desirable to cover it with a moisture-resistant varnish, so the frame will last a longer time. The frame should be slightly deepened to the bath, because after installing the drywall, finishing material will be laid on it. When mounting the frame, it is necessary to use the building level and plumb line. Moisture resistant drywall is green.
Screen mounting:
- drywall sheet is marked;
- cut blanks with a construction knife;
- outline and cut a technical window. Screw the hinges and hang the door;
- the panels are connected at an angle of 90 degrees with self-tapping screws;
- attach the plates to the frame with self-tapping screws 10-15 cm apart;
- about one centimeter should be left from the floor and the edge of the bath, since if moisture gets on the drywall, it can expand a little, swell.
- drywall is primed, the selected finishing material is laid on top of the primer - ceramic tiles, sheathing made of plastic panels, etc.
Sheathing the frame with MDF boards, OSB is almost identical to the installation of a drywall screen, there is one caveat - before installation, the plates are treated with a special water-repellent compound and carefully primed on both sides.
How to install a screen under the bath with your own hands analysis of installation technology
For those who decide to make a screen under the bath with their own hands, there are many options for solving this problem. Such structures perform a number of functions: they mask communications, improve the design of the bathroom, form a place to store household chemicals, etc. The home master has a great opportunity to implement creative ideas, because installing a screen under the bath is an exciting activity.
What screen options are popular today?
Screen design can be very different. You can make it:
- deaf;
- with sliding doors;
- with a hinged door (or two);
- with shelves;
- with pull-out block;
- removable, etc.
The bath screen looks stylish and makes the bathroom more functional.
Finding out how to install the screen under the bath, you need to choose the right model. The design is chosen depending on the characteristics of the room. For a spacious room, you can install a screen under the bathtub with shelves that are mounted on its front surface.

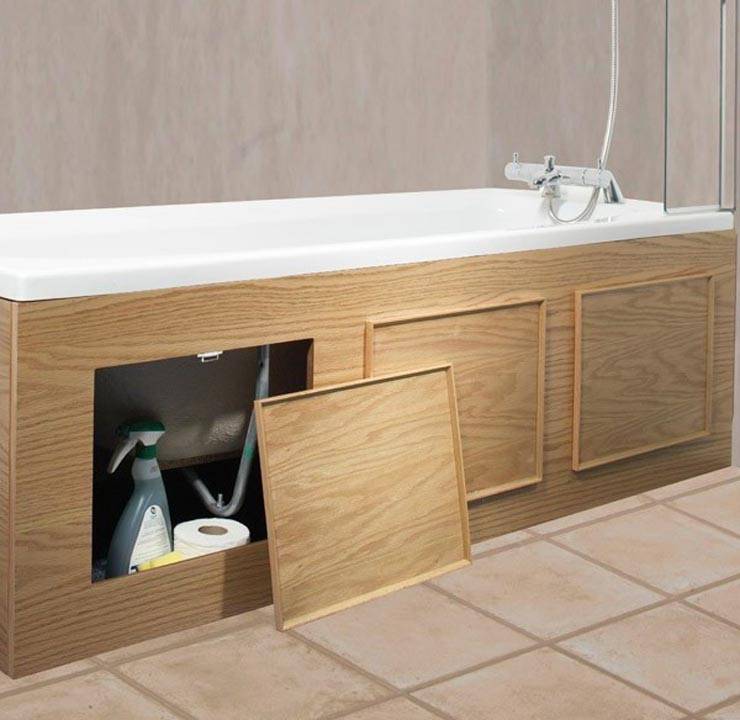


It is better to make such a design removable, because because of the shelves, access to the communications located under the bathroom can be somewhat difficult. The most functional screen under the bathroom for a small room is a device with sliding doors.
A blank screen is a very simple, but least practical option, since if it is necessary to repair communications, it will have to be completely dismantled.
An even easier way to hide the unsightly surface of the bathtub and the space below it is with curtains. An ordinary pipe is mounted under the side, on which a non-woven fabric of suitable sizes is suspended. Unfortunately, ease of execution is the only advantage of this option. Such a screen is short-lived and does not look very presentable.
The screen itself can be made of different materials, for example:
- plastic;
- drywall;
- thin sheet of painted metal;
- MDF;
- acrylic, etc.
Brickwork is a more time-consuming way to make a bathroom screen, but it's worth noting that it's one of the most reliable and durable options. Most often, after installation of the structure, it requires additional finishing. This provides excellent opportunities to improve the design of the bathroom.
For example, in a small room, it makes sense to install a mirror screen under the bath, which will visually expand the space. A stylish tile bath screen is a standard option for an all-tiled bathroom.
In a small room, a bathtub mirror screen is more than appropriate.
Mosaic is an excellent choice for finishing structures with a curved surface. A good tile adhesive will simplify the process and help make it as creative as possible.
Please note: When choosing the type of screen, you need to think about the possibility of getting close to the edge of the bath. To do this, you can leave a small gap below, only 50-70 mm. Another way to solve the problem is to make a small bevel on the vertical surface.
This option is acceptable if the screen is tiled with ceramic tiles.
Another way to solve the problem is to make a small bevel on the vertical surface. This option is acceptable if the screen is lined with ceramic tiles.
Visually, the installation procedure for a drywall screen with a niche for legs is demonstrated in this video:
The procedure and features of mounting the screen
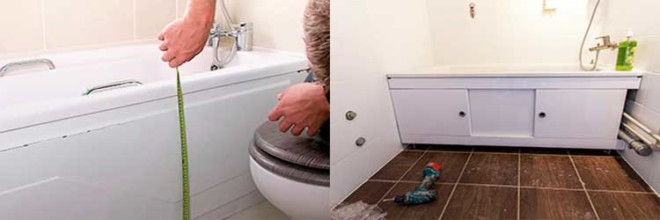
A general description of how to make a bath screen might look like this: 1. Mark the attachment points using a level.2. Make the necessary measurements.3. Make a screen frame from a metal profile.4. Fix the frame elements according to the markup.5. Cut panels from suitable material.6. Attach the panels to the frame.
7. Perform facing work.
How to install a screen for an acrylic bath
There are several options for installing a screen on an acrylic bath. The easiest way is to fix a deaf, non-opening panel. The most durable design will be required for swing doors. A purchased or self-made design can be fixed on:
- self-tapping screws;
- magnets;
- springs;
- clamps;
- against a rigid frame.
Sometimes you can see non-removable screens made of moisture-resistant drywall or brick and tiled. Such non-separable designs can be beautiful, but satisfy the owners until the first plumbing breakdown or siphon clogging.
Self-tapping mounting
To fix the decorative screen on self-tapping screws, you will need a set of special fasteners. It can be pieces of plastic or aluminum corner. They need to be fixed at the top on the stiffener of the acrylic bath, and at the bottom on the racks of the support frame or horizontal profile, if any.
After installing the fasteners, attach the screen and mark against each of them.
Drill holes in the panel in the marked places and use a cone crown or a large diameter drill to select a hole for the self-tapping screws.
Screw the hardware to the fasteners, and install decorative caps in the cuts of the hats. If you could not find the plugs on sale, then you can cut them yourself and put them on glue.


On magnets
In order for the magnets to firmly hold the decorative panel, a steel frame or vertical stops are required, which are connected to the supporting structure of the bath. The magnets themselves must be glued to the back surface of the panel and then attached to the installed steel profile. To finally fix the screen, 2-3 clamps should be screwed to the bath stiffener.
For springs
Mounting the screen to the acrylic bath with springs is simple and reliable. Its device is based on the fact that springs are attached to the elements of the supporting frame of the bath, which will raise the screen, pressing it against the stiffening rib. The work is performed in the following sequence:
- put the screen over the side and lift it up to the stop;
- on the racks of the frame, mark the lower level of the panel;
- move the marks 30 mm higher;
- attach the lower part of the spring to the new marks and then the top will show a place on the rack for drilling a hole for the hook;
- on the reverse side of the screen, glue a piece of a corner with a drilled hole for the hook of the lower part of the spring;
- glue wooden blocks to the side wall of the bathtub, which will not allow the panel to move towards the bowl;
- install the springs, press the screen down, slide the top over the side and release.
The dimensions of the bars must be selected experimentally, taking into account the thickness of the panel material.
On clamps
Floor spring clamps are used for bathtubs with a rounded or asymmetric shape. In addition to the clamps, you will need locking latches to complete the job. The procedure for this method of fastening is as follows:
- using a plumb or bubble level, draw a line on the floor corresponding to the edge of the bathtub rim;
- arrange the corner clamps on the floor along the drawn line and mark the places for drilling;
- drill holes in the floor, install the clamps and fix them on the dowels;
- fasten the latches to the bath stiffener opposite the clamps;
- on the back of the panel, mark the location of the clamps and screw the fixing tabs there;
- install the bottom of the screen into the clips, and firmly press the top of the screen against the board until it locks into place.
The main thing in this method is not to make a mistake with the markup in order to ensure that all fastener elements match.
by surprise
To install the screen on an acrylic bathtub, you will need to make a solid frame, at the ends of which locking spacer screws are installed on the support legs.
The decorative panel is attached to this frame with self-tapping screws or glue. You need to fill the bath with water. This is necessary to take into account possible subsidence and more accurately determine the moment of stop.
To install in place, put the finished screen over the side and, turning the screws, lift it until the top edge rests against the edge.
Drain the water and check the security of the installation.


