- What to do if the bath is of a non-standard shape
- Frame assembly
- Curved frame sheathing
- Varieties of designs and materials of manufacture
- Kinds
- Material
- Plastic
- Metal
- MDF
- Polystyrene
- Drywall
- PVC
- Acrylic
- Glass or mirror
- Design
- Deaf stationary
- Removable stationary
- With hinged doors
- Model with sliding doors
- Materials and requirements for them
- Criteria for choosing the type of screen for the bathroom
- If not drywall, then what?
- Removable structures
- Screen range
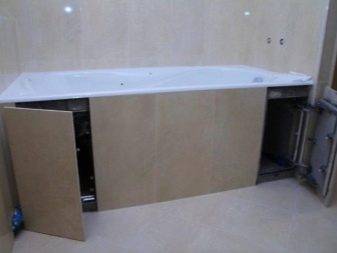
- Installation of the finished apron under the bath
- Necessary materials and tools
- Preparing for installation
- Step-by-step instruction
- Why make a screen under the bathroom
- Installation methods
What to do if the bath is of a non-standard shape
Frame technology can also be used when equipping a screen for a corner, semicircular bath, and even if the bowl has a non-standard shape. In this case, a curved screen is made, which is then tiled with a mosaic, which is excellent for laying on bases of semicircular and other non-rectilinear shapes.
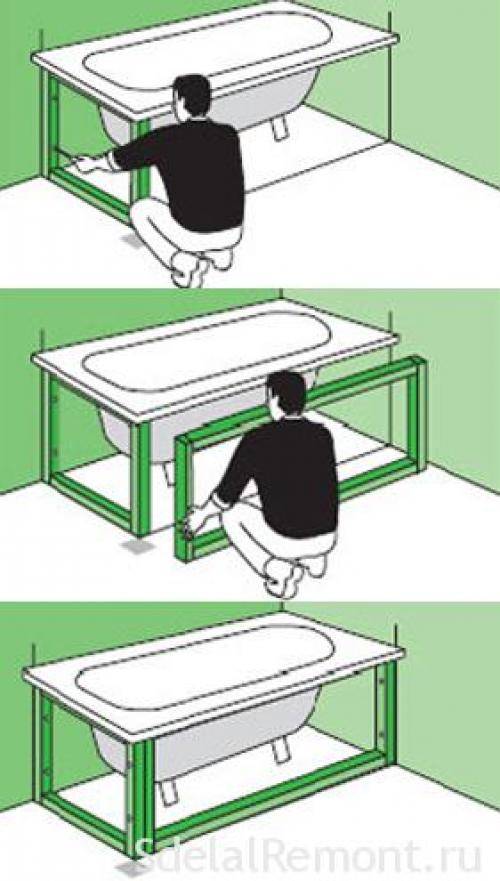
Frame assembly
The technology for manufacturing a frame for such a screen is as follows:
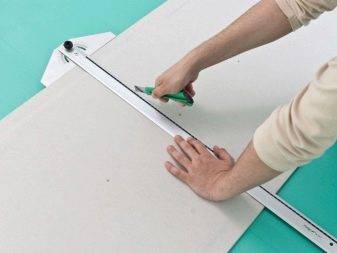
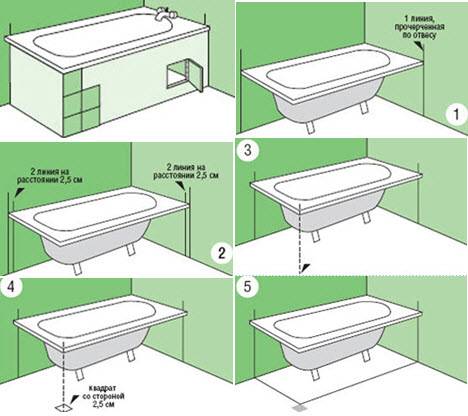
With the help of the building level on the floor, the contour of the bath is marked. To do this, the level is attached to the side of the bath in different places, after which the points are connected in one line.
- To ensure that the lining is flush with the side, the marked line is transferred deep under the bath to a distance that is equal to the sum of the width of the side, plus the thickness of drywall, mosaic and glue.
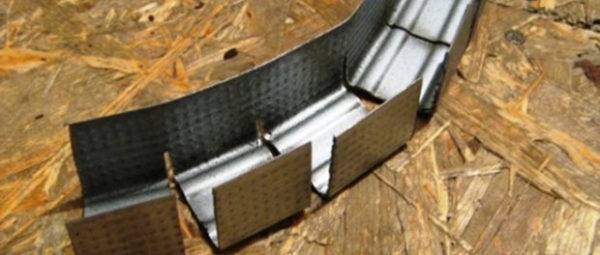
- The curved guide is made from a conventional UD profile. To do this, it is cut on one side and bent to the other, as shown in the photo. By alternating the sides of the notch, you can create a curved guide of any bend radius. The uniformity of the bend depends on the distance between the incisions: the more often they are made, the smoother the finished frame will turn out. The optimal distance between the cut lines is about 50 mm.
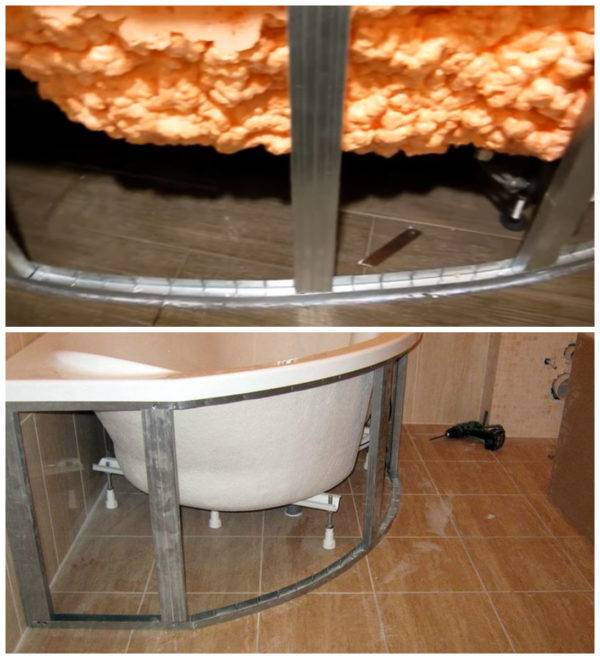
- The prepared guide is fixed to the floor tiles with a sealant (previously degreased). You can also prepare several holes in the floor for additional fixation of the guide with dowels.
- If the bath is acrylic and has glued support bars, the upper curved guide profile is attached to them with self-tapping screws. The upper guide is attached to the steel bath with liquid nails or sealant.
- When the glue dries, the vertical racks of the frame are installed. Racks are fastened with self-tapping screws, and their step depends on the radius of curvature of the frame.
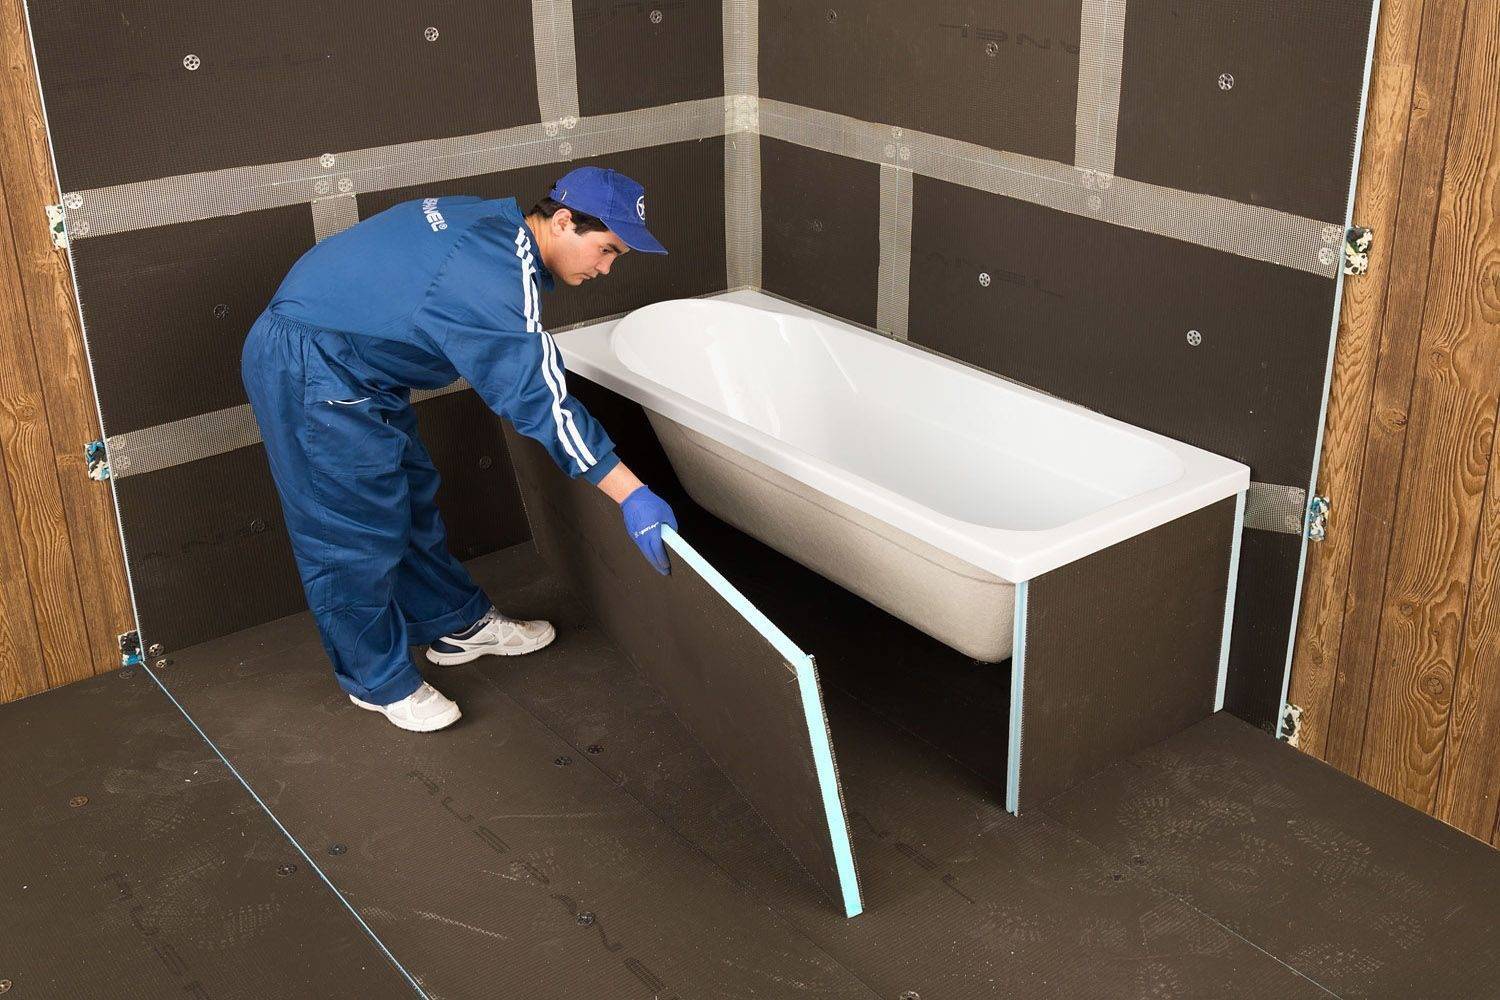
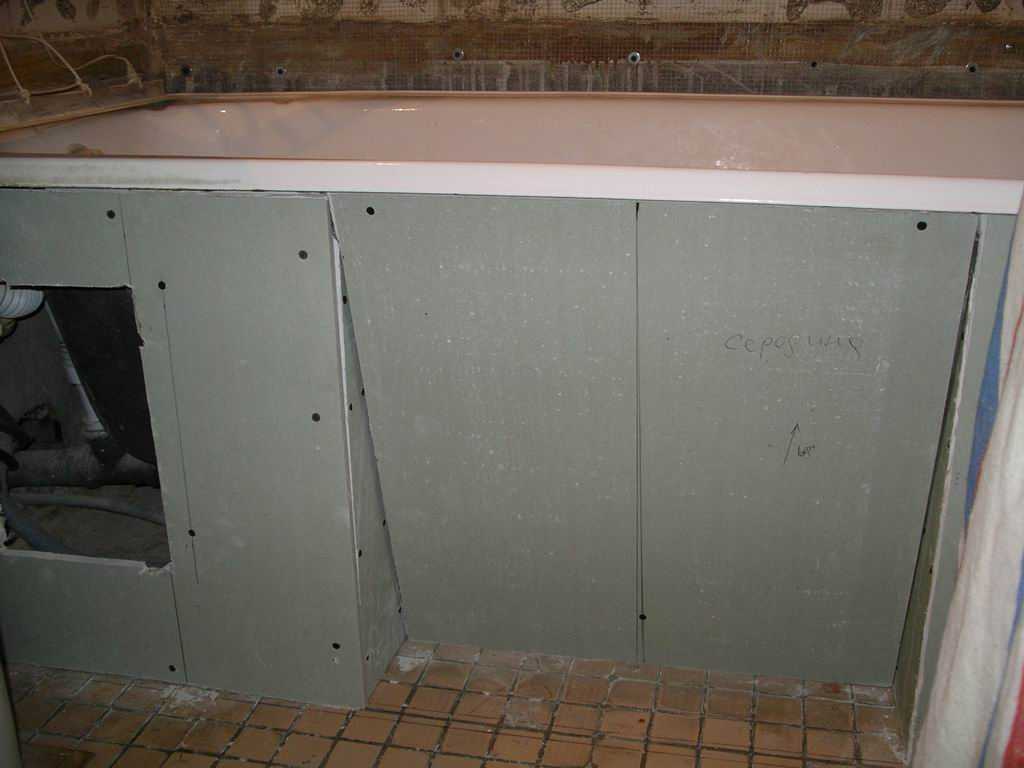
Curved frame sheathing
Drywall is used to sew up the frame, since this sheet material is most easily adapted for sheathing curved structures. For these purposes, arched GKL is often used: if it is wetted, then structures with almost any bend radius can be sewn up with it.
Another option is to use moisture-resistant drywall, and to bend it in the right places, make cuts and break the core, followed by fixation to the frame. For this method, you need to install racks in increments of 10–15 cm.But this method has many disadvantages - in addition to the loss of strength and integrity of the skin, the resulting seams have to be sealed with putty. Therefore, it is recommended to use thin sheets that, after wetting, can be carefully bent.
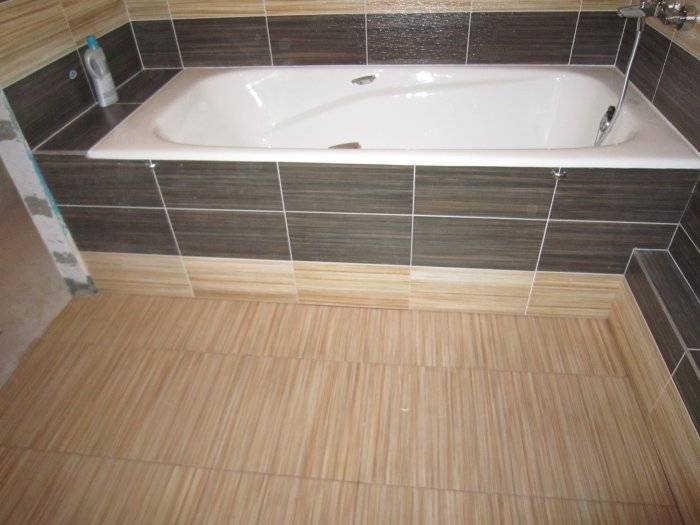
After completion of the sheathing, the non-standard-shaped screen is lined with ceramic mosaics.

As you can see, a simple frame technology allows you to make a screen for tiling bathtubs made of various materials and various shapes.
Varieties of designs and materials of manufacture

The cabinet-screen under the bath includes the following options:
- Buying ready. Suitable if you have a standard bath. In this case, just measure its parameters and go to the nearest store;
- Individual order. You will need this approach if you have a semicircular, corner and any other bath with atypical dimensions and shapes. Much more needs to be measured. Consider all corners and rounding places. By measuring the top and bottom at the same time, you can identify areas of the curved floor. Next, you will need a schematic sketch and a good manufacturer. For measurements, you can also hire a specialist.

When choosing a material, consider its resistance to water:
- Plastic. A good, budget way to decorate the facade. The material is completely neutral to moisture. Not afraid of heat. Refuse too cheap and thin options. They may contain toxic inclusions. When heated, such plastic will begin to poison you with volatile secretions. Minimize mechanical impact on the surface of the planks. They quickly become covered with multiple scratches. With a careful attitude, it will last a long time without losing its natural gloss;
- Glass.For these purposes, it is better to abandon real float glass. If desire is louder than reason, use a multilayer triplex. The plate will contain several shockproof films at once. Glass will not shatter when broken. Only covered with a network of cracks. Not afraid of water. It is advisable to choose tempered glass. They don't care how hot they get. Nevertheless, synthetic analogues are preferable. Plexiglas, colored hardboard, fiberglass. They are distinguished by less fragility, reduced weight. At the same time, strength is significantly increased;
- Metals. Another reliable way. Choose only corrosion-resistant grades. These are stainless or chrome-plated steel, aluminum, titanium-coated parts. You can use metal with a mirror finish. So you will additionally get rid of streaks and hard-to-clean "fingers". The material is distinguished by high strength, long service life;
- MDF or LMDF. Do not be fooled by the fact that these are the most damp-resistant wood-based panels. They will need an additional water-repellent coating. This is due to the close proximity of the source of spray. Lack of protection can cause deformation of the valves with their jamming or breaking;
- Wood. Only the hardest grades (beech, oak). Mandatory treatment with antiseptics and varnishing. This approach will not turn your bathroom cabinet into a breeding ground for fungus and mold.

In screen sizes, the widest variation can be in length. This parameter can range from 105 cm (miniature) to 190 (heroic bath). The increase in length is accompanied by the need to choose a more durable frame. At the same time, it can be supplied with stop legs. There is no such significant difference in height.This parameter can change from 50 to 60 cm. But, in the first place, focus on the dimensions of your bath.
Kinds
Screens are classified depending on the material of manufacture and design features.
Material
Bathroom panels are made from different materials. Products made of polystyrene, PVC and plastic are considered popular. Less often in bathrooms, screens made of glass and metal are used.


Plastic
Plastic models are considered the most popular among consumers, which is explained by the following advantages of panels of this type:
- low price;
- simple installation and operation;
- long service life;
- moisture resistance;
- a wide variety of colors and the possibility of applying patterns.
The main disadvantage of plastic models is that with a slight application of force, the material breaks.
Metal
Metal models are more expensive than plastic ones. Panels made from this material are highly resistant to mechanical damage. As in the case of plastic screens, a variety of patterns are applied to metal screens, which allows the use of such products in various interiors. The main disadvantage of models of this type is that due to scratches and other defects, the panels become rusty.
MDF
MDF models are mainly installed in classic-style bathrooms. Screens of this type are susceptible to moisture. Therefore, for the bathroom, it is recommended to purchase MDF panels covered with a protective film.
Polystyrene
Polystyrene is a lot like plastic.Therefore, screens made of both materials have the same advantages and disadvantages.
Drywall
This material is used to make the base for laying ceramic tiles. Separately, gypsum boards are not used to create screens for a bath.
PVC
PVC panels are characterized by the advantages that plastic products have. The main difference between these screens is that polyvinyl chloride tolerates mechanical stress better.
Acrylic
This type of screens is made of plastic, which is then covered with an acrylic layer. Such products often come with bathrooms made from a similar material. Acrylic models have the same properties as plastic ones, with the only exception: decorative patterns are not applied to this type of panel.
Glass or mirror
It is not advisable to install glass or mirror models in the bathroom. Panels of this type, even with minor loads, break. Installation of mirror models is advisable in cases where there is a need to visually increase the size of the room.
Design
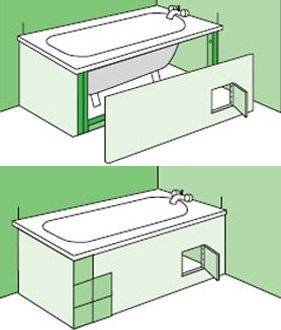
Under the bathrooms, stationary screens or structures with movable doors (hinged or sliding) are installed. Products of the first type are often made from removable panels. The choice in favor of a particular type of construction depends on the purpose of installing the screen.
Deaf stationary
Structures of this type are usually built from durable materials such as brick or metal. Such products provide additional support for the bath and endure external influences, including moisture. Among the disadvantages of stationary structures are the following:
- the load on the floor increases;
- reduced space in the bathroom;
- dismantling is impossible without destroying the structure.
Stationary structures are not installed under acrylic bathtubs.
Removable stationary
Structurally, this type of screens does not differ from the previous one. The difference lies in the fact that for the manufacture of these products, plastic panels are mainly used, which can be removed if necessary.
With hinged doors
The use of screens with hinged doors is justified in large rooms. Such designs provide convenient access to the space under the bathroom.
Model with sliding doors
Sliding panels are mounted on rails that are mounted along the bathtub and the floor. Similar designs are used in small rooms. The use of sliding panels is also justified by the fact that the material, if necessary, can be easily removed and replaced with a new one. The main disadvantage of these models is that when pressed, the panels immediately shift.
Materials and requirements for them
Do-it-yourself bath screen is made from:
- galvanized profile sheathed with sheet material:
- moisture resistant drywall;
- moisture resistant or laminated plywood with a thickness of at least 10 mm;
- GVL (a good choice, as it is absolutely not afraid of moisture and does not deform);
- bricks;
- aerated concrete 50 mm thick;
- plastic panels and guides for their installation (this option is purely decorative, suitable only for cast iron or steel bathtubs).
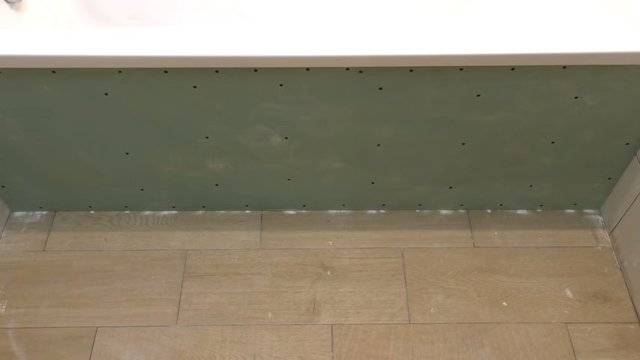
All of these designs, except for the last one, need finishing. Most often it is porcelain stoneware or ceramic tiles, the same as laid on the walls of the bathroom.
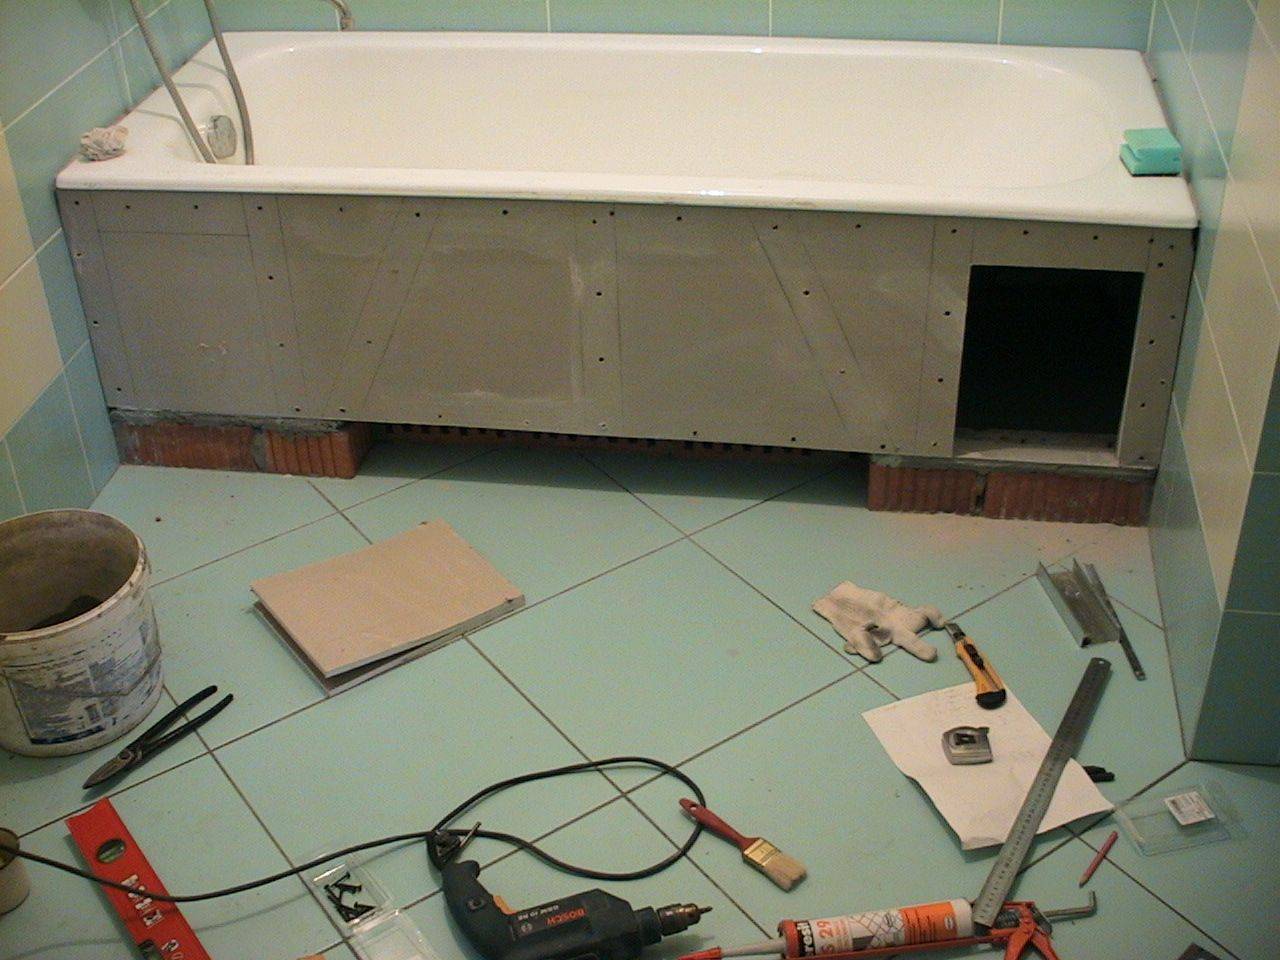
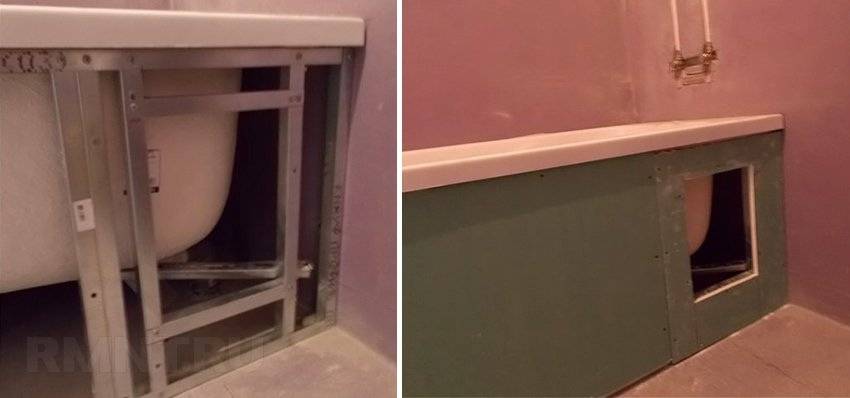
The most common version of a homemade bath screen is from profiles and drywall.In order for the structure to be reliable and not to bend under loads, the profile must be taken with a thick wall, it can be reinforced. Also a prerequisite is a good quality of galvanizing. If possible, you should take branded profiles so that there are no problems later - after all, high humidity in the bathroom is the norm.


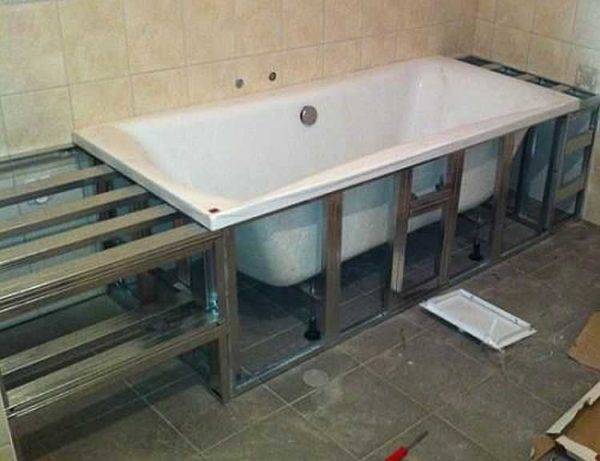
Frame made of galvanized profile for sheathing with sheet material
Sheet material for the frame must be moisture resistant. This is a prerequisite. And even in this case, before installation, it will not hurt to prime it with a composition that increases water-repellent properties. Not bad if this composition is also antibacterial - protection against mold and fungi will not hurt.
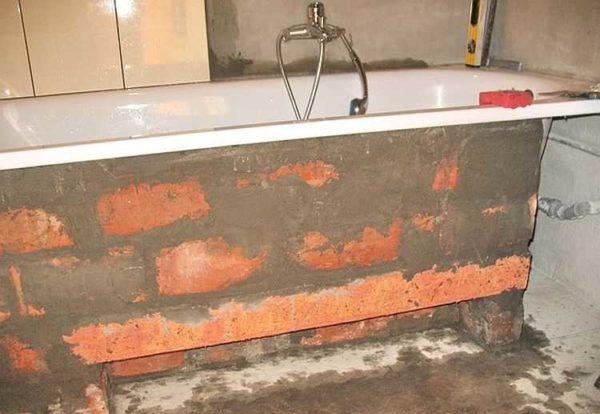
Brick screens are made mainly for acrylic bathtubs - so that part of the load can be transferred to a brick wall. Although, if desired, the profile frame can be made with sufficient bearing capacity - to make double reinforced racks.
If it is decided to make a screen for a brick bath, it must be used ceramic, red. Silicate is better not to take because of its hygroscopicity. Ceramic brick is also hygroscopic, but its absorption capacity is less. To minimize possible problems (painting from high humidity), it is desirable to cover the masonry from the inside with a layer of plaster. This is not easy, but if desired, it is possible to apply the solution as the screen is erected. Special care is not required, the main thing is to protect the brick from moisture.
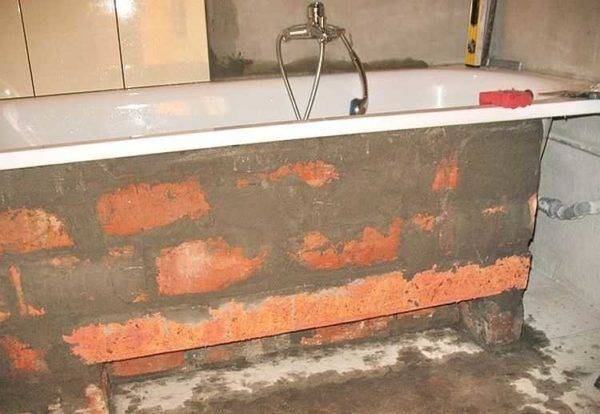
Brick bath screen ready for tiling
Another version of the screen under the bath, which you can do with your own hands - from aerated concrete. This material is easy to process. The required relief is formed easily, even with a sharp piece of iron, and the block is cut with an ordinary saw.For all that, the blocks have a good bearing capacity. So this material can be used for homemade acrylic bathroom screen. In addition, the blocks are large, so this small wall is formed very quickly.
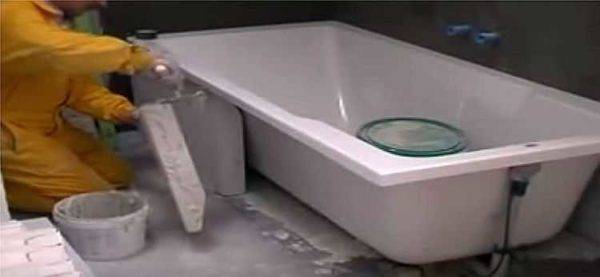
Laying the screen under the foam concrete bath
Note! In the photo above you see a block worked on one side. This is done so that after laying the tile, it is flush with the sides of the bathroom, and does not protrude outward. For the same purpose, during installation, the blocks are slightly recessed, leaving a gap equal to the thickness of the tile and tile adhesive.
For the same purpose, during installation, the blocks are slightly recessed, leaving a gap equal to the thickness of the tile and tile adhesive.
In the photo, the master keeps the underworked part pointing down, but when laying the block, they turn it over. In this position, glue is applied to its lower part, which fixes the block to the floor. Glue is applied to one more side face and to the top. This ensures fixation with the side of the bath and the previous block. The technology for making a screen for aerated concrete bath is simple, if you have at least some experience in masonry, you can handle it.
Criteria for choosing the type of screen for the bathroom
The screen in the bathroom is needed not only for decorative purposes, but also to protect the space under the bathroom from water leakage. Its presence causes the appearance of unpleasant odors and fungi. This means that when choosing a specific screen, stop at the option that completely eliminates the ingress of water under the bath. Water can get in not only during the adoption of water procedures, but also due to a breakthrough in pipelines.
The screen should hermetically close the space under the bathroom
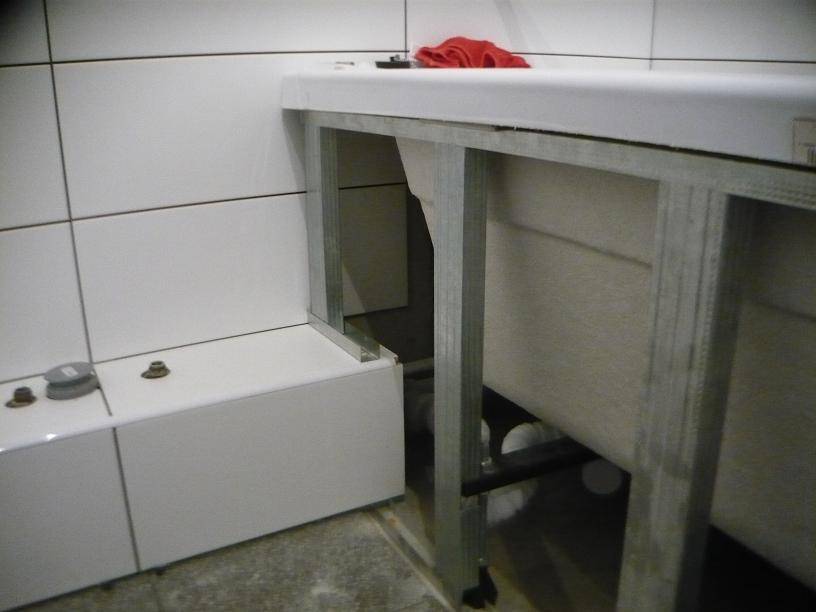
Do not forget to always provide access to the siphon, stopcocks and other utilities. Today's sanitary products and equipment guarantee many years of use if properly installed. Periodic cleaning of siphons is done by very effective means, there is no need to disassemble them, this relaxes plumbers a little. But some cleaning products, if the rules of use are violated, can raise the temperature to such values at which plastic pipes become soft, deform at the junctions and, as a result, leaks appear. In addition, small valuable jewelry can get into the siphon of the bath, you can get them out of there only after disassembling it. Conclusion - always consider access to the bottom of the tub when choosing a screen. While having a space for storing detergents under the bathroom is voluntary, emergency access is a must for all bath screen options.
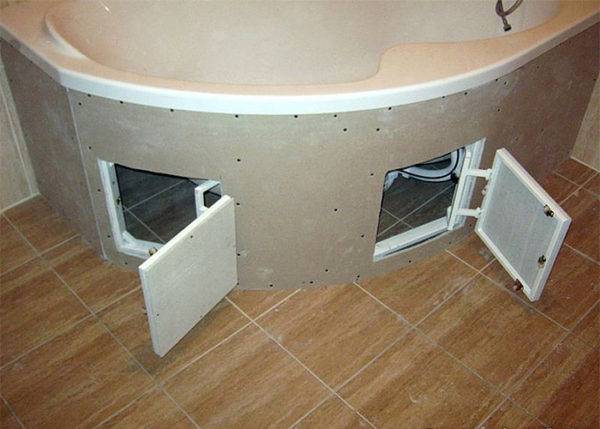
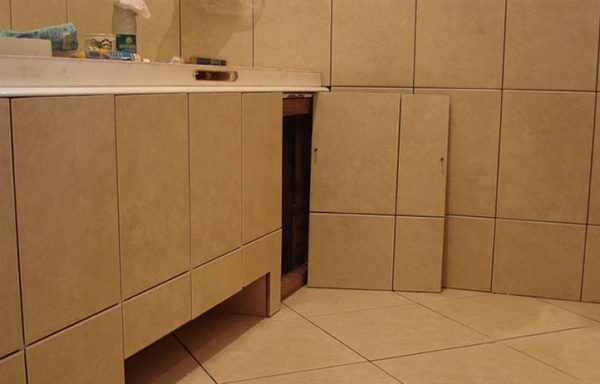
It is important to provide an inspection hatch
Screen with inspection hatch
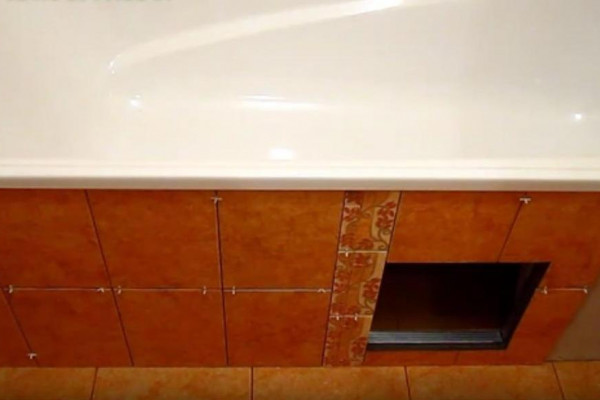
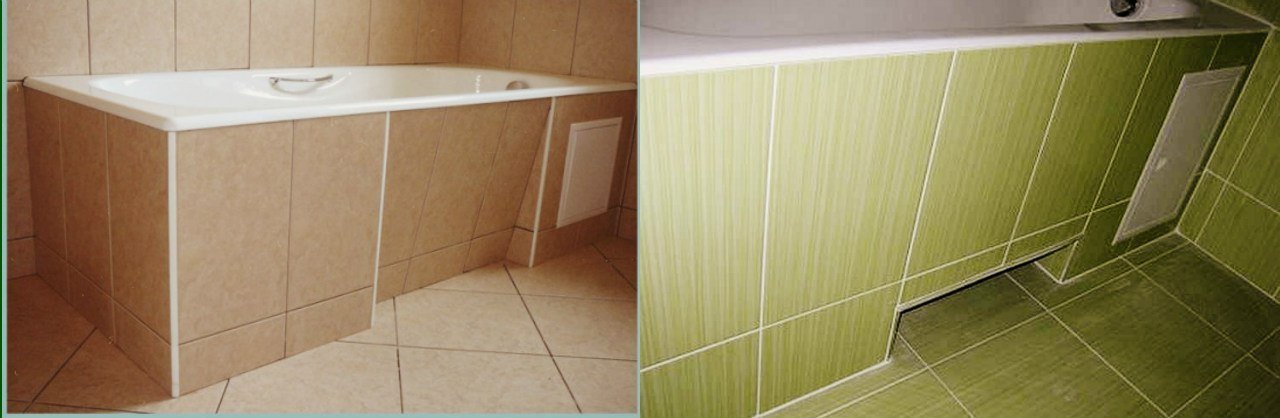
The screen should be as strong, durable, beautiful and easy to clean as possible. These conditions are best met by ceramic tiles, all other materials, including plastic, are significantly inferior to it. But ceramic tiles can be laid both on solid brick surfaces and on drywall boards. We strongly advise you not to use drywall for the manufacture of screens, according to professionals, this is the worst possible option.


Screen with ceramic tiles
Mosaic bathtub
Conclusion - a screen made of bricks or foam blocks, finished with ceramic tiles, is considered optimal.The availability of access for revision and storage of bathroom accessories in this option is provided.
Foam block screen with cladding
And the last. Only this option can be used for acrylic bathtubs, they are so fragile that even with a slight load they change their shape. All screens, except for stationary brick or block ones, are extremely negative about any fluctuations in linear dimensions. For example, we will take the most successful option for a bathroom screen - from foam blocks with ceramic tiles.
If not drywall, then what?
The bathroom screen can be assembled in other ways. A beautiful and fairly durable product is assembled using decorative bricks. Such a design should be assembled at the initial stages of repair, when there is already a ready-made concrete screed on the floor, but the floor covering has not yet been laid. The brick screen is assembled by means of masonry. To assemble the product, a solution is used (a part of cement to six parts of sand). To perform such work requires the skills of a bricklayer.
When laying bricks, it is necessary to immediately provide for the presence of technical holes (holes for ventilation, for installing an inspection hatch or a niche for legs). Their installation occurs by removing part of the bricks from the masonry.
There are two ways to subsequently decorate a brick screen. Masonry can be covered in several layers with moisture-resistant varnish and leave its natural texture. The masonry can be plastered, and then any tile material can be put on its surface. Laying tiles is allowed only after a week from the moment the assembly of the brick structure was completed. This period will allow the solution to dry well.If the temporary pause is not maintained, the tile will fall in a couple of days, since in the first days the brickwork shifts and shrinks.
A brick, even placed on an edge, still forms a fairly high load on the floors when assembling the structure. So if there is an alternative to minimize it, it should definitely be used
As an alternative, experts recommend paying attention to silicate tongue-and-groove boards. They are allowed to be used for lining bathrooms.
The described material is universal for assembling light ceilings; if necessary, silicate boards can be easily cut with a conventional hacksaw. The presence of a tongue-and-groove system makes it easy to assemble monolithic blocks. The plates are fastened together with special adhesives or gypsum plaster. A screen made of silicate boards requires subsequent decorative cladding. For its implementation, any tile material that can withstand moisture is suitable.
Removable structures
If necessary, it is always possible to install a removable screen under the bathroom. Its base is assembled from oriented strand boards. Due to the peculiarities of production and its internal structure, the described material resists moisture well and is not afraid of it. The front side of such a screen must be tiled. Adjustable legs are mounted on the bottom. It is they who allow the described product to be pressed tightly against the upper side of the bathtub bowl after installation and securely fix the entire decorative structure.
Screen range
The space available under the bathroom can be completely abandoned or made into a place for storing various household items.It is covered with a screen consisting of a durable aluminum, steel or polymer frame and a panel that is attached to it.
The range of these products is huge, especially for decorative design. On sale there are models of different shapes and textures, plain and decorated with photo printing.
Depending on the design features, screens are made:
- sliding;
- stationary deaf;
- removable;
- with doors - hinged and folding;
- with technological hatch;
- with shelves.
Their canvas is:
- solid;
- lattice.
As a result of installing a lattice-type screen under the bathroom fixtures, air exchange improves, an unpleasant smell and mold do not appear there.
Most of the factory-made models are equipped with adjustable legs. Due to their presence, a gap is formed between the floor covering and the lower edge of the screen, allowing a person to stand close to the bath. The length of the structure is standardly 150 - 170 centimeters, and the height is 50 - 60 centimeters, but other sizes are also available in the assortment.


Depending on the material of manufacture, these products are:
- Plastic. Among their advantages is a wide variety of colors and textures. Such products are easy to clean from various contaminants, they are not deformed, and retain their original appearance for a long time. There is nothing difficult in such a job as installing a plastic screen under the bath. Of the minuses, it should be noted insufficient mechanical strength and instability to chemicals and abrasives.
- glass. Plexiglas products look original and impressive. On sale there are options in matte and mirror versions, with painting, with a corrugated surface and other decor.The material is characterized by durability, strength, high resistance to abrasion and the influence of detergent compositions. The disadvantages include high cost, high weight. Compared with plastic products, the process of installing a Plexiglas screen under a bathroom is more complicated.
- From MDF. Such products have a wide selection of colors, affordable cost, it is easy to mount. Screens made of this material are easy to clean from dirt, they do not need special care, they will suit any style of the room. But there are also disadvantages - a tendency to deformation, a short service life, a limited number of sizes.
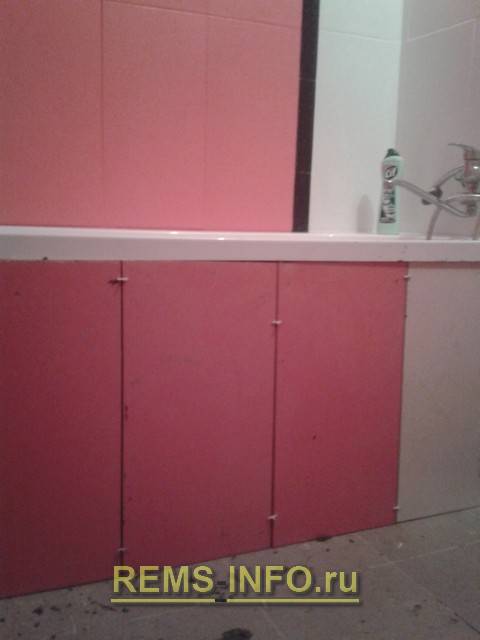
- From drywall. The most popular option for making a screen with your own hands. Drywall can be easily adjusted to different sizes and shapes of plumbing fixtures. It is light weight and long lasting. The work related to how to install a plasterboard screen under the bath takes a lot of time and requires a mandatory decorative finish.
Before starting the installation of most models, it is necessary to assemble the frame along the perimeter of the bath. It is most often made from aluminum profiles and much less often from wooden bars. Before you install a screen made of lightweight plastic for the bath, you do not need to make a frame, since it is attached directly to the side of the plumbing.
In some cases, the space is covered with brickwork, after which it is faced with mosaics or tiles.Experts recommend leaving an emergency hatch in such a wall for repairing communications in the event of an accident, so that you do not have to disassemble it. The design created in this way looks great and is reliable, but the workflow, how to put the screen under the bath, is time-consuming and eliminates the use of space for domestic purposes.
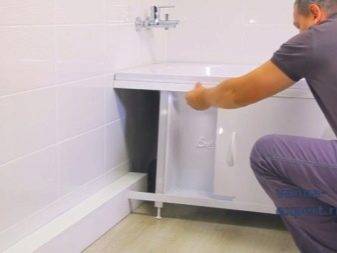
Installation of the finished apron under the bath
If funds allow, there is no desire to make a screen yourself, you can purchase a factory model. When choosing it, you must take into account the shape and size of the bath. Installation of the finished product requires a minimum of time and effort.
Necessary materials and tools
To perform installation work, you will need the following tools and materials:
- building level;
- measuring instruments;
- screwdriver;
- open-end wrench;
- fasteners;
- finished screen.
Preparing for installation
Before installing the screen under the bath, it is necessary to complete all the repair work in the room, connect the water supply and sewerage. If the font has already been in operation, then dust and dirt can collect under it, which must be removed.
When the preparation for installation is over, before starting the installation of the panel, check its completeness.
The standard model includes:
- racks and guides;
- legs;
- fasteners;
- plugs;
- panels;
- handles, if there are doors;
- assembly instructions.
Step-by-step instruction
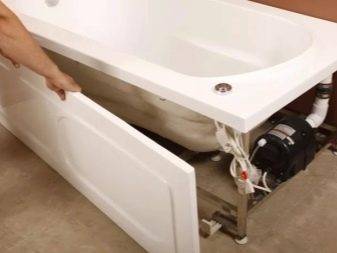
It is not difficult to install a ready-made screen on your own, for this you need to follow these steps:
- Unpack the product and place it on the side of the bath.
- Bring the upper edge into the recess located on the edge of the bowl.
- Set the wall in a vertical position, for this use the level.
- Fix the top of the apron with expansion bolts.
- Install legs. This can be done outside or inside - it all depends on the chosen model.
- Once again check the verticality of the installation and adjust the height of the legs to securely fix the panel.
- Screw the handles to the doors, check their performance.
Why make a screen under the bathroom
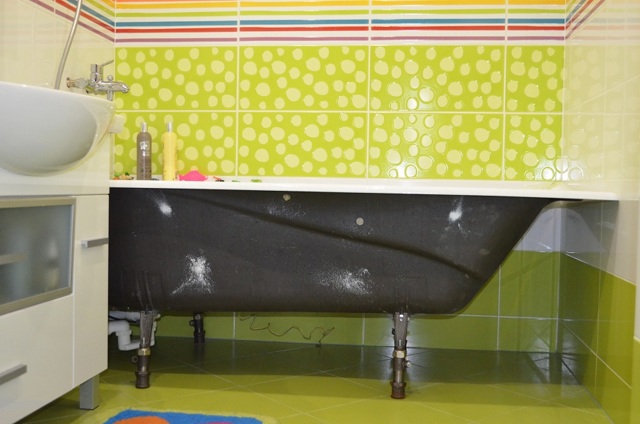
The walls and floor in the bathroom are tiled, and plumbing is installed in its place and connected to communications. Everything looks great. The only problem that spoils the view is the space under the bath from its side down.
In order for the interior of the room to look harmonious and complete, it is necessary to somehow close the bath itself and the pipes connected to it.
The main task of the decorative screen under the bathroom is to cover the unpresentable-looking legs and the outer side of the bath from the eyes of the owners
If bathing sanitary ware is made of acrylic or plastic, then in most cases it looks quite decent from the outside. And cast iron or steel products, on the contrary, do not please the eye. They must be decorated on the outside, otherwise the bathroom will not look too neat.
Housewives often store detergents and other household goods under the bathroom. All this, as well as communications, should preferably be covered with a decorative screen. Such a screen is a great way to hide the excess and not too beautiful in appearance. All these jars, bottles, rags and pipelines will be securely hidden behind it from the eyes of people.
If the bathroom is tiled, then the screen under the bathtub is also recommended to be made from it. So the design of this room can be arranged in a single completed style. The main thing when installing this decor is not to forget about the need to have access to communications.A hatch will need to be made in the screen, through which, in case of leaks, it will be possible to get to the pipes for their repair.
Installation methods
Self-installation of the finished screen is carried out using a tape measure, a building level and a screwdriver. Factory models are already equipped with fasteners and fittings, so additional purchase of screws and self-tapping screws is not required. Before installation, the bath must be filled with water. This applies to bathtubs installed earlier. If the screen and bath are installed at the same time, then this is not necessary.
Initially, you need to measure the space under the bathroom and mark the places where the frame is fixed. Then, exactly following the sequence of fixing the parts specified in the instructions, you should install the frame. Then you need to adjust the legs. To do this, they must be unscrewed so that the fixation of the frame between the side of the bathtub and the floor surface is maximum. In order for the frame not to dangle, it is recommended to apply a thin layer of sealant under the legs and press them firmly to the floor. After making sure that the frame is securely attached to the floor, the gap between the frame and the side of the tub should be foamed. Thanks to this procedure, the structure will acquire additional rigidity and stability.
The next stage includes the installation of decorative panels, hanging the doors with a swing system, and installing them in a guide chute with a sliding system. Then you need to screw the handles to the doors and process the seams with a sealant. If it is not possible to purchase a finished model, then you can assemble and install a protective screen with your own hands. The easiest way is to make a screen from drywall sheets and a galvanized aluminum profile with a section of 75x40 and 60x27 mm.The design is a compartment door that moves along the gutters of the W-shaped profile.


Installation and installation are carried out using a building level, a ruler, self-tapping screws for metal, dowels, a drill and metal shears. Initially, you should clean the space under the bathroom from construction debris and make sure that communications are in good condition. Next, you need to install the frame from the profile and mount the W-shaped guides on it. The distance between the top bar of the frame and the bathtub should be foamed.
Drywall door panels are cut in such a way that they overlap each other in length. The cut sheets are then inserted into a frame frame made to fit the doors and inserted into the gutter. Excess foam should be cut off with a utility knife. The last stage of installation is the decorative finishing of drywall with tiles, screwing the handles.