
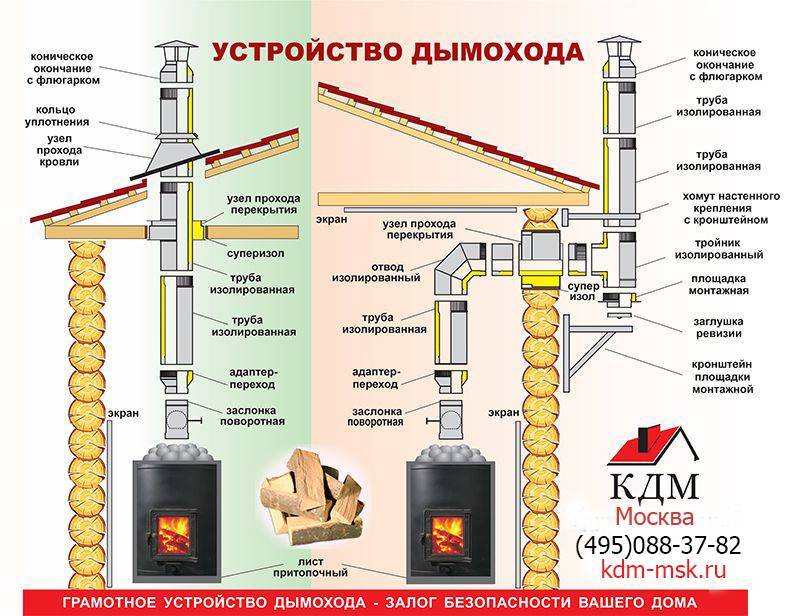
- General installation rules
- Advantages
- Stages of work
- metal surfaces
- brick chimneys
- Ceramic pipes
- Reinforced concrete
- Classification of chimney structures
- Mounting Features
- Why is the chimney clogged
- Chimney installation principles
- Benefits of a brick chimney
- Sealing the chimney from the side of the street
- Steel chimney - the choice of metal and design
- Conditions for normal operation
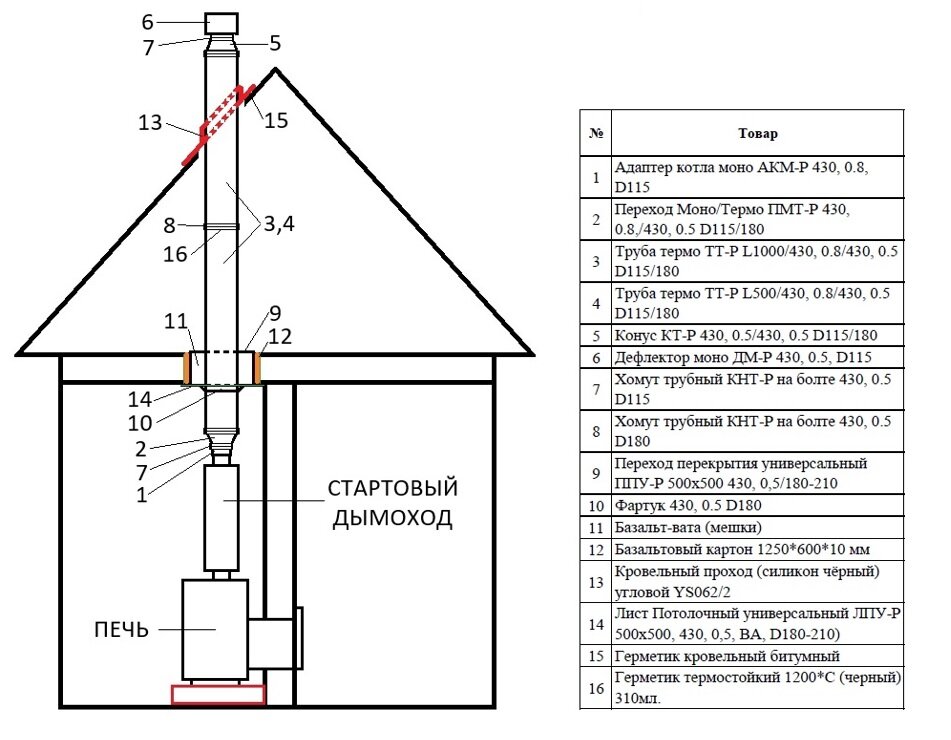
- We install a sandwich chimney in the bath in stages
- Stage I. We connect the elements of the chimney
- Stage II. Option 1. We pass the chimney through the wall
- Stage II. Option 2. We pass the chimney through the roof
- Stage III. We fix the chimney
- Stage IV. End of installation
General installation rules
Finding out how to make your own chimney in the house, you need to focus on certain rules. So:
- Installation of elements is carried out strictly from the bottom up.
- The fastening of pipes to each other is carried out only according to the principle of installing the inner part in the next one. Thus, we will secure the chimney from condensate.
- The use of clamps is mandatory when fastening parts with tees, bends, and the like.
- Keep in mind that docking points cannot be placed in the area of responsibility of floors.
- Use brackets to mount tees.
- Fixings must be installed at least once every two meters.
- When mounting and fastening segments, check for deflection.
- Do not allow the pipe to come into contact with communications.
- When laying the channel in places of overlap, make indents of 150 mm. for insulated pipes, and 300 mm. for bare pipes.
- Do not allow the creation of "lying" areas, more than three meters.
Focusing on these rules, the question of how to build the right chimney will not cause serious concerns. In general, chimneys for a home may differ in parameters, however, most of the listed rules apply to everyone.
Advantages
With the advent of a large number of factory products for assembling galvanized steel chimneys, the need to make pipes with your own hands has decreased. However, homemade pipes allow you to reduce costs and choose the ideal diameter. In addition, they are used to equip gutters, so the ability to make pipes with your own hands is useful in everyday life. Metal chimneys in comparison with others have the following advantages:
- A light weight. Smoke exhaust channels made of homemade galvanized pipes weigh much less than brick or ceramic ones. Therefore, to install this type of chimney, it is not necessary to equip a foundation, the cost of pouring which exceeds the cost of material and installation work.
- Fire safety. According to building codes, steel chimneys are completely safe in terms of fire. High quality metal can withstand heating up to 900 degrees, so it is suitable even for solid fuel stoves and fireplaces.
- Low cost.Steel chimneys are the most democratic way of organizing smoke removal, the installation cost is several times lower than the installation of brick and ceramic counterparts.
- Easy assembly. A chimney made of galvanized steel is assembled without difficulty with your own hands according to the instructions, which saves money spent on hiring professional workers.
Stages of work
Having chosen what you can paint the pipe with, you should not immediately apply paint. It is necessary to carry out preparatory work and select the necessary materials. You may need:
- brush (if the pipe is large, you can use a roller);
- metal hard brush;
- acetone or other degreaser;
- primer;
- selected paint composition.
Further work will vary depending on what the chimney is made of. Chimneys are made from:
- metal;
- bricks;
- ceramics;
- reinforced concrete.
Before starting work, it is recommended, if possible, to stop the gas supply to the chimney and allow the pipe to cool down to ambient temperature. This will not only reduce injuries (the risk of getting burned on a hot surface) and the toxicity of the paint and varnish composition, but will also allow the dye to form a stronger film when it hardens.
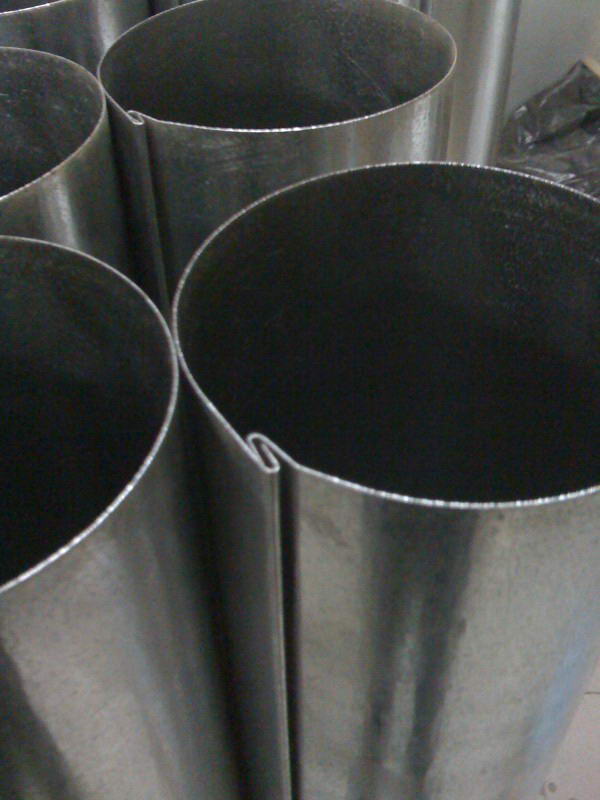
metal surfaces
Pipes are made mainly of stainless steel and have recently become the most popular in private homes. They are installed not only on gas boilers and columns, but also mounted on stoves made of bricks. Stainless steel chimneys are durable and comfortable. Their main advantage is ease of installation. But before painting stainless steel, the surface must be prepared. To do this, do the following:
- clean the metal from traces of the old coating, dust and other contaminants with a metal brush;
- thoroughly washed and dried;
- treated with a degreaser;
- an anti-corrosion mixture is applied (if the soil contains anti-corrosion additives, then this step can be omitted);
- after drying, the chimney is covered with 2-3 layers of primer.
Once the primer is dry, you can start painting. Staining is carried out around the perimeter and starts from the top.
Corrosion protection is of great importance for the service life of the chimney. At high operating temperatures and aggressive environments, the protective paint layer must be resistant to these harmful factors. Therefore, painting chimneys is a must.
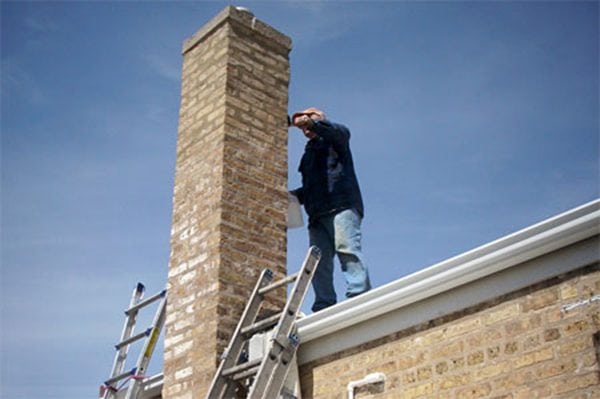
brick chimneys
Now brick is less popular, but until recently chimneys were mostly made of it. But how to paint a brick? First of all, the design must be prepared:
- tighten the loose bolts on the connecting clamps;
- remove old paint or lime;
- wash from soot, soot and dirt;
- restore the damaged layer of plaster (it is not necessary to change it completely, just apply the mixture to the damaged areas and wait for it to dry);
- apply a primer in at least 2 coats (more allowed).
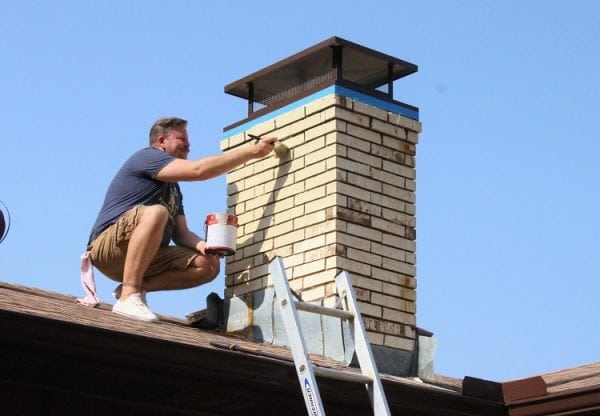
After the primer dries, you can paint. Paint on a brick is recommended to be applied in 2 layers to ensure greater strength and color saturation.
Ceramic pipes
This is a construction novelty, consisting of a ceramic pipe, a layer of insulation and a foam concrete or metal finish. It is considered the most heat-saving.
The method of painting depends on what the insulating layer is covered with:
- foam concrete is processed using the same technology as brick;
- the metal is painted in accordance with the rules for painting the metal base described above.
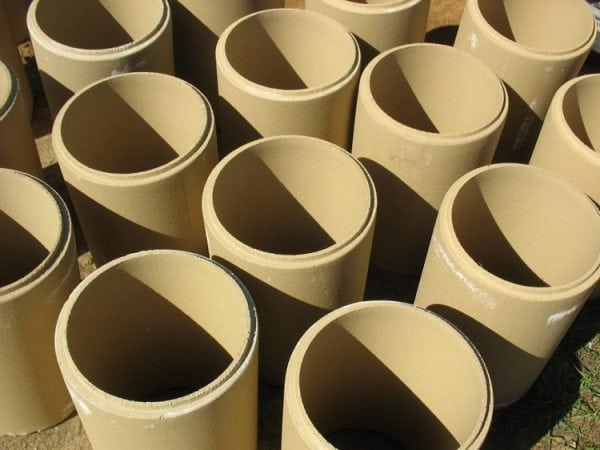
When choosing dyes for ceramic pipes, heat resistance does not play a big role, because the insulation layer reduces the heating of the outer surface.
Reinforced concrete
In private houses, reinforced concrete structures are extremely rare, most likely, it will be an industrial pipeline passing through the site, delivering gas or water to the house. You will have to choose a color for it not to your liking, but in accordance with the requirements of the marking color.


The process of protection and finishing is carried out in exactly the same way as when processing and applying paints and varnishes to a metal chimney. The main thing is not to forget about anti-corrosion treatment and degreasing, because the continuity of the supplied utilities depends on the safety of the pipeline.
If the paint is selected in accordance with all requirements and all stages of processing are followed, then after the composition has dried, a durable non-toxic film will be obtained that will protect the structure for 5-15 years. The term of protection depends on atmospheric influences, the internal temperature of the chimney and on the quality of the acquired paint and varnish.
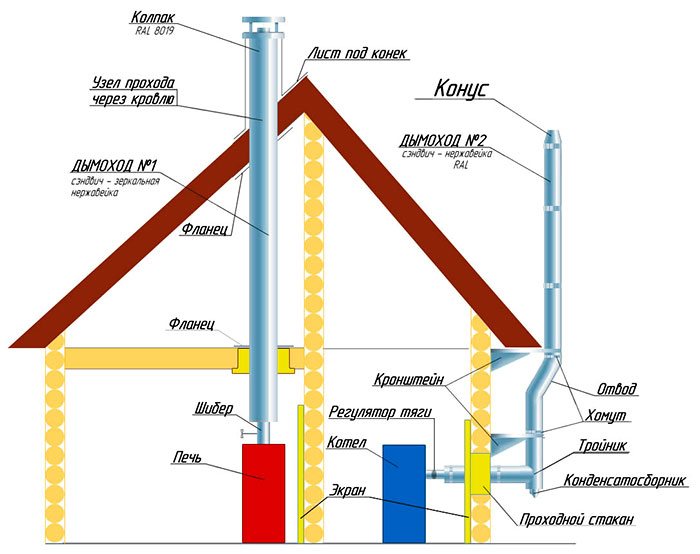
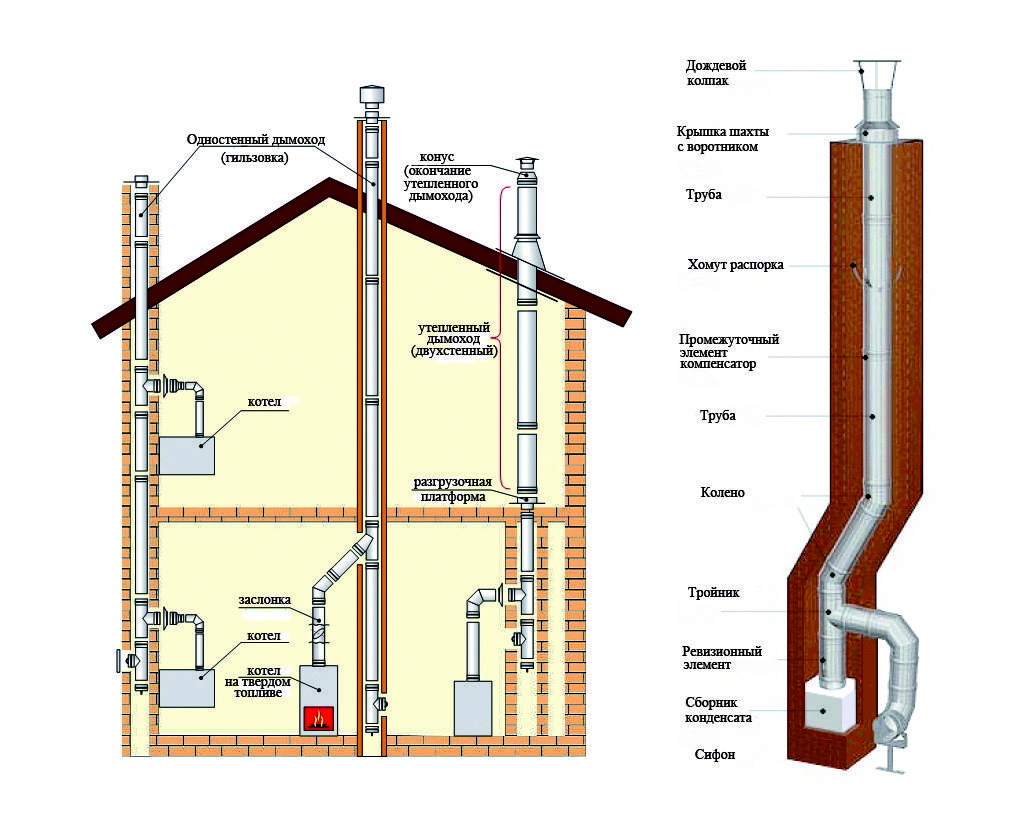
Classification of chimney structures
Before you install a chimney pipe through a wall, you should consider the types of construction. By design, it is single-walled and double-walled. The first option is made of sheet steel. It is inexpensive and suitable for installation in country houses, cottages. The disadvantage of the product is a short service life. For effective operation, the structure will have to be insulated.
Double-wall chimneys are sandwich systems that are recommended for installation in wooden houses.
The chimney is multi-layered and has low thermal conductivity, which is extremely important for flammable materials
According to the material of construction, there are:
- Brick. Often, their construction requires a foundation, and for proper masonry, certain building skills. This option is acceptable when building a fireplace in the house.
- Steel. Stainless material is cheap, but requires external thermal insulation. If this is not done, then condensate will accumulate inside the pipes, which will affect the quality of traction. More moisture can get into the furnace and extinguish the flame. It will be difficult to re-ignite the cauldron.
steel chimney
- Asbestos-cement. Such products are heavy and fragile. They require a foundation to install. Under the influence of hot gases and moisture, such products are destroyed faster.
- Ceramic. Such a chimney is able to withstand temperatures of more than 100 degrees, but needs thermal insulation and careful operation. Installation of such pipes is difficult, but they are expensive.
- From sandwich pipes. The preferred option for building a chimney on the street. For the production of the product, two pipes are taken, placed in each other. Between them there is a heat-insulating layer. The system is mounted simply and quickly.
When choosing a material, not only its technical characteristics are taken into account, but also decorativeness.
Mounting Features
During the installation of the chimney, it is recommended to follow a number of rules.
The basic rule is that all objects surrounding the pipe should be heated by no more than 50 ° C.Steel tends to heat up, therefore, when installing them, it is recommended to lay an additional layer of thermal insulation. This problem can be solved with ready-made sandwich systems.
The chimney must run at a safe distance from electrical wiring, gas pipes and trees.
Where the pipe passes through walls or roofs, there must be a thick layer of heat-resistant sealant between the pipe and the appropriate material. The same sealant is laid between the pipes at their joints.
When connecting, they are guided by another rule: one pipe must enter the other at a distance that is equal to the radius of the outer section of the pipes.
When assembling the structure, it should be borne in mind that the chimney should not have narrowing points, otherwise the aerodynamics of the pipe will suffer.
Horizontal sections should not be longer than 100cm.
In the lower part of the chimney, an inspection window is mounted - a removable nozzle. The upper part ends with a head with a spark arrester and a cone.
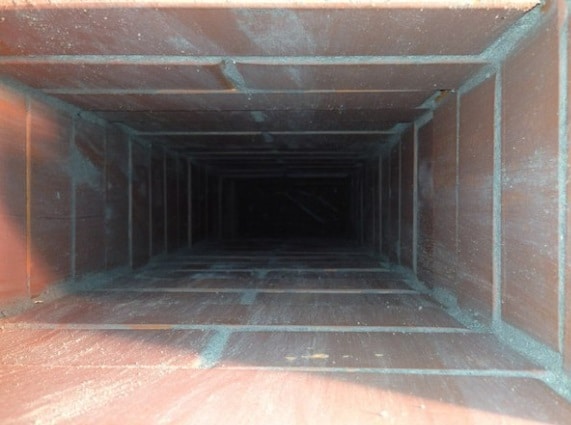
Why is the chimney clogged
Chimney clogging is a natural process that occurs as a result of combustion. Only part of the fuel, breaking up into fractions, acquires a gaseous form and goes out into the atmosphere as an emission.


Other fragments with a heavier, denser structure take the form of soot deposits and settle on the inner surface of the pipeline, over time significantly worsening its throughput.
The use of firewood from coniferous trees provokes clogging of channels. Viscous resinous substances, contained in excess in the composition, form a powerful adhesive base and help retain soot deposits on it.
Such contamination is difficult to prep clean and requires careful removal by means of mechanical devices.
Household garbage, packaging containers, remnants of old furniture, textiles and other items that are not a fuel resource by definition emit caustic ether complexes, heavy carcinogens and resinous compounds during combustion.
Therefore, burning in the furnace or fireplace of such human waste adversely affects the operation of heating equipment of any class.
All of them in the form of a dense, viscous sediment cover the inner surface of the pipes and create conditions for retaining soot, soot and soot. The channel through which the gaseous elements escape into the atmosphere narrows to a minimum, the draft overturns, and part of the smoke enters the living room.
The temperature in the room drops and the use of heating equipment becomes dangerous due to the risk of carbon monoxide poisoning.
They accelerate the clogging of the chimney channel with deposits of firewood from a recently sawn, damp forest.
A damp log reduces the level of heat transfer by 35%, contributes to the rapid clogging of the smoke exhaust system, and eventually disables it.
Sometimes an active accumulation of soot inside the pipe is provoked by errors that are accidentally or due to inexperience made in the process of laying the firebox and arranging the chimney for a fireplace or stove.
It could be:
- incorrectly calculated angle of inclination of the pipe;
- too thin walls of the drainage system;
- improperly selected chimney pipe;
- increased volume of condensate formed due to insufficient thermal insulation;
- excessive number of bends and turns of the chimney path;
- roughness on the inner surface of the outlet channels.
It is these reasons that accelerate the pollution of chimneys and several times reduce the efficiency of stoves, boilers and fireplaces. Homeowners are advised to be very careful in choosing stove-makers and contact only those who have already confirmed their skills and high qualifications.
Otherwise, with enviable regularity, the question will arise of how to clean a home chimney, giving you a lot of trouble and requiring constant financial costs.
Chimney installation principles
In a wooden house, each ventilated room and each firebox must have a separate ventilation duct.
In order for a certain draft to arise, which appears due to the difference in temperatures of the exhaust products of combustion and the environment, the chimney must be located at a certain height above the roof of the house. This standard cannot be applied to flue gas ducts that operate from heating boilers with a closed combustion chamber.
Do-it-yourself laying of the chimney of the furnace must be carried out in strict accordance with all the principles that are set forth in the regulatory documents.
They indicate that chimneys must be placed strictly in a vertical position. It is allowed to deviate pipes to the vertical at an angle of 30 degrees, but not more than one meter horizontally.


The cross section of these inclined sections should be constant, smooth. The height of the chimney is not less than five meters, it is considered from the mouth to the grate.
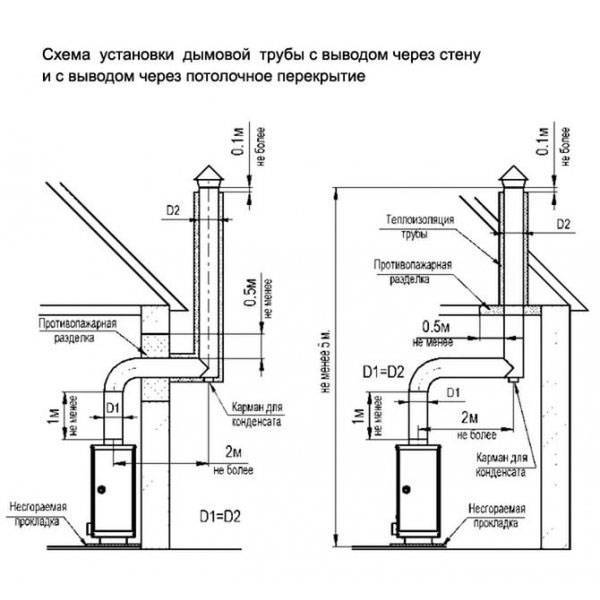
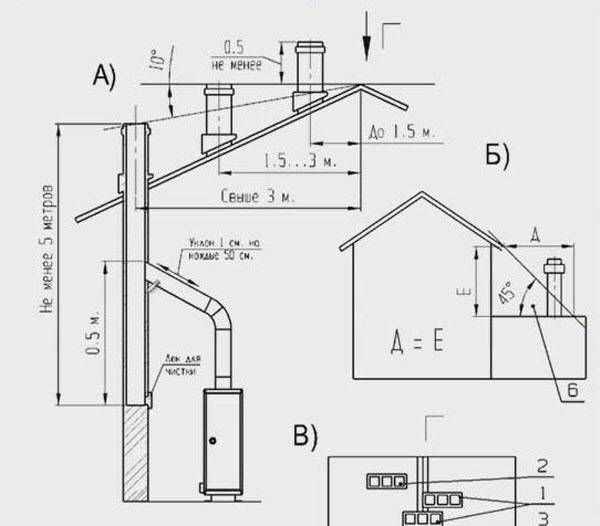
The chimney must be placed according to certain standards above the roof:
- For a flat roof of a wooden house, it is placed at least 0.5 meters;
- Above the roof ridge in a wooden house, if the chimney is located at a distance, then at least half a meter;
- Not lower than the roof ridge of a wooden house - if the chimney is located at a distance of 1.5-3 meters from the ridge;
- Not lower than the line drawn down from the ridge to the horizon at an angle of 10 degrees - provided that the chimney is located no less than three meters from the ridge.
Although the assembly of the chimney is not particularly difficult, it is necessary to take this procedure carefully, since mistakes made during installation often lead to very unfavorable consequences.
Chimney protection

Starting self-assembly, do not neglect fire safety measures.
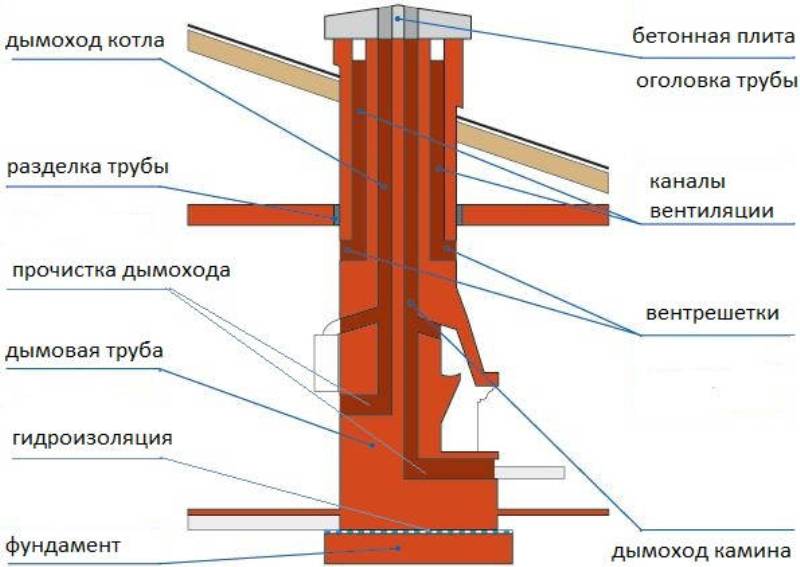
Benefits of a brick chimney
A chimney assembled from bricks is most often mounted on a stove, taking into account such advantages as:
- the ability of the material to resist fire;
- duration of operation;
- ease of laying bricks;
- no need for specialized maintenance;
- easy repair.
 The brick channel withstands high temperatures, but clogs relatively often
A brick chimney can also be characterized from the negative side: it is rough inside and therefore quickly becomes contaminated with soot, the accumulation of which adversely affects the traction force. The disadvantages of a chimney made of bricks also include a lot of weight, often requiring the stove to be placed on a separate base.
Sealing the chimney from the side of the street
When the main construction work is completed, the protective film is removed. Check the tightness of all joints, seams, joints.
When carrying out sealing, it is important to consider such nuances:
- At the point of transition from a single-walled pipe to a sandwich, all outer edges are processed along the circumference.
- When applied to the inside of the pipes, the outer part of the upper section is coated.When processing the outer part, the principle is similar.
It is recommended to use exclusively refractory sealant that tolerates temperatures of 1000 degrees and above.
The total length of the chimney from the grate is from 6 m.
Steel chimney - the choice of metal and design
Metal pipes for smoke extraction differ from each other in the type of steel and construction. The first point affects operation:
- Uncoated black steel - affordable, but not resistant to corrosion;
- Low alloy steel - relatively resistant to chemical reactions, therefore rarely rusted;
- Stainless steel is durable but expensive;
- Corrugated steel - accumulates soot, which quickly clogs.

The design of a steel chimney is:


- Typical single-wall - is a pipe that must be insulated during installation to prevent fire;
- Single-walled sleeved - located inside the brickwork, which makes the structure safe;
- Multi-level like a sandwich system - presented in the form of two pipes (internal and external) with pre-provided insulation and channels for condensate outlet.

Often, do-it-yourself chimney installation involves immersing one pipe into another.

Conditions for normal operation
The design must:
- effectively remove gaseous wastes of fuel combustion;
- be safe and comfortable at home;
- have good traction;
- withstand high temperatures;
- be protected from moisture and condensation;
- have resistance to external aggressive environment.
Chimneys can have a square and cylindrical shape, the latter is considered optimal, as it is less susceptible to the accumulation of soot and soot.
Other parameters that are also indicated by building codes:
- alloy steel parts produced for the installation of chimneys are distinguished by anti-corrosion qualities and have a thickness of 0.5 cm;
- the size of the pipe diameter must match the size of the furnace nozzle or be slightly larger than it;
- a chimney arranged for a brick oven is equipped with pockets that are located at the bottom of the chimney channels and have a depth of 20-25 centimeters. Doors are installed on them through which soot deposits are cleaned;
- a metal chimney cannot have more than 3 turns;
- the turning radius of a metal chimney cannot be greater than the diameter of the pipe;
- the pipe must have a height of at least five meters.
All these conditions will help to create normal draft in the chimney and effective removal of combustion products hazardous to health.
We install a sandwich chimney in the bath in stages
The installation of a sandwich pipe for a chimney itself is not difficult. Since sandwich pipes are as fireproof as possible, even a person who is very far from construction can connect and fix them correctly.


The "sandwich" chimney is mounted from the bottom up - from the stove to the roof, and the outer pipe must be "put on" the inner one. In general, there are several important points for mounting a sandwich. Let's take a closer look.
Stage I. We connect the elements of the chimney
When installing a sandwich chimney, pay attention to the fact that one of the ends of the pipe is always narrowed with a slightly smaller radius. It just needs to be inserted into the previous pipe
Due to the fact that soot almost does not accumulate in such a chimney, it is easy to remove condensate from it - and it is better to install special tees for this.
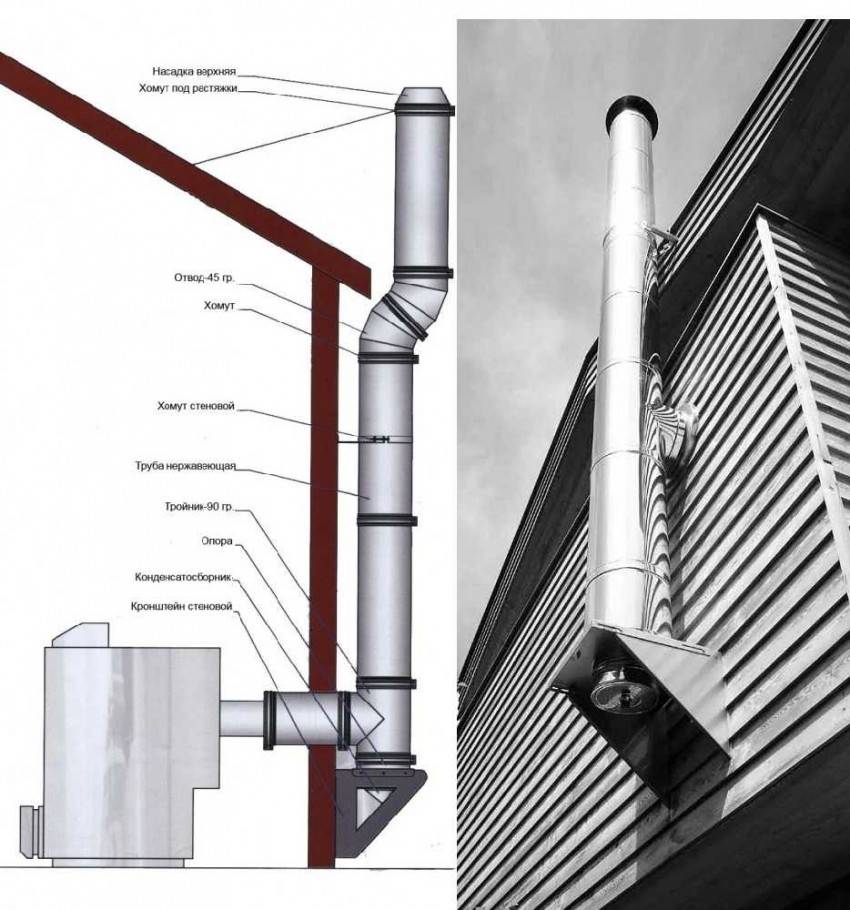
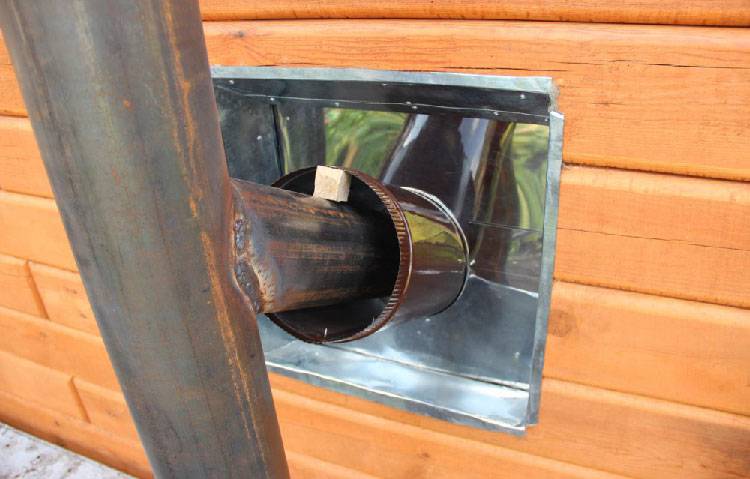
Stage II. Option 1. We pass the chimney through the wall
If the chimney will go through the wall, it will have to be disassembled and the seats under the bracket should be strengthened. Next, we assemble the outer bracket and attach two corners to it like skids - so that you can move the tee without any problems during the installation of the chimney from sandwich pipes, and nothing gets stuck.
The wall itself can be covered with plywood one centimeter thick and an asbestos sheet can be fixed with screws over its entire area. On top of that - a solid sheet of galvanized metal 2x1.20 cm. In the sheet itself, we cut a square hole for the passage and fix it with screws. Finally, we cover the bracket with metal varnish to protect it from corrosion. Next, we drill the desired hole in the adapter and put a sandwich in it.
They also use such a concept as a concession in the construction of a chimney - this is the space that we specially leave between the smoke channel and the wall.
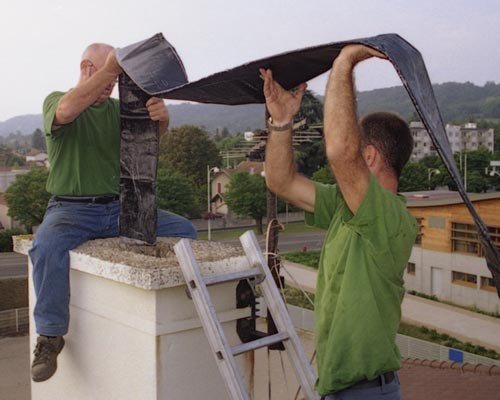
Stage II. Option 2. We pass the chimney through the roof
When passing a sandwich pipe through the roof, you must first take a galvanized steel sheet, attach it from the inside to the hole, and bring the pipe out. Only after that we attach the sheet to the roof. If necessary, it can be additionally brought under the edge of the roof.
If the roof is made of combustible materials, it must be protected from fire. And for this, on a chimney that rises above wooden tiles or bitumen, we install a deflector with a spark arrestor mesh with small cells.
Stage III. We fix the chimney
We fasten all tees, elbows and other elements with clamps, and we fasten the tee with a support bracket. If the upper part of the chimney remains loose, it is better to secure it. At least the same stretch marks of 120 degrees. Here is how you additionally need to fasten the butt joints: sandwich pipes to each other - with crimp clamps, pipes with other elements, such as adapters and tees - with the same clamps, but on both sides.
Stage IV. End of installation
After assembly is completed, be sure to remove the protective film from the pipes
The optimal length of the chimney is 5-6 m from the grate of the furnace to the head - pay attention to this. And seal all seams and gaps
To do this, you will need a heat-resistant chimney sealant that is rated for temperatures of at least 1000 ° C. You need to apply it like this:
- For inner pipes - on the outer surface of the upper inner pipe.
- For external pipes - on the outer surface.
- When switching from a single-walled to a double-walled pipe - outside, around the circumference.
- When connecting a single-wall pipe and other modules - as in the last version.
When everything is ready, be sure to check the most dangerous heating zones of the chimney for temperature. And so that later cleaning the chimney is simple and easy, it necessarily provides for an audit - this is a special removable part or a hole with a door.
Installation of a sandwich chimney is very simple and easy due to the simplicity of design and light weight - if you have already decided on the project and purchased the material, feel free to roll up your sleeves!


