- Step by step making a bed at home
- Frame and base assembly
- Headboard making
- Bed assembly
- Bunk bed design. Step-by-step instruction
- Preparation of material for the manufacture of a bunk bed
- Frame assembly
- Mounting racks
- Ladder installation
- The final stage
- Pros and cons of a children's bunk bed
- Do-it-yourself children's bed-house: drawings and options
- DIY baby crib photo
- What materials are they made from
- What are the advantages of handmade furniture?
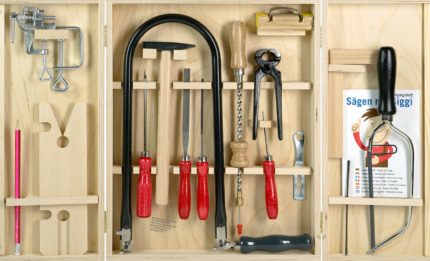
- Preparation of a working tool
- Natural ecology - wood
- The simplest wooden structure for children on chains
- Prices for the popular range of miter saws
- Prices for cordless drill/driver
- Manufacturing technology of iron bunk bed
- DIY step-by-step process for making a bunk bed
- Frame manufacturing
- Back
- Side rails and ladder
- legs
- Bunk bed decor
- Bed with wardrobe
- Staircase to bunk bed
- Upper bunk height
Step by step making a bed at home
Let us consider in detail the assembly at home of a simple single-sleeping single-tiered bed for a child made of wood. To do this, you will need boards, timber, slats, screws and bolts.
Frame and base assembly
The assembly of the frame is the easiest step. To do this, you need to cut the side faces in accordance with the drawing, connect them with each other with self-tapping screws so that a rectangular box with right angles is formed. You can check the evenness of the corners using a triangle.
 If the baby has a large physique, the parameters of the blanks can be changed upwards.
The base is made using rails, which are interconnected at a distance of five centimeters, and attached to the frame. After that, the sides are cut out, if they are provided. They need to be attached to the frame and base with self-tapping screws.
When the frame with the base is ready, you need to cover everything with varnish or paint. You can also use sheathing material - fabric, leather or something else.
 The rear and front sides are filled with slats, fixed with glue.
Headboard making
This process is a little more complicated. From a sheet of wood or chipboard, you need to cut out the headboard in accordance with the sketch and process it with sandpaper. Attach it to the frame and mark its correct position with a pencil. If necessary, saw off the excess, you can give it a more bizarre shape.
 Parts should fit tightly into each other, without any backlash.
Backrest decoration must be completed before it is attached to the entire frame. In order to attach it to the structure, you need to drill four holes and connect with bolts.
Bed assembly
The final stage is the preparation of the last parts and assembly. Cut four legs from a piece of timber and sand them with sandpaper. Attach to frame.
If desired, you can make boxes for storing things at home.To do this, you need to mount the boxes with a bottom and attach them to the side walls of the bed using treadmills. In this case, you do not need to make legs, you just need to make the footboard and headboard a little longer so that they touch the floor.
 Since the furniture is intended for the baby, all impregnations must be natural, not containing toxic and aggressive substances.
The assembly of the bed includes the connection of all constituent elements with the help of bolts and self-tapping screws. Carefully ensure that each of the elements must be processed with sandpaper.
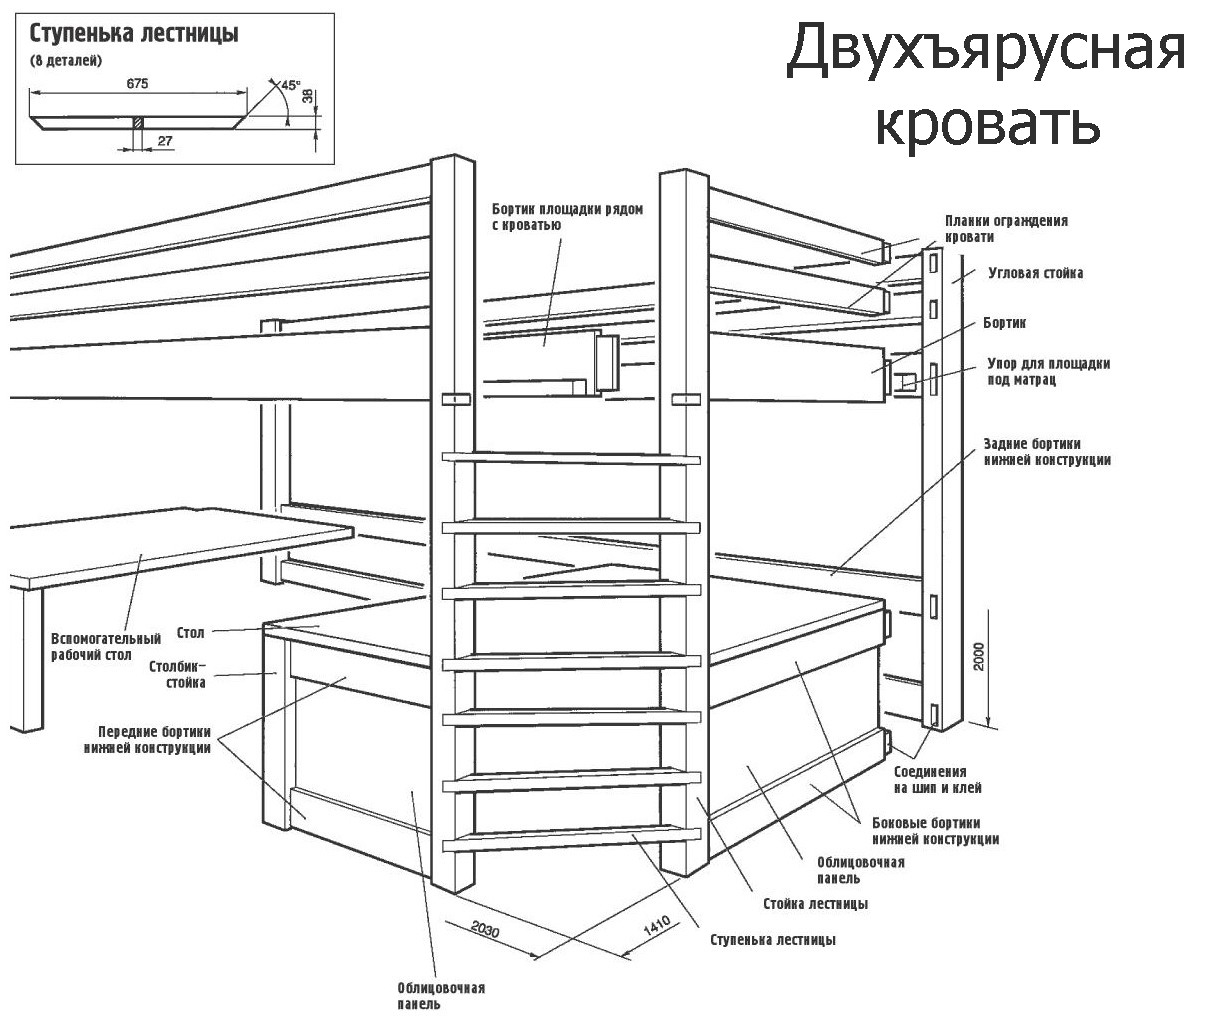
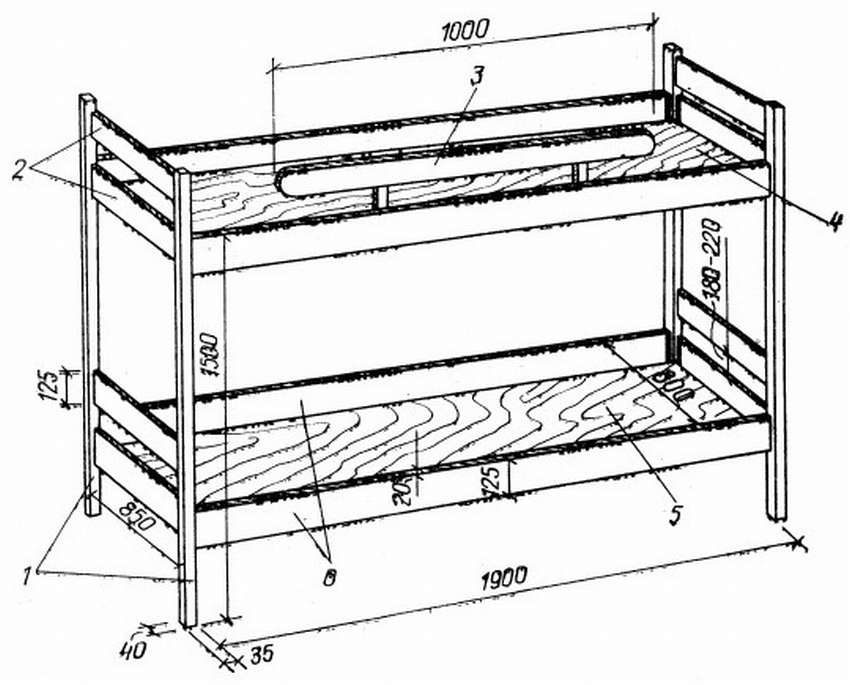
Bunk bed design. Step-by-step instruction
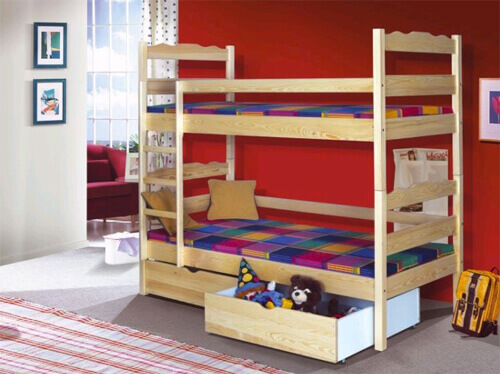
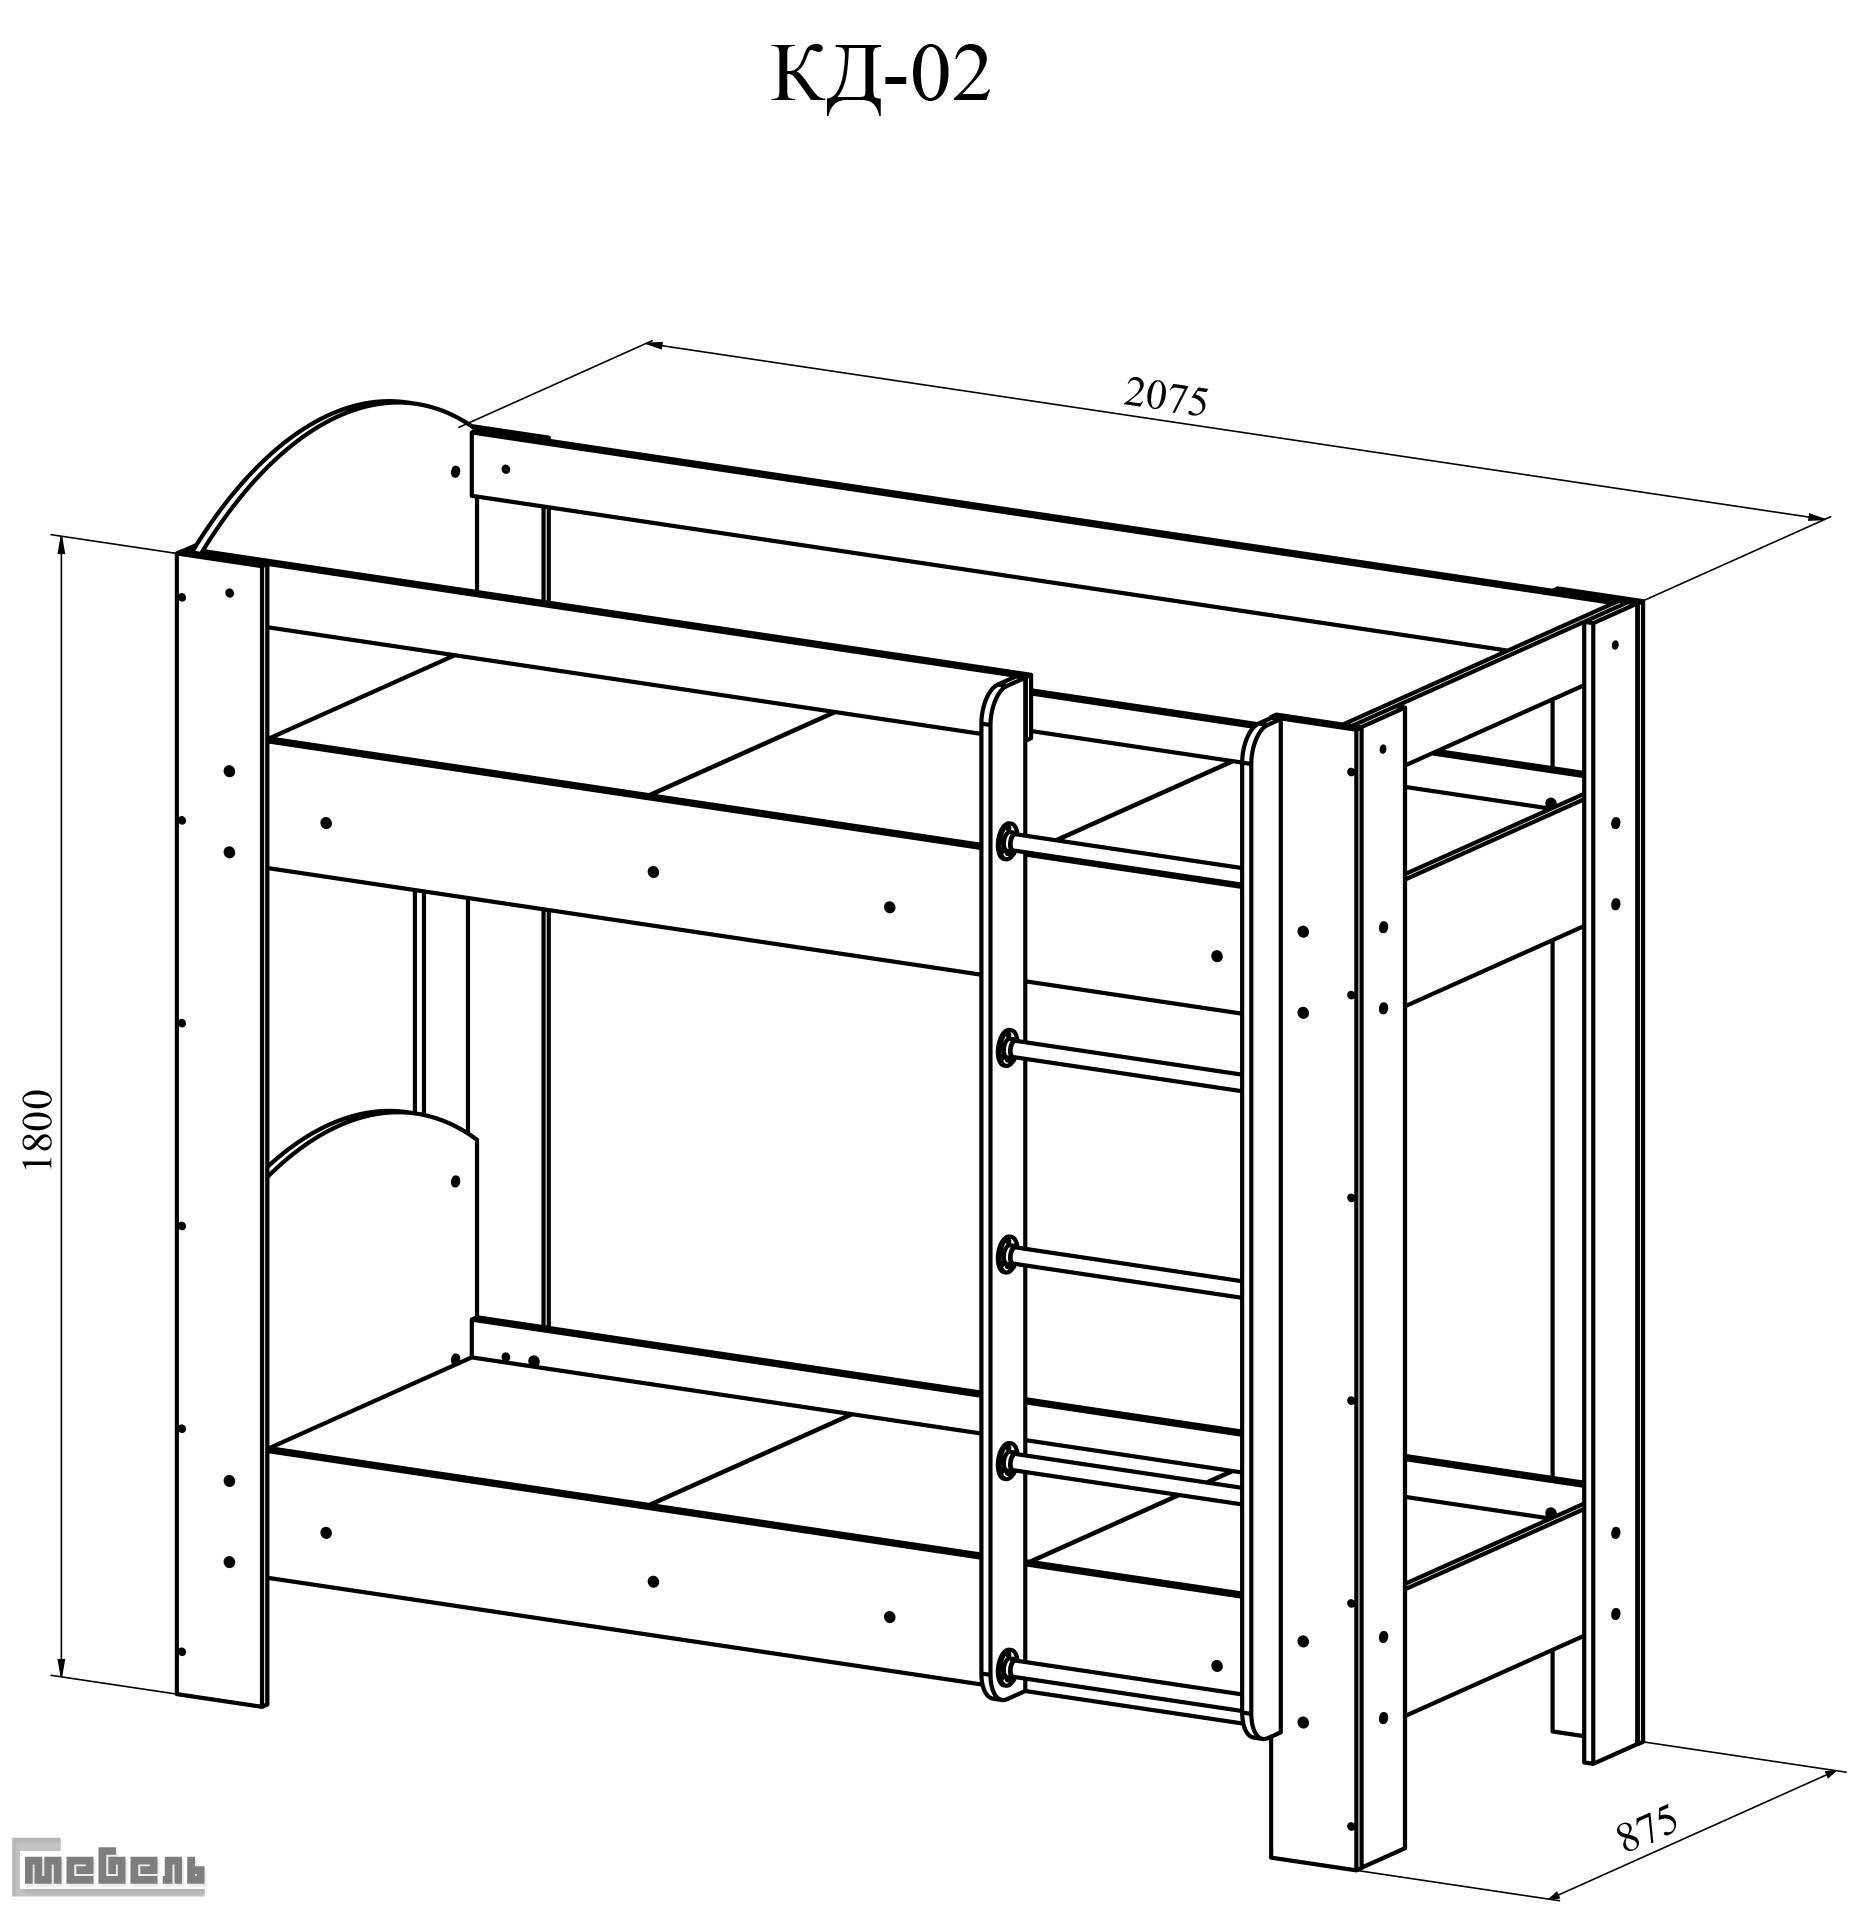
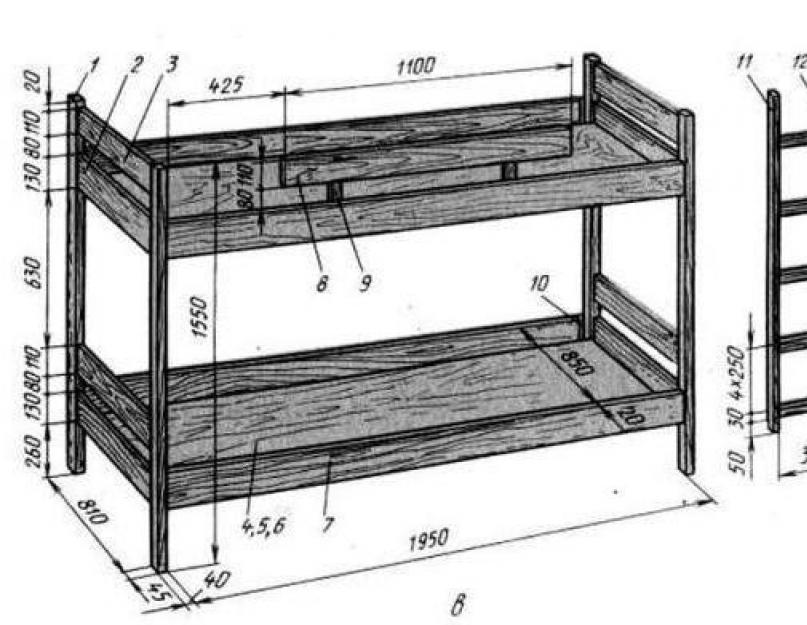
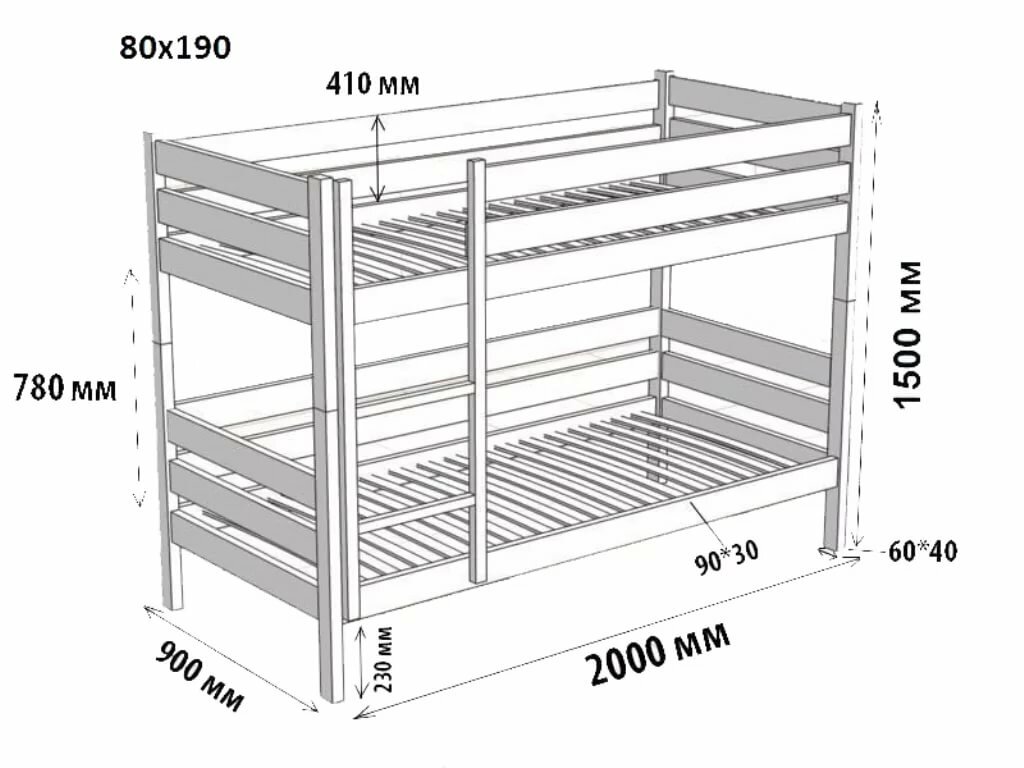
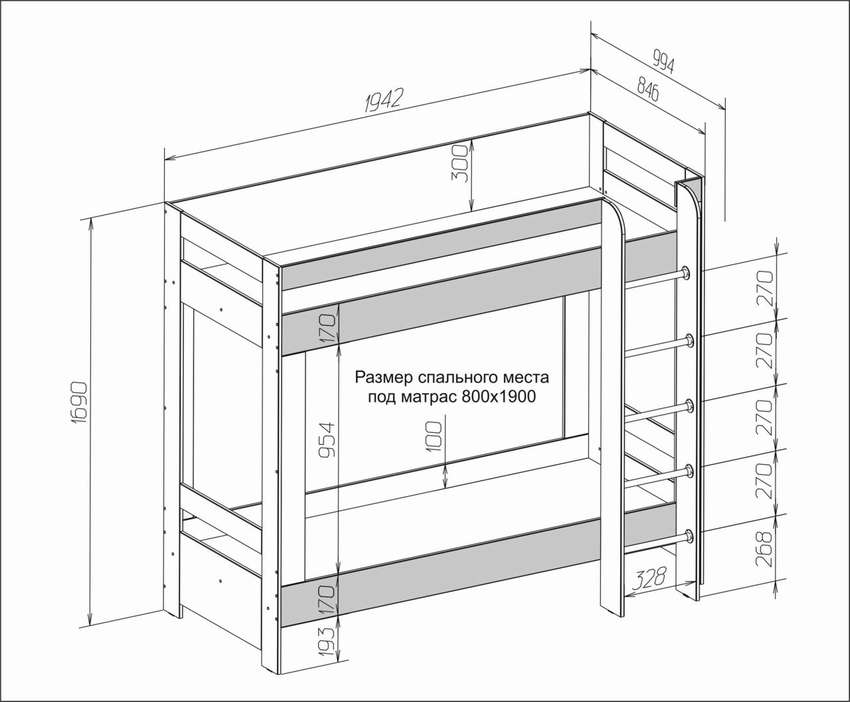
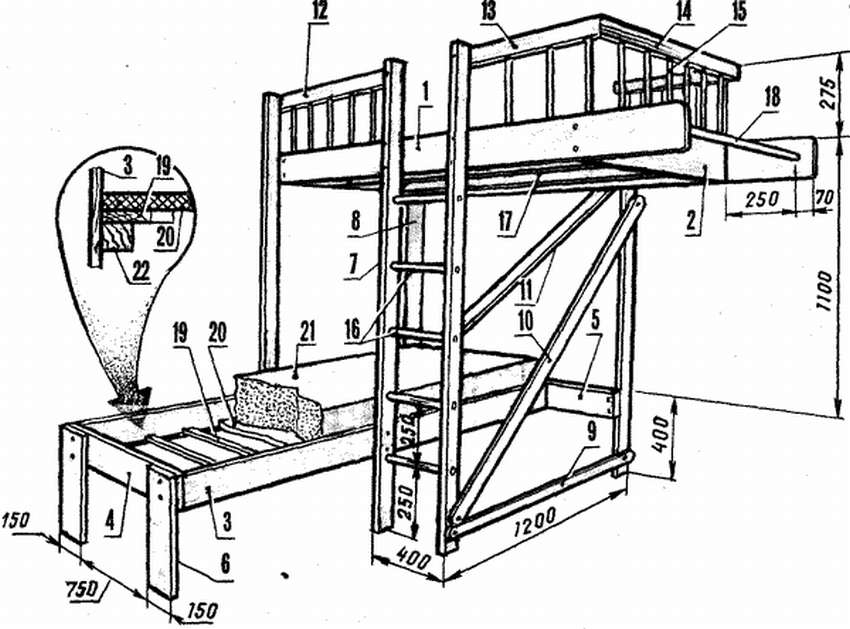
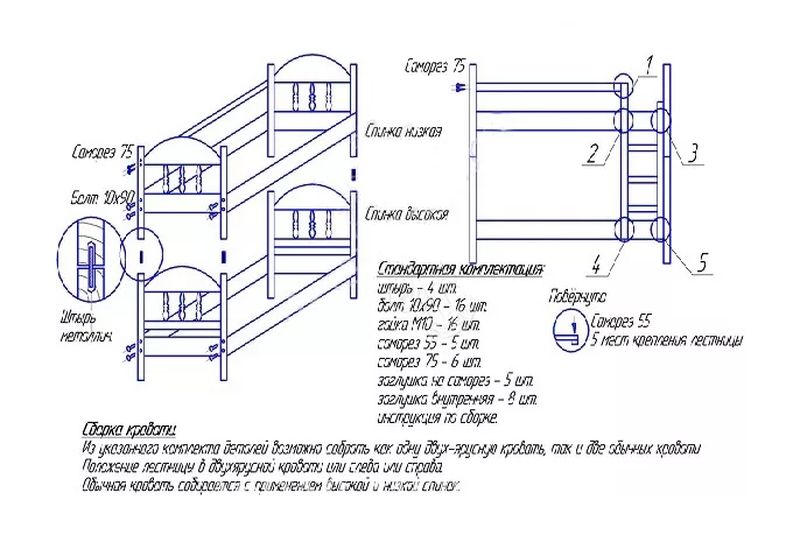
With a large number of children, many beds are needed. A wooden bunk bed will solve this problem. Before assembly, you need to draw a bed diagram indicating the dimensions of all elements. The height of the structure should be such that the upper tier is not under the very ceiling. Warm air rises here, because of which a sleeping child may experience discomfort. Drawings and diagrams are located below each process. Various options are being considered.
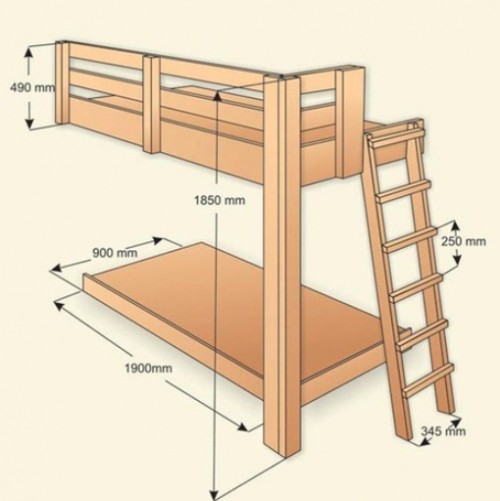
The free space from the floor to the mattress of the lower tier should be at least 40 cm. The distance between the tiers is 50-70 cm. The length and width of the standard children's model is 180x80 cm.
Preparation of material for the manufacture of a bunk bed
To assemble the bed, you need to prepare (dimensions):
- timber 50x50 mm for frames,
- boards 30x150 mm for racks,
- beam 40x40 mm for handrails and props,
- boards 20x200 mm (wood),
- steel corners,
- furniture bolts,
- self-tapping screws,
- wood oil.
All lumber before assembling the bed should be carefully sanded. Of the tools you will need a screwdriver, an adjustable wrench and a hacksaw.
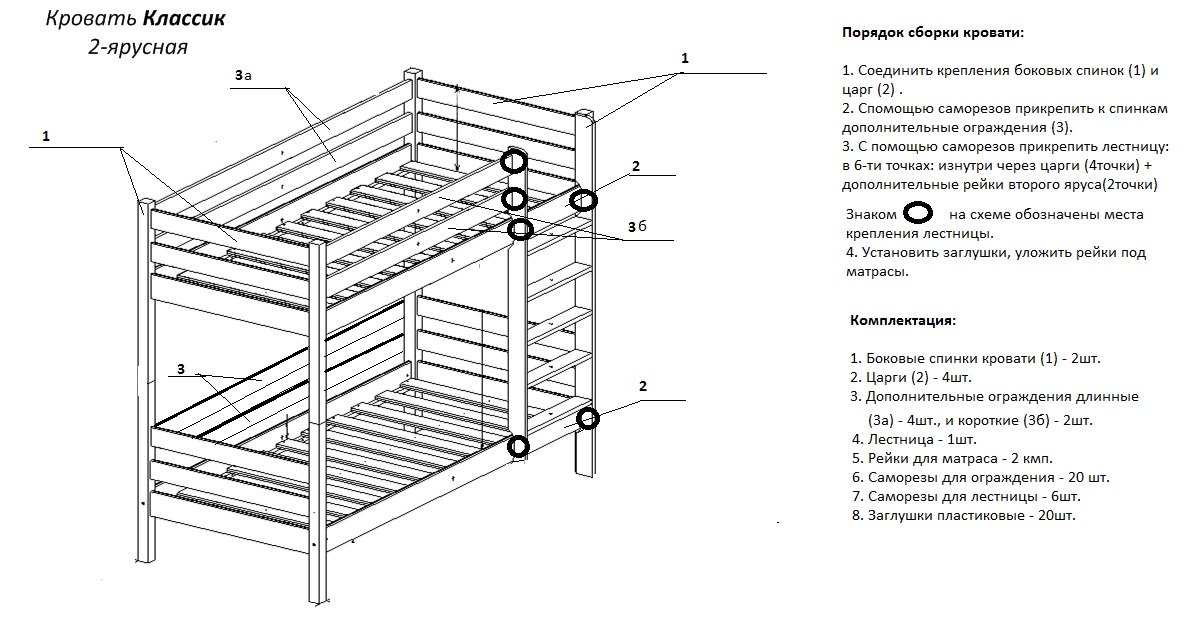
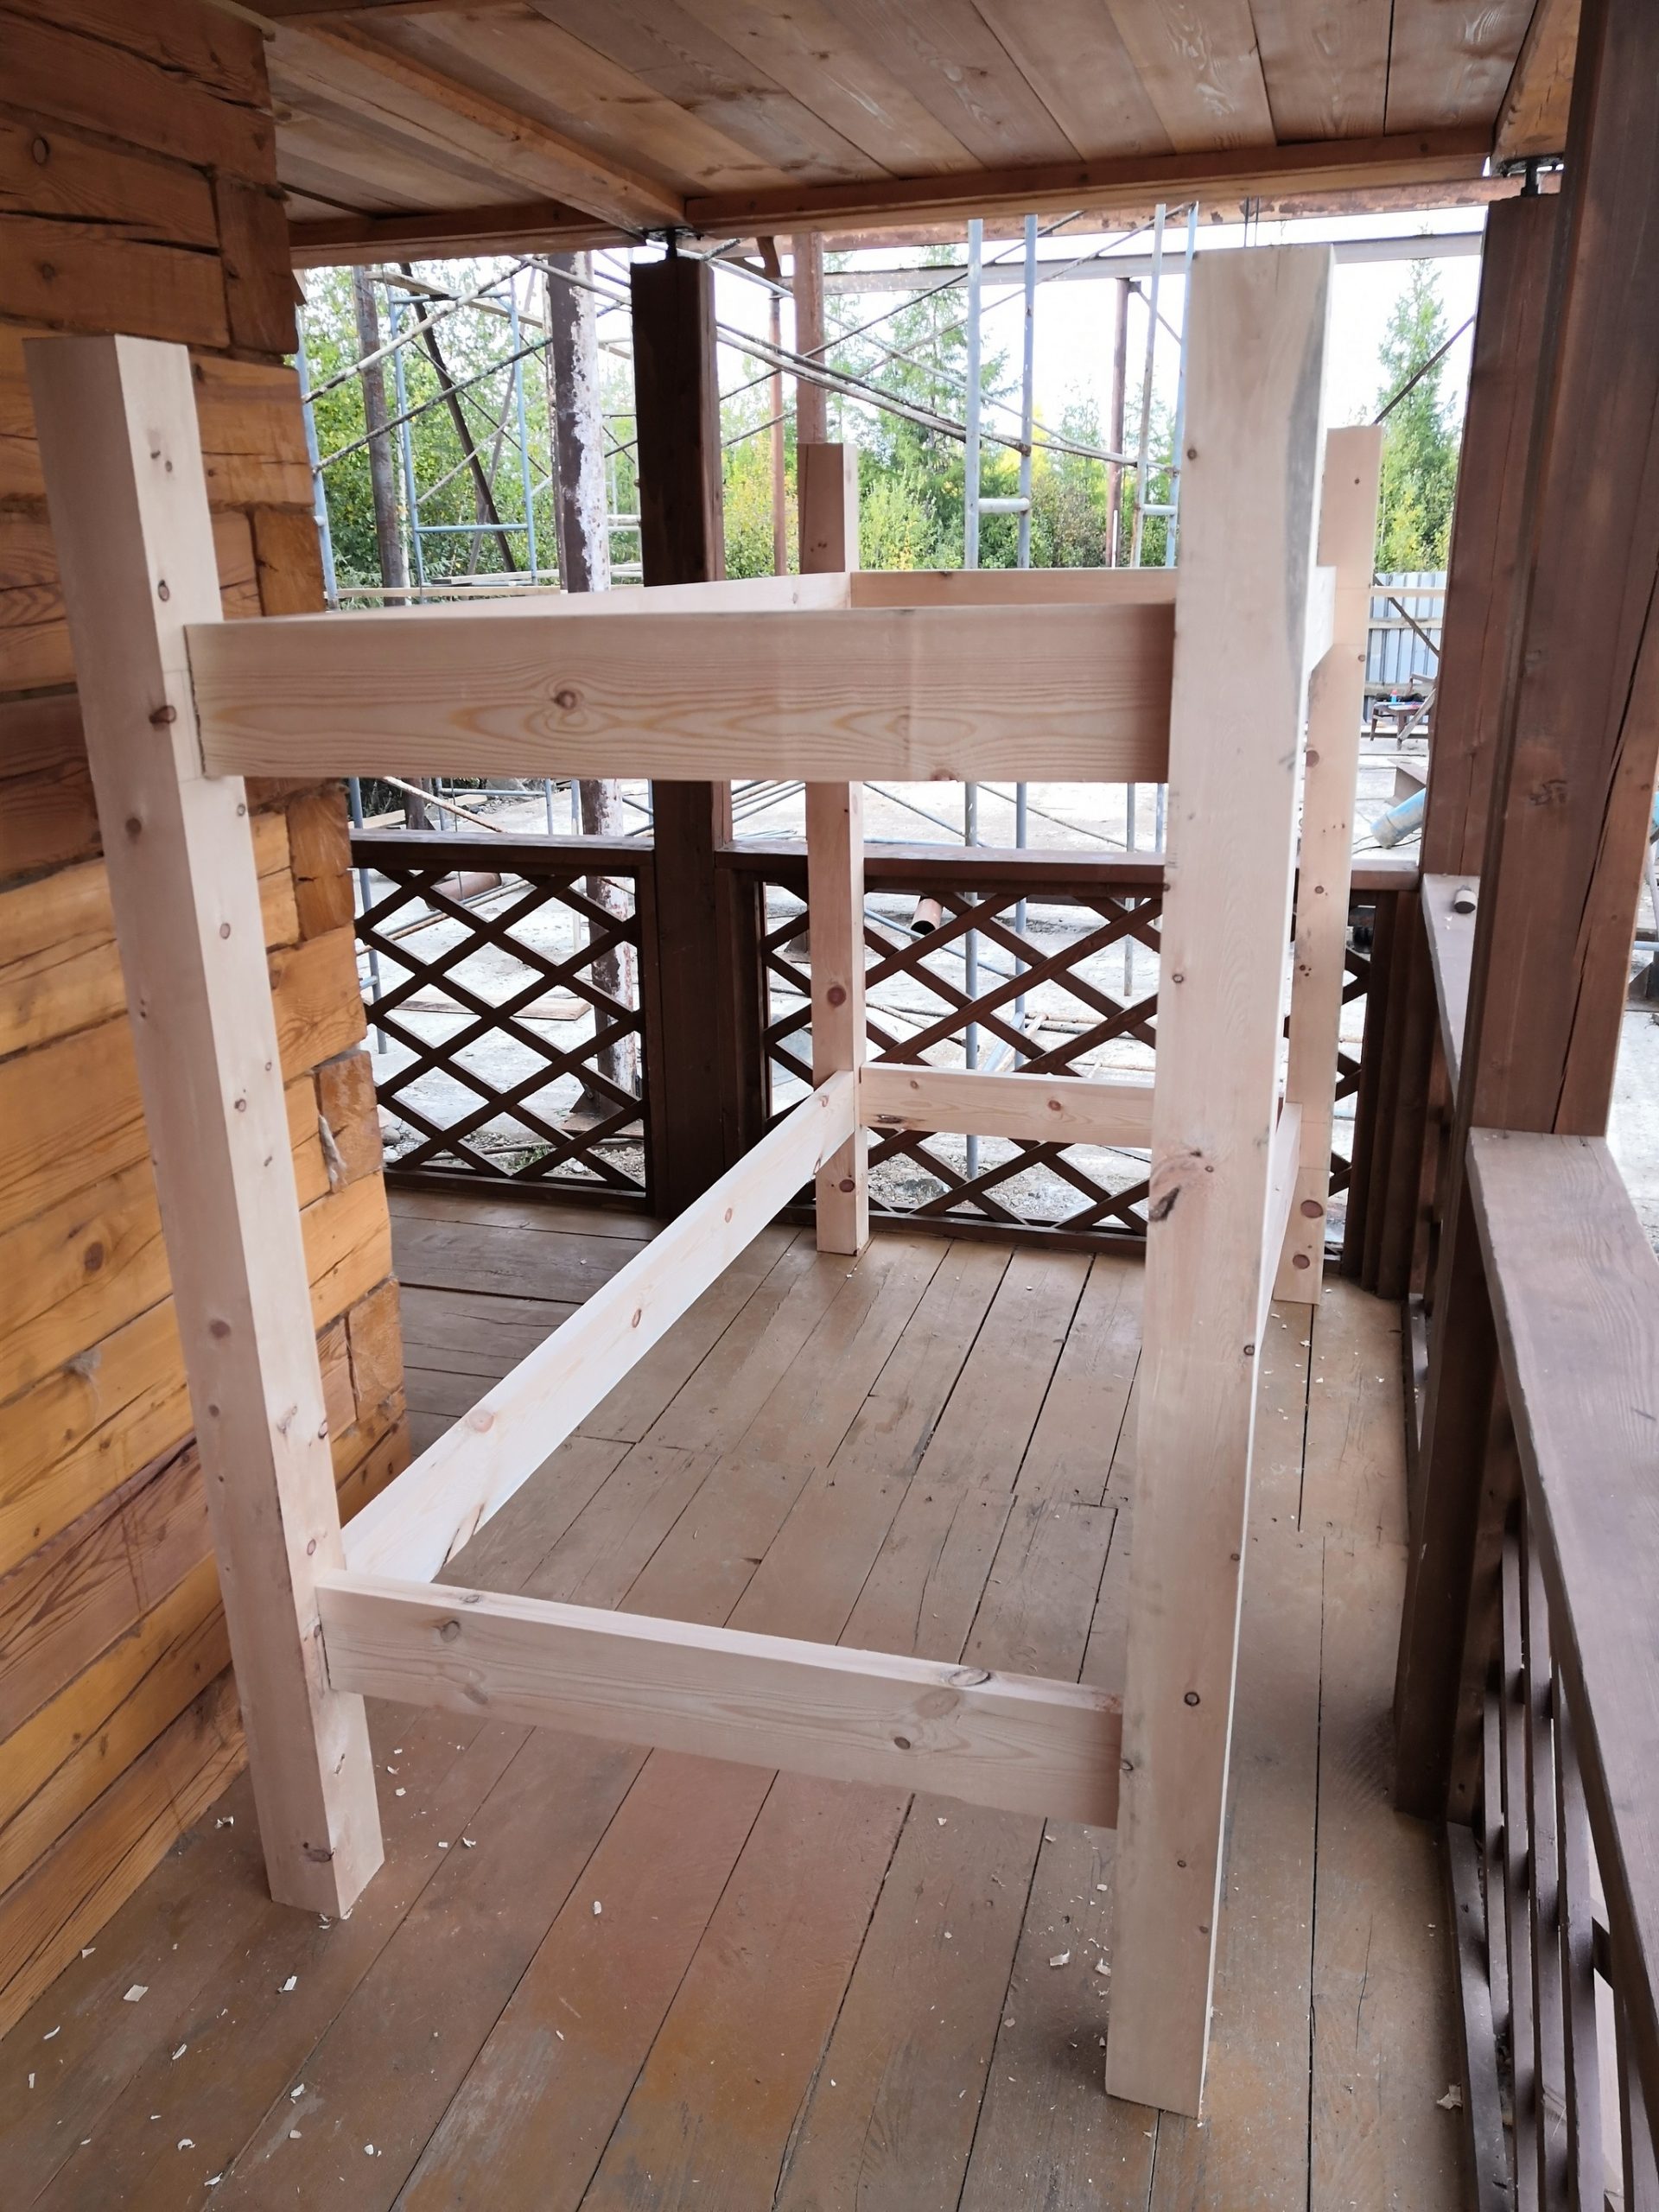
Frame assembly
The first frames under the mattress are made
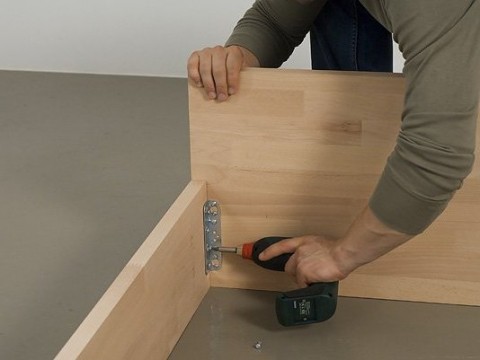
When assembling them, it is important to monitor the squareness of the corners. You can fasten the timber using the spike / groove method with gluing or steel corners. Spacers (at least four) are attached to the frames from below, on which a sheet of plywood is laid or wide boards are stuffed
Spacers (at least four) are attached to the frames from below, on which a sheet of plywood is laid or wide boards are stuffed.
Edges are fixed along the edges of each frame. It is best to make them from a board 200 mm wide. Previously, the ends of the edge that will be on top should be rounded and sanded. Fastening is carried out on self-tapping screws.
Mounting racks
Racks can be made in two ways - from furniture panels or from a bar. The second method is preferable, since in this case the lower tier will not be closed tightly (from the ends and from the side of the wall). This will allow the child not to feel locked in a confined space. The length of the bars should be such that they protrude above the plane of the upper tier by at least 40-50 cm.
Racks are pre-knocked down in two by transverse jumpers at the height of the backs of both tiers. Prepared frames are attached to them with furniture bolts. To make it more convenient to work, it is worthwhile to first fix temporary supports from a bar to the racks. You can fill and permanent steel corners.
Ladder installation
For racks of this structural element, a beam is usually used. Steps can be made from it. But it is better to cut a few poles. Paving stones are attached to bolts or corners. The poles are fixed with glue, having previously selected holes for them in the beam of racks.
It is necessary to fix the ladder as securely as possible. It is better to use for this purpose not self-tapping screws, bolts.Fixation is usually made to the sides of the upper and lower tiers from the end or front of the bed. A photo:

The final stage
So that when playing on the upper tier, the child could not fall down, railings along the length of the bed must be fixed to the racks. It is desirable to sheathe the backs from the ends with a board. All sharp corners of the structure should be rounded and sanded with a grinder with a special disc.
After the assembly of the bed is completed, all wooden elements are varnished or oiled. The latter option is considered environmentally safer. It is advisable to additionally fix the finished bed with bolts to the wall.
Bunk beds with their own hands. Video
Pros and cons of a children's bunk bed
Such a double bed for many families is sometimes the only acceptable option, because the advantages here outweigh the disadvantages.
The main advantages of a bunk bed for children:
- it takes up little space in the room (in the conditions of city apartments, where every square meter is important, this is a significant plus);
- a bunk bed looks beautiful if made by skillful hands with due diligence;
- it can simultaneously perform the functions of a sports corner and a workplace for a child;
- making a bunk bed with your own hands is possible with minimal carpentry skills.
But such furniture also has disadvantages:
- the whole structure, due to its high height, sometimes looks too cumbersome;
- a purchased bunk bed in cabinet furniture stores is expensive (from 7 thousand rubles or more);
- the child may fall from the second floor if the sides are not sufficiently fixed;
- the bed may be unstable, it will probably have to be additionally fixed to the wall.
But all these disadvantages are not terrible at all if you assemble the product yourself and follow all the recommendations of specialists.
Do-it-yourself children's bed-house: drawings and options
Before starting work, it is important to prepare a sketch. Thanks to him, you can compare the parameters of the product and the room, adjust them, and also calculate the length and width of the mattress, bed linen, bedspreads and pick up / order all this in advance
In addition, the drawn diagram will help you decide what the end result will be. Do you (or your child) want an open, closed house?
seyitkaratas89
krohashopmoscow
krohashopmoscow
krohashopmoscow
krohashopmoscow
krohashopmoscow
How many seats does it fit? Will it be single or double tier? If this is a loft bed, then what is planned below - a second bed or an area for playing, studying?
littlehome.furniture
beds42
There are floor houses - for very young children, so that they do not fall. The slatted bottom is literally a couple of centimeters from the floor.


doodywoodydom
4magic_store
And there are taller designs - with legs or storage boxes. The latter save a lot of space in the room (no need for a chest of drawers), but they also need to be provided in advance. Boxes are made on rails or on wheels. To guarantee the preservation of the floor, it is better to choose guides.
iwood_kz
lazareva_com9060
lazareva_com9060
Sometimes there is also a completely minimalistic option, when the roof frame is located along one sidewall, against the wall.
_babyvigvam_
izdereva74
A do-it-yourself bed-house for children can be of any size.But for reference, a cheat sheet from the masters.
They identify the three most popular standard sizes: 160/70 cm, 160/80 cm, 190/80 cm. The first two are suitable for children up to eight, maximum ten years. And the third is acceptable for teenagers. If you want to equip a recreation area for many years to come, then it is better to choose a length of 190 cm.
True, if you now need to save space in the nursery, or you and your child want to update the furniture in the near future, choose a more compact model.
krovatki_nsk54
kids_exclusive_
DIY baby crib photo
![[instruction] do-it-yourself bunk bed | 80+ photos](https://fix.housecope.com/wp-content/uploads/2/6/c/26c55e25ec48578b8a0c5e0009b1e165.jpeg)


We also recommend viewing:
- DIY mill
- Do-it-yourself motoblock
- Do-it-yourself gate
- Do-it-yourself summer shower
- DIY garden figures
- Do-it-yourself swing
- DIY toilet in the country
- DIY garden paths
- Do-it-yourself playground
- DIY veranda
- Do-it-yourself barn
- Do-it-yourself pond
- DIY beds
- DIY chicken coop
- DIY flower garden
- DIY septic tank
- Do-it-yourself fountain
- DIY tire crafts
- Do-it-yourself cellar
- DIY fly trap
- DIY aviary
- DIY pool
- Do-it-yourself canopy
- DIY garden
- Do-it-yourself porch
- DIY paving slabs
- Do-it-yourself smokehouse
- Do-it-yourself barbecue
- Do-it-yourself barrel
- DIY hammock
- DIY landscape design
- DIY flowerbeds
- DIY greenhouse
- Do-it-yourself Alpine slide
- Make a cage with your own hands
- How to decorate the yard with your own hands
- Watering with your own hands
- Do-it-yourself drinker
- Do-it-yourself change house
- DIY fishing rod
What materials are they made from
For the frame, they mainly use wooden beads or make it from boards. And here are the options.All other elements can be made from boards. This material is natural, but it is not easy and long to work with it: every detail requires careful processing, and there are many of them, since the boards are usually narrow, otherwise such a bed looks rough. If you have at least some skills, it's worth a try. If not, better use other materials.
Two-level beds for children can be made of wood
A do-it-yourself bunk bed is built faster if the parts are cut out of sheet material: chipboard, MDF or plywood. Chipboard is better to take laminated, the same can be found and plywood. It can also be painted: if you take birch furniture plywood. She looks good
It is only important to cut off evenly so that there are no chips along the edge
Chipboard edges can be processed with special tapes. They are self-adhesive; they are glued through a rag using an ordinary iron. Only these materials have an unpleasant feature: in their production, a binder is used, which releases formaldehyde into the air. Since the substance is harmful, its quantity is monitored and normalized. For the manufacture of children's furniture, fiberboard and plywood with an emission class of E1 are allowed. In terms of the amount of substances released, it is no more harmful than wood.
What are the advantages of handmade furniture?
A self-made bed is always better than a store-bought one. And there are many reasons for that. First of all - the quality of the material used in the work. Choosing it, any master will take into account such parameters as reliability and durability. Therefore, at the end of the work, he will have confidence that his product will last long enough and will not disappoint with durability at the first use. It happens that in the store it is impossible to find the right thing.For furniture, this situation is especially relevant: the size of the object may not be suitable, the design or the types of frame and finish materials used may not be suitable. The question arises as to which is better: to order an individual production of a thing or to take up the work on your own. Sometimes the choice of the second option is preferable, because in this case there is no need to find a good master, explain your ideas to him and pay a considerable amount for the work. But the main advantage of any handmade thing, of course, is the special sensations both during work and in the process of using the product - it is always nice to feel like a creator.
Let's summarize. By creating home furniture with your own hands, you can win on several points:
- price;
- quality characteristics of the materials used;
- unique design;
- individual product options.
Preparation of a working tool
A home master will surely have everything you need; you can easily do without professional specialized equipment.
 If you do not have the necessary tools and you do not know how to use them, it may be worth abandoning the idea of \u200b\u200bmaking the bed yourself.
You can order sawing parts according to your drawings in a workshop with professional machines. Then you will only have to assemble with a screwdriver, mallet and glue.
To do everything yourself, depending on the chosen material and model, you may need:
- Electric jigsaw, grinder, saw - hacksaw for the preparation of parts.
- Drill, screwdriver, better, cordless.
- Clamps for fixing glued elements or convenient assembly on self-tapping screws and bolts.
- Planer, grinder, emery, milling cutter to round the edges of the boards, remove fibers, sand finished furniture before painting
- Hammer, chisel, mallet - in addition to driving nails, you will need it when working with dowels.
- Roulette, pencil, level for marking.
- Brush and roller for varnish or paint.
- Iron - for pasting the ends of MDF or chipboard.
We have specifically indicated the purpose of each tool so that you can choose a replacement for what is missing. For example, it is quite possible to do without a milling cutter with a hand tool, a planer.
Natural ecology - wood
Bunk bed do it yourself from wood is the most popular option. Wood for manufacturing must be pre-prepared, cleaned, dried.

To protect against fungus, mold, termites, the material is treated with an antiseptic, special impregnations, drying oil. It is a very malleable, durable material. Products from it look exquisite, soundly.

Among the positive aspects of use, environmental friendliness, a pleasant, light aroma, simplicity and ease of processing, availability in any price category, a large selection of lumber in terms of texture, degree of processing, and size are distinguished.

The disadvantages are the deformation of the finished product with raw material, flammability, massiveness of the structure.

The simplest wooden structure for children on chains
To assemble the beds, you will need: timber (glued) 90x90 mm, plywood (18 ... 21 mm thick), boards 25x55 mm for the manufacture of stairs and railings, protective impregnation and paint for wood, as well as accessories.
Table. Accessories for making a bed.
| Name | A photo |
|---|---|
| metal corners | |
| Dowels | |
| Bolts (180 mm) for fastening the frame to the wall | |
| Ring-head screws (with washers) | |
| Chain | |
| Carabiners | |
| eye nuts | |
| Anchors 12x150 mm | |
| Confirmates | |
| self-tapping screws |
For the production of structures, a minimum of tools is required, which each owner usually has. The only thing is that there should be a place for work, for example, a garage, since neighbors in an apartment building are unlikely to like work related to wood processing.
Step 1 Prepare two identical bases for the top and bottom beds. Timber and plywood are cut to size.
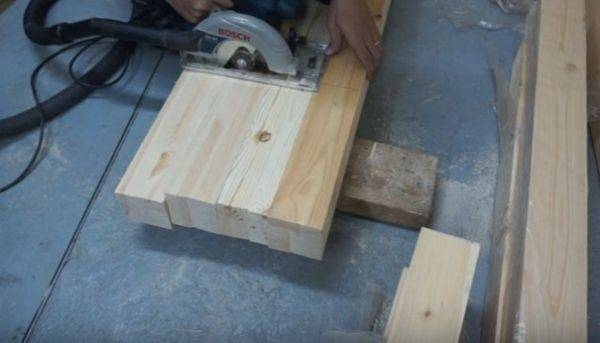
wood cutting
Prices for the popular range of miter saws
miter saw
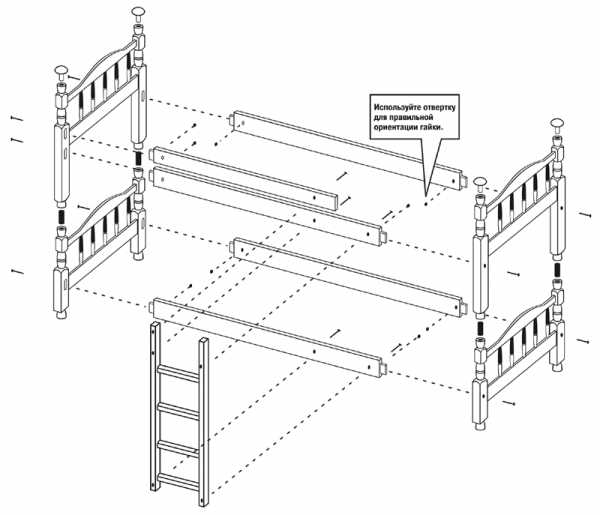
There are no special drawings for this two-tiered structure, which is distinguished by its simplicity. You just need to assemble two frames from a bar of the required size. In our case - 1800x800 mm.
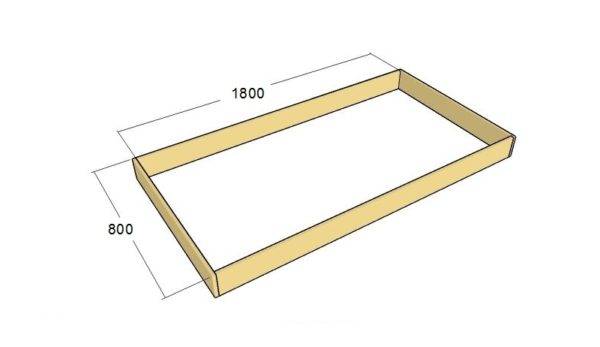
Sample drawing
Longitudinal cuts are made in the beam to create a groove for laying plywood.
Longitudinal cuts are made
The result is a recess in which the base will be securely fixed.
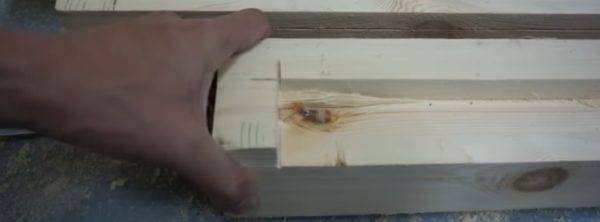
Photo of the finished cut
Small defects can be eliminated with a chisel.
The frame elements are fastened with glued dowels and corners (2 dowels are required for each connection).
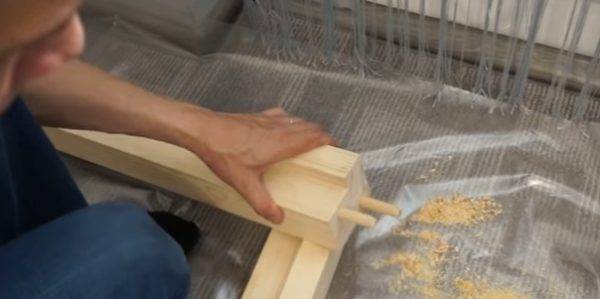
2 dowels are required for each connection
The corners are fixed with four self-tapping screws on each side.
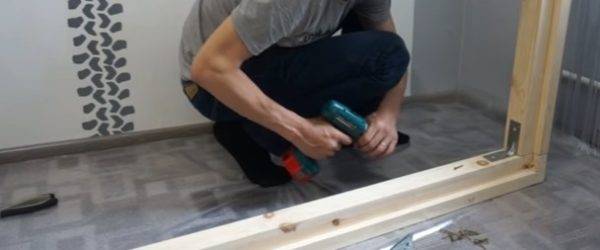
Fixing metal corners
After that, you can begin to fix the frames to the wall.
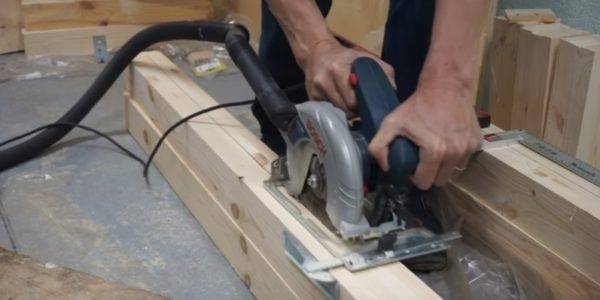
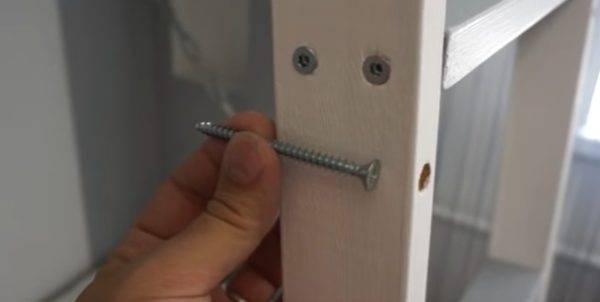
Step 2. Bolts 180 mm long are used to fasten the beds to the wall (4 for each frame). To drown the bolts in the timber, as the protruding heads will interfere with the installation of mattresses, it is also necessary to make a shallow cut with a pen drill.


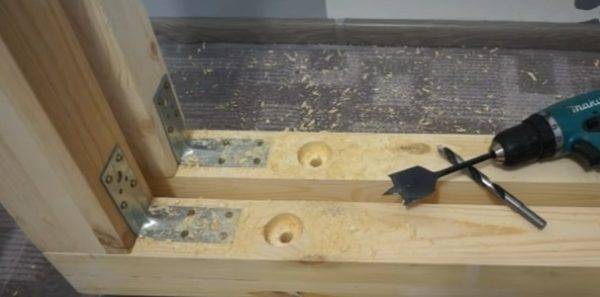
The result of working with a pen drill
There are four such holes to be made - on each beam adjacent to the wall.The outer side of the bed will be fixed to the wall with a chain. To do this, you need screws with a head bent into a ring (such a hardware is called a screw-ring or a screw-hook).
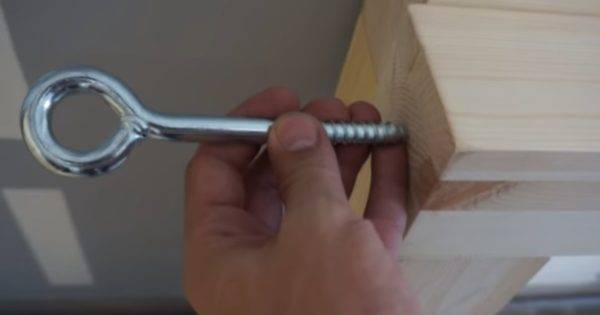
Screw ring
Frames ready for installation must be painted. For this, any decorative coating (for wood) intended for indoor use is used. It is necessary to install the lower base at such a distance from the floor that it is possible to place boxes for storing things. For convenience, the base is installed on a temporary support.
It is best to start fastening by fixing the outer wall of the bed to the chain. This makes it easier to align the horizontal afterwards. Holes are drilled to install anchors. Both fasteners for the chain are fixed.
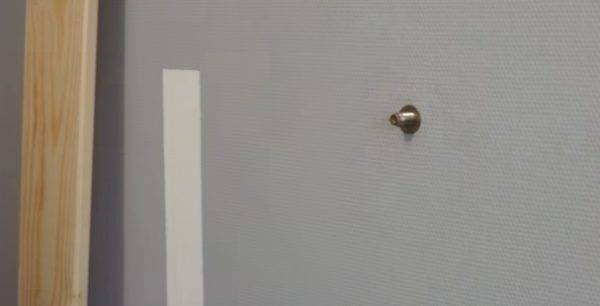
Fixed mount
Eye nuts are mounted through the washer. The chain is hung on a carabiner. The lower horse of the chain is also fixed with a carabiner on a ring screw.
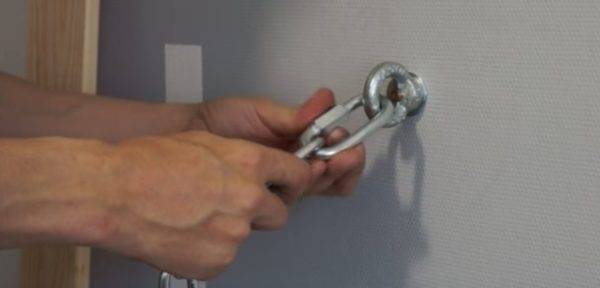
Hanging chain
Dowels for fastening the part of the frame adjacent to the wall are installed in holes made with a 16 mm drill. Anchors are twisted.
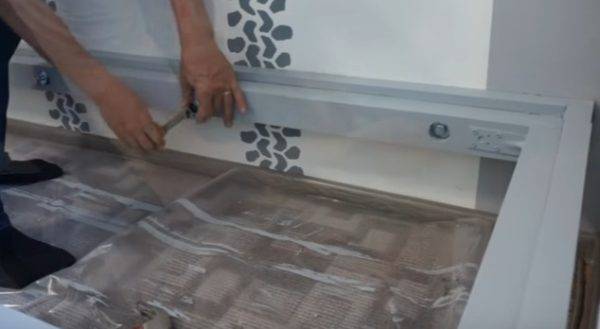
Anchors are twisted
The plywood base is fixed to the frame with self-tapping screws.
Fixing the plywood base
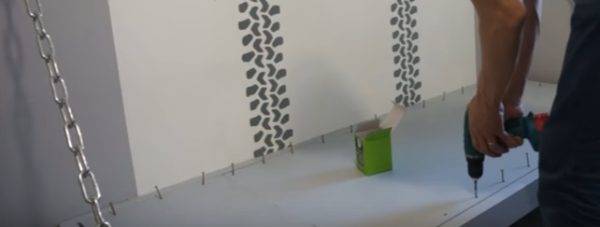
The upper bed is attached in the same way.
The top bed is also installed.
Prices for cordless drill/driver
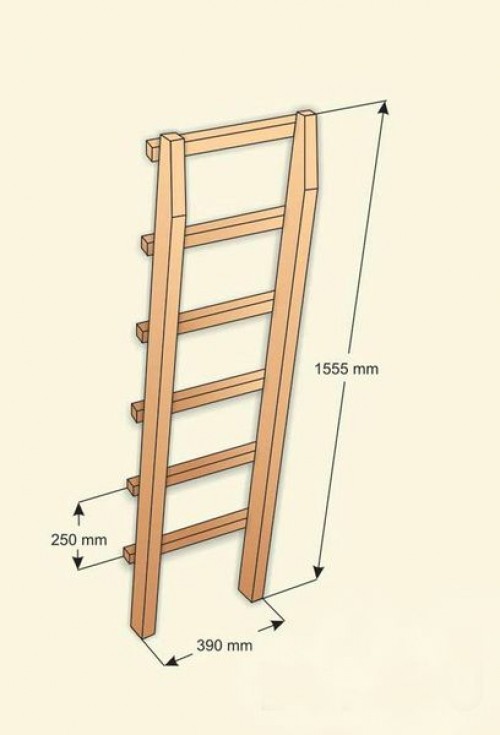
Step 3. Mounting the stairs. In order for the child to climb up, a solid structure is needed. It can be assembled from boards 25x55 mm. In our case, larch was used. The ladder is attached to the upper and lower beds. Stair dimensions:
- step length - 36 mm;
- the distance between the crossbars is 31 cm.
- number of steps - 5 pcs.
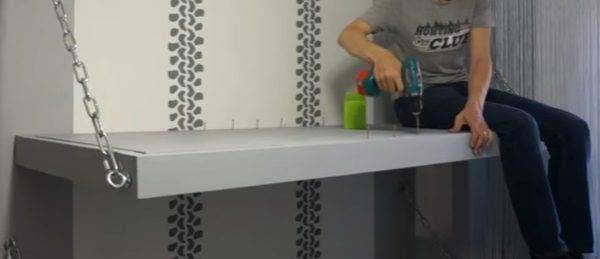
For fastening the steps, confirmations with a size of 7x70 mm are used. You will need 2 euro screws on each side. The ladder is fixed to the bar of the upper and lower bases with the help of long self-tapping screws, the caps of which are slightly recessed into the tree.
Self-tapping screws must be of sufficient length
The design is reinforced with metal corners.
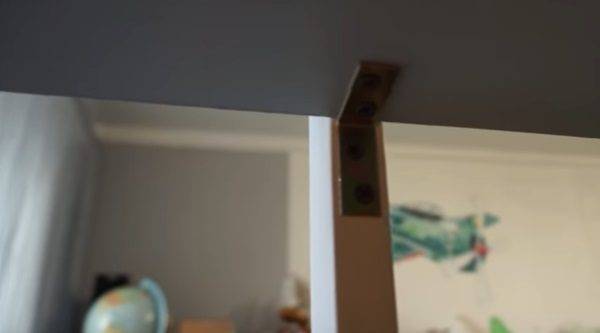
Reinforcement with metal corners
To protect the child from falling, it is necessary to make a fence. It is also made from boards. Railing height - 20 cm (above the mattress).
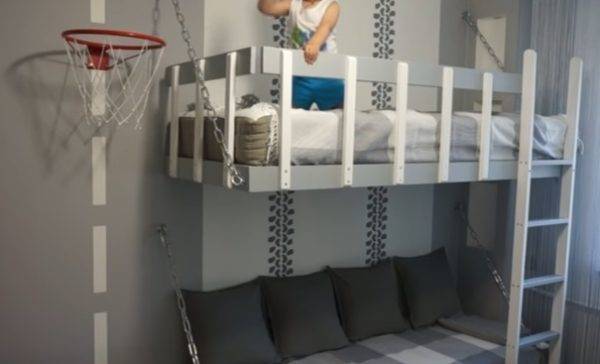
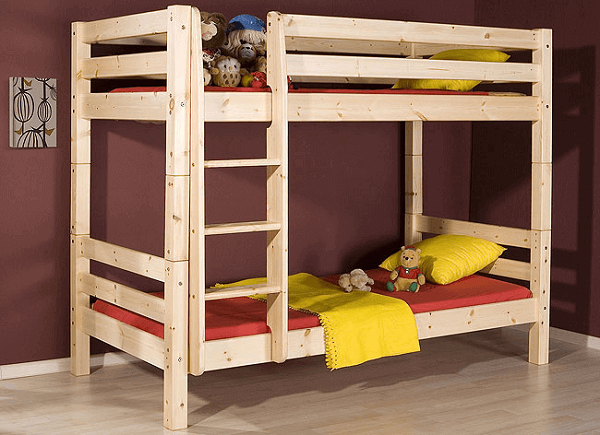
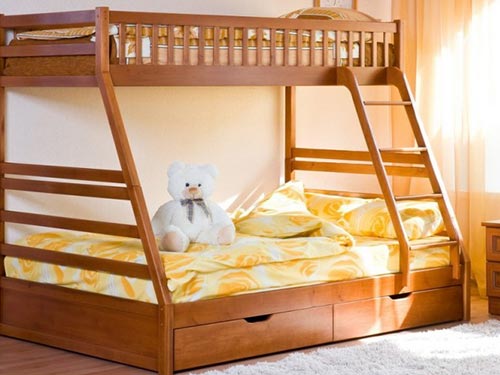
Finished bunk bed
Manufacturing technology of iron bunk bed
For making a bunk bed do-it-yourself metal you will need a metal profile 50x25 to create frames for sleeping places, a profile with a section of 20x25 to make a rack base for a mattress and metal elements with a section of 40x40 mm for side racks. You will also need to purchase metal screws, screws, primer and paint for metal surfaces.

The grinder needs to cut all the constituent elements from the profile pipe, which are then welded together
Based on the drawing of a children's bunk bed, do-it-yourself cutting of all blanks of a given length is performed. The assembly of the structure begins with the creation of backrests in the amount of 4 pcs. Structural elements must be laid out on a horizontal surface and connected with a welding seam. After each step, it is recommended to check the angle value, which should be equal to 90 degrees.
With the help of a grinder from a profile pipe 20x25 mm, slats are cut under the mattress. Next comes the base. On the long parts of the frame, 12 metal strips are welded at the same distance from each other.Then it is necessary to connect the vertical racks in pairs, to which the backs of the lower and upper tiers are attached by welding. The result is two structures.
To the first, at a distance of 35 cm from the floor, a frame is welded under the mattress of the lower tier, and for the upper floor - at a distance of 95 cm from the lower level. All actions are performed according to the drawing of a children's bed with their own hands.


In the places where the frames of the second rack are fastened, it is necessary to weld two sections of the profile measuring 20x20 mm. They should be installed with some clearance, since the elements must fit snugly into the inner part of the 50x25 mm profile. Such a technique will allow in the future to transport the structure, which will not lose the strength and rigidity of the joints.

Metal bunk bed is the strongest and most durable
The final stage is the manufacture of a staircase 36 cm wide. With the help of a grinder, all the constituent elements are cut from a profile pipe, which are welded together. The structure is attached to the bed with self-tapping screws.
After the bunk bed is assembled, all seams are sanded, the surface is cleaned of dust and the base is primed with a special compound. After it has completely dried, two layers of metal paint are applied to the structure.
DIY step-by-step process for making a bunk bed
Frame manufacturing
First, you should measure the mattress, the shape of which corresponds to the size of the bed. If the design provides for a sofa, then the lower part of the seat is measured.
The frame creation process is as follows:
- Creation of side panels - tsarg.To do this, two boards of different widths are fastened at right angles according to the type of shelf.
- Attaching bars to the panels, between which there will be boards holding the mattress in the future.
- Fastening all four bars with spikes or self-tapping screws.
- Attaching boards between the bars.
 First, the bed frame is made.
If a sofa is used, it must be attached to the box. To do this, side supports are prepared, which are two vertically located bars, pulled together by other bars, smaller in size. There should be two such supports, for both sides.
The fastening of the boards is carried out using either spikes or lugs, which are processed with wood glue. The elements must be connected very firmly in order to prevent the frame from weakening during operation. After the box is dried.
 The frame making process is quite simple.
Back
It is best to perform a slatted version of the back by adding slats to the frames of both tiers. They allow not only to hold the bed, but also to protect it from contact with the walls. The back of the lower tier is often made soft, which allows it to function as a sofa.
For the manufacture of the backrest, you will need boards tightly pressed against each other or a furniture shield equal in width to the frame, as well as dowels for connection. The slats must be attached to the back of the box by drilling holes in both elements and connecting them with dowels.
 The back is made of closely spaced slats.
Side rails and ladder
For the side walls, dividing into the headboard and backrest, you will need two sanded boards (one is somewhat narrower than the second) and four side rails. The headboard is attached as follows:
- Installing the headboard boards in the rail on the sides.
- The connection of the back and headboard.
- Making slats, lattice or mesh to support the mattress.
- Attaching the rail to the inside of the box.
- Preparation of the frame for the lamellas and its location on the inner plane of the tier.
- Overlay rails on the frame with a step of 5-7 cm.
- Chamfering the outer ribs with a hand plow.
 In conclusion, side rails and a ladder are made.
When attaching the backrest, it is required to change the location of the boards, installing a narrow board on top, and a wide board on the bottom. Thus, the height of the narrow board of the head should match the wide board of the back.
The ladder can have a different number of steps, be located directly or at an angle, and also be placed on different sides of the bed. Its assembly consists of the following steps:
- Installation of two parallel bars, which are the bases and guides of the stairs.
- Attaching steps. First, the lower one is fastened to the backrest, and then the rest are placed one above the other. Steps should be inserted into the bars.
 The ladder is made in two stages.
There are such types of connections of steps as recess, external and metal corner. In any case, the mount must be hidden, which will protect the child.
Also, the ladder is equipped with a handrail, which is a board attached to the frame. It is selected taking into account the easy grip of the child's hand.
legs
The legs can be of different sizes and shapes, calculated to ensure maximum reliability of the structure. Most often, round, square or carved legs are used, which can be fixed from the outside, from the inside or inserted into the frame.
 The legs are made of bars and can be of any shape.
For the manufacture of legs, bars 50-100 mm thick are used, which are connected in pairs. As a result, an end should be obtained according to the type of shelf, and the length of the leg coincides with the height of the fence of the upper tier.
Bunk bed decor
It is necessary to think over the decoration of the bed before the start of production, as it can significantly change the project. If you have certain skills, you can make furniture in the form of a car, a house or any other object. A simpler, but no less popular option is to equip the bed with a Swedish wall, a rope and bars. It is also common to mount a slide for a quick descent.
 Ideas for decor can be very diverse.
Making a bunk bed with your own hands is a rather laborious and painstaking process. However, with some skill and care, you can get a unique and high quality product.
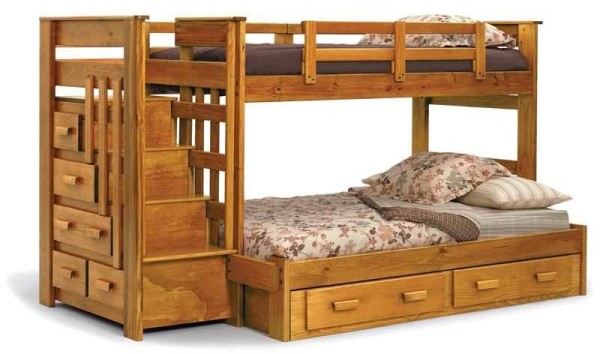
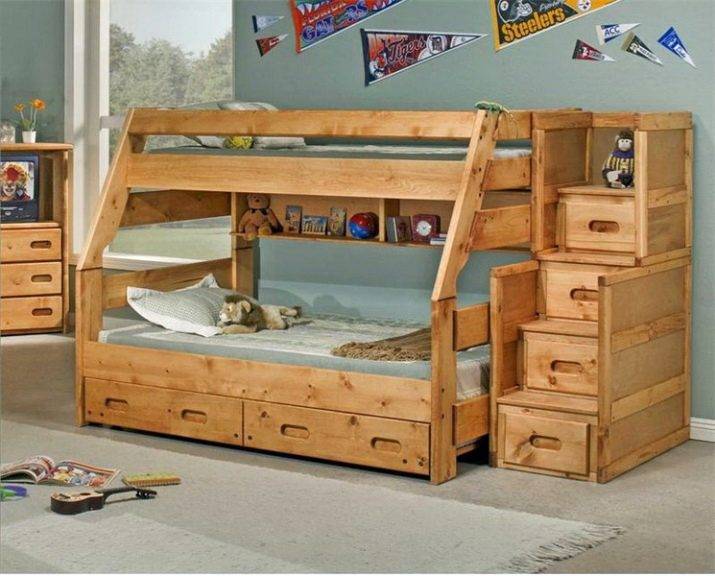
Bed with wardrobe
Based on the drawing of a traditional bed with two floors, you can create custom models with wardrobes and chests of drawers. To make a simple bed with a small compartment for clothes, you will need the following materials: timber 10x10 cm, boards and slats more than 3 cm thick, MDF, furniture fittings (hinges, handles, microlift, shelf mounts), a screwdriver, wood screws, a saw, a level, pencil, 2 slatted bottoms. The model should be made according to the following master class:
- An assembly of 8 boards (determine the bases of the sleeping beds) and 4 frame bars.
- Installation inside along the perimeter of plank rectangles of slatted bases under the slatted bottom.
- Installation from side boards, from rails - stairs.
- Assembling the top, bottom, sidewalls and back wall of the future cabinet made of MDF (in height it should reach the 2nd floor of the bed).
- Screwing the base of the cabinet to one of the ends of the future bed.
- Screwing door panels, installation of internal filling, installation of furniture handles.
Staircase to bunk bed
So that the child can safely climb to the second tier, you need to make a ladder. It should be installed according to your tastes and the size of the room. You can make it look like a staircase in a train compartment, then it will not take up any space. In this case, it can even be used as a Swedish wall.
And you can make a more complex structure, the so-called diagonal staircase. It looks prettier, but can also take up a significant amount of space. We complete our work by laying sheets of plywood or chipboard in the place where the mattresses will lie.
Note!
When determining the height of a bunk bed, keep in mind that the child will sometimes want to jump on it, so it should not be installed too close to the ceiling.
Upper bunk height
Usually the upper tier is placed at a height of 80-180 cm. It all depends on your wishes. If the top tier is located at the maximum height, then you have more opportunities to use the lower free space. Otherwise, your options are somewhat narrowed, but there are fewer signs for parents to worry that the child will fall from a great height.
In general, if a loft bunk bed excites your imagination, and you definitely decided to install it, then the main thing to do is to determine the distance between the upper tier and the ceiling. Firstly, you need to understand that the child is growing and he needs, if not to stand, then at least to sit normally in bed.Secondly, it is not quite comfortable to sleep when you have a ceiling in front of you. Thirdly, the flow of warm air rises, so with a small distance to the ceiling, especially at high ambient temperatures, the child will simply miss it.
Bunk bed for children


