- Is it worth it to make a cabin yourself
- Installation of the cab tray
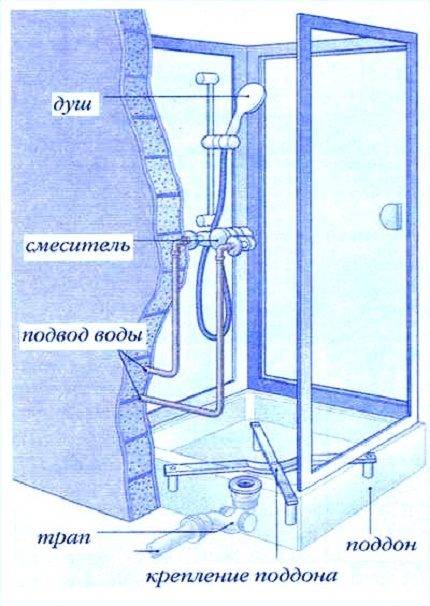
- Connect communications
- Where to begin?
- The choice of plumbing
- Production of showers
- How to build and assemble partitions
- Installing curtain railings
- Construction and assembly of the cabin roof in Khrushchev
- The final stage of the manufacture of the soul
- Dimensions
- Width
- Types of shower cabins available for installation in a wooden house
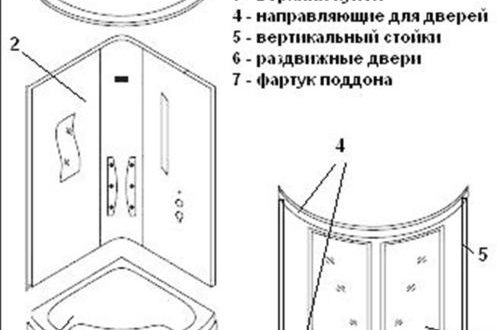
- Do-it-yourself installation of side panels, doors and roof in a shower cabin
- Assemble the pallet
- How to prepare for assembling a shower enclosure
- Choosing a place in a small bathroom
- Installation of shower walls
- Operating recommendations
- Care of doors and fencing
- Pan cleaning
Is it worth it to make a cabin yourself
When comparing a hand-made design and a purchased model, both positive and negative sides are highlighted.
Advantages:
- long period of use without repair work;
- the absence of a large number of moving elements that have the property of rapidly collapsing;
- a homemade shower room has more options for alternative solutions, which makes it possible to choose the view to your taste;
- savings.
Flaws:
- some limited cockpit functionality;
- during dismantling, difficulties may arise;
- the mechanism of connection to the sewerage is more difficult;
- for self-assembly, you should have basic knowledge and skills.
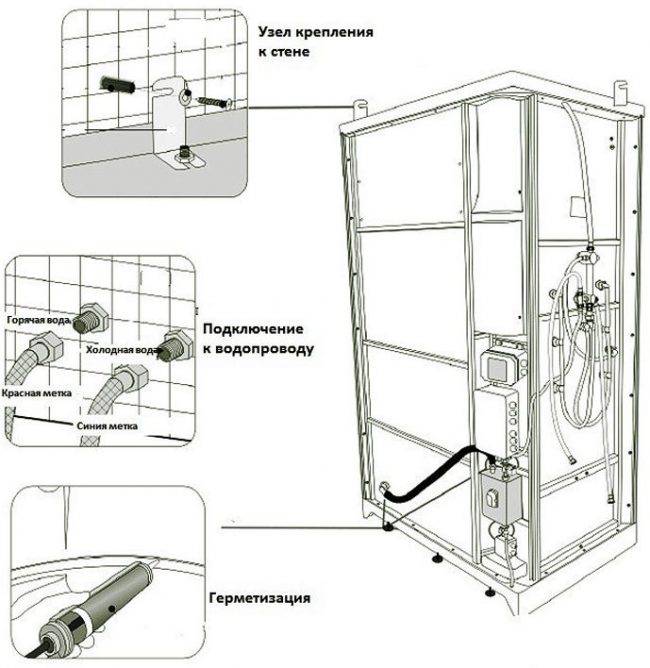
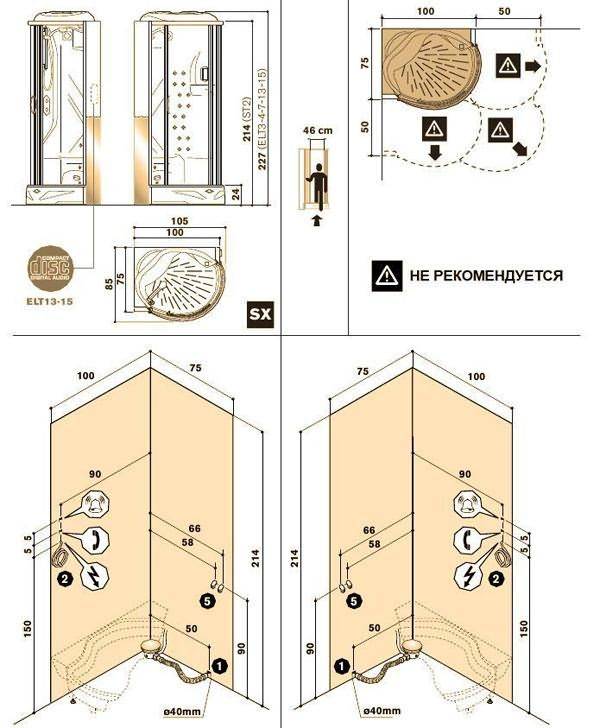
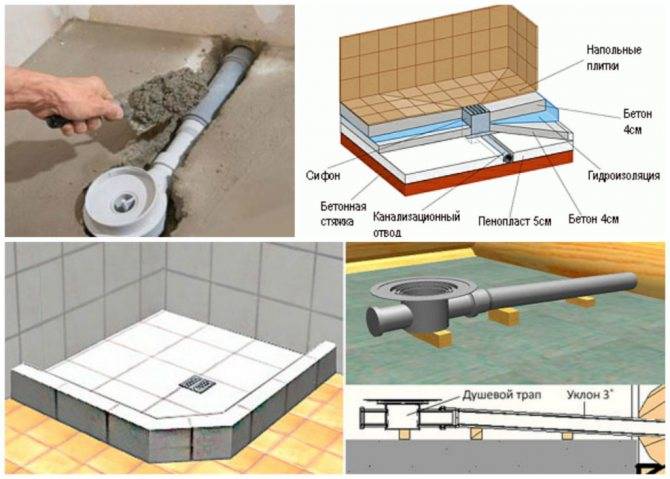
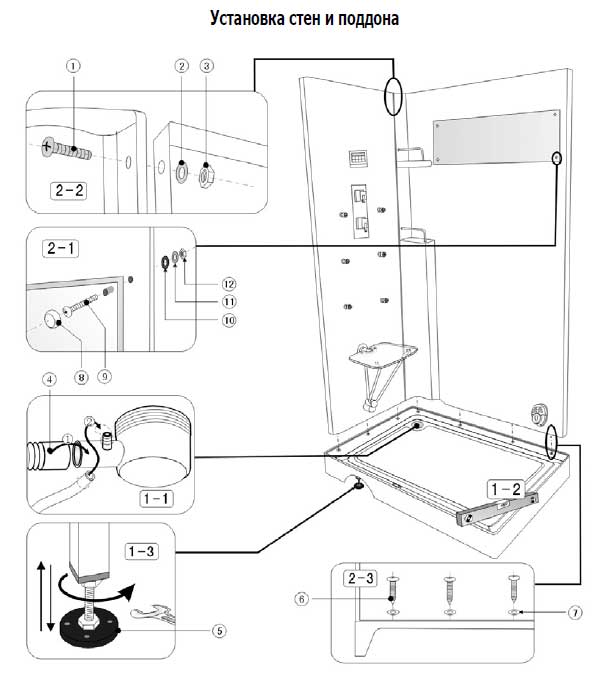
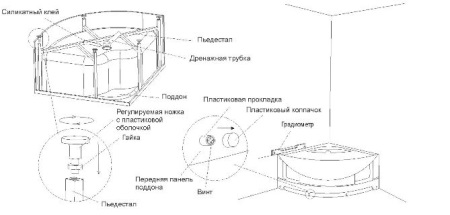
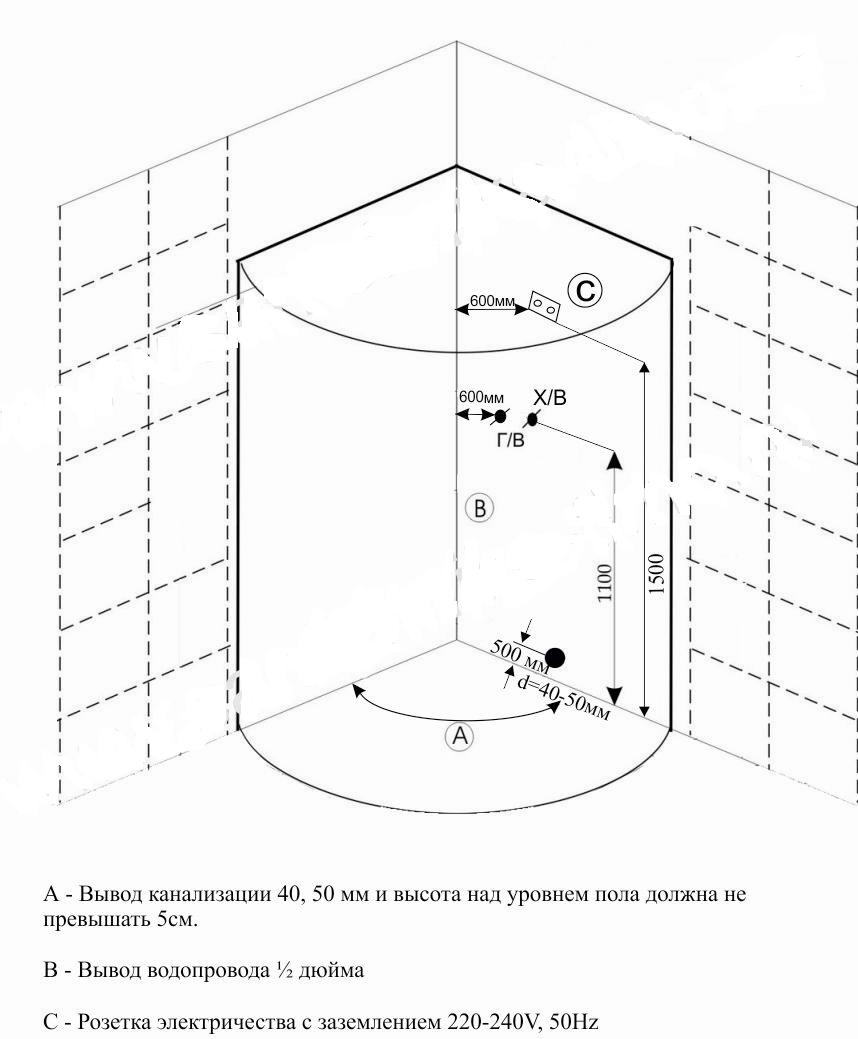
Installation of the cab tray
When installing a pallet, you need to pay attention to a number of aspects:

Floor flatness. If there are slight deviations, they can be compensated for with the adjustable feet. In extreme cases, you will have to level the floor under the cab.
The cab drain must be located close to the sewer pipe. Ideally, the floor drain is located exactly under the cubicle drain. This option will be considered. If the distance between the drain and the sewer hole is impressive, use an additional corrugated flexible hose.

The connection and tightness of the elements must provide reliable protection against leaks during operation.

Of the tools and additional materials, you will need an adjustable wrench, a building level, silicone-based sealant and a construction gun.


The siphon body is installed with the corresponding end in the drain hole of the pan. The corrugated pipe is inserted into the sewer hole. All joints are sealed with sealant to avoid the penetration of unpleasant odors and leaks.

The cab base has adjustable feet, the height of which is set with a wrench. It is necessary to level the cab pallet with constant level control. Moreover, this must be done along all edges exactly until the optimal result is obtained.
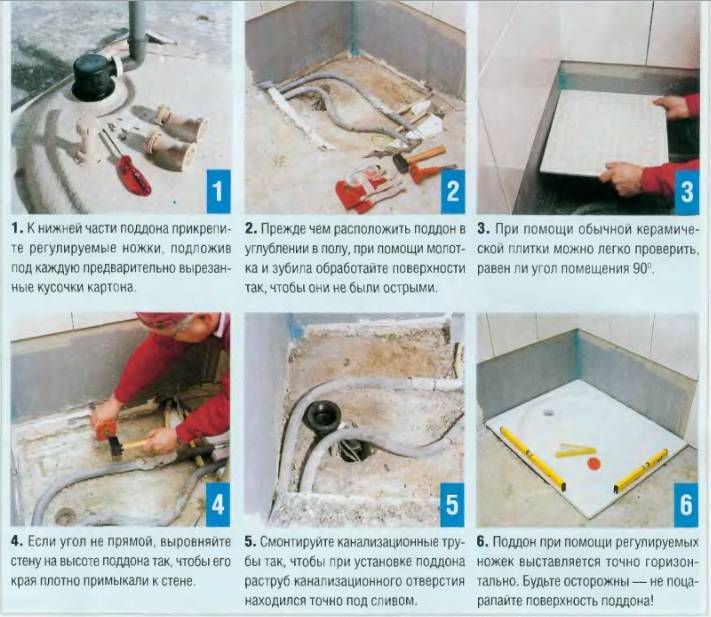

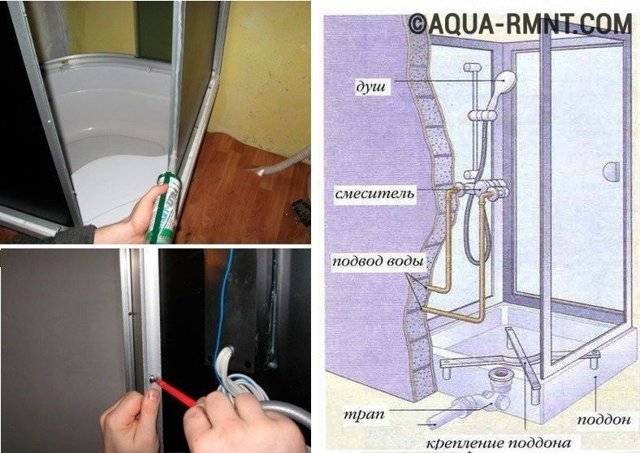
After adjusting and fixing the base of the cabin, the gap between it and the wall is sealed with sealant, you can use a small plinth designed for this purpose.

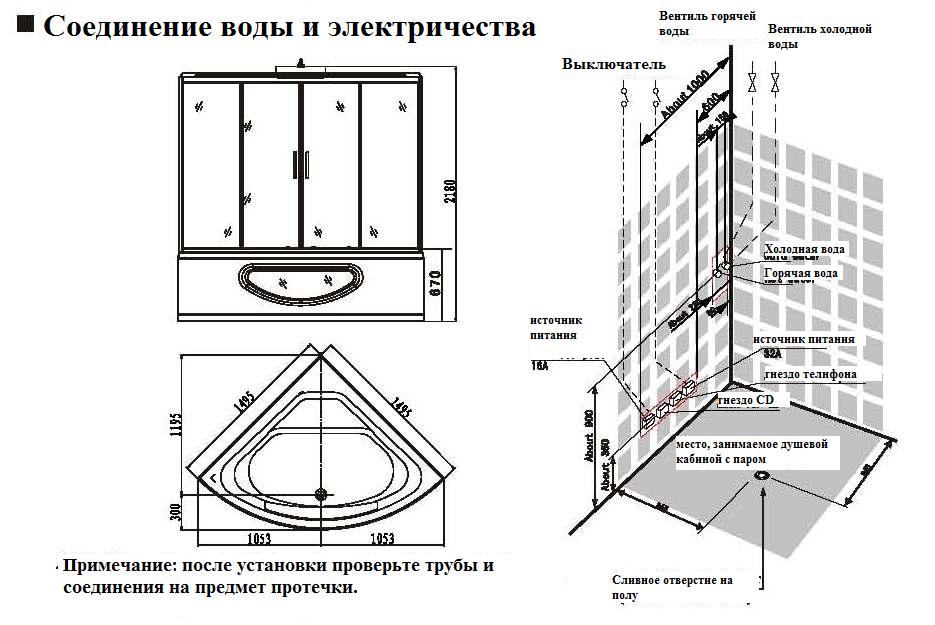
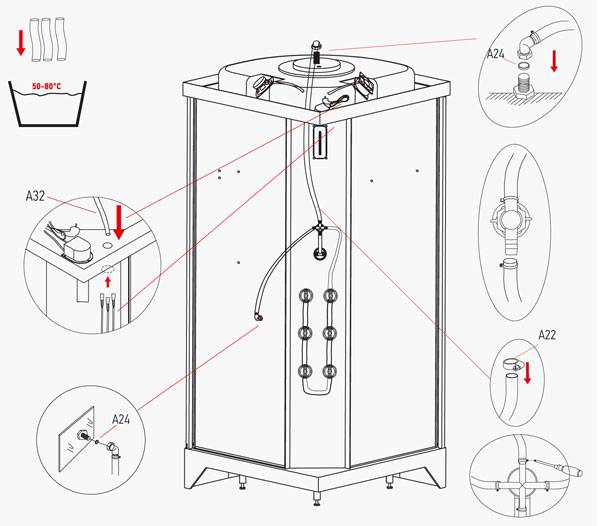
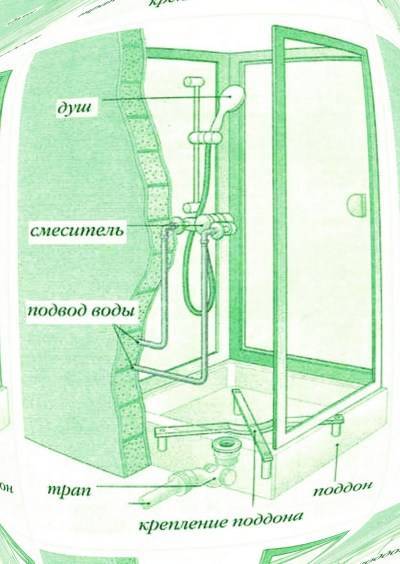
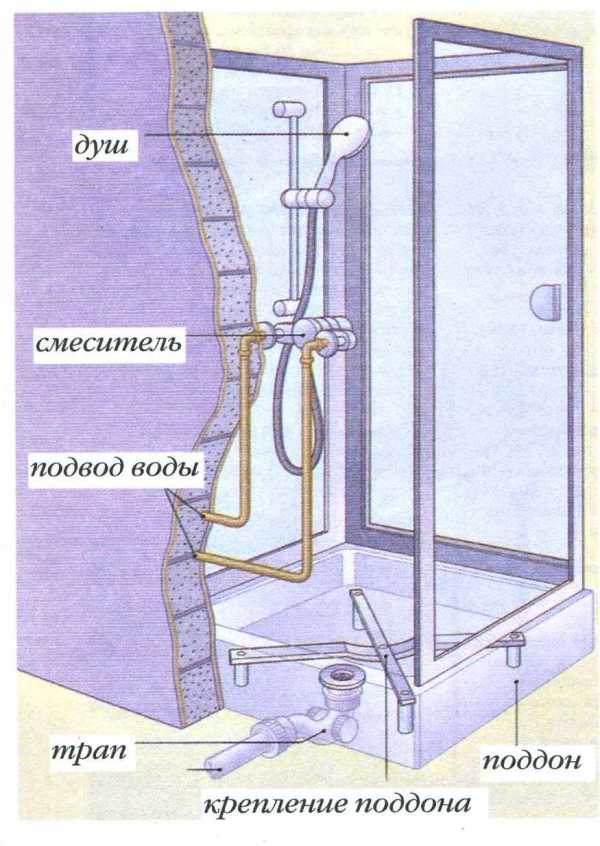
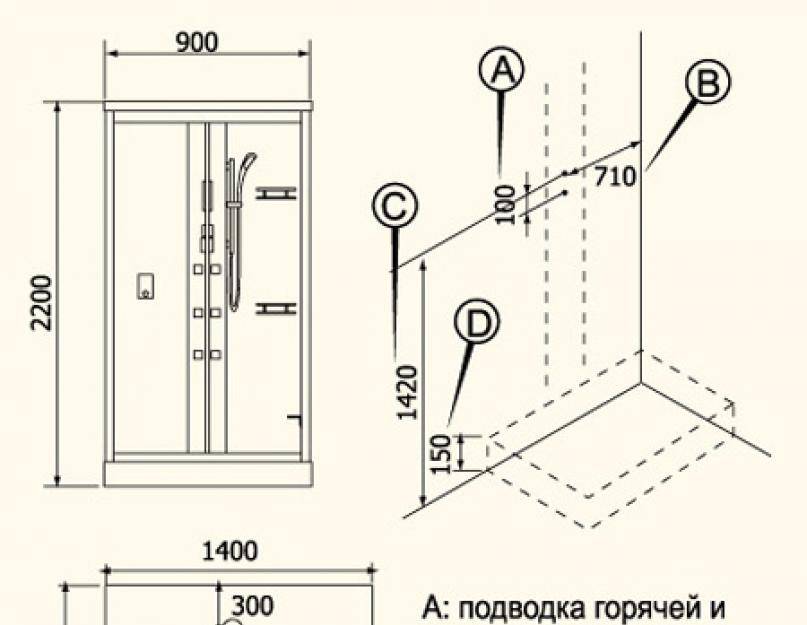
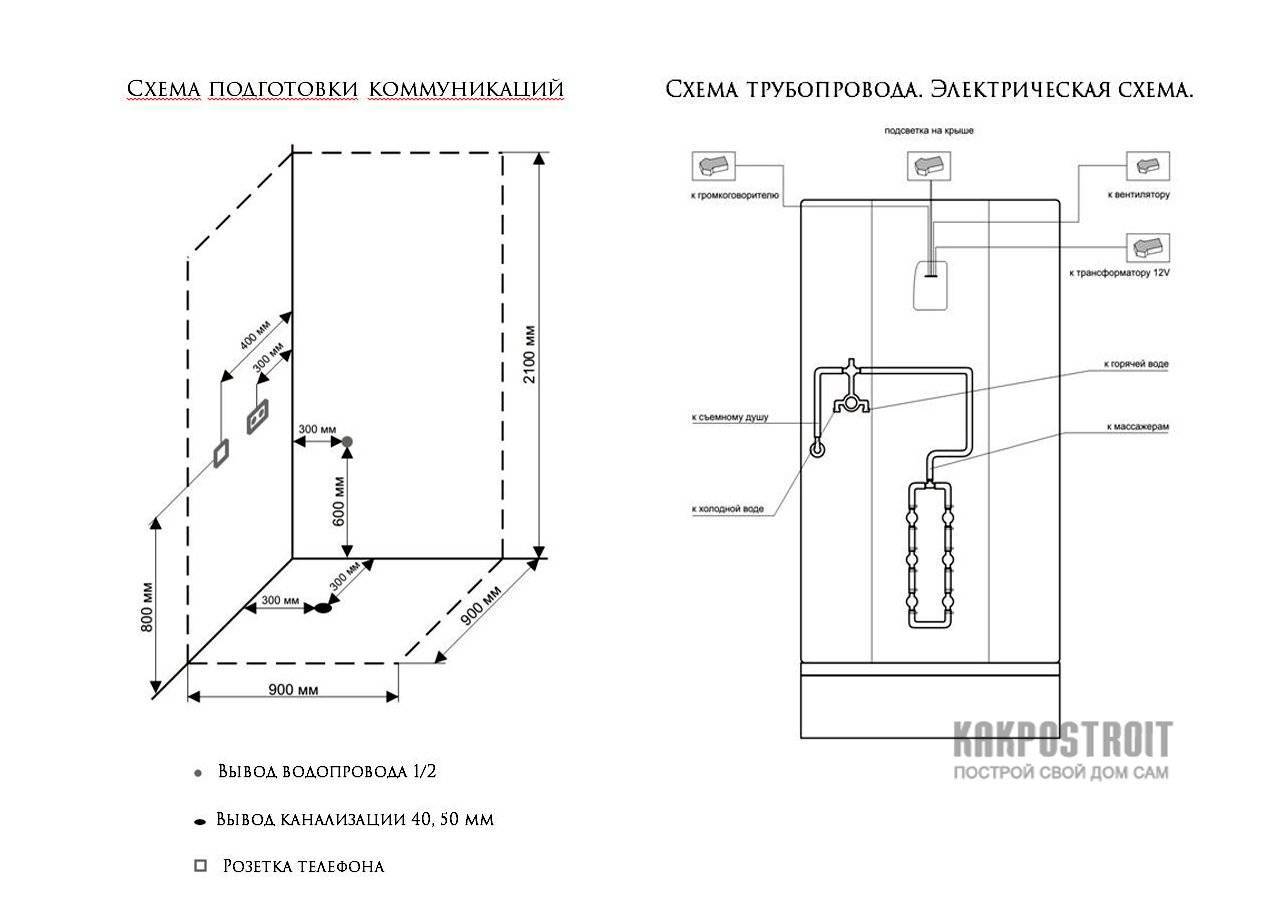
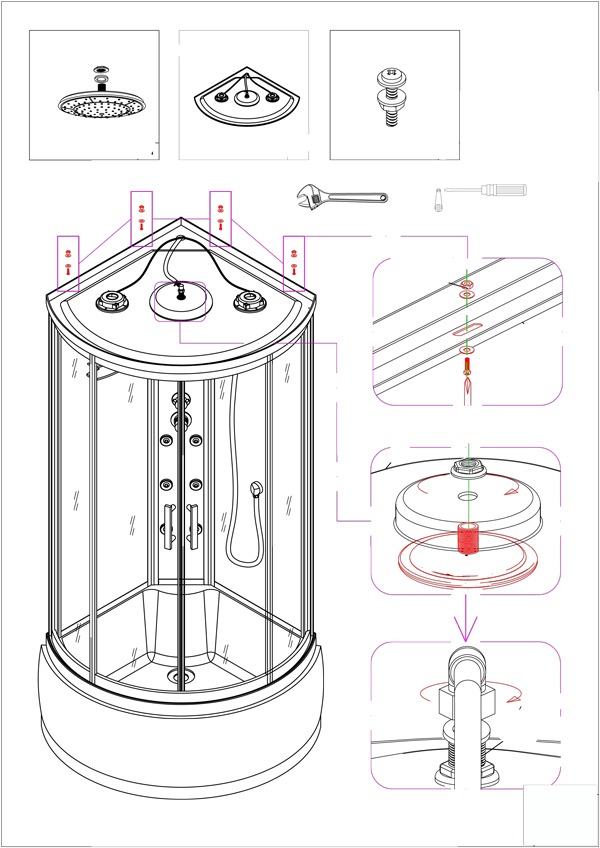
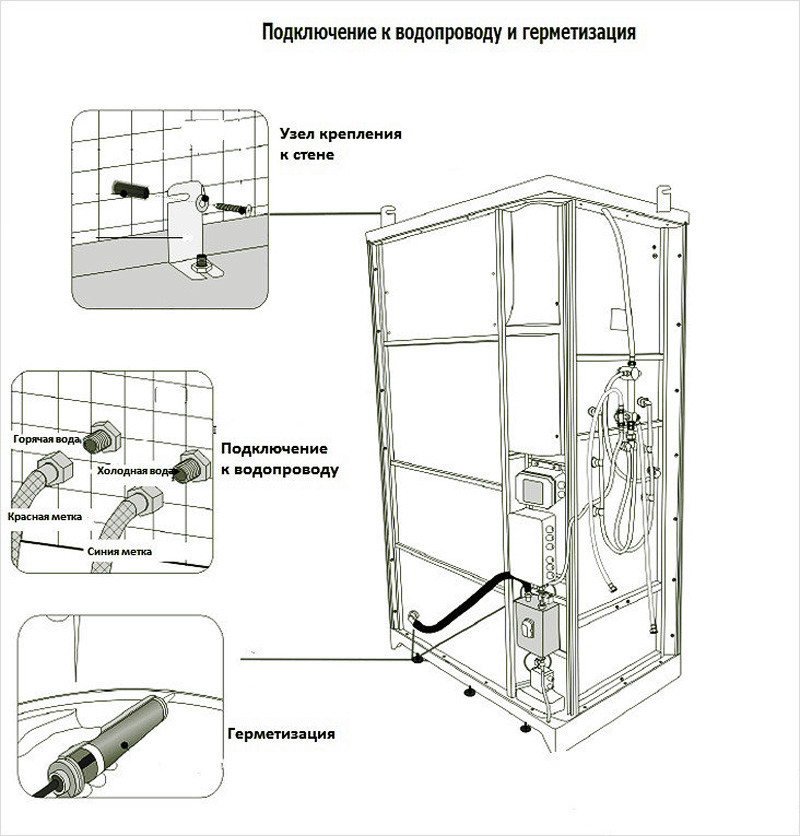
Connect communications
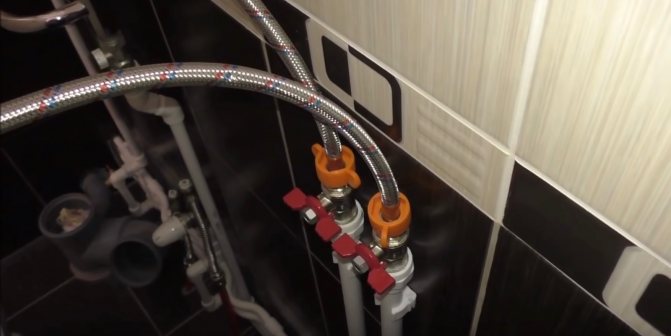
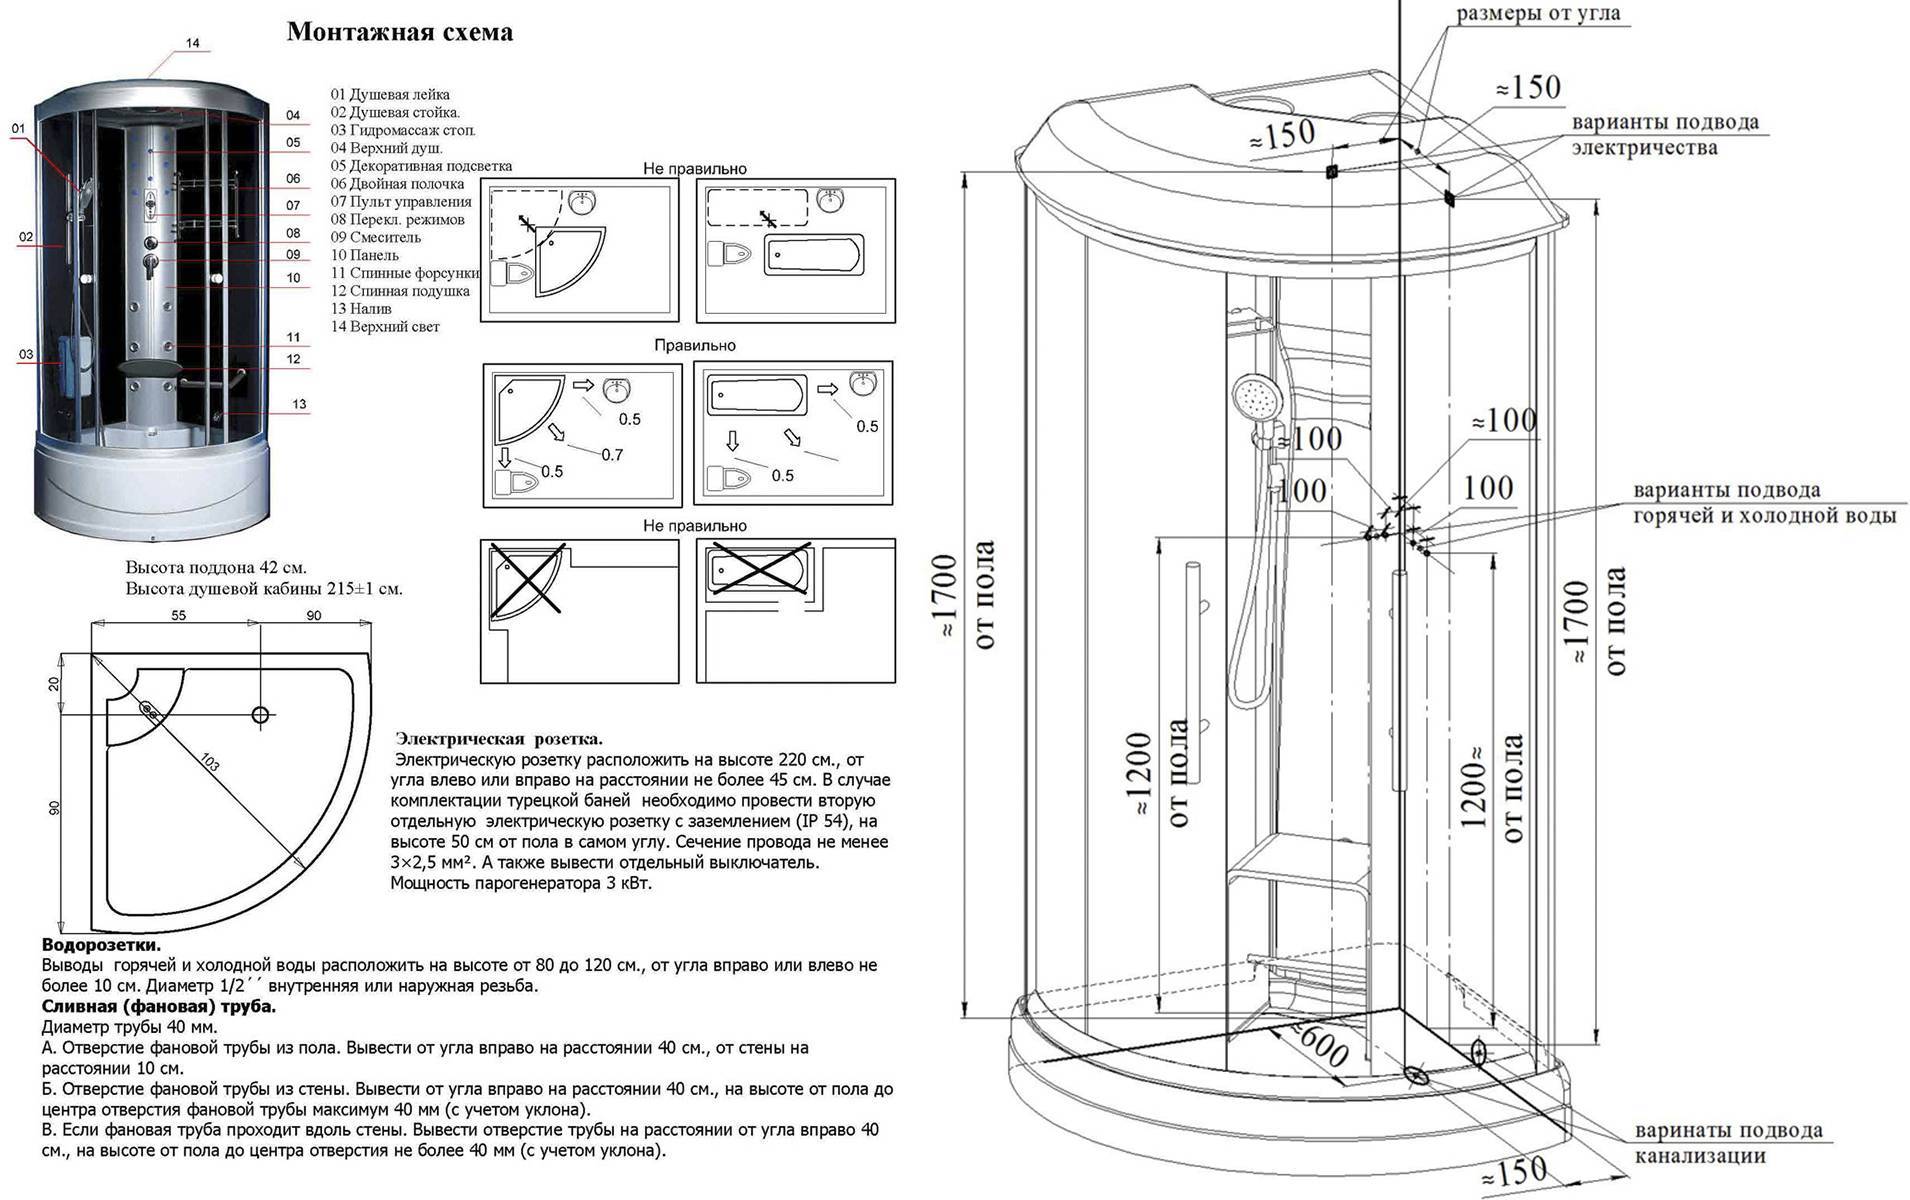
Frame: @Alexander Kvasha / YouTube Connect the internal wiring of the shower cabin hoses according to the diagram in the instructions and fix all joints with clamps. Using flexible hoses, connect the cold and hot water fittings to the corresponding outlets in the wall. Tighten the union nuts with a wrench, remembering to install the gaskets.
Make sure the system pressure is within the manufacturer's recommendations. If the water quality is poor, install fine filters at the inlet to prolong the life of the steam generator and the whirlpool system.
Use a waterproof, grounded socket to connect to the mains. It is desirable that a separate line be laid to it with a two-pole machine and a residual current device.
Slide the shower enclosure into place and connect the siphon outlet to the sewer socket. If a diameters do not match., use the transition sleeve, treating the edges with plumbing grease or liquid soap. When connecting the siphon with a flexible hose, shape it so that the middle part is raised and forms a water seal.
Where to begin?
Assembling a shower cabin begins with the choice of equipment. All commercially available products can be divided into three categories. Models of each group differ in terms of comfort, functionality and cost. Accordingly, the installation of shower cabins will also have its own characteristics. Let's look at each category.
- Economy These are elementary models that include a deep tray and a mixer. Side windows and walls are often absent - they are replaced by curtains. Before installing such products, it is necessary to complete the renovation in the bathroom, in particular, to complete the finishing.Economy class cabins do not have decorative elements, and attract buyers with their low price.
- Middle class. Models from this category are distinguished by extended functionality. There are walls, a deep pan, glass and a roof. Most booths are regularly equipped with a radio station, lighting, and a hydromassage function. Note that absolutely all products have forced ventilation. The booths can be installed without completing the wall cladding, but the electronic filling will require installation of an electrical outlet.
Premium. Here there are functions of a steam room, various options for a shower spout, electronic panel with touch control. Such products are difficult to install on their own - this should be done by professionals.
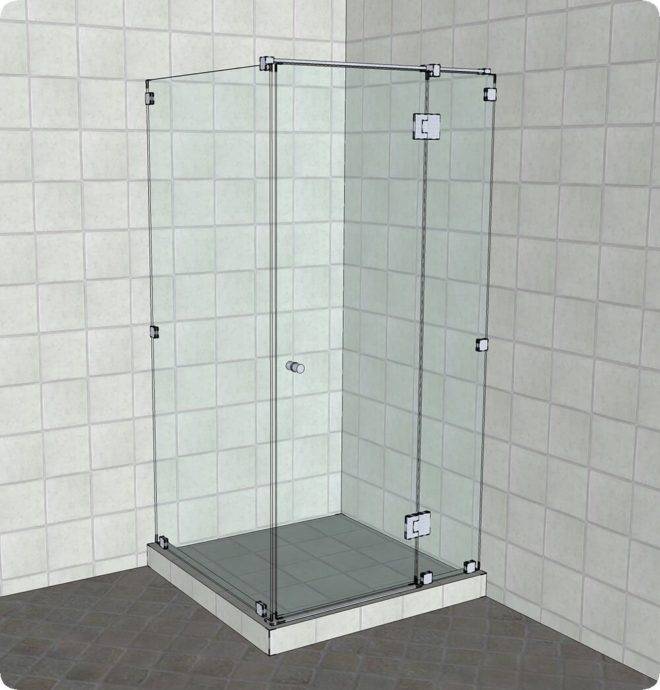
The choice of plumbing
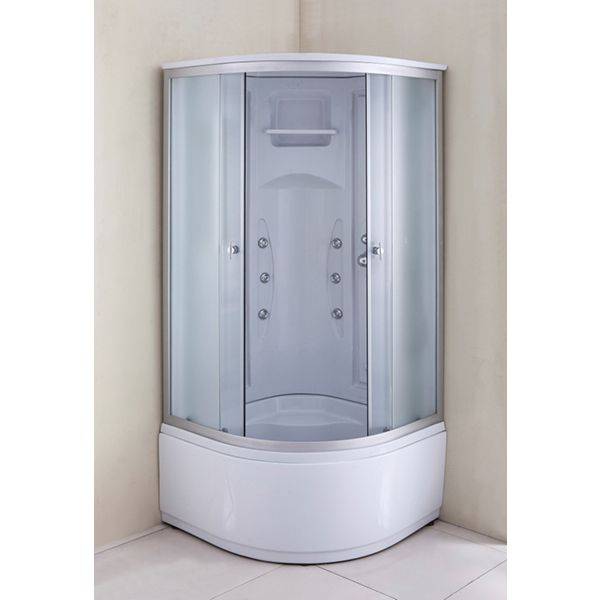
The choice of a shower cabin may be limited by the area of the bathroom, your desires and financial capabilities. Closed and open cabins have their advantages and disadvantages. For example, an open corner cabin can be installed directly on the floor, which significantly reduces its cost.
Shower closed box comes in different configurations, with many additional features for some models. The main disadvantage of such structures is high price.
Do not rush to choose plumbing: look at reviews of various models on the Internet, soberly assess your capabilities, and only then a new plumbing device will bring you joy and satisfaction during operation.
Find out more details about choosing a shower cabin from this article.
Production of showers
They make structures from various materials:
- Brick cabins are distinguished by their strength and long service life, they are difficult to break or damage.
- Tile showers will be a real decoration for your home. Cons - the complexity of the manufacturing process. Working with tiles implies accuracy and diligence when laying out the slab.
- Fiberglass is also often used in cabin construction. Advantages: material strength, high moisture resistance. Disadvantage: with frequent use, the material wears out a lot and loses its presentable appearance.
- Tempered glass is more practical than fiberglass and looks expensive and presentable.
- Wooden cabins are absolutely safe for health, but for their use you need to choose a tree that has water-repellent properties.
How to build and assemble partitions
Partitions allow you to turn the bath into something that looks like a shower. They are collected in two ways: clean and wet.
The first method requires the use of the blocks themselves, glass glue and plastic crosses to align the "bricks" with respect to each other. Nails can be used as mortgages for leveling with respect to the floor.

For the second method, special plastic, aluminum or wooden modules are purchased. First, they must be attached to the floor and ceiling with screws, and grooves will help to fasten the modules with each other and with glass blocks.
Installing curtain railings
To protect the room from splashes and puddles, it is necessary to create an enclosed space. Curtains can help in this matter.
This is a less expensive solution compared to other options.
Mounts:
- "Crocodiles" - the most common fasteners that resemble clothespins. They work on the principle of capture.On the other hand, they are attached with rings to a steel or plastic cornice.
- Hooks with rings - with this type of fastener, holes are made in the upper part of the curtain, and hooks are threaded through them, fixed to the eaves with rings.
- Eyelets - holes are made in the curtain, and then metal or plastic rings are inserted into them, through which the cornice is threaded. They make it possible to move the curtain freely and prevent it from falling.
- Clips on magnets - work on the principle of a magnet, the role of which is played by an exciting canvas of curtains, clips. Fastening does not require holes, but is highly reliable.
- Cornice with chains - the curtain is attached to the curtain rod thanks to a set of hooks, chains and rings, which connect the entire structure with a metal pipe. In addition to chains, cords or threads are also used to fasten curtains.
Construction and assembly of the cabin roof in Khrushchev
Before attaching the cabin roof, lighting, a fan and a watering can are mounted in it. All these elements are attached to the sealant and self-tapping screws, this will prevent leakage. Then, when the roof is assembled, it is fixed with sealant and screws.
The final stage of the manufacture of the soul
When the installation is completed, it is necessary to start up and make sure that the shower is working.
At the same time, the tightness of the joints and holes is checked, the reliability of the fasteners of all nuts. It is advisable to check the pallet under the weight of its weight.
After a visual check, you can open the water supply to detect smudges.
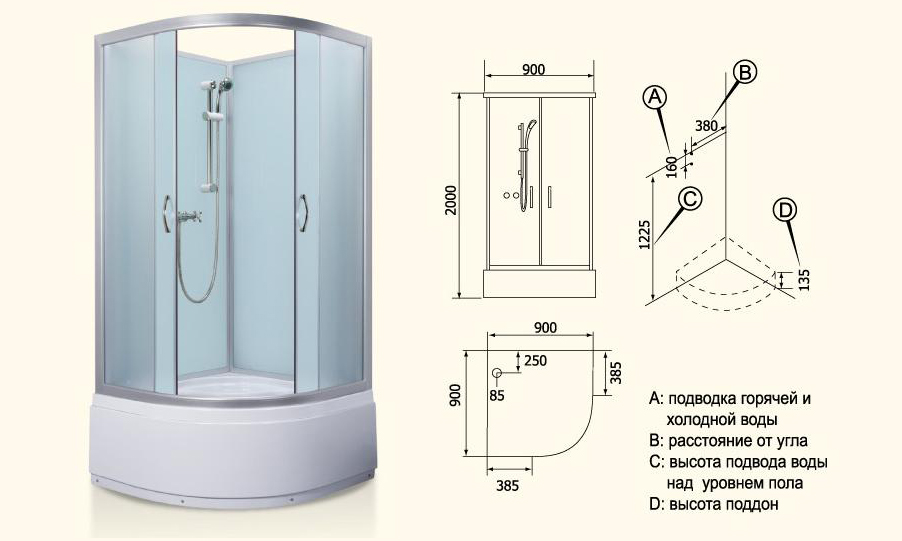
Dimensions
There are many different sizes of shower enclosures on the market.
When choosing, it is important to first decide on the size, and then look at the design and equipment.Due to the small dimensions of the apartments, many people prefer to install showers rather than bathtubs.
This saves a lot of space and is also the most convenient way to take a shower.
Width
The smallest width parameter is considered to be 0.75 m. It is possible only for asymmetric models. Good fit in small bathroom. Such a small size saves a lot of space in the bathroom, which makes it possible to install it even in the smallest room. The only negative is the inability to completely relax.
In such a shower you can only be in a standing position. Sitting or lying down is out of the question. Additional features are usually not included. But it is immediately worth noting that this size is suitable only for medium-sized people. For example, tall and massive men will feel uncomfortable in it. Therefore, before buying, you need to go inside and assess the situation. Such an action will help not to make a mistake with the choice.
The minimum width dimension of standard models is 0.8 m. They are very popular among users. This is due to the fact that the largest number of rooms reserved for the bathroom are small in size. This option will save a lot of space and allow you to install additional appliances or furniture in the bathroom. The cost of such a shower cabin is low and the average person can afford it. The functions that can be in the booth will create the perfect atmosphere for taking a shower.
The maximum width of shower cabins can reach up to 1.8 m. This is the most convenient option, which makes it possible to accommodate two people inside at once.This model is usually used in large rooms connected to the toilet. Due to its large size, the shower cabin can include a number of additional functions, such as hydromassage, aromatherapy, radio, telephone, and more. The cost of this design is much higher than the previous one. But it justifies the investment.
There are also models of shower cabins, which are made together with the bathtub. They are also called combined. Along the perimeter of the bath there are walls, and the top can be either open or closed. Unlike the usual shower stalls, this design is quite large, so it is only suitable for a large room. The user is given the opportunity not only to take a shower while standing, but also to relax in a horizontal position. This design has its advantages and disadvantages.

Pros:
- You can take both a shower and a bath. Perfect for lovers of warm water.
- Spacious shower. This is due to the rather large size of the bath.
- Made in the most reliable way. High sides provide safety and also control the level of water in the pan.
Minuses:
- When leaving such a shower cabin, it is necessary to step over a large tray, which is not convenient for all people.
- Price. The price of this option is quite high compared to a conventional shower cabin, even of the largest size.
- The structure is quite high and can reach 2.5 m.
It should be understood that the wider the shower cabin, the more convenient it is to use. There should be enough space inside for movement while taking a shower.
The height of the shower enclosure is also an important factor when choosing.The smallest height is 1.98 m. It is comfortable, but not for everyone. The highest cabin is considered to be 2.3 m. The comfortable curtain height is 2 meters.
It should be noted that the height is selected individually. In this case, it is necessary to take into account the growth of each family member when buying. It is desirable that there be a "reserve". Therefore, it is recommended to immediately take the largest shower. As a rule, the ceilings in the bathroom will allow you to install such a design.
If the size of the shower cabin is chosen correctly, then its installation will not be problematic for the user. The main thing is to navigate the market of the presented models. The most popular and in demand are side models of showers. This is due to the fact that their walls fit snugly against the walls of the bathroom, which is the most comfortable and safe option. The installation of such a cabin is also quite simple.
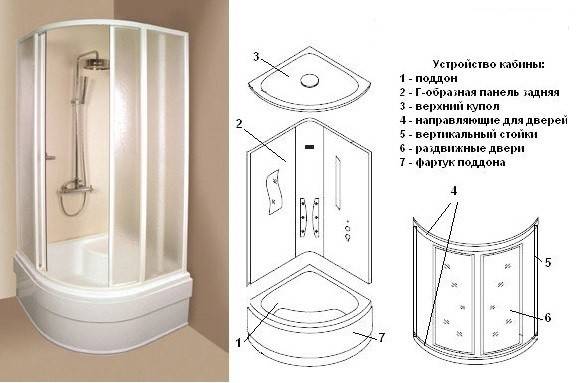
Types of shower cabins available for installation in a wooden house
Open. Boxes of the first type captivate with their simplicity of construction, design aesthetics and low cost. Few elements of shower enclosures are easy and compact to install, but at the same time offer users a minimum of comfort and functionality. Open cabins are devoid of a roof, and often their own walls - they are successfully replaced by (moisture-proof and tiled) walls in a bathroom in a wooden house.
Similar designs with a matte, transparent and tinted fence are installed on a pallet or on a specially prepared floor. On the one hand, they are simple and reliable, economical in terms of water consumption and do not require any special skills from installers.On the other hand, they do not provide freedom of access to engineering communications. Mounted in a niche, in a corner or against a bathroom wall, such systems can decorate any interior.
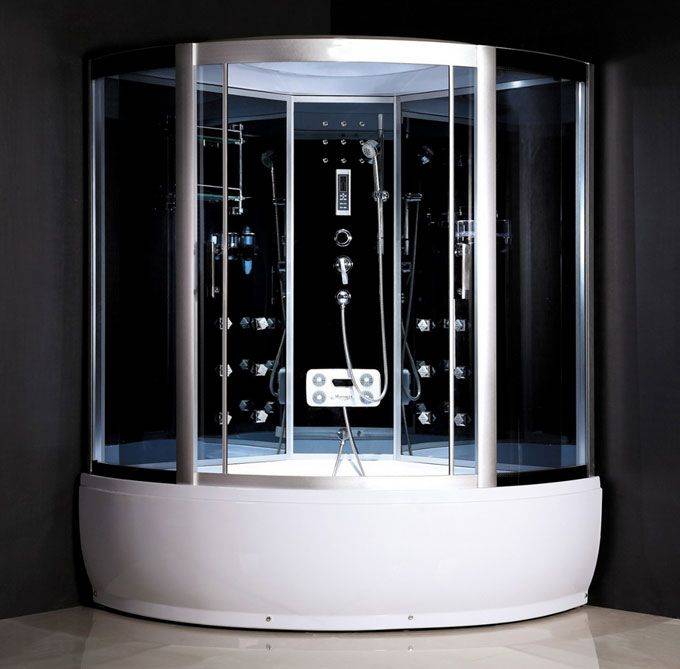
Closed. A closed shower room in a wooden house has an isolated design, mobility and a wide range of models. Their shape can be round, semicircular, square, rectangular or angular. Collapsible boxes consist of tightly fitted walls, hinged or sliding doors, a roof and a pallet. Unlike open models, they are sealed, which allows them to maintain an internal microclimate and protect the box from external noise.
The shower device of this row is much more complicated. They are equipped with a set of adjustable nozzles and a hydromassage function. Multifunctional boxes, in addition to the shower, are equipped with a couple of additional functions. More expensive models with rich technical equipment offer their users a whole range of hygiene procedures and additional features: Turkish bath, tropical shower, hydromassage, aromatherapy, color therapy, electronic, touch or voice control, radio, backlight, telephone and other things.
Those who want to take a steam bath in such a box, massage a tired body in it, and finally, buy a shower cabin, you need to make sure that the pressure in the pipes is at least 2-3 atmospheres (does not fall below the operating pressure declared by the cabin manufacturer). If these parameters do not match, you will have to spend money - purchase and install a booster pump. The same applies to combination boxes with a deep tray or bathtub.
Installation of a shower cabin in a private wooden house is complicated by the supply of electricity, installation of pumps, complex equipment - everything that requires special skills from installers. Therefore, we will focus on the assembly and installation of the most popular closed-type model. Your task is to capture the essence. Models may differ from each other in shape, size, filling, design finds, but the basic assembly principle is the same for everyone.
So, to install a shower cabin in a wooden house with our own hands and protect the bathroom from moisture, we need the following tools and materials:
- open end wrenches;
- crosshead screwdriver;
- construction stapler;
- knife;
- two-meter building level;
- rubber spatula;
- drill with a crown for wood (with extension and shank);
- moisture resistant plywood or DSP;
- anti-corrosion paint (for painting support beams);
- silicone sealant;
- cement mortar;
- expanded clay;
- pads for sleeves (made of foamed polymer);
- waterproofing membrane;
- fiberglass reinforcing mesh;
- waterproofing primer;
- antiseptic;
- bituminous mastic (for gluing waterproofing);
- membrane film;
- moisture resistant drywall;
- polymer mastic;
- primer for drywall;
- scotch;
- wooden bars;
- plastic panels for walls and ceilings;
- ceramic tile;
- waterproof grout;
- tile adhesive.
When installing a shower in a wooden house with your own hands, the set of tools can vary significantly. There are many different designs, including those for special keys, but they are usually supplied with the products. With the above set, you can install almost all running showers on the market.
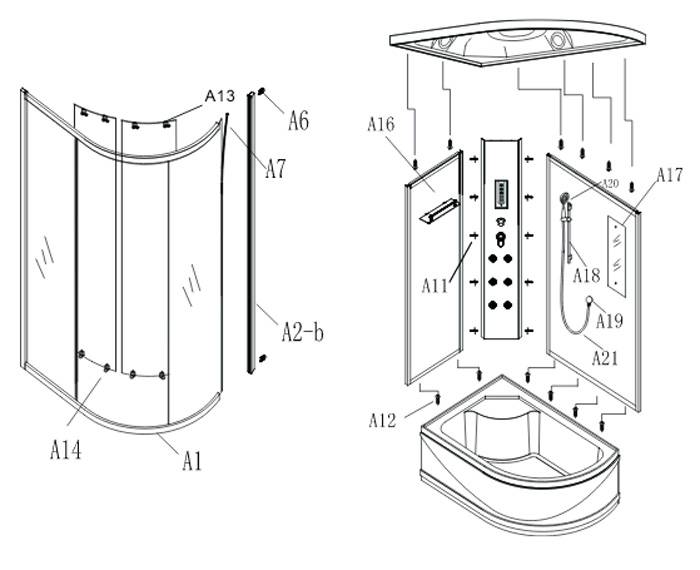
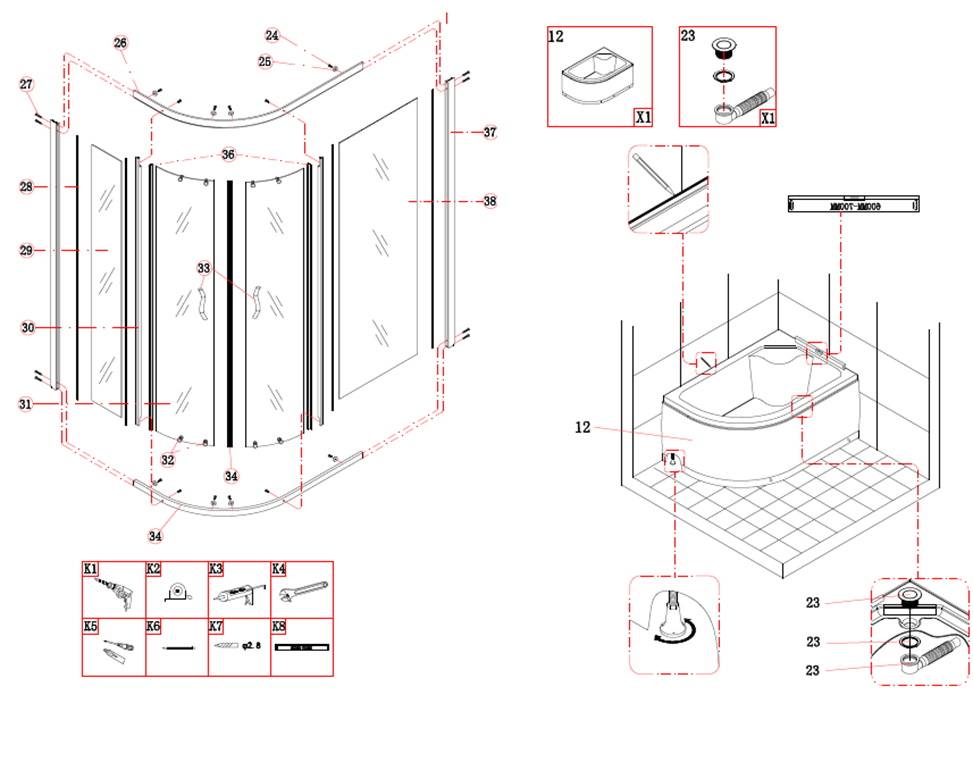
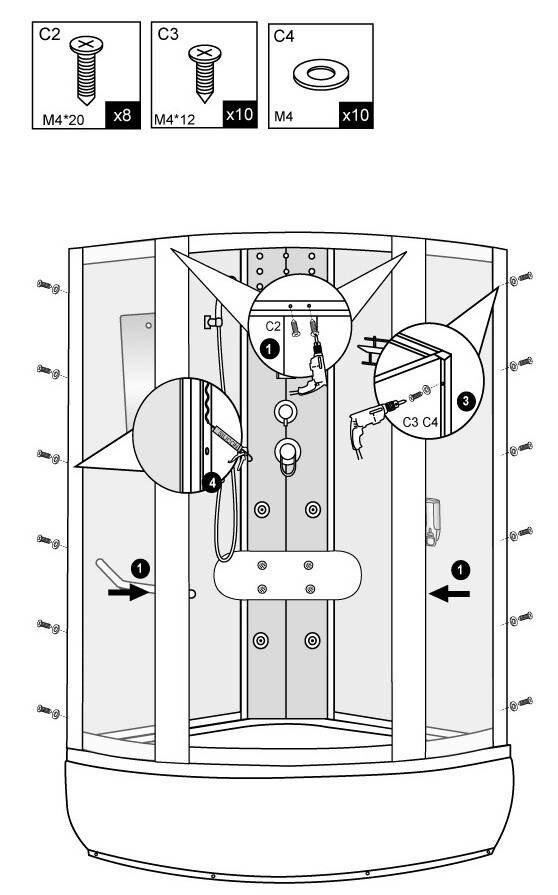
Do-it-yourself installation of side panels, doors and roof in a shower cabin
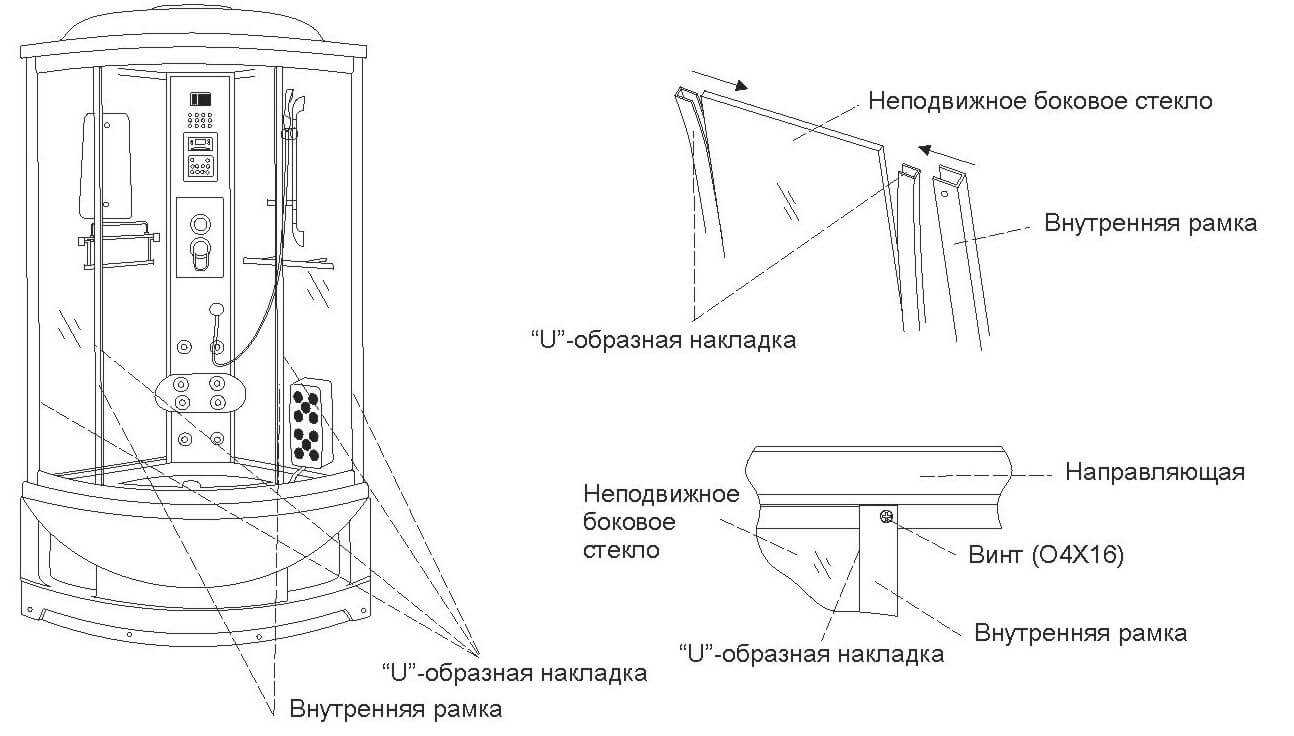
When installing a shower do-it-yourself cabins the next step will be the installation of side panels and glass. To install the side panels, you will need adhesive sealant and hardware. The panels should be placed on the edge of the pallet and placed exactly in a vertical position. This can be achieved with a level. The panels must be placed next to each other and make sure that all mounting holes match. The bottom rail is narrower than the top one. And where there are fewer holes, this is the bottom.
Before installing the glasses, they must be carefully inspected, determining where they have the top (there are fewer holes at the bottom). Next, you need to insert the glass into the guides. Connect the rails to the rack using self-tapping screws. Raise the glass, smear with silicone sealant and put it in place, tighten the screws.
Excess adhesive must be removed immediately. It is necessary to ensure that the glue does not fill the grooves in the pan, otherwise the water will not drain.
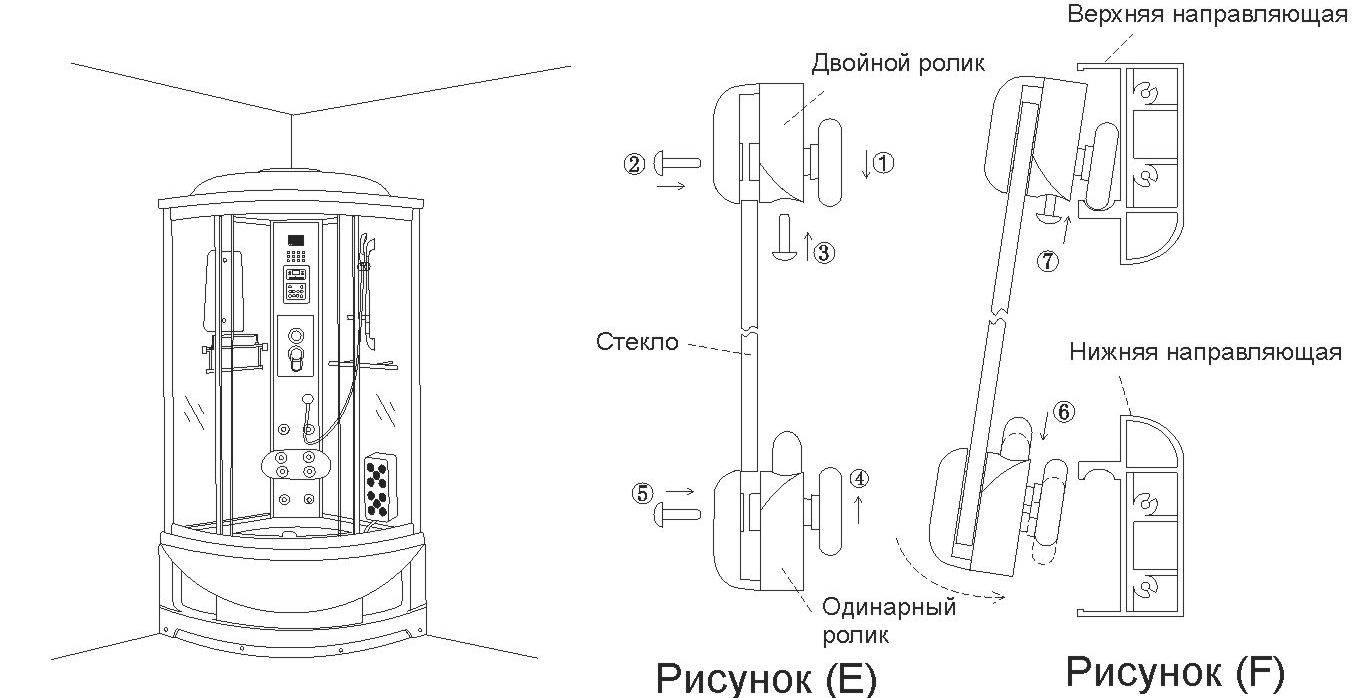
Installing shower doors is easy enough.
It is important to remember that the installation of doors should be done only after the sealant has completely dried. Its drying time, depending on the brand and type, can reach a day.
After making sure that the glue has dried, install the guides for the doors of the future shower. First, fix the rollers in the grooves at the top and bottom. put on the door sealant and insert the doors into the grooves. Ready.
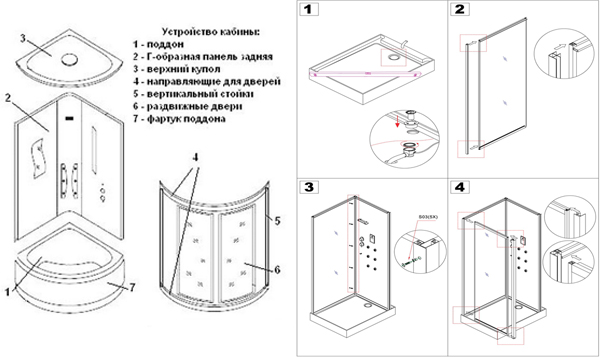
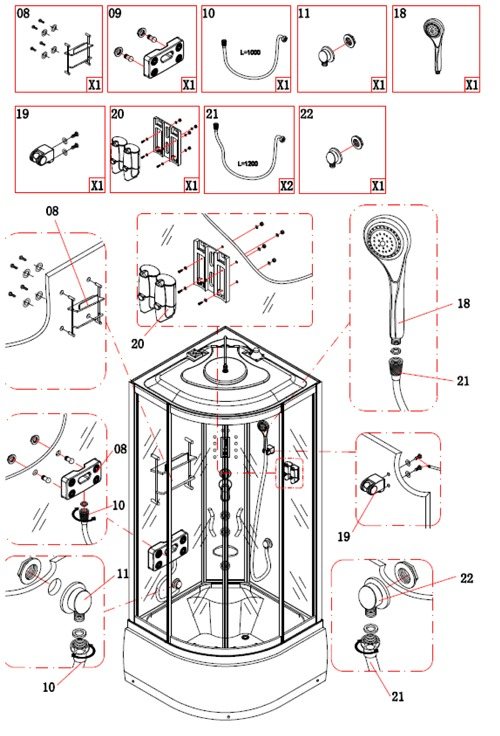
The final stage is the installation of the shower roof. A watering can, a backlight and a fan are fixed on it. After that, it is necessary to check the operation of the electrical lighting in the cab (light, radio, fan). If everything works, fix the mirror, handles, shelves. You can take a shower.
Tips for owners of private houses from a specialist:
- Installing the shower stall itself is relatively simple.More difficult is the preparation of communications. The problem is that in a private house, showers are installed close to a wall or in a corner, that is, to two walls. Therefore, there are difficulties with the conduct of sewer and water pipes. This problem can be solved in two ways. Firstly, it is possible to cut the pallet in places where pipes are laid, but sometimes a low pallet does not allow this. Secondly, pipes can be laid in the wall itself, but this is subject to major repairs in the sanitary room.
- When connecting water to a shower cabin, it is better to use flexible pipes about one and a half meters long. It is also advisable to install a water filter. The filter will purify water from various mechanical impurities and thus extend the life of the cabin.
- To connect the booth to the sewer, you must use a special supply with an adapter to the drain pipe. After connecting the water supply and sewerage, you need to try to start it. If a leak is found somewhere, once again treat all the seams with sealant, wait for it to dry completely and start the system again.
If you follow the proposed instructions, then there will be no questions during the assembly and installation of a shower cabin in the house.
Share this helpful article:
Assemble the pallet
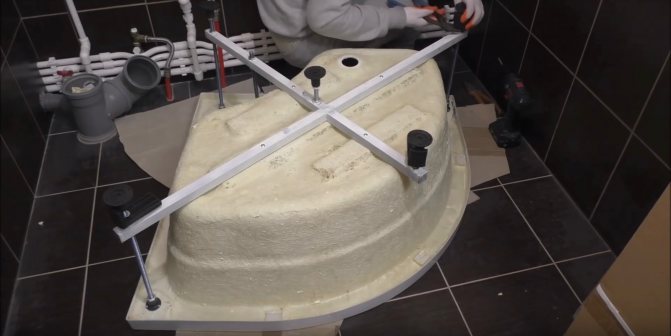
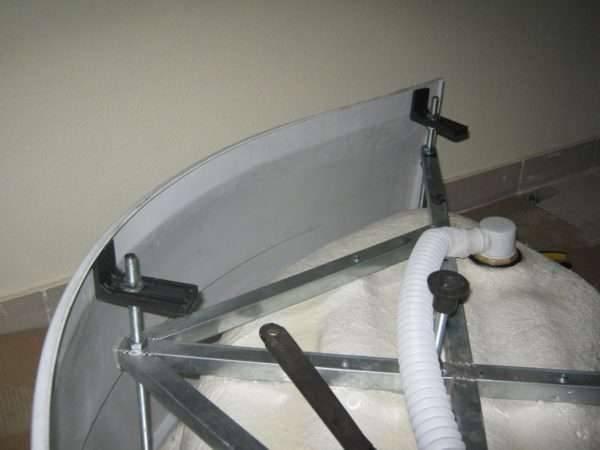
Frame: @Alexander Kvasha / YouTube As a rule, the lower part of the shower cabin is made of acrylic and reinforced with a metal frame on height-adjustable legs. In front, the design is closed with a decorative screen, which is more convenient to install at the very end of the installation.
Assemble the frame according to the diagram. Usually this is a crosshair of two steel pipes, which are screwed to the pallet with self-tapping screws in certain places with mortgages.Use only complete screws, otherwise there is a risk of drilling through the bottom and ruining it. To reduce squeaking, you can first apply a layer of silicone sealant to the frame.
Install studs with nuts, legs, and screen brackets at each end of the cross and centered. First, approximately adjust the height with the nuts. Then use a bubble level to check the position of the tray and make sure it is level. If necessary, raise or lower the corners by turning the legs, and after adjustment, fix them with locknuts.
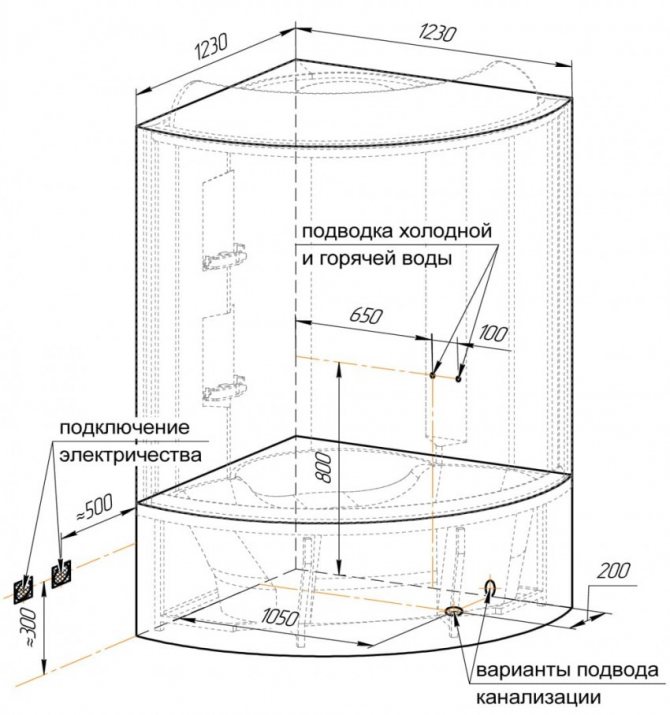
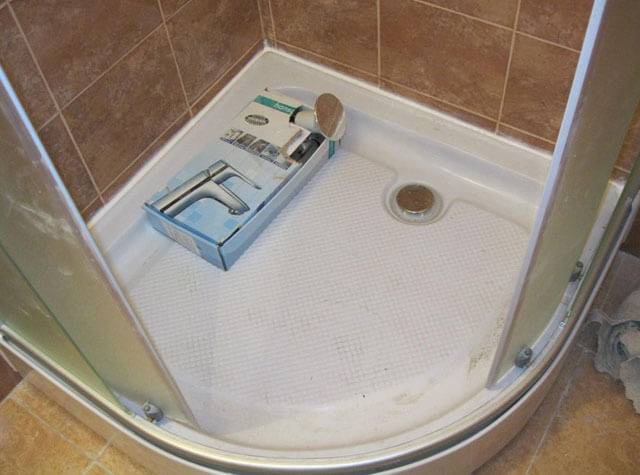
How to prepare for assembling a shower enclosure
First of all, you need to disassemble the old plumbing.
If the floor where the shower cabin will stand is uneven, then it is advisable to level it, for example, with a screed.
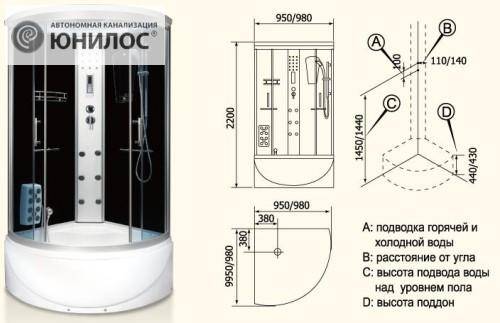
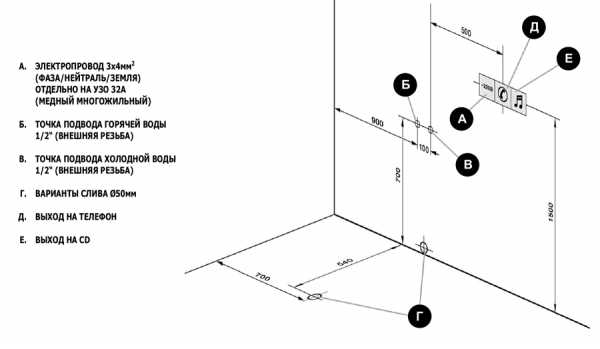
It is also necessary to ensure the supply of the following engineering communications:
- sewer system;
- water supply;
- ventilation;
- electricity.
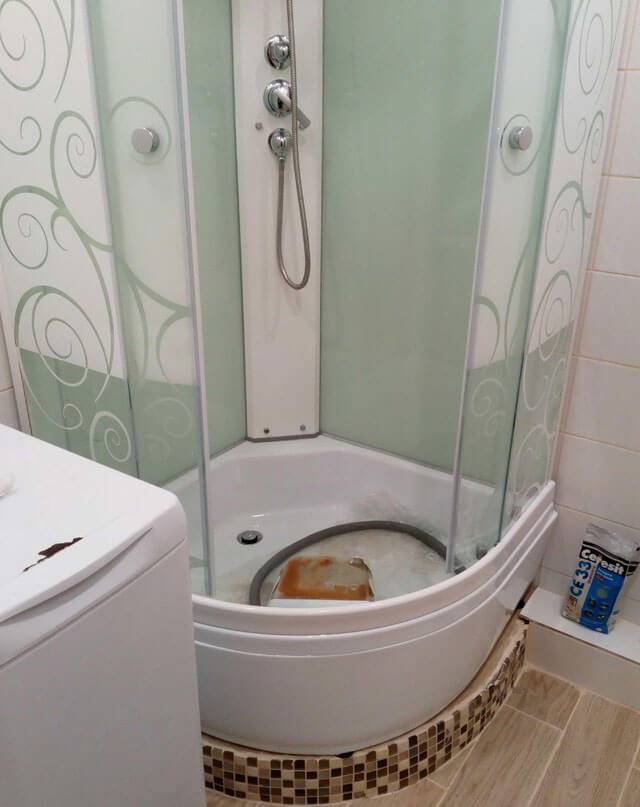
Choosing a place in a small bathroom
Before an upcoming purchase shower cubicle should take into account:
- features of the room in which it will be installed;
- type and size of the room;
- water pressure in the system (the correct functioning of the shower cabin will depend on it).
In small apartments and small rooms, it is better to place a booth next to communications. Location in the corner of the room will save space, free access to the shower, and also allow you to comfortably use household or other appliances in the room.
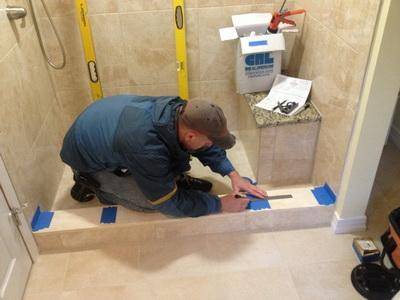
Installation of shower walls
When planning how to install a shower cabin correctly, a certain sequence of actions is required.You can find the instructions in the attached instructions.
At this stage, the side walls are assembled:
- The top of the pallet is freed from the packaging film, leaving the bottom still covered with it.
- The pallet is shifted from one of the walls of the room and an opaque wall is placed there.
- The hole in the pallet is joined to the corner and fastened with 35 mm self-tapping screws, without much effort.
- A marker along the corner marks the places of the holes.
- The septum is removed, a 5 mm silicone layer is applied and put back in place. The excess composition is removed - this should always be done immediately after the part is pressed.
- The tray with the baffle is moved against the wall and the center panel is applied to determine if more lining is needed. The place of contact of the side wall with this panel is sealed. Connect them with fasteners of 10 millimeters.
- By analogy with the first side wall, a second one is installed.
- Next, they deal with a fixed partition. An oblique cut of the metal profile is placed at the bottom. It is covered with sealant and a partition is mounted. The top edge must be flush with the wall. A 3 mm hole is made on the outside of the profile and the partition and wall are pulled together with self-tapping screws.
- Profiles are mounted - upper and lower, combining the rounded parts. In this case, the upper profile is wider than the lower one.
Operating recommendations

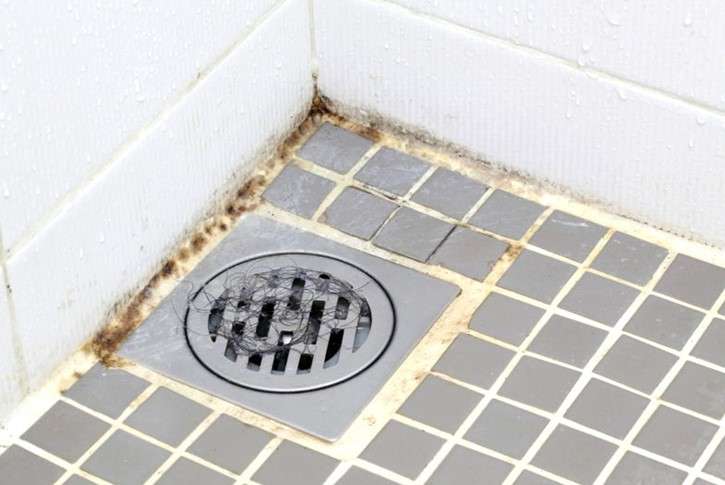
The microclimate in a typical bathroom of any high-rise building is far from ideal: high humidity with very mediocre air exchange. However, such conditions are perfect for life and the spread of mold, traces of which can be seen at the junctions of structural elements and in the grooves of fittings."Oils on the fire" add lime stains that appear on the surfaces of the cabin and plumbing fixtures due to the use of poor quality water in the bathroom. All this, combined with a high load from daily use, spoils the appearance and reduces the life of the shower box. Proper care of the booth will allow not only to maintain an attractive appearance for a long time, but also significantly extend its service life.


Care of doors and fencing
Tempered glass railing has high strength, resistance to mechanical damage (scratches). Caring for the glass elements of the booth is simple: after use, the surface should be rinsed and wiped dry with a napkin. The task of maintaining a glass railing is made easier by regular glycerin, which is an excellent water repellent. The absence of water droplets on the glass surface will avoid the appearance of limescale.
- Proper care of plastic and polymeric materials consists in the regular use of special chemicals that treat the surfaces of the booth after each use.
- A shower enclosure with decorative tiles does not require special care. The only weak point of this material is the joints. The grout in the joints has a porous structure, due to which compensation occurs during thermal deformation of the material. The reverse side of the coin is rapid contamination, the appearance of lime stains and mold colonies at the joints of tiles.
The problem is solved by regular treatment of tile joints with specialized sprays or cleaning concentrates.
Pan cleaning
Proper care of the pallet consists in the regular removal of dirt, foam and moisture from its surface. The recommendations for processing the shower tray depend on the material from which it is made. To date, the most common materials are:
- acrylic;
- artificial stone;
- a natural stone;
- enamel coated steel.
The basic rule for tying behind acrylic pallets is no abrasives. For cleaning, it is enough to apply a specialized agent to the acrylic surface with a sprayer or sponge, and after a while (indicated by the manufacturer on the package), rinse with warm water.
Pallets made of artificial stone do not tolerate abrasive particles, detergents, which include acids, alkalis, acetone, methylene chloride. To clean such material, it is better to use specialized chemicals or use the following advice: during cleaning, fill the pan with water with the addition of a descaling agent, leave for 20-30 minutes, then rinse the surfaces with clean water and wipe dry. Daily maintenance consists of wiping the surface with dishwashing detergent or soapy water.
To clean natural stone, it is better to use professional chemicals or a homemade product based on pure water and a small amount of PH-neutral soap. In practice, a solution of water with ammonia proved to be excellent.
Enamel pallets perfectly tolerate potent chemistry with fairly aggressive compounds. The only thing that the coating is afraid of is the mechanical damage that can be caused when using coarse-grained abrasives.
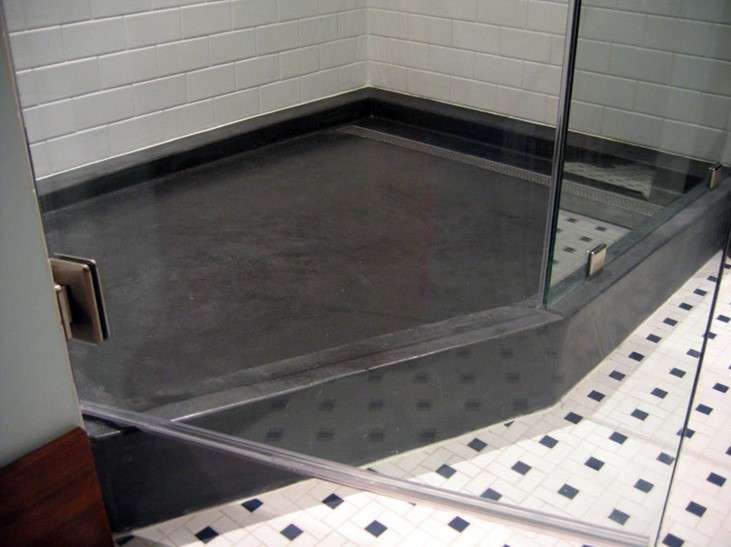
Homemade pallets with decorative tiles, static to strong solutions and abrasives. Detergents containing acids in soy composition ideally remove grease, dirt and limescale. The cleaning algorithm is as follows: apply the composition to the tile, carefully wipe the surfaces with a sponge or brush, rinse off the foam with clean water and remove any remaining moisture with a clean cloth. To process the seam, you can use specialized tools or use a steam cleaner. The steam will soften the buildup, which can be easily removed with a regular sponge.
More information about cleaning shower boxes can be found in the video:


