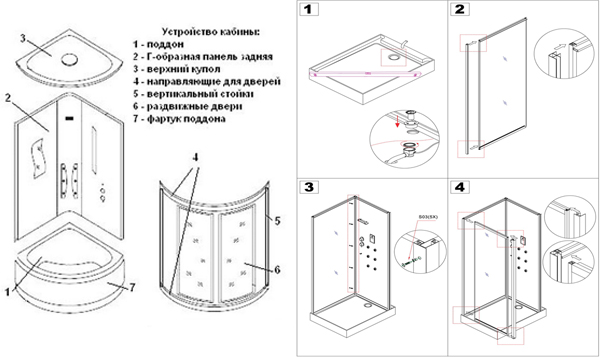
- How to assemble the cabin
- Assembly instructions: how to install the corner with your own hands
- Types of shower cabins available for installation in a wooden house
- Do-it-yourself shower cabin construction
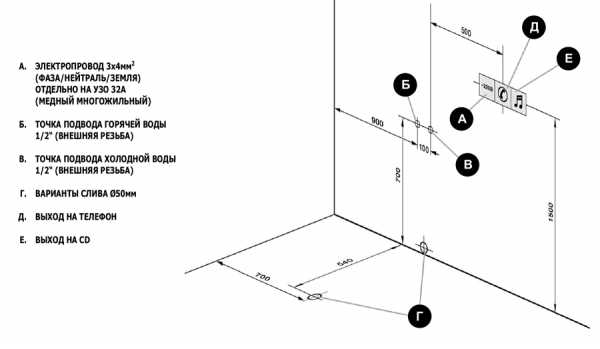
- Supply of communications
- Waterproofing
- Pallet construction
- Frame manufacturing
- Sewer connection
- How to check the quality of parts?
- Stage six
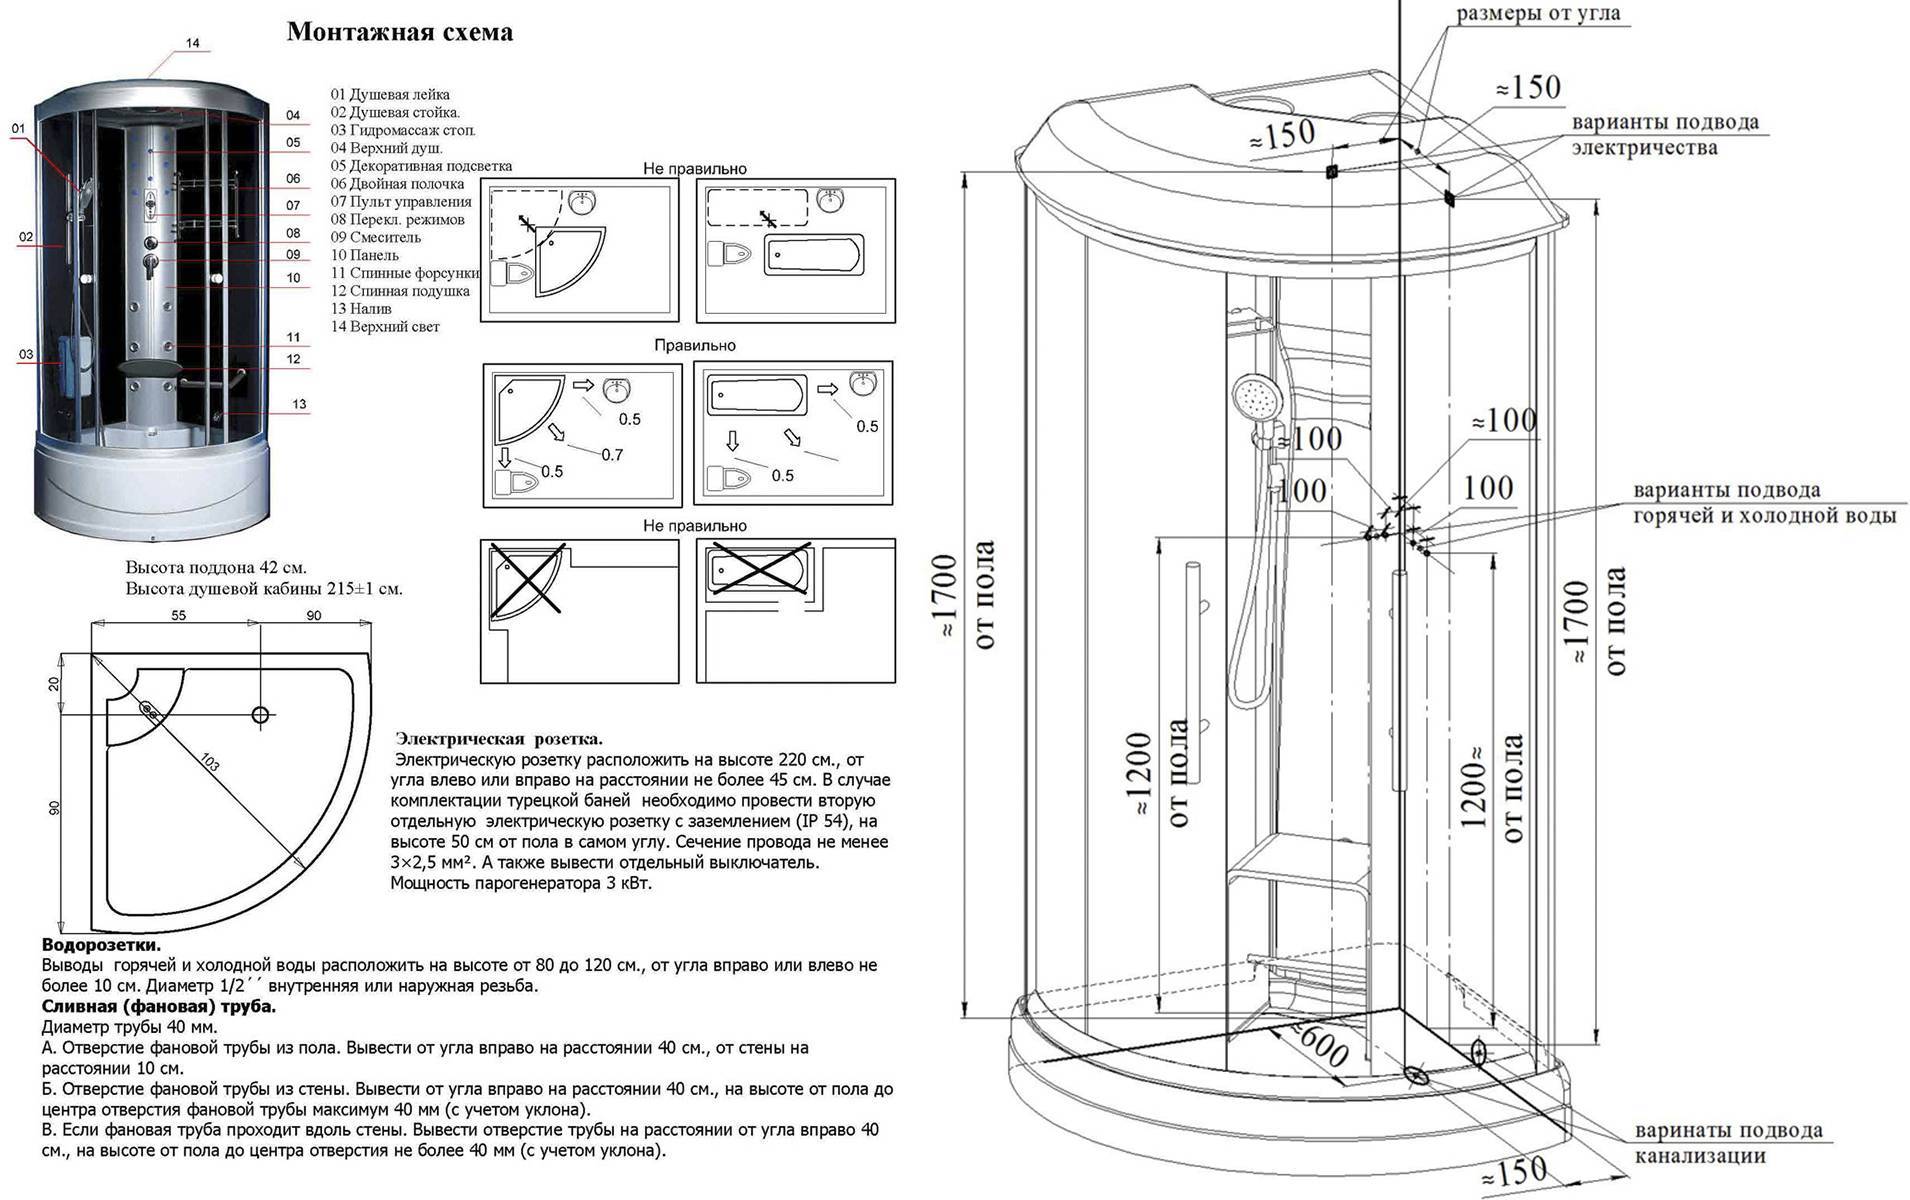
- Dimensions
- Width
- Shower cabin assembly
- Preparation for work
- Checking the location of communications
- Pallet installation
- Installation of siphon and panel fittings
- Assembly of the side walls
- Doors and ceiling panel
- Connection to communications
- Screen pinning
- Checking the operation of electrical appliances
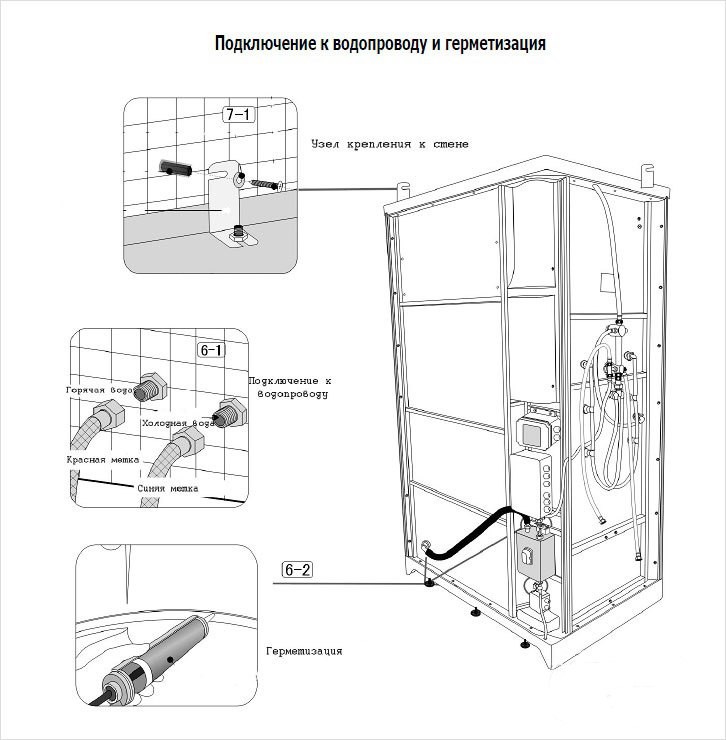
- Stage 7. Connecting the cabin to water and sewerage
- Connecting a shower cabin with your own hands to the water supply and sewerage
- Shower panel installation
- Connecting the shower cabin to the power supply system
How to assemble the cabin
In order to avoid difficulties during the assembly of the structure, it is recommended to carefully read the instructions that came with the product.
Important! Before starting work, you should prepare. It is important to make sure that the surface meets the required standards
If necessary, the floor is leveled and waterproofed. Installation of a shower stall is only allowed on a perfectly flat area.
Assembly instructions: how to install the corner with your own hands
The place for installation is selected.
Two factors play a key role: the shower is located close to the exhaust, a large number of models require grounding, as they are equipped with additional functions and need electricity.
The initial stage of installation is the assembly of the structure itself. In the process work, the nuances of connection become clear and determine its actual dimensions.
Sewer system. The drain is installed in a special hole. A siphon is installed and a corrugated pipe is connected for outlet to the sewer
To prevent unpleasant odors from entering the shower room, a rubber cuff is put on the end of the corrugated pipe.
It is important to correctly connect the water supply to the booth. Only pipes and fittings made of high quality material are used
All connections must be sealed.
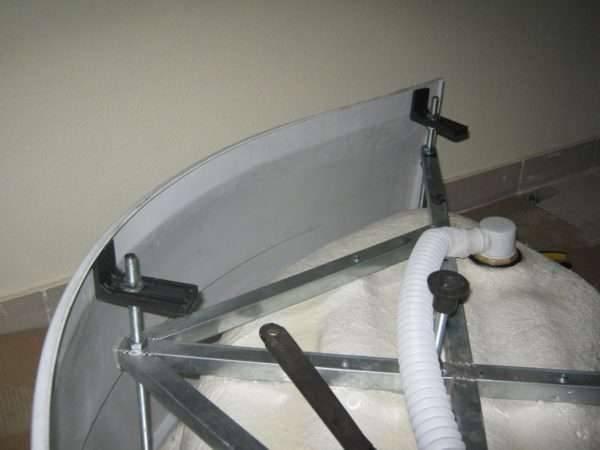
The collection of the pallet is as follows:
- The baited locknuts on the studs are screwed into the pallet. After screwing in until it stops, they are fixed with a nut. During these manipulations, do not overdo it so as not to break the thread.
- Then one more nut is screwed onto each stud with notches up.
- Further, the frame is placed on the studs and attracted from both sides.
- Brackets made of plastic are screwed onto the front studs.
- The legs are attached and the base is installed in its place.
- The shower screen is adjusted to the lower edge of the shower tray.
- Finally, the lower part of the brackets is exposed with a gap of 20 millimeters from the floor.
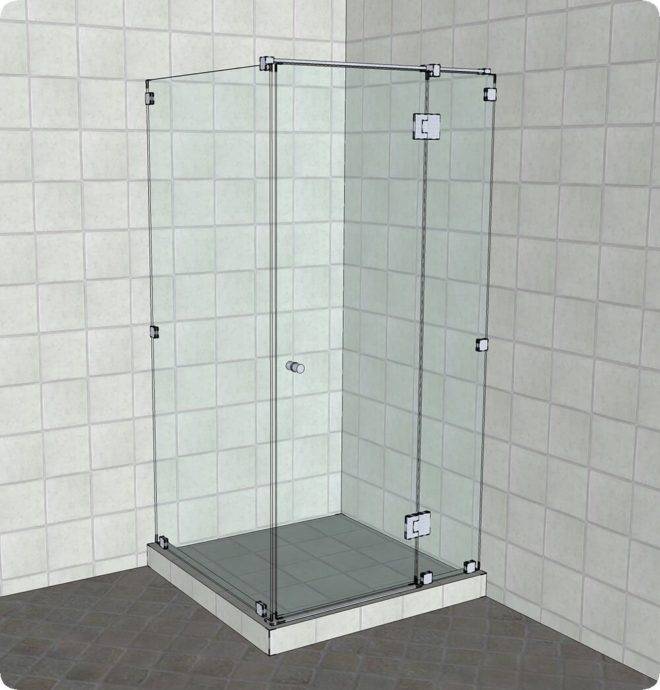
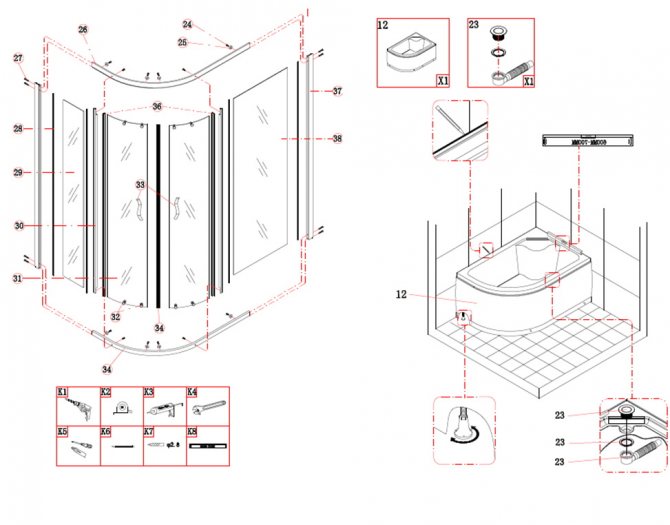
The cabin is assembled like this:
- Collecting the guide frame for the doors.
- Installation in place.
- Alignment of grooves with holes and tightening with screws of two arcs and racks.
- Installation of side glass walls.
- Fixing rollers.
- The finished frame is placed on a pallet and the correctness of its placement is verified.
- Mounting points are marked.
- The cabin is removed, and holes are drilled in place of the marks and dowels are inserted.
- The places of contact of the structure with the walls are coated with sealant.
- The guides are put in place and screwed with bolts.
- Upon completion of the installation of the cabin, doors are installed.
Types of shower cabins available for installation in a wooden house
Open. Boxes of the first type captivate with their simplicity of construction, design aesthetics and low cost. Few elements of shower enclosures are easy and compact to install, but at the same time offer users a minimum of comfort and functionality. Open cabins are devoid of a roof, and often their own walls - they are successfully replaced by (moisture-proof and tiled) walls in a bathroom in a wooden house.
Similar designs with a matte, transparent and tinted fence are installed on a pallet or on a specially prepared floor. On the one hand, they are simple and reliable, economical in terms of water consumption and do not require any special skills from installers. On the other hand, they do not provide freedom of access to engineering communications. Mounted in a niche, in a corner or against a bathroom wall, such systems can decorate any interior.
Closed. A closed shower room in a wooden house has an isolated design, mobility and a wide range of models. Their shape can be round, semicircular, square, rectangular or angular.Collapsible boxes consist of tightly fitted walls, hinged or sliding doors, a roof and a pallet. Unlike open models, they are sealed, which allows them to maintain an internal microclimate and protect the box from external noise.
The shower device of this row is much more complicated. They are equipped with a set of adjustable nozzles and a hydromassage function. Multifunctional boxes, in addition to the shower, are equipped with a couple of additional functions. More expensive models with rich technical equipment offer their users a whole range of hygiene procedures and additional features: Turkish bath, tropical shower, hydromassage, aromatherapy, color therapy, electronic, touch or voice control, radio, backlight, telephone and other things.
Those who want to take a steam bath in such a box, massage a tired body in it, and finally, buy a shower cabin, you need to make sure that the pressure in the pipes is at least 2-3 atmospheres (does not fall below the operating pressure declared by the cabin manufacturer). If these parameters do not match, you will have to spend money - purchase and install a booster pump. The same applies to combination boxes with a deep tray or bathtub.
Installation of a shower cabin in a private wooden house is complicated by the supply of electricity, the installation of pumps, complex equipment - all that requires special skills from installers. Therefore, we will focus on the assembly and installation of the most popular closed-type model. Your task is to capture the essence. Models may differ from each other in shape, size, filling, design finds, but the basic assembly principle is the same for everyone.
So, to install a shower cabin in a wooden house with our own hands and protect the bathroom from moisture, we need the following tools and materials:
- open end wrenches;
- crosshead screwdriver;
- construction stapler;
- knife;
- two-meter building level;
- rubber spatula;
- drill with a crown for wood (with extension and shank);
- moisture resistant plywood or DSP;
- anti-corrosion paint (for painting support beams);
- silicone sealant;
- cement mortar;
- expanded clay;
- pads for sleeves (made of foamed polymer);
- waterproofing membrane;
- fiberglass reinforcing mesh;
- waterproofing primer;
- antiseptic;
- bituminous mastic (for gluing waterproofing);
- membrane film;
- moisture resistant drywall;
- polymer mastic;
- primer for drywall;
- scotch;
- wooden bars;
- plastic panels for walls and ceilings;
- ceramic tile;
- waterproof grout;
- tile adhesive.
When installing a shower in a wooden house with your own hands, the set of tools can vary significantly. There are many different designs, including those for special keys, but they are usually supplied with the products. With the above set, you can install almost all running showers on the market.
Do-it-yourself shower cabin construction
Self-production of a shower cabin is a complex process that includes several stages. First you need to accurately determine the location of the future hydrobox, its dimensions, and the materials used. A drawing of the structure with detailed dimensions is drawn up. If there is an old finish on the walls, it is removed.If necessary, the old screed is dismantled and a new one is poured.
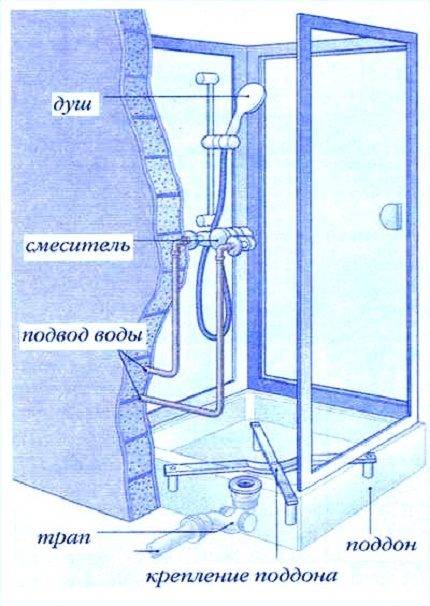
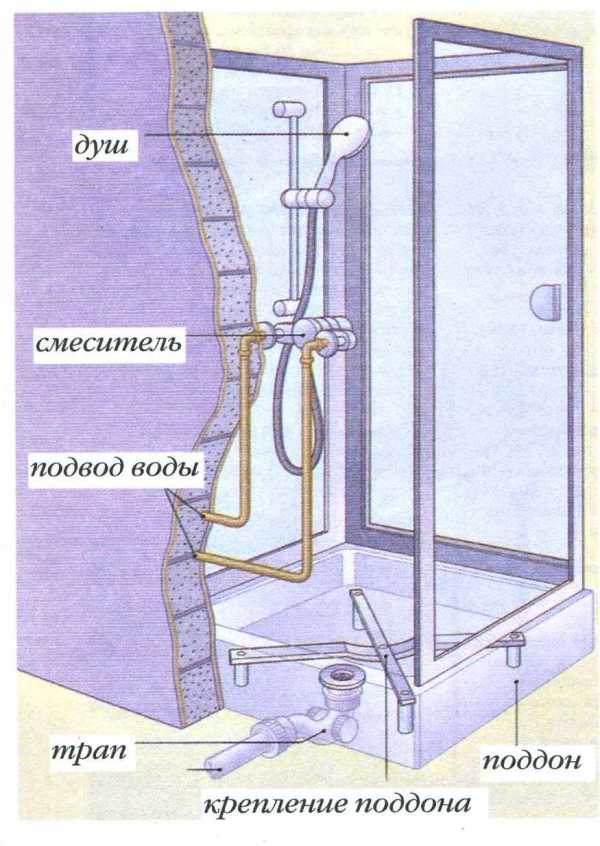
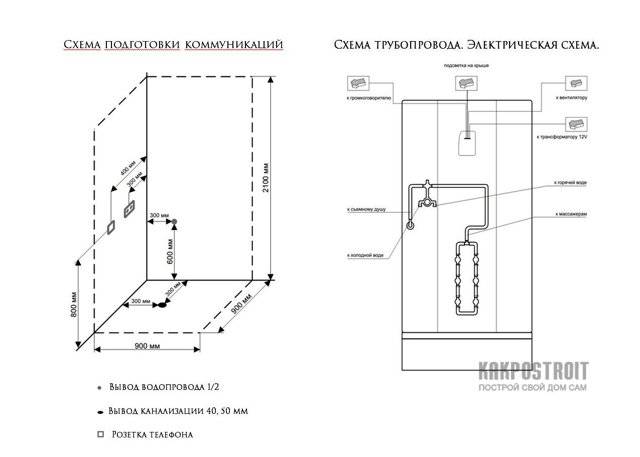
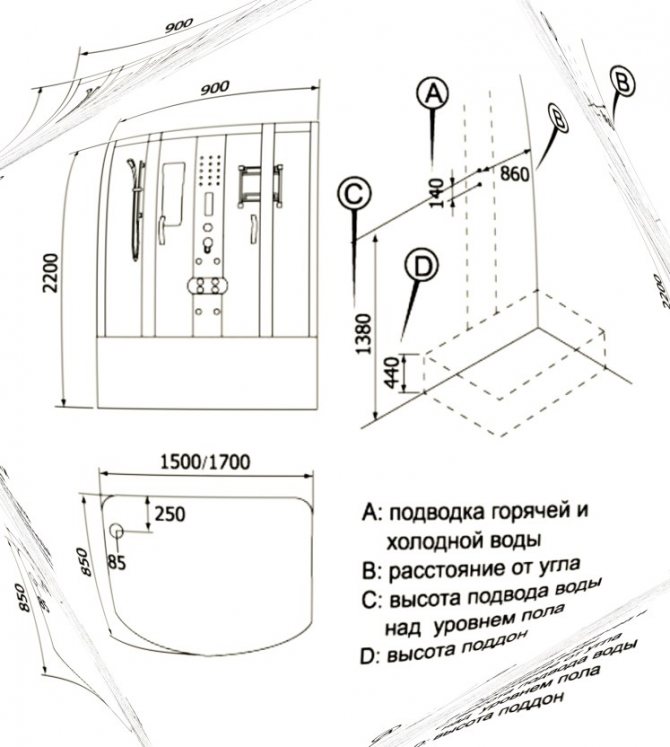
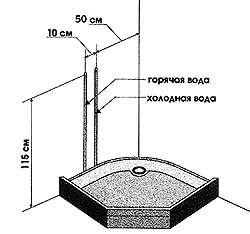
Supply of communications
Water pipes and sewerage are carried out in a hidden way. In modern houses, polypropylene pipes are used for this, which are placed in strobes. At the same time, they need to be cut so wide that, in addition to the pipe itself, a layer of thermal insulation also fits in the strobe. As it is usually used either ecowool or special sleeves. Don't forget to install stopcocks. They are mounted outside the cabin.


After the system is laid and its performance is checked, the strobes are plastered. At the ends of the pipes, threaded flanges are installed for the subsequent installation of the union nuts of the mixer.
Waterproofing
Without properly made waterproofing, subject to a homemade pallet, you will quickly flood your neighbors from below. Modern compositions for protection against water are divided into the following types:
- Penetrating - used for monolithic concrete surfaces;
- Rolled - self-adhesive options are most often used for the home;
- Coating - compositions based on polymer-cement substance or bitumen.
Before organizing a sealed layer, the old finish should be removed. If preference is given to roll materials, they are overlapped. The junction of the wall and floor is carefully glued with a special tape.
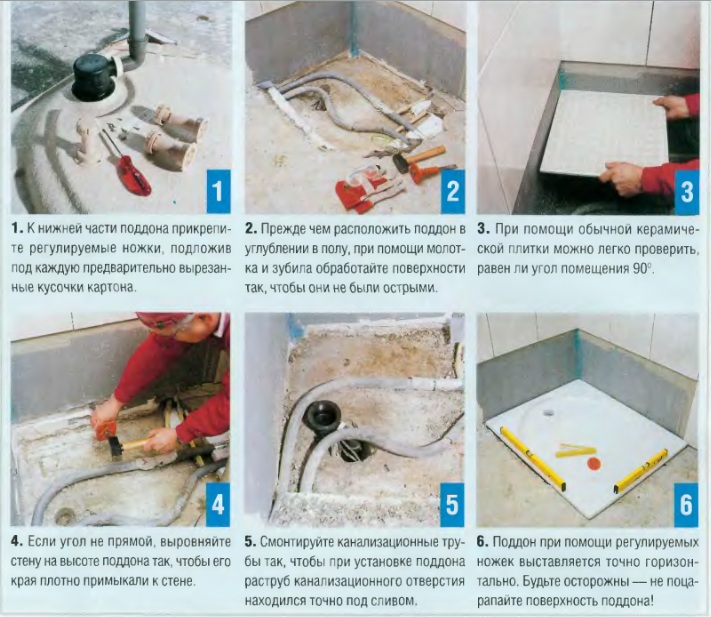
Pallet construction
The sequence of actions in this case depends entirely on whether the finished product is used or it is decided to build a pallet from scratch. The first option is much easier. The finished structure is installed as follows:
- The base is carefully leveled, for which a rough screed is made;
- Sewer pipes are laid, a drain siphon is installed;
- The product itself is installed;
- A decorative screen is attached to the latches, usually it comes with a pallet in the kit.
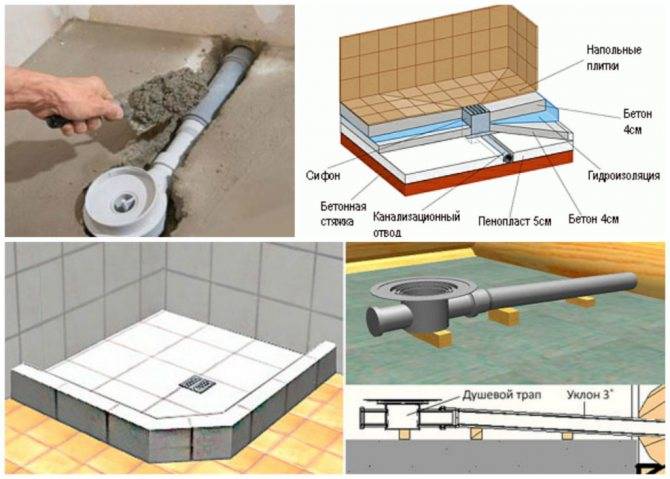
The pallet is usually built of brick. At the same time, water-resistant additives, for example, liquid glass, must be added to the cement mortar. If the glazing will be installed on a metal frame, mortgages are mounted for it. A rough screed is poured inside, on top of which waterproofing is applied. A ladder and sewer pipes are laid in the right place
In this case, it is important to observe the slope. A layer of thermal insulation is placed on top, usually a 50 mm foam sheet is used for this, on top of it there is another layer of waterproofing and a screed reinforced with a metal reinforcing mesh with 100 by 100 mm cells
The screed must be poured with a slope towards the drain point. After it is completely dry, waterproofing is laid, only after that it is possible to finish the structure with tiles.
Frame manufacturing
The frame of the shower cabin can be made of aluminum profile or wood, but the latter must be treated with an antiseptic composition. The first profile is laid on the edge of the base, it must be exactly in a horizontal plane, a level is used to check. The counterpart is installed on the ceiling. For reinforcement, vertical rails and horizontal rails are mounted.
Drywall sheets are fixed on the frame, which are pasted over with reinforcing tape along the joint. The plaster is applied on top. After drying, a waterproofing layer is mounted. Ceramic tiles can be laid on top of it. It should be laid on a waterproof adhesive composition. Instead of tiles, special latex paint or ready-made plastic panels can be used.
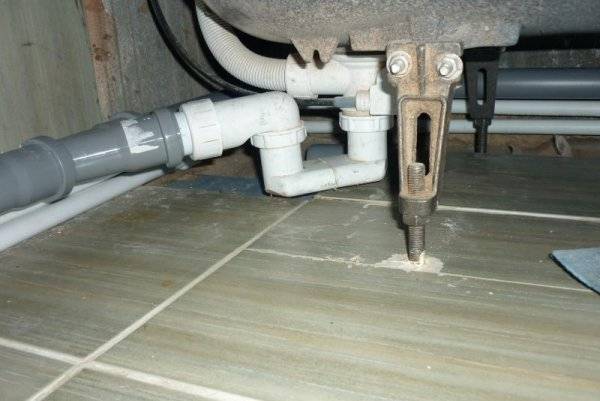
Sewer connection
The method of connecting the drainage system depends on the type of the pallet. If a finished product is used, a siphon is connected to its drain hole, a corrugation is connected. The second end of the latter is connected to the sewer outlet.
If the pallet is homemade, a ladder is installed in it, which is mounted even in the subfloor. The performance of the product must be at least 30 liters per minute, otherwise the water simply will not have time to drain. The square ladder is mounted in the center of the cabin, the slope from the walls is at least 3 degrees. The slotted ladder is installed next to the wall.
A well-made shower enclosure will last for many years. If necessary, the finished pallet can always be replaced, this procedure will not take much time and will not require large-scale repair work.
How to check the quality of parts?
Before installing the cabin in the bathroom, you need to make sure the quality of the components. For this, the product is pre-assembled in a spacious room and without the use of sealant. Cabins with a ceramic pallet are mounted using a jigsaw.
Pallet: ceramic, steel or cast iron, acrylic (the latter is at the peak of popularity).
- Thin sanitary ware has a lot of chances to crack or break - look at the thickness.
- The steel trays are supplied on adjustable feet, with a bottom treated with polyurethane foam and rubber pads underneath (so that water jets do not create a rumble when they meet the surface). If there is no such protection, it will be inconvenient to use the shower.
- Acrylic needs additional support in the form of a support system, a metal frame or fiberglass bottom reinforcement. Check for the presence of parts that give rigidity to the structure.
Scratches and chips on the frame, and even more so broken parts, are unacceptable. Test fine details for geometric conformity.
The glass is in the package, and in the box it is not clear whether it remained intact after transportation. According to the standards for booths, tempered glass with a thickness of at least 6 mm is used, which is enough to withstand many mechanical stresses. But to check, shake the box - if there is no characteristic noise of broken glass, then everything is fine. It is better to order sliding glass doors at Almetagroup.

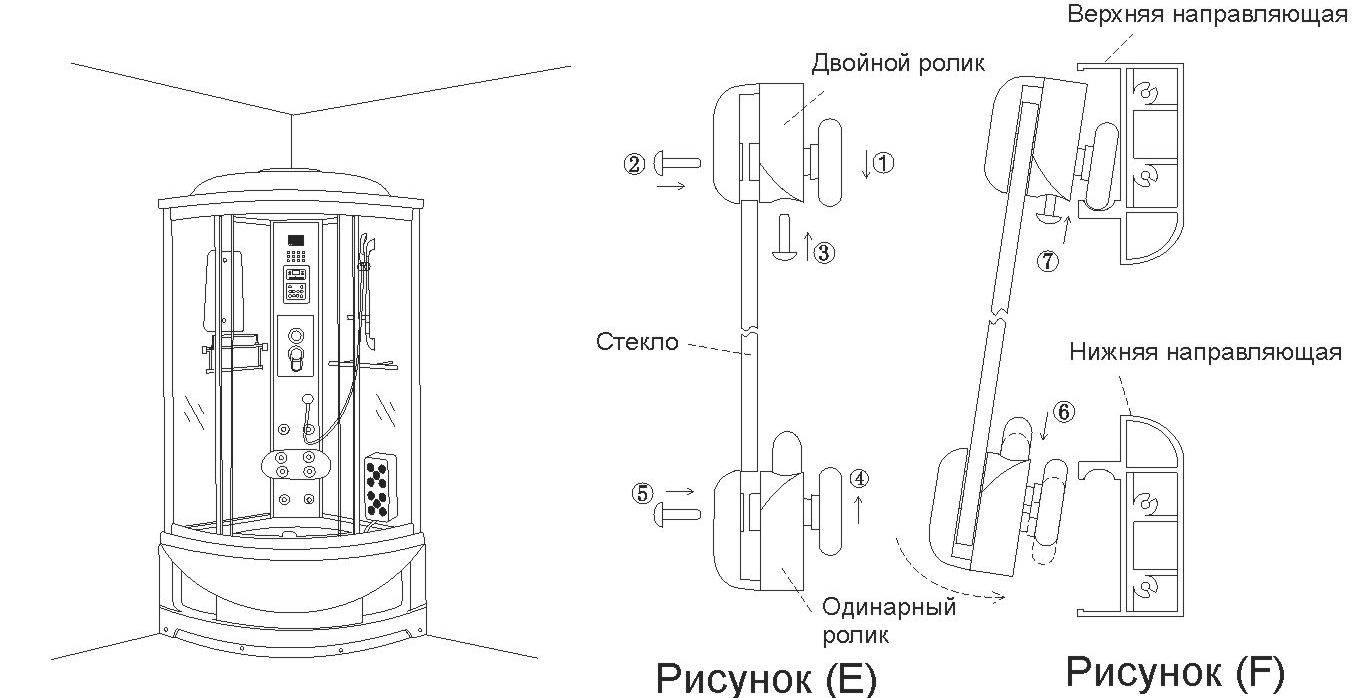
Stage six
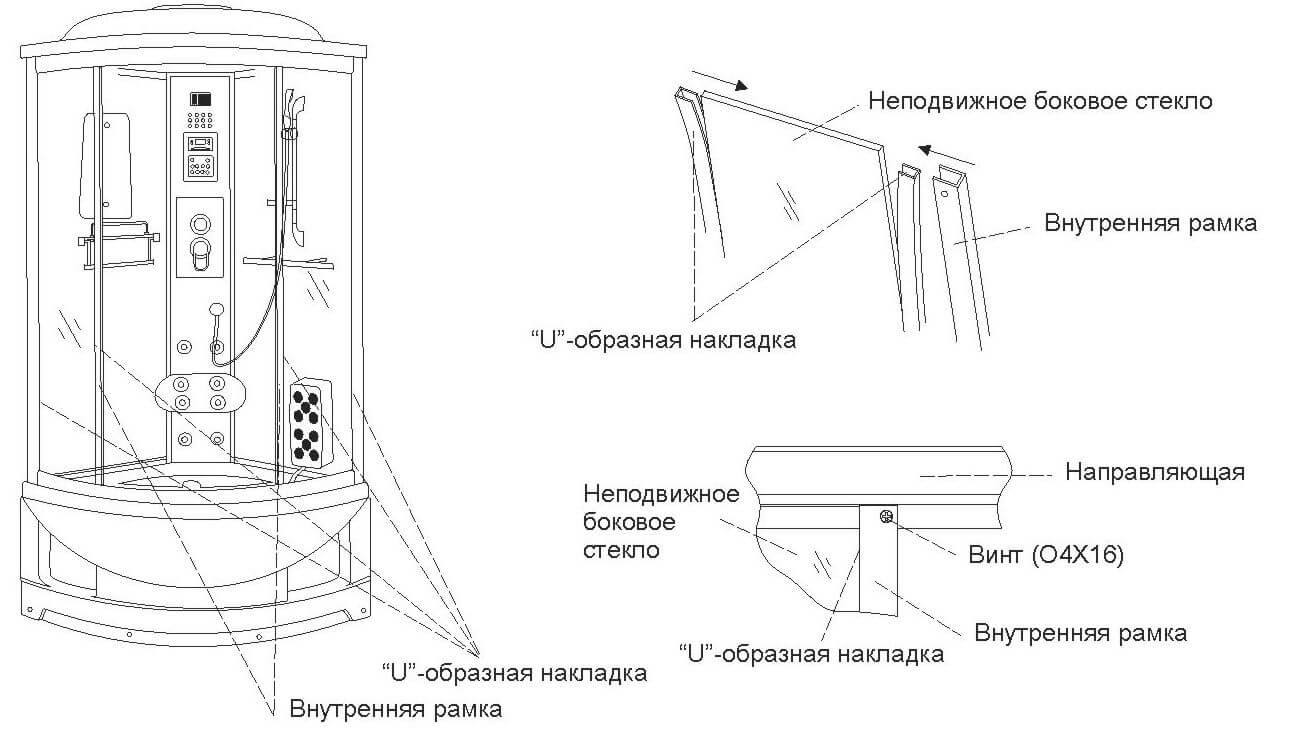
Assembly of the front frame
- Connect transverse (arc-shaped) and longitudinal (straight) aluminum profiles using self-tapping screws
- Install the front side fixed windows in the groove of the longitudinal profile, having previously put a silicone U-shaped rubber seal on the glass.
If the glass is difficult to insert, do not try to knock on it, do not hammer it. Try smearing a little silicone sealant on the U-shaped seal and gently with pressure, without bending or deforming the glass, try to insert it into the groove.
3. Press the free edge of the glass with the corners of the front walls using self-tapping screws.
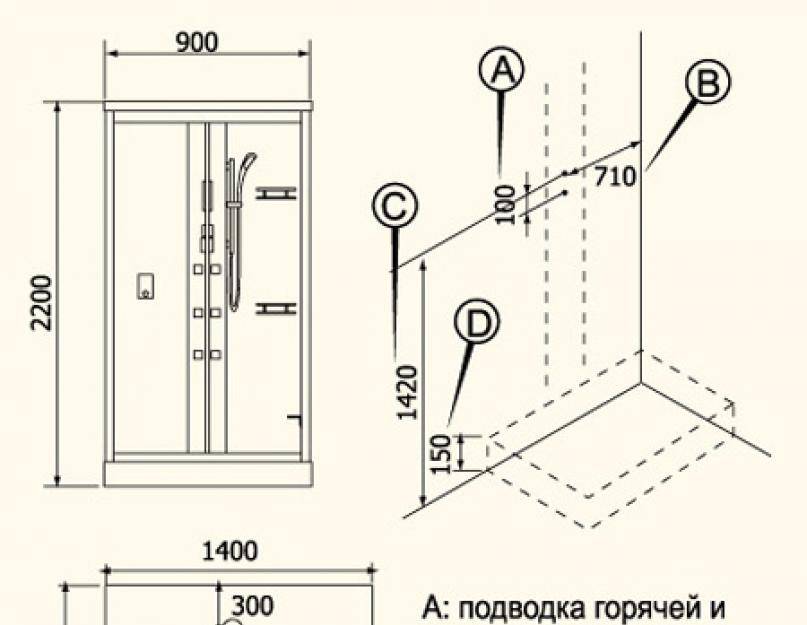
Dimensions
There are many different sizes of shower enclosures on the market.
When choosing, it is important to first decide on the size, and then look at the design and equipment. Due to the small dimensions of the apartments, many people prefer to install showers rather than bathtubs.
This saves a lot of space and is also the most convenient way to take a shower.
Width
The smallest width parameter is considered to be 0.75 m. It is possible only for asymmetric models. Good for a small bathroom. Such a small size saves a lot of space in the bathroom, which makes it possible to install it even in the smallest room. The only negative is the inability to completely relax.
In such a shower you can only be in a standing position. Sitting or lying down is out of the question. Additional features are usually not included. But it is immediately worth noting that this size is suitable only for medium-sized people. For example, tall and massive men will feel uncomfortable in it. Therefore, before buying, you need to go inside and assess the situation. Such an action will help not to make a mistake with the choice.
The minimum width dimension of standard models is 0.8 m. They are very popular among users. This is due to the fact that the largest number of rooms reserved for the bathroom are small in size. This option will save a lot of space and allow you to install additional appliances or furniture in the bathroom. The cost of such a shower cabin is low and the average person can afford it. The functions that can be in the booth will create the perfect atmosphere for taking a shower.
The maximum width of shower cabins can reach up to 1.8 m. This is the most convenient option, which makes it possible to accommodate two people inside at once. This model is usually used in large rooms connected to the toilet.Due to its large size, the shower cabin can include a number of additional functions, such as hydromassage, aromatherapy, radio, telephone, and more. The cost of this design is much higher than the previous one. But it justifies the investment.
There are also models of shower cabins, which are made together with the bathtub. They are also called combined. Along the perimeter of the bath there are walls, and the top can be either open or closed. Unlike the usual shower stalls, this design is quite large, so it is only suitable for a large room. The user is given the opportunity not only to take a shower while standing, but also to relax in a horizontal position. This design has its advantages and disadvantages.
Pros:
- You can take both a shower and a bath. Perfect for lovers of warm water.
- Spacious shower. This is due to the rather large size of the bath.
- Made in the most reliable way. High sides provide safety and also control the level of water in the pan.
Minuses:
- When leaving such a shower cabin, it is necessary to step over a large tray, which is not convenient for all people.
- Price. The price of this option is quite high compared to a conventional shower cabin, even of the largest size.
- The structure is quite high and can reach 2.5 m.
It should be understood that the wider the shower cabin, the more convenient it is to use. There should be enough space inside for movement while taking a shower.
The height of the shower enclosure is also an important factor when choosing. The smallest height is 1.98 m. It is comfortable, but not for everyone.The highest cabin is considered to be 2.3 m. The comfortable curtain height is 2 meters.
It should be noted that the height is selected individually. In this case, it is necessary to take into account the growth of each family member when buying. It is desirable that there be a "reserve". Therefore, it is recommended to immediately take the largest shower. As a rule, the ceilings in the bathroom will allow you to install such a design.
If the size of the shower cabin is chosen correctly, then its installation will not be problematic for the user. The main thing is to navigate the market of the presented models. The most popular and in demand are side models of showers. This is due to the fact that their walls fit snugly against the walls of the bathroom, which is the most comfortable and safe option. The installation of such a cabin is also quite simple.
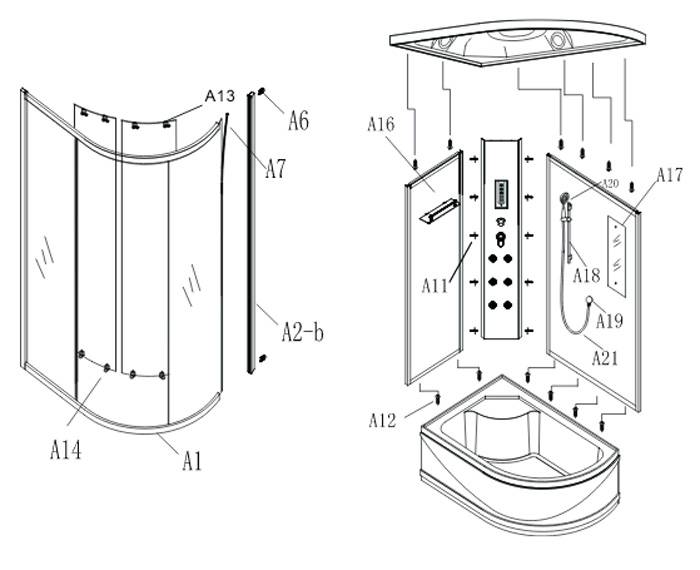
Shower cabin assembly
Installation of different models may vary, but there are general assembly rules that must be studied before installing a shower.
Preparation for work
Before starting work, you need to prepare the following materials and tools:
- building level;
- measuring instruments;
- pencil;
- screwdriver;
- hacksaw for metal;
- wrench
- sealant;
- siphon and flexible hose;
- shower cabin.
Before starting work, you need to prepare a screwdriver.
Checking the location of communications
They check the presence of hot and cold water outlets, sewerage and a waterproof outlet near the planned installation site.
Pallet installation
First, the frame is assembled, it looks like cross pipes. This element is screwed to the pallet at the locations of the mortgages. Use the supplied screws. Adjustable legs and brackets for attaching a decorative screen are installed at the ends and in the center of the cross.


A shower stall will not function effectively without a properly installed shower tray.
Adjust the horizontal installation of the base by twisting the legs, then check everything with a level and fix the position with lock nuts. The screen is fixed at the end of installation.
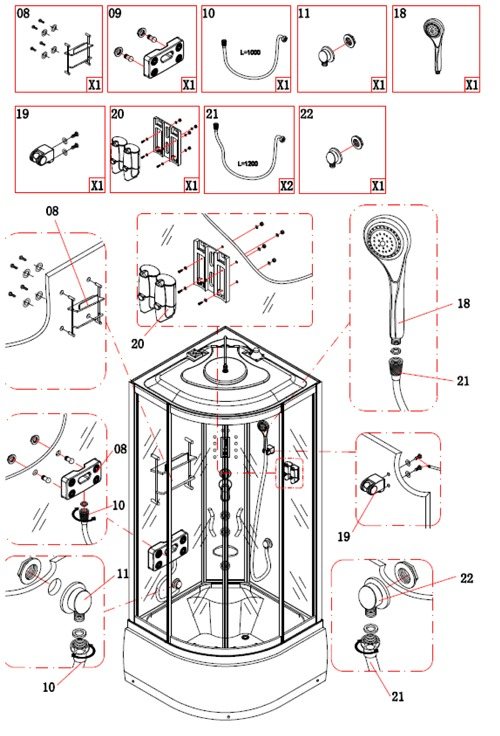
Installation of siphon and panel fittings
According to the scheme, plums are collected. The pallet is put on its side and the siphon is fixed. The drain is tried on to the sewer socket, but it is better to put it on after assembling the cabin, when it is installed in place.
While the back panel is not assembled, install the shower switch, mirror, foot massager and other accessories. The instructions tell you what to mount and where. In low-cost models, there is no central panel, so accessories and the control system are on the side walls.
Assembly of the side walls
In most cases, the cabin frame is made of an aluminum profile, into which the side walls and sliding doors are inserted. This will require an assistant. The frame profiles are connected with screws, but they are not completely clamped. The frame is installed on the pallet, its position is adjusted and fixed with bolts. A sealant is placed inside the profile, its remains are removed with a knife. Carefully insert the side windows and fix them with special stops.
Side walls and sliding doors are inserted into the cabin frame.
Doors and ceiling panel
In the grooves of the upper and lower profiles, along which the doors move, limiters for the rollers are mounted. To prevent spray from getting out, seals are fixed at the ends of the side walls.
Handles, rollers are attached to the curtains and inserted into the finished frame structure. Check the operation of the doors, if necessary, adjust the position of the rollers.
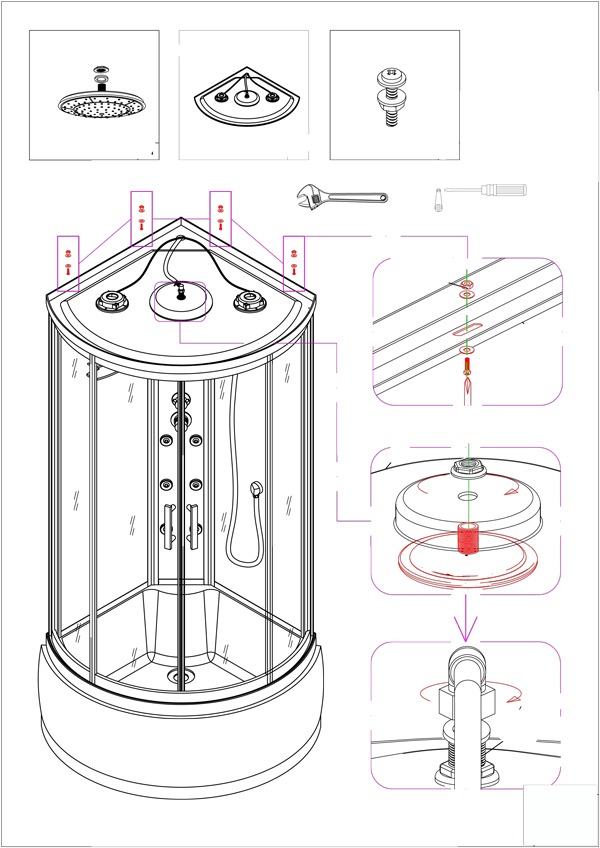
A protective film is removed from the ceiling, lighting, a fan, a rain shower head are installed, and all these elements are connected.
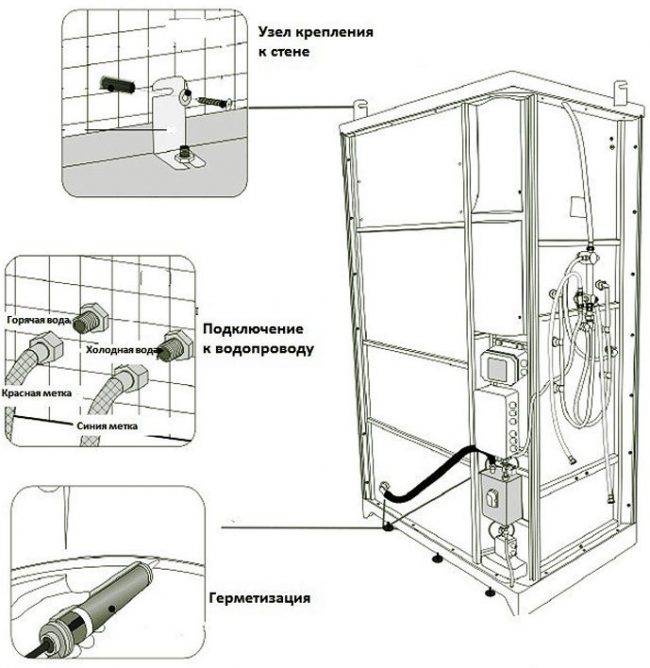
Connection to communications
First, according to the existing instructions, the internal pipelines are connected, all joints are securely fixed with clamps. Flexible hoses connect the corresponding inlets on the wall and fittings of cold / hot water. Before tightening the nuts, check if they have gaskets.
With low water quality, fine filters are installed to extend the life of the steam generator, hydromassage. The system is connected to the network only through a waterproof socket. Must be grounded. Put the cabin in place, connect the siphon to the sewer
Screen pinning
It remains to install a decorative screen on the pallet, which will hide all communications. It is fixed to the brackets with screws, then they are closed with plugs.
Checking the operation of electrical appliances
First, the operation of the fan, radio and lighting, powered by electric current, is checked. Cabin assembly is not just connecting the pallet to communications, but ensuring proper operation and connection.
It is important to remember that:
- there is moisture in the bathroom, so it is impossible to place electrical and switching panels, chokes and other devices there;
- for good safety against electric shocks and the safety of equipment, as well as protecting it from voltage surges, you need to install special machines to turn off the power in an emergency,
- it is better to install a socket of a hidden type and from the outer (reverse) side of the shower cabin.It must be reliably protected from moisture and dust and have an IP44 index.
- The shower cabin must have good grounding, very often a metal pallet acts as a ground electrode.
After the main part of the assembly is completed, all fastening materials must be left to harden.
Stage 7. Connecting the cabin to water and sewerage
7.1. Take a PVC hose for nozzles and cut it into pieces of the required length for massage of the lower back. Put them on and fix them on the injector fittings with clamps. Fasten the hose from the top jet to the faucet fitting, to the outlet with the “back massage, lumbar massage” indicator on the reflector (use a clamp).


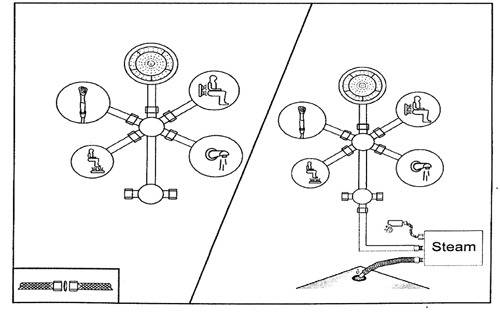
7.2. Take the PVC hose for the foot massager. Connect one end of it to the chrome-plated corner of the water supply to the foot massager using a plastic corner-fitting with a gasket and a clamp, and connect the other end to the mixer nozzle, to the outlet with a pointer on the reflector "foot massager" (use a clamp).
7.3. Take a PVC hose for the overhead shower, fasten one end of it to the faucet fitting, to the outlet with a pointer on the reflector “overhead shower” (use a clamp), and attach the other end to a plastic fitting with a gasket, which must be screwed to the overhead shower.
7.4. Take a PVC hose for a hand shower. Connect one end of it to the chrome-plated corner of the water supply to the hand shower using a plastic corner-fitting with a gasket and a clamp, and connect the other end to the mixer fitting, to the outlet with a pointer on the reflector "hand shower" (use a clamp).
7.5.Take a PVC hose for pouring water into the bath, fasten one end of it to the fitting of the mixer, to the outlet with a pointer on the reflector “pour water into the bath” (use a clamp), and attach the other end to a plastic corner fitting with a gasket, which will be screwed on later to the spout installed on the pallet.
7.6. Take reinforced water pressure hoses of the required length (minimum recommended length 1m).
7.7. Screw the hoses to the water supply system and make a preliminary discharge of dirty water into the sewer.
7.8. Screw the hoses to the cabin mixer according to the cold-hot markings.
ATTENTION! THE MIXER IS CONNECTED TO THE WATER SUPPLY SYSTEM ONLY WITH FLEXIBLE HOSES (HOSES ARE NOT INCLUDED IN THE DELIVERY SET). PIPE FITTINGS SHOULD BE SEALED AT THE CONNECTION POINTS, THE NUTS SHOULD BE TIGHTENED TIGHT
ALL CLAMPS ON THE WATER SUPPLY HOSES (MIXER, HYDROMASSAGE JETS, OVERHEAD SHOWER, SHOWER SHOWER, FOOT MASSAGER) ON THE BACK SIDE OF THE CABIN SHOULD BE CHECKED BEFORE TURNING ON THE WATER IN THE SHOWER CABIN, AND THERE IS NO WATER IN THE SHOWER CABIN.
7.9. Slide the cab into place (take care not to kink the hoses behind the cab).
7.10. Pull the corrugation to the required length and stick it into the sewer socket, if necessary, cut off the wrong size
7.11. Check the water supply and drainage of the cabin components, if there is a leak, eliminate it.
7.12. Install the decorative screen (item 2.15) after removing the protective film from it.
Connecting a shower cabin with your own hands to the water supply and sewerage
Step 1 First, turn off the water in the riser, after which you need to open the cold and hot water taps to reduce the pressure in the system.
Step 2Next, you need to remove the old shower, if any. Using pliers, you need to loosen the fasteners, unscrew the coupling, and then put the compression fittings on the taps.
Step 3. Apply lubricant to the threads of the compression fittings and attach the shower enclosure adapter to it.
Step 4. Connecting the shower cabin to the water supply involves the application of silicone sealants. Then you can install the anchor, according to the instructions.
Step 5 Install the screws. Flexible hoses are attached to the adapters, then the connections should be tightened tightly with pliers.
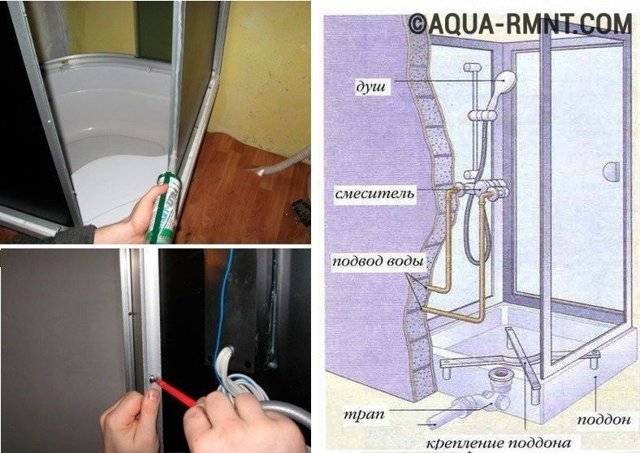
Shower panel installation
After connecting to the water supply and sewerage systems, you can proceed with the installation of the shower panel.
Wells are put on the previously installed bolts, starting from the top bolt.
Then the water supply pipes are attached to the outer side of the panel.
The next step will be the installation of decorative plates.
After completing all these processes, you need to check the performance and tightness of the entire system. For this purpose, the taps are opened and a check is made for leaks. If there are none, then the work is done well. Otherwise, the detected leaks should be additionally sealed with silicone.


The next step is to install the walls, ceiling panels, install the door and all the necessary fittings. The final step is to connect the shower cabin to the power supply system.
Connecting the shower cabin to the power supply system
After making sure that there are no leaks in the cab, you can start connecting the device to the mains. All devices must be installed in compliance with safety regulations and the following rules:
- the electrical cable for the shower enclosure must be made of copper and double insulated. If possible, different consumers of energy (pump and hydro massager), it is better to connect to different phases;
- for the needs of a shower cabin, it is better to provide an automatic machine with a protective shutdown device corresponding to the maximum level of energy consumed.
Along with connecting the shower cabin to communications, the ventilation system is important. Air circulation in the room will ensure that there is no condensation
Installation and connection of the shower cabin can be done independently, but you can also involve professionals. The quality of the performance of these works determines the further operation of the device and the entire system as a whole. Take this process seriously. Good luck!


