- Brick base for pallet
- How to make a do-it-yourself tile shower tray
- Filling the screed
- Ladder installation
- The erection of the side
- Filling the screed inside the pallet
- Waterproofing
- Facing
- Material selection
- Stages of preparing a tile shower
- Pallet manufacturing
- How to make a shower stall with a tile tray
- general information
- Optimal shower dimensions
- Construction dimensions
- Training
- wall requirements
- Doors or guardrail
- Size calculation
- Tools and materials
- Starting the installation
- Installation of the finished pallet
- Construction of a homemade pallet
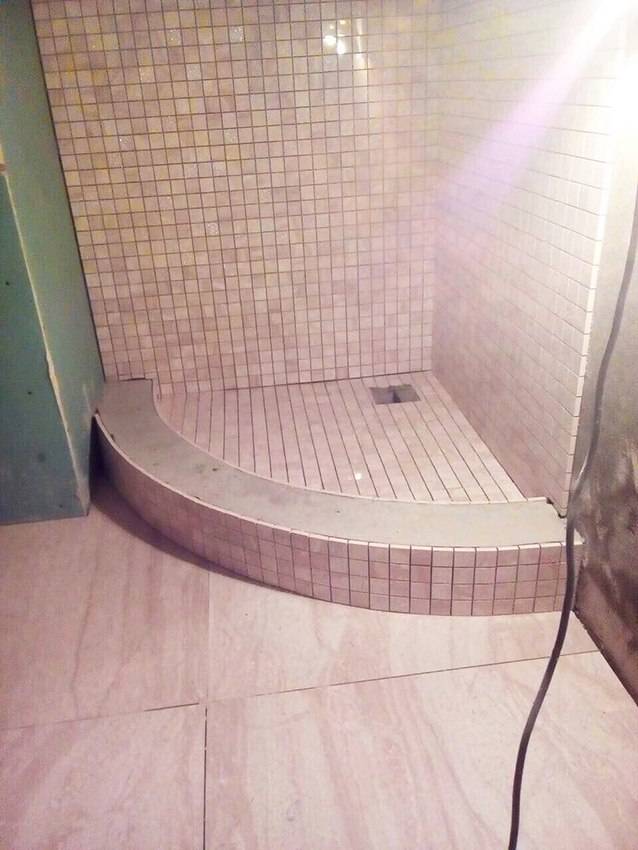
- Making a corner
- Installation of fences
- Brick pallet base
- Classification of shower cabins by type of pallets
- Installation of doors and fastening of curtains
- Conclusions and useful video on the topic
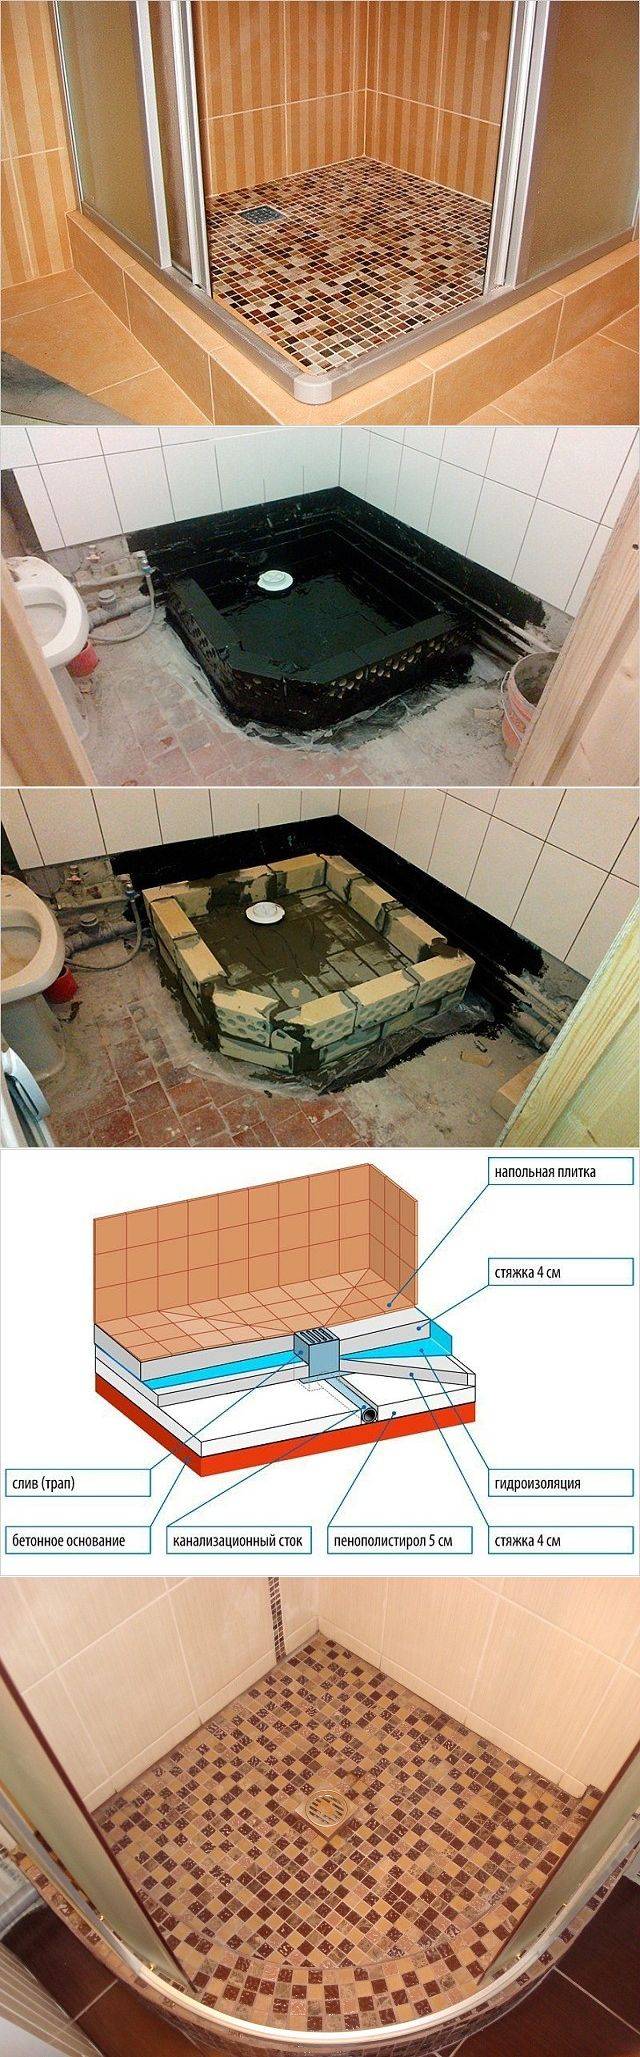
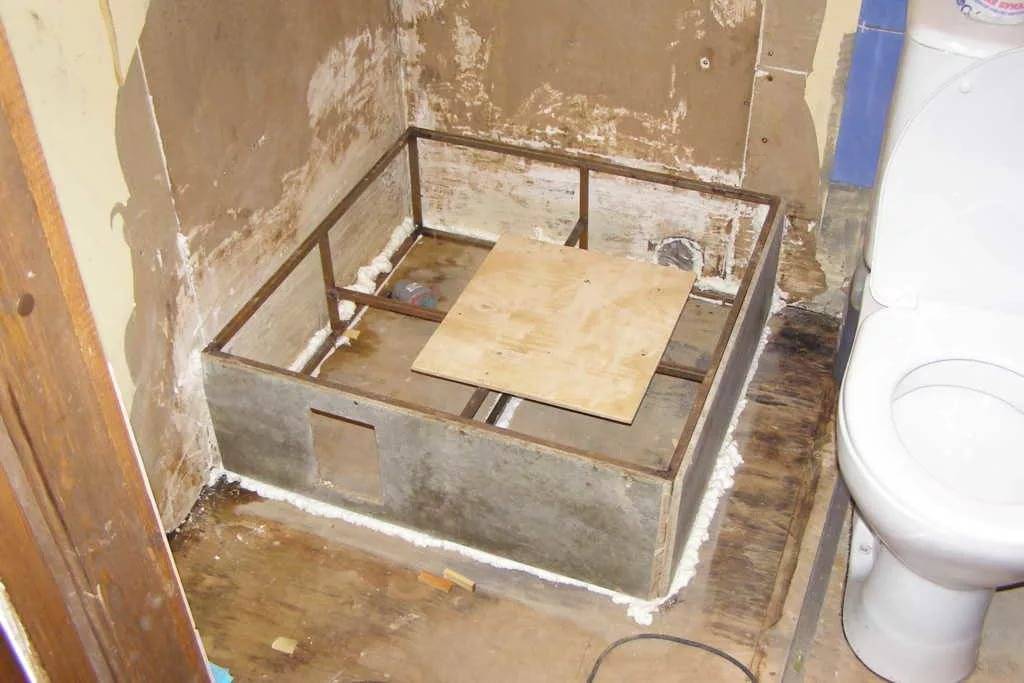
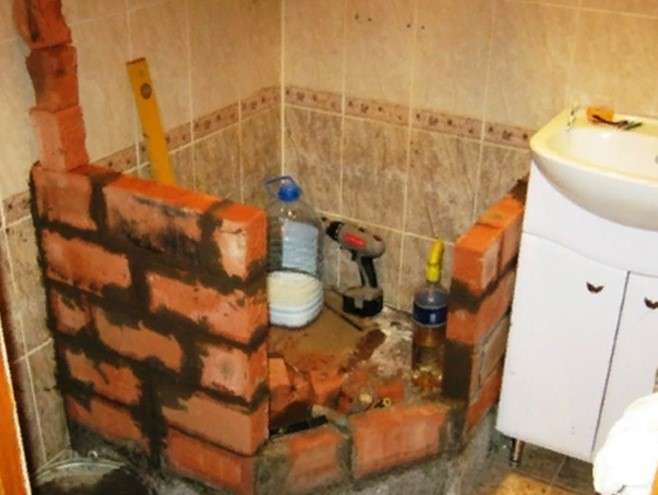
Brick base for pallet
For those who have not yet tried to make shower cabins with their own hands, the photos at the end of this page show how to lay the base for a pallet from any kind of brick. After the primary waterproofing dries, a cement-sand mortar should be prepared (the same amount of cement, three buckets of pitch and 70 g of plasticizer will be required for a bucket of water) or a ready-made solution should be purchased in advance. A reinforcing metal mesh is laid on the base.
If you plan to make a shower tray with your own hands, its dimensions can be any. But it should be noted that its height should not be less than 5 cm higher than the height of the location of the sewer pipe. At the same time, a place for drainage should be determined, and then a ladder should be installed and connected to the sewer pipes.
It is very important that the pipes are installed with some slope towards the sewer, so that the water is completely gone, and its stagnation does not cause an unpleasant musty smell. Pipes can be slightly lifted with wooden blocks or other materials.
The angle of inclination must be at least 3 degrees.
 Do-it-yourself shower construction
Each plastic pipe should be carefully threaded into a wider metal one so that it is not damaged by the weight of building materials, and then attached to the floor with clamps. Sometimes they use an external, more durable sewer, usually painted orange, which can withstand much greater loads.
How to make a do-it-yourself tile shower tray
For those people who do not know how to make a shower tray with their own hands, we suggest that you familiarize yourself with the technology of this process, as well as the features of each operation.
The main steps in the manufacture and installation of a tile shower tray:
- Screed filling.
- Ladder installation.
- The erection of the side of the pallet.
- Filling the screed inside the pallet.
- Waterproofing.
- Facing.
Filling the screed
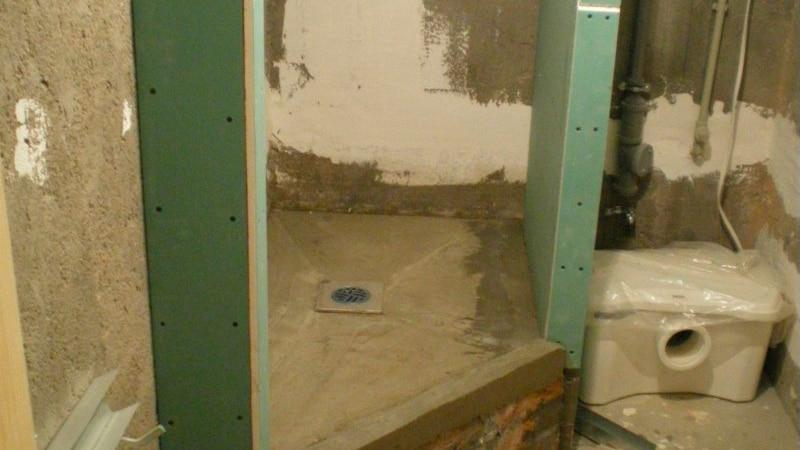
The manufacture of the pallet should begin with preparatory operations, during which the existing base must be brought into the appropriate state. First of all, it is necessary to dismantle the old plumbing and tiles, and then check the quality of the rough screed.If an empty sound comes out when tapping the floor, then it is better to remove the old coating, and instead fill in a layer of a new screed, on which the shower tray will be installed.
After that, two coats of primer should be applied to the floor. Now you can start waterproofing. If a liquid mastic was chosen for these purposes, then this material must be applied to the floor, as well as to the walls (up to 400 mm in height). All corners, as well as the joints of the floor and walls, should be especially carefully processed.
After the mastic has hardened, you can start pouring the rough screed onto the floor, this operation should be performed only if the old rough screed is completely dismantled. If you want your bathroom to be warm and comfortable, you can install an underfloor heating system.
Ladder installation
After the screed poured onto the floor hardens, you can proceed with the installation of the trap. A sewer pipe must be connected to the installation site of the shower tray. So that water does not stagnate in the pan during water procedures, the pipe must be supplied with a certain slope, you can check the slope using a level. Then, under the prepared ladder, you can lay a brick, giving the structure the required height, and fix it with plaster or alabaster.
Ladder installation
When the applied mixtures harden well, it is recommended to test the pan for tightness. To do this, you need to pour some water inside and check how quickly it drains into the sewer pipe, as well as how dry all the joints remain. If you find the slightest leak, do not delay fixing this problem.
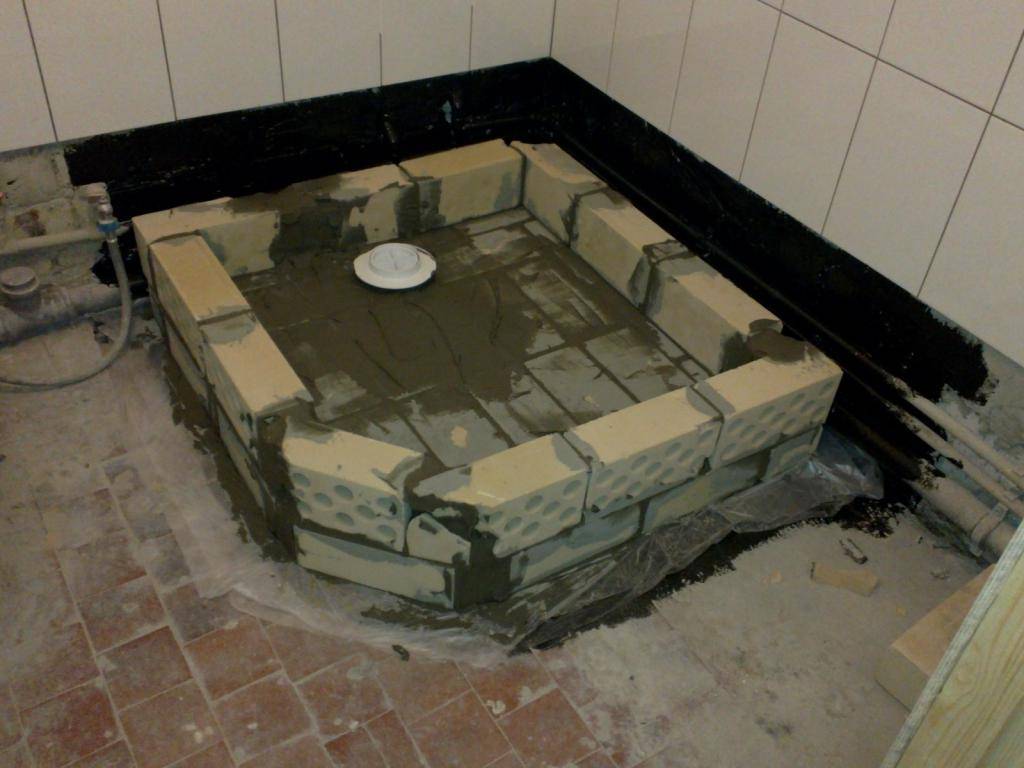
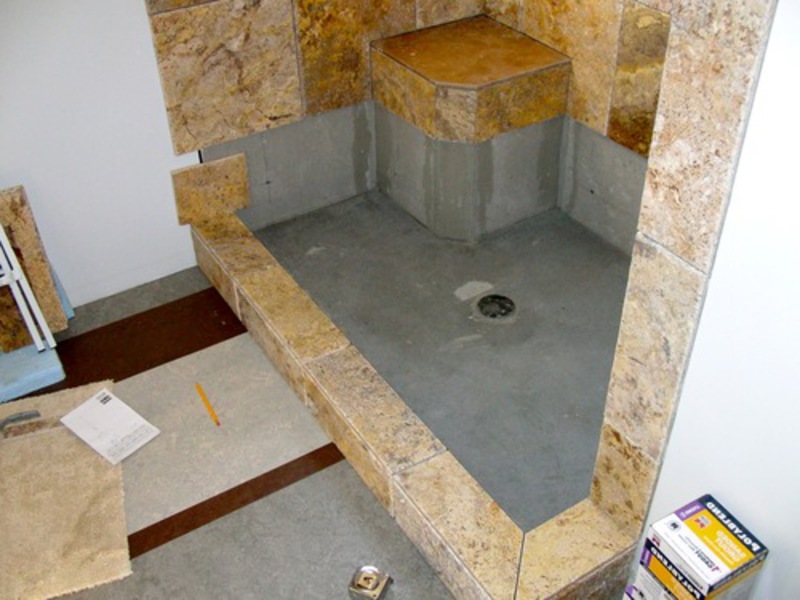
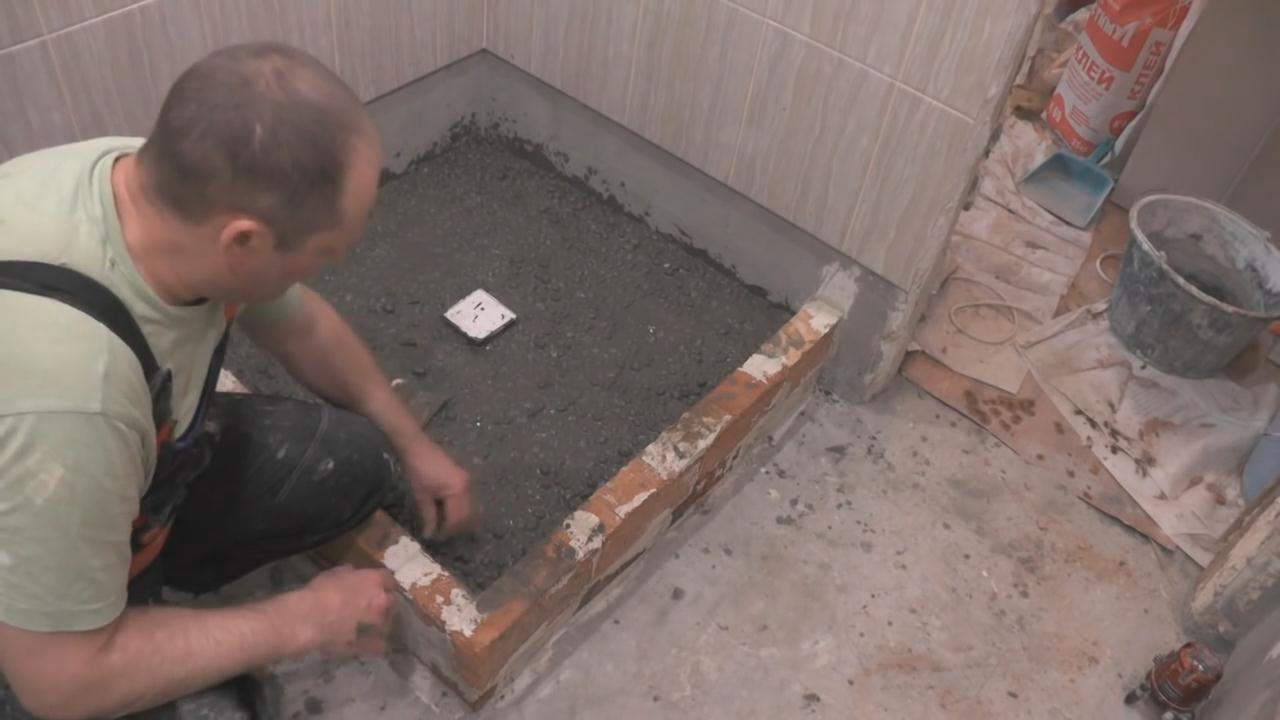
The erection of the side
For the manufacture of the side, you can use an ordinary brick.The pallet can have the shape of a square or a rectangle, if desired, you can give it a bend. It is necessary to lay the brick taking into account the chosen configuration, so that the side repeats the shape of the future pallet.
Building a brick wall
Before proceeding with the laying of bricks, it is recommended to make markings on the floor, which will help to make a side of the desired shape. Now you can start preparing the cement-sand mortar and laying the bricks. The side should be higher than the ladder, but it should not be made too high, just a few centimeters is enough.
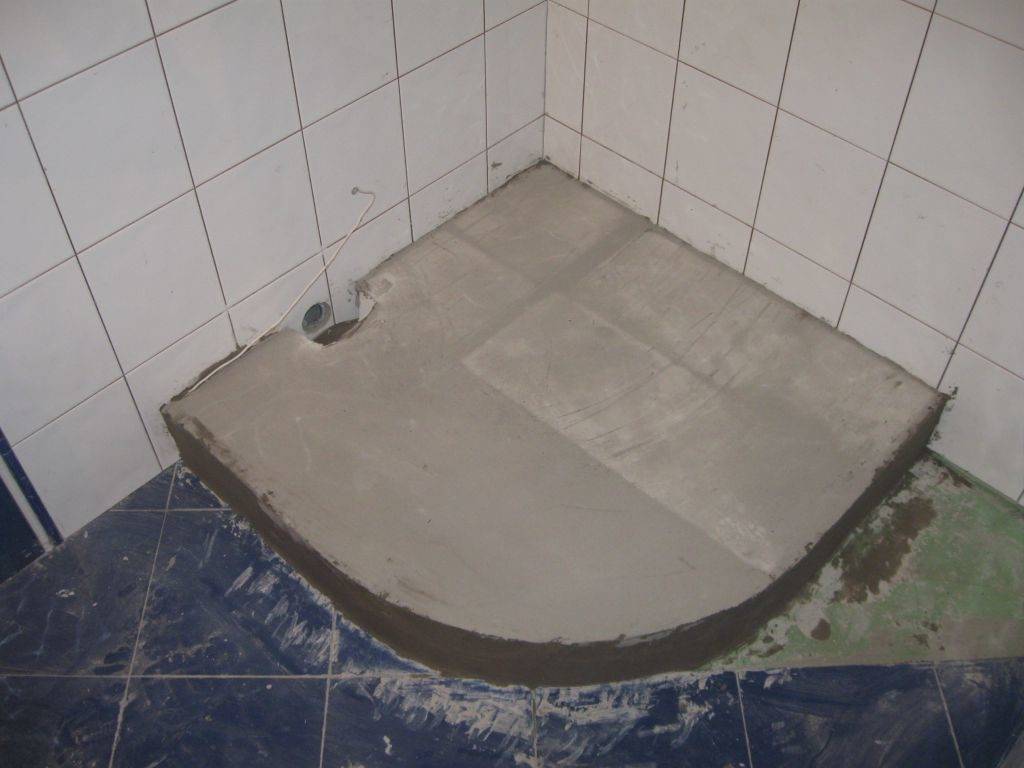
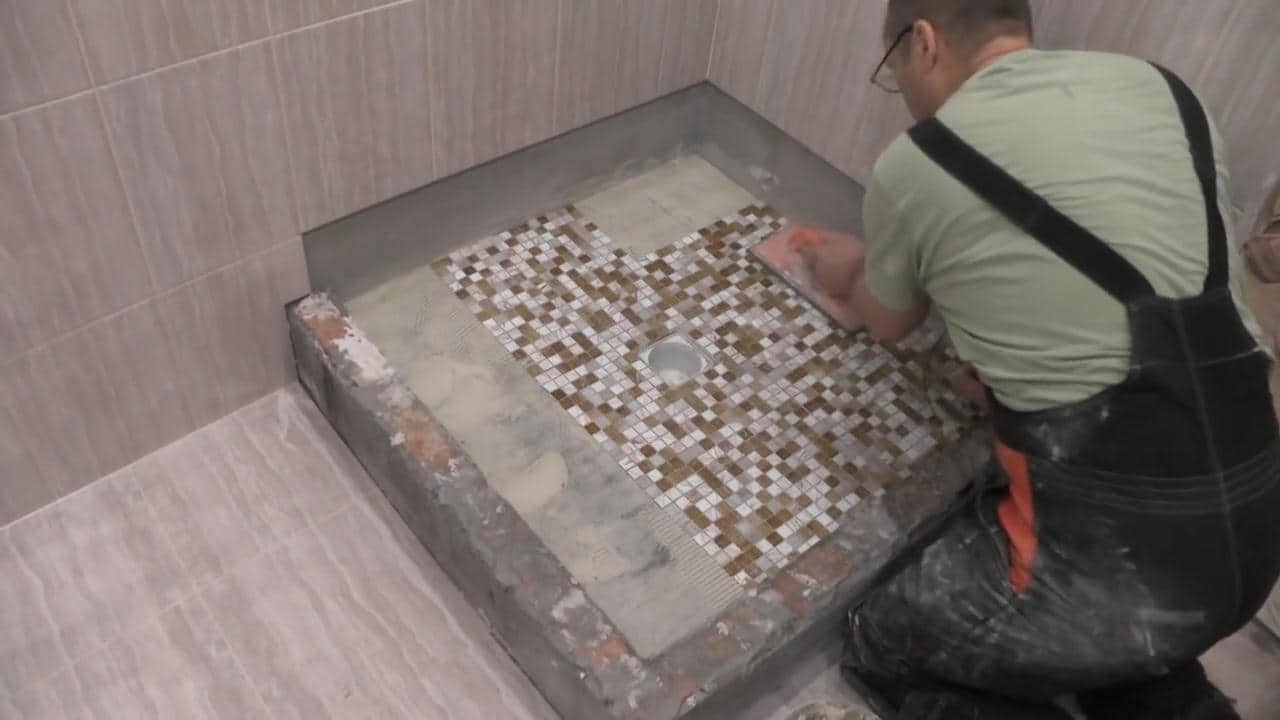
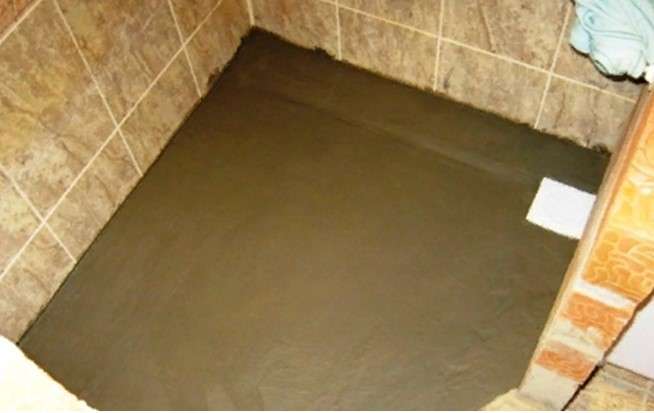
Filling the screed inside the pallet
Now is the time to start pouring the final screed inside the shower tray. To improve the quality of the solution, it is necessary to add a little liquid glass or other water-repellent components to it.
Be sure to place beacons before pouring. Do not forget that the screed should have a slight slope, this can also be controlled using beacons.
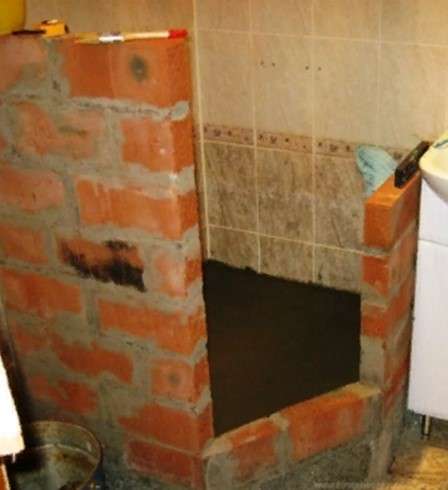
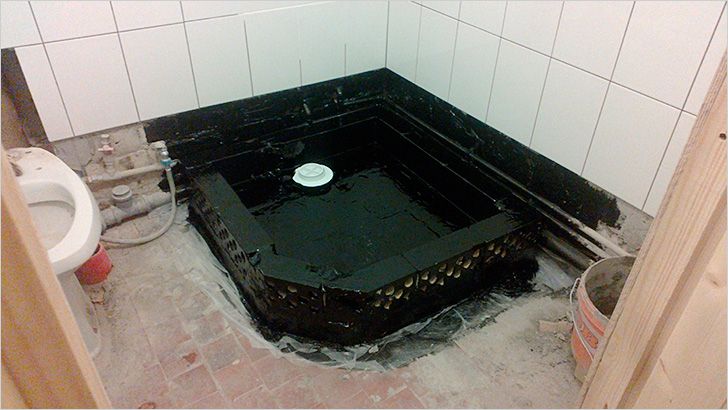
Waterproofing
After the screed has dried, you can proceed to the final waterproofing. Coat the dried screed and brick sides with mastic, this will prevent moisture from getting inside. The waterproofing mastic must be applied very carefully, and its layer should not be too thick, since after that it will be possible to proceed to the final stage of work.
Final waterproofing
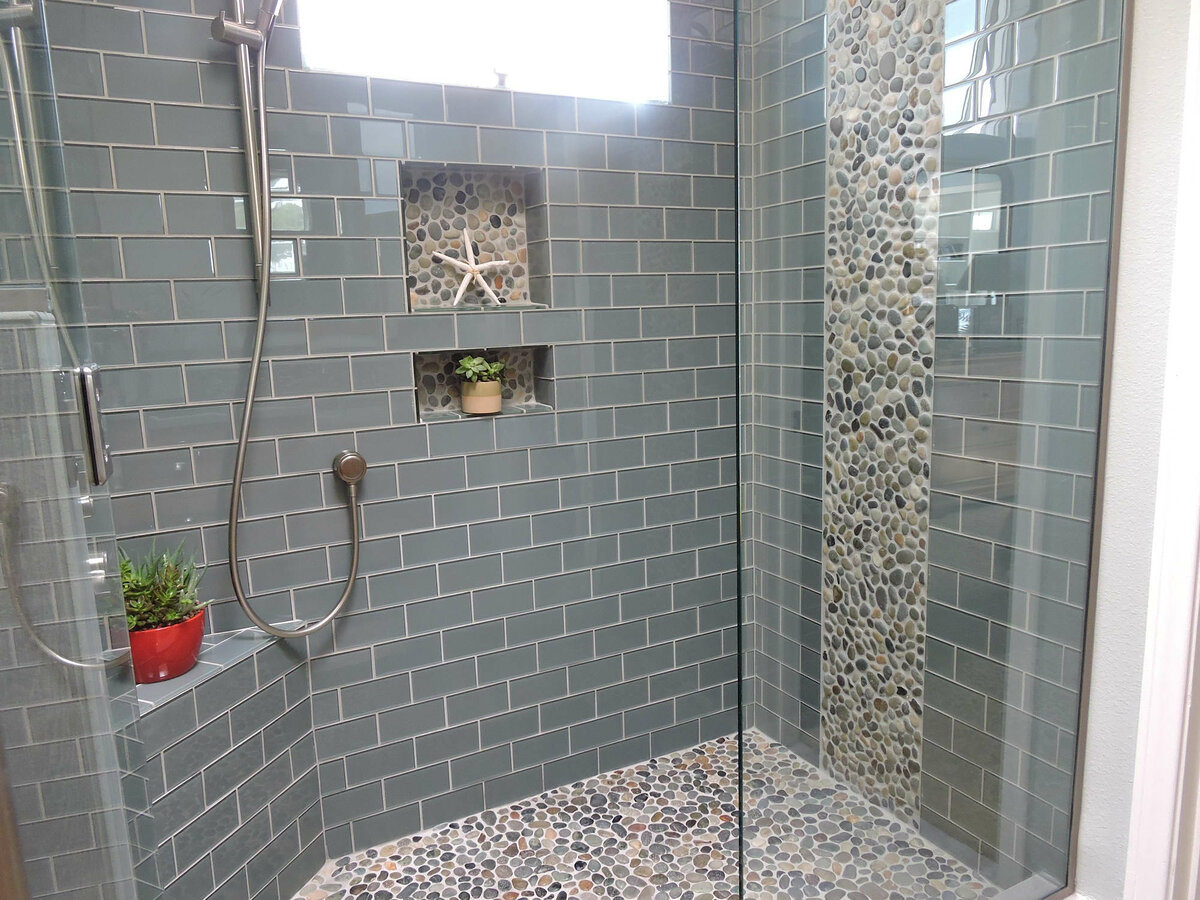
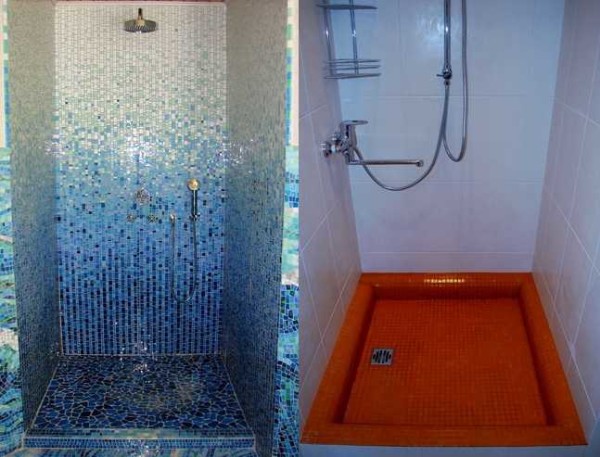
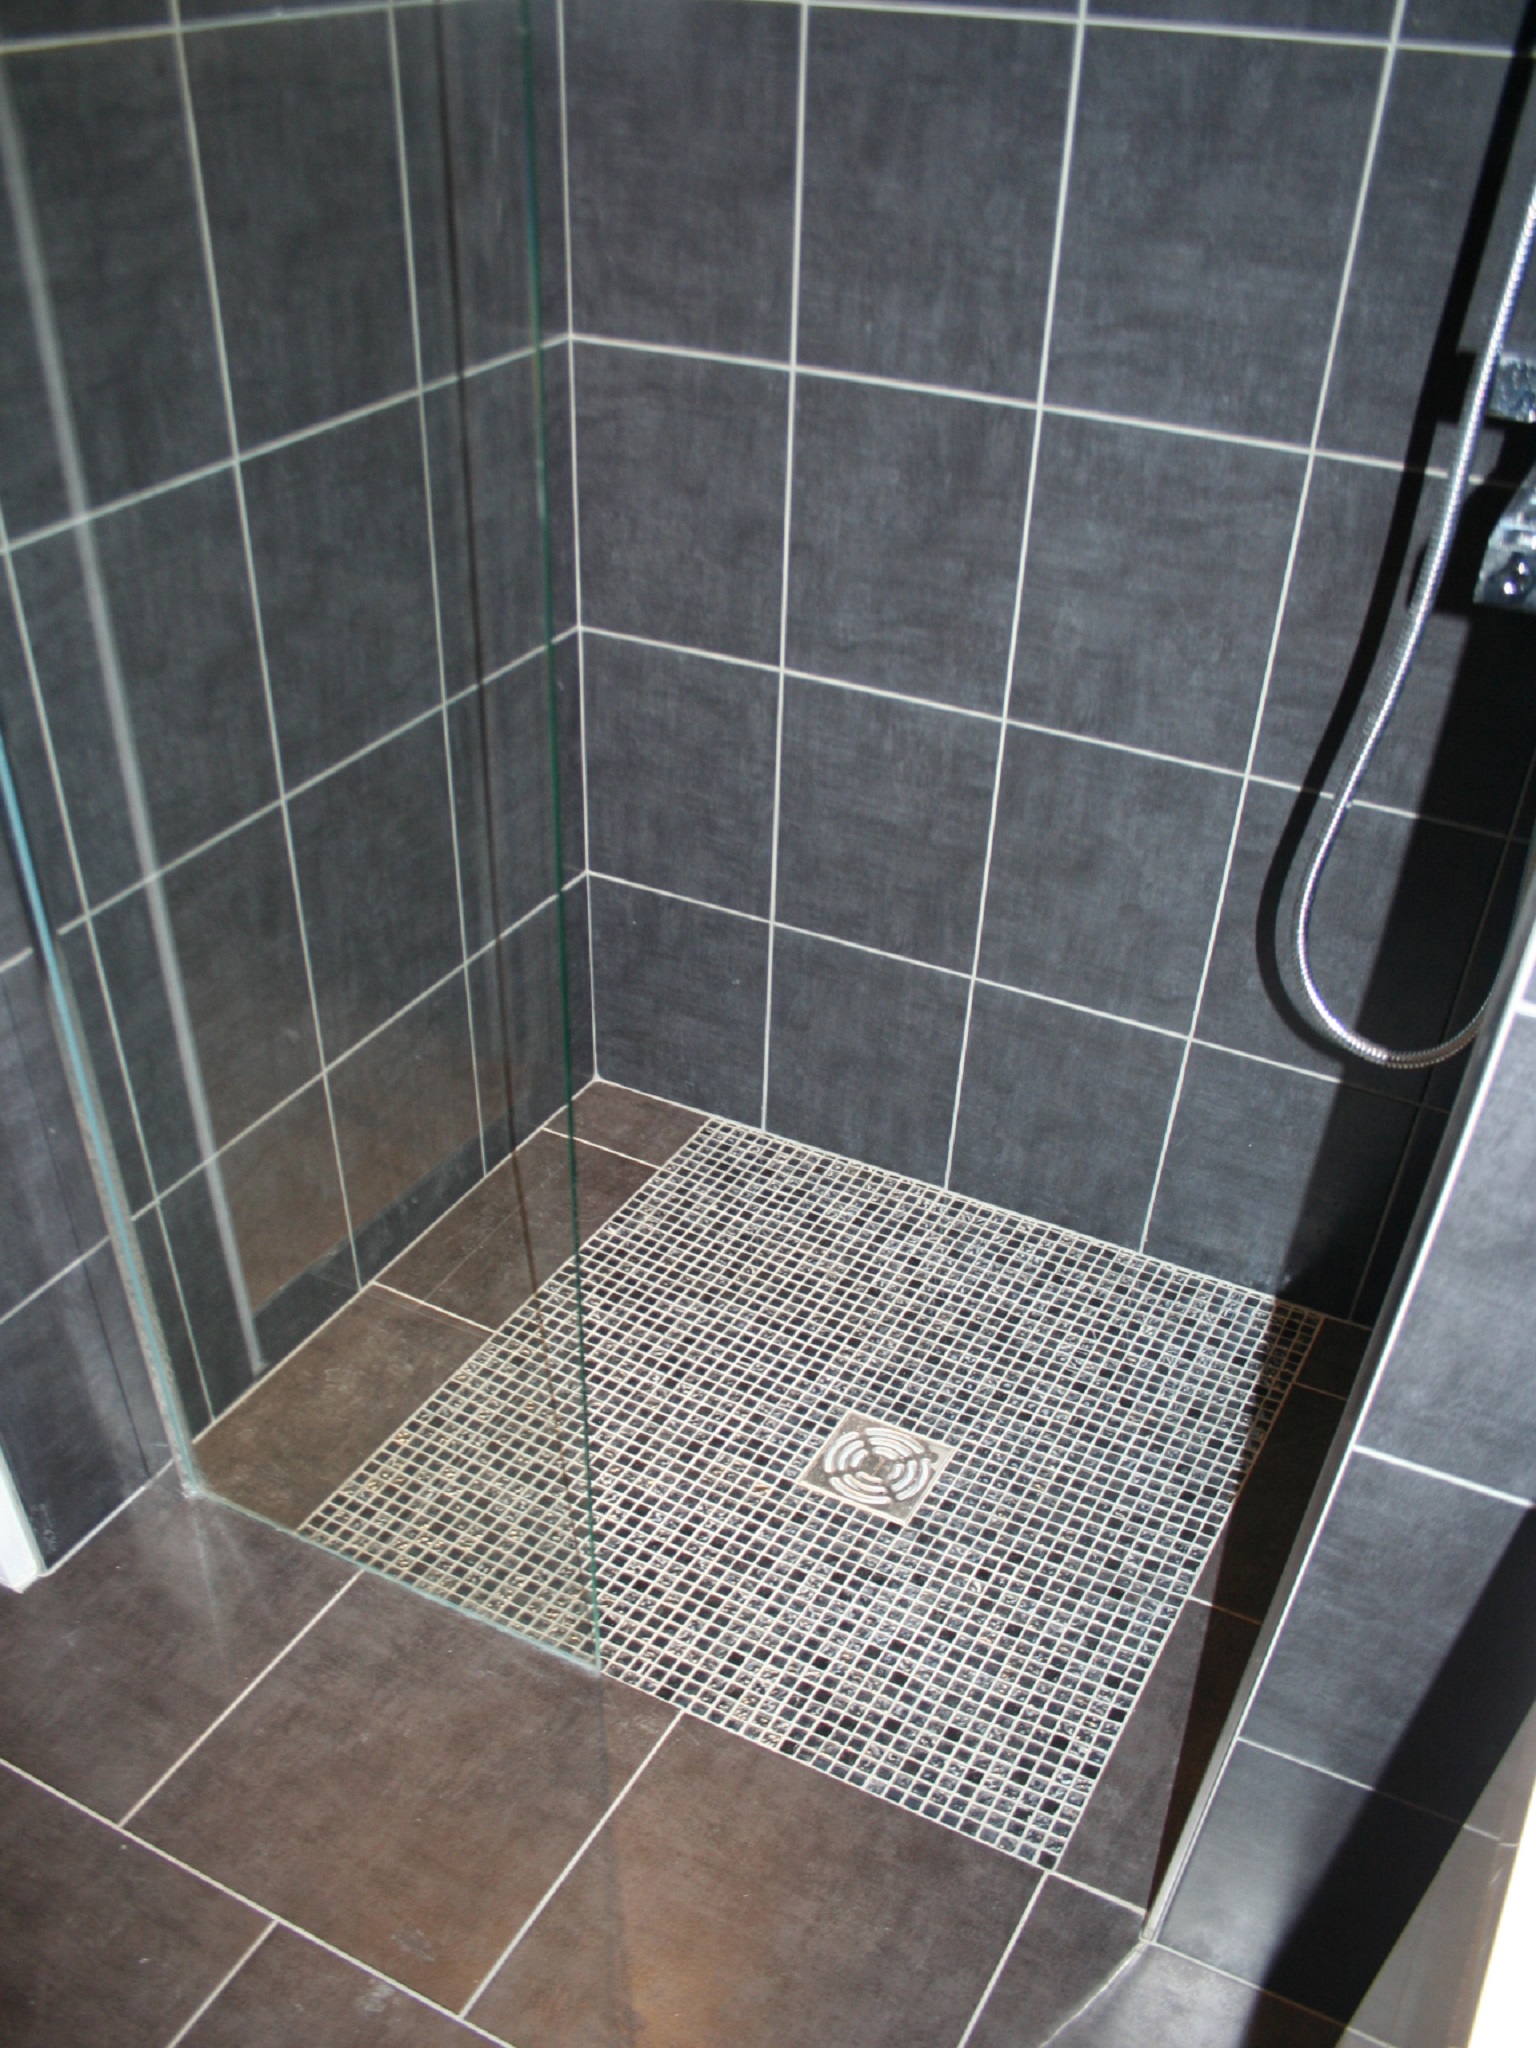
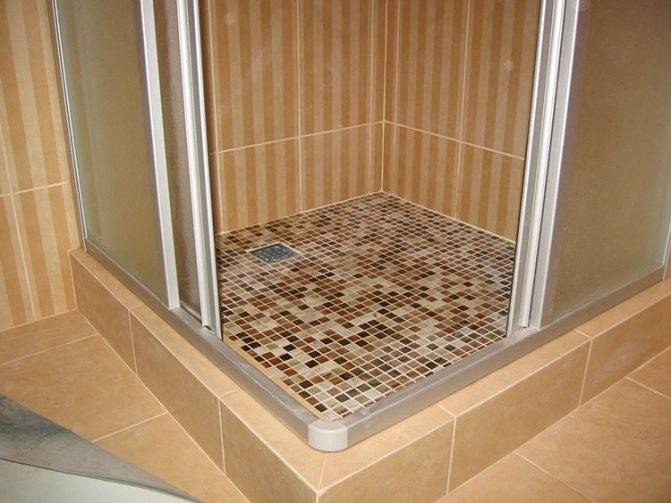
Facing
When all the preparatory work has already been completed, you can do the facing work. Choose the tile and the way it is placed so that there are as few swatches as possible, then the work will be easier, and the cladding will look much more beautiful.
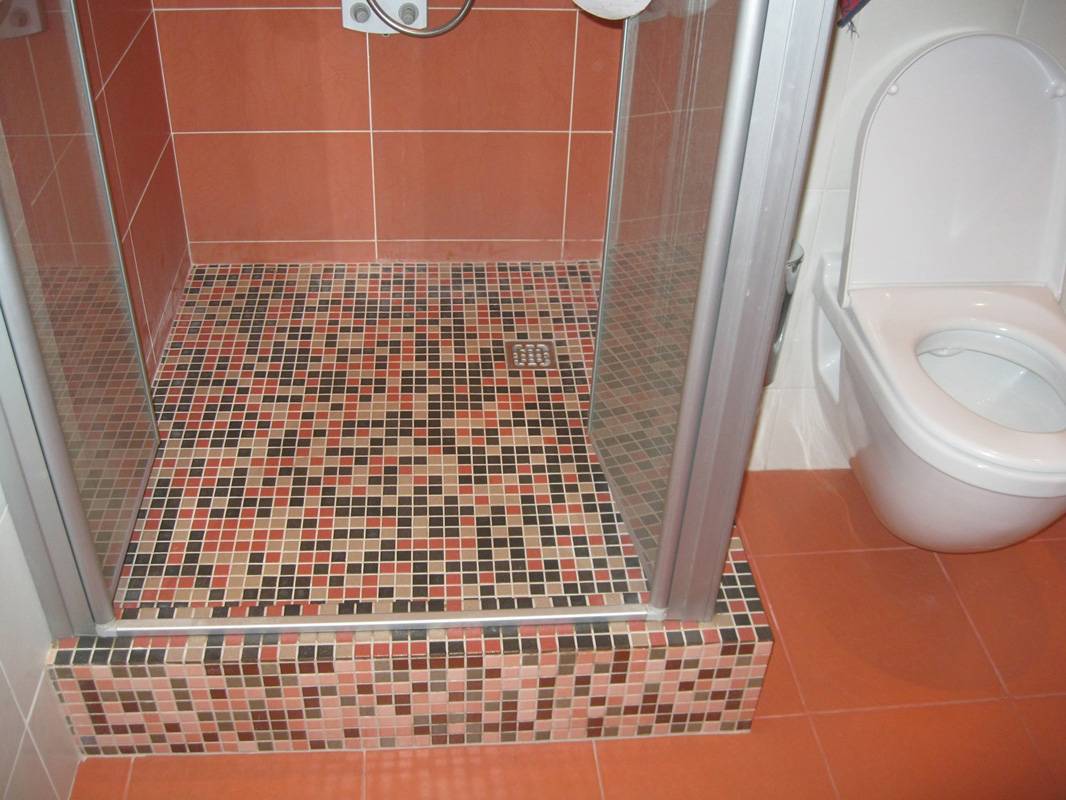


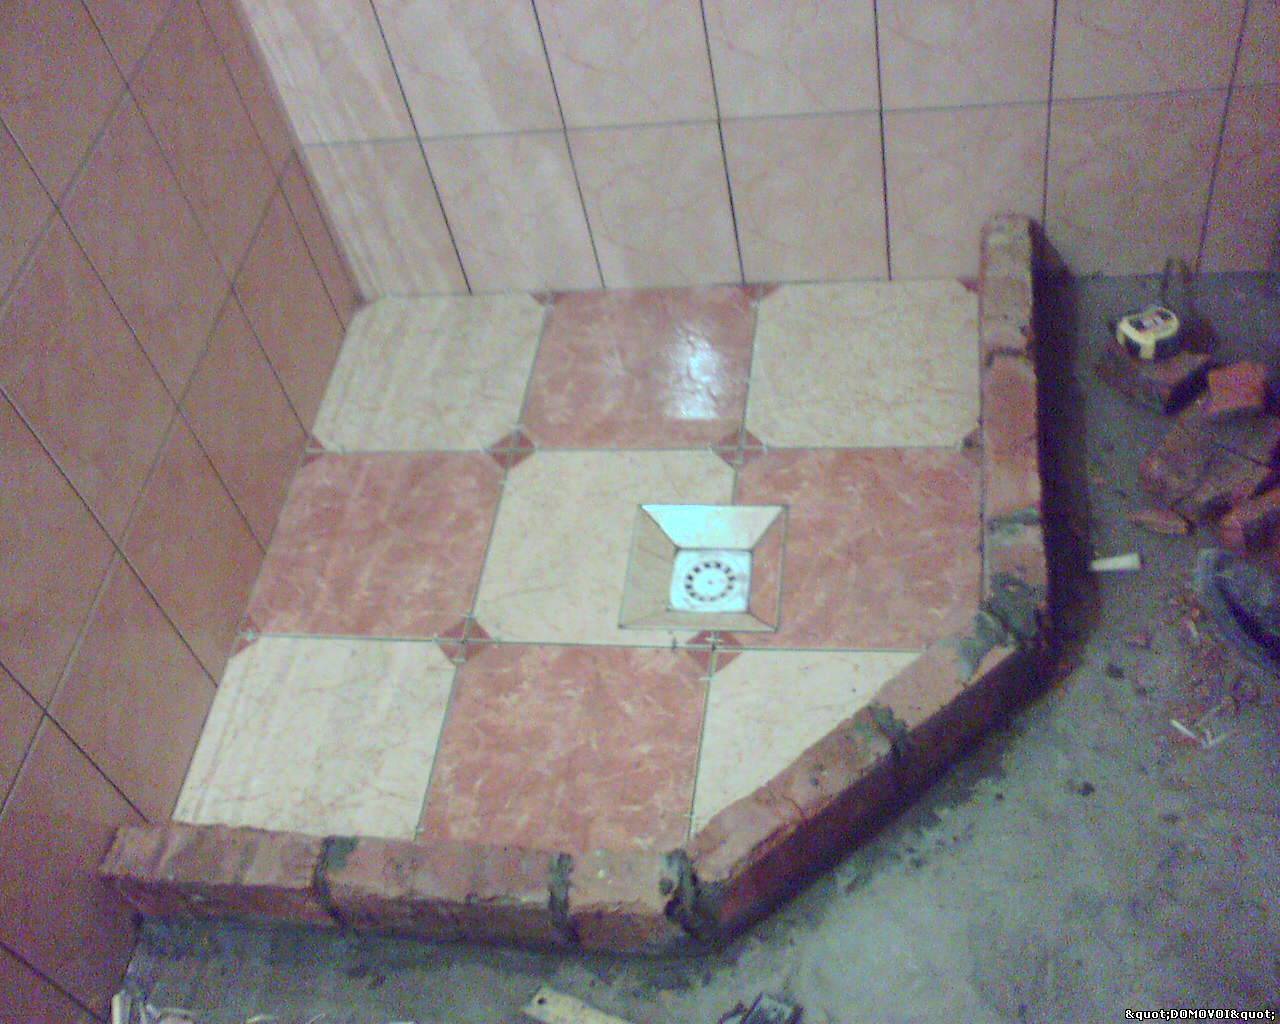

Facing work must begin from the floor, and then move on to the sides of the structure. Tiles should be laid on the walls in a vertical direction, clearly level, making sure that the rows are even. Lastly, lay the top of the side.
Final tiling
Now you know how to install a tile shower tray. As you can see, there is nothing supernatural in this.
Material selection
If the basic parameters of the shower tray in the bathroom (location, height, type of drain) are determined, it is important to choose the right materials for construction. There are main options:
- installation of the finished pallet on legs, concrete base, brickwork or other types of "bed";
- lifting the podium to the desired height using plate materials (OSB and others) and legs or masonry (pouring) supports;
- creation of a monolithic or brick (block) pallet.
The first option is convenient by minimizing work and the ability to fit finished walls without additional effort. The second provides access for repairs in the event of a leak or other problem. The third guarantees the maximum strength of the podium, but makes it difficult to fix a leak or replace a drain.
As materials are used:
- a ready-made pallet of any configuration, brick or aerated concrete blocks for supports or concrete and formwork for a monolithic bed, a shower drain, tiles or a finished facade for exterior decoration;
- beam or metal profile for the frame, moisture-resistant slab materials for the podium, waterproofing, shower drain, finishing materials;
- cement-sand (cement-expanded clay) mixture and boards (moisture-resistant plywood) for formwork, shower drain, waterproofing, finishing materials. When laying a bed of bricks (blocks), a certain amount of cement-sand mixture will be required to level the base under the tile.
Consider three options for a podium device for a shower cabin, completely created independently (without a ready-made pallet).
The preparatory work for all types of pallets is the same. The floor of the bathroom is cleaned of all contaminants, leveled as necessary, waterproofing is arranged with access to the walls (height 10 ... For concrete (reinforced concrete) floors and walls, a penetrating waterproofing option is convenient, more details about this method of protecting structures from water can be found in the article “Waterproofing the basement from the inside”.
Stages of preparing a tile shower
When constructing a shower enclosure from tiles with your own hands, a person faces a certain number of problems, they must be urgently solved in order to get a good result. Often a good and high-quality drain is required, in order to achieve this, you will have to raise the floor and purchase the required amount of materials and mortar with the presence of a plasticizer.
The room will need to be waterproofed, the most suitable option is a system suitable for swimming pools. Waterproofing allows you not to spoil the room inside from moisture, therefore it is a prerequisite.A certain amount of non-slip tile is purchased as a finish for the floor, and a mosaic will look interesting for the walls, it has water-repellent properties and allows you to get a beautiful pattern without much difficulty.
 Before laying tiles in the shower, level the floor surface
Also, in such work, one cannot do without a special water-repellent glue, because the lined finish also depends on it. Additionally, you can make a heated floor for greater comfort, and build a door, although an ordinary rubberized curtain is also suitable for economy. If there is a need to create a completely shower enclosure with plasterboard walls in a country house, cottage or apartment, then this option will not be more economical than purchased.
Then the following points will be a plus:
- You can pick up and impose a shower stall to your taste and size;
- Use only high-quality materials on the wall, corner;
- Be confident in the long-term performance of your product.
You can also choose which door to install yourself, you can simply, quickly and economically hang a curtain, or better, cut a piece of glass. Experts recommend that you first purchase curtains and only then go for cutting, as you will need to additionally contact the master, where they make holes for them.
The disadvantage of this product is its high price category. If you need to save money, you can buy a piece of ordinary thick glass, and paste it over with a film yourself, it will take a little more time for such work, but the result will be the same. Also, a polycarbonate sheet is purchased as an analogue to glass, it also has a slight transparency and is less whimsical in care.To install it, a profile is purchased from which a frame is created, then a sheet is inserted into it, and holes for fasteners are drilled.
Pallet manufacturing
Work should begin from the bottom of the cabin - the pallet. If you use a ready-made base, this will reduce the complexity and installation time.

When making a pallet yourself, you must take care in advance to protect the room from moisture. To do this, you need to use roll waterproofing.

It all depends on what material the floor is made of. The surface that has been treated must not allow moisture to pass through. The same applies to the bottom of the walls.

Next is the pouring of concrete. In this case, the surface should be inclined in the direction of the drain by 2-3 cm per meter. Before pouring, drainage pipes are laid and a drain ladder is fixed.


How to make a shower stall with a tile tray
Shower cabins are often made in small bathrooms. It is popular in baths and cottages, they put them instead of a bathroom in apartments and houses, they do it in addition - who knows how. But not everyone likes plastic cabins: they are too flimsy. A do-it-yourself shower cabin, although it takes more time, is more reliable.
From the outside, there isn't much difference.
If you want to make your own shower stall in order to save money, do the math first. You will need good waterproofing, and most likely for pools. You just need a good drain, for which you will need to raise the floor, and this is a decent amount of a solution with plasticizers that increase water repellency. For finishing, you will need a good floor tile with a non-slip surface or mosaic, and glue (water-repellent).It would also be nice to have floor heating - it is very unpleasant to stand on a concrete floor in winter. You will also need doors, although you can get by with a curtain. It's already a big amount. There are cheaper options - simple shower enclosures.
If you also need to build walls, even from drywall, then there will be no savings for sure. Many note that a do-it-yourself shower cabin is not cheaper, and this is at least. But what's good is that you can make it exactly the way you like it, in the size you want (or how it turns out). A self-contained shower cabin is inexpensive only if there is a ready-made nook that is simply fenced off with a door or curtain, but the cost of installing a drain and a floor does not disappear.
general information
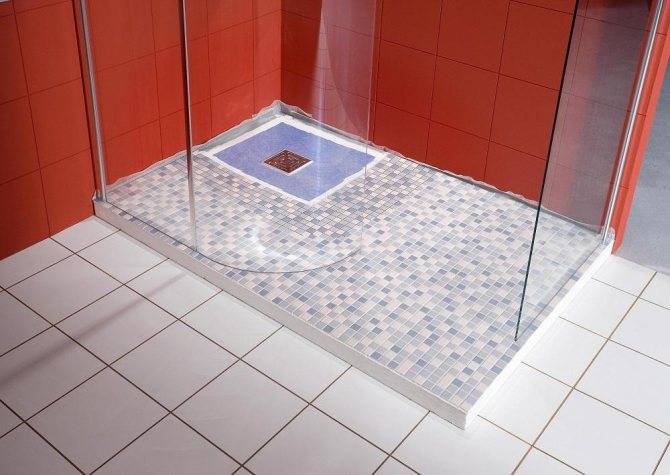
The drip tray is a shallow container designed to drain the water in the shower. Manufacturers offer various materials and various forms of this device. Often, the stand has several legs, or a container configuration is provided that allows you to attach a drain ladder to the bottom and bring the sewer pipe into a common drain. You can put the pallet on the same brick or aerated concrete blocks. A device for the disposal of water is made from steel, cast iron, acrylic. If you want to make a pallet yourself, choose building materials such as brick or concrete. Surface cladding is made of tiles, mosaics, allowing you to choose a color, ornament and complement the overall design of the bathroom.
Optimal shower dimensions
The dimensions of the shower room depend on two factors: the size of the room in which the cabin will be installed and the height / weight of its visitors.
If the dimensions of the room allow, then the cabin can be fenced off by more than a meter in length and width. There you can mount two shower heads or a shower plus a sink. It all depends on the needs and wishes.
 For a large bathroom, you can install a shower cabin with several watering cans.
If the bathroom is small and the cabin is planned to be installed in the place of the former bath, then there is not much choice here, even a glass corner cabin is mounted in order to save space.
 Little space is occupied by a standard shower.
In addition, in order to equip the stack, you need to raise the floor in the shower area by at least 10 cm. At the same time, the cabin itself will also rise, which is difficult in apartments with low ceilings.
The height of the cabin can be different - up to the ceiling or covering the head of a person.
 The shower cabin does not have to be up to the ceiling.
Construction dimensions
It is important to determine the size of the shower. It should be selected individually based on the dimensions of your family members.
If you have a large household, then the cabin should be spacious.

The size of a shower stall made of tiles can be within the following limits:
800×800 mm. Cabins with such parameters can be safely called “miniature”, because even a slender person will find it difficult to bend down in it.
900×900 mm. This size is better. It is mainly used in cases where everyone in the family is relatively slender.
1000×1000 mm or more. These are already spacious cabins in which you can sit down freely and take a shower without hesitation.
So, as you can see, the size of the future design is determined individually.
Training
When the type of shower room and the place for it is chosen, they begin to prepare for installation.
wall requirements
The place where the cabin will be installed will be damp and damp due to frequent contact with water. Therefore, the walls near which it will stand must be made of water-repellent material. The best for this purpose is a tile fixed with a water-resistant material. Sheathing with PVC panels, brick, stone is also suitable. If it is not possible to completely change the material of the walls, you can sheathe them with moisture-resistant drywall and additionally cover them with a waterproof composition. This will help to completely prevent rotting and reproduction of fungi and bacteria. In addition, the coating should be well washed and not deteriorate under the influence of cleaning products.


In addition, ventilation and electricity must be provided.
Open communications can be covered with plaster, and the wires can be placed where the importance is minimally increased, that is, as far as possible from the shower itself
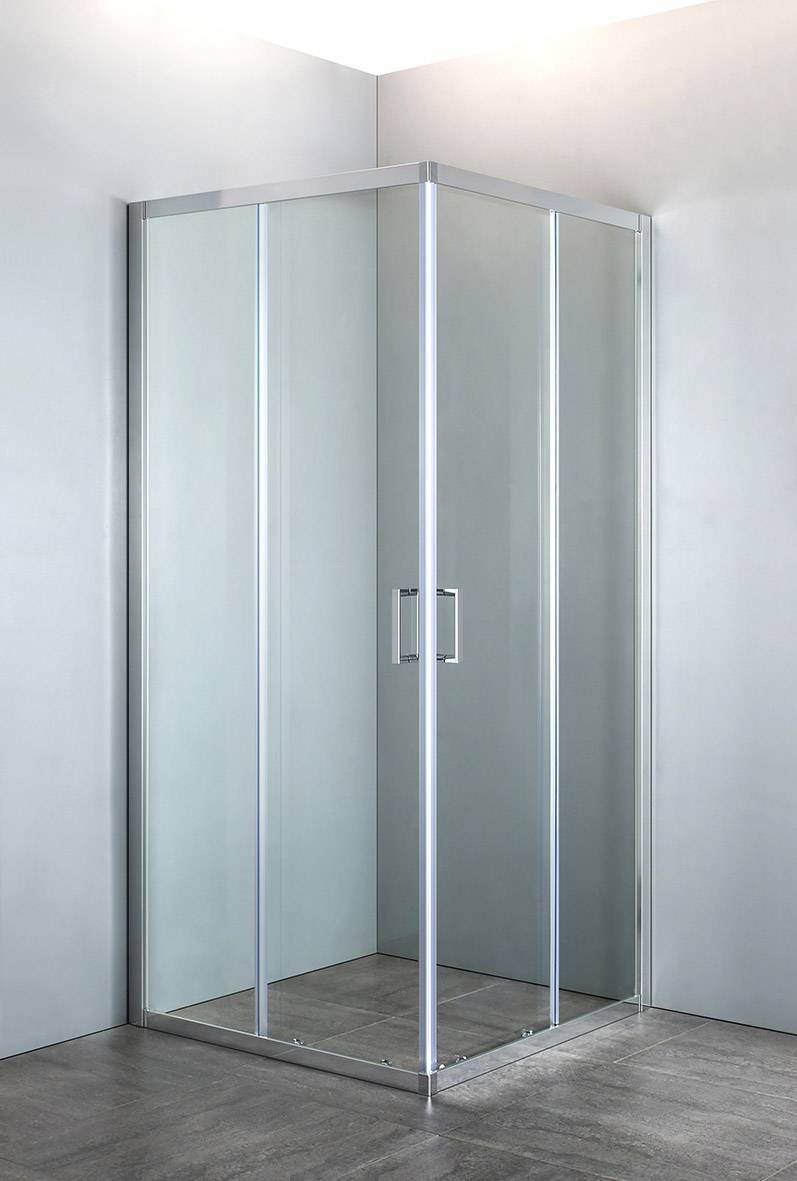
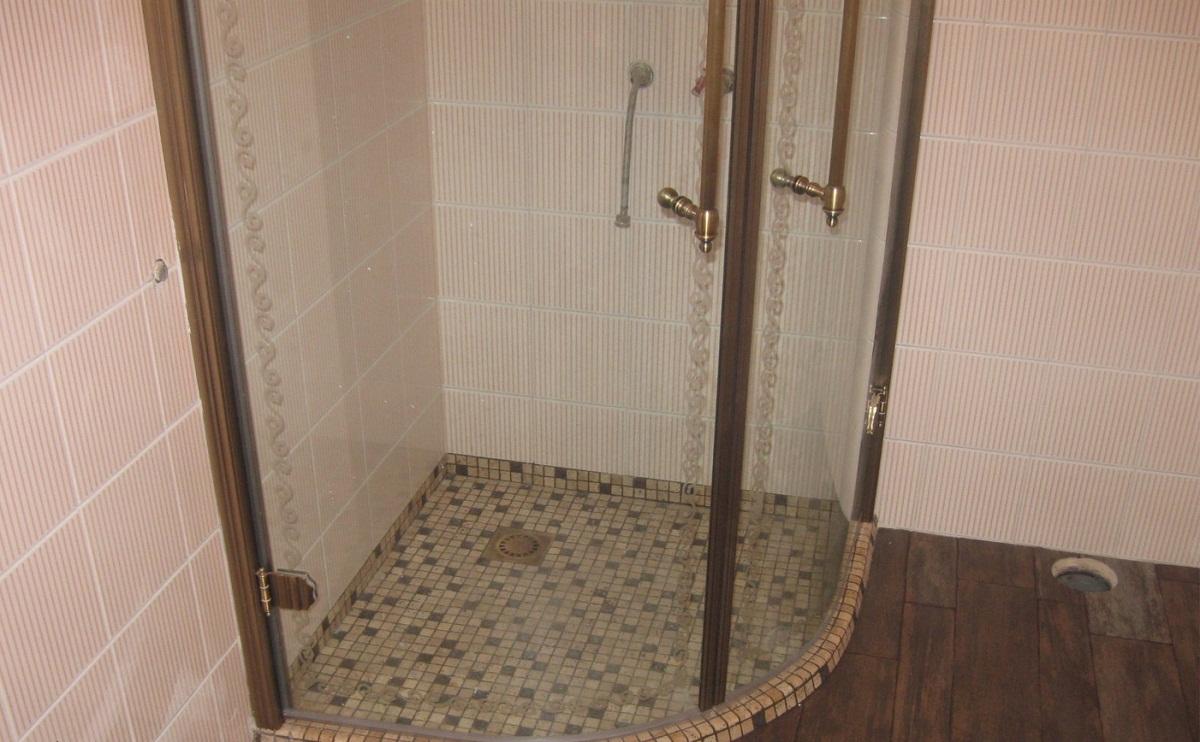
Doors or guardrail
When choosing what to install as shower doors, you also need to focus on the size of the room.
Swing door drawing
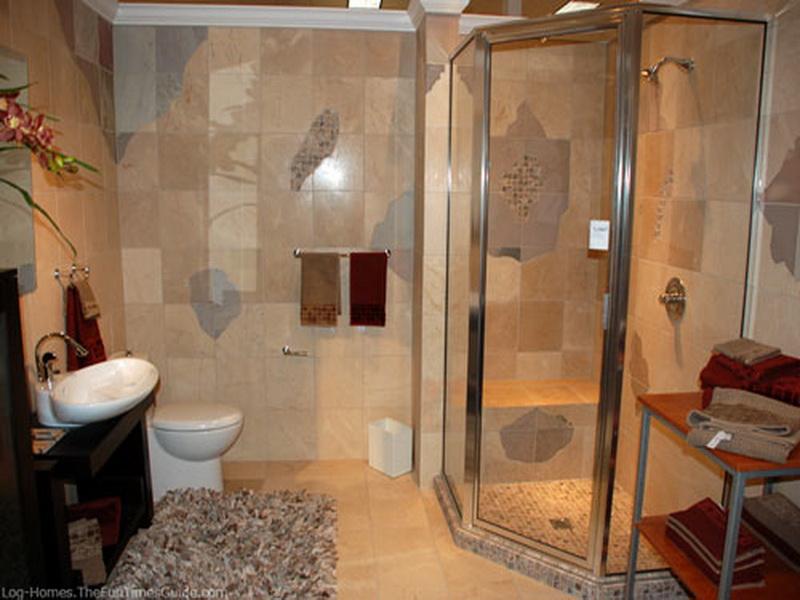
For larger rooms in your home, you can opt for fixed railings. Thus, the shower will turn out to be open, looking beautiful, aesthetically pleasing and modern. Sometimes a swivel railing or screen is additionally installed - this advantageously combines a classic shower box and a modern open shower. With this solution, splashes will surely fly, and only one person can use the shower at a time.
Doors are a classic solution that will fit any shower cabin. They can be matte or glossy, with different opening options.For cramped bathrooms in a private house, those doors that take up as little space as possible are suitable - sliding, folding and the so-called "in-swing".
Size calculation
Dimensions are also planned taking into account the area of \u200b\u200bthe bathroom and your own needs, but you need to build on standard measurements. The minimum size of a booth in which an adult of average build is placed is 80x80 centimeters. But in such a space, you can forget about comfort. It is better to install a cabin with dimensions of 90x90, 100x100, 90x110 centimeters, depending on the possibilities of the room. The most comfortable size will be 1.2-1.4 meters on at least one side.
Drawing of the connection to the shower cubicle
In urban apartments, the height of the shower room is determined by the height of the ceiling. In any case, this parameter should be calculated in such a way that a person can enter the cabin at full height, easily reach the mixer with his hand, and so that water splashes hit the ceiling as little as possible.
Tools and materials
Before building a shower, you need to prepare all the necessary tools:
- drill;
- putty knife;
- brush;
- roulette;
- level.
You also need to prepare materials:
- brick;
- cement;
- mixture for waterproofing;
- film and mesh.
Once the materials are ready, assembly can begin.
Starting the installation
The following is instructions for self-construction shower cabin. Consider options based on a factory-made acrylic and home-made pallet made of expanded clay concrete blocks. The material of the fence will be moisture-resistant drywall. Before starting work, you should prepare the estimated amount:
- sheets of silicate glass;
- expanded clay concrete blocks;
- bricks to create sides;
- tiles for finishing the cabin and pallet;
- waterproof tile adhesive;
- cement-sand mortar;
- waterproof screed;
- waterproofing.

In addition, you will need a drain with a siphon or a ladder to remove wastewater from the cabin to the sewer system.
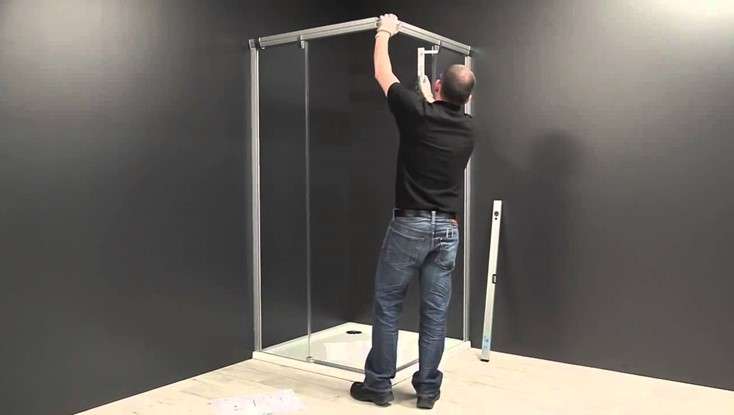
Installation of the finished pallet
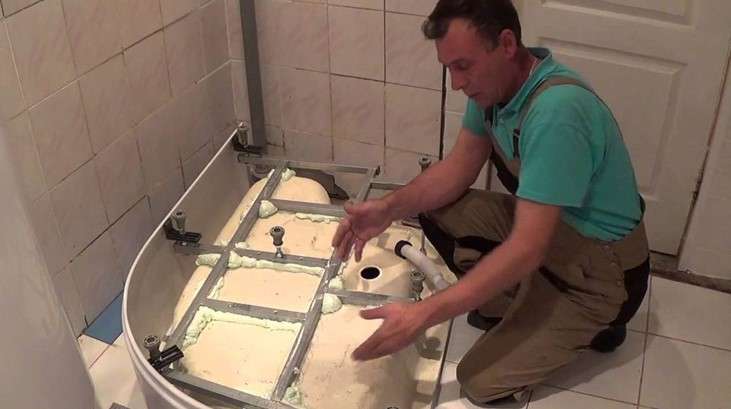
To install a factory pallet, you will need a rigid frame, which can be made in the form of a steel frame, from a bar treated with a septic tank and water-repellents, bricks. The most common carcass construction is a steel frame made of steel beams with a criss-cross fixation. Stages of work:
- The frame is attached to the pallet on special metal studs, which are screwed at one end into the provided holes along the edges of the pallet, and at the other end into the frame supports.

On the nuts mounted on the studs, steel beams are mounted perpendicular to each other (crosswise). After adjusting the position, they are fixed with locknuts.
The pallet with the frame is installed in place. The predetermined height and slope are regulated by the position of the legs located on the studs of the structure. The recommended difference in the direction of the drain is 20 mm per 1 m.

Next, you should install a drain and a siphon if these elements were not installed when purchasing the pallet. To prevent leaks, the joint between the siphon and the drain is treated with silicone sealant.
Construction of a homemade pallet
Self-erection of the pallet makes it possible to create a cabin with parameters defined by the owner: width, shape, height of the sides. Consider the stages of work.


- We mix the solution. Purchased mixtures are diluted, carefully observing the dosage indicated on the package.It is convenient to do this in a large capacity using a construction mixer or a special nozzle for a drill.
The blocks are laid on a waterproofed old base. Communications are carried out between the blocks and a ladder is installed. Required drainage angle is 5-7°. The space between communications and blocks is not filled to simplify the repair work during further operation.
Along the edge of the brick structure laid on the edge, the sides are laid out, which will serve as the basis for the installation of the fence.
The surface of the pallet is filled with a waterproof screed. Layer thickness - 3-5 mm. When pouring, a slope of at least 10 mm per 1 m should be observed. designs.
Making a corner
As noted above, the walls of the shower enclosure will be laid out of brick.
- A layer of mortar is applied to the sides, on top of which bricks are laid in horizontal rows “on the edge” or in a quarter of a brick.
- To combine the masonry into a monolithic structure, it is necessary to observe the dressing of the seams: the longitudinal seams in adjacent rows are shifted by half a brick.
- The height of the corner is 7 rows with a standard brick width of 250 mm. The thickness of the seams is 12 mm.
- To fix the brick to the wall, it is recommended to use steel bars with a diameter of 6 mm. The bars are laid between brick rows (in a seam) and driven into the holes of the main wall. To create holes, use a puncher with drills equipped with victorious soldering.
Installation of fences
Having brought the walls of the corner to the desired height, you can proceed to the installation of the fence. In this example, we will consider silicate glass, 6 mm thick, as the material of the fence.
- Corner plastic profiles are attached to the walls and to the upper part of the brick shower enclosure. High-quality fastening of profiles is provided by dowel plugs and impact screws.

Fastening of glasses in a profile is provided with sealant. For safety, the exposed glass edges are chamfered.
Instead of cabin doors, a sliding curtain will be used, which is mounted on a stainless steel pipe frame. Installation of the pipe to the wall is provided by special flanges.
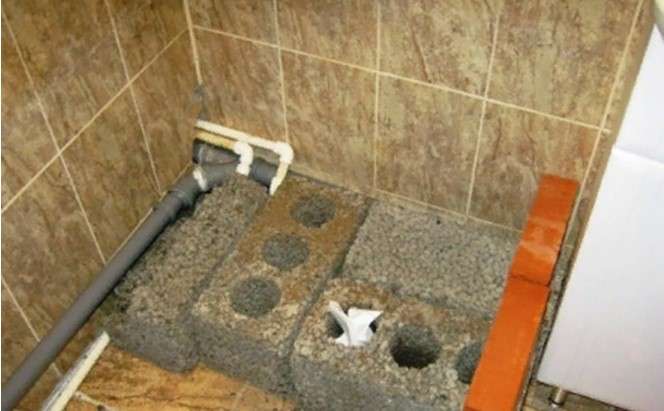
Brick pallet base
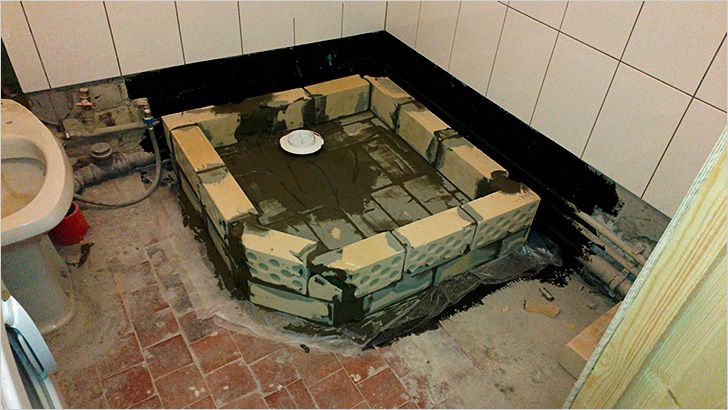
After the first layer of waterproofing has dried, you need to start laying the base of the pallet from ordinary or silicate bricks. The solution can be made from three buckets of sand, one bucket of cement, one bucket of water and 70 grams of plasticizer. You can also lay a brick on a ready-made mortar purchased at a store. A metal reinforcing mesh must be laid on the base.
The advantage of a homemade shower cabin is that the size of the pallet can be either very small (for a small bathroom) or large enough if the dimensions of the room allow. The finished pallet must be at least five centimeters higher than the sewer pipe.
In parallel, you need to decide on the place of drainage, install a ladder and connect it to the sewer pipes that lead to the place where the drain is installed.
The sewer pipe is carefully threaded into a metal pipe of a larger diameter so that the heavy weight of building materials does not damage it, and is fixed to the floor with clamps. You can use a harder outdoor sewer instead (it's usually orange in color and can withstand heavy loads).
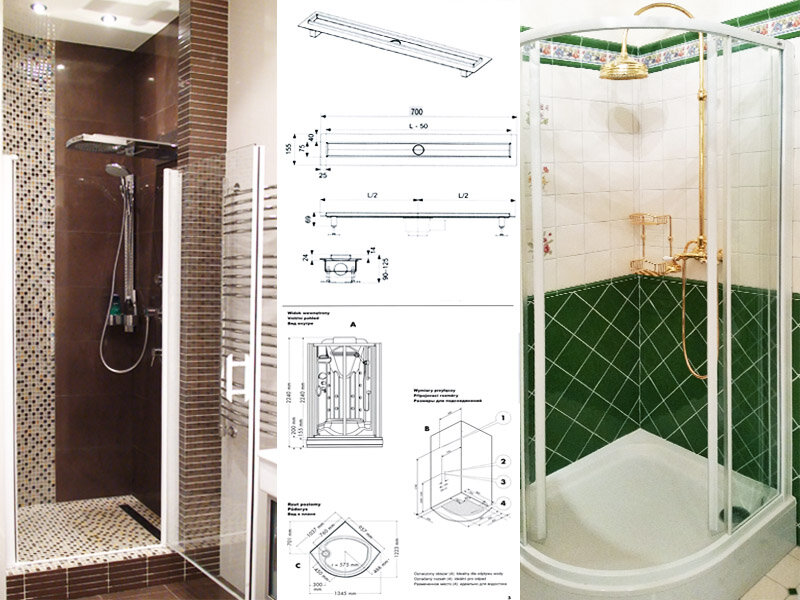
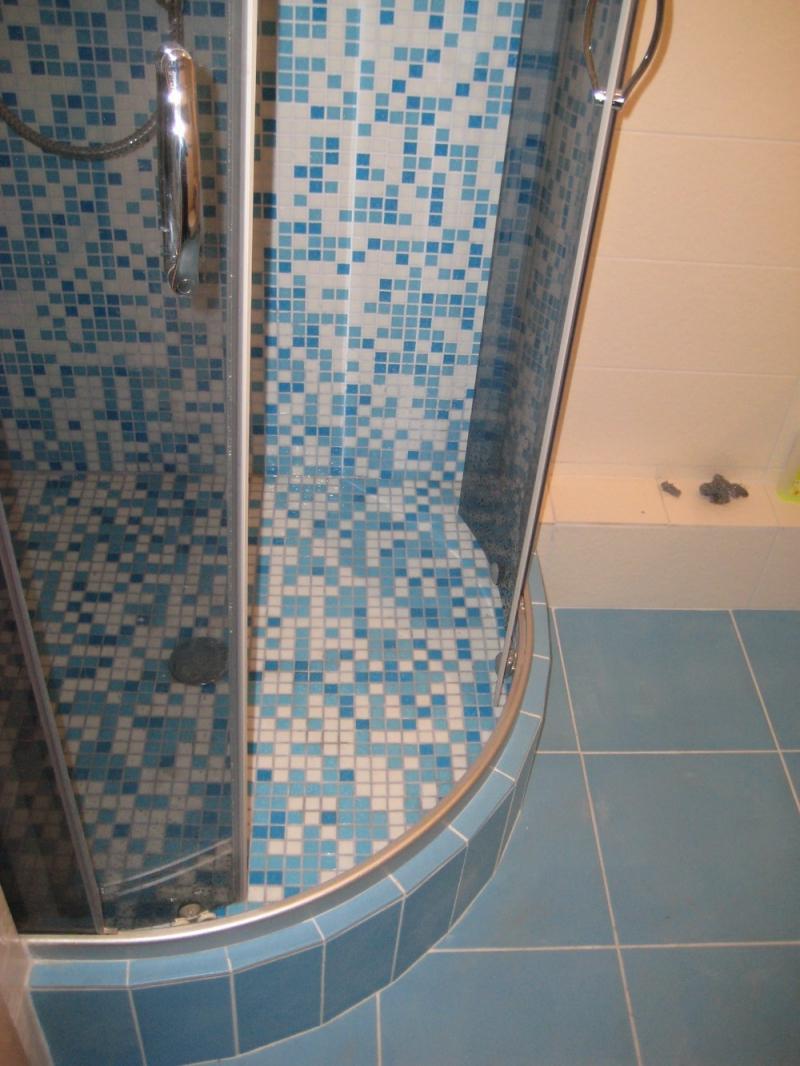
Classification of shower cabins by type of pallets
The difference between showers that are made of tiles is how the water is collected. So, pallets for cabins are of three types:
- classic steel, acrylic or cast iron pallets up to 45 cm high from the floor level. They are equipped with all the elements that help drain the water and divert it to the sewer. The tile in this case is used as a cladding. The pallets themselves are installed in the mounting legs, then they need to be tiled by analogy with small bathtubs;
- flat and shallow pallets with a height of up to 15 cm. Sometimes you need to make a recess under them if you are using molded factory products. Also, such pallets can be made with your own hands, if you take bricks as sides. The entire structure must first be covered with concrete, and then with tiles;
- sloping floors. Thanks to this solution, you can successfully combine the flooring of the bathroom as a whole with the floor of the shower cabin in terms of style.
However, when creating a water outlet, you do not need to go too deep into the concrete floor, since the coating has a limited thickness, and if it is reduced, it will weaken. This can cause problems such as the collapse of the coating, and if you do not live on the ground floor, then not only you will suffer, but also your neighbors below.
Installation of doors and fastening of curtains
To fasten the walls and doors to the ceiling, walls and pallets, a frame made of galvanized steel or aluminum is screwed with dowels.
Doors and walls are purchased at the store. Two varieties are offered:
- plastic;
- glass.
It is impossible to process glass at home, but this is not necessary: there are fittings that do not require drilling holes - they are pressed onto a sheet of glass.
Glass doors
Glass walls look much nobler than plastic ones, but due to their fragility, this option is not recommended for families with small children.
If the design plan prescribes to make the booth entirely of tiles, the frame is sheathed with moisture-resistant drywall and pasted over with ceramics. Instead of a door, you can hang a curtain on a chrome bar.
The amount of work when installing a tile shower cabin is small, but it is difficult to overestimate the effect: the user receives exactly the product that he needs. The main task is to follow the above tips to create a reliable waterproofing of the pallet.


Conclusions and useful video on the topic
For a more complete picture of the various nuances and stages of work on arranging homemade booths, we suggest that you study several videos with tips from the masters.
How to mount a linear drain for a shower enclosure:
How to make a cabin with a tile pallet and underfloor heating:
The initial stage of the construction of the pallet - height calculation, rough screed:
Installation of a ladder and floor insulation in a shower cubicle:
How to make a floor screed for a pallet:
p>Building a homemade shower cabin with tile or mosaic cladding allows you to realize the most creative design ideas. And if you do all the work efficiently, not forgetting about the slopes and waterproofing of surfaces, such a shower will last much longer than plastic cabins.
But if you are not confident in your construction skills, you can always involve professional builders or plumbers in the work.
Do you like tile showers and want to build one for yourself? If you still have any questions after reading our instructions, ask them in the block below.
Or do you want to supplement our material with practical recommendations for laying tiles, connecting to a water supply / sewerage system? Maybe you just finished building a shower stall? Write your comments and advice, add photos of your own booth - your experience will inspire many beginners in this business.


