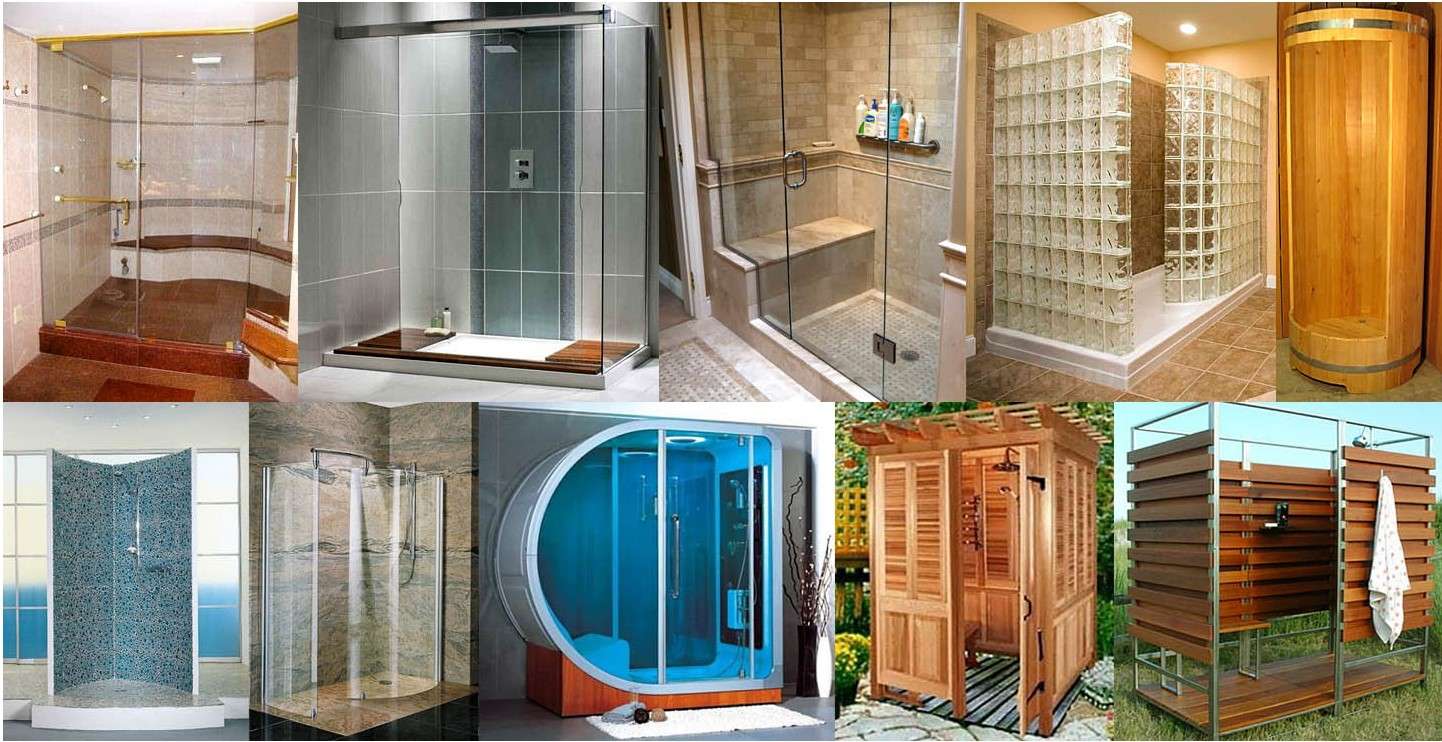
- Required materials and accessories
- Do you need shower doors?
- Cladding, curtain arrangement
- Brick shower curtains
- Installation and connection methods
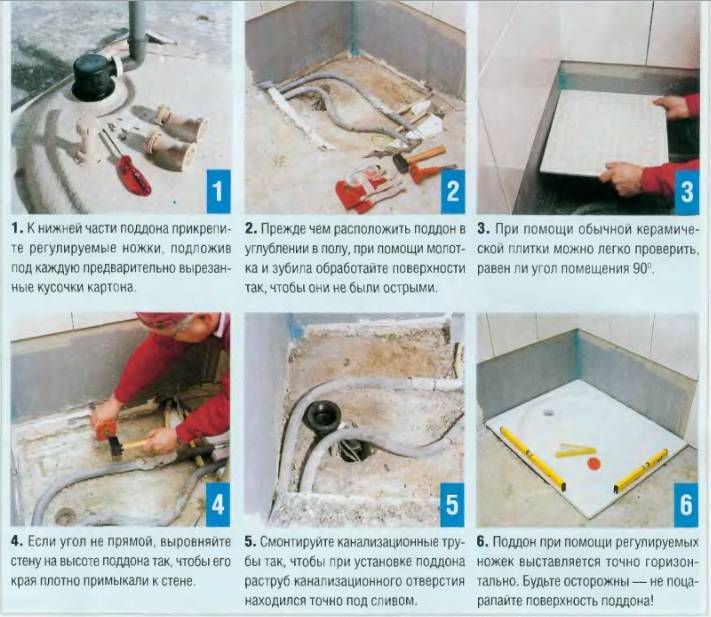
- Do-it-yourself tile pallet ↑
- Materials and tools
- Step by step installation of tiles
- Step by step installation of the mosaic
- Design and material selection
- Requirements for coverings of a shower area without a pallet
- Types of structures according to the height of the sides
- Sequence of installation of different pallets
- Acrylic
- cast iron
- Steel
- Made of artificial stone or ceramic
- Step-by-step work plan for installing a pallet with sides on the frame
- Installation of a metal frame
- Fixing the position of the frame
- Siphon connection
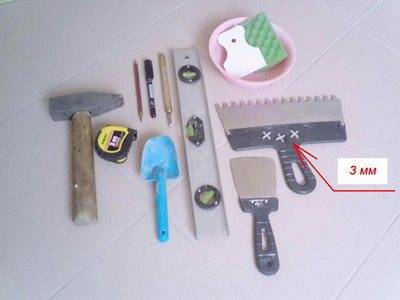
- Preparation for work tools and materials
- Do-it-yourself shower cabin stages of creation
- Installing the factory tray
- Making our own pallet
- We are building a corner
- We install a fence
- Features of the installation of a shower cabin-hydrobox
- Do-it-yourself installation of side panels, doors and roof in a shower cabin
- Preparation for work
- How to mount a pallet with your own hands
Required materials and accessories
For self-installation of a drain pipe for a shower, the following materials will be required:
- collapsible siphon with screw fastening, mounted under tiles;
- drain pipe with a diameter of at least 40 mm included;
- silicone sealant;
- foam polystyrene plates 50 mm thick;
- cement-sand mixture up to 5 kg per 1 m² of floor;
- roofing material or other waterproof sheet material, laid in 2 layers;
- finishing cement-polymer mixture for waterproofing, 3-4 kg per 1 m²;
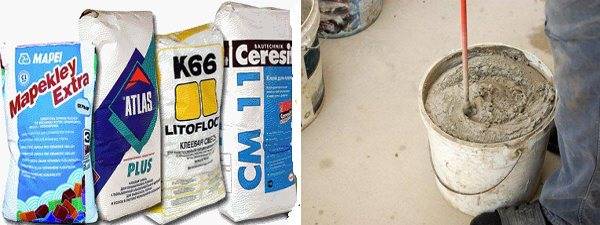
- waterproof glue for tiles;
- tile;
- mixture for grouting tile joints is waterproof.
Tools required for installation:
- a hammer;
- chisel;
- trowel, or trowel;
- notched trowel;
- building level;
- tape measure, marker;
- straight straight rail;
- trough or buckets for glue and screed;
- construction mixer;
- grinder saw for cutting tiles;
- blowtorch or building hair dryer.
Do you need shower doors?
The easiest, but not the cheapest option is to put glass doors in a homemade shower cabin
The problem with doors is most simply solved when the cubicle is rectangular. In this case, you can simply cut the doors out of glass, depending on the size. It is not problematic to choose canopies for such doors, since there is a considerable choice in hardware stores. The most important thing is that such doors will have to be ordered, since they will have to drill holes for awnings, and oh, how difficult it is to do it yourself.
No less important, ordinary glass is not suitable for such purposes. Suitable for tempered glass
If it breaks, the fragments do not have sharp edges, like ordinary glass, so it is impossible to get hurt. The only drawback of such glass is its high cost. You can save significant money if you order ordinary glass, and then paste over it on both sides with a translucent polymer film. Naturally, this will take a lot of effort and time, but the effect will be the same as in the case of tempered glass.
It is very important to stick the film correctly, adhering to the technology, but this is a topic for a completely different conversation. There are other options: as an option, it is permissible to adapt sheet polycarbonate for these purposes
Firstly, you get a translucent door, and secondly, it is easy to install, and it will turn out to be lighter than glass. It is enough to use a suitable furniture profile to make the frame of the desired size. After that, the polycarbonate sheet is planted on the sealant or simply fastened with screws.
There are other options: as an option, it is permissible to adapt sheet polycarbonate for these purposes. Firstly, you get a translucent door, and secondly, it is easy to install, and it will turn out to be lighter than glass. It is enough to use a suitable furniture profile to make the frame of the desired size. After that, the polycarbonate sheet is planted on a sealant or simply fastened with screws.
In extreme cases, if you don’t want to mess around, you can buy ready-made, factory-made. Alternatively, you can adapt the plastic doors "accordion", as shown in the video.
do-it-yourself shower stall
Watch this video on YouTube
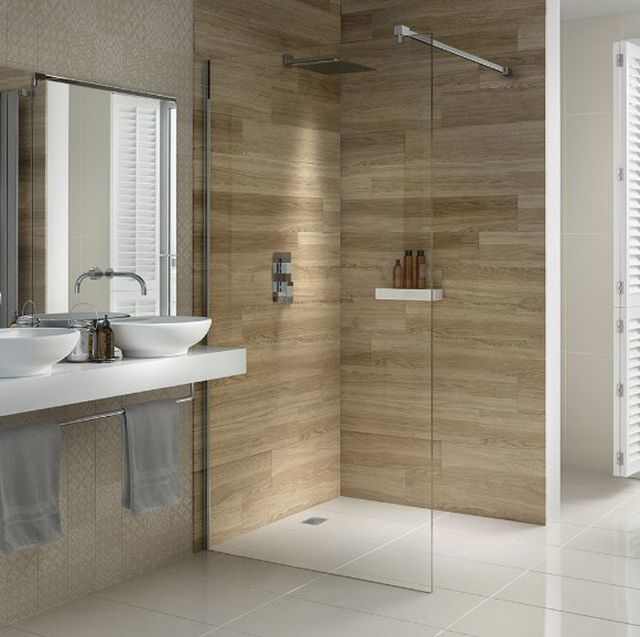
Cladding, curtain arrangement
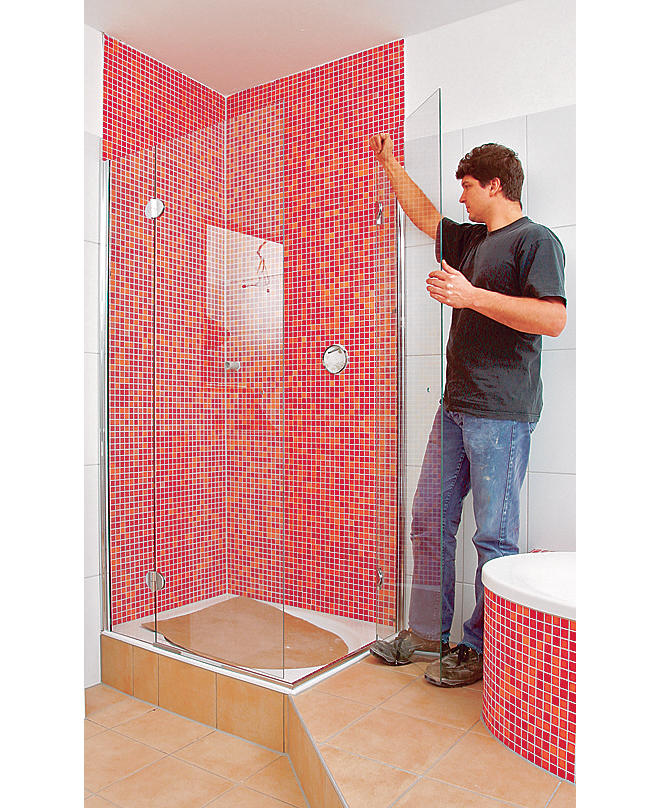
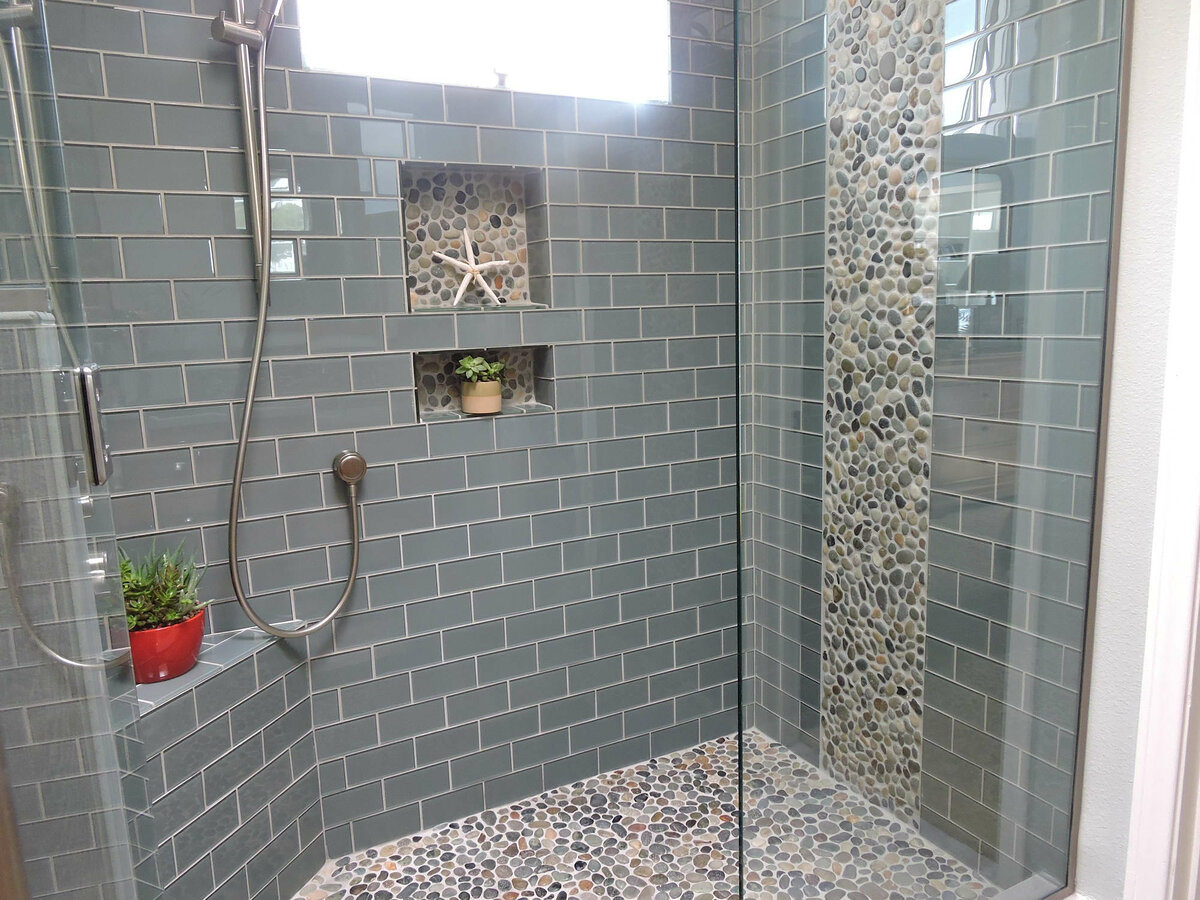
Finishing the surfaces of the shower cabin is carried out according to a single technology for laying clay tiles. As a rule, for these purposes, tiles of medium and small sizes are used, good results are obtained when facing with mosaics.
It is preferable to hide the water supply pipes behind the cladding. To do this, grooves are punched in the wall in advance, into which communications are placed, a mixer is introduced and the surface is processed.
And you will also need to make wiring for lighting and ventilation.Lay it at a certain distance from the pipes and observe all fire safety measures. For this reason, the wiring is installed on the outside of the shower room and protected by the RCD. After installation, all surfaces are faced with ceramic tiles.
Reference! For floor is better to use tiles with a rough anti-slip coating.
At the same time, it is preferable to use a special health-improving sealant as a grout for joints. It will protect against moisture and prevent the occurrence of mold and fungus at the joints of the tiles.
Brick shower curtains

There can be 2 types:
- from a special waterproof fabric;
- from glass or compacted colorless plastic.
Each type is installed according to the instructions. It is necessary to rely on the scale of the place where such barriers are needed. Glass or plastic shutters are the most powerful.
This is taken into account when choosing materials for construction. All guides and frame frames made of metal are attached to the wall and pallet
All joints are treated with sealant and specialized rubberized pads are installed so that moisture does not get into the joints.
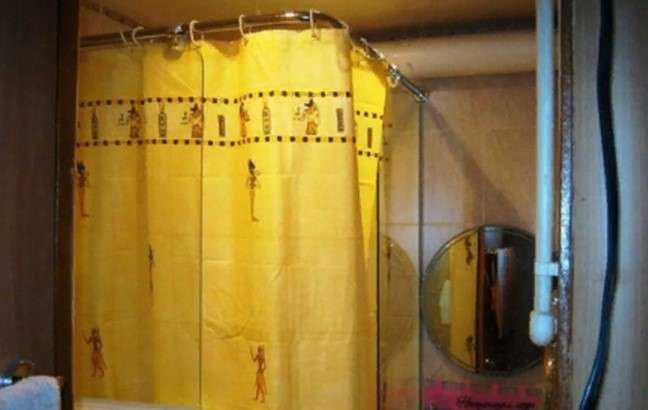
With soft types of fences, everything is easier. They are formed with the help of the upper bar. The material is hung on specialized hooks that prevent the fabric from breaking.


Installation and connection methods
Aerated concrete pallet for mosaic cladding
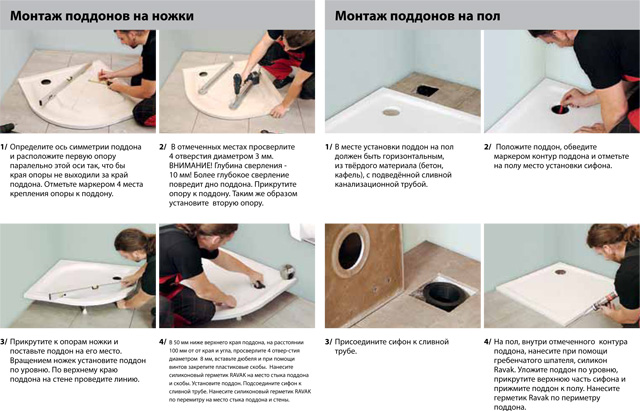
Shower trays can be installed in several ways:
- on foam concrete;
- on the legs;
- on ready-made plastic stands.
In the first case, the pallet is put in place and the outer contour is circled. Then, foam concrete stands (no more than 10 cm) are put on glue at all corners of the pallet.A pallet is placed on top and leveled horizontally. When the glue sets, the pallet is removed and the sewer pipe and drain are mounted. Then blocks are cut out of foam concrete with a hacksaw and a square base is built around the perimeter of the structure.
Then a pallet is “planted” on it with glue and the joints are coated with sealant. When the installation is completed, it remains only to tile the outer side of the block foundation with tiles or mosaics.
Installation of the pallet on legs is carried out according to the instructions. As a basis, the kit should have a plastic screen, if it is absent, then the perimeter is made, as in the previous case, from foam concrete or brick, followed by tiling.
Do-it-yourself tile pallet ↑
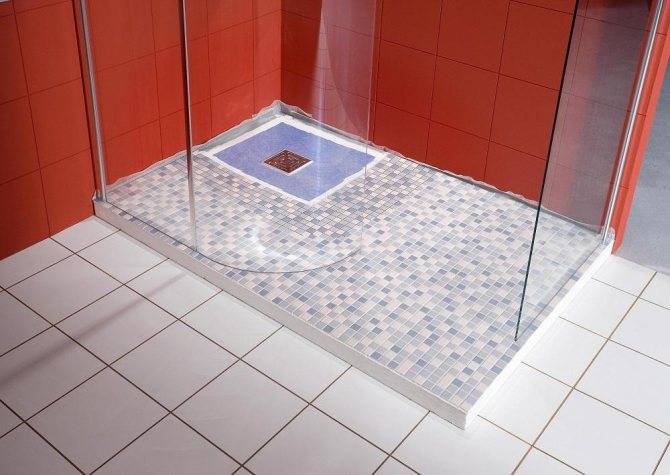
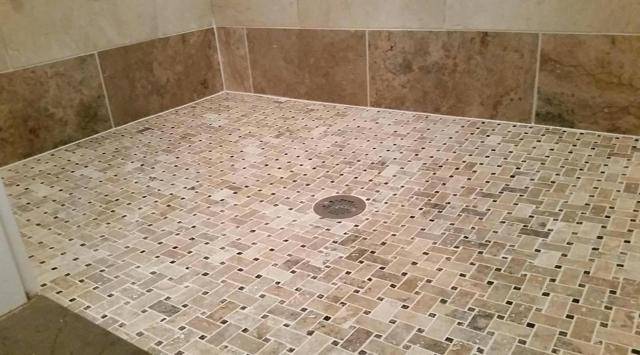
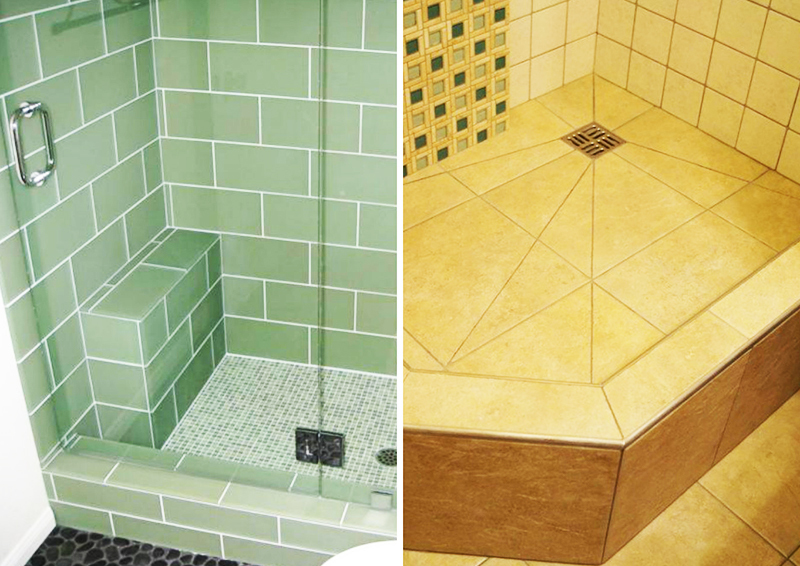
For lining the pallet, you can use ordinary ceramic floor tiles, but a mosaic will look more beautiful.
Materials and tools
Materials and tools required for tiling a shower tray:
- floor tiles or mosaics;
- adhesive mixture for laying tiles (it is better to use water-repellent);
- notched trowel (comb);
- level;
- roulette;
- rubber mallet;
- grinder or tile cutter;
- construction knife;
- water-repellent grout for joints;
- rubber spatula;
- cross stitches.
for laying tiles
Step by step installation of tiles
Before starting laying, you need to prepare an adhesive composition. It is prepared using a drill with a mixer nozzle in the exact proportions recommended by the manufacturer.
composition for laying tiles
Laying tiles must begin from one corner.For high-quality laying, the adhesive mixture is applied to the surface with a notched trowel, the tile is laid on the adhesive and pressed down.
tiles
To adjust the level, use a rubber mallet, tapping in the right places. Evenness and the same size of the seams can be controlled using special plastic crosses.
After laying tiles over the entire surface, it is necessary to fill the seams with a special mixture. It serves to prevent water from getting under the lining.
The mixture is prepared in small portions and rubbed into the seams with a rubber spatula.
Next, you need to rinse the entire surface with a damp cloth to remove the remnants of the grout mixture. To make the seams the same, you can go through them with the back of the spatula (the plastic handle of a special spatula is designed for this).
After completing all the work, the surface of the tile is washed again and wiped dry.
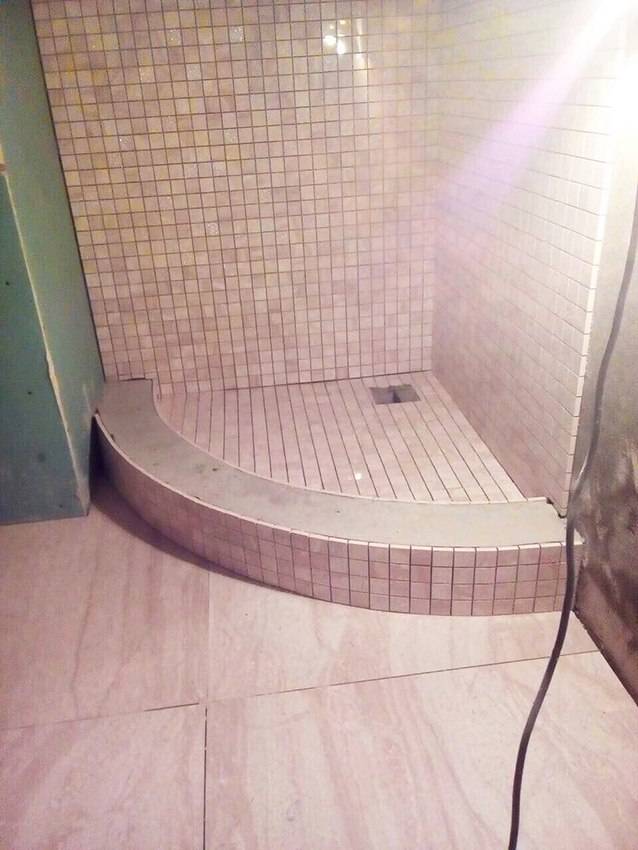
Step by step installation of the mosaic
Mosaic is a very beautiful finishing material, which is usually used for lining shower trays, or for solving other design problems.
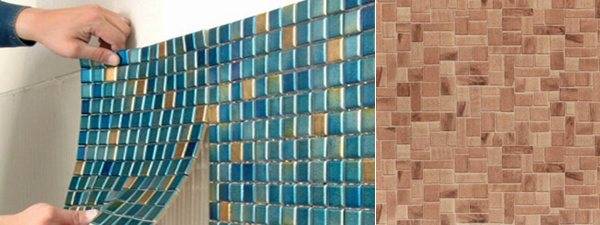
and glass mosaic for bathroom
Mosaic is glass and plastic. For the pallet, you can use any mosaic.
An adhesive composition is applied to the surface with a notched trowel, and a tile is applied. The tile is pressed a little, excess glue must be removed immediately.
In the article: installation of polypropylene pipes, read detailed instructions on the installation of polypropylene pipes. For ways to hide pipes in a toilet, watch the video on the page.


A do-it-yourself acrylic bathtub installed on a frame fits perfectly into the interior of a modern bathroom. How to do? Read here.
Trimming of tiles is carried out with a construction knife or scissors, since the base of the mosaic is paper or in the form of a mesh.
mosaics
After laying the mosaic, you can start grouting. The seams are rubbed with a special waterproof grout mixture using a rubber spatula.
Mosaic grouting is a very crucial moment, which must be carried out very quickly and grout residues should be wiped off immediately.
and wipe dry
After filling the seams, thoroughly wash the lined surface and wipe it dry.
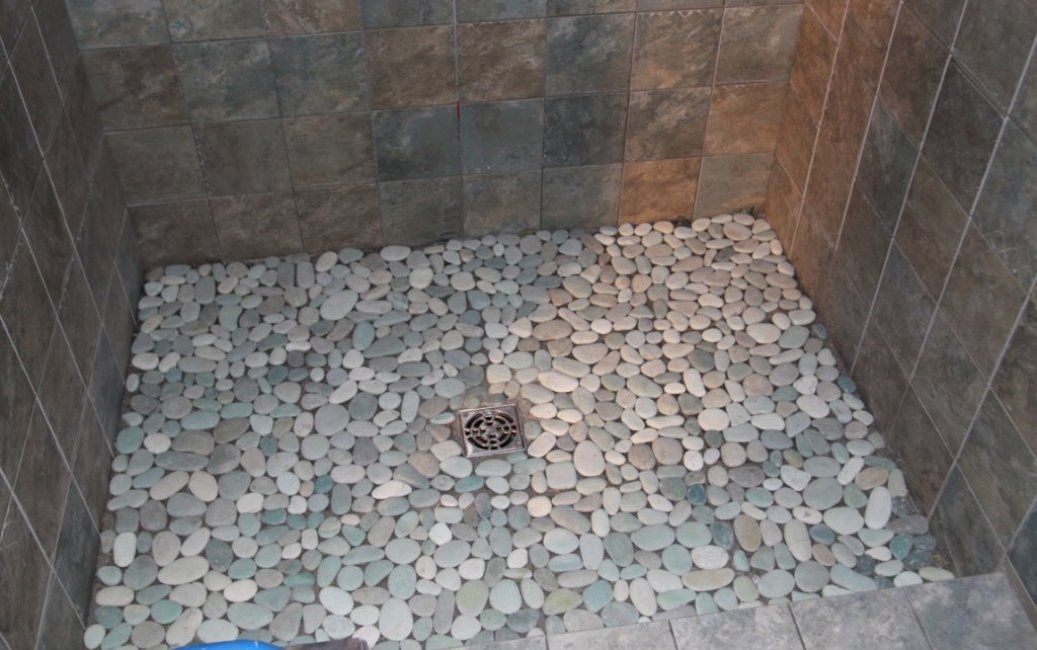
Design and material selection
The easiest option to create an original design is a mosaic for a shower cabin. It is convenient to lay it when decorating the floor (small fragments do not require the use of a tile cutter and laying along the lines). What is especially important is that drawing a pattern near the grate of the ladder does not require special skill.
Also, the interior of shower cabins can be created with your own hands by combining various natural materials. For example, a combination of wood and stone will create an atmosphere of individuality. And plastic in combination with sea or river pebbles on the floor will add not only style, but also comfort to the interior.
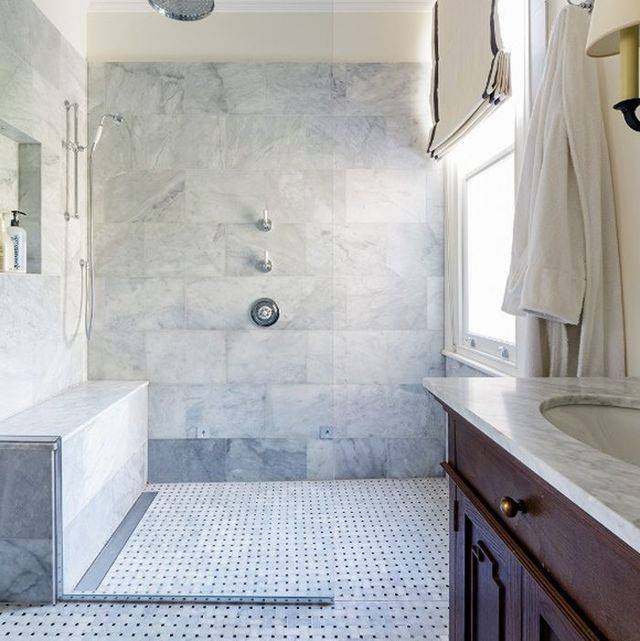
Marble is considered the most expensive and durable. The coating from it can stand for more than a hundred years.
Requirements for coverings of a shower area without a pallet
The requirements for covering the shower area are high, since in this room, due to the slippery floor, there is a high probability of an accident.
An important condition for safety is the choice of high-quality non-slip flooring.
The tile must be non-slip, treated with a special coating.If desired and possible, you can lay out the floor with tiles made of natural or artificial stone. But the problem is that it is thin - 3-4 mm. This results in the following requirement - the thickness of the laid tiles in the shower should be 8-10 mm, and the adhesive coating: 4-9 mm.
For reliable flooring, tiles are often used.
Types of structures according to the height of the sides
The bottom is in the form of a square, rectangle, semicircle. The complexity of the work depends on the depth of the pallet.
- The height of the walls from 20 cm gives the design the appearance of a small bath. For a shower cabin with a high tray, installation without a frame is not carried out. The framework is established on six legs.
- For the average depth of the structure (10-20 cm height of the sides), installation is carried out both on the frame and on the principle of small pallets.
- A small structure is sometimes mounted on supports. But if they are absent, then a special foundation is being prepared.
There are showers, where the bottom is a floor with waterproofing and a drain drain.
Installation of the shower tray is carried out in two ways: on the frame and on the foundation.
Sequence of installation of different pallets
To do everything right, use the tips in this section. Some materials will deteriorate quickly if their characteristics are not taken into account. For example, this often happens with acrylic.
Acrylic
If the bottom of the product is not reinforced, it can be reinforced with expanded polystyrene. A sheet of material is laid on the foundation. Another option is a support frame made of steel strips welded together or connected by brackets.
- Place the tray on the floor, mark the drain on the floor with a pencil.
- Pour or glue the foundation.
- Remove the bowl and connect the siphon to the drain pipe.Its edge should not touch the floor.
- Fill the siphon with water to check for leaks. Seal the revealed defects.
- Lubricate the joints of the sleeve and the siphon pipe with epoxy sealant. If they have paronite or polymer gaskets, sealant is not needed.
- Spread the foundation with glue and carefully glue the tray onto it.
- If there are legs in the kit, attach them to the pallet at the same level. Make sure that their length is not less than the length of the siphon.
- Install the product on the foundation, podium or legs.
- Level check the evenness of the tray.
- Degrease and seal the joints with the wall with silicone sealant.
You can use the shower after ten hours - after the sealant and glue have dried.
Watch a video on how to install a shower tray with your own hands. It clearly outlines a similar instruction.
cast iron
The foundation for cast-iron bowls is almost never made. An exception is cases when the distance from the bottom to the floor is less than the height of the siphon. To raise the tray, it is enough to lay bricks or foam blocks around the perimeter. In this case, use the usual masonry mortar. In other cases, the design is installed directly on the floor, on the legs that are already attached to the bowl.
- Using a level, determine the differences and, where necessary, place steel plates or other objects under the legs.
- Connect the siphon and coat the joints with epoxy glue.
- A little later, fill in the water and check for leaks. If there are, remove them.
- Fix the legs with cement mortar diluted 1:3. Formwork can be made from matchboxes.
1 of 2
Instagram @dsigovatov
2 of 2
Instagram @lm.plumbing.services


The cast iron pallet is not glued to the wall. You can use the cabin after ten hours - when the epoxy sealant dries.
Steel
You can also reinforce the bottom of the steel tray with a sheet of expanded polystyrene foam on the podium or with a homemade frame. Usually, there are no legs included with a steel stand.
- Make a frame: concrete or brick foundation.
- If the podium was filled with a cement-sand mixture, wait until it dries and waterproof.
- Connect the siphon and check that the drain is working. Repair leaks, if any.
- Install the tray and level it with a level.
- Attach it to the foundation with mortar or glue.
- Degrease and seal all joints with epoxy sealant.
The video has clear instructions.
Made of artificial stone or ceramic
Products made of ceramics and artificial stone must be installed very carefully, as they are fragile and can crack even from one blow. It can be difficult as the material is heavy
It is better if the product will stand on a dais or frame.
- Make a markup according to the size of the tray.
- Dismantle the trim in this area to the screed.
- Waterproof the floor and build a podium out of cement, brick, or aerated concrete.
- Cut a small hatch in it in order to have access to the drain system.
- Wait for it to dry.
- Attach the entire structure to the drain pipe and pour a bucket of water.
- If there are leaks, fix them. Take the bowl back.
- Cut a long, strong piece of string, fold it in half and thread it through the drain hole of the tray so that the other end remains on the other side of the product.
- Attach pieces of polypropylene or other objects to the ends to hold the heavy tray while leveling.
- Move it to the installation site and use a level to adjust the position.
- Fill the voids between the foundation and the tray with masonry mortar.
As in all other cases, you can use the shower after the sealant and glue have dried.
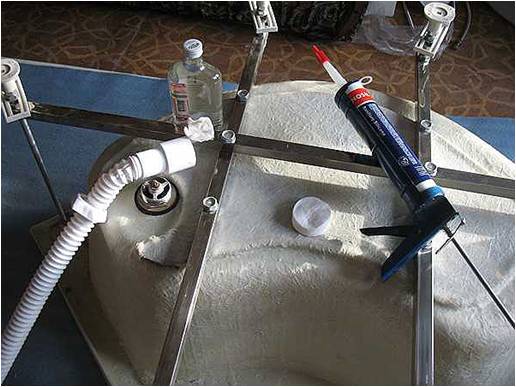
Step-by-step work plan for installing a pallet with sides on the frame
For work you will need materials and tools:
- for sealing joints - FUM tape;
- silicone sealant;
- for connection to the sewerage - a double;
- siphon.
The sequence of work is not violated:
Installation of a shower tray begins with the assembly of the frame. This will allow you to install the pallet in a strictly horizontal position.
Installation of a metal frame
- For the supporting beams of the frame, the cross section is 0.1x0.1 cm. They are strengthened to the bottom of the pallet with self-tapping screws. To do this, the bottom is turned over.
- The strength of the structure is enhanced by fastening the pipes either crosswise or parallel to each other. The choice depends on the shape of the bottom.
- The supports of the metal frame will be studs with thrust bearings, which are installed in special holes at the end of the carrier tubes. The position of the studs is fixed with washers or nuts.
Fixing the position of the frame
- When the frame is assembled, it turns over and is installed on the legs.
- The horizontal position of the pallet is adjusted. Studs are twisted or thrust bearings are rotated. The position of the legs is fixed with locknuts.
- Before fixing the position of the structure, preliminary markings are applied on the wall and floor of its installation. Corner models are fixed on the wall with special brackets. Joints to the wall are treated with sealant.
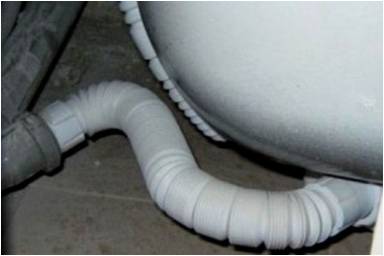
Siphon connection
- A siphon with a flexible pipe is purchased. This will allow you to adjust the length and height of the drain installation.
- Sealant is smeared with a hole for installing the grate.
- After the grating, a gasket is laid and the tee is fixed with a screw.
- With the help of gaskets, the position of the outlet to the sewer is strengthened and it is fixed with a coupling.
- The second end of the flexible hose is connected to the connection node. All joints are treated with sealant and sealed with gaskets.
When the connections of the drain system are checked for tightness, a connection is made to the water supply system.
Preparation for work tools and materials
Any work should begin with the preparation of the necessary tool. Materials for work should also be chosen, starting from the features of the future design. To summarize, you need the following:
- pipes for sewerage with branches and seals;
- waterproofing;
profile, fasteners, etc. To lay out the pallet, you can take a brick or expanded clay blocks. To fill the pallet with cement mortar, you will need plastic to form a shape out of it. If the fence is brick or block, then you will need to prepare:
- trowel with a hammer;
- solution mixer;
- building level.
For plastic pipes you will need:
- soldering iron;
- pipe knife;
- screwdriver.
In addition, you need to have on hand:
- sealant gun;
- roulette;
- construction corner.
It should be remembered that laying out the pallet is not enough. It needs to be lined. For decoration, as a rule, tiles are used. Perhaps it will require adjustment in size, so you need to have a tile cutter or a grinder with a stone circle.
If a factory acrylic pallet is installed, then screwdrivers and sealant will be needed.
Do-it-yourself shower cabin stages of creation
It's time to get down to the creative process of creating the shower stall of your dreams. As mentioned above, the pallet can be made independently, or you can buy it ready-made in the store. The second option is easier to install, so let's start with it.
We use moisture-proof drywall as a material for fencing. Before you start, you need to stock up on the necessary building material. You will need:
- sheet silicate glass;
- expanded clay concrete blocks;
- brick for laying sides;
- facing tiles;
- moisture resistant tile adhesive;
- cement mortar;
- waterproof screed;
- waterproofing.
Naturally, you will need to purchase a drain and a siphon. Water must somehow get into the sewer system.


Installing the factory tray
To install the purchased pallet, you need to make a frame. It can be in the form of a metal frame or assembled from timber, which must be treated with a moisture-proof compound.

The sequence of work will be as follows:
- We fix the frame to the pallet with metal studs. We attach one of their ends to the frame supports, and the other to the holes on the edges of the pallet.
- We fasten metal beams to the studs with nuts. After their position is adjusted, they need to be countered.
- We install the pallet, adjust its height and inclination. It should slope towards the drain.
After that, we put a drain with a siphon, if they are not already installed at the factory. We process the joints and joints with sealant.
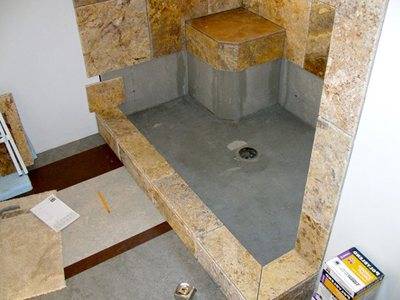
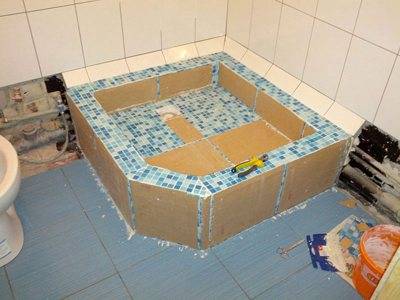
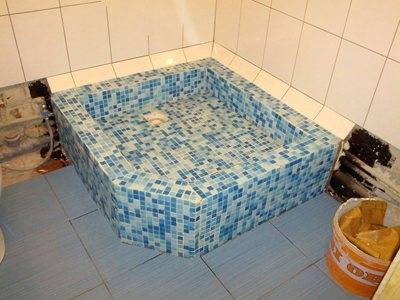
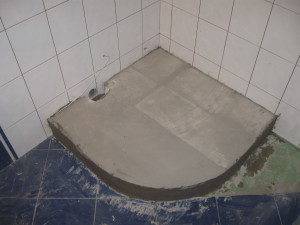
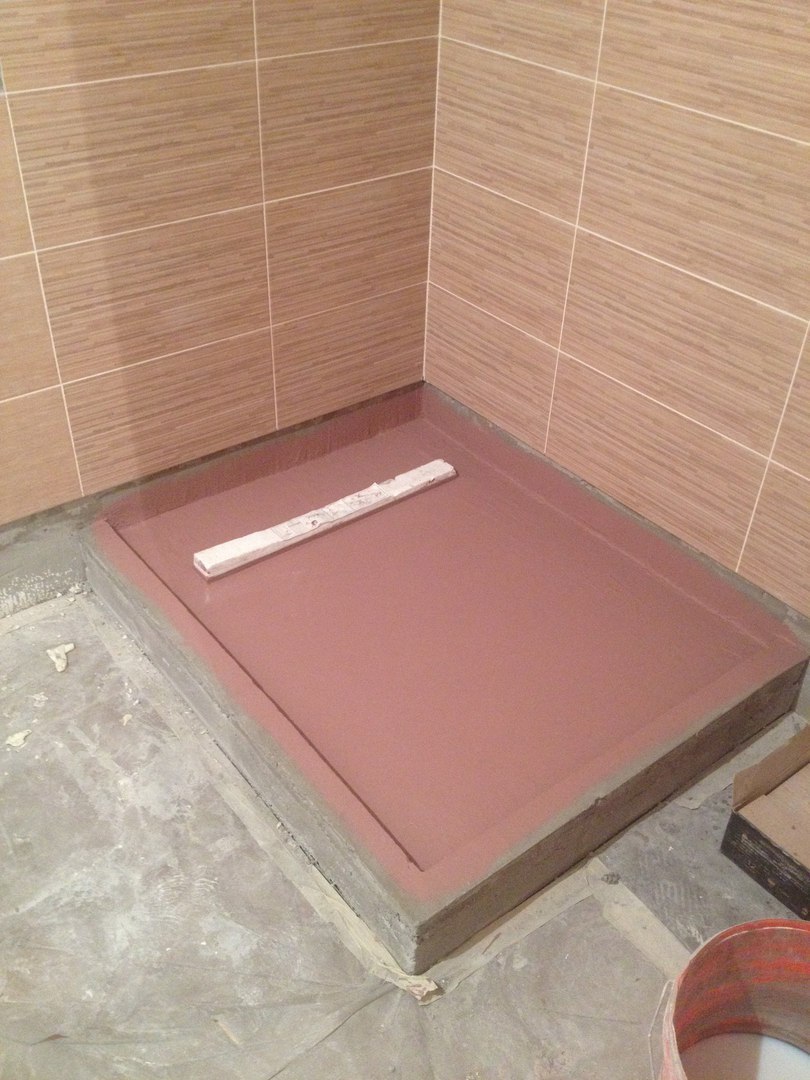
Making our own pallet
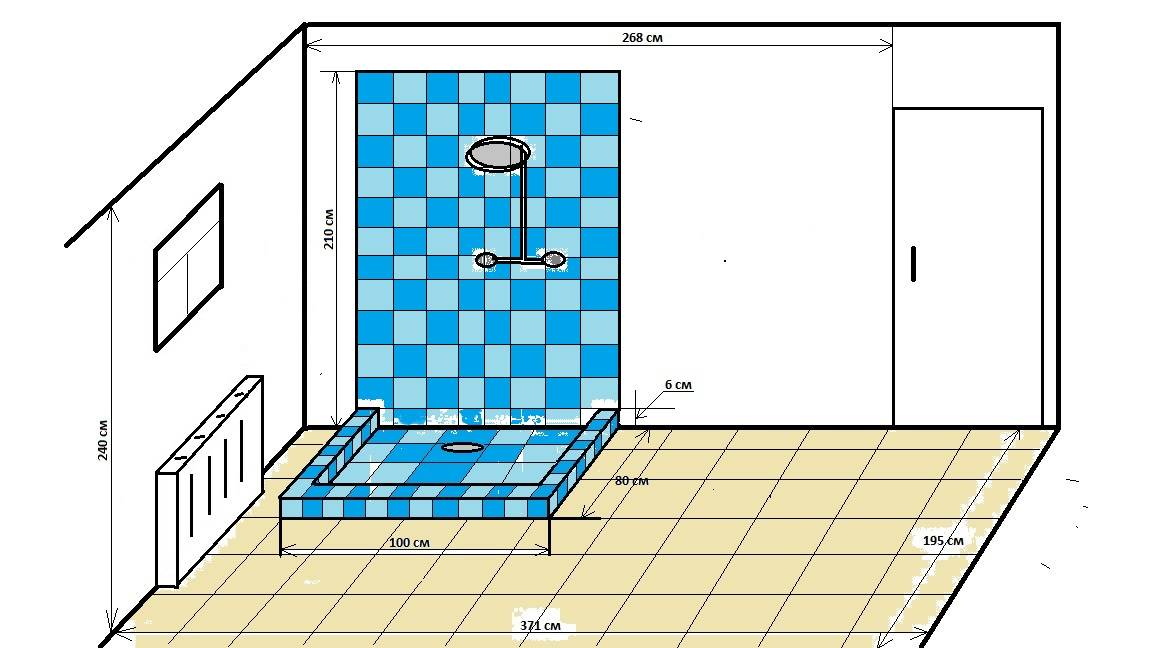
Creating your own pallet compares favorably with the fact that it will be possible to make a cabin of arbitrary sizes and shapes. This is especially true for a small bathroom.We adhere to the following work plan:
- First of all, we prepare the solution. The mixture must be diluted, adhering to the proportions indicated by the manufacturer. It would be better to use a large bucket and a mixer. Instead of a mixer, a drill with a special nozzle is suitable.
- We put the blocks on a prepared and waterproofed base. Between the blocks we lay communications and a ladder for draining water. To facilitate further maintenance, free space should be left between the blocks and communications.
- Along the edge we build sides of brick laid on its side. This will be the basis for the fence.
- The pallet is filled with a waterproof screed. Fill layer, up to about five millimeters.
We are building a corner
We use brick as a material for building walls:
- we will apply a mortar on the sides and we will lay out a brick horizontally in a row on it - you need to lay it with an edge;
- in order for the masonry to be monolithic, proper dressing should be ensured - for this, the longitudinal seams lying in adjacent rows should be shifted by half a brick;
- the corner is raised to a height of seven rows - the thickness of the seam should be twelve millimeters;
- the brick is attached to the wall with steel bars - the bars are placed in the seams between the bricks and driven into the main wall.
We install a fence
Once the corner is laid out to the desired level, you can begin to put up a fence. For example, consider a silicate glass fence six millimeters thick:
- On the walls of the corner and on its upper edge we fix the corner plastic profile. Dowel plugs, as well as impact self-tapping screws, will help to securely fix it.
- The glass in the profile is fixed with a sealant.To ensure safety, the edges of the glass that are left open are chamfered.
- A curtain will be installed as a cabin door. It will be held on a stainless steel frame. The pipe will be fixed to the wall with flanges.
As you can see, everything is quite simple. With due diligence, patience and skill, the task can be dealt with quite easily and quickly. However, we have considered the simplest options, if there is a task to create a shower cabin of a more complex shape and with additional functions, this will require more time and work experience. In any case, if you do nothing, then nothing will work!
Features of the installation of a shower cabin-hydrobox
In closed showers and hydroboxes, after installing the pallet, it is necessary to assemble a panel covering the wall. It has mounting holes in which all the "gadgets" are pre-installed - nozzles, holders, soap dishes, seats, speakers, lamps, etc. the shape and size of the bottom is different for everyone, so it's hard to make a mistake. It is advisable to lubricate all the "landing holes" with sealant: there will be less dripping later.
Particular attention should be paid to the installation of injectors. In addition to installing the sprayers themselves, they must be connected to each other with hose segments. It is put on the nozzle nozzles, tightened with clamps. All this is assembled according to the scheme available in the instructions.
Pay special attention to ensure that the nozzle tips are intact and the clamps are well tightened. It will not be superfluous to smear each seat with sealant (both under the nozzle and under the hoses)
Connection of shower nozzles from the back
The wall with connected accessories is placed in a special groove. The junction is also pre-lubricated with sealant. Cold, hot water is connected, you can check the performance of the system.
After installing the walls, the lid is assembled. There is usually a rain shower, maybe a lamp. When installing them, you can also use a sealant - you never know where water gets in ... A hose is put on the shower pipe, which is tightened with clamps. Conductors are connected to the lamp terminals, the junction is carefully insulated, several heat-shrink tubes can be put on in series.
The assembled cover is installed on the wall. The joint is again lubricated with sealant. While the sealant has not hardened, the assembled door frame is installed. When doors are installed depends on the model. In some cases, they need to be hung before installation, in some - after. All joints are sealed.
The assembly of the hydrobox shower cabin is shown in sufficient detail in this video. There are no comments, but the sequence of actions is clear.
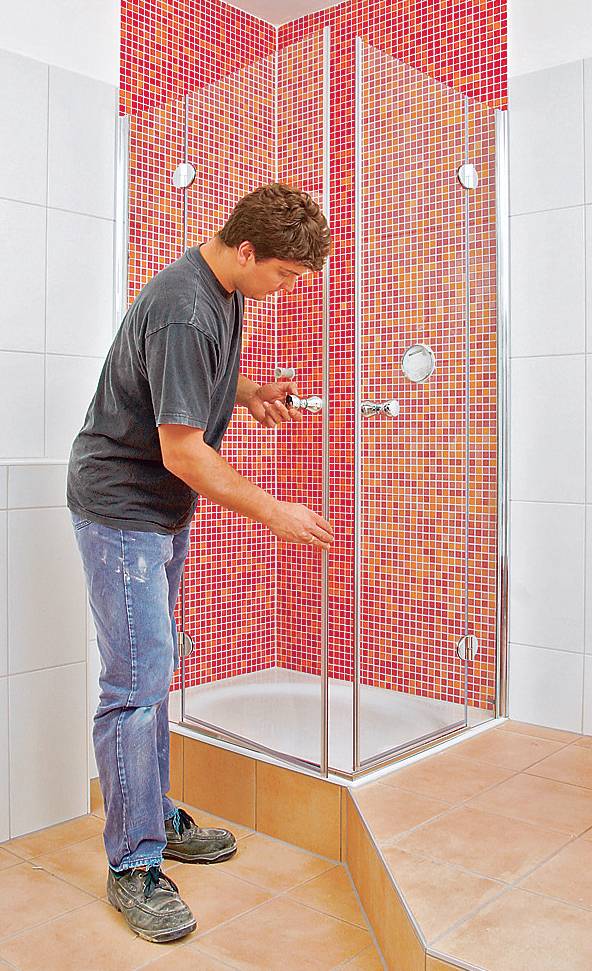
Do-it-yourself installation of side panels, doors and roof in a shower cabin
When installing a shower stall with your own hands, the next step will be the installation of side panels and glasses. To install the side panels, you will need adhesive sealant and hardware. The panels should be placed on the edge of the pallet and placed exactly in a vertical position. This can be achieved with a level. The panels must be placed next to each other and make sure that all mounting holes match. The bottom rail is narrower than the top one. And where there are fewer holes, this is the bottom.
Before installing the glasses, they must be carefully inspected, determining where they have the top (there are fewer holes at the bottom).Next, you need to insert the glass into the guides. Connect the rails to the rack using self-tapping screws. Raise the glass, smear with silicone sealant and put it in place, tighten the screws.
Excess adhesive must be removed immediately. It is necessary to ensure that the glue does not fill the grooves in the pan, otherwise the water will not drain.


Installing shower doors is easy enough.
It is important to remember that the installation of doors should be done only after the sealant has completely dried. Its drying time, depending on the brand and type, can reach a day.
After making sure that the glue has dried, install the guides for the doors of the future shower. First, fix the rollers in the grooves at the top and bottom. Put a seal on the door and insert the door into the grooves. Ready.
The final stage is the installation of the shower roof. A watering can, a backlight and a fan are fixed on it. After that, it is necessary to check the operation of the electrical lighting in the cab (light, radio, fan). If everything works, fix the mirror, handles, shelves. You can take a shower.
Tips for owners of private houses from a specialist:
- Installing the shower stall itself is relatively simple. More difficult is the preparation of communications. The problem is that in a private house, showers are installed close to a wall or in a corner, that is, to two walls. Therefore, there are difficulties with the conduct of sewer and water pipes. This problem can be solved in two ways. Firstly, it is possible to cut the pallet in places where pipes are laid, but sometimes a low pallet does not allow this. Secondly, pipes can be laid in the wall itself, but this is subject to major repairs in the sanitary room.
- When connecting water to a shower cabin, it is better to use flexible pipes about one and a half meters long. It is also advisable to install a water filter. The filter will purify water from various mechanical impurities and thus extend the life of the cabin.
- To connect the booth to the sewer, you must use a special supply with an adapter to the drain pipe. After connecting the water supply and sewerage, you need to try to start it. If a leak is found somewhere, once again treat all the seams with sealant, wait for it to dry completely and start the system again.
If you follow the proposed instructions, then there will be no questions during the assembly and installation of a shower cabin in the house.
Share this helpful article:
Preparation for work
First, prepare the tools and building materials necessary for the construction of shower cabins from tiles with a drain in the floor.
Building materials:
- Cement, sand. Five kilograms of dry mixture is enough for one square meter. As a rule, a ready-made mixture is taken for the screed.
- Expanded polystyrene - 1 sheet, thickness - 4 cm. Recommended for thermal insulation.
- Siphon. Experts advise devices with a latch and screw fastening, which provide waterproofing of all nodes.
- Sewer pipe with a diameter of 50 mm with accessories.
- Silicone sealant.
- Rolled roofing felt for waterproofing. It is laid in three layers. The footage is taken 3 times more than the covered area.
- Waterproofing cement-polymer mixture for screed (consumption 3 kg per 1 sq. m).
- Tile adhesive.
- Grout for seams. It is better to purchase cement in the form of a powder.
- Plywood or chipboard - 1 formwork sheet.
- Shower tiles.
Tools:
- Master OK;
- notched trowel;
- measuring devices;
- level, rule;
- abrasive tools for grinding;
- capacity for cement mixture;
- blowtorch;
- construction dryer.
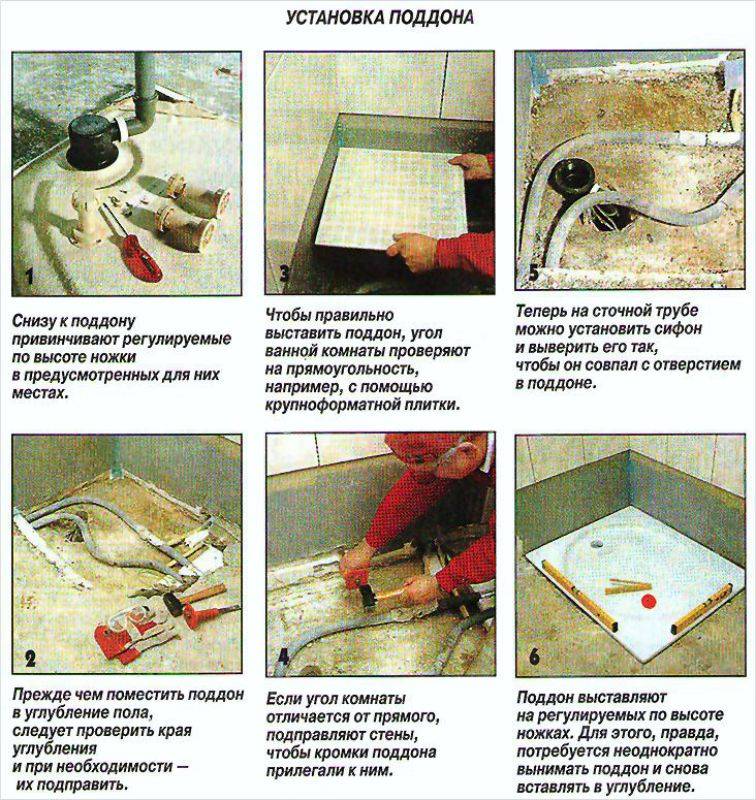
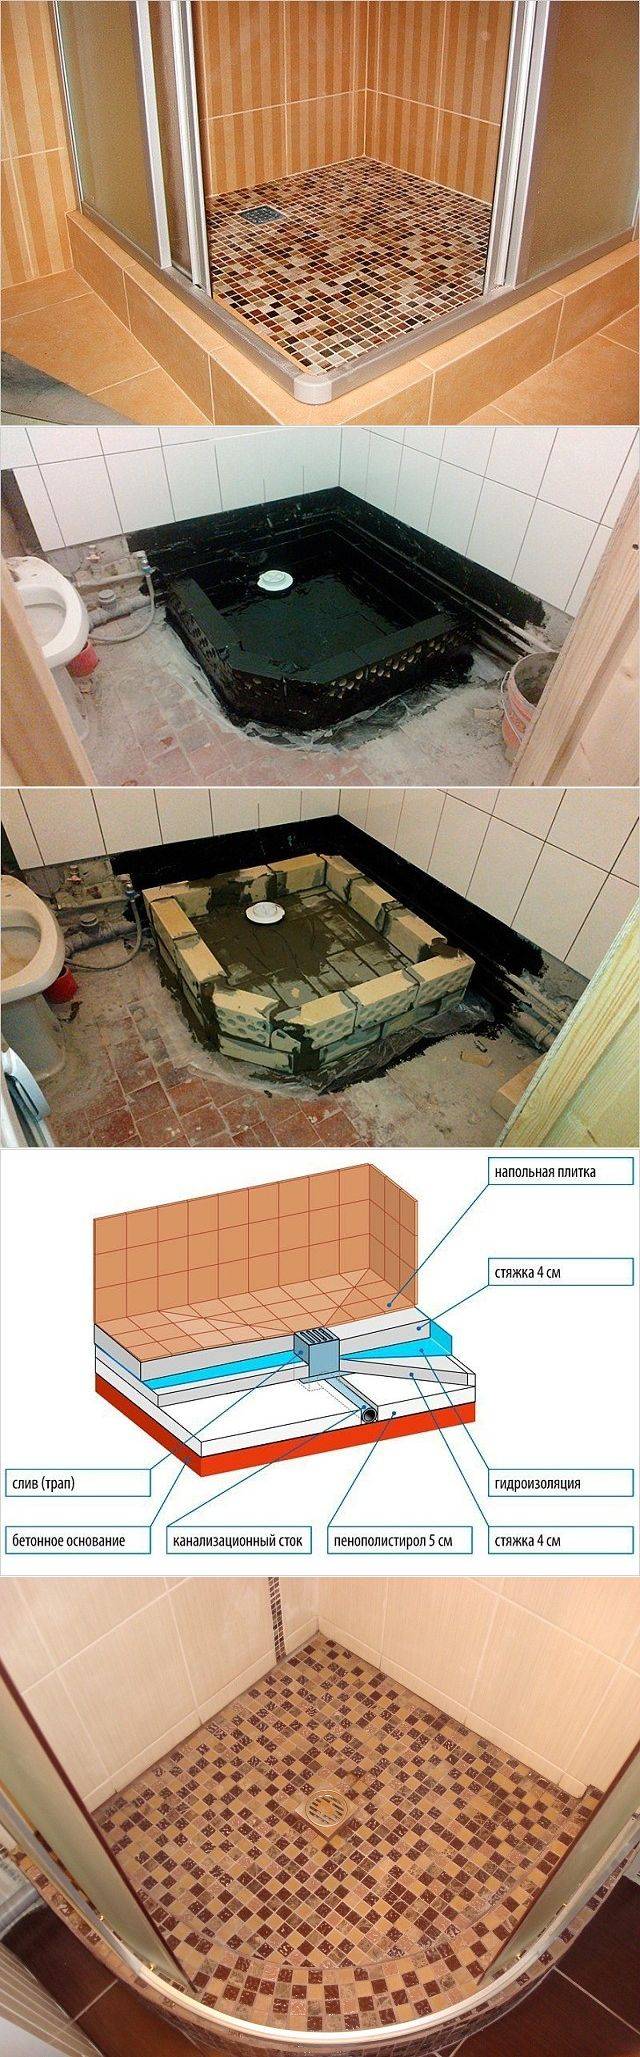
How to mount a pallet with your own hands
If you decide to make the bottom of the shower cabin with your own hands, then a moisture-resistant brick is selected as the basis.
Installed plumbing and water supply.
A waterproofing layer is laid.
- The place of installation is treated with mastic and film.
- Brick sides are lined up using a moisture-resistant mortar. In height, they should be higher than the ledge of the drain drain. Its level determines the height of the homemade pallet. Vertically, the line of the sides corresponds to the walls of the cabin.
- The inner part of the bottom is poured with a self-leveling concrete mixture. Its layer is 6-8 cm. This creates a slope towards the drain hole so that water leaves.
- The dried structure is treated with a primer, mastic.
- The last layer for coating is a mixture of cement and adhesive for ceramic tiles.
- Dry construction is processed with sandpaper.
- Moisture resistant material for cladding is selected. Mosaic is recommended. It will help hide the unevenness of the bottom.
If a structure of great height is erected, then steps for the cabin are constructed.


