- Modernization of the rocket heat generator
- Description and principle of operation of a solid fuel boiler
- Calculation of basic parameters (with drawings and dimensions)
- Pipe
- Screen
- bedding
- Chimney
- Photo gallery: diagrams for a potbelly stove for a garage
- Varieties
- Features of long burning furnaces
- 8 Sawdust stove - nothing complicated and affordable
- Construction and application
- Operation of long-burning furnaces
- Do-it-yourself long-burning stove: diagram and step-by-step instructions
- Making a bubafonya furnace from a gas cylinder
- Video: how to make a bubafonya oven from a gas cylinder
- Making a long-burning brick oven
- Foundation preparation
- Ordering brickwork
- Step-by-step instructions for making an oven
- Video - Homemade potbelly stove for the garage
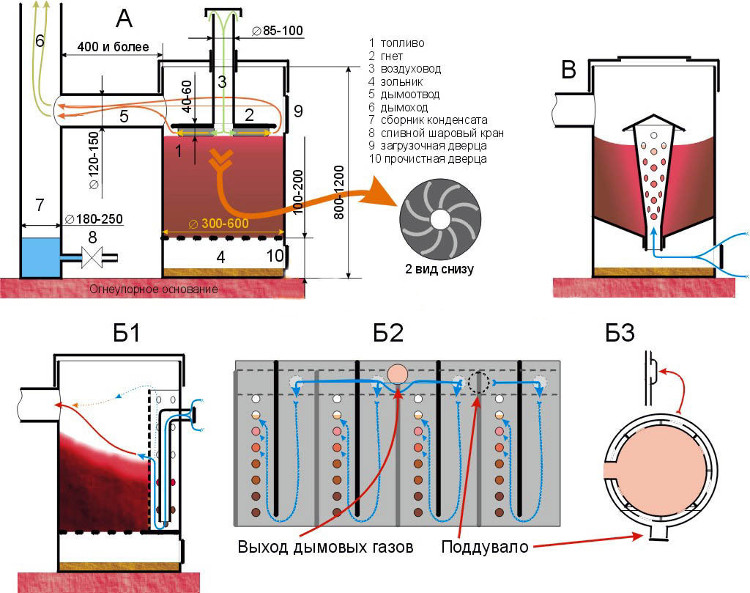
Modernization of the rocket heat generator
To expand the scope of reactive heating furnaces, they are being finalized, increasing the convenience and versatility of the design. A platform intended for cooking is often replaced in mobile structures with a full-fledged stove. It is convenient to use such a hob in your own backyard for household purposes - for cooking food for pets or during the preservation of blanks for the winter.A feature of this type of rocket furnace is a wide and flat horizontal channel into which hot gases are directed from the nozzle. Passing under the surface of the stove, they heat it red-hot, after which they go into a vertical chimney. Comfortable legs give stability to the structure, and the original shape allows the unit to be used as a stand or table when it is not used for its intended purpose.
A jet stove with a stove is a necessary thing in a suburban area
A liquid heat exchanger cannot be installed in the flame tube of a jet furnace, but this does not mean that it cannot be used as a heat generator in a water heating system. To do this, the "rocket" is equipped with a kind of contour of radiator plates, which create a kind of labyrinth in the afterburning zone. Due to their heating, heat is removed from the afterburner to the water jacket. The efficiency of the unit depends on the area and heat capacity of the plates, so they are made in the form of massive metal strips with an area of up to ¾ of the cross section of the flame channel. It must be said that such a heat exchanger is best used to produce hot water using the rocket stove itself in the traditional way.
Scheme of a rocket assembly equipped with a water circuit
The rocket stove with a convector has an original design. To increase heat transfer, vertical tubes are mounted on the surface of the outer casing, which perform the same role as the air channels of the buleryan. Cold air is trapped at the bottom of the tube heat exchangers and heated up as it moves up. This ensures forced convection, which further increases the thermal efficiency of the installation.
Shell of the rocket heat generator equipped with a convector
4
Rocket heating from a cylinder - let's work with a welding machine
For the construction of the rocket, we choose a heat-resistant and non-explosive cylinder. An all-metal 50-liter tank in which propane is stored is optimal for these purposes. Such a balloon has standard dimensions: height - 85 cm and cross section - 30 cm.
Such parameters are ideal for self-production of the furnace. The modest size and small weight of the cylinder do not make it difficult to work with it. At the same time, it is allowed to burn any wood fuel in the finished rocket. You can also take propane cylinders for 27 or 12 liters. They make compact portable stoves. But the power indicators of such devices are small. It is not advisable to use them for heating rooms, country houses.
A stove from a large gas cylinder: it looks interesting, it looks dangerous
For the construction of the furnace, in addition to the cylinder, you will need:
pipes made of steel with a cross section of 15, 7 and 10 cm (the first two will go to the organization of a vertical internal channel, the third - to the chimney); a profiled pipe product 15x15 cm (we will make a loading compartment and a firebox from it); 3 mm thick sheet of metal; dense (100 or more kg / cubic meter) basalt fiber (it will serve as a heat-insulating material).
On the Internet there are various drawings for creating a stove from a balloon. We propose to follow this scheme.
The algorithm for manufacturing a rocket balloon installation is simple. First, we bleed all the gas from the tank. Then we unscrew the valve, fill the tank with water (up to the top) and cut off its upper part along the seam.We cut out the windows on the two sides of the gas cylinder that are required to connect the chimney and install the fuel chamber.
After that, we insert the profile tubular product into the container, connect it to the channel (vertical). The latter is taken out through the bottom of the tank. Next, we perform all the necessary actions, focusing on the presented drawing, as well as on the video that we offer home craftsmen for review.
At the end of the work, we weld the cut off part of the container in its place, analyze all the resulting seams for permeability. Uncontrolled entry of air into the structure must not be allowed. If the seams are reliable, we connect a chimney to a home-made system. We weld the legs to the bottom of the rocket balloon. We install the stove on a steel sheet with parameters of 1.5x1 m. The unit is ready for use!


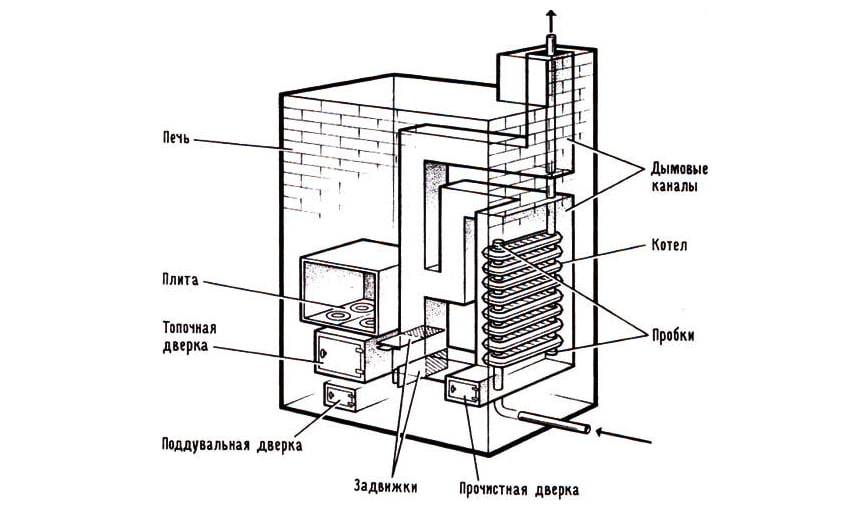
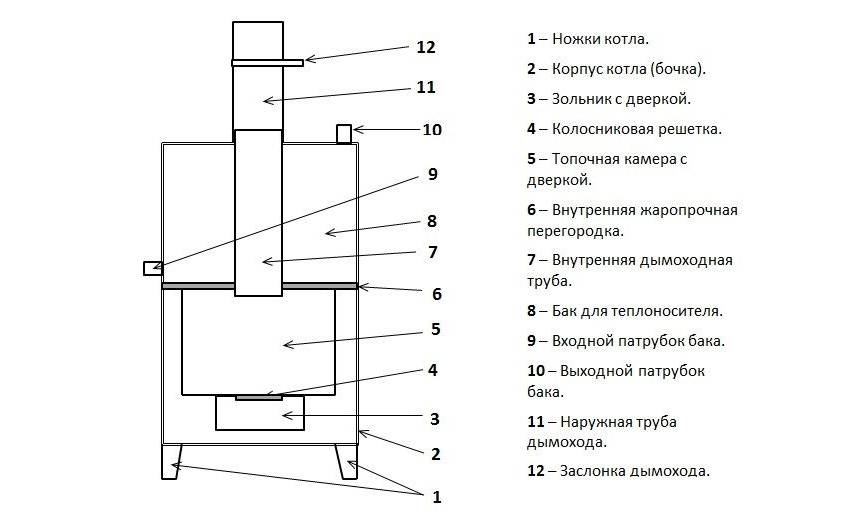
Description and principle of operation of a solid fuel boiler
General view of the boiler
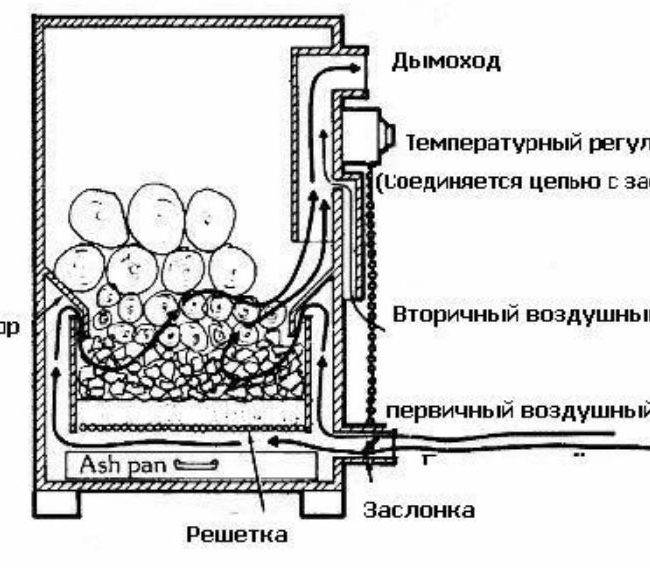
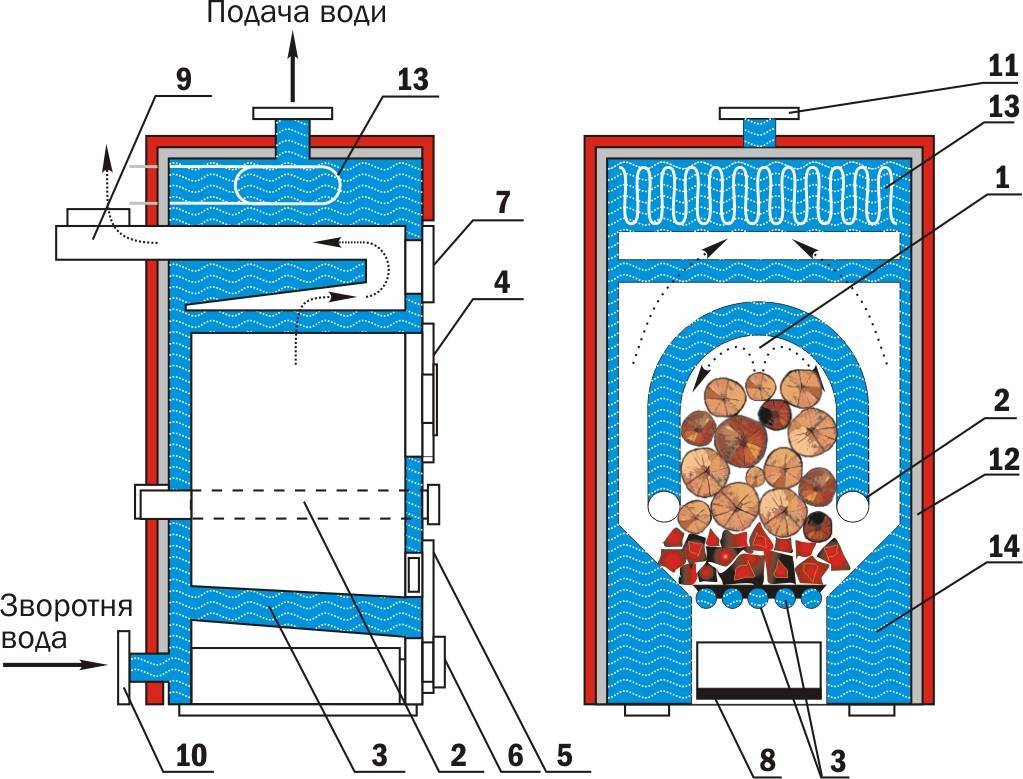
A long-burning solid fuel boiler is a large furnace with a limited solid fuel combustion zone and a controlled supply of oxygen. The principle of operation of the device is based on the ability of solid fuel elements to smolder for a long time with increased heat transfer. In the process, the substance is completely burned out with minimal waste generation.
A large amount of solid fuel is loaded into the furnace on average 1–2 times a day, however, there are units that can operate for several days. By regulating the flow of oxygen into the combustion zone, slow smoldering occurs at elevated temperatures. The smoke is removed through a special pipe. It passes through the heat exchanger and warms up the water for the heating system.Timely loading of the furnace ensures almost continuous operation of the device.
Combustion of fuel in a long-burning boiler often occurs from top to bottom. In this case, as the upper layer burns out, the fire moves lower, to the next layers. Such thermal units have many advantages that ensure their popularity among all population groups:
- The increased volume of a fire chamber for loading of fuel.
- Long service life on a single load.
- Great heat dissipation.
- Environmental friendliness. During operation, the heater emits a minimum amount of exhaust gases.
Standard long-burning boilers differ in the type of fuel used:
- Devices that operate on the same type of fuel. Usually firewood acts in this capacity, sometimes pallets obtained from the waste of the woodworking industry.
- Universal units. Here it is possible to combine several types of solid elements - firewood, sawdust, pallets.
According to the type of work, all existing types of long-term combustion boilers can be divided into two large groups:
- Pyrolysis. In the operation of such devices, the principle of pyrolysis is used. Solid fuel particles burn through at high temperatures and low oxygen supply. In the process, gas is produced, which is sent to a separate compartment, where it burns. This principle increases the efficiency of the boiler and the burning time of the fuel.
- Classic. They have a simplified design, differ in the volume of the furnace, the method of combustion, the presence of a water jacket-contour, etc.The simplest classic boiler without a jacket is a metal container made of a pipe or barrel, where the combustion of solid particles takes place according to the “top-down” principle.
The scope of solid fuel boilers is extensive. Household models heat private households, shops and similar residential and non-residential facilities. Large industrial units, which require a separate equipped room, can heat a small plant. The popularity of boilers is due to the low cost and ease of operation.
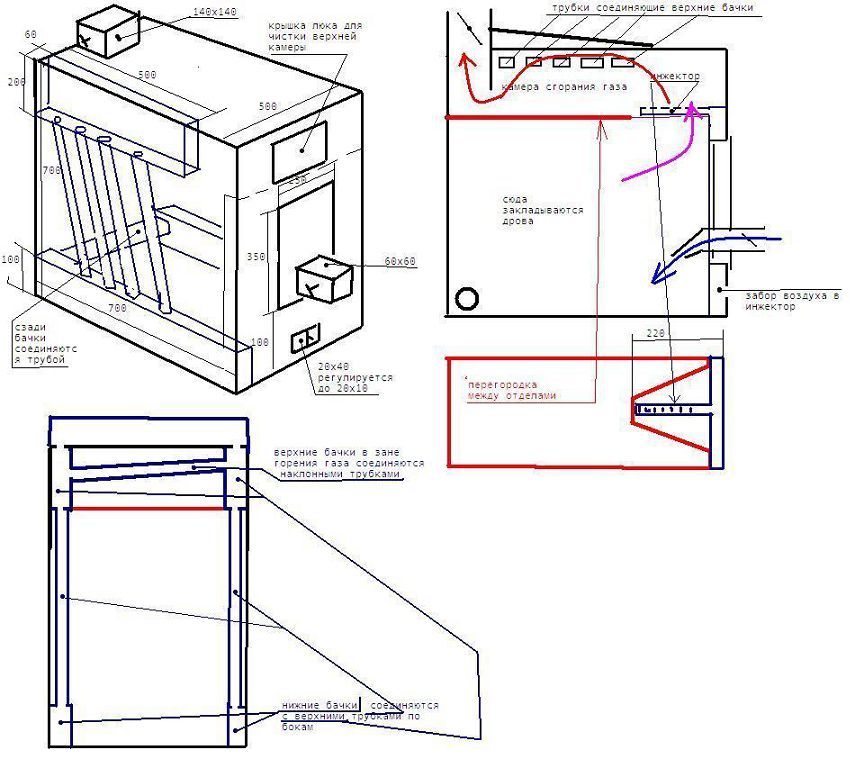
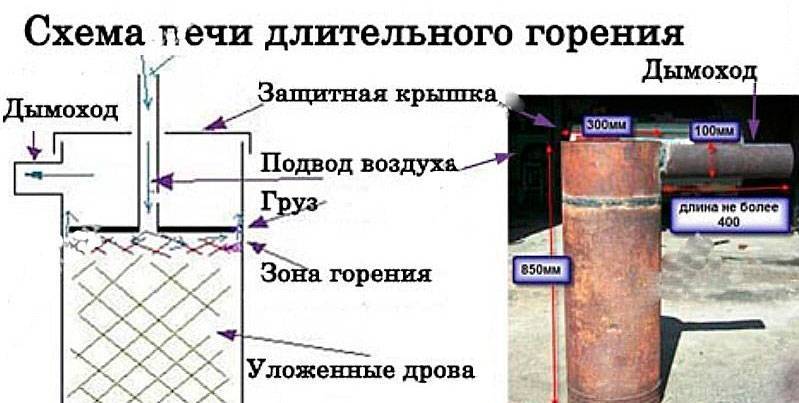
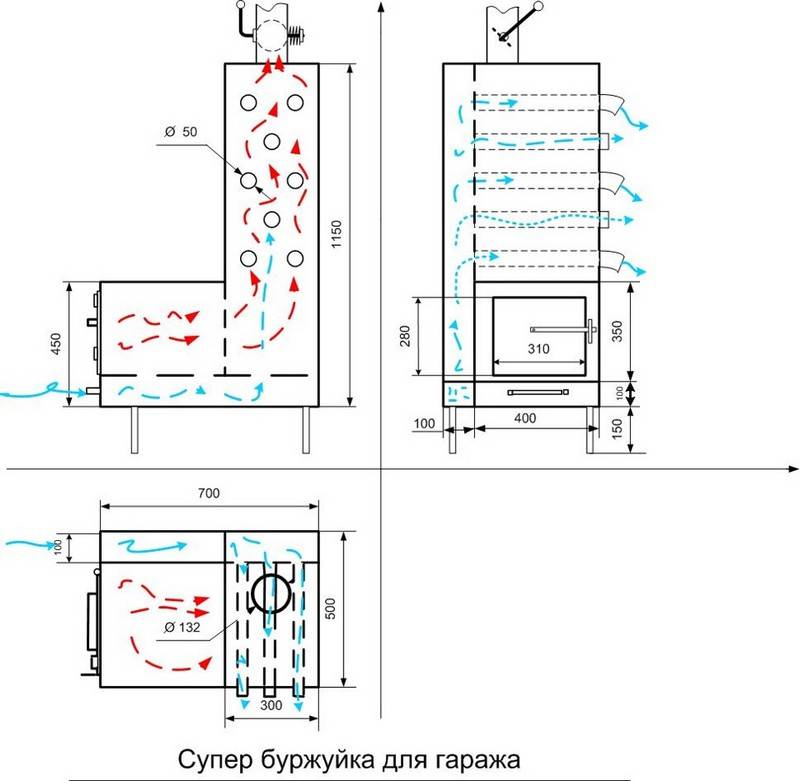
Calculation of basic parameters (with drawings and dimensions)
The high efficiency of a potbelly stove can only be obtained if all the main design parameters are correctly calculated.
Pipe
In this case, the diameter of this element is very important. The throughput of the chimney should be less than the performance of the furnace furnace, which is the main distinguishing feature of the potbelly stove. This will allow warm air not to immediately leave the stove, but to linger in it and heat the surrounding air.
It is very important to make an accurate calculation for her. The diameter should be 2.7 times the volume of the firebox. In this case, the diameter is determined in millimeters, and the volume of the furnace in liters
For example, the volume of the furnace part is 40 liters, which means that the diameter of the chimney should be about 106 mm
In this case, the diameter is determined in millimeters, and the volume of the furnace in liters. For example, the volume of the furnace part is 40 liters, which means that the diameter of the chimney should be about 106 mm.
If the stove provides for the installation of grates, then the height of the furnace is considered without taking into account the volume of this part, that is, from the top of the grate.
Screen
It is very important to make the hot gases not cool down, but completely burn out.In addition, the fuel must be burned by partial pyrolysis, which requires an extremely high temperature. A metal screen, which is located on three sides of the stove, will help to achieve a similar effect.
You need to put it at a distance of 50–70 mm from the walls of the stove, so that most of the heat will return to the stove. This movement of air will give the necessary heat, and protect against fire.
A metal screen, which is located on three sides of the stove, will help to achieve a similar effect. You need to put it at a distance of 50–70 mm from the walls of the stove, so that most of the heat will return to the stove. This movement of air will give the necessary heat, and protect against fire.


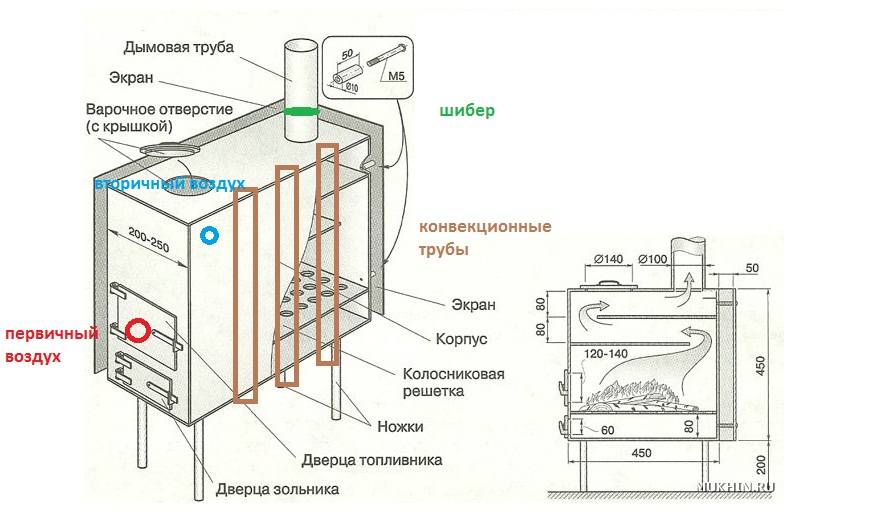
The screen of a potbelly stove made of red brick is able to accumulate heat
bedding
She must be. There are two reasons for this:
- part of the heat is radiated downward;
- the floor on which the stove stands is heated, which means there is a risk of fire.
The litter solves two of these problems at once. It can be used as a metal sheet with an extension of 350 mm (ideally 600 mm) beyond the contour of the furnace itself. There are also more modern materials that do an excellent job with this task, for example, a sheet of asbestos or kaolin cardboard, at least 6 mm thick.
Asbestos sheet can be used for bedding under a potbelly stove
Chimney
Despite all the calculations, gases sometimes go into the chimney not completely burned out. Therefore, it must be done in a special way. The chimney consists of:
- vertical part (1–1.2 m), which is recommended to be wrapped with heat-insulating material;
- burs (slightly inclined part or completely horizontal), 2.5–4.5 m long, which should be 1.2 m from the ceiling, which is not protected by heat-resistant materials, from the floor - by 2.2 m.
The chimney must be brought outside
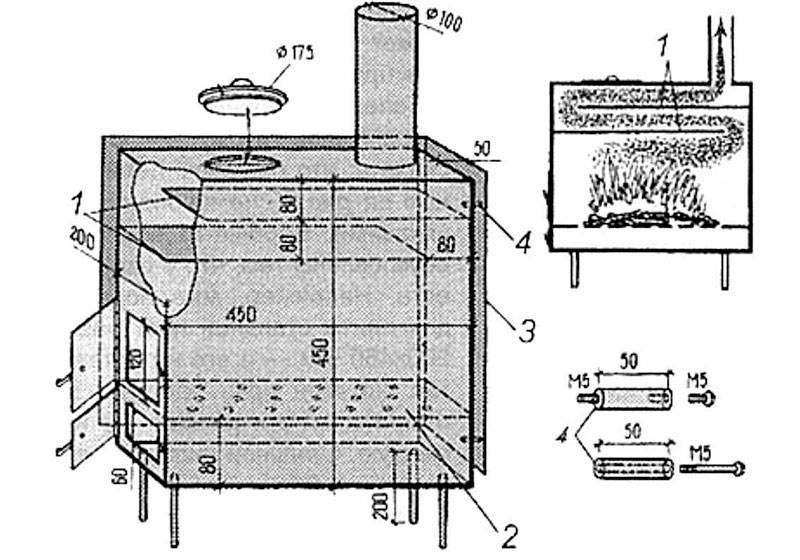
Photo gallery: diagrams for a potbelly stove for a garage
All exact measurements must be indicated on the diagram. The chimney must necessarily be brought out to the street. The potbelly stove can be round or square. The volume of the furnace depends on the presence of grates. The scheme of the potbelly stove depends on the material used
Varieties
If you are going to buy a wood-burning stove, then you will need information about the varieties of these units. Here is what we can find for sale:
- Steel and cast iron models;
- Units with and without hob;
- Stoves of chimney type and conventional;
- Conventional combustion furnaces and pyrolysis modifications.
The differences between steel and cast iron units are quite obvious - the former are lighter, less reliable and cheaper, while the latter have a gigantic weight, but are distinguished by endurance and a long service life.
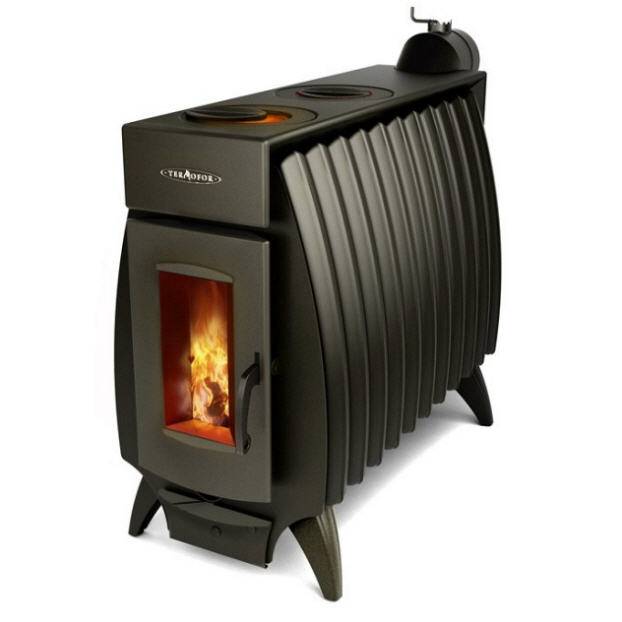
Such units not only look great in the interior of a country house, but also allow you to cook directly on them.
An economical wood-burning stove, which includes a hob, is a great find for a cozy country house, a small cottage or a technical room where people are constantly working. Here you can cook soup, fry meat, heat a kettle to enjoy a hearty lunch or dinner. In general, a worthy addition for small-sized housing and technical premises.
Long burning stoves combine the practicality of heating units and the beauty of classic fireplaces. Such units, working on wood, will create a cozy atmosphere in the house with a beautifully burning flame. Relaxing in a house with a fireplace is a pleasure that will become available for minimal money.
Such devices can burn wood in the usual way or pyrolysis. In the first case, combustion is carried out in the standard mode, with the removal of combustion products through the chimney. In pyrolysis furnaces there is a fuel afterburning chamber - it burns pyrolysis products formed during heating and combustion of firewood in the main chamber. Such furnaces have a higher efficiency.
Features of long burning furnaces
The features of this heater include:
- a large volume of the firebox and a large door for loading fuel, which allows you to immediately lay a lot of firewood;
- dividing the firebox into two parts - for smoldering firewood and burning gas;
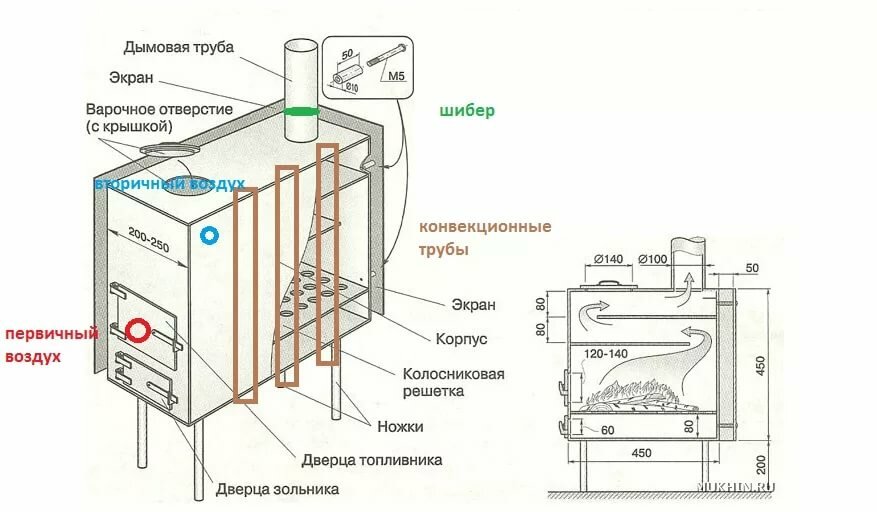
- the presence of a flame deflector from the chimney, called a "tooth", in the form of a plate welded to the top of the firebox, so that the flame does not enter the pipe.

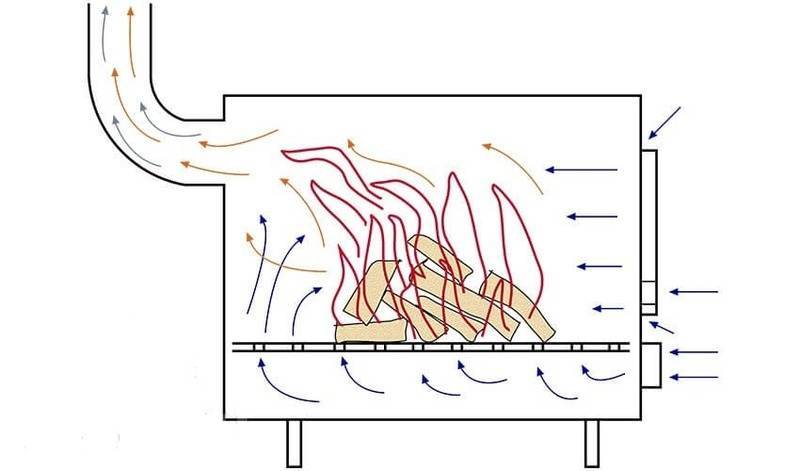
heating the stove itself and the room for a long-term combustion stove
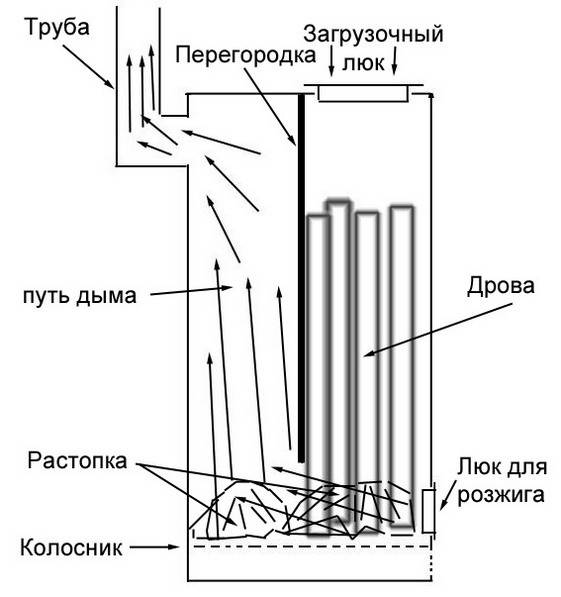
A simple stove is kindled from below, the fire in it spreads up and to the sides. The flame is large, the firewood burns quickly, there is a lot of coal left. The combustion process occurs in this way due to the fact that air is constantly open to the furnace from below. In a long-burning stove, wood is ignited from above, the fire spreads downwards. Air enters only to the place where the firewood burns.The combustion is not too intense, more precisely, it can be called smoldering, much less heat is released, the air temperature in the room is maintained at the same level.
In addition to logs of firewood, pyrolysis gas is also burned in the long-term combustion furnace, which is formed during the smoldering of fuel and moves to the second combustion chamber, where it mixes with air. As a result, the products of final combustion practically do not contain substances harmful to humans and the environment, the efficiency of the stove increases, and heating costs are reduced.
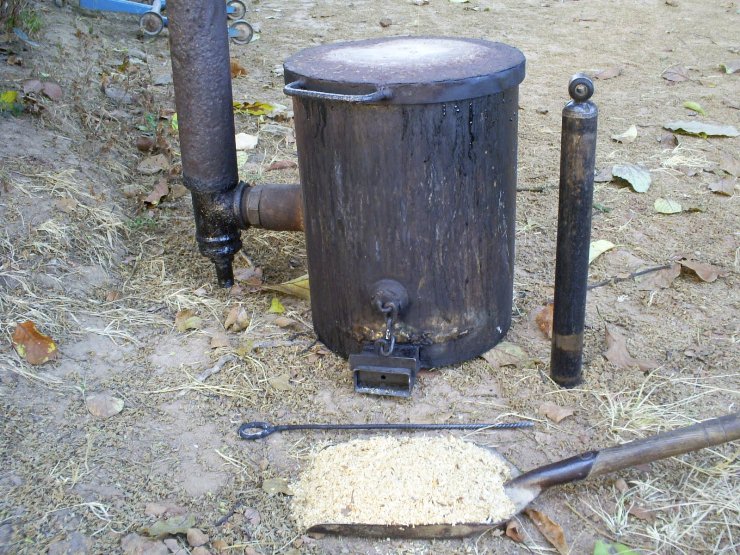
8 Sawdust stove - nothing complicated and affordable
Such a device runs on the cheapest fuel, which burns well and gives a lot of heat energy. Often sawdust is simply thrown away or sold at a symbolic price. But they can burn only in special devices; in other types of furnaces, if they burn, it is bad. The design features provide for the possibility of strong compaction of the wood pulp so that no air remains between its particles. In this state, they will not burn out quickly, but smolder, giving off heat sufficient to heat one or two rooms.
The installation is going on the same principle as others with vertical loading. It is better to use cylindrical metal products, but if this is not possible, you can make a rectangular shape. Unlike a potbelly stove, where firewood is loaded from the side, we provide for loading sawdust from above. This one differs from other models by the presence of a conical tube. It is inserted in the middle of the air regulator - a circle with a hole inside the oven. The design is shown in the drawing.


We fill the sawdust inside and ram it as tightly as possible to prolong the burning process. We remove the pipe - it's easy because of its conical shape.The hole formed in its place will serve as a chimney and for supplying oxygen to support sawdust smoldering. From the side of the blower, we set fire to sawdust - the process has begun
It is important to properly adjust the chimney: excessive draft will draw heat out into the street, with weak combustion, smoke will penetrate into the room
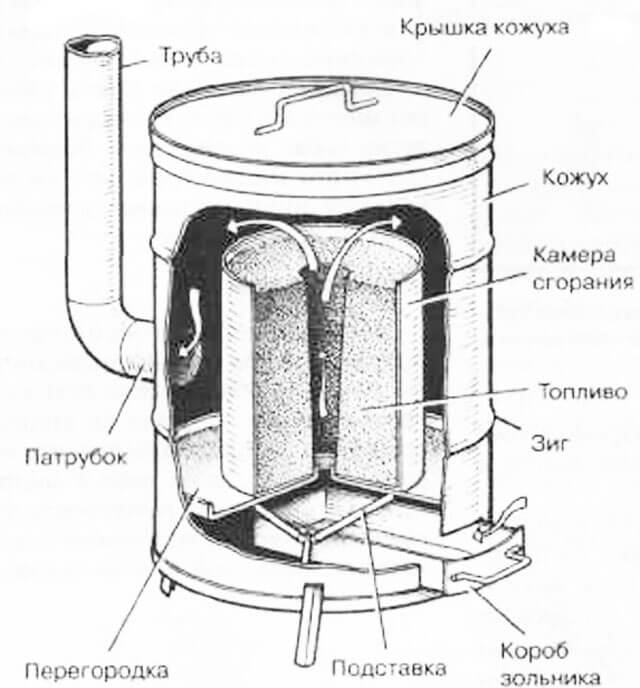
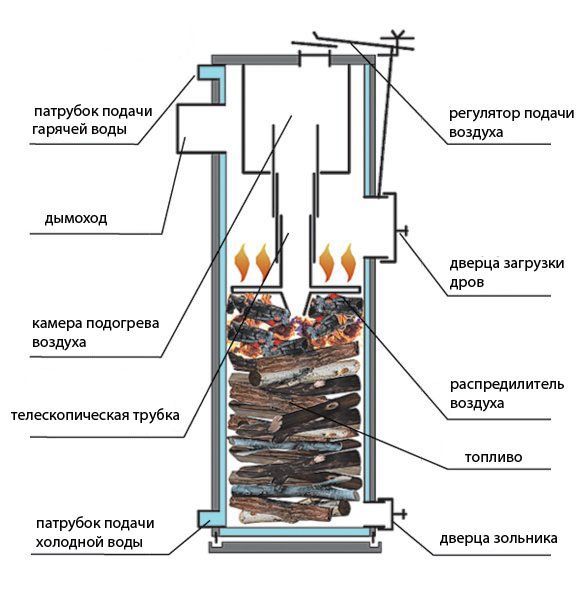
Construction and application
The main feature of the long-burning furnace device is two chambers. Firewood is ignited in one, gases are burned in the second. In some models, the firebox is located in the upper part of the body, and the second chamber is located under it or through the partition. Combustion begins with the upper layers of fuel, then the firewood descends. With the help of fans, new air flows are supplied.
 It is necessary to responsibly approach the choice of materials for the manufacture of the furnace
Home-made wood-burning stoves are used most often for heating large greenhouses, garages, workshops or utility rooms. If you make the structure airtight and properly equip the chimney, then you can place the unit in a residential building. In this case, you need to equip the device with a water circuit, which is connected to the radiators of the heating system.
See also: wood-burning stove with a water circuit for heating a private house.
How to make a homemade long-burning boiler:
Operation of long-burning furnaces
Be careful when using resinous trees as firewood, they can clog your chimney very quickly.
Long-burning wood-burning stoves can burn up to 10 hours. It all depends on the amount of fuel loaded and the required temperature in the premises. The intensity of combustion is most often regulated with the help of a blower. At the very beginning of kindling, you need to let the wood burn properly.After the process starts and the room becomes warm, the air supply can be shut off.
So the stove will work in smoldering mode, with a very small amount of flame. Together with a fully loaded firebox, this will allow you not to approach the unit for 6-10 hours (depending on power and model). Because of this mode of operation, slag and soot can accumulate in the chimney, so you need to let the economy stove run at full capacity once every 7-10 days - this will ensure its cleaning.
Also, one should not forget about the standard cleaning of heating equipment - you need to regularly remove ash from it, as well as clean the chimney.
Do-it-yourself long-burning stove: diagram and step-by-step instructions
The most common materials for the manufacture of long-burning furnaces are metal and brick.
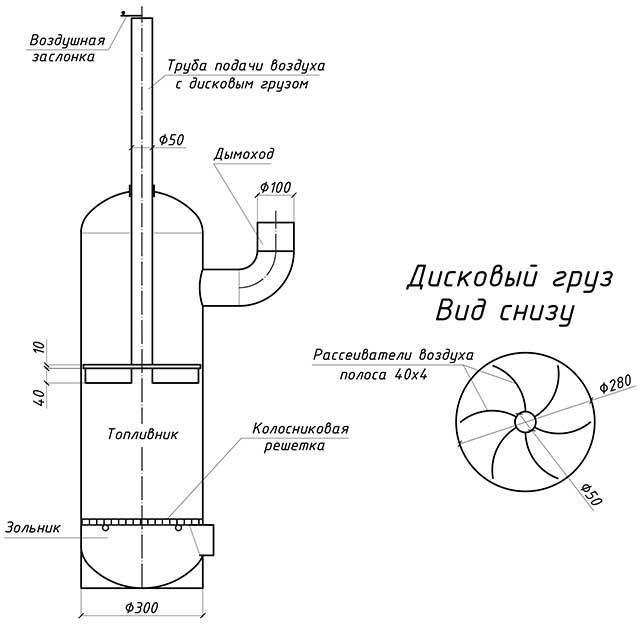
Making a bubafonya furnace from a gas cylinder
For the independent manufacture of the bubafonya furnace, a used gas cylinder with a volume of 50 liters is best suited. The order of work is as follows:
-
Cut off the upper part of the cylinder at the place of the rounding of the body with a grinder. This fragment will serve as a cover in the future design.
The top of the bottle is convenient to use as a furnace cover
- Weld a metal strip to the upper edge (at the place where the future cover was cut). Such a side will not allow the lid to move out.
- Next, you need to make a pressure piston, due to which the furnace material will be pressed down during combustion. From a thick steel sheet, cut a circle with a diameter slightly smaller than the body. The circle should freely fall inside the balloon. The gap between the housing wall and the circle should be 8–10 mm wide.
- Drill a hole with a diameter of 100 mm in the middle of the circle.It is convenient to do this using a core drill.
- Take a pipe with the same diameter and weld one end to the middle of the circle. The result is a part with a common hole.
-
Then, four sections of the channel are welded to the back of the circle in a crosswise pattern. They form a kind of channels through which air will enter the combustion chamber.
Instead of channels on the piston, you can use the corners
- Weld handles and stands.
- Clean sharp and protruding fragments of welding with a file or grinder.
Video: how to make a bubafonya oven from a gas cylinder


Making a long-burning brick oven
Of course, in comparison with a home-made metal structure, a brick oven looks more advantageous. However, its independent production is a laborious process, requiring certain skills and time.
Above the combustion chamber there is a hob for cooking
Foundation preparation
Since the brickwork is quite massive, a solid foundation is required for the stove. The depth of the foundation must ensure the stability of the structure. Foundation preparation is as follows:
- First you need to dig a small pit 30 cm deep. Its width and length should be 10 cm more than the expected dimensions of the furnace.
- Level the bottom of the pit and cover with roofing material or other insulating material.
- Pour a layer of sand 10 cm thick on top, which must be compacted.
- Pour a layer of fine gravel of the same thickness on top of the sand cushion.
- For the reliability of the base, it can be reinforced with a metal grate.For this, reinforcing bars are used, interconnected by wire. The width of the lattice cells should be no more than 10 cm. The thickness of the rods is selected in the range from 8 to 12 mm.
- Lay the grate in the pit so that it does not touch the bottom. To do this, put fragments of bricks under the metal frame.
- Pour concrete mixture of brand M-200 or M-250. Concrete must completely cover the metal frame.
For reliability, the foundation can be reinforced with a metal grate
Ordering brickwork
After a few days, when the base hardens, you can proceed to the brickwork of the long-burning stove. Before starting construction work, it is necessary to soak the brick for a day in water. This must be done so that the brick laid in rows does not draw moisture from the mixture. Bricks should be laid as follows:
- The first and second row must be laid out in continuous layers.
- An ash pan will be installed on the second row, so you need to provide a place for the door.
- On the fifth row, an overlap is installed above the door. Subsequently, a drying chamber box will be installed in it.
- The sixth and seventh rows are designed to accommodate the grate and install the door into the combustion chamber.
- From the eighth to the tenth row, a firebox will be placed. During the laying of the combustion chamber, it is necessary to use fire-resistant material - fireclay bricks. Use clay-based mixtures as a masonry adhesive. Ready-made mixtures intended for laying furnaces go on sale.
- The eleventh row serves as the ceiling of the combustion chamber and forms the area for the chimney. On top of this row, it is necessary to lay steel reinforcement and fill it with a cement mixture.
- On the twelfth row, a place is formed for the hob.
- Starting from the thirteenth - fourteenth row, rows for the chimney are laid. Its height is made according to individual projects, so the number of rows can be increased several times.
The procedure for laying bricks for a long-burning stove with a hob
Step-by-step instructions for making an oven
Step 1. In our example, a simple 250-liter barrel with thick walls is used - ideal for making an oven. Cut off the top of the barrel, but don't throw it away.
The top of the barrel is cut off
Step 2. Make a kind of cover from the top - a "pancake" for supplying oxygen. Adjust it to the size of the barrel - as a result, when installed, 2 mm should remain between it and the walls around the entire circumference. Seal the neck of the lid. In its center, make a hole for installing a pipe through which air will be supplied. Also weld 4 channels, as in the photo below.
"Pancake" for air supplyAnother photo of the element
Step 3 Stepping back a little from the top edge, cut another hole in the wall of the barrel - for mounting the chimney. In our example, a pipe with a diameter of 140 mm will serve as a chimney.
Hole for installing a chimney
Step 4. Start making the lid. Make it from sheet metal 4 mm thick, and weld a sealing ring on the bottom that matches the diameter of the barrel. In the center of the cover, make a hole for the pipe that was welded to the "pancake".
Cover for the ovenIn the middle of the cover there is a hole for the air duct from the "pancake"
Step 5. At the bottom of the barrel, make simple legs so that the structure is stable. The legs must be metal, as well as all other elements.
Making oven legsLegs must be metal
Step 6 Install the stove in the right place and start creating the chimney. In our example, it is of a prefabricated type. First of all, make a clamp, through which the chimney will be attached to the body.


A clamp that will allow you to attach the chimney to the stove
Step 7. Make guides in the chimney, thanks to which it will be easily fixed to the body.
Guides in the chimney
Step 8. Dock the barrel with the pipe, without fail laying all the joints with asbestos cloth. Put a collar over the fabric, tighten it.
Asbestos fabric Tightening the clamp over the fabric Finished joint between the pipe and the barrel
Step 9. That's it, the design is assembled, you can check its performance. Load sawdust or firewood inside.
Furnace loaded with fuel
Step 10 Pour used oil into the fuel, then install the cap. As for the "pancake", then do not use it yet. After the fuel flares up, remove the lid and put the "pancake". For a full warm-up of such a design, it takes about 10 minutes, in the future, firewood will burn for a long time. Although how long the burning will last depends largely on the quality of the fuel.
Photo of the finished oven for the garage
Video - Homemade potbelly stove for the garage
If you wish, you can modify the design described above, although it will already do its job perfectly. For example, to increase efficiency, you can increase the surface and thereby improve heat transfer. To this end, weld metal plates on the sides of the case.
In addition, you can make a grate with an ash pan: cut a circle from a sheet of metal along the inner diameter of the body, drill holes with a diameter of 60-80 cm and install from below. After that, the ash will fall down through the holes - to where the ash pan is equipped. It is believed that the fuel will burn faster because of this, remember this moment and make sure that the ash pan is sealed as much as possible.


