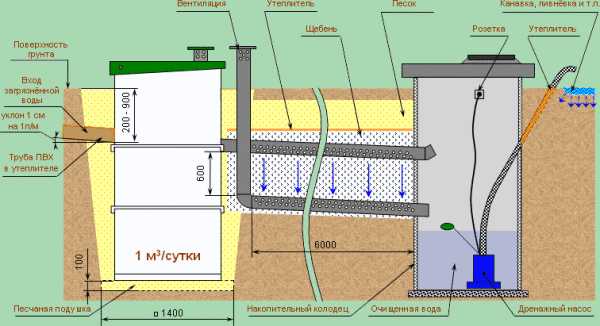
- Installation of a plastic absorption well
- DIY drainage - step by step technology
- How to make drainage wells with your own hands
- What are drainage wells?
- How to make a drainage well
- Stage three. Well construction
- Making a tank from plastic pipes
- How to make a drainage well from concrete rings on your own?
- Operation of the facility
- Purpose of drainage pipes
- Stage four. We protect the structure from surface water
- Varieties of drainage wells
- Construction materials
- DIY drainage well
- Materials and working principle
- Types of drainage systems
- Construction order
- Digging a trench
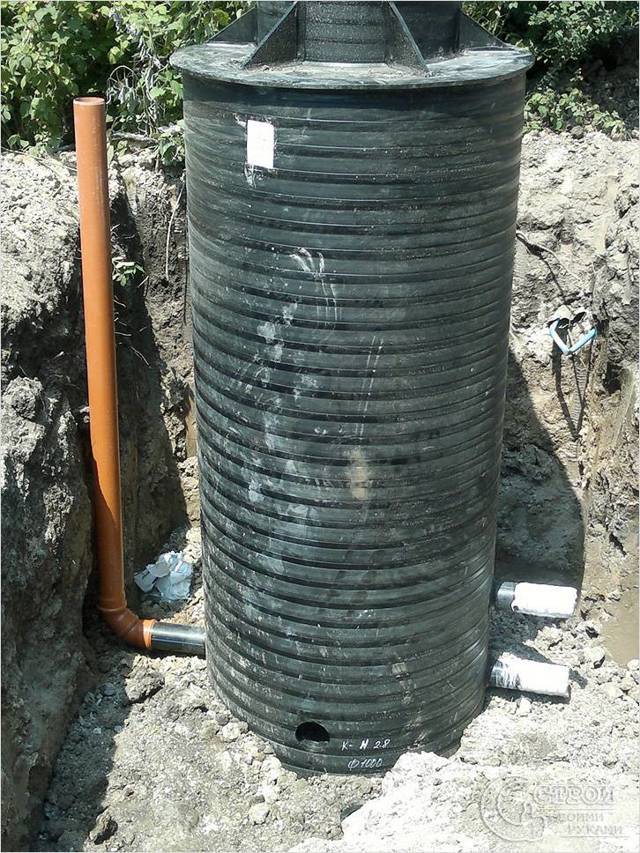
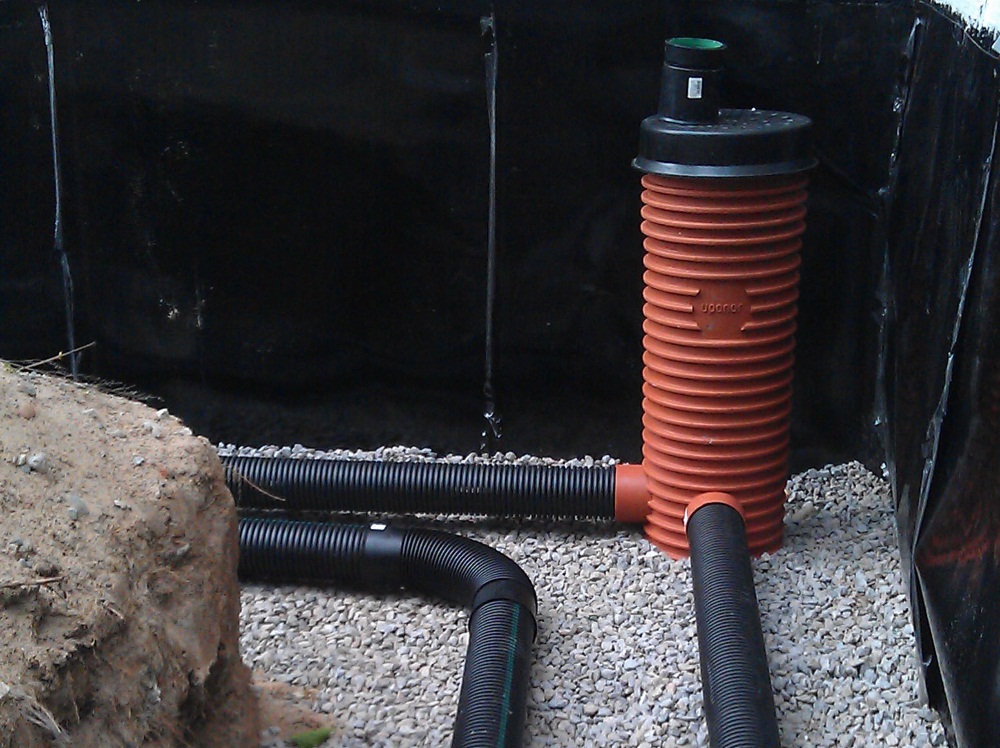
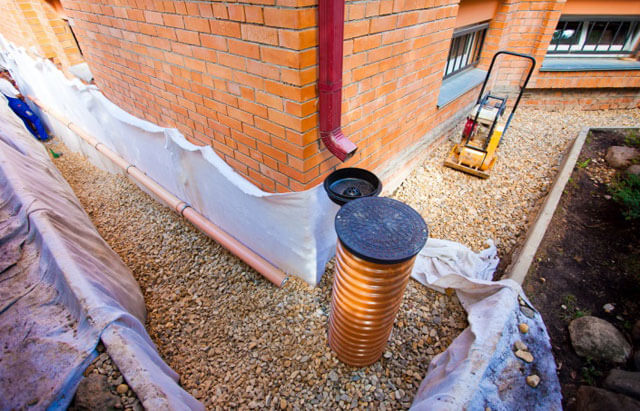
Installation of a plastic absorption well
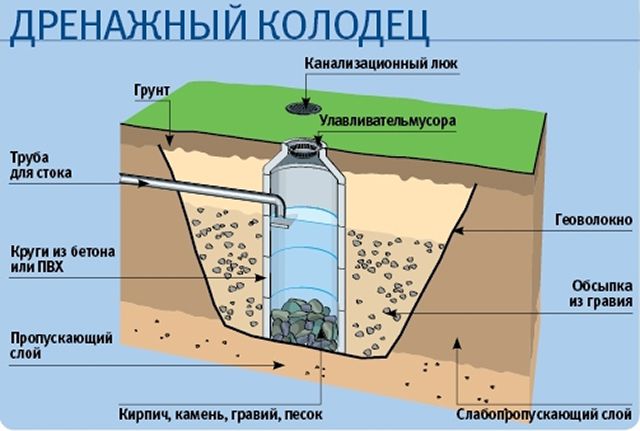
The creation of a filter-type well for drainage with the use of plastic containers is performed using products without a bottom. Their installation is carried out in the same way as described above, except for pouring the concrete base.
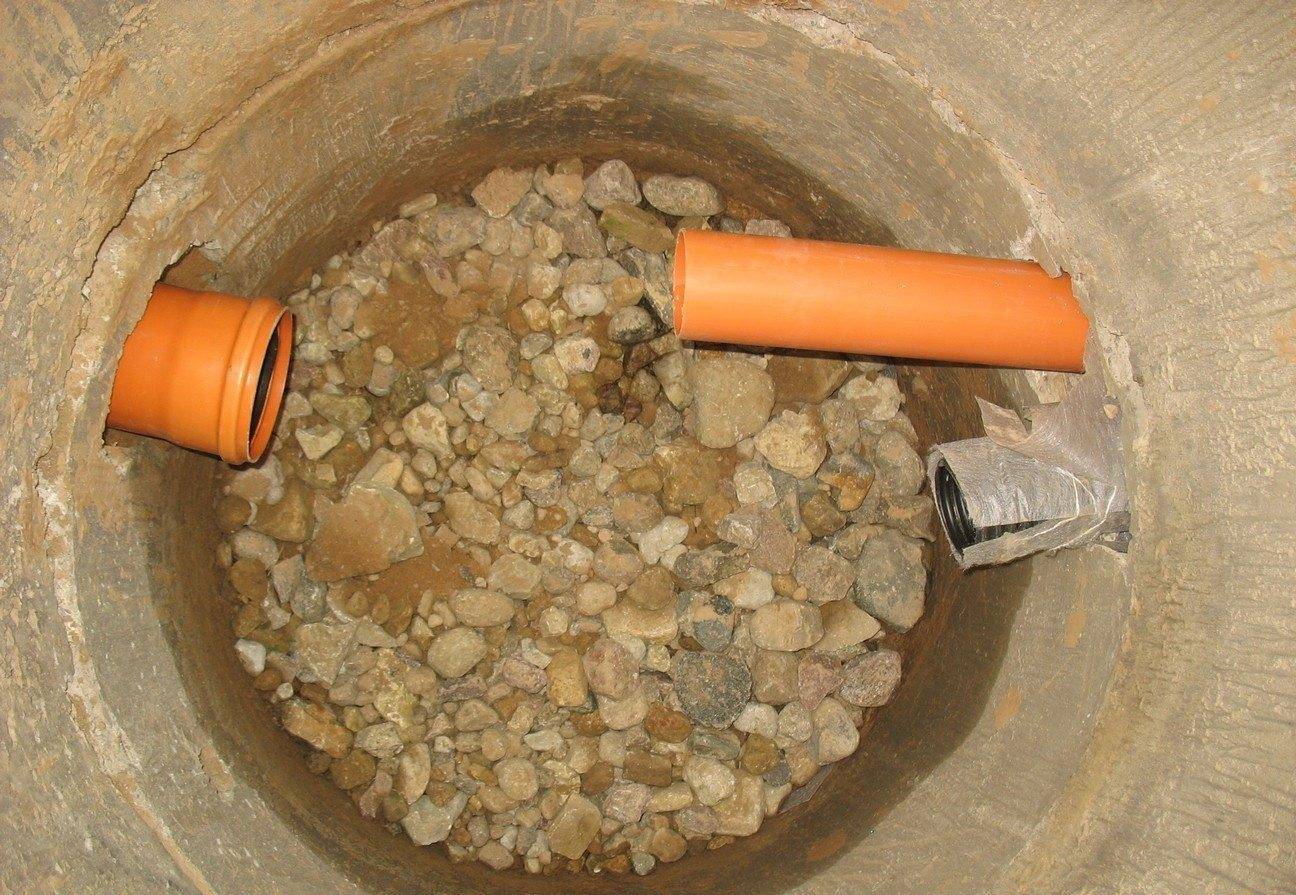
At the bottom of the well, instead, a filter system is created that can purify the incoming liquid in a natural way. Gravel, crushed stone or other similar bulk material with a thickness of 20 to 30 centimeters is poured onto the bottom in one layer.
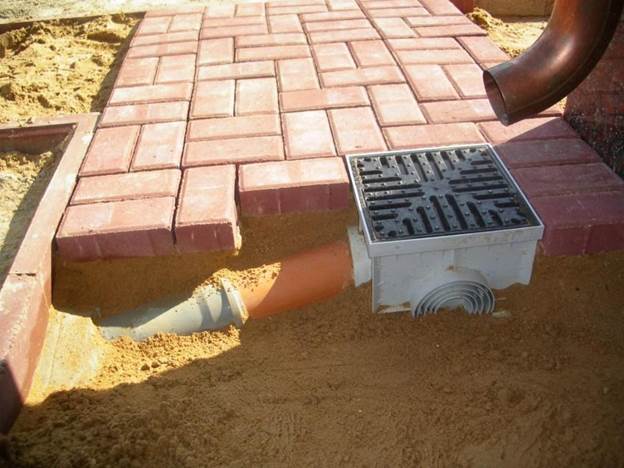
Pipes are laid to the upper part of the structure and covered with gravel or rubble from all sides, covered with geofabric and finally covered with a hatch. In order for the filter well to work productively for a long period, you need to properly install it.
DIY drainage - step by step technology
Today we will look at how to properly make drainage around a house under construction with our own hands.
At the very first stage, it is necessary to determine what type of soil prevails on the site, for this it is necessary to conduct geological surveys. After the study, it will be clear which soils prevail and, accordingly, it will immediately be clear at what depth the drainage pipe should run. If drainage is being laid to simply drain water from the site, then it is not necessary to do surveys, but if we are talking about building a private house and installing foundation drainage, then it is better to use the services of specialists in order to avoid problems with a “floating” foundation in the future and the possible formation of a technological cracking:
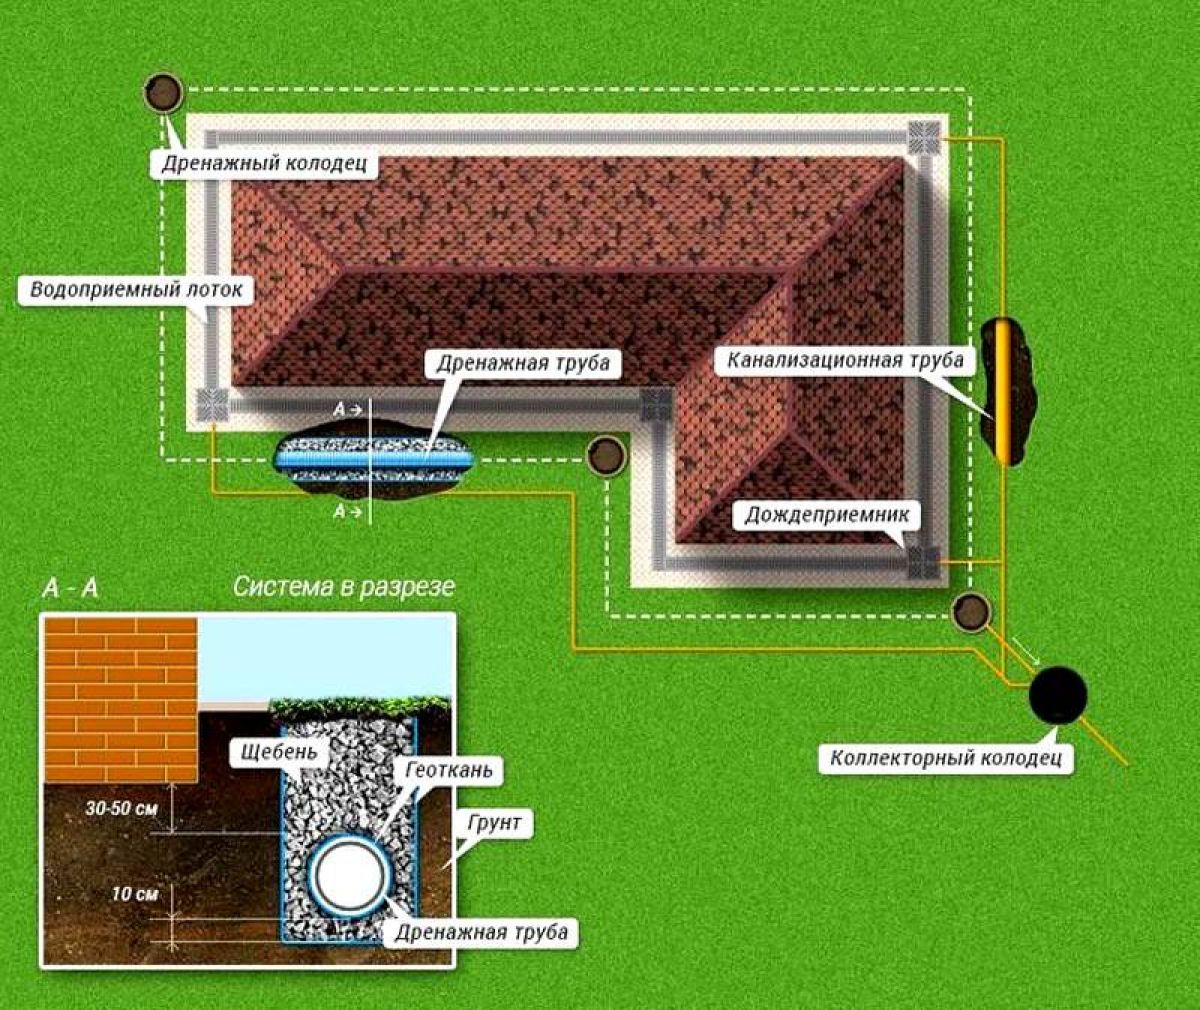
The photo above shows a do-it-yourself drainage scheme around the house.
In our case, it is necessary to do the drainage of the site on clay soils with your own hands. In addition, it turned out that groundwater comes close to the surface. We will dig a trench around the house for laying a drainage pipe with a depth of 50 cm.
After the trench is ready, we fill the bottom with sand and ram it with a homemade rammer. The sand at the bottom of the trench is used as a coarse fraction:
After the work done, we lay geotextile on top of the sand, it does not allow the layers to mix, that is, the sand does not combine with the gravel that will be laid next.Geotextile is a synthetic non-woven fabric that acts as a filter, water passes through it, but large particles cannot pass through. In the process of arranging drainage with our own hands on the site, we lay the geofabric so that there is a margin on the sides for further “wrapping” of the pipe, lined with rubble on all sides:
As mentioned earlier, a layer of gravel is laid on the geotextile. It is better to use fine gravel. The layer should be large enough for better groundwater filtration. We set the required slope with gravel at the bottom of the trench. A drainage pipe is laid directly on the gravel layer. This pipe is made of polyethylene, it is corrugated, with special holes through which groundwater enters. The pipe is usually laid with a slope of at least 3%, if possible more, so that the water flows better to the well (revisions):
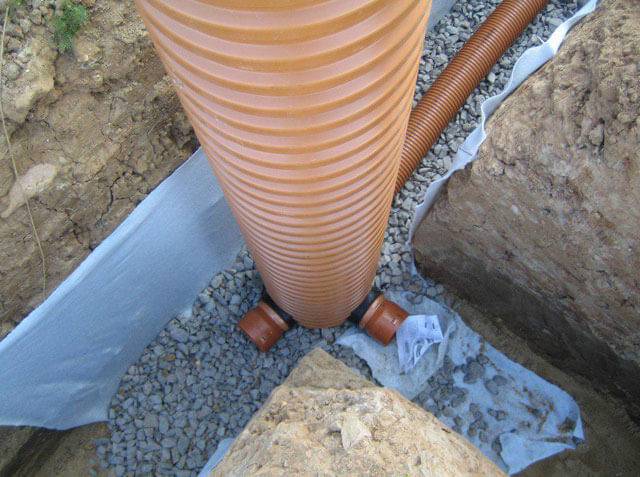
Further, in order for the drainage of the foundation, made by oneself, to be of high quality, we sprinkle the pipe with crushed stone of the same fraction as under the pipe. On the sides, top and bottom of the pipe, the layer of crushed stone should be the same. If one pipe is not enough, you can make drainage from small sections by joining them with a special coupling:
The meaning of all the work is to ensure that the groundwater that has fallen into the pipes is diverted somewhere. This will prevent the foundation from being washed away with water, which can cause it to simply collapse. Therefore, during the do-it-yourself drainage around the house using perforated pipes, a real drainage system is created, which includes pipes and wells for collecting water that act as revisions. Wells are designed to always have access to the pipe, and if necessary, it could be cleaned.
In our case, the wells were located at pipe bends. After sprinkling it with crushed stone, we close the layer of geofabric with an overlap, as mentioned earlier, we “wrap” the pipe with a layer of crushed stone. After the geotextile is closed, we again sprinkle with sand, and again we ram. After completing the work on the drainage device around the house with our own hands, we fill the trench with the previously selected soil. If desired, you can additionally insulate the drainage system by placing a layer of thermal insulation material on the top sand cushion. You can already make a path along the layer of earth. So it will always be visible where the pipes of the drainage system pass.
How to make drainage wells with your own hands
- How to make drainage wells with your own hands
- Do-it-yourself site drainage
- How to make a drainage well with your own hands and bring pipes to it
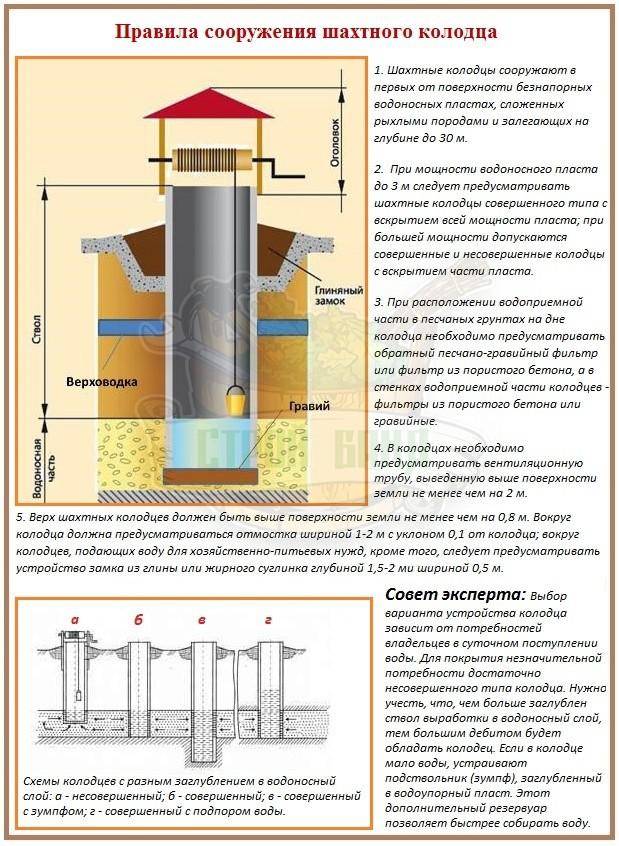
Drainage wells are reliable assistants in the fight against high humidity in the area. Their device helps to remove excess moisture, while the depth of groundwater increases. With increased soil moisture, the site often becomes swampy, moisture constantly accumulates on it. If the drainage system is neglected, under the influence of excessive moisture, the foundation begins to sag after some time, in the winter season the soil freezes and deforms.


What are drainage wells?
Wells can be absorption, storage or viewing. The latter variety has a specific purpose - it is arranged not so that water accumulates in it, but so that the system can be inspected and cleaned. They can be installed at the corners of systems or in places where several branches converge at once - there is a greater likelihood of pipe clogging.For such a well, the size is selected depending on whether a person will go down there to clean it.
Absorption wells, that is, filtering, are installed in order to drain the soil. In depth, they are carried out within two meters. A filter made of gravel, gravel, broken bricks or other similar materials is arranged at the bottom of the well. If it is not possible to arrange such a well, they make a storage one, that is, a water intake. To install it, you need to choose the lowest point on the site - so it will be more convenient for the water to drain. An electric pump is installed to pump out water.
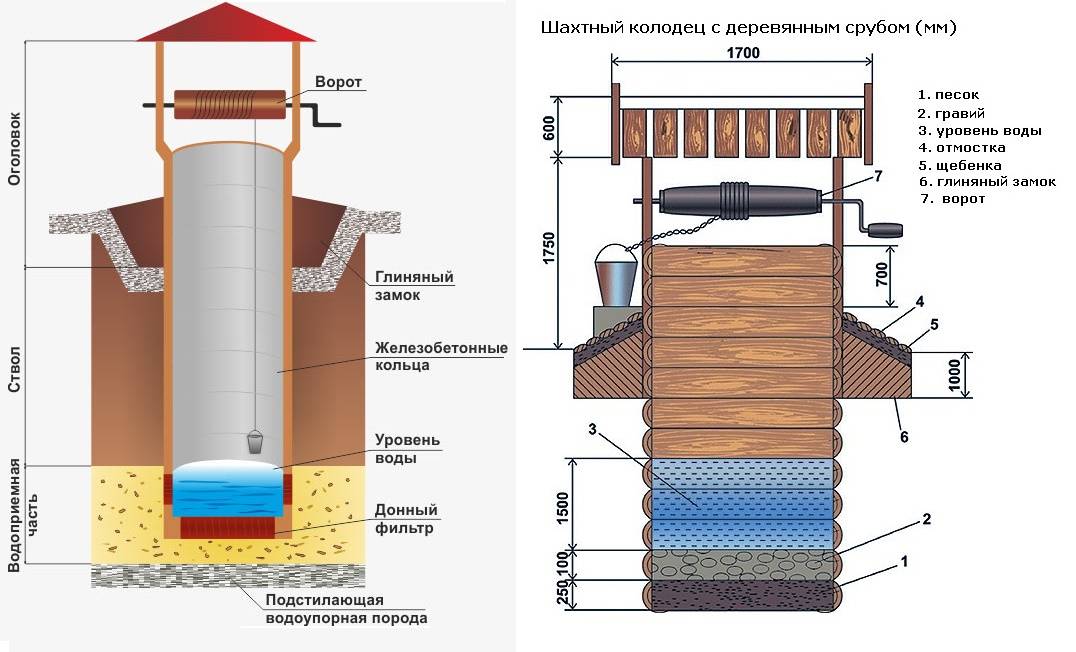
Plastic or concrete rings can be used as a material for the well. Concrete products have a longer service life, but due to their massiveness, their use will be more difficult. Depending on the purpose of the well, its dimensions can be different, and before buying pipes, you must first decide on what kind of diameter you need.
How to make a drainage well
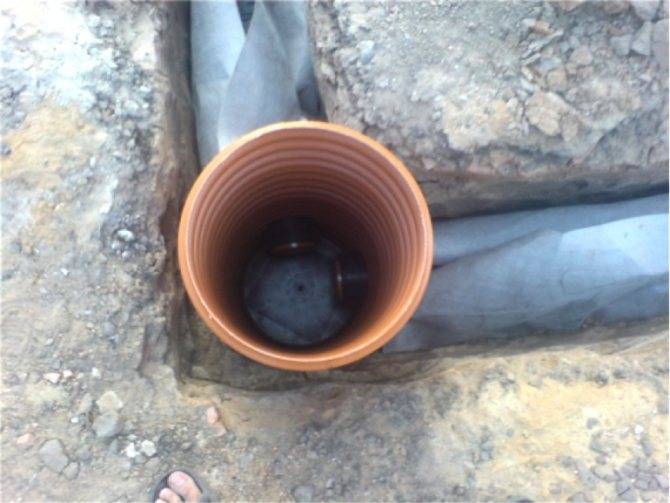
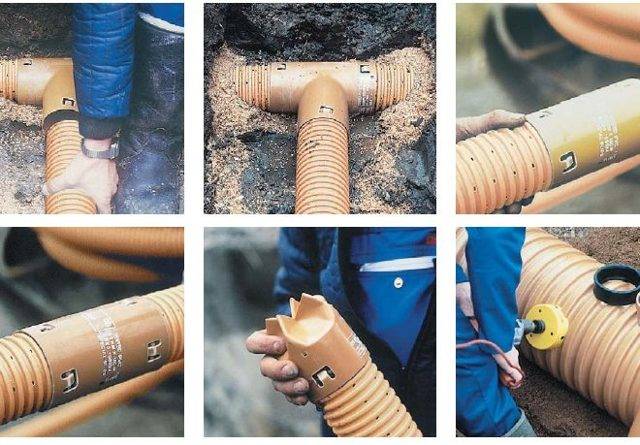
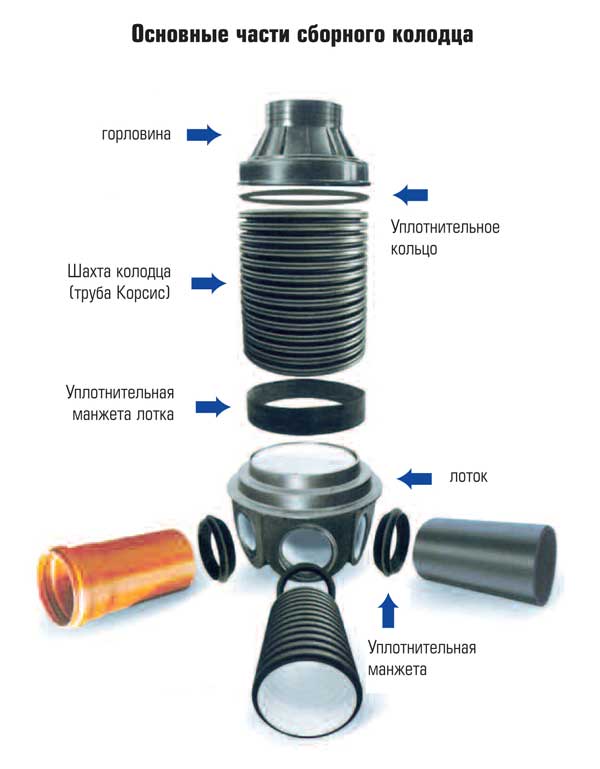
To create a drainage well, in addition to the main pipe, you will need rubber seals, a plastic hatch, and a bottom. These items are sometimes purchased from different distributors - this allows you to save a little.
Make holes for pipes in the body of the well, install rubber cuffs. Strengthen the bottom, the joints must be sealed using bitumen-based pipe mastic. It is also necessary to make a drainage ditch - fill its bottom with a mixture of crushed stone and sand, compact it well. Everything is poured with a cement solution, geotextile is laid on top. Now you can lower a plastic pipe into the ditch, connect additional channels in the right amount.Outside, the well can be covered with gravel or small gravel. Finally, install the hatch.
Such work is easy to do on your own, without the involvement of assistants. Wells will need to be cleaned from time to time - in order to prevent clogging of the drainage system. The structure will not require special care - if everything is done correctly, the structure can last for many years.
How to make drainage wells with your own hands 👍, To keep the foundation of a country house in good condition, it is necessary to provide it with protection from the effects of precipitation.
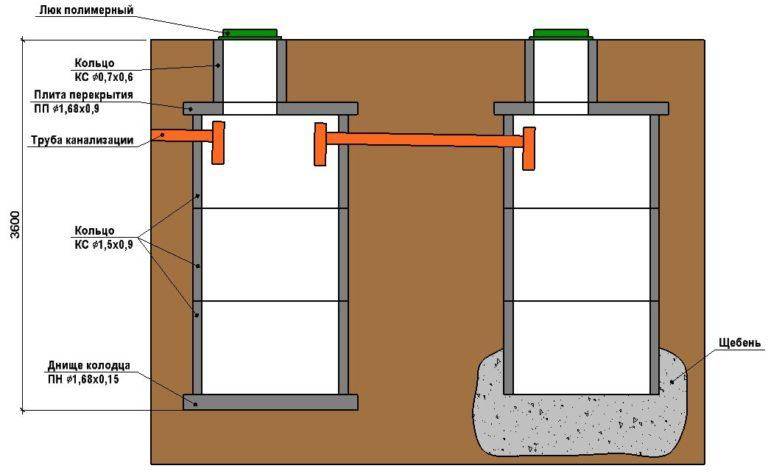
Stage three. Well construction
Well construction
We’ll make a reservation right away that it won’t work out alone - you need at least one more person.
One of the workers (let's call him a "cutter") starts digging the earth in a selected place along the diameter of the ring
To destroy heavy soil, he uses crowbar, stones that come across on the way are also removed.
The second person at this time is near the mouth of the mine and raises the selected stones and soil to the surface with the help of a tripod, winch and bucket.
It is recommended to get a third assistant, who will replace the "cutter", say, every half an hour.
It is important that the “cutter” is provided with the most comfortable working environment. To do this, the mine must be ventilated - with a mechanized pumping device or with an ordinary umbrella.
We perform all actions in this sequence.
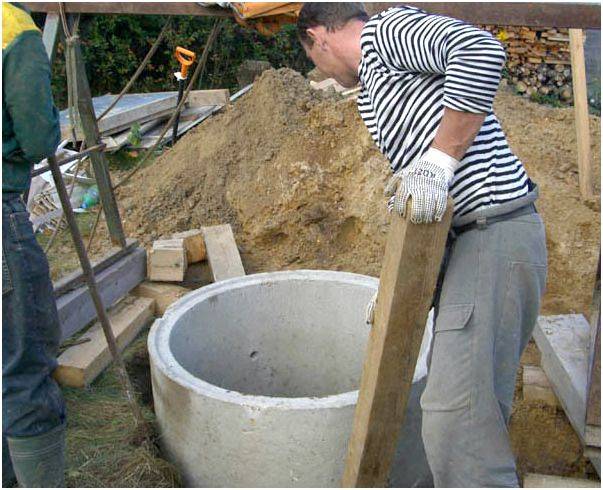
Step 1. We lay the first concrete ring in place of the future mine. The “cutter” digs the walls of the ring, as it deepens, it sinks deeper and deeper. It is advisable to use a product with pins or cone-shaped points for the first ring in order to facilitate downward movement.
Installation of concrete rings
Step 2. After the top edge of the ring reaches the same level with the ground, put another one on top and continue to work. The weight of each ring is approximately 600-700 kg.
Step 3. Two people are enough to roll the ring to the place of work. But if it is possible to use a crane, then it is better not to neglect it, because with the help of such special equipment, you can more accurately lower the ring onto the seat.
If the soil is dry and strong, then you can go deep by 2-3 meters, and after that, using a crane, install several rings in a row.
Digging a well Digging a well Digging a well
Step 4. Similarly, we continue the procedure until the aquifer is reached. As practice shows, for a standard work shift (8 hours), 3 concrete rings can be laid.
After the appearance of fontanelles, we go deeper a few more meters, after which we cover the bottom with a “pillow” of rubble (it will serve as a water filter).
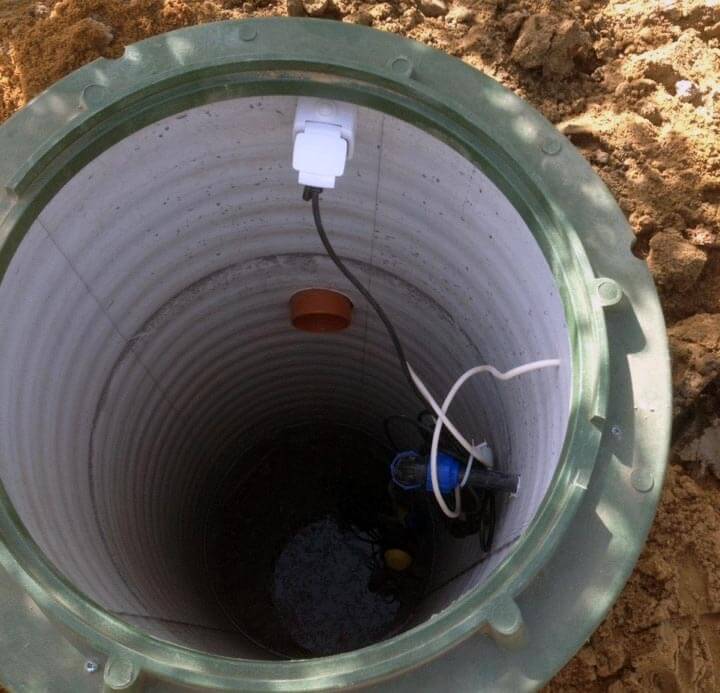
Step 5. The mine is pumped with a drainage submersible pump. The more water is pumped out of the well, the greater its debit will be.


Drainage pump for a well Drainage pump for a well
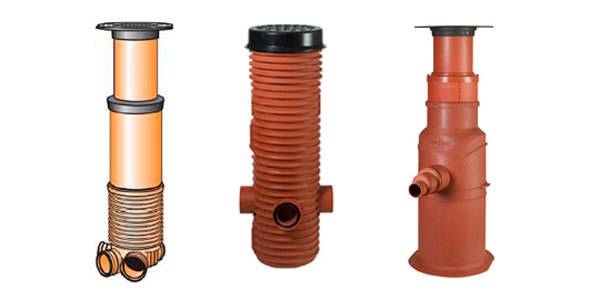
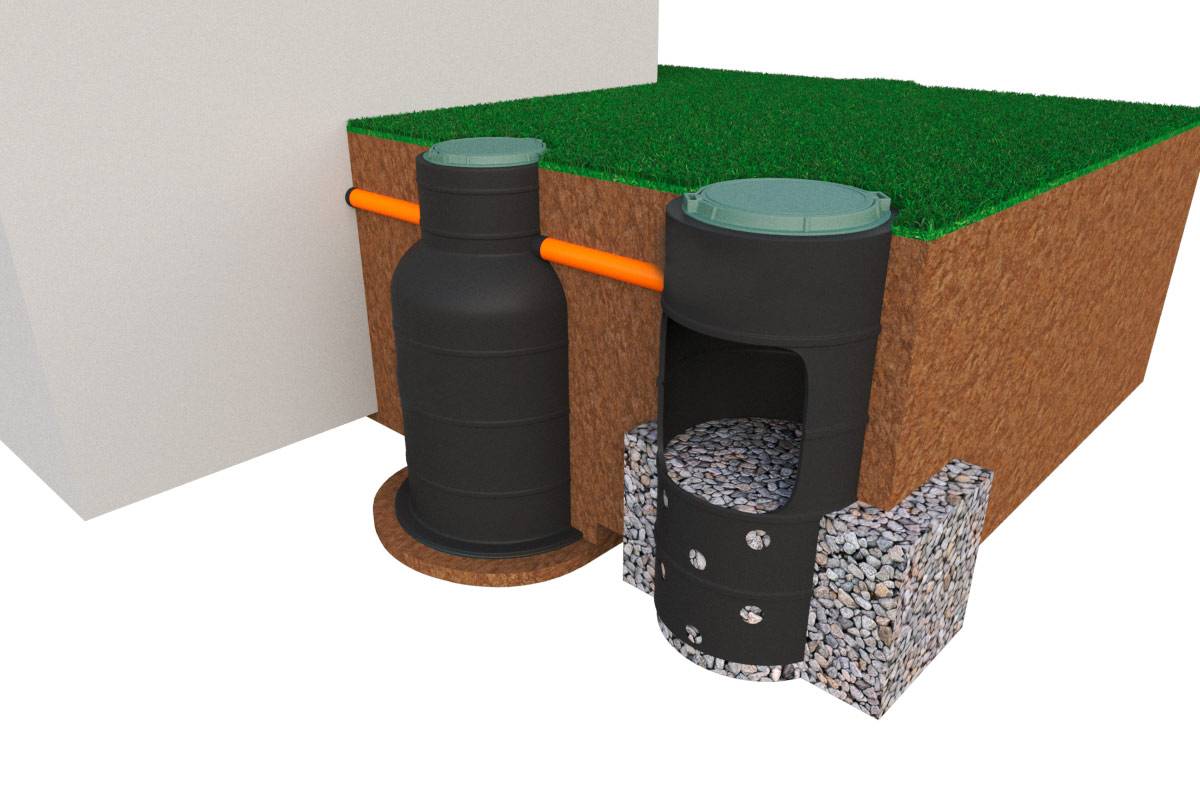
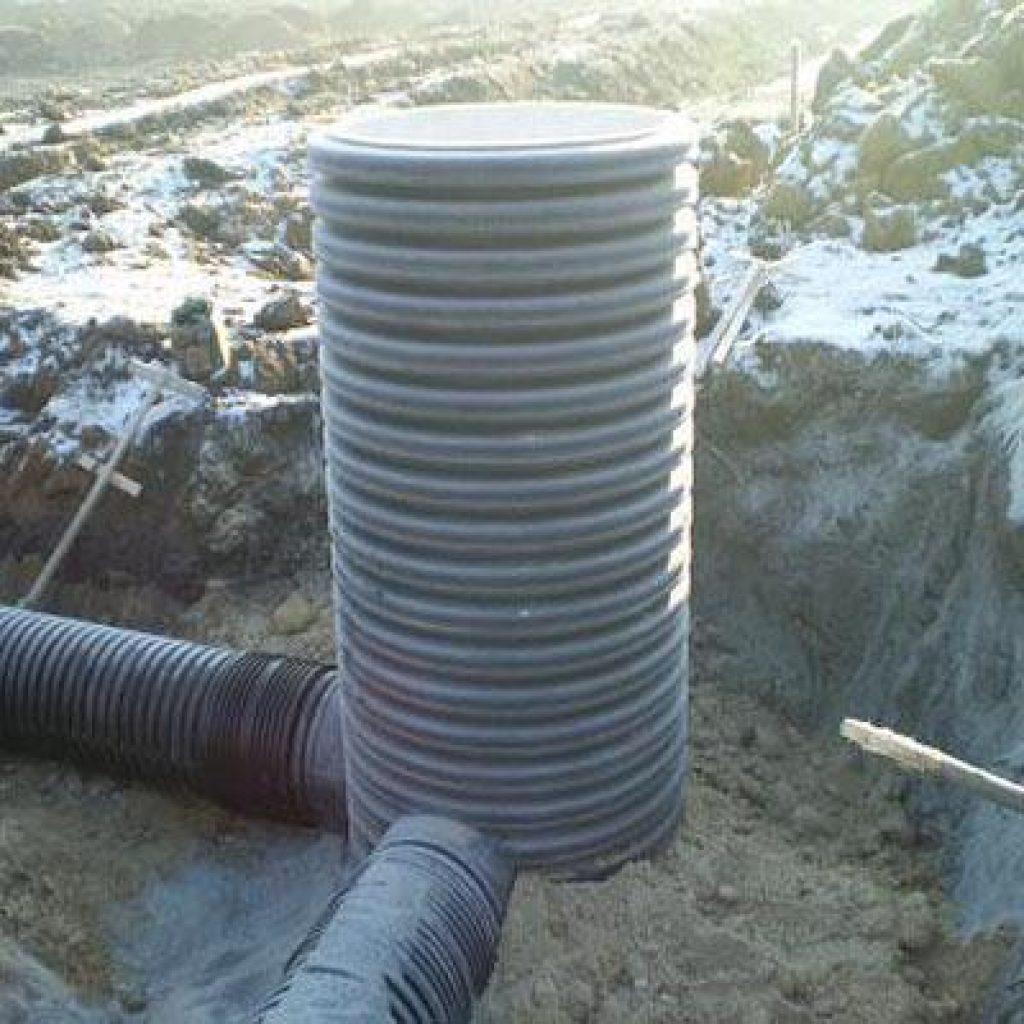
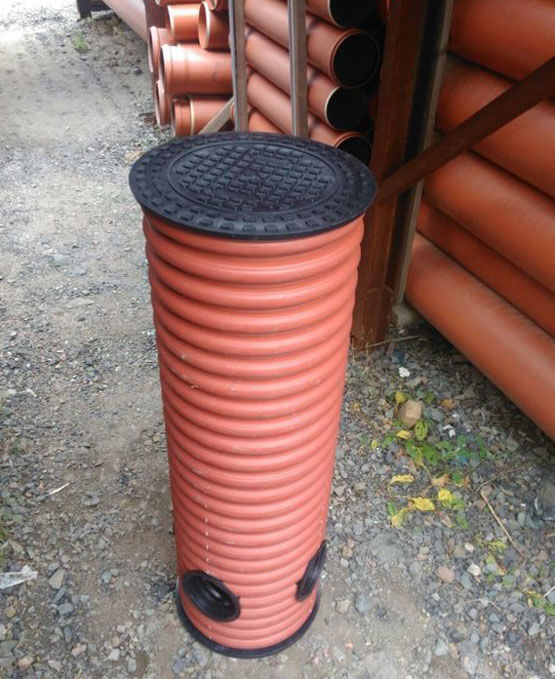
Making a tank from plastic pipes
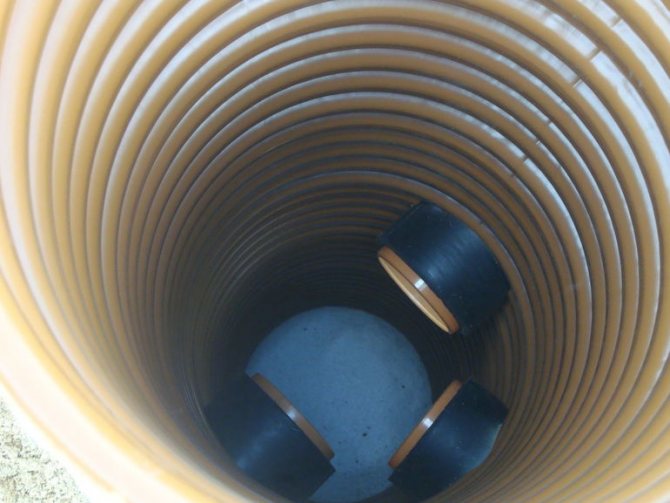
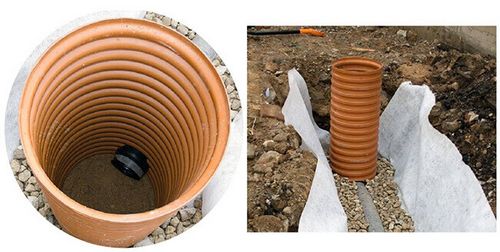
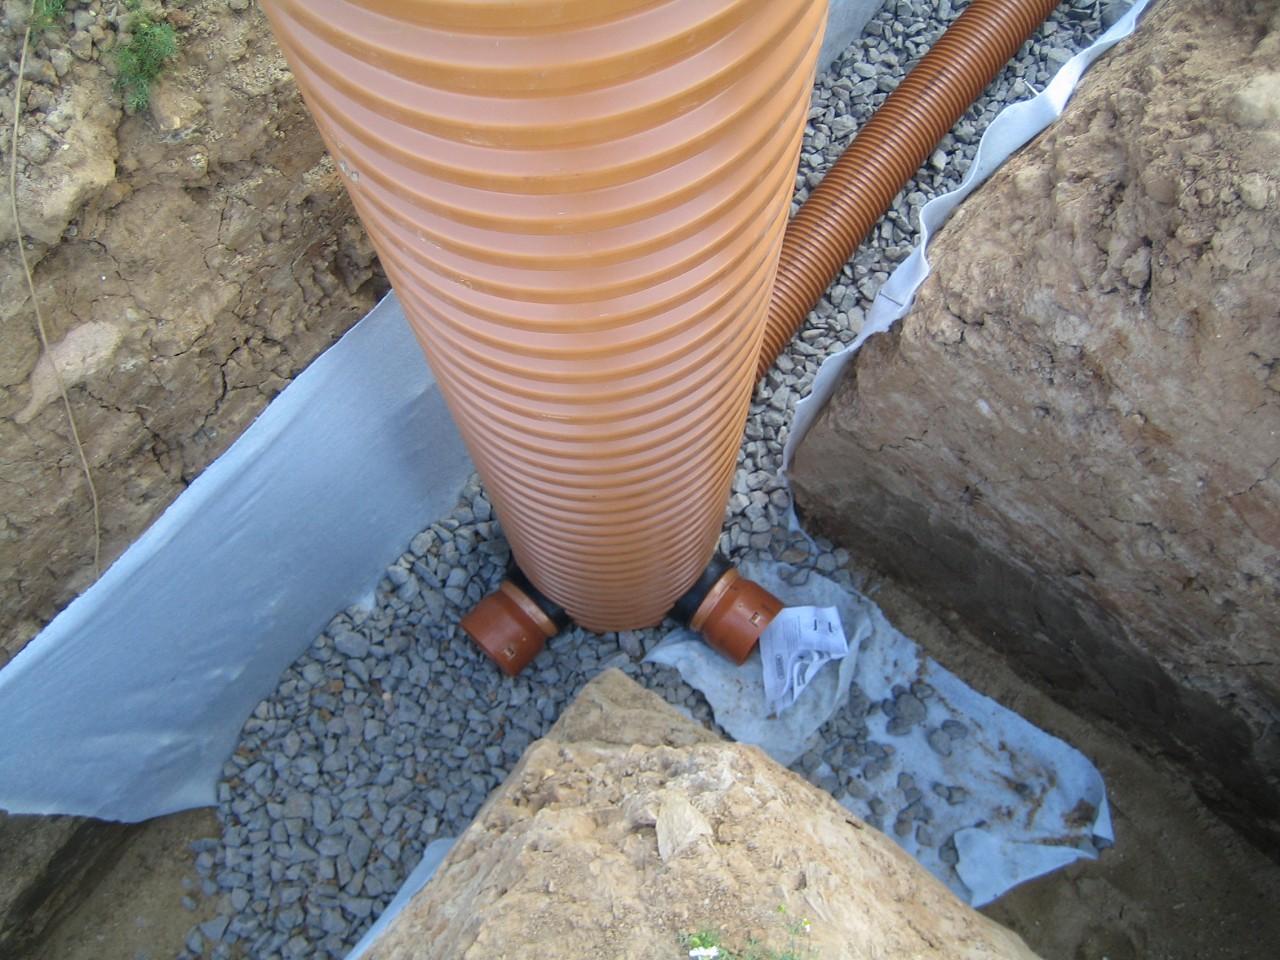
If a decision is made to make a well out of a plastic container, but it is missing, you can make it yourself. To do this, you should buy a plastic pipe with a diameter of 35-45 centimeters, if you plan to build viewing and turning objects, and a product with a cross section of 63-95 centimeters for absorption and collector structures.
In addition, you will need a round bottom and a plastic hatch, the dimensions of which must match the pipes. You will also need rubber gaskets.
The sequence of manufacturing a plastic container:
- Cut off a piece of plastic pipe of the desired size, which is determined taking into account the depth of the well.
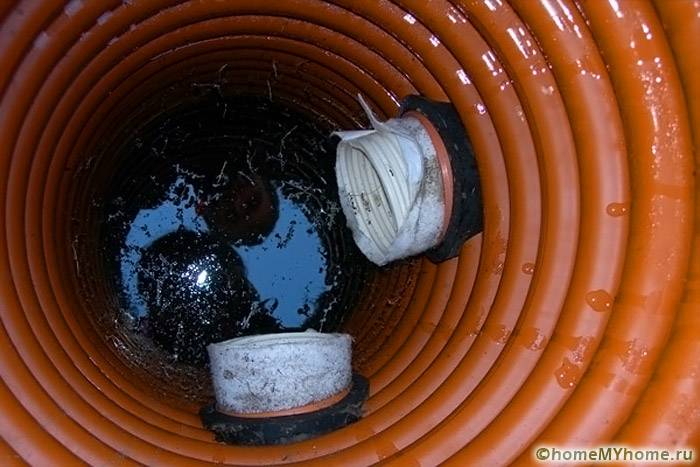
- At a distance of 40-50 centimeters from the bottom, a hole is made for connecting pipelines and equipped with gaskets.
- The bottom is attached to the plastic tank and the resulting seams are sealed with sealant or bituminous mastic. The installation process of a do-it-yourself drainage tank is carried out as described above.
How to make a drainage well from concrete rings on your own?
DIY installation process
First of all, it is worth noting that the sizes of the rings for different types of structures differ from each other. For example, for a filter structure, reinforced rings are used (you can use ordinary concrete mix / reinforced concrete) in the form of a rod (whose diameter is in the range of about twelve millimeters). As a rule, in this case, three rings are enough, which are laid by extension.
Before installing concrete rings, it is necessary to dig a hole under the drainage well itself with a depth of 1.5 m. It is worth noting that the holes should be located in the very lowland.
If you are building an absorption structure, then in this case it is necessary to create a cushion of crushed stone / gravel, 1.5 m deep.
As for the water intake construction, in this case a bottom / screed is constructed. Then laying is carried out (one ring is installed on the other). In the link that is closest to the surface, a small hole is made under the pipe. With the help of cement, cover all the cracks around the pipes. You can also apply mastic.
As for the "viewing", they can be located both at the corners of the connection, and on even segments that are at a slight slope.
Operation of the facility
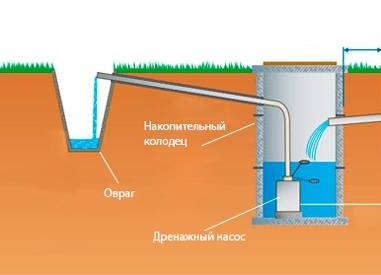
In most cases, drainage wells operate autonomously, naturally and without additional effort, transferring flows to the final catchment points. At the same time, with varying degrees of regularity, it may be necessary to clean the structure or promptly pump large volumes of water (with heavy rainfall). In such situations, special pumping equipment is used. With its help, water is pumped from a drainage well into a septic tank, pond or other storage device. Usually the pump is connected for a certain time until the well is drained. But in some cases, the equipment is configured for continuous operation with short interruptions.
Purpose of drainage pipes
Increased soil moisture adversely affects building structures, especially the foundations of buildings. Under the influence of water and temperature fluctuations, the base quickly collapses, cracks appear on the basement and walls. Flooding of the garden plot can cause the death of plants, damage to household structures.
To reduce the impact of floods, precipitation or groundwater, owners sites are laying drainage pipes with your own hands. Timely drainage eliminates the cause of winter frost heaving, as a result of which foundations, blind areas and paths are destroyed. In basements or cellars, air humidity decreases, mold spots disappear. The walls of underground structures do not freeze during the cold period.
Drainage of marshy soil in a personal plot leads to its earlier warming up.This favorably affects the growth of plants, the yield increases. Gardeners have noticed that crop pests and mosquitoes are getting smaller. Sites, paths and other elements of landscape design on dry, stable ground last longer.
Drainage pipes are widely used in industrial and civil construction when draining pits, laying roads, and in land reclamation.
Stage four. We protect the structure from surface water
To keep the well clean, it must be properly protected. Water should enter the shaft only from below, and therefore the walls must be reliably insulated. To do this, we firmly connect the rings to each other, resorting to one of two possible methods.
Well
- We drill the walls of the rings and fix them with metal brackets mounted on bolts.
- We twist the rings with steel wire, catching it on the loading eyes. To twist the wire, we use a metal rod, for example, a crowbar.
External and internal sealing of concrete rings with traditional bituminous materials
We strengthen the seams according to the following scheme.
Step 1. We put pieces of linen rope in the voids between the rings (an excellent material - natural and environmentally friendly).


Step 2. We cover the ropes with a solution of sand, cement and liquid glass. In this way, we will achieve reliable waterproofing, which, moreover, will be completely neutral when in contact with water.
Step 3. On top of the upper rings, we dig a pit of a meter depth.
Step 4 We waterproof the outer surface of the rings using liquid bituminous mastic.
Step 5. We lay a thermal insulation layer around the upper rings (we can use any foamed polymer, for example, foam).
Step 6We fill the pit around the well with clay. This is called "clay castle".
Clay castle of a well Clay castle of a well
Varieties of drainage wells
By appointment, the mine for drainage can be:
- Lookout.
- Collector.
- Absorption.
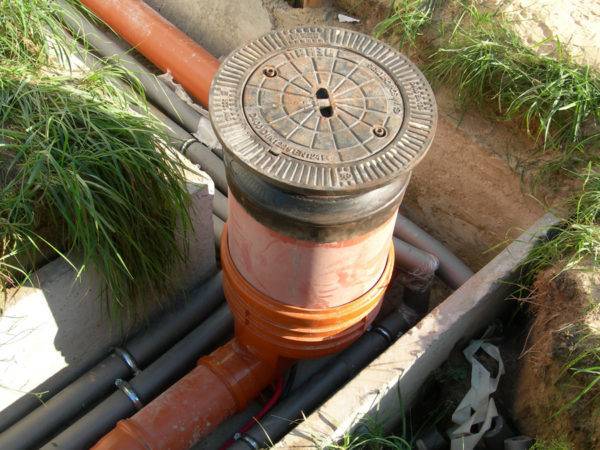
The manhole for drainage has several other working names. It can be called revision or inspection. Designed to monitor the technical condition of the drainage system, its timely cleaning, maintenance and repair.
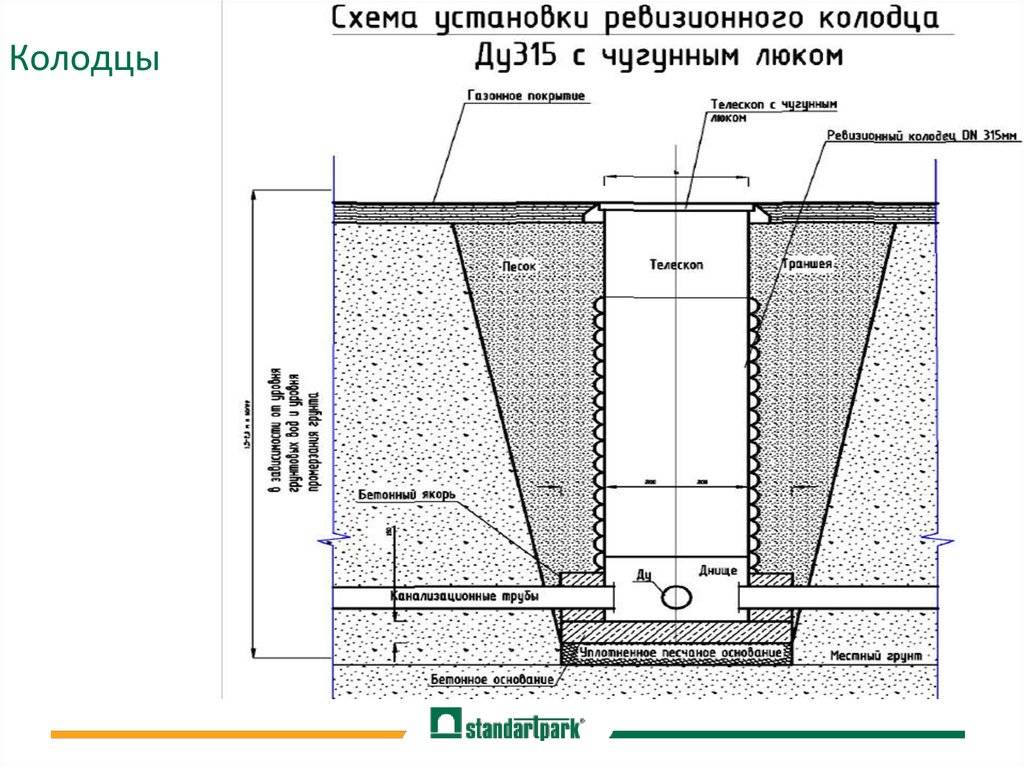
A manhole is installed for drainage in places where pipes turn or change their direction. On straight pipes, shafts are installed every 30 meters with a pipeline diameter of 15 cm or every 50 meters with a pipeline diameter of 20 cm. Additionally, a manhole for drainage can be installed at the intersection points of drains.
If it is planned that there will be a descent for maintenance, then the plastic manhole shaft must have a diameter of at least 1.0 meters. If the shaft is cleaned by water pressure from an external hose, then the diameter of 35-45 cm will be optimal for the shaft.
Plastic stormwater collection wells are typical for private country houses. If the site has a slope, then the installation of the shaft is carried out at the lowest point of the site.
If the site is flat, then the installation of drainage pipes is carried out under a slight sewer slope, and storm wells are installed slightly below the level of the pipes. This will ensure an arbitrary outflow of water from the pipes into the shaft.
Fluid may accumulate or drain naturally into a central drainage channel, the nearest body of water. If there is no outlet, then the pumping of water is carried out by a pump, which often comes with the tank.
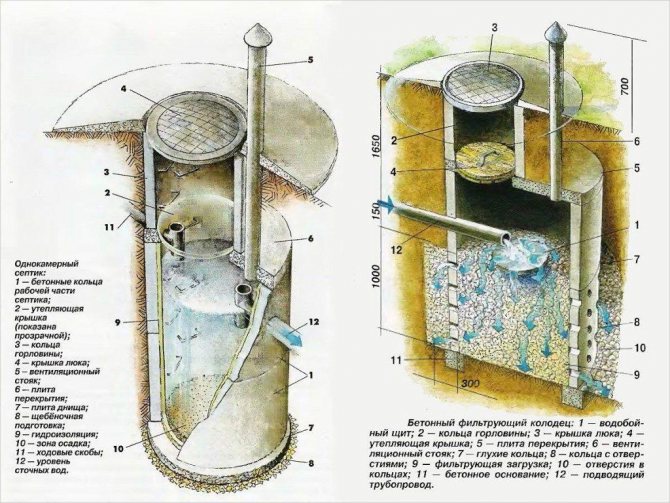
The collector drive can serve as an element of the sewer system. The drainage well for sewerage is equipped with a solids cleaning system. After passing through the septic tank several levels of cleaning, fluid accumulates in the mine, which is subsequently pumped out. The dimensions of the drive are not regulated, it all depends on the wishes of the owner.
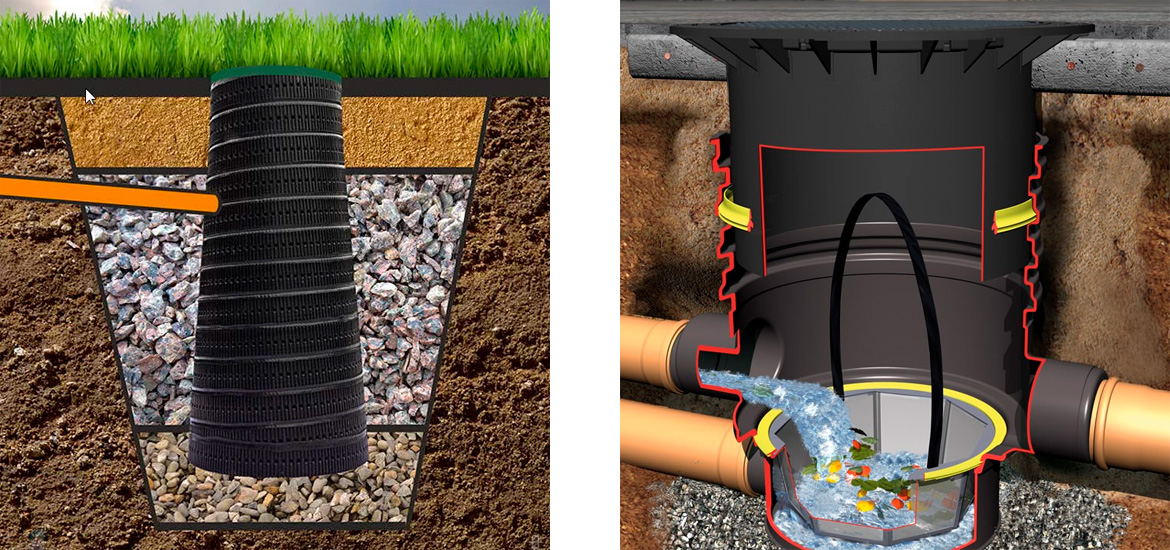
The absorbing or filtering accumulator is designed to drain a certain small area of area, to which it is impossible or not necessary to bring a common drainage structure. For drainage, the soil is selected, on which the volume of liquid passing through the well is not more than 1 cubic meter. m.
A characteristic difference between the well is the absence of a bottom, the shape and method of installation. It has the shape of a truncated cone, which is installed with a smaller diameter up. If desired, you can install a shaft of a different shape.
For installation, a pit is equipped, with a depth of about 2.0 meters. A crushed stone pillow, 2-3 cm thick, is laid at the bottom of the pit. But a cone wrapped with geotextile is installed on the pillow. Inside the shaft, a lining is made of small stone, crushed stone or slag, which is covered with geotextiles. When filling the mine, the liquid is pumped out, and the geotextile is replaced.


By type, wells are divided into:
- Turning.
- Tee.
- Cross.
- Checkpoint.
- Dead end.
- No holes.
The rotary drainage well plastic is established in places of turn of pipes. Often these are the outer and inner corners of buildings. These places are most vulnerable to clogging. Branch pipes at the rotary well are located at an angle of 90 °.
A well-cross and a well-tee can be in place of rotary shafts, to which additional drainage lines are connected. The cross and tee can be used as viewing points in separate areas where several drainage lines are connected to one point.
Branch pipes at such mines are located at an angle of 90 ° in relation to each other. The dead-end type of the mine is applicable to the collector well, it has one inlet pipe. A storage tank without holes is used as an absorption shaft.
Construction materials
The wells used to create a do-it-yourself drainage system on a personal plot are usually assembled from concrete rings or purchased plastic containers of certain sizes.
How to make a drainage well, and what materials to use, each owner of a country house decides for himself. But it should be borne in mind that the cost of the first option is cheaper, but requires more labor, and the second is much easier to manufacture, but its price is higher.
The assembly of wells from concrete rings is distinguished by the need to solve a number of problems. Due to the significant weight of the rings, you have to order special equipment and pay for the work of assistants. In concrete wells, you need to create holes for laying pipes, and such work is difficult.
As a result, the laboriousness of the installation of a concrete structure pays off with its durability, strength, reliability and affordable cost. Such a self-made drainage well has increased resistance to negative influences. It can be placed anywhere, as well as in areas located on soils subject to heaving when they freeze or in the event of hydrothermal shifts.
Under the same operating conditions, plastic products for the well can be deformed, despite the fact that they are easy to install, reliable and convenient. On their body there are already holes of the required diameter, designed for laying and connecting pipes.
DIY drainage well
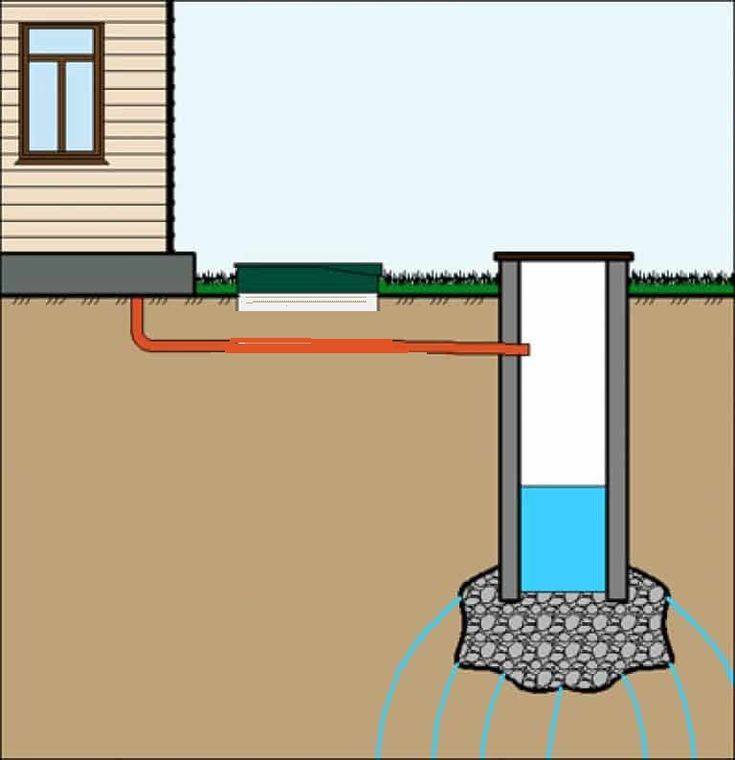
It is unlikely that anyone would think of building a house on a sandy area. For construction, places with groundwater are selected so that in the future there will be no problems with drinking water. But this plus of the area can turn into waterlogging of the soil, and the destruction of the foundation of the building. To protect yourself from this problem, you need to build a drainage well. This design serves to divert groundwater from the site.
Materials and working principle
The work of the well is simple. A trench is pulled out on the site to collect and drain water - a drain. One or more drains are connected to it, which drain the liquid into a reservoir located nearby with the site or into a special reservoir.
Types of drainage systems
Drainage wells are divided into four types according to the type of soil and the movement of groundwater. The principle of operation of each is different, and before you make a drainage well, decide what system you need.
Collector well
This version of the drainage system is able to collect and accumulate moisture, which can later be dumped into a ditch or used to water plants. Its construction is appropriate in the lowest part of the terrain.
Rotary wells
They are mounted on drainage bends or in places where several sewers are connected. In such places, there is a high probability of contamination of the internal cavities.


absorption well
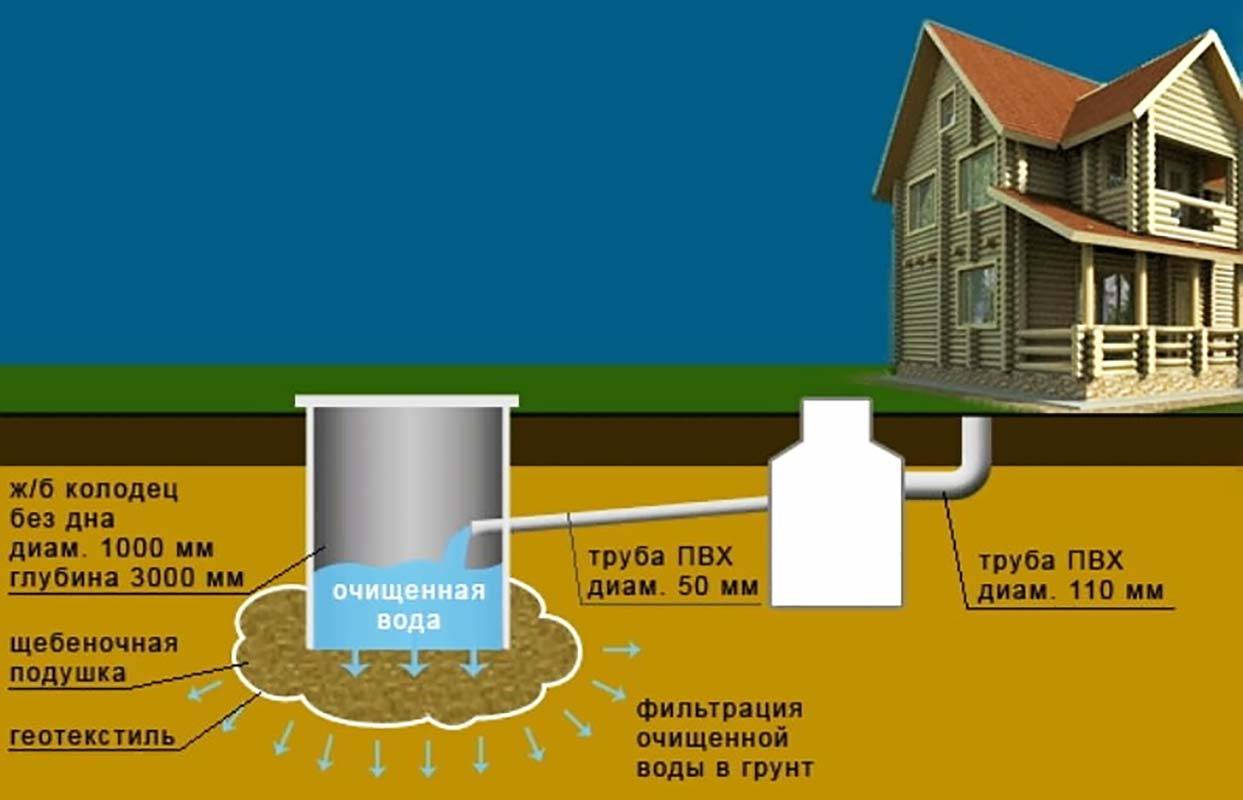
Such a well must be equipped in those places where it is impossible to lay pipes to drain liquid, due to the lack of a reservoir for discharge or sewerage. This is the deepest type of drainage system, and the minimum depth must be at least 3 m. The bottom in the well is made of crushed stone or sand, this will allow the liquid to be discharged into the groundwater.
manhole
This option is used to access the drainage system and possible repairs. For convenience, its width should be at least 1 m. In principle, such wells can be made in other systems, because repairs and preventive cleaning will not be superfluous.
Construction order
When choosing the size of the future well, the area of \u200b\u200bthe site is taken into account, namely the part that needs to be drained.
When all the materials are ready, work can begin. We dig a hole at least 2 meters deep, depending on the type of drainage system. At the bottom you need to equip a special pillow. Coarse sand is best suited for this. The bedding should be from 30 to 40 cm thick, in the process of arranging it must be well tamped.
On the backfill, you need to make a square formwork for arranging the foundation, which will serve as the bottom of the well. It should be laid reinforcing mesh, preferably small. This structure is filled with concrete mortar.
After the concrete has set, the inner and outer formwork is installed on the base. The walls from above must be connected with wooden planks. Concreting of the walls of the well is carried out according to the level. After 2 - 3 weeks, when the concrete is completely dry, we remove the formwork and backfill the base. It is better to use fine gravel or expanded clay for this.
Digging a trench
To drain liquid from the well, polyethylene or asbestos pipes are used. Just digging a trench and laying pipes towards the dump site will not be enough. In order for the reset to occur correctly, you need to perform the following steps.
- Fill the bottom of the trench with sand.
- Lay a layer of fine gravel on top of it.
- A drainage pipe is laid on such a pillow, which is also covered with sand and gravel.
Together, the layer of sand and gravel should be half the depth of the trench. The remaining depth is covered with loam, and a fertile layer of earth is laid on top.
When arranging drainage on an already built-up site, work should be carried out in small sections of 15–20 meters each. During operation, the soil removed from the excavated section is poured into the previous section of the trench. It is better to start work in late July - early August. At this time, the groundwater level is the lowest.


