- Preparatory work
- Foundation preparation
- Selection of materials
- Arrangement of a closed system
- Methods for arranging a drainage structure
- Why do you need a drainage device on the site?
- The main stages of installation
- Is it possible to make a drainage system yourself?
- Prerequisites for organizing drainage
- Advantages of the Sofrock system
- Technical requirements for the placement of the drainage system
- What materials are required for the drainage device?
- How to install drainage pipes: step by step instructions
- trench preparation
- Pipe laying
- Installation of drainage pipes:
Preparatory work
It is most convenient to do the construction of drainage systems for the foundation of the house with your own hands simultaneously with the construction of the foundation of the building. However, if this was not done on time, you can start organizing drainage near the finished private house. The scheme of the drainage system depends on the type of foundation.
So, pile foundation drainage building is not required. Strip foundation drainage is the easiest to build. It can be built at the laying stage or after the introduction of a private house into operation. The most difficult option is reservoir drainage under the foundation slab. Build the drainage of the slab foundation in two ways:
- construction of a drainage system before pouring the slabs;
- if the foundation of a private house has already been built, then it is built along the perimeter of the house, as in the case of a strip foundation.
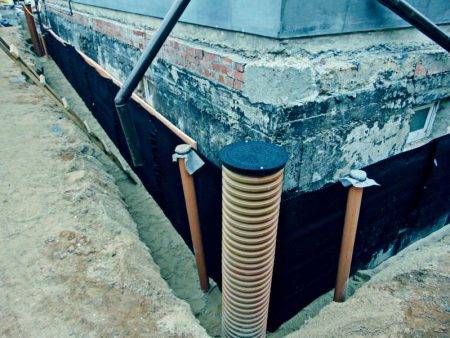
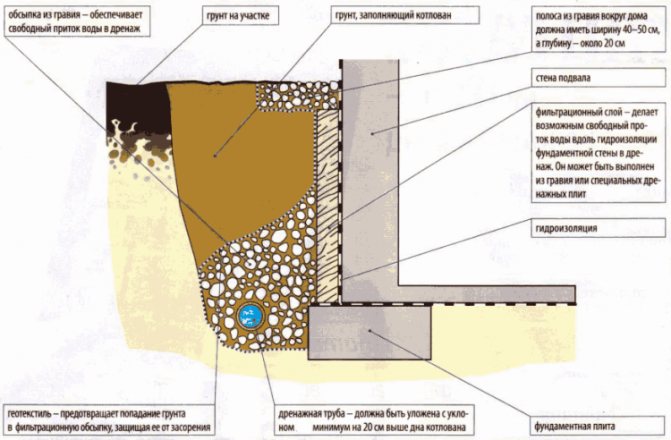
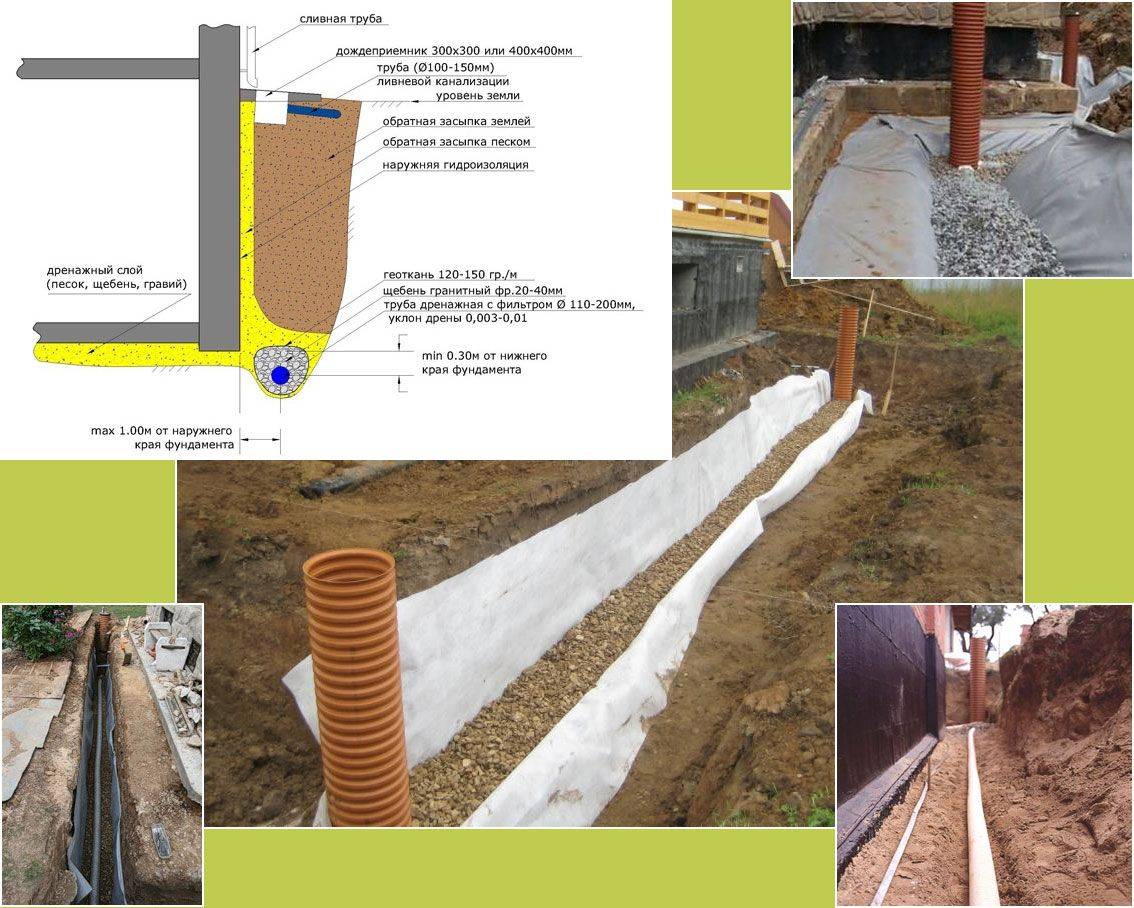
Foundation preparation
Before arranging wall drainage of the foundation, it is necessary to carry out measures to perform waterproofing work. Foundation preparation is carried out according to the following algorithm:
The foundation is being excavated.
- As the foundation slabs are released, they should be cleaned of the earth and the previous waterproofing layer.
- Give time to dry the foundation.
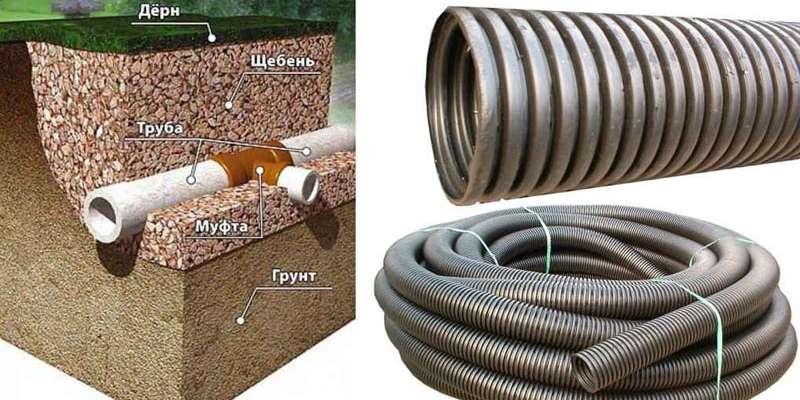
Selection of materials
Building codes allow for the construction of drainage systems to use pipes made of:
- Ceramics.
- asbestos cement,
- Plastic.
In modern conditions, if foundation drainage is being built, plastic pipes are selected in almost 100% of cases, since they are no less reliable than the others, but at the same time they are easy to install.
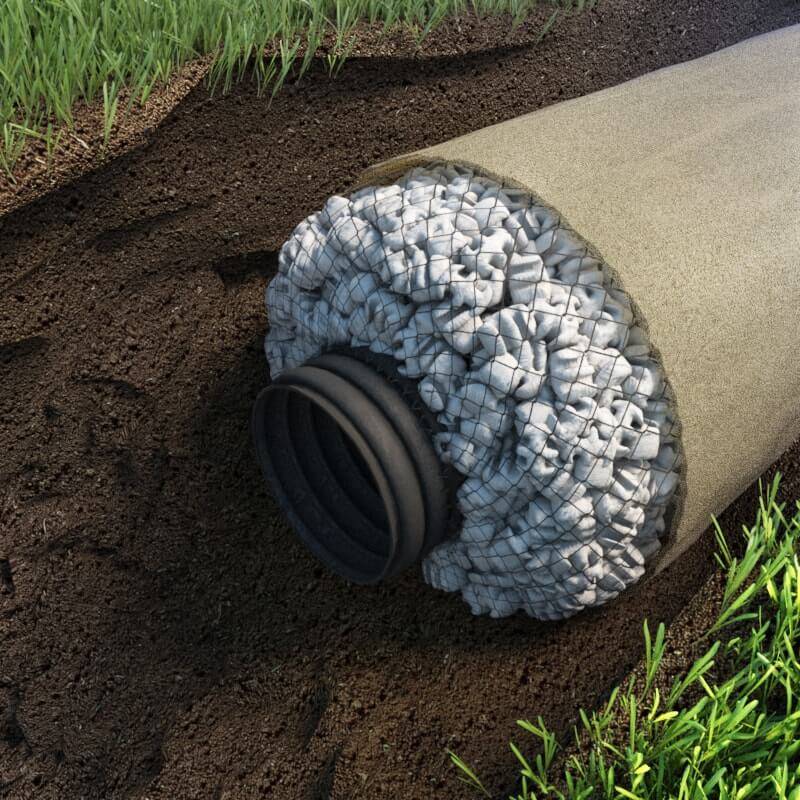
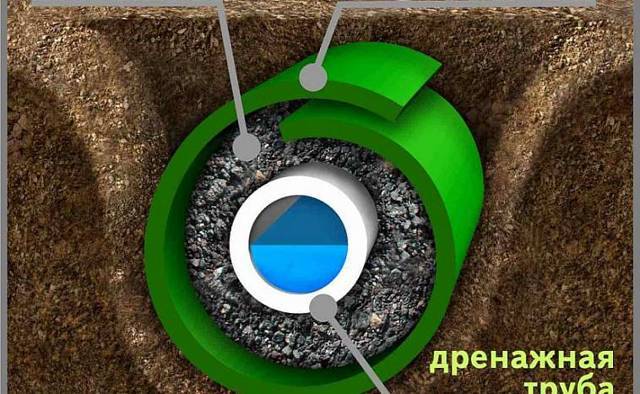
The industry produces special polymer pipes for the construction of drainage systems - corrugated and already perforated. There are special samples wrapped in filter non-woven material. Such a shell helps prevent siltation of the system.
Arrangement of a closed system
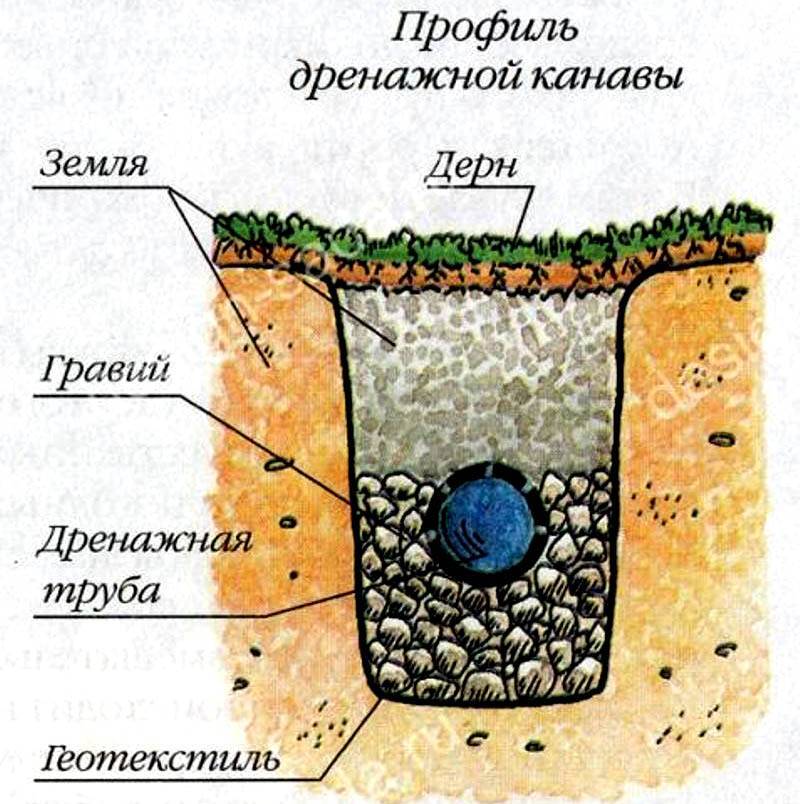
Before proceeding with this time-consuming procedure, it is necessary to prepare and purchase bulk building materials:
- Crushed stone of medium / large fraction, which is needed to obtain a stable layer that prevents dirt and bulk soil fragments from entering the system. And also this material protects the corrugated pipe from the increased pressure of the earth layer.
- River sand creating a filtration cushion.
In addition to bulk substances, useful:
- Drainage pipes that form the drainage system itself. Depending on the intricacy of the project, the diameter and number of pipe products are selected.Recently, PVC products have become popular.
- Drainage pumps providing mechanical drainage. They are used when the site is seriously damaged due to flooding by underground runoff.
Methods for arranging a drainage structure
When thinking about how to lay a drainage pipe, you need to understand that there are several ways to install drainage structures:
- Trench with gravel and sand. Drainage of a closed type, which is a groove dug in the ground, filled with a layer of rubble, on top of which sand is laid. For the best effect, they can be made in the form of a “herringbone”, while the central trench, to which the secondary ones are suitable, must be made with a slope directed towards the point of water discharge. The distance between the drains is selected depending on the composition of the soil. On clay, it should not exceed 10, loam - 20 and sandy - 50 m.
- Open drainage. The easiest to use and cheapest option. It is a groove, half a meter wide and about 70 cm deep, dug along the perimeter of the site. The sides in the drains are made beveled, at an angle of about 30 °. Water is discharged from the system into a common gutter. The main drawback of the design is an unaesthetic appearance, somewhat spoiling the landscape of the site.
- Construction using perforated piping. The most common technology for laying drainage pipes. Deep drainage designed to drain high-lying groundwater. Ceramic or asbestos-cement pipes with holes drilled into them are laid in the ground. A more modern option is perforated plastic or ready-to-install drainage systems that can be found on the market.
- Drainage trays.This is a surface drainage that allows you to remove moisture from the site that has fallen on it in the form of precipitation. For the arrangement of the structure, special trays are used, which can be made of modified concrete or plastic. The trenches are led from water intakes to the place of discharge, while a slight slope is necessarily observed, of the order of 2-3 °. Parts are installed in small grooves, their sides should be at ground level. From above trays are surely covered with decorative lattices.
If the area is located on a hill, open drainage ditches are dug across the slope. Thus, it will be possible to "intercept" the water flowing from above.
The disadvantage of an open drainage system is considered to be a somewhat unaesthetic appearance of the structure.
This is the most popular drainage system for owners of private plots and country houses.
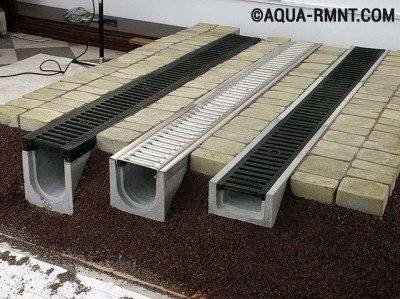
Drainage trays are used to remove excess moisture that enters the site in the form of precipitation.
Why do you need a drainage device on the site?
Every second suburban area suffers from excess moisture in the soil, which negatively affects coatings, lawns and generally spoils the appearance of the territory. Usually the problem of waterlogging is caused by close-lying clays and loams with a low filtration coefficient. Such soils very slowly pass rain and melt water through themselves, leading to its accumulation and stagnation in the upper vegetation layer. Therefore, it is necessary to drain the area with a high level of groundwater.


The drainage device allows you to remove excess moisture from the soil and creates an optimal water balance in the area.Thus, the surface drainage of the territory creates comfortable conditions for the development of plants and lawn grass, while not overdrying the soil.
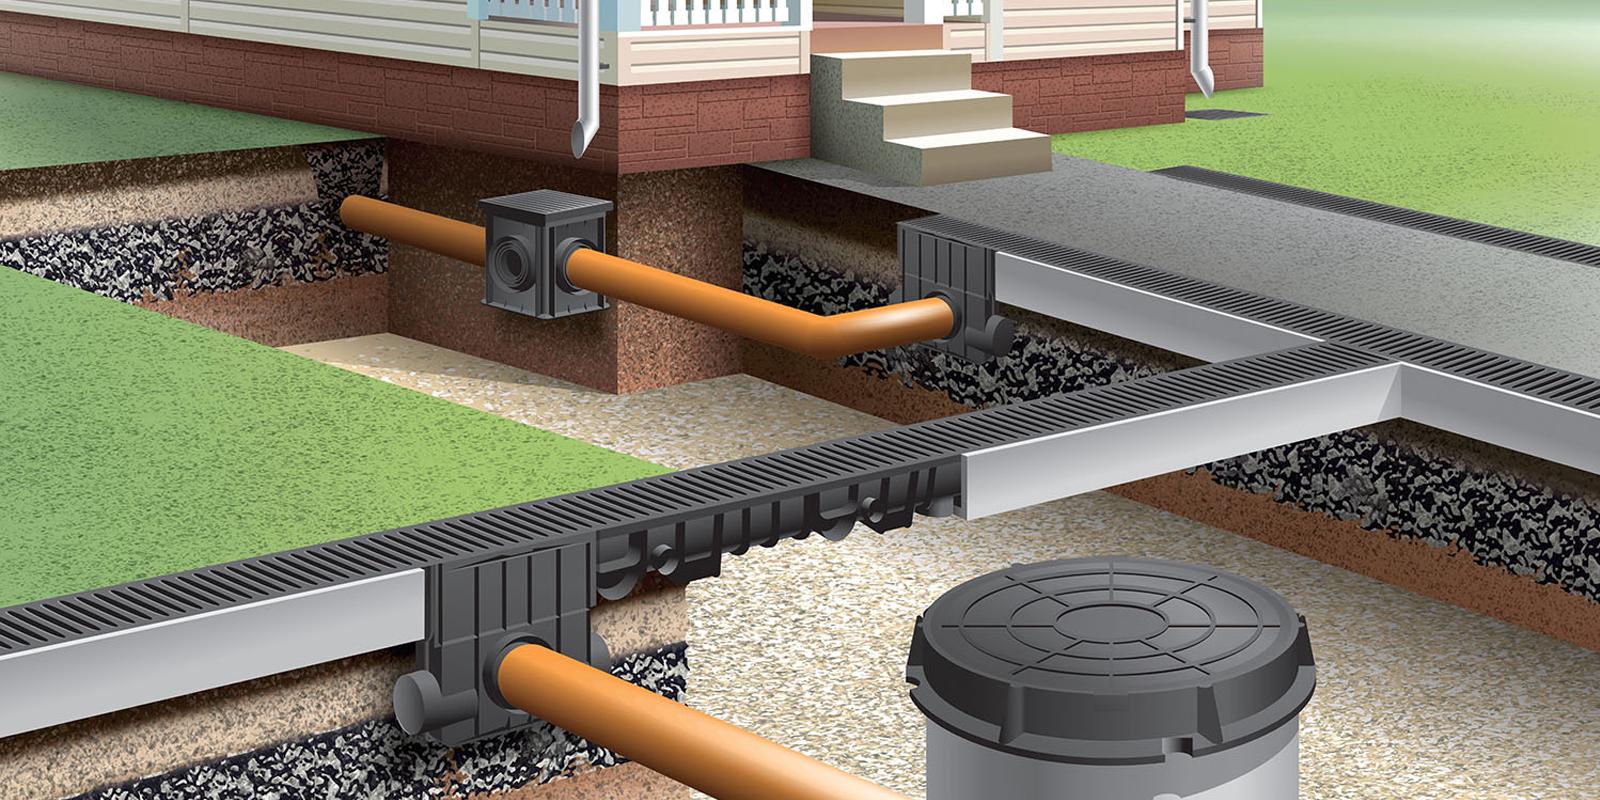
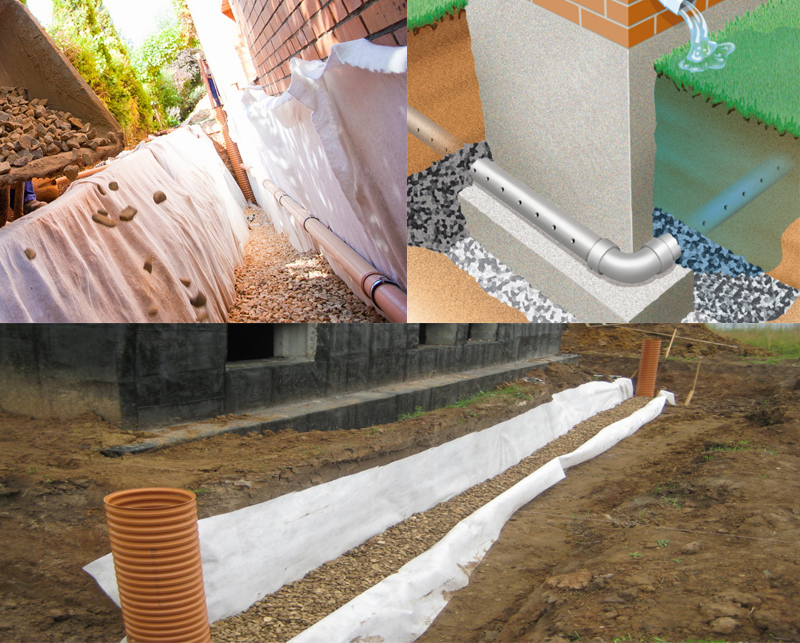
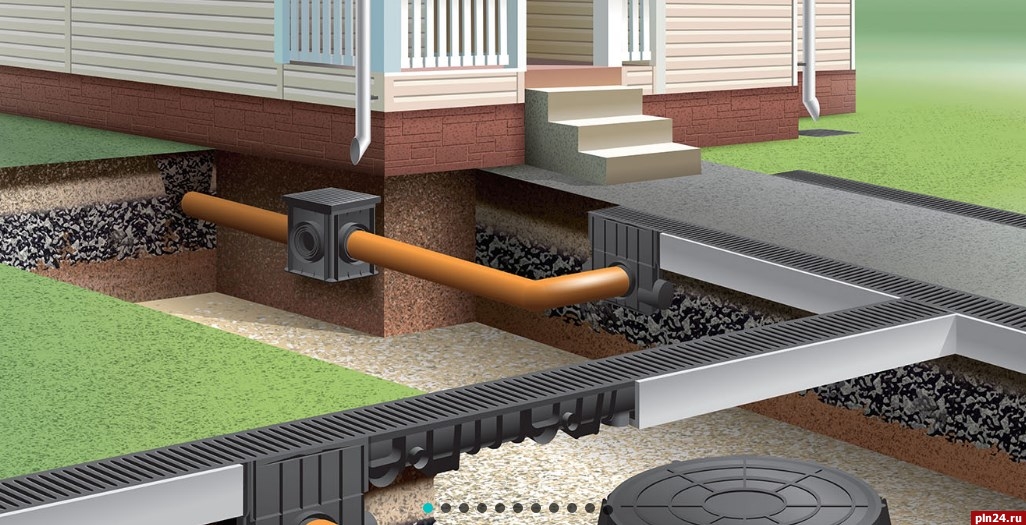
Any house, like an aquiclude on the path of surface runoff, collects water around it, especially if it is built at a low point in the site. And the installation of an annular drainage in front of the blind area prevents frost swelling and removes excess moisture from the house.
In addition, a properly designed and installed drainage system collects both surface water and maintains the overall water table at the required depth.
Fig.1 An example of a site where drainage work is required.
The main stages of installation
The first step is to draw a site plan on paper and decide how exactly the drainage will take place. Remember that water should drain to the lowest point - there must be a water tank. To determine such a site, you can use the theodolite device. Based on the plan, the required amount of materials is calculated.
Step-by-step instructions for performing work:
- In accordance with the project on paper, it is worth marking the site on the ground.
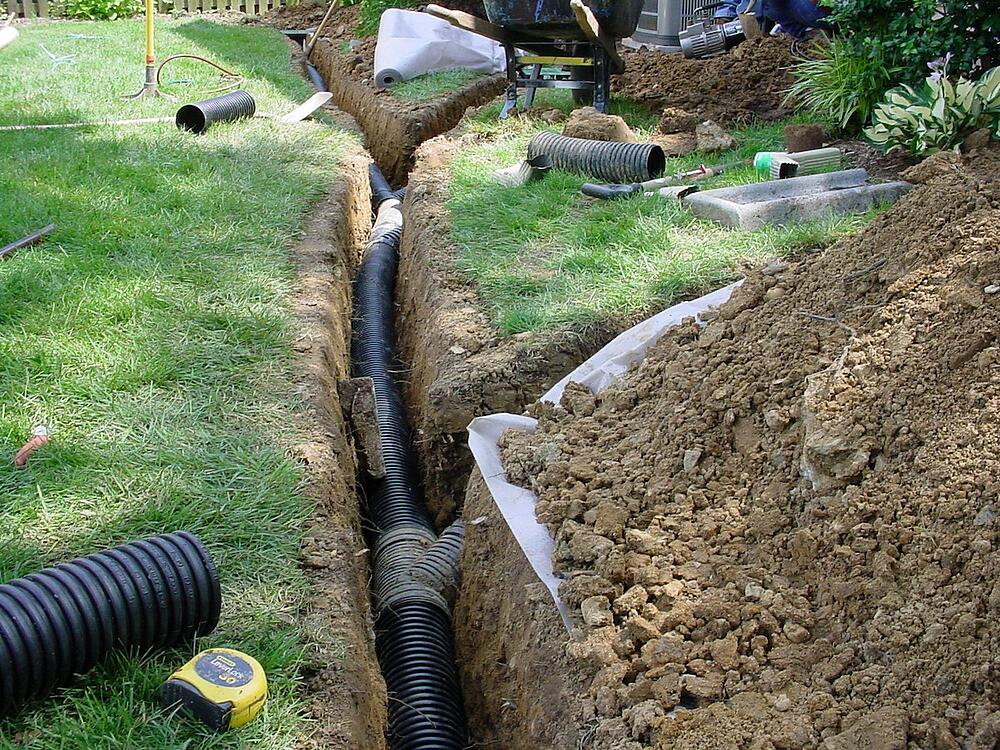
- After that, trenches are dug, the size of which should take into account the pipe and gravel that will be buried there.
- For digging, it is better to take a bayonet shovel - it will increase the speed of work.
- The width of the ditch should be about half a meter.
- The next step is to create a ditch slope for the system.
- At the same time, height differences are taken into account, which are marked with poles.
- To make the bottom form the desired slope, we use sand.
- A geotextile material is laid out on the base of the trench, which should have a good smell at the junctions.
- Then it is filled with gravel, taking into account the slope.
- In the fine fraction, we make a gutter into which the pipe should fit.
- Next, we lay the drainage products, connect them in accordance with the technology, check that the desired slope remains.
- You can control the direction with a stretched thread.
- Pipe joints are connected with a special tape.
- The next step is the installation of manholes.
- If the drainage products do not have a filter layer, then it is worth wrapping them with geotextile, securing with a rope.
- After that, gravel is poured on top with a layer of up to 18 cm and from above, on both sides with a smell, we close the system with the edges of the lower geotextile.
- The final chord will be filling the drainage with coarse river sand.
Before closing the pipes, fill them with water and see how correctly it will flow through the system. While the structure is not buried, it is still possible to fix everything.
Thus we get a good and functional system. Now excessive precipitation and moisture accumulation are not terrible for your buildings. Drainage should be installed not only around residential facilities, but also around the perimeter of household structures.
A few tips for arranging drainage:
In the event that the system passes under the road, which is often used by vehicles, then the pipes in the section of the route must be metal. Further, they must be tightly connected to the rest of the structure.
When the trench is ready, you should first tamp the bottom, and only then start filling it with accessories.
Drainage products should be covered with gravel by 18-30 cm.
Geotextiles are used to prevent contamination of the system. For the same purpose, you can wrap the components with filter material.
When installing the structure, the possibility of its maintenance should be taken into account.To do this, create inspection wells
The best places for them are bends and joints.
It is important that the drains do not touch or block the communications already existing in the ground - wires, pipes.
You need to start digging a trench from the highest point of the earth.
You should not save on the amount of geotextile, since this material is designed to protect the drainage pipe from silting.
As a water sump, it is easiest to attach a metal welded box.
Is it possible to make a drainage system yourself?
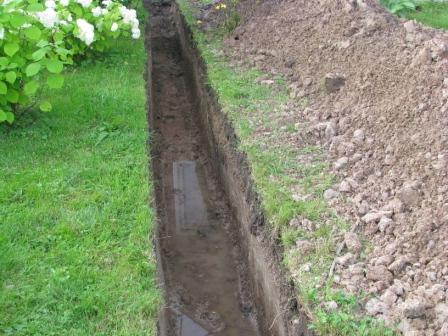
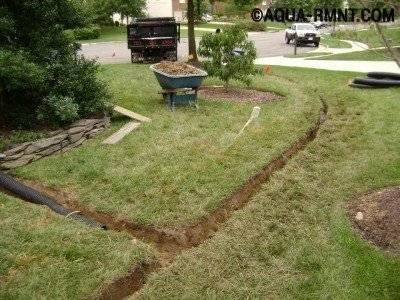
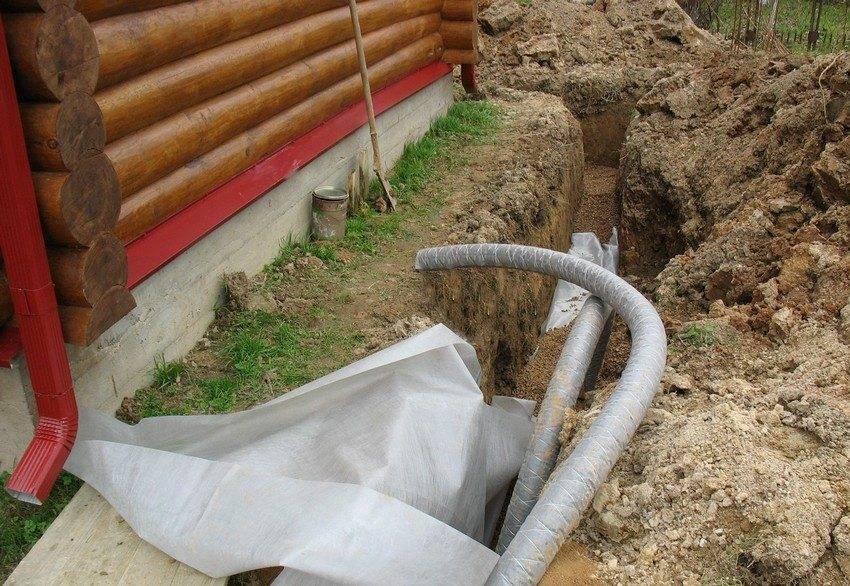
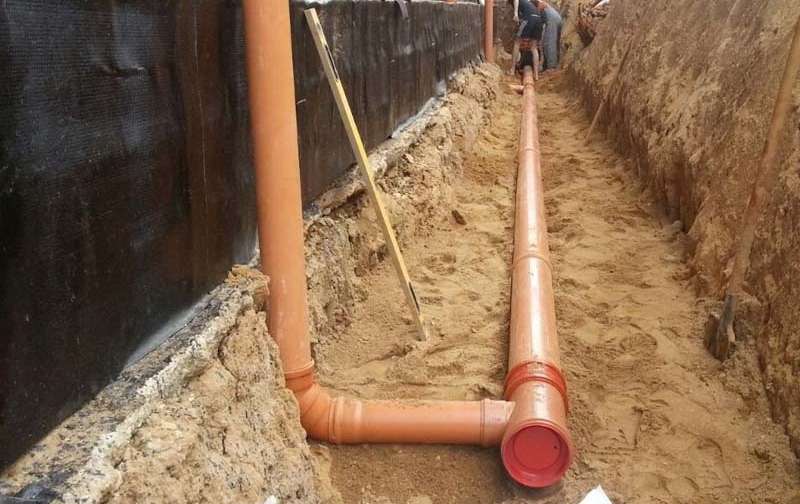
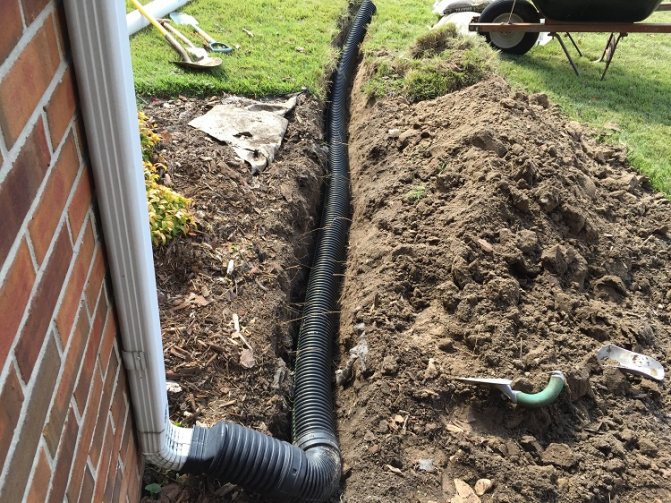
Trench for drainage pipe
Today it will not be a problem to find a company that will undertake the creation of drainage systems on the site. However, such services are not cheap. At average prices, for the organization of drainage of a plot of 6 acres (with the installation of an inspection and collection wells) it will cost at least 150,000 rubles.


But you can lay drainage pipes with your own hands, in this case, you can save a lot by paying only for the necessary materials.
With tools (shovels, ropes and a building level), even a novice builder can handle the matter. The main scope of work is the digging of trenches. Do-it-yourself installation of plastic pipes is usually not difficult.
Prerequisites for organizing drainage
Drainage is an expensive system, even if you do not have to pay for the services of specialists, and the owner of the site is ready to do all the work on his own. Therefore, you should figure out how much it is generally needed.
The need for a system device cannot be determined “by eye”, because groundwater can lie close to the surface, which becomes a real problem only during floods or heavy rains.
The drainage system is designed to collect and drain groundwater that accumulates in the upper layers due to low filtration qualities of the rocks.
-
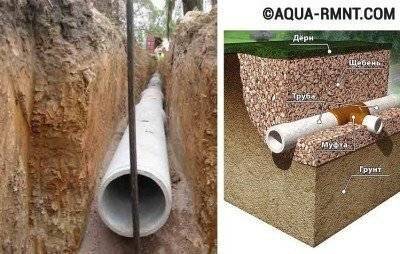
Drainage pipe in gravel backfill
-
Corrugated Drain Pipe
-
Gravel backfill - a component of drainage
-
The use of geotextiles in the drainage system
-
Compliance with the slope when arranging drainage
-
Drainage depth
-
Designation of the drainage system on the site
-
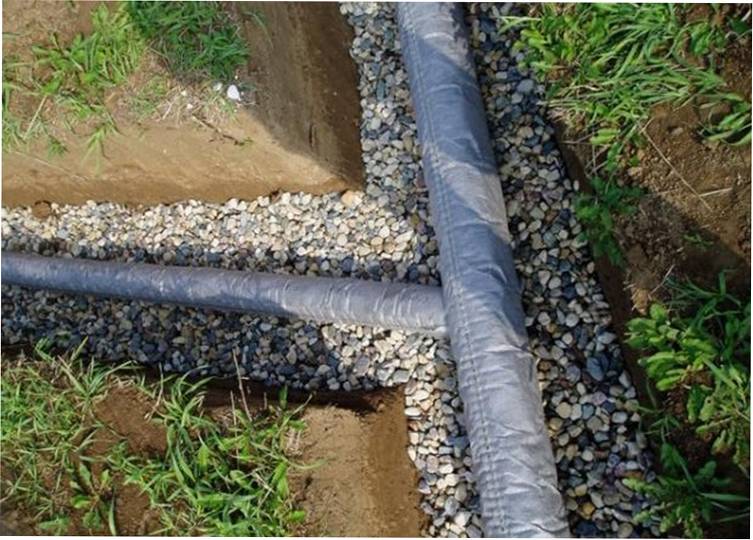
Drainage and sewer pipe in one trench
Many areas are located in the lowlands. Waterlogged soil causes root rot, which creates many difficulties in caring for the garden and garden. Plants often infect fungal diseases, “eat” mold. Some crops do not take root in wet soil, and the crop rots in the bud.
Dense clay soils do not absorb water well. This leads to frequent flooding of the underground parts of buildings. Due to the high degree of mineralization, flood and atmospheric waters adversely affect buildings: they destroy building materials and provoke corrosion.
Even high-quality waterproofing is not able to 100% prevent basement flooding, erosion of foundations and plinths. As a result, buildings serve much less than they could.


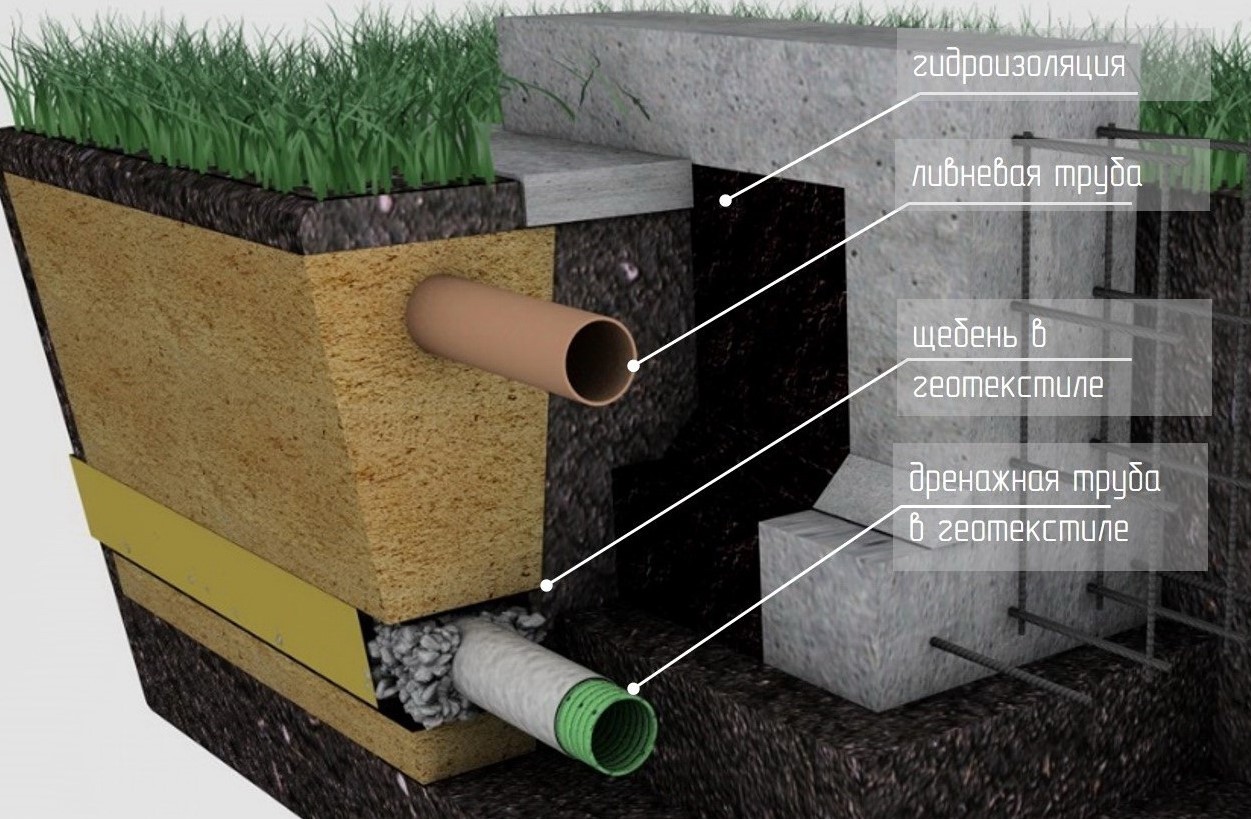
Construction of closed drainage
Open drainage systems are designed to collect and drain rain, flood and melt water, closed drainage systems are designed to protect underground structures from groundwater.
You can determine whether drainage is needed on the site by several signs:
- Terrain relief. Sites located in lowlands and on steep slopes need a drainage system.Otherwise, fertile soils can be eroded or flooded during rains and floods.
- Puddles. The flat terrain is convenient for construction, but puddles can appear and remain for a long time. This is a clear sign that water is poorly absorbed into the soil. A drainage system should be installed throughout the site.
- Rotting of the root system of plants. If excess liquid remains in vegetable gardens, flower beds and lawns, the plants will rot and get sick.
- moisture loving plants. If one or more types of moisture-loving plants grow on the site, this clearly indicates waterlogging of the soil.
- Flooding of basements and cellars. An obvious "symptom" of the need for drainage is the flooding of foundations and underground building structures.
- Hydrogeological research and observations. If experts have determined that the site has a high GWL, or similar conclusions can be reached during excavation, care should be taken to drain the soil.
Proper laying of drainage pipes on the site is the only way to inexpensively and effectively get rid of excess water.
If you contact a specialized company, the system will cost significantly more. It is better to understand the features of the arrangement of drainage and do everything yourself.
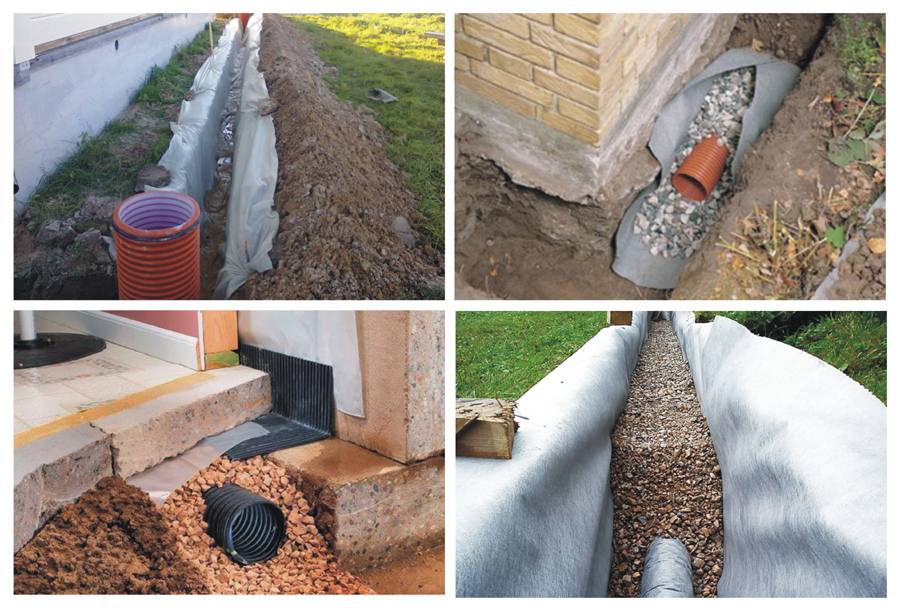
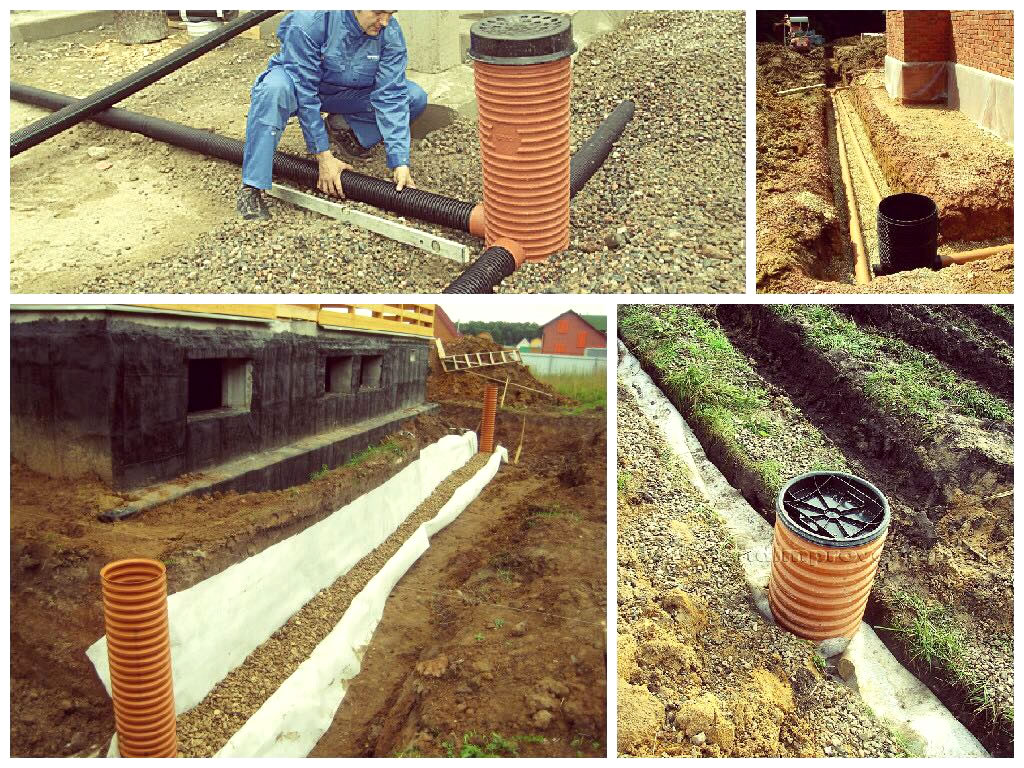
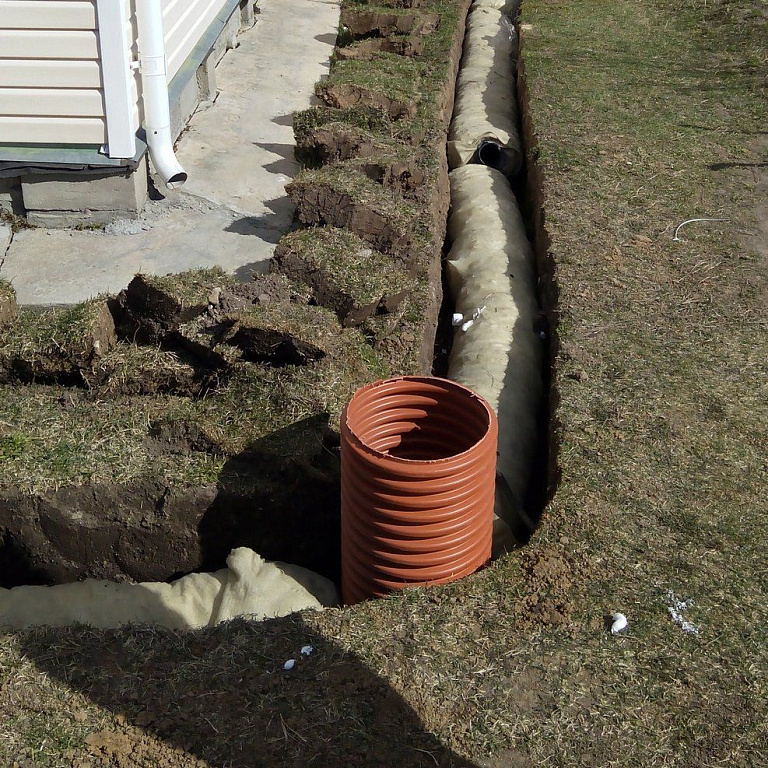
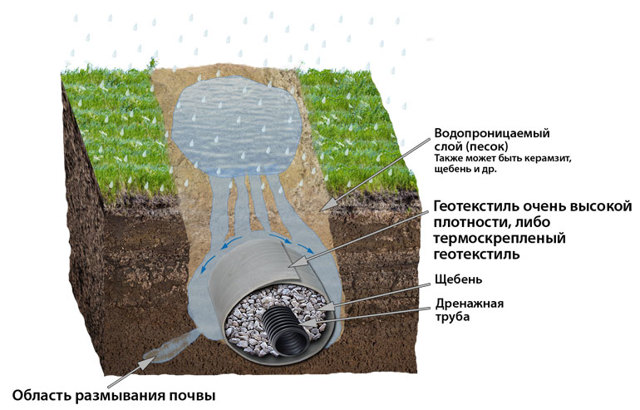
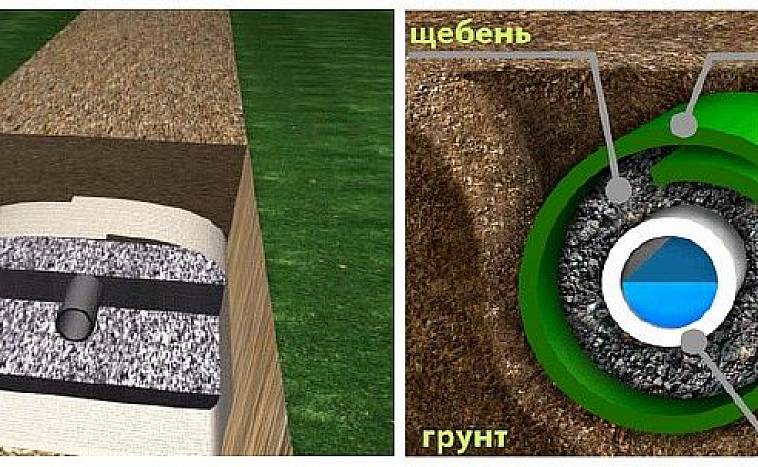
To build a drainage system with your own hands, you will need a perforated corrugation or a rigid plastic pipe with slot-like or round holes, which you can drill or cut with your own hands. Gravel backfill and geotextiles will be needed.
Advantages of the Sofrock system
"Softrock" in comparison with traditional drainage using crushed stone has a lot of advantages.
- Inexpensive and fast installation.The blocks are very flexible and light in weight, which greatly simplifies their installation in a prepared trench. It is required to equip a place for a water stack, it is advisable to cover the drainage with sand from above, especially on clay soil. Transportation and installation does not require the use of expensive special equipment.
- High drainage efficiency. The water in the area does not stagnate. The geosynthetic filler ensures its fast and efficient collection into the system. "Sofrock" can withstand the weight of the earth 2.5 m high and the weight of cars up to 25 tons. The system will last more than a hundred years, is not afraid of temperature changes, does not freeze, adapts to any climatic conditions, is very reliable, can be reused, does not silt up and does not gets clogged.

It remains only to fill the drainage ditches with earth and cover with turf
Preservation of the site and buildings. After the installation, there is no dirt, debris from building materials or traces of heavy special equipment on the site, the general landscape and lawn are preserved.
Buying "Softrock" is much more profitable than buying any analogues. The drainage pipe with polystyrene foam is laid very quickly. No additional costs are required for the use of special equipment for the delivery and installation of the system and additional materials. Inexpensive, but short-lived and low-quality polystyrene foam or reliable and durable polystyrene can be used as a filler.
Even if some unforeseen accident occurs, the system can be purged through manholes
Technical requirements for the placement of the drainage system
Engineering systems for water drainage are designed in accordance with the requirements of SNiP -85, -85.The standards regulate the location of drains, water receivers, connecting nodes, manholes.
Placement of system elements in accordance with building codes:
- Drainage collectors - at the lowest points of the site;
- Drainage wells - at the turns of the channels and every 20 m.
- The minimum pipe slope is 2 cm per 1 meter in clay soils, 3 cm in sandy soils.
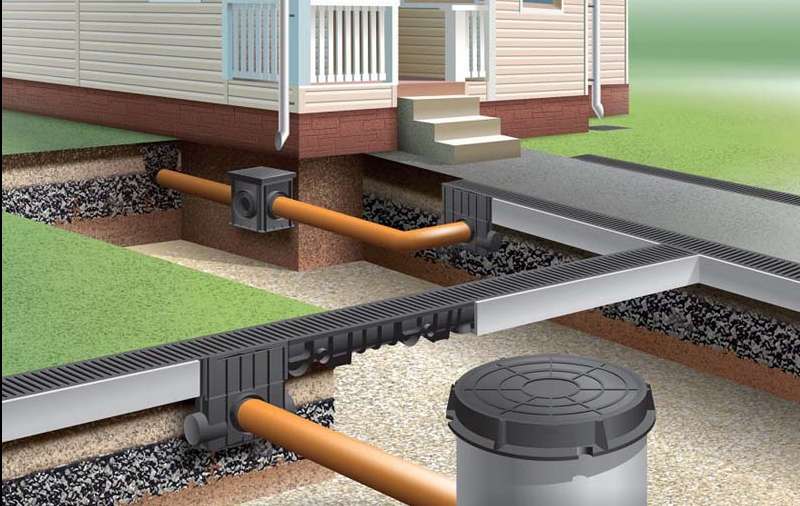
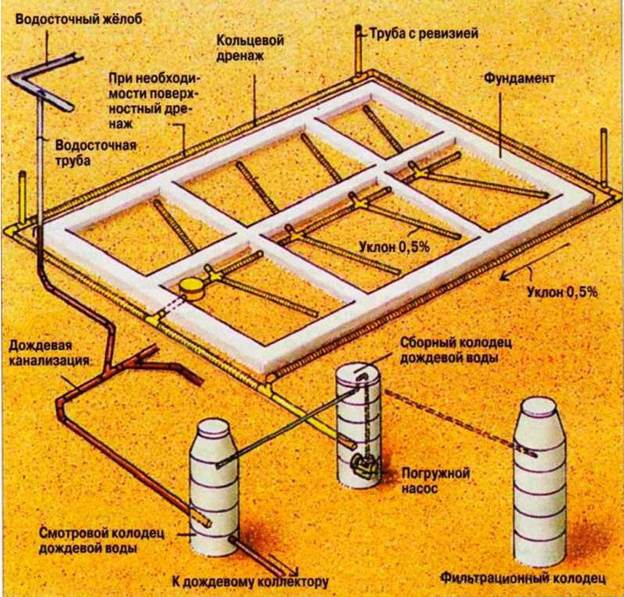 Diagram of the drainage system of the house
To ensure that the work on draining the site does not lead to the opposite results, it is necessary to determine:
- depth of the drainage pipe;
- optimal drain slope;
- number and location of wells;
- method of removing water - into a gutter, pond, sewer, sewer truck or for irrigation.
Pipelines for surface drainage are laid to a depth of 1 meter. They are located along paths, playgrounds, drains. Storm water cannot be combined with underground drainage. In the event of heavy prolonged rains or snowmelt, the system may not be able to withstand the multiple increase in liquid volume. When the common channel overflows, water flows back into the drainage. This causes waterlogging and erosion of the deep layers of the soil. As a result, the strengthening of the forces of frost heaving in winter, the destruction of the blind area, damage to the foundation.


 The result of soil heaving
For the device of underground wall drainage, the following is calculated:
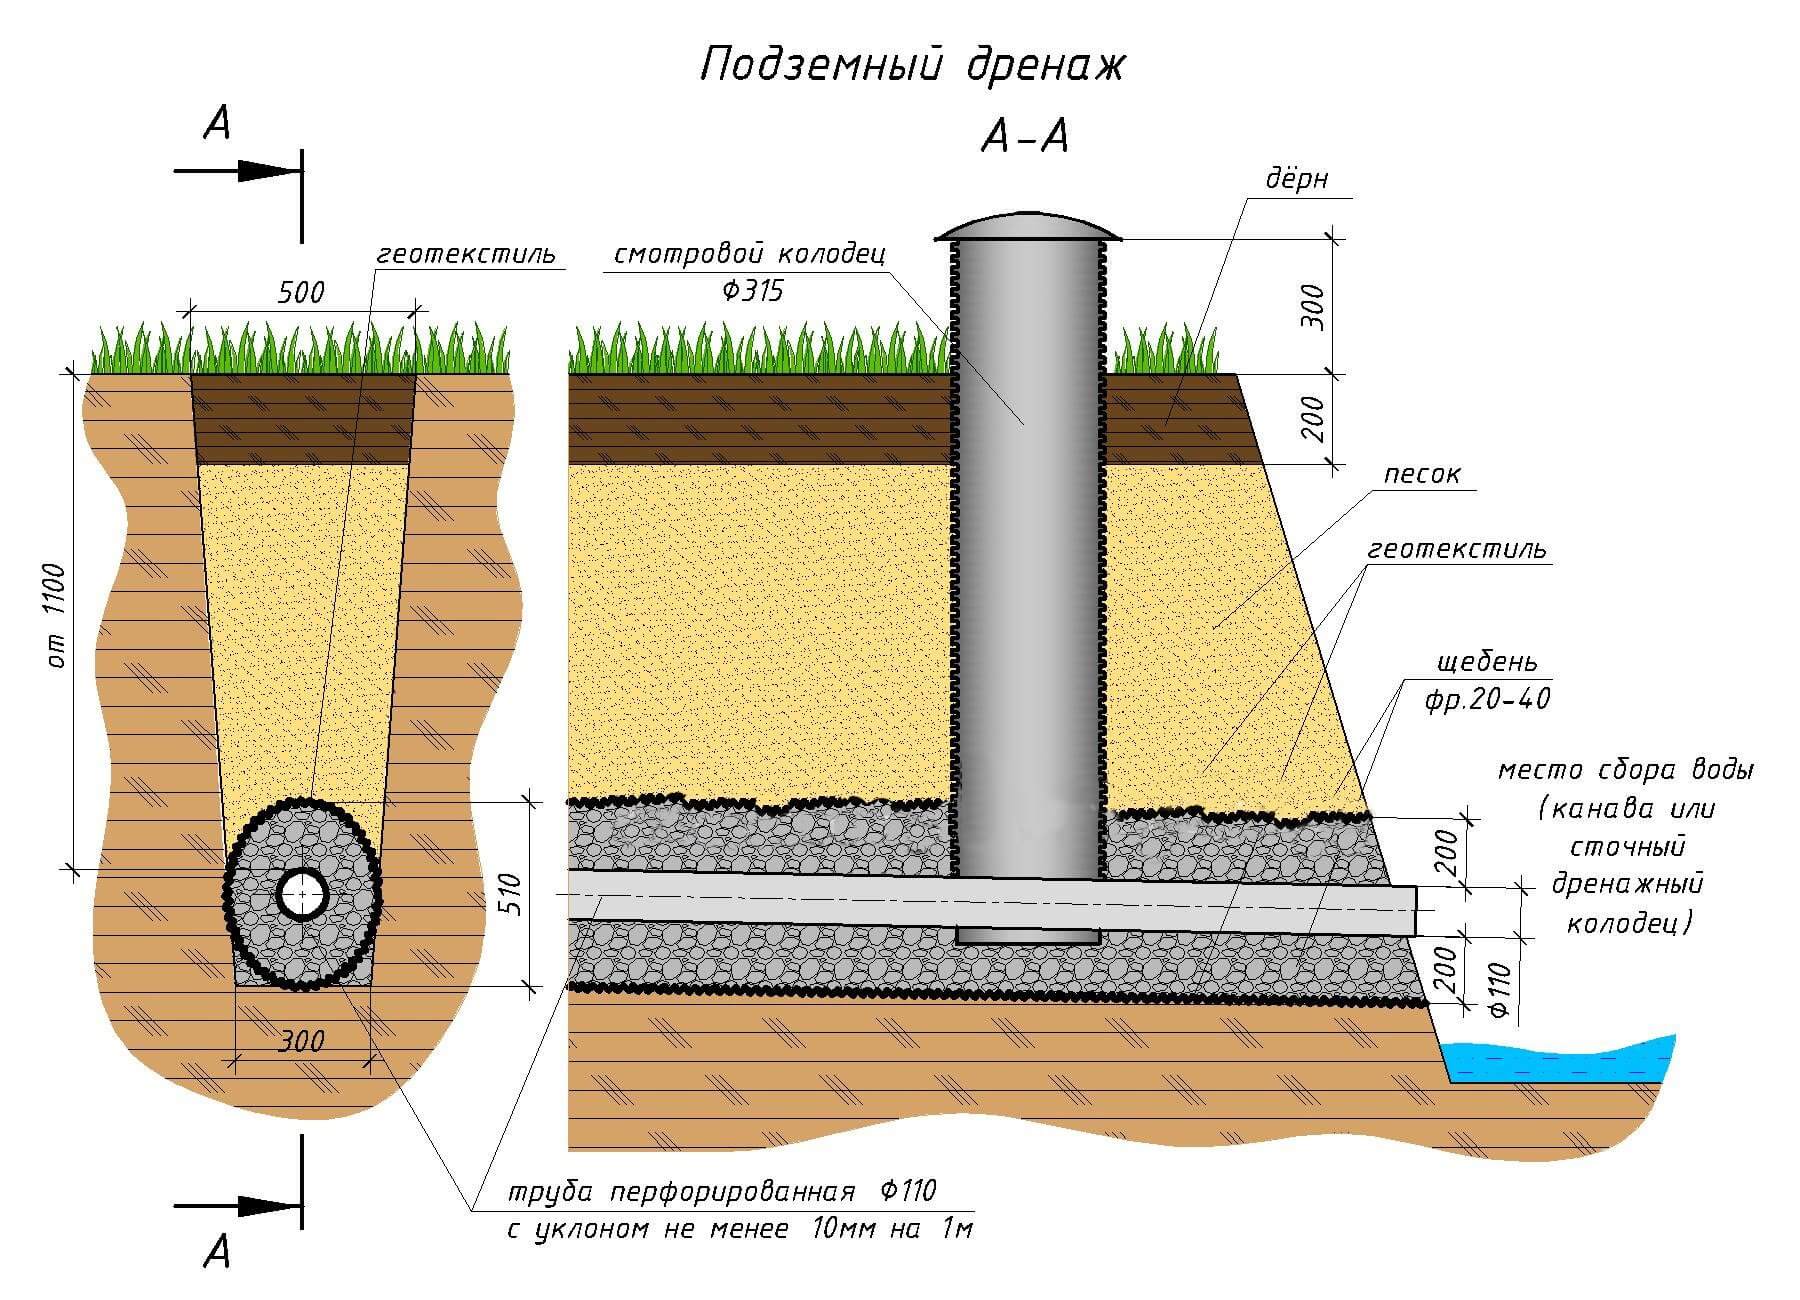
- Laying depth. So that the water in the lumen of the pipe, turning into ice, does not break the walls, the channels are laid below the freezing point of the soil. Its coordinates are determined according to SP 131.13330.2012 or a table on the Internet. The height of the crushed stone pillow of 40 cm is added to the value.
- Laying the base of the foundation.If the base is a shallow tape, the laying depth is taken according to the calculation from paragraph No. 1. In other cases, the drainage is located below the level of the structure by 30-50 cm.
After calculating the parameters of the drainage system and making a detailed drawing, the consumption of basic materials is determined - pipes, fittings, wells, geotextiles, crushed stone for backfilling.
What materials are required for the drainage device?
Some thirty years ago, asbestos-cement or ceramic pipes were used to lay drainage. Before laying them in a ditch, numerous holes were drilled in them to allow water to penetrate.
This was a laborious operation, and besides, the holes made were clogged quite often, which greatly reduced the life of the system.
Today, for a drainage device or an autonomous sewage device, do-it-yourself materials are used that are more suitable and easy to use. These are corrugated pipes made of plastic, PVC or polyethylene, which already have the necessary perforation.
Thanks to this design, the load of the soil poured from above is distributed evenly over the pipe, which leads to an increase in the service life of the pipes.
How to install drainage pipes: step by step instructions
Modern drainage pipes are light in weight, affordable and easy to install, for their laying there is no need to use heavy equipment, and also to hire over qualified specialists, it is enough to follow the phased work and our recommendations, and the installation of drainage pipes is carried out in the following sequence:
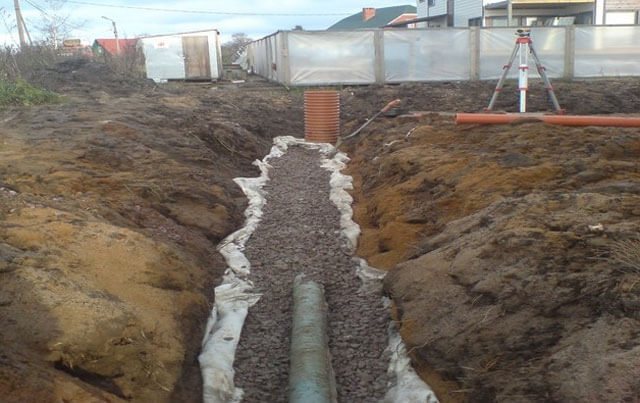
trench preparation
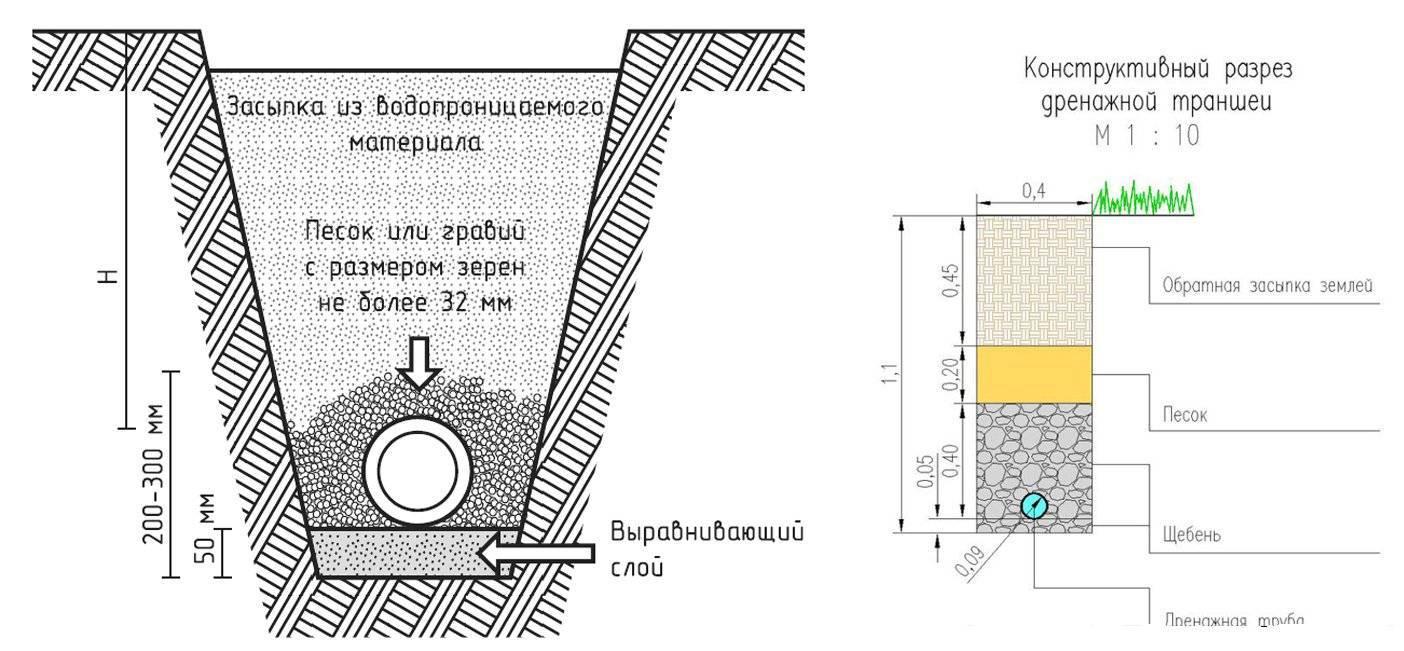
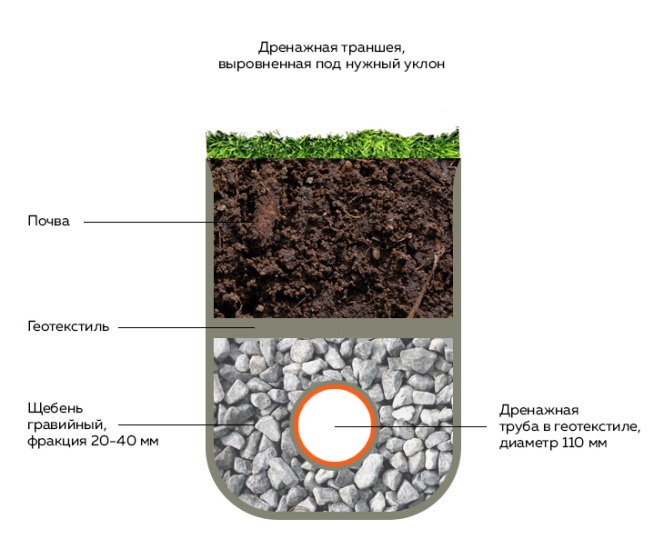
- A drainage (filtering) layer of fine crushed stone of a fraction (grain size) of 10-20 mm with a height of at least 15 cm is poured into an open trench.
- The drainage layer is planned with a constant slope, at least 10-15 mm per 2 m of length. For control, you can use a water level and a cord or level fixed on a two-meter rail, at one end of which a boss is fixed that fixes the size of the slope. In this case, the design slope will be reached when the bubble is in the center of the level.
Pipe laying
Laying installation of drainage pipes starts from the upper mark to the downstream well (reservoir).
The pipeline is assembled from individual drains (perforated pipes) and fittings (adapters, bends, tees, plugs) and is laid on a planned drainage layer.
In the case of using ceramic and concrete pipes, the gaps in their joints (5-15 mm) should be used as water inlets, protecting them from flooding with turf laid down with grass, moss or other fibrous materials.
The connection of asbestos-cement pipes should be carried out on couplings with sealing rings.
The finished pipeline is sprinkled with a drainage (filtering) layer of crushed stone of a fraction of 10-20 mm, at least 20 cm high above the top of the pipe, without breaking the connections and without changing the created slope.
On top of the drainage layer, you can lay a layer of harvested turf with grass down. The trench is backfilled with permeable soil such as sand. to the surface of the earth, and a fertile layer of earth is laid on top.
Installation of drainage pipes:
- drainage (filter layer) of crushed stone fraction 10 - 20 mm, 20 mm thick,
- drainage pipe,
- permeable soil (sand) - 90 - 100 mm,
- fertile layer of earth (sod) - 10 - 15 cm.
The appearance on the market of new products for drainage, such as corrugated perforated pipes made of polyvinyl chloride (PVC) with filters for various types of soil, has greatly simplified the work. Such pipes with stiffening ribs make it easy to install drainage pipes, they evenly distribute loads throughout the pipe, which makes their service life almost unlimited.
PVC drainage pipes are laid to a depth not higher than the freezing level, in accordance with the depth of the existing foundation, the installation of drainage pipes is carried out in the above sequence. Filters are used to protect the drainage system from silting. The pipe with a geotextile filter is designed for sandy and sandy loamy soils. A pipe with a coconut fiber filter is laid in peat bogs, clays and loams.


In addition to these materials, freshly cut brushwood without leaves and bunches of fascines connected from it, poles 6-10 cm thick, flaky (flat) stones, cobblestones, bricks can be used as drainage.
Drainage along the fence can be arranged in separate sections. A ditch 2.5-3 m long, 0.5 m wide is dug to a depth of 1-1.5 m and gradually filled with household, poorly disposed waste (broken glass, cans, construction debris, stones, etc.). After layer-by-layer compaction, the ditch filled to the lower level of the fertile layer is filled up. Then they dig another ditch into the joint. And so, over the course of a number of years, a drainage system is created.
How to install drainage pipes: step by step instructions In order to properly install drainage pipes, it is necessary to correctly follow certain instructions and sequences.This material describes how to install drainage pipes yourself.


