- Types of drainage systems
- What is site drainage and why should it not be neglected?
- Terrain where site drainage is more than necessary
- Drainage: what is it and why do it
- Types of water drainage systems from the site
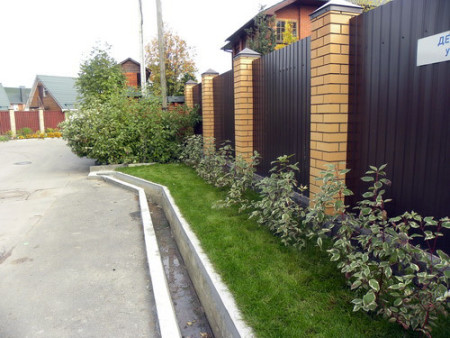
- Features of open drainage
- Varieties of closed drainage
- wall drainage
- What should be in the project
- Deep drainage system
- Closed wall drainage
- Where to divert water?
- Types of drainage for a private house
- The main types of drainage structures
- open
- Closed
- zasypnye
- Surface
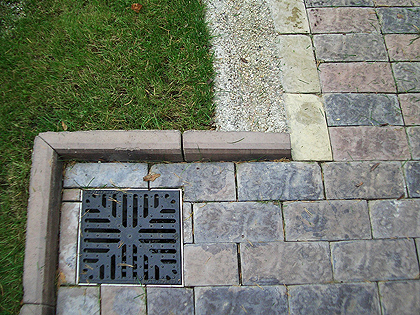
- Point drainage
- Linear drainage
- deep
- wall drainage
- ring drainage
- DIY drainage - step by step technology
- Price
Types of drainage systems
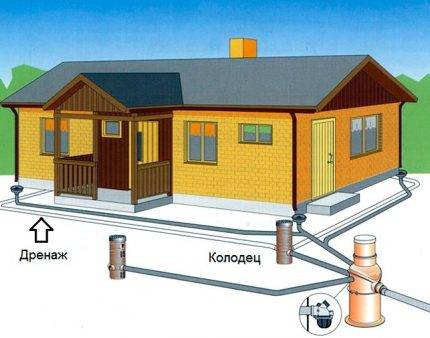
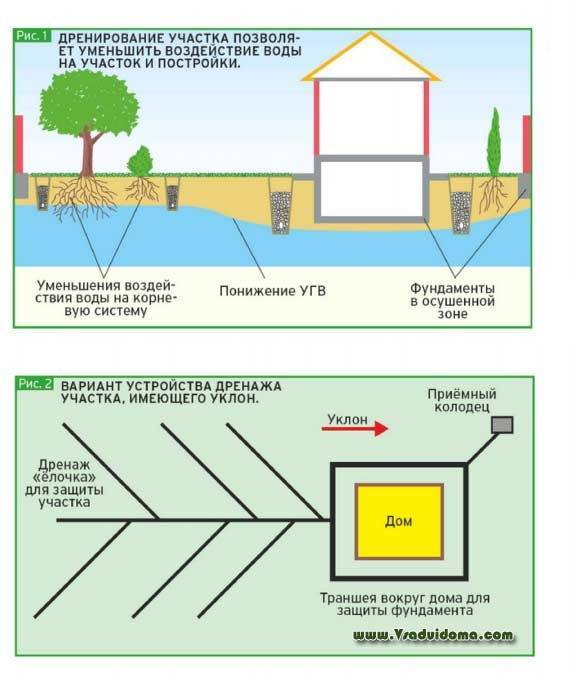
Taking into account the initial data, to ensure the protection of the personal plot from the negative impact of groundwater, they perform drainage system design general meaning: systematic drainage, coastal or head. To prevent flooding of the basements of the house, local drainages are equipped, which are ring or near the foundation.
The design solution for drainage is a system of pipes that are installed at a certain depth. The liquid seeps into perforated pipes through the soil layer and is discharged from the territory to nearby reservoirs, ravines, equipped reservoirs, wells and containers.A special collection is arranged underground, and thus it does not occupy a useful house adjoining territory.
Wall or foundation drainage is performed around buildings that have basements or semi-basements. A drainage system plan of this type is developed, taking into account the depth of laying the foundation of the building. Thanks to its arrangement, the formation of mold, dampness and washing away of these premises and the foundation is prevented. The construction of near-foundation drainage enhances the waterproofing of house structures.
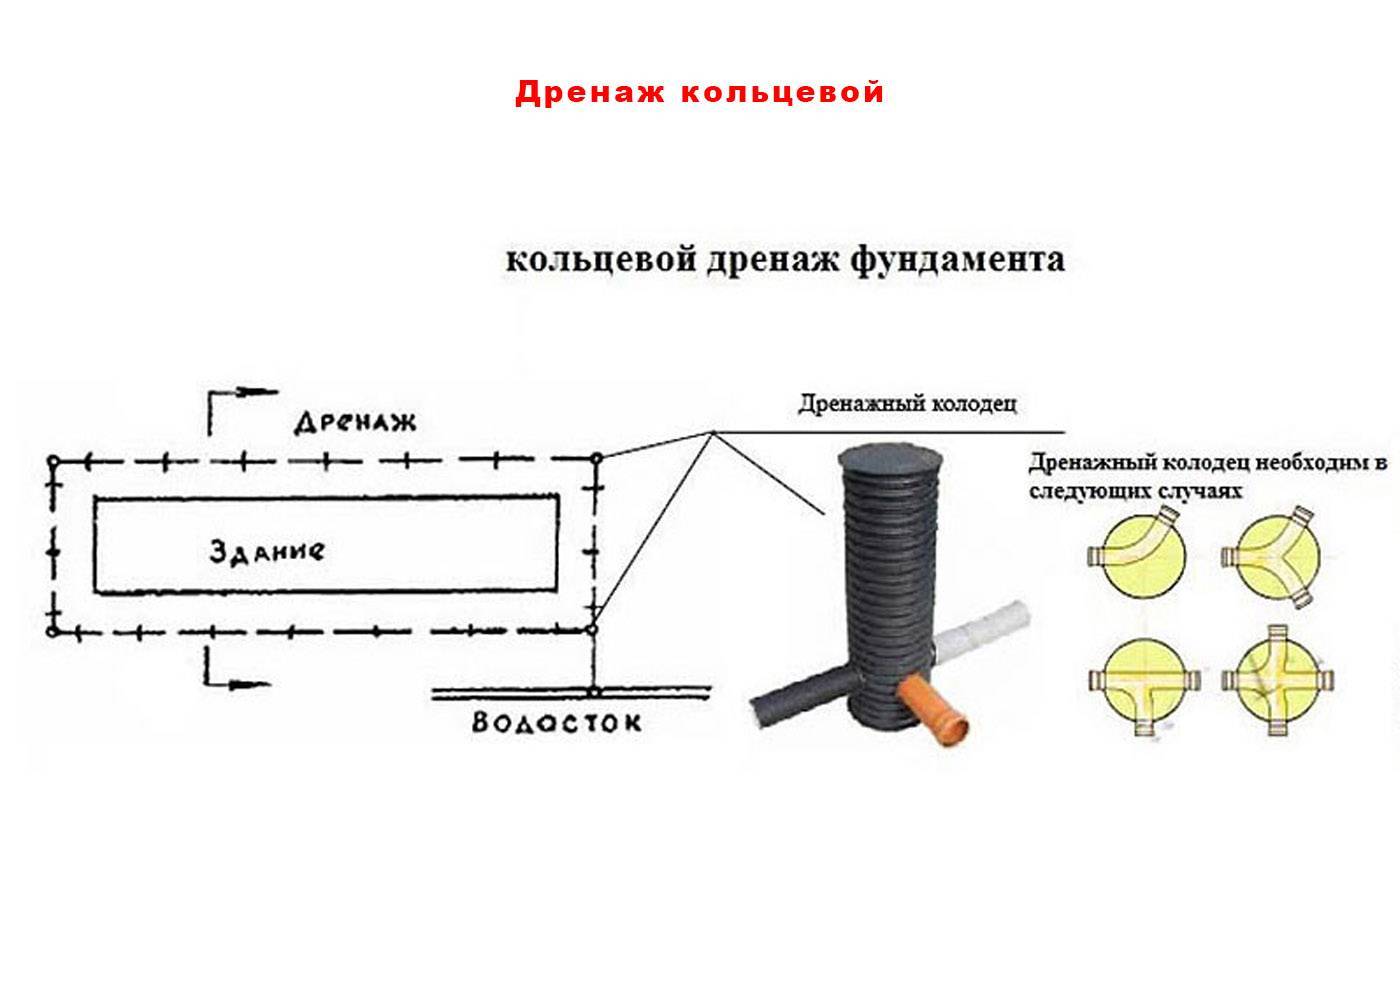
The ring version of the drainage has differences from the wall. The first of them involves digging trenches for pipes at a distance of no more than 3 meters from the walls. The ring method is used when the creation of a drainage system was not provided for at the design stage of the building and the blind areas for construction have already been completed. Drainage pipes should be installed at a depth that exceeds the location of the sole of the base around the house.
A systematic drainage structure is constructed in areas where groundwater is fed by liquid seepage from above (these can be surface, domestic and atmospheric drains), as well as recharge from below due to
pressure groundwater. On built-up sites, horizontal areal drainage is usually used, but in the case of a strong influence of the aquifer (which means feeding from below), drainage is arranged according to the vertical type.
If there is flooding of the site with groundwater, provided that the center of their supply is located outside the local area, head drainage is arranged. It is equipped along the upper boundary of the site in places where the highest marks of the aquiclude are recorded.When the aquiclude lies at a shallow depth, it is customary to lay the head drainage in the area where there is a slight depression to ensure complete interception of moisture.
If it is necessary to drain a site located in close proximity to water bodies, use a drainage plan for a coastal-type site. As a result, protection against flooding will be provided. It is laid parallel to the coastline and mounted to a depth in accordance with previously performed calculations.
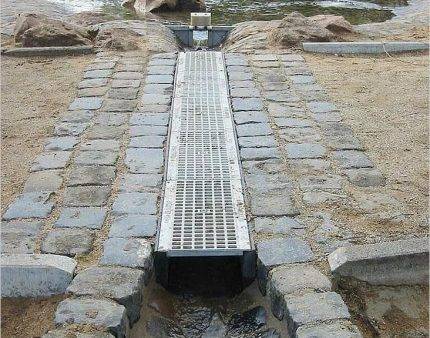
A storm sewer system, such as in the photo, is constructed from trays that are laid on the surface. It diverts storm water from the walls of buildings into storm water wells.
What is site drainage and why should it not be neglected?
In the general sense of the word, drainage is a system of measures aimed at removing excess water in the area (this surface and (or) its depth).

What is dangerous neglect of this part of the construction:
- The presence of moisture under the foundation threatens the mobility of the soil;
- In the cold season, the effect of "peeling" will appear, which will provoke processes that destroy the support of the house;
- The "heaving" of the soil will eventually begin to squeeze the structure out of the ground.
At the same time, the need for drainage is due to the fact that it:
- Increases the level of waterproofing of the entire structure;
- Reduces the moisture content under the foundation - a catalyst for chemical reactions that destroy the reinforcement of the base;
- Designed to minimize the extrusion forces on the septic tank, auxiliary buildings and the foundation of the fences around the perimeter of the site.
- The optimal amount of moisture in the soil contributes to the proper development of trees, shrubs, lawn grass, fruit and vegetable crops.
- Provides quick drainage from the site after rains and when snow melts.
Summing up the above, we can conclude that there are plenty of arguments in favor of the arrangement of drainage, and there should be practically no room for doubts about its necessity.

Terrain where site drainage is more than necessary
No matter how interesting in terms of design a site with a slope may seem, it must be surveyed for the proximity of groundwater and the potential danger of soil being washed out by water flows.
The second closest to the risk zone is considered to be a land plot located in a lowland. There are two factors here at once - precipitation and groundwater can quickly turn a luxurious meadow into a dull swamp.
If the nature of the soil around your house is clay or loam, then puddles that dry out for a long time are provided for you. Do you disagree with this? Then the drainage of the site is your only salvation.
If, regardless of the relief of the site, soil studies have shown that groundwater is no more than a meter away, carrying out measures to equip the drainage system will again be the first task for those who are going to live comfortably here.
Not mandatory, but recommended for the installation of drainage are all areas (regardless of the terrain) where deep foundations are planned (for a garage, basement, pool, etc.), as well as if it is planned to cover significant areas with slabs, asphalt, paving tiles or paving stones.
Drainage: what is it and why do it
Drainage is used to protect buildings from internal flooding. This is a dehumidification system designed to eliminate excessive accumulation of water around a house or land.
This is especially important for houses located in the valley.Water can accumulate around objects due to various reasons: it can be snow melting, an increase in the level of ground moisture, special properties of this type of land
And also because of the special location of the building, due to which the water around it cannot drain on its own.
The owner of the house should think about the construction of a drainage system in the following cases:
- in this area, an elevated level of groundwater is normal;
- if liquid began to accumulate in the basement due to melting snow;
- mold began to appear in the corners on the floor of the rooms on the first floor;
- if the foundation of the building is constantly wet or washed away with water;
- the area is characterized by a high level of precipitation;
- the soil on which the house stands, due to its natural properties, does not absorb moisture well;
- fungus began to appear on the walls;
- The plot with the house is located in a lowland.
In practice, drainage is a device based on pipes that remove excess moisture that enters them. Experts advise to always create such a system, since it is an effective method of extending the life of any buildings.


Types of water drainage systems from the site
There are many drainage schemes, but all varieties can be combined into three large groups: open, closed and combined. In accordance with this, there are three main types of drainage structures: surface, deep and also combined. Consider the features of each.
Features of open drainage
Water is collected by open drainage thanks to a system of ditches and trenches, that is, objects that are not covered by a layer of earth from above.They arrange it to collect and drain water from the soil-vegetative layer, i.e. for site drainage. The principle of operation of an open system is based on the ability of underground water to rush into the space freed from soil, as it flows into a well.
They arrange an extensive network at a slight angle so that the water flowing into the grooves moves by gravity beyond the boundaries of the site (quarry or fire reservoir) or accumulates for irrigation in a storage well.
The walls of the grooves of an open system, if necessary, are strengthened with compacted crumpled clay, laid out with cobblestones or tiles. It is permissible to carry out reinforcement with flexible branches of shrubs or suitable trees woven together.
In order for the water inlets of the drainage system of the site not to be clogged with debris and foliage, sometimes protective gratings are installed over the ditches
The end point of the water collection of the floating drainage system is natural (rivers, lakes, ponds) and artificial reservoirs, as well as ditches, ravines, quarries located behind the fences of the suburban area. The storage type drainage network involves the collection of transported underground water into a storage well.
- coverage of all points of water accumulation;
- calculation of the slope of drainage trenches;
- ensuring system protection from clogging;
- measures to prevent the emergence of new wetlands;
- the location of the water collector at the lowest point of the relief.
The norms of the slope angle of the channels depend on the type of soil: for clay from 0.002, for sandy - from 0.003.
There is an opinion that open drainage is not aesthetic. This is not so, because many ways have been developed to beautifully design outdoor drainage systems.
One way is to use a pump to make a small waterfall or stream.In the dry season, the rocky or pebbly bottom turns into a “dry stream”, which also looks very attractive among the greenery.
A significant drawback of open drainage lies in a noticeable reduction in the usable area of the site. There are restrictions on the depth of cuvettes and grooves, because it is not customary to arrange them below 0.5 - 0.7 m from the daylight surface.
If it is necessary to build a drainage system at a greater depth, it is necessary to increase the width of the trenches, arrange transitional bridges, and carefully consider the drainage scheme so as not to impede the movement of people and personal equipment around the site.
Varieties of closed drainage
For the arrangement of closed drainage, an engineering project will be required, since all elements are underground, and the functionality of the system depends on their correct location. There are local and general types of deep drainage.
If you need to protect the foundation of only one building or divert water from the road - this is a local variety, if you decide to drain the entire area - a common one.
Local types of systems, in turn, are divided into:
- wall-mounted (in clay soils, on the surface, along the perimeter of buildings - houses, baths, garages);
- reservoir (in the ground under the building);
- ring (in sandy soils, around buildings, below the foundation).
All of the listed types of closed drainage serve to prevent the foundation from underflooding, as well as to protect against infiltration of groundwater into the basements and basements.
Depending on the location of the drainage pipes, the systems are divided into various types: horizontal (most in demand in summer cottages), vertical and combined.
All of the listed types (wall, ring and reservoir drainage) belong to the horizontal variety. Pipes are placed with a slight slope under the foundation or around it.
For the arrangement of the vertical system, pumping equipment is used. This is a complex structure, so it is rarely used for the improvement of the private sector. Accordingly, the combined type of deep drainage is not common.
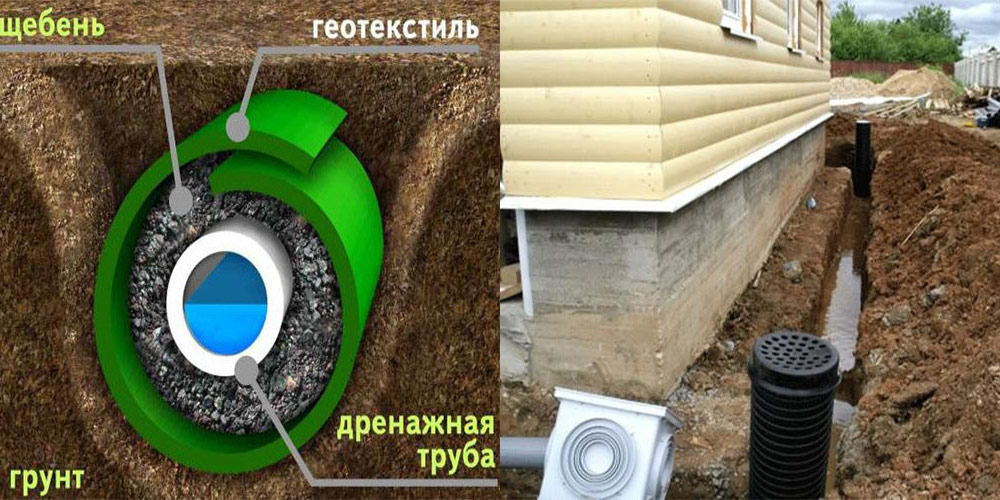
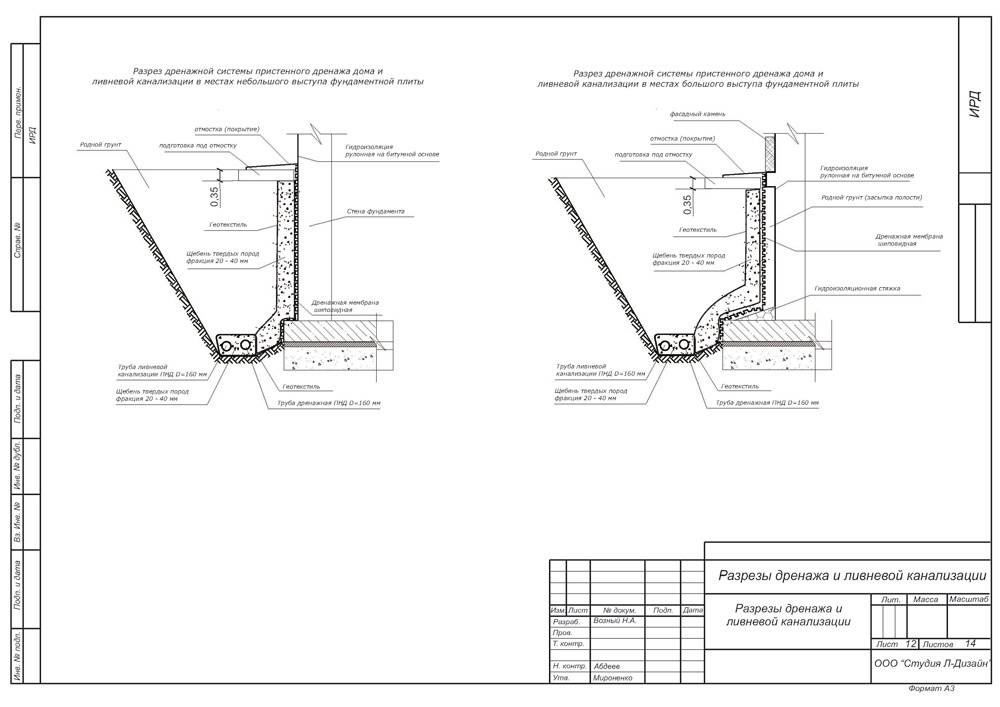
wall drainage
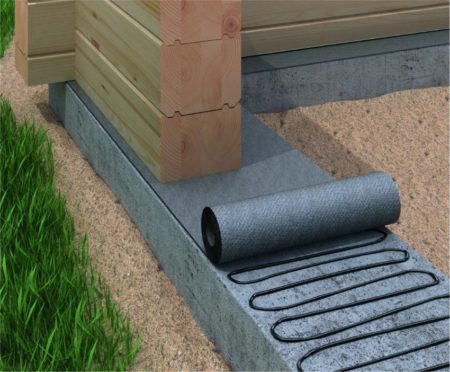
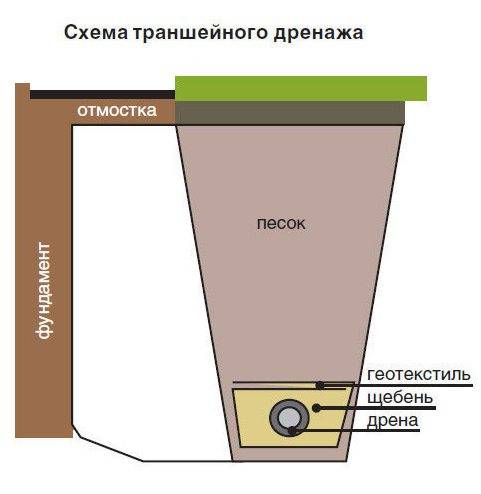
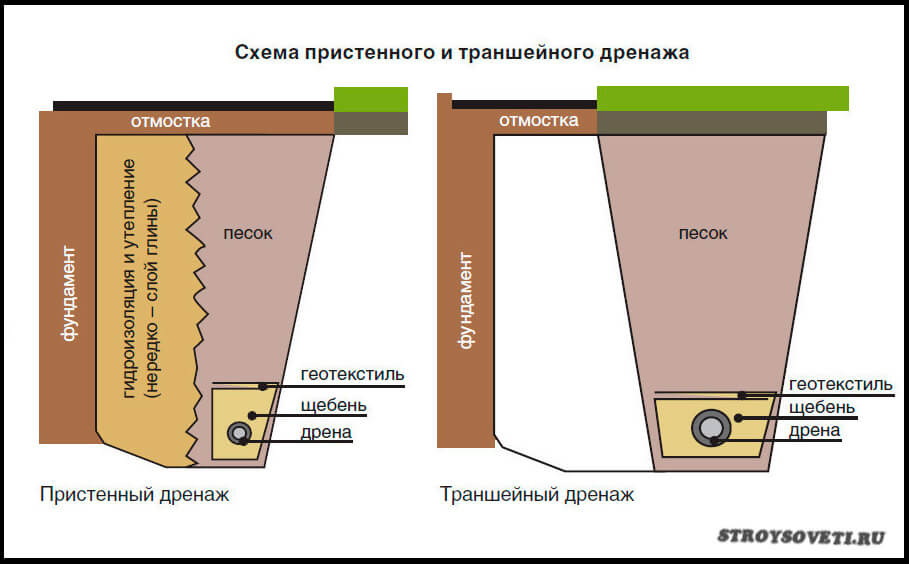
Performed close to the building. One of the walls of the drainage trench is part of the basement, foundation. Additionally waterproofed with bitumen. The outer wall is made inclined, extending beyond the blind area.
The bottom of the drainage should have a clear slope. It is provided with a compacted sand cushion. Geotextile is laid on top. Large gravel is poured on it, drains are laid, covered with a smaller stone. Manholes are installed at key points. Wall drainage does not have to be a closed system. Can be arranged only at a part of the building.


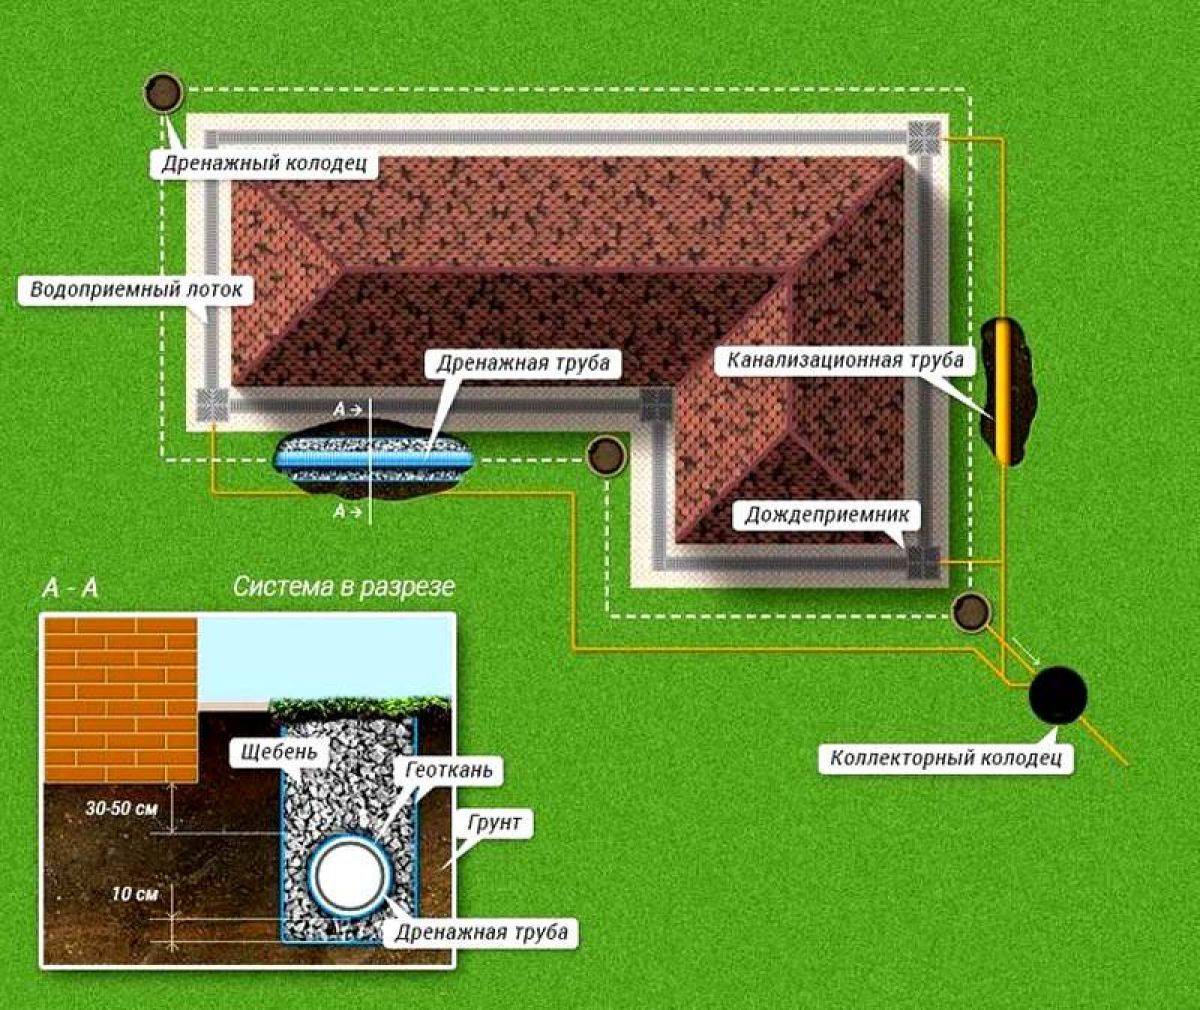

 Waterproofing the foundation before installing drainage
What should be in the project
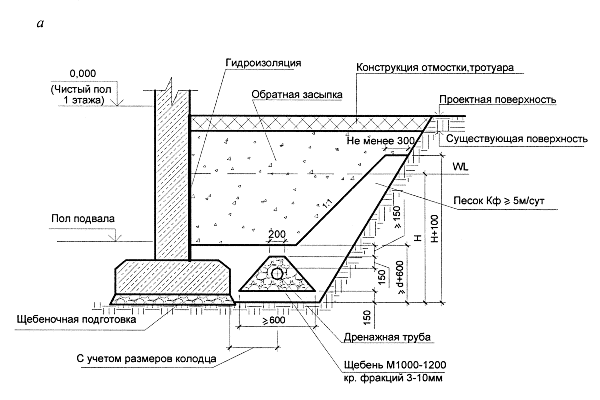
Before starting any construction, it is necessary to develop a drawing. According to the requirements of SNiP, the foundation drainage project should include:
-
Scheme of wells, location of drains (pipes), insulation;
- Geometric data on the drainage system: ditch slope, trench dimensions, distances between the prefabricated parts of the system;
- The diameter of the pipe used, the dimensions of the wells;
-
Fastening materials used.
The resulting scheme will help to calculate the cost of materials, develop estimates and approve the project in certain government agencies.In addition, according to SNiP, wall drainage of the foundation also takes into account the general slope of the site, the amount of average annual precipitation, the level of freezing of the earth and groundwater.
 Basement drainage drawing
The next step is to install a drainage system according to the scheme. Regardless of whether a closed or open drainage system is used, the following operations must be performed before installing the drain:
- Clear the area of land on which the drainage will be located. It is necessary to remove construction debris and stones that can damage the pipes, remove plantings with large roots and make sure that tree roots do not break through the trench;
- The minimum trench depth is the maximum depth of soil freezing. Ideally, you need to make a ditch so deep that its bottom is slightly below the freezing level. If you ignore this rule, then in the cold season the drain will freeze and will not have time to thaw in the spring. Subsequently, the functionality of the drainage systems will be impaired;
- The walls of a deep drain are necessarily strengthened and insulated. Sometimes craftsmen use geotextiles to insulate pipes directly, but in the northern regions it is much more convenient to equip insulation in a ditch;
- In a closed-type drainage system, several types of crushed stone, different in fraction size, should be combined. A stone of large diameter is used to backfill the lower level, its size gradually decreases as it approaches the surface of the earth;
- The pipe is laid only on a sand cushion, this is necessary to form a kind of filter at the bottom of the ditch that does not allow water to pass through;
-
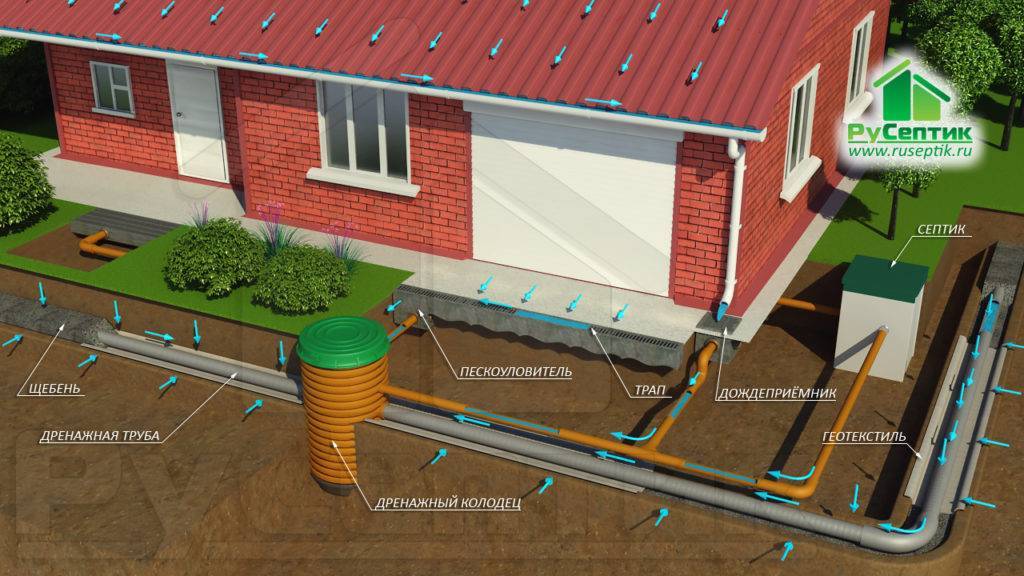
Underground drainage can be a complex system consisting of numerous drains and highways, or a simpler, perimeter one. The first is used on large wetlands, while the second is needed to drain the foundation and is placed around the house;
- The permissible level of drainage depends on the level of groundwater. But you need to take into account the fact that the gutter should be located at the lowest point of the site;
- At the same time, the drainage well or septic tank is even lower than the ditch, at an angle of at least 20 degrees;
- If you are equipping a sewage disposal system on the surface, then an air conditioner is required. It is most often a metal mesh that filters rain or melt water from leaves and other blockages;
- After completion of all construction work, it is imperative to fill up the trench for safety reasons. If external drains are used, and an open canvas should remain on the surface, then walkways or other ceilings must be installed. For a drainage system, the depth of which is from 1 meter, soil backfill is used. To do this, the earth is sifted and poured into a ditch in a slide;
- SNiP allow the installation of drainage around the house at a distance of 1.5–2 meters from the outer wall of the building.
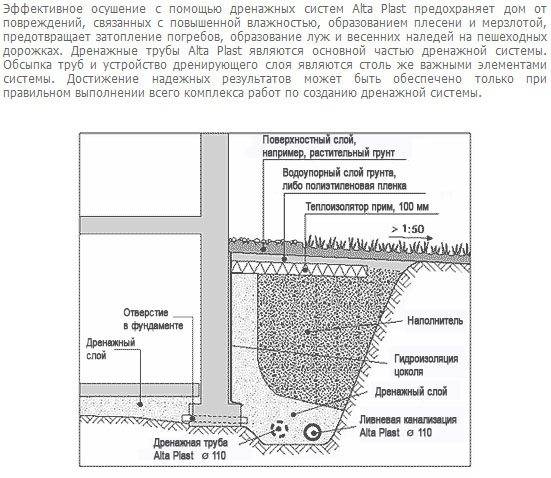
Deep drainage system
If the groundwater level on the site is high, and the house has a basement or underground garage, then you will have to install a deep drainage system.
Signs that it is necessary can be considered:
- High humidity in the basement; - Basement heating; - Rapid filling of the septic tank (cesspool).
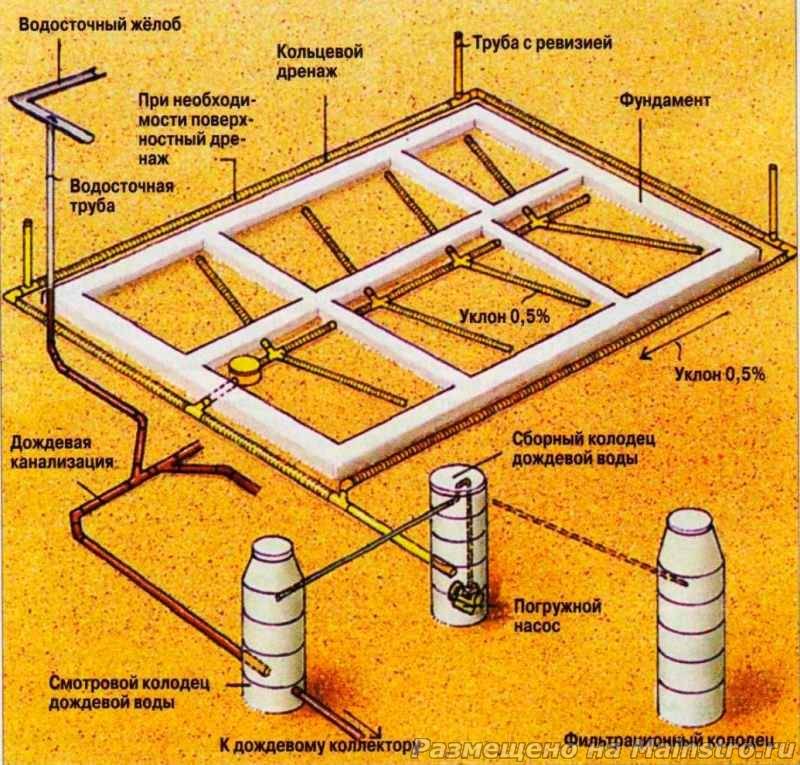
It is advisable to equip the underground drainage system of the foundation during the construction of the house. This will be much cheaper than removing moisture from a finished foundation, built without taking into account the actual level of groundwater.
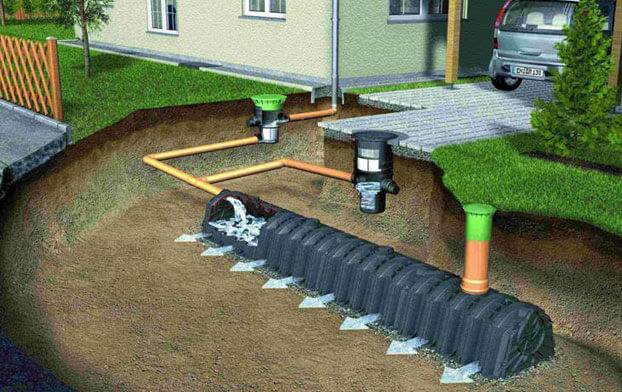
Water is drained immediately into a storm or mixed sewer (by gravity - with a slope of the site is not
The slope can be both natural and artificial - for example, through the use of special concrete pipe-channels with an internal slope or multi-level stepped gutters.
Water collected by surface drainage can also be diverted into the collector, and from there they will fall into the municipal storm sewer or soak into the soil (through the drainage field - a layer of rubble).
Arrangement of a simple drainage system
Drainage trench around the house (ring drainage)
The easiest way to drain water and neutralize the impact of ground moisture on the basement and foundation is to install a fairly wide drainage gutter around the perimeter of the building at a distance of one and a half to two meters From him. Its depth must be below foundation level, its bottom is sloped and filled with cement mortar.
The drainage ditch effectively removes moisture from the base of the house, but water from downpipes should not drain into it.
Closed wall drainage
The blind area is not only water drainage. but also the protection of the foundation
The purpose of this soil drainage system is to remove ground, rain or melt water from the foundation and prevent ground water from rising during snowmelt or heavy rain. It is a closed circuit of perforated (perforated) pipes or gutters with the convex side up, laid at a depth of one to one and a half meters.
Unlike the ring, wall drainage pipes are laid above the level of the base of the foundation. The trench is paved with broken bricks or large crushed stone of several fractions, drains are also covered with crushed stone and wrapped with it in filter material - for example, geotextiles or fiberglass. The filter does not allow the drain holes to become clogged with silt, and the top of the trench is covered with gratings and covered with soil.
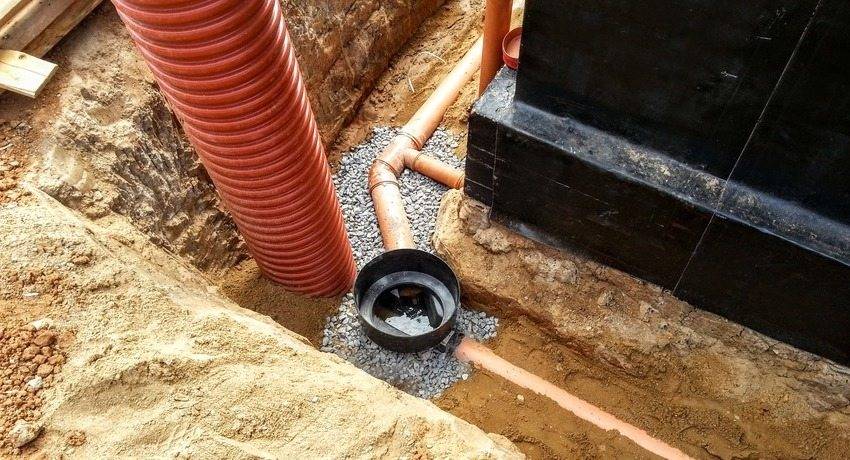
At the corners of the building, "rotary wells" are installed - they set the direction of the discharged water. The wells are made of PVC, their diameter is less than half a meter, and their height is from one to three meters.
The ditch with pipes should slope down the slope (and away from the building) and lead water flows below the level of the basement floor. Such a drainage trench pulls, absorbs and removes moisture from approximately an area at a distance of 15-25 meters around it.


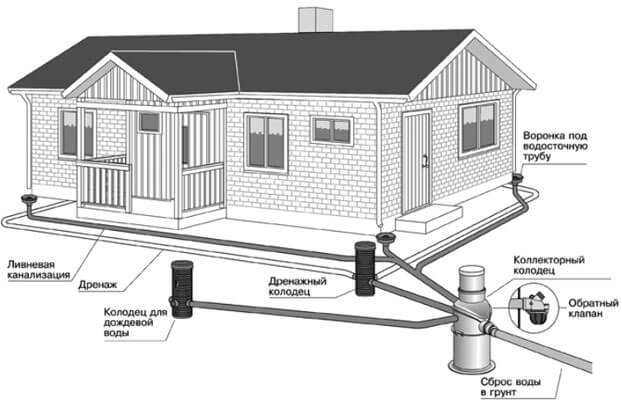
Where to divert water?
If the building stands on a slope, as a rule, the drainage trench goes around its “horseshoe” from the side of the hill and has an exit from the opposite side. If there is such an opportunity, water can be drained into a small “technical” reservoir, from where it will be used for household needs - watering the garden, construction and repair, etc.
In other cases, water is either immediately discharged into a general or individual sewer, or enters a storage collector well, where it is absorbed into the soil and discharged by gravity or by a pump to the site.
The arrangement of simple drainage trenches is not difficult, but the arrangement of a full-fledged soil drainage system that connects both the drying of the site itself and the removal of water from the house located on it requires special calculations and professional installation.It is better to entrust it to professionals, since the losses from malfunctions, repairs and alterations will be greater than the costs of the services of specialists.
Types of drainage for a private house
Do-it-yourself drainage of the foundation of a house is of two types: surface and deep. The first of them is necessary to drain water after melting snow and rain from the surface of the soil or blind area. Structurally, this is a conventional storm drain. Water is collected in it along the blind area of the foundation, which has a slight slope from the wall of the house in the direction of the sewer. The size of the storm drain depends on the maximum rainfall in the area and the area of the roof that collects water.

To protect against groundwater, it is necessary to equip a deep drainage system. Moreover, it should be located as low as possible, ideally - below the sole of the foundation.

For the sake of saving money and time, some inexperienced developers combine the sewer and drainage system by organizing the drain of the roof drains into the drainage pipe. This should not be done in any case, because during rain the drainage pipe does not have time to drain the drain water, and they actively penetrate the soil through the perforation, causing waterlogging around the drainage. If there is nowhere to drain rainwater, you can drain it directly into the drainage storage tank, but always through your own separate pipe.
The drainage device itself is highly dependent on the type of soil. So for sandy soil with a high clay horizon lying above the base of the foundation, drainage should take place at the junction of the clay and sand horizons. Heavy clay soil does not pass water well, and to determine the depth of water penetration, it will be necessary to dig an exploration pit.On heavily waterlogged lands, it may be necessary to create a local watershed from a waterproof film or even a concrete partition in the ground.
The main types of drainage structures
open
 Trenches of this type are used to drain surface water when the site on which the house under construction is located has practically no slope or is even located in a small depression.
After prolonged rains, you can approach such a house only in rubber boots, not to mention the spring flood.
Using open ground trenches, organize the collection and removal of surface water into the sewer system, a special prefabricated well, or outside the site, if possible.
Open systems are easy to make, but they spoil the landscape and are unsafe to walk on - you can easily trip.
Closed
Such drainage is a more effective solution for draining the soil at a considerable depth - up to one and a half meters.
It is a system of filter pipes placed in a water-permeable material: fine crushed stone, gravel, expanded clay
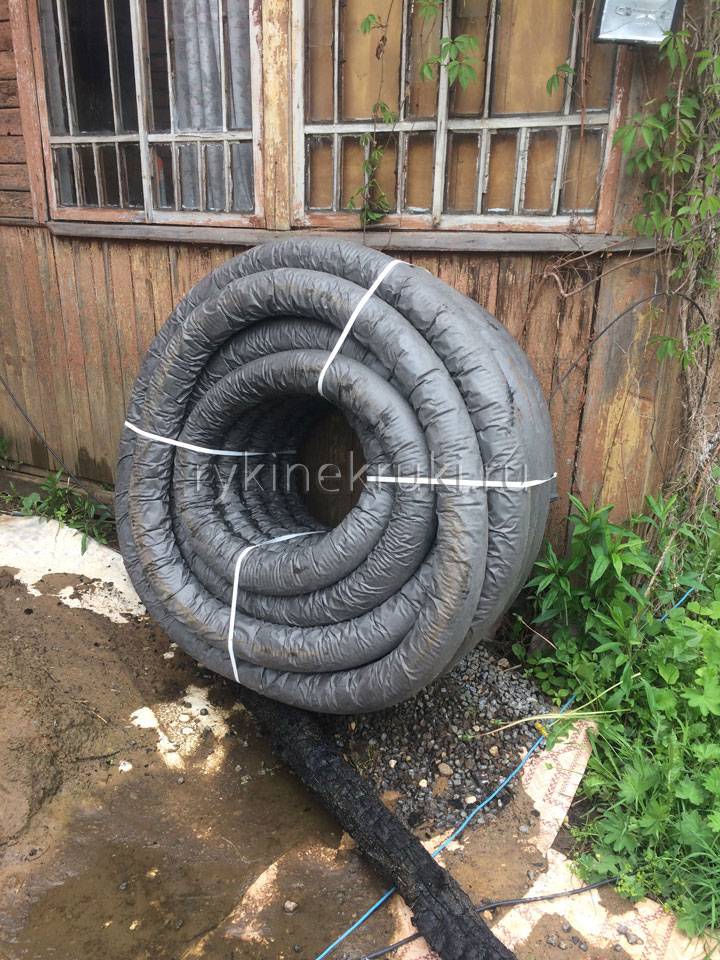
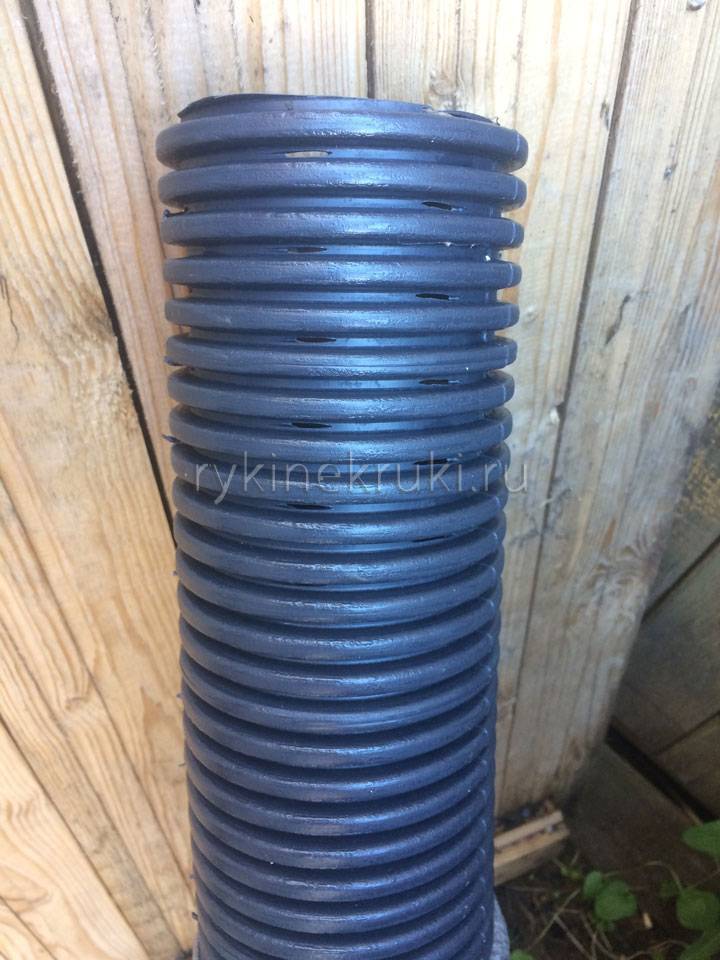
For this purpose, special perforated pipes with numerous holes of small diameter are used.
You can also use regular plastic sewer pipesby drilling holes with an electric drill. The device of such a system is much more complicated and expensive.
zasypnye
For a small area, backfill drainage trenches are used. They successfully remove both surface and ground water.
At the same time, there is no need to spend money on the purchase of pipes and related accessories (angles, tees, gratings, etc.).Ditches are dug to a depth of 1 to 1.5 m along the perimeter of the house at some distance and filled with broken bricks or crushed stone of large fractions.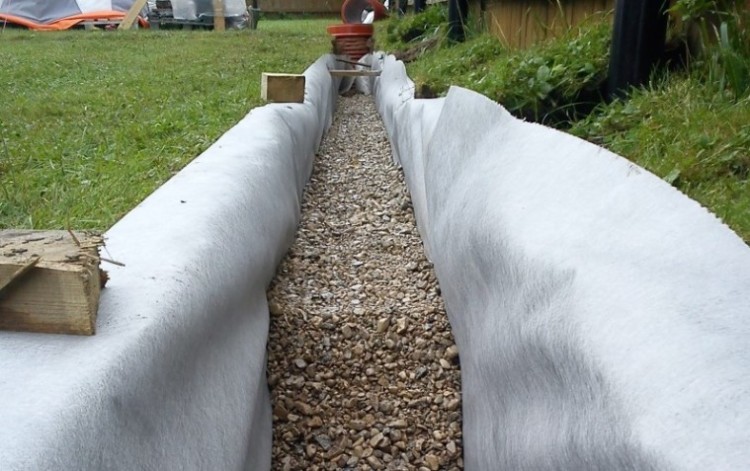
From above, it is better to cover this backfill with a strip of geotextile, and then cover it with earth with turf laying. True, they cannot be cleaned after silting.
Surface
There is nothing more than an open type drainage. It has 2 varieties: point and line.
Point drainage
 Perform for local water drainage (from one point). For example, from a drain pipe, from a garden shower or a water tap.


If there is a place on the site where water often accumulates, getting rid of it using this method is the easiest. The device is a water intake, usually purchased, laid flush with the ground in the right place.
Concrete or plastic trays are attached to it, laid with a slope of about 1 degree towards the water outlet. From above, the trays are covered with metal or plastic gratings.
Linear drainage
If several point receivers are combined into one common outlet line, a linear drainage system will be obtained.
It should be recalled that point and line systems only drain surface water.
storm sewer
deep
If the house is located in a lowland, or there is a waterproof clay layer at a depth, as well as at high GWL the amount of underground water will be large.
In this case, deep drainage of a closed type should be performed, the device of which is described above.In order to avoid clogging of the drainage pipes, revision (cleaning) wells are made of such a size that you can put your hand into it.
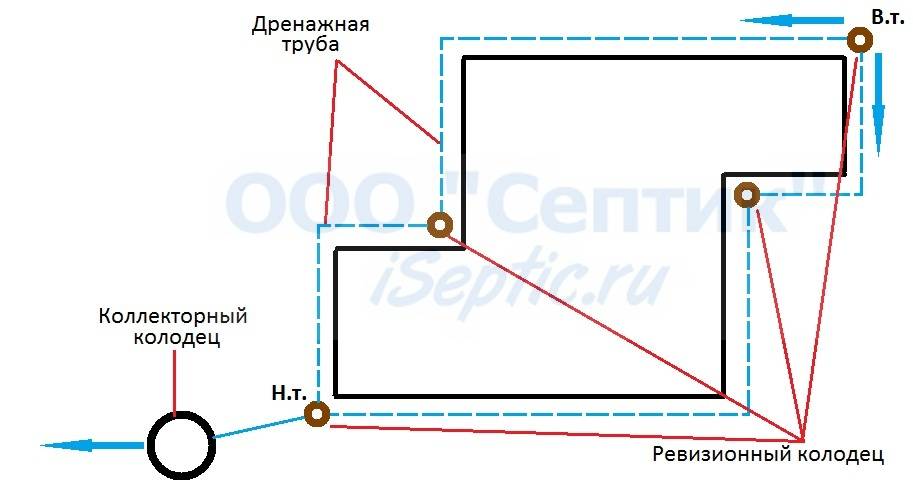
Cleaning elements should be located in corner, T-shaped junctions and after 10-12 meters of underground utilities. By location relative to the foundation, deep drainage can be wall or ring.
wall drainage
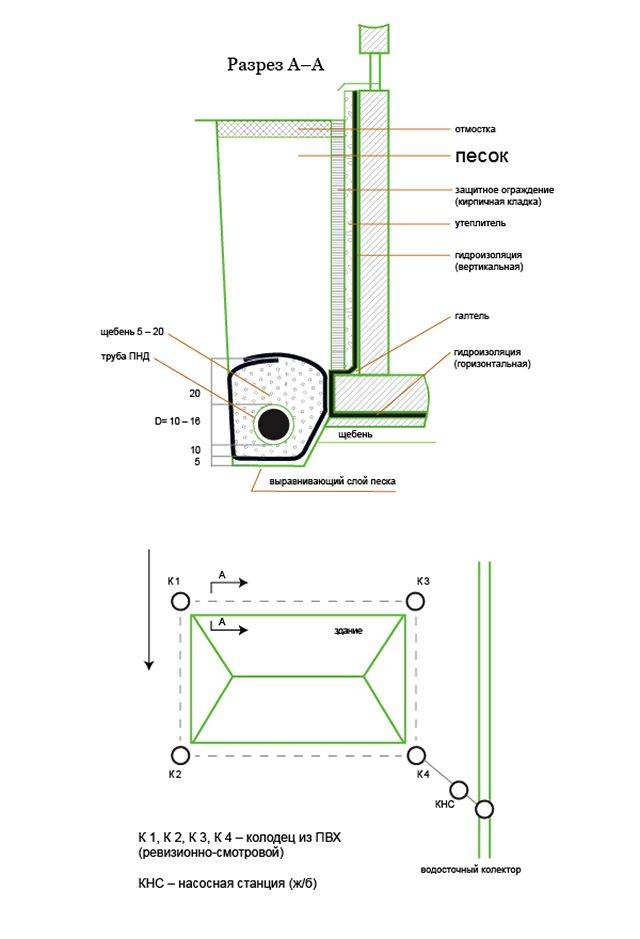
Arrange when there is a basement or basement under the building. The trench is dug close to the wall of the strip foundation.
Additional excavation work can be avoided if this is done when laying the foundation. The depth of the shallowest point should be about 20 cm more than the depth of the sole.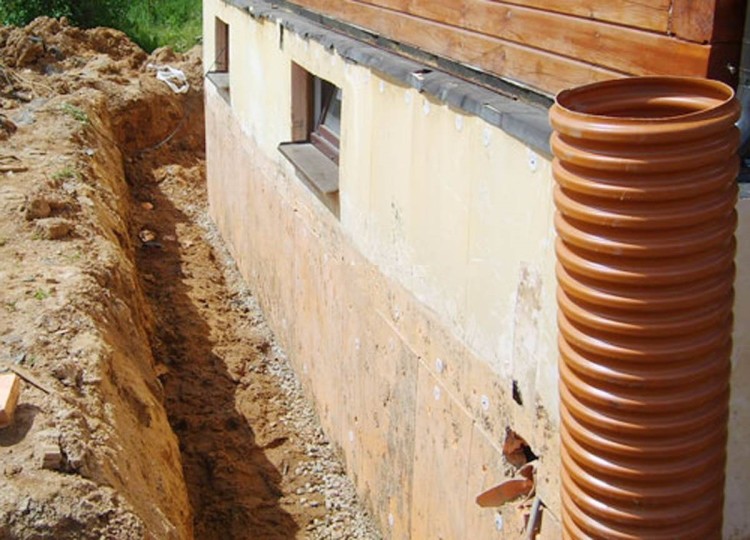
The pipe is placed inside a drainage layer of gravel, small gravel or expanded clay, wrapping everything with geotextile fabric.
When backfilling the ditch with soil, a layer of clean coarse-grained river sand is covered close to the side surface of the foundation, with a layer-by-layer compaction 25–30 cm thick.
First, coat the foundation wall with a layer of greasy crumpled clay (clay castle).
ring drainage
Performed if there is no basement in the house. In this case, a trench is dug after the construction of the house is completed at a distance of 1.5–3 m from the foundation.
DIY drainage - step by step technology
Today we will look at how to do it yourself proper drainage around the house under construction.
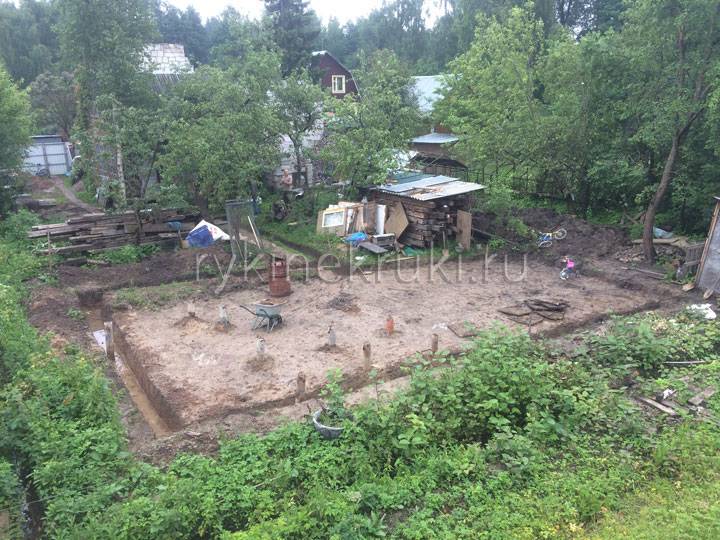
At the very first stage, it is necessary to determine what type of soil prevails on the site, for this it is necessary to conduct geological surveys. After the study, it will be clear which soils prevail and, accordingly, it will immediately be clear at what depth there must be a drain pipe.If drainage is being laid to simply drain water from the site, then it is not necessary to do surveys, but if we are talking about building a private house and installing foundation drainage, then it is better to use the services of specialists in order to avoid problems with a “floating” foundation in the future and the possible formation of a technological cracking:
The photo above shows a do-it-yourself drainage scheme around the house.
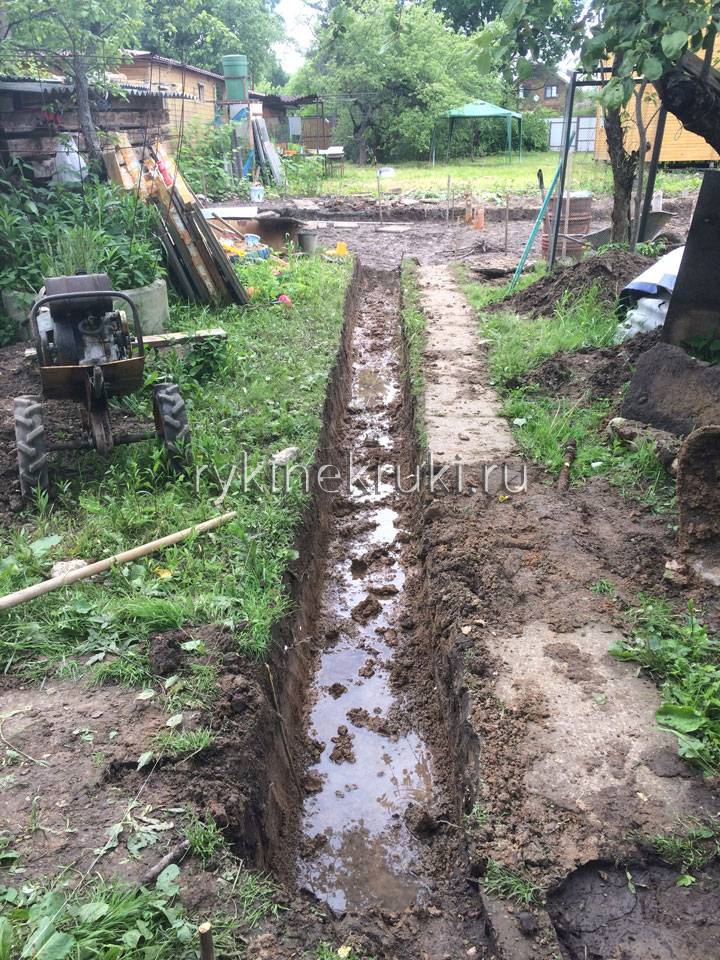
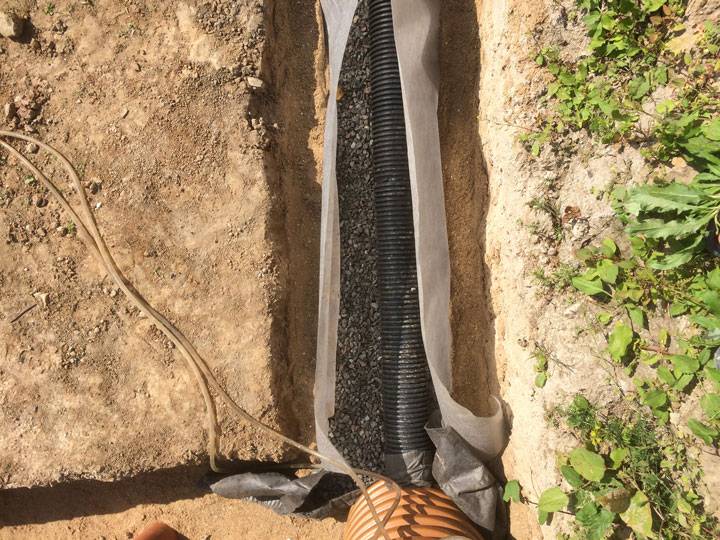
In our case, it is necessary to do the drainage of the site on clay soils with your own hands. In addition, it turned out that groundwater comes close to the surface. Trench around the house for laying a drainage pipe we will dig 50 cm deep.
After the trench is ready, we fill the bottom with sand and ram it with a homemade rammer. The sand at the bottom of the trench is used as a coarse fraction:
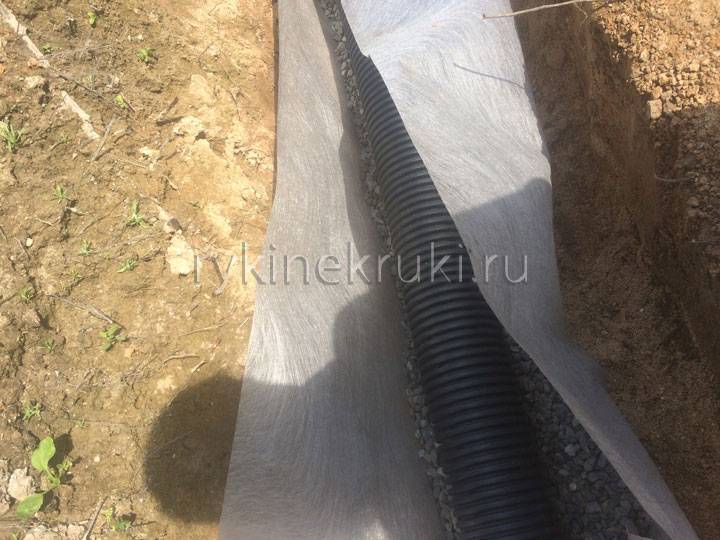
After the work done, we lay geotextile on top of the sand, it does not allow the layers to mix, that is, the sand does not combine with the gravel that will be laid next. Geotextile is a synthetic non-woven fabric that acts as a filter, water passes through it, but large particles cannot pass through. In the process of arranging drainage with our own hands on the site, we lay the geofabric so that there is a margin on the sides for further “wrapping” of the pipe, lined with rubble on all sides:

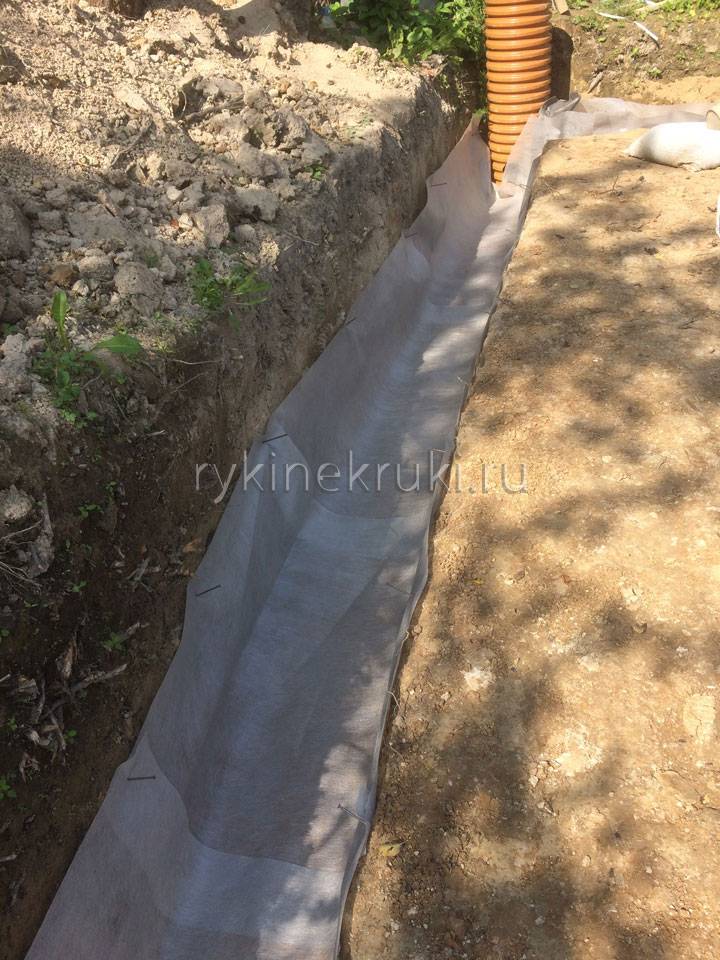
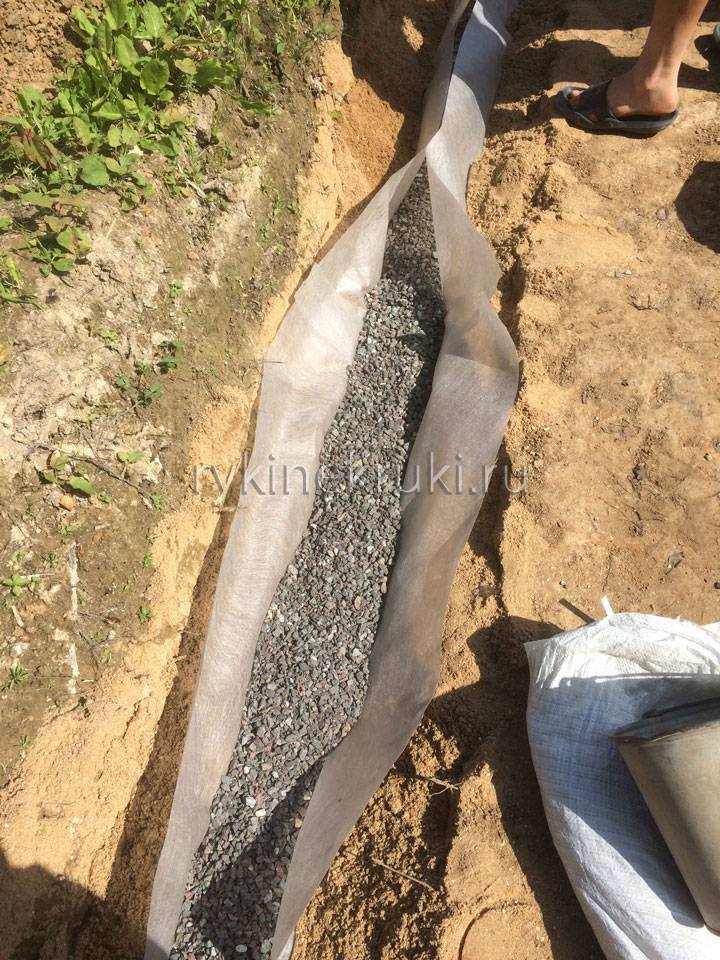
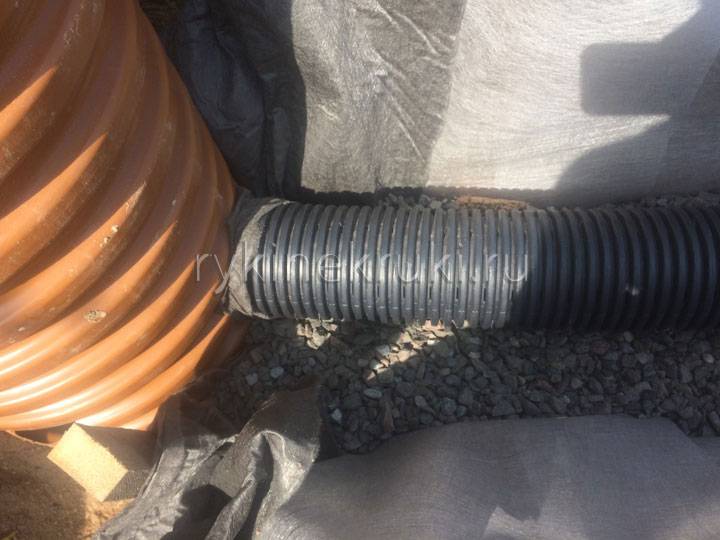
As mentioned earlier, a layer of gravel is laid on the geotextile. It is better to use fine gravel. The layer should be large enough for better groundwater filtration. We set the required slope with gravel at the bottom of the trench. A drainage pipe is laid directly on the gravel layer.This pipe is made of polyethylene, it is corrugated, with special holes through which groundwater enters. The pipe is usually laid with a slope of at least 3%, if possible more, so that the water flows better to the well (revisions):


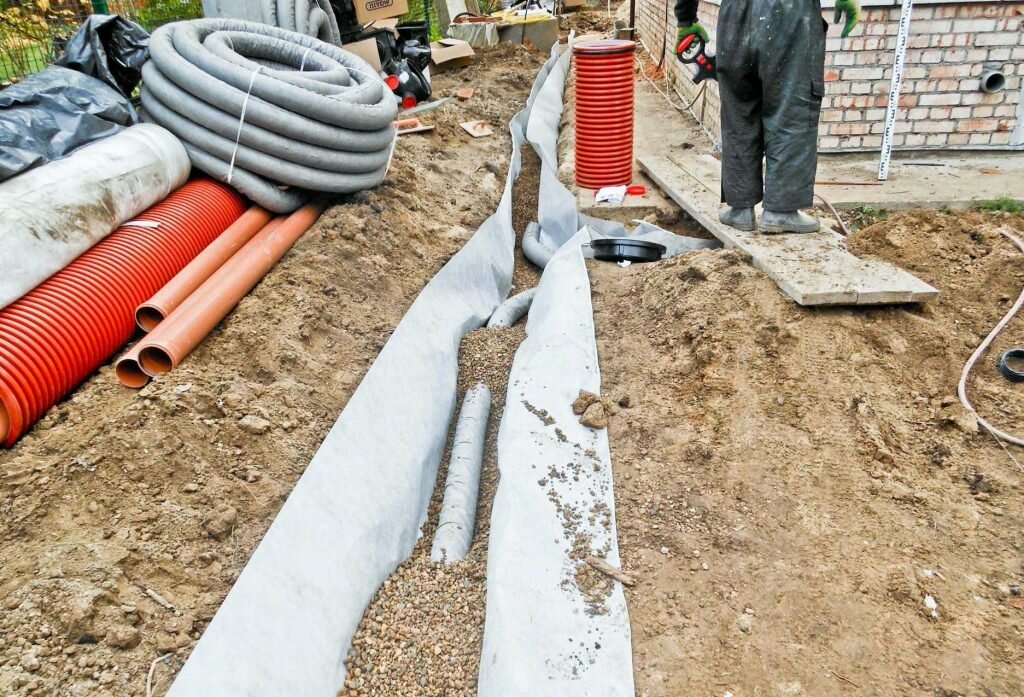


Further, in order for the drainage of the foundation, made by oneself, to be of high quality, we sprinkle the pipe with crushed stone of the same fraction as under the pipe. On the sides, top and bottom of the pipe, the layer of crushed stone should be the same. If one pipe is not enough, you can make drainage from small sections by joining them with a special coupling:
The meaning of all the work is to ensure that the groundwater that has fallen into the pipes is diverted somewhere. This will prevent the foundation from being washed away with water, which can cause it to simply collapse. Therefore, during the do-it-yourself drainage around the house using perforated pipes, a real drainage system is created, which includes pipes and wells for collecting water that act as revisions. Wells are designed to always have access to the pipe, and if necessary, it could be cleaned.
In our case, the wells were located at pipe bends. After sprinkling it with crushed stone, we close the layer of geofabric with an overlap, as mentioned earlier, we “wrap” the pipe with a layer of crushed stone. After the geotextile is closed, we again sprinkle with sand, and again we ram. After completing the work on the drainage device around the house with our own hands, we fill the trench with the previously selected soil. If desired, you can additionally insulate the drainage system by placing a layer of thermal insulation material on the top sand cushion. You can already make a path along the layer of earth. So it will always be visible where the pipes of the drainage system pass.
Price
The cost of arranging drainage around the house depends on the materials with which you will make the drainage system (for example, the price of construction waste is cheap). To work in the country, you can take the most affordable filters: wooden boards (fold them crosswise and install them with their ends on the walls of the trench), stones, fragments of bricks, slate. For the drainage system of a wooden or brick residential building, it is worth taking more complex and expensive materials - plastic pipes, old metal communications, even a pipe made of plastic bottles is suitable for low rainfall.
Be sure to take care of the insulation. If it is not possible to buy geotextile for drainage, then cover the pipes with unnecessary rags or even humus. This will help keep the system from freezing during the cold season.


