- Alternative option for surface drainage
- Drainage: what is it and why do it
- Making closed drainage
- Schema Design
- Preparation of materials and tools
- System gasket
- DIY drainage - step by step technology
- What is drainage
- When should drainage be provided?
- Where to start the construction of drainage
- How to use surface drainage in landscape design
- Choosing the right dehumidification system.
- Surface drainage of water from the site.
- Underground site drainage.
- Lowering groundwater drainage.
- Intercepting drainage.
- Storm sewer.
Alternative option for surface drainage
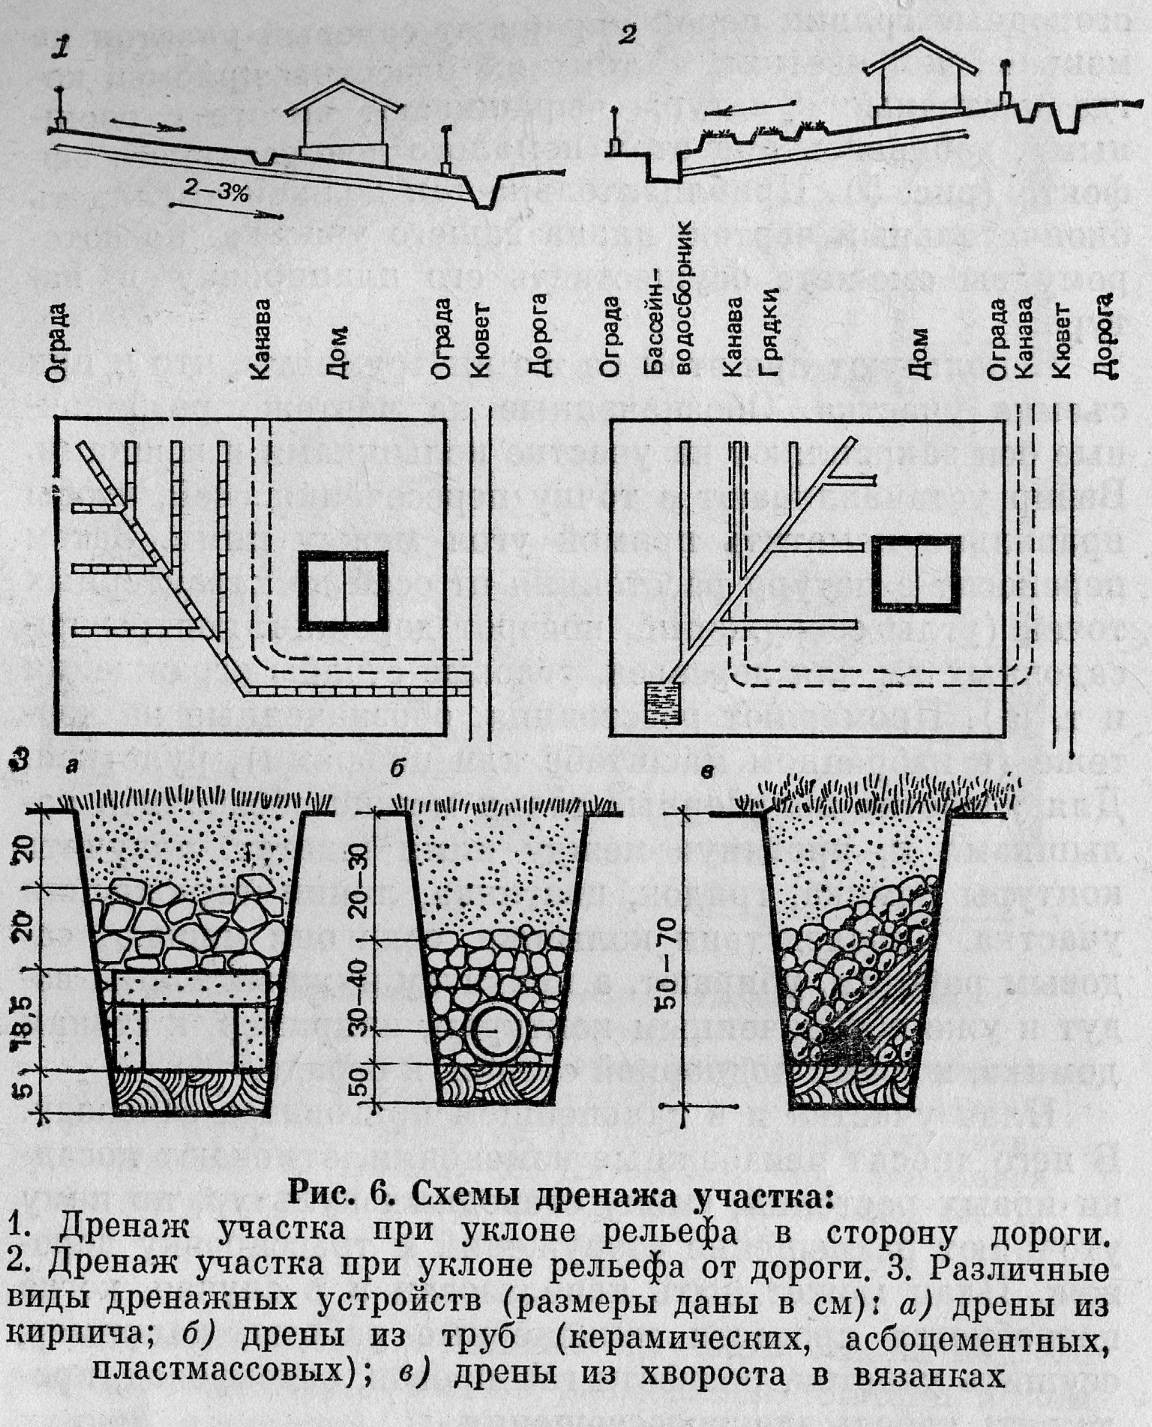
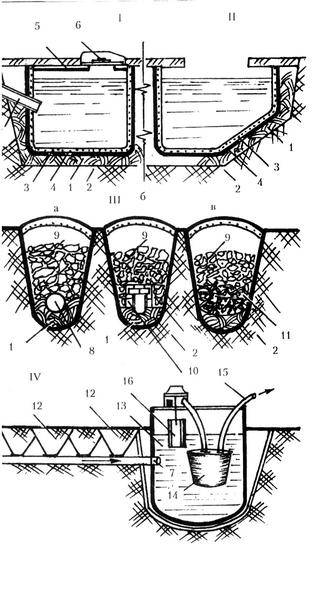
If it is not possible to purchase crushed stone, then other materials can be used for surface drainage. For example, make fashin drainage using birch, oak, coniferous or alder brushwood. The twigs are tied into bundles, placing them on goats (crossed pegs installed along the length of the trench).
Brushwood is laid with the butt (thick part) up and tied into bundles about 30 cm thick. Large twigs should be placed inside, small ones on the sides. Moss is laid on top and on the sides of fascines (bundles).
Such drainage of the site - drainage using rods - is a completely workable option, and with the right arrangement in peat soils, such a system can last more than 20 years.
Drainage: what is it and why do it
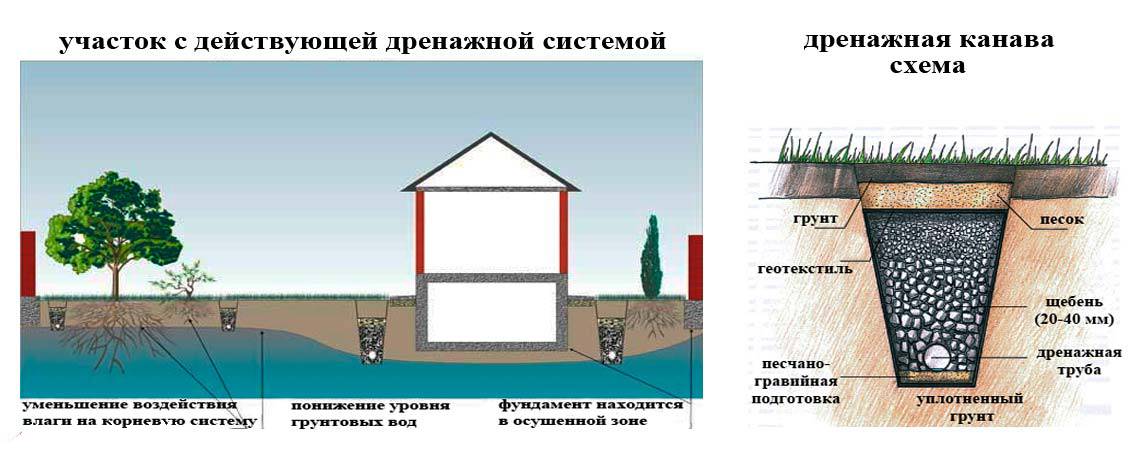
Drainage is used to protect buildings from internal flooding. This is a dehumidification system designed to eliminate excessive accumulation of water around a house or land.
This is especially important for houses located in the valley. Water can accumulate around objects due to various reasons: it can be snow melting, an increase in the level of ground moisture, special properties of this type of land
And also because of the special location of the building, due to which the water around it cannot drain on its own.
The owner of the house should think about the construction of a drainage system in the following cases:
- in this area, an elevated level of groundwater is normal;
- if liquid began to accumulate in the basement due to melting snow;
- mold began to appear in the corners on the floor of the rooms on the first floor;
- if the foundation of the building is constantly wet or washed away with water;
- the area is characterized by a high level of precipitation;
- the soil on which the house stands, due to its natural properties, does not absorb moisture well;
- fungus began to appear on the walls;
- The plot with the house is located in a lowland.
In practice, drainage is a device based on pipes that remove excess moisture that enters them. Experts advise to always create such a system, since it is an effective method of extending the life of any buildings.
Making closed drainage
How to make a deep drainage system on the site with your own hands? For the correct performance of the work it is necessary:
- develop a scheme of the drainage system;
- prepare all the necessary materials and tools;
- install the system according to the recommended technology.
Schema Design
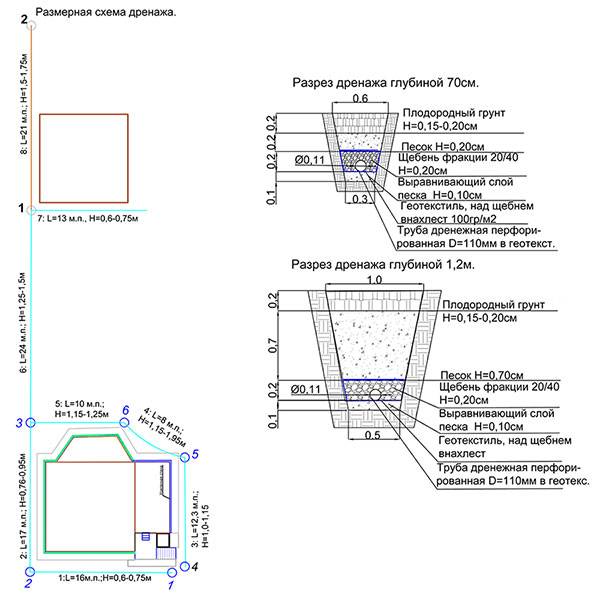
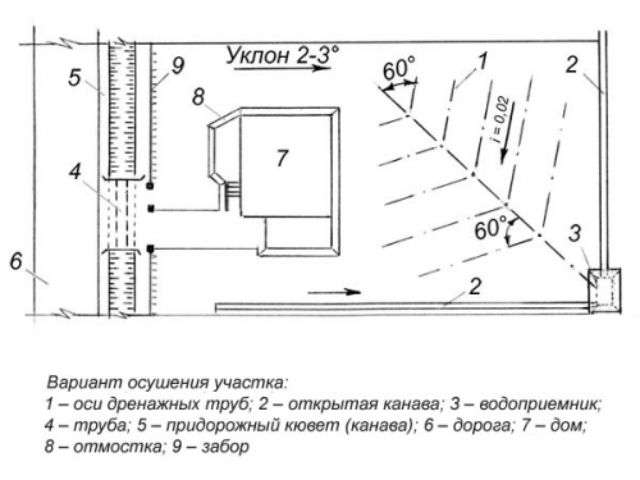
The initial stage of the construction of drainage in a garden plot is the design of a future drainage system. The scheme is developed taking into account the following requirements:
- the distance from the drainage pipe to the foundation of the building must be at least 1 m;
- before the fence (fences) it is required to leave at least 0.5 - 0.6 m;
- the depth of the trench intended for laying pipes should be more than 1 - 1.2 m, and near fruit trees and shrubs from 1.6 to 1.75 m;
- the minimum width of trenches is 0.35 m;
- the distance between adjacent trenches should be at least 10 m;
- it is not recommended to lay pipes in the places of passage of cars and other equipment;
- in places where the direction of the pipeline system changes, where pipes converge or diverge, it is recommended to install manholes.
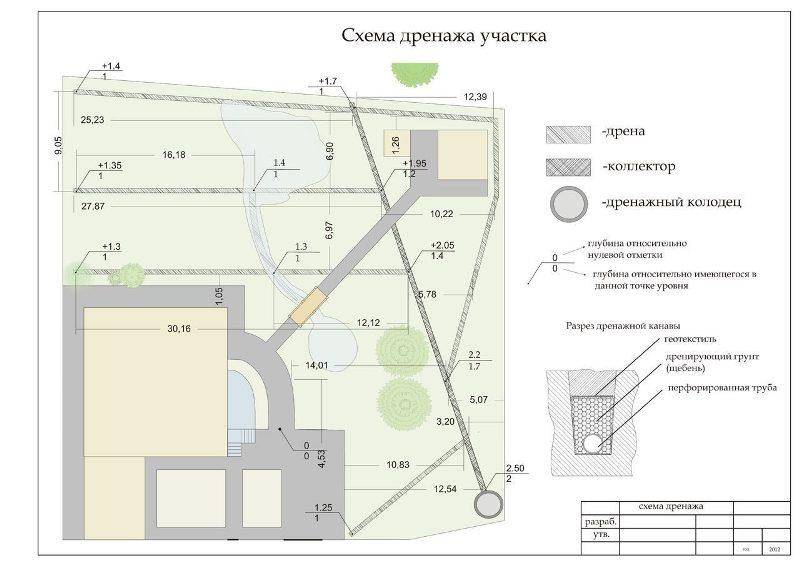
Drainage scheme
The scheme determines the number of pipes, manholes and other elements of the system.
Preparation of materials and tools
To equip drainage for draining the land with your own hands, you will need to prepare:
drainage pipes with a diameter of 100 - 110 mm for conducting central highways and 50 - 60 mm for prefabricated drains;
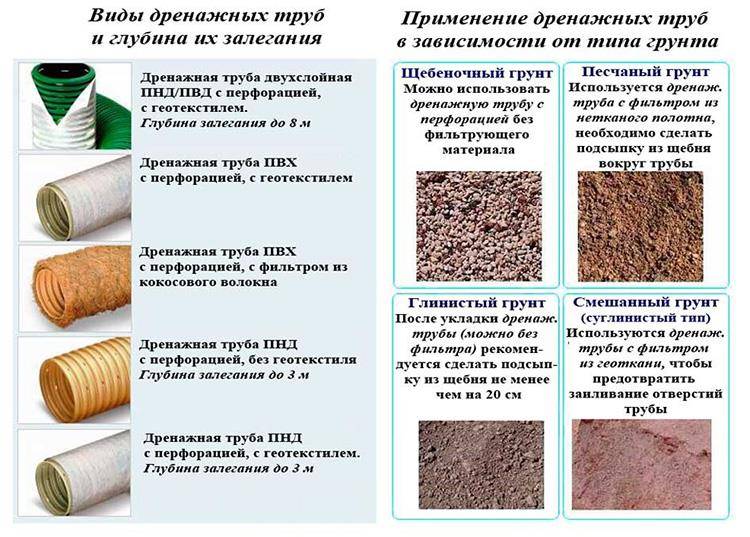
Types of drainage pipes and their scope
- fittings for pipeline assembly: elbows, tees, connecting elements and so on;
- manholes (you can purchase ready-made plastic structures or make equipment yourself, for example, from concrete rings);
- prefabricated or drainage well made of plastic or concrete rings;
- geotextile or any other filter material necessary to protect pipes from clogging;
- sand;
- fine gravel.
To complete the work you will need:
- pipe cutter (you can use special scissors for cutting plastic pipes or a hacksaw);
- drill (when installing wells from concrete rings, a puncher is additionally required);
- marking tools: tape measure, wooden pegs;
- building level;
- shovel (it is recommended to prepare a bayonet and shovel shovel to facilitate the work);
- pipeline assembly tools. When using threaded fittings, wrenches will be required, when assembling the system by welding, welding equipment, and so on.
System gasket
The laying of the drainage system of the site is carried out according to the following scheme:
- garden marking. In accordance with the drainage project of the territory, the locations of drainage pipes, manholes, collection tanks, and so on are determined. For clarity, certain places are recommended to be marked with wooden pegs;
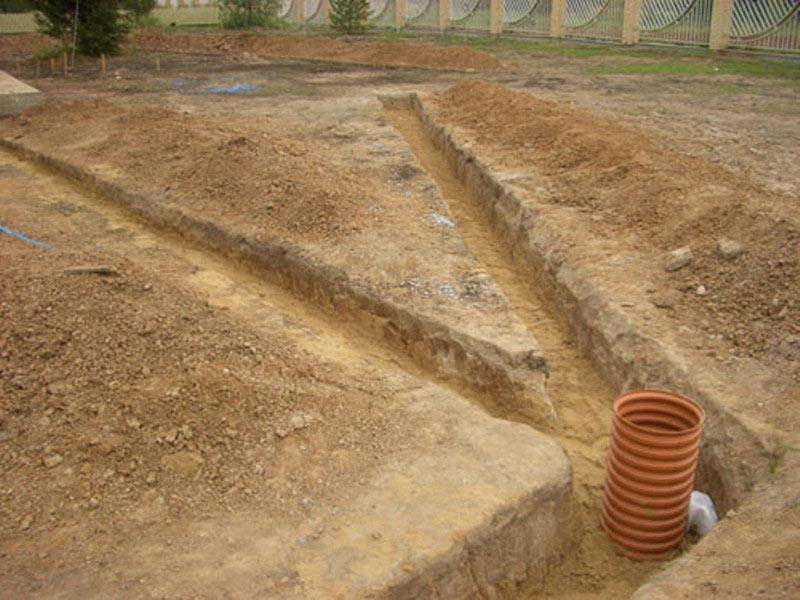
- digging trenches and pits for the location of wells;
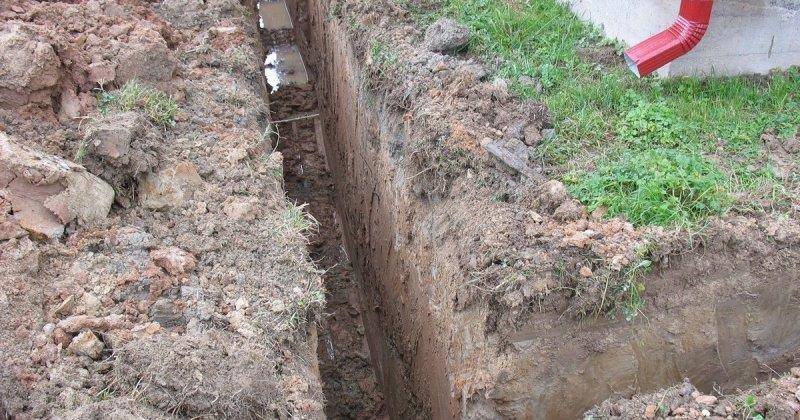
Preparation of trenches for pipes and wells
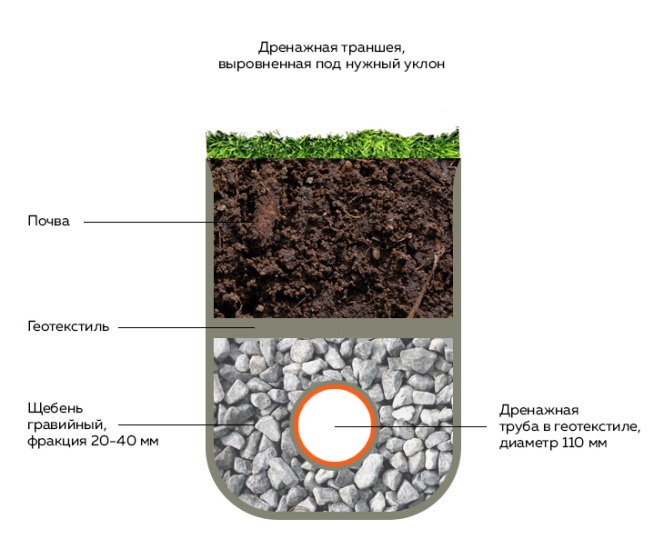
When carrying out earthworks, the slope of the trenches should be taken into account to ensure gravity flow. If there is no natural slope on the site, then digging trenches should be carried out in compliance with a slope of 0.7 ° - 1 ° per 1 meter of length.

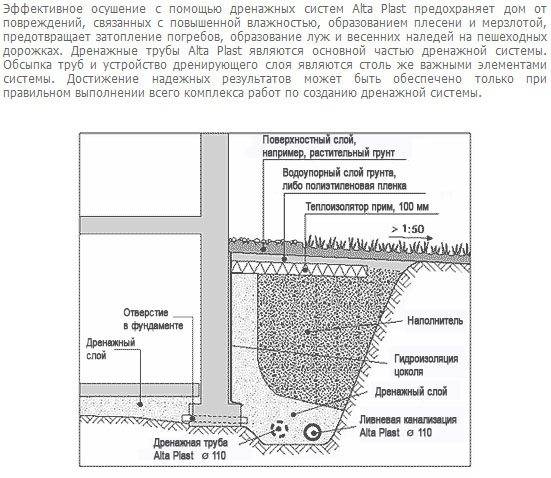


- collection tank installation. It is recommended to lay a layer of sand (approximately 20 cm) and a layer of gravel (approximately 30 cm) on the bottom of the well, which will allow additional filtration of wastewater before disposal.
If it is assumed that the water from the collection tank will be pumped out forcibly, then the laying of sand and gravel can be neglected;
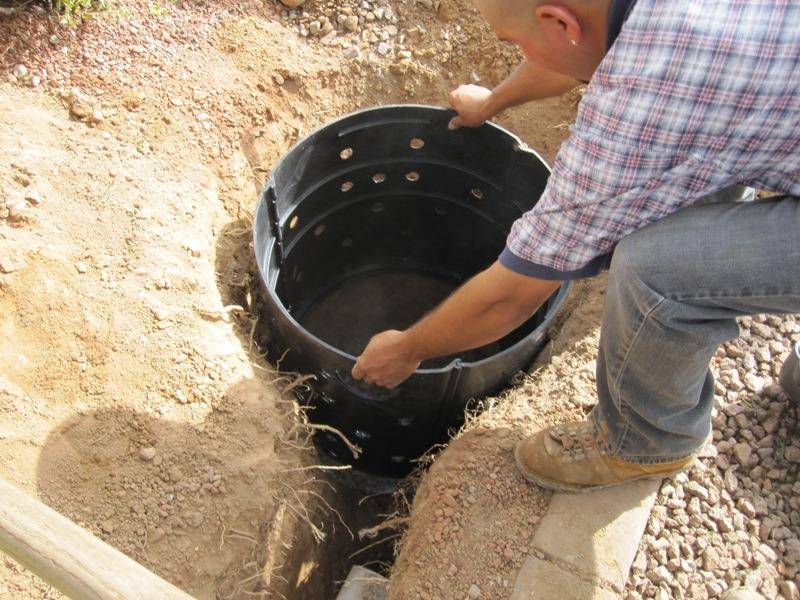
Installation of a drainage well for the collection and disposal of wastewater
- installation of manholes;
Installation of a well to monitor the state of the system
- closing the trenches with a sand cushion (a layer of 20 - 25 cm is enough);
- laying of protective material (geotextile);
- backfilling of prepared trenches by 25 - 30 cm with a layer of gravel;
Preparing trenches for laying pipes
- pipeline assembly and installation. Connection of pipes to the collection (drainage) tank;
Laying a drainage pipeline
- pipe protection from above. To do this, the pipes are covered with a layer of gravel and covered with filtration material. It is recommended to additionally equip a layer of sand on top of the pipes;
- backfilling and compacting the soil;
- decoration (if necessary).
For more information about laying deep drainage, see the video.
To extend the service life and maximize the drainage of the site, the drainage system is recommended to be periodically cleaned of debris and flushed. Global cleaning of the system should be carried out at least once every 10 - 12 years.
DIY drainage - step by step technology
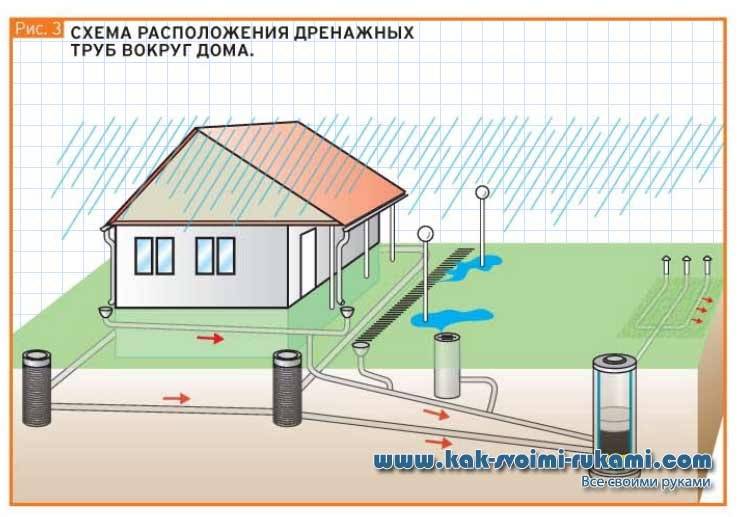
Today we will look at how to properly make drainage around a house under construction with our own hands.
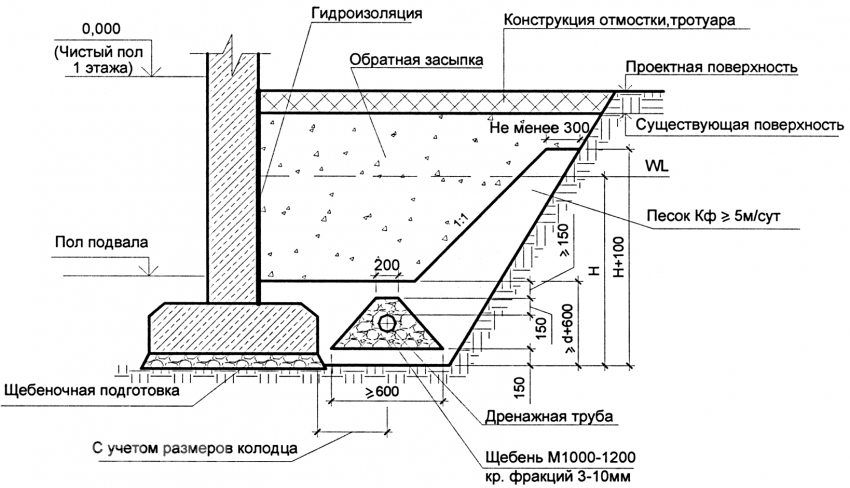
At the very first stage, it is necessary to determine what type of soil prevails on the site, for this it is necessary to conduct geological surveys. After the study, it will be clear which soils prevail and, accordingly, it will immediately be clear at what depth the drainage pipe should run.If drainage is being laid to simply drain water from the site, then it is not necessary to do surveys, but if we are talking about building a private house and installing foundation drainage, then it is better to use the services of specialists in order to avoid problems with a “floating” foundation in the future and the possible formation of a technological cracking:
The photo above shows a do-it-yourself drainage scheme around the house.
In our case, it is necessary to do the drainage of the site on clay soils with your own hands. In addition, it turned out that groundwater comes close to the surface. We will dig a trench around the house for laying a drainage pipe with a depth of 50 cm.


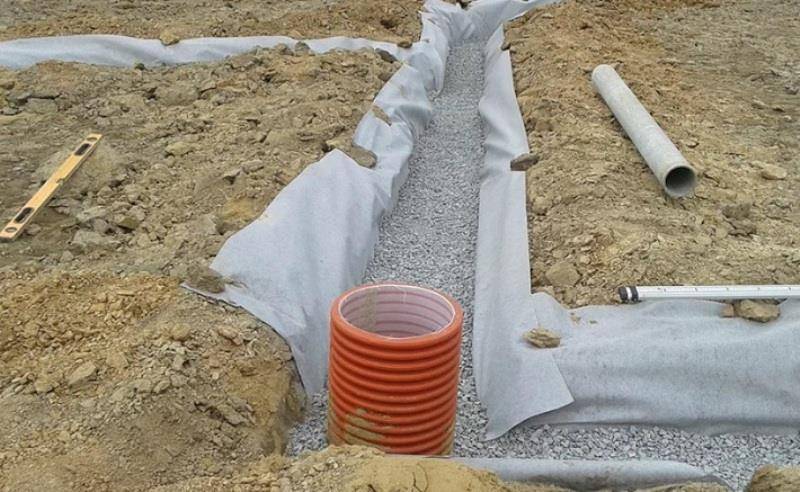
After the trench is ready, we fill the bottom with sand and ram it with a homemade rammer. The sand at the bottom of the trench is used as a coarse fraction:
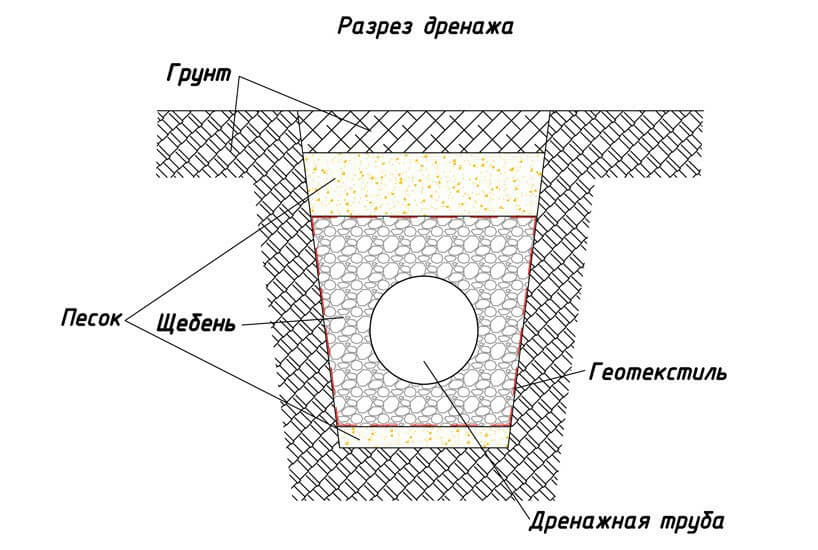
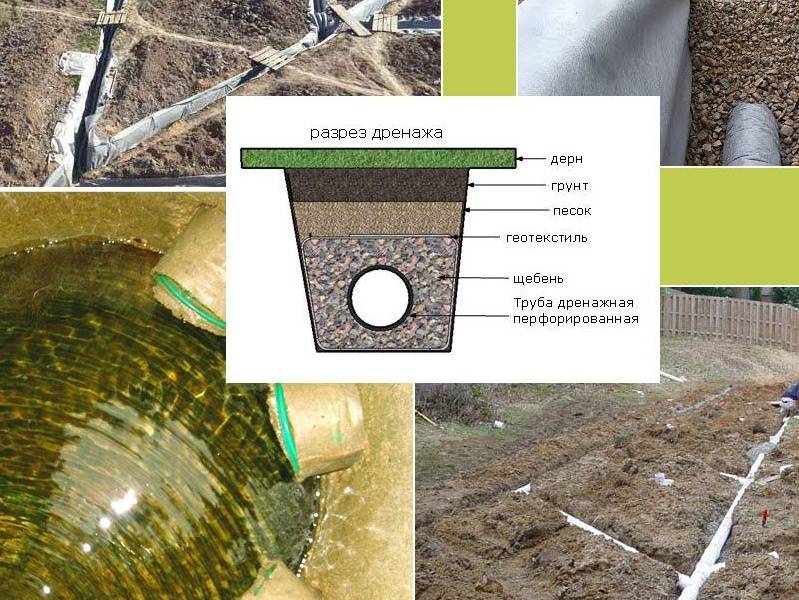
After the work done, we lay geotextile on top of the sand, it does not allow the layers to mix, that is, the sand does not combine with the gravel that will be laid next. Geotextile is a synthetic non-woven fabric that acts as a filter, water passes through it, but large particles cannot pass through. In the process of arranging drainage with our own hands on the site, we lay the geofabric so that there is a margin on the sides for further “wrapping” of the pipe, lined with rubble on all sides:
As mentioned earlier, a layer of gravel is laid on the geotextile. It is better to use fine gravel. The layer should be large enough for better groundwater filtration. We set the required slope with gravel at the bottom of the trench. A drainage pipe is laid directly on the gravel layer.This pipe is made of polyethylene, it is corrugated, with special holes through which groundwater enters. The pipe is usually laid with a slope of at least 3%, if possible more, so that the water flows better to the well (revisions):
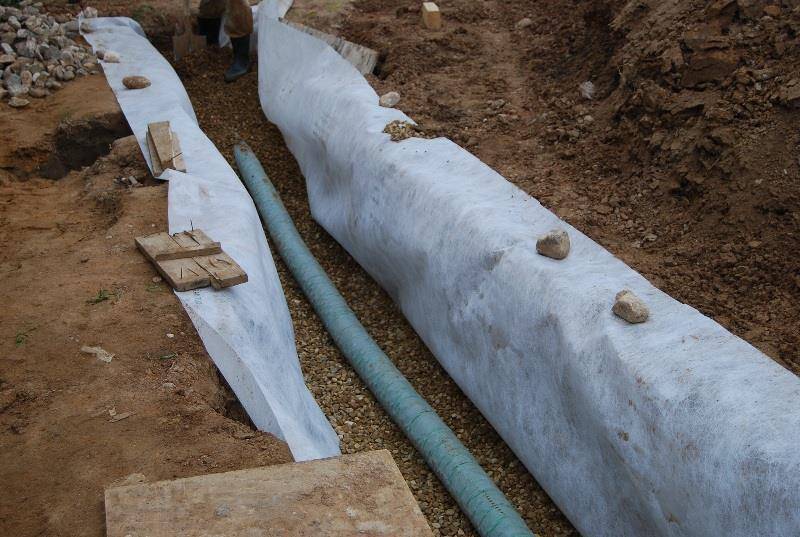
Further, in order for the drainage of the foundation, made by oneself, to be of high quality, we sprinkle the pipe with crushed stone of the same fraction as under the pipe. On the sides, top and bottom of the pipe, the layer of crushed stone should be the same. If one pipe is not enough, you can make drainage from small sections by joining them with a special coupling:
The meaning of all the work is to ensure that the groundwater that has fallen into the pipes is diverted somewhere. This will prevent the foundation from being washed away with water, which can cause it to simply collapse. Therefore, during the do-it-yourself drainage around the house using perforated pipes, a real drainage system is created, which includes pipes and wells for collecting water that act as revisions. Wells are designed to always have access to the pipe, and if necessary, it could be cleaned.
In our case, the wells were located at pipe bends. After sprinkling it with crushed stone, we close the layer of geofabric with an overlap, as mentioned earlier, we “wrap” the pipe with a layer of crushed stone. After the geotextile is closed, we again sprinkle with sand, and again we ram. After completing the work on the drainage device around the house with our own hands, we fill the trench with the previously selected soil. If desired, you can additionally insulate the drainage system by placing a layer of thermal insulation material on the top sand cushion. You can already make a path along the layer of earth. So it will always be visible where the pipes of the drainage system pass.
What is drainage
In fact, this is a system by which water is removed from the surface of the soil or from a certain depth. This is one of the drainage systems. It achieves the following:
Water and moisture are removed from the areas where the foundation structures are located. The thing is that excessive moisture, especially for clay soils, causes foundation movements. As the builders say, it will "float", that is, it will become unstable. If we add frosty heaving of the soil to this, then the earth will simply push the structure out.
Lack of drainage on the site - wet basements in houses
- Basements and basements are being drained. Many may note that modern waterproofing materials are able to withstand any exposure to water, in any quantity. Nobody is going to argue with this. It's just that each material has its own operational resource. In a few years, even the highest quality waterproofing material will dry up. That's when the problems begin. In addition, there is always a possibility that there is a defect in some section of the insulation through which moisture will penetrate into the basement.
- If an autonomous sewage system with a septic tank is used on a suburban area, then the drainage will help the latter to stay in the ground. Taking into account, if the dacha has an increased level of groundwater.
- It is clear that the drainage system does not allow waterlogging of the soil. So, we can say that plants planted in the ground will grow normally.
- If the summer cottage is a territory located on a slope, then during precipitation, rainwater will wash out the fertile layer. This can be avoided by arranging drainage in a sloped area into which water flows are redirected. That is, they will be removed according to an organized system, without affecting the soil.
On the slopes, fertile soil is washed away by rain
We must pay tribute to the fact that not all suburban areas require the creation of a drainage system. For example, if it is located on a hill. Basically, there is always a need for it. Let's look at situations in which drainage is indispensable.
When should drainage be provided?
That is, we will indicate those cases when the drainage system is necessary in any case.
- If the suburban area is located in the lowlands. All atmospheric precipitation will flow down the slope here. The laws of physics have not been repealed.
- If the site is located on a flat area, the soil is clayey, the groundwater level is high (not lower than 1 m).
- Drainage on a site with a slope (strong) is also necessary.
- If you plan to build buildings with a deep foundation.
- If, according to the project, the main part of the territory of the summer cottage will be covered with a waterproof layer: concrete or asphalt paths and platforms.
- If lawns, flower beds are equipped with an automatic irrigation system.
If automatic watering of lawns is organized at the dacha, then drainage must be built


Where to start the construction of drainage
It is necessary to start with studies of a suburban area for the type of soil, the level of groundwater and the type of relief. This can only be done by professionals by conducting geological and geodetic surveys. Usually they make a topographic survey of the site, where the cadastral boundaries of the cottage are determined.The terrain is determined (wavy or even, with a slope in which direction), the type of soil, making exploration by drilling, and the physical and chemical properties of the soil. Be sure to indicate the UGV in the reports.
Based on the data provided, recommendations are formed on the depth of foundations, the type of waterproofing and drainage system. Sometimes it happens that experts generally do not recommend building large houses with basements, as the owners of the suburban area intended. Which leads the latter into bewilderment. Disappointments appear, but there is no way out.
It is clear that all ongoing research costs money, sometimes a lot. But you should not avoid these expenses, because the information received will subsequently save much larger capital investments. Therefore, all these studies, only at first glance, are unnecessary procedures. In fact, they are useful and necessary.
Checking the level of groundwater occurrence by drilling
How to use surface drainage in landscape design
Proper soil drainage of a large or small garden plot can simultaneously become its decoration. Even if global drainage of the territory is not required, surface drains around the house, blind areas, grooves are required. To begin with, it is desirable to make a project - a diagram of how moisture will be removed from the soil. Usually, water simply collects in grooves, trenches, wells and leaves the territory itself.

Also for such cases, you can build backfill drainage.
The layout depends on:
- garden styles;
- the presence or absence of sewerage;
- water depth;
- water disposal method;
- location of buildings, large trees;
- terrain slope.
There are two options for drainage trenches.Gutters that receive water coming from above and already collected before are made with waterproof walls made of concrete or plastic.

The cheapest and simplest can be considered surface drainage and backfill. For a deep or closed drainage system, significant costs will be required.
Drainage structures are designed to absorb excess moisture from the soil, therefore their surfaces are permeable. Surface drainage systems are sometimes created above deep drain pipes as an additional measure in excessively wet areas.

When creating a site drainage system with your own hands, first of all, you need to think over its scheme, determine the lowest place on the site.
It is permissible to decorate any trenches, for this they use:
- decorative gratings made of metal or plastic, special hatches of square, round, rectangular shape (for ditches made using ready-made trays);
- natural stone - if the ditch is drain, the elements are fastened with cement mortar, the drainage is created by "dry laying";
- Reno mattresses are the closest analogue of gabions, which are metal meshes filled with stones. They are laid at an angle or horizontally. With their help, not only drainage trenches are formed, but also crumbling slopes that are easily washed out by water are strengthened.
Tip: an interesting drainage system on the site is created with the participation of an artificial or natural pond, streams flowing on the territory
It is important that such reservoirs are located lower than the house and various outbuildings.
Choosing the right dehumidification system.
Before starting work, you should decide on the type of drainage that is necessary in this particular case. From this will depend on the amount of work on its manufacture. The choice of a drainage system depends on several factors: what object needs to be protected from water (house, plot), what type of water needs to be drained (precipitation, groundwater), the landscape of the site, and others.


Drainage system and storm sewer.
Surface drainage of water from the site.
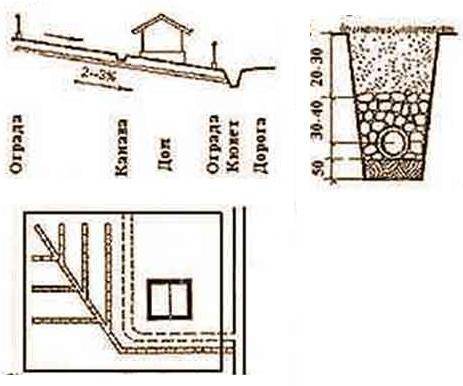
Let's imagine a situation. The land plot is sloping and water flows over the plot from the neighbor's plot located above. In this situation, the problem can be solved in two ways. You can do underground drainage of the entire site, spending a lot of time and money, or you can make a simple watershed at the border of the plots, forcing water to flow around the site. To do this, you will need to make a small embankment, decorating it with bushes and trees, or put artificial obstacles in the way of water, for example, make a fence with a blank foundation. You can make it even easier: dig an ordinary ditch in the path of water and bring it outside your site. The ditch can be covered with rubble.
Drainage ditch.
Drainage ditch filled with rubble.
Underground site drainage.
If it is not possible to organize surface drainage of water due to the characteristics of the landscape or for any other reason, then it is possible to drain a piece of land using underground drainage. For this, channels are dug, a central drainage pipe and drainage pipes with branches are laid in them. The distance between drains depends on the type of soil. If clay, then there should be a distance of about 20 m between the drainage pipes, if sand, then 50 m.
Site drainage plan.
Site drainage.
Lowering groundwater drainage.
If you are building a house and you want the house to have a basement, but the groundwater level is high on the site, then the drainage must be arranged below the level of the foundation of the house. The drainage pipe should be laid below the foundation level by 0.5-1m and away from the foundation at a distance of 1.5-2m. Why does the pipe need to be below the foundation level? The fact is that the groundwater level will never fall to the level of drainage pipes. There will always be water backwater, and the water between the drainage pipes will take the form of a curved lens
Therefore, it is important that the top of this water lens does not reach the foundation of the house.
Scheme of downward drainage of groundwater.
Also, the drainage pipe should not be in the stress zone under the foundation. If the pipe is laid in this stress zone, then the soil under the foundation will be washed away by water that flows through the drainage, and then the foundation may settle and be destroyed.
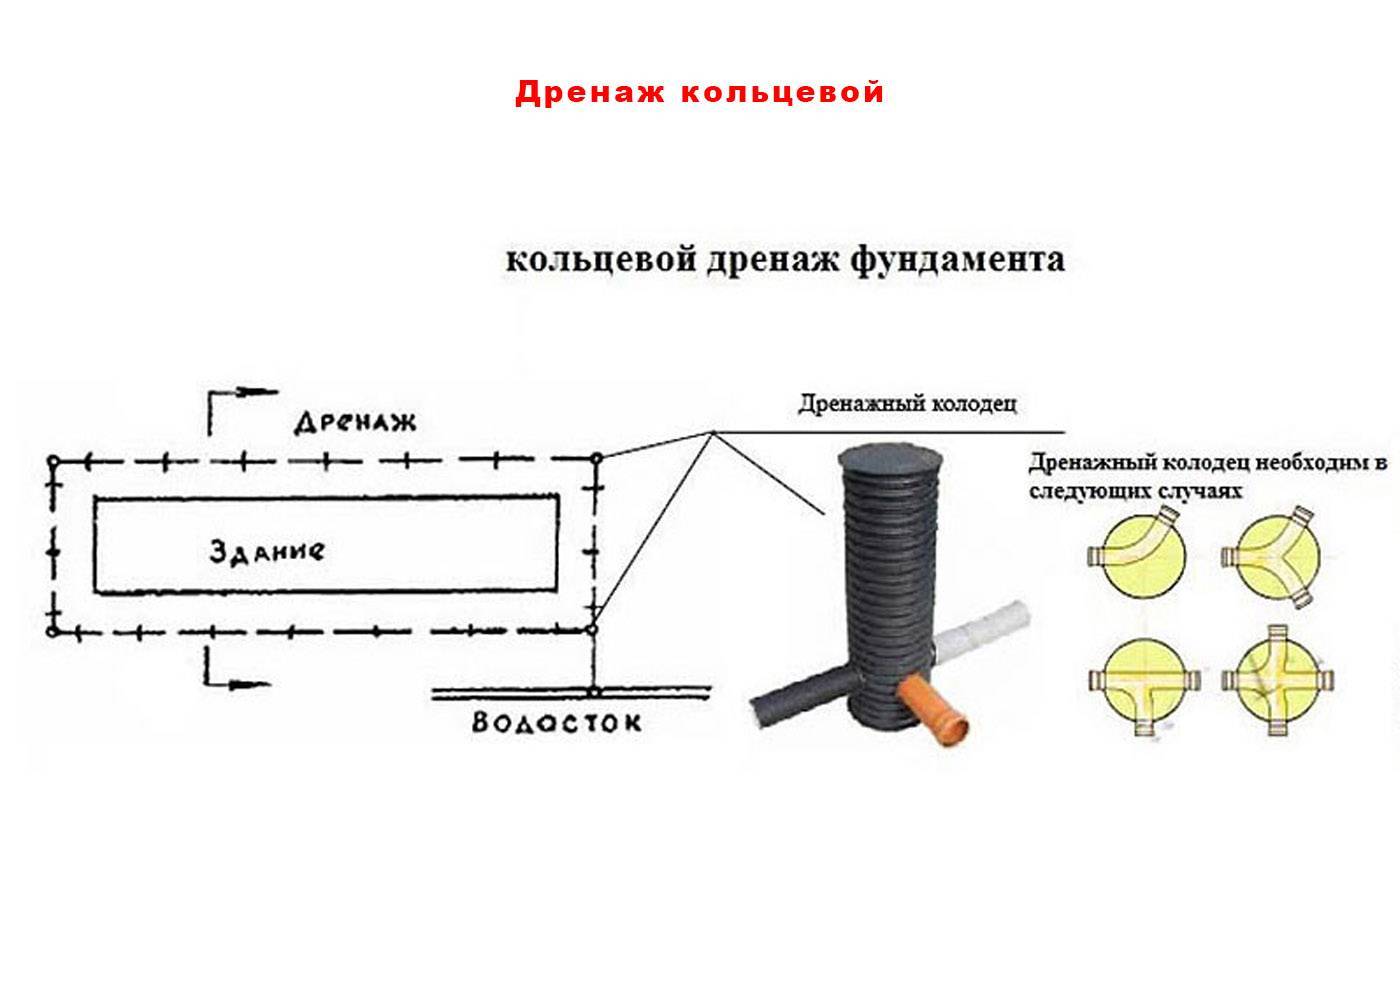
Intercepting drainage.
If water appears in the basement of the house after rain or melting snow, then an intercepting drainage is needed, which will intercept the water on the way to the house. This type of drainage can be arranged close to the foundation of the house or at a short distance from the house. The depth of such drainage should not be lower than the sole of the foundation of the house.
Drainage scheme.
Drainage scheme.
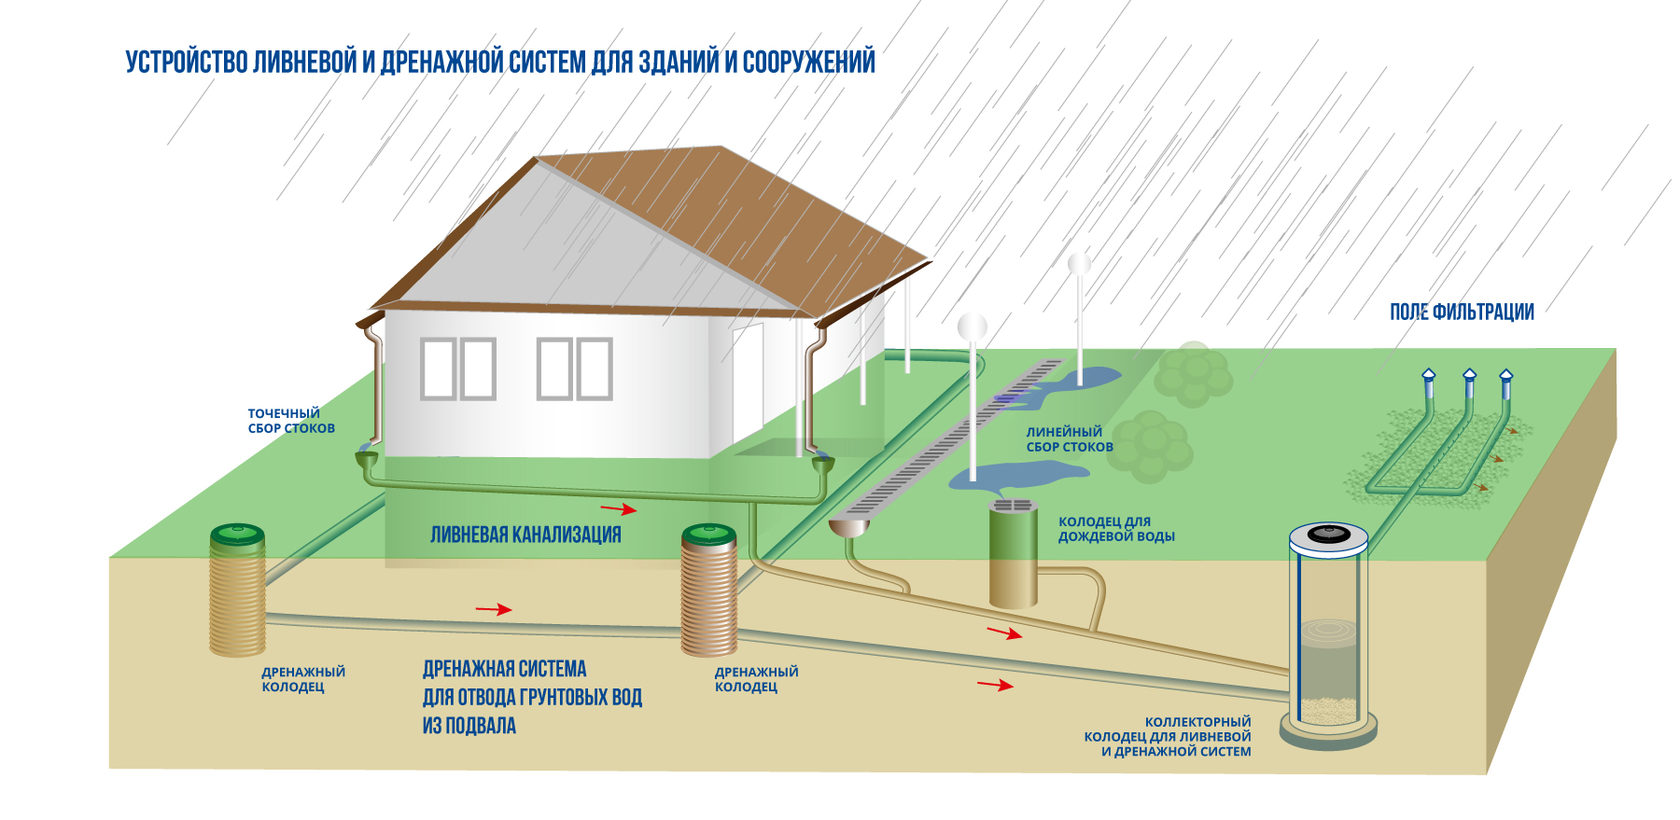
Storm sewer.
If you want to organize the drainage of storm water from the house, then you can make an underground water drainage with point water inlets or surface drainage using special trays with a grate. Drainage from trays can be more expensive due to material prices, but it allows you to intercept water along the entire length of the trays.
Not
storm sewers should be confused with drainage of water from the site or from the house.it
two different things.
When draining storm water from the house, drainage pipes with holes are not used. Water is discharged through conventional sewer or special corrugated pipes. Some people make a very big mistake when storm drains are connected to drain pipes. In other words, storm water is run into pipes with holes. According to their logic, the water that is collected from the roof of the house will be discharged through these pipes, and additionally, water from the ground will seep into the drainage pipes and leave through them. In fact, a large volume of storm water will not completely leave through such pipes, but on the contrary, it will seep out of them and soak the ground around. The consequences of such improper drainage can be very bad, for example, soaking the foundation of the house and its subsidence.
Installation of storm sewer with corrugated pipes.
Installation of underground storm sewers.
Installation of storm above-ground sewerage with trays.
Storm sewer from trays.