- Types of drainage system on the site
- Types of dehumidification systems
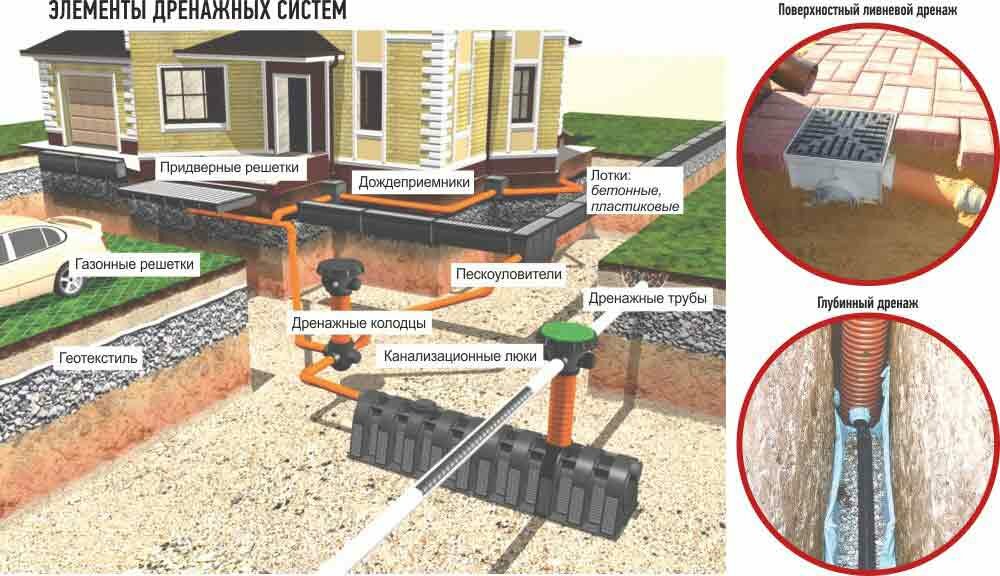
- Surface type drainage
- deep drainage
- The principle of operation of the drainage system
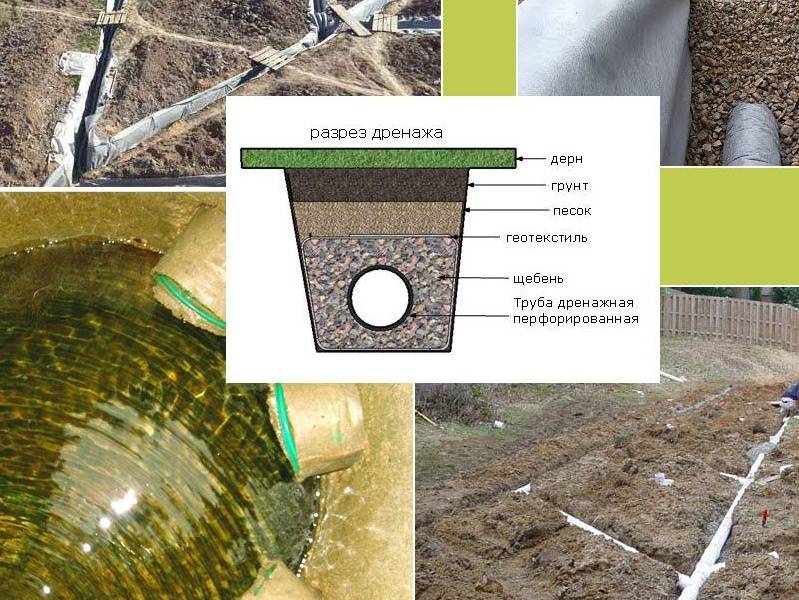
- The order of laying the drainage system
- Choosing the right dehumidification system.
- Surface drainage of water from the site.
- Underground site drainage.
- Lowering groundwater drainage.
- Intercepting drainage.
- Storm sewer.
- Why do you need drainage in the garden
Types of drainage system on the site
The drainage system has quite a few varieties. Views may vary depending on the source of the system. It is better to give preference to simpler devices for the sewerage device.
The main types of drainage:
- Surface - a simple but effective drain system. It is used to remove rain, melted snow or excess liquid during technological processes. A surface device can be found at any summer cottage and house.
- Deep - a more radical drain, which is a system of corrugated pipes with holes laid in places where it is necessary to lower the water level.
Surface drainage is divided into several types. You can distinguish point and line. The first option is used exclusively to drain a certain area. The second name of the point system is local drain.Such drainage is placed on the roofs, in front of the doors, in the places of distribution of taps for irrigation.
Linear drainage is used for large areas. This is a symbiosis of trays and channels that are installed at a certain slope. Different materials can be used for drain parts.
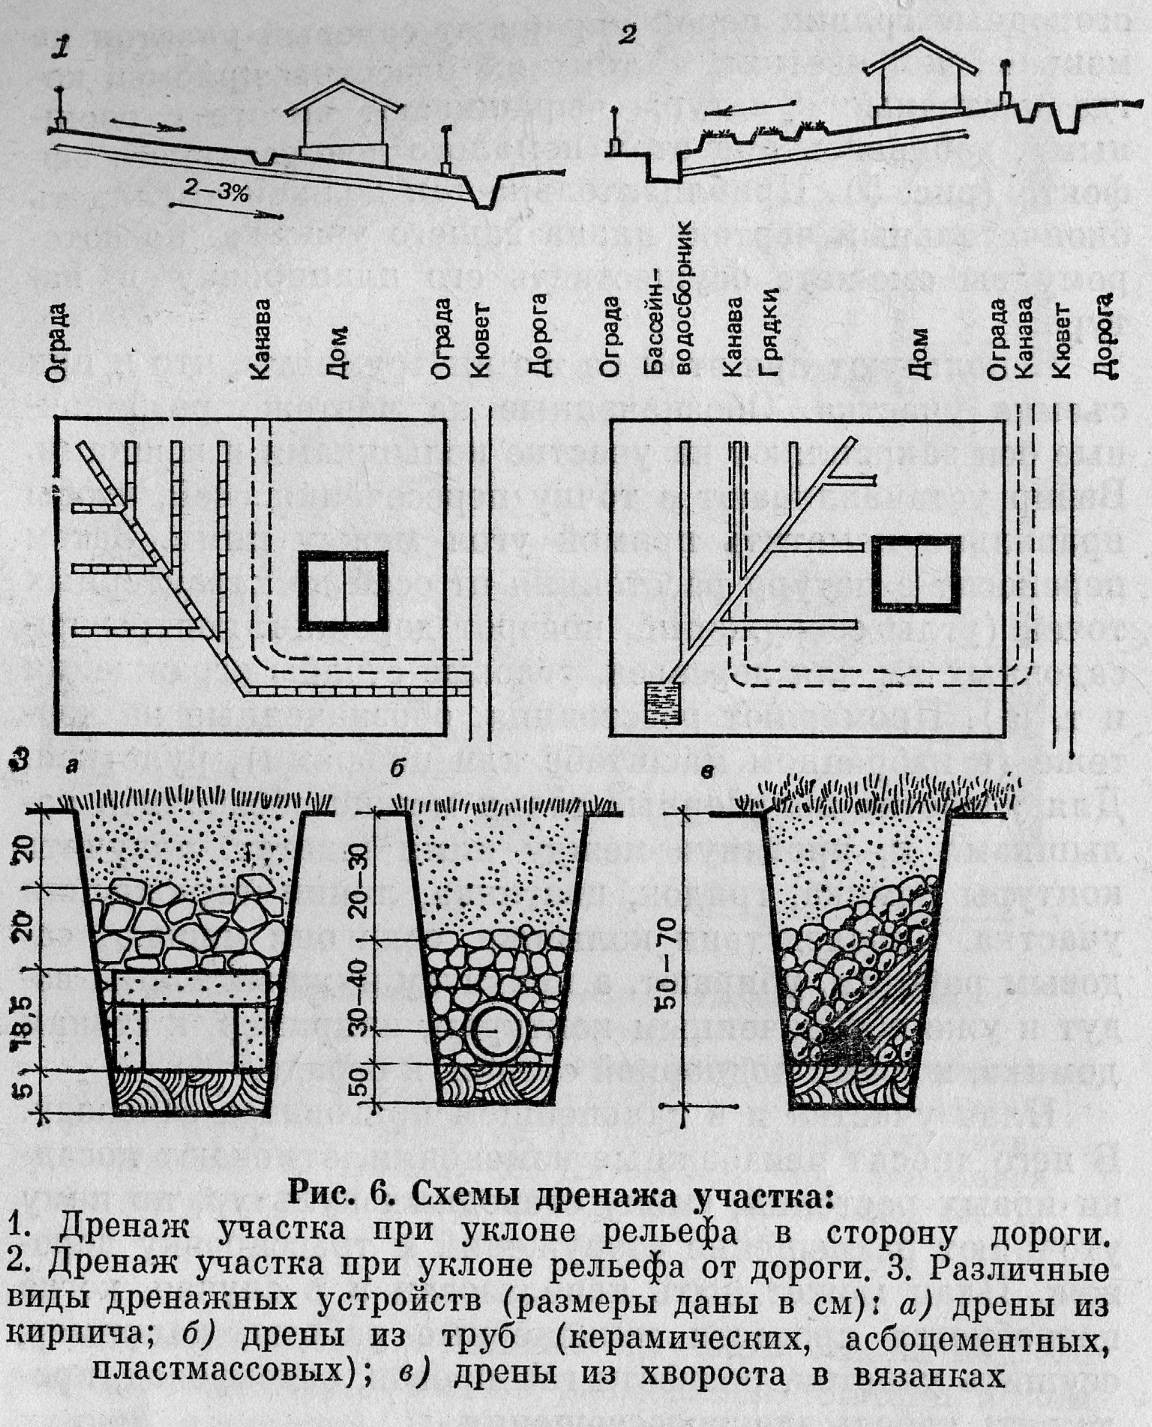
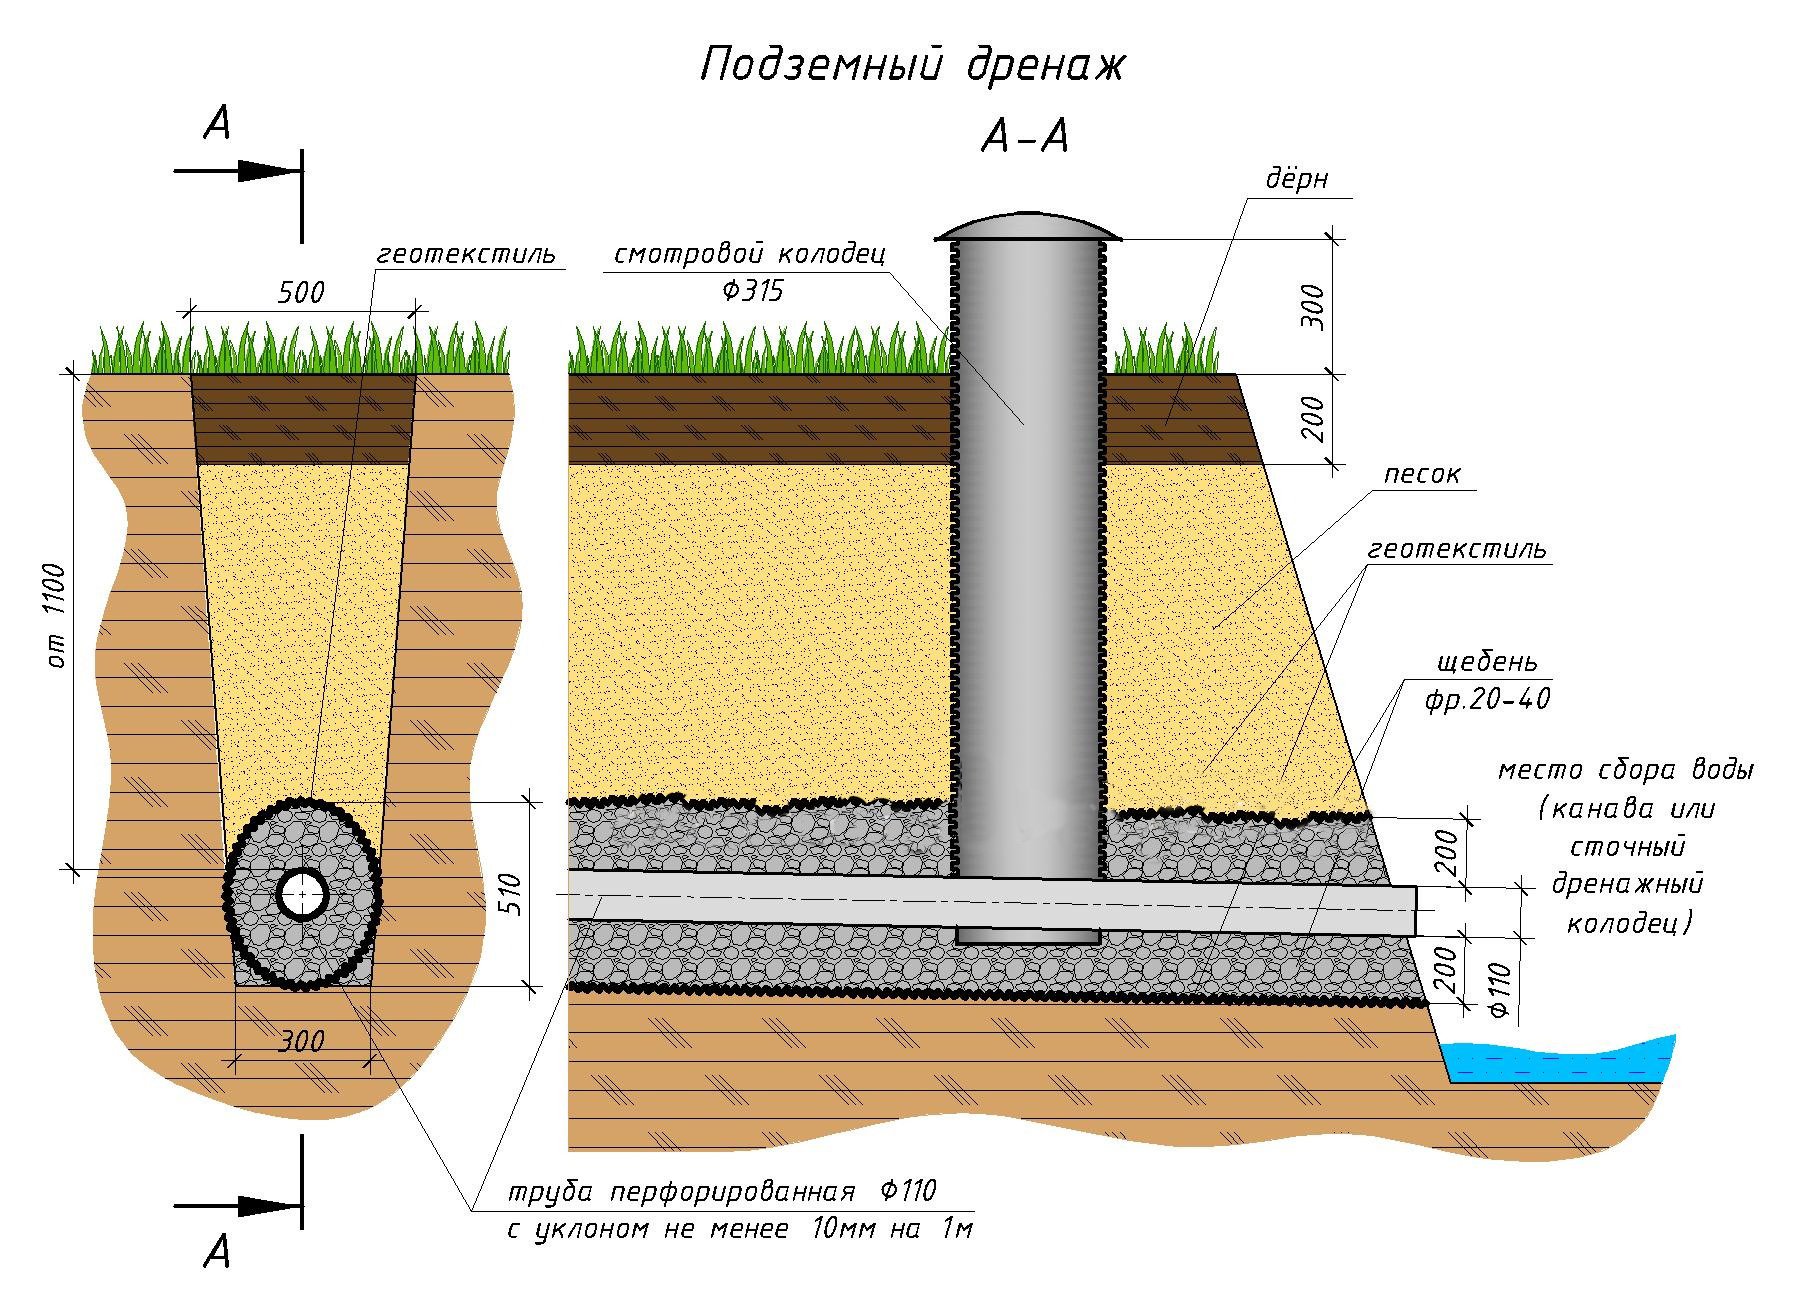
The design of deep drainage is represented by a complex of special pipes (drains). They are mounted with a slope towards the well or collector, any reservoir. The installation depth of the pipes is 0.8-1.5 m. The pipes can also be located in the middle of the site, taking into account the occurrence of groundwater. The interval between the pipes is 10-20 m. The system looks like a "herringbone".
Types of drainage wells:
- Swivel. Mounted on the corners of the sewer. Used for drain cleaning. Container sizes may vary.
- Water intake. They collect water in places where it is impossible to divert it. Water is removed using special pumps.
- Absorption. When water cannot be removed from the site, it is absorbed by the layers of soil that are capable of it. These are sandy and sandy loam species. With the help of crushed stone, filtration is created in the well.
A deep drain is installed taking into account the characteristics of the terrain. Calculate the required drainage slope. In the case of a flat surface, I make the slope of the trench itself.
Types of dehumidification systems
There are a wide variety of land drainage systems. At the same time, in various sources, their classification can be very different from each other. In the case of drainage systems for suburban and summer cottages, it is recommended to use the simplest and most proven solutions.
Surface type drainage
Surface drainage is the simplest and most effective system.The main task is to drain the soil by draining water formed as a result of heavy rainfall and uneven snowmelt.
Grids protect the open drainage system from large debris
Surface drainage system It is built on the area of the site, around the house and buildings adjacent to it, near garage structures, warehouses and the courtyard. Surface drainage is divided into two subspecies:
- Point - in some sources it is referred to as local drainage. It is used to collect and divert water from a certain place on the site. The main area of application is drainage of areas under drains, near entrance doors and gates, in the area of tanks and irrigation taps. Often used as an emergency system if another type of drainage is overloaded.
- Linear - used to drain the entire area. It is a system consisting of receiving trays and channels arranged at a certain angle, providing a constant flow of water. The drainage system is equipped with filter grates and sand traps. Trays and drains are made of PVC, polypropylene, HDPE or polymer concrete.
When installing a surface drainage system, it is recommended to combine point and linear drainage. This will ensure the most efficient operation of the system. If necessary, point and line drainage can be combined with the system described below.


deep drainage
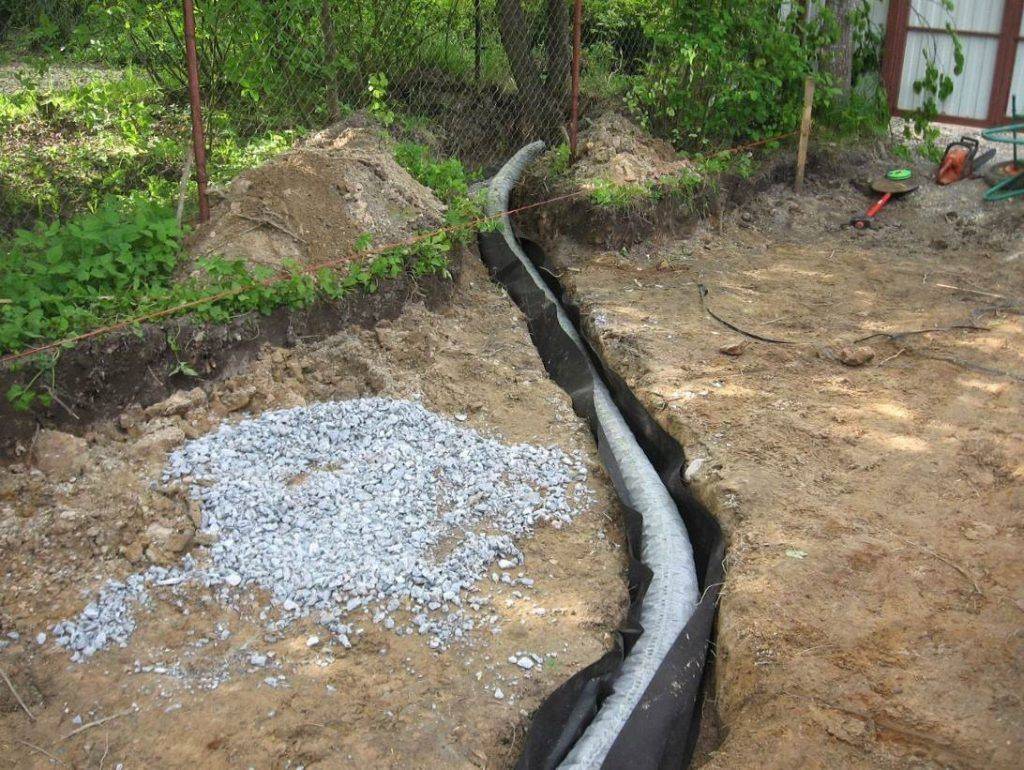
Deep drainage is carried out in the form of a pipeline laid in places where it is necessary to constantly drain the soil or lower the groundwater level.Drains are laid with observance of a slope in the direction of the flow of water, which enters the collector, well or reservoir located outside the site.
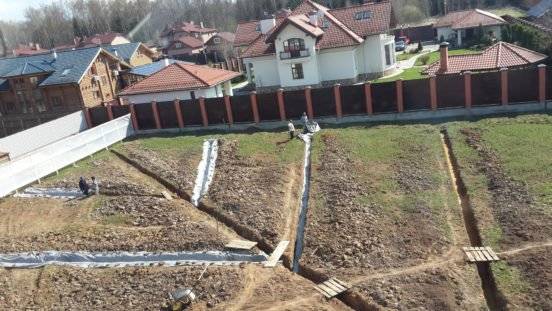
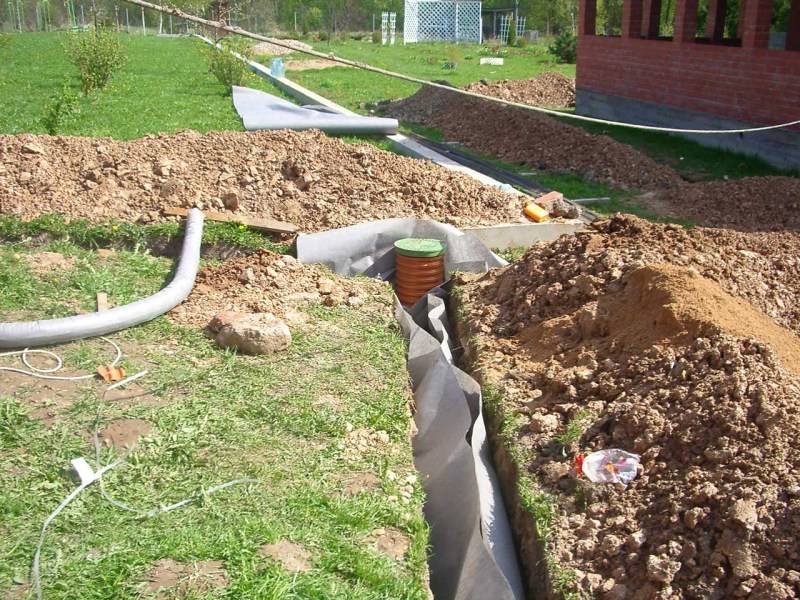
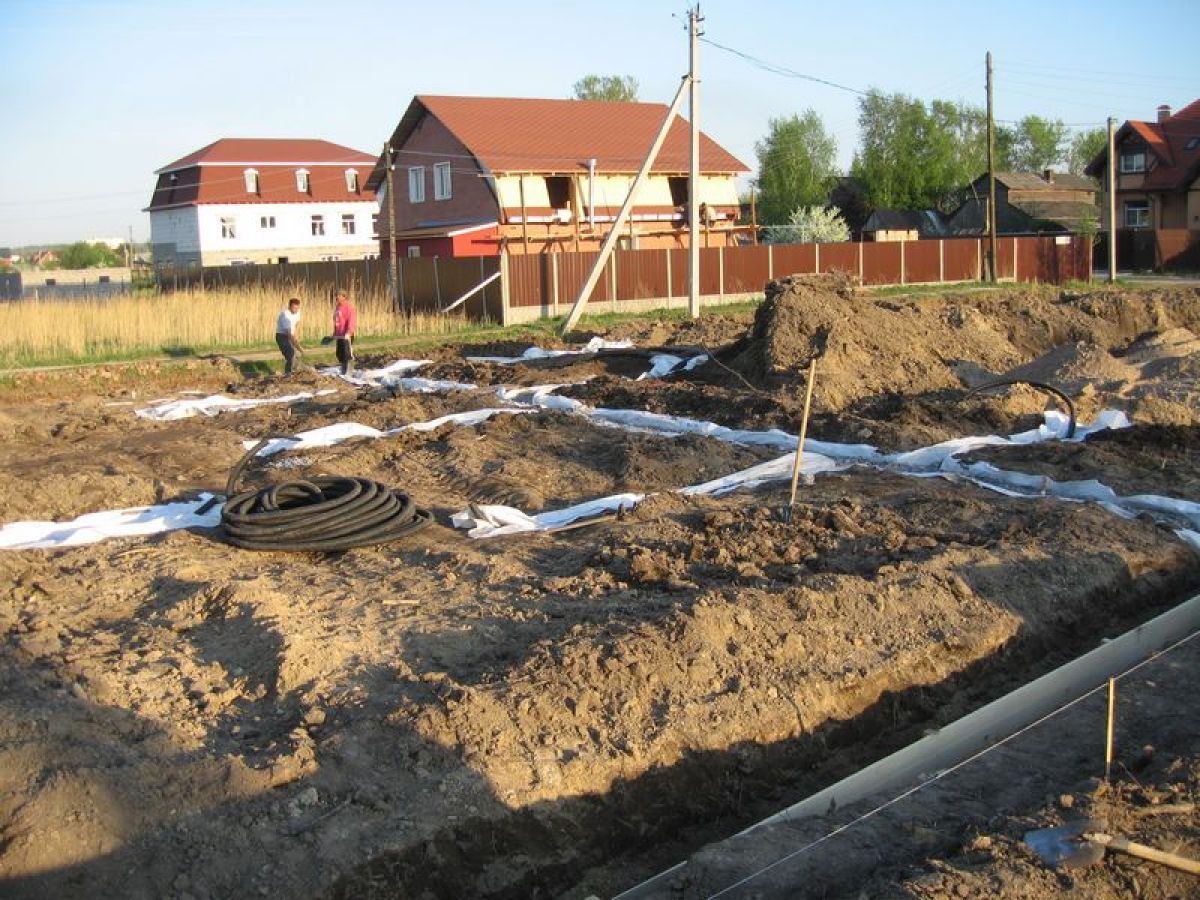
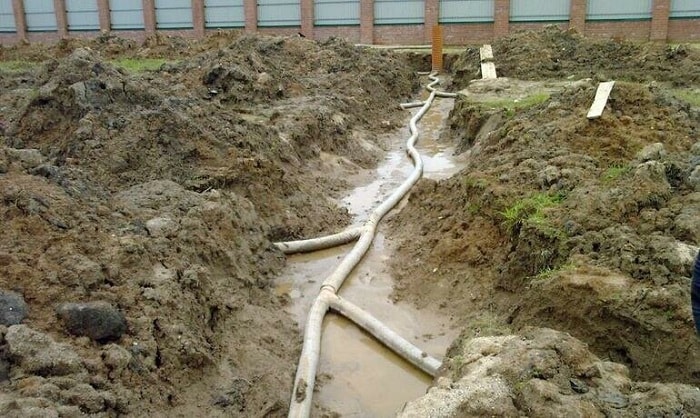
The process of constructing deep drainage in a suburban area
For example, when constructing a drainage system, when drains are laid to a depth of 0.9–1 m, the recommended distance between them is at least 9–11 m. On loamy soil, under the same conditions, the step between drains decreases to 7–9 m, and on clayey up to 4–5.5 m. More detailed data for different depths of laying can be seen in the table below. The information is taken from the book "Draining land for gardens" by A.M.Dumbljauskas.
| Drainage depth, m | Distance between drains, m | ||
| sandy soil | loamy soil | Clay soil | |
| 0,45 | 4,5–5,5 | 4–5 | 2–3 |
| 0,6 | 6,5–7,5 | 5–6,5 | 3–4 |
| 0,9 | 9–11 | 7–9 | 4–5,5 |
| 1,2 | 12–15 | 10–12 | 4,5–7 |
| 1,5 | 15,5–18 | 12–15 | 6,5–9 |
| 1,8 | 18–22 | 15–18 | 7–11 |
When laying pipes the features of the terrain are observed. According to the technology, drains are laid from the highest to the lowest point on the site. If the site is relatively flat, then to give a slope, a slope is formed along the bottom of the trench. The minimum slope level is 2 cm per 1 running meter of the drainage pipe when constructing drainage in clay and loamy soil. For sandy soil, a slope of 3 cm per 1 meter is observed.
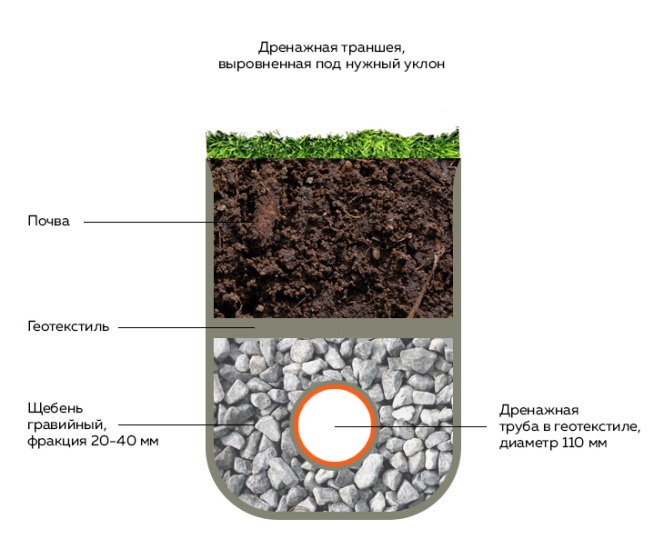
Diagram of a deep drainage device
When arranging drainage of a long length, a minimum slope must be observed along the entire length of the drainage route. For example, for drainage system 15 m long, the minimum level difference between the start and end points of the route will be at least 30 cm.
If possible, it is recommended to exceed the declared slope standards. This will provide faster drainage, reduce the risk of silting and clogging of the drain.In addition, digging a trench with a large slope is much easier than measuring out 1–2 cm.
The principle of operation of the drainage system
The action of the drainage is fully consistent with its main purpose - the removal of excess moisture to a safe distance. It would be a mistake to assume that one pipe laid around the perimeter of the house can cope with this problem.
In fact, this is a whole engineering and construction complex that fights against an excess of moisture, protecting foundations and basements, but without overdrying the surrounding area.
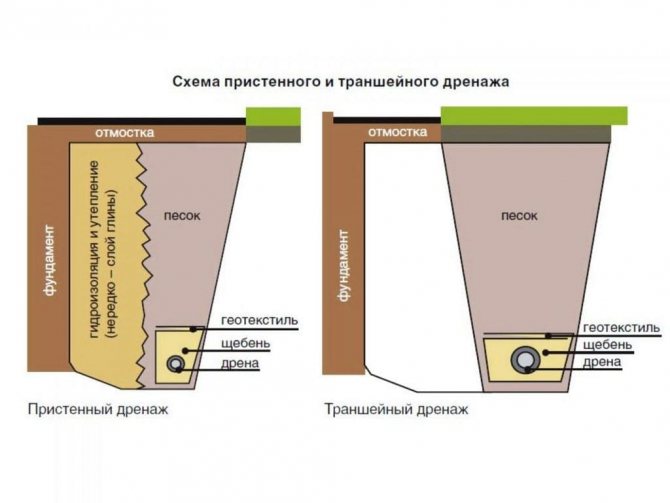
The wall type of drainage is appropriate in conditions of clay soil and loam, when melt, rain and groundwater cannot independently leave the area located around the building. A complex design of pipes, wells and outlets removes excess water quite effectively, despite the budgetary cost.


One of the simplest designs of wall drainage: installation of drains around the perimeter of the building, revision wells in the corners (sometimes two are enough), drainage outside the garden plot (+)
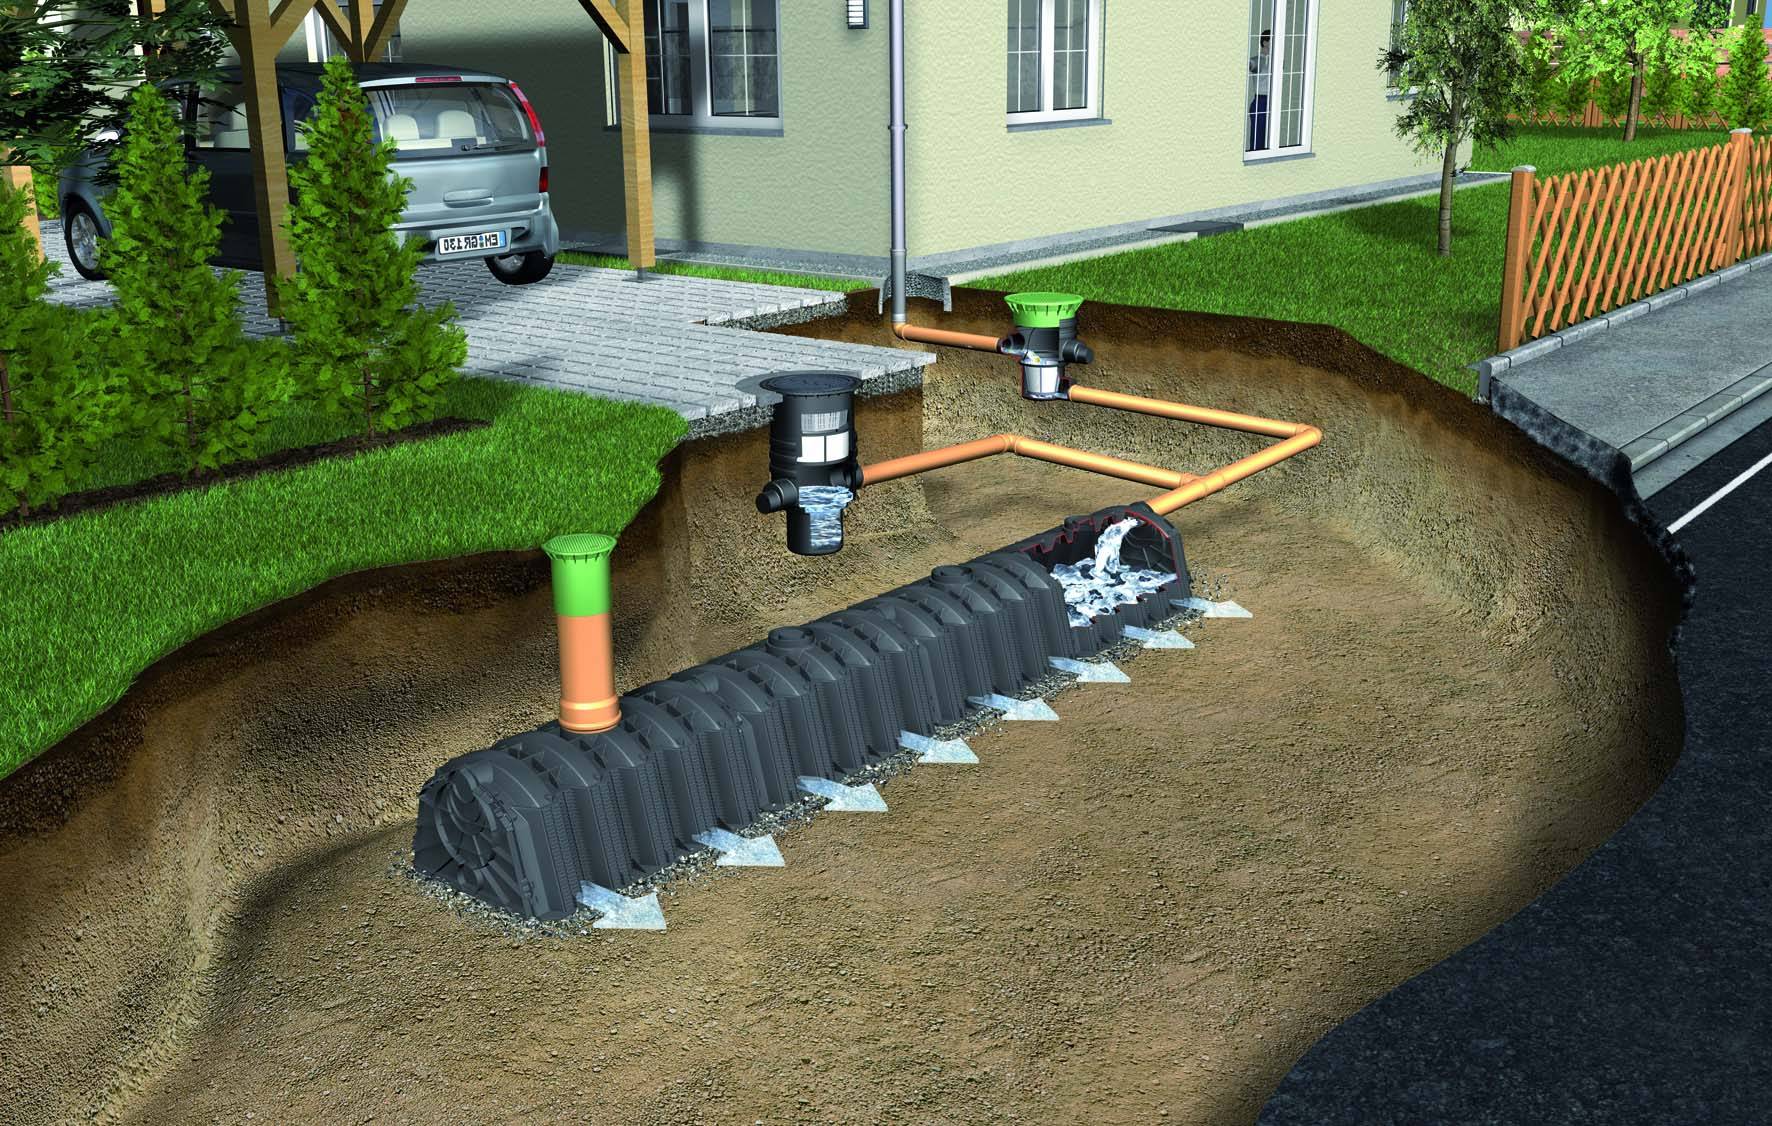
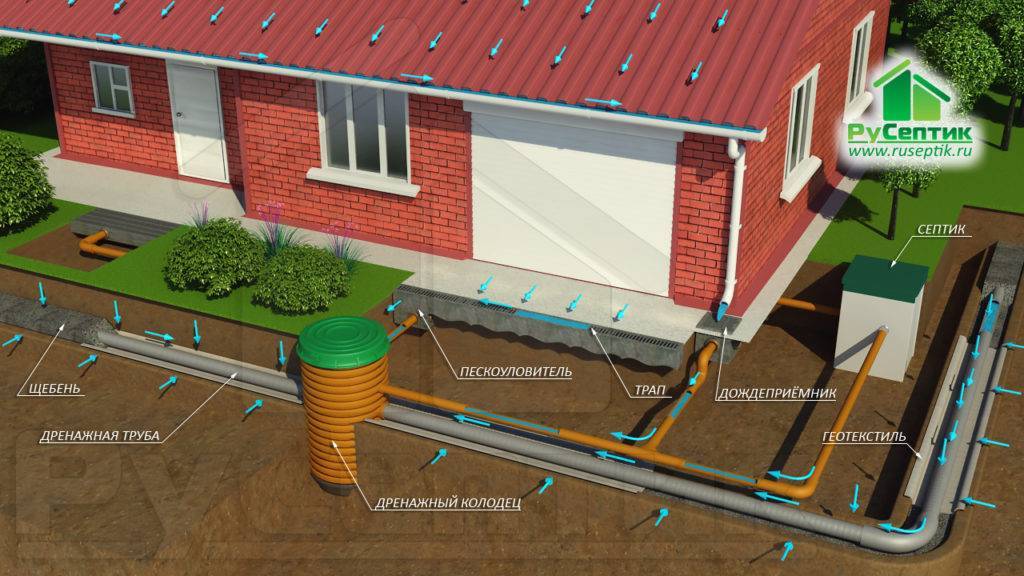
One of the popular schemes involves the connection of two systems - drainage and storm water - in the area of \u200b\u200bthe storage well, which is usually located at the lowest point of the territory adjacent to the house.
In practice, the option is often used when the drainage pipeline is cut into the manholes of the storm sewer. However, this is possible only under one condition - if the total volume of effluents does not exceed the norms calculated for the installed equipment.
If the drain zone is located above the water level in the reservoir, pumping equipment has to be installed. Popular option - submersible drainage pump, selected by power.
There are two options for arranging drainage around the foundation: traditional and more reliable. Traditional - this is the installation of pipes with gravel backfill, a filter and a clay lock. Its performance has been proven for decades.
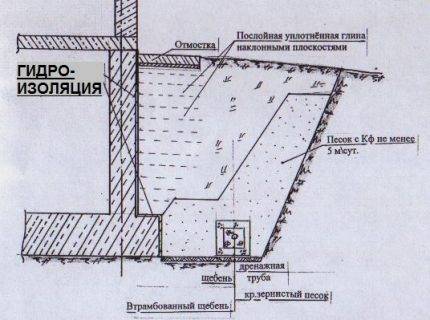 The clay lock, which is one of the important elements of the system, is compacted in layers to increase water resistance. It cuts off groundwater from the foundation, thus creating an irresistible water barrier (+)
More reliable modern drainage is distinguished by the design of the foundation. A geomembrane is fixed along its entire width, the characteristics of which are not inferior to a clay castle.
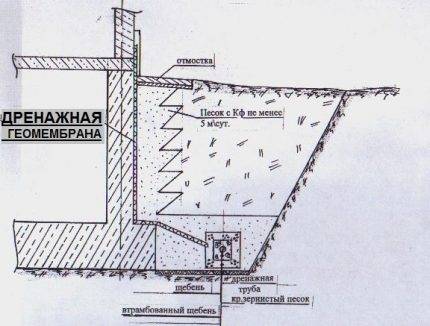 Installation of a geomembrane is more economical in terms of device: no need to dig a deep ditch, look for the right grade of clay, transport a heavy load to a construction site, remove excess soil (+)
The installation process is much simpler, if only because you do not need to do calculations and calculate the angle of inclination of the clay "plug". Now almost all wall drainage schemes include the use of a geomembrane, because it is reliable, practical, fast and efficient.
The order of laying the drainage system
In order to save money, many homeowners plan to do all the installation work associated with installing a drainage system with their own hands. For such home craftsmen, the following is step by step instructions for self-installation drainage in a summer cottage or in the private sector.
Mounting sequence
At the initial stage, marking and digging of trenches intended for pipe laying
Here it is important to strictly comply with the requirements of the project documentation, if any.
The next step is tamping the bottom and side surface of the trenches. To perform this simple operation, you can use a simple device that is easy to make on your own.
For greater efficiency, sandy soils can be slightly moistened.
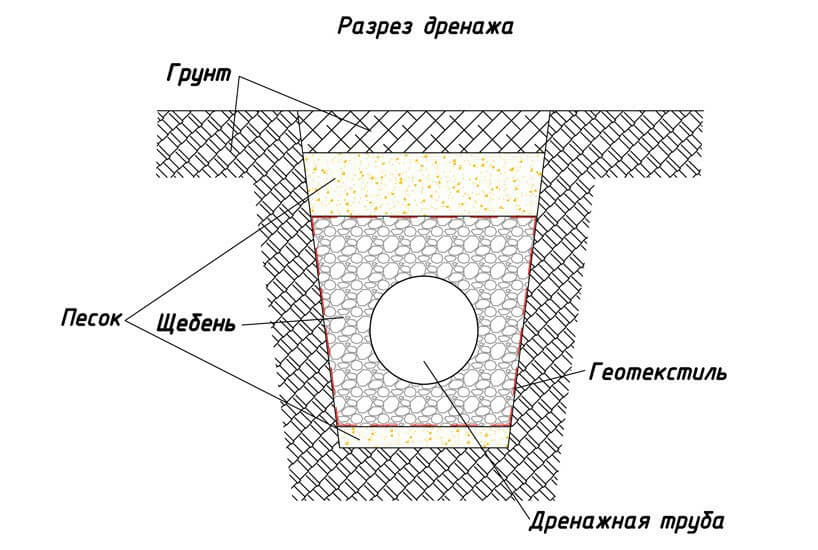
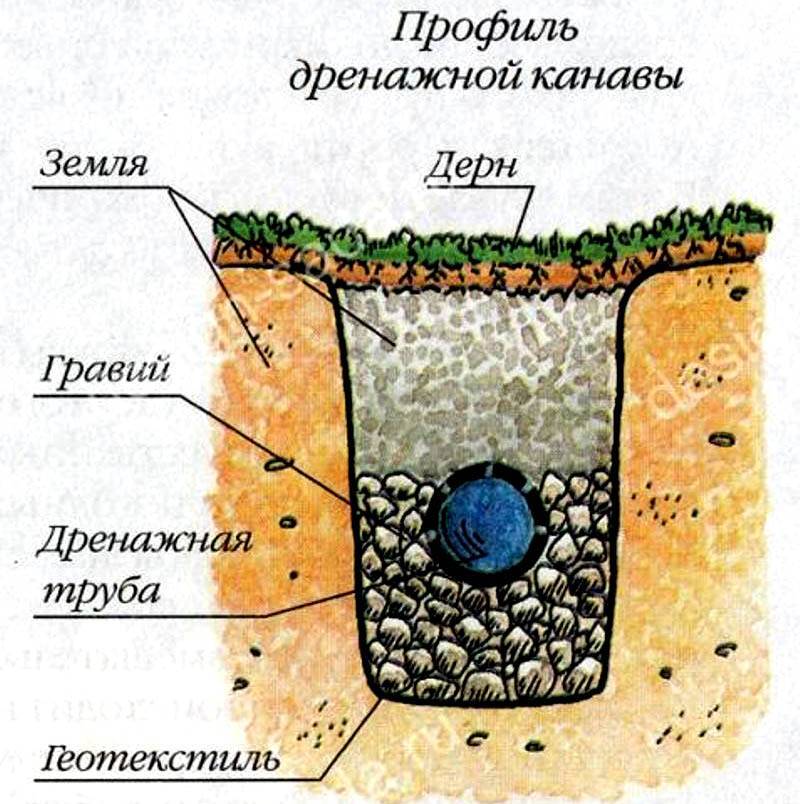
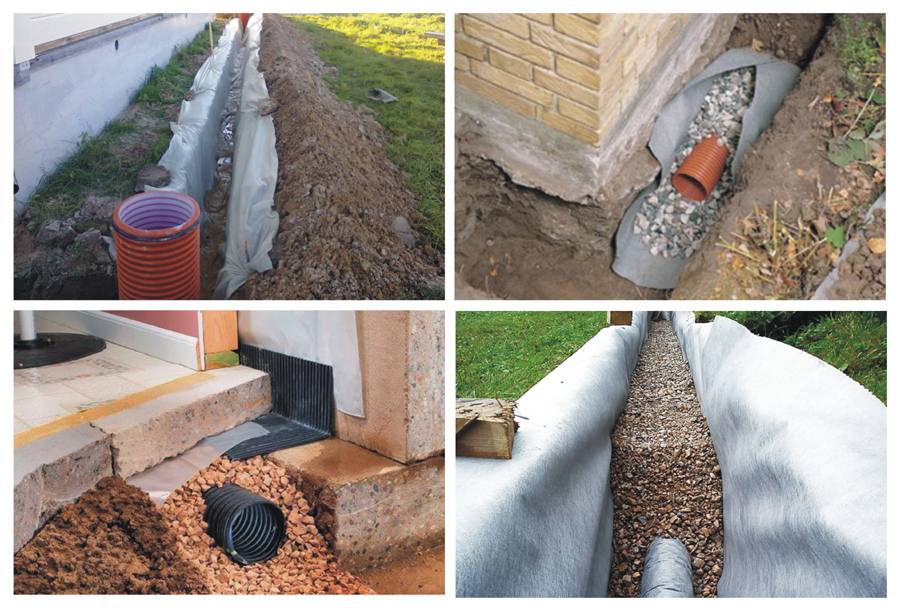
Next - laying on the bottom and side walls of the trench sand pillows and rubble and its careful ramming.
The tamped surface is covered with a geotextile sheet in such a way that a web residue of at least 0.5 m is formed on both sides of the trench.
The next step is washing and laying gravel on the bottom of the trench. Typically, a gravel pad has a thickness of 200 to 250mm.
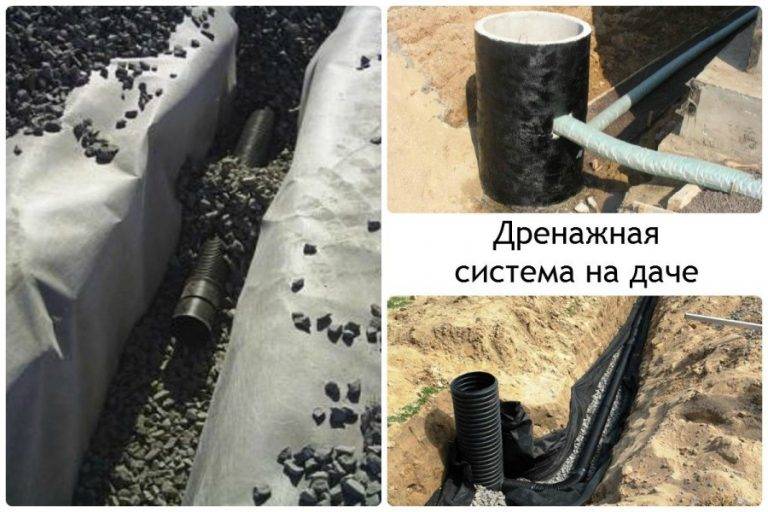
Perforated drainage pipes are wrapped with geotextile.
Next, the pipe is laid on a gravel bed and connected using specially designed couplings.
In those places where three or more pipes are joined, a special drainage well is installed. In addition, such wells should be installed every 50-55 m.
After assembling the structure, the trench is covered with a layer of gravel 25-30 cm thick.
After that, the trench is completely covered with soil. To improve the aesthetic characteristics, layers of turf can be laid on top.
It is advisable to use the water collected in drainage wells for irrigation of beds or other domestic needs.


It is very difficult to ensure the removal of excess moisture from the site. Before starting the installation of the drainage system, you need to carefully study the landscape of the site, soil features, accurately determine depth of aquifers layers. Based on these data, independently, or with the help of specialists, draw up a draft drainage system.Only after that you can start installation work.
Choosing the right dehumidification system.
Before starting work, you should decide on the type of drainage that is necessary in this particular case. From this will depend on the amount of work on its manufacture. The choice of a drainage system depends on several factors: what object needs to be protected from water (house, plot), what type of water needs to be drained (precipitation, groundwater), the landscape of the site, and others.
 drainage system and storm sewer.
Surface drainage of water from the site.
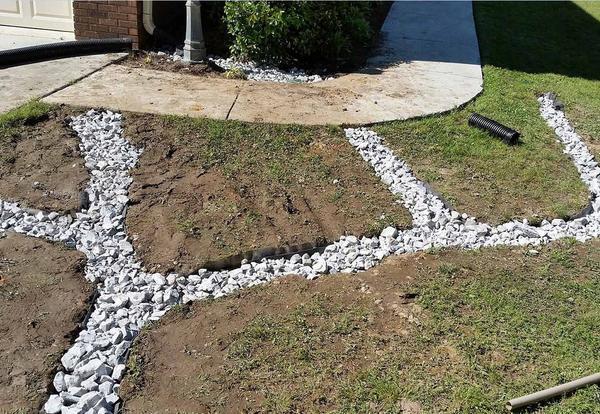
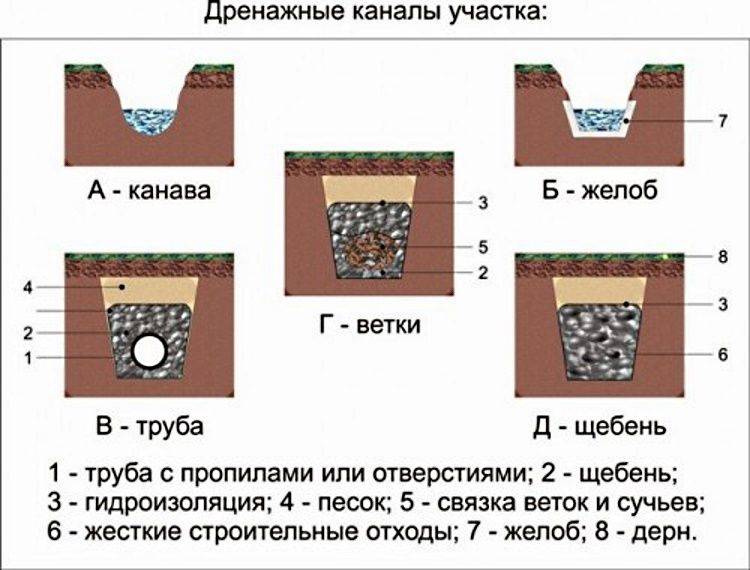
Let's imagine a situation. The land is sloping and water is flowing on the plot from the neighbor's plotlocated above. In this situation, the problem can be solved in two ways. You can do underground drainage of the entire site, spending a lot of time and money, or you can make a simple watershed at the border of the plots, forcing water to flow around the site. To do this, you will need to make a small embankment, decorating it with bushes and trees, or put artificial obstacles in the way of water, for example, make a fence with a blank foundation. You can make it even easier: dig an ordinary ditch in the path of water and bring it outside your site. The ditch can be covered with rubble.
 Drainage ditch.
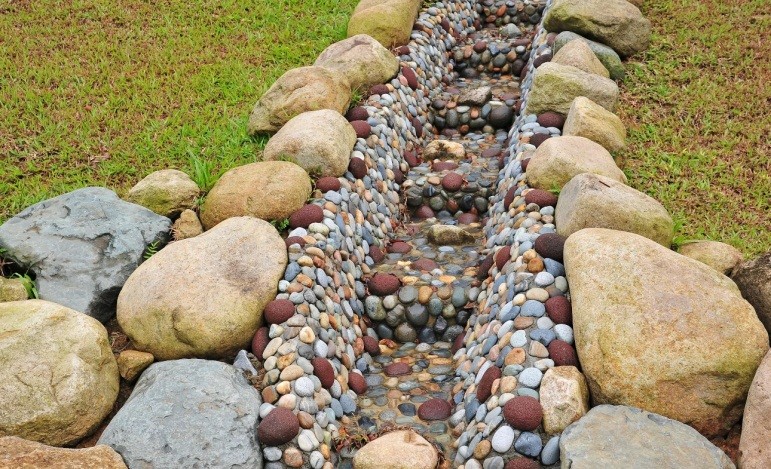
 Drainage ditch filled with rubble.
Underground site drainage.
If it is not possible to organize surface drainage of water due to the characteristics of the landscape or for any other reason, then it is possible to drain a piece of land using underground drainage. For this, channels are dug, a central drainage pipe and drainage pipes with branches are laid in them. The distance between drains depends on the type of soil.If clay, then there should be a distance of about 20 m between the drainage pipes, if sand, then 50 m.
 Site drainage plan.
 Site drainage.
Lowering groundwater drainage.
If you are building a house and you want the house to have a basement, but the groundwater level is high on the site, then the drainage must be arranged below the level of the foundation of the house. The drainage pipe should be laid below the foundation level by 0.5-1m and away from the foundation at a distance of 1.5-2m. Why does the pipe need to be below the foundation level? The fact is that the groundwater level will never fall to the level of drainage pipes. There will always be water backwater, and the water between the drainage pipes will take the form of a curved lens
Therefore, it is important that the top of this water lens does not reach the foundation of the house.
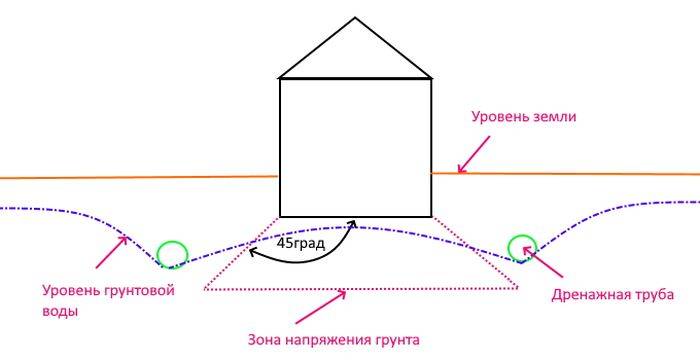 Scheme of downward drainage of groundwater.
Also, the drainage pipe should not be in the stress zone under the foundation. If the pipe is laid in this stress zone, then the soil under the foundation will be washed away by water that flows through the drainage, and then the foundation may settle and be destroyed.


Intercepting drainage.
If water appears in the basement of the house after rain or melting snow, then an intercepting drainage is needed, which will intercept the water on the way to the house. This type of drainage can be arranged close to the foundation of the house or at a short distance from the house. The depth of such drainage should not be lower than the sole of the foundation of the house.
 Drainage scheme.
 Drainage scheme.
Storm sewer.
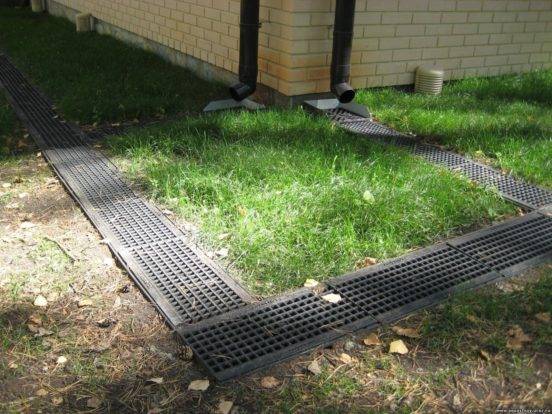
If you want to organize the drainage of storm water from the house, then you can make an underground water drainage with point water inlets or surface drainage using special trays with a grate. Drainage from trays can be more expensive due to material prices, but it allows you to intercept water along the entire length of the trays.
Not
storm sewers should be confused with drainage of water from the site or from the house. it
two different things.
When draining storm water from the house, drainage pipes with holes are not used. Water is discharged through conventional sewer or special corrugated pipes. Some people make a very big mistake when storm drains are connected to drain pipes. In other words, storm water is run into pipes with holes. According to their logic, the water that is collected from the roof of the house will be discharged through these pipes, and additionally, water from the ground will seep into the drainage pipes and leave through them. In fact, a large volume of storm water will not completely leave through such pipes, but on the contrary, it will seep out of them and soak the ground around. The consequences of such improper drainage can be very bad, for example, soaking the foundation of the house and its subsidence.
 Installation of storm sewer with corrugated pipes.
 Installation of underground storm sewers.
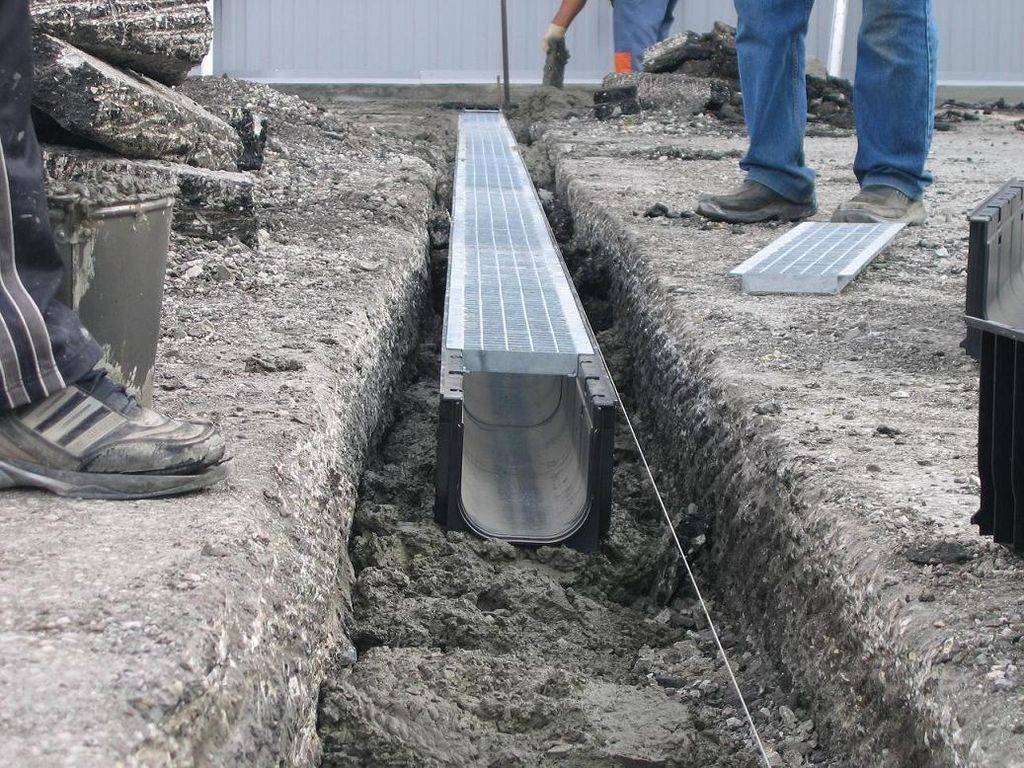 Installation of storm above-ground sewerage with trays.
 Storm sewer from trays.
Why do you need drainage in the garden
Ask any builder or landscape designer where to start equipping a suburban area. There is only one answer - from drainage, if required. And, as practice shows, such a need is almost always present.
And it is necessary to start with it only because the creation of a drainage system is a huge amount of earthwork. Almost the entire summer cottage will have to be dug with ditches. And if some buildings have already been erected on the site, then they will simply interfere with the construction of drainage.
It should be added that the construction of a drainage system is an expensive process. Therefore, many private developers refuse it, referring to the fact that just recently everyone somehow managed without it. The argument is, frankly, weak. After all, life has gotten better in recent years. Long gone into oblivion are small dachas knocked together from boards. They were replaced by houses built of stone or wood, in extreme cases using frame technology, but sheathed with modern materials.

The consequences of the lack of a drainage system - sagging foundation and cracks walls of the house
That is, everyone wants to live comfortably and beautifully. Why, then, do some refuse to improve the backyard, to create a beautiful landscape design, in which drainage plays an important role. But its absence can lead to serious problems, where puddles after rain, dirt on garden paths, poorly growing plants are just “flowers”. The consequences can be much more serious, for example, a sagging foundation, hence cracks in the walls.


