- Basic principles of the drainage system
- Do-it-yourself ring drainage
- How to do deep drainage?
- Choosing the right dehumidification system.
- Surface drainage of water from the site.
- Underground site drainage.
- Lowering groundwater drainage.
- Intercepting drainage.
- Storm sewer.
- Main works
- Stormwater as an effective addition
- What is drainage
- When should drainage be provided?
- Where to start the construction of drainage
- Installation of drainage around a turnkey private house
- How to choose a contractor
- How much does high-quality turnkey drainage cost?
- Features of the closed version
- Basic requirements for LF for a private house
- Conclusion
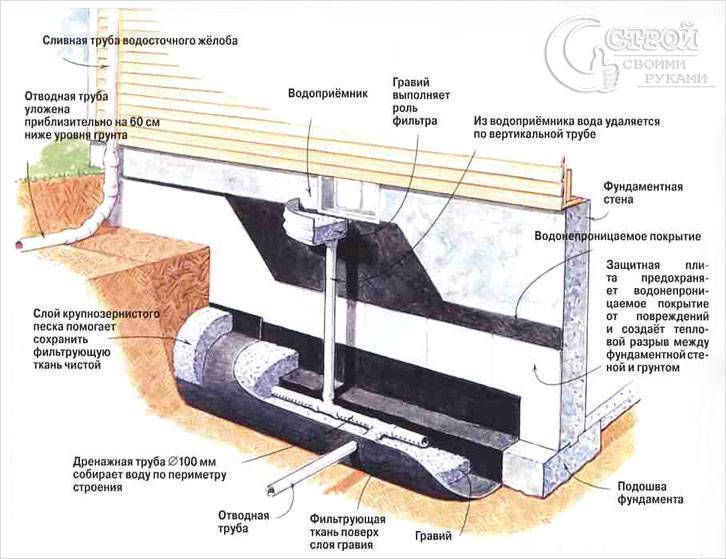
Basic principles of the drainage system
Precipitation, spring gathering of snow often leads to excessive wetting of the top layer of soil in a personal plot. Under normal conditions, evaporating from the surface of the earth and seeping into the lower layers of the soil, moisture disappears, taking part in the endless cycle of the water cycle in nature.
However, with a certain structure of the soil, it is possible to thaw natural waters and, as a result, swamp the area, up to the formation of small lakes and ponds. Most often, such a picture can be observed in areas with clay soil or a large amount of loam.
The water-impervious layer is located at a depth of fifty centimeters to several meters, retaining huge masses of water and making it impossible to carry out any construction work without first draining the site.
Drainage system is a complex of engineering and technical building structures, the main purpose of which is to protect buildings and structures from
Groundwater and melt water, once on the clay layer, no longer stagnate, but are collected and discharged from the site by a complex and carefully calculated system of traps, conduits, storage and pumping wells.
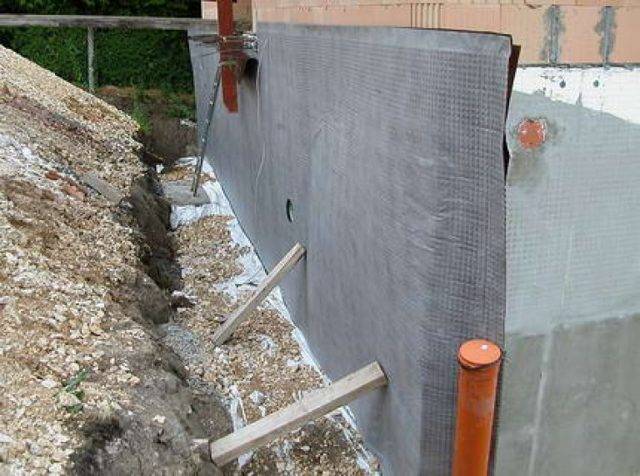
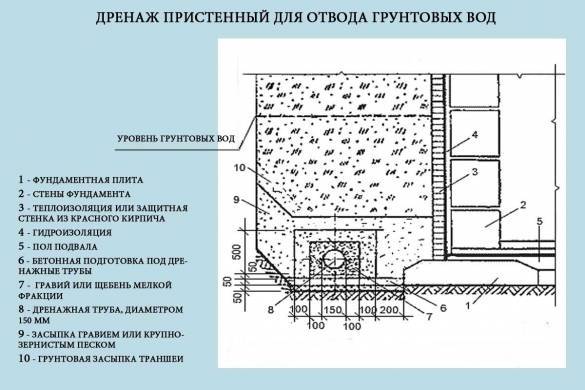
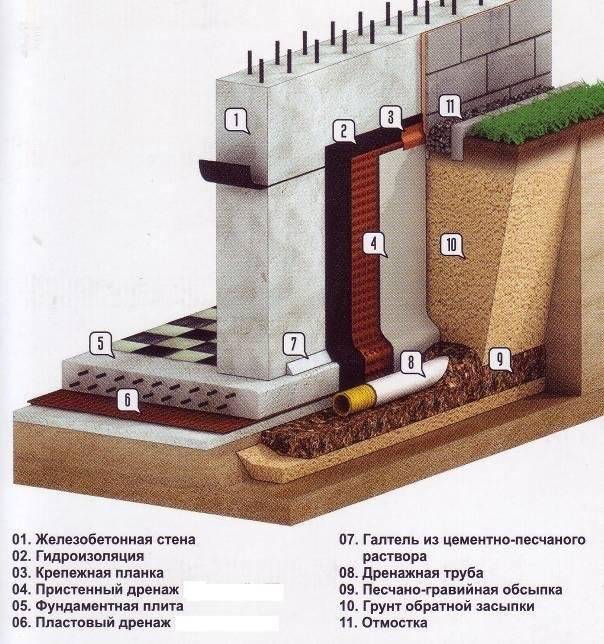
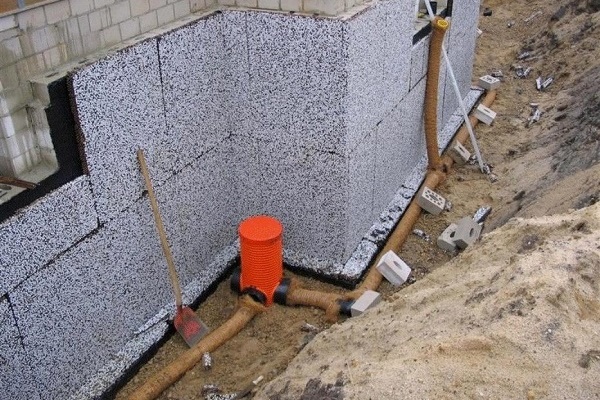
The most reliable and effective system for protecting a house built on a site with clay soil is wall drainage. A simple project and relatively low financial costs required for the device of this type of protection contribute to its popularity and wide application.
Structurally, it consists of drainage pipes laid around the perimeter of the entire building - drains that are used to drain water. They are located at a depth of thirty to fifty centimeters below the level of the foundation cushion. At the corners of the building, at the junction of pipes, manholes are installed. The system of pipes and wells is closed to the last, located in the lowest place of the site, pumping out the well. From it, water enters the storm sewer or natural reservoir.
In the case when the output point is above the level of the pumping well, it is necessary to install additional pumping equipment responsible for pumping water. In all other cases, water leaves the well by gravity.
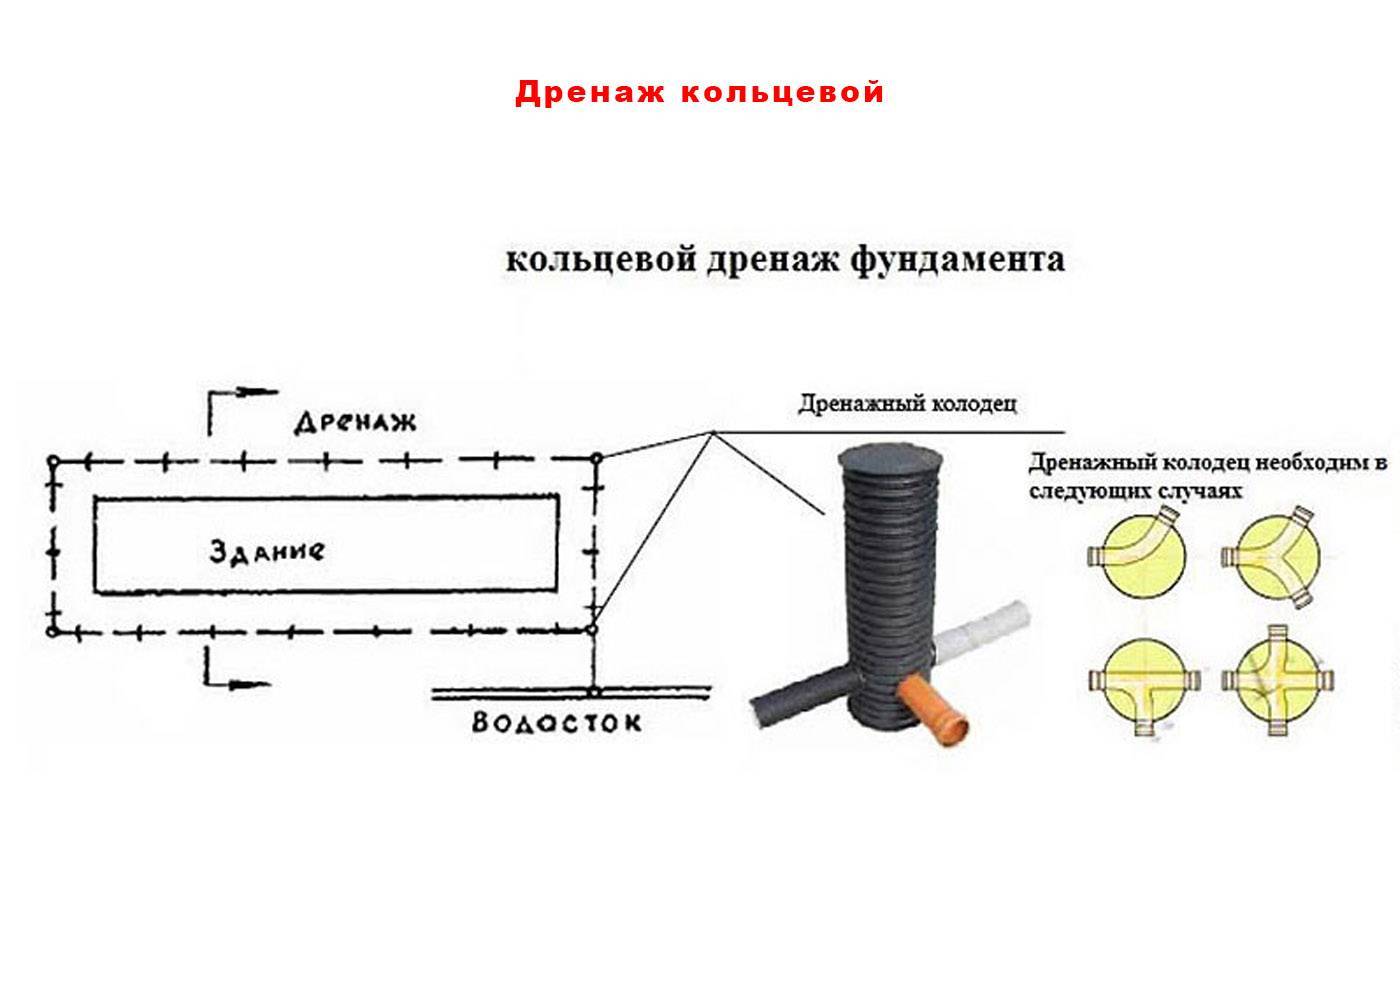
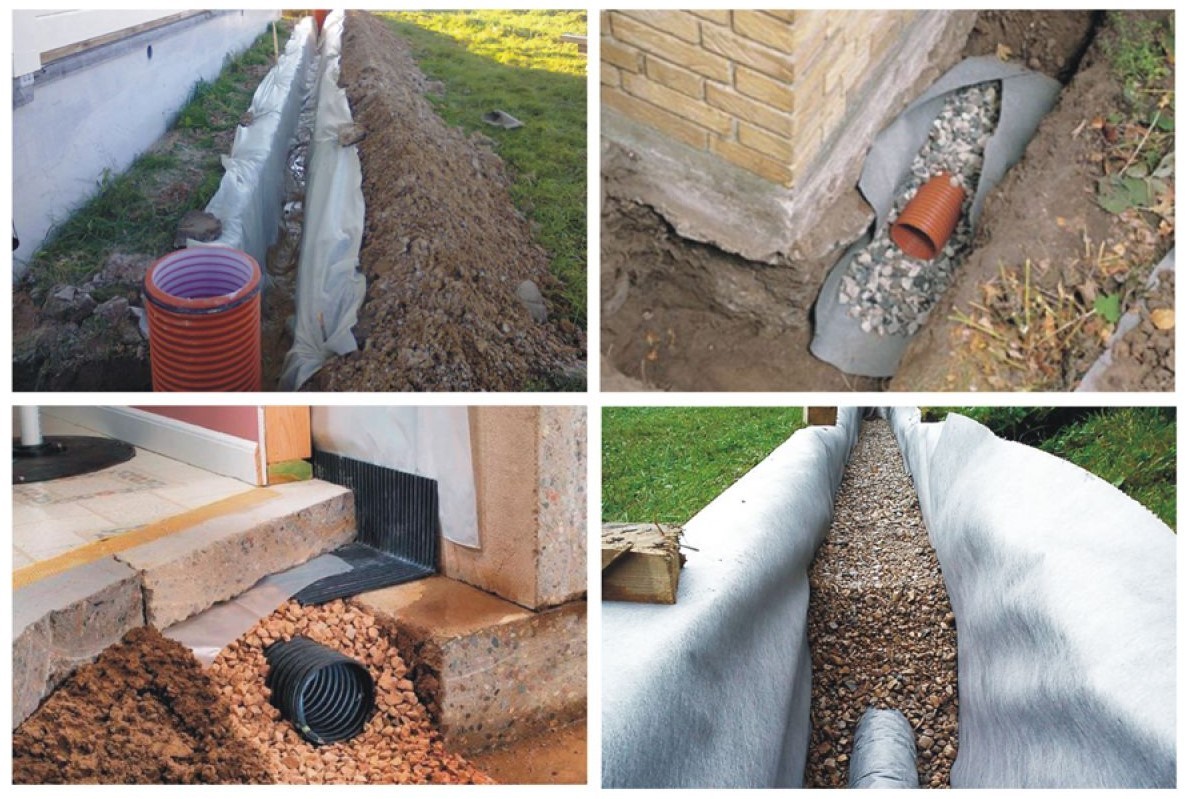
Do-it-yourself ring drainage
Such a system can be equipped after the completion of the construction of the building.The recommendations for spacing between structures and drainage remain the same.
A couple of additional important remarks should be made first.
Firstly, regarding the depth of the drainage pipes. The dependence is simple: the pipes are laid half a meter below the foundation of the building.
Scheme of laying pipes of the annular drainage
Secondly, regarding the storage well. In the case of a collector system, it is more expedient to use its variety with a blank bottom. The installation procedure differs from the instructions for the filtration well only in the absence of bottom gravel backfill.
Revision wells are installed according to the same principle as storage wells. Only the overall characteristics of the products change (selected depending on the conditions of a particular situation) and the place where the drainage pipes enter.
revision well
Well installation scheme
Thirdly, regarding the size of the trench. To determine the optimal indicator, add 200-300 mm to the outer diameter of the pipe. The remaining free space will be filled with gravel. The cross section of the trench can be rectangular and trapezoidal - as you prefer. From the bottom of the pits, stones, bricks and other elements that can violate the integrity of the pipes being laid must be removed.
The order of work is presented in the table.
For your own convenience, you can make a markup first. To do this, step back from the walls of the house 3 m (ideally.In the absence of sufficient space, many developers reduce this figure to 1 m, be guided by the situation), drive a metal or wooden peg into the ground, step back from it further to the width of the trench, drive in the second peg, then set similar landmarks opposite, at the opposite corner of the building. Stretch the rope between the pegs.


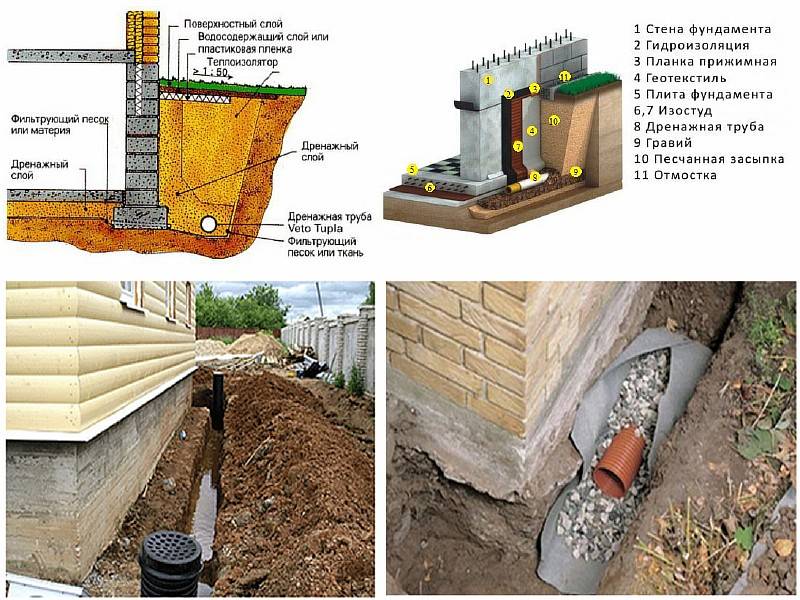
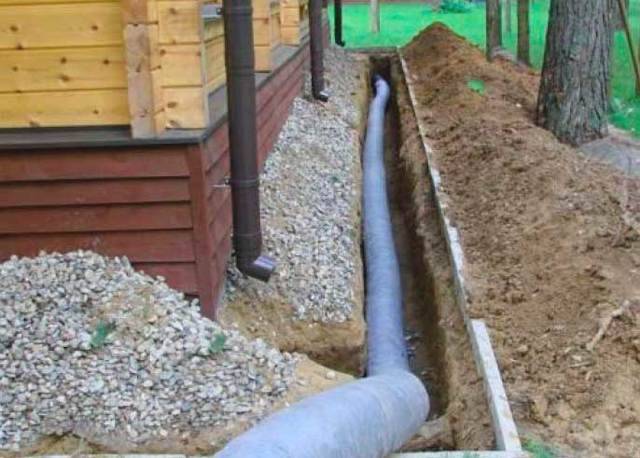
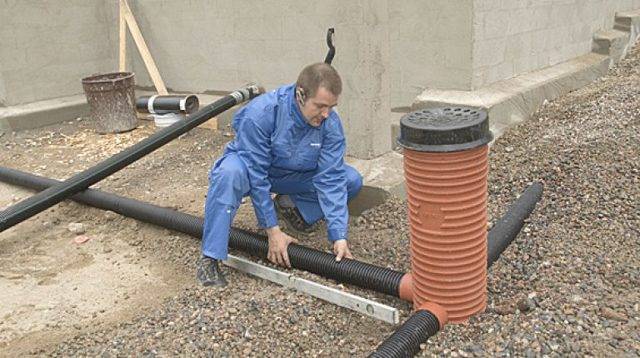
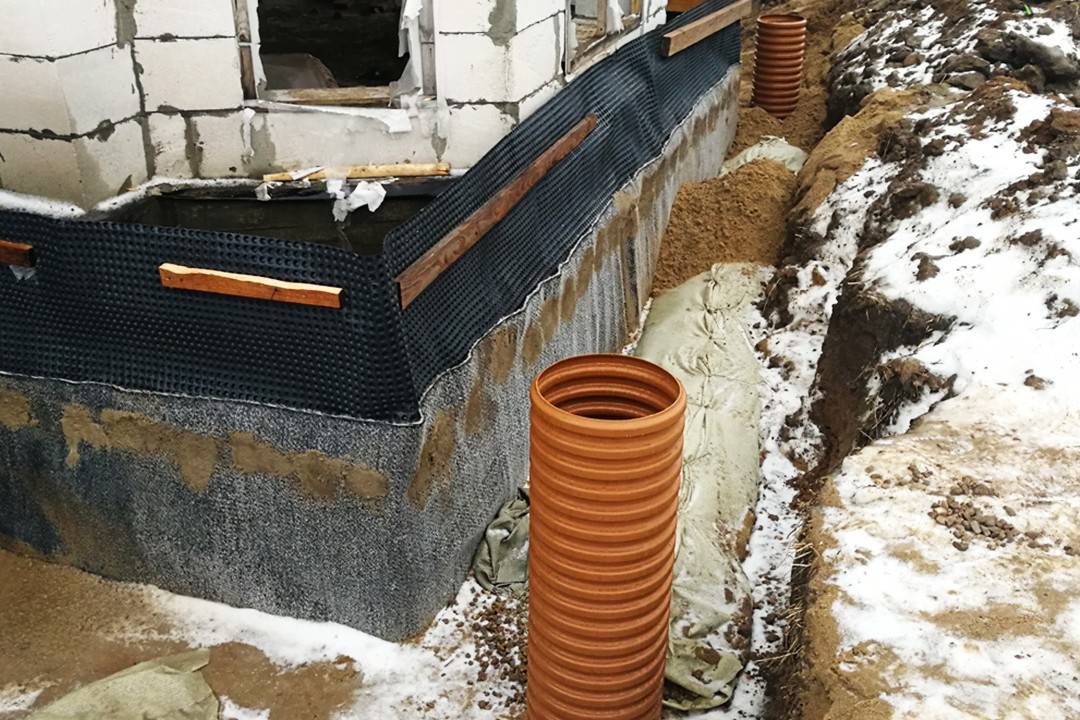


Table. Do-it-yourself ring drainage
| Stage of work | Description |
|---|---|
| Excavation | Dig trenches around the perimeter of the foundation. Do not forget about the slope of the bottom - keep it within 1-3 cm per meter. As a result, the highest point of the drainage system should be located below the lowest point of the supporting structure. |
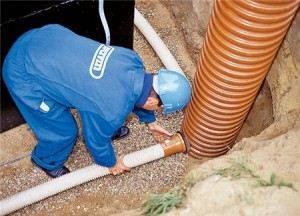
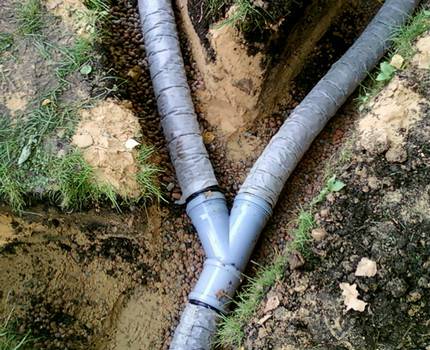
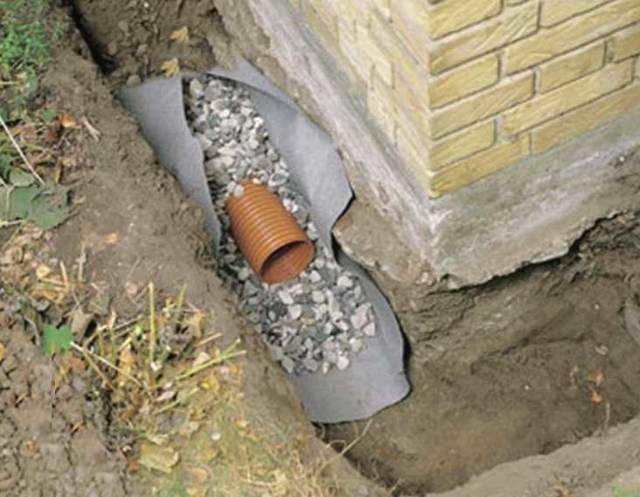
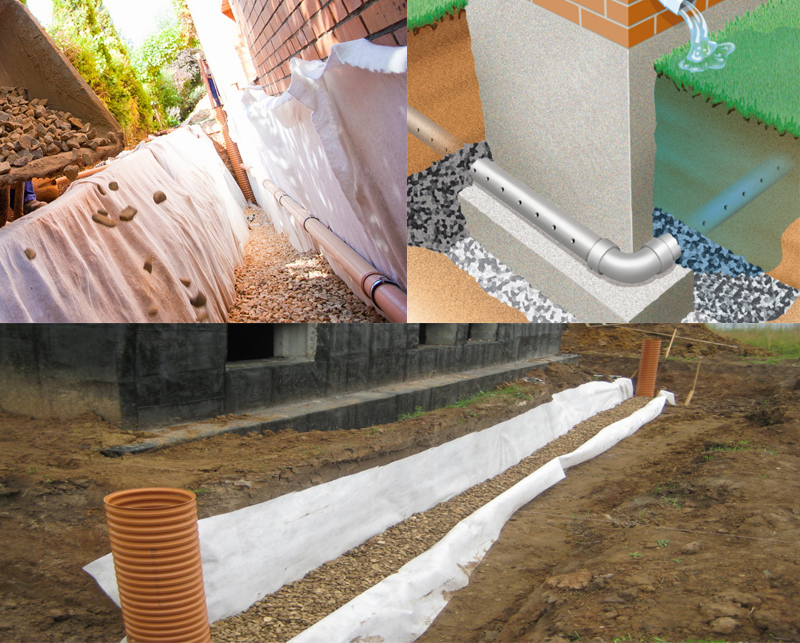
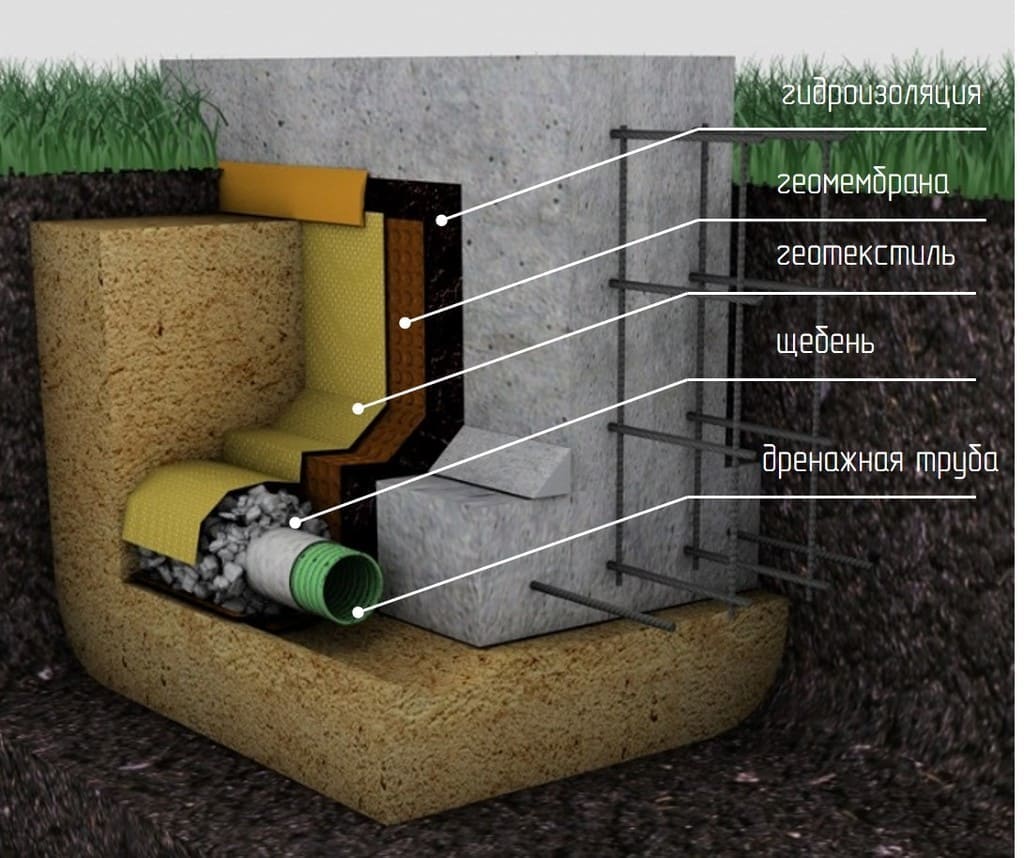
| The device of the filter layers | Fill the bottom of the trench with a 10 cm layer of river sand. Tamp carefully with observance of the given slope. Lay a layer of geotextile on top of the sand (if the soil is clean sandy) of such a width that in the future it will be possible to cover the pipes, taking into account the thickness of the crushed stone backfill. On top of the geotextile, pour a 10-centimeter layer of gravel, not forgetting to withstand the specified slope. Lay pipes on rubble. The image shows ordinary orange sewer pipes - here the developer made the holes himself. It is more convenient to use the flexible initially perforated pipes recommended by us, but in the absence of such, you can go the way of the developer from the photo. Maintain a 5-6 cm step between the holes. Recommendations for connecting pipes were given earlier. |
| Continuation of the isolation device | Pour a 15-20 cm layer of gravel over the pipe. Overlap the geotextile.As a result, the pipes will be surrounded on all sides by gravel, separated from the soil and sand by geotextiles. |
In conclusion, it remains to install revision and storage wells, connect pipes to them and backfill the soil.
Well connection
How to do deep drainage?
For the correct installation of deep drainage on a personal land plot, first of all, a clear project of all work is formed, establishing the types of soil available on the territory, the relief features and the level of groundwater.
This type of research is entrusted to engineering-geological organizations. They will make a full study of the area, and then provide the customer with a topographic survey that describes in detail the relief, hydrogeological features and the geological structure of the site. With this information at hand, installing an effective drainage system is not difficult.
The system is built in the following order:
The main elements of the deep drainage system are drains (pipes of a specific design). They are located below the foundation cushion of the building that they plan to protect, or along the entire perimeter of land ownership at a depth of 80 centimeters to one and a half meters.
The necessary slope of the pipe is made towards the collector, drain well or any other natural or artificial reservoir located outside the site.
In this way, the moisture collected as a result of precipitation is collected, and the general level of the groundwater occurring nearby is reduced to a non-critical state. In the center of the site and along the edges of the drains are located at a distance of 10-20 meters from each other.The structures are shaped like a herringbone where the end channels redirect all the water into the main trench leading to the main intake.
To enhance the efficiency of the deep drainage system, it is worth using pipes equipped with a two-layer geotextile filter and a circular perforated layer. This communication option is suitable for soils of all types and has the ability to divert more water.
On absolutely flat areas, the required slope is achieved by lowering when digging the bottom of the trench. For loamy and clay soils, the optimal slope level is 2 centimeters per meter of pipe, for sandy soils - 3 centimeters. If the site has a large area, in order to avoid too global earthworks, several manholes are installed.
Communication pipes are equipped with rotary and water intake wells. If necessary, and if it is impossible to remove excess water outside the site, an absorption (filtering) well is added to the remaining elements, designed to drain the main volume of water.
Under the base of the absorption well, a bulk layer of crushed stone or broken bricks is necessarily made. This is necessary so that the collected liquid evenly goes into the soil and does not erode the lower layers, provoking subsidence of the soil.
Immediately before laying the pipes, a 10-cm layer of coarse-grained sand and the same layer of crushed stone are poured into the trenches.
The resulting cushioning cushion does not allow communications to break under the weight of the soil. To avoid silting of pipes, the channels are lined with geotextiles.
It is desirable to carry out the laying of deep drainage on the site after all heavy construction work, so that the communications do not sag or crack as a result of intense operational load
On top of the laid out pipes, one more layer of sand and rubble is made, and the remaining voids are filled with earth, making mounds on the surface. When the system finally "sits" in the trenches, the poured earth itself will sink to its natural level.
Correctly and accurately installed system provides timely and quick removal of moisture from the site and reliably protects buildings from flooding and subsequent destruction.
Choosing the right dehumidification system.
Before starting work, you should decide on the type of drainage that is necessary in this particular case. From this will depend on the amount of work on its manufacture. The choice of a drainage system depends on several factors: what object needs to be protected from water (house, plot), what type of water needs to be drained (precipitation, groundwater), the landscape of the site, and others.


Drainage system and storm sewer.
Surface drainage of water from the site.
Let's imagine a situation. The land plot is sloping and water flows over the plot from the neighbor's plot located above. In this situation, the problem can be solved in two ways. You can do underground drainage of the entire site, spending a lot of time and money, or you can make a simple watershed at the border of the plots, forcing water to flow around the site. To do this, you will need to make a small embankment, decorating it with bushes and trees, or put artificial obstacles in the way of water, for example, make a fence with a blank foundation.You can make it even easier: dig an ordinary ditch in the path of water and bring it outside your site. The ditch can be covered with rubble.
Drainage ditch.
Drainage ditch filled with rubble.
Underground site drainage.
If it is not possible to organize surface drainage of water due to the characteristics of the landscape or for any other reason, then it is possible to drain a piece of land using underground drainage. For this, channels are dug, a central drainage pipe and drainage pipes with branches are laid in them. The distance between drains depends on the type of soil. If clay, then there should be a distance of about 20 m between the drainage pipes, if sand, then 50 m.
Site drainage plan.
Site drainage.
Lowering groundwater drainage.
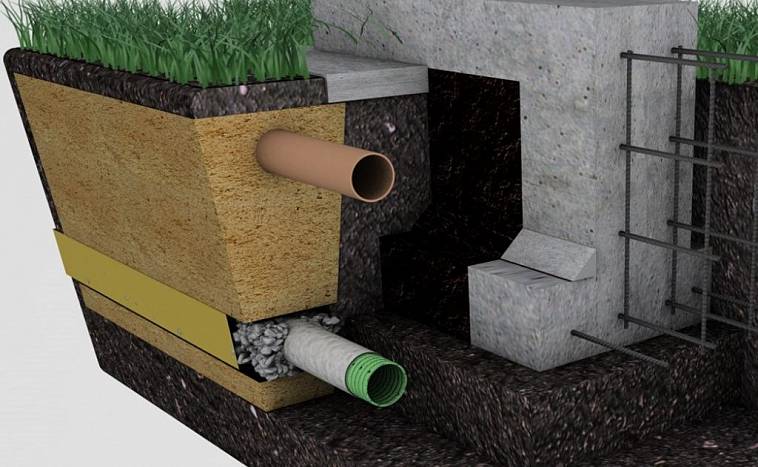
If you are building a house and you want the house to have a basement, but the groundwater level is high on the site, then the drainage must be arranged below the level of the foundation of the house. The drainage pipe should be laid below the foundation level by 0.5-1m and away from the foundation at a distance of 1.5-2m. Why does the pipe need to be below the foundation level? The fact is that the groundwater level will never fall to the level of drainage pipes. There will always be water backwater, and the water between the drainage pipes will take the form of a curved lens
Therefore, it is important that the top of this water lens does not reach the foundation of the house.
Scheme of downward drainage of groundwater.
Also, the drainage pipe should not be in the stress zone under the foundation. If the pipe is laid in this stress zone, then the soil under the foundation will be washed away by water that flows through the drainage, and then the foundation may settle and be destroyed.
Intercepting drainage.
If water appears in the basement of the house after rain or melting snow, then an intercepting drainage is needed, which will intercept the water on the way to the house. This type of drainage can be arranged close to the foundation of the house or at a short distance from the house. The depth of such drainage should not be lower than the sole of the foundation of the house.
Drainage scheme.
Drainage scheme.
Storm sewer.
If you want to organize the drainage of storm water from the house, then you can make an underground water drainage with point water inlets or surface drainage using special trays with a grate. Drainage from trays can be more expensive due to material prices, but it allows you to intercept water along the entire length of the trays.
Not
storm sewers should be confused with drainage of water from the site or from the house. it
two different things.
When draining storm water from the house, drainage pipes with holes are not used. Water is discharged through conventional sewer or special corrugated pipes. Some people make a very big mistake when storm drains are connected to drain pipes. In other words, storm water is run into pipes with holes. According to their logic, the water that is collected from the roof of the house will be discharged through these pipes, and additionally, water from the ground will seep into the drainage pipes and leave through them. In fact, a large volume of storm water will not completely leave through such pipes, but on the contrary, it will seep out of them and soak the ground around. The consequences of such improper drainage can be very bad, for example, soaking the foundation of the house and its subsidence.
Installation of storm sewer with corrugated pipes.
Installation of underground storm sewers.
Installation of storm above-ground sewerage with trays.
Storm sewer from trays.
Main works
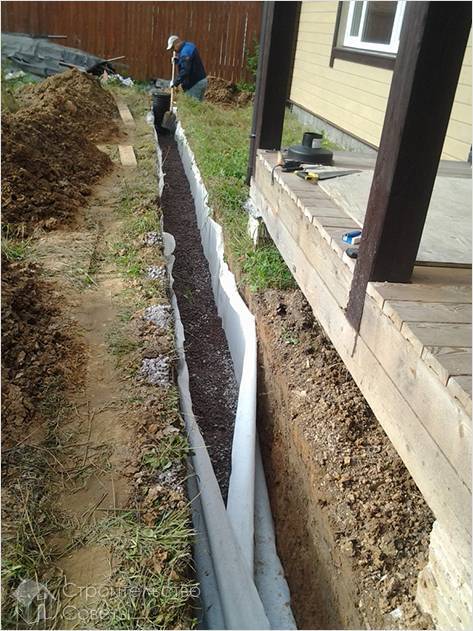
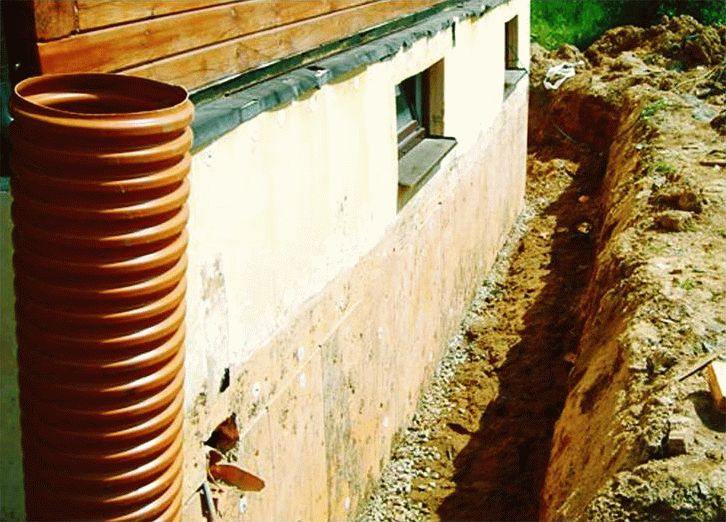
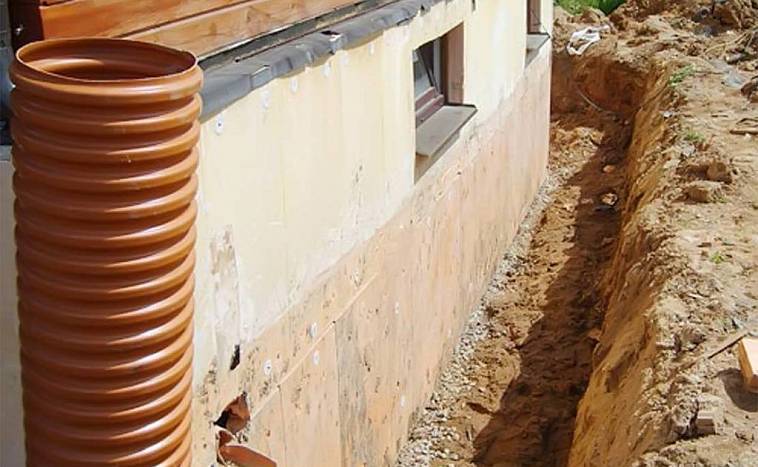
So let's get started.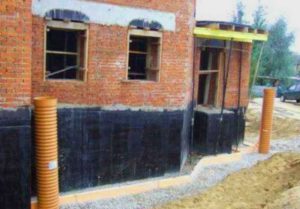 To begin with, we will dig trenches for laying our system, while retreating 1 meter away from the foundation. Let's estimate the width of the trench - it should be 20 cm larger than the diameter of the pipe.
When laying pipes, do not forget that the drainage must pass half a meter below the supporting structure.
We compact the trench with a 10 cm sand cushion - we check the slope, it should remain the same.
We put wide strips of geotextile fabric on the sand so that its ends protrude beyond the boundaries of the trench. Next, we fall asleep around the foundation of large gravel - it conducts water perfectly.
 Only after all this, we lay the pipes, while making sure that they fall with a slope to the lowest point of the system. With the help of fittings, we connect the pipes, just in case, we wrap them with electrical tape and fall asleep 10 cm with gravel. Then we sew the ends of the geotextile with threads.
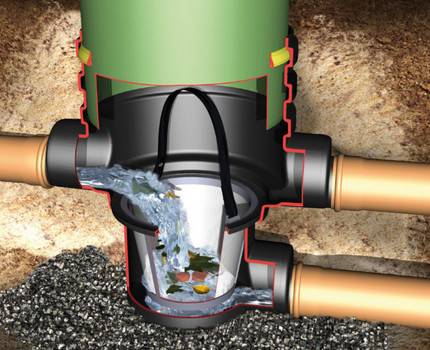
We install the collector at a distance of at least 5 m from the house. It should be located between the levels of the pipe and groundwater. From the pipes below about a meter. We also cover the pit for the collector with geotextile fabric, and only after that we install the well itself. To eliminate the bevel of the well in the bottom of the tank, you need to drill several holes and secure it firmly. After that, we fall asleep with gravel and then with earth.


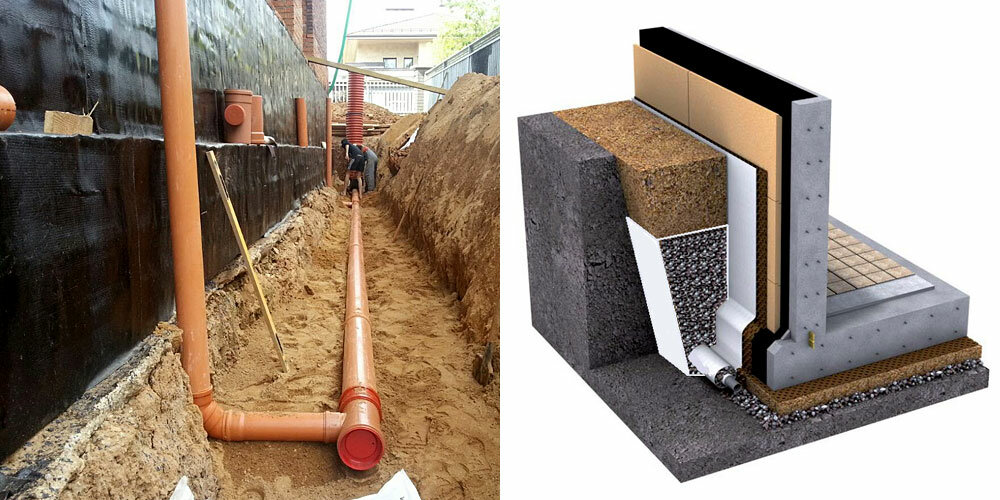
By the way, trenches should be filled in such a way that a small mound is formed, because if this is not done, the soil will sag and will have to be poured again.
Unfortunately, it is not always possible to stay within the framework of the proposed scheme.In exceptional cases, it is necessary, for example, to purchase additional equipment.
For example, let's imagine that your water intake tank is above the level of the pipes, then you will have to install a drainage pump among other things. It will forcibly distill the water masses.
If the depth of the pipes is higher than the freezing depth of the soil, it is necessary to install a heating system using a heating cable. This will keep your drainage system from freezing in the winter.
Thus, if you want to do the drainage of the foundation with your own hands, it is not the easiest, but quite doable task.
Stormwater as an effective addition
Storm sewer - a set of drainpipes with a well for the accumulation of moisture, through which it is transferred to the water intake. Before the water enters the well, there is a special siphon partition (grille) designed to clean the incoming liquid from debris, as a result of which the system does not clog, and there is no unpleasant odor in it.
A storm sewer system with linear-type water collectors is a series of trays located at a slope towards the place of moisture collection. Tanks are installed in ditches with a layer of gravel at the bottom. The technology is used when the slope of the day surface of the site does not exceed 30 degrees relative to the horizon.
Open ditches of the drainage system, as well as storm sewers, can be covered with a special storm grate that does not allow debris
The main difference between a point system and a linear one is that the point system uses a pipe system located underground. Water is collected through the so-called "points" - special storm drains equipped with a permeable grate.
This solution makes the structure almost invisible on the site.
Storm sewer point collectors are installed under the downpipes that collect atmospheric water from the roof of buildings
Sometimes one type of system is not enough for an area, so they can be combined to maintain an optimal level of moisture.
It is necessary to choose the type of system individually, taking into account landscape and geological features. For example, if the house is located away from a body of water, then you can limit yourself to open drainage. If the mansion is located on a landslide-prone slope in the river valley, then it is better to apply several systems at the same time. You can read more about the arrangement of storm sewers here.
Image gallery
Photo from
Linear storm sewer
Plastic tray in the stormwater device
Point variant of the water collector
Channel for the removal of water collected by the system
What is drainage
In fact, this is a system by which water is removed from the surface of the soil or from a certain depth. This is one of the drainage systems. It achieves the following:
Water and moisture are removed from the areas where the foundation structures are located. The thing is that excessive moisture, especially for clay soils, causes foundation movements. As the builders say, it will "float", that is, it will become unstable. If we add frosty heaving of the soil to this, then the earth will simply push the structure out.


Lack of drainage on the site - wet basements in houses
- Basements and basements are being drained. Many may note that modern waterproofing materials are able to withstand any exposure to water, in any quantity. Nobody is going to argue with this.It's just that each material has its own operational resource. In a few years, even the highest quality waterproofing material will dry up. That's when the problems begin. In addition, there is always a possibility that there is a defect in some section of the insulation through which moisture will penetrate into the basement.
- If an autonomous sewage system with a septic tank is used on a suburban area, then the drainage will help the latter to stay in the ground. Taking into account, if the dacha has an increased level of groundwater.
- It is clear that the drainage system does not allow waterlogging of the soil. So, we can say that plants planted in the ground will grow normally.
- If the summer cottage is a territory located on a slope, then during precipitation, rainwater will wash out the fertile layer. This can be avoided by arranging drainage in a sloped area into which water flows are redirected. That is, they will be removed according to an organized system, without affecting the soil.
On the slopes, fertile soil is washed away by rain
We must pay tribute to the fact that not all suburban areas require the creation of a drainage system. For example, if it is located on a hill. Basically, there is always a need for it. Let's look at situations in which drainage is indispensable.
When should drainage be provided?
That is, we will indicate those cases when the drainage system is necessary in any case.
- If the suburban area is located in the lowlands. All atmospheric precipitation will flow down the slope here. The laws of physics have not been repealed.
- If the site is located on a flat area, the soil is clayey, the groundwater level is high (not lower than 1 m).
- Drainage on a site with a slope (strong) is also necessary.
- If you plan to build buildings with a deep foundation.
- If, according to the project, the main part of the territory of the summer cottage will be covered with a waterproof layer: concrete or asphalt paths and platforms.
- If lawns, flower beds are equipped with an automatic irrigation system.
If automatic watering of lawns is organized at the dacha, then drainage must be built
Where to start the construction of drainage
It is necessary to start with studies of a suburban area for the type of soil, the level of groundwater and the type of relief. This can only be done by professionals by conducting geological and geodetic surveys. Usually they make a topographic survey of the site, where the cadastral boundaries of the cottage are determined. The terrain is determined (wavy or even, with a slope in which direction), the type of soil, making exploration by drilling, and the physical and chemical properties of the soil. Be sure to indicate the UGV in the reports.
Based on the data provided, recommendations are formed on the depth of foundations, the type of waterproofing and drainage system. Sometimes it happens that experts generally do not recommend building large houses with basements, as the owners of the suburban area intended. Which leads the latter into bewilderment. Disappointments appear, but there is no way out.
It is clear that all ongoing research costs money, sometimes a lot. But you should not avoid these expenses, because the information received will subsequently save much larger capital investments. Therefore, all these studies, only at first glance, are unnecessary procedures. In fact, they are useful and necessary.
Checking the level of groundwater occurrence by drilling
Installation of drainage around a turnkey private house
How to choose a contractor

When choosing a contractor, the following points should be considered.
- Known name. The organization or brigade must have a certain reputation in a given locality/region.
- positive feedback. It is necessary to find as many reviews and information about this contractor as possible.
- Official registration with tax and other authorities. Serious contractors have the status of an individual entrepreneur or a legal entity. All information about them is transparent.
- Portfolio. The customer has the right to demand to show examples of work.
- Agreement. The contract is mandatory. Before signing, the document is carefully read. All unclear points must be clarified immediately. If the conditions are not satisfactory, the customer must demand their change, or refuse the services of this organization.
- acceptance. Acceptance is made after inspection.
How much does high-quality turnkey drainage cost?
The cost of turnkey drainage depends on many factors. Before drawing up the project, no one will tell the exact cost. The approximate price of a surface linear system is from 900 rubles per linear meter. Deep - from 1500 rubles / linear meter. Deep drainage of an annular shape costs from 3000 rubles per linear meter. Storm drains - from 1200 rubles / linear meter.
Features of the closed version
Having figured out how to properly drain around the house, and having drawn up a project, you should prepare for further work. You should stock up on materials, as well as the necessary tools.
In the course of work, you may need:
- twine for marking and marking the position of communications;
- building level and plumb to control the slope of the pipes;
- bayonet and shovel;
- soil tamping tool;
- a bucket and / or a wheelbarrow for transporting unnecessary land;
- measuring tape;
- hacksaw, etc.
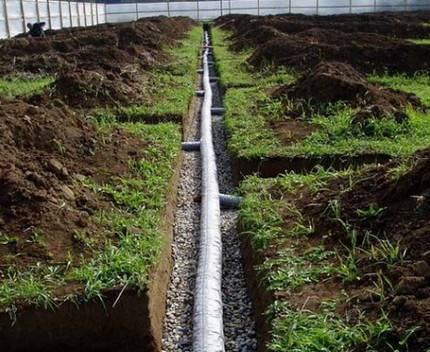
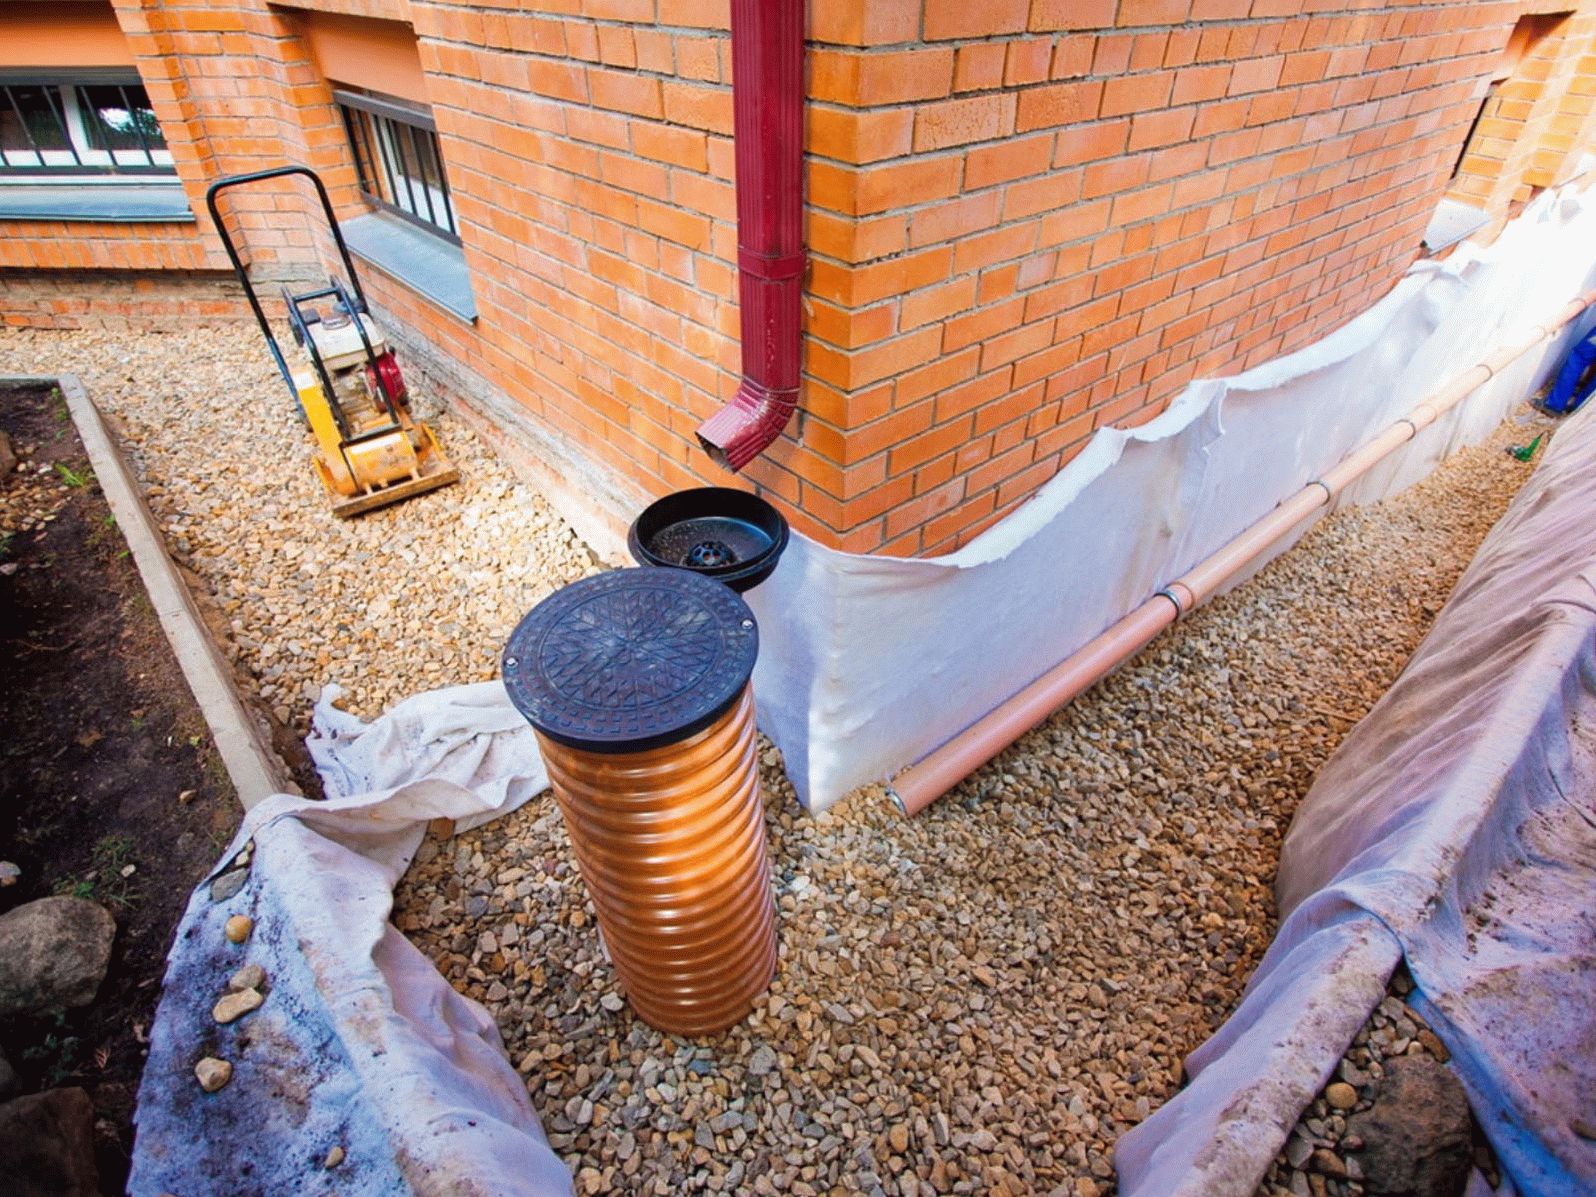
You will also need a certain amount of drainage pipes. These are special designs with perforations, they are usually made of plastic. Instead, you can use plastic pipes for external sewage, having previously made holes on their surface with a conventional drill.
Additionally, it is necessary to prepare: geotextiles, sand, crushed stone or other similar material, manholes according to the number of turns, etc.
In the process of installing the drainage system around the house, geotextiles are used - non-woven filter material, as well as crushed stone of large fractions
Geotextiles are needed to protect the filler surrounding the drainage pipe from the penetration of fine clay particles and siltation. Save on this material is not worth it. It should be enough to completely cover the walls and bottom of the excavated trench, as well as to cover the backfilled pipe with a solid overlap.
First, it is recommended to mark up on the ground, and then proceed with earthworks. They usually start digging from the highest point of the system, gradually deepening the trench.
When calculating the slope of the drainage pipe, you can focus on the standard of 1%. If the length of the trench is 20 m, then the height difference between its start and end points should be 20 cm. The necessary measurements are made using a conventional tape measure.
After the trench is ready, its bottom must be carefully tamped. Then a 10 cm layer of sand is poured onto the bottom, which is also carefully rammed.After that, it is recommended to cover the entire trench with a layer of geotextile in such a way that both the bottom and the walls of the structure are covered, and the edges of the material come to the surface and lie freely on the ground.
In the device of a closed drainage system, perforated drainage pipes, geotextiles and backfill materials are used: sand, gravel, crushed stone (+)
Now, a layer of gravel of about 20 cm should be poured onto the bottom, hidden by geotextiles. Any filter material will be acceptable: crushed stone, expanded clay, brick fragments, etc. The main thing is that its fraction is larger than the size of the holes in the drainage pipes, otherwise blockages cannot be avoided.


After laying, the gravel must be leveled and the slope of the communications must be checked, it must correspond to the previous calculations and measurements.
If everything is in order, drainage pipes are placed on the gravel, connected to inspection and drainage wells. Then the system is covered with another layer of gravel (crushed stone, expanded clay, etc.). The height of this layer should also be 20 cm. The edges of the geotextile that have remained free are wrapped over the backfill layer.
In the places where the drainage pipe turns, manholes are installed, which are necessary to monitor the state of the system. They are covered with lids on top.
The nonwoven layers should overlap by about 30 cm. It is sometimes recommended to secure the position of the geotextile with twine or plastic retainers.
Now you can fill the rest of the trench with sand (you need a layer of 10 cm) and soil. The sand needs to be compacted again, especially in the space on the sides of the drainpipe. Previously cut turf is laid on top or tracks are mounted.
You can also come up with your own version of decorating the place where drainage pipes are laid. There must be access to the manhole covers, as well as to the point of discharge of the discharged moisture.
Inspection wells are plastic vertical containers closed with lids. They are used to periodically check the status of the system.
The drainage well is a wider container and can be round or square in configuration. Most often, an old plastic barrel is used for its arrangement.
You can also use concrete rings of a suitable diameter or make walls of cast concrete. In the latter case, the reinforcement of the structure must be performed. The top of the drainage well should be closed with a solid cover.
Basic requirements for LF for a private house
Events with a "tape" are carried out taking into account the existing norms of SNIP. The main provisions for the construction stages of the formation of the foundation of reinforced concrete slabs are set out in SNiP 2.02.01-83, additional standards in GOST 13580-85. Also important are the requirements for the construction of foundations in SNiP 3.02.01-87 and the Document on load-bearing and enclosing buildings SNiP 3.03.01-87.
Basic requirements for the construction of the tape:
- Following the technology (do not change anything in the order of work and the rules for their implementation).
- The composition of building materials (they must be of high quality).
- Reinforcement procedure (metal frame is an integral part of the base, giving it the main strength).
- Compliance with the proportions of materials from the calculated part (you cannot use volumes in more or less quantities) of the foundation project.
The strip foundation for a private house should have large margins of safety, since the main loads will “go” to it.
Conclusion
A well-placed drainage system protects the monolithic base slab from the damaging effects of moisture. Practicing builders recommend not being limited to the method and at the same time supplementing the technology with a waterproofing device between the layers of the foundation.
Despite the fact that drainage installation is recommended for almost all types of soil, before developing its scheme, it is necessary to analyze the hydrogeological features of the built-up area in order to reasonably choose a method of water drainage depending on the type of soil and the moisture content in it.


