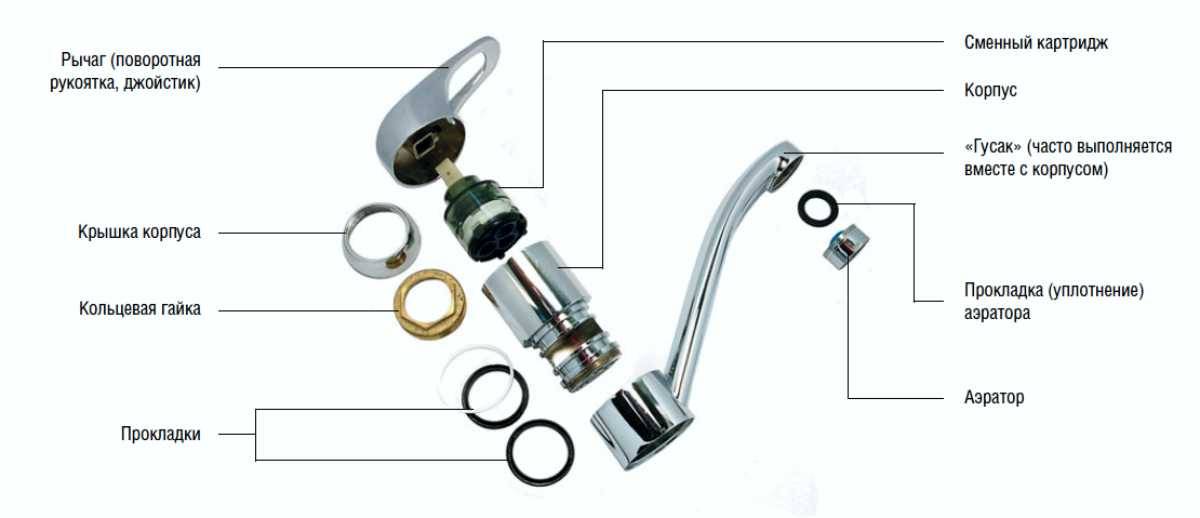
- General information
- How to restore the nut yourself?
- Replacement
- How to disassemble the lever device?
- Disassembly of the disk product
- Disassembly of the ball mixer
- The structure of the cartridge disc mixer
- Types of spout/shower switches for bathroom faucets
- Extraction devices
- Flag analogs
- Push fittings
- Device equipped with ceramic plates
- Conclusion
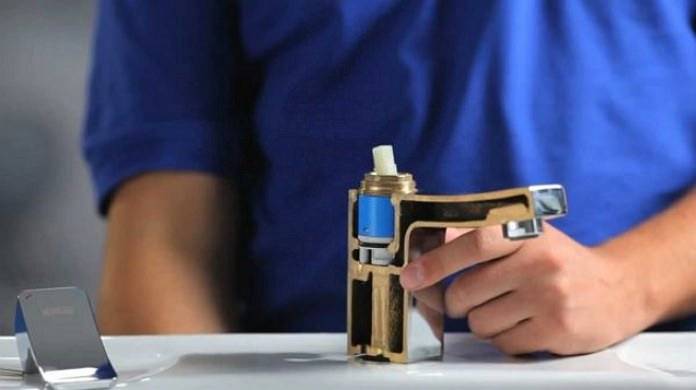
- Types of mixers and their device
- Mixer with one lever
- Mixer with thermostat
- Touchless faucets
- Popular manufacturers
- Dismantling
- How to find the right spare parts
- Switch disassembly
- Crane dismantling
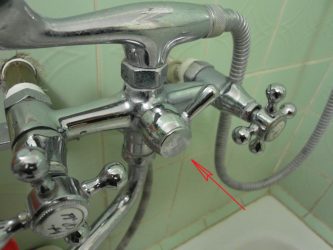
General information
Such switches most often consist of a crank that moves the keg with the valve between the outlet valves. A rod with rubber cuffs is also used, when changing position, one or the other branch pipe is opened. Both options are good and it is very difficult to name one of the options. The diverter looks like a separate mixer assembly. This mechanism is weak and breaks first.
The cause of the breakdown is the wear of rubber cuffs (gaskets); the formation of limescale; a strong effect on the diverter mechanism of electrochemical corrosion, which corrodes the stem and crank.This happens because the valves do not fit enough, as a result of which they pass water into both pipes. Because of this, both the shower and the spout begin to leak.
Any mechanism of the diverter can be exchanged for another, but it is necessary to take into account the period of use of the mixer. Sometimes it is worth changing the entire mixer, this is done in order not to repair the mixer, which has lost its appearance.
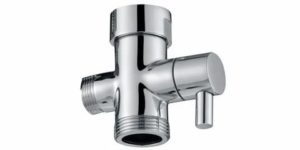
There are several options for issuing diverters. There are switches that attach to the mixer as a separate unit. The shower diverter can be detached to clean the connections or to replace it. The diverter can be removed and the mixer will work, but only without a shower. There are also switches built into the mixer body.
This is interesting: What to do if the tap is flowing - why leaking and how to fix?
How to restore the nut yourself?
Step 1. Remove the gooseneck, upper and lower nylon rings.
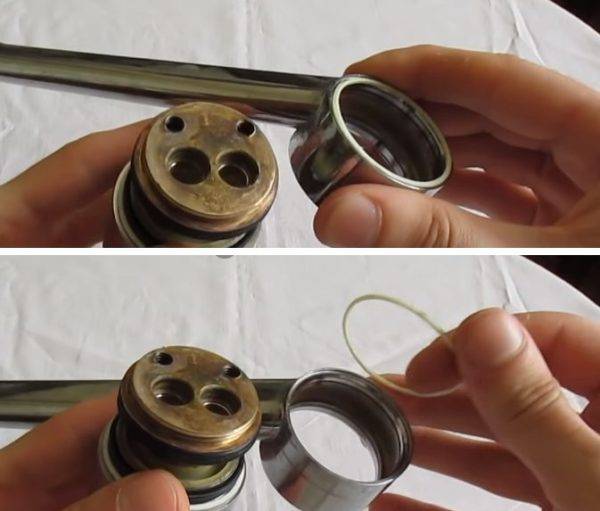
Remove the gooseneck and both o-rings
Step 2. Pry off the rubber seals with a thin object and carefully remove them from the special technological grooves
Work carefully, do not leave depressions in the grooves, because of them new leaks may appear.
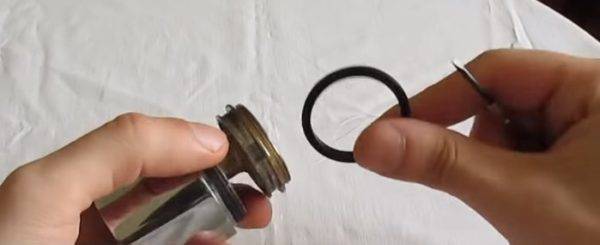
Next, take out the rubber seals.
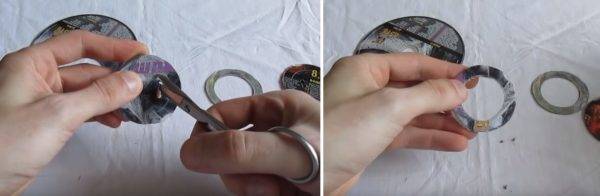
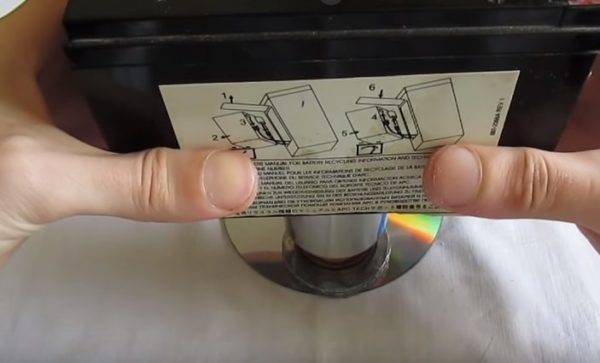
Now you should start replacing the worn clamping nut. It can be made from unnecessary CDs.
Step 3 With a compass or awl, carefully circle the nut on the disk, make sure that the outer and inner diameters do not move. With sharp small scissors, cut the part along the outer contour.
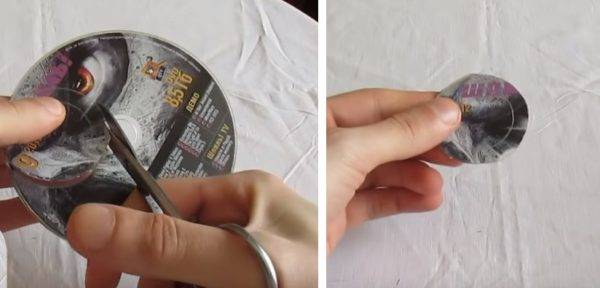
Cutting out a blank from a disc
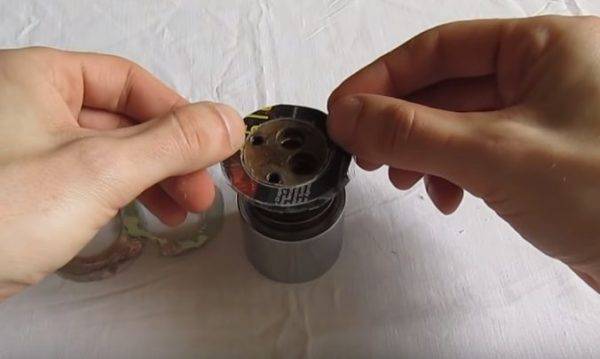
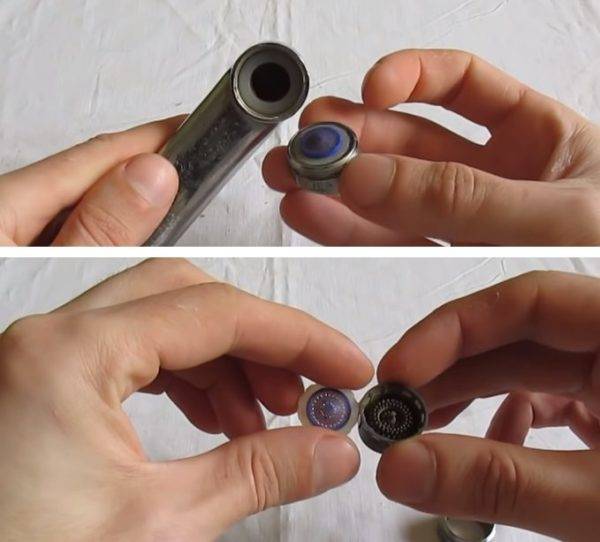
Step 4. Heat up gas stove burner piece of wire and make a hole in the center of the workpiece, without it it is impossible to remove the inside of the disk.
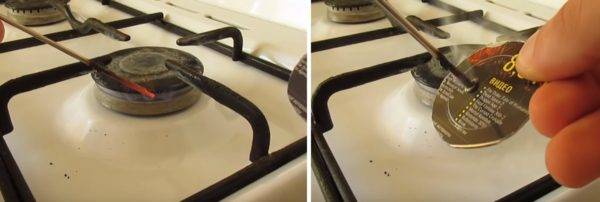
A hole is burned in the workpiece with a hot wire
Step 5. With scissors, carefully remove the inner diameter. The disk consists of two parts, separate them.


Cut out the inside of the workpiece
Step 6. All components of the future nut should fit snugly onto the thread, fit them with a small round file. Such blanks must be made 6 pieces.
Pieces are customized to size
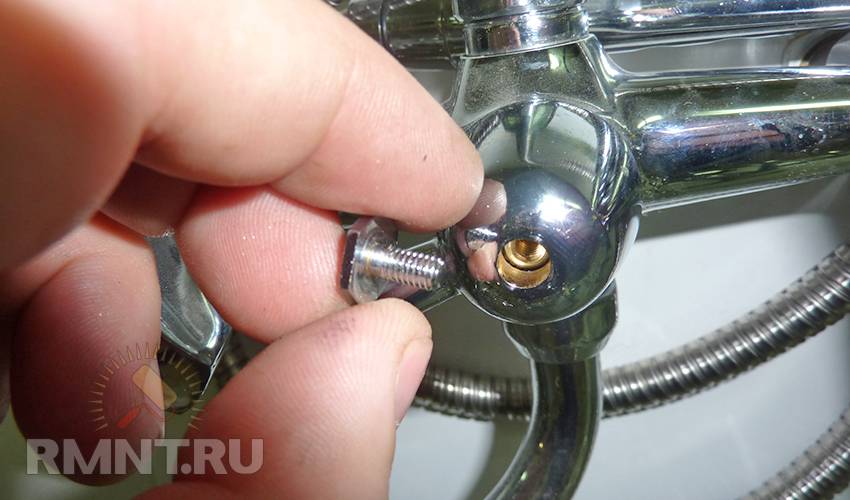
Step 7. Screw the elements onto the thread one at a time and glue them together with a special glue for polymers. This is a very effective composition, bonding is carried out using the molecular welding method.
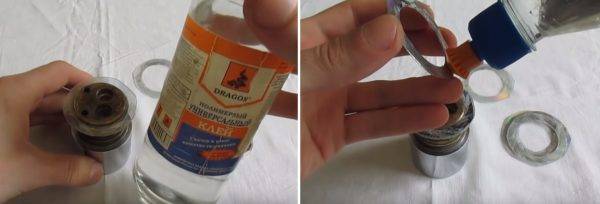
The blanks are screwed onto the thread, having previously smeared with glue
Step 8 Press the faucet in a vertical position and leave the glue to dry completely.
The crane body is turned over and pressed from above with a load
While the nut dries, check the condition of the aerator. The device is designed to saturate the water with air, thereby reducing the splashing of the jet. Unscrew the aerator housing, remove the internal parts and clean the narrow slots from dirt and oxides. Check the condition of the rubber gasket, replace it if necessary.
Check the condition of the aerator
The glue has hardened - continue assembling the mixer.
Replacement
Replacing the cartridge is quite easy. The main thing is to follow simple rules, namely, do not rush and do not be afraid:
First, turn off the water. If there are valves that shut off the water separately to the mixer, great! Otherwise, you will have to close the water to the entire apartment. If it is not possible to turn off the water in the apartment, then the only option that remains is to contact the Criminal Code or the HOA in order to block the common risers.
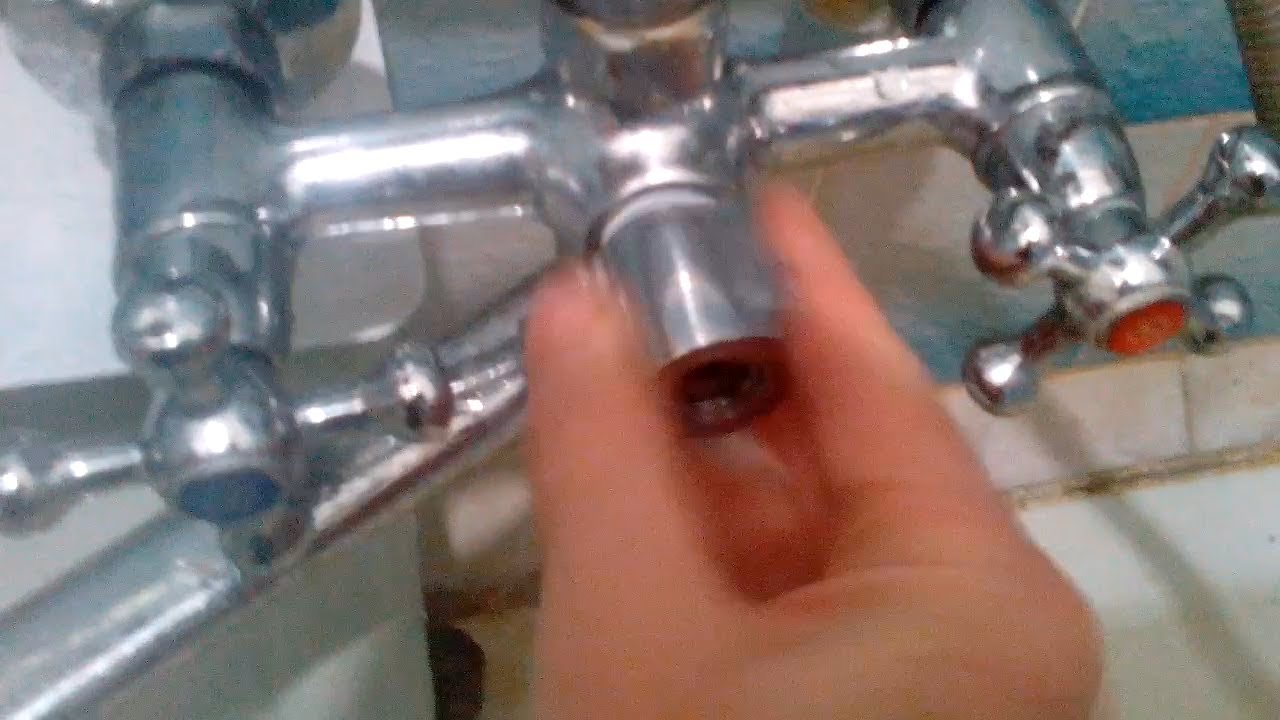
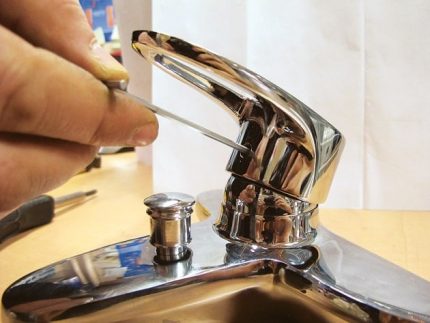
Next, carefully remove the decorative plug on the mixer lever (red-blue plastic thing). This can be done with a flat screwdriver or a knife.
Under it we will find the screw of the locking lever. It will most likely be difficult to see it with the naked eye, so use a flashlight. The screw can be both a Phillips screwdriver and a hex. We loosen it and remove the lever.
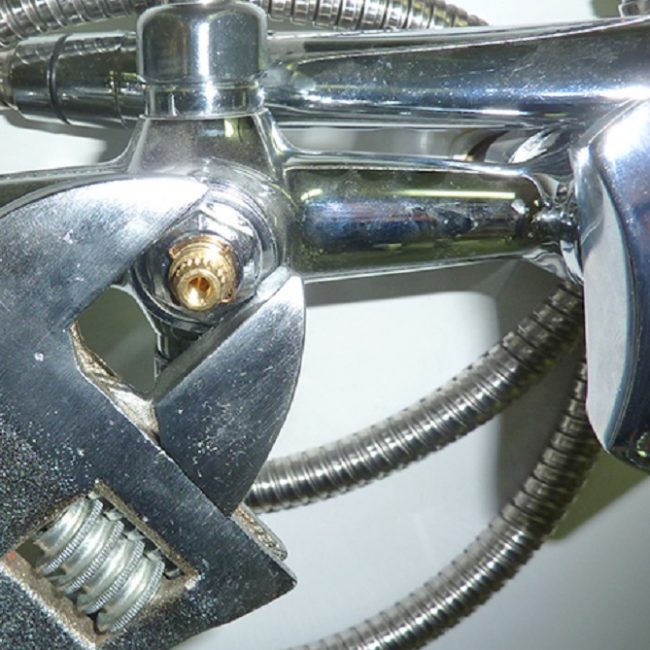
The next obstacle that will meet on our way is a chrome cap. The difficulty here is that it sticks with time and turning it off can be quite problematic. Of course, you can do this with a key, but this part is so delicate that it can be easily damaged. Although this will not affect the performance of the device. Unless the appearance suffers. Therefore, to avoid unnecessary sacrifices, use WD-40 before unscrewing the cap, this will greatly simplify the task.
After we removed the uncomfortable cap, under it we find a convenient nut that can be unscrewed with any key (adjustable is more convenient). It actually holds the part we need in the mixer body. If the nut does not want to give in, we use the same magic WD-40.
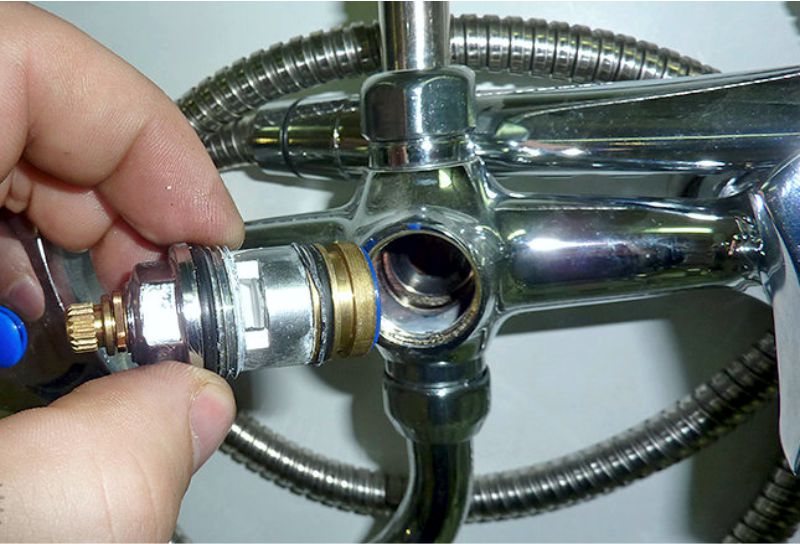
The nut is removed and now it is the goal of our operation - the cartridge! We remove it from the nest and clean the place where we will put the new one from dirt, sand, rust and everything that should not be there.
Now we take the faulty part and go to the store with it (unless of course you purchased it in advance).
The seller will easily pick up exactly the same cartridge for you, and you can safely start assembling your mixer.
Carefully insert our part into the seat. It is necessary that the protrusions on the cartridge body coincide with the holes in the mixer. Tighten the nut
When twisting, it is better to hold the cartridge slightly so that it does not jump out of the grooves. Attention! The mixer is a rather delicate device. All parts are tightened tightly, but without much effort.
Some people think that the tighter you tighten it, the more likely it is to avoid leakage, but this is not entirely true. If you overdo it, you can achieve the opposite effect.
We recommend that you turn on the water immediately after you have tightened the nut, that is, before you put on the cap and lever. This is in case a leak is found so as not to disassemble everything first. If water has leaked somewhere - well, you have to take everything apart again, now you know how to do it. There can be two reasons for the leak: either the part still jumped out of the grooves and is not tight, or it is a factory defect of the new cartridge. In the second case, of course, the part must be replaced.
If everything is in order, we tighten the fixing screw on the lever, put a decorative plug and that's it, you can use it!
How to disassemble the lever device?
To repair models with one locking mechanism, it is necessary, first of all, to disassemble the structure in order to get the damaged element. It is replaced with a similar new part. Repairing a lever mixer is quite easy, but you need to act very carefully.


Disassembly of the disk product
To dismantle the accessory, you will need a set of the following tools - a screwdriver and a hex key.
The following algorithm of actions is applied:
- First of all, it is necessary to block the pipes with hot / cold water.
- You should get rid of the plug, which is removed with a screwdriver.
- A hex key unscrews the screw part that connects the lever to the stem, where the water is regulated.
- Having done this, you can manually remove the crane lever. After that, it is necessary to unscrew the ceramic nut, as well as the clamping nut that secures the top plate.
This opens access to the mixer disc. You can get it, and insert a new cartridge into the resulting space, while you need to monitor the correct position of the holes on this part.
After that, all operations are carried out in the reverse order. After assembling the tap and completing the manipulations, you can turn on the water to check the correct assembly.
 Going to the store for a new cartridge, it is advisable to grab a failed drive. Models may differ in the diameter of the holes available and the latches that are located on the bottom edge of the products. It is better to give preference to cartridges with a silicone gasket, as they resist water better.
Disassembly of the ball mixer
A similar process is performed in the same way as described above, but there are some nuances. First of all, you also need to turn off the water. After that, using a screwdriver, the decorative cap is removed, the fixing screw is unscrewed and the nut is removed, which holds the crane mechanism in the correct position.
It should be borne in mind that in case of a serious breakdown of the ball accessory, you will have to change the entire mixer. Repair of the ball device is possible only if the problems are caused by a worn out rubber gasket or clogging of the tap with abrasive materials.
 In some mixer models, the handle fits snugly enough in the control rod.To release the part, it is recommended to gently pry it with the end of a screwdriver
Constantly dripping water from a faucet usually indicates a gasket problem.
To resolve the issue, you need to take the following steps:
As described above, the screw is unscrewed, the lever is removed.
The connection is removed from the thread, after which the screw is unscrewed with a screwdriver
If plaque is found on it, it must be carefully removed with a soft cloth.
The ball is removed from the structure, after which the worn gaskets are carefully removed, which are replaced with new parts.
At the end of the process, the ball is put back in place, and the seals are attached with a plastic nut.
The lever is placed again, and then the screw is screwed to fix this part. After performing these operations, the crane is checked
After performing these operations, the crane is checked.
Problems with clogging of the ball mixer are indicated by a thin stream of water even at the maximum pressure of the tap.
In this case, you need to follow the following instructions:
- unscrew the nut from the spout of the mixer;
- pull out the mesh and rinse it thoroughly with water;
- insert the part back, then re-tighten the nut.
If the manipulations described above did not help solve the problem, it is necessary to replace the device and install a new faucet in the kitchen or bathroom.
Special care must be taken when loosening and tightening the fixing nuts. Excessive force can easily damage the elements
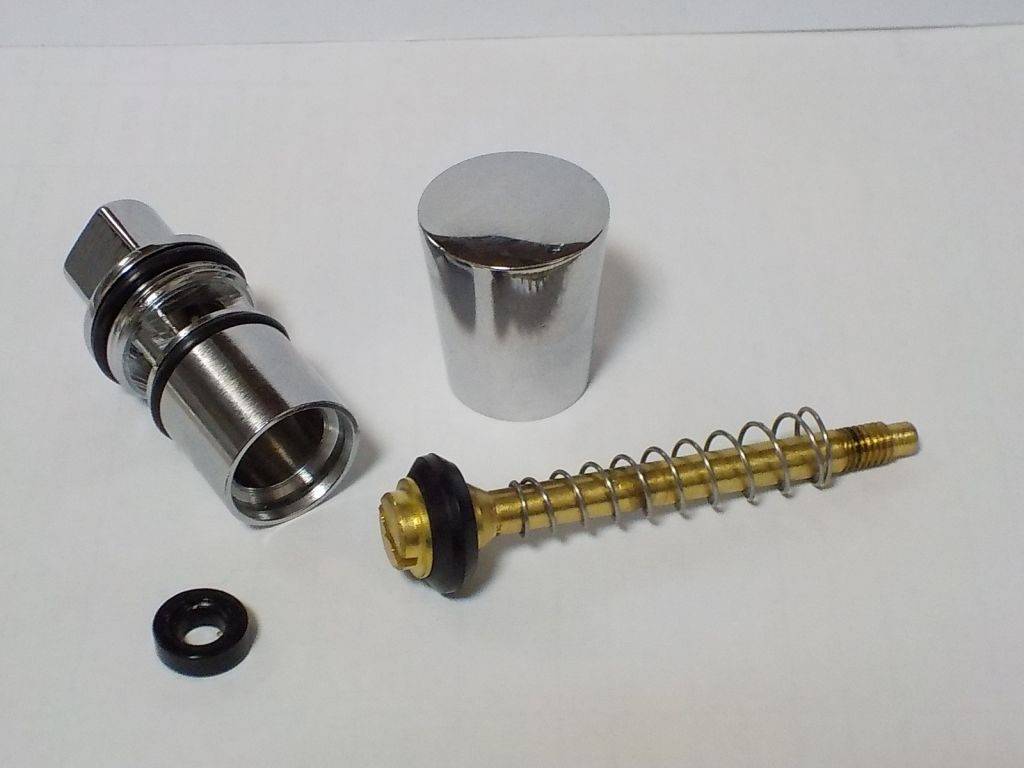
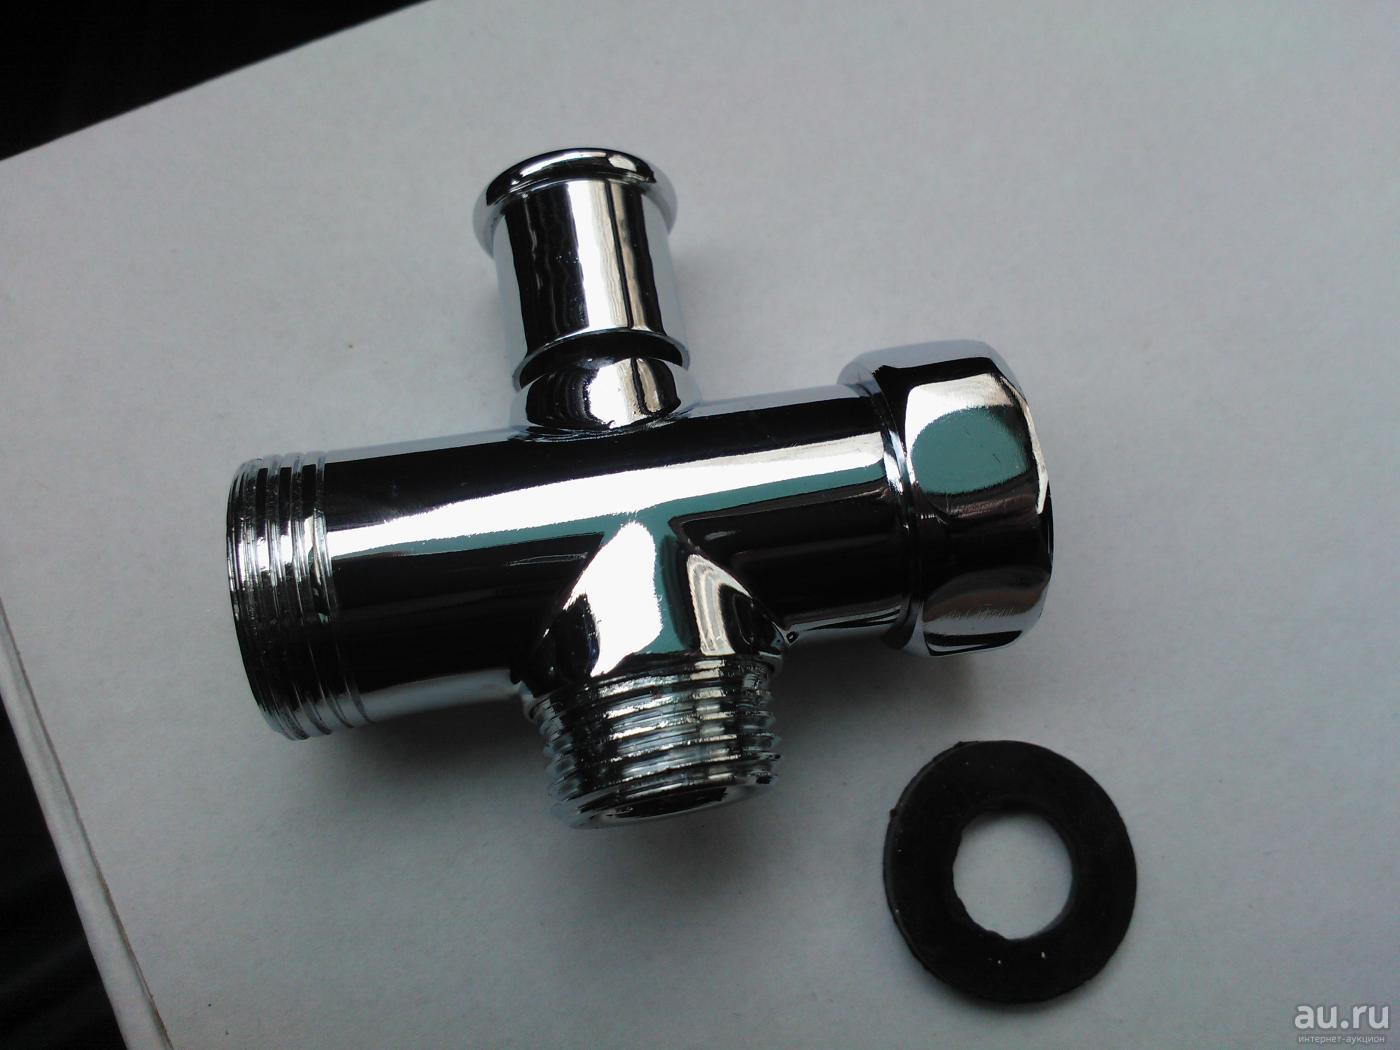
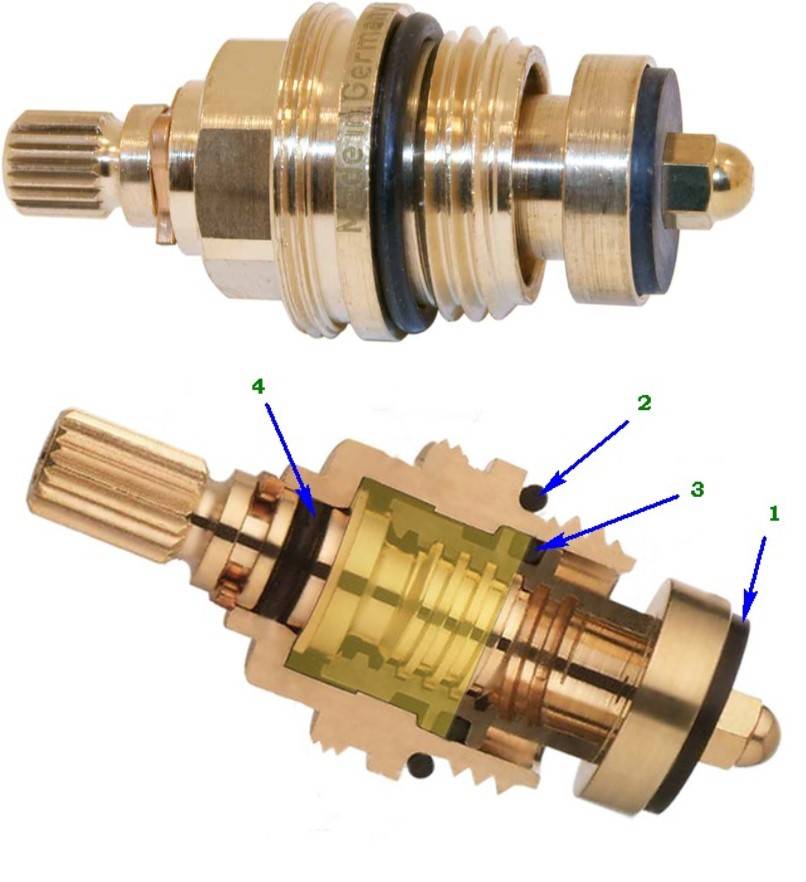
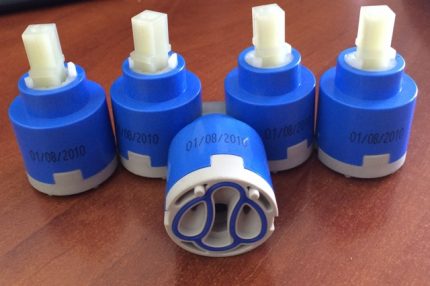
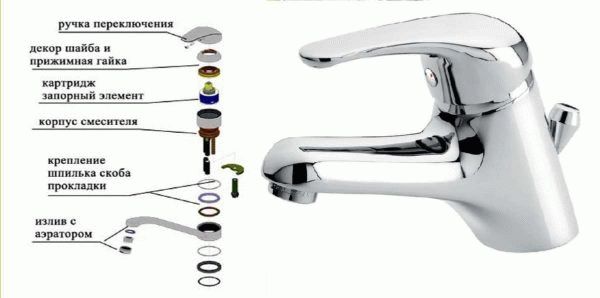
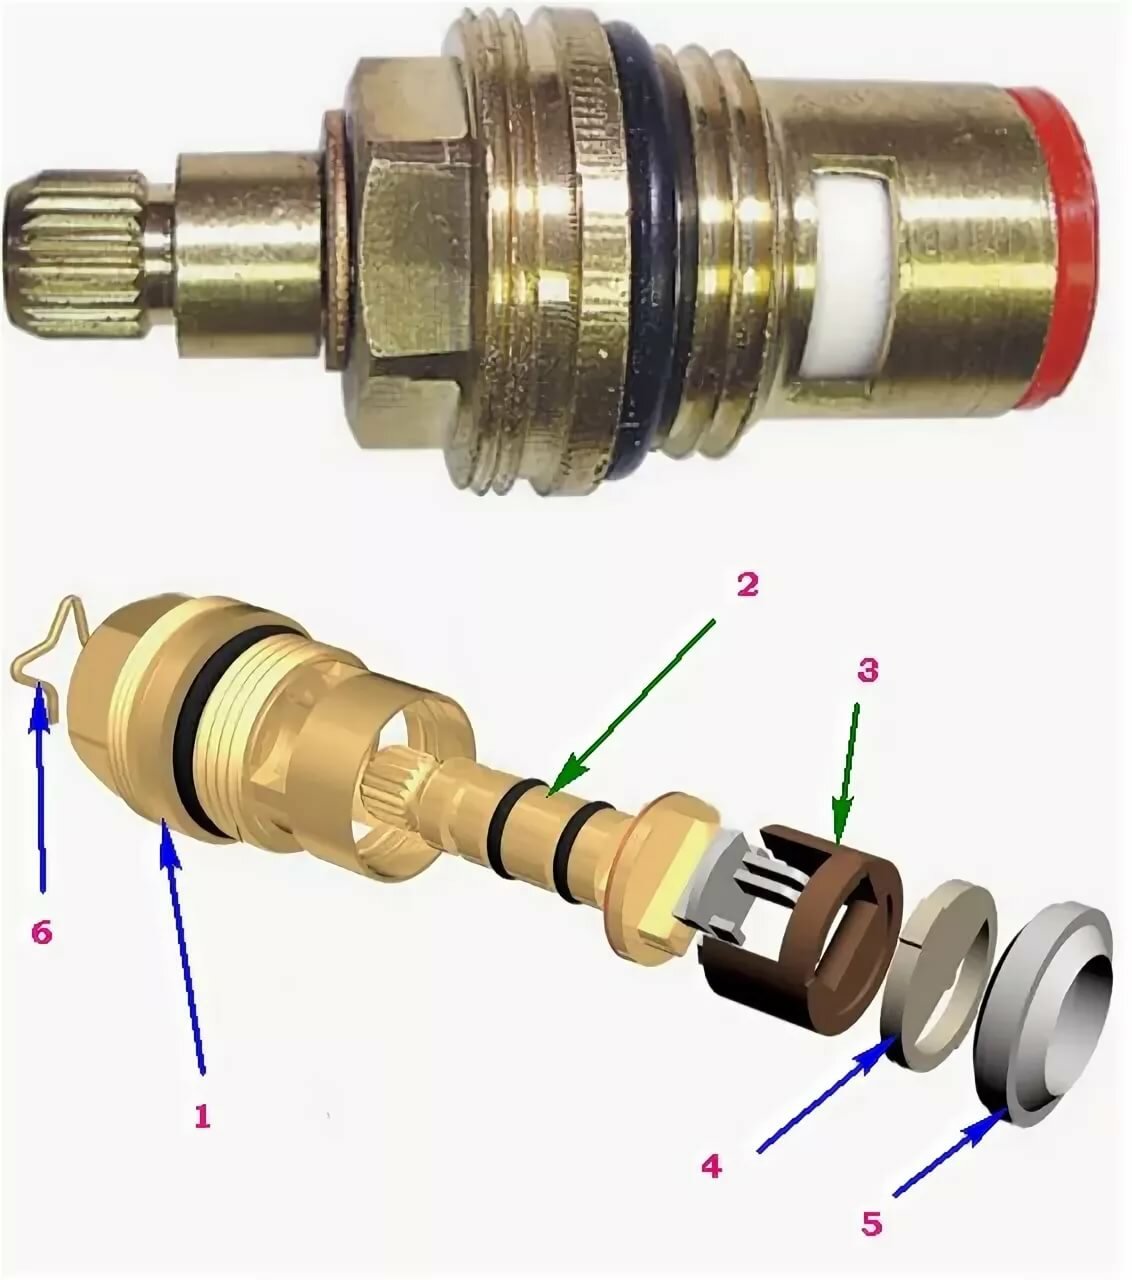
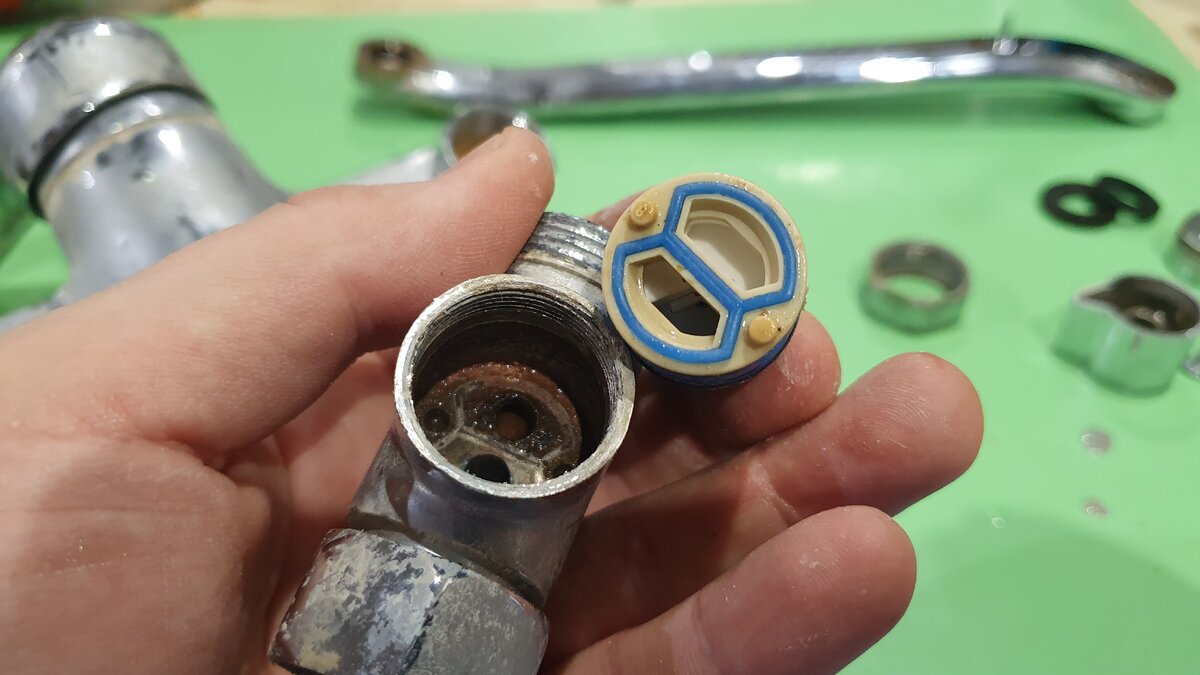
The structure of the cartridge disc mixer
This cartridge faucet model is good because they are easy to repair or replace if repair is not possible.
The structure of single-lever disc cartridges with ceramic plates is not complicated. Top down:
- Switch with fixing screw.
- Locking (clamping) nut.
- Cartridge. It mixes water flows, the same device shuts off the water.
- The body of the mixer, in which there is a "seat" place for the cartridge.
- Fasteners, studs and gaskets to ensure tightness.
- Outflow (gander). It can be a separate part - in rotary models for the kitchen or part of the body - for sinks in the bathroom.
- If the spout is separate, gaskets are still installed from below and there is another part of the body.
Lack of disk cartridge for single lever mixer lies in the high demands on water quality. If even a small foreign fragment gets between the plates, the tap will leak or stop functioning altogether. In addition, it is sometimes very difficult to set the required temperature.


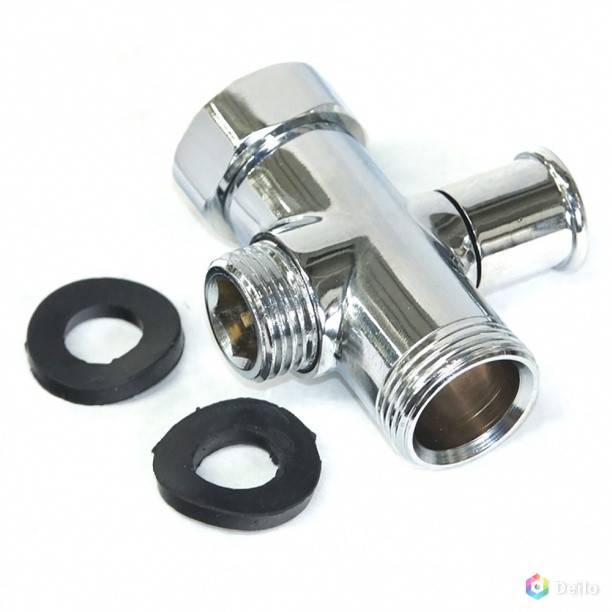
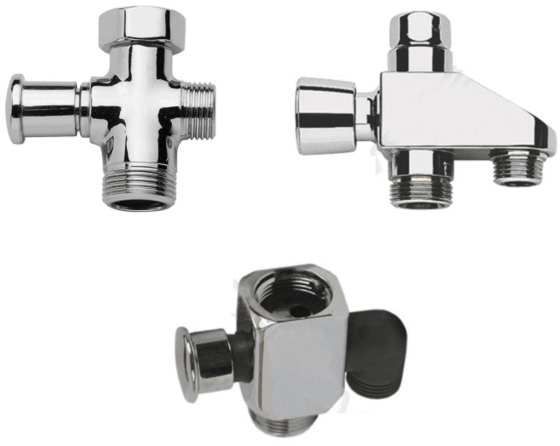
Types of spout/shower switches for bathroom faucets
Modern bath faucets with shower, equipped with four different types of diverters:
- button device,
- flag analog,
- inverted button device,
- innovative ceramic device.
Let's talk about these types in more detail.
Extraction devices
- Exhaust pushbutton switches are classic for lever (pedal) mixers.
- In this case, in order to transfer the water supply from the outlet of the device to the shower, go to pull up the switch handle.
- In this position, under the action of a jet of flowing water, the divertor is fixed mechanically.
Note! Some models of exhaust devices are supplemented with the option of manually fixing their position. It is needed for systems with low water pressure / pressure, at a time when the switch cannot be locked automatically
- In order for the element to fix the direction “to the shower”, after pulling the handle up, turn it to either side by 90 °.
- To return the switch to its original position, you need to turn the handle back 90 °. (See also How to Choose a Sink: The Highlights.)
Flag analogs
- The flag rotary switch is traditionally used in two-valve shower faucets.
- The device includes two elements. This is an eccentric on which the handle is put on, it is turned by the user. And the central rod, it moves into the mixer body, thereby opening the flow of water in the right direction.
- The main advantage of this type of switches is a high level of reliability, because the node is made entirely of bronze. In addition, the device is comfortable to use when the mixer is connected.
Push fittings
Pressure devices switch water flows with a simple action on the button.
In appearance, such a device does not differ from the classical counterpart: in its neutral position, water flows through the spout. In order to transfer the jet to the shower, go to press the push-button switch.
The main disadvantages of the device are as follows.
- In most cases, the water is redirected when the mixer is already connected, in the pressure fixtures the water head forms the switching resistance.
- In addition, the user's hands are wet and it is uncomfortable for him to pull the button.
The main advantage of the variety: it is still easier to press than to drag it up.
Device equipped with ceramic plates
This latest divertor design solution was proposed by Lemark. Its price is high, but it is only reliable with a very long service life.
The main advantages of the device are below.
- Resistance to water hammer when switching water.
- Modern design that can withstand more than 150,000 cycles of work.
- Smooth switching, it is supplied with a rotation angle of 180 °.
Conclusion
Mixer diverters can have different designs. All of them have certain pluses and minuses. Choose a mixer tap based on which shower diverter is the most ergonomic for you.
Check out the video in this article. It provides additional information.
Types of mixers and their device
From the entire range of mixers available for sale, the following main types stand out:
- with two levers;
- with one lever;
- thermostatic mixers;
- touch-controlled faucets - smart faucets that are controlled using the display also belong to this category.
Many bathrooms and kitchens still retain the "classics" of the domestic "faucet industry" - two-valve faucets. Indeed, for a long period, people simply had no other options. Such devices simply separated the streams of cold and hot water.
Somewhat later, another know-how was invented, or to be more precise, a mixer with one lever. By moving the mixer lever up or down, it was possible to control the pressure of the water flow, and by turning it to the left or right, switch to cold or hot water.The type of mixer familiar from Soviet times is gradually disappearing into oblivion.
Designers are trying to come up with something new, striving for a more modern look for plumbing. From a practical point of view, this approach has only brought benefits. Now you can adjust the device much faster, and it’s easier to manage it.

Devices with two valves are divided into two subspecies. The first option includes a variant in which a gasket made of an elastic material plays a locking role. The reciprocating type cartridge can open and close the water passage. It is silicone gaskets that prolong the life of such a device. The second subspecies of mixers include those in which a pair of ceramic plates serve as a locking element. The top mounted plate can rotate while the bottom plate is fixed. This type of mixer much more expensive than the first.


Mixer with one lever
There are a lot of different holes on the body of the device with one lever, they are needed for tubes and mounting elements. The spout of such a mixer can be both movable and made in the form of a single unit with the body. Monolithic with a body is most often found in mixers in which the handle is installed in the upper part. If the lever is mounted at the bottom, then the spout is usually very long and high. On modern single-lever faucets, aerators are installed, which not only fill the water stream with oxygen, but also significantly reduce water consumption.

In mixers with one lever of a spherical type, a rounded part is located in the central part. Inside there is a cavity, as well as three holes. Smooth operation and durability are ensured by the rubber seat.This element is fixed with retaining rings. The mixer lever, when returned to its original position, comes into contact with the stem. When the lever is turned, the streams of cold and hot water are combined into one. If the lever is lowered, the water shuts off.
Mixer with thermostat
One of the modern models. Thanks to the built-in thermostat, the water coming from the tap always has the same temperature. The thermostat itself is hidden inside the crane box. There are two handles to control the flow of water. One of them regulates the pressure of water, and the second - its temperature. This scheme of the device allows you to satisfy the needs of a larger number of users.

Mixers of this type are mounted either on walls or on washbasins. As a rule, the kit includes elements that limit the maximum temperature of the water. If something breaks down in such a device, then you can correct the situation on your own. Leave the bigger problems to the experts.
Touchless faucets
All devices where water is supplied automatically are called non-contact or, in other words, sensory. By bringing your hand to the sensor, you can activate the water supply. Thanks to this device, the time and effort to perform simple actions is reduced.
In addition to the usual ones with sensors, there are also smart faucets. For various built-in functions, they are clearly in the lead. The basic delivery of touch models consists of a one-piece body with a spout, a rechargeable battery, and an electronic control unit.
Similar names:
- The mixer is automatic.
- The mixer is infrared.
The sensors themselves, which are installed on such mixers, can be not only of the infrared type. Touch control devices consume water "wisely". Perhaps some people will not like it - those who prefer to turn on the water pressure more strongly. But the fact that they have increased hygiene is definitely liked by all users. Very rarely fail and almost never get dirty. And certainly with such faucets it will be difficult to arrange a lake in the bathroom.
Popular manufacturers
Model from the brand Hansgrohe
The diverter for the mixer is presented on the market in a wide range. Buyers trust more such companies:
- Hansgrohe. This is a German manufacturer, which is considered a leader in the production of sanitary ware. It brings to the attention of buyers bathroom faucets with high-quality fittings. Products combine elegance and German technology. Most often there are products from chrome-plated brass.
- Kludi. Produces durable and multi-purpose products with unique designs. The devices combine classic shapes and innovative solutions. Most models have built-in plastic aerators to minimize solid water deposits.
- Oras. This is a Finnish company offering luxury products. It is engaged in the production of thermostats and contactless mixers. The most popular models are Bagno Alessi, Optima.
Dismantling
Dismantling the mixer is required when it is useless to repair it. This may be due to damage to the body, mounts, or the desire to change the old model to a more modern one.
Dismantling procedure:
- Shut off the water supply.
- Drain the rest of the water.
- Using a wrench, unscrew the fastening nuts. If this is a mixer that is mounted on the wall, you will need an adjustable wrench. If the faucet is for a sink, then it is installed on studs, which are fixed with nuts. They are unscrewed with an ordinary open-end or tubular wrench. The size is selected by the nut, as they can be different.
- The wall-mounted bath faucet at this stage can only be removed from the fittings. From the tap for the washbasin or kitchen faucet, you still need to disconnect the hoses that supply hot and cold water.
The dismantling process is completed.
How to find the right spare parts
You should go to the plumbing store, taking the old part with you, as you can make a mistake with the size. For example, there are 1/2 and 3/8 inch crane boxes, with square and splined stems, with different thread pitches.
Switch disassembly
The process of disassembling the switching device is not particularly difficult, but sometimes it is difficult due to the layers formed, tightly clogging the threaded connections. The procedure for dismantling the divertor is determined by the type of construction.
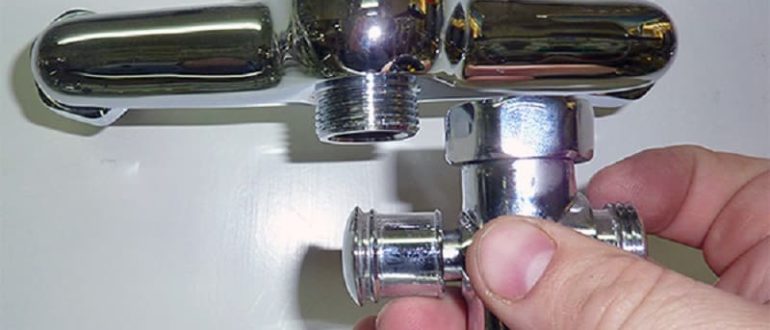
If the device has its own housing and is installed as an intermediate element on the outlet of the faucet, then it is enough to disconnect it and unscrew the shower hose and spout. Disassembling the diverter located in the mixer body is a little more difficult.
Recommended course of action:
- Remove the button or switch lever. They are mounted differently. Carefully remove the decorative plug, unscrew the fixing screw from the stem and remove the lever. When there is no decorative cork, its role is played by the screw itself, designed in the same style as the faucet body.
- Unscrew the nut fixing the mechanism in the mixer body.
- Take out the mechanism (cartridge).
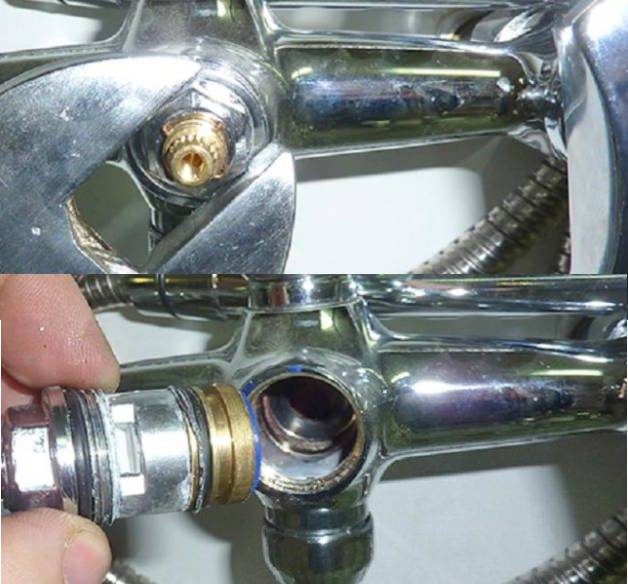
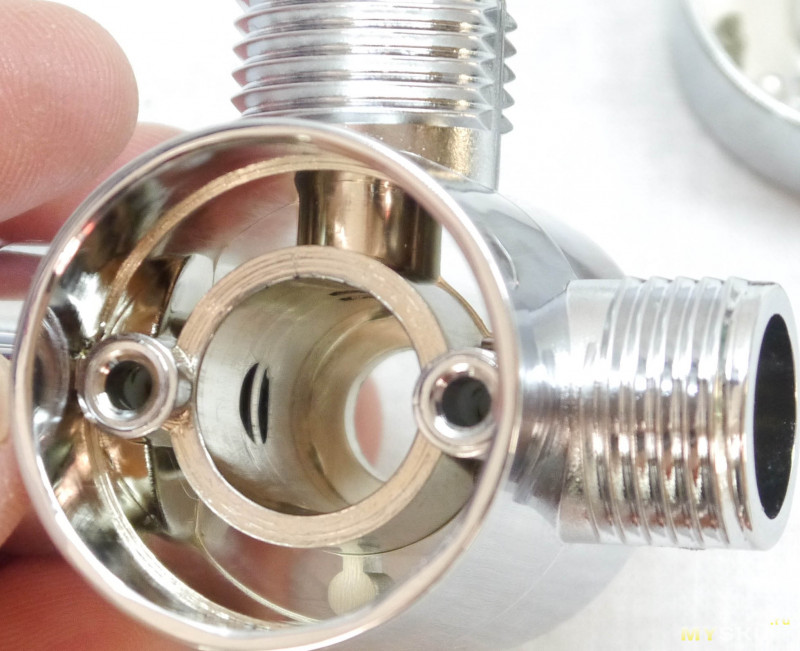
For eccentric products, unscrew the spout and the lower part that locks the eccentric inside the body, wrap the chrome part with a soft cloth and use a gas wrench
The work is delicate and the connection is usually clogged with lime deposits, so proceed with care and precision.
After unscrewing this part, remove the eccentric from the body .. Then take the old mechanism and buy the same one in the store
Be sure to follow the sizes. Usually this is a ½ or ¾ connector
Then take the old mechanism and buy the same one in the store. Be sure to follow the sizes. Usually this is a ½ or ¾ connector.


In some cases, there are no serious breakdowns, then try to eliminate the shortcomings that have appeared. It is usually necessary to clean the limescale, which interferes with the normal movement of parts and violates the tightness of the valves.
Crane dismantling
This procedure is simple, it does not require special skills or abilities. It will be enough to have the necessary tools with you and want to do the work yourself. Disassembly of a two-valve type mixer should be done when the first leaks appear, a thin stream of water flows, or the valves are poorly regulated.
Before disassembling the mixer, lay a cloth or any other protective coating on the bottom of the bath. It will protect the surface from possible chips as a result of falling tools or parts of the mixer.
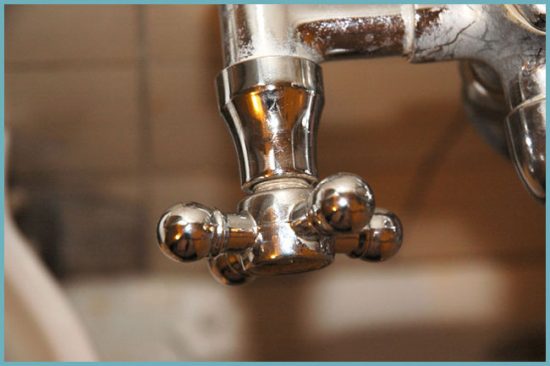 Repair a two-valve faucet is within the power of any owner
For dismantling, you will need a screwdriver and an adjustable wrench.This work is familiar to many men, but those who have not yet encountered the disassembly of the crane need to carefully read the instructions and follow it. You will surely succeed
Treat your work with attention and in no case rush
The first step in any plumbing work is to turn off the water supply.
Drain residual water from the mixer hose.
Plug the bathtub drain with a rag to keep small parts out of it.
Using a screwdriver, pry off the decorative plastic trims on the valves that indicate hot and cold water.
There will be screws underneath.
The same screwdriver must be unscrewed.
Then, with an adjustable wrench, carefully unscrew the axle box, disassemble the remaining parts of the valve and check for breakages, blockages, plaque and other causes of malfunctions.


