- Wire detector - main functions
- Instructions for using the detector
- Preparing for the upcoming work
- Using the detector "Woodpecker E-121"
- The simplest circuit
- Field-effect transistor
- Electromagnetic phone
- Ohmmeter
- Assembling the scheme
- We are looking for wiring
- How the device works
- The options are good - take your pick
- Types of modern search instruments and their characteristics
- Electrostatic testers
- Electromagnetic devices
- Metal detectors (searchers)
- Combined devices
- Professional search instruments
- Electromagnetic concealed wire detector
- Indicator screwdriver
- metal detector
- Multimeter and FET
- Combined detector
- 1 Homemade detector with a piezoelectric element - in simple words about the complex
- An overview of several models of wire and metal detectors
- Voltage detector UNI-T UT-12A
- Mastech MS6812 locator
- BSIDE FWT11 wiring finder
- Scanner IdeenWelt (Germany)
- Metal detector Einhell TC-MD 50
- BOSCH PMD 7 wiring scanner
- Wire detector Bosch GMS 120 M
- Scanner of cables and metal materials BOSCH D-Tect 150 Professional
- Combined hidden wiring finder
- Metal detector unit
- How a metal detector circuit works
- Magnetic search block
- Instrument assembly
- Tips for using hidden wire detectors
Wire detector - main functions
When starting repair work, few people have an electrical wiring plan on hand, so the situation when you get into it with a self-tapping screw or a nail is quite common. Such an incident is dangerous, by the way, not only because the wires are damaged, but you have to pull new ones ... In such a situation, you can also get injured or burned, because we are talking about electricity. To avoid this, you need a special detector.
In addition, such a device is useful on the farm not only in case of repair, because sometimes it is necessary to make a single hole in the wall, for example, to hang a picture or nail a shelf. In general, there can be a thousand options. Of course, we all know that electrical wires are laid either horizontally or vertically, and a person who has at least a little developed logical thinking can roughly guess their location.
However, this option is very doubtful, because in houses with old wiring, cables can lie anywhere. So the detection of hidden wiring without a special device is simply impossible. It is also useful in order to check the integrity of the electrical network, find metal objects and determine the polarity. DC circuits. And some of these devices can find wood, plastic, non-ferrous metals, etc.
Instructions for using the detector
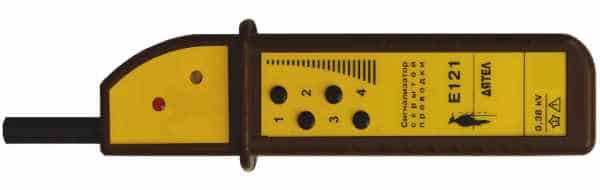
Due to the variety of designs concealed wiring indicators it is necessary to consider the instructions for their use on the example of a specific model. For this, an inexpensive electrostatic ISP "Dyatel E-121", widely used by domestic installers, was chosen. But first you need to prepare for the search procedure.
Preparing for the upcoming work
To speed up the detection of electrical wiring using any detector, experienced experts suggest following a number of simple rules.
You can test a new detector on a regular extension cord that is plugged into a power outlet. Books or ceramic plates can be used as a barrier.
Below are the main ones:
- Initially test the performance of the device on any live wire. The detector may simply run out of batteries, and it will not work correctly.
- Calibrate the device at a distance of 1 meter from the walls, if this option is available.
- The surfaces to be examined must not be wet.
- If possible, turn off all working electrical appliances in the apartment, including telephones.
- Wiring accuracy will be drastically reduced if a conductive wallpaper adhesive is used.
These recommendations will eliminate the loss of time due to inoperable equipment and unacceptable parameters of the surface under study.
Using the detector "Woodpecker E-121"
The Dyatel E-121 detector is capable of operating in 4 sensitivity ranges.
The procedure for working with this wire detection device is as follows:
- Alternately press the buttons of the sensitivity ranges. At the same time, the signaling device should emit a short light and sound signal. If there is no reaction of the device, check the battery.
- Press the button "4" (provides maximum sensitivity), bring the detector to the analyzed surface and, if there is an indication, reduce the sensitivity by pressing the buttons from "3" to "1" in sequence.
- Simultaneously with the decrease in sensitivity, it is necessary to reduce the distance to the object being detected, localizing the alarm trigger zone.
- To locate the location of the conductor, move the detector along the wall, trying to find the area with the maximum electromagnetic field.
- To neutralize interfering ambient currents, put your hand on the analyzed surface near the detector. If there is no conductor near the hand, then the "Woodpecker E-121" will stop giving signals.
- When searching for a broken wire, apply voltage to the damaged core, and ground the rest.
The accuracy of determining the location of the electric cable depends on the degree of humidity and the materials surrounding the wire.
Detection of electrical wires in plastered walls, reinforced concrete panels and in a ground shield will be difficult.
Domestic detector "Woodpecker E-121" effectively detects wiring on depth up to 8 cm and costs around $ 15, which guaranteed him popularity among electricians
To test fuses and fuses, you must turn on mode "1" or "2" and touch the antenna to the contacts before and after the fuse. In the event of a malfunction, the detector will not signal.
The Dyatel E-121 detector has a combined system of light and sound alarms, which allow you to keep the device working if one of the alarms breaks down
For the correct interpretation of the results of the work device, you should first familiarize yourself with its instructions, because almost every detector requires the correct initial setup.
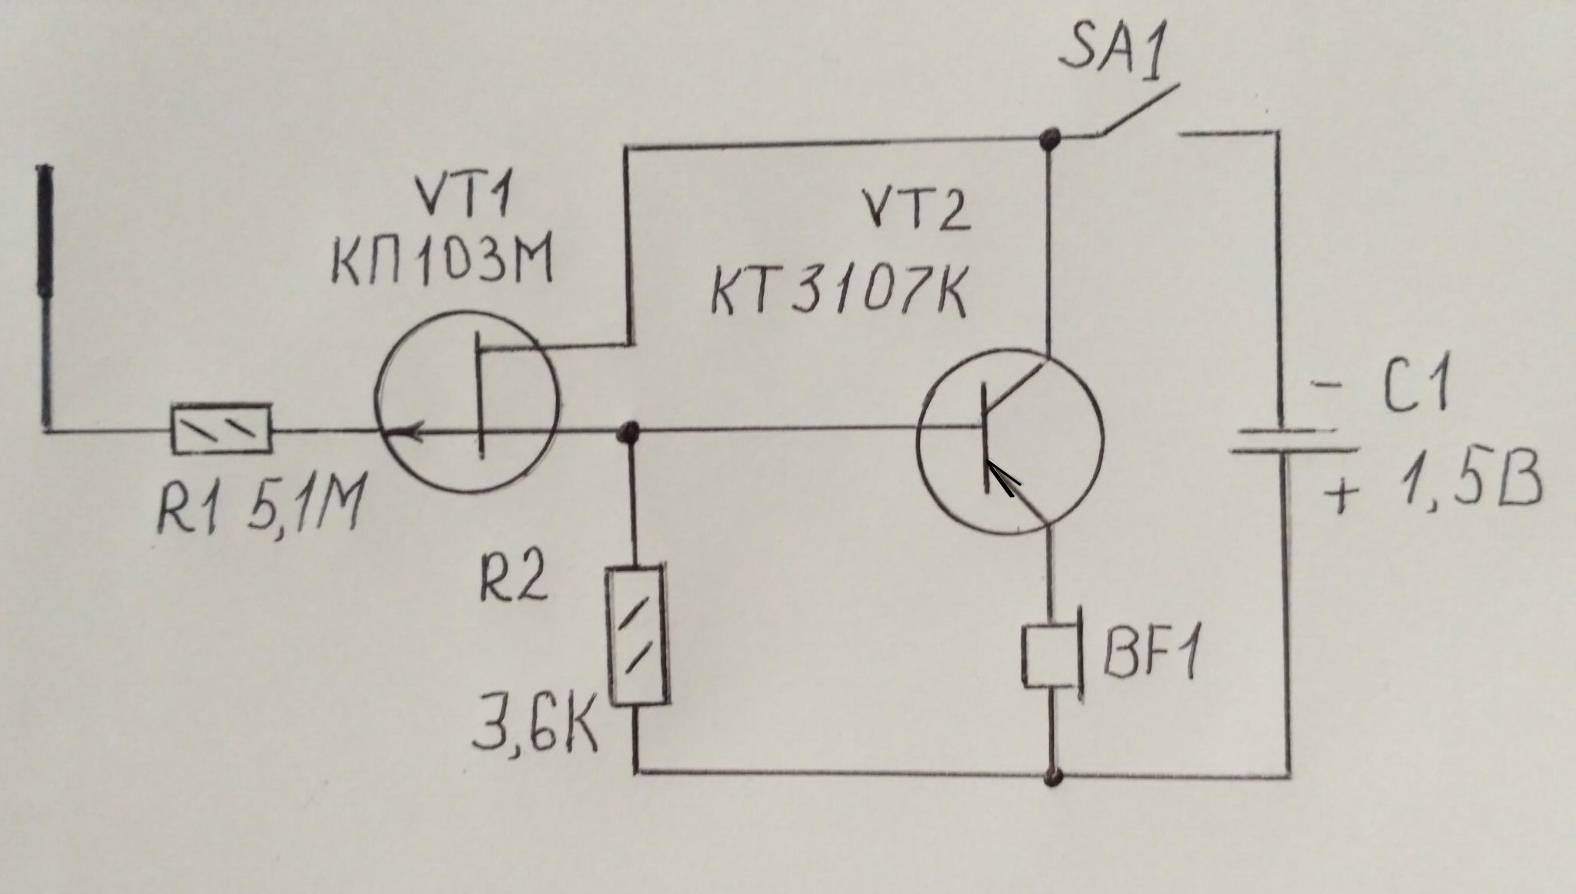
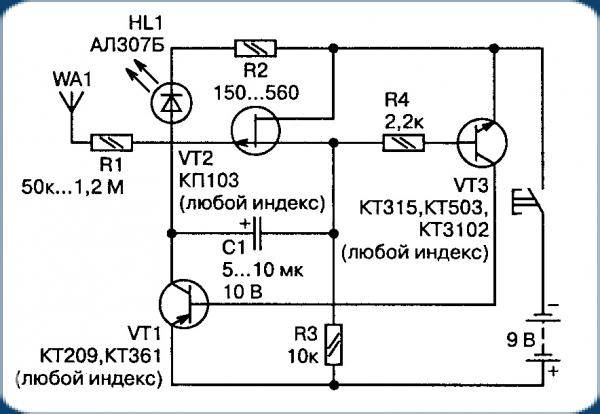
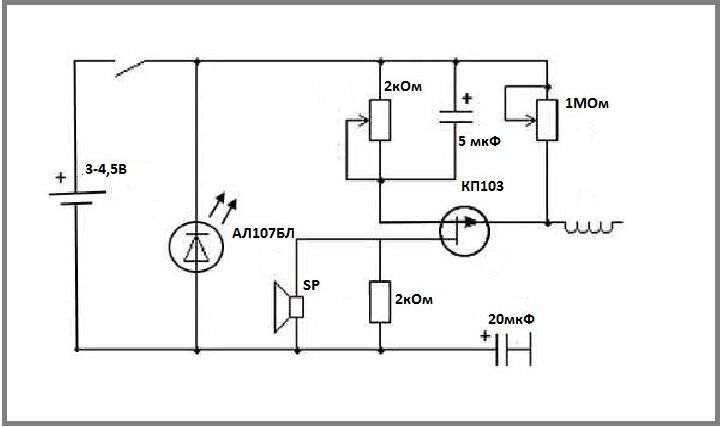
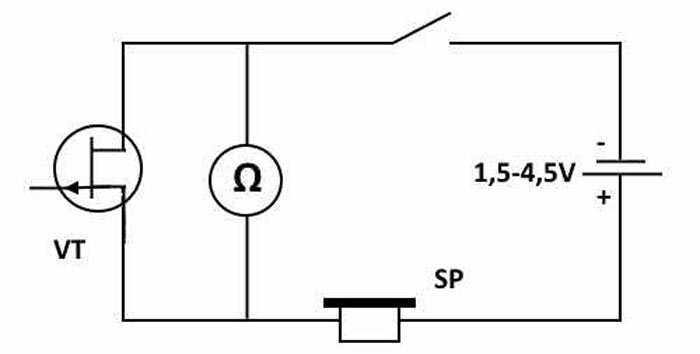
The simplest circuit
This is the simplest scheme, so we will talk about it first, and explaining all the little things in the most detail (let understanding people not laugh). If desired, anyone can collect it.
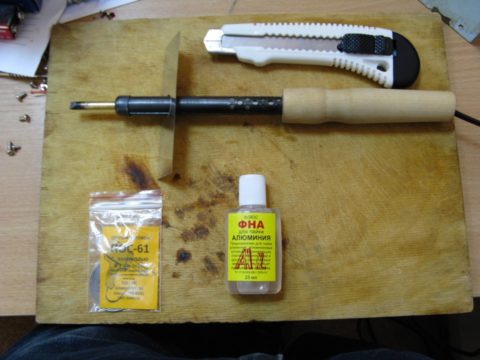
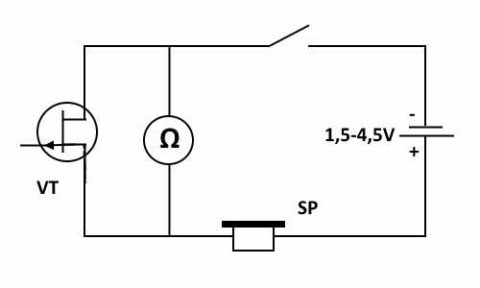 To implement we need:
- field-effect transistor type KP 103 or KP 303 (designated VT);
- power supply 1.5-5 V (one or more batteries);
- electromagnetic telephone (designated SP);
- wires;
- any switch or toggle switch;
- ohmmeter (denoted Ω) or avometer (tester), although you can do without it.
Of the tools you need only a soldering iron and wire cutters. For soldering, of course, there must be solder, flux or rosin. Now more about the obscure details.
Field-effect transistor
The most important detail, on the diagram it is indicated like this:
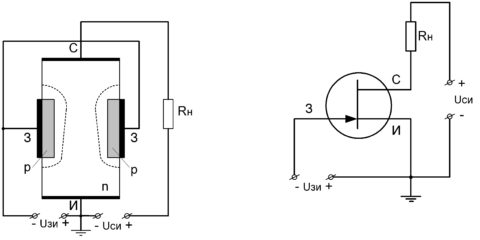 Structure and designation of a field-effect transistor
We look at the right side of the figure, the left one is not important to us, here its conclusions are indicated by letters:
“Z” - shutter (the direction of the arrow indicates the type p or n, this is also not taken into account now;
"I" - source;
"C" - stock.
If no voltage is applied to the gate of the transistor, then there is a large resistance between the source and the drain, the current almost does not flow. By applying voltage, we open the gate and reduce the resistance (like opening a tap on a pipe), the current begins to flow. Moreover, field-effect transistors are very sensitive, the hidden wiring detector circuit is based on this feature.
This is what it looks like in the photo.
 Transistor KP103 in a metal case
Transistor KP 303 has the same appearance, but differs in marking
After the numbers, there is still a letter designation, we do not take it into account. A second version is available in a plastic case in the form of a prism and three flat terminals at the bottom
How the conclusions are located on the case should be clear from the figure below. On it, a transistor in a metal case is shown with the leads down, you need to navigate by the key.


This is how the conclusions are located on the case
Electromagnetic phone
This is not a telephone set, but only its part (the device got its name from here), it looks like this:
 Electromagnetic phone
Comes with a body made entirely of plastic. Suitable for old rotary phones. It is located in the tube in the part that is adjacent to the ear (we hear the interlocutor from it). In order to remove the phone, you need to unscrew the decorative cover and disconnect the wires at the terminals.
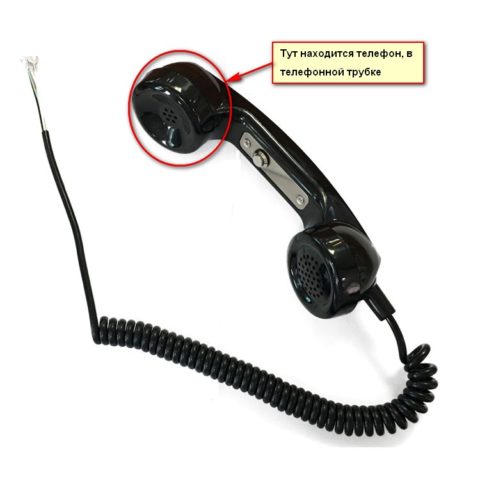 Handset
The marking is not important to us except for the resistance, it should be in the range of 1600 - 2200 Ohms (it can be denoted by Ω).
The phone works as follows principle - inside there is an electromagnet, which, when current flows through it, attracts a metal membrane. The vibrations of the membrane create the sound we hear.
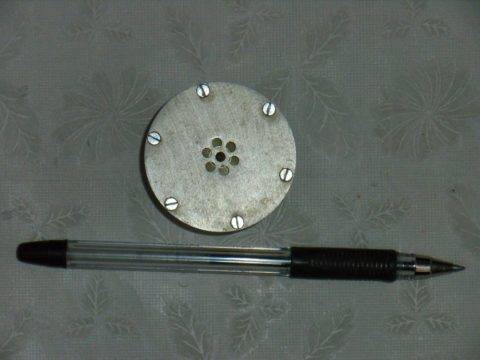
Ohmmeter
This is a measuring device for determining resistance.
It looks like this:
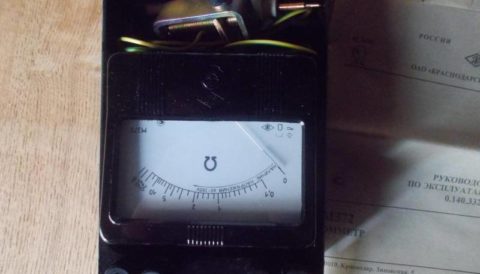 Ohmmeter
If it's hard to find, then we can do without it, the circuit will work anyway. If necessary, you can draw conclusions for the connection, and use the “tester” during the search (an avometer or multimeter is the same thing) in the resistance measurement mode. Almost everyone has this device.
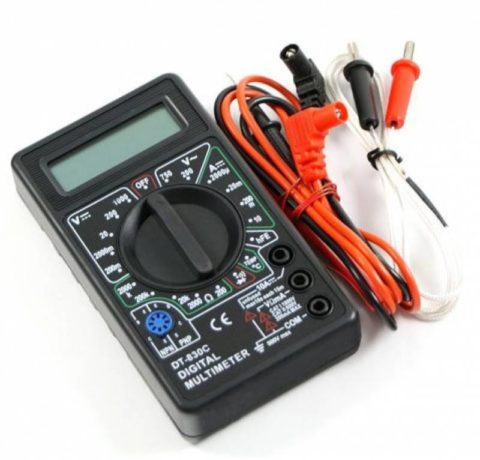 Avometer or "tester"
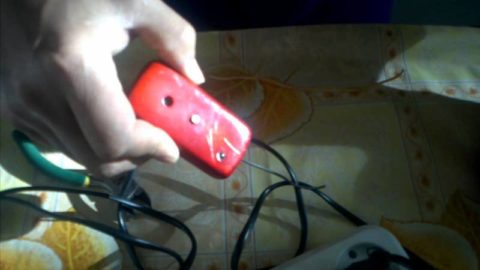
Assembling the scheme
 A soldering iron is sufficient for assembly.
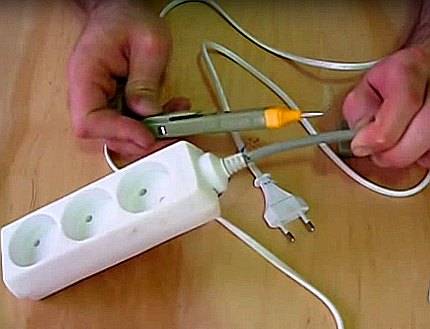
We assemble all the details with a canopy using wires according to the diagram. We solder a piece of a single-core wire with a length of 5-10 centimeters to the gate of the transistor. It will be the antenna.
After assembly, you can pack everything in any suitable case, such as a plastic soap dish.
 Soap dish can serve as a case
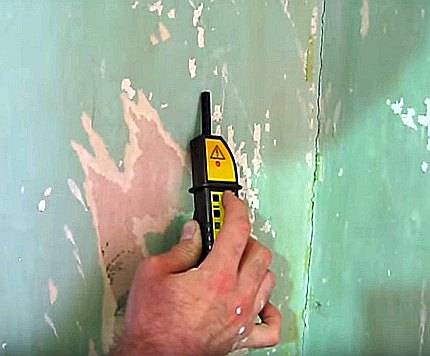
We are looking for wiring
We bring the switched on device to the wall and begin to draw the antenna along it. In the place where there is a live wire from the phone, a buzz will grow (like a working transformer). The closer to the wire, the stronger the sound.
More precisely, you can find the wiring according to the readings of the ohmmeter; when approaching, it shows the least resistance. To work with an ohmmeter, turn off the power to the device.
How the device works
The whole point (as we have already said) is the high sensitivity of the field-effect transistor. An electromagnetic field induced on its gate with an antenna opens the transistor. The current is applied to the phone and it starts beeping at a frequency of 50 Hertz (the frequency of the alternating current in the mains).
An ohmmeter measures the resistance between source and drain. It becomes smaller as the gate signal increases.
Now let's look at more complex devices, without going into too much detail.
The options are good - take your pick
Obviously, there are a lot of options for this device. Some craftsmen are helped by an indicator screwdriver with the function of detecting hidden wiring. It will determine whether the electric extension cord is in working condition, whether there is voltage in the network, find a phase or zero in the outlet, a cable in the wall under a layer of plaster. It's simple to use. The sharp end must be put at the right point. For example, plug into an outlet. The indicator light will turn on to indicate that a phase has been found.
Video: the principle of operation of the indicator screwdriver with the function of detecting hidden wiring is simple and clear.
 Watch this video on YouTube
A tool is also suitable for determining a break in the network. To do this, a screwdriver is led along the wall where the cable passes. Where there is a break, the indicator light will turn off. In the same way, they also search for a cable closed in the wall. True, the thin area of \u200b\u200bthe tip of the screwdriver will make this process quite long in time.
A larger area can be captured by a smartphone.Surprisingly, it is also possible to restore the layout of electricity cables in the room with the help of a mobile phone. To do this, you need to download a special application "Metal Detector" to your phone. Of course, the application is designed to search for metal. However, it also copes with hidden wires.
The principle of operation is based on the built-in magnetic sensor. They are looking for metal.

Built-in magnetic sensor will help find hidden wiring and using a regular smartphone
On some smartphones of the Android system, this program is installed by default. It's called Electronic Compass. This is the same magnetic field strength sensor. They use the program in the same way as an electromagnetic detector: they drive the gadget along the wall in search of what is hidden from the eyes.


One way or another, the wiring indicator in the wall is an irreplaceable thing. Repair without it is extremely difficult. And, conversely, the use of such an item really simplifies the work. In all other respects, you should be guided by your taste and the frequency of contacting this device for help. It is on these factors that the chosen option depends.
The use of a hidden wire detector simplifies repair work
And one more thing. Any device to detect a break in a hidden wiring may be wrong. Devices do not always clearly respond to two elements that are in close proximity to each other. The battery may be discharged or another factor may be triggered, causing the device to operate incorrectly. Therefore, it is best to play it safe and, before drilling a wall, turn off the electricity in this room.
Types of modern search instruments and their characteristics
To date, there are a large number of detectors of various types. Some devices help to find not only wires in the wall, but also an accidental break.
According to the principle of its action There are two types of seekers:
- Electrostatic.
- Electromagnetic.
- Metal detectors.
- Combined.
Electrostatic testers
Electrostatic detectors help detect electromagnetic fields that come from live wires. These are simple searchers that you can make yourself according to a certain pattern.
Features and characteristics of detectors:
- Since the finder responds to certain electromagnetic fields, the wires in the wall must be under high voltage to be detected.
- When working with the device, it is necessary to select a certain sensitivity level, because if it is too low, then there may be problems with detecting wires that are too deep in the wall under the plaster. If the level is too high, the device may erroneously operate.
- If the walls in the room are damp or there are many different metal structures in them, then it will be almost impossible to search for wiring.
But given the low cost, ease of use and efficiency, such devices are used even by electricians.
 Electrostatic device for finding hidden electrical wiring
Electromagnetic devices
Such devices help to find the electromagnetic excitation that comes from the wiring connected to a certain load. The quality of work and accuracy of such finders is much higher than the previous ones.
Also, these devices have one feature of the work.In order to determine where certain wiring is laid in the wall and how deep, it must have a load not less than 1 kW. For example, you can simply connect an electric kettle or iron to the mains.
 Electromagnetic device for finding hidden wiring
Metal detectors (searchers)
There are situations when it is impossible to connect voltage to the wires or the load, then in this case detectors or metal detectors are used. The devices work in this way: various metal elements enter the electromagnetic field of the finder, which cause certain vibrations that are captured by the detector.
Such devices clearly react to any metal objects that are in the walls, so in addition to wires, they will also find them.
 Metal detector for finding wires in the walls
Combined devices
Detectors of this type are multifunctional, as they are able to combine several types of devices that find wiring in the walls. Such functions significantly expand the scope of the detectors and increase their efficiency.
The TS-75 model, which contains a metal detector device and an electrostatic detector, is in great demand.
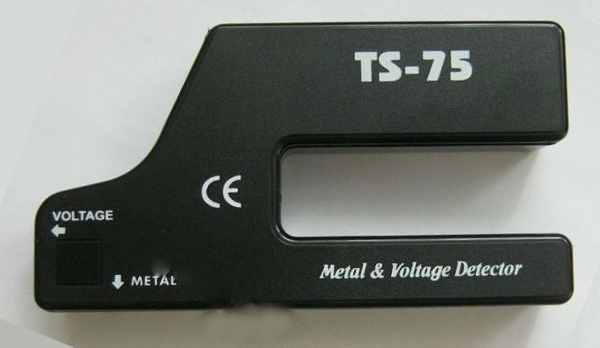 Combined multifunctional device for finding hidden wiring
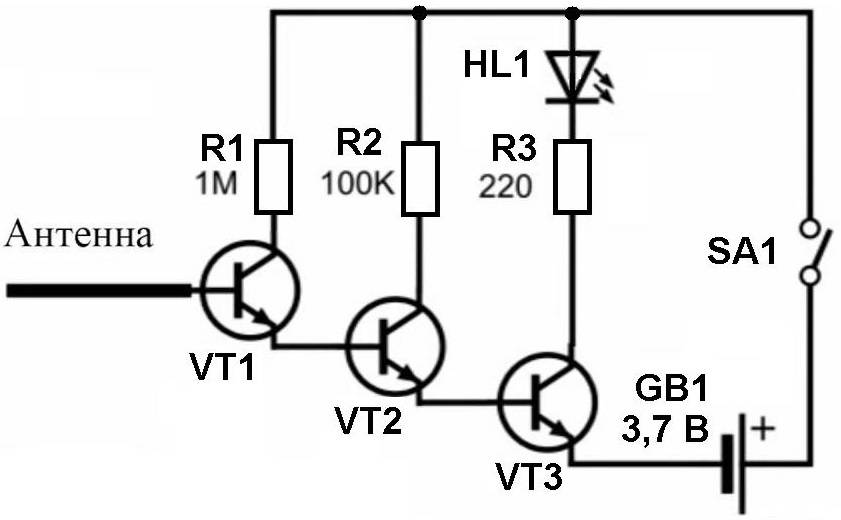
Homemade detectors can be:
- With sound indication. During operation of such a device, when it finds hidden wires, a characteristic sound is emitted.
- With sound and light warning system (indication). When the device finds the wiring, it not only emits an audible alert, but also the light starts flashing.
- On a field effect transistor. This device is easy to make according to a certain scheme.There are several different options for assembling a device with a light alert.
- Search signaling device without batteries. The device is powered by the mains, which also signals the detection of a bright light located on the body of the finder.
- The detector on the microcontroller. Such a detector works on the responsiveness of the finder to the electromagnetic field, which is formed by the current flowing through the wires. When assembling, you can use an LED or a sound piezo emitter as an annunciator.
- Dual element device. The detector has an LED lamp as an indicator, which starts to glow when wiring is detected.
Professional search instruments
There are many methods that allow you to find out where the cables are laid. They are based on the use of devices capable of detecting a wire without direct contact. These include the following devices:
- electromagnetic hidden wiring detector;
- indicator screwdriver;
- metal detector;
- multimeter and field effect transistor;
- combined detector.
Electromagnetic concealed wire detector
Electromagnetic detectors are professional devices manufactured to detect wires. Their work is based on the registration of variable electromagnetic fields coming from the conductor. This type of device requires that during the search, a current of 5-10 amperes flow through the probed cable. This corresponds to an electrical load of 1-2 kW.
 Wire Detector
Electromagnetic wire finder has good accuracy. But there is one big drawback. It is able to detect a wire if current flows through it.It will not be possible to find a circuit break with such a device. Accordingly, the house must be energized, and the line under investigation must not have a wire break. This type of detector is perfect if the cable is working and you need to make a hole in the wall without any extra risks.
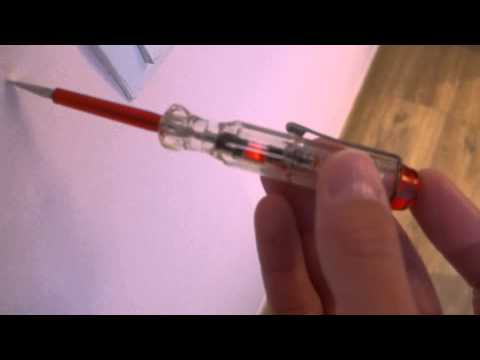
Indicator screwdriver
The cheapest method of detecting hidden wiring. The indicator costs about 20-30 rubles. Every electrician has one. Electricians use it to find phase and zero. If you touch the indicator screwdriver to the cable, it will light up. Expensive models are able to emit a sound signal. Regardless of the price, the device indicates the phase wire, and is silent at zero.
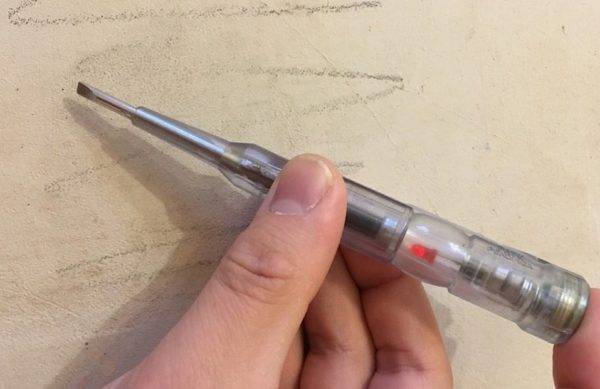 Cable search with using an indicator screwdriver
Transistor modifications of indicator screwdrivers can glow without direct contact with the cable. Sensitivity allows you to detect the phase wire at a distance of up to 20 mm. Therefore, if the current-carrying core is at a shallow depth, the device will detect it
It is important that the wire is energized, and the indicator is transistor
metal detector
This device is often called a metal detector. It is used to determine the presence of metal in the earth at a depth of about one meter. If there are no metal fittings in the walls, nothing prevents you from using a metal detector to search for wiring.


The use of a metal detector wins over other search methods. The cable does not need to be live to detect a wire. The device is designed to search at great depths, so it is easily able to find a wire in the wall at distances of 1-5 cm. Cables are usually laid at this depth.

However, using a metal detector in a building with fittings will not work.The device works on any metal, and not specifically on electrical wiring. Metal detectors are quite large in size. It is problematic to store them in a standard tool box.
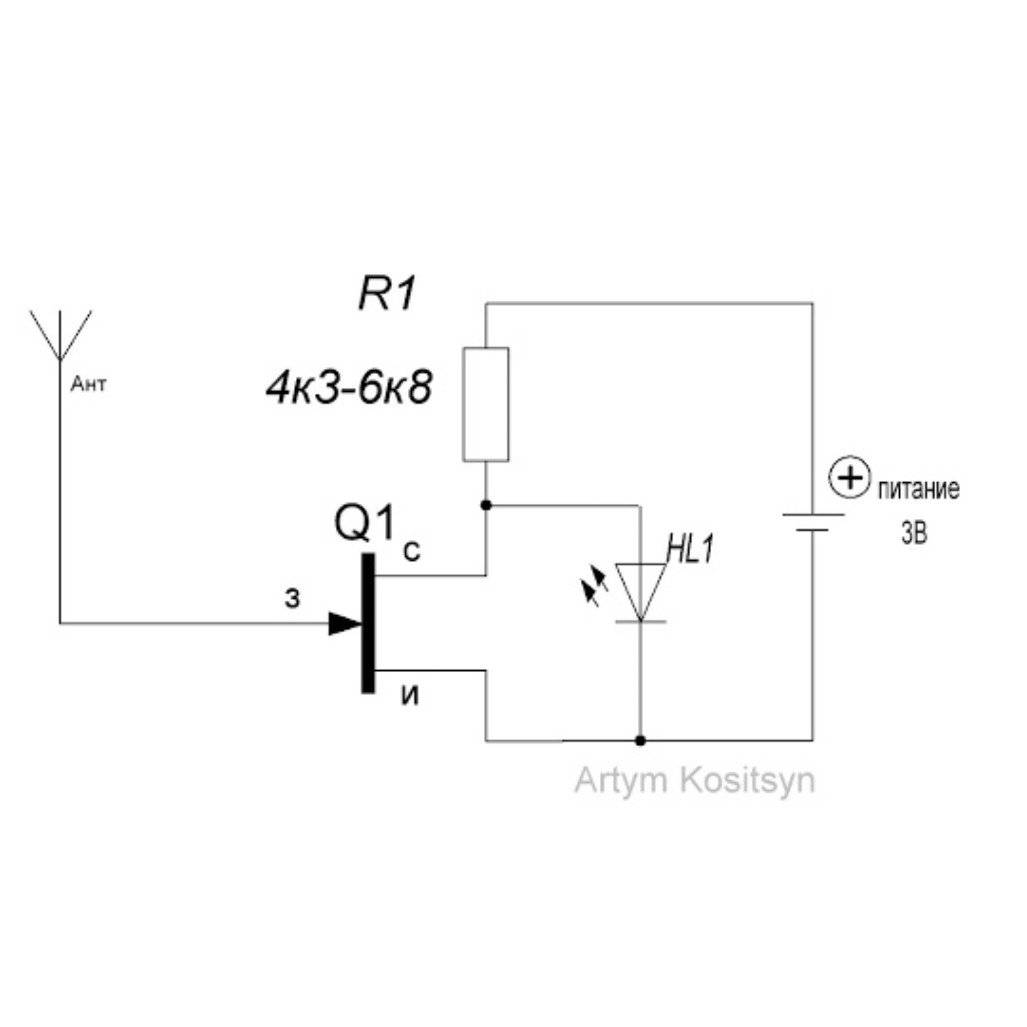
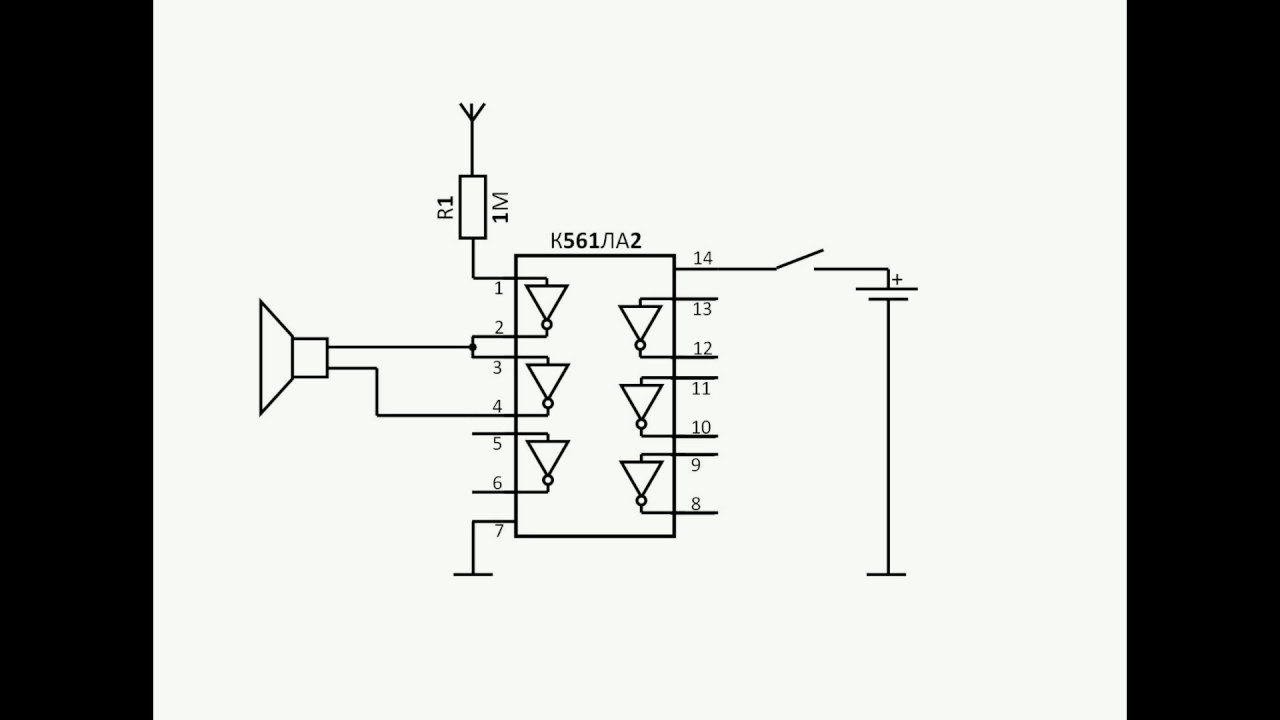
Multimeter and FET
Determination of hidden wiring with a multimeter is suitable for radio amateurs. The sensitive element for the search will have to be soldered with your own hands. In addition to the measuring device, a field effect transistor is useful. The main thing is that its gate has a low opening voltage and a small input capacitance. For example, Soviet elements of the KP103 series or imported 2SK241. It is also permissible to use an old pointer tester as a device.
The multimeter is put into high resistance measurement mode. Usually these are ranges up to 200 kΩ or 2 MΩ. The probes of the device are connected to the drain-source junction. The shutter remains suspended in the air. To increase the sensitivity of the search, a piece of wire should be soldered to it. The length and shape of the segment are selected empirically
Care must be taken when assembling the device. KP103 - not the cheapest transistors
They are easily damaged by static electricity.
Combined detector
Combined hidden wire finders are a class of devices that have several sensitive elements. For example, a metal detector and an electromagnetic detector in one compact body. Two types of sensor, working simultaneously, eliminate the shortcomings and errors of each other.
Combined appliances are more expensive than their simpler counterparts. A person who is looking for a network malfunction can, at his discretion, turn on or off one or another type of sensor, or use several at the same time. It all depends on the experience with the detector and the condition of the wiring under study.

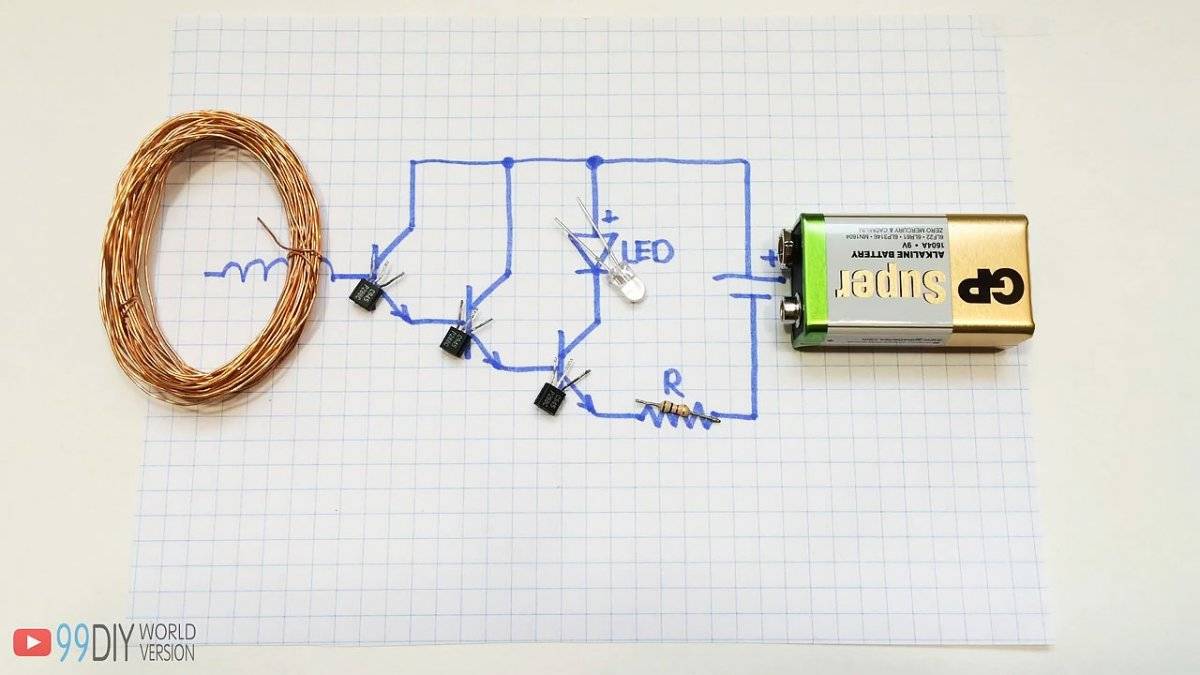
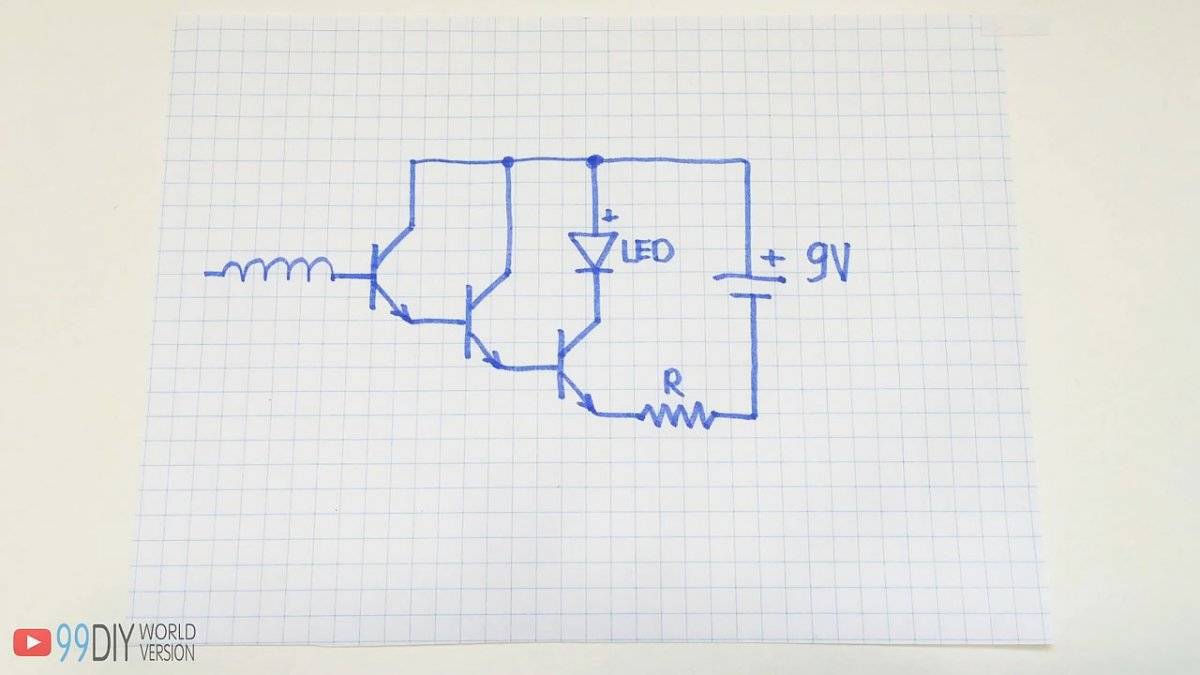
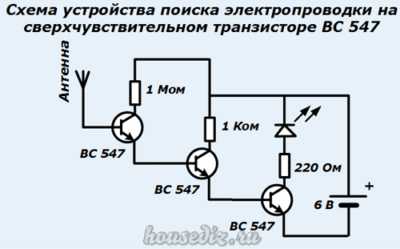
1 Homemade detector with a piezoelectric element - in simple words about the complex
Flush-wire detectors are divided into low-end and high-end devices. The low-class device is designed to search for electrical appliances and wiring that is energized. The high-class detector has great sensitivity and advanced functionality. Such a device serves to determine the breakage of hidden wiring, detects the location of wires without voltage.
Do-it-yourself hidden wiring detector from improvised meansby adding a few small details. When designing this instrument, please note that in order to determine wires in the wall voltage will fit. And if you need high-frequency equipment to detect a break and pinpoint the exact location of the cable down to the millimeter, purchase a quality detector in the store.
You can make a hidden wiring detector yourself
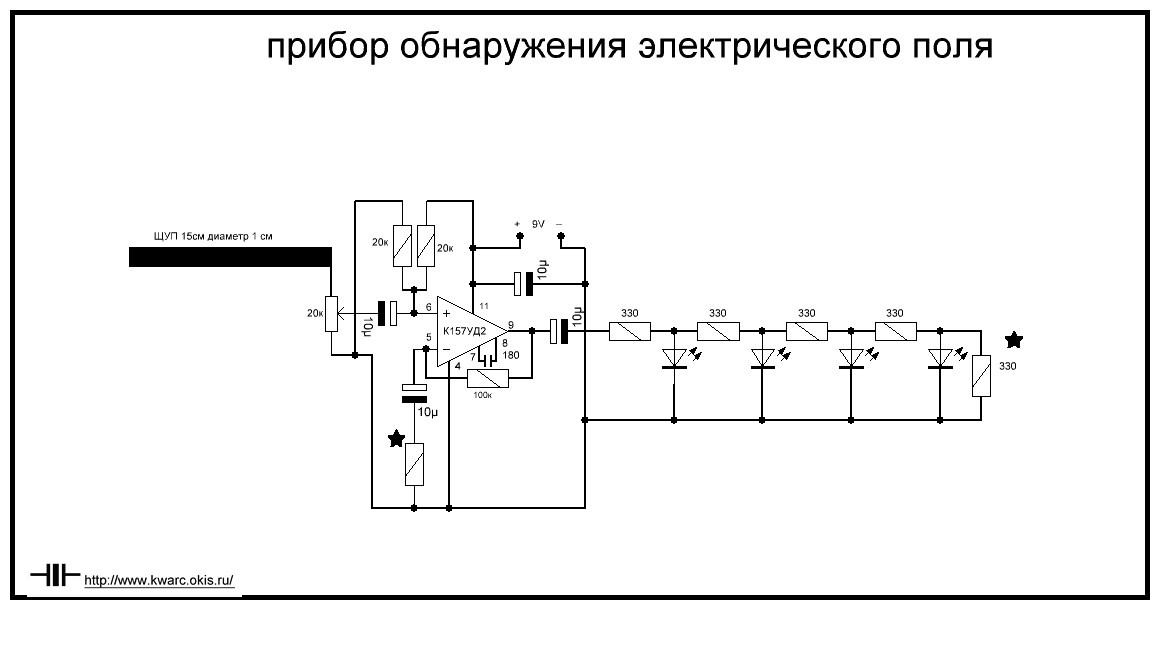
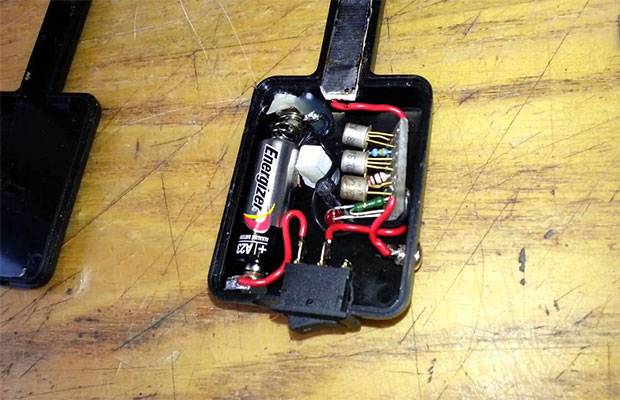
To assemble the device, you will need the following set of elements:
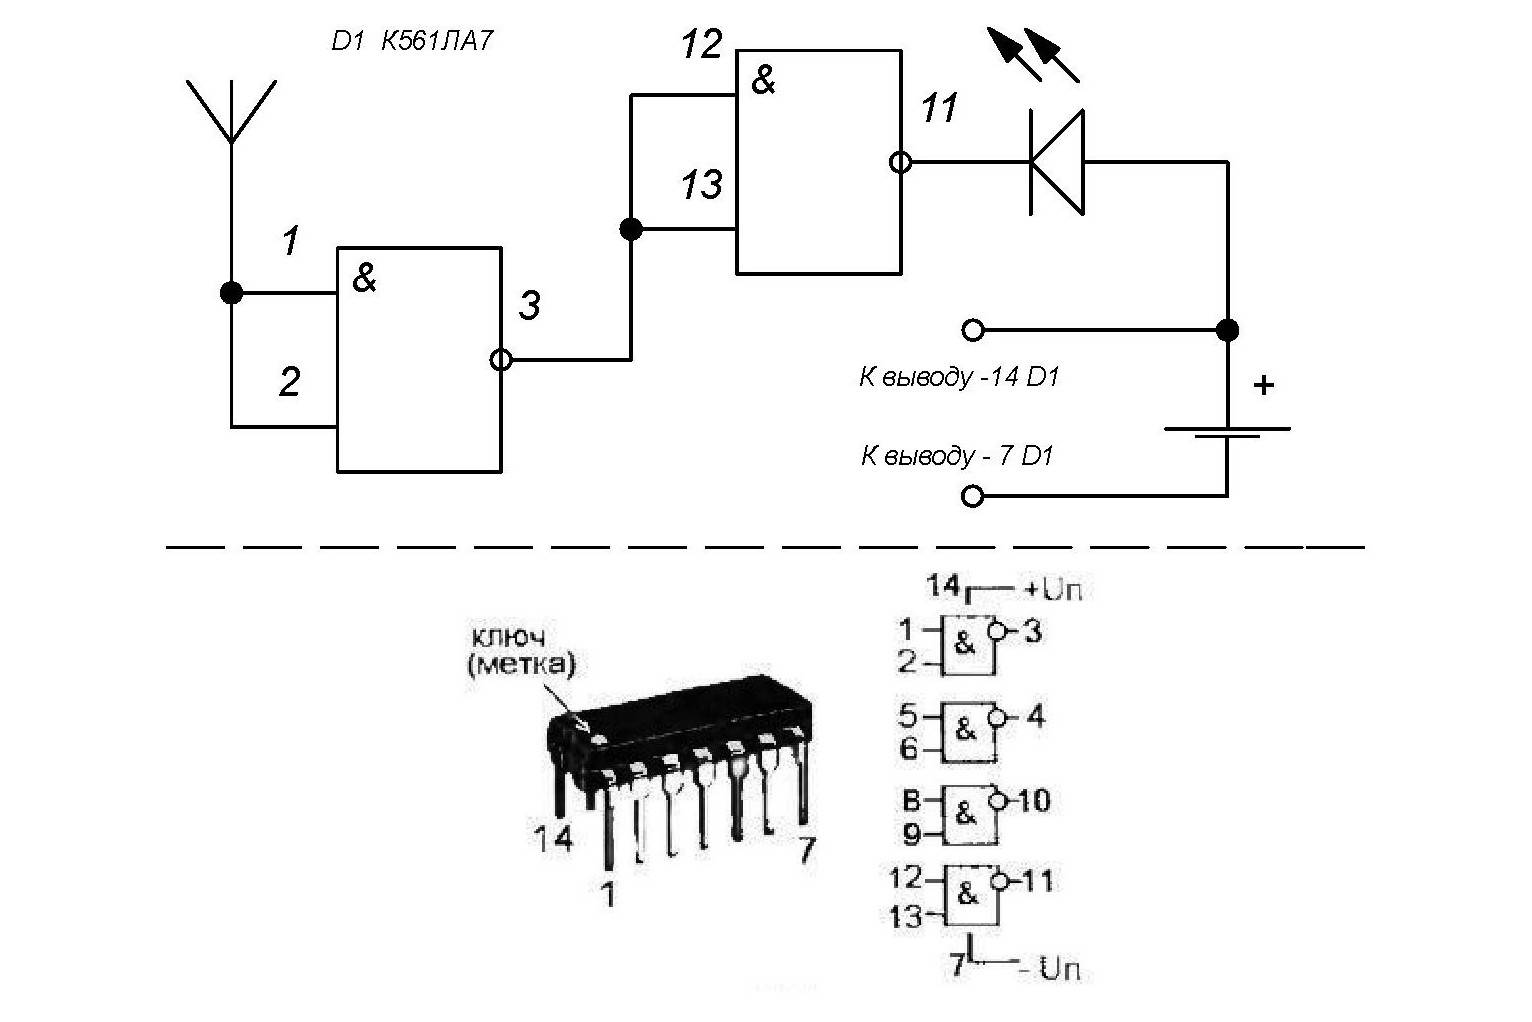
- chip K561LA7;
- 9 V Krona battery;
- connector, battery connector;
- current limiter (resistor) with a nominal resistance of 1 MΩ;
- sound piezoelectric element;
- single-core copper wire or wire L = 5–15 cm;
- wiring for soldering contacts;
- a wooden ruler, boxes from under the power supply, another home-made design for laying the chain.
Additionally, for work you will need a small soldering iron power up to 25 Wso as not to overheat the chip; rosin; solder; wire cutters. Before proceeding with the assembly, let's take a closer look at the main elements. The main part on which the assembly takes place is the Soviet-type K561LA7 microcircuit. It can be found on the radio market or in old stocks.The K561LA7 microcircuit is sensitive to static and electromagnetic fields, which are created by electrical devices and conductors. The level of current in the system controls the resistor, which is located between the integrated circuit and the antenna. We use a single-core copper wire as an antenna. The length of this element affects the sensitivity of the device, it is selected experimentally.
Another important assembly detail is the piezoelectric element. Capturing an electromagnetic signal, it creates a characteristic crackle that signals the presence of wiring in a given location. It is not necessary to specifically purchase a part, remove the speaker from the old player, toys (Tetris, Tamagotchi, clock, sound machine). Instead of a speaker, you can solder headphones. The sound will be clearer and you won't have to listen to the crackle. As an indicator of hidden wiring, an LED element can be additionally mounted in the device. The circuit is powered by a 9-volt Krona battery.

A 9-volt Krona battery will be needed to power the circuit
To make it more convenient for you to work with the microcircuit, take cardboard or polystyrene and mark with a needle the places for attaching 14 legs (legs) of the part. Then insert the legs of the integrated circuit into them and number them from 1 to 14, starting from left to right with the legs up.
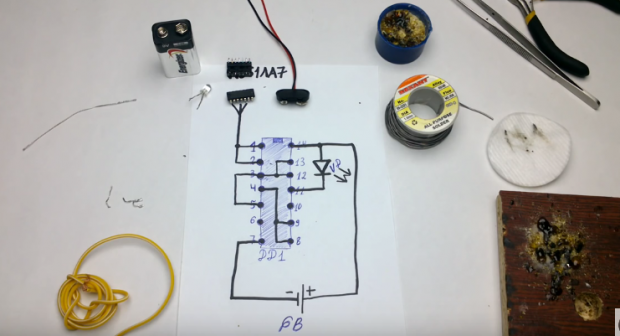
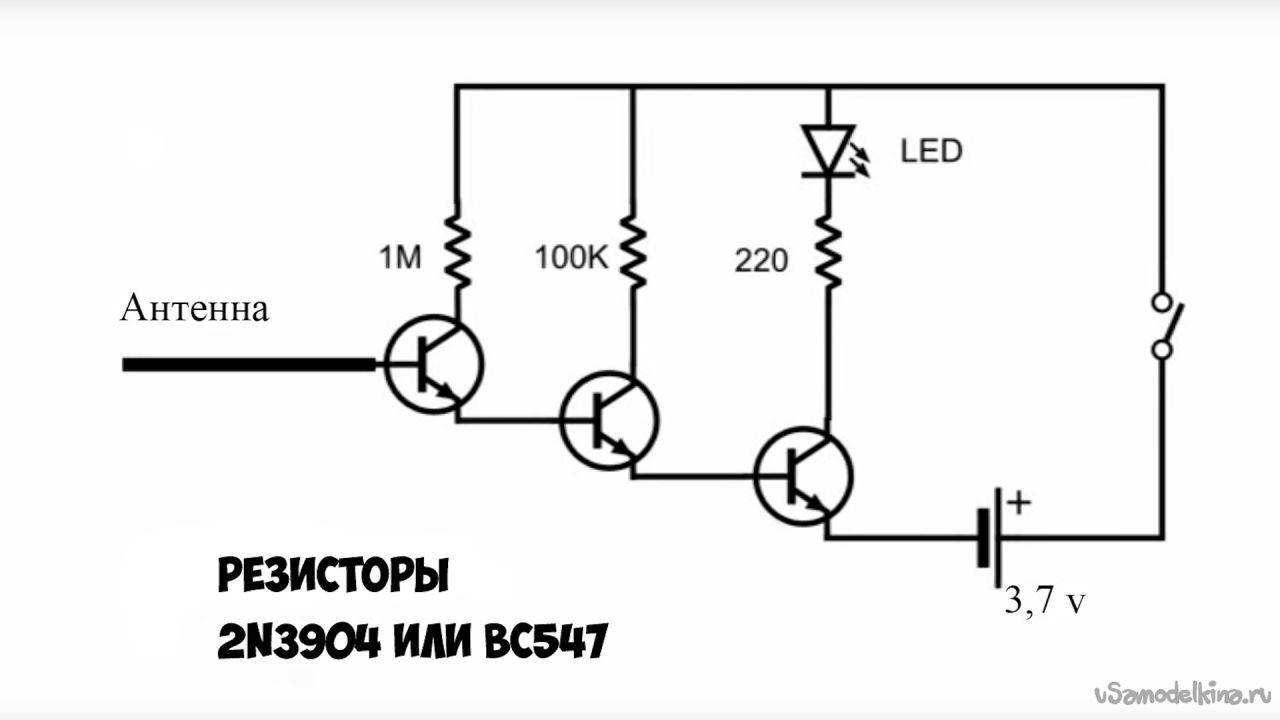
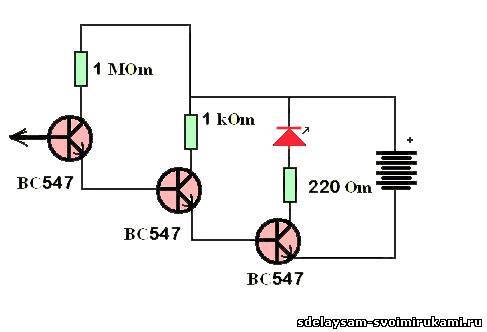
Scheme of assembling a detector with an LED
We make connections in the following sequence:
- 1. We prepare a box where we will put the parts after assembly. For a cheap alternative, use a plastic bottle cap. Make a hole in the end with a knife with a diameter of about 5 mm.
- 2.Insert a hollow rod into the resulting hole, for example, the base of a ballpoint pen, suitable for the diameter, which will be the handle (holder).
- 3. We take a soldering iron and solder a 1 MΩ resistor to pins 1–2 of the microcircuit, blocking both contacts.
- 4. We solder the first speaker wire to the 4th leg, after which we connect the 5th and 6th legs together, solder them and connect the second end of the piezoelectric wire.
- 5. We close legs 3 and 5–6 with a short wire, forming a jumper.
- 6. Solder the copper wire to the end of the resistor.
- 7. Pull the connector wires (battery connector) through the handle. We solder the red wire (with a positive charge) to the 14th leg, and the black wire (with a negative charge) to the 7th leg.
- 8. From the other end of the plastic cap (box), we make a hole for the copper wire to exit. We put a microcircuit with wiring inside the lid.
- 9. From above, close the lid with a speaker, fixing it on the sides with hot glue.
- 10. Straighten the copper wire vertically and connect the battery to the connector.
The wiring detector is ready. If you have connected all the elements correctly, the device will work. If possible, we advise you to equip the system with a switch or remove the battery from the socket after the end of work in order to save battery and not overload the system.
An overview of several models of wire and metal detectors
Let's start the review with inexpensive models, which often prove to be the most practical for non-professionals who want to renovate their home.
Voltage detector UNI-T UT-12A

This inexpensive and compact device enjoys a good reputation. Price up to 500-600 rubles. Despite its simplicity, it reliably detects hidden live wiring.The device is equipped with an audible alarm that can be turned off and guided by an LED indicator that will flash when voltage is detected. If the indicator does not flash, but stays on, that's not a sign device malfunction, but a sign that it is time to change the battery.


Mastech MS6812 locator

The MS6812 Cable Tester and Wire Detector can locate hidden live wires. The kit includes a generator that expands the capabilities of the scanner. If you read the article from the beginning, then you know that it makes it possible to search for wiring even without voltage. And besides, you can find a place of hidden closure. Or call a separate conductor in the bundle, which is sometimes necessary and is not the easiest task.
BSIDE FWT11 wiring finder
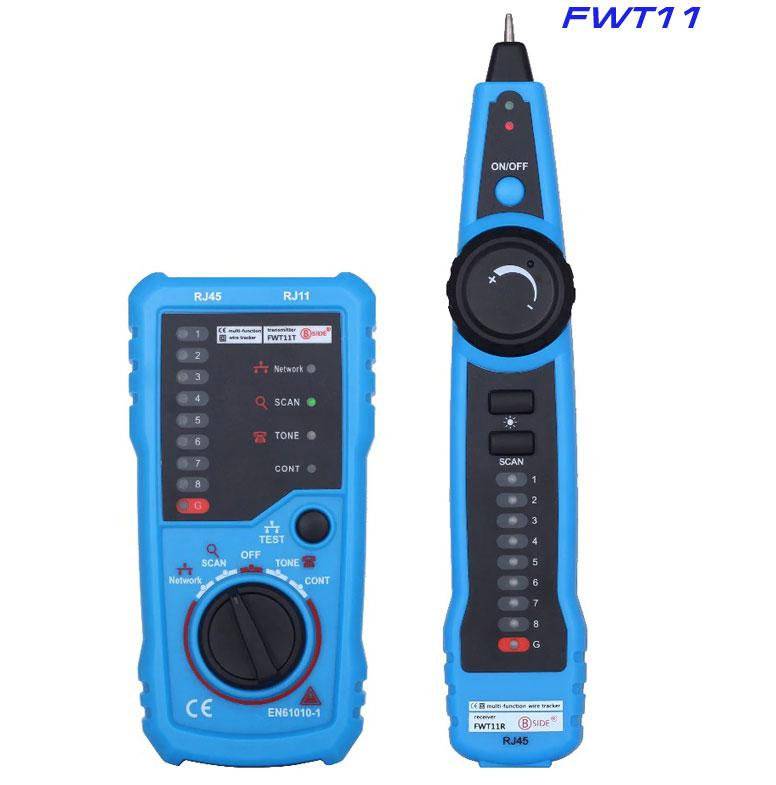
Using RJ45 and RJ11 connectors, you can connect LAN, Ethernet cables and test them. It is also possible to connect to cables using alligator clips. For noisy working conditions, there is a jack for headphones (headphones).
The generator and receiver-probe are powered by batteries of size 6F22 9 V (“Krona”). The probe has a built-in LED flashlight that helps out in dimly lit areas.
Characteristics:
| Length of cable: | 300 m |
| Protection class: | IP40 |
| Functions: | tracing, topology, signal generator |
| Dimensions: | 235 x 145 x 51 mm |
| The weight: | 500 g |
Scanner IdeenWelt (Germany)

This device can be classified as combined. It includes a coil and a capacitive sensor. Therefore, it can detect wood and plastics. When searching for wiring, such functions do not interfere at all, as they sometimes allow you to get an answer to additional questions.The undoubted advantages of the device include ease of handling.
The device provides sound and light indication of detected objects.
Some characteristics are given in the table:
| Wiring detection: | up to 30 mm |
| Metal detection: | up to 50 mm |
| Tree detection: | up to 38 mm |
Metal detector Einhell TC-MD 50

A combined type device that uses a magnetic and electric field to detect objects. On the reverse side there is a gasket in order not to scratch the walls when searching, you can also use a soft coating. The detector has a visual and audible alarm. If the device is not used, it will automatically turn off after 1 minute.
Characteristics:
| Metal detection (black): | 50 mm |
| Tree detection: | 19 mm |
| Metal detection (copper): | 38 mm |
| Wiring detection: | 50 mm |
| Scanner weight: | 150 g |
| Packed weight: | 340 g |
BOSCH PMD 7 wiring scanner

Multifunctional scanner for detecting metals, wood and hidden wiring. All metals are detected up to a depth of 70 mm, and live wiring up to 50 mm. The detector has a three-color indication (yellow, green, red).
Calibration in the device is automatic, detection occurs in real time. Power is supplied from a 1.5 V element. The weight is only 150 g. The manufacturer (Germany) gives a guarantee for one and a half years.
Wire detector Bosch GMS 120 M

This is a professional grade device. It allows you to determine the wiring (live) at a depth of up to 50 mm. Wood is detected up to 38 mm, ferrous metals up to 120 mm and copper up to 80 mm.
The device has automatic calibration. There is a center detection function.In addition, the ring in the middle is designed to indicate the exact position of the target and mark the wall with a marker. The switch allows you to select one of three operating modes: wood, metal, wiring.
The scanner display is backlit. A 9 V battery is used to power the device. There is a function automatic shutdown when non-use for more than 5 minutes.
Scanner of cables and metal materials BOSCH D-Tect 150 Professional
At the end of the review, a professional radar-type device. It detects wiring at a depth of 60mm. Metals (including steel fittings) are found at a depth of 150 mm, pipes - 80 mm. The device weighs about 700 g.
The main advantage of the device is high accuracy up to 1 mm - metal detection. The display is very informative. This radar requires no calibration and is ready for measurements immediately after being turned on.
Combined hidden wiring finder
This device is a "two in one" can work both in the search mode for electromagnetic radiation, and as a metal detector.
Here is his diagram:
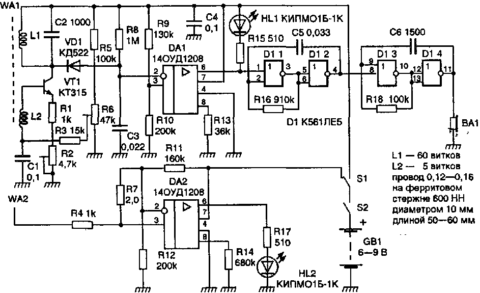 Combined wire detector
The choice of modes is carried out by the switch S 1, which can supply voltage to one or another block, we will consider them in turn.
Metal detector unit
It is located at the top (according to the scheme for this moment off) and consists of the following units:
Magnetic antenna on a ferrite rod (WA 1);
 Magnetic antenna
Generator assembled on a KT315 transistor (VT 1) and a second coil of a magnetic antenna (L2);
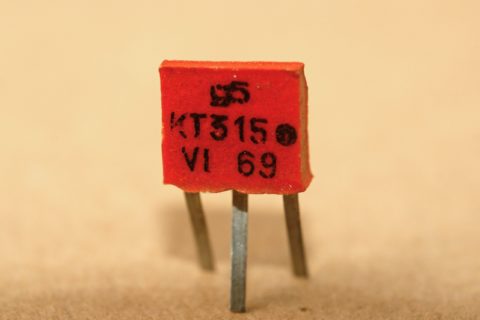 Transistor KT 315
Receiver unit on the first coil of the magnetic antenna (L1), capacitor C2 with a detector on the diode KD522 (VD1);
Diode KD522
Diode pinout
Amplifier on the chip 140UD12 (DA1);
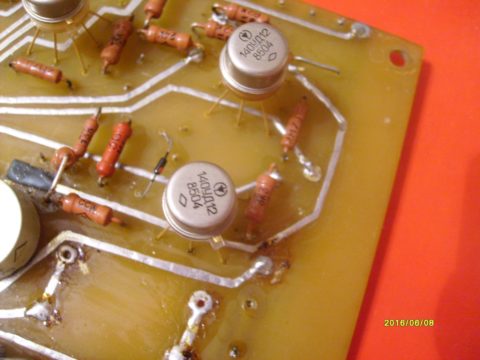 Chips K140 UD 12 on the board
- An indicator in the form of a KIPMO1B LED (others can be used instead, for example, AL 307);
- A pulse generator with a duration of up to a second based on two logical elements of a digital microcircuit of the simplest logic 561LE5 (D1 1; D 1 2);
- Audio frequency generator on the two remaining elements of the microcircuit;
- Piezoceramic emitter ZP-1 (VA 1).
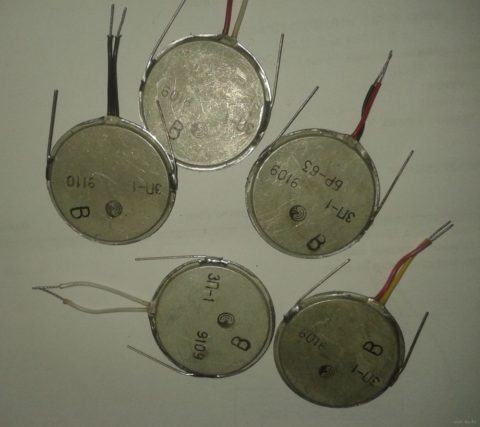 Piezoceramic emitters, they are found in almost all small devices with a sound alarm
How a metal detector circuit works
The generator is tuned to a frequency close to the receiver's transmission threshold. To do this, trimming resistors R2 and R6 are used.

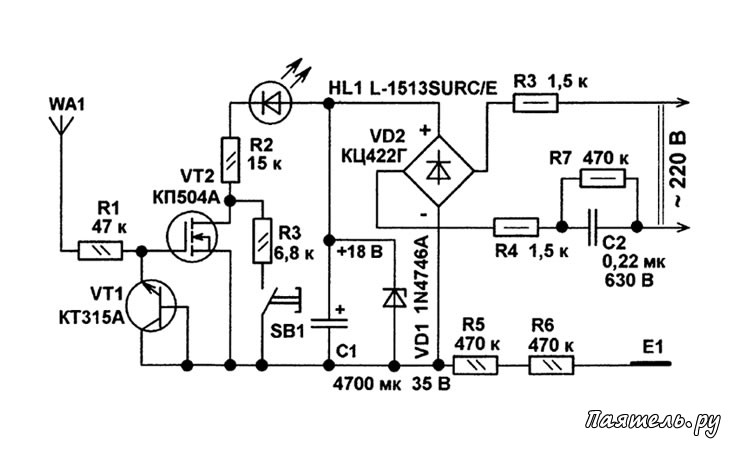


- In the presence of metal nearby, the settings of the generator and receiver circuits change, and the generator signal passes through the frequency filter of the receiver.
- Additionally, the operational amplifier - comparator DA 1 has a response threshold compared to the voltage supplied from the divider on resistors R9, R10 to its second input. If this value is exceeded it starts to work. The signal is amplified by the operational amplifier to a level sufficient to be perceived by the generator on D1, D2 as a logical unit and start it. The HL 1 LED is also connected to the output of the amplifier, which, by its ignition, indicates the detection of wiring.
- The signal from the first generator periodically starts the audio frequency generator at D3, D4. A piezoceramic emitter connected to the output of the generator emits an intermittent signal.
Magnetic search block
To start it, you need to set the switch S 1 to the second position. This node is much simpler. It is assembled on the second operational amplifier DA 2.
An antenna is connected to its input, a second LED HL 2 is installed at the output. If there is interference (signal) on the antenna, the amplifier will raise its level and light the connected LED.
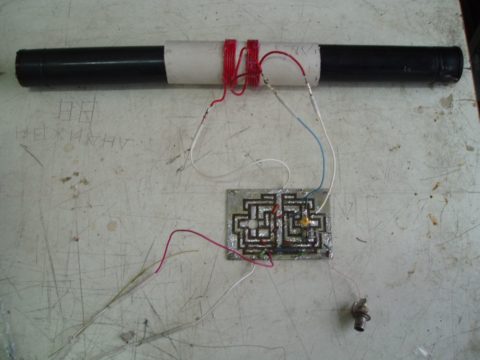
Instrument assembly
We will not give advice here, so assembly instructions useless, the techniques are the same as for the installation of all electronic devices. It is difficult to make it a canopy, it is better to use a printed circuit board.
Radio amateurs themselves know how to do everything. But there is one remark - for stable operation you need as far as possible separate magnetic and conventional antennas.
 Assembled device in action
Tips for using hidden wire detectors
What cable scanner do you use?
ElectrostaticElectromagnetic
Here are some helpful tips:
The very first tip is to make sure the battery is fresh before using the detector.
If this is not the case, then the detection accuracy will be extremely low and you can hit the drill directly into a live cable or water pipe.
If you are using a generator to supply power to the cable under test, make sure that it is disconnected from the mains and that there is no voltage on it! Failure to follow this advice may result in electric shock.
If you find a response from the device (it doesn’t matter if it uses a sound or light indicator), do not rush to conclusions. Especially if it is an active type device, a metal detector
Examine the route in detail, sketch its location on paper or mark with a pencil on the wall. Only after analyzing all the data, decide where the pipe or fittings can be, and where the wiring is. Also take into account the entrances of communications in a known place in order to track their route further.
Note that a simple type (passive) wire detector in mains mode will only show the location of the phase wire. It will not detect neutral or protective earth if they run separately from the phase wires.