- Finishing Tips
- Drainage pit equipment
- Do-it-yourself shower arrangement
- How to build a shower in the country with your own hands from various materials
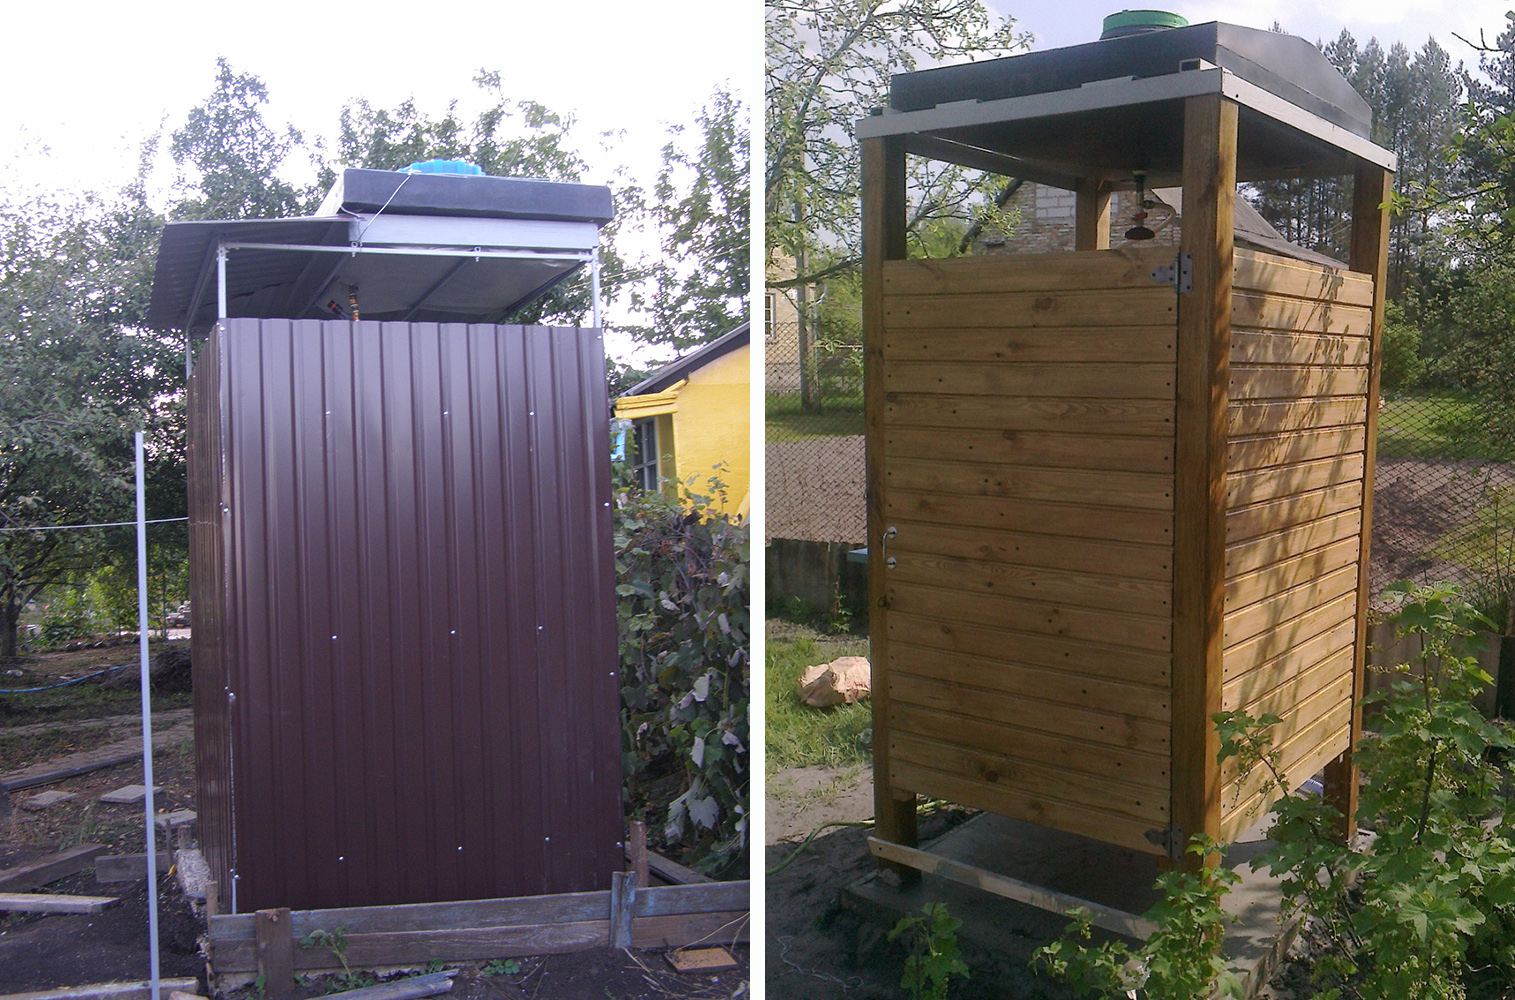
- Outdoor shower for giving from solid wood
- How to build a summer shower from profile pipes
- Summer shower from corrugated board: another finish option
- Brick summer shower: construction nuances
- Peculiarities
- Brick
- Country shower lighting and ventilation
- Frame construction
- Foundation laying
- Is it worth it to make a cabin yourself
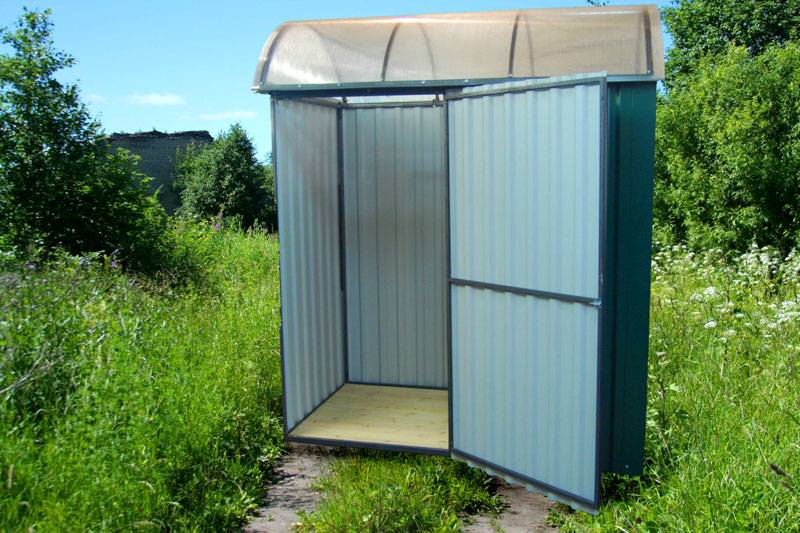
- Cabin with metal frame
- Water heating and heating
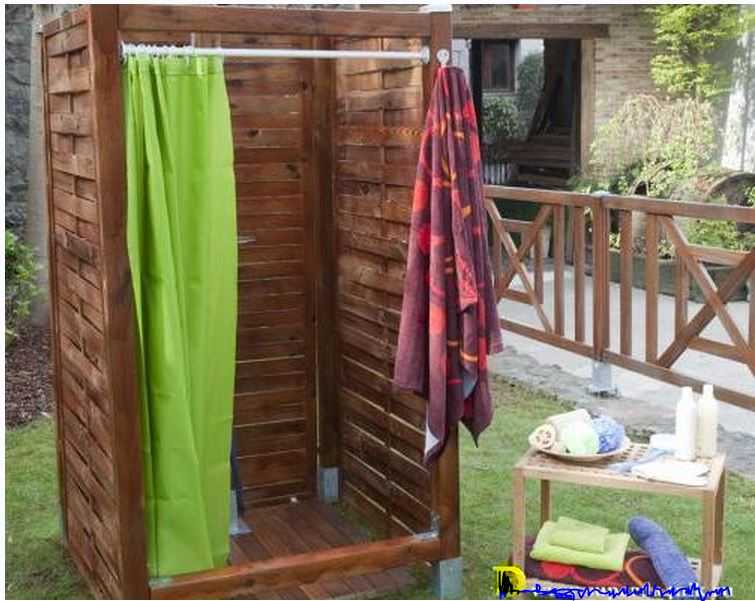
- Shower with curtains
- portable summer
- We build a summer shower
- Summer shower insulation
- Foundation preparation
- How to arrange a frame
- Metal
- Wood
- The interior of the summer cabin
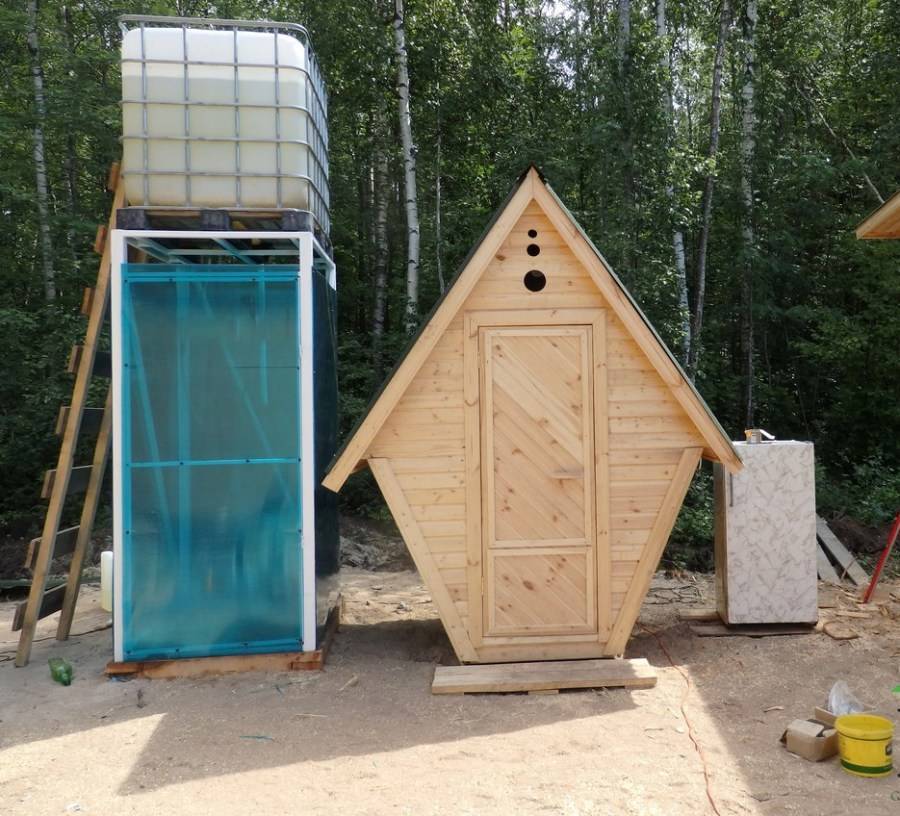
- Types of shower cabins for a summer cottage
Finishing Tips
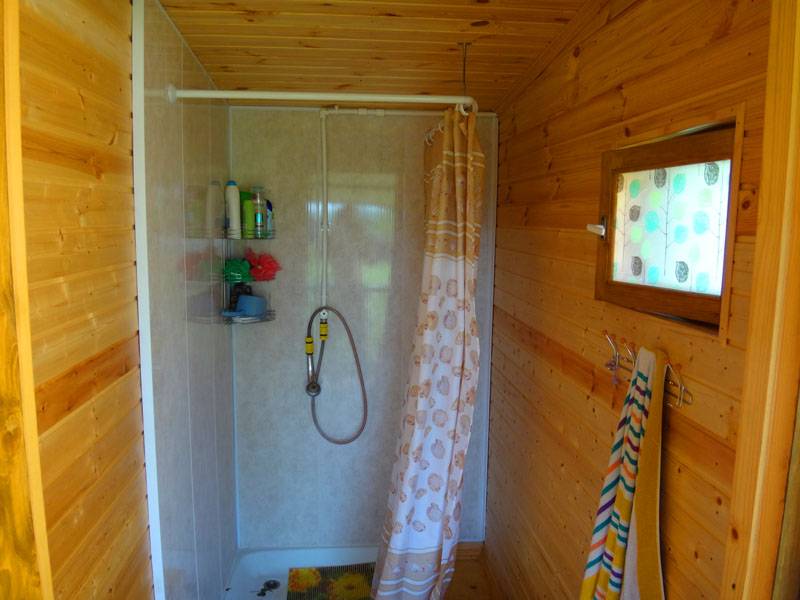
The interior shower finish should be made of moisture-resistant materials: plastic panels, pieces of linoleum, oilcloth, etc. If wood is used, then each individual board is covered with hot drying oil.
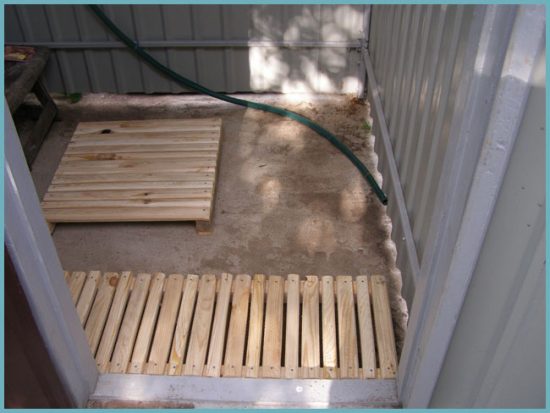
The concrete floor is usually covered with gratings made of plastic or wood, rubber mats are laid on top. It is quite convenient to equip a small locker room directly in the shower room.In order to prevent water from getting into it, the floors in it rise slightly by a couple of centimeters - this can be easily achieved by additionally placing a pallet.
 Summer shower interior
As for the exterior finish, similar materials that have already been used to decorate the country house and other buildings on the site will look harmonious.
To use the shower not only in the summer, but also in the colder season, it is recommended to insulate it with polystyrene foam, which fits into the interior and is upholstered with PVC film on top. The walls are usually painted or plastered, sheathed with clapboard or siding.
Drainage pit equipment
The volume of the pit is usually more than 2 cubic meters. m, while its walls must be strengthened in order to avoid possible scree. The drain is located a few meters from the shower, but not under the structure itself and not at its walls - this will lead to the destruction of the foundation in the future, as well as to the appearance of unwanted odors.
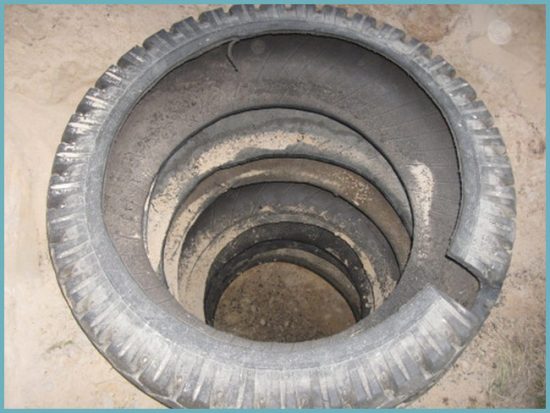 An example of equipment for a drain pit for a summer shower
The drain must be laid with a waterproof layer - roofing material, hydrostekloizol, PVC film or concrete screed (reinforced with a metal mesh) are used.
Attention! A common mistake is to use clay as an insulating material, which erodes and soon clogs the drainage ditch.
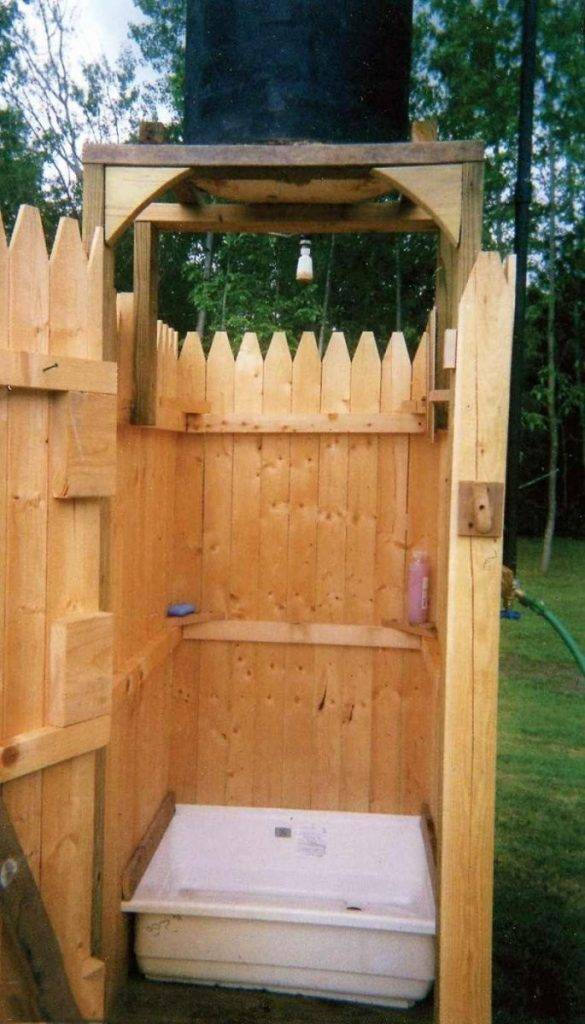
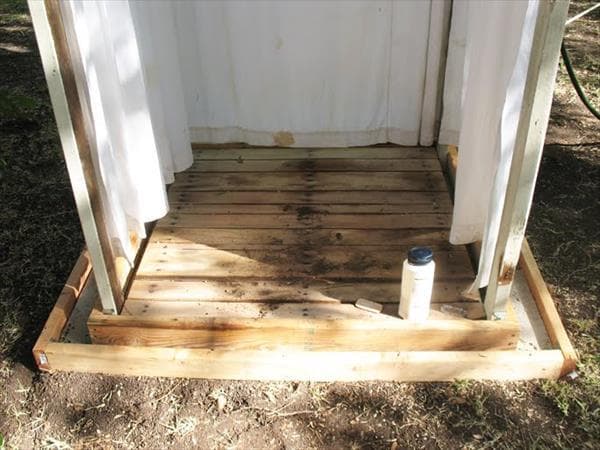
Do-it-yourself shower arrangement
On the floor in the shower cabin, usually, a wooden grate (wooden pallet) is laid or tiled. You can also install a factory shower tray, acrylic, plastic or metal. A door for a summer shower is usually made from the same material as the walls.If the shower room is with a dressing room, it can be fenced off with a moisture-proof curtain. Don't forget about lighting. During the day, the light in the cabin should pass through the window, which is often located directly under the ceiling.
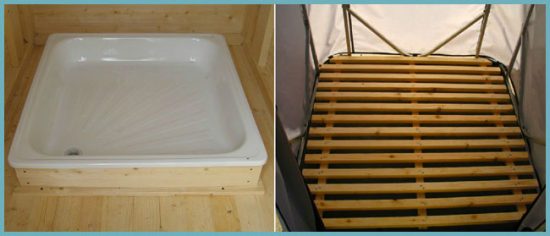 Equipment options for outdoor shower trays
You can also stretch the electrical wiring to the shower and connect the lamp, in this case special attention is paid to the insulation of the wires. Anything can be an additional complete set of a summer shower: shelves, soap dishes, hooks for clothes and towels
A lot of interesting ideas can be seen in the photo of ready-made shower cabins, and some of them can rightly be called a decoration of the dacha.
How to build a shower in the country with your own hands from various materials
As already mentioned, the use of various materials in construction has its own specifics.
It is very important to understand which of them can be combined and which are not worth it. For example, it makes absolutely no sense to mount a frame made of thick timber if an exterior finish is planned from polycarbonate.
In this section, we will analyze the nuances of certain combinations of building materials. Let's start with the most common option - wood.
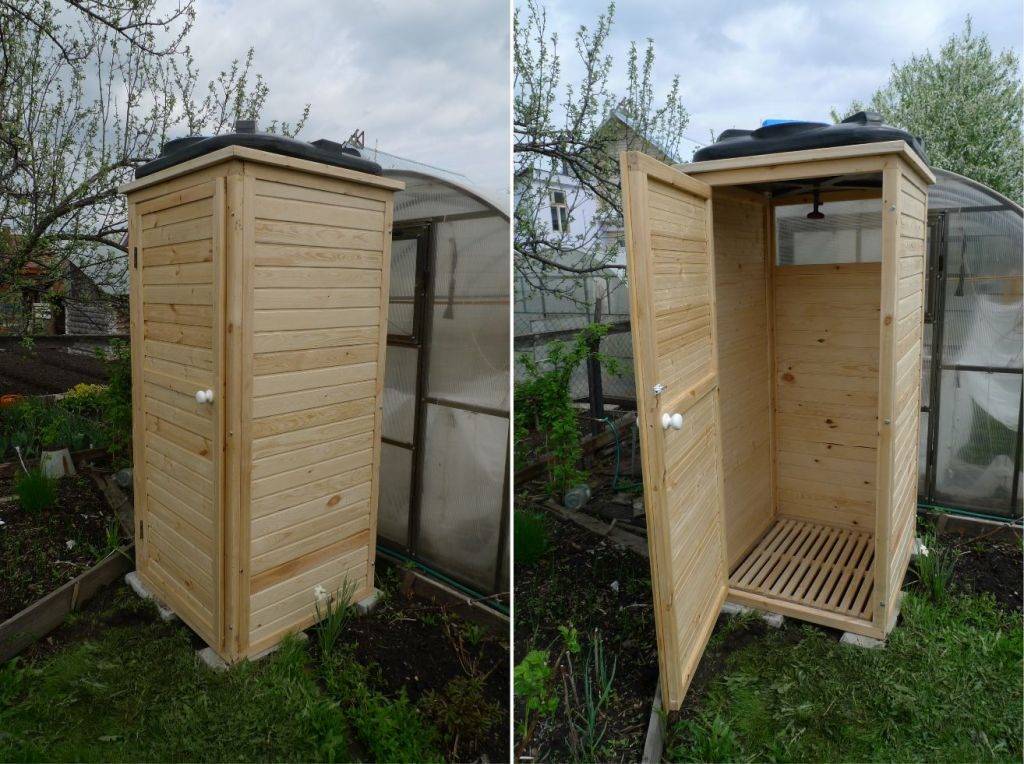
Outdoor shower for giving from solid wood
This is the heaviest material that requires reliable support and, most often, a pile-screw foundation. It is better to use timber as racks here. At the same time, the thicker the boards used in the decoration, the wider the edges of the timber should be. Most often, such buildings are sheathed with thin clapboard. In this case, a bar with a size of 50 × 50 mm is sufficient.
 Wood looks much better than other materials
How to build a summer shower from profile pipes
The profile pipe is light in weight, while its strength is quite high. A frame made of such material is usually sheathed with polycarbonate sheets. If we talk about the cost, then such a shower stall will be expensive, but its appearance will be at a fairly high level. The only problem here is the difficulty of choosing a finishing material. Poor-quality polycarbonate does not tolerate direct sunlight and temperature changes. It happens that it begins to crack in the second year of use. Often this happens with overvoltage, when the bending of the web is too strong.
As a finishing material for a summer shower from a profile pipe PVC panels can be used - this option will be more practical. The advantage of such a building is that it does not require interior decoration.
 Interior decoration of the shower room with plastic panels
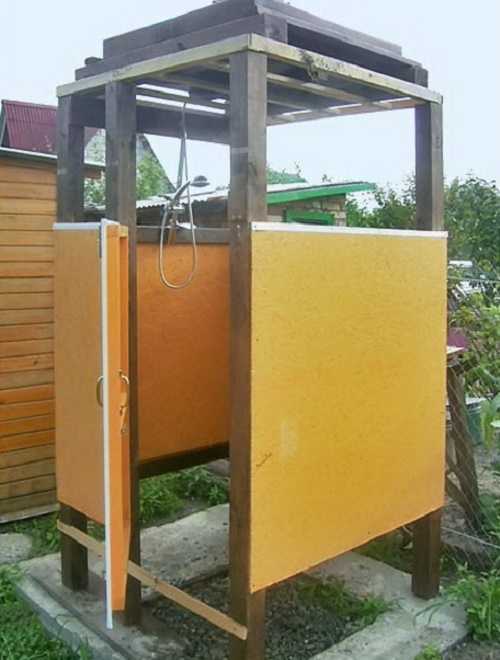
Summer shower from corrugated board: another finish option
Decking as a finishing material can be used both on a wooden frame and on a pipe. However, the appearance of such a shower stall will not be very presentable. Such buildings are often compared to a barn or a booth for storing garden tools. However, at a cost such a shower will be profitable, and the rinsing process in it is no worse than in a polycarbonate building.
 Decking does not look very attractive
Brick summer shower: construction nuances
This is the most thorough of all the options listed. For such a booth, a quality foundation is needed. But, despite the fact that such a building is very durable (with proper masonry), the comfort of a brick shower is inferior to the rest.The fact is that the brick does not warm up so well, which means that it will be constantly cool in the shower. This will entail the need for additional heating of water. Yes, and the construction of a brick building, and after that its interior decoration, will take a much longer amount of time than a structure built using polycarbonate or corrugated board.
Peculiarities
A summer shower in the country is a full-fledged building. Its design can be performed in several versions. The rack is one of the simplest, even a beginner can build such a shower. Ready-made designs are sold in stores at a low price, all that remains is to assemble it in the country. Another option is a panel. It is placed along a horizontal surface. It can be a fence or a wall of a house. The most common type is the cabin. It consists of 3 or 4 walls and is sometimes supplemented by a dressing room. You can install a shower stall almost anywhere on the site. According to the method of water supply, garden showers are of 2 types: with a barrel and plumbing. Conventionally, 4 types of showers can be distinguished: mobile, stationary, warm and universal. A warm shower implies warming for use in spring and autumn. Universal is a fairly large building, additionally with a dry closet.
Brick
A brick option is also possible. It is expensive, but this option has the longest life. The first step is to make a foundation.


A hole is dug around the perimeter up to half a meter deep and 20 centimeters wide. Then it is covered with stones, broken bricks and poured with concrete.

A week later, you can build a structure, be sure to remember the doorway. On the top layer, mount the bars for the roof.

The roof can be covered with slate and a hole is made for the hose. A watering can and a faucet are attached to it. With this design of the booth, a larger tank can be used, since the brick can withstand huge loads. Stock is a must. If desired, you can make water heating.


A very simple shower room is made on the corner of the building. You will need a tank and a metal tube. The tube is bent in a semicircle and installed to the corner of the building. Above the height of a person, a tank with a hose is installed. Put on a curtain on the arc. Your shower is ready.

There are a huge variety of options for a summer shower that you can do with your own hands. All of them do not require special skills. Just follow the plan, do not forget about the drain and the summer shower will delight you on hot days.

Country shower lighting and ventilation
Lighting will be useful, as you will have to take a shower in the dark. However, when laying and wiring wires, follow the safety rules:
- Work with wires without damaging the insulation
- Make wiring so that it does not interfere with movement both indoors and outdoors
- Carefully isolate the joints
- Provide moisture proof for switches and lamps
For ventilation, make a window or a special hole with a grill or mesh so that debris and insects cannot get inside. Ventilation will help to avoid wrangling and bad smells in the shower.
 For good ventilation it is necessary to make an opening window
Frame construction
If a wooden door is provided in the booth, then 2 additional racks will be required, which are dug into the ground at a distance equal to the width of the door + the width of the door frame + a gap of 2-3 cm is left.
Vertical racks can be attached to the lower trim of the beam or dug into holes 1 m deep. To prevent the beam from rotting, it is coated with resin, drying oil, machine oil or wrapped in roofing material. For a fortress, the racks in the ground are poured with concrete.
The front racks are made 50-150 mm longer than the rear ones, so that water from the roof flows down to the back wall of the shower cabin. All racks are fastened with upper and lower strapping made of timber or boards. A do-it-yourself shower in the country can be sheathed with any available material. The photo looks most aesthetically pleasing: lining, edged board or false timber. Between the boards, small (up to 3 mm) gaps (slits) are always left so that when wet and expanding, the boards do not stick out. The tree is treated with antifungal impregnation and varnish.
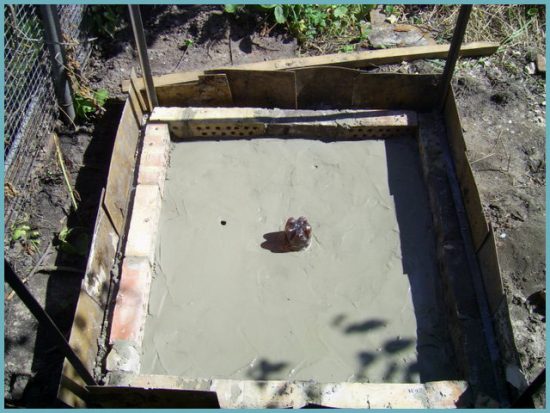
Foundation laying
Even if the load is small, it is not recommended to install an outdoor shower without a foundation at all. Hurricane winds, which are not uncommon in many regions of our country, easily overturn everything that is not securely fastened.
The foundation is made of concrete blocks or poured in the form of piles in the ground. The easiest and fastest way to lay the foundation for a small summer shower:
- drill or dig wells 60-80 cm deep;
- pour crushed stone to the bottom;
- install frame racks;
- fix the supports vertically;
- fill holes with concrete.
Supports made of metal must be pre-treated against corrosion, from wood - from decay.
It is better to lay a strip base under a brick building.Pour a layer of crushed stone or broken brick into a trench 30-40 cm deep, 20 cm wide, install formwork, lay reinforcement, pour concrete. After 3-4 days, walls can be laid.
Is it worth it to make a cabin yourself
When comparing a hand-made design and a purchased model, both positive and negative sides are highlighted.
Advantages:
- long period of use without repair work;
- the absence of a large number of moving elements that have the property of rapidly collapsing;
- a homemade shower room has more options for alternative solutions, which makes it possible to choose the view to your taste;
- savings.
Flaws:
- some limited cockpit functionality;
- during dismantling, difficulties may arise;
- the mechanism of connection to the sewerage is more difficult;
- for self-assembly, you should have basic knowledge and skills.
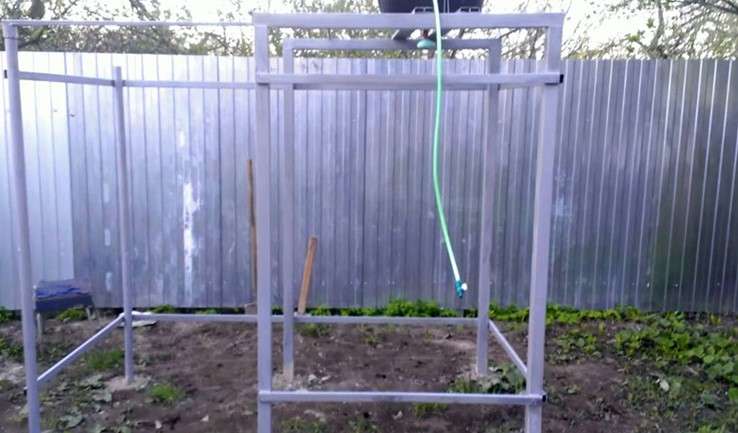
Cabin with metal frame
Choose pipes of at least 20x30 mm, a corner of 45x45 mm. Of the tools you will need:
- welding machine;
- Sander.
 Cabin with metal frame
Create a drawing of a future shower cabin for a summer residence. Be sure to include jumpers at the bottom and in the middle. To make it easier to fix the floor boards, use a corner as the bottom jumpers. Make the upper stops also from the corner, because. it is easier to fix the water tank on it. Their dimensions will depend on the capacity of the tank and its material. If the tank is metal, the stops must be such as to support its weight with water.
Depending on what material for wall cladding you choose, you need to consider the location of the fasteners. For plastic or metal profiles, it is worth welding metal plates.If they are soft materials, such as tarpaulin or rubberized fabric, they can be fixed with a strong synthetic thread directly to the pipes.
Upon completion of the design work, we proceed directly to the assembly. You will need:
- 4 pipes 2-2.2 m long for vertical supports;
- 8 pipes for central and upper lintels;
- 4 corners for the bottom;
- corners for stops under the tank.
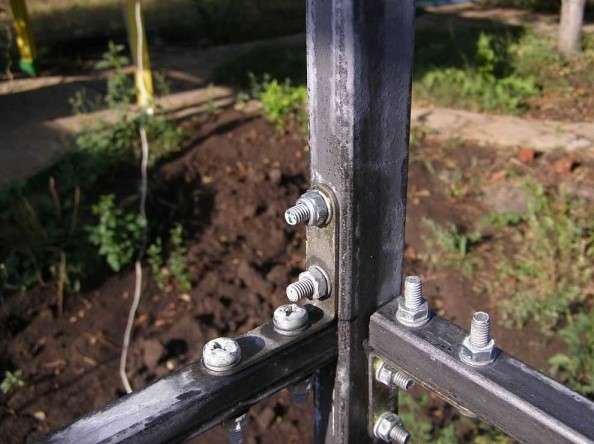
If you plan to make opening doors, 4 more pipes and 2 hinges. All parts are cut at an angle of 90°. Clean all edges for welding. How to make the design more rigid? To strengthen it, you can weld metal corners at the corners of the frame or attach them with bolts to vertical posts.
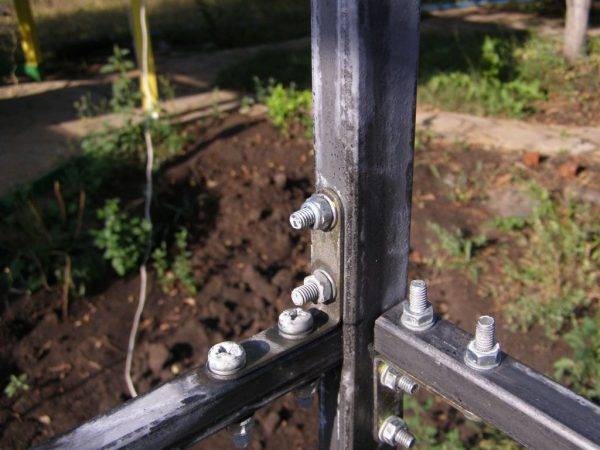 Fastening with bolts
During welding, never weld the seam completely on one side at once. First, “grab” a little from all sides and only then thoroughly weld the joints. Otherwise, the metal will pull in the direction of welding and it will be impossible to return it back.
It is better to take electrodes with a diameter of 3-4 mm. It is convenient for them to weld both thin metal with a thickness of 1 mm, and thicker metal - 4 mm. Select such a current strength that the metal melts. If you set a large one, you will burn through the walls of the pipes. At a lower value, the electrode will stick to the metal. If you have never brewed or are not sure if you can do everything right, contact a professional. After all, a poorly welded structure can fall under the weight of the tank and cause injury.
Welding
For painting, choose a special paint for metal. To protect the frame from rust, go through the primer before painting, and then apply 2 coats of paint or enamel. If you are using profile pipes, use a roller.This will save time and reduce material consumption. After the enamel dries, we proceed to the manufacture of the wooden floor and the installation of the shower tank.
Water heating and heating
If a heating element is installed in the tank, heating the water is not a problem. In this case, you will also have to heat the shower inside before visiting with electricity, for example, with a fan heater. However, due to the high cost of electricity, this method of heating water does not suit everyone. In addition, it will not be possible to equip a home-made tank with a heating element in accordance with all the rules, since emergency automation is required (protection against overheating of the heating element with a large amount of sediment and boiling water).
As an alternative, the following solution can be proposed: the tank is connected with the supply and return pipelines to the hot water unit, through which the water will circulate, gradually heating up. Circulation will be provided by a circulation pump similar to those used in heating systems. With a large diameter of pipes in the mains and the heat exchanger, the installation of a pump is optional - the water will circulate due to convection. In this case, the heat exchanger must be positioned so that its “hot” side is higher than the “cold” side. In this case, the heated water should be able to immediately rush up.
The role of a water heating unit can be:
-
Solar collector. You can make a simple option yourself by placing a battery of black-painted steel, copper or aluminum pipes in a glass-covered box.A factory-made collector will require purchase costs, but its efficiency is much higher due to the use of modern technologies: some modern models are capable of heating water up to +70 ° C in cloudy conditions and 20-degree frost.
-
Solar oven. It is a system of reflectors that focus sunlight from a large area on the coil. Reflectors should be precisely foiled, since an ordinary mirror reflects well only the visible range, and absorbs IR rays.
- Cooking oven. Quite often, such a structure is erected in country houses in order to cook food. It is possible to embed a hot water register connected to the tank in it.
- Gas stove. If a stove connected to a gas cylinder is used instead of a stove, then a hot water circuit made of a copper tube with a diameter of 6–10 mm can be laid in the form of loops around the burners. Now the heat, which previously simply escaped during cooking, will be absorbed by the water in the shower tank.
If there is a water heating unit for heating the washing room, it is necessary to install any thin-walled heating radiator in it and draw a “return” through it.
On this, the process of building an all-weather shower can be considered completed.
Shower with curtains

Necessary materials:
- durable pallet
- Boards for frames and columns
- Concrete
- Pipe clamps
- A hammer
- Screwdriver
- Drill, screwdriver
- Nails and screws
- curtains
- wooden rods
- Hooks
- garden hose
- shower head
Step-by-step instruction: Step 1: Making the base for the shower stall
Choose a location for a summer shower in your yard, following the same rules as in the previous master class (convenient water supply, elevation, seclusion). After that, place a wooden frame there (like a sandbox), and fill it with cement. Place a pallet inside the frame (the frame should be slightly larger than the pallet).


Step 2: Putting together the structure
Now you need to make two more wooden frames: one from the bottom around the shower tray, and the second of the same size for the top of the shower. After that, attach vertical columns to the lower frame (using brackets), and on the other side, attach the upper frame to them in the same way.
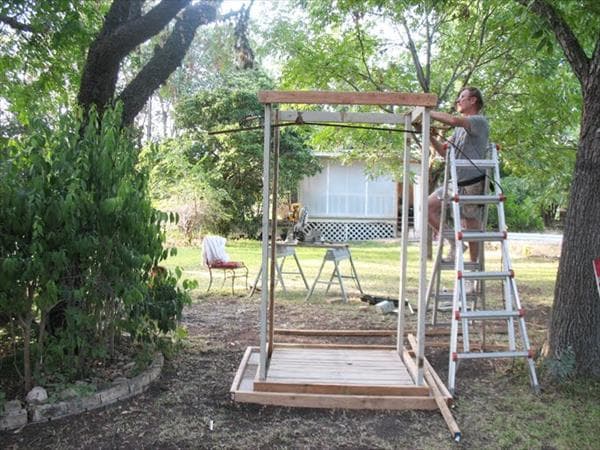
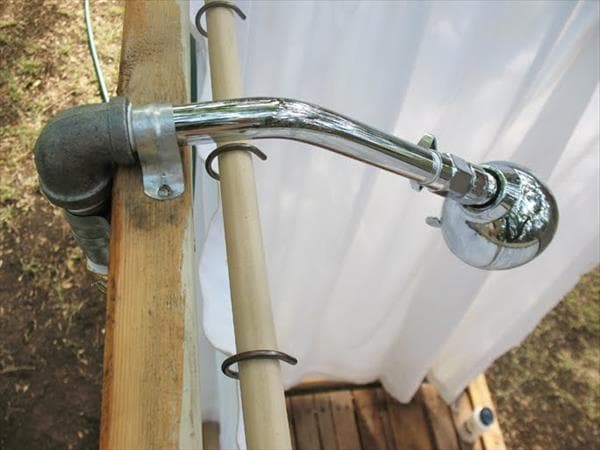
Step 3: Fix the pipe
After the structure is fixed to the base around the pallet, you can proceed to attach the hose. To do this, fix the shower head to the upper frame with a pipe clamp, and connect it to the hose. To fix the hose, you also need to use clamps: attach one to the upper frame, and the second to one of the columns (see photo). Check if everything works.
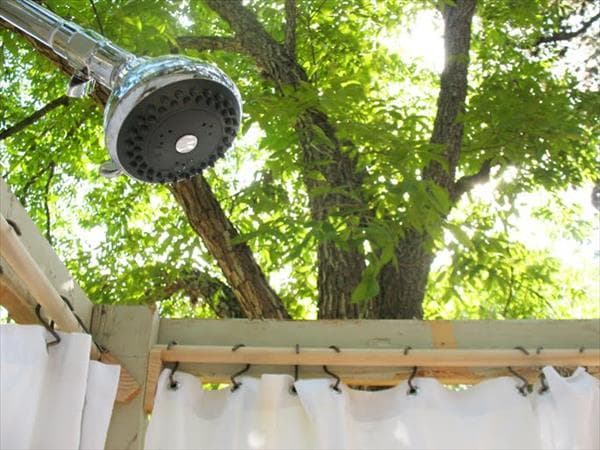
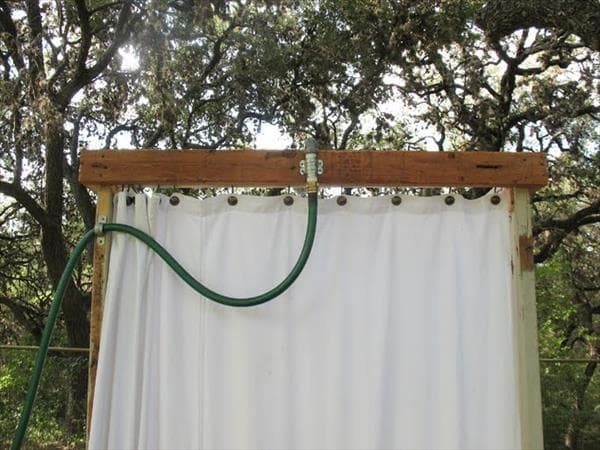
Step 4: Attaching the Curtains
Attach wooden rods inside the top frame and hang curtains from them. On three sides, if desired, the curtains can be attached additionally to the columns so that they do not deflect (by the wind, for example) and serve as reliable “walls”, and leave the fourth with the ability to open and close.
Note: The pallet you need for the base should be without wide gaps between the boards so as not to get your foot stuck there and trip over
Also note that the curtains should not be too heavy, as the wooden rods that serve as cornices for them will sag under their weight.
portable summer
Let's start with the simplest models, which do not even require cubicles or large capacity devices. There are mobile showers that work on the principle of a foot pump. The source of water is any container that you put next to you - a bucket, a basin, a tank - whatever you have. You lower the end of the hose connected to the foot pump into it, which most often looks like a rug.

Foot summer shower - toptun
A hose with a watering can is connected to the outlet of this "pump". To get a stream of water, trample on the mat alternately pressing the pump pads. We trampled - the water went.
What is good about this option is that you can carry it with you. It's warm outside - wash on the lawn. It got colder - they went into the house, put a trough, washed themselves there. You can also take this shower on a hike - it fits in a standard package. Another plus - water temperature regulate yourself: poured warmer - wash in warm. If you want to freshen up, take a bucket of cooler water. A good option for a shower for summer use.
We build a summer shower
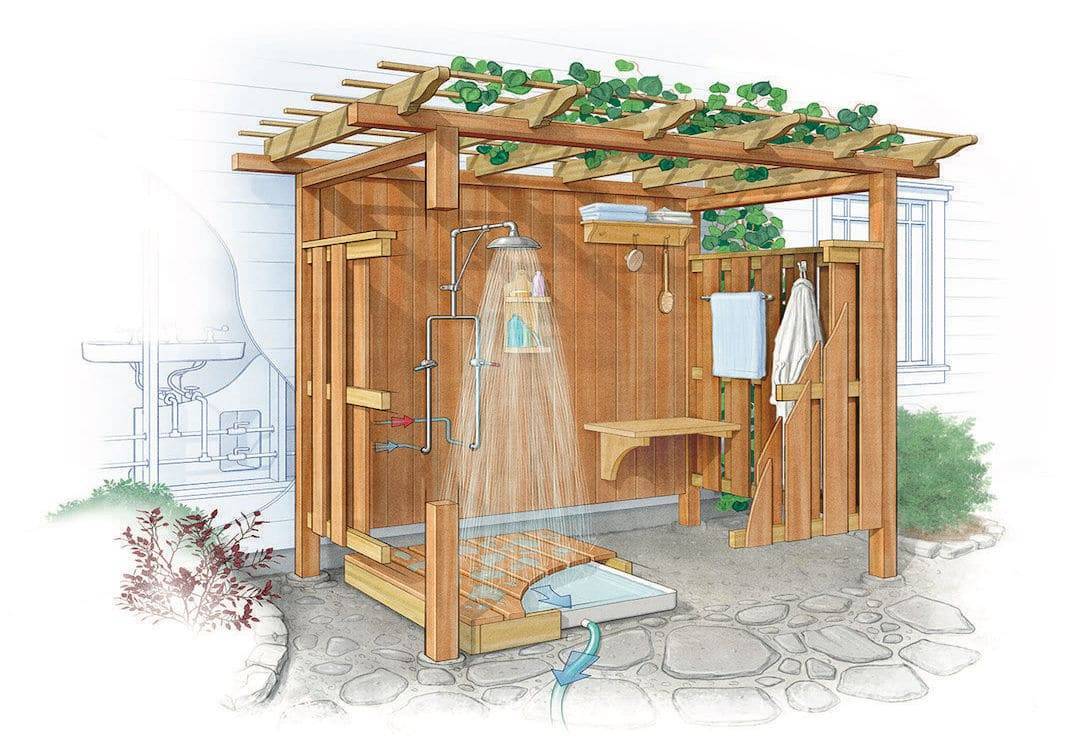
Getting down to practical advice, let's try to build a simple, but aesthetically beautiful and comfortable outdoor wooden outdoor shower for summer cottages, with a minimum consumption of materials.
It's nice to cool off with a cool shower on a summer evening.
Do-it-yourself summer shower is not only an oasis in the hot heat, but also a flight of your imagination
Let's cook:
- boards and slats
- shower set (faucet, curved tube, bracket, adapter and nozzle)
Climbing plants can be great walls for a do-it-yourself summer shower
- garden hose
- self-tapping screws
- fasteners
Outdoor shower with tub
Boards for the floor of a summer shower must be treated with special means
The figure shows the dimensions of each part of the shower.
Rice. one
Rice. 2
The next step is to assemble the pallet.Since the pallet is round, we need a drawing.


Rice. 3
We assemble the structure in three stages:
From four boards we make an inner square.
Rice. four
We draw a circle on them.
Rice. 5
We saw off the parts of the boards that go beyond the circle with a jigsaw.
Stylish outdoor shower
Wooden shower cabin - a beautiful and durable option
We impose a second layer of boards diagonally to the first, draw a circle on them and saw off the excess parts.
Rice. 6
We put a mount for the shower support. We attach one part to the first layer of boards, the other to the second. We have a gap where we will insert the shower rack.
Rice. 7
We tighten both layers with self-tapping screws.
Rice. eight
Installing the support.
Rice. 9
We complete the pallet finishing by laying the top layer of slats. We repeat the operation with drawing a circle and sawing off excess parts.
Rice. ten
- We fix the pipe to the rack with a bracket.
- We mount the remaining parts of the shower set on the support. We fasten the atomizer to the top of the tube. In the lower part we fix the mixer and the adapter. Connect a garden hose to the adapter.
Summer shower with beautiful tiles and plant decor
Summer shower with a decorative path to the house
Summer shower with hydromassage
For adherents of solid buildings, we offer to build a capital summer shower. Let's prepare the tools:
- hacksaw
- a hammer
If you do not have the opportunity to build a summer shower for a summer residence with your own hands, then a portable summer shower with a bottom water supply will be the way out of the situation.
- level
- drill
- Bulgarian
Summer shower at the entrance to the house
- concrete mixer (tank for mixing cement mortar)
- shovel
- Master OK
Outdoor shower with decorative stone floor
The design of such a shower room will not only allow you to freshen up on a hot summer day, but also bring aesthetic pleasure.
Construction begins with the preparation of a pit for the foundation. We dig it according to predetermined sizes. Carefully align the walls and bottom of the pit.


We expose the formwork with a margin on the walls of the shower cabin. Mix and pour the solution. We wait until it is completely dry, and proceed to the construction of the shower walls.
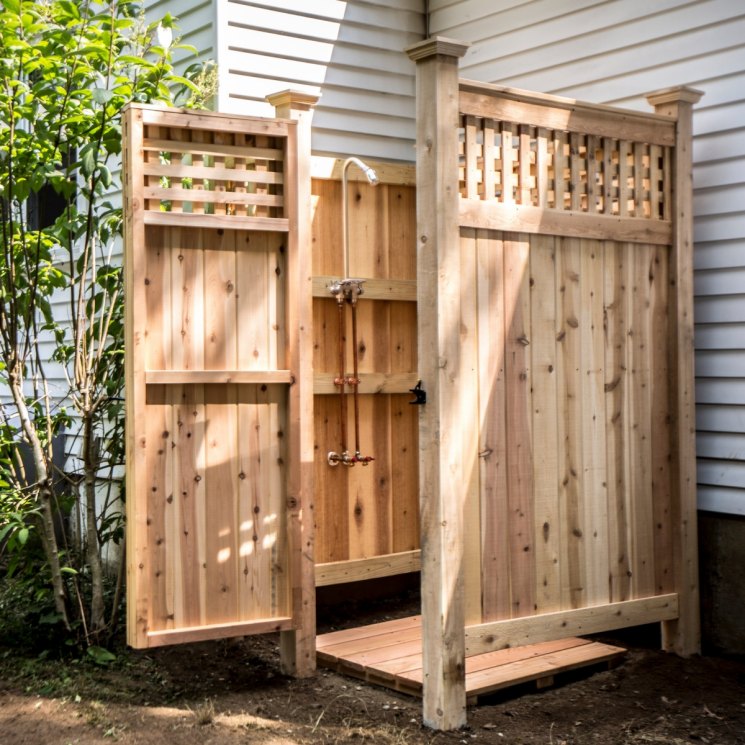
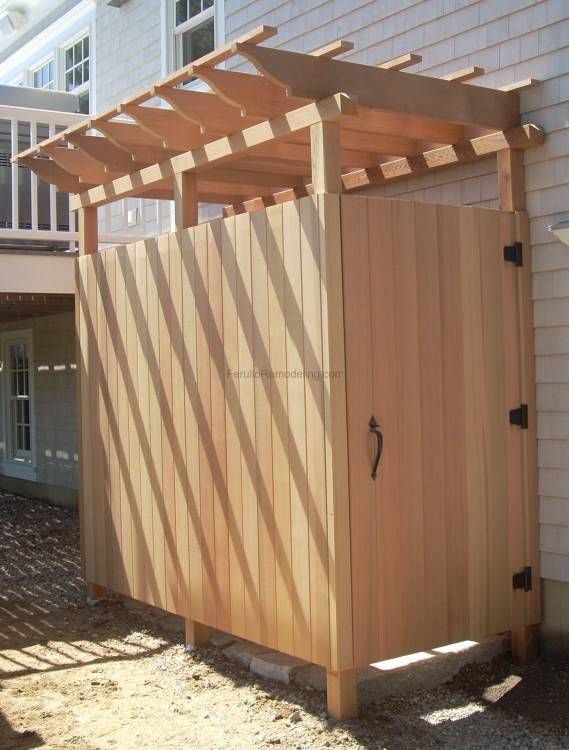
An outdoor shower is one of the essential additions to a suburban area.
We mark the masonry, lay out three walls in half a brick, using a level and a plumb line.
When laying the walls, do not forget to leave a ventilation hole at the bottom of the shower and a niche for a small window closer to the ceilings.
Summer shower near the wall of the house with water from the public water supply
We lay floor bars along the upper row of bricks and securely immure them.
We close the floors with a layer of waterproofing material and slate, having previously made a hole in it for the pipe.
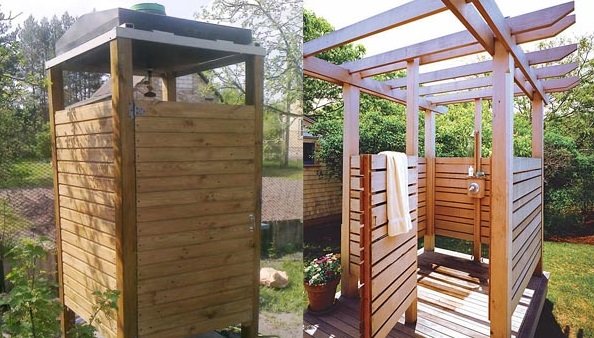
Summer shower made of wood in a modern style
An outdoor shower is one of the household facilities necessary for a comfortable pastime in a suburban area.
Let's start finishing work. The ceiling and walls can be plastered and tiled, you can use plastic fastening to a metal frame.
We run a drain pipe along the bottom. We make a frame from a metal profile or wooden bars. We lay out the bottom with wooden slats or plastic tiles.
We insert the door frame into the open wall of the shower, fasten it to the bolts, fill it with mounting foam and hang the door.
Shower panel stone wall decoration - a versatile option
Now you have an accurate idea of how to build a summer shower for a summer residence and what is needed for this. You do not have to follow our exact instructions, you can paint the shower, use other finishing materials. For an open version, you can install a frame with a curtain, and in the capital model you can do without a door, replacing it with a sliding wooden or plastic curtain.
A do-it-yourself summer shower will become an indispensable outbuilding on a personal plot
We offer you to watch interesting ideas for a summer shower in this video:
Summer shower insulation
Why insulate a simple summer shower if it is used in the warm season? The fact is that carrying out thermal insulation work will significantly extend the life of this structure. The main thing is to competently conduct insulation around the perimeter. For this use:
Mineral wool. This is an environmentally friendly material that is very easy to install. The mats are laid in the frame, after which it is sheathed from the inside. To prevent moisture from entering the material, it is covered with an impervious film.
Shower frame prepared for installation of insulation
Glass wool. Can be used if desired for warming the shower in the country
Of course, when working with it, you need to be careful, and carefully follow the installation instructions.
Waterproof foam. It is a modern material that is optimally suited for warming an outdoor shower
To do this, it is enough to use plates with a thickness of 5 cm. They fit into the frame, on top of which the interior walls are finished.
Foundation preparation
It is much easier to erect a frame structure than a capital structure - depending on the type of structure chosen, the stages of preparing the site for construction will differ.
For a temporary structure, it is enough to simply remove 10-15 cm of the top layer of soil from the site to level it, and then fill it with sand.
For a country capital soul, a foundation will be required, the depth of which is determined by the materials used for its construction. For example, for a brick shower, a foundation will be quite enough, the depth of which will reach 30 cm.
 Foundation for the construction of a capital summer shower
The foundation is laid in the following sequence:
- pegs are driven into the outer corners of the future soul;
- a cord is pulled around the perimeter;
- a place is being prepared for pipes (a log or a branch wrapped in roofing material is laid);
- concrete mortar is poured.
How to arrange a frame
Although the load from the water tank and the skin material is small, the frame must be strong and stable. Too flimsy racks can bend and fold at the most inopportune moment.
Metal
For the manufacture of a metal frame for a tank with a volume of 200-250 mm, profile pipes with a cross section of at least 20x40 mm or a corner with a shelf with a width of 45 mm or more are suitable. You can use round pipes with a diameter of 40 mm or more, but it is more difficult to connect them. If there are several tanks, the racks are needed even more powerfully.


The frame is assembled from racks, strapping and jumpers. For connection, welding or bolts are used. Welded seams are machined. The finished frame is covered with waterproof paint.
Wood
The frame for the shower is made of softwood lumber.They are inexpensive, and due to their resinous content, they are more resistant to moisture than hardwoods.
The cross section of the lower trim is 100x100 or 150x100 mm, the racks are 100x100 mm. The blanks are connected with metal corners, bolts and a thorn-groove lock.

First, a beam of the lower trim is installed on the foundation, then the racks and the upper trim are attached. For stability, the design is reinforced with jumpers and jibs. Previously, the tree is impregnated with an antiseptic.

The interior of the summer cabin
A shower designed for outdoor water procedures is a four-part structure:
- A drain hole dug deep and wide by half a meter. If you make a recess in the ground with high quality, counting on long-term use, then you need to furnish it with brick sides. The laying should be done in a checkerboard pattern, as this will improve the absorption of flowing water into the soil;
- Floor slab, lying on top of the drain pit and supplemented by a sewer drain;
- Shower cabin, made up of walls no more than 2.2 meters high. The main thing is that the booth is made of strong material, does not loosen and can withstand the weight of a barrel of water;
- Large container filled with water. Its volume must be selected based on how many people want to take a shower in one day. Usually one person spends about 25 liters on water procedures. Two holes should be provided in this barrel - for filling with water from a water pipe or bucket and for installing a tap with a perforated nozzle from a watering can.
All of the listed parts of the summer shower can be improvised materials. For example, nothing prevents you from assembling a booth from metal sheets left over from arranging a fence for the house.Pipes can become supports for it.
In a summer shower made from improvised materials, in comparison with a purchased booth, the following advantages should be noted:
- low cost of materials for construction;
- the ability to make a shower with a unique design and shape, tailored to the local landscape;
- a shower stall made of some materials (polycarbonate or film) is easy to move to another place or clean;
- assembling a homemade shower does not require complex drawings;
- conscientious construction, because you have to use the booth yourself.
True, the home-made design of a summer shower has one significant drawback - a large waste of time and effort for construction.
Types of shower cabins for a summer cottage
The summer shower cabin can be made in four versions:
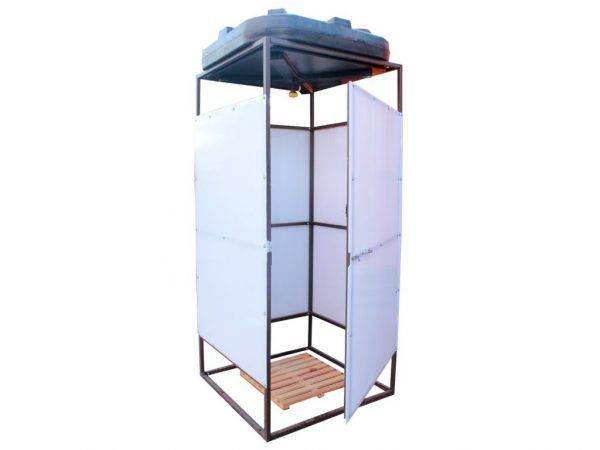
Portable shower, consisting of metal racks for the frame, walls made of moisture-resistant material, a rubber mat, as well as a water tank, faucet and shower head. Such a booth for water procedures in the open air is placed in the country at the onset of summer, and then removed. This is the simplest type of summer shower, as it takes one hour to assemble the structure. But the fact that such a shower will last for many years is out of the question;
The material for the manufacture of the shower was a durable film
Shower on the outside wall of the house. The option is non-standard, since the structure is devoid of walls (they are replaced by a temporary screen) and is located near the wall of the house, consecrated by the sun. Naturally, the wall is protected from dampness with tiles or other moisture-resistant material, and the water tank is attached to the place where more sunlight falls.True, in such a shower you can freeze because of the wind, and the water in the tank rarely heats up to the desired temperature;
The shower is adjacent to the house, located under the roof
Frame shower. This design is preferred by most gardeners. It stands on a pile foundation, consists of a metal frame and a booth lining material, which can be plastic panels, boards or polycarbonate. However, this shower will last a short time, unlike a capital structure;
Frame design holds the shower stall
A capital structure built on a strip foundation and brickwork, insulated and equipped with water heating. Sewer pipes, plumbing and electrical wires are connected to it, because such a shower is used not only in summer, but also in winter. The construction of this reliable structure will require a lot of time and materials.


