- pouring concrete
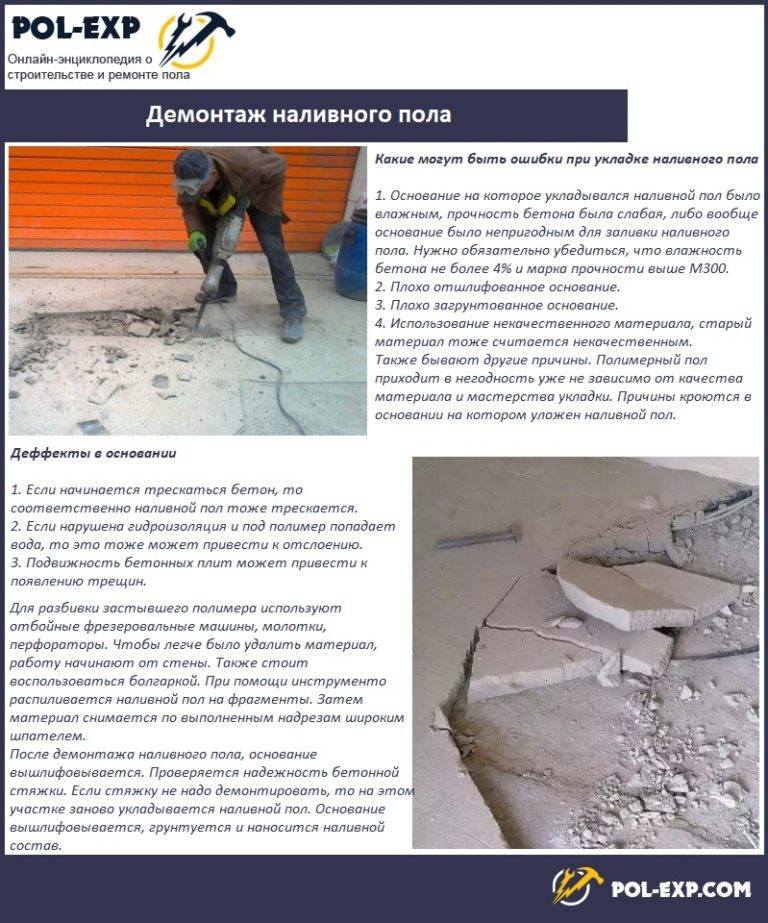
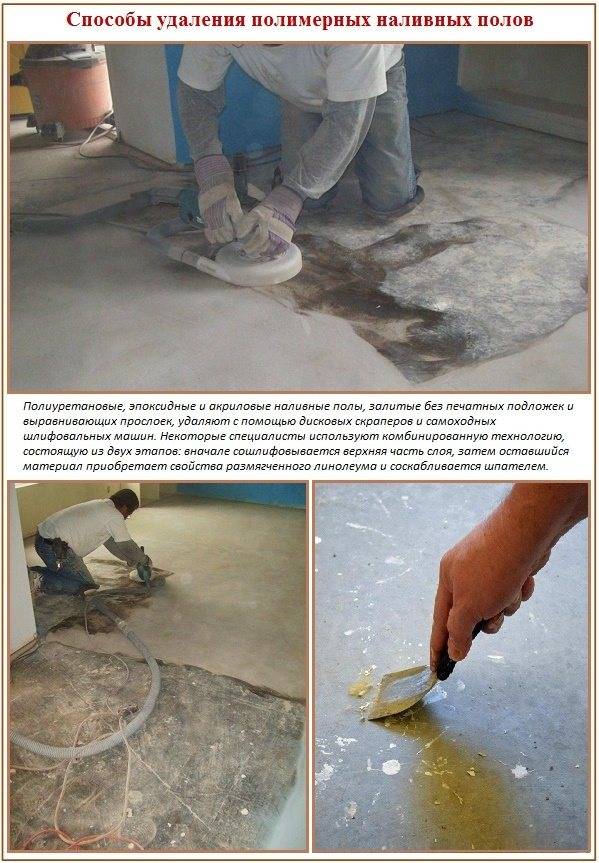
- How to remove floor screed
- Dismantling of concrete screed
- Floor and ceiling
- How best to dismantle the floor screed
- How to strengthen?
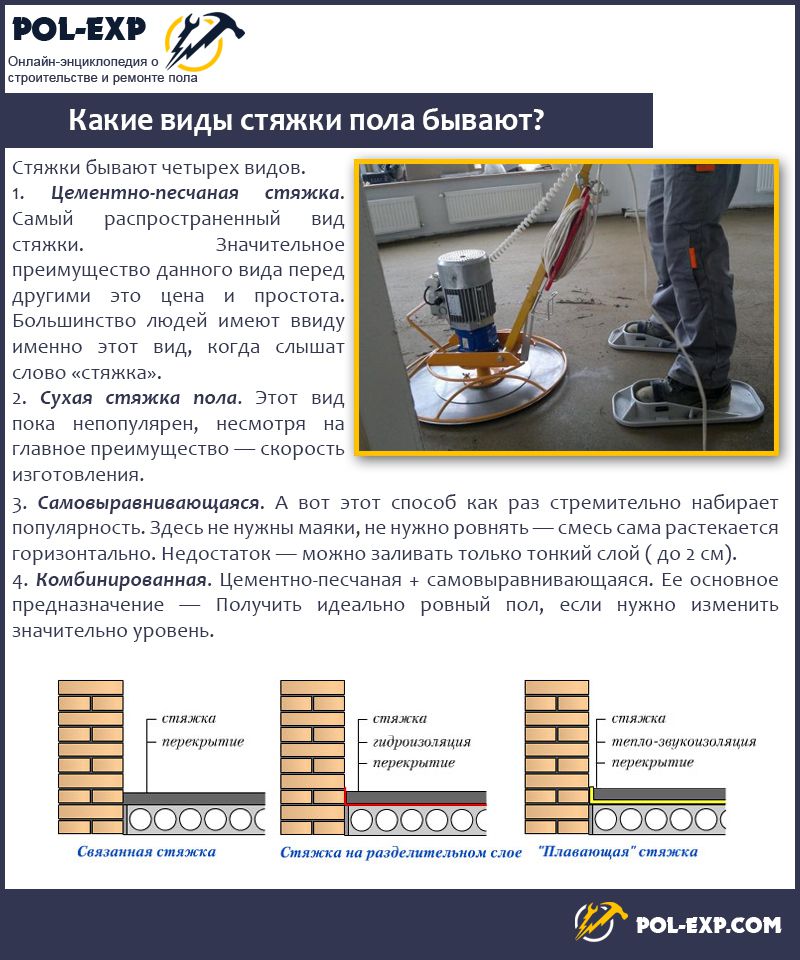
- Floor screed and its main functions
- Overhaul of concrete screed
- Screed markers
- Dusting with toppings during the overhaul of the screed
- How to dust concrete screed
- The main types of repair work when restoring the screed
- Solving problems with cracks and cobwebs
- Dismantling the floor: everything you need to know about this job
- Types of ties and the possibility of removal
pouring concrete
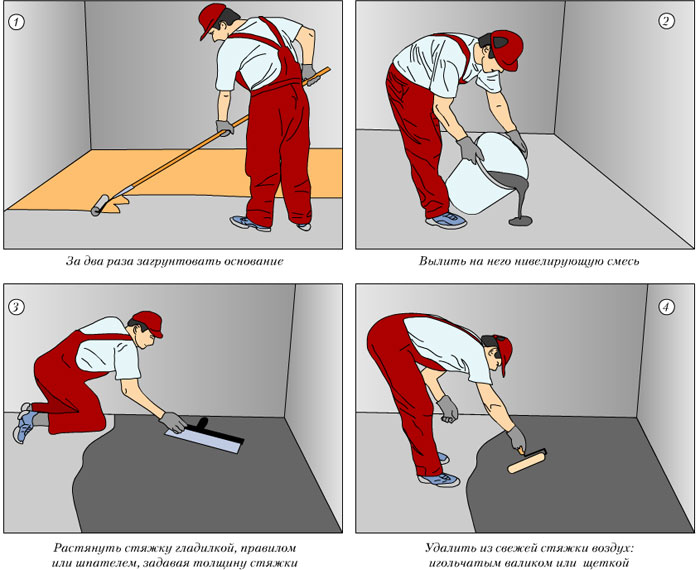
For pouring, you will need a rule and a trowel. It is desirable that the concrete mixer is located in the same room where the work is done. It is on wheels and can be moved as needed.
Preparation of mortar for screed
Step 1. Unload the concrete on the floor, shovel it between two beacons. Start from the wall, take your time, throw in a layer of approximately the same thickness.
Step 2. Make a rough edit with a trowel. Align the recesses, discard the excess mass from the back of the beacon. Do not throw the mixture too wide, do not forget that the reinforcing mesh must be constantly raised, during operation it may fall.
Adding mortar with a trowel
Step 3Level the thrown concrete as a rule. The rule must be pulled towards you and simultaneously moved left / right.
alignment
For leveling concrete, you should have a strict rule. The mass is heavy, the rule must be pulled with great effort. If the strength of the device is insufficient, then in the middle it will bend. As a result, a gutter is formed between the beacons, and this is a very unpleasant marriage. Constantly clear the beacons of stones, the width of the poured concrete should be such that it can be leveled with outstretched hands.
Another photo of the process
Step 4. In the same way, make a screed throughout the room. Do not forget to manually throw and level various small niches and junctions of walls with the floor.
After the floor is completely dry, we can proceed to further refine the floor surface.
Work should always start from the farthest wall and move towards the exit of the room. Pull the concrete mixer behind you as needed
Constantly pay attention to the position of the reinforcing mesh. There are times when all special measures to raise it do not give the desired effect.
If so, after leveling each small section of concrete, re-raise the mesh. Remember that it should never lie on the ground.


How to make insulated concrete screed
Mechanized floor pouring
How to remove floor screed
Dismantling the old floor screed is a very laborious process. It requires special tools and experience in repair work. Of course, to break, not to build, but after all, destroying everything in a row is no good. With extra effort, you can make a hole in the ceiling, but how then to close it? And the neighbors below will not be happy with a hole in the ceiling instead of a beautiful chandelier.If you doubt that you will cope with such work, then it is better to invite professionals. Let their work have to be paid, but you will have a guarantee that you will not harm yourself or people. If you are confident in your abilities, then we will try to carry out the dismantling by joint efforts.
First, it is necessary to establish precisely that these works are really needed. Even if you have planned a major overhaul, then before you start breaking everything, carefully look at how necessary it is to dismantle the old screed. It may be possible to repair the old one.
Let's see in what cases the old screed is removed:
- the screed is badly cracked and cannot be restored;
- lowering the floor level is required;
- installation or repair of communications under the screed is necessary;
- the condition of the old screed is so unsatisfactory that it is not possible to lay a new floor covering on it;
- old ceilings may not withstand if a new one is poured over the old screed.
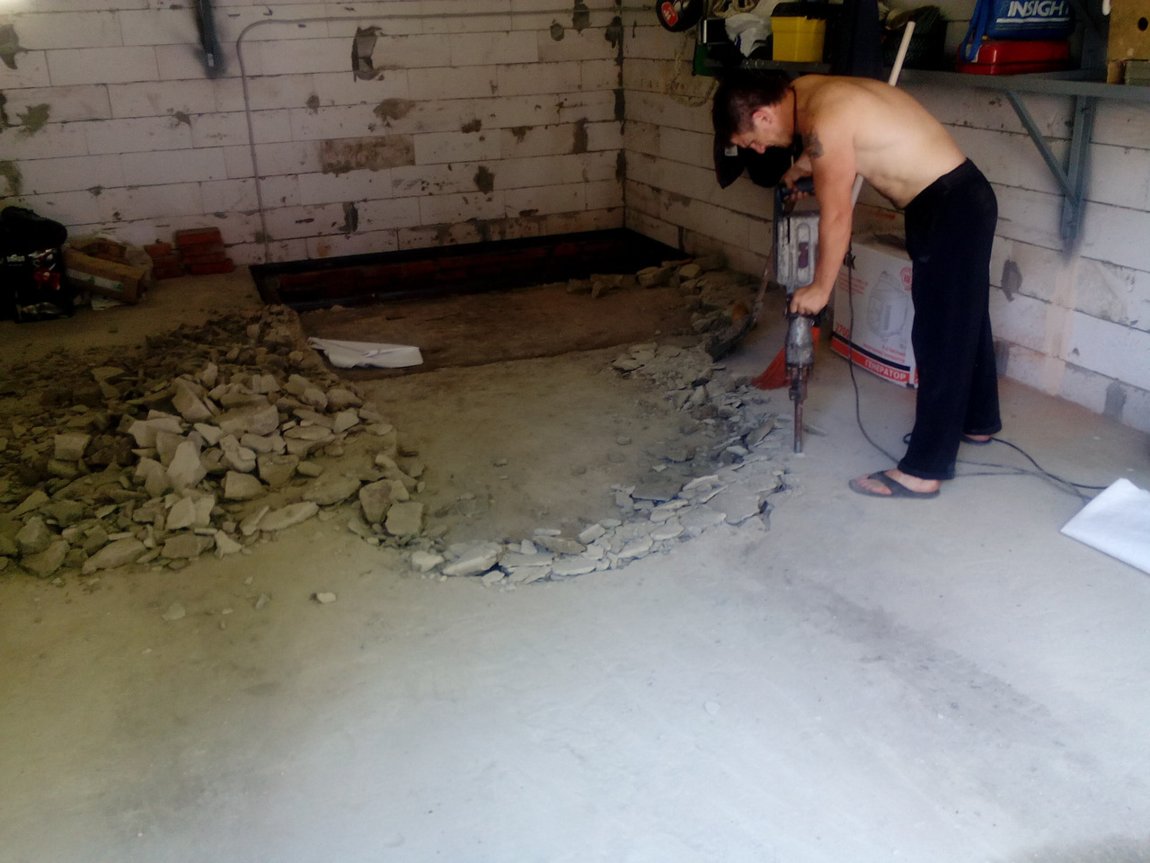
Dismantling of concrete screed
You will most likely have to figure out how to remove the concrete screed, since floors in residential buildings are mostly made of concrete. What is concrete? This is a material that resembles a stone in its strength and you simply will not be able to split it with the same hammer. The best way to get rid of this coating is diamond cutting. Professionals have such equipment, but you are unlikely to spend big money on buying this tool, especially since you are unlikely to ever need it again.
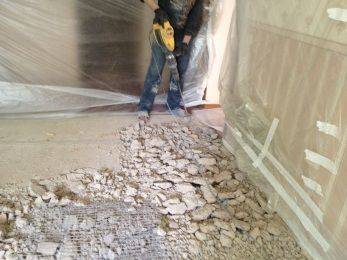
In any case, dismantling begins with the removal of skirting boards and old flooring: carpet, linoleum, laminate.You can easily do these works yourself, and they do not require any special conditions. When performing these works, it is really possible to break and destroy
If you decide to keep the flooring in order to lay it, for example, in the country, then you need to carefully remove it. In any case, you will not cause harm to neighbors, except for noise.
We remove the old screed
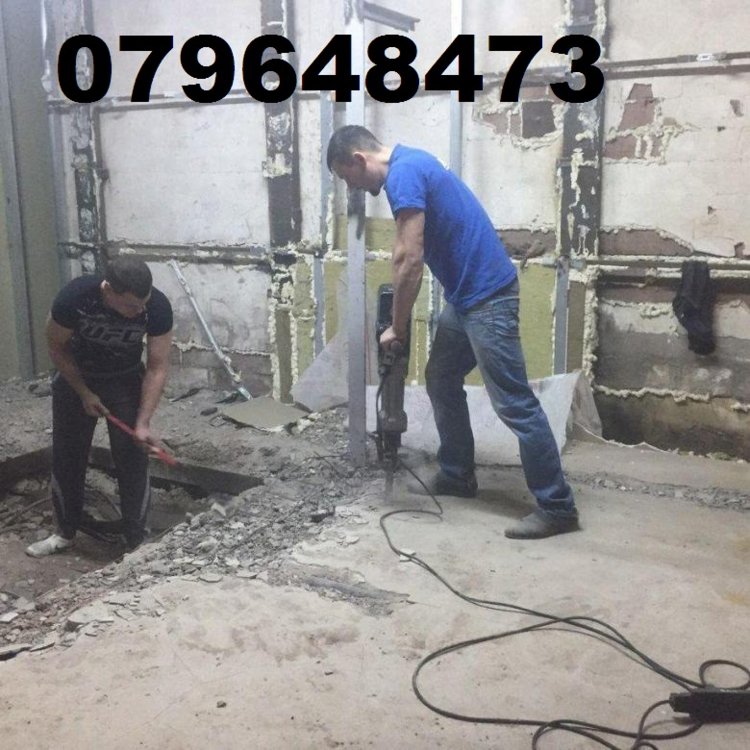
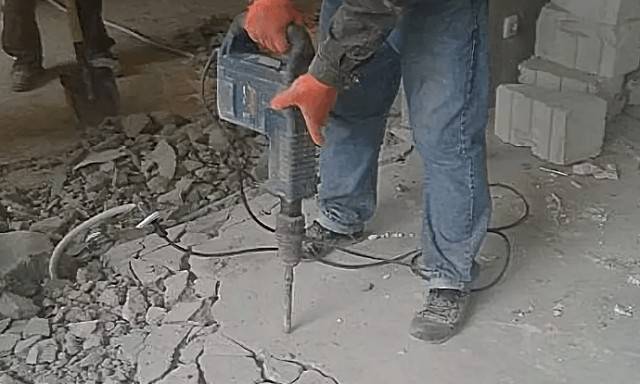
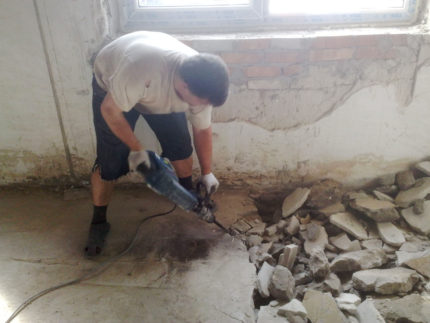
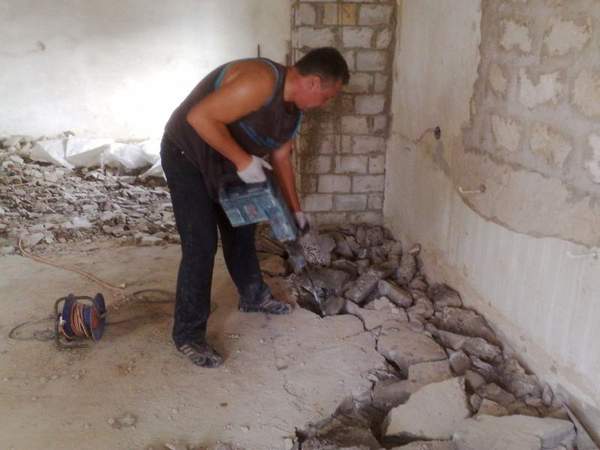
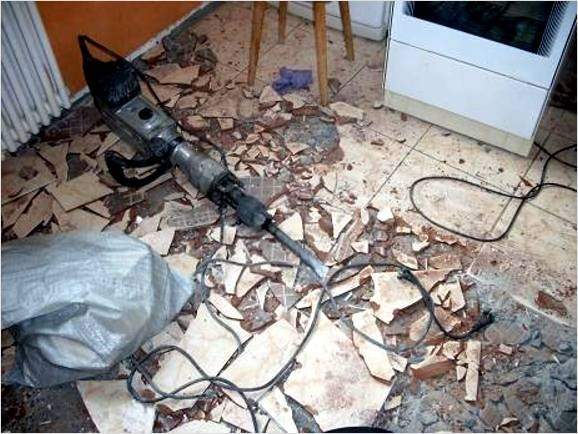
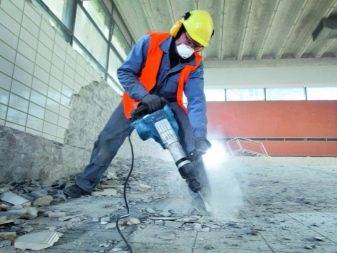
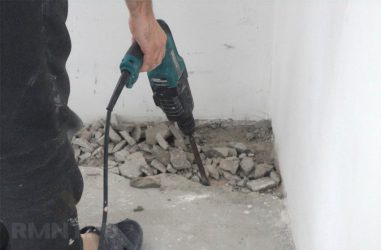
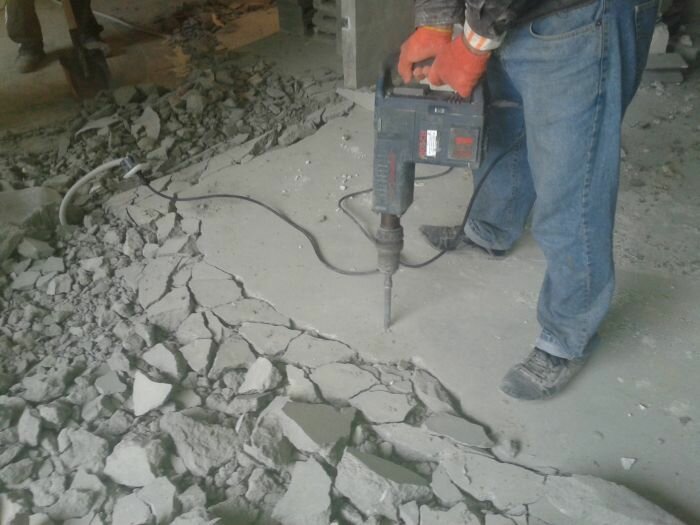
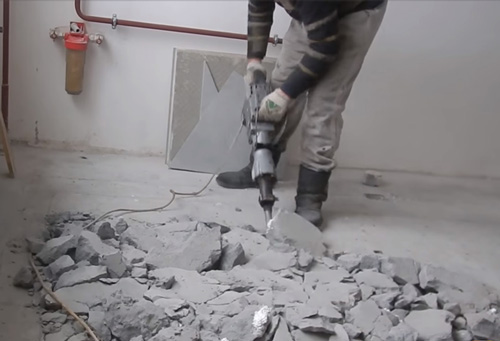
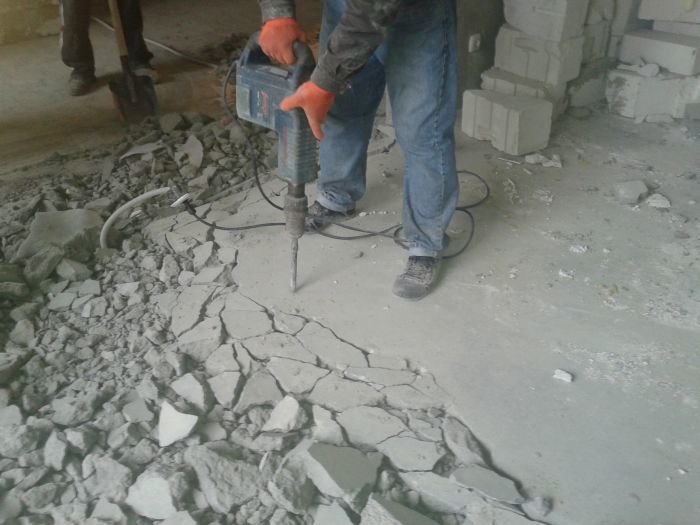
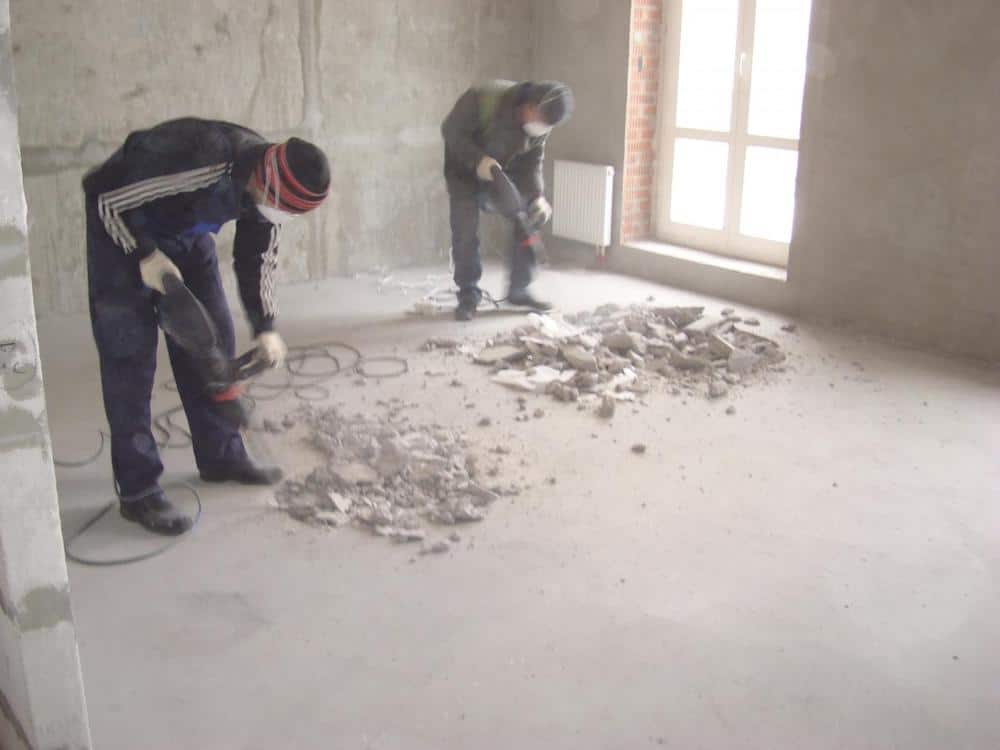
After more or less quiet work, you have to fight with concrete. You are offered a choice of two options: using hand power tools and purely manual work. Hand power tools: concrete hammer, hammer drill, diamond cutting device will speed up the work, but will make a lot of noise. If metal-reinforced coatings get in your way, you will also need a special joint cutter.
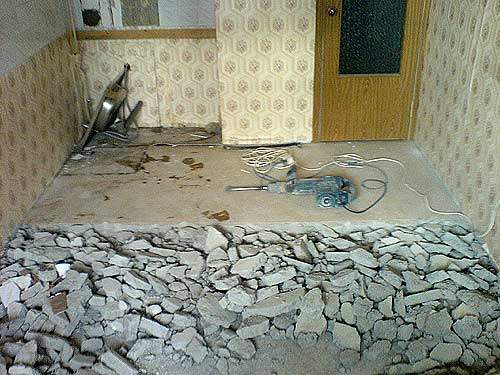
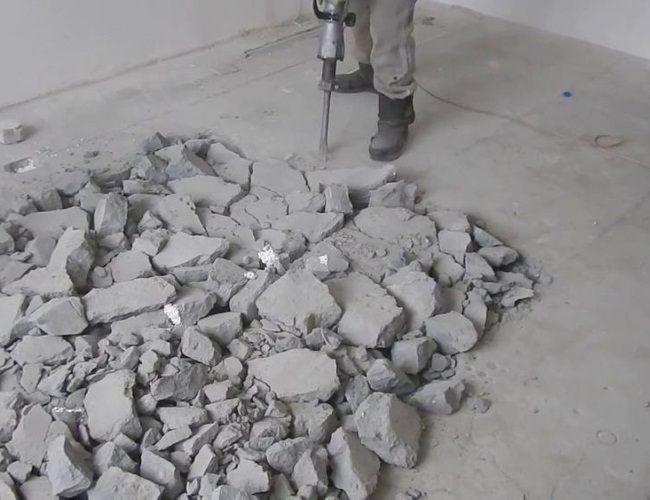
Breaking into pieces
Fans of manual labor can use a crowbar, hammer, sledgehammer, chisel. You will have slow work, very loud, dusty, but cheap. What is better for neighbors: loud, but fast or loud, but long? Decide for yourself. In any case, the dismantling of the cement-sand screed is carried out by one method: breaking the concrete into pieces.
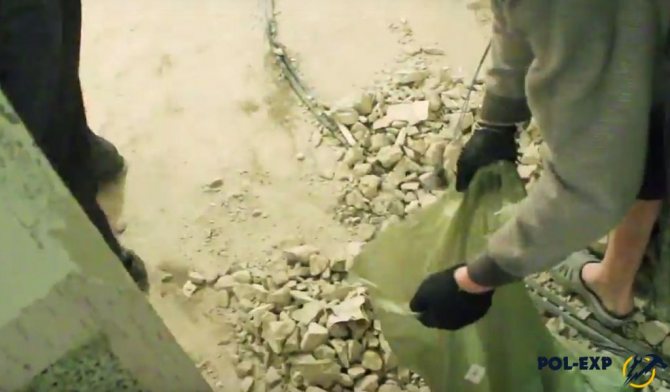
During dismantling, be prepared for a lot of dust, dirt, pieces of concrete, old fittings and incredible noise. Stock up not only with a tool, but also with garbage bags, patience and the consent of housemates. The noise of the jackhammer will be heard on all floors, so warn everyone in advance and agree on a schedule for your noisy work.
Perforator to help you
Before starting a noisy campaign, make sure once again that such repairs are worthwhile.It is possible that it can still be repaired or replaced in parts. Try to do all the work with the least loss for yourself and for your neighbors.


Ivan Vystupaev 10 589
tell friends
Floor and ceiling
How best to dismantle the floor screed
During the overhaul, it may be necessary to dismantle the old flooring and screed, which is located between the bearing floor and the final finish
How to perform this operation most efficiently and what aspects to pay attention to is the topic of this review. . And first some theory
The floor screed is a monolithic (made from a cement-sand mortar) or composite (for example, a dry screed) structure, which is applied directly to existing floors and allows solving a number of important construction tasks:
And first, a little theory. The floor screed is a monolithic (made from a cement-sand mortar) or composite (for example, a dry screed) structure, which is applied directly to existing floors and allows solving a number of important construction tasks:
- Filling voids, potholes, assembly joints and fine leveling of the floor (for the possibility of subsequent finishing);
- Possibility of increasing the consumer characteristics of the object (when laying additional layers of heat-insulating, waterproofing and noise-absorbing materials under the screed);
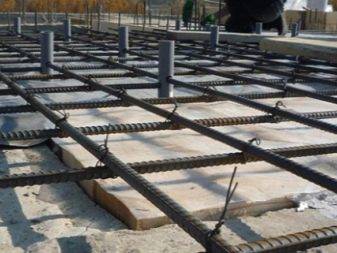
- Increased strength characteristics due to the introduction of reinforcing metal meshes into the floor screed.
- Increasing the bearing loads of the entire building as a whole.
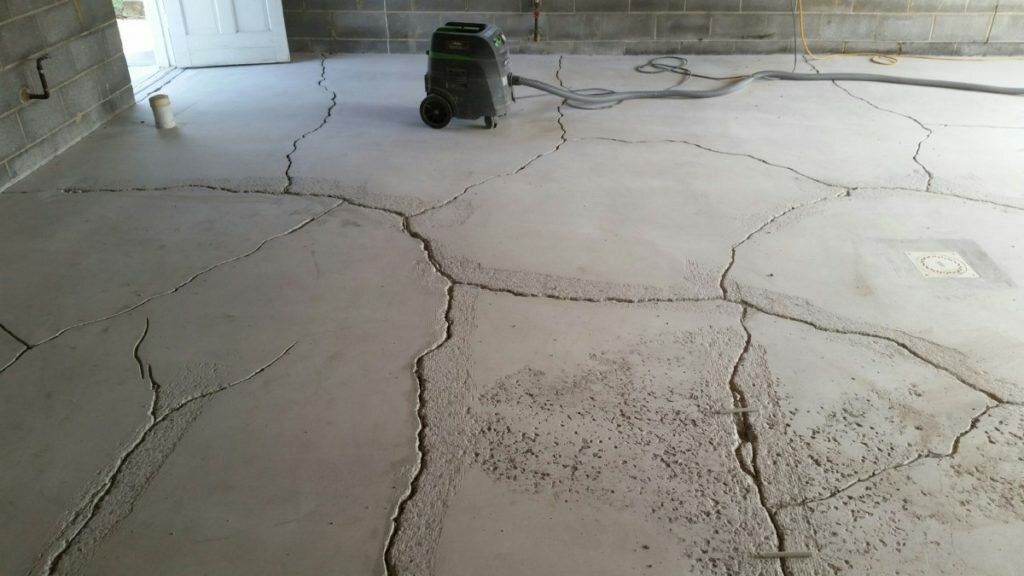
However, over time, the existing base can deform, which is the most common reason for dismantling the floor screed.
How to strengthen?
Strengthening a weak screed is a way of preventive repair. Carrying out some simple manipulations will eliminate the need to remove the screed to the base, as well as protect it from destruction and delay the need for urgent repairs.
To strengthen the screed, it is necessary to drill holes of 20 mm in diameter with a puncher to the main foundation. The distance between the holes should be 25 cm. It is best if the upper part is twice as wide in diameter as the hole itself. After all the recesses are drilled, they need to be cleaned.
At the end of the preparatory work, it is necessary to arm yourself with trimmings of reinforcement with a diameter of 12 mm. Reinforcing bars will need to be degreased and shortened in length equal to the depth of the holes.
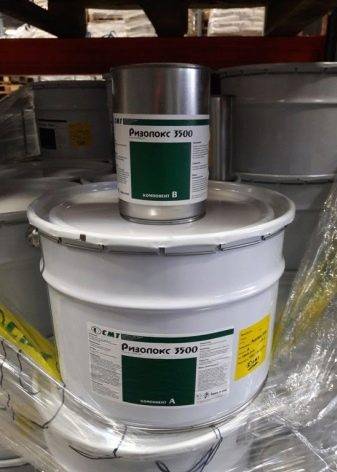
When strengthening, you can not do without a special epoxy mixture for concrete, which is called "Rizopox 3500". It can also be used for other repairs associated with the destruction of the screed. The diluted mixture must be mixed with quartz sand, and then poured into the holes formed in the floor. After filling the holes, insert pieces of reinforcement into them, and then cover the top of the hole with liquid.
The result of this work will be the strengthening of the screed by strengthening it with metal reinforcement. This method can be used not only to strengthen a weakened screed, but also as a preventive measure when installing a new screed. Reinforcement at the installation stage will prevent the formation of cracks and potholes and make the floor wear-resistant.
Floor screed and its main functions
Before we talk about how to properly and efficiently remove the old screed, you should understand and understand what it is and why it is mounted in residential and industrial premises. A screed is a base that is laid on a subfloor (for example, ceiling, soil, etc.), and a finishing floor covering is already mounted on top of it. The screed allows you to level the surface of the subfloor or, conversely, set a certain slope for it.
This property is very important in relation to some floor coverings - among the whole variety of finishing materials, there are those that are very demanding on the evenness and cleanliness of the base, and it is precisely these qualities that make it possible to achieve the laying of the screed layer.
What types of floor screed are there?
Also, all kinds of communications can be laid inside the base being created - water supply and drainage pipes, electrical wiring, ventilation, etc. The screed allows you to evenly distribute the load that the floor experiences daily over the entire surface. Also, thanks to it, it is possible to create good hydro-, heat- and sound-proof layers.


Floor screed device
On average, the thickness of the screed layer is small - about 4-10 cm, depending on how much it is necessary to level the rough base. There are also thicker options, but this is rare.
Consumption of cement for screed
The screed can be monolithic, made from a building mixture based on cement, sand and water - concrete, as well as composite, which is a layer of gypsum materials and expanded clay.This layer acquires special strength due to the laying of a reinforcing mesh made of steel or polymeric materials inside the screed - a reinforced screed is obtained.
Reinforced concrete screed
The main advantages of the screed:
- long period of operation;
- excellent strength;
- the ability to provide thermal and waterproofing of the floor;
- resistance to various types of loads.
The disadvantages of the screed are complex installation, a long drying period, and a significant cost of work. Yes, and dismantle it if necessary is not so simple.
Concrete screed restoration scheme
This is interesting: Heating cable for underfloor heating: we study together
Overhaul of concrete screed
If the damage exceeds 30%, a complete replacement of the structure is carried out. The old screed is removed.
Calculation of the thickness of the screed. The calculation is always carried out from the bottom up, providing for a margin in a big way.
The traditional design, taking into account thicknesses, looks like this:
- waterproofing (p / e film) - 1 mm;
- thermal insulation (expanded clay bedding, mineral wool, expanded polystyrene slabs) - from 25 mm;
- reinforcing mesh - 6 mm;
- protective layer of concrete - depends on the loads;
- finish coating.
Screed markers
The solution is leveled on rack or pin markers. Both types are fixed with a small amount of cement-sand mortar. The pins are laid in the corners and along the wall structures with a step of 0.5 m. The profiles are parallel to each other, the first with an indent of 25-30 cm, then with a step of 1-1-.5 m.
Height marks on the pins are carried out with a tightly stretched cord and level
They start working from the corner closest to the doorway - diagonally. The second diagonal is beaten off along the primary cord. Next - pull them around the perimeter, make marks on the wall markers.


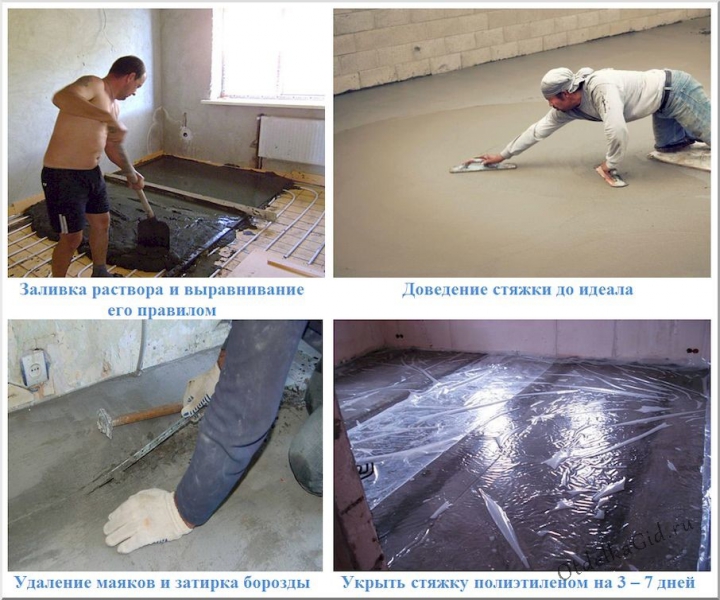
Screed overhaul procedure:
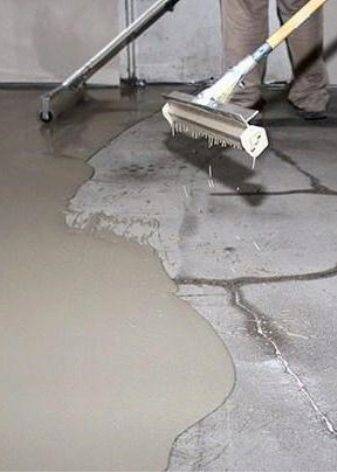
- the base is cleaned of sludge, debris, including together with special mixtures for cleaning concrete;
- the surface is treated with a concrete finishing machine, dusted with an industrial vacuum cleaner. A primer is applied to the entire area, you can use an already familiar p / y or epoxy primer;
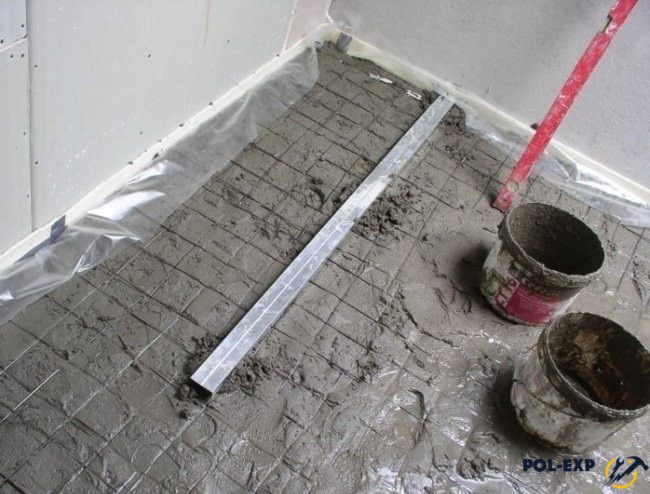
- waterproofing is laid on the dried layer (overlap 15 cm, entry onto the walls to the height of the screed + 2-3 cm). The joints are glued with adhesive tape;
- thermal insulation is provided. Expanded clay is poured, leveling it with a rolling roller. Or, mineral wool or expanded polystyrene slabs are tightly laid with a run-out of seams;
- laying of reinforcing mesh. The material should recede from the walls by 3-4 cm, overlap - 1-2 cells. The mesh is fixed into a single structure with a knitting wire;
- markers are attached to the surface. If pins are used, when the solution solidifies, the heights are beaten;
- prepare a viscous cement-sand mortar in a ratio of 1: 3 and pour between the markers. Each portion is leveled by the rule;
- when the material has hardened, the guides are removed, the recesses are filled with mortar.

Materials for the overhaul of the screed:
- thixotropic mixtures, incl. fast hardening;
- repair bulk mixtures;
- non-shrink concrete mixes.
Dusting with toppings during the overhaul of the screed
Depending on the operational loads on the floor, metallized, corundum or quartz hardeners are used. The first option is the leader in terms of strength and is effectively used on industrial floors. For higher and medium loads, it is advisable to use corundum mixtures. They reinforce the surface of the screed up to two times.
How to dust concrete screed
Technology requires an exceptionally professional approach. Any errors will cause marriage and peeling of the hardener. The screed must be reinforced, with a concrete layer thickness of 7 cm or more. Toppings work on concrete M300 and above.
The readiness of the coating for hardening is determined visually - there should be a slight mark from the shoes on the surface (4-5 mm)
The freshly poured structure is well compacted by vibrators. After pouring, wait about 7 days.
Then proceed as follows:
- the composition is distributed on the basis of dosing carts for 2/3 of the total consumption. Sprinkling starts from the junctions, since it is there that the concrete sets the fastest;
- after soaking the topping with moisture, which can be seen from its darkening, grouting is carried out with concrete finishing machines. The mixture must penetrate into the concrete structure;
- after the first grout, the rest of the hardener is immediately added. After it has been impregnated with concrete moisture, grouting is carried out;
- finishing processing is carried out after a deep setting of the screed, when the footprint from the shoe does not fall more than 1 mm deep. In practice, 2 hours is enough for this. To do this, blades are installed on the grinder with a gradual change in the angle of inclination. The finished surface has a characteristic matt sheen.
When all work is completed, you can treat the screed with a special moisture-retaining compound. The floor needs care - for this it is covered with a p / e film. After 24-48 hours, expansion joints are arranged, acting as a seam cutter. After the screed has fully matured, the seams are sealed with polyurethane sealants.
The main types of repair work when restoring the screed
Screed restoration includes several main types of work:
- repair of cracks, chips, irregularities, traces of a marker or formwork;
- repair of large through cracks;
- complete repair of a concrete screed, followed by polishing and installation of a floor covering or underfloor heating with laying a heat and waterproofing layer.
- dedusting.
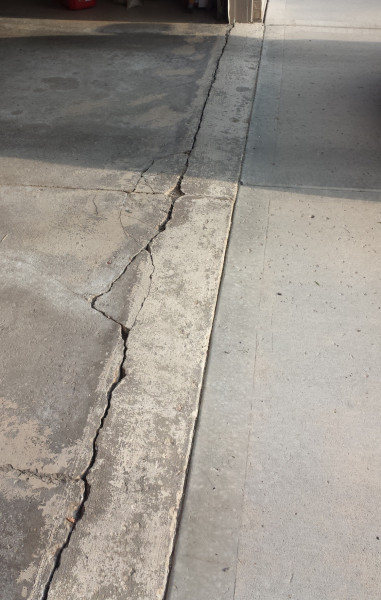 Cracks in the screed
Repair of a cement surface includes four main types of repair activities. All of them are made according to a special scheme. Particularly expensive and difficult is a major overhaul for a clean floor. To carry it out, the necessary tool is a metal roller for rolling with a handle. Its width must be more than 50 centimeters and weight not less than 10 kilograms.
After the completion of the repair work, except for the last type, the floor screed is left alone for 20 days, daily wetting it with water. You should be wary of overdoing it with water, because concrete slowly absorbs a certain amount of moisture, the excess of which can harm.
Solving problems with cracks and cobwebs
When faced with the repair of floor screed cracks, you should pay attention to their number and volume. Small cracks naturally take less time to repair
To begin with, they are examined, after which the screed is removed next to the crack. This will allow you to avoid the appearance of chips on the surface in the future. Even hidden chips will thus be detected and repaired. The shape of the crack in depth should resemble a cone.
Any debris from the inside is removed, water is poured to increase humidity.
During the drying process, any prepared mixture will shrink.For this reason, the solution is not poured flush with the floor, but slightly higher. You should not worry, because later you can easily remove the “cap” with a grinder.
Improvised tools will not help in detecting significant cracks. Cuts are made along the damage with a circular saw. The best option here is to use a diamond disc, and not another. Concrete from the cuts is removed with a chisel, as was done before with small defects. It remains only to pour the prepared cement mortar, which must dry out within the prescribed period.


It is worth highlighting in a separate category cracks in the concrete floor, which appeared as a result of shrinkage of the poured mortar. Initially, you should “embroider” them to a depth of 5 mm. Further, everything is very simple - clean the dust and add the solution. In this case, it is recommended to use mineral-polymer complexes as additives to the mixture. Shrinkage of concrete in this case no longer occurs.
"Spider web" requires no less attention. It occurs when the solution dries significantly faster. Many people have a question about how to seal a concrete floor. To seal cracks, an elastic sealant is most often used over a primer layer. But it is not always possible to find such places of damage. Their detection is carried out by wetting the surface.
Dismantling the floor: everything you need to know about this job
Categories :Articles
Have you ever tried breaking down an old concrete floor? Even with a powerful hammer drill, this job can take a lot of time and effort. It just seems that it's all about the power of the blow - in fact, here you need to know where to hit and how to do it correctly.Only with a deliberate approach to this work can it be carried out quickly and with a minimum amount of effort expended. In general, if you want the dismantling of the floor to be easy and simple, the work must be treated reasonably. What we will do in this article, in which we will deal with the question of how to properly dismantle the floor - we will consider scrap of old floors made from various materials.
Dismantling the floor photo
Types of ties and the possibility of removal
You can dismantle any screed - the difference is only in the complexity.
Wet floor screed. This classic method, proven for decades, is still widely used today, due to the low cost per square meter of the finished coating. It is applied to a base cleaned of dust, primed and dried. Requires the installation of damping tape around the perimeter of the junction with the walls for waterproofing and suppression of the spread of structure-borne noise. To increase the strength, a reinforcing mesh - metal or plastic - is laid in the screed. Requires additional leveling of the surface. The dismantling of such a screed is the most time-consuming, it requires crushing, sawing or milling a capital structure that is firmly connected to the ceiling and walls. Professional equipment is required, it is also difficult to remove residues after dismantling.
Dry screed. This is a fast technology, the screed material is poured between the lighthouse lags, rammed and covered with plywood or OSB sheets. It also requires sealing the cracks and cavities of the base, its waterproofing
It is important that the sheets rest not only on the logs, but also on the surface of the filling material. Such a screed is more expensive than wet, it is more afraid of moisture
Dismantling of this design is easy - just unscrew the screws, remove the sheets and logs, immerse the backfill material in bags and take them out.
Semi-dry screed. It is carried out in a mechanized way, a large amount of fiber is added to the cement mixture. The solution with a small proportion of water is supplied to the surface by a pneumatic supercharger, after which it is rammed. The fiberglass increases the internal cohesion, so mesh reinforcement is not necessary. The cost is also high, due to the high cost of equipment and the involvement of qualified specialists. Dismantling such a screed is easier than wet and harder than dry.
Wet screed
Usually, when choosing a type, they don’t think about how to remove the concrete screed later, they don’t take into account the cost and laboriousness of its dismantling.
This is interesting: Floor screed (140 photos) - what is it: a concrete screed device under a wooden floor surface in an apartment, materials for a floating structure


