- How to install indoor drainage yourself
- Construction of a drainage system
- Required Tools
- Work algorithm
- Rules for the location of manholes
- Optional equipment
- Types of drainage system
- What is drainage
- When should drainage be provided?
- Where to start the construction of drainage
- When is Foundation Drainage Performed?
- Drainage systems
- What is a drainage system: device and purpose
- Types of drainage systems
- Do-it-yourself drainage work
- How to make indoor drainage around the house with your own hands
- A few words about the plastic drainage well
- Design
- deep drainage
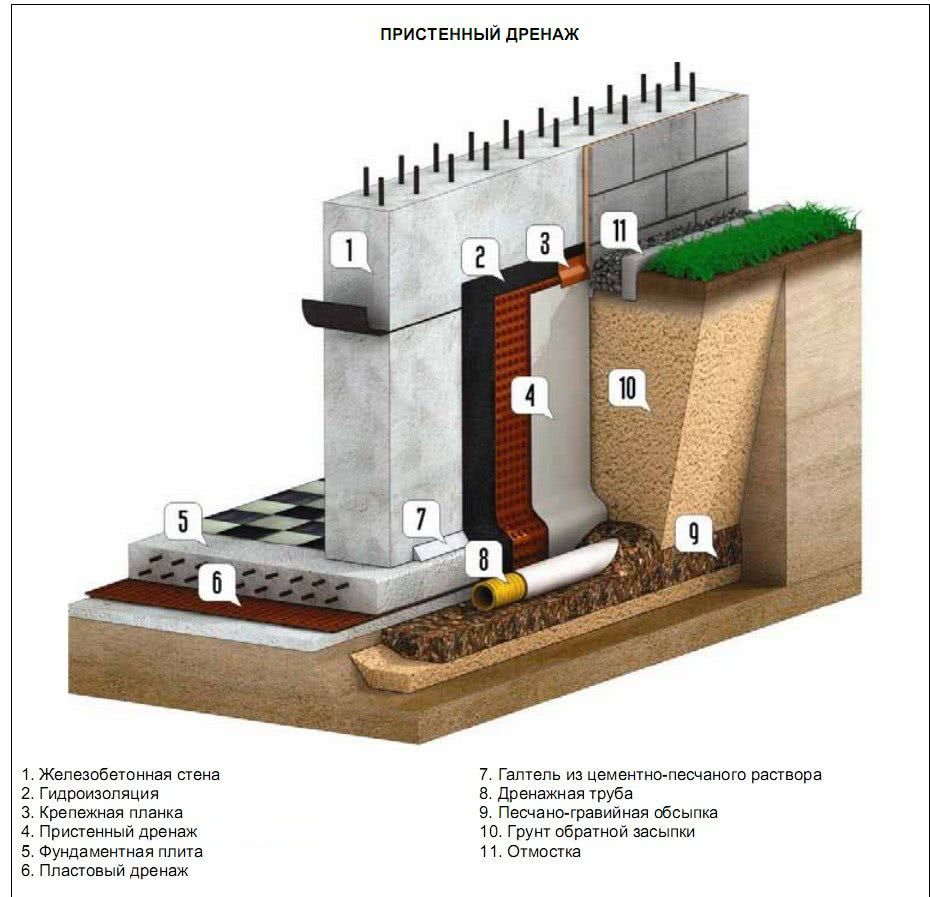
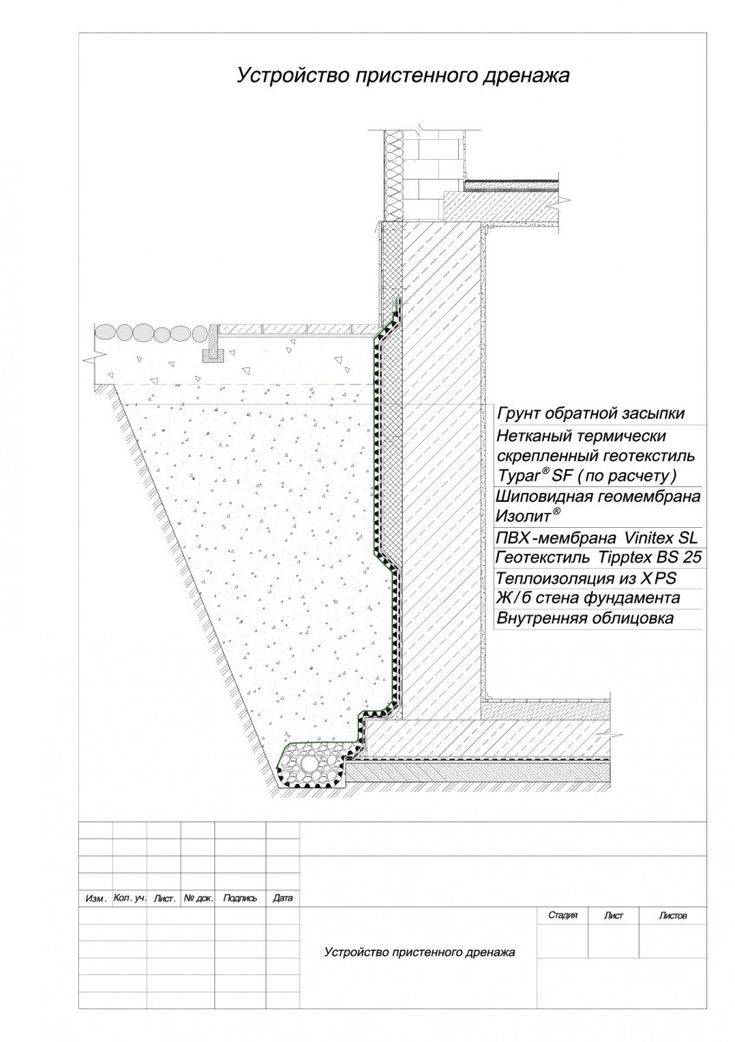
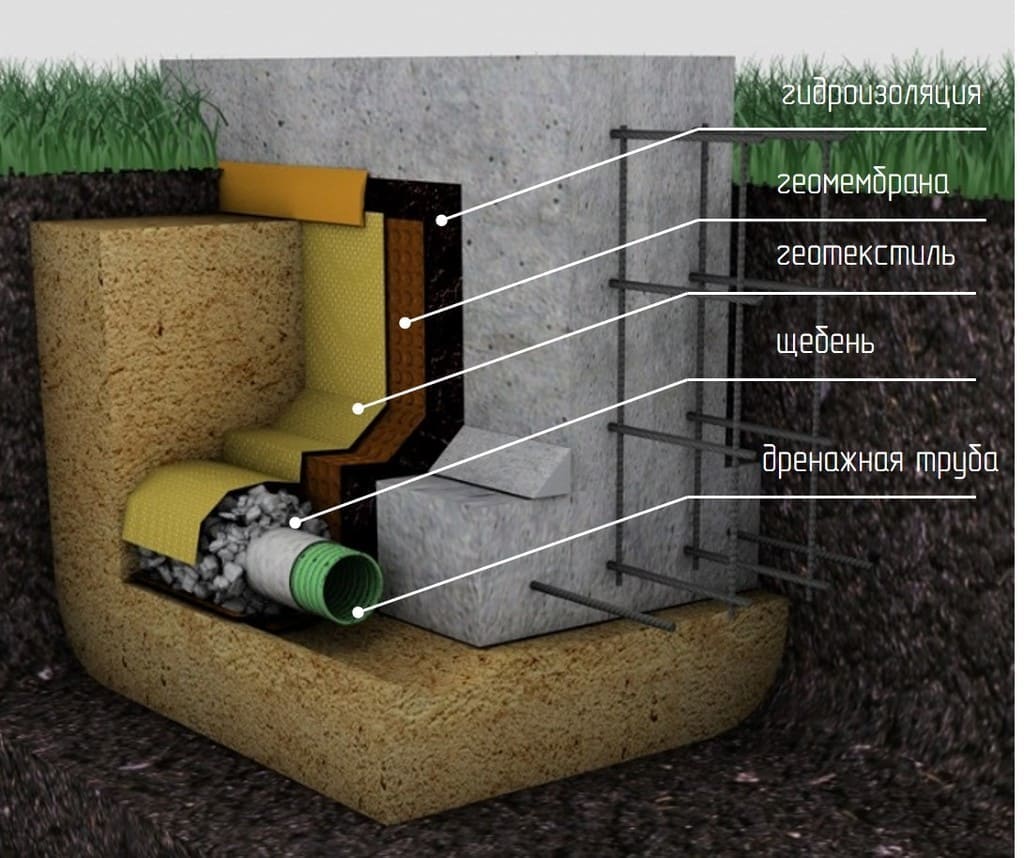
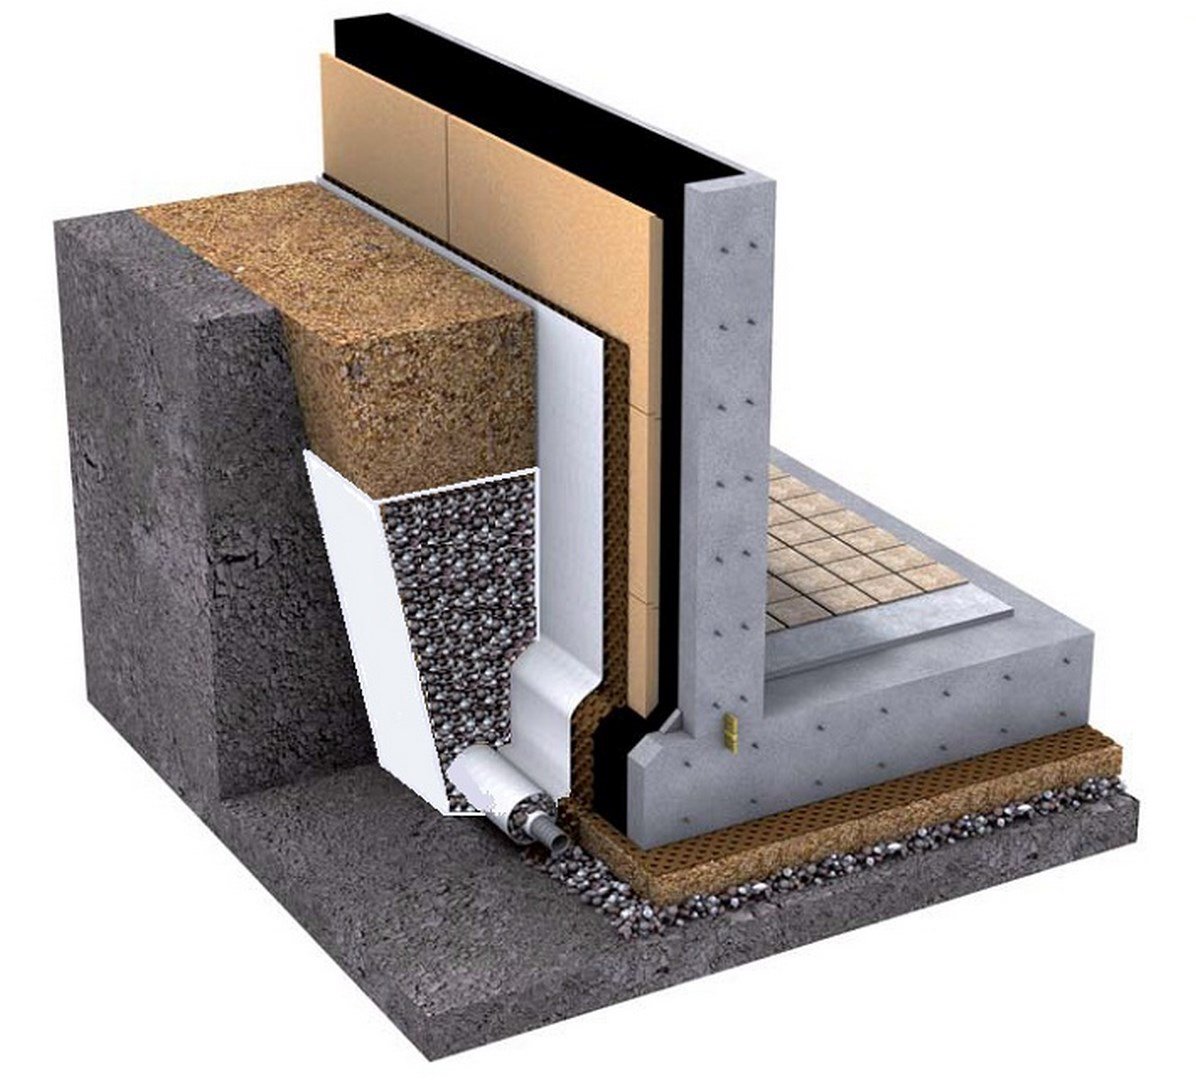
- Wall drainage system of the foundation
How to install indoor drainage yourself
We warn you, if you are not completely sure, then it is better to entrust this matter to professionals. If problems arise, they can easily find the causes, correct their shortcomings.
First, it is necessary to analyze the soil of the territory of the building, to build a layout of pipes, taking into account the placement of buildings, trees, and reservoirs. You will need the following materials:
- Different types of shovels, for carrying earth or digging
- Construction level, plumb line to control pipe inclination
- Roulette, twine (or thread)
- Wheelbarrow, manual stretcher for carrying earth or buckets
- Geotextile
- Crushed stone or gravel
- Sand
- Perforated pipes (size, quantity depends on the volume of moisture, the area of \u200b\u200bthe site) or pipes perforated by a drill for external sewage
- Drainage pump
- Drainage wells are special for collecting moisture of a larger diameter than pipes
- Rings for connecting pipes
- A tool that is suitable for compacting soil
- Awl, hacksaw
Step-by-step instruction:
- We make markings, start digging from the highest point, gradually deepening. For example, if you need a ditch 15 meters long, then the depth of the beginning and end of the ditch must be different from 15 centimeters. Remember the minimum depth of a closed drainage system is 50 centimeters.
- We tamp the trench with a specially prepared tool (you can tightly with your feet).
- Sprinkle the bottom with sand about 7-13 centimeters high, tamp it down.
- We lay geotextiles so that the bottom, walls, edges of the earth are covered (they must lie freely at least 40 centimeters long on each side of the ditch).
- We pour gravel, gravel along the entire length (or any filter material: stones, granite, brick fragments) about 20 centimeters high, exactly along the entire ditch, keeping the depth differences. The basic rule of the material used is the size, it must be larger than the holes of a perforated pipe or sewer pipe with holes. Otherwise, 100% there will be pipe blockages.
- We lay our perforated pipes, connect them to drainage wells, fixing rings at the intersection of two or more pipes.
- We check the slope of the pipes by watering the pipes with plain water.
- If everything works, we fall asleep another 20 centimeters of gravel, overlap with the remnants of geotextiles on top of each other.
- We fill the ditches with sand, earth, tamp, put the turf.
- There should be access to wells for collecting ground moisture.
Construction of a drainage system
Consider how to make the drainage of the foundation in stages.
Required Tools
To do the job, you will need a small set of tools, namely:
- Shovels - shovel and bayonet.
- Pick.
- Hammer drill with pneumatic or electric drive.
- A wheelbarrow for the removal of soil and the transport of rubble.
Work algorithm
- Trenches for laying drainage pipes are dug, stepping back from the foundation to the side of 1 meter.
- The width of the trench should be 20 cm larger than the diameter of the pipes. So, if you plan to use a pipe having a diameter of 100 mm, then the width of the trench should be 30 cm. The trenches should be made with a slope of 1 cm per meter.
- The depth of the trench depends on the depth of the foundation. Pipes should be located half a meter lower than its lowest point. Only in this case, the drainage of the basement will be effective.
- The bottom of the trench is compacted and a sand cushion 10 cm high is poured. The sand layer should be well compacted. Now you need to check the slope again, it should remain unchanged.
- Wide strips of geotextile fabric are laid on a layer of sand so that the side sections of the material protrude beyond the sides of the trench.
- We continue to build drainage around the foundation by backfilling a layer of rubble, since this material is an excellent conductor of water. It is better to use crushed stone of a fairly large fraction.
- Now we proceed to the construction of the pipeline, making sure that the pipes lie with a slope to the lowest point of the system.
- Pipes are connected using fittings using a press fit method. To reduce backlash in the joints, winding with insulating tape is performed.
- From above, the pipes are covered with a layer of crushed stone so that there is a layer 10 cm high above the pipe.
- The ends of the geotextile are wrapped and fastened with threads (sewn).
- Since the drainage of the foundation slab is built to divert water, a place should be provided where this water will be collected. To do this, at a distance of at least five meters from the house, a water intake is arranged. It should be located about a meter below the pipe, but at the same time be higher than the groundwater level.
- The bottom of the pit under the water intake is covered with a geotextile fabric, then a plastic container is installed there.
- Several holes are drilled in the bottom of the tank and it is fixed in case of soil shift. Backfilling is carried out first with gravel, then with soil.
- The trenches are backfilled with soil in such a way that a noticeable mound forms above them. The fact is that the soil will still sag and, if backfilling is flush with the soil level, then soon you will have to backfill.
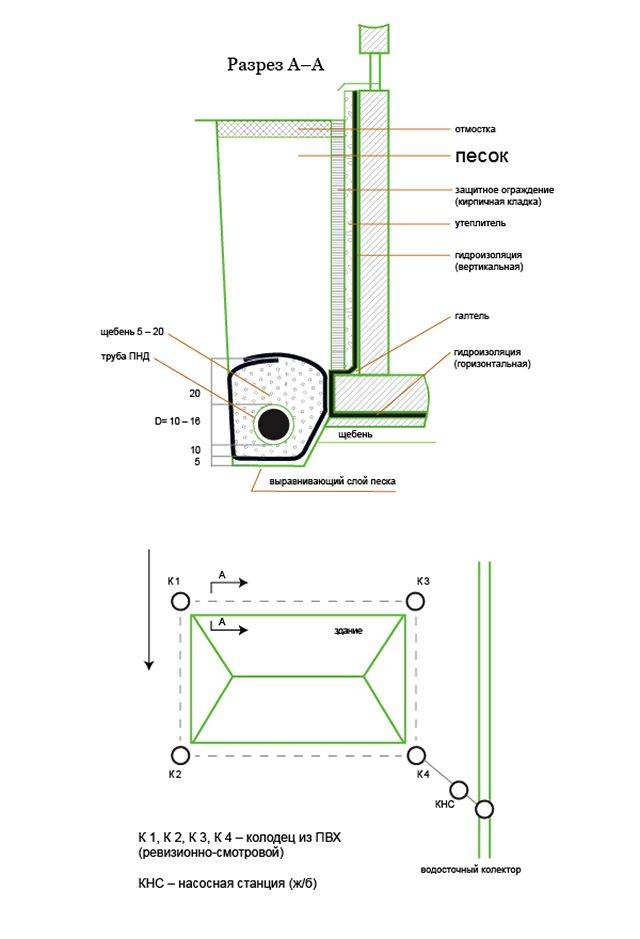
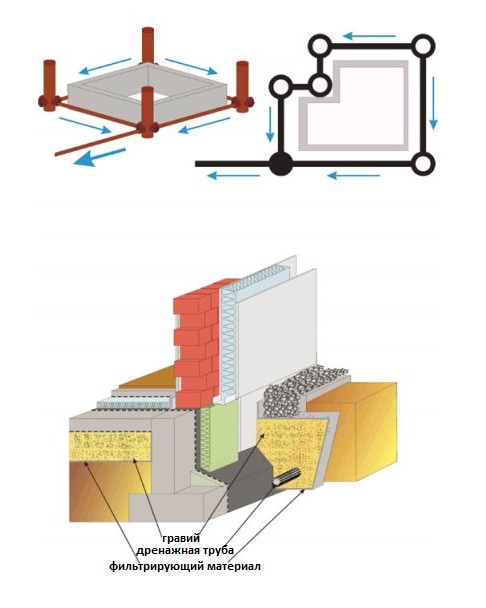
Rules for the location of manholes
When performing circular drainage of the building foundation, it is necessary to provide for the installation of manholes. They are placed according to the following rules:
- The installation of wells is planned in the corners of the building.
- As a rule, the standard scheme for constructing the basement drainage provides for the installation of four viewing and two receiving wells. Moreover, one of them will be used for storm sewers, and the second - for the drainage system.
Optional equipment
Not in all cases it is possible to collect drainage under the foundation using a standard scheme. In some cases, it is necessary to provide for the installation of additional equipment.
So, if the water intake point is higher than the location of the pipes, then a drainage pump should be included in the circuit.This setting will be used to force the collected waters to move.
If the pipe depth is insufficient (above the freezing depth), it is rational to install pipe heating using a heating cable. The use of this element will allow you to 100% protect the drainage system during the off-season from freezing.
So, if there is a desire and free time, drainage do-it-yourself foundation may well be fulfilled. Beginners in the construction business can be advised to carefully study the theory and watch a training video that shows all the work processes.
Types of drainage system
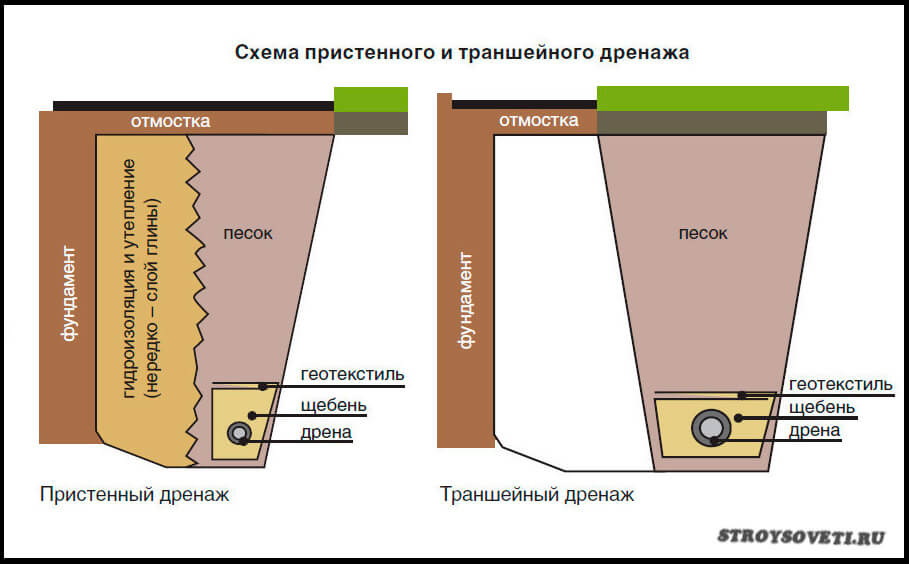
In order to protect the building from moisture, wall drainage is laid, which helps prevent the formation of mold on the walls. There are three types of such wall drainage.
Open. In this case, a ditch is dug around the building, into which water flows. The depth and width of the ditches is half a meter. But such a wall drainage system has its drawbacks. First of all, this is that such wall drainage spoils the view of the entire site. But it's not so scary. Over time, ditches lose their ability to function. This is due to the shedding of the earth. In this case, they need to be strengthened.
Zasypnoy. In this case, the dug ditches are covered with large bricks, rubble or rubble. Then everything is covered with pieces of turf. The advantage of this wall drainage is that it serves for a long time. And the downside is the poor conductivity of water and the inability to maintain.
Closed. In this case, pipes are used for wall drainage. Unlike previous options, this wall drainage has many more advantages. But on the other hand, this system is much more difficult to install.Still, the end justifies the means. And therefore, this wall drainage is considered the best.
In addition, the system is:
- wall;
- Ring.
Wall drainage is built around the building. And in the case when it is planned to build a basement or a basement in the building, then wall drainage must be done. A special recommendation is to do it in parallel with the construction of the foundation. In this case, you will save the time that you need to spend on the work on the creation of wall drainage.
Wall drainage is laid parallel to the walls and at the same time their ends are led out into specially equipped wells, which are called inspection wells. And at the point that is below all, they make another well. It is called the output. This well serves to collect all the water, which is subsequently pumped out of the wall drainage.
The ring system is laid out as follows. This system is laid at a distance of about three meters from the foundation. At the same time, the building should not have basements and other similar premises.
This type of system is effective when the surrounding soil consists of clayey rock. It is also necessary to install a clay lock between the system and the building. In addition, pipes are laid on crushed stone, or other material that allows water to pass through.


What is drainage
In fact, this is a system by which water is removed from the surface of the soil or from a certain depth. This is one of the drainage systems. It achieves the following:
Water and moisture are removed from the areas where the foundation structures are located.The thing is that excessive moisture, especially for clay soils, causes foundation movements. As the builders say, it will "float", that is, it will become unstable. If we add frosty heaving of the soil to this, then the earth will simply push the structure out.

Lack of drainage on the site - wet basements in houses
- Basements and basements are being drained. Many may note that modern waterproofing materials are able to withstand any exposure to water, in any quantity. Nobody is going to argue with this. It's just that each material has its own operational resource. In a few years, even the highest quality waterproofing material will dry up. That's when the problems begin. In addition, there is always a possibility that there is a defect in some section of the insulation through which moisture will penetrate into the basement.
- If an autonomous sewage system with a septic tank is used on a suburban area, then the drainage will help the latter to stay in the ground. Taking into account, if the dacha has an increased level of groundwater.
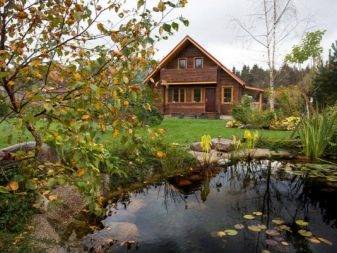
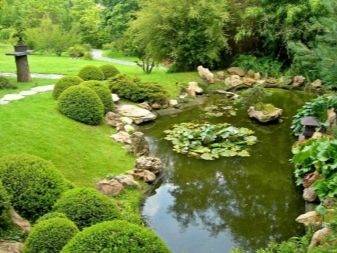
- It is clear that the drainage system does not allow waterlogging of the soil. So, we can say that plants planted in the ground will grow normally.
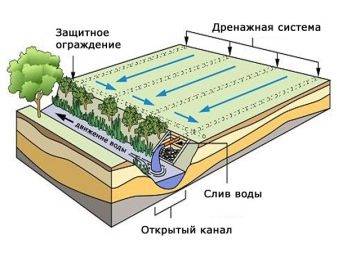
- If the summer cottage is a territory located on a slope, then during precipitation, rainwater will wash out the fertile layer. This can be avoided by arranging drainage in a sloped area into which water flows are redirected. That is, they will be removed according to an organized system, without affecting the soil.

On the slopes, fertile soil is washed away by rain
We must pay tribute to the fact that not all suburban areas require the creation of a drainage system.For example, if it is located on a hill. Basically, there is always a need for it. Let's look at situations in which drainage is indispensable.
When should drainage be provided?
That is, we will indicate those cases when the drainage system is necessary in any case.
- If the suburban area is located in the lowlands. All atmospheric precipitation will flow down the slope here. The laws of physics have not been repealed.
- If the site is located on a flat area, the soil is clayey, the groundwater level is high (not lower than 1 m).
- Drainage on a site with a slope (strong) is also necessary.
- If you plan to build buildings with a deep foundation.
- If, according to the project, the main part of the territory of the summer cottage will be covered with a waterproof layer: concrete or asphalt paths and platforms.
- If lawns, flower beds are equipped with an automatic irrigation system.

If automatic watering of lawns is organized at the dacha, then drainage must be built
Where to start the construction of drainage
It is necessary to start with studies of a suburban area for the type of soil, groundwater level and type of terrain. This can only be done by professionals by conducting geological and geodetic surveys. Usually they make a topographic survey of the site, where the cadastral boundaries of the cottage are determined. The terrain is determined (wavy or even, with a slope in which direction), the type of soil, making exploration by drilling, and the physical and chemical properties of the soil. Be sure to indicate the UGV in the reports.
Based on the data provided, recommendations are formed on the depth of foundations, the type of waterproofing and drainage system.Sometimes it happens that experts generally do not recommend building large houses with basements, as the owners of the suburban area intended. Which leads the latter into bewilderment. Disappointments appear, but there is no way out.
It is clear that all ongoing research costs money, sometimes a lot. But you should not avoid these expenses, because the information received will subsequently save much larger capital investments. Therefore, all these studies, only at first glance, are unnecessary procedures. In fact, they are useful and necessary.

Checking the level of groundwater occurrence by drilling
When is Foundation Drainage Performed?
Wall drainage of the foundation must be provided immediately if, from the experience of neighbors, you know that the problem of water accumulation in the basement exists. If you are not sure that it is needed, you can limit yourself to the blind area. And solve the problem as it arises.
After living on the site for some time, you will have time to explore it. You will learn,
- where the aquifers lie
- how deep (if it is really needed) to dig a drainage ditch,
- which pipes are better to buy for the drainage system.
Wall drainage of the foundation must be provided immediately at the stage of wall construction
True, when performing drainage of the foundation, and to be more precise, wall drainage around the foundation, then, after some time after the completion of construction, it will be necessary to break the concrete or asphalt coating around the house, disrupt the landscape design, transplant established shrubs and trees.
Drainage systems
From this review you will learn:
Unfortunately, when starting the construction of a house, not everyone thinks about such an important issue as drainage.The presence of a drainage system not only prolongs the life of the house, but also improves the quality of care for various plants and green spaces on the site. Properly installed and maintained drainage will ensure dryness and acceptable humidity in the cellar or basement for many years to come, as well as reduce the risk of mold and mildew.
Properly installed and maintained drainage will ensure dryness and acceptable humidity in the cellar or basement for many years to come, as well as reduce the risk of mold and mildew.
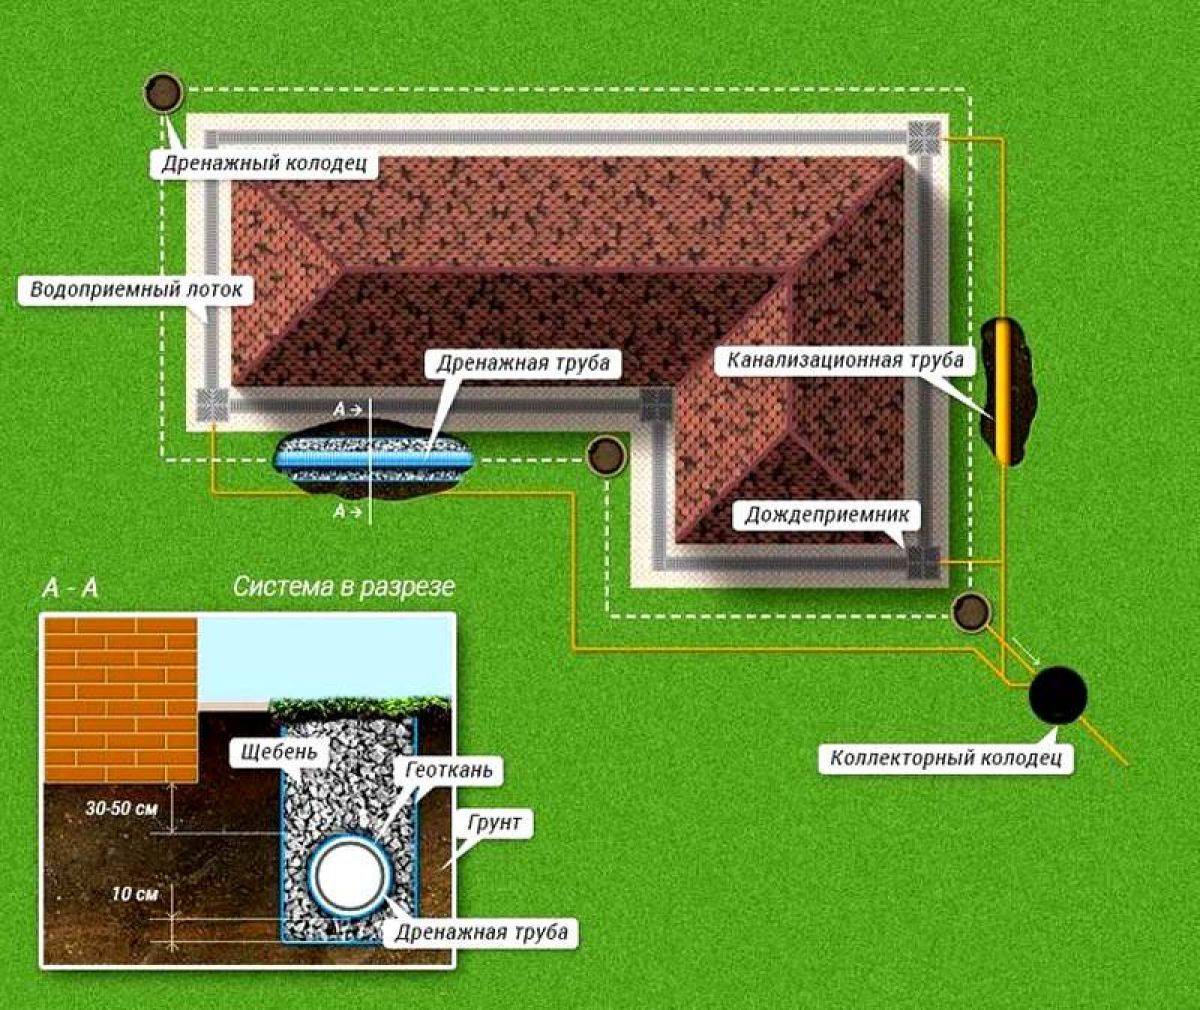
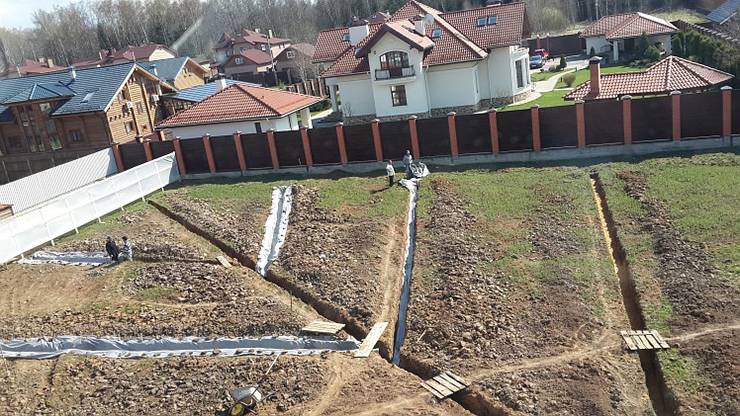
Site drainage system.
What is a drainage system: device and purpose
In short, the drainage system is a real engineering center, each part of which diverts sedimentary, ground, melt and other waters to a safe distance for home operation.
To carry out this "mission", special trays, containers and wells are used.
The effluents themselves are then discharged, already cleaned, into a centralized sewerage system or used in households. purposes.


The main elements of drainage include:
- Collectors of excess water;
- Drainage wells and tanks;
- Garbage bins;
- Perforated pipes;
- Channels.
The greatest danger to the operation of the house, excess water is the fact that they begin to destroy the foundation, and also increase the level of humidity in areas such as the cellar or basement.
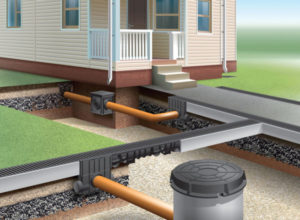
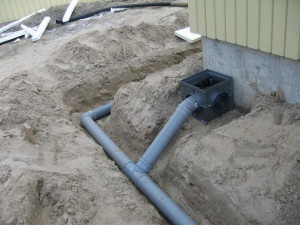
Installation of a drainage system on the site. Thanks to this scheme, communications can be done by hand.
First, excess water completely saturates the surrounding soil, then moisture begins to penetrate deep into the base of the house, damaging the foundation along the way. After the water has got into the foundation, it begins to literally destroy it from the inside.
This happens for one simple reason: when water freezes, it expands.
Therefore, when the ambient temperature drops in the building, cracks appear, which in the future can lead to both the distortion of the entire building and its complete destruction.
Not to mention the fact that excess water has an extremely negative effect on the condition and fertility of plants growing in the garden and vegetable garden.
Foundation drainage is a necessary component of the construction of structures on soils with a large percentage of groundwater.
Therefore, the presence of excess water in the soil is not only puddles in the area after the rain. This issue should be taken very seriously.
Whether it is necessary to build drainage is easy to determine by how quickly puddles disappear after rain. If the puddles go away for a long time, then this is an alarm signal that there is a large amount of clay or groundwater in the ground. In this scenario, the construction of drainage is a must.
Types of drainage systems
For each individual site, a special, unique drainage system should be built, which is selected taking into account such features as: the abundance of groundwater, the amount of precipitation, relief features, the percentage of clay in the soil, and so on.
Depending on the principle of the device, drainage is:
- Deep - with its help get rid of excess groundwater, the level of which is constantly high, or it rises sharply after precipitation or snow melt;
- Surface (sometimes open and closed) drainage, with its help, water is collected from the surface of a site paved with a material that prevents it from leaving naturally. Helps to get rid of excess water from the site.This system also includes point and line drainage.
Do-it-yourself drainage work
Drainage work is simple, you can do it alone, with an assistant. The main thing is the plan. You can order from the master, develop it yourself. The master will conduct a preliminary study of the soil, water regime on the site. When they rely only on their knowledge, serious mistakes and miscalculations are possible.
For drainage work, simple tools and materials will be required. Tools:
- Pneumatic, electric jackhammer - it is convenient to loosen the earth in a trench, split solid inclusions (stones, fragments of construction waste)
- 1-2 large picks can be used without electricity, compressed air.
- 2-3 bayonet, shovel shovels - for digging trenches, collecting soil in a wheelbarrow
- Large crowbar - will help break up inclusions, loosen hard layers of soil where you can not use a jackhammer, pickaxe
- Construction wheelbarrow - for the removal of excavated soil, the supply of building material (crushed stone, sand)
- Concrete mixer - will help to get a high-quality solution for the construction of a blind area, a prefabricated well
- Impact electric drill (cordless) with a set of drills for plastic, concrete - it is convenient to drill missing holes in plastic, speed up cutting (a chain of holes is drilled along the cut line, a cut is made. Protects thick-walled plastic, asbestos-cement pipes from uncontrolled cracking, damage)
- Construction knife, large scissors - for cutting drainage pipes made of thin-walled plastic, polyethylene, geotextile
- Large levels, plumb lines, measuring tape (10-15 meters) - to maintain the required angle of inclination of pipes in the system.
- Cordless electric jigsaw with blades for plastic - handy for quick cutting of drain pipes
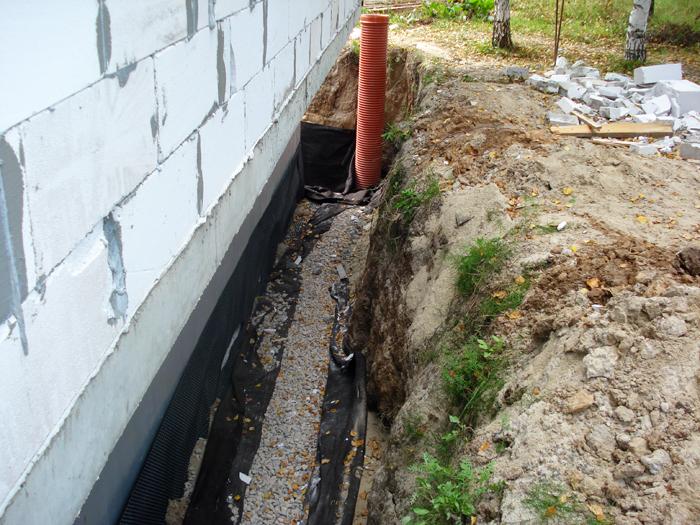
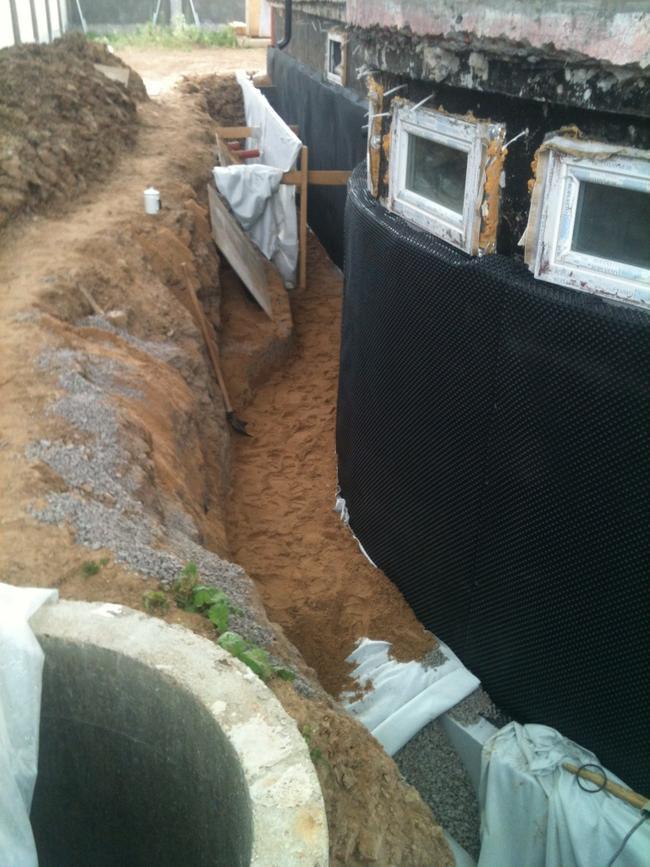
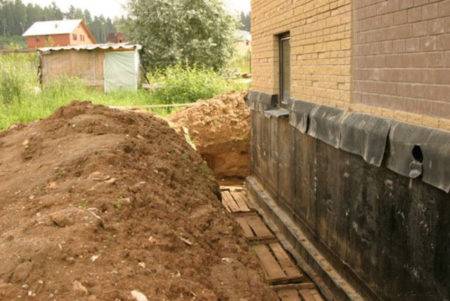 The initial stage of the construction of wall drainage
How to make indoor drainage around the house with your own hands
Such a device for protecting the house from water can be done independently even after the construction of the building is completed. First of all, you need to prepare working tools and all the necessary materials:
- shovels of two types (bayonet and shovel);
- spirit level for checking the slope;
- manual type rammer;
- a device for removing excess soil from the site (stretcher or wheelbarrow);
- roulette;
- geotextile;
- backfill for the moisture-collecting layer (granite crushed stone is best suited);
- sand;
- inspection and drainage wells;
- drainage pump;
- drains and fittings for their connection with each other and with wells.
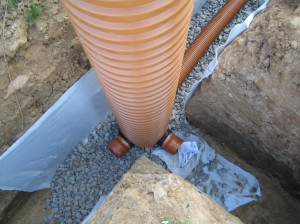
Pipes must be perforated. You can purchase ready-made drains, or make them yourself from an existing orange sewer pipe. Flexible products are not recommended. The diameter of the pipeline can be 70-150 mm.
The material is preferably plastic with high strength and wall resistance to stress. Moreover, the deeper the drains go, the higher this figure should be. You can take asbestos and ceramic products.
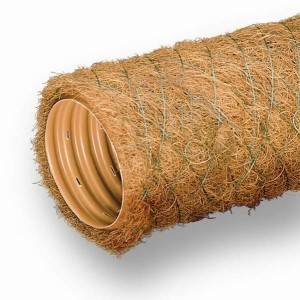
Some prefabricated drainage pipes are surrounded by an additional filter material, such as coconut fiber.
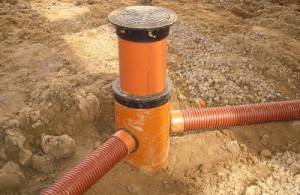
A plastic inspection and drainage well is bought ready-made or made independently from a thick-walled plastic pipe of large diameter. They will need to buy hatches.


After acquiring everything you need, they start measuring, allowing you to mark the place where the drains and other elements of the drainage system. The site is cleared of debris and the excavation and installation work begins. Let's look at how to properly lay the drainage pipe around the house:
They dig trenches of the required depth, and in the right places pits for wells. Their width must be at least 20 cm larger than the pipeline diameter. During excavation, it is necessary to control compliance with the slope using a spirit level.
Prepare trenches and pits for wells. To do this, sand is poured to the bottom and carefully rammed. Don't forget to check slope compliance. The sand cushion should be 0.10 - 0.15 cm high. With a high groundwater level for plastic wells, in order to avoid their ascent, it is recommended to make a concrete base 10 cm thick, to which the container is attached during installation.
Geotextiles are laid in the ditch in such a way that the edges of the material extend beyond the upper boundaries of the trench.
Laying at the bottom of the drainage pipe. Drains are connected to each other. In this case, sockets or special fittings can be used. Pipes are inserted into the inlets of the wells, using rubber sealing rings.
A twenty-centimeter layer of crushed stone or other material is poured onto the drains. Don't forget the slope.
Close drains surrounded by rubble, geotextiles.
Drainage trenches are covered with a layer of sand, 10-20 cm thick
It is carefully rammed, and backfilled with soil from above. If the region is characterized by a large amount of precipitation, then storm system trays are installed above the drains on the sand.
Wells are backfilled and covered with manholes.
The drainage system is ready.
Video on how to make a drainage system around the house with your own hands:
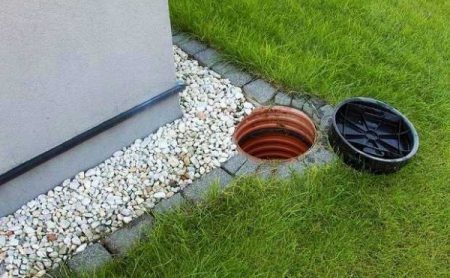
A few words about the plastic drainage well

In its simplest form, it can be a container for collecting water. At the junction with the inlet pipeline, a valve must be installed to prevent the reverse flow of water. It is good if the container has a large diameter, for example, 80-100 cm.
From the drainage well, you can lay a non-perforated outlet pipeline to a ravine, filtration well or reservoir. Drainage from the collector can be done by gravity or by a drainage pump. Water from the well can be used for technical needs and irrigation.
Design
Choosing drainage options on the site, as follows from all of the above, is not easy. But all the same, whether in the country or in a full-fledged country house, the project will have to be drawn up. The simplest method - open drainage - is acceptable if it is required to free the layer formed by soil and plants from water. The operation of channels not closed from above is ensured by the withdrawal of underground water to places where the soil is partially removed. From there, it already moves by gravity into the well.
Important: they plan the course of the outlet channels with a slight angle, immediately deciding whether the liquid will be discharged into quarries, fire ponds, or it will be accumulated for subsequent irrigation. The project always provides an answer to the question of whether it is necessary to strengthen the walls of the ditches, lining them with stone (tile)
They are determined in advance not only with the final discharge point, but also with the type and location of the protective grid.
An unremovable property of open drainage is, unfortunately, the absorption of free space. In small areas, this can be critical.The closed tide method is devoid of such shortcomings, but here qualified engineers should already prepare the project. Professionals recommend never deviating from the norms enshrined in SNiP 2.06.15-85.
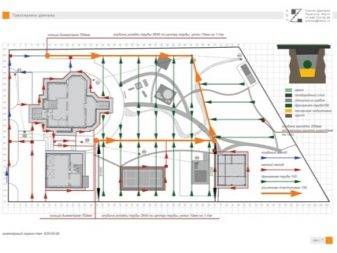
The finished project always includes:
- drawing of drainage circuits;
- private drawings of individual functional elements;
- an estimate describing all resulting costs;
- reflection of soil and groundwater properties;
- placement of structures on the site itself and on adjacent properties;
- routes of roads, permanent paths;
- location and properties of natural, artificial reservoirs;
- hydrogeological characteristics of the area;
- information about the climate regime;
- data on existing and planned green spaces, on planned construction.
It is impossible to approach with the same measure the design of drainage in sand and in clay. Of course, the release of rocky areas from water also has its own characteristics. Houses that stand on a hill and are surrounded by a descending area are usually built without wall drainage.
deep drainage
It is better to install such a system at the initial stage of improvement, simultaneously with the construction of a house. In this case, it is better to start the drainage of the land plot by determining the direction of water flow during heavy rains. Having solved this problem, purchase drainage pipes and geotextiles.


 drainage system
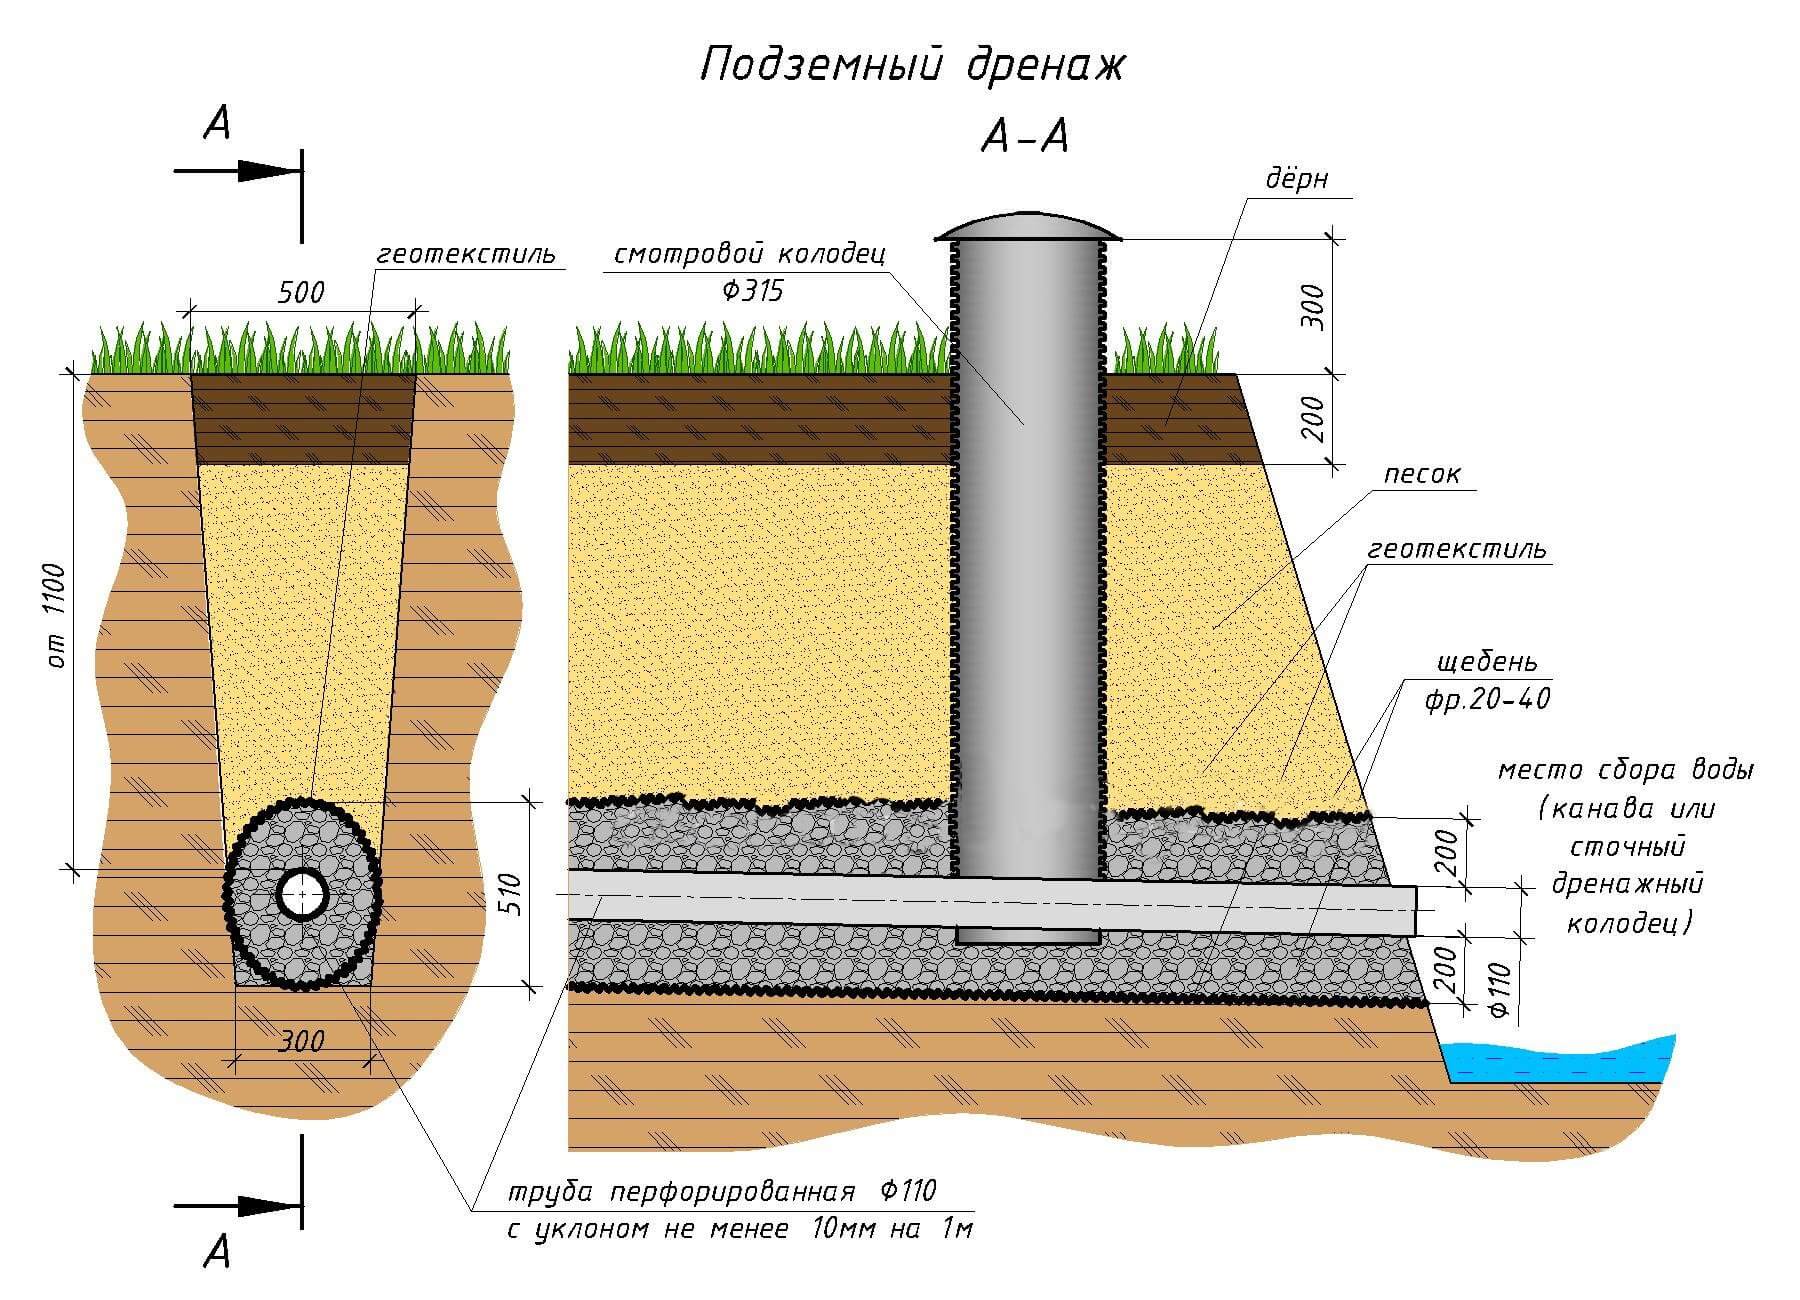
Previously, drainage pipes (drains) were made of asbestos cement and ceramics, but in our time they have given way to plastic: HDPE (low pressure polyethylene), PVD (high pressure polyethylene) and PVC (polyvinyl chloride). They are single-layer and double-layer, with a diameter of 100-190 mm.Water-permeable holes up to 3-5 mm are made over the entire surface. To prevent perforation from clogging and silting up, pipes are most often sold already wrapped in geotextile, which performs the function of filtration. On clays and loams, it is better to have such 2-3 fabric layers for reliability, since the particles in such soil are smaller and clog the system faster than on sandy loamy soils. Drains are laid into the soil to a depth of 1.5-6 m, depending on the requirements. The depth of drainage is calculated taking into account the level of groundwater.
In places of sharp turns or connections of several pipes, wells are placed. They are needed for convenient cleaning of the system in case of an unexpected blockage and for inspecting the condition of the drainage pipes. Ultimately, the entire chain of manholes and pipes must lead to a common collector well (at the lowest point of the land ownership), from where the water is sent by gravity to the drain outside the territory or is forcibly pumped out manually.
 Well
Well
In order for the water itself to flow in the direction you need, it is necessary to lay pipes at a certain slope. Ideally, you need to make the angle as small as possible, since with a fast flow of water, silting occurs earlier.
You can set such an angle using a level, a water level or from improvised materials - an ordinary board and a building level. In the latter case, the board is laid on the bottom of the trench, and a level is placed on top and measured, if necessary, corrected.
Now let's figure out how to properly install a drainage ditch. To begin with, we dig trenches (drainage ditches) of the required depth, tamp the bottom, observe the correct slope (at this stage, an approximate one can be used).Next, we pour a layer of coarse-grained river sand 10 cm, spill and tamp. We make alignment, observing the exact slope. Then we lay a layer of geotextile on top, with a density not exceeding 200 g per square meter. m. The edges of the fabric should go along the sides of the trench so that they can then be wrapped inside. We pour washed crushed stone onto the geotextile: for clay soils we take a larger fraction (150-250), for sandy loam it can be smaller (up to 150).
We lay the drainage pipe and gradually fill it with rubble in layers and carefully tamp. On top of the drain there should be a layer of crushed stone 10-30 cm. We wrap the geotextile inward so that the overlap of the edges is at least 15 cm. Next, we pour river sand, and at the very end - fertile soil. The drainage ditch is ready.
 Drainage pipe layout
The construction of a drainage ditch requires a certain amount of time and money, but this work is done once and for all, so it makes sense to do it with the utmost quality.
We recommend that you save the drainage plan. If in the future you need to dig the soil for some reason, you will know exactly where the drainage pipes lie.
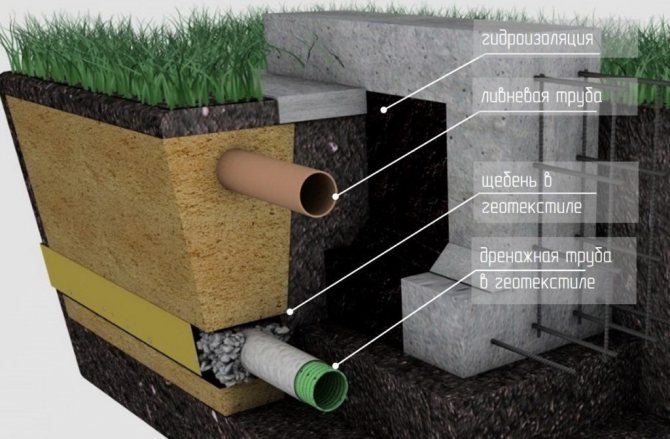
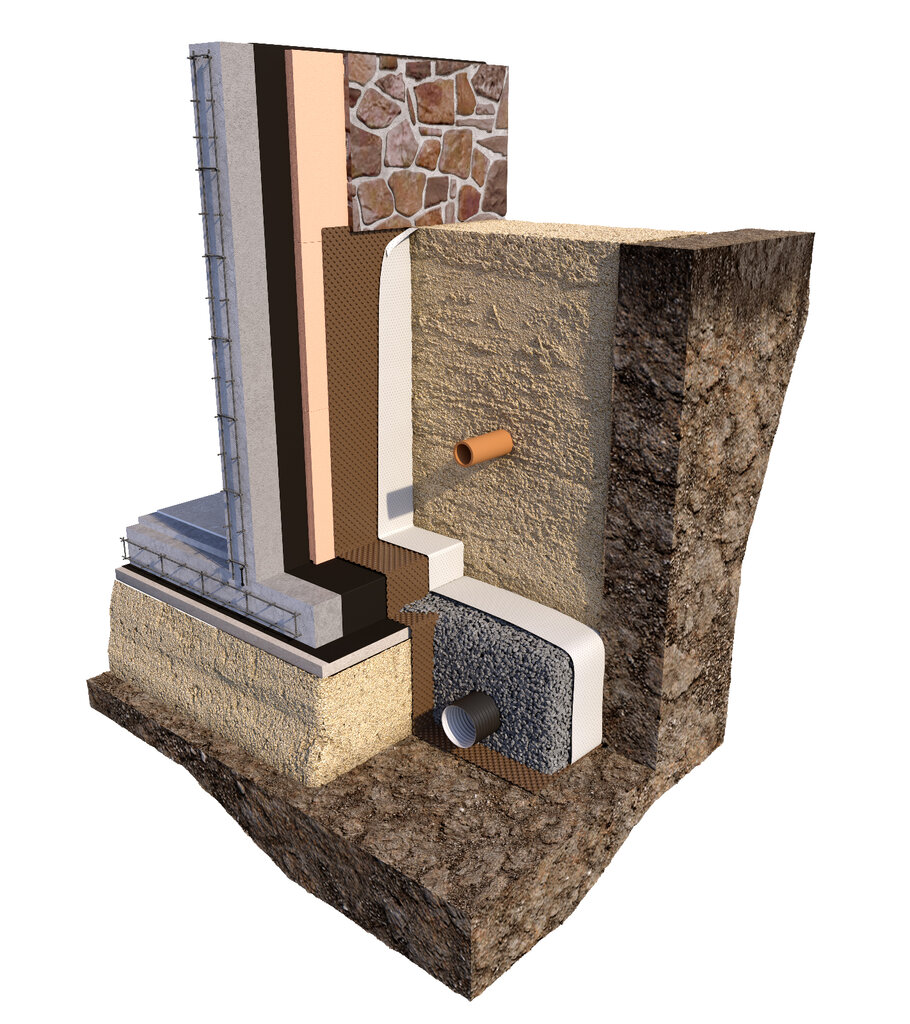
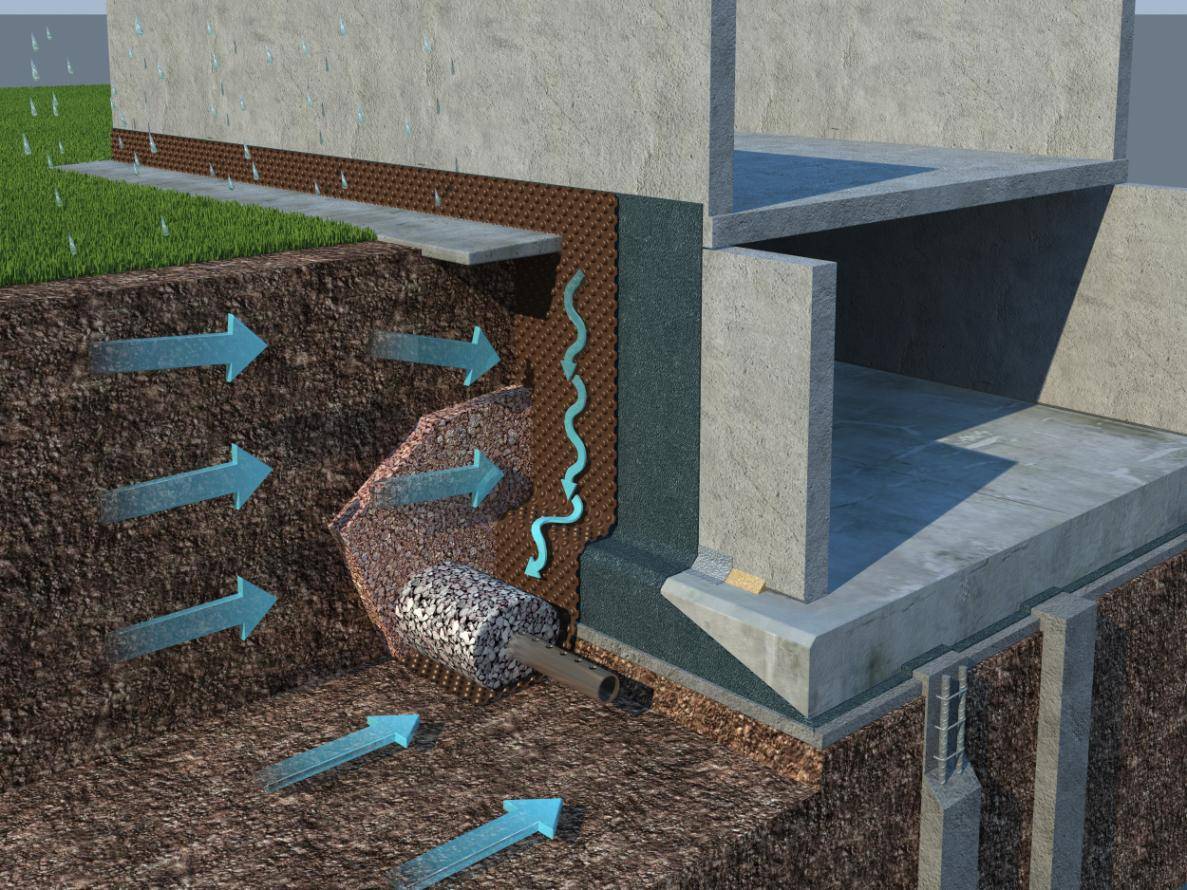
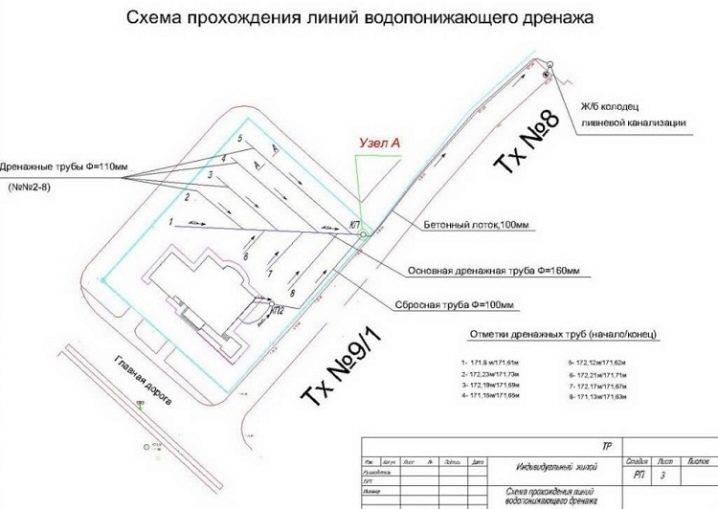
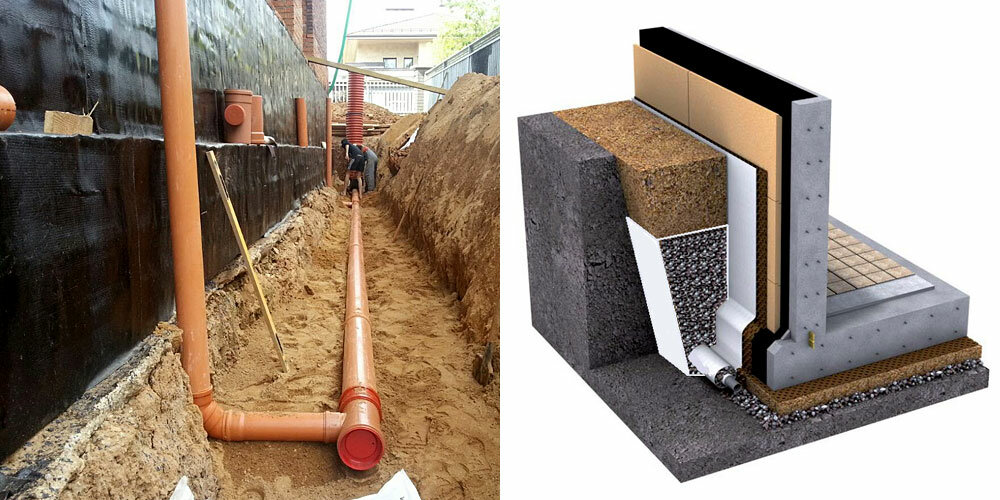
Wall drainage system of the foundation
Work on the installation of wall drainage begins with digging trenches around the entire perimeter of the house.
Wall drainage system
At a distance of about 1 meter from the walls of the house, a trench breaks out with a depth exceeding the depth of the foundation. The width of the trench should allow placing a drainage pipe with a diameter of 110 mm in it. Along the edges of the pipe, there should be another 10 cm of free space for backfilling around the crushed stone pipe.
The drainage pipe must be perforated, that is, there must be holes in its upper part for the passage of water.
It is not necessary to use ready-made pipes. You can get by with ordinary plastic pipes designed for laying sewers. They need to drill holes with a diameter of 5 mm every 10 cm.
The bottom of the trench is backfilled with sand by 5-10 cm. This ensures that the slope of the trench towards the water collector is at least 1 cm per linear meter. Such a slope is necessary to ensure the normal gravity flow of water.
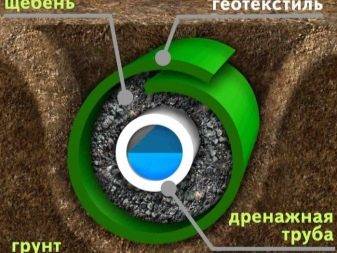
Geotextiles are laid on a layer of sand in such a way that they can wrap the pipe a couple of times. Geotextiles pass water well through themselves, simultaneously protecting the pipe from clogging with soil particles. The ends of the geotextile are fixed on the walls of the dug trench. The pipe is covered with gravel with a layer of about 10 cm.
Then the pipe itself is laid, which is also covered with gravel on all sides. The thickness of the backfill may vary, but usually it is 30-50 cm. The pipe with gravel backfill is wrapped in geotextile, the edges of which are fastened with clamps. The space remaining in the trench is covered with sand or gravel.
Pipes are interconnected by fittings or flexible connectors
Attention should be paid to the smoothness of the pipe connection.
It is highly undesirable to connect pipes at an angle of 90 degrees, as this can lead to rapid silting of the pipe at the junction. It is best to use two connectors, each of which will rotate at an angle of 45 degrees.


All foundation drainage systems provide for revision wells located in the lowest part of the drainage system. Such a well can easily be made from an asbestos-cement or plastic pipe.
drainage well
The purpose of a drainage well is to collect water in some kind of container.
A hole is dug near the bottom of the pipe, into which a drainage container is placed. It can be a plastic barrel with several holes to drain moisture into the soil. Previously, such a pit is lined with geotextiles, and then a barrel is placed in it. Geotextile protects the openings in the barrel from stones and soil.
Thus, water from the drainage system is drained into a plastic water intake, from where it evaporates through a pipe that goes up and is absorbed by the soil through the drainage holes in the barrel.
You can also organize the drainage of water from the drainage well using a solid pipe. This method is especially relevant if the soil on the site is clayey, not able to absorb water well.
Professionals advise to make only high-quality drainage systems - the installation of revision wells in such systems is carried out at every second pipe bend. To do this, these places are deepened 50 cm below the level of pipe laying. The value of revision wells lies in the fact that in case of clogging of the system, it can be cleaned through the revision well with water pressure.


