- How to make a TsAGI deflector on a chimney pipe with your own hands
- Required Tools
- Development of a drawing of the TsAGI deflector model
- Step-by-step instruction
- Features of rotational and static deflectors
- Mounting the deflector
- Video - Making a deflector with your own hands
- purpose
- Main functions
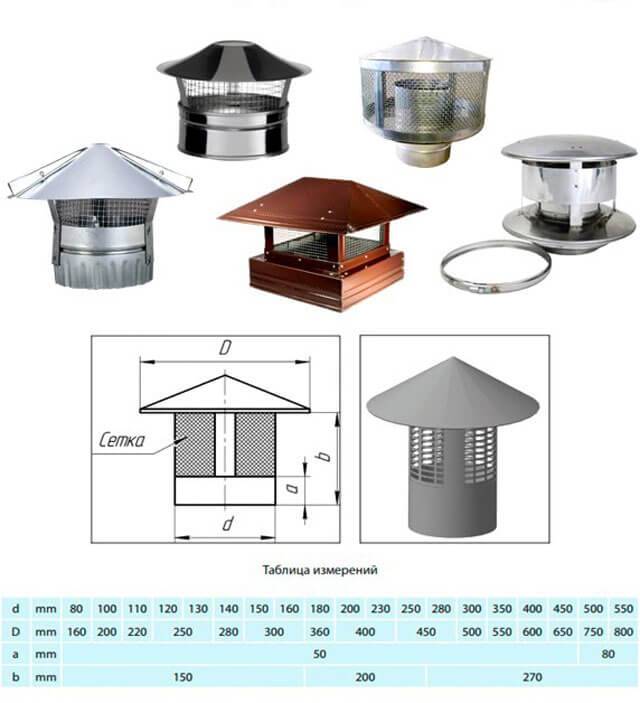
- Chimney cap construction
- Materials used to make a wind vane
- Options for gas ducts for a country house
- Selection Guide
- Chimney of solid fuel boiler
- Installing a Classic Appliance
- Types of structures
- 5 Do-it-yourself ventilation deflector
- How to calculate a static deflector
- Self-assembly of the deflector
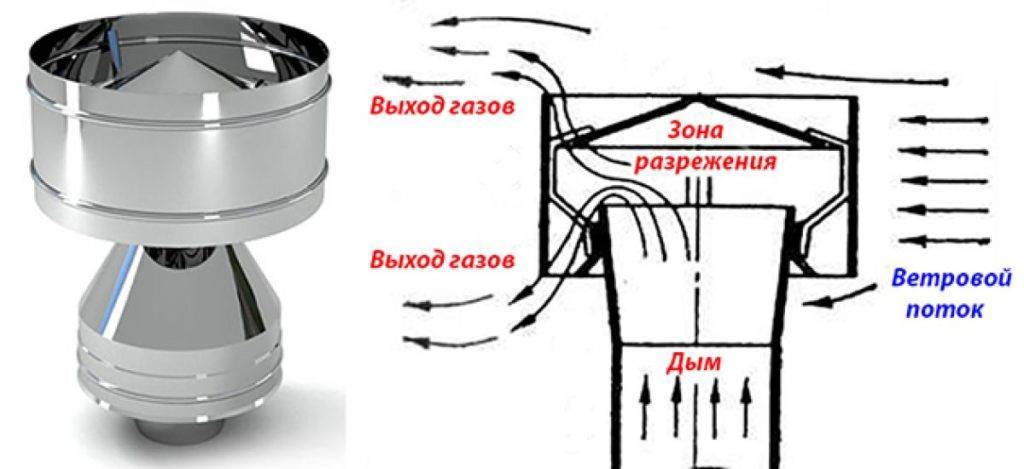
- The device of the smoke channel deflector and the principle of its operation
- Advantages and disadvantages of turbo deflectors
How to make a TsAGI deflector on a chimney pipe with your own hands
The process of developing and assembling a deflector on an exhaust pipe consists of four stages: drawing, creating blanks, assembling, installing the structure and fixing it directly on the chimney.
Required Tools
You will definitely need:
- a sheet of thick paper for drawing and layout;
- marker for marking;
- riveter for connecting structural elements;
- scissors for metal for cutting parts;
- drill;
- a hammer.
Do not forget about the right tool before installing the deflector
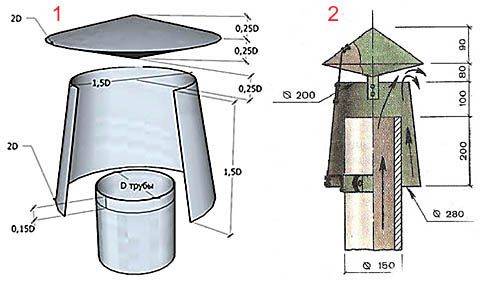
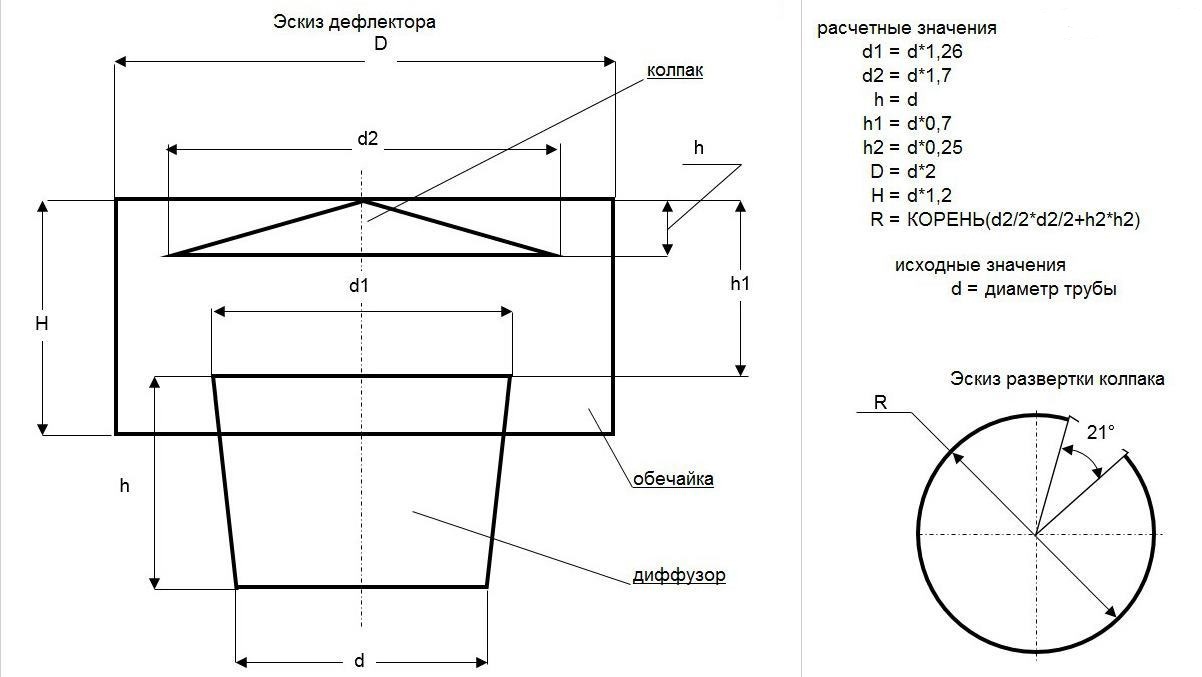
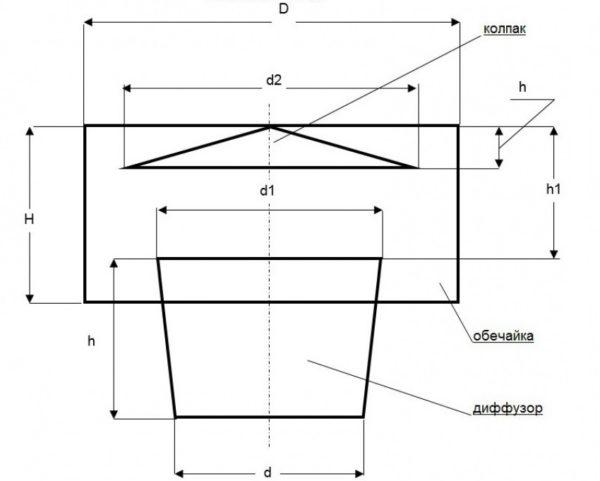
Development of a drawing of the TsAGI deflector model
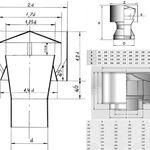
There is an algorithm for how to make a deflector on a chimney pipe with your own hands. The first step is recommended to be done on paper. First you need to calculate the dimensions of the diameter of the nozzle and the upper cap of the structure, as well as calculate the height of the reflector.
For this, special formulas are used:
- diameter of the upper part of the deflector - 1.25d;
- diameter of the outer ring - 2d;
- construction height - 2d + d / 2;
- ring height - 1.2d;
- cap diameter - 1.7d;
- the distance from the base to the edge of the outer casing is d/2.
Where d is the diameter of the chimney.
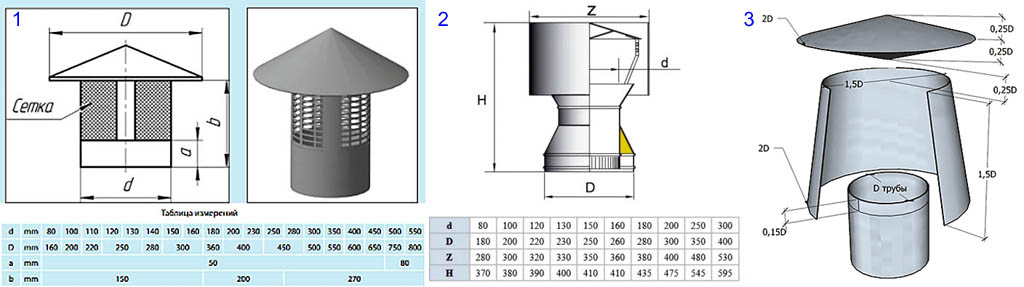
A table will help to facilitate the task, which contains ready-made calculations for standard sizes of metal pipes.
| Chimney diameter, cm | Outer casing diameter, cm | Height of the outer casing, cm | Diffuser outlet diameter, cm | Cap diameter, cm | Installation height of the outer casing, cm |
| 100 | 20.0 | 12.0 | 12.5 | 17.0…19.0 | 5.0 |
| 125 | 25.0 | 15.0 | 15.7 | 21.2…23.8 | 6.3 |
| 160 | 32.0 | 19.2 | 20.0 | 27.2…30.4 | 8.0 |
| 20.0 | 40.0 | 24.0 | 25.0 | 34.0…38.0 | 10.0 |
| 25.0 | 50.0 | 30.0 | 31.3 | 42.5…47.5 | 12.5 |
| 31.5 | 63.0 | 37.8 | 39.4 | 53.6–59.9 | 15.8 |
If the chimney has a non-standard width, then all calculations will have to be done independently. But, knowing the formulas, it is easy to measure the diameter of the pipe and determine all the necessary indicators to use them when drawing up drawings.
When the patterns are made, it is recommended to first assemble a paper prototype of the future reflector. Even if you are an experienced craftsman and are sure that you will construct a deflector for a stove chimney with your own hands without problems, you should not skip this step, since it will help you identify possible errors and flaws, and correct calculations or a drawing. Only after creating the correct paper layout, which confirms that the deflector scheme is accurate, you can proceed to the next step.
Step-by-step instruction
There is a work order that must be followed, otherwise you will not be able to connect the individual parts of the chimney deflector yourself with your own hands.
The procedure is as follows:
- Using paper blanks, transfer the template to the surface of the metal from which you plan to make a reflector. Carefully trace the outlines of the paper details. You can use a permanent marker, special chalk and even a simple pencil for this purpose.
- Using scissors for metal, cut out the blanks of the necessary structural details.
- Along the entire contour on the sections, the metal must be bent by 5 mm and carefully walked with a hammer.
- Roll the workpiece into a cylinder shape, drill holes for fasteners so that you can connect the structure with rivets. Welding is allowed, but not arc welding. Care must be taken not to burn through the metal. The distance between the main attachment points, choose from 2 to 6 cm, it varies according to the size of the finished structure. The outer cylinder is folded and fastened in the same way.
- Bending and connecting the edges, make the rest of the details: an umbrella and a protective cap in the form of a cone.
- Fasteners must be cut out of the galvanized sheet - 3-4 strips: width 6 cm, length - up to 20 cm. Bend around the entire perimeter on both sides and walk along them with a hammer. From the inside of the umbrella, it is necessary to drill mounting holes, departing from the edge by 5 cm. 3 points will be enough. After that, fasten the metal strips to the cap with rivets. Then they need to be bent at an angle of 90 degrees.
- Connect the diffuser and cone using rivets to the inlet pipe. Having made a deflector for a round pipe with your own hands, you can proceed with its installation.
A Volper chimney deflector can also be created using a similar method.Its design is very similar to the TsAGI model, but there are some differences in the upper part. They are also made of stainless steel, galvanized or copper.
Features of rotational and static deflectors
Rotary (rotating) models of complex design with a system of blades. Are intended for the organization of draft only in rooms. They remove vapors, odors, gases. The impelling rotational force is natural gusts of wind. The design allows you to orient the movable head in a certain direction and not depend on the power and orientation of the blowing wind. During its rotation, a vacuum is created that does not allow reverse thrust to develop.
It is worth noting the static design with an axial ventilation unit. Works on a suction of air from rooms. The static deflector (DS) itself is installed on the roof, rotates in a certain sector. Mounted at the outlet of the ventilation duct. Here, under the deflector, inside the sleeve, an axial low-noise low-pressure fan is assembled.
Start-up is carried out in automatic mode by a pressure sensor signal, but at low values of gravitational pressure. The set is supplemented with drainage connected to the insulated glass and an air duct 1 m long. The static ventilation structure above the false ceiling is masked.
Static deflectors are used in the ventilation system to remove air from apartment and collective aeration ducts. On houses of any number of storeys, newly erected buildings and during the reconstruction of already operated ones.


Mounting the deflector
There are two ways to install the structure - directly on the chimney and on a pipe section, which is then put on the chimney channel.The second method is much more convenient and safer, since the most time-consuming process is carried out below, and not on the roof. Most factory models have a lower pipe, which is simply put on the pipe and secured with a metal clamp.
Fixed deflector - photo
To install a homemade deflector, you will need a piece of pipe with a diameter slightly larger than the diameter of the chimney, and threaded studs.
Step 1.
At one end of the pipe, stepping back from the cut 10-15 cm, the drilling points for fasteners are marked along the circumference. The same marks are placed on the wide part of the diffuser.
Step 2
Drill holes in the diffuser and pipe, try on the elements to each other. The top and bottom holes must match exactly, otherwise the fasteners will not be able to install evenly.
Step 3
The studs are threaded through the holes and fixed with nuts on both sides on the diffuser and on the pipe. The nuts should be tightened evenly so that the deflector body is not deformed.
Step 4
They raise the structure to the roof, put the pipe on the chimney and fix it with clamps.
It is very important that there are no gaps between the elements in this area, and therefore it is necessary to tighten the clamp very tightly. Additionally, you can process the joint around the perimeter with a heat-resistant sealant
The installation of such a deflector is performed a little differently, since its design has certain differences. First, three holes are drilled in the chimney at the same level for the mounting bolts. The annular part of the device is inserted into the cut of the chimney and fixed with bolts. Next, an axle is inserted into the annular bearing, a cylinder is put on it, then a weather vane sheet, a protective cap.All elements are connected with brackets or rivets.
When choosing a deflector with a wind vane, remember that the bearings require regular lubrication, otherwise the device will not rotate. Also, icing of the hull should not be allowed, and frost should not be knocked off as soon as it appears.
Video - Making a deflector with your own hands
The chimney is one of the most important components of stoves and fireplaces.
Also a very important detail is the cap on the chimney, which ensures the correct and stable removal of combustion products.
It is quite possible to install a chimney cap with your own hands, but first you need to find out the characteristics of these devices, their main functions and the principle of operation. We will also find out what reasons contribute to smoke, that is, the occurrence of reverse thrust in the pipe.
A cap on a chimney pipe (it is also called an umbrella on a chimney, a visor, a chimney, a deflector, a weather vane) is an old architectural element that in our time bears the imprint of antiquity and refined taste. Some modern chimneys are a real work of art that makes the chimney original and the roof complete.


purpose
An umbrella is installed on the chimney in order to increase draft by deflecting air flows. Deflectors of the correct design prevent atmospheric phenomena from entering the chimney - snow, slanting rains (see).
Also, the chimney cap prevents debris and birds from getting inside. To do this, a mesh is installed, which at the same time freely allows smoke to be released outside.
Main functions
Thus, the chimney cap performs the following functions:
- traction gain;
- increase in the efficiency of the chimney pipe (up to 20%);
- protection from snow, rain, debris;
- an obstacle to the destruction of the brickwork of the chimney.
Chimney cap construction
- cover or umbrella;
- drip or tap for water.
A cover or umbrella is designed to protect against atmospheric phenomena entering the chimney. A drip or water outlet is designed to drain the flowing moisture from the top of the pipe, thereby reducing the formation of ice in the winter.
Materials used to make a wind vane
When planning to make a do-it-yourself chimney cap, you should use materials that are heat-resistant and corrosion-resistant. These characteristics have materials such as:
- galvanized iron;
- stainless steel;
- copper.
It is important to remember that chimney caps are located in hard-to-reach places. Based on this, it is necessary to choose a cap, which is made of high-quality material, and is resistant, according to its characteristics, to various atmospheric phenomena.
One of the most resistant is the cap on the chimney pipe, made of copper.
Options for gas ducts for a country house
To discharge combustion products with a relatively low temperature (up to 120 ° C) emitted by gas boilers, the following types of chimneys are suitable:
- three-layer modular stainless steel sandwich with non-combustible insulation - basalt wool;
- a channel made of iron or asbestos-cement pipes, protected by thermal insulation;
- ceramic insulated systems such as Schiedel;
- brick block with a stainless steel pipe insert, covered from the outside with heat-insulating material;
- the same, with an internal polymer sleeve of the FuranFlex type.
Three-layer sandwich device for smoke removal
Let us explain why it is impossible to build a traditional brick chimney or put an ordinary steel pipe connected to a gas boiler. The exhaust gases contain water vapor, which is a product of the combustion of hydrocarbons. From contact with cold walls, moisture condenses out, then events develop as follows:
- Thanks to numerous pores, water penetrates into the building material. In metal chimneys, condensate flows down the walls.
- Since gas and other high-efficiency boilers (on diesel fuel and liquefied propane) operate periodically, frost has time to grab moisture, turning it into ice.
- Ice granules, increasing in size, peel the brick from the inside and out, gradually destroying the chimney.
- For the same reason, the walls of an uninsulated steel flue closer to the head are covered with ice. The passage diameter of the channel decreases.
Ordinary iron pipe insulated with non-combustible kaolin wool
Selection Guide
Since we initially undertook to install an inexpensive version of the chimney in a private house, suitable for do-it-yourself installation, we recommend using a stainless steel pipe sandwich. Installation of other types of pipes is associated with the following difficulties:
- Asbestos and thick-walled steel pipes are heavy, which complicates the work. In addition, the outer part will have to be sheathed with insulation and sheet metal. The cost and duration of construction will definitely exceed the assembly of a sandwich.
- Ceramic chimneys for gas boilers are the best choice if the developer has the means. Systems such as Schiedel UNI are reliable and durable, but too expensive and out of reach for the average homeowner.
- Stainless and polymer inserts are used for the reconstruction - lining of existing brick channels, previously built according to old projects. Specially fencing such a structure is unprofitable and pointless.
Flue variant with ceramic insert
A turbocharged gas boiler can also be connected to a conventional vertical chimney by organizing the supply of outside air through a separate pipe. The technical solution should be implemented when a gas duct has already been made in a private house, brought to the roof. In other cases, a coaxial pipe is mounted (shown in the photo) - this is the most economical and correct option.
Noteworthy is the last, cheapest way to build a chimney: make a sandwich for a gas boiler with your own hands. A stainless pipe is taken, wrapped in basalt wool of the required thickness and sheathed with galvanized roofing. The practical implementation of this solution is shown in the video:
Chimney of solid fuel boiler
The mode of operation of wood and coal heating units involves the release of hotter gases. The temperature of the combustion products reaches 200 ° C or more, the smoke channel warms up completely and the condensate practically does not freeze. But it is replaced by another hidden enemy - soot deposited on the inner walls. Periodically, it ignites, causing the pipe to heat up to 400-600 degrees.


Solid fuel boilers are suitable for the following types of chimneys:
- three-layer stainless steel (sandwich);
- single-wall pipe made of stainless or thick-walled (3 mm) black steel;
- ceramics.
Brick gas duct of rectangular section 270 x 140 mm is lined with an oval stainless pipe
It is contraindicated to put asbestos pipes on TT-boilers, stoves and fireplaces - they crack from high temperatures. A simple brick channel will work, but due to roughness it will become clogged with soot, so it is better to sleeve it with a stainless insert. Polymer sleeve FuranFlex will not work - the maximum operating temperature is only 250 ° C.
Installing a Classic Appliance
Putting this type of cap on the chimney is easy. A classic device can be installed by almost anyone. To solve this problem, you do not need to have any special knowledge and skills.
To do the job, you need to prepare in advance:
- Tools.
- The deflector.
During installation, two ladders may be required. One is needed in order to climb the roof, and the second - on the skate.
The installation procedure is quite simple.
To do this, follow these steps:
- Fix the lower part of the device to the mouth of the chimney using special bolts.
- Next, mount the upper part of the cap (diffuser) by using clamps.
- In the third step, install the protective visor. To do this, use brackets.
After fixing the classic device to the chimney, the draft quality will increase by an order of magnitude. The manufacturing cost of this device is low. Therefore, do not save on its installation.
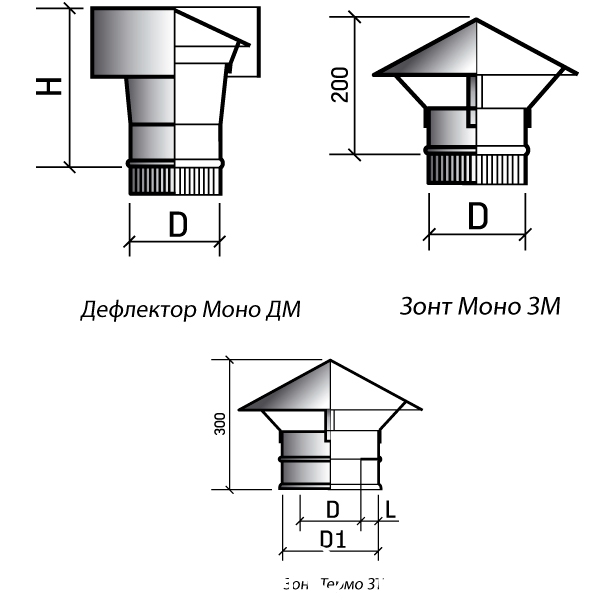
Types of structures
Varieties:
- with a flat top;
- closed with a lid, which can be opened if necessary;
- with two slopes on the pipe surface;
- flat with a copper top;
- with a semicircular top.
More often, deflectors are made from galvanized iron sheet materials. Recently, devices made of metal with an enamel or plastic coating have been on sale.
Depending on the design, the following types of deflectors are distinguished:
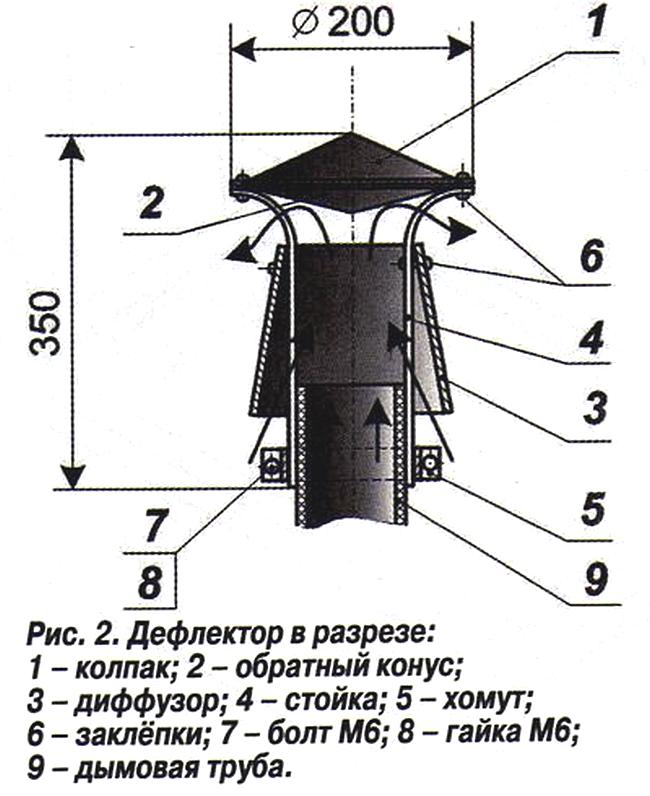
- TsAGI - developed at the Central Aerodynamic Institute named after Professor N.E. Zhukovsky.
- "Smoke Tooth"
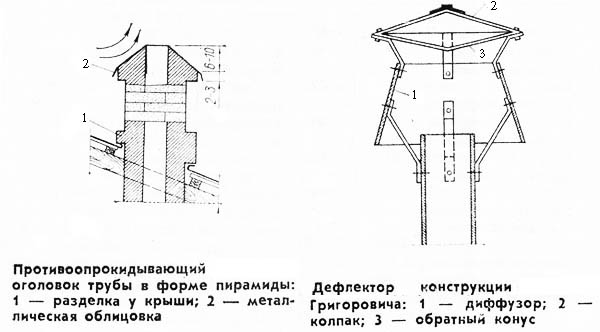
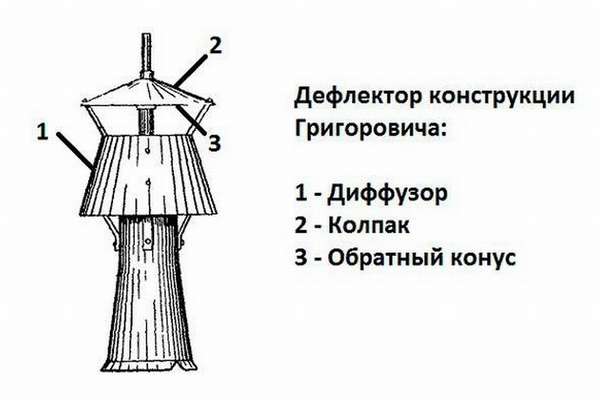
- "Grigorovich" - the name was given in honor of the aircraft designer.
- Spherical shape - able to perform rotational movements.
- "Astato" - have an open design.
- "Volper" - has a round structure.
- "Shenard" - shaped like a star.
- "Vane".
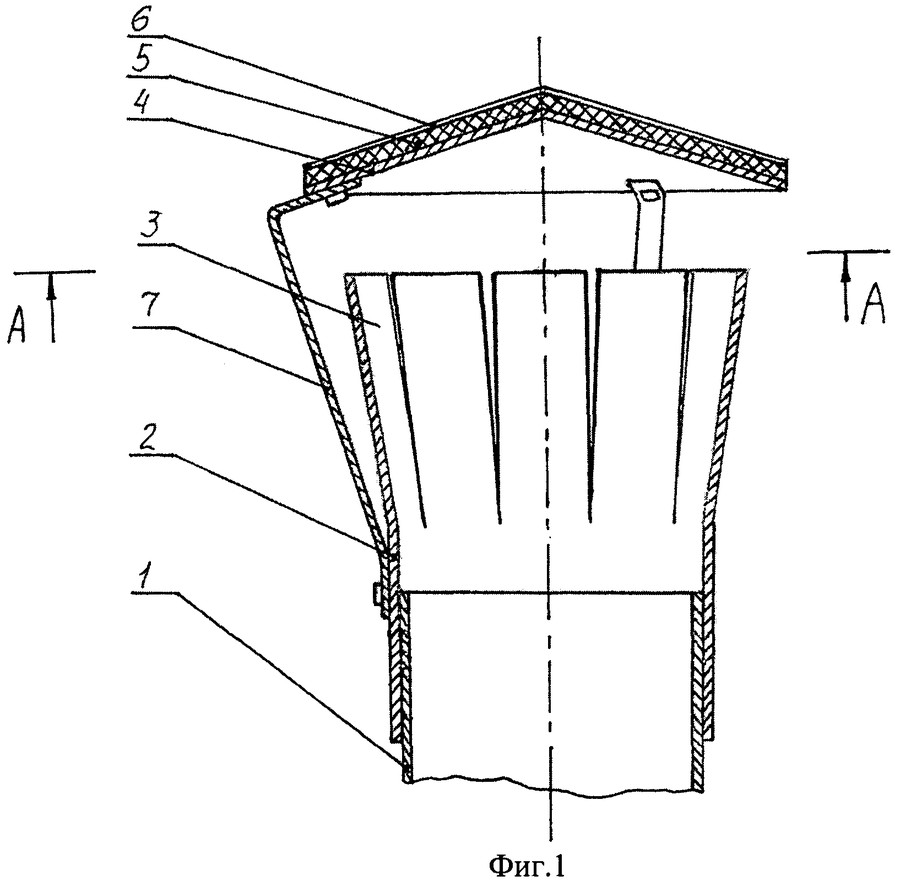
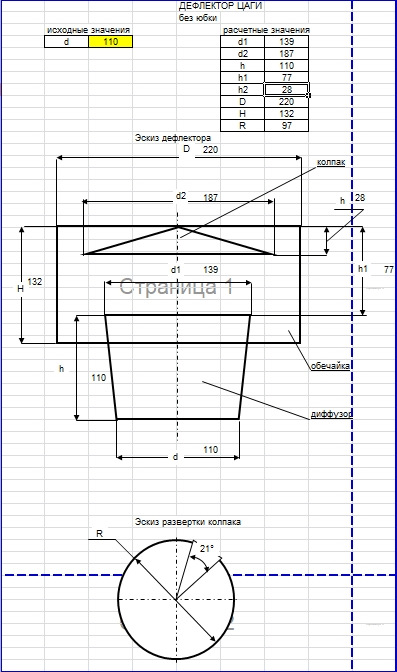
- H-shaped.
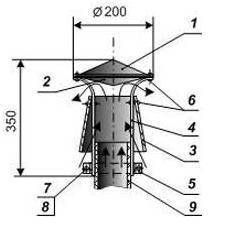
The TsAGI deflector is in great demand, consisting of a branch pipe at the inlet, a diffuser of various configurations, a housing, several brackets, and an umbrella element.
 TsAGI deflector
5 Do-it-yourself ventilation deflector
Knowing about the device and the principle of operation of the device, many owners decide to make a ventilation deflector with their own hands. From the point of view of his own implementation, the version of Grigorovich's product is unrivaled, so we will consider the implementation of this particular version. The main advantage is that such ventilation works without electricity, all year round.
You should first prepare:
- stainless steel sheet type, can be replaced with galvanized;
- electric drill;
- fixing clamps, bolts, rivets and nuts;
- drawing tool for metal surfaces;
- compass;
- sheet cardboard;
- ruler;
- scissors for metal and paper.
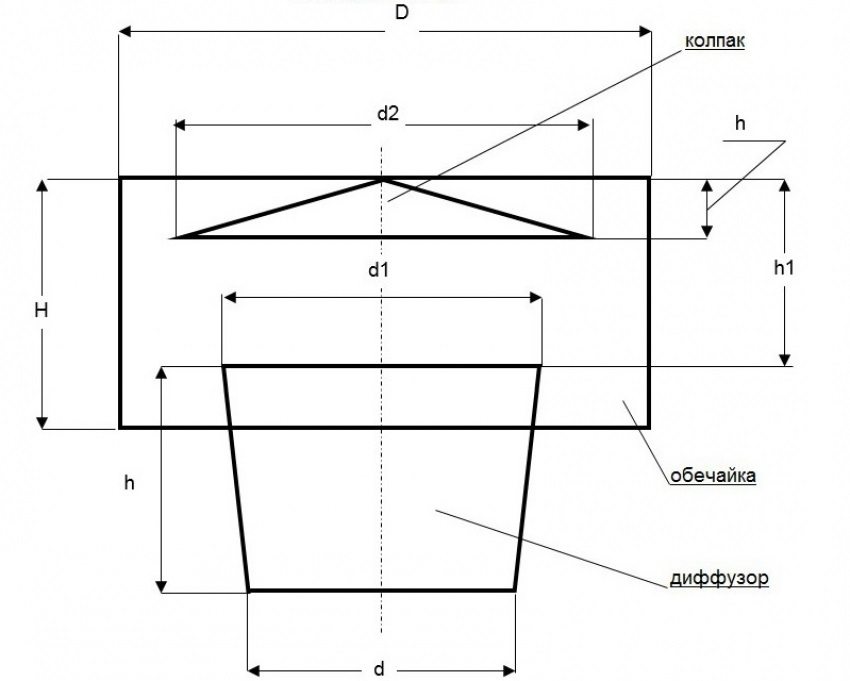
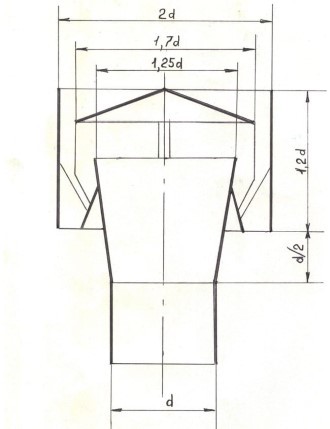
How to calculate a static deflector
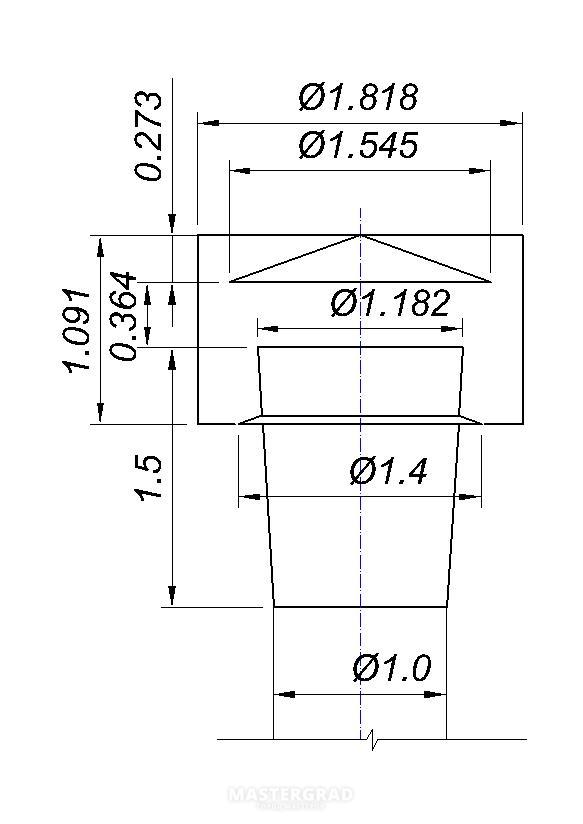
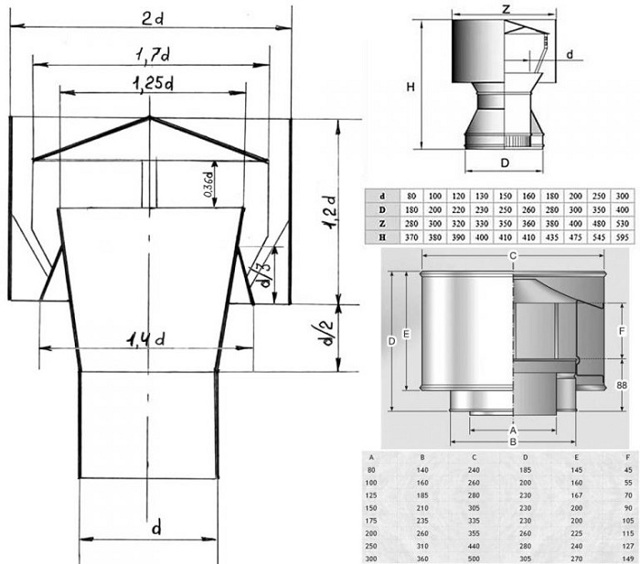
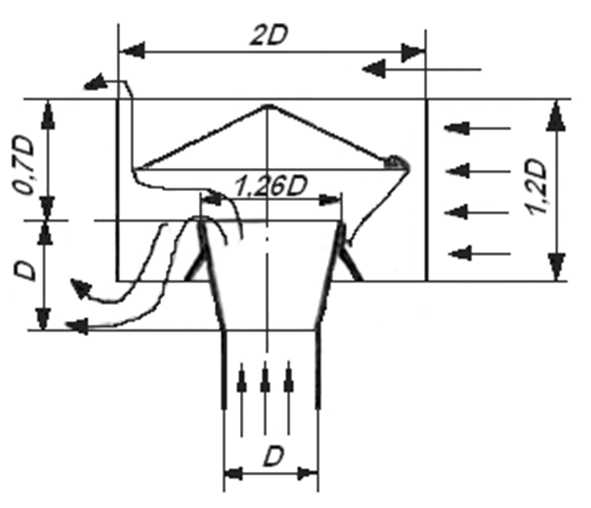
When making the deflector yourself, you need to perform calculations and sketch out a sketch of the future product. You need to proceed from the inner diameter of the chimney pipe.
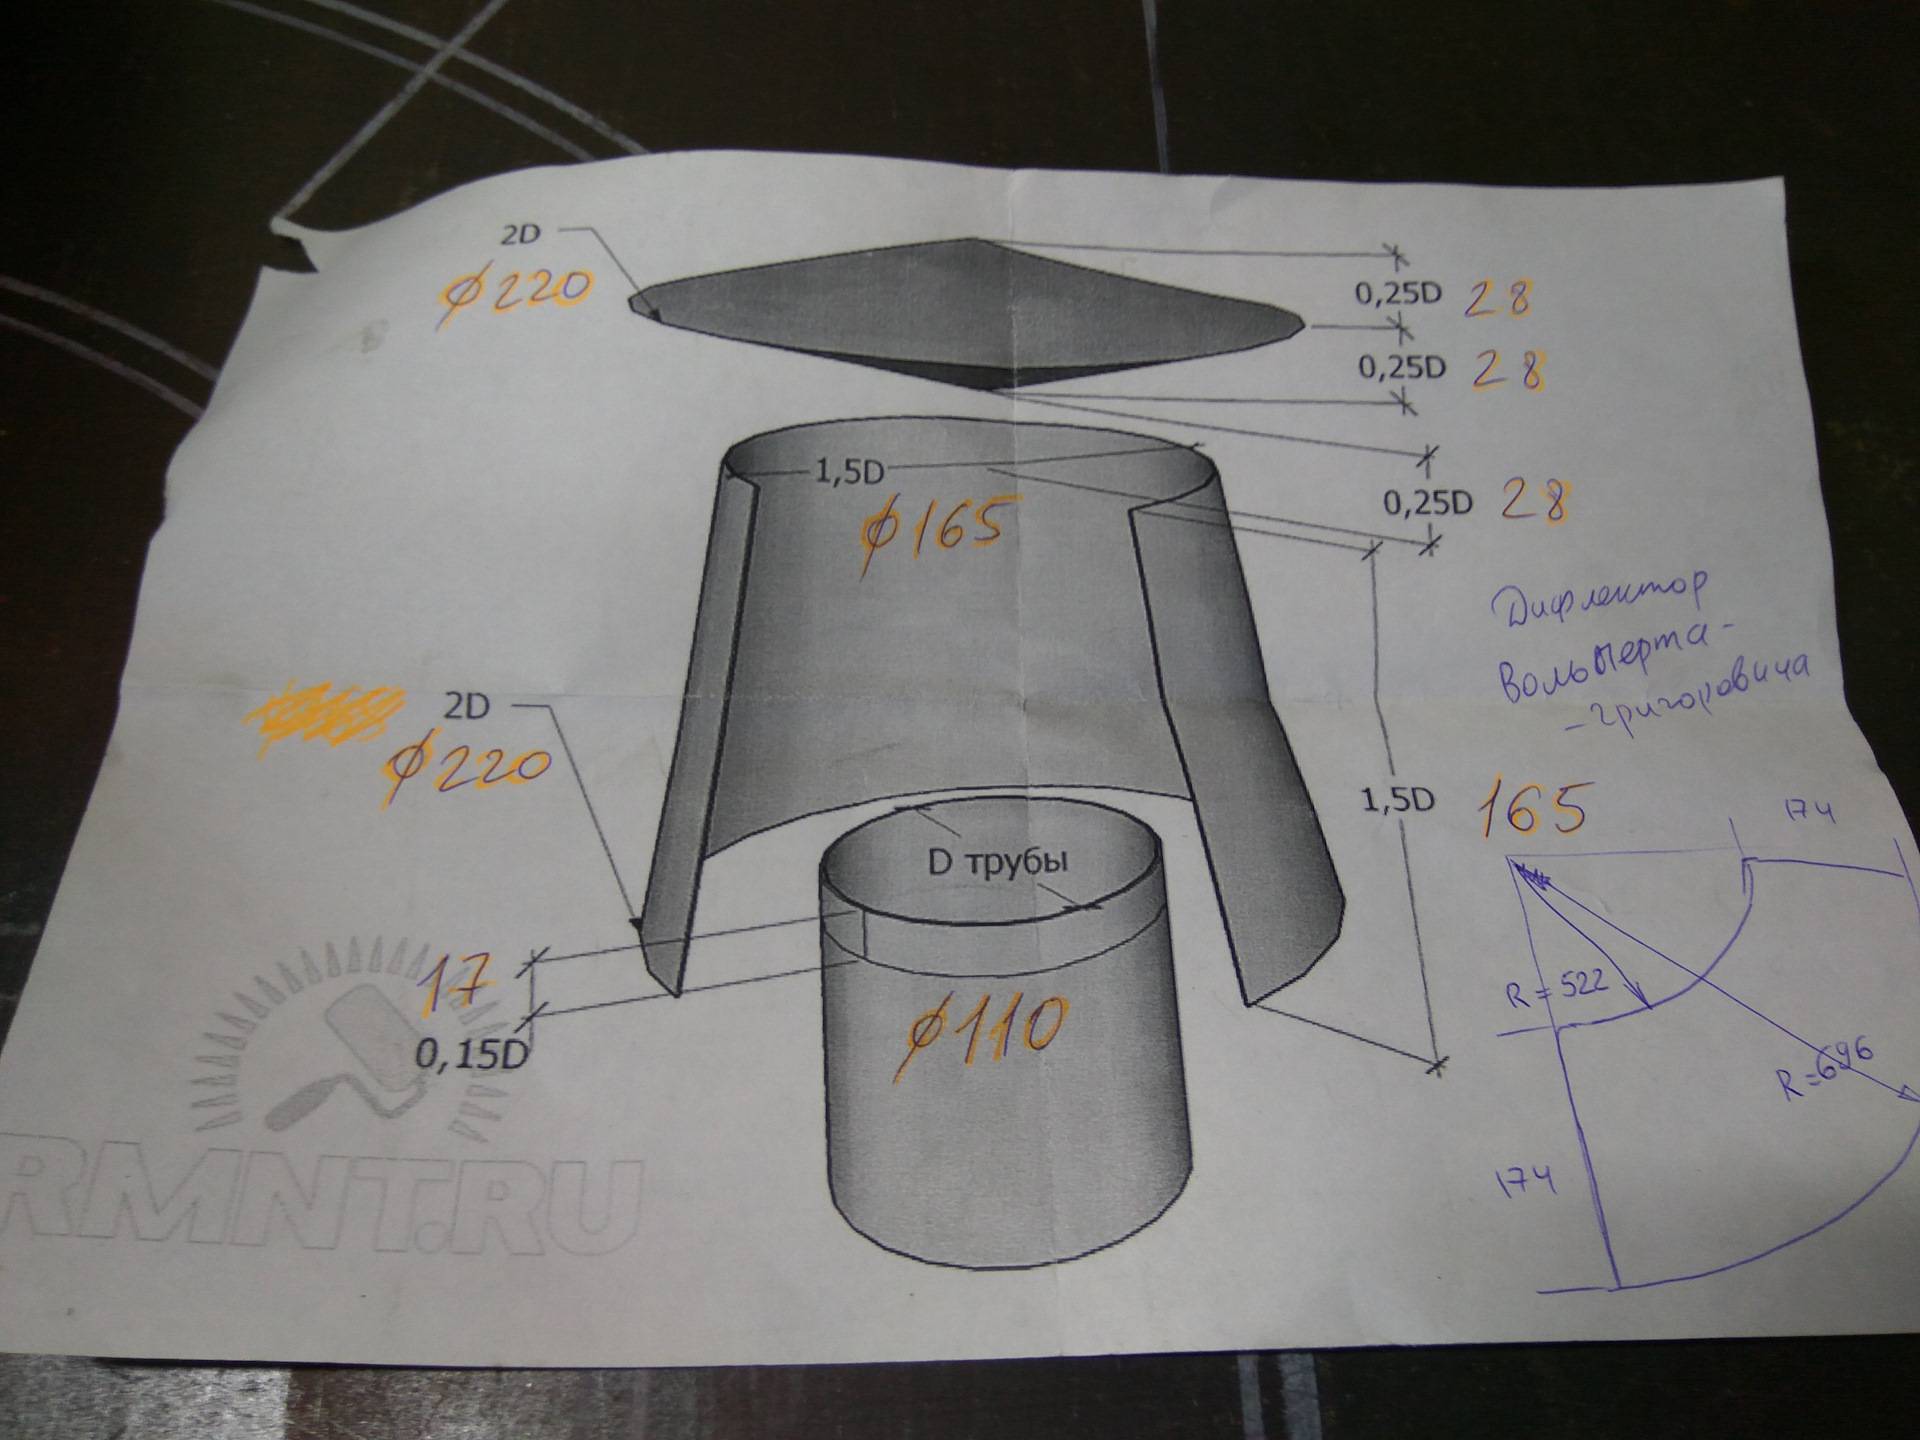
The photo shows the dependence of the size of the deflector on the diameter of the chimney.To determine the lower diameter of the diffuser, the base parameter is multiplied by 2, the upper one by 1.5, the height of the diffuser by 1.5, the height of the cone, including the reverse one, the height of the umbrella itself by 0.25, the pipe entering the diffuser by by 0.15
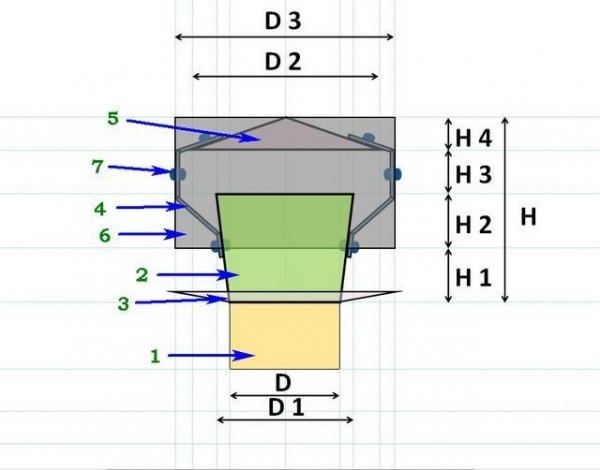
For a standard device, the parameters can be selected from the table:
The table will allow you to choose the dimensions of the deflector without performing calculations. But if there are no suitable sizes in it, you still have to arm yourself with a calculator or find the appropriate program on the Internet.
In the manufacture of a deflector with individual parameters, these special formulas are also used to determine the dimensions: • Diffuser = 1.2 x din. pipes; • H = 1.6 x din. pipes; • Cover width = 1.7 x din. pipes.


Having learned all the dimensions, you can calculate the sweep of the cone of the umbrella. If the diameter and height are known, then the diameter of the round billet can be easily calculated using the Pythagorean theorem:
R = √(D/2)² + H²
Now we have to determine the parameters of the sector, which will subsequently be cut from the workpiece.
The length of a full circle in 360⁰ L is equal to 2π R. The length of the circle underlying the finished cone Lm will be less than L. The length of the segment arc (X) is determined from the difference of these lengths. To do this, make up the proportion:
L/360⁰ = Lm/X
The desired size is calculated from it: X \u003d 360 x Lm / L. The resulting value of X is subtracted from 360⁰ - this will be the size of the cut sector.
So, if the height of the deflector should be 168 mm and the diameter 280 mm, then the radius of the workpiece is 219 mm, and its circumferential length Lm = 218.7 x 2 x 3.14 = 1373 mm. The desired cone will have a circumference of 280 x 3.14 = 879 mm. Hence 879/1373 x 360⁰ = 230⁰. The cut sector should have an angle of 360 - 230 = 130⁰.
When you need to cut a workpiece in the form of a truncated cone, you have to solve a more difficult task, because. the known value will be the height of the truncated part, and not the entire cone. Regardless of this, the calculation is performed on the basis of the same Pythagorean theorem. The total height is found from the proportion:
(D – Dm)/ 2H = D/2Hp
Whence it follows that Hp = D x H / (D-Dm). Having learned this value, calculate the parameters of the workpiece for a full cone and subtract the upper part from it.
With known parameters: the height of the cone - full or truncated and the radius of the base, by simple calculations, simply determine the radius of the outer and inner (in the case of a truncated cone) and then the initial angle and length of the generatrix of the curve
Suppose a truncated cone is required, in which H \u003d 240 mm, the diameter at the base is 400 mm, and the upper circle should have a diameter of 300 mm.
- Total height Hp = 400 x 240 / (400 - 300) = 960 mm.
- Workpiece outer radius Rz = √(400/2)² + 960² = 980.6 mm.
- Smaller hole radius Rm = √(960 - 240)² + (300|2)² = 239 mm.
- Sector angle: 360/2 x 400/980.6 = 73.4⁰.
It remains to draw one arc with a radius of 980.6 mm and the second one with a radius of 239 mm from the same point and draw the radii at an angle of 73.4⁰. If it is planned to overlap the edges, then allowances are added.
Self-assembly of the deflector
First, patterns are prepared, then they are laid out on a sheet of metal and the parts are cut out using special scissors. The body is folded, the edges are fastened with rivets. Next, the upper and lower cones are attached to each other, using the edge of the first one for this.it is larger and special fixing cuts about 1.5 cm wide can be cut in it in several places, and then bent.
It is not difficult to assemble a simple deflector, but if a rotational type device is to be installed, you will have to deal with many parts
Before assembly, 3 racks are installed in the lower cone, evenly distributing them around the perimeter and using threaded studs for this. To connect the umbrella to the diffuser, loops of metal strips are riveted on the latter. The racks are screwed into the hinges and, for greater reliability, they are fixed with nuts.
Further, they carry out work on the installation of a deflector made by hand on the chimney of a gas or other type of boiler. The assembled device is placed on the pipe and fixed using clamps, avoiding gaps. Sometimes the joint is treated with a heat-resistant sealant.
The device of the smoke channel deflector and the principle of its operation
All chimney deflectors have the same design and consist of four elements:
- cylinder;
- diffuser;
- ring breaks;
- protective cap.
Devices may differ in design, dimensions and the number of additional elements, but they all work on the same principle.
Since the design does not create resistance to the internal air flow, the smoke does not get back into the room and is effectively removed outside the building. In addition, the device protects the channel from dirt and debris and looks aesthetically pleasing.


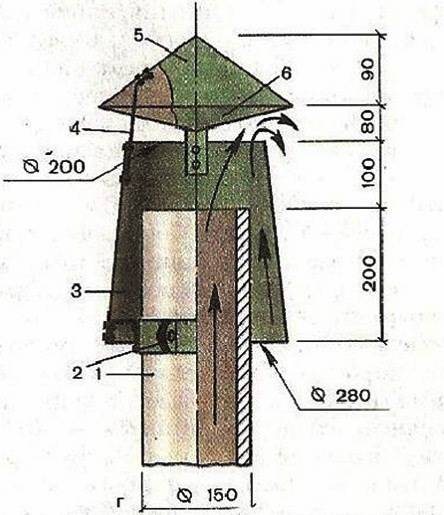

Studies show that installing a deflector on a chimney increases the efficiency of heating appliances by 15–20%. However, this value depends not only on the deflector, but also on the location and diameter of the chimney section.
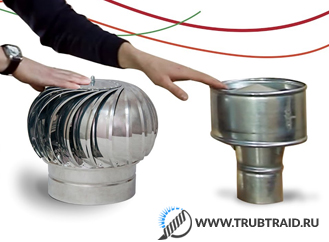
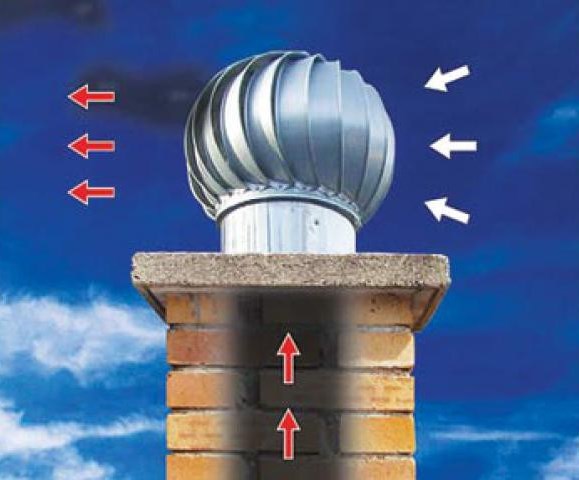
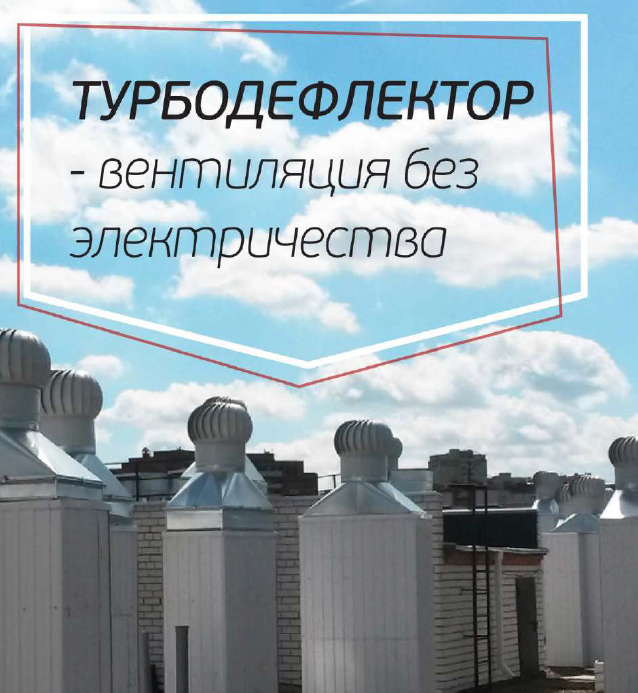
Advantages and disadvantages of turbo deflectors
What will a user get who makes a ventilation turbo deflector with his own hands or buys it? A lot of advantages and only positive impressions about his work. Here are the advantages that a product for ventilation or a chimney has:
- The head of the turbo deflector, which rotates, enhances the air exchange in the ventilation or chimney. There is no reverse draft, and the under-roof space does not accumulate condensate. In addition, the rotary device works much better than a conventional deflector.
- The product runs exclusively on wind energy, without consuming electricity. Therefore, there will be no extra costs, unlike the use of electric fans.
- If the equipment is properly cared for and installed correctly, the service life will be 10 years, or 100,000 hours of operation. If you take stainless steel turbo deflectors, then their service life is 15 years. In comparison, the fans work 3 times less.
- Snow, hail, rain, foliage, rodents will not get into the ventilation duct. The turbo deflector is used in areas with strong and frequent gusts of wind.
- The design of the equipment is light, convenient and compact. Turbo deflectors with a diameter of 20 cm or more have a weight slightly less than that of the TsAGI deflector. Products of large size, which is 680 mm, have a weight of approximately 9 kg. To understand the difference, let's say that a TsAGI deflector of the same diameter has a weight of up to 50 kg.
- Ease of installation. Even a beginner can handle this task. You only need instructions and a standard set of tools.
This is why turbo deflectors are so commonly used. But along with the advantages, the products also have some disadvantages:
- when compared with other types of deflectors, the turbo deflector is somewhat more expensive. True, if you do it yourself, then it will be cheaper;
- under adverse atmospheric conditions, for example, if there is no wind, low temperature or high humidity, the device may simply not work and stop. But if the deflector is constantly in motion, then it is less susceptible to icing;
- the use of a deflector for rooms with increased ventilation requirements, such as a medical laboratory, production rooms, buildings with chemicals, cannot be considered the only remedy. You still need to install fans.
Depending on the material of manufacture, the price of the device can be quite high. Yet these shortcomings are very few, so many people prefer to use a deflector for their ventilation system.


